
With the Windows 11/10 ISO, you can create bootable media which can be USB flash drive or DVD. The bootable media can be used as a recovery environment for troubleshooting or performing clean installs of the latest Windows 11/10. Conveniently enough, you can also install Windows 11/10 from your Android smartphone using DriveDroid – in this post, we will walk you through the steps to do just that!

Before we begin, let’s take a look at the prerequisite for this procedure.
What is DriveDroid?
DriveDroid is an Android app that creates installation media by mounting an operating system disc image. It allows you to install a wide range of operating systems, including Linux distros and Windows 11/10. To use DriveDroid, you’re required to root your Android device.
Magisk is our recommended and easiest method for rooting your device – but you’ll need to back up your Android device because the rooting process involves wiping your device.
You can install Windows 11/10 from an Android phone using DriveDroid in 5 easy steps as follows:
- Download the latest Windows 11 or Windows 10 ISO
- Download and Configure DriveDroid
- Test your DriveDroid USB Settings
- Mount the Windows 11/10 ISO in DriveDroid
- Access the Windows Boot Menu
Let’s see the description of the process involved in each step.
1] Download the latest Windows 11 or Windows 10 ISO
An ISO image is a sector-by-sector copy of the Windows DVD stored as a single ‘.iso’ file on your computer. You can then burn this ISO file onto another DVD, create a bootable USB drive, mount it as a drive letter in Windows, or extract its files using 7-Zip.
Using the steps in this article, you can download the ISO images directly, rather than being forced to use Microsoft’s Media Creation Tool.
After the Windows ISO finishes downloading, you need to copy the image via a USB cable onto your Android smartphone in an easily remembered folder.
Alternatively, you can simply visit aka.ms/Windows10 on your Android smartphone and directly download the Windows ISO.
Once done, continue with the next step.
Related: How to convert EXE file to APK file.
2] Download and Configure DriveDroid
Download and install DriveDroid from the Google Play Store.
Launch DriveDroid and the app will immediately request root access, which you should Grant.
Next, configure the Image Directory, which is the folder where you store your disc images (ISOs), such as the Windows version you copied to your device.
Once done, continue with the next step.
3] Test your DriveDroid USB Settings
In this step, DriveDroid will test your Android device’s USB connection settings. DriveDroid needs to handle the USB connection as a mass storage device, allowing it to mount your Windows 10 ISO as a bootable image.
For most users, the Standard Android Kernel is the correct option. Select the first option, then press Next. Wait for the DriveDroid test file to appear as a mountable drive.
If the device doesn’t appear in your File Explorer, select Choose a Different USB System and try again.
When you cycle through the three basic USB settings and the DriveDroid test file does not appear, you can modify the DriveDroid USB options from the main page. Tap the cogwheel (Settings) icon in the top-right corner, then scroll down. Select USB Settings > Manually Change USB Mode > Mass Storage, then Confirm.
Once done, continue with the next step.
4] Mount the Windows 11/10 ISO in DriveDroid
Depending on the default image folder option, the Windows 11/10 ISO may already be listed on the DriveDroid main page. If not, do the following:
- Tap the cogwheel (Settings) icon in the top-right, then select Image Directories.
- Tap the red circle with a + sign in the bottom corner.
- Now, browse to the folder containing your disc images and provide access when requested.
- Select the correct directory from the Image Directory, then head back to the DriveDroid homepage.
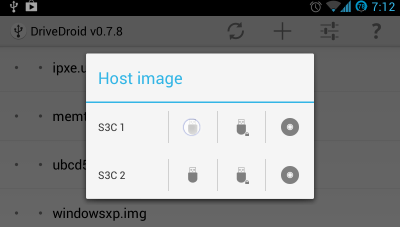
- Next, select the Windows 11/10 ISO, then Host image using CD-ROM. A small disc icon should appear on the disc image, indicating it is mounted.
Once done, continue with the next and final step.
5] Access the Windows Boot Menu
In this final step of installing Windows 11/10 from Android phone using DriveDroid, do the following:
- Shut down the PC you want to install Windows 11/10 on.
- Connect your Android device to the PC using a USB cable.
- Next, power on the PC and boot into BIOS/UEFI by continuing pressing the right key for your system. The right key for your system could be F1, F2, F10, etc. – and it depends on your manufacturer. You may be able to see which key, in the bottom left or right side of your boot screen, when your computer is booting.
- In the BIOS/UEFI environment, switch to Boot tab.
Here you will see Boot Priority which will list connected hard drive, CD/DVD ROM and USB drive if any. You can use the arrow keys or + & – on your keyboard to change the order.
- Scroll down to find the DriveDroid option, named something similar to Linux File-CD Gadget.
- Hit Enter.
The Windows 11/10 installation screen will now load, and you can install a clean version of Windows 11/10 on your computer.
That’s it!
Installing Windows 10 from an Android phone might seem like a daunting task, but it can actually be done with the right tools and steps. This blog post will guide you through the process and provide you with all the necessary information to successfully install Windows 10 on your device. Whether you want to switch from Android to Windows or simply test out the operating system on your phone, this article will help you achieve your goal.
What’s Needed
To install Windows 10 from an Android phone, you will need the following:
- A compatible Android phone
- A stable internet connection
- A reliable Windows 10 installation image
- A USB cable to connect your phone to a computer
It’s important to note that this process may vary depending on your phone model and the version of Android you are running. Make sure to check the specific requirements for your device before attempting to install Windows 10.
Video Tutorial:
What Requires Your Focus?
Before diving into the installation process, there are a few important things to keep in mind:
- Backup your data: Installing Windows 10 on your Android phone will erase all data, so it is crucial to backup any important files or documents beforehand.
- Charge your phone: Make sure your phone has enough battery power to complete the installation process. It is recommended to have at least 50% battery life before proceeding.
- Follow the instructions carefully: Installing a new operating system can be complex, so it’s important to read and understand each step before proceeding. Take your time and don’t rush the process.
Now, let’s explore the different options you can choose from to install Windows 10 from your Android phone.
Option 1: How to Install Windows 10 via ADB
ADB (Android Debug Bridge) is a command-line tool that allows you to communicate with your Android device from a computer. Here’s how you can use ADB to install Windows 10 on your Android phone:
Pros:
- ADB provides more control and flexibility during the installation process.
- It is a widely used method, so there is plenty of support available online.
Cons:
- Using ADB requires some technical knowledge and familiarity with command-line tools.
- The process can be time-consuming and may take longer compared to other methods.
To install Windows 10 via ADB, follow these steps:
1. Enable USB debugging on your Android phone by going to “Settings” > “About Phone” > “Build Number” and tapping it seven times to enable developer mode.
2. Go to “Settings” > “Developer Options” and enable USB debugging.
3. Connect your Android phone to your computer using a USB cable.
4. Open a command prompt or terminal window on your computer.
5. Navigate to the folder where you have the Windows 10 installation image stored.
6. Enter the following command to verify that your device is connected and recognized by ADB:
“`
adb devices
“`
7. If your device is listed, you can proceed with the installation. If not, make sure you have installed the necessary USB drivers for your phone on your computer.
8. Enter the following command to reboot your device into bootloader mode:
“`
adb reboot bootloader
“`
9. Once your device is in bootloader mode, enter the following command to unlock the bootloader (this step may vary depending on your device):
“`
fastboot oem unlock
“`
10. Confirm the bootloader unlock on your phone’s screen.
11. Enter the following command to flash the Windows 10 installation image to your device:
“`
fastboot flash system
“`
12. Wait for the installation process to complete.
13. Reboot your device into recovery mode by entering the following command:
“`
adb reboot recovery
“`
14. From the recovery mode menu, select “Wipe data/factory reset” to perform a factory reset.
15. Reboot your device, and you should now have Windows 10 installed on your Android phone.
Option 2: How to Install Windows 10 via Dual Boot
Dual booting allows you to have multiple operating systems installed on your phone and choose which one to boot into. Here’s how you can install Windows 10 via dual boot on your Android phone:
Pros:
- Dual booting allows you to switch between Android and Windows 10 easily.
- You can keep your existing Android installation without losing any data.
Cons:
- Dual booting requires more storage space on your device compared to other methods.
- It can be more complex to set up and configure dual booting on your device.
To install Windows 10 via dual boot, follow these steps:
1. Backup all your data from your Android phone to a computer or external storage device.
2. Download a dual boot manager app from the Google Play Store, such as “MultiROM Manager.”
3. Open the dual boot manager app and follow the on-screen instructions to install the dual boot environment on your device.
4. Download the Windows 10 installation image for your phone’s architecture (ARM or x86) from the official Microsoft website or other trusted sources.
5. Transfer the Windows 10 installation image to your phone’s internal storage.
6. Open the dual boot manager app and select “Add ROM” or a similar option.
7. Browse for the Windows 10 installation image file and select it.
8. Follow the on-screen instructions to configure the Windows 10 installation settings, such as partition size and installation location.
9. Once the configuration is complete, reboot your device.
10. You should now see a boot menu where you can select either Android or Windows 10 to boot into.
11. Select Windows 10, and the installation process will begin.
12. Follow the on-screen instructions to complete the installation.
13. After the installation is finished, you can switch between Android and Windows 10 by selecting the desired operating system from the boot menu.
Option 3: How to Install Windows 10 via Emulation
Another option to install Windows 10 on your Android phone is through emulation. Emulation allows you to run Windows 10 as a virtual machine on your phone. Here’s how you can install Windows 10 via emulation:
Pros:
- Emulation is a relatively easy and straightforward method to install Windows 10 on your phone.
- You can run Windows 10 alongside your existing Android installation without affecting it.
Cons:
- Emulation may require more resources from your device, resulting in reduced performance.
- Windows 10 running on emulation may not have full access to hardware features and capabilities.
To install Windows 10 via emulation, follow these steps:
1. Backup all your data from your Android phone to a computer or external storage device.
2. Download a Windows 10 emulator app from the Google Play Store, such as “Limbo PC Emulator.”
3. Open the emulator app and follow the on-screen instructions to configure the virtual machine settings.
4. Download the Windows 10 ISO image for your phone’s architecture (ARM or x86) from the official Microsoft website or other trusted sources.
5. Transfer the Windows 10 ISO image to your phone’s internal storage.
6. Within the emulator app, select the option to create a new virtual machine.
7. Browse for the Windows 10 ISO image file and select it.
8. Configure the virtual machine settings, such as RAM allocation, disk space, and processor cores.
9. Start the virtual machine and follow the on-screen instructions to install Windows 10.
10. Once the installation is complete, you can run Windows 10 on your Android phone through the emulator app.
Option 4: How to Install Windows 10 via Custom ROM
If you want a more integrated experience of Windows 10 on your Android phone, you can consider installing a custom ROM that brings the Windows 10 interface and functionality. Here’s how you can install Windows 10 via a custom ROM:
Pros:
- A custom ROM provides a complete Windows 10 experience on your Android phone.
- You can enjoy the full functionality of Windows 10, including access to Windows Store and Microsoft Office apps.
Cons:
- Installing a custom ROM requires unlocking the bootloader and may void your warranty.
- Custom ROMs may not be as stable or reliable as the official Android operating system.
To install Windows 10 via a custom ROM, follow these steps:
1. Backup all your data from your Android phone to a computer or external storage device.
2. Search for a reputable Windows 10 custom ROM for your phone model.
3. Download the Windows 10 custom ROM and transfer it to your phone’s internal storage.
4. Reboot your phone into recovery mode. This step may vary depending on your device, but typically involves holding down specific buttons during startup.
5. From the recovery mode menu, select the option to install a system update or install a custom ROM.
6. Browse for the Windows 10 custom ROM file and select it.
7. Follow the on-screen instructions to flash the custom ROM to your device.
8. Once the installation is complete, reboot your phone.
9. Your Android phone should now boot into the Windows 10 custom ROM, providing you with a Windows-like interface and functionality.
Why Can’t I Install Windows 10?
While installing Windows 10 on an Android phone may seem like an exciting idea, it’s essential to understand that not all devices support this functionality. Additionally, there might be technical limitations or restrictions imposed by the device manufacturer. If you’re unable to install Windows 10 on your Android phone, here are three alternative solutions to consider:
1. Use a Windows 10 emulator app: Instead of installing Windows 10 as a full operating system, you can use a Windows 10 emulator app available on the Google Play Store. These apps provide a simulation of the Windows 10 interface and allow you to run Windows apps on your Android phone.
2. Remote desktop connection: If you have a Windows 10 PC or laptop, you can remotely connect to it using remote desktop applications. This way, you can access and control your Windows 10 environment from your Android phone without needing to install Windows 10 directly on the device.
3. Virtual machine on a PC: If you want to experience Windows 10 on a larger screen, you can install a virtual machine software like VirtualBox or VMware on your computer and create a Windows 10 virtual machine. Then, you can use remote desktop apps on your Android phone to connect to the virtual machine running on your PC.
Implications and Recommendations
Installing Windows 10 on your Android phone can have several implications and considerations. Here are three points to keep in mind:
1. Compatibility and stability: Not all Android phones are compatible with Windows 10 installation methods, and even if they are, the stability and performance of the operating system may vary. Make sure to research your device model and read user experiences before proceeding.
2. Data privacy and security: Installing Windows 10 on your Android phone may involve unlocking the bootloader, which can expose your device to potential security risks. Additionally, accessing Windows apps and services on your phone may require you to enter your Microsoft account credentials, which can compromise your data privacy. Always use caution and ensure the legitimacy of the installation methods and apps you use.
3. Limited functionality: While installing Windows 10 on your Android phone may provide a unique experience, it is important to understand that certain features or functionalities may not be fully supported. Some apps or hardware components may not work as expected, and you may encounter compatibility issues with certain Windows software.
Considering these implications, it is recommended to thoroughly research and understand the installation process, device compatibility, and potential risks before attempting to install Windows 10 on your Android phone. Always backup your data and proceed with caution to avoid any unintended consequences.
The Bottom Line
Installing Windows 10 on an Android phone can be a fascinating experiment or a practical solution for those who want to explore the Windows operating system on their devices. Through options like ADB, dual booting, emulation, or custom ROMs, you can achieve varying degrees of Windows 10 functionality on your Android phone.
However, it is crucial to be aware of the limitations, potential risks, and implications of this process. Not all devices support Windows 10 installation, and even if they do, the stability and performance may not be optimal. Always backup your data, research extensively, and proceed with caution when attempting to install Windows 10 on your Android phone.
Remember, always prioritize your data privacy and security, and ensure that the installation methods and software you use are reputable and trusted. With careful planning and execution, you can enjoy the experience of Windows 10 on your Android phone while being mindful of any potential challenges or limitations.
5 FAQs about Installing Windows 10 from an Android Phone
Q1: Is it possible to install Windows 10 on any Android phone?
A1: No, not all Android phones support the installation of Windows 10. It depends on the device model and the availability of compatible installation methods.
Q2: Will installing Windows 10 on my Android phone void the warranty?
A2: Unlocking the bootloader and installing a custom ROM or making system-level changes can potentially void the warranty of your Android phone. It is essential to check your device’s warranty terms and conditions before proceeding.
Q3: Can I switch back to Android after installing Windows 10 on my phone?
A3: Depending on the installation method, you may be able to switch back to Android by uninstalling the Windows 10 installation, restoring a backup, or using a dual boot manager. It is recommended to research the specific method you used for installation to understand the process of reverting to Android.
Q4: Will installing Windows 10 on my Android phone affect the performance of my device?
A4: Installing Windows 10 on an Android phone may require additional system resources and can potentially affect the performance of your device. Emulation and virtual machine methods, in particular, may result in reduced performance due to resource allocation to the emulated environment.
Q5: Are there any official methods to install Windows 10 on an Android phone?
A5: No, there are no official methods provided by Microsoft to install Windows 10 on an Android phone. The methods mentioned in this blog post are unofficial and may vary in terms of stability and support. Always exercise caution and research thoroughly before attempting any installation method.
You can install Windows 10 from a wide range of external media. Keeping a backup copy of Windows 10 on a USB flash storage drive is useful. But what if you need a copy of Windows 10 when you’re out and about?
In that instance, you could install Windows 10 direct from your Android smartphone via the DriveDroid app. Here’s how you set up DriveDroid, then install Windows 10 from your smartphone.
What Is DriveDroid?
DriveDroid is an Android app that allows you to mount an operating system disc image and make it act as an installation media, such as a bootable USB flash drive or CD/DVD-ROM.
You can use DriveDroid to install a wide range of operating systems. It is commonly associated with Linux distros, but you can also use it to install Windows 10.
Important: DriveDroid requires Android root access.
Rooting is a process that gives you privileged access to the device. It allows an app more control and access than a standard app. Rooting is similar to jailbreaking an iOS device.
You can ask if rooting is still useful for Android devices. However, as you’ll see from this tutorial, there is definitely some use!
If you want to root your Android smartphone, check out our guide on the best way to root your Android device. In my experience, Magisk is the easiest method to rooting your device—but you’ll need to take a system backup before committing because the process potentially involves wiping your device.
How to Install Windows 10 From Your Android Device with DriveDroid
If you don’t have root access on your Android device, the rest of this tutorial will not work properly. DriveDroid requires root access on your device to mount the Windows 10 ISO properly. You’ll also need root access if you want to install a different operating system, such as a Linux distro.
From here on in, this tutorial assumes your Android device has root access.
0. A Note Before You Install DriveDroid
Unfortunately, the DriveDroid app is no longer being actively updated. Recent reviews on the DriveDroid Google Play page reveal that potential DriveDroid users using recently released smartphones running recent versions of Android are struggling to get DriveDroid up and running properly.
For example, on 27 July 2022, user Swaroop Ghimire wrote:
This app really needs an update. It says no hosting device which is an error for latest devices, but it works on my old Android phones
The long and short of this is that you can still attempt this tutorial, but there is a chance that it might not work with your Android device—you have been warned!
Furthermore, rooting your device can have other consequences, such as some apps failing to work post-root. You could attempt to trick apps into thinking your Android is not rooted, but there is no guarantee that it will work.
1. Download the Latest Version of Windows 10
To install Windows 10 from your Android device, you’ll need a copy of Windows 10. The Windows Media Creation Tool is the easiest way to download the latest version of Windows 10.
Head to the Windows 10 software download page and select the Download tool now.
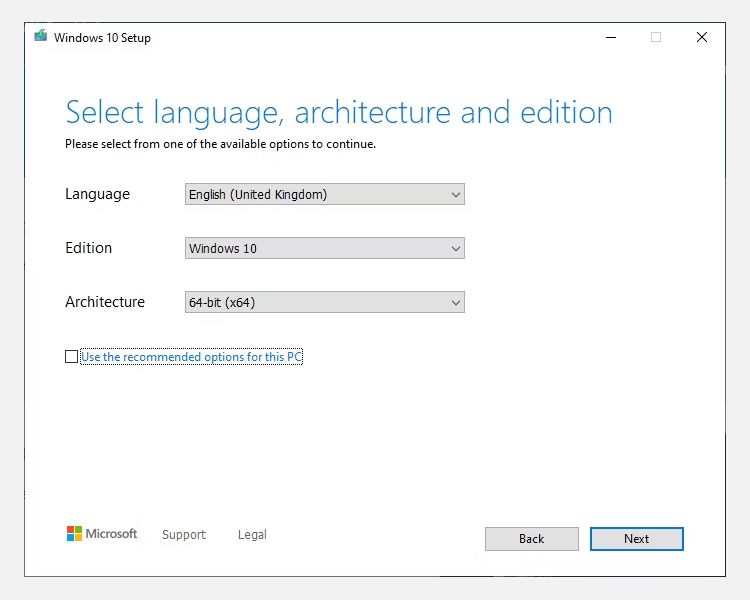
- Open the Windows Media Creation Tool.
- Select Create installation media for another PC, then create your Windows 10 ISO settings.
- If you’re creating a backup ISO for the PC you’re using, you can Use the recommended options for this PC.
- Press Next, then let the process complete.
After the Windows 10 ISO finishes downloading, you need to copy it onto your Android smartphone in an easily remembered folder. It is best to copy the files to your Android using a USB cable, as you will also require an active connection for the rest of the tutorial.
2. Download and Configure DriveDroid
Download and install DriveDroid.
Open DriveDroid. The app will immediately request root access, which you should Grant.
Configure the Image Directory. The Image Directory is the folder where you store your disc images (ISOs), such as the Windows 10 version you copied to your device.
During the DriveDroid initial setup, you will select a default folder, but you can change this later.
Download: DriveDroid for Android (Free)
3. Test Your DriveDroid USB Settings
DriveDroid will now test the USB connection settings for your Android device. DriveDroid needs to handle the USB connection as a mass storage device, allowing it to mount your Windows 10 ISO as a bootable image.
Follow the steps with the help of the screenshots below:
For most users, the Standard Android Kernel is the correct option. Select the first option, then press Next. Wait for the DriveDroid test file to appear as a mountable drive.
If the device doesn’t appear in your File Explorer, select Choose a Different USB System and try again.
When you cycle through the three basic USB settings and the DriveDroid test file does not appear, don’t worry.
Adjust DriveDroid USB Options
You can modify the DriveDroid USB options from the main page.
Select the Gear icon in the top-right corner, then scroll down. Next, select USB Settings > Manually Change USB Mode > Mass Storage, then Confirm.
4. Mount Your Windows 10 ISO in DriveDroid
Now, you need to mount the Windows 10 image. Depending on the default image folder option, the Windows 10 ISO might already feature on the DriveDroid main page.
If not, select the Gear icon in the top-right, then select Image Directories.
Press the red icon in the bottom corner. Now, browse to the folder containing your disc images and provide access when requested.
Select the correct directory from the Image Directory, then head back to the DriveDroid homepage.
Next, select the Windows 10 ISO, then Host image using CD-ROM. A small disc icon should appear on the disc image, indicating it is mounted and ready to go.
Using a USB cable, you need to connect your Android device to the PC you want to install Windows on. The PC should be switched off, to begin with. Connect the USB cable and your Android device to the computer.
When you switch it on, you need to enter the boot menu using the dedicated shortcut. For most PCs, the boot menu shortcut is F8, F11, or DEL, although it does vary between manufacturers.
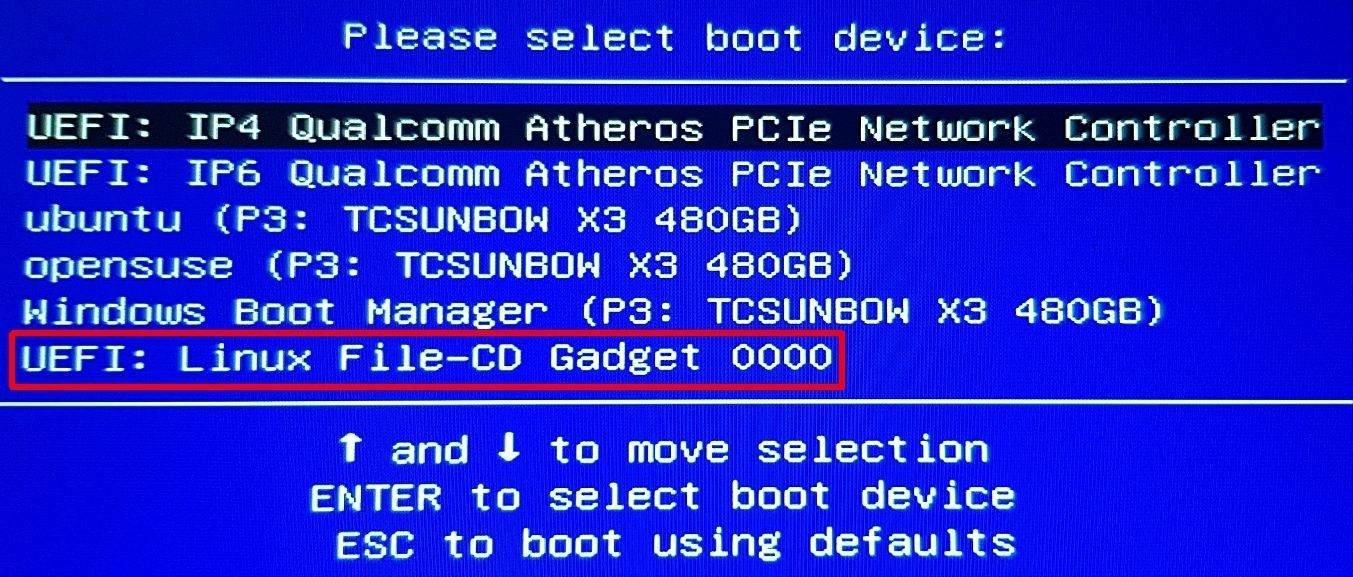
When the boot menu loads, scroll down to find the DriveDroid option, named something similar to Linux File-CD Gadget. Press Enter.
The Windows 10 installation screen will now load, and you can install a clean version of Windows 10 on your computer.
Install Windows 10 From Your Android Smartphone on Any Computer
Once you have the Windows 10 ISO and DriveDroid setup on your Android device, you’re good to go. The only significant downside to the DriveDroid installation method is that your Windows 10 ISO will eventually become outdated.
When that happens, you’ll have to download the latest version, then copy it across to your Android device to use with DriveDroid.
DriveDroid is a handy app to keep close by. You can use the app to even boot your PC directly over a USB cable using any ISO or IMG file stored on your phone.
Если вас часто просят родственники или знакомые, переустановить систему на их устройстве, тогда это руководство может вам пригодиться. Мы сделали самое простое руководство для каждого пользователя который часто сталкивается с переустановкой Windows.
В этой статье мы обсудим то Как установить Windows с помощью Android смартфона. Если вы часто делаете переустановку системы, а диск или флешка находятся где-то в другом месте, вам на помощь придет это руководство. Есть программа с интересным названием DriveDroid которая позволяет делать из памяти вашего смартфона, загрузочную флешку для установки системы. Ее суть заключается в том что образы которые хранятся в памяти телефона, выдаются за USB образы дисков.
Поверьте этот способ очень простой и удобный. Думаю, справится сможет даже новичок в этом деле. А процесс установки может быть даже быстрее чем с флешки. Что определенно является плюсом.
Содержание
- Как установить Windows с помощью Android смартфона
- Необходимые инструменты
- Подготовка образа
Как установить Windows с помощью Android смартфона
Сразу стоит сказать, что данная программа больше приспособлена для Linux систем, но если все правильно настроить можно и создать загрузочный образ диска с Windows.
Необходимые инструменты
Давайте же начнем. Для начала нужно удостовериться что на вашем смартфоне установлен Root версии 2.0 или выше и есть в доступном, свободном объеме 3 Гигабайта основной памяти. После этого нужно установить из Google Play свежую версию программы DriveDroid и скачать нужную нам версию Windows. После этого скачайте программу для создания загрузочного образа для Windows — Winusb. Установить эту программу можно из офицциальных репозиториев Ubuntu:
$ sudo apt-get install winusb
Пользоваться программой DriveDroid очень просто, и как мы сказали ранее: Справится даже новичок.
Подготовка образа
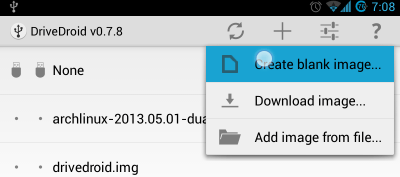
Как мы заметили выше, взять и установить ISO образ установщика Windows не получиться, потому что программа изначально работает с образами Linux. Поэтому нам придется ее настроить. После запуска прогаммы, появится новое окно с подтверждением прав на Root-доступ, предоставьте нужную информацию и нажмите на кнопку плюс «+». Она находится в правом верхнем углу экрана. Затем выберите Create Blank Image, и создайте чистый образ.
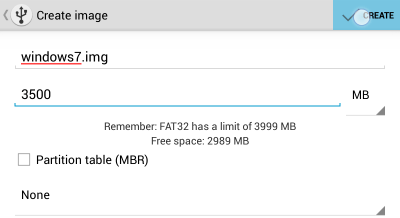
В новом окне, вы должны указать названием образа и размер, который должен быть равен оригинальному образу с Windows. Снимите галочку с Partition table (MBR) и после этого выберите файловую систему None.
Создание образа может занять некоторое время, после того как процесс будет готов, подключите только что созданную вами флешку к вашему устройству, затем нажмите на Writable USB для того чтобы иметь доступ к записи.
После этого нужно перейти к вашему Ubuntu и ввести такую команду как:
$ cfdisk /dev/sdb
Здесь /dev/sdb служит как путь к памяти вашего смартфона, с помощью которого вы собираетесь Windows. Выберите таблицу разделов dos и намете новые, затем Enter, Запись и Yes. После этого отформатируйте диск с файловой системой NTFS.
$ mkfs -t ntfs /dev/sdb1
И после этого, мы можем записывать образ:
winusb —install windows7.iso /dev/sdb1
Важно: Windows7.iso это название установочного образа диска с Windows, а /dev/sdb1 это путь к подключенной флешке. Если вам нужно узнать этот адрес, просто ведите запрос в командной строке:
$ ls /dev | grep sd
Это позволит узнать какие новые устройства появились после подключения к флешке.
После того как программа завершит запись, нужно будет перезагрузить систему и начать установку Windows. Также нужно будет зайти в BIOS и выставить приоритет нашей флешке при загрузке. После этого вы можете приступать к установке Windows с вашего смартфона.
Если у вас остались какие то вопросы по теме «Как установить Windows с помощью Android смартфона» то можете задавать их в комментарии на сайте. Также поделитесь была полезна ли для вас эта информация.
Содержание статьи:
- Загрузочная флешка на Android: от А до Я
- ШАГ 1
- ШАГ 2
- ШАГ 3
- ШАГ 4
- Вопросы и ответы: 18
Народная мудрость: «На все руки от скуки?».
*
Приветствую всех!
Если у вас «полетела» ОС Windows на компьютере, а под-рукой нет ни второго работающего ПК ни загрузочной флешки с Windows — не спешите отчаиваться, ведь подготовить установочную флешку можно даже на телефоне (Android)!
Я сам столкнулся с нечто подобным, когда был на выходных за городом. Как назло, пошел проливной дождь и планы резко поменялись — решил «оживить» один старый компьютер на чердаке: с собой был только брелок-флешка и телефон — однако за неск. часов «колдовства» удалось подготовить загрузочную флешку и установить Windows. 😉
Собственно, о том, как «это» всё сделать на практике — и будет сегодняшняя заметка! 👌 (разумеется, чтобы в будущем ничем «подобным» не заниматься — лучше носить с собой аварийную флешку с LiveCD)
*
Загрузочная флешка на Android: от А до Я
ШАГ 1
Для начала следует сказать «пару слов» о том, как можно подключить флешку к телефону (если вы этого не сделаете — все остальное в этой заметке не имеет смысла):
- лучший вариант: иметь под-рукой универсальную флешку с двумя выходами — USB Type-С (/Micro USB) и классический USB 3.0. Ее можно подключить и к телефону, и к ПК (удобна для передачи файлов). Я такую ношу с собой, как брелок. 😉 Приобрести можно 📌в компьютерных магазинах;
- чуть менее удобный вариант: использовать спец. переходники с USB Type-C на USB 3.0 (см. скрины ниже). Благодаря им можно подключить к телефону любую самую обычную флешку (или даже внешний HDD).
*
👉 В помощь!
Как подключить флешку к телефону (планшету) на Android через Micro USB порт.

Флешка подключена к телефону
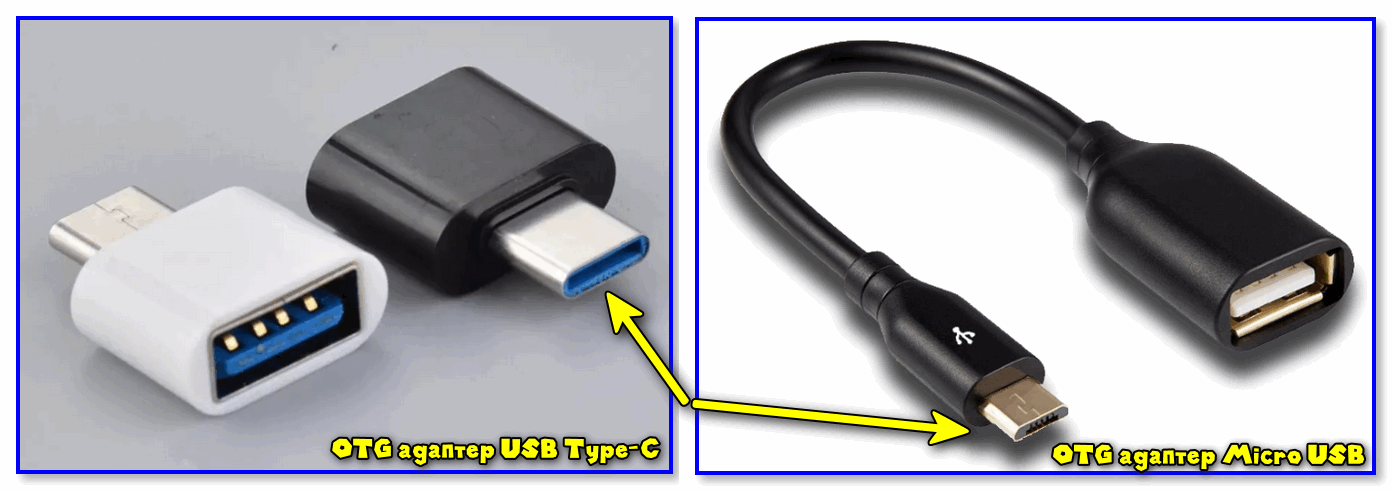
OTG-адаптеры
*
ШАГ 2
Далее на телефон нужно загрузить установочный ISO-образ с Windows. С сегодняшним мобильным интернетом — это сделать совсем не сложно. Даже я за городом смог загрузить за неск. часов ISO на 4 ГБ! (хотя, тут нельзя зарекаться, ведь многое зависит от вашего месторасположения — в нашей стране возможно всё…)
Важно! С образами больше 4 ГБ могут быть сложности у многих утилит при записи. Используйте первый вариант (предложенный мной ниже), если у вас такой образ!
Ссылку на свою статью, по которой можно загрузить офиц. ISO с Windows 10/11 — оставляю ниже (откуда и что загружать — каждый выбирает сам…).
📌 В помощь!
1) Как скачать Windows 10/11 на русском языке (официальные ISO-образы).
2) Как настроить и использовать торрент на Андроиде (или как скачивать торрент-файлы с телефона).
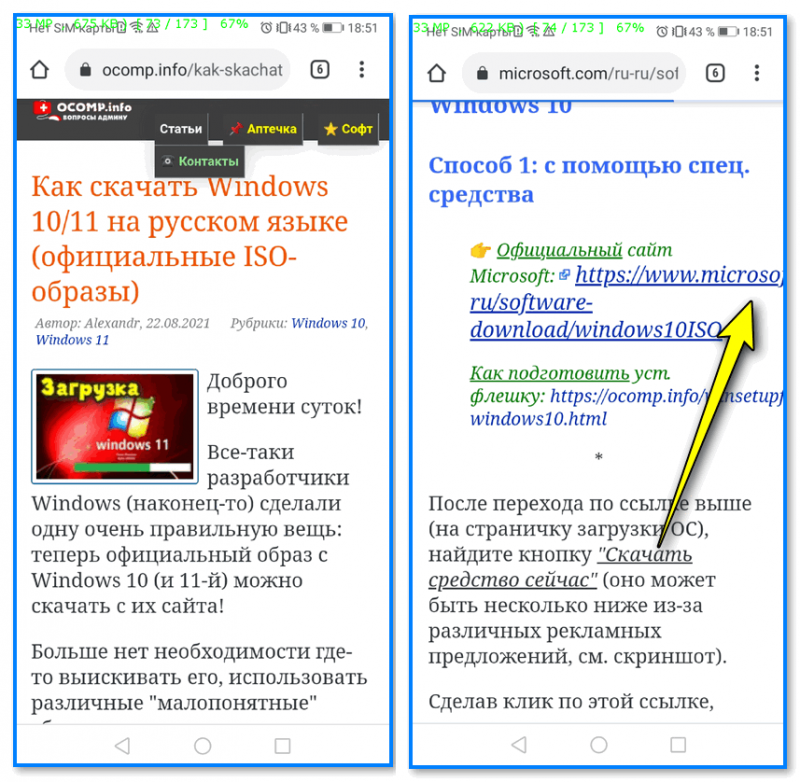
Переходим на офиц. сайт для загрузки ISO
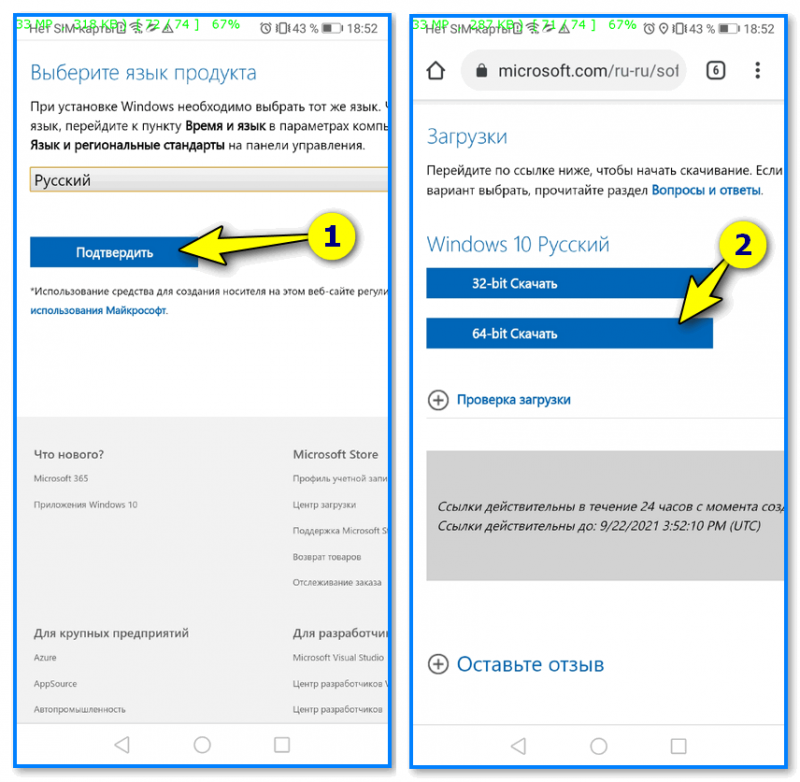
Загрузка ISO
*
ШАГ 3
Все способы ниже не требуют ROOT-прав (где нужен ROOT — я просто не брал в обзор)!
Вариант 1
Первый вариант я рассматриваю как приоритетный — он подходит для подготовки и GPT, и MBR флешек (и справляется с ISO-файлами разных размеров).
Для работы нам понадобиться приложение 📌 Ventoy (ссылка на Play Market).
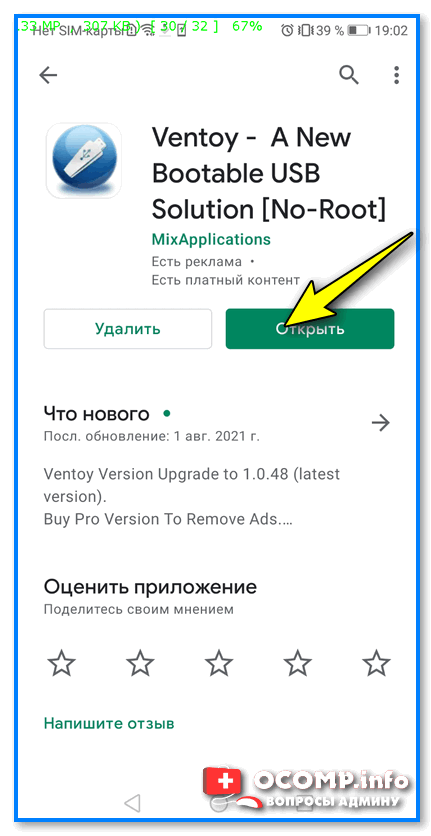
Ventoy на телефон
После запуска Ventoy: подключите флешку, установите переключатель на MBR/GPT и нажмите кнопку Install (важно! Все данные с флешки будут удалены, перепроверьте, нет ли на ней нужных файлов!).
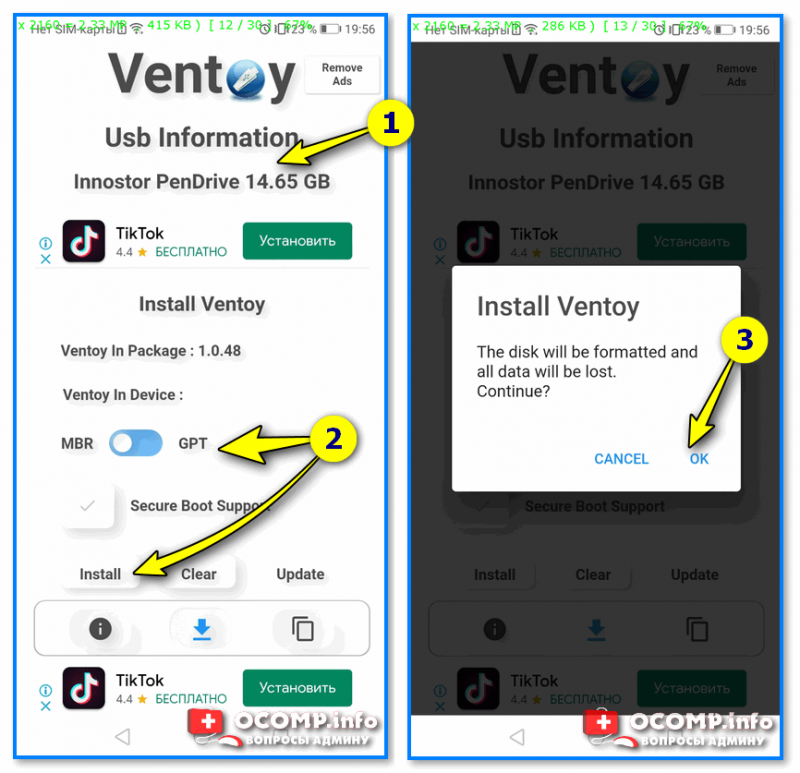
Ventoy — форматируем флешку
Когда флешка будет отформатирована в Ventoy: отсоедините ее от телефона, затем снова подключите и скопируйте на нее ISO-файл (без распаковки, просто копирование! Подобно тому, как вы это делаете с фотографиями или документами).
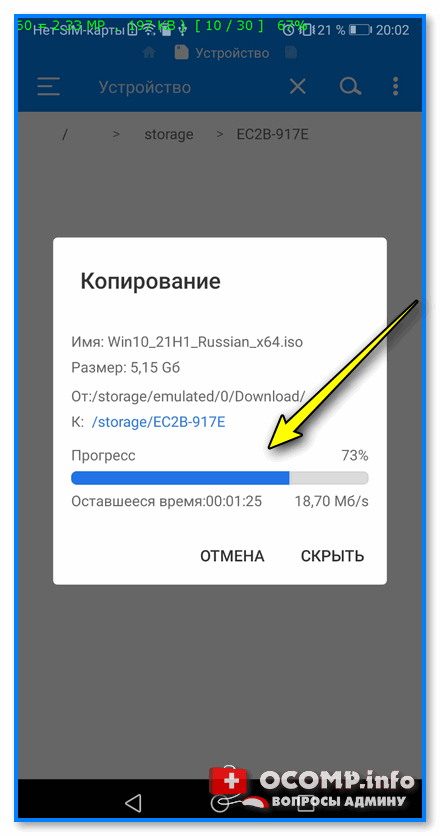
Копируем ISO на флешку
Когда ISO будет скопирован — флешку можно отключать от телефона и подключать к компьютеру для установки Windows! 👌
*
Вариант 2
Этот вариант подойдет только для современных ПК с UEFI («обновл.» версией BIOS).
Для начала на телефоне нам понадобиться WinRAR // ссылка на Play Market (это приложение поможет нам разархивировать ISO-образ как обычный архив).
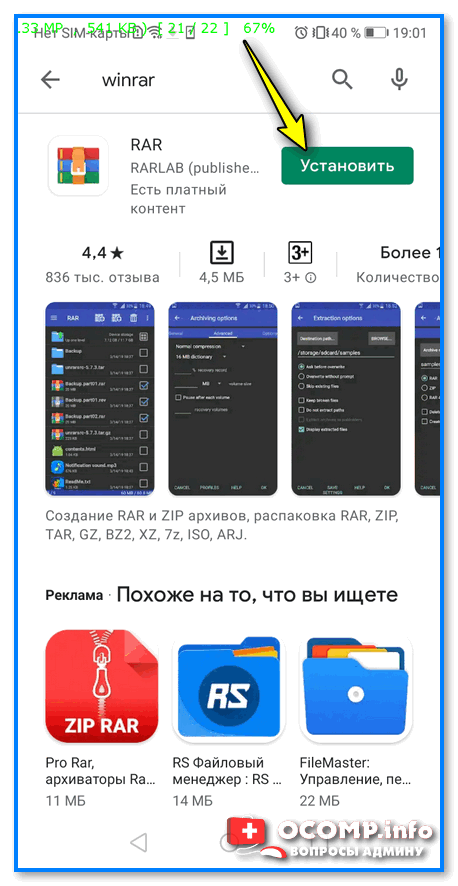
WinRAR — установка
Далее нужно будет зайти в настройки Android, открыть раздел с накопителями и отформатировать подключенную флешку (если флешка уже отформатирована — этот шаг можно пропустить).
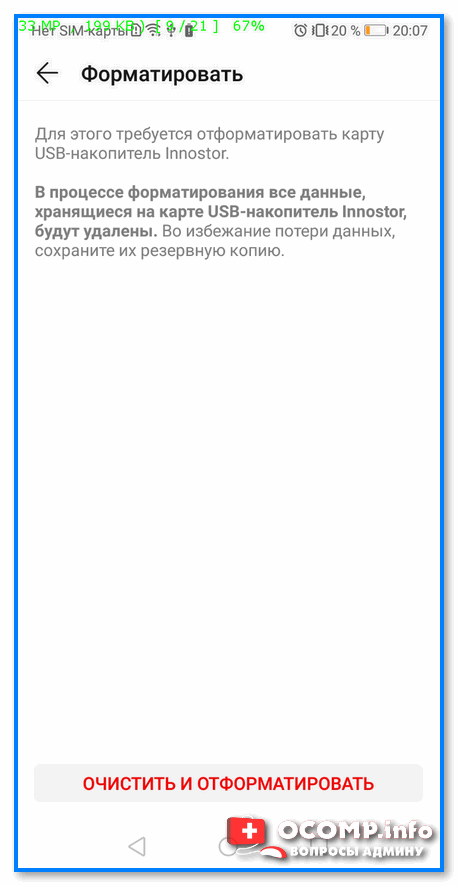
Очистить и форматировать
Затем нужно запустить WinRAR, открыть в нем ISO-файл с Windows и запустить его распаковку на флешку (см. кнопку «Путь назначения»). 👇
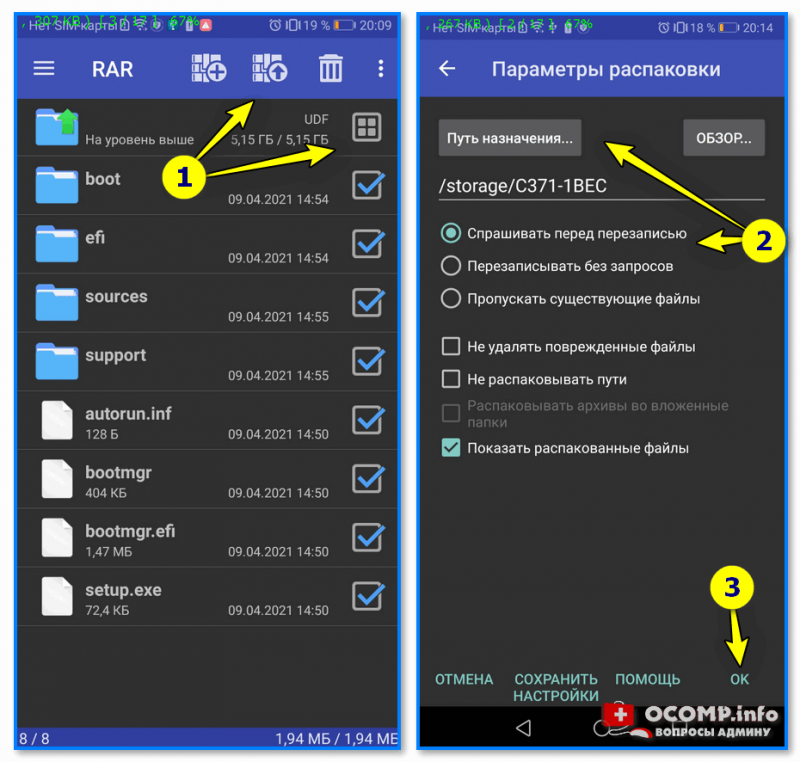
Параметры распаковки (ISO на флешку)
После распаковки, флешку можно подключать к ПК и проверять запустится ли установка ОС…
*
Вариант 3
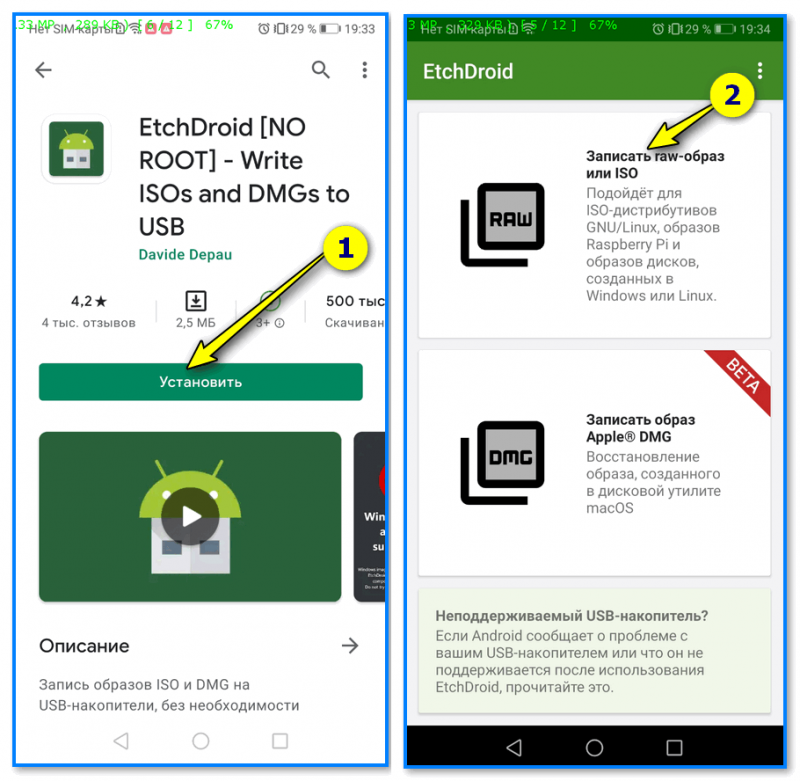
EtchDroid (ссылка на Play Market) — хорошее приложение для подготовки загрузочных флешек (больше подходит для записи Linux образов на флешку, чем для Windows). Для подготовки накопителей с Windows тоже годится, однако, приложение «справляется» не со всеми ISO (определяется экспериментально)!
Как пользоваться: подключаете флешку, запускаете EtchDroid и выбираете в меню функцию «Записать raw-образ или ISO». 👇
EtchDroid — записать ISO
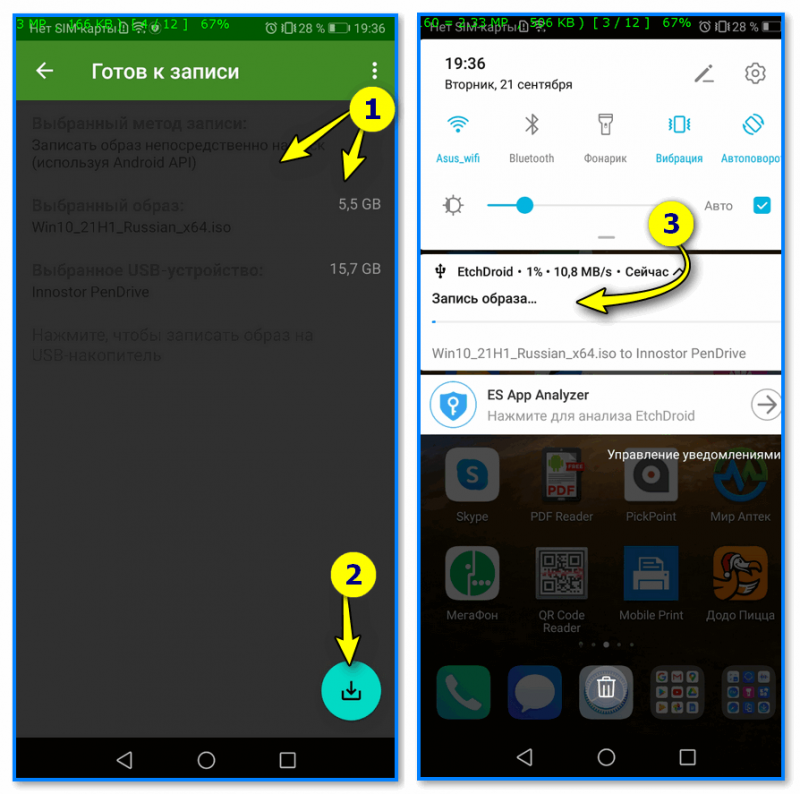
Далее нужно будет выбрать флешку, указать ISO-образ и нажать на кнопку «со стрелочкой». Запустится процесс записи: минут 10-20 придется подождать… По завершению (если все прошло гладко) — увидите сообщение о успешной записи — теперь флешка готова! 😉
Запись
*
ШАГ 4
Во-первых, сразу ссылка в помощь на то, как загрузиться с установочной флешки (в своем примере я подготавливал флешку в Ventoy по первому варианту — загружаться с нее можно обычным образом!).
Во-вторых, обратите внимание, что у вас в BOOT-меню может отображаться 2 пункта с одной и той же флешкой: проверяйте оба!
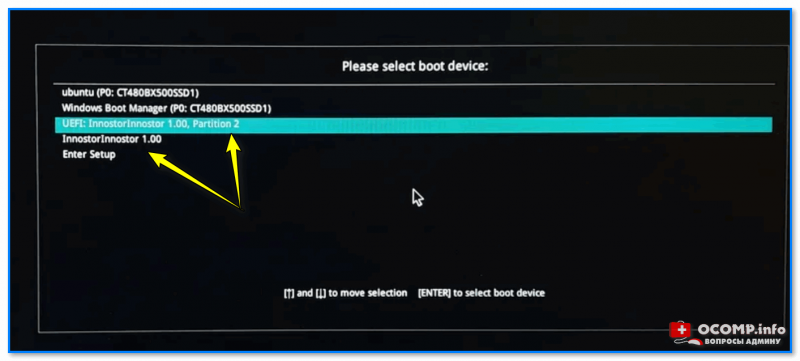
Проверьте оба варианта
В моем случае все прошло штатно: появилось меню Ventoy, далее запустилась установка Windows.
Если у вас «вылетят» ошибки (установка завершится синим экраном и т.д. и т.п.) — попробуйте подготовить флешку другим способом (еще лучше, сделать это на ПК… 😉).
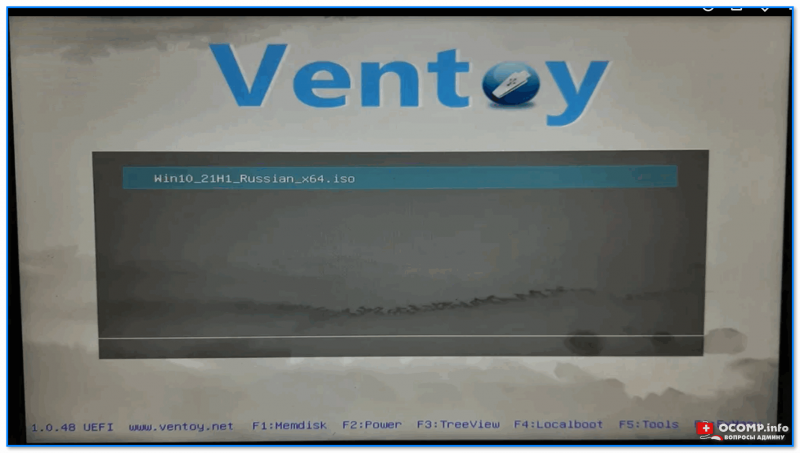
Ventoy — флешка работает
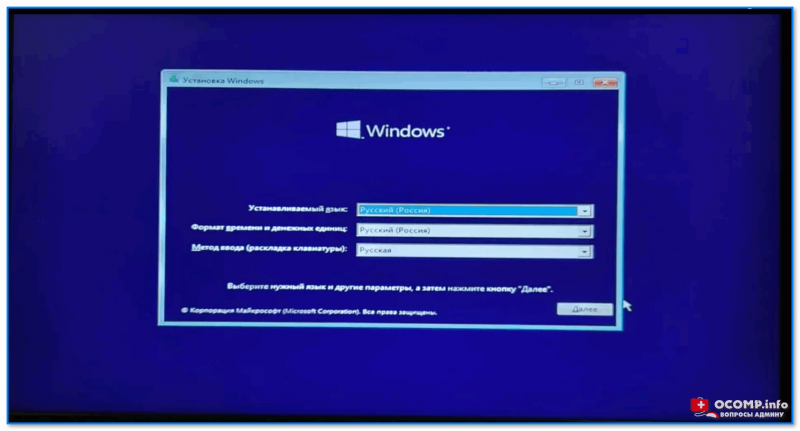
Установка пошла…
*
📌 Важно!
Если образ с Windows не удается записать на телефоне — можно попробовать записать образ с Linux. Если удастся его установить с этой флешки (а вероятность этого выше!) — то уже в Linux можно и флешку подготовить, и запустить виртуальную машину с Windows…
*
Дополнения и иные мнения — приветствуются в комментариях!
Успехов!
👋