
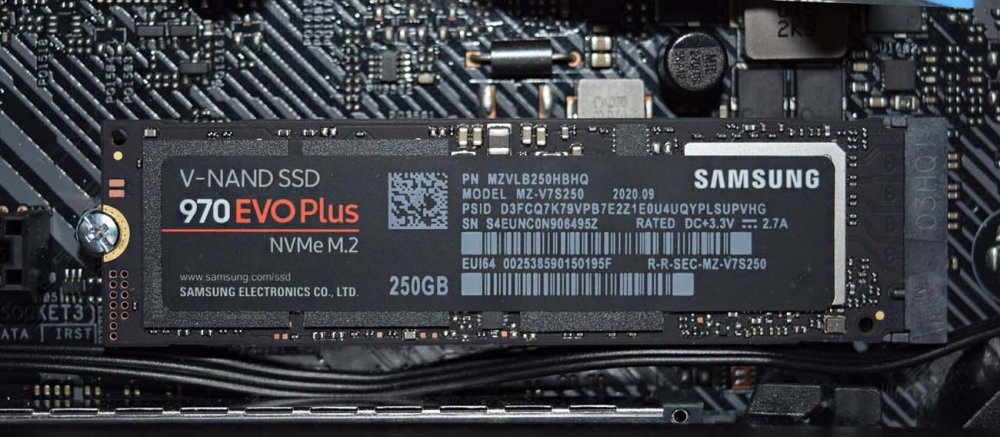
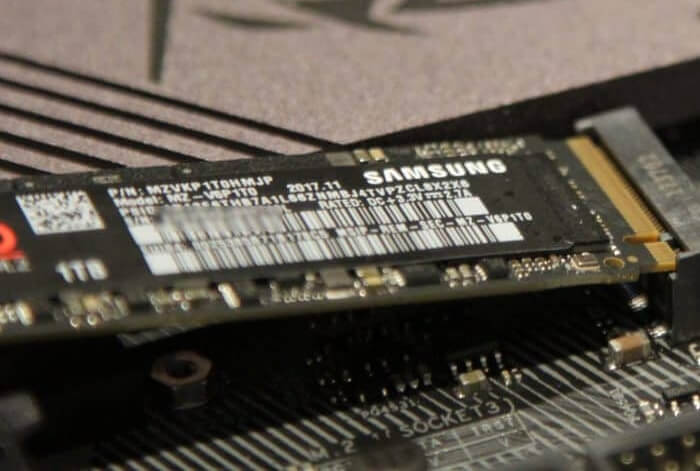
Привет, друзья. Сегодня мы с вами установим Windows 10 на SSD M.2 спецификации NVMe. Вопрос очень актуальный, так как эти накопители сейчас стали доступны в цене. Так, например, высокоскоростной Samsung 970 EVO Plus с объёмом 250 Гб сейчас можно купить за 4500 руб. Номинальные линейные скорости чтения и записи этой модели SSD M.2 NVMe самые высокие на данный момент — 3500 Мб/с и 3200 Мб/с. Самое главное, чтобы ваша материнская плата имела разъём M.2 интерфейса PCI Express 3.0 x4, а BIOS поддерживал NVMe. В этом случае установка операционной системы на твердотельный накопитель и последующая загрузка с него системы будет возможна. В нашем случае имеется материнка ASUS, и она в полной мере поддерживает накопители M.2 форм-фактора 2242, 2260, 2280, 22110. Выбранный нами SSD имеет ключ 2280 и совместим с нашей материнкой. Если такой накопитель для вас слишком дорогой, вы можете купить модели в два раза дешевле. Но и номинальные скорости обработки данных там будут меньше — в пределах 1800 Мб/с. Итак, как же установить Windows 10 на SSD M.2 NVMe?
Примечание: друзья, если у вас ещё недостаточно понимания, что такое современные SSD M.2 NVMe, посмотрите статью нашего сайта «SSD NVMe: всё о современных высокопроизводительных SSD-накопителях PCI-E». В ней рассматривается, что такое M.2, что такое NVMe, какие бывают размеры этого типа жёсткого диска, говорится о его поддержке материнскими платами, о ключах.
***
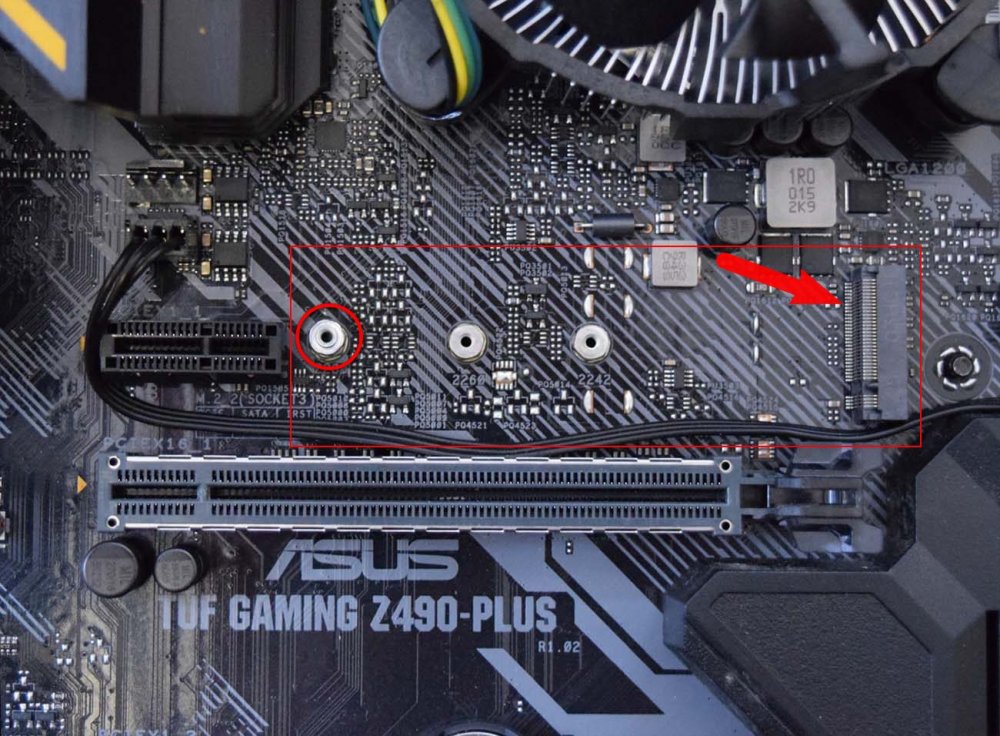
Устанавливается SSD M.2 в разъём M.2 довольно просто. Находим гнездо M.2 PCIe и устанавливаем в него твердотельник. Затем осторожно и несильно закрепляем винтом.
Далее создаём загрузочную флешку с Windows 10 и подсоединяем её к компьютеру. Но перед установкой операционной системы мы заглянем в BIOS.
Друзья, считается, что установка и последующая загрузка Windows 10 с SSD M.2 с использованием технологии NVMe осуществляется только в системе, которая поддерживает UEFI. Но у нас получилось установить Windows 10 SSD NVMe, отключив UEFI — в режиме BIOS Legscy. Нам позволила это сделать функциональная геймерская материнская плата Asus Tuf Gaming Z490-Plus. Включаем компьютер и входим в БИОС. Идём в «Advanced Mode» — расширенный режим BIOS.
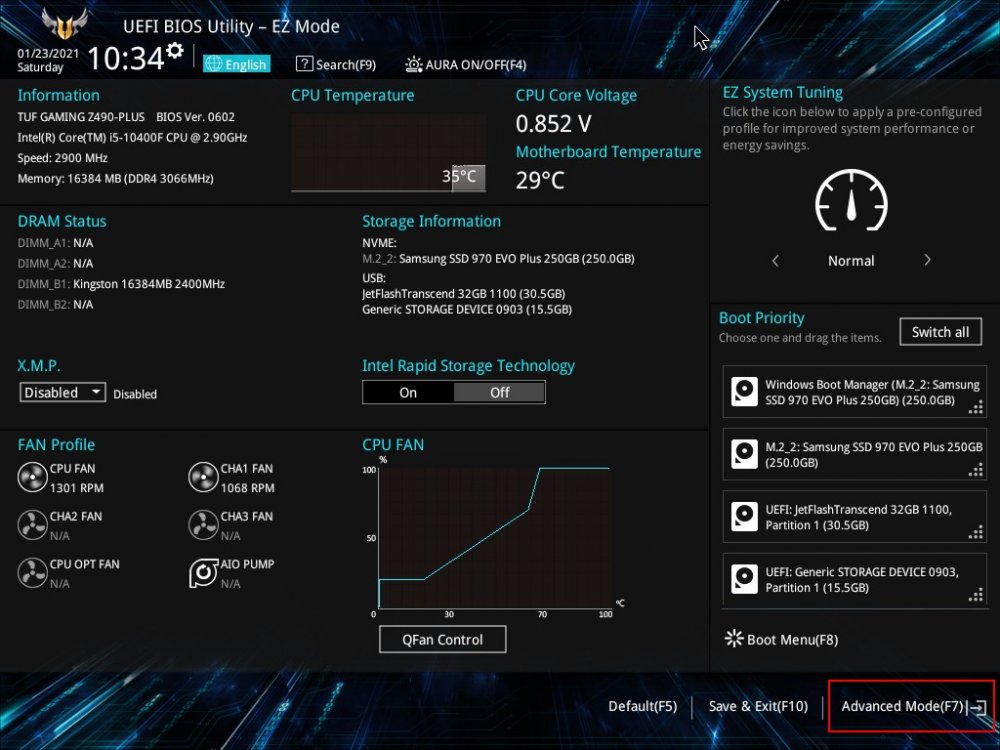
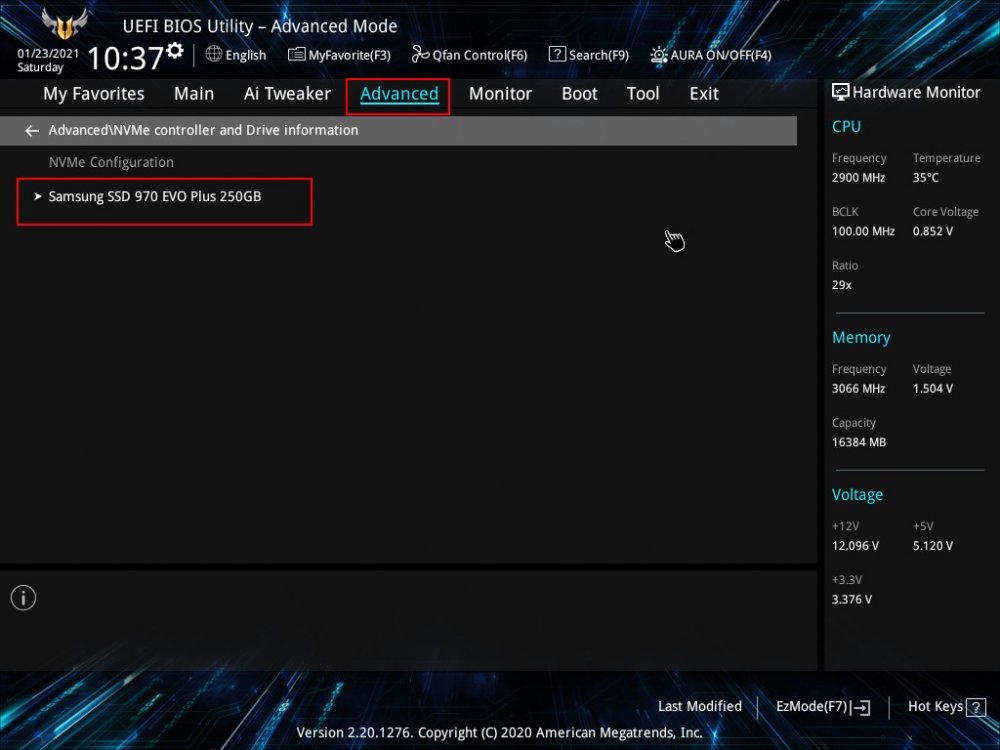
На вкладке «Advanced» открываем настройку «NVMe Configuration».
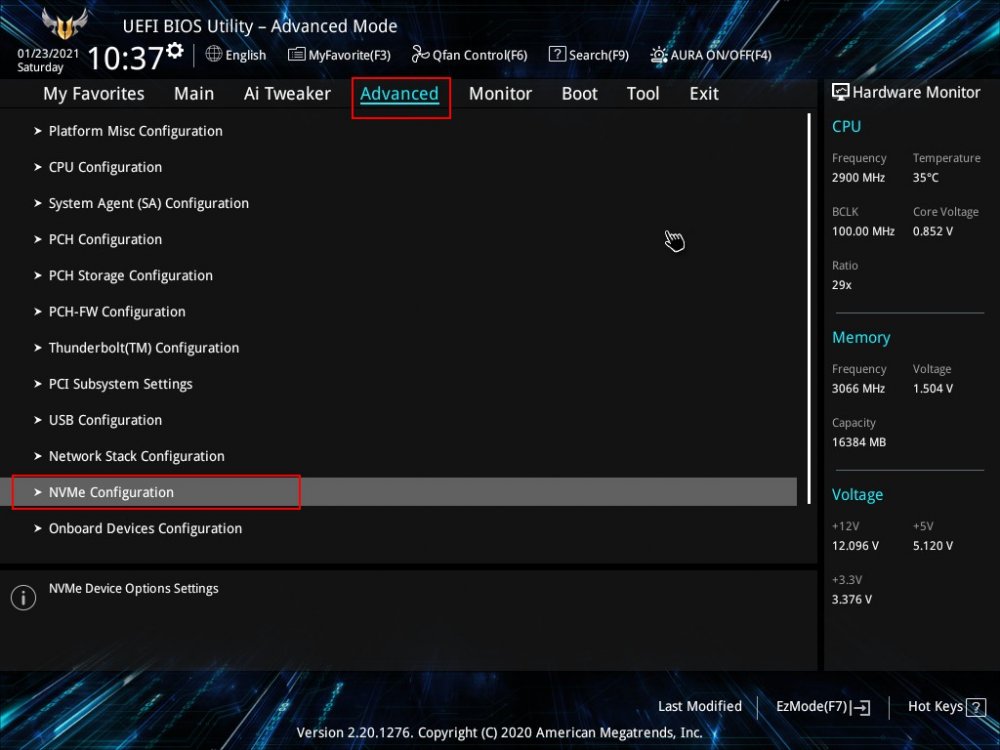
Здесь должен отображаться накопитель SSD M.2, если он правильно установлен в материнскую плату. Вот наш Samsung 970 EVO Plus 250 Гб отображается.
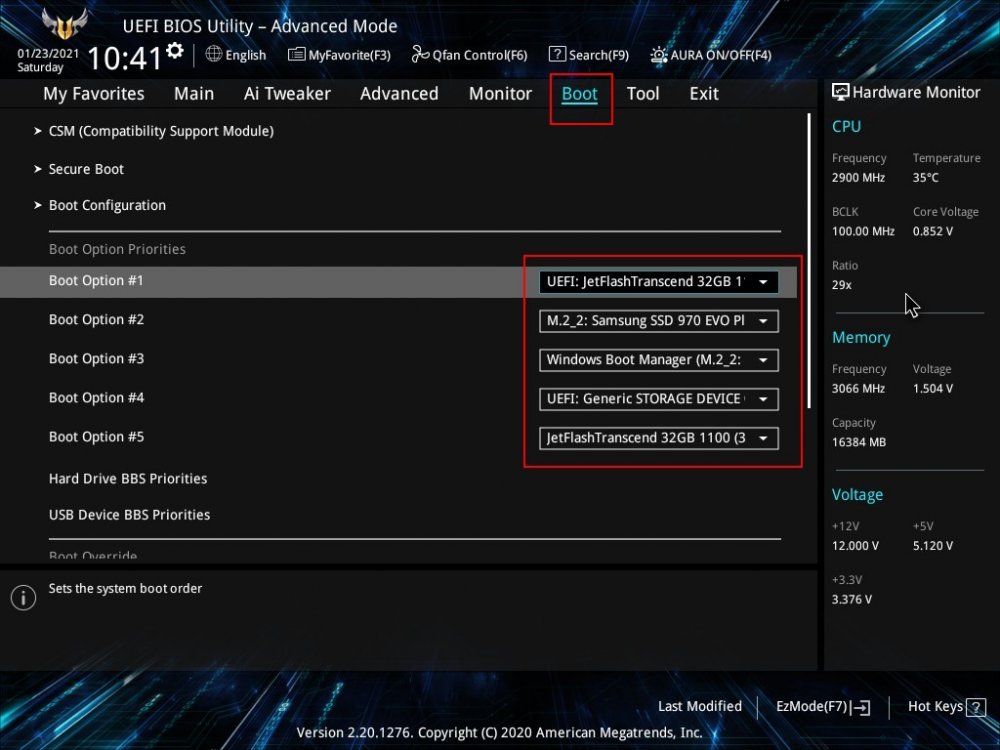
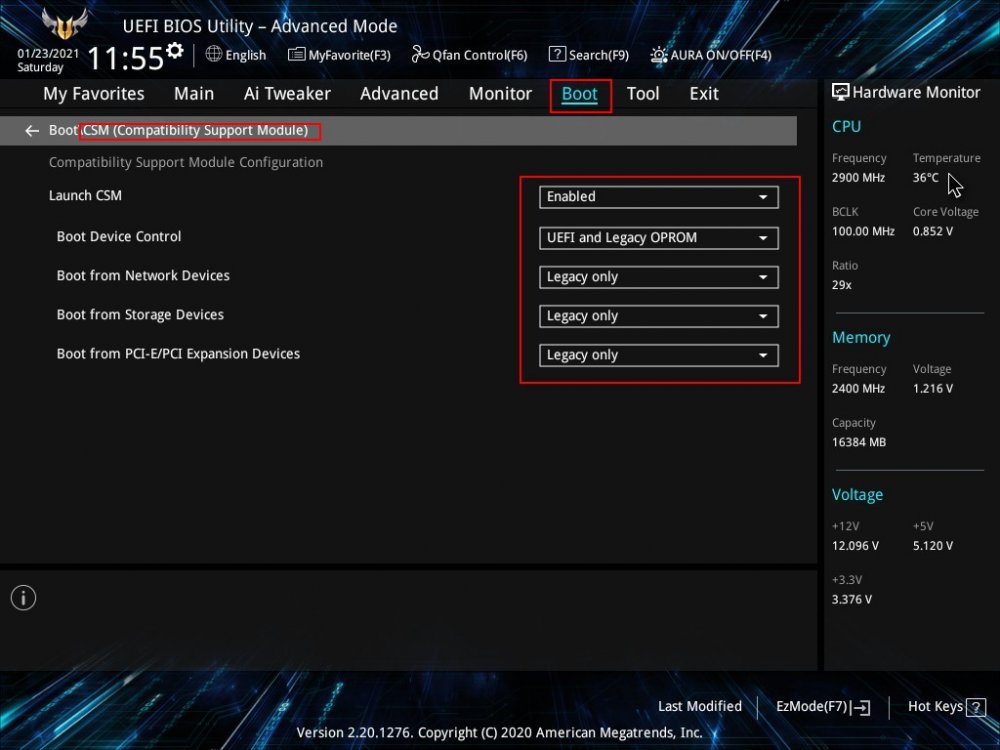
Переходим на вкладку «Boot», отвечающую за конфигурацию загрузки компьютера. Заходим в настройки CSM.
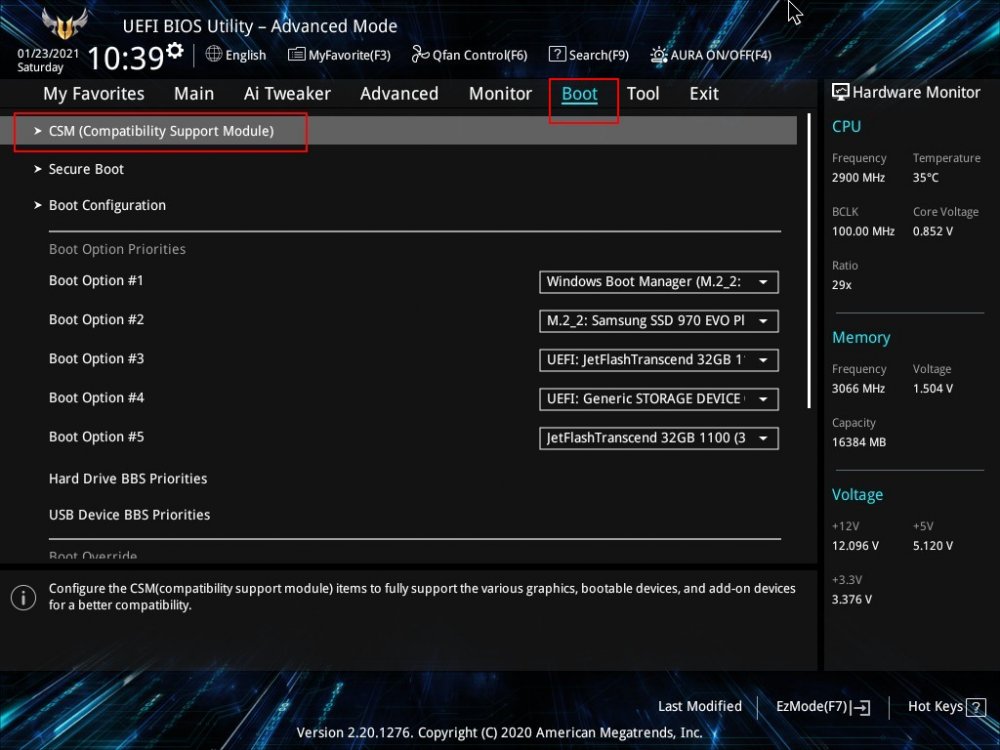
CSM — это так называемый модуль поддержки совместимости, который позволит установить на компьютер Windows 10 и в современном режиме UEFI, и в режиме устаревшего БИОСа (Legacy). В первом случае система установится на SSD и преобразует его в современный стиль разметки диска GPT. Во втором случае загрузочная запись на накопителе будет устаревшей MBR. В принципе, SSD в обоих случаях будет работать на одинаково высокой скорости.
Ниже мы покажем два способа установки Windows 10 — в UEFI и Legacy.
Чтобы установить Windows 10 в режиме UEFI, все настройки BIOS в разделе «CSM» ставим в UEFI.
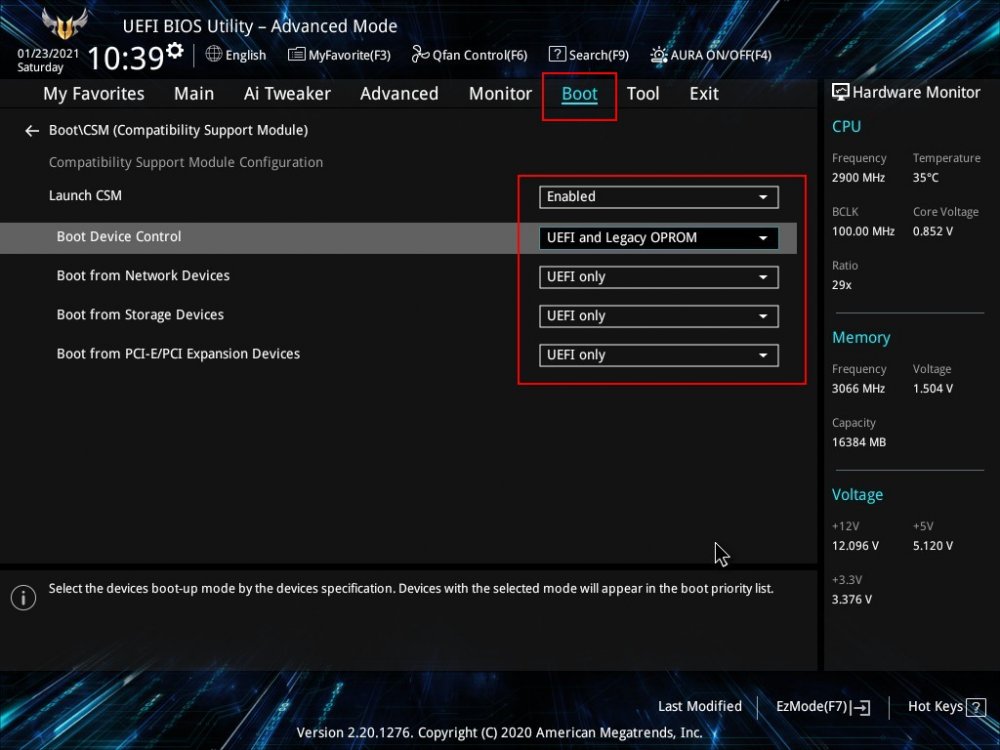
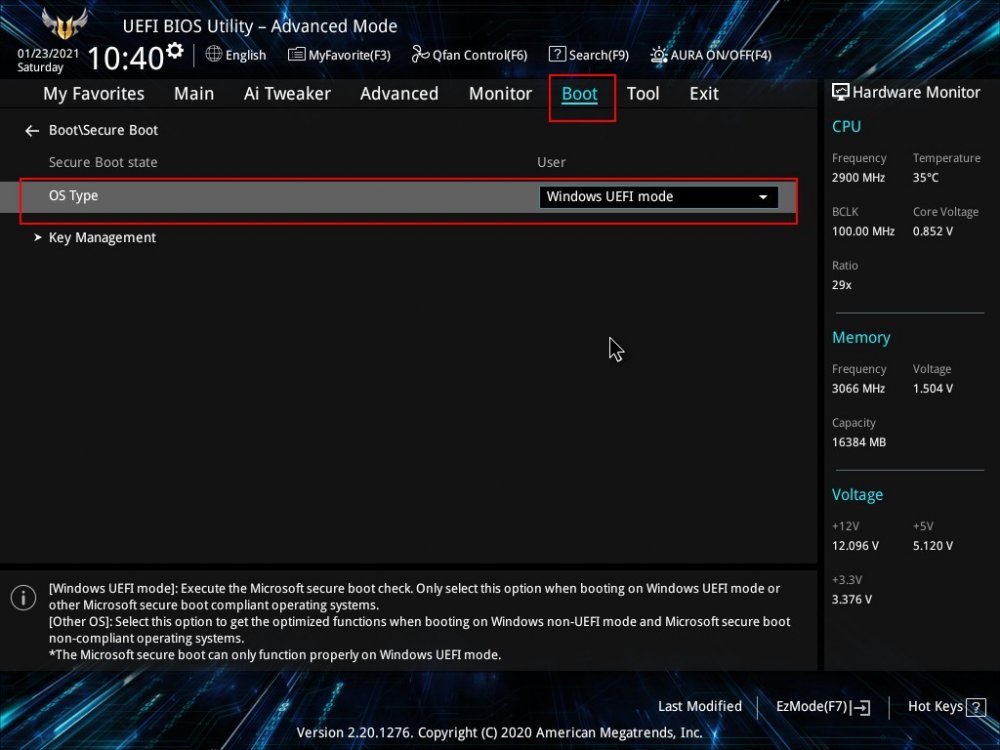
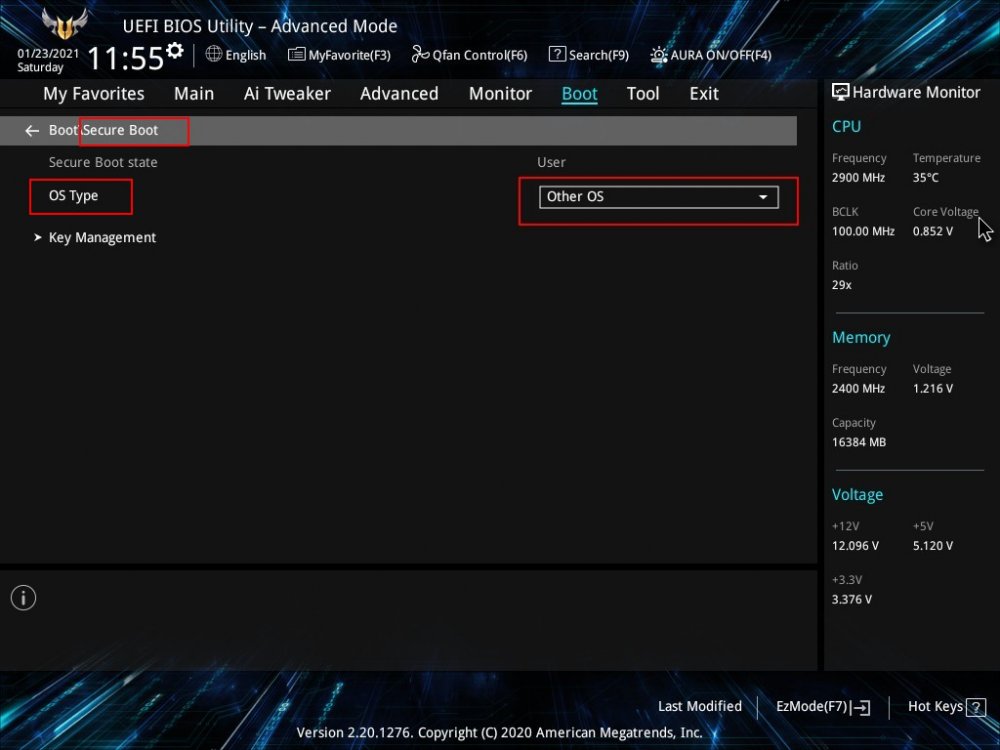
Настраиваем функцию Secure Boot, она отвечает за безопасную загрузку систем UEFI.
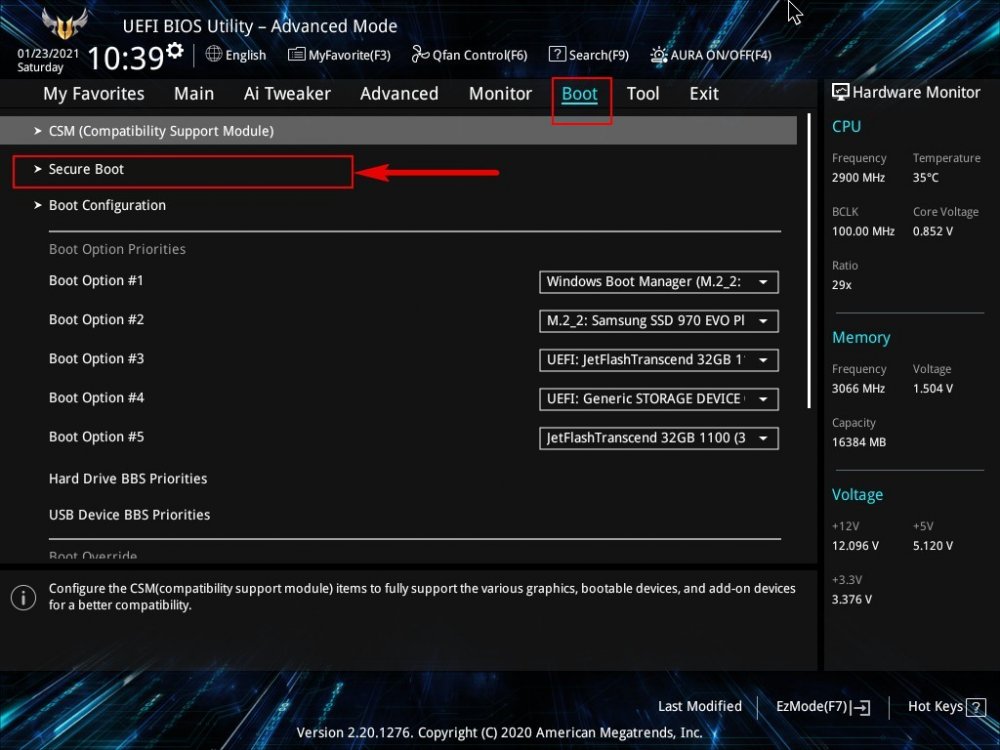
Выставляем эту функцию в UEFI.
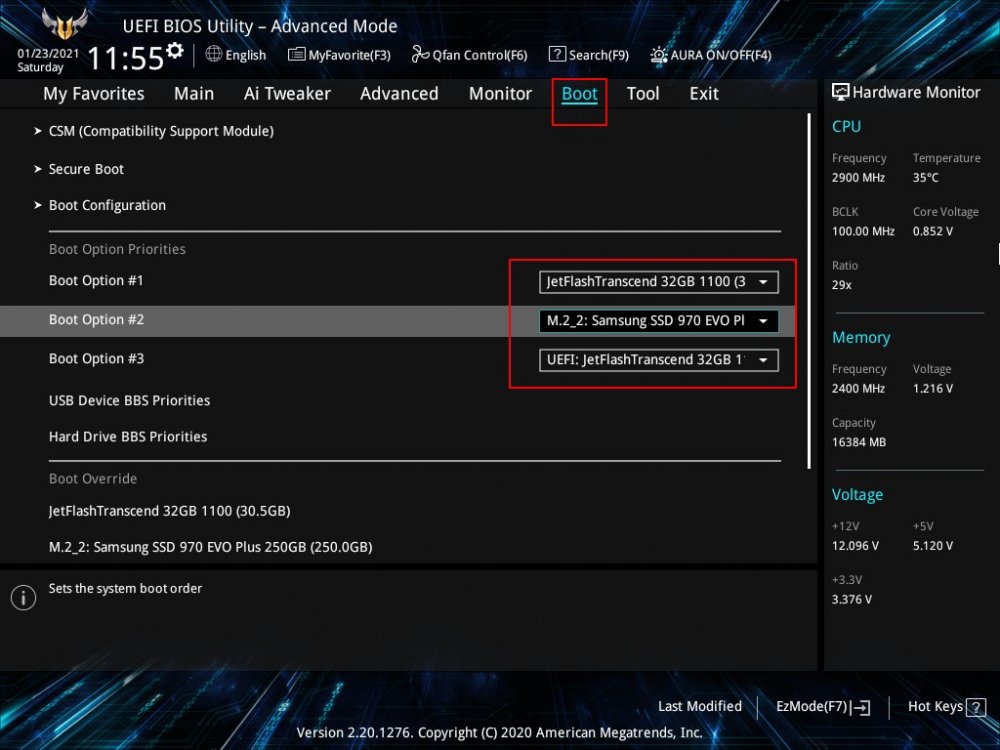
Возвращаемся в начальное окно вкладки «Boot» и выставляем первым загрузочным устройством флешку, а вторым — SSD M.2.
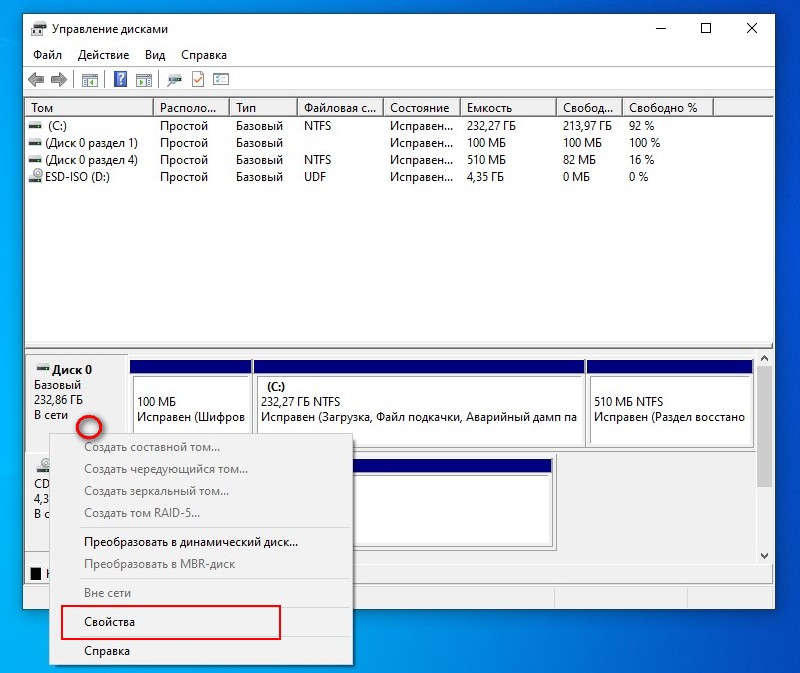
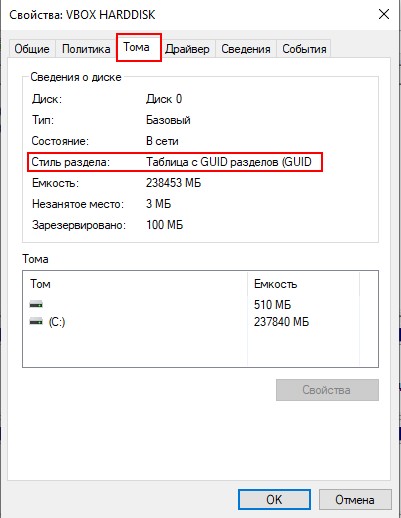
Сохраняем наши изменения в BIOS и перезагружаемся. Устанавливаем Windows 10. После установки системы открываем штатное управление дисками и смотрим свойства SSD M.2. Видим, что накопитель имеет стиль разметки GPT, то есть операционную систему мы установили в режиме UEFI.
Теперь давайте выставим настройки в режиме BIOS Legacy. На вкладке «Boot» в разделе «CSM» выставляем Legacy.
Настройки опции Secure Boot (OS Type) ставим в Other OS (Разные ОС).
Возвращаемся на вкладку «Boot» и выставляем первым загрузочным устройством флешку, а вторым — SSD M.2.
Далее устанавливаем Windows 10 обычным способом. После установки системы открываем штатное управление дисками и смотрим свойства SSD M.2. Видим, что накопитель имеет стиль разметки MBR, т. е. операционную систему мы установили в режиме BIOS Legacy.
Друзья, установочный процесс Windows 10 в обоих случаях будет стандартным. Он детально описан в статье сайта «Как установить Windows 10».
NVMe drives are becoming more and more popular, and for good reason. They offer much higher speeds than traditional SATA drives, and they’re more power-efficient too. If you’re looking to upgrade your computer’s storage drive, you might be wondering if you can install Windows 11 on an NVMe SSD drive. The answer is yes! Here are two methods you can use to get Windows 11 up and running on your new NVMe SSD drive
***Are you interested in how to install Windows 11 on M.2 SSD?
Prepare for Windows 11 Installation on NVMe SSD
Here are the basic requirements for you to notice to be able to install Windows 11 operating system on an NVMe drive:
- To be able to install Windows 11 on an NVMe SSD drive, you need to have a computer that supports the NVMe standard and meets the minimum system requirements of Windows 11.
- You also need to format the drive using the NTFS file system, to make the drive recognizable once connected to your computer.
- If it’s a new NVMe drive, try to initialize SSD to GPT instead.
It is no longer a thing to install Windows 11 on an NVMe SSD drive anymore as we have outlined two of the most helpful methods for you. You can use the SSD cloning software to easily migrate Windows 11 to a new NVMe SSD without installing it. Or, spend some time to clean install Windows 11 on NVMe drive with the help of a bootable installation media. Both methods require you to connect the new NVMe drive to your Windows device to get the job done, let’s find out how to connect this type of SSD then.
***EaseUS Todo Backup is the NVMe SSD cloning software we’ll use to directly move Windows OS installation to the new NVMe SSD drive. Download and enjoy it.
How to Connect NVMe SSD to Your PC and Laptop
- For desktop PC connection:
Here’s a guideline for you to correctly connect an NVMe SSD to a desktop PC.
Connecting an NVME SSD to a desktop PC is a simple process. First, identify an available PCI Express slot on your motherboard. Next, insert the NVME SSD into the slot and secure it with screws. Finally, connect a SATA cable from the SSD to an available SATA port on your motherboard. That’s it! Your NVME SSD is now ready to use.
- For laptop connection:
By comparison, it’s more troublesome to connect a second hard drive to a laptop but we still get you there.
There are a few different ways to connect an NVMe SSD to your laptop. The most common is through a USB port, although some laptops also have Thunderbolt 3 ports that can be used. The Thunderbolt 3 connection will be faster, but the USB connection will work just fine.
1. If your laptop has a Thunderbolt 3 port, you can use an adapter like the StarTech Thunderbolt 3 to NVMe M.2 SSD Enclosure to connect your SSD. Simply insert your NVMe SSD into the enclosure, connect the Thunderbolt 3 cable, and then plug the other end of the cable into your laptop.
2. If your laptop only has a USB port, you can use a USB to NVMe SSD adapter like the Inateck FE3001. Again, simply insert your NVMe SSD into the adapter, connect the USB cable, and then plug the other end of the cable into your laptop.
Method 1. How to Clone Windows 11 to NVMe SSD Without Installing from Scratch
When you want to install Windows 11 on a new NVMe SSD, you may need to clone your current system to the SSD for better performance. For example,
- You want to upgrade your current SATA SSD to a faster NVMe SSD.
- You have an old HDD that is running out of space and want to upgrade to a larger SSD.
- You want to replace a boot drive without reinstalling Windows OS, or moving files & programs.
No matter what your reasons are, you can use the disk cloning method to install Windows 11 on NVMe SSD. But which tool should you use for the job? EaseUS Todo Backup is one of the most reliable HDD to SSD cloning software that can help you clone your current system to NVMe SSD without any data loss.
To be specific, EaseUS Todo Backup is a comprehensive backup and clone tool for both home users and businesses. It offers a wide range of features to make sure your data is safe, including full disk/partition backups, system image backups, file backups, cloud backups, and more. Whether you need to backup your entire system or just want a system migration or system transfer, EaseUS Todo Backup has you covered.
Step-by-step Guide: Migrate Windows 11/Windows 10 on NVMe SSD
Let’s go through the whole process, which is incredibly easy to follow, to migrate Windows 11 operating system to the NVMe SSD drive without losing old configurations on your PC!
Step 1. Open EaseUS Todo Backup and click «Tools«, and then you can choose any function presented to you.

Step 2. EaseUS Todo Backup will automatically select the boot and system partition, what you need to do is choose the target disk and click «Next.»
(Make sure that the partition style of the source disk and the target disk are the same.)
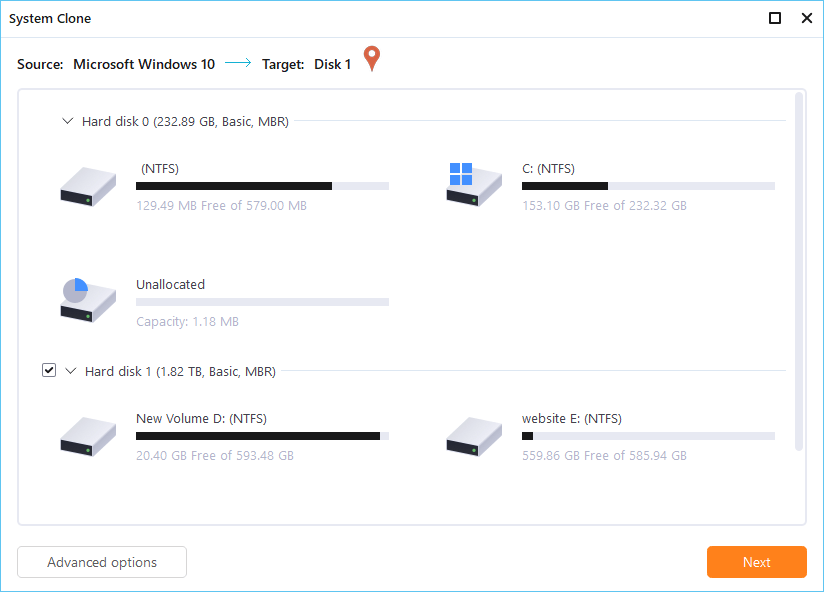
*System clone will wipe out all data, please make sure you backup your data in advance.

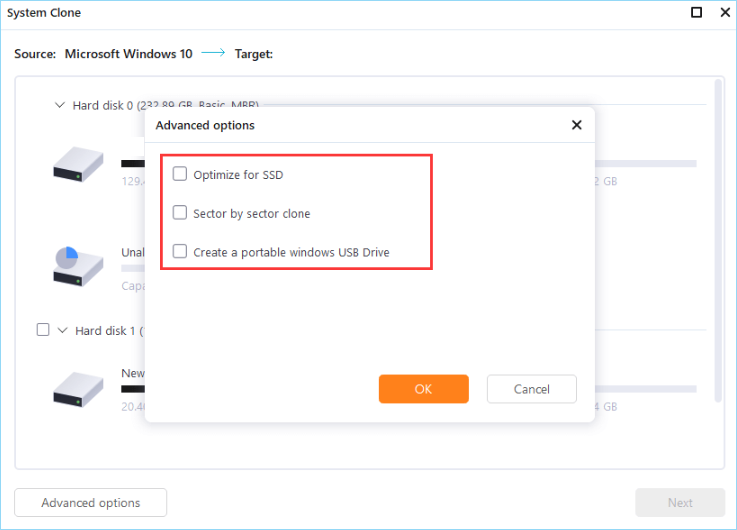
Step 3. If you want to clone your system to an SSD, you can choose «optimize for SSD» in the advanced options.
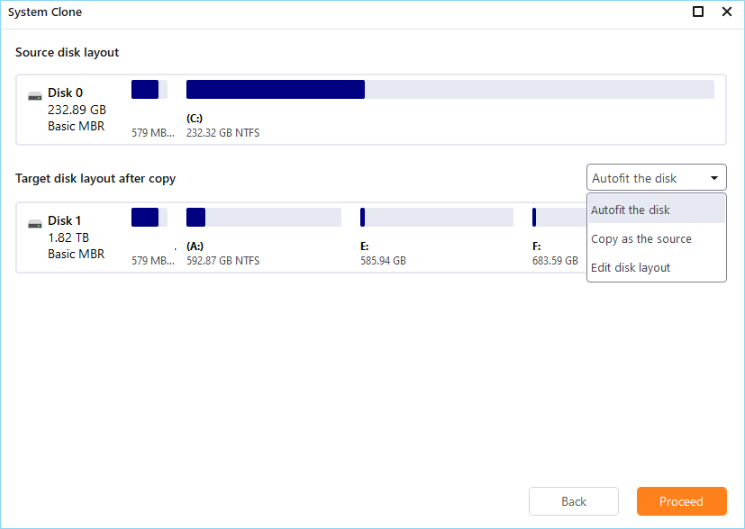
Step 4. Click «Proceed» to start cloning.
Method 2. How to Clean Install Windows 11 on NVMe SSD from USB
This is a guide on how to clean install Windows 11 on an NVMe SSD. If you don’t need the old operating system configurations, or it’s because your original operating system is not the new Windows 11, you’ll need to get the new OS by a clean install, which is time-consuming and needs your careful operation at each step in the below guide.
Step 1. Go to the Microsoft download page to create a Windows 11 installation media.

Step 2. Insert the Windows 11 installation media into your computer.
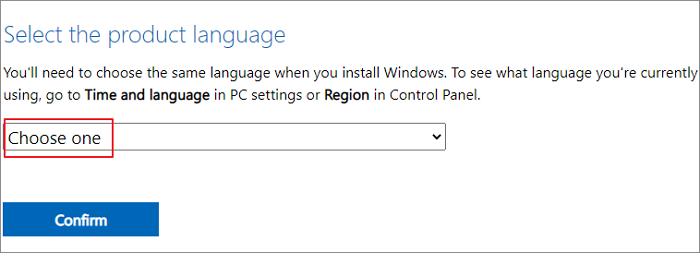
Step 3. Select the language, time and currency format, and keyboard or input method that you want to use during the installation.
Step 4. Click Install Now.
Step 5. If you’re asked for a product key, you don’t need one.
Step 6. Choose the installation option that you want:
— Upgrade: Keep personal files and apps
— Custom: Install Windows only (advanced)
Step 7. Select the drive on which you want to install Windows. If you have multiple drives, select the drive that you want to keep as your primary drive.
Step 8. Click Next, and then follow the instructions to complete the installation process.
Step 9. Once you’ve completed the installation process, your computer will restart and you’ll be able to use Windows 11.
Should I Try Windows 11 Migration or Windows 11 Installation on NVMe?
After trying both methods, we found that cloning Windows 11 and cleaning install Windows 10/11 on NVMe SSD work differently to meet users’ demands, so we cannot use one word to tell which one is a better option.
To sum up, the method that resolves your case shall be the most recommended. An automatic migration and cloning method provided by EaseUS Todo Backup is for users who want a hard drive upgrade or replacement on the same device. In this way, they don’t necessarily need to reinstall Windows 11/10 on the new NVMe drive anymore. In fact, they just move everything on the old hard drive to the new drive without losing OS, programs and personal files and settings.
While for users who don’t have any original copy of Windows 11 or Windows 10, they need to install the desired OS version on their new PC or new NVMe drive, the manual way of clean install from USB is necessary. Though a little painful to go through the whole procedure, with a little bit of care, you can install Windows 10/11 on NVMe SSD without any problem.
Just remember to back up your important files before you begin. Hence, no matter which way you took at the end, be aware of the backup importance on a PC (the free version of EaseUS Todo Backup is comprehensive enough for personal use), which will save you from the endless pain of paying an extra high price on data recovery software.
FAQ on How to Install Windows 10/11 on NVMe
Should I install Windows 11 on NVMe?
NVMe is a new protocol for accessing high-speed storage devices, and it is the successor to the AHCI protocol. Windows 11 includes native support for NVMe, and thus you do not need to install any special drivers to use an NVMe drive. However, there are a few things to keep in mind if you want to install Windows 11 on an NVMe drive.
First, keep in mind that NVMe is a very new technology, and thus there are not as many NVMe drives on the market as there are traditional hard drives or SSDs. This means that you may have to pay a premium for an NVMe drive. Secondly, while Windows 11 includes native support for NVMe, your motherboard’s BIOS may not. This means that you may need to update your BIOS in order to use an NVMe drive. Finally, keep in mind that NVMe drives are designed for use in high-performance applications. If you are not using your computer for gaming or other demanding tasks, you may not see a significant difference in performance by using an NVMe drive.
Can I install Windows 11 on m2 SSD?
Yes, you can install Windows 11 on an m2 SSD. M2 is a type of solid-state drive (SSD) that is designed for use in high-performance applications. Windows 11 includes native support for m2 SSDs.
Here’s a detailed tutorial on how to boot Windows 10 or Windows 11 from an M2 NVME SSD Drive using Clover Boot and a physical PCIe x4 M2 NVME SSD Card on an old Legacy BIOS or UEFI BIOS-based unsupported computer system.
Boot and Install Windows 10 / 11 from M2 NVME SSD on an Unsupported Motherboard PC
This tutorial will help you boot Windows 10 or Windows 11 from an unsupported motherboard that does not have NVME M2 Slot. Nor does their BIOS support directly booting windows from M2 NVME Solid State Drive. Please note that this tutorial assumes you have basic knowledge of computer hardware and software installation.
Why Use an M2 NVME SSD instead of a regular SSD Drive?
A regular SSD Drive which is usually plugged inside a LAPTOP or PC is not as fast as an M2 NVME SSD Storage. On a regular SSD drive, you will hardly get 220 Mbps read-write speeds. Whereas M2 NVME Storage can give you read-write speeds up to 1600 Mbps on PCie x2 slots, and the read-write speed increases from 3500 Mbps to 7500 Mbps if your PC’s motherboard supports PCIe x4 slot.
Which M2 NVME SSD Storage is Right for Me?
If you are on a tight budget and can compromise on performance a bit, then you can opt for Kingston NV2 or Western Digital’s WD SN770 M2 NVME Storage. If you don’t have any budget constraints, you must go with Samsung 980 Pro or Samsung 990 Pro, or Western Digital WD850X NVME M2 SSD. Samsung’s 980 pro and 990 pro both have up to 50GB of DRAM Cache that ensures the fastest transfer of any file size up to 50GB or more with read-write speeds of 7.5Gbps or 7500 Mbps.
Requirements & Downloads
A. A computer with an available PCIe x4 x16 or x2 slot
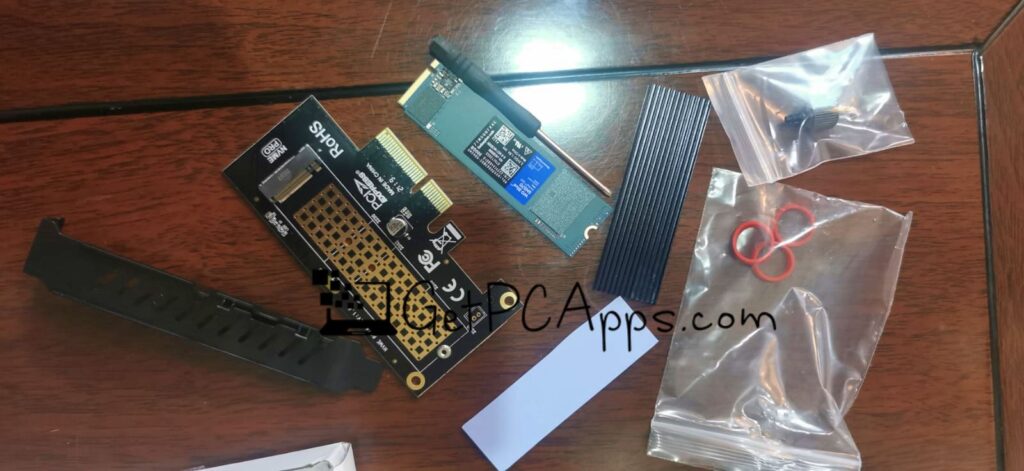
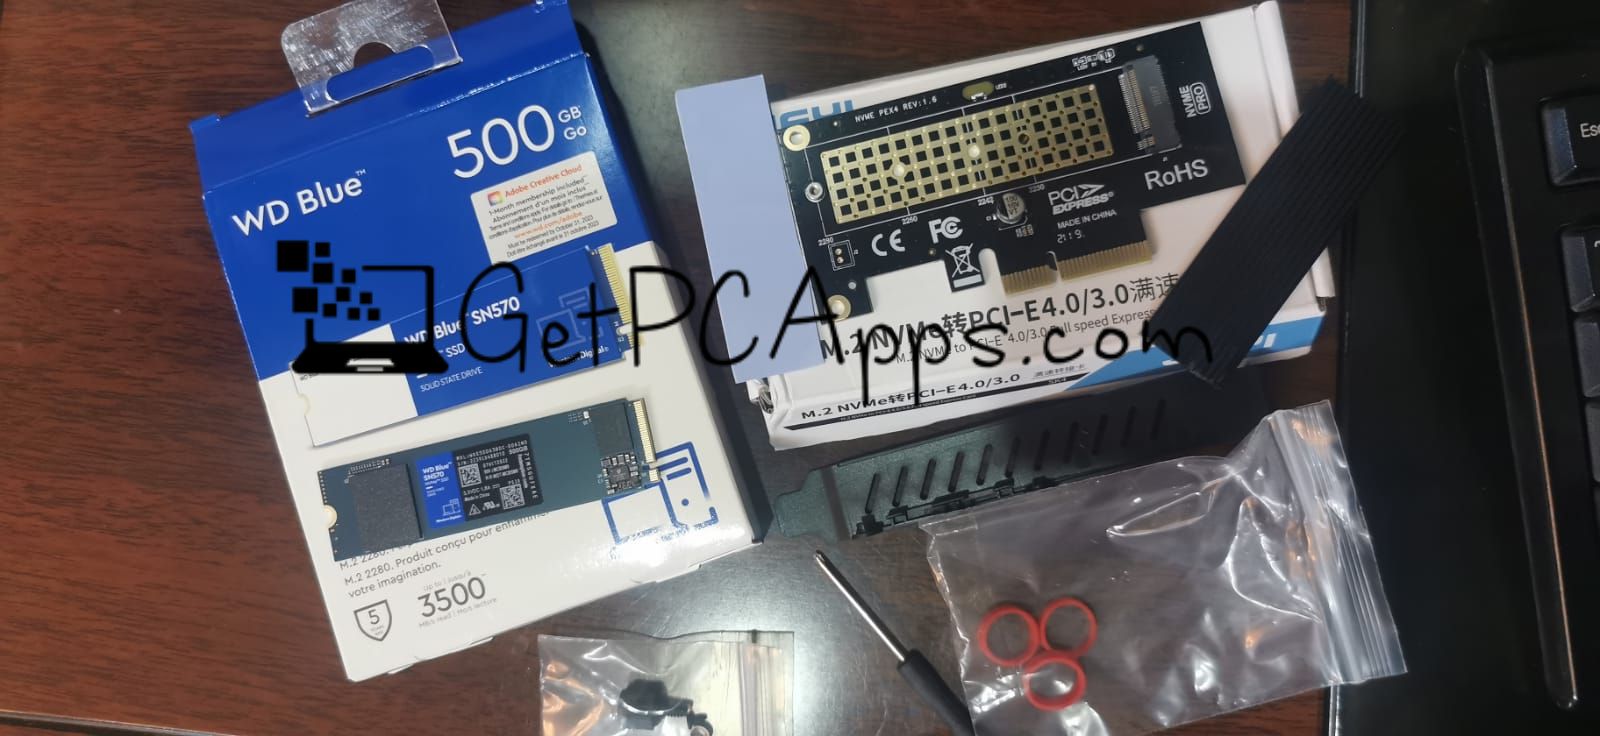
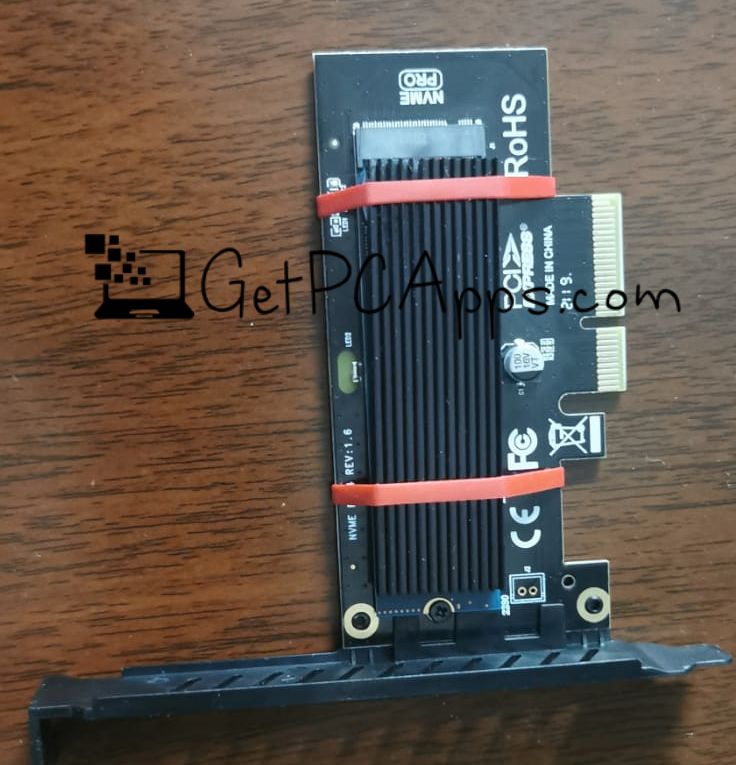
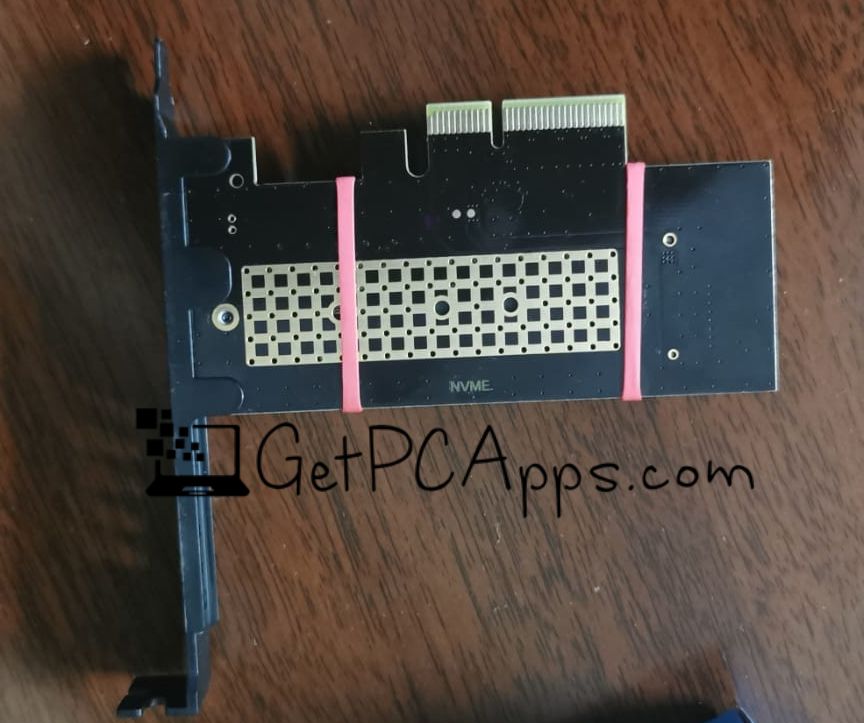
B. A physical PCIe x4 M2 NVME SSD card
C. We will use the existing hard disk’s C drive and shrink it to create another partition where we will extract Windows 10 ISO or Windows 11 ISO and later extract Clover’s boot files in 2nd phase, which is really important
D. Clover Boot software + BootIce (To make the drive bootable) + gimagex (To split install.wim file into 4GB and less two parts, so we can paste it inside FAT32 formatted Drive, that does not support file size of more than 4GB)
E. MiniTool Partition Wizard v11.4
F. WinRAR or 7Zip to Extract Windows ISO Files
G. A computer running Windows 7, 8, or Windows 10 on a regular hard drive
Step 1: Download Windows 10 / 11 ISO & Split Install.WIM File to Fit inside Fat32 Drive
1. Download Windows 10 or Windows 11 ISO
2. Extract the Windows ISO file using WinRAR or 7Zip software at any disk location which must be NTFS Drive.
3. Now go inside sources folder and try to locate install.wim file, it’s size must be exceeding 4GB. We need to split the file into two files less than 4GB, so that file can be easily used inside FAT32 Drive that has 4GB file limit.
4. In the requirements step D, you have to download all tools and extract them. Open the GImageX tool 32bit or 64bit depending on your OS version. Select the install.wim file from this path for Source WIM: “Drive:\Sources\install.wim”
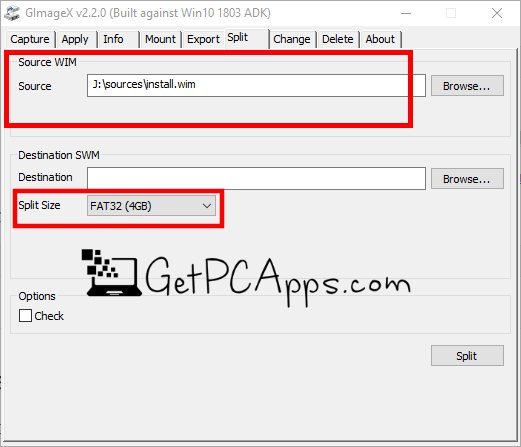
5. Then Choose the Destination “install.swm” path such as “C:\custom-wim\install.swm”
6. After choosing the destination, you need to choose Split Size: Select it as FAT32 (4GB)
7. Then click on the Split button
8. This process will generate two SWM files called “install.swm” and “install2.swm”
9. Paste these two “install.swm” and “install2.swm” files inside sources folder of Windows, that you had located in Step 3.
10. Remove install.wim file from this path: “Drive:\Sources\install.wim”
Step 2: Create a Boot Partition Drive from the Existing Hard Disk
1. Create a new 10GB FAT32 partition from C:/ drive by shrinking the C:/ partition using MiniTool Partition Wizard 11.4 and name the drive “Clover Boot” to remember it.
2. Copy all extracted Windows ISO files and paste them inside the “Clover Boot” Drive that you had just created.
Step 3: Install the M2 NVME SSD Card

1. Turn off your computer and unplug the power cable.
2. Open your computer case and locate an available PCIe slot.
3. Insert M2 NVME SSD Drive into PCIe x4 M2 NVME SSD Card.
4. Secure the card by fastening the screws or latches on the slot.
5. Insert the physical PCIe x4 M2 NVME SSD card into the PCIe x4, x2 or x16 slot.
6. Close the computer case and reconnect the power cable.

7. Turn on your computer and format your NVME M2 Disk Drive as an NTFS GPT partition, using Mini Partition Tool. You may create partitions on NVME M2 Disk if you need to.
Step 4: Prepare the Clover Boot Drive
1. As you already had downloaded the required clover boot files above in requirements section D. Now you only need to place the files in the right place. Please follow the next step.
2. Extract the Clover Boot Files inside the “Clover Boot” Drive, and replace any Windows files, if it asks to replace them. This is a really important step.
3. Run BootIce tool which was also downloaded with all tools package in requirements STEP D.
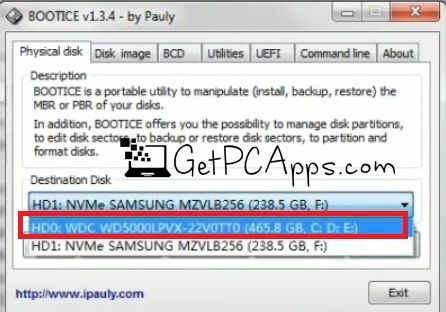
4. From the Physical Disk Tab, you need to Choose Destination Disk as your REGULAR Hard DRIVE, and not the NVME M2 Drive.
5. Then click on Process MBR
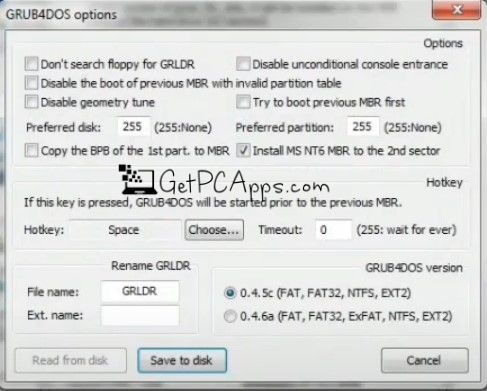
6. It will open a new Window called, Master Boot Record: Select GRUB4DOS 0.4.5c/0.4.6a (grldr.mbr)

7. Then Click on Install / Config Button at Bottom
8. It will open another Window GRUB4DOS Options, where you need to select Save to disk
9. Now you can see the message: Grub4Dos is successfully installed! Please copy GRLDR (and optional menu.lst) to the root of any partition of this disk.

10. Those two files would already be at their place when you extract the tools inside “Clover Boot Drive”
Step 5: Configure the BIOS
Since old systems cannot detect M2 NVME SSD as a boot device, due to missing IDE Controller, so we don’t need to configure legacy or UEFI BIOS at this step. This Clover boot process is being done to redirect the boot from your regular hard drive to an M2 NVME Storage Disk, so you can boot Windows 10 or Windows 11 OS from M2 NVME Disk on any old unsupported system, that does not have an official M2 NVME slot.
Step 6: Install Windows 10 or 11 on the M2 NVME SSD
1. Now you have all things in place, the next step is to reboot your computer.
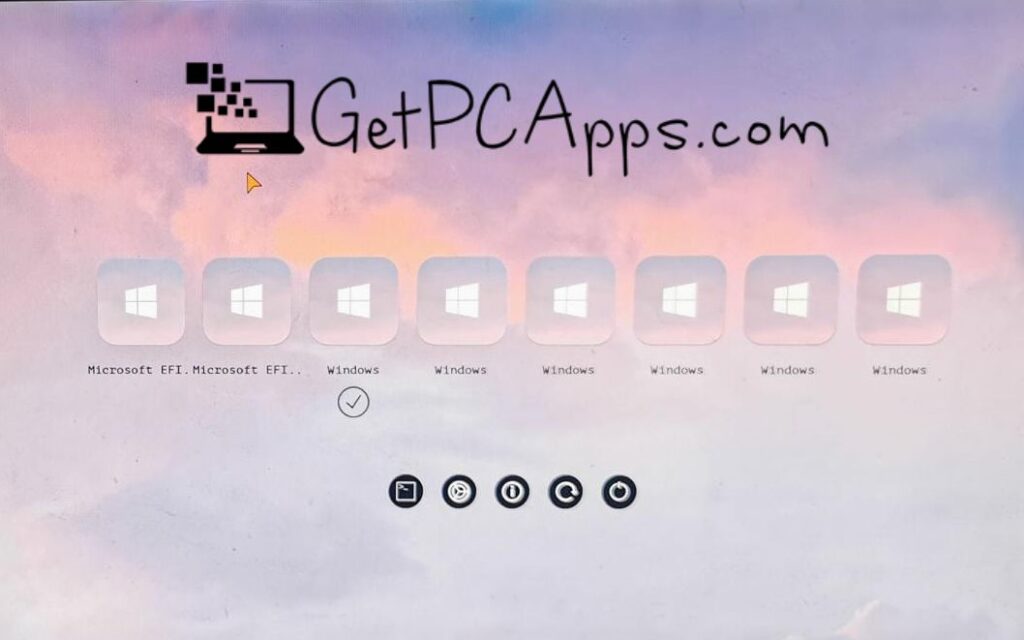
2. It will bring a Clover Boot Screen where you need to select the very 1st option Microsoft EFI.. Now you will be able to see the Windows 10 or Windows 11 Setup on your screen.
3. Follow the on-screen instructions to install Windows 10 or 11 on the M2 NVME SSD. Make sure to select the M2 NVME SSD as the installation destination.
4. Complete the Windows installation process by following the prompts.
Step 7: Learn about Dual Booting Windows using Clover Boot
1. Restart your computer and your computer will automatically boot from the Clover Boot drive
2. Select the M2 NVME SSD with the Windows installation as the boot option from the Clover Boot menu.
3. Now the Clover Boot Menu will show you 3 options whenever you boot the computer, The 1st option will be Windows Installation Disk, 2nd option will always be the Windows OS that you have recently installed on M2 SSD NVME Drive, whereas 3rd option will be your old Windows System on your regular hard drive. This way, your computer will dual boot two Windows operating systems, one from M2 SSD NVME Drive, and the other one from your old regular mechanical hard disk drive.
Congratulations! You have successfully booted Windows 10 or 11 from an M2 NVME SSD Drive on your old Legacy BIOS or UEFI BIOS-based computer system using Clover Boot and a physical PCIe x4 M2 NVME SSD Card. You should now experience faster boot times using an M2 NVME Drive and improved Windows performance on your old unsupported computer system. CrystalDiskMark tool shows 1.64 Gbps as Read Speed and 1.59 Gbps as Write Speed on an M2 NVME SSD Windows Boot Drive with Clover Boot.
If you are facing any difficulty during the process, you can leave your comments and I will try my best to help you. If you think that this process is too technical to handle, and you want a helping hand for professional assistance, then you can hire me for this job. You can get back to me using the contact form or leave the comments below.
- Author
- Recent Posts
With a passion for all things tech, I delve deep into the world of Windows software and tutorials to bring you expert insights and practical advice. As a seasoned blogger, I strive to simplify complex topics and empower readers to harness the full potential of their digital devices. Join me on a journey of discovery and mastery in the ever-evolving landscape of technology.
|
|
|
0 / 0 / 0 Регистрация: 25.03.2019 Сообщений: 8 |
|
|
25.03.2019, 15:35. Показов 164046. Ответов 23 Доброго времени суток. Столкнулся с такой проблемой. Компьютер Ryzen 2600 на материнке от gigabyte b450m-ds3h. Недавно приобрёл nvme ssd, вставил в систему. После инициализации проверил CrystalDiskMark и скорости впечатляют. Захотел поставить на него систему, но столкнулся с кучей проблем. Создал загрузочную флешку Руфусом, на формат GPT. Загружаюсь в установщик, а тот диск не видит. Ни в окошке, ни diskpart’ом. При этом и биос, и Шиндовс его видят и могут с ним работать. В биосе Настройки и по умолчанию ставил, и пытался изменить, но установщику по кочерыжке. Может кто что подскажет. Версия биоса f2
0 |
|
cpp_developer Эксперт 20123 / 5690 / 1417 Регистрация: 09.04.2010 Сообщений: 22,546 Блог |
25.03.2019, 15:35 |
|
Ответы с готовыми решениями: Установка Windows 10 на SSD m2 nvme Windows 10 не устанавливается на m2 nvme ssd Запуск windows с ssd M.2 NVMe 23 |
|
47 / 43 / 1 Регистрация: 21.03.2019 Сообщений: 206 |
|
|
25.03.2019, 23:21 |
|
|
Скажите зачем вы создали флешку Руфусом? Просто из любопытства, вы ведь ставите 10ку? Вас что то не устраивает в том как сам мелкософт создаёт загрузочную флешку?Диск у вас надеюсь не логический?Что показывает винда в управлении дисками?
0 |
|
0 / 0 / 0 Регистрация: 25.03.2019 Сообщений: 8 |
|
|
26.03.2019, 06:56 [ТС] |
|
|
Руфусом я создавал для того, чтобы убедится в формате GPT. Софт от Майков я тоже использовал, но такж тщетно. В самой винде диск определяется также, как и два остальных
0 |
|
47 / 43 / 1 Регистрация: 21.03.2019 Сообщений: 206 |
|
|
26.03.2019, 08:09 |
|
|
В Биосе в бут меню ваш диск виден?
0 |
|
0 / 0 / 0 Регистрация: 25.03.2019 Сообщений: 8 |
|
|
26.03.2019, 08:12 [ТС] |
|
|
Да. Даже пытался перекинуть Файлы на него в Винде и все отлично. Единственное место, где этого диска нет, это установщик Виндовса. Везде есть в самой системе, diskpart его видит, но начинаешь устанавливать и все, как будто я его вытащил из системы
0 |
|
47 / 43 / 1 Регистрация: 21.03.2019 Сообщений: 206 |
|
|
26.03.2019, 08:17 |
|
|
Я столкнулся с такой ерундой когда собирал комп, но у меня комп не видел SSD из биоса, а в винде видел)Вылечил удалением ключей, отключением секьюр бута и отключил включил, заработало, у вас случай более интересный, попробуйте удалить диск и установкой с нуля без предварительного форматирования, видимо не видеть ссд — это фича АМД)
0 |
|
0 / 0 / 0 Регистрация: 25.03.2019 Сообщений: 8 |
|
|
26.03.2019, 09:06 [ТС] |
|
|
В общем. Я обновил BIOS до версии F4. Ранее не видел опции Secure Boot от слова совсем, пока не решил отключить режим CSM. И вуаля. Правда отключение SB проблеме это не помогло. Установщик не видит NVMe диск
0 |
|
240 / 218 / 46 Регистрация: 17.04.2010 Сообщений: 526 |
|
|
26.03.2019, 09:47 |
|
|
Скорее всего нужно скачать драйвер и при установке системы добавить его.
0 |
|
0 / 0 / 0 Регистрация: 25.03.2019 Сообщений: 8 |
|
|
26.03.2019, 10:02 [ТС] |
|
|
Я тоже на это грешу, да вот только где найти драйвер на 10 Винду? Везде, где я искал, только для 7-ки или RAID дрова
0 |
|
240 / 218 / 46 Регистрация: 17.04.2010 Сообщений: 526 |
|
|
26.03.2019, 10:20 |
|
|
AMD RAID Driver (Preinstall driver, press F6 during Windows* setup to read from floppy) OS: Windows 10 64bit http://download.gigabyte.eu/Fi… 2.0.87.zip
0 |
|
14448 / 6173 / 329 Регистрация: 03.07.2010 Сообщений: 20,709 |
|
|
26.03.2019, 11:00 |
|
|
Сообщение от T3RR4BYT3 драйвер на 10 Винду драйвер Сообщение от T3RR4BYT3 nvme ssd интегрирован в Win 10 по «умолчанию». Добавлено через 38 минут
0 |
|
0 / 0 / 0 Регистрация: 25.03.2019 Сообщений: 8 |
|
|
26.03.2019, 11:41 [ТС] |
|
|
Сообщение от dzu попробуйте отключить(disable) в буте — хдд\ссд и загрузится с флешки. Как ни делал, все по барабану. Даже физически отсоединял все диски, кроме флешки. Все перепробовал. Ничто не работает Добавлено через 1 минуту
0 |
|
240 / 218 / 46 Регистрация: 17.04.2010 Сообщений: 526 |
|
|
26.03.2019, 12:30 |
|
|
Сообщение от T3RR4BYT3 Я начинаю думать, что на этой матке нет поддержки загрузки с NVMe, что странно для платы 2018 года Если биос видит диск, то и загружаться с него должен. Проблема либо в настройках биоса, либо в драйвере в момент установки системы. Еще могут быть конфликты разных устройств… Какая модель SSD диска?
0 |
|
0 / 0 / 0 Регистрация: 25.03.2019 Сообщений: 8 |
|
|
26.03.2019, 12:37 [ТС] |
|
|
Сообщение от x128 Какая модель SSD диска? Kingspec NE-512 на 477 физических GB
0 |
|
240 / 218 / 46 Регистрация: 17.04.2010 Сообщений: 526 |
|
|
26.03.2019, 13:05 |
|
|
T3RR4BYT3, к SATA что-то подключено? Если оставить только один SSD диск ситуация повторяется?
0 |
|
0 / 0 / 0 Регистрация: 25.03.2019 Сообщений: 8 |
|
|
26.03.2019, 13:15 [ТС] |
|
|
Сообщение от x128 к SATA что-то подключено? Да. Два жестких диска(HDD) Сообщение от x128 Если оставить только один SSD диск ситуация повторяется? Да. Установщик не видит NVMe ни в какую Добавлено через 6 минут
0 |
|
240 / 218 / 46 Регистрация: 17.04.2010 Сообщений: 526 |
|
|
26.03.2019, 13:30 |
|
|
Просто в конфигурациях с M.2 + SATA бывают нюансы и это должно быть обозначено в мануале.
0 |
|
47 / 43 / 1 Регистрация: 21.03.2019 Сообщений: 206 |
|
|
26.03.2019, 19:05 |
|
|
Ну насчёт нюансов, так они бывают не только с М2, но и с обычными сата ссд и ни слова о них в мануале и ещё при том , что они указываются как поддерживаемые материнской платой
0 |
|
0 / 0 / 1 Регистрация: 02.04.2019 Сообщений: 2 |
|
|
02.04.2019, 17:49 |
|
|
Сообщение было отмечено Dimonick как решение Решение Та же проблема. Пытаюсь установить Win10 LTSC с флешки, записанной руфусом, на NVMe SSD (samsung 970). Добавлено через 1 час 16 минут
0 |
|
47 / 43 / 1 Регистрация: 21.03.2019 Сообщений: 206 |
|
|
02.04.2019, 19:08 |
|
|
Ты же хотел в GPT?
0 |
|
raxper Эксперт 30234 / 6612 / 1498 Регистрация: 28.12.2010 Сообщений: 21,154 Блог |
02.04.2019, 19:08 |
|
20 |
|
Новые блоги и статьи
Все статьи Все блоги / |
||||
|
Трансферное обучение с предобученными моделями в Keras с Python
AI_Generated 06.05.2025 Суть трансферного обучения проста: взять модель, которая уже научилась решать одну задачу, и адаптировать её для решения другой, похожей задачи. Мозг человека работает по схожему принципу. Изучив. . . |
Циклические зависимости в C#: методы управления и устранения
stackOverflow 06.05.2025 Если вы хоть раз работали над не самым тривиальным проектом на C#, то наверняка сталкивались с той ситуацией, когда компилятор вдруг начинает сыпать странными ошибками о невозможности разрешить. . . |
Как перейти от Waterfall к Agile
EggHead 06.05.2025 Каскадная модель разработки Waterfall — классический пример того, как благие намерения превращаются в организационный кошмар. Изначально созданная для упорядочивания хаоса и внесения предсказуемости. . . |
Оптимизация SQL запросов — Продвинутые техники
Codd 06.05.2025 Интересно наблюдать эволюцию подходов к оптимизации. Двадцать лет назад всё сводилось к нескольким простым правилам: «Избегайте SELECT *», «Используйте индексы», «Не джойните слишком много таблиц». . . . |
Создание микросервисов с gRPC и Protobuf в C++
bytestream 06.05.2025 Монолитные приложения, которые ещё недавно считались стандартом индустрии, уступают место микросервисной архитектуре — подходу, при котором система разбивается на небольшие автономные сервисы, каждый. . . |
|
Многопоточность и параллелизм в Python: потоки, процессы и гринлеты
py-thonny 06.05.2025 Параллелизм и конкурентность — две стороны многопоточной медали, которые постоянно путают даже бывалые разработчики. Конкурентность (concurrency) — это когда ваша программа умеет жонглировать. . . |
Распределенное обучение с TensorFlow и Python
AI_Generated 05.05.2025 В машинном обучении размер имеет значение. С ростом сложности моделей и объема данных одиночный процессор или даже мощная видеокарта уже не справляются с задачей обучения за разумное время. Когда. . . |
CRUD API на C# и GraphQL
stackOverflow 05.05.2025 В бэкенд-разработке постоянно возникают новые технологии, призванные решить актуальные проблемы и упростить жизнь программистам. Одной из таких технологий стал GraphQL — язык запросов для API,. . . |
Распознавание голоса и речи на C#
UnmanagedCoder 05.05.2025 Интеграция голосового управления в приложения на C# стала намного доступнее благодаря развитию специализированных библиотек и API. При этом многие разработчики до сих пор считают голосовое управление. . . |
Реализация своих итераторов в C++
NullReferenced 05.05.2025 Итераторы в C++ — это абстракция, которая связывает весь экосистему Стандартной Библиотеки Шаблонов (STL) в единое целое, позволяя алгоритмам работать с разнородными структурами данных без знания их. . . |
Наверх