
Skip to content
Formerly known as JBoss AS or simply JBoss, WildFly is a fantastic full-featured multiplaform open-source and free application server authored by Red Hat.
This quick tutorial will list the steps to install this AS on a Windows machine.
PREREQUISITE: Install the lastest Java Development Kit (JDK)
To be able to run the AS, you will need a compatible JDK (JDK 7 Update 75 or later), if possible the lastest available on the Oracle website.
- Go to this link and download the lastest JDK (e.g. jdk-8u91-windows-x64.exe).
- Change the installation directory to c:\Java\jdk{your-version} (e.g. jdk1.8.0_91)

This should be like:
- Create an environment variable JAVA_HOME for your system.
- On your keyboard, press windows+break
- Click on ‘Advanced System Configuration’
- Under ‘Environment variables’, add the variable JAVA_HOME with values ‘c:\Java\jdk{your-version}’
- And add it to the Path variable
- You will need to close any command windows that were open before executing a command with this path, since there is no way to reload environment variables from an active command prompt.
- To check if the path variable is correctly configured, type ‘javac -version’ in the prompt. This will give you the version of the java compiler you installed.


Installing WildFly 10
- Download the lastest stable version of the Enterprise Application Integration (EAI) server from the official website (Link). (E.g. wildfly-10.0.0.Final.zip)
- Extract the zip archive to C:\EAI. Your system will create a brand new folder named ‘wildfly-10.0.0.Final’ under C:\EAI.
- Execute the script ‘C:\EAI\wildfly-10.0.0.Final\bin\standalone.bat‘ to set up the bootstrap environment, check the installation and start the server.

- After that the server has been started, you should be able to access the web server at the address http://localhost:8080 and to access to the console at http://localhost:8080/console.


Configure WildFly server
Add a user to access to the console
To be able to access the admin console, you will need to add a new user by executing the script ‘add-user.bat’ located under your WildFly installation folder (e.g. c:\EAI\wildfly-10.0.0.Final).
- Execute the script ‘add-user.bat’ in a console window.
- Add a Management User by just typing ‘enter’ since this is the default option.
- Enter the details of the new user to add as described. (e.g. ‘admin’ and ‘1234’ for a local installation).
- Revisit the server console at localhost:9990/console and enter your credentials.
- Now, you should be able to see this

Download & Install WildFly Server on Windows
In this tutorial, you will learn how to Download and Install the WildFly Application server on the Windows operating system. The Wildfly Application server was formerly known as the JBOSS server. This post will install the server using the .zip archive package file.
Download WildFly
Navigate to Wildfly’s official website:
- https://www.wildfly.org/

Download the Wildfly server zip package. Click on the DOWNLOAD THE ZIP button.
Install Wildfly
Extract the contents of the zip file. Use the standard extract tool or the zip utility like 7zip.
Move the JBoss folder to a standard disk location. c:\jboss
Set JBOSS_HOME
Set JBOSS_HOME environment variable to point to the install folder of the server. You can add the $JBOSS_HOME/bin directory to the PATH variable. We can refer to other directories under the home using this variable relatively. For example, to point to the bin directory, we can use $JBOSS_HOME/bin
Steps to set the variable:
Verify the Install
Open the command prompt window.
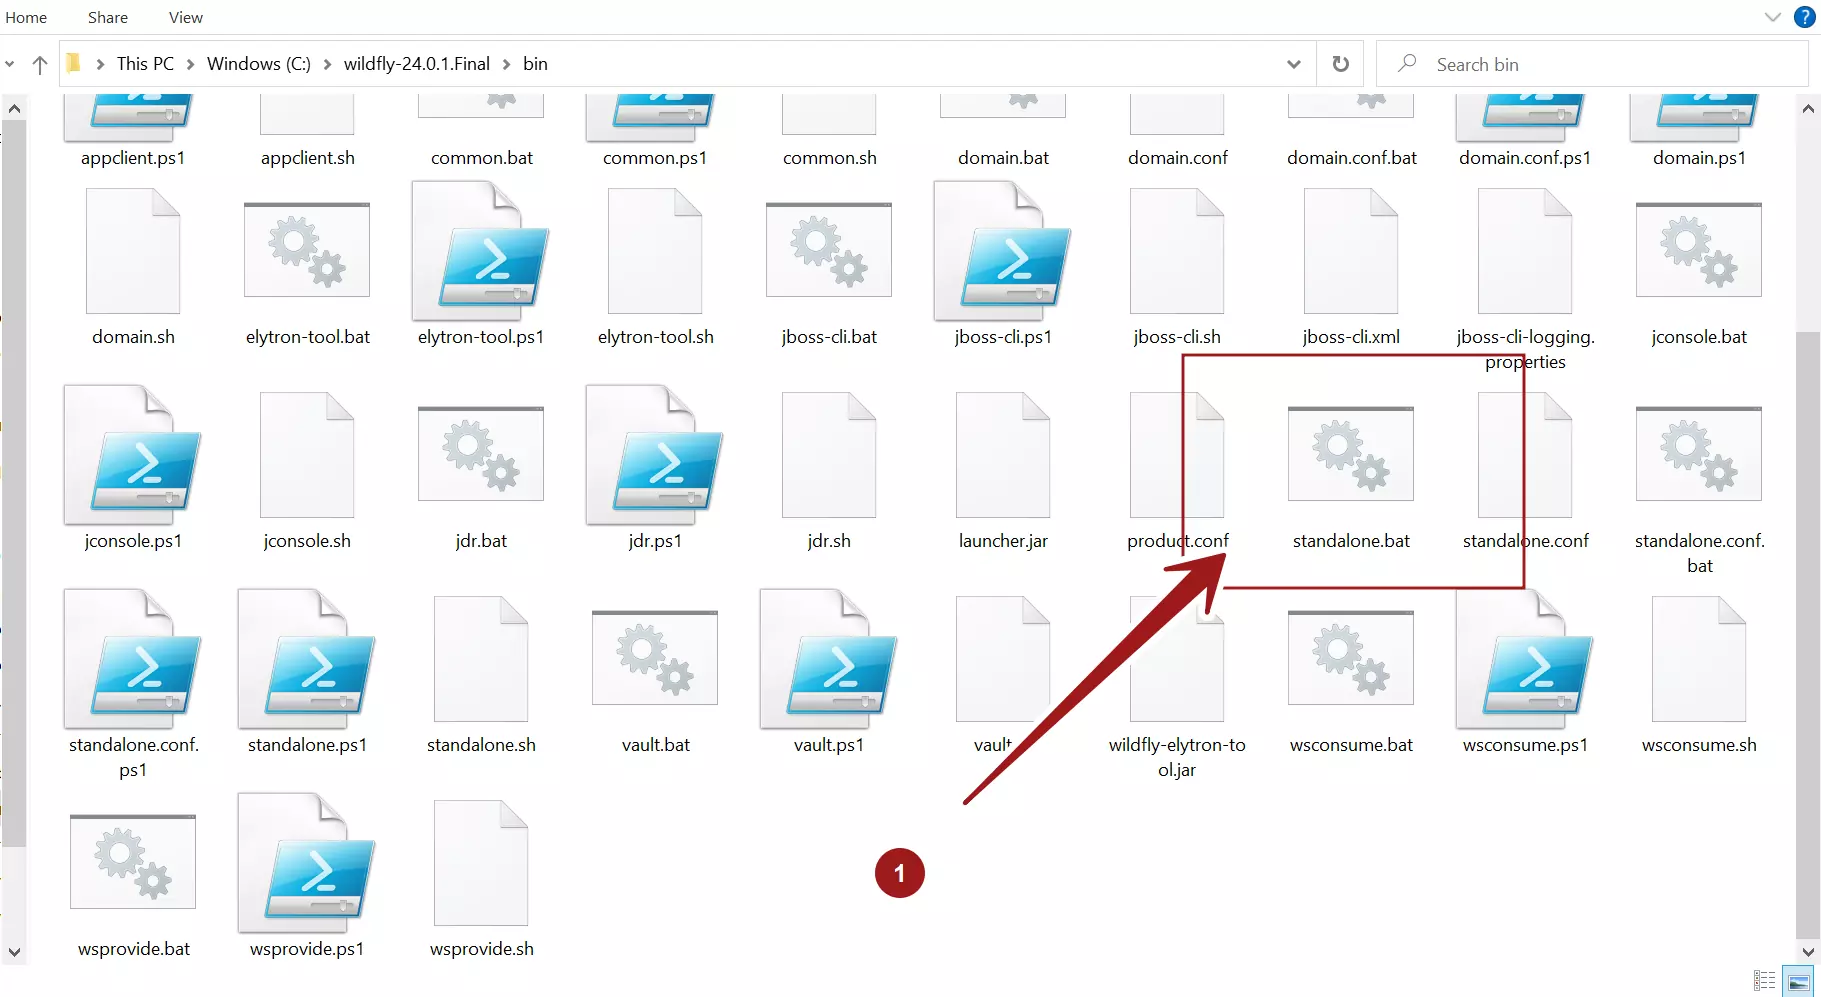
Change the directory to the bin directory.
Execute the standalone.bat script.
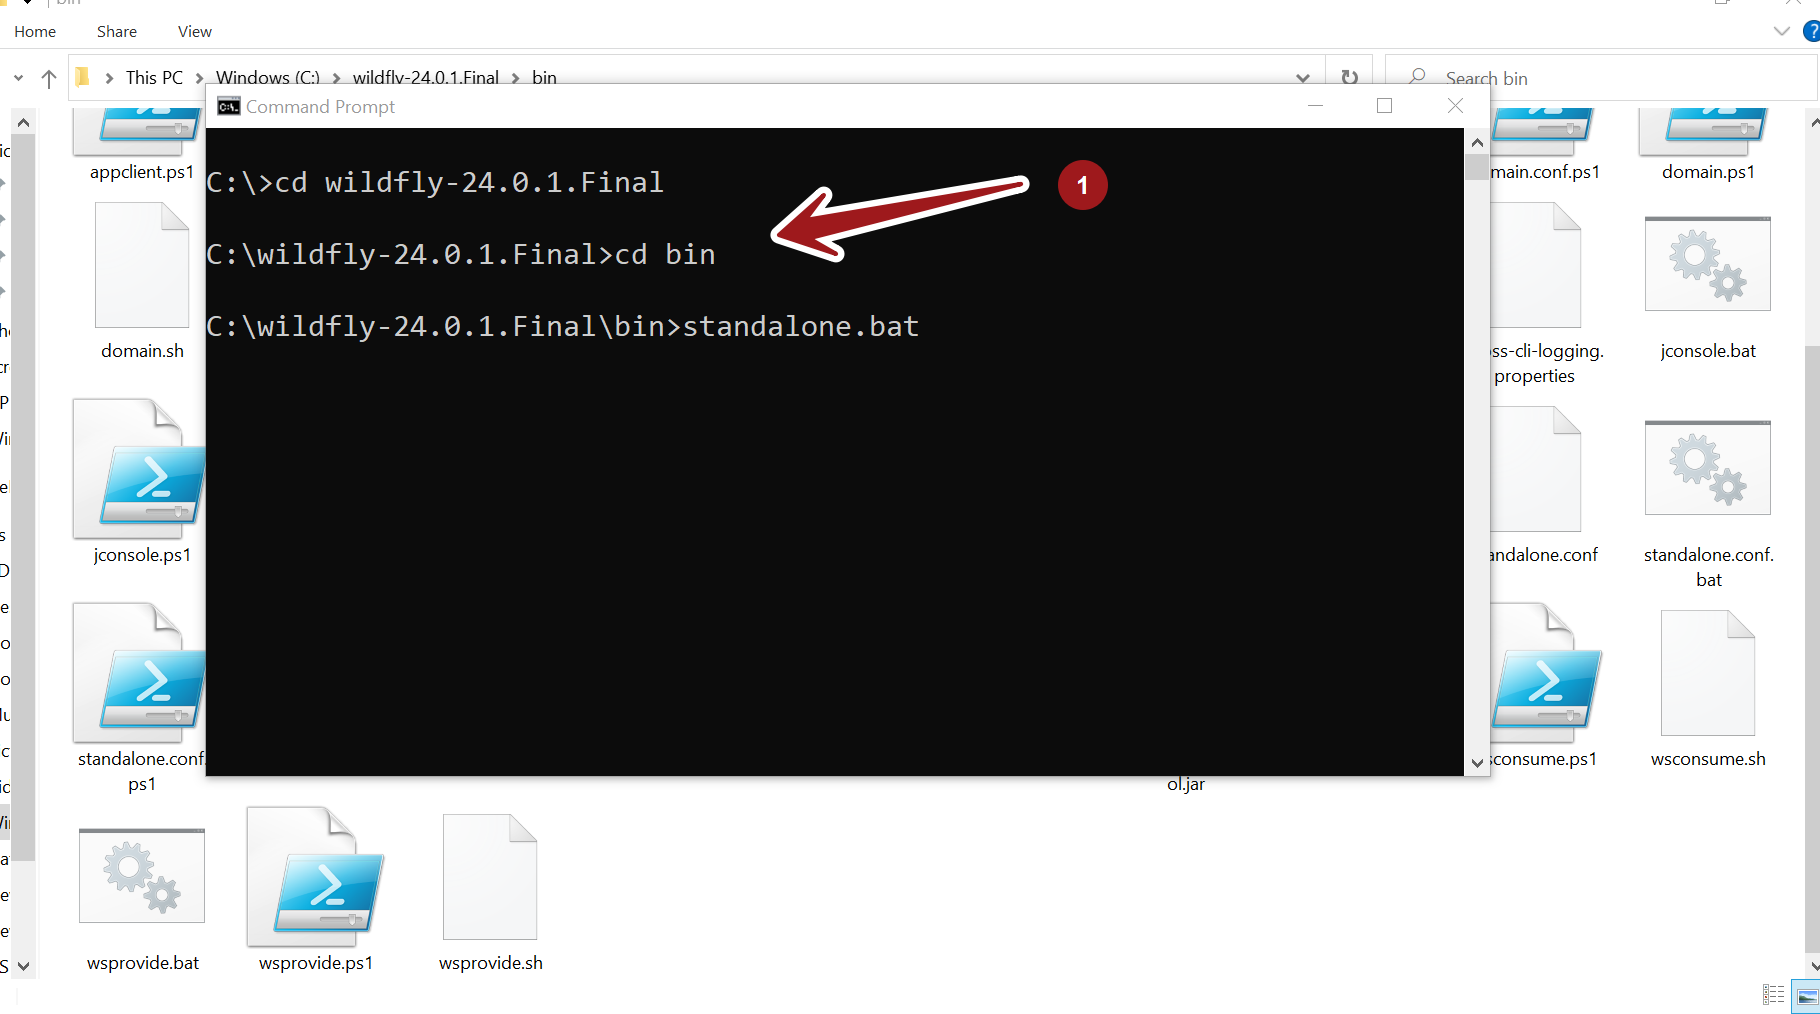
You should see the boot process of the server. Something similar to :
C:\wildfly-24.0.1.Final\bin>standalone.bat
Calling “C:\wildfly-24.0.1.Final\bin\standalone.conf.bat”
Setting JAVA property to “E:\jdk-14.0.1\bin\java”
===============================================================================
JBoss Bootstrap Environment
JBOSS_HOME: “C:\wildfly-24.0.1.Final”
JAVA: “E:\jdk-14.0.1\bin\java”
JAVA_OPTS: “-server -Dprogram.name=standalone.bat -Xms64M -Xmx512M -XX:MetaspaceSize=96M -XX:MaxMetaspaceSize=256m -Djava.net.preferIPv4Stack=true –
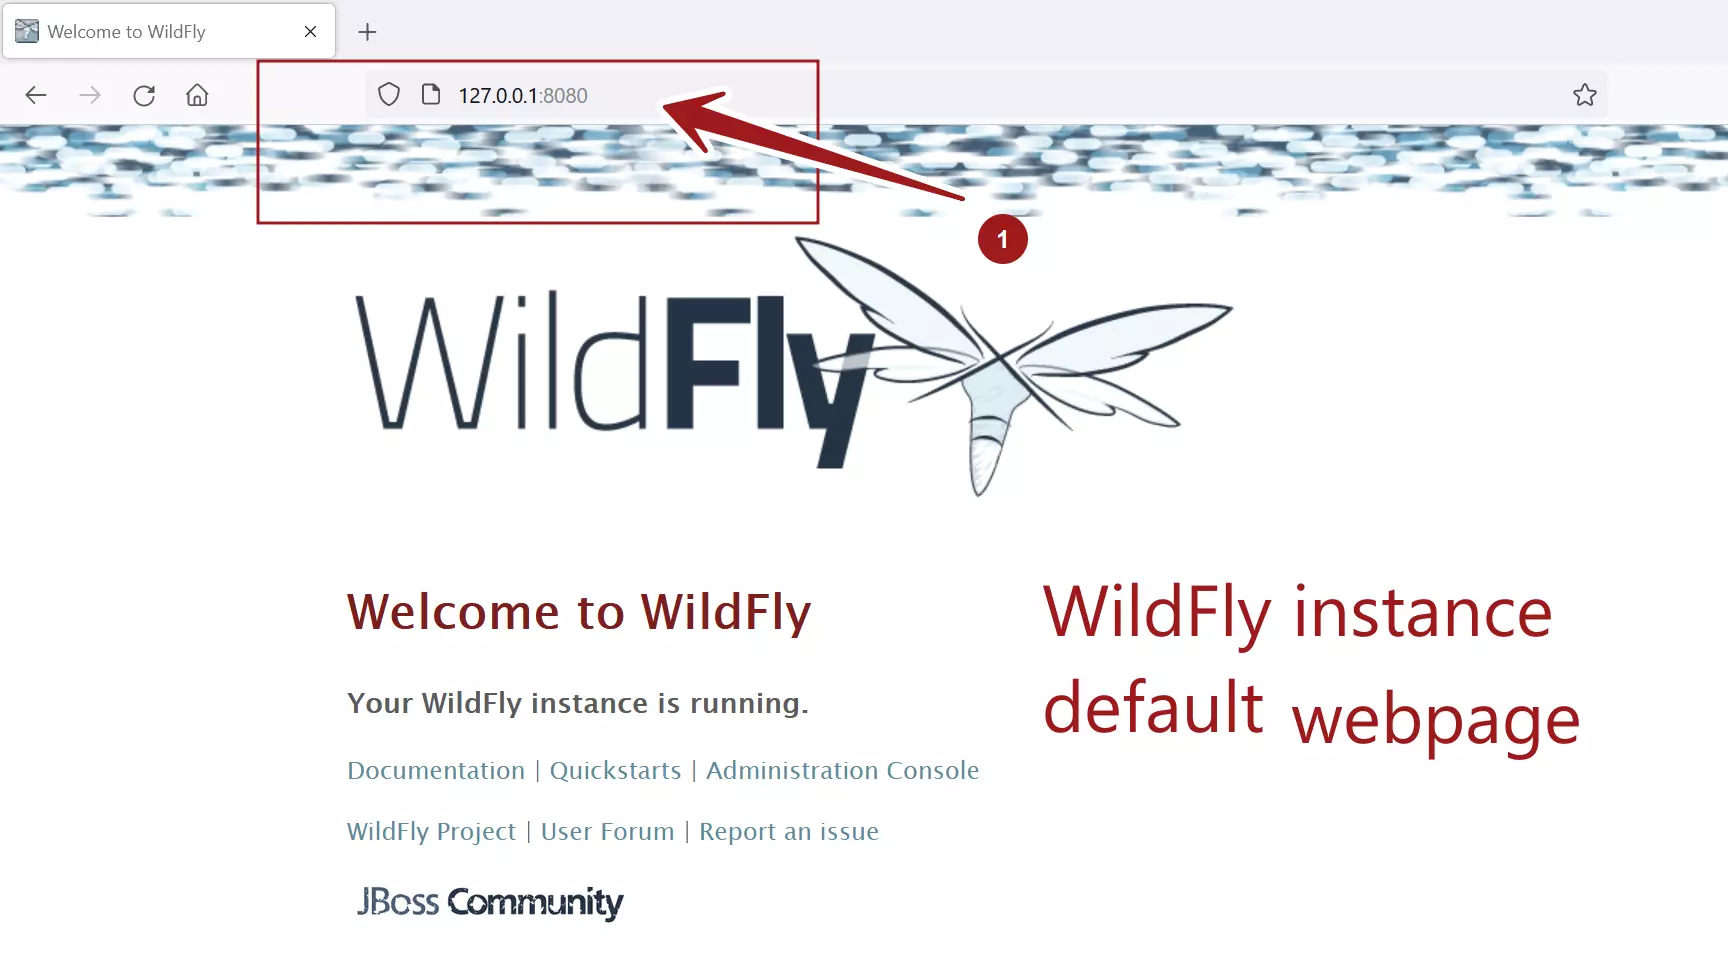
Verification
Open the browser and navigate to the default server URL:
http://127.0.0.1:8080 or
http://localhost:8080
The default Wildfly server page should be displayed in the browser.
That’s it. You have successfully installed the Wildfly server on the Windows platform.
Related
JBoss Install on Ubuntu Linux machine:
- https://www.testingdocs.com/install-jboss-application-server-on-linux/
JBoss EAP
Now Wildfly is also available as JBoss EAP ( Enterprise Application Platform). This is more secure version of the JBoss Application Server for Enterprise development and supported by Red Hat, Inc.
This tutorial covers how to install WildFly application server on Linux and Windows machines. First off, you need to download a JDK which is supported by WildFly. Then, we will download and unzip the application server.
Installing Java
Firstly, if you are not sure which JDK to download, check this article: Choosing the right JDK for WildFly and JBoss EAP 7 .
Next, Install the Production and Early-Access OpenJDK Builds for your OS from : https://jdk.java.net/
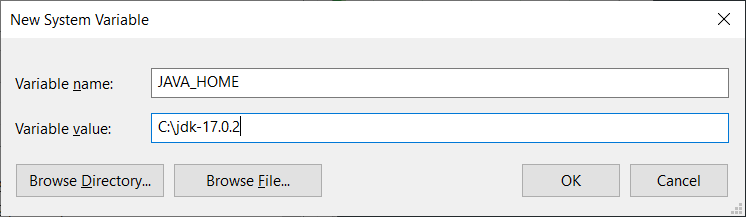
Environment variables settings
Once you have installed Java, set the JAVA_HOME and include in your PATH the bin folder of your Java installation.
Linux users:
Enter in your .profile / .bash_profile script the following (substitute with the actual JDK installation path):
#Set the JAVA_HOME
export JAVA_HOME=~/java/jdk/jdk-17.0.2
#Add the JAVA_HOME to the PATH
export PATH="$JAVA_HOME/bin:$PATH"
Make sure that the above variables come after any existing code that sets PATH.
Windows users:
- Open the Start menu and search for environment variables.
- Select the Edit the system environment variables result.
- In the System Properties window, under the Advanced tab, click Environment Variables…
- Select the Path environment variable and Edit to include the bin folder where java/javac is available:
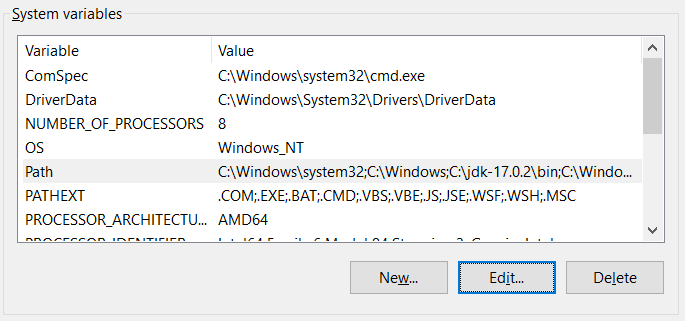
Finally, define a new environment variable JAVA_HOME which points to the root folder where you have installed Java:
Installing WildFly
Navigate to https://wildfly.org/downloads/ and download the zip file with the latest stable version of WildFly application server. Unzip the archive and move to the “bin” folder.
Alternatively, you can also download it from the command line with any tool such as curl. For example to download WildFly 27:
curl -L -O https://github.com/wildfly/wildfly/releases/download/27.0.1.Final/wildfly-27.0.1.Final.zip
Move to the folder “bin” which is under WildFly installation and start WildFly with:
$ ./standalone.sh
Windows user will start the application server with:
standalone.bat
The application server will start as you can see from the Console:
15:47:25,343 INFO  [org.wildfly.extension.undertow] (MSC service thread 1-4) WFLYUT0006: Undertow HTTPS listener https listening on 127.0.0.1:8443
15:47:25,432 INFO  [org.jboss.ws.common.management] (MSC service thread 1-3) JBWS022052: Starting JBossWS 5.3.0.Final (Apache CXF 3.3.3)
15:47:25,551 INFO  [org.jboss.as.server] (Controller Boot Thread) WFLYSRV0212: Resuming server
15:47:25,553 INFO  [org.jboss.as] (Controller Boot Thread) WFLYSRV0060: Http management interface listening on http://127.0.0.1:9990/management
15:47:25,553 INFO  [org.jboss.as] (Controller Boot Thread) WFLYSRV0051: Admin console listening on http://127.0.0.1:9990
15:47:25,553 INFO  [org.jboss.as] (Controller Boot Thread) WFLYSRV0025: WildFly Full 18.0.0.Final (WildFly Core 10.0.0.Final) started in 3120ms - Started 315 of 577 services (369 services are lazy, passive or on-demand)
You can check that it’s running, by reaching the home page at localhost:8080

Configuring WildFly as a service on Windows
Installing WildFly as a service for Linux machines is discussed in this tutorial: How to run WildFly as Service
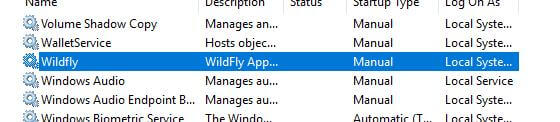
In order to install WildFly as service on Windows, you will need the following steps:
- Firstly, move to the folder “JBOSS_HOME\docs\contrib\scripts\”.
- Next, copy the service directory to JBOSS_HOME\bin
- Then, open an Admin Shell and navigate into the service folder
- Finally, run “service.bat install“

Next open windows Services, you should see Wildfly installed, you can now start it from here and set it to automatic:
Conclusion
By following the above steps, you will be able to successfully install WildFly and begin using it for their Java application needs.
Last Updated on 14/11/2020
This tutorial will show how to download and install Wildfly application server on both Windows and Ubuntu operational systems.
Pre-requisites
- Java Development Kit – click here to follow to tutorial.
Installation
Wildfly installation is pretty straightforward and very similar on Windows and Ubuntu, in short, the installation consists on download and unzip the server on a folder on your machine.
Windows
Go to Wildfly download page and download the file Java EE7 Full & Web Distribution on ZIP format. Unzip the downloaded .zip file in a directory of your choice.
Ubuntu
Similarly to Windows, go to Wildfly download page and download the Java EE7 Full & Web Distribution on TAR (tar.gz) format.
Go to the directory where you downloaded Wildfly, usually, it resides on /home/username/Downloads. Unzip the downloaded file:
cd /home/bruno/Downloads
sudo tar -xvf wildfly-10.1.0.Final.tar.gz
Move the unziped folder to /opt:
sudo mv wildfly-10.1.0.Final /opt
Now we need to grant permissions to another applications to access files from the folder where we installed Wildfly. The simpler way of doing that, is by the command below (not recommended on production environments for security reasons).
sudo chmod 777 -R /opt/wildfly-10.1.0.Final/
That’s all.
I hope it helps. Cya!
We use cookies on our website to give you the most relevant experience by remembering your preferences and repeat visits. By clicking “Accept”, you consent to the use of ALL the cookies.
© 2020 The original authors.
Zipped distribution,
Galleon provisioning or bootable JAR, this guide helps you identify the
installation strategy that best fits your application requirements.
1. WildFly or WildFly Preview
The WildFly project now produces two appserver variants, standard WildFly and WildFly Preview,
so you’ll want to decide which is right for you. For most users the standard WildFly variant is the right choice,
but if you’d like a technical preview look at what’s coming in the future, try out WildFly Preview.
2. Installing WildFly from a zipped distribution
Downloading the WildFly release zip and unzipping it is the traditional way to install
a complete WildFly server with support for both standalone and managed domain operating modes. A WildFly distribution
contains a large number of default configurations allowing you to select the server features and operating modes.
A WildFly distribution based installation is well suited when:
-
You want to rely on a traditional Jakarta EE application deployment.
-
You want a Jakarta EE or MicroProfile platform compliant server that offers all Jakarta EE or MicroProfile features.
-
You are not (yet) concerned by server installation size and memory footprint.
-
You are not yet sure of the kind of operating mode and application you are targeting.
-
Your server instances will contain one or more application deployments.
If that is the kind of installation you are aiming at, the guides that you should read next are:
-
The Getting Started Guide shows you
how to install, start and configure the server. -
The Getting
Started Developing Applications Guide shows you how to build Jakarta EE
applications and deploy them to WildFly.
3. Installing WildFly with Galleon
Galleon provisioning tooling allows you to construct a customized WildFly installation according to your application needs.
Some applications don’t need a fully featured server supporting all operating modes and containing all Jakarta EE capabilities.
Galleon tooling allows you to select the server capabilities you want to see installed.
A WildFly server provisioned with Galleon is well suited when:
-
You want to rely on a traditional Jakarta EE application deployment.
-
You want to easily update an installation to the latest WildFly version.
-
Your application requires only a subset of the Jakarta EE or MicroProfile platform APIs
(although Galleon can provision a server that supports the full set of Jakarta EE and MicroProfile platform APIs). -
You are concerned by server installation size and memory footprint.
-
You are only using standalone operating mode (with support for High Availability or not).
-
Your server instances will contain one or more application deployments.
If that is the kind of installation you are aiming at, the guides that you should read next are:
-
The Galleon Provisioning Guide shows you how to
provision customized WildFly server using Galleon. -
The Getting
Started Developing Applications Guide shows you how to build Jakarta EE
applications and deploy them to WildFly.
4. WildFly Bootable JAR
A bootable JAR contains both a customized WildFly server and your deployment. Such a JAR can
then run with a simple java command such as java -jar myapp-bootable.jar
A bootable JAR is built using Maven. You need to integrate the
bootable JAR Maven plugin
in the Maven project of your application.
A Bootable JAR is well suited when:
-
You want to leverage your existing WildFly applications.
-
You want to build a microservice composed of a server and a single application deployment.
-
You are concerned by JAR size and memory footprint.
-
You are only using standalone operating mode (with support for High Availability or not).
-
You are building your application using Maven.
If that is the kind of installation you are aiming at, the guide that you should read next is:
-
The Bootable JAR Guide shows you how to package your application and the WildFly server
into a bootable JAR.