
- Печать
Страницы: [1] 2 Все Вниз
Тема: Установка Ubuntu рядом с Windows 10 GPT/BIOS (Прочитано 15542 раз)
0 Пользователей и 1 Гость просматривают эту тему.
AngryAgain
Здравствуйте!
Такая проблема, которую уже отчаялся решить.
У меня ноутбук Lenovo z570 с установленной 10ой Виндой. Диск размечен как GPT, системное ПО BIOS (не UEFI !)
Соответственно Windows создала себе раздел EFI System, куда поместила Windows Boot Manager.
ubuntu@ubuntu:~$ sudo fdisk -l
Disklabel type: gpt
Disk identifier: D1CB061A-38BF-48CE-BD0D-67E9E1DC0AB2
Device         Start       End   Sectors   Size Type
/dev/sda1       2048    923647    921600   450M Windows recovery environment
/dev/sda2     923648   1128447    204800   100M EFI System
/dev/sda3    1128448   1161215     32768    16M Microsoft reserved
/dev/sda4    1161216 209717247 208556032  99.5G Microsoft basic data
/dev/sda5  209717248 945315839 735598592 350.8G Microsoft basic data
/dev/sda6  945315840 945326079     10240     5M BIOS boot
/dev/sda7  945326080 976773134  31447055    15G Linux filesystem
Вопрос: как правильно поставить Ubuntu и заставить запускаться GRUB ? Сейчас Ubuntu устанавливается, но запускается Windows Boot Manager и он её, естественно, не видит.
Сама Ubuntu «не видит» при установке уже установленную Win10.
Пробовал создать Bios Boot Partition, устанавливать grub в /dev/sda, устанавливать grub в /dev/sda2, ставил grub-efi, запускал boot-repair, который ругался на то, что запущен не в EFI режиме (что объяснимо, у меня BIOS, еклмн )
efibootmgr при этом говорит
efibootmgr: EFI variables are not supported on this system.
В общем, темный лес, что с этим делать…
Есть идеи?
wajnon
AngryAgain,
/dev/sda7 945326080 976773134 31447055 15G Linux filesystem
это что?
vasyl
AngryAgain,
/dev/sda2 923648 1128447 204800 100M EFI System
у меня BIOS
че-то тут не сходится…
Ubuntu Mate 16.04 + Windows 10
Sly_tom_cat
А какого года девайс что он голый BIOS без поддержки UEFI?
По мне так нужно просто загрузится с LiveUSB в uefi режиме — очень многие якобы БИОСы это умеют делать несмотря на то что никогда не сознаются что они UEFI.
zaskock
Правильные ответы начинаются с правильных вопросов.
AngryAgain
AngryAgain,
/dev/sda7 945326080 976773134 31447055 15G Linux filesystem
это что?
Это Ubuntu / раздел, swap не делал, /boot отдельно тоже не разметил.
А какого года девайс что он голый BIOS без поддержки UEFI?
По мне так нужно просто загрузится с LiveUSB в uefi режиме — очень многие якобы БИОСы это умеют делать несмотря на то что никогда не сознаются что они UEFI.
купил в 12ом году. Тоже вчера посещали такие мысли. Но я сталкивался с другими более свежими ноутами Lenovo, там понятно, что это UEFI и соответствующие режимы есть. У меня лишь только выбор приоритета загрузки, да режим работы HDD Compatible или AHCI…
Пользователь решил продолжить мысль [time]02 Ноябрь 2015, 17:57:48[/time]:
А не может быть, что в MBR прописана ссылка на EFI раздел (в каком либо виде)? С другой стороны в BIOS’e Windows Boot Manager определен как устройство для загрузки.
Еще вопрос для общего развития: evivars доступны, если грузишься в EFI режиме?
« Последнее редактирование: 02 Ноября 2015, 16:58:19 от AngryAgain »
zaskock
AngryAgain,
А на быструю клавишу F12 при включении не пробовали нажимать и выбрать загрузку с UEFI/USB?
Правильные ответы начинаются с правильных вопросов.
Дюшик
AngryAgain,
У вас скорей всего BIOS c поддержкой UEFI. Выглядит как обычный BIOS, в разделе Boot (если правильно помню) есть параметр UEFI BOOT. Он может быть или включен (тогда системы устанавливаются в UEFI режиме, как у вас) или выключен. Больше никаких «признаков» UEFI в BIOS нет.
AngryAgain
вчера исшарил весь BIOS, ничего похожего нет. Форумы леново тоже молчат по поводу UEFI, в модели z580, вроде как, есть в биосе какое-то упоминание uefi, но у меня нет.
Можно как-нибудь средствами убунты продиагностировать, что находиться в MBR, и есть ли вообще MBR?
Папандопуло
аппарат запускался в оборот (ИМХО) c 7-ой виндой, так что UEFI искать смысла нет.
А 10-ке пофиг если EFI, иль нет.
у меня 10-ка грузится и так и сяк, а вот семерке подавай режим LEGACY — нету у нее «парольки».
UBUNTе подавай UEFI — она в этом режиме и ставилась.
Весь этот зоопарк на GPT.
« Последнее редактирование: 03 Ноября 2015, 17:31:02 от Папандопуло »
Дюшик
Можно как-нибудь средствами убунты продиагностировать, что находиться в MBR, и есть ли вообще MBR?
У вас диск с разметкой GPT, там нет MBR. По всем признакам в BIOS есть поддержка UEFI и десятка установлена в UEFI режиме.
Ubuntu устанавливаете х64? Если ставите с флешки, то флешка подготовлена как UEFI загрузочная? Какую Ubuntu устанавливаете, если 15.хх, то у них бывают подобные проблемы с установкой в UEFI режиме.
AngryAgain
Ubuntu x64, пробовал ставить 14.10 и 15.04.
Гружусь с флешки. Флешка записана средствами винды через WinSetupFromUSB.
флешка подготовлена как UEFI загрузочная
Здесь можно поподробнее? Как это сделать? И в чем отличие от загрузочной флешки Grub4Dos например?
zaskock
AngryAgain,
Вот что вам надо https://rufus.akeo.ie/
и с помощью этой программки создать загрузочную UEFI флешку.
Правильные ответы начинаются с правильных вопросов.
Toivo80
Ubuntu x64, пробовал ставить 14.10 и 15.04.
Гружусь с флешки. Флешка записана средствами винды через WinSetupFromUSB.флешка подготовлена как UEFI загрузочная
Здесь можно поподробнее? Как это сделать? И в чем отличие от загрузочной флешки Grub4Dos например?
ISO ubuntu поставляется с загрузчиком uefi — это видно при загрузке GRUB со стандартным меню в рамочке, и с загрузчиком legacy. В этом случае при загрузке появляется рабочий стол и окно «try-install».
victor00000
- Печать
Страницы: [1] 2 Все Вверх

Dual booting Linux with Windows is one of the most convenient ways of enjoying the two operating systems on the same computer.
You have both OS installed on the disk, on real hardware and when you power on your system, you can choose which operating system to use.
In an earlier tutorial, I showed the steps to dual boot Ubuntu with Windows 7 which comes with an MBR partition. The steps are almost the same for the newer systems that come preinstalled with Windows 10.
In this tutorial, I’ll show you how to install Ubuntu with Windows 10 already installed on the system.
💡
Before you start following the tutorial, I advise reading it entirely first. See what you need and what you should do in this tutorial. Once you have a good idea about the procedure and have all the necessary things on hand, start the process. Dual-boot is not a complicated process. It just takes some time and patience.
The steps mentioned here apply to other Ubuntu versions such as Lubuntu, Kubuntu, Xubuntu and Ubuntu-based Linux distributions such as Linux Mint, elementary OS, etc.
Compatibility checks
This tutorial is suitable for systems that come with Windows 10 pre-installed with UEFI secure boot and GPT partitioning system. Please check whether your system uses GPT or MBR.
Make sure your system uses UEFI: This tutorial is only applicable for systems with UEFI boot. If you have bought your system in the last 5-6 years, chances are that you should already have a UEFI system on GPT partition. However, there is no harm in verifying that your system uses UEFI. If your system uses legacy BIOS with MBR partitioning system, please follow this dual boot tutorial.
Bitlocker encryption process is different: Newer systems with Windows 10 Pro have their disk encrypted with Bitlocker. If you have such a system, please follow this tutorial to dual boot with Bitclocker encryption.
Dual Booting Ubuntu With Windows 10 Pro With BitLocker Encryption
I have written about dual booting Windows and Ubuntu in the past. The process has improved so much in the last few years. Ubuntu and other Linux play very well with secure boot and UEFI now. So, why I am I writing about installing Ubuntu with Windows 10 once again?
It’s FOSSAbhishek Prakash
System with both SSD and HDD: If you have a system with both SSD and HDD, i.e. dual disk system, the process is pretty much the same. However, you’ll be a lot better following this dedicated tutorial on dual booting dual disk system.
Dual Booting Ubuntu and Windows With a SSD and a HDD
Dual booting Ubuntu and Windows is not that complicated and I have covered it in detailed tutorial in the past. Recently, I also wrote about dual booting on a Bitlocker encrypted Windows system. And yet here I am talking about it again. Why? Because the scenario is slightly different and
It’s FOSSAbhishek Prakash

Prerequisites: What do you need?
You’ll need the following things to easily and safely install Linux alongside Windows:
- A computer that comes preinstalled with Windows 10.
- A USB key (pen drive or USB drive) of at least 4 GB in size and no data on it.
- Internet connection (for downloading Ubuntu ISO image and live USB creating tool). You can do this on any system, not necessarily on the system you are dual booting.
- Optional: External USB disk for making back up of your existing data.
- Optional: Windows recovery or bootable disk (if you encounter any major boot issues, it could be fixed).
Let’s see the steps of installing Ubuntu alongside Windows 10. I have made a video of the entire process. You may watch that as well.
Step 1: Make a backup of your Windows system [optional]
It is always nice to have a backup of your data, just in case you mess up with the system while dealing with disk partitions.
I advise copying all the essential data you cannot afford to lose on an external USB disk. You can use an external HDD (slower but cheaper) or SSD (faster but expensive) and copy the important files and folders.
Step 2: Download Ubuntu (or whichever Linux distribution you are using)
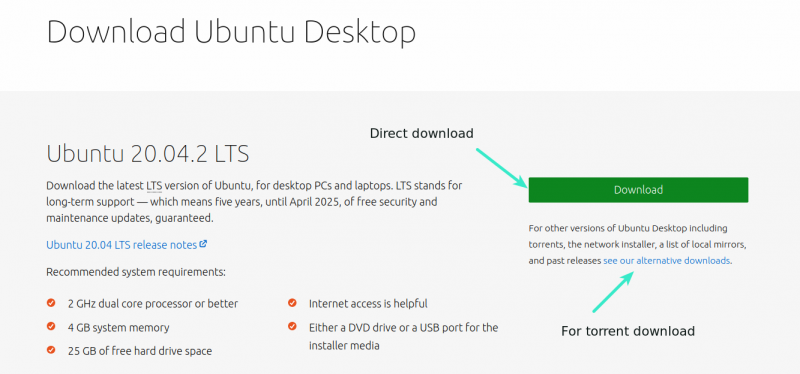
Head over to Ubuntu’s website and download the ISO file. The file should be around 2.5 GB in size. If you need to download Ubuntu via torrents, you can click the ‘alternative downloads.’
Step 3: Create a live USB/disk of Ubuntu
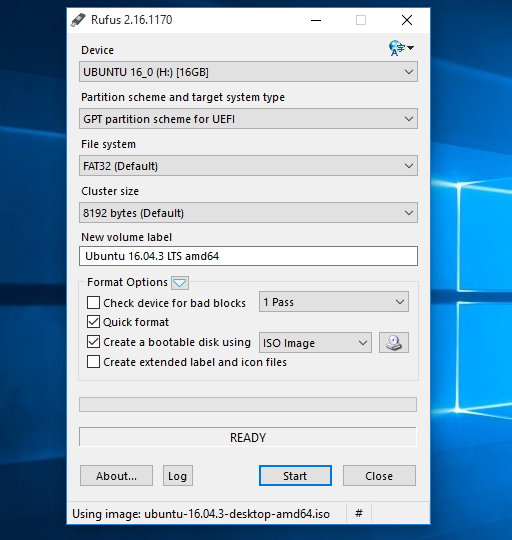
I presume that you are using Windows to create the live USB. Several free applications allow you to create a live Ubuntu USB. You can use any of these tools. Since I cannot show all of them, I’ll go with Rufus.
Download Rufus for free from its website. It will download a .exe file.
Plug in your USB. This device will be formatted so make sure you don’t have any important data on this USB disk.
Run the Rufus tool you just downloaded. It automatically identifies the plugged-in USB but double-check it anyway. Now, browse to the location of the downloaded ISO image and ensure that it uses GPT partitioning scheme and UEFI target system.
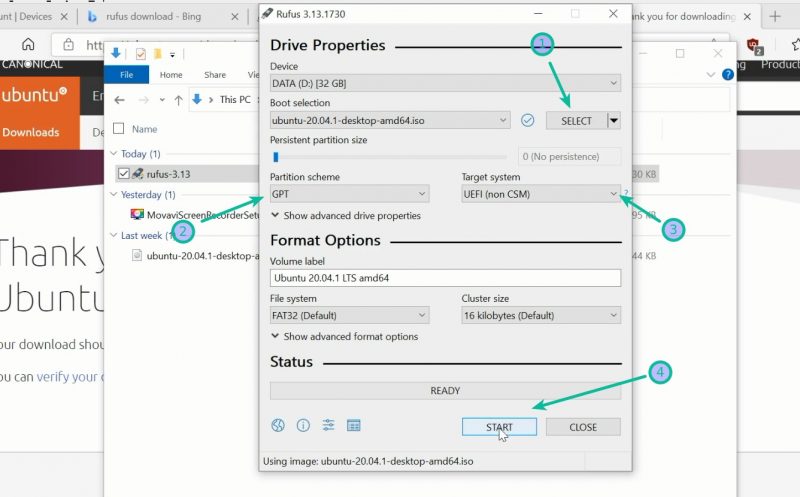
Hit the start button and wait for the process to complete. Your live Linux USB is ready.
📋
Installing Ubuntu and creating the live Ubuntu USB process can be done on any computer. But the rest of the process takes on the system on which you are dual booting.
Step 4: Make some free space on your disk for Ubuntu installation
In many systems, while installing Ubuntu, it gives the option to make a disk partition for Ubuntu. However, that is not a surety. This is why making the required free space on the disk would be better before starting the installation procedure.
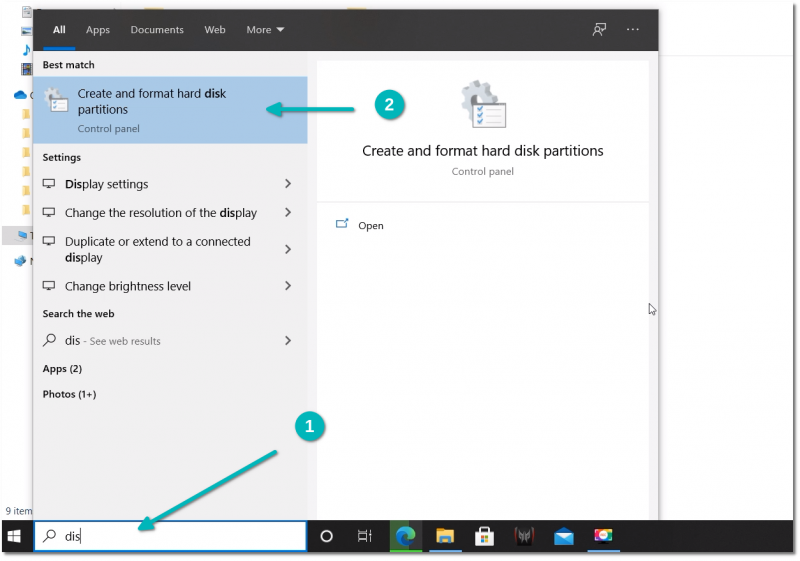
In the Windows menu, search for ‘disk partitions’ and go to ‘Create and format hard disk partitions.’
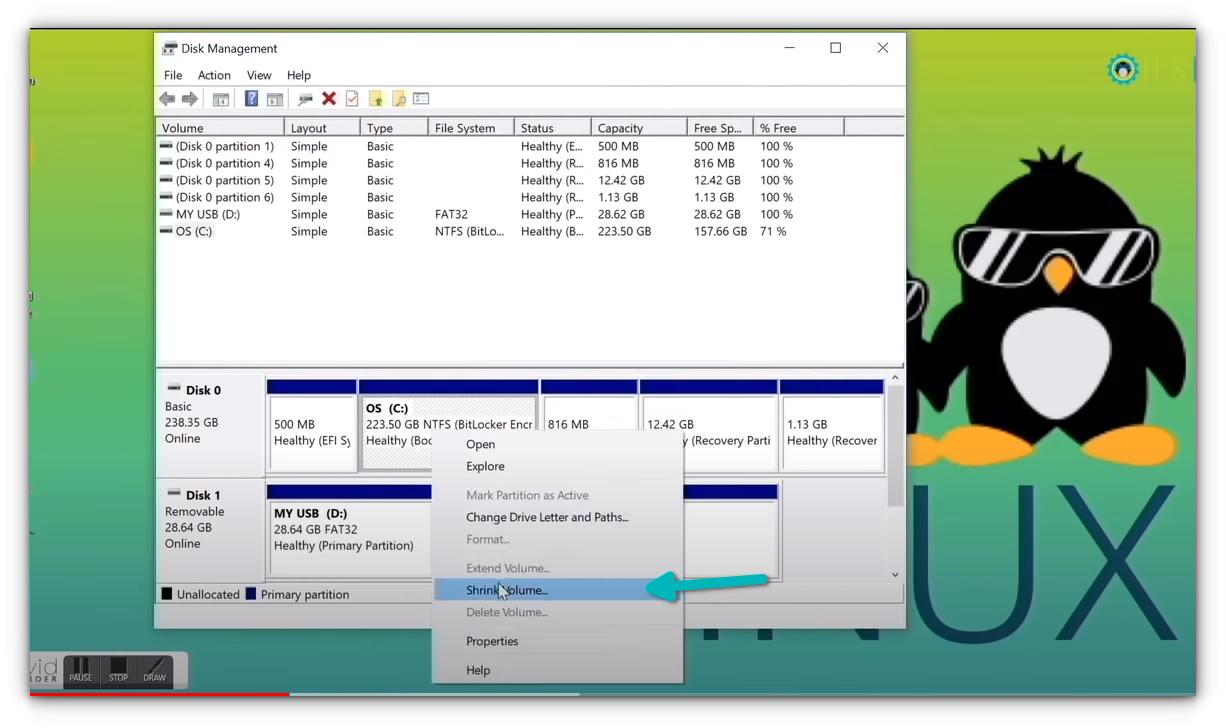
In the Disk Management tool, right-click on the drive which you want to partition and select shrink volume.
If you have just one partition like this, you need to make some free space out of it for Linux. Use any of them except C drive if you have several partitions of considerable size because it may erase the data.
The 256 GB in my system already had several partitions from the manufacturer but mainly for backup and other purposes. The primary partition was the C drive, around 220 GB, where Windows 10 is installed. In my case, I shrank the C drive to make some free space for Linux installation.
How much space do you need for Linux in dual boot?
This depends on how much total disk space you have. You may install Ubuntu on 15 or 20 GB but you’ll soon start running out of disk space. These days, you should have at least 120 GB of disk. In that case, go for 30-40 GB of disk for Linux. If you have 250 GB disk, allocate 60-80 GB or even more. If you have more disk space, allocate even more free space, if you want.
What if you have D, E or F drives?
This is a common confusion for many people as they think Ubuntu can only be installed on the C drive. That’s not true. I had only one C drive, so I shrank it. If you have D, E or F drive, you may shrink one of those drives. You may also choose to delete the D, E or F drive. NEVER DELETE C DRIVE.
Step 5: Boot from live Ubuntu USB
You created a live Ubuntu USB in step 3. Plug it into the system. Before you go and boot from the live USB, let’s have a quick word about the infamous secure boot.
Do I need to disable the secure boot for installing Linux?
6-8 years back, the UEFI secure boot was not well-supported by Linux; hence, you had to disable secure boot before installing Linux. Thankfully, Ubuntu and many other Linux distributions currently support secure boot very well. Usually, you should not need to do anything about it. However, if your system doesn’t allow booting from live USB or if you see any other related issue, you may disable the secure boot on Windows.
Alright! Let’s see how to boot from the USB. You can go to the boot settings by pressing F2/F10 or F12 at the system start time and selecting to boot from the USB. However, some people find it difficult.
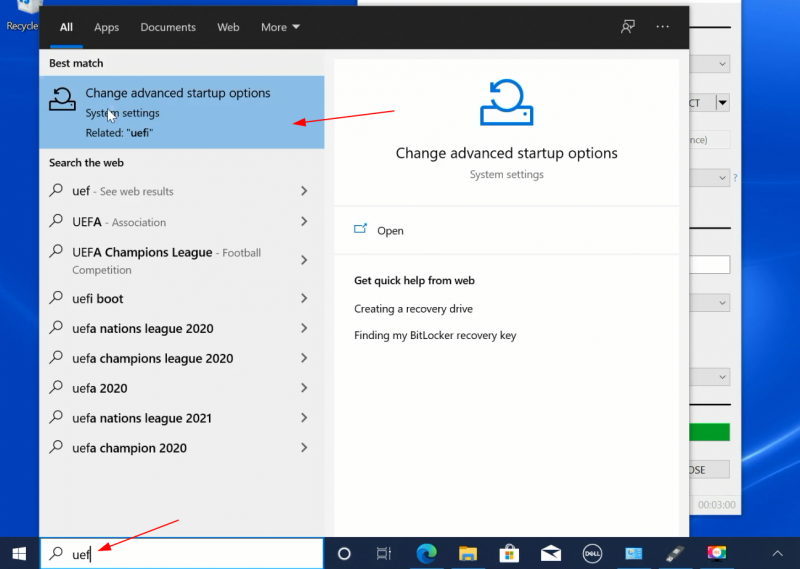
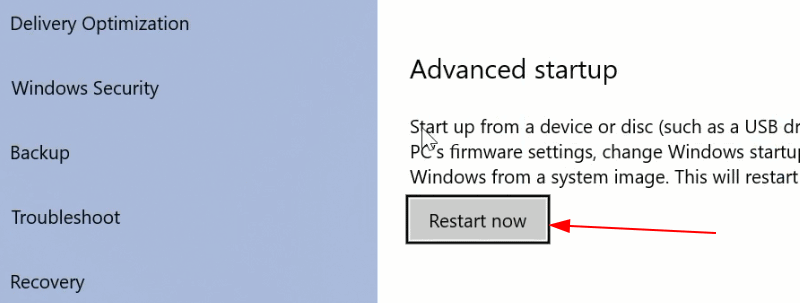
The longer but an easier step is to access the UEFI boot settings from within Windows. In the Windows menu, search for UEFI and then click on ‘Change advanced startup options’:
Go to the Advanced startup option and click on Restart now button.
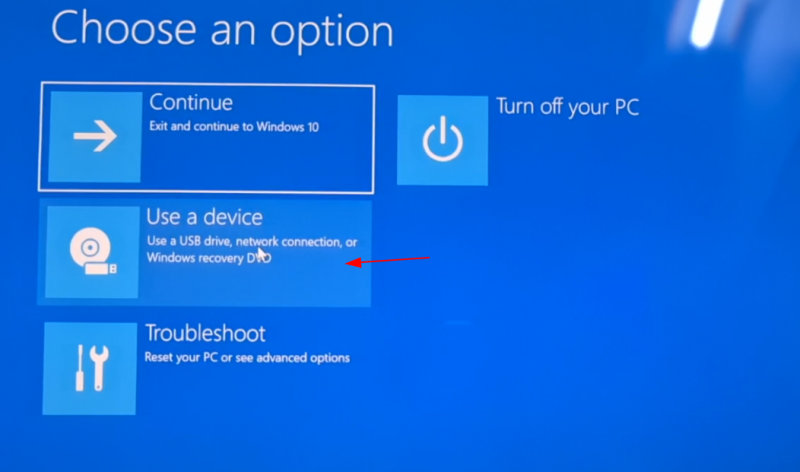
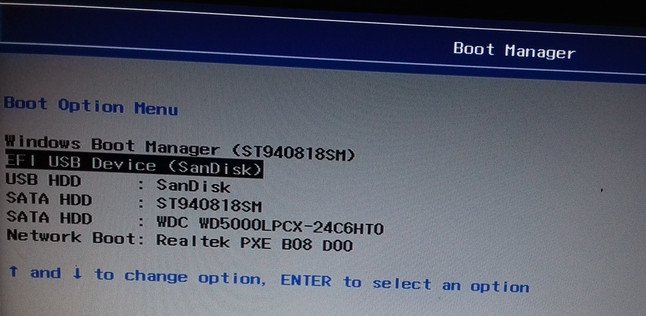
On the next screen, click on ‘Use a device’:
Recognize the USB disk with its name and size. It may also be displayed as EFI USB Device.
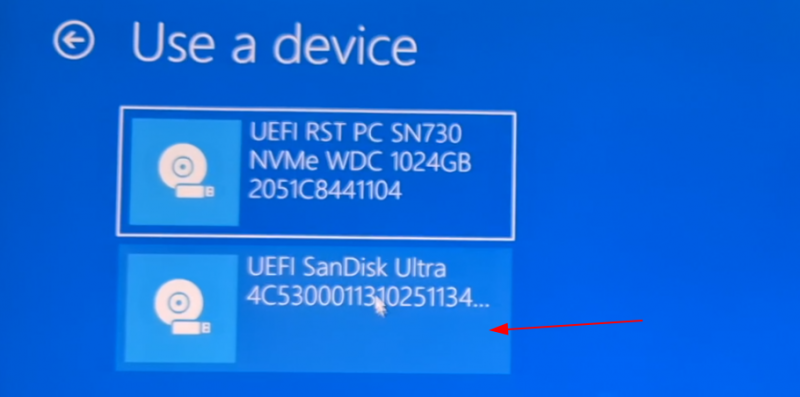
Now it will power off your system and reboot into the disk you chose which should be the live USB disk. You should see a screen like this after a few seconds:
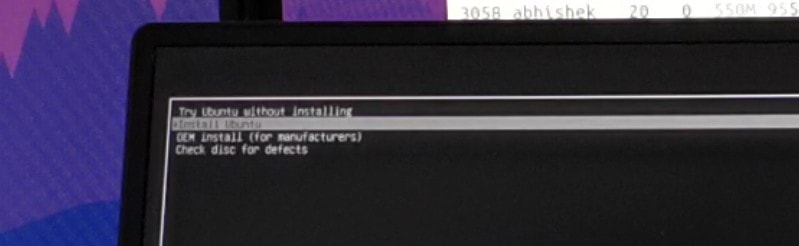
The ‘Try Ubuntu without installing’ option allows you to experience Ubuntu from the live disk. The option to install Ubuntu can be found on the desktop.
The “Install Ubuntu” option will start the Ubuntu installation immediately.
You can opt for either option based on your preference.
Step 6: Installing Ubuntu along with Windows 10
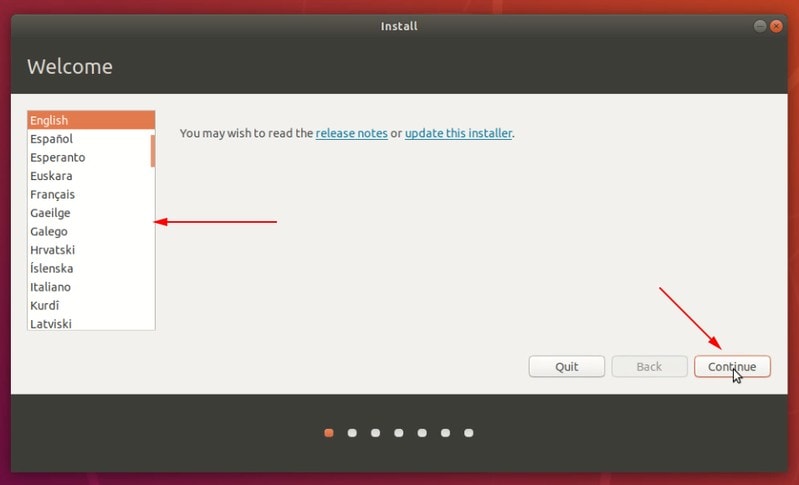
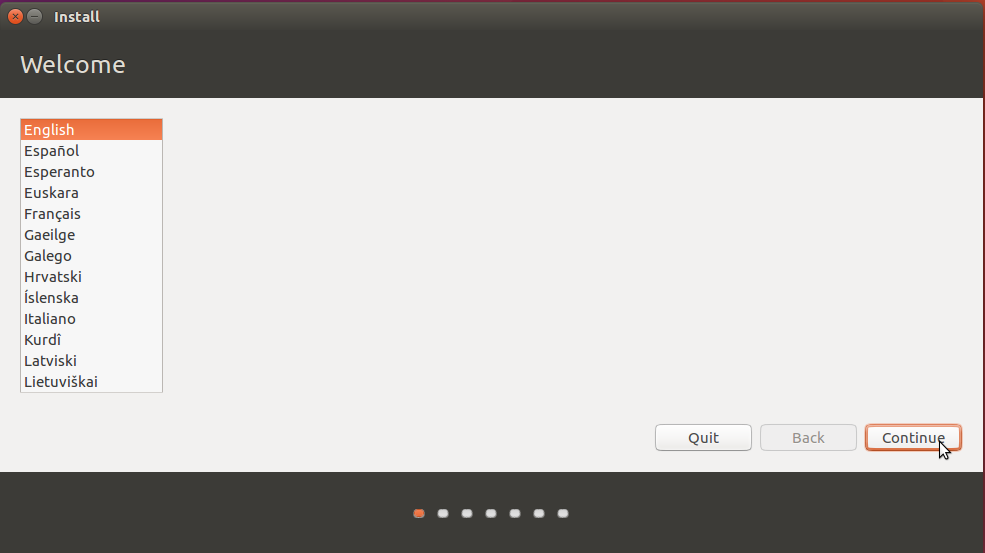
Start the installation procedure. The first few steps are simple. You choose the language and keyboard layout.
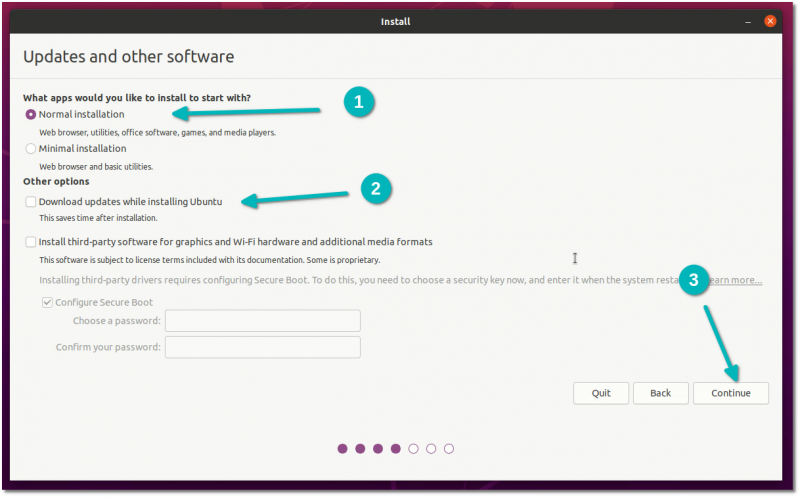
On the next screen, choose Normal installation. No need to download updates or install third-party software just yet. You may do it after the installation completes.
Hit continue. It may take some time to go to the next step.
Note: Some people try to download updates and install media codes while installing. In my experience, it sometimes creates issues during installation and may also cause the installation to fail. For this reason, I advise against them.
Important: Installation takes two approaches based on what you see on the next screen
Since this is a detailed tutorial, I’ll cover both aspects.
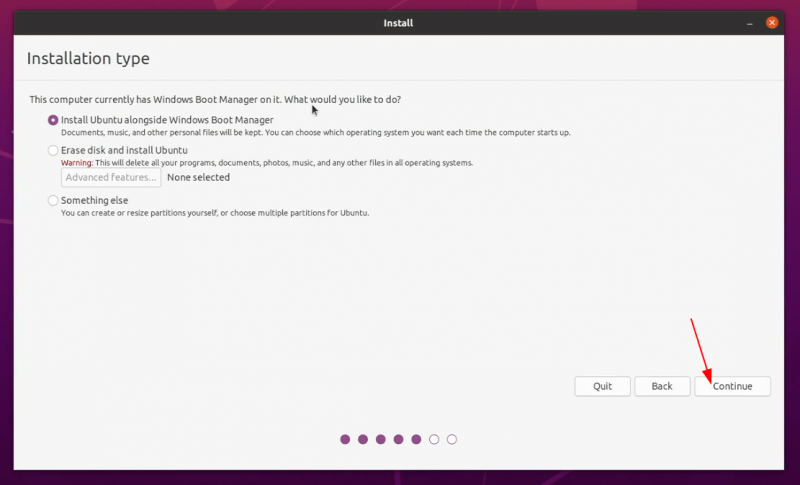
Approach 1: You see the “Install Ubuntu alongside Windows Boot Manager”
If you see the “Install Ubuntu alongside Windows Boot Manager” on the Installation type screen, you are in luck. You can select this method and hit continue.
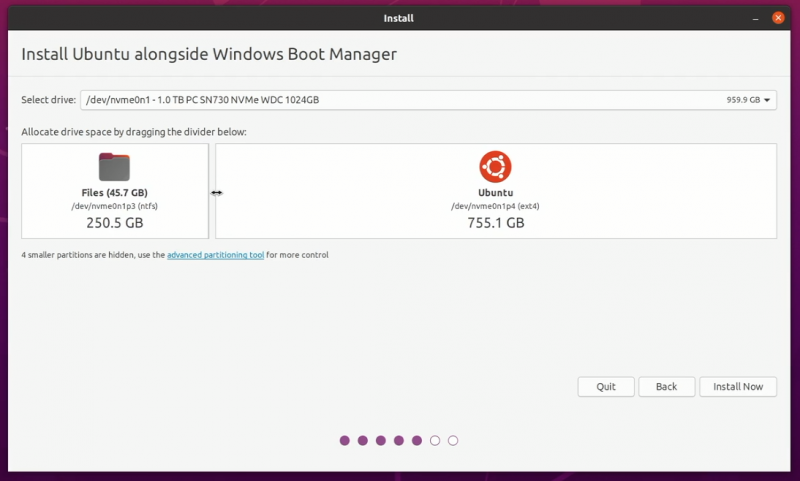
The next screen will give you the option to create a partition for Ubuntu by dragging the divider. You can allocate appropriate disk space to Linux here. Ubuntu will create one partition of the allocated disk space and it will have root with home and a swapfile of 2 GB in size under root itself.
Approach 2: You don’t see ‘Install Ubuntu alongside Windows Boot Manager’ option or it is greyed out
But if you are one of the unlucky ones who don’t see this option, no need to worry. Things are not that bad for you. You can still install Ubuntu with Windows.
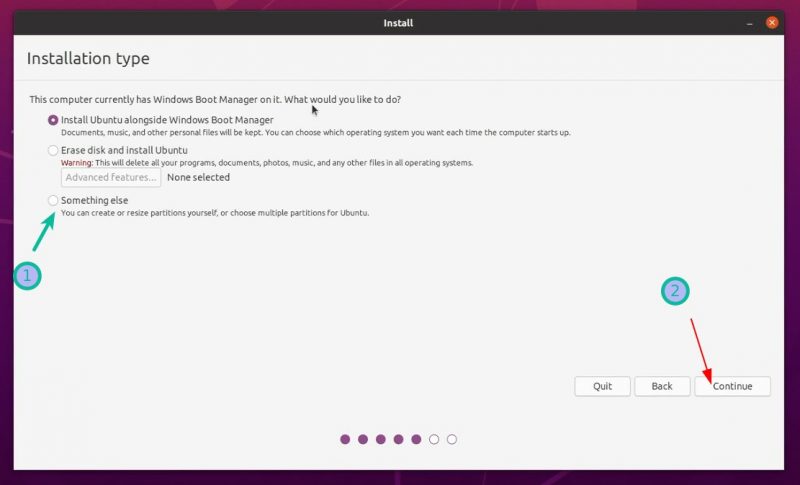
On the Installation type screen, go with Something Else.
It will take you to the partitioning screen. Remember you had created some free space beforehand?
You may allocate the entire free space to root (swapfile and home will be created automatically under root) or separate root, swap and home partitioning. Both methods are acceptable.
I show the steps for creating root, swap and home partitions separately. But feel free to use a single partition for all of them.
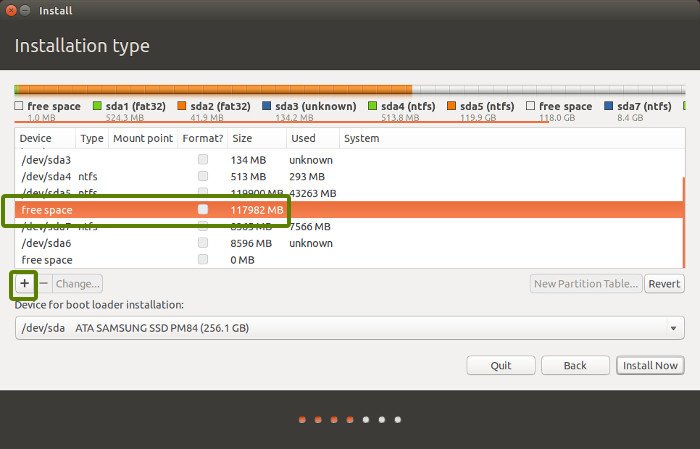
Select the free space and click on the + sign.
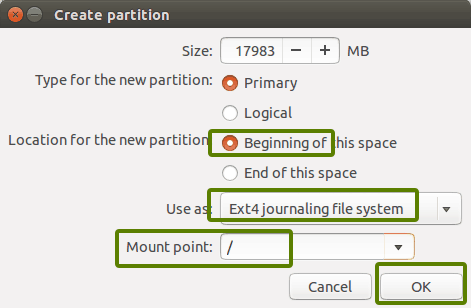
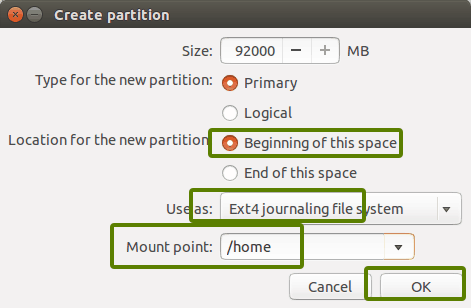
It will provide you with the option to create a Linux partition. You are creating the Root partition. Anything above 25 GB is more than sufficient for it. Choose the size, select Ext 4 as the file type and / (means root) as the mount point.
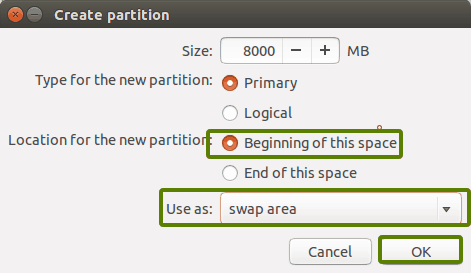
Clicking on OK in the previous step will bring you to the partition screen. Next, create a swap. Like previously, click on the + sign again. This time, use the file type as the Swap area.
Ideal swap size in Linux is debatable. If you have 2 GB or less RAM, use swap double the size of RAM. If you have 3-6 GB of RAM, use a swap of the same size as RAM. If you have 8 GB or more RAM, you may use swap half the size of RAM (unless you have plenty of disk space, and you want to use hibernation and in that case, use a swap of at least the same size as RAM).
If you feel like you have less swap on your system, don’t worry. You can easily create swapfile and add more swap space to your systems.
Similarly, create a Home partition. Allocate it maximum space (in fact allocate it the rest of the free space) because this is where you’ll save music, pictures and downloaded files.
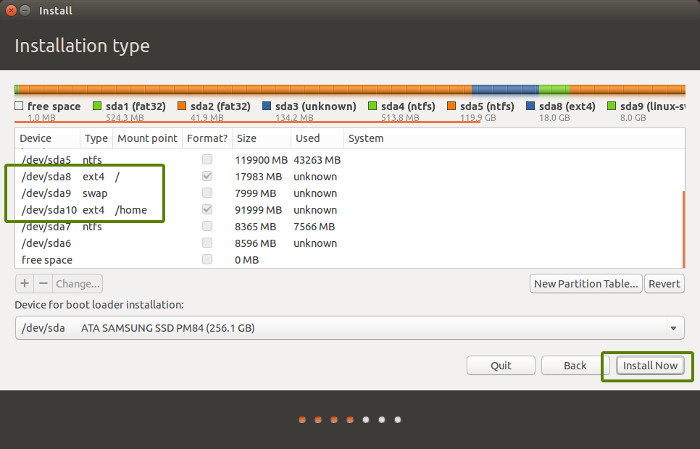
Once you are ready with Root, Swap and Home, click on Install Now:
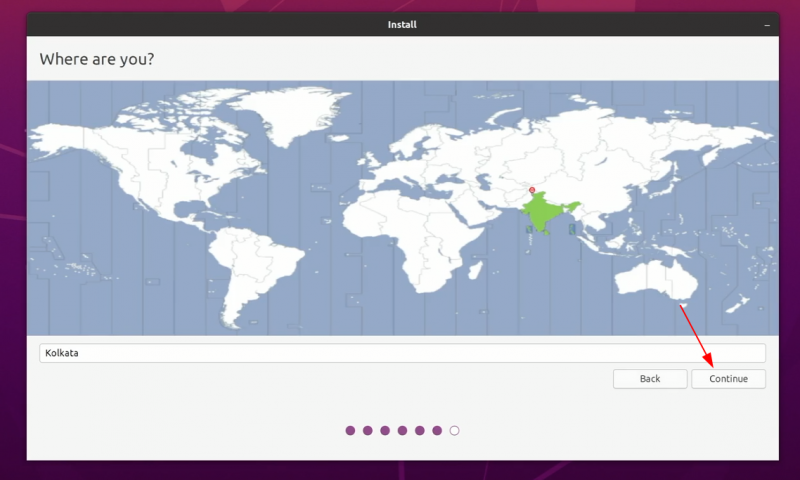
Well, you have almost won the battle. You can smell victory now. Select a timezone when asked.
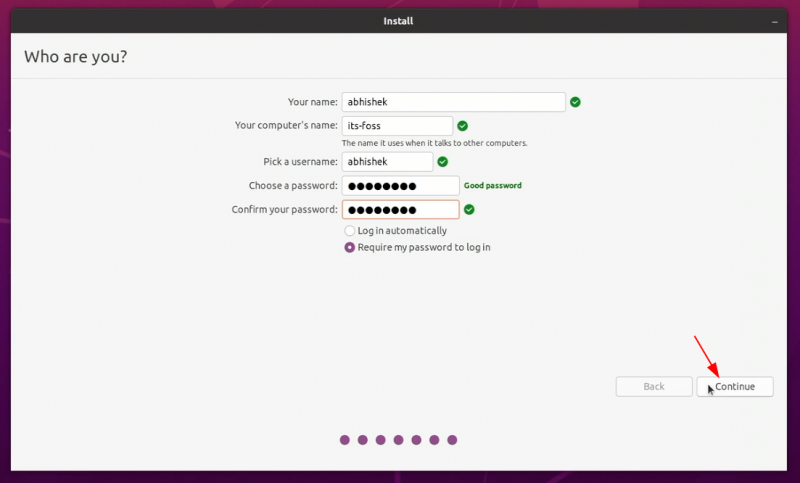
Next, you’ll be asked to enter a username, hostname (computer’s name) and password.
Now it’s just a matter of waiting. It should take 8-10 minutes to complete the installation.
Once the installation finishes, restart the system.
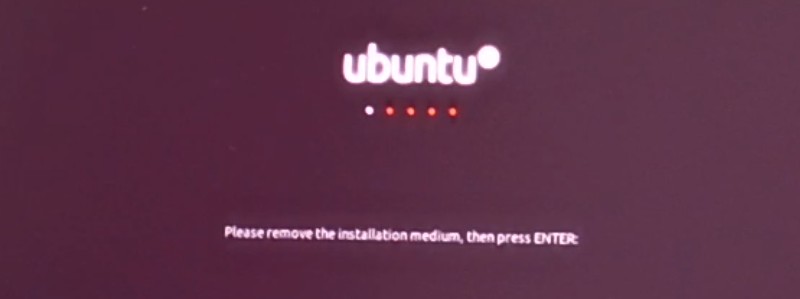
You’ll be asked to remove the USB disk. You can remove the disk at this stage without worrying. The system reboots after this.
💡
You do not need the live USB disk to use Linux anymore. You have installed Ubuntu on your computer’s disk. Remove the USB and keep it for later if you want to use it for installing Linux on some other system. You may also format and use it for regular data storage or transfer.
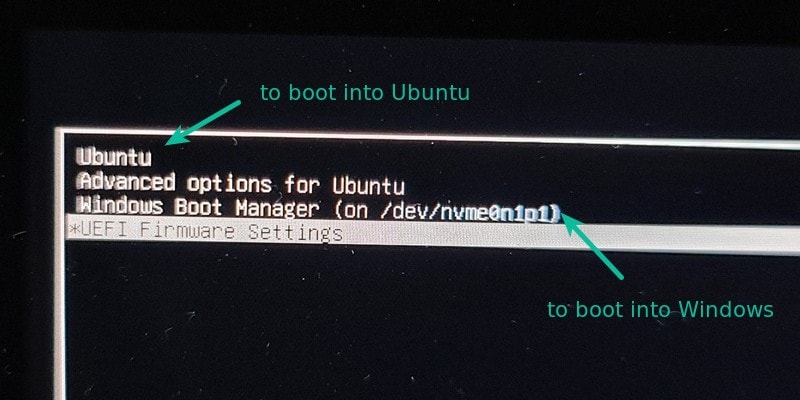
If everything goes smoothly, you should see the grub screen once the system powers on. Here, you can choose Ubuntu to boot into Ubuntu and Windows boot manager to boot into Windows. Pretty cool, right?
Dual boot did not succeed? Here are some troubleshooting tips
Life is not even for everyone. For some, the dual boot might not succeed just yet. However, instead of giving up, you may follow a couple of tips and retry the installation procedure.
Try changing the USB port
This may sound ridiculous but sometimes some USB ports cause issue with booting the USB or installing Linux. Changing the USB port could be a trick.
Try not using internet while installing Linux
I have experienced that sometimes Linux installation throws error if it is connected to the internet. If you encountered a “‘grub-efi-amd64-signed’ package failed to install into /target” error, please try installing Ubuntu without internet.
Disable secure boot and/or fast boot
In some rare cases, secure boot would not allow you to boot from live USB or install Linux. Disable secure boot. You may also disable fast boot in some cases.
Dual boot finished but you don’t see the grub screen to boot into Ubuntu
Please check your boot order in the UEFI settings. Do you see Ubuntu/UEFI below Windows Boot Manager? If yes, move it up the order. If you don’t see grub at all, you may carefully try this or this tutorial.
Grub rescue error or no bootable device found after dual booting
Use this tutorial for no bootable device found error. And this one is for grub rescue error.
Additional Tips: You’ll notice that there is a time difference between Windows and Ubuntu You can fix the time gap issue in dual boot easily. Also, in the grub screen, Ubuntu is up the priority. You can also change the boot order to make Windows default if you are going to use Windows more often than Linux. If you want to reverse the process, follow this guide to remove Ubuntu from dual boot with Windows.

I hope this guide helped you to dual boot Ubuntu with Windows 10 UEFI. I went into too much detail here, but I wanted to answer all the typical confusion and show all the required steps.
If you still have doubts or face strange errors, please comment, and I’ll try to help you out.
Содержание статьи:
- Пример установки Ubuntu (на ПК с Windows)
- ШАГ 1: загрузочная флешка
- ШАГ 2: подкл. флешки и загрузка с нее
- ШАГ 3: установка Windows
- ШАГ 4: установка Ubuntu
- Вопросы и ответы: 0
Доброго здравия!
Иметь 2 опер. системы на компьютере в некоторых случаях архи-удобно: повышает надежность (если ошибка с одной — загрузится другая); можно учиться чему-то новому; открывать файлы, которые в одной из систем недоступны; использовать более разнообразный софт, и т.д.
Ну и т.к. тема эта интересна и периодически по ней вижу вопросы — решил сегодня привести небольшой пример, как относительно легко можно установить Ubuntu 22 рядом с Windows 10 (11) на одном компьютере (так, чтобы можно было работать с любой из них — достаточно просто на этапе загрузки устройства выбрать нужную).
*
Заранее предупреждаю всех читателей, кто воспользуется советами из этой заметки: несмотря на то, что ничего очень сложного мы делать не будем, — 📌 сделайте БЭКАП всех нужных данных с диска, т.к. всё предугадать нельзя (никто не отменял сбои и ошибки, плюс у всех разное железо, уровень админ.-я, возможно использование др. версий софта и т.д.).
Кстати, в заметке рассмотрен случая, когда на компьютере используется UEFI и разметка диска в формате GPT. Прим.: большинство современных ПК/ноутбуков это и использует…
*
Теперь к теме…
📌 По теме!
Лучшие дистрибутивы Linux для новичка: какую версию выбрать, с чего начать (образы с загрузкой в режиме LiveCD + с поддержкой русского языка!) — https://ocomp.info/vyibor-linux.html
*
Пример установки Ubuntu (на ПК с Windows)
ШАГ 1: загрузочная флешка
Итак…
Первое, что нам нужно сделать — подготовить установочную флешку (ее еще называют загрузочной). В своем примере я сделаю универсальную флешку, на которую запишу и Windows, и Linux (а затем с нее произведу установку).
Для создания такой флешки нам нужно:
- загрузить образ ISO-файл с Windows 10/11 (📌вот тут рассказал, как это сделать);
- загрузить ISO-файл с Ubuntu 22 (ссылка ниже 👇);
- загрузить 📌программу Ventoy (она легко создаст мульти-загрузочную флешку);
- 👉👉 далее: форматируете флешку в Ventoy и просто копируете на нее образы ISO с Windows и Linux (никак не изменяя их).
- Всё, флешка будет готова! 👌
***
Ubuntu
📌Офиц. страница: https://ubuntu.com/download/desktop
Скрин. Лого «Убунту»
Наиболее популярная версия Linux для дом. пользователя (встроено куча софта: офис, торрент, плееры, разметка диска, браузеры и т.д.). В данный момент версия Ubuntu 22.04 LTS). Для этой версии есть свои тех. требования:
- процессор: 1,5 ГГц, двухъядерный;
- ОЗУ: 4 ГБ;
- место на диске: 25 ГБ (лучше чуть больше);
- доступ к Интернет;
- наличие исправного DVD-привода или USB-порта 2.0/3.0+ (для установки системы).
***
📌 В помощь!
Как создать загрузочную флешку с Linux (при работе в Windows). Cкрины настроек из бесплатных программ — https://ocomp.info/sozdanie-zagr-fleshek-s-linux.html
*
ШАГ 2: подкл. флешки и загрузка с нее
Далее подключаем созданную в ШАГЕ 1 уст. флешку к исправному USB-порту и включаем компьютер/ноутбук.
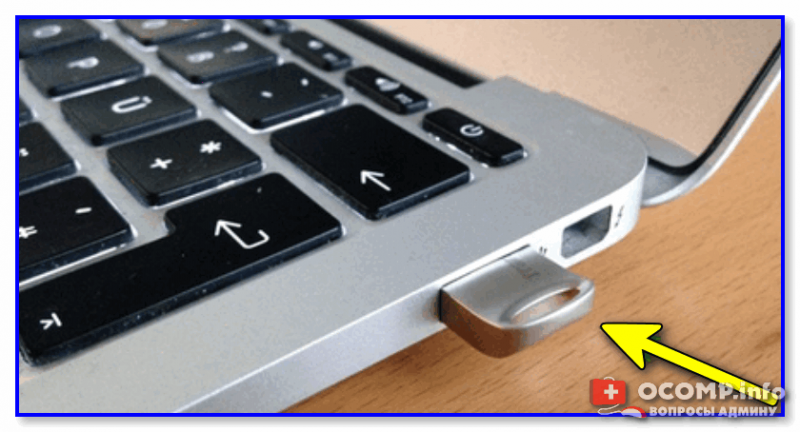
Флешка подключена к USB-порту!
Следом сразу же нужно нажать 📌спец. кнопку для входа в загрузочное меню |Boot Menu (на каждом устройстве она своя — зависит от версии BIOS, и его производителя). Чаще всего это кнопки: F8, Esc, F12, F9.
Если загрузочное меню откроется — вы должны увидеть в нем «нашу» подготовленную флешку (в моем случае «UEFI: Kingston Data Traveler…» 👇) — именно эту строку нужно выбрать и нажать Enter.
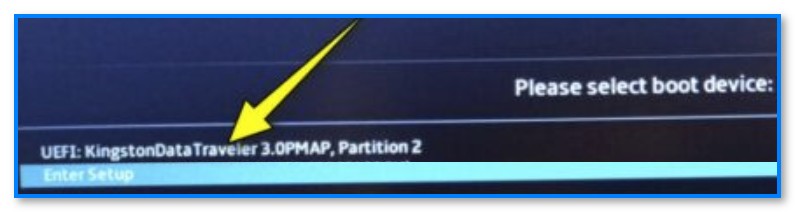
Фото. Пример загрузочного меню — выбираем флешку
Если с флешкой всё в порядке — должно появиться меню Ventoy (со списком всех ISO-образов, доступных для установки). Следует также выбрать нужный и нажать Enter.
Примечание: в своем примере я установлю сначала Windows 10 (+ удалю все данные на диске, т.к. они мне не нужны), а затем Linux Ubuntu 22.04. В принципе, если у вас уже есть Windows — следующий шаг можете пропустить…
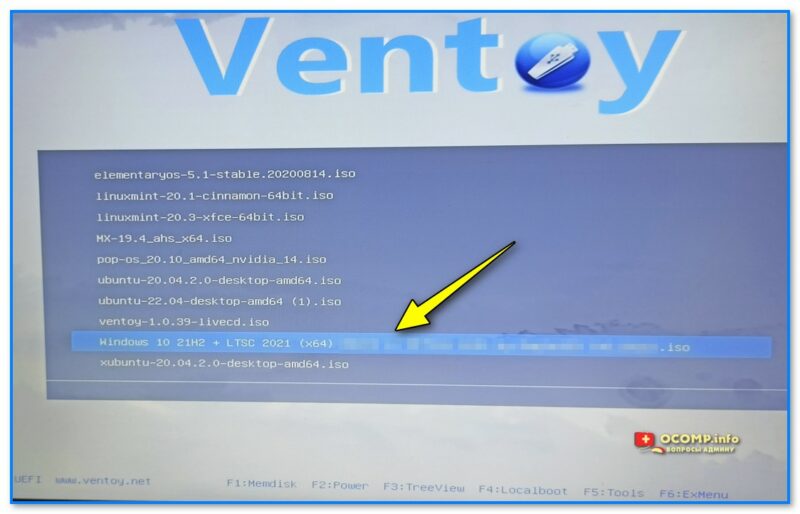
Фото. Ventoy — меню загрузочной флешки — установка ОС Windows 10
*
ШАГ 3: установка Windows
📌 Дополнение: полная установка Windows 10 описана в этой инструкции — https://ocomp.info/ustanovka-windows-10.html
*
1) Установка Windows начинается (в большинстве случаев) с выбора языка. Разумеется, лучше выбрать сразу «Великий и Могучий»… 👇
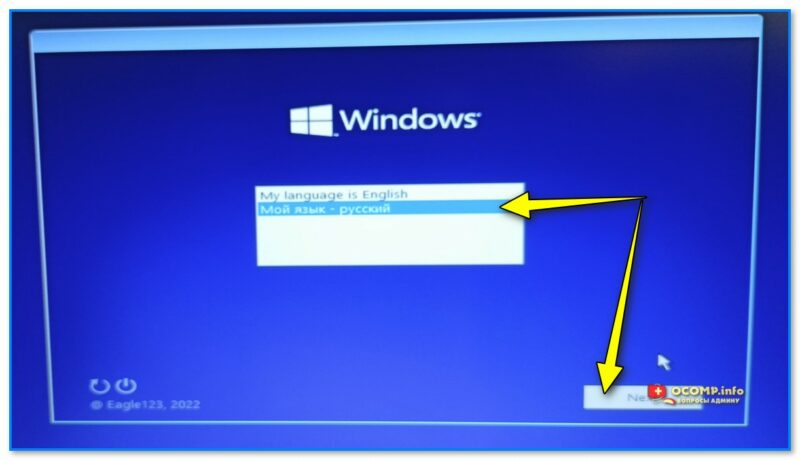
Фото. Выбор языка — уст. Windows
2) Далее подтверждаем свое намерение и начинаем установку…
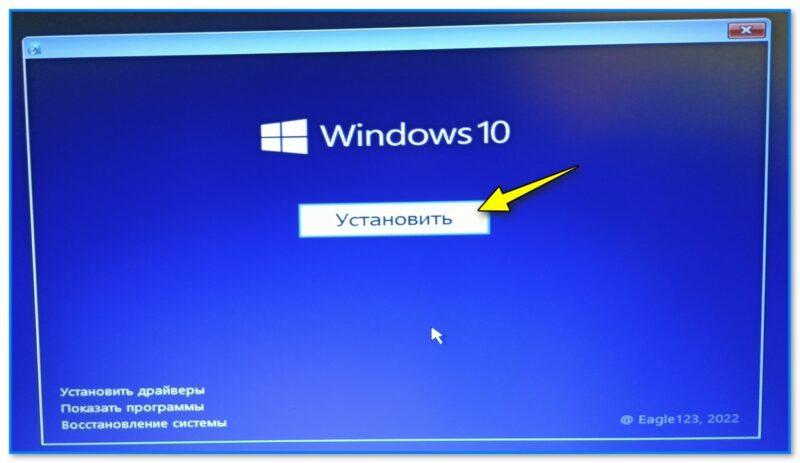
Фото экрана. Установить
3) Как правило, следуем нужно будет прочитать соглашение и нажать по кнопке OK, а затем подождать 1-2 мин., пока произойдет первичная загрузка… См. скрин ниже — окно «Начало установки»…
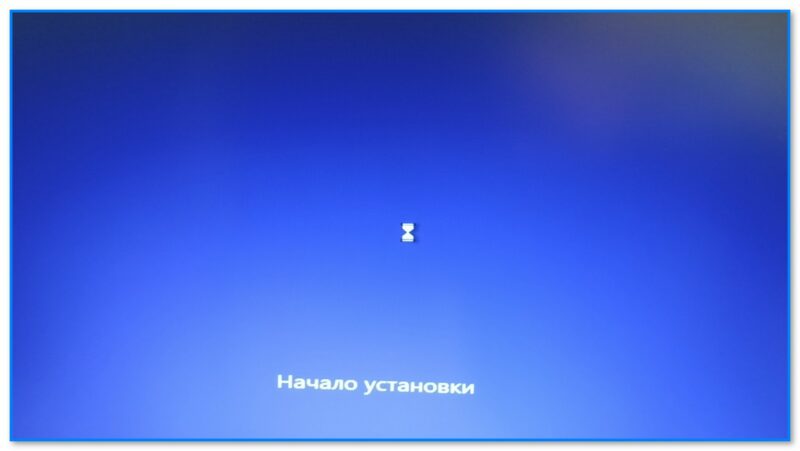
Фото. Начало установки
4) В своем примере я выбрать вариант установки Windows для опытных пользователей (чего рекомендую и вам).
В этом случае у вас появится меню «Где вы хотите установить Windows» — а в нем можно удалить и отформатировать все диски (чего я и сделал, чтобы не осталось никаких старых данных).
Примечание: для удаления раздела диска — просто выберите его в этом окне и нажмите кнопку «Удалить». 👇
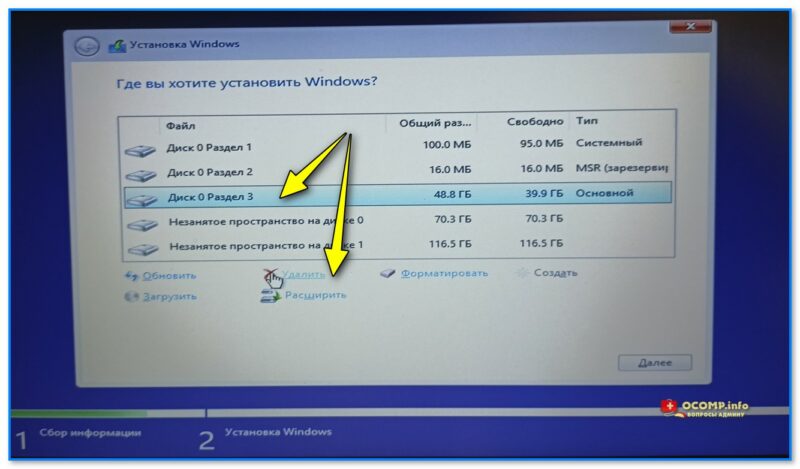
Фото. Удаляем все лишние разделы
5) Затем (если вы всё также удалите, как и я) у вас будут отображаться столько строк, сколько подключено дисков.
Для создания раздела под Windows — нажмите по нужному диску/строке, нажмите кнопку «Создать», введите размер (можно оставить по умолчанию) и нажмите «Применить». 👇
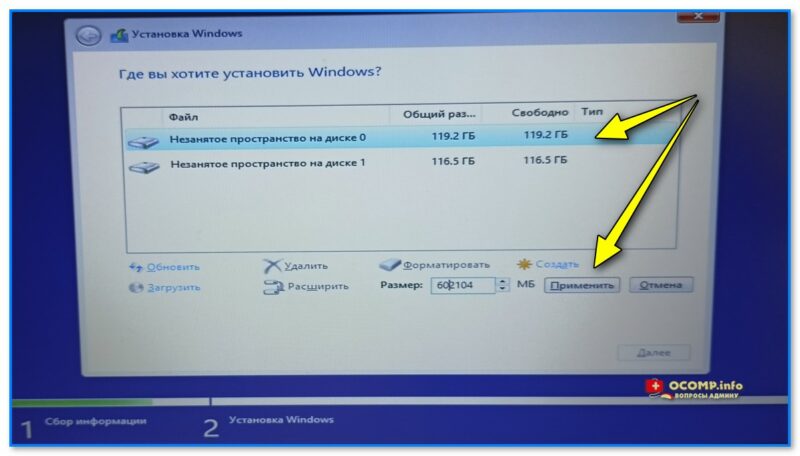
Фото. У меня на этом примере 2 диска. На одном из них я создаю раздел и в него устанавливаю Windows
6) После выбираем созданный раздел и нажимаем «Далее». 👇
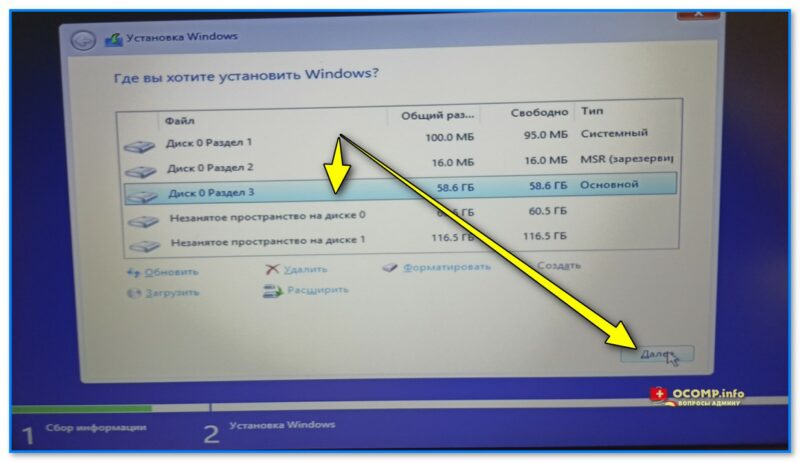
Фото. Выбор раздела и кнопка далее
7) Дожидаемся пока скопируются все файлы. Когда устройство уйдет на перезагрузку — установочную флешку лучше откл. от USB-порта (чтобы компьютер с нее не стал снова грузиться… чего нам уже не нужно).
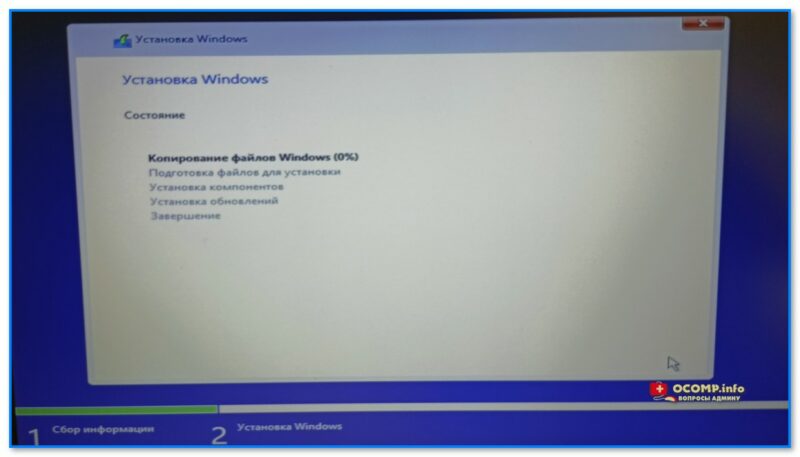
Фото. Дожидаемся завершения копирования
 Далее, после перезагрузки, Windows попросит нас указать время, задать пароль, имя учетной записи и прочие параметры (с которыми, обычно, сложностей не возникает // поэтому я их опустил).

Фото. Это может занять неск. минут (после этого окна потребуется установить время, задать пароль и пр.)
9) В итоге появится рабочий стол — первая задача решена?! Осталось «добить» еще Ubuntu… 👌
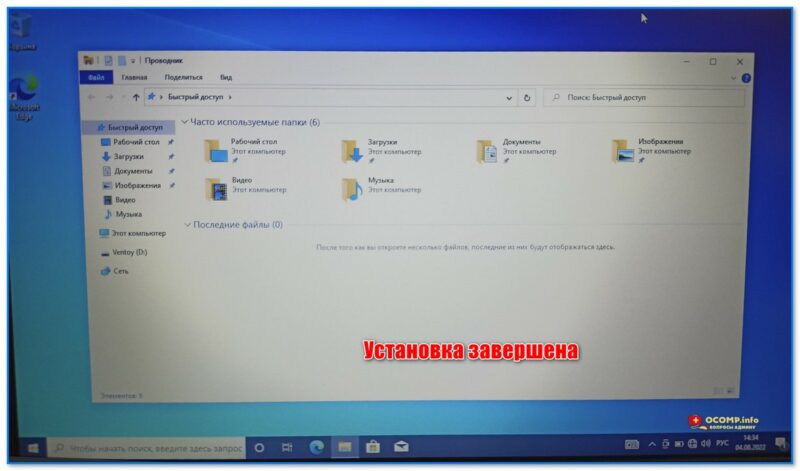
Фото. Установка завершена
*
ШАГ 4: установка Ubuntu
1) Снова подключаем «нашу» подготовленную в ШАГЕ 1 флешку к USB-порту, включаем компьютер и 📌заходим в Boot Menu. Выбираем в нем флешку и нажимаем Enter.
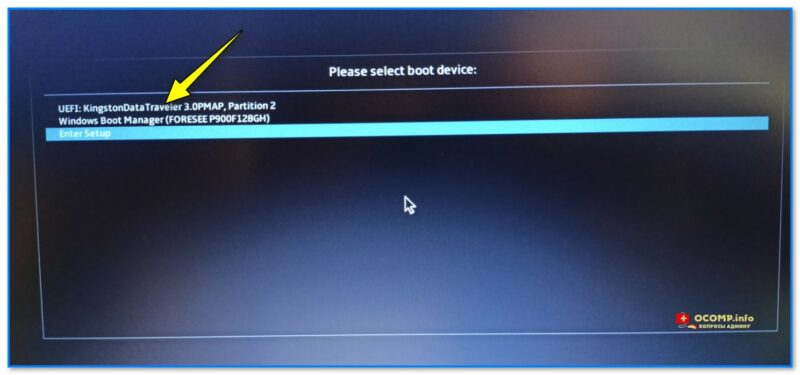
Фото. Открываем в загрузочном меню установочную флешку
2) В меню Ventoy (если вы в этой утилите подготавливали флешку) выбираем строку с Ubuntu 22.04 и нажимаем клавишу Enter… 👇
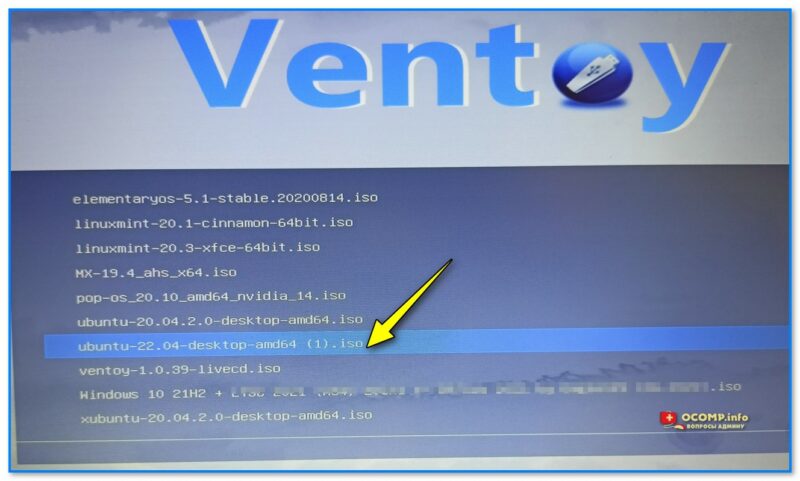
Фото. Ventoy — выбор ОС Ubuntu для установки на диск
3) В появившемся меню GRUB нужно выбрать первый пункт — «Try or Install Ubuntu» (т.е. попробовать или установить Ubuntu).
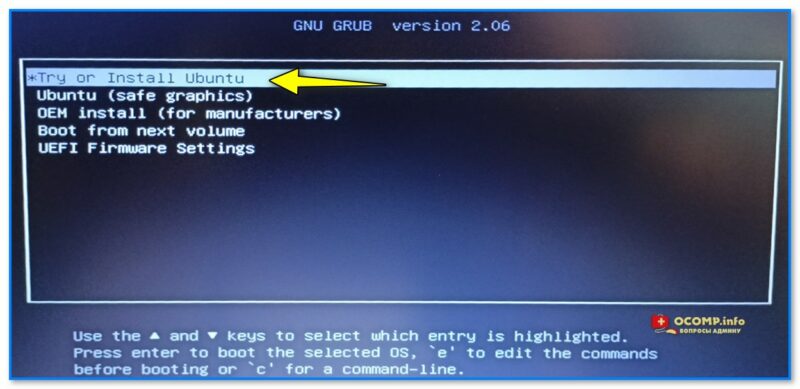
Фото. Инсталляция то бишь установка системы
4) Затем нужно будет подождать 2-3 мин., пока система загрузится.

Фото. Asus Ubuntu
5) Установка системы начинается с окна приветствия: рекомендую сразу же указать русский язык и выбрать вариант «Установить Ubuntu». См. пример на скрине ниже. 👇
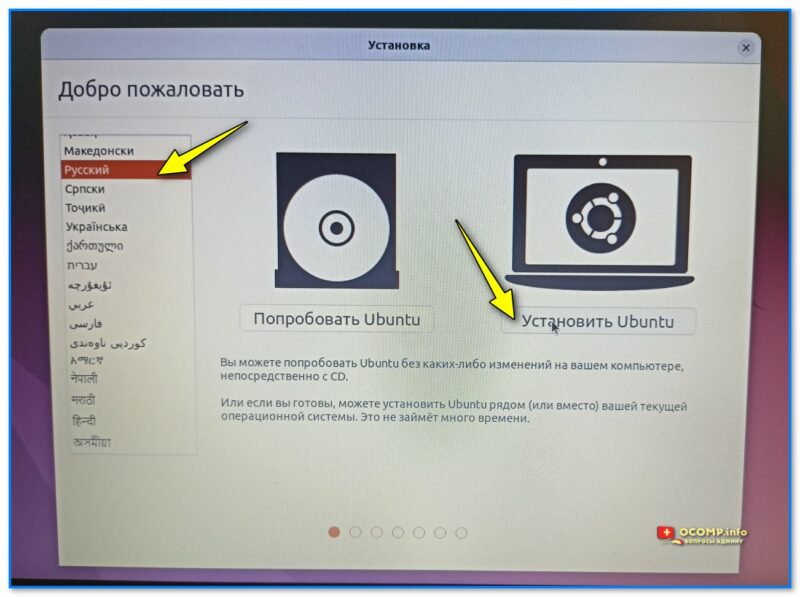
Фото. Выбор языка — русский, установить Ubuntu
6) Раскладка клавиатуры — также рекомендуется вариант «Russian» (англ. будет добавлен автоматически).
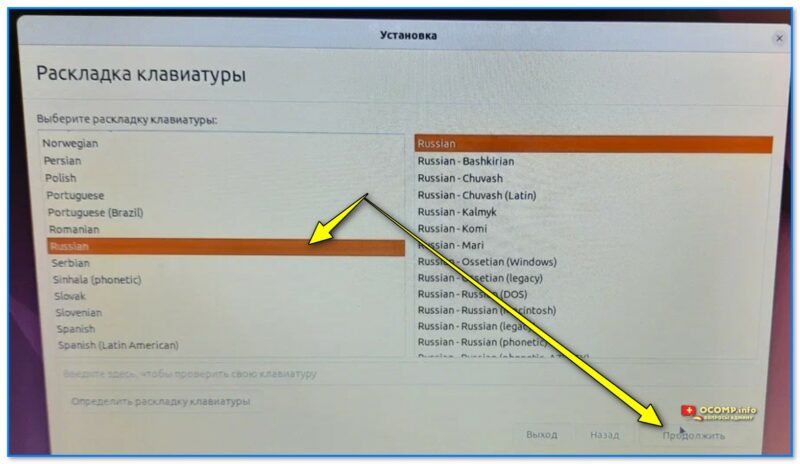
Фото. Раскладка клавиатуры — русская
7) Насчет комплектации — посоветовал бы выбрать вариант «Обычная» (чтобы были все приложения, которые могут понадобиться: плееры, браузеры, офис и т.д.!).
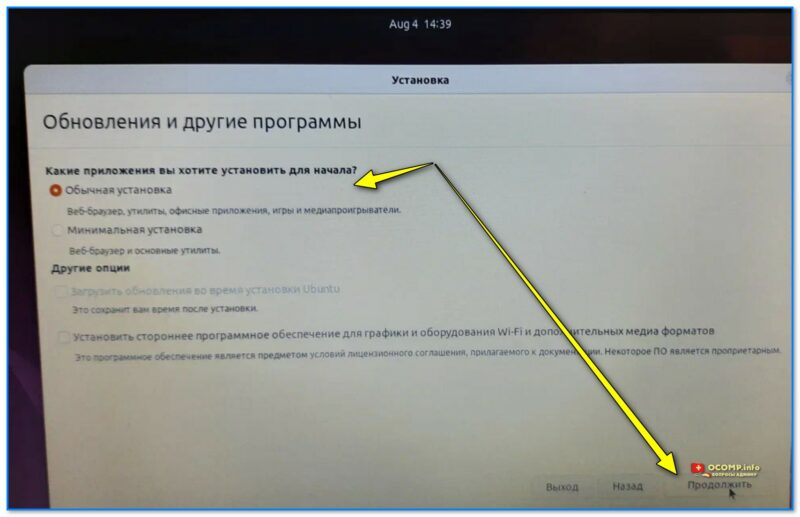
Фото. Установка обычная
📌 Тип установки — самый важный шаг!
В своем примере я выбрал пункт:
«Установить Ubuntu рядом с Windows Boot Manager (Документы, музыка и другие личные файлы будут сохранены. Вы сможете выбирать, какая операционная система будет запускаться при включении компьютера)»
В этом случае установщик автоматически подберет схему раздела, диск под установку Ubuntu и пр. В моей работе и тестах этот способ ни разу не испортил данные на диске, но ручаться я за него не могу… (если вы хотите сделать это вручную — то 📌ознакомьтесь с этим примером, там я показал на Elementary OS, у нее такой же установщик…).
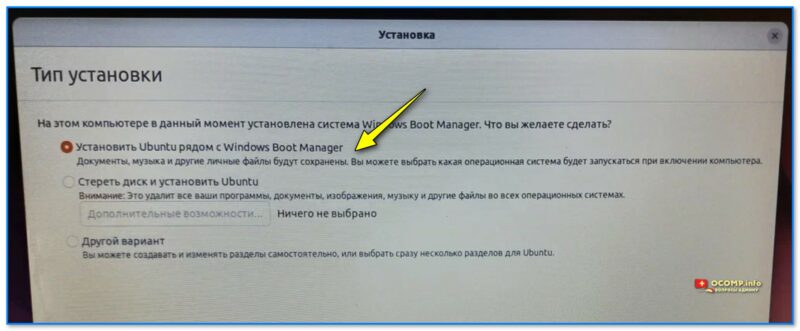
Фото. Установить Ubuntu рядом с Windows Boot Manager (первый пункт)
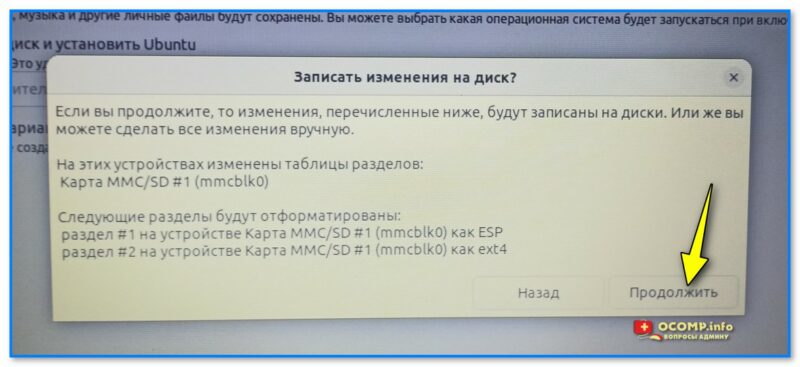
Фото. Соглашаемся с установкой
9) В следующем шаге нужно правильно указать часовой пояс (кстати, если вашего города нет — можно пока выбрать любой из доступных поясов, а затем после установки в настройках Ubuntu этот момент поправить…)

Фото. Где вы находитесь — указать часовой пояс
10) Имя пользователя, ПК, и пароль рекомендую задавать на латинице!
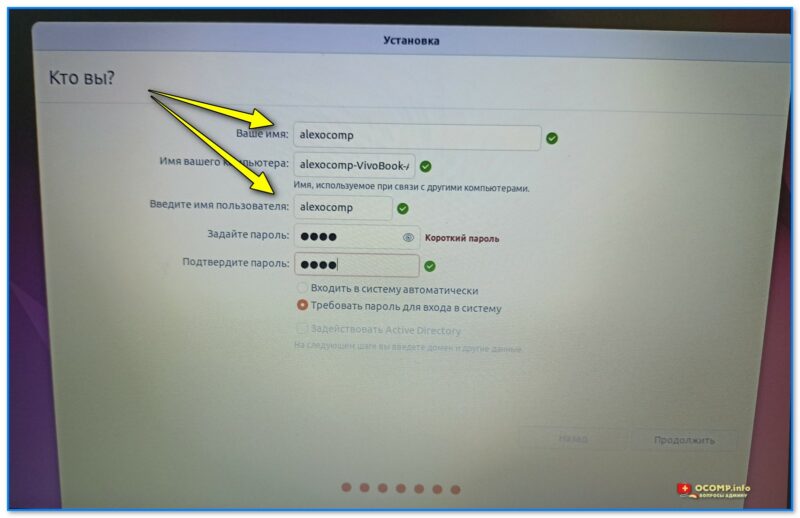
Фото. Имя ПК, пользователя, и задание пароля
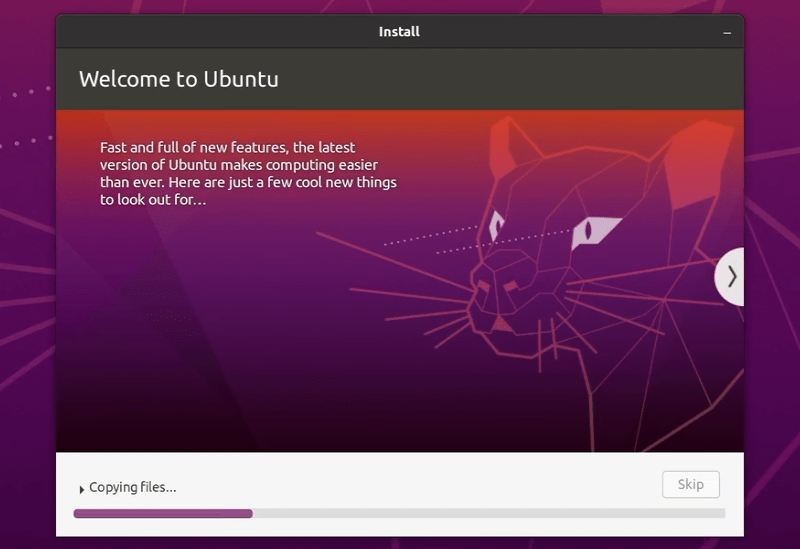
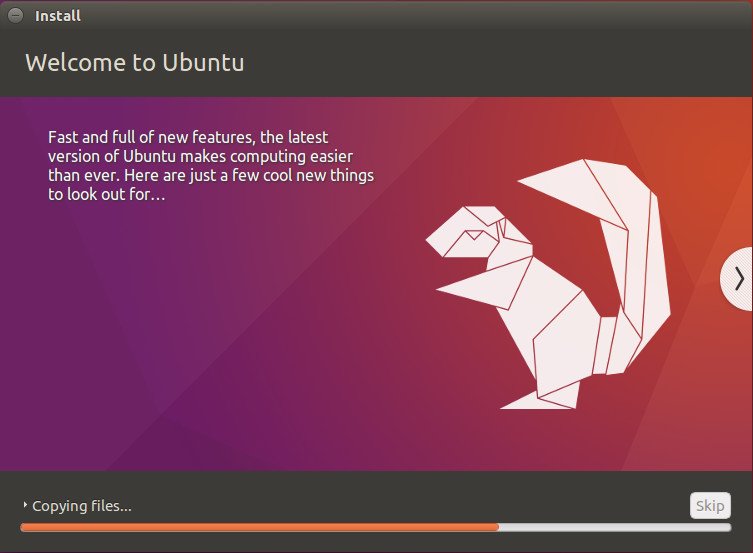
11) Далее дожидаемся пока будут скопированы все файлы установщика… На это требуется 5-10 мин. времени на современном устройстве.
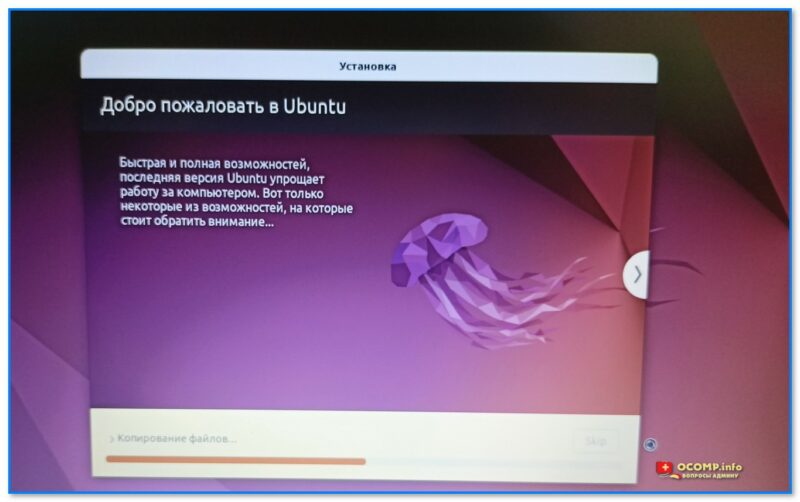
Фото. Процесс установки — не мешаем
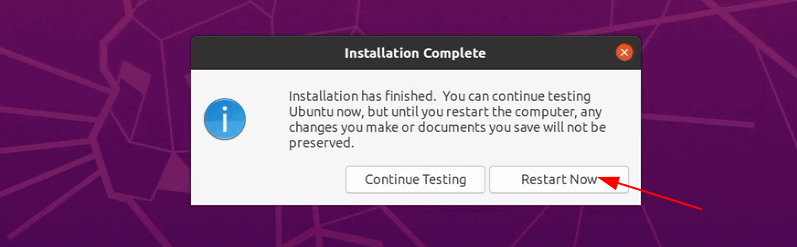
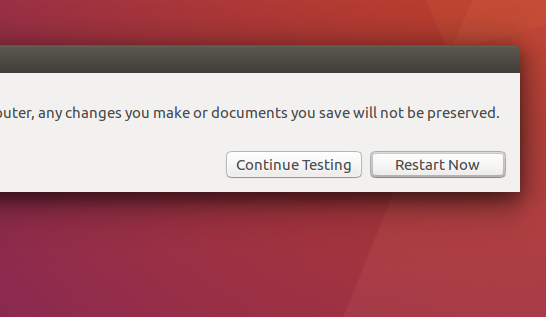
12) Если установка прошла успешно — увидите соответствующее окно.👇 Загрузочную флешку можно отключать и перезагружать компьютер.
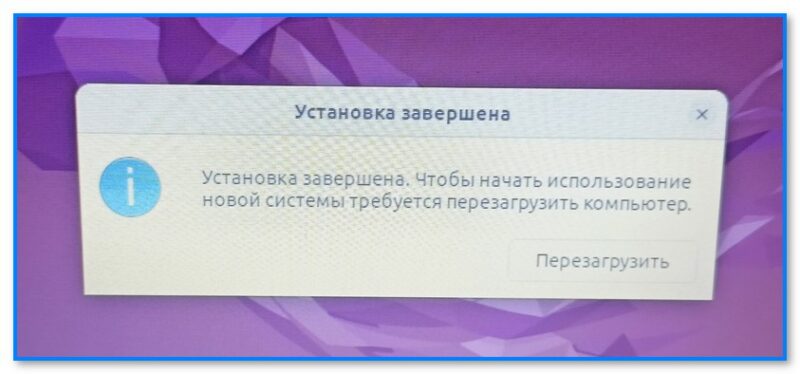
Фото. Дожидаемся окна об успешном завершении
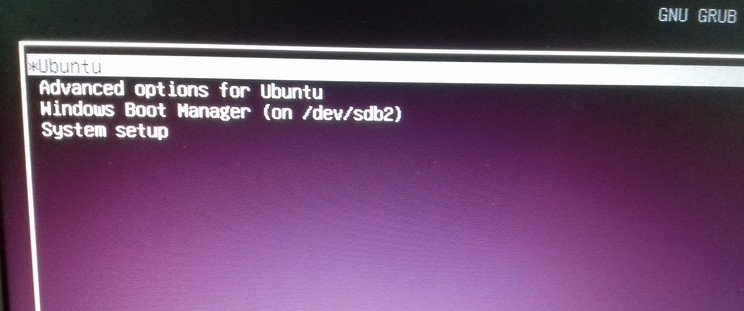
13) После перезагрузки вы увидите меню GRUB — в нем можно выбрать нужную ОС: Windows или Ubuntu (оно теперь всегда будет появляться при вкл. компьютера).
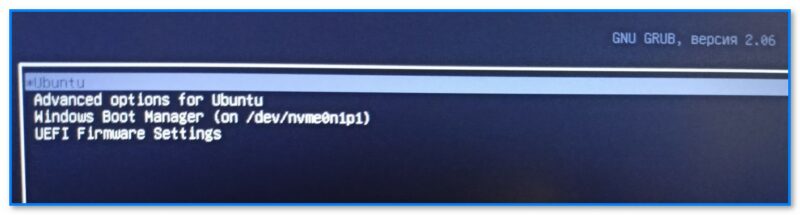
Фото. После включения ноутбука — появл. меню GRUB
14) Как видите на фото ниже — система грузится, работает (в меню слева у Ubuntu представлены быстрые ссылки: браузер, проводник, почтовая программа, офис, магазин приложений, справка и пр.). Задача решена?! 👀👍
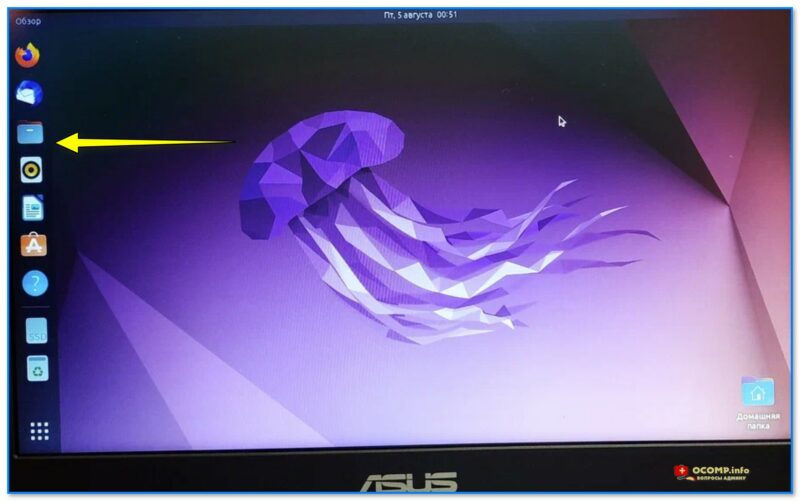
Фото. Ubuntu установлена — можно пользоваться!
*
За сим откланяюсь…
Дополнения по теме — приветствуются во комментариях ниже.
Успехов!
🙂
Время на прочтение5 мин
Количество просмотров151K
Привет, Хабр! Сегодня мы рассмотрим ситуацию, когда при двойной установке Linux & Windows загрузчик GRUB не стартует, давая возможность выбрать ОС, а автоматически загружается Windows. Немного теории:
GRUB (GRand Unified Bootloader) — программа-загрузчик операционных систем.
GRUB может загрузить любую совместимую с ней операционную систему. Среди них: Linux, FreeBSD, Solaris и многие другие. Кроме того, GRUB умеет по цепочке передавать управление другому загрузчику, что позволяет ему загружать Windows (через загрузчик NTLDR), MS-DOS, OS/2 и другие системы.
Значит с теорией мы немного разобрались (думаю этого будет достаточно), теперь же рассмотрим, какие бывают подводные камни, при установке Dual Boot Windows и Linux на одном компьютере.
Эксперимент производился на рабочей станции со следующими характеристиками:
Base Board Information
- Manufacturer: Acer
- Product Name: Aspire XC600
Memory Device
- Size: 4096 MB
- Type: DDR3
- Speed: 1333 MHz
- Manufacturer: Kingston
- Rank: 2
HDD
- product: ST500DM002-1BD14
- vendor: Seagate
- physical id: 0.0.0
- bus info: scsi@0:0.0.0
- logical name: /dev/sda
- size: 465GiB (500GB)
- capabilities: gpt-1.00 partitioned partitioned:gpt
Доказано, что проблем с установкой Debian 8.6 Jessie совместно с Windows 10 не обнаружено. Debian корректно прописывается в автозагрузке, GRUB запускается без ошибок и две ОС также работают нормально.
Но, как показала практика, не со всеми дистрибутивами такое происходит. При установке Ubuntu 16.04.1 вместо Debian на ту же рабочую станцию вылез первый подводный камень — GRUB не стартовал, и Windows 10 автоматом шла на загрузку.
Решение проблемы было найдено спустя недели три-четыре (тогда уже надоело считать, сколько времени убито на решение проблемы). Оно оказалось неожиданным, но в тоже время вся система заработала. Значит, если вы столкнулись с такой же проблемой, приведенная ниже инструкция может вам пригодится и сэкономить кучу времени.
Важно! До начала выполнения инструкции нужно подготовить LiveCD с дистрибутивом Linux Mint — все операции мы будем выполнять на нем (я выбрал этот дистрибутив из-за того, что на него спокойно можно установить Midnight Commander, что сложно сделать на LiveCD с Ubuntu, так мы получаем больше пространства для маневров). Также стоит заметить, что команда из под консоли update-grub вам не поможет, так как она рассчитана на случай, когда GRUB запускается, но не видит другие ОС кроме Линукса. Также рекомендую создавать резервные копии файлов/каталогов, над которыми вы осуществляете хоть малейшие изменения.
- Через терминал, с правами root смонтировать раздел с EFI в папку /mnt. В моем случае, это была команда mount /dev/sda2 /mnt.
- Введите команду sudo -s и подтвердите пароль (он пустой по умолчанию) для последующих операций (многие советуют не делать этого, а вводить sudo и команду для выполнения — я поддерживаю это мнение, но инструкция рассчитана на опытных пользователей системы Linux, которые понимаю, что делают все на свой страх и риск).
- Запустить Midnight Commander командой mc.
- Найти в файловой системе следующий каталог: EFI в папке /mnt.
- Переименовать каталог Microsoft во что-нибудь другое, например в Microsoft2.
- Создаем новый каталог с именем Microsoft.
- Заходим в только что созданный каталог Microsoft и частично создаем внутри его иерархию папок аналогичную старому Microsoft (тому, что переименовали). В моем случае он имел такую структуру папок: /boot/, затем куча папок и файл bootmgfw.efi рядом с ними. Нужно воссоздать структуру папок ровно до этого файла. Т.е. всё, что лежит рядом с ним — не нужно, а всё, что идет до него (т.е. родительские папки, соседние с ними тоже не нужны) воссоздаем в нашей новой папке Microsoft. В моем случае понадобилось создать только папку /boot, итоговый путь до нового каталога вышел таким: /EFI/Microsoft/boot. Можно просто скопировать все папки и файлы — проверено, это работает и можно не создавать все вручную.
- Находим в каталоге из шага 6 папку с именем нашего дистрибутива Линукса, в нашем случае это Ubuntu. Копируем (оригиналы файлов и папку ubuntu на всякий случай оставляем, не помешают) все файлы из данной в папки в итоговый каталог, созданный на предыдущем шаге: /EFI/Microsoft/boot.
- В получившейся файловой системе находим файл grubx.efi или grubx64.efi (будет только один из них: в зависимости от разрядности установленного Линукса). Переименовываем его в bootmgfw.efi.
- Находим файл /boot/grub/grub.cfg в файловой системе установленного Линукса. Открываем его для редактирования. Внутри него находим слово «Microsoft» в контексте строки, начинающейся с «chainloader» и заменяем это слово (должно быть только одно вхождение и именно в строке с «chainloader», так что не ошибетесь) на название каталога, в который мы переименовали Microsoft (т.е. на Microsoft2 в нашем примере). Сохраняем изменения в файле.
Также, в этом файле вы можете поменять названия в списке, который выводит GRUB. Например, вместо
openSUSE Leap 42.2 27.01
в части кода:
menuentry 'openSUSE Leap 42.2 27.01'  --class opensuse --class gnu-linux --class gnu --class os $menuentry_id_option 'gnulinux-simple-996b3ed5-150f-4de3-a40c-6d385e27d6de' {
	load_video
	set gfxpayload=keep
	insmod gzio
	insmod part_gpt
	insmod ext2
	set root='hd0,gpt6'
	if [ x$feature_platform_search_hint = xy ]; then
	  search --no-floppy --fs-uuid --set=root --hint-bios=hd0,gpt6 --hint-efi=hd0,gpt6 --hint-baremetal=ahci0,gpt6  996b3ed5-150f-4de3-a40c-6d385e27d6de
	else
	  search --no-floppy --fs-uuid --set=root 996b3ed5-150f-4de3-a40c-6d385e27d6de
	fi
	echo	'Загружается Linux 4.4.36-8-default …'
	linuxefi /boot/vmlinuz-4.4.36-8-default root=UUID=996b3ed5-150f-4de3-a40c-6d385e27d6de ro  resume=/dev/sda7 splash=silent quiet showopts
	echo	'Загружается начальный виртуальный диск …'
	initrdefi /boot/initrd-4.4.36-8-default
}
Написать
openSUSE The best choice!:)
:
menuentry 'openSUSE The best choice!:)'  --class opensuse --class gnu-linux --class gnu --class os $menuentry_id_option 'gnulinux-simple-996b3ed5-150f-4de3-a40c-6d385e27d6de' {
	load_video
	set gfxpayload=keep
	insmod gzio
	insmod part_gpt
	insmod ext2
	set root='hd0,gpt6'
	if [ x$feature_platform_search_hint = xy ]; then
	  search --no-floppy --fs-uuid --set=root --hint-bios=hd0,gpt6 --hint-efi=hd0,gpt6 --hint-baremetal=ahci0,gpt6  996b3ed5-150f-4de3-a40c-6d385e27d6de
	else
	  search --no-floppy --fs-uuid --set=root 996b3ed5-150f-4de3-a40c-6d385e27d6de
	fi
	echo	'Загружается Linux 4.4.36-8-default …'
	linuxefi /boot/vmlinuz-4.4.36-8-default root=UUID=996b3ed5-150f-4de3-a40c-6d385e27d6de ro  resume=/dev/sda7 splash=silent quiet showopts
	echo	'Загружается начальный виртуальный диск …'
	initrdefi /boot/initrd-4.4.36-8-default
}
Хоть мелочь, а приятно! Остальное в коде советую не трогать.
Если трудно разобраться с управлением Midnight Commander (в этом нет ничего страшного, у меня тоже в первый раз были проблемы с этой программой), все операции можно выполнить в файловом менеджере Nautilus (или в другом, не суть важно), но изначально запустив его под правами пользователя root.
После этого идем на перезагрузку и радуемся результату. Но, как оказывается, такая проблема есть и у дистрибутива OpenSUSE Leap 42.2. Как показала практика, если на компьютере установлен дистрибутив OpenSUSE с Windows 10, то приведенная выше инструкция не поможет. Точнее, она поможет, но только ее нужно дополнить. После выполнения основной части выполняем следующие шаги:
- После выполнения всех операций заходим в папку /EFI/opensuse/x86_64-efi/ (название итоговой папки x86_64-efi может быть другим в зависимости от архитектуры ПК)
- Копируем файл grub.efi (если у вас включена опция Secure Boot, там будет еще файл shim.efi, тогда советую скопировать их вместе)
- Заходим в папку /EFI/Boot и удаляем все файлы, которые там есть (при обновлении загрузчика они снова появятся, но в этом нет ничего страшного)
- Вставляем файл (или файлы), которые мы скопировали и спокойно идем на перезагрузку.
Вот и вся инструкция. Думаю, кому-то пригодится…
P.S. Если же у вас все хорошо, GRUB с OpenSUSE запускается, но не видит Windows, радуйтесь — проблема решается всего одной командной: grub2-mkconfig -o /boot/grub2/grub.cfg, а если у вас стоит Ubuntu, нужно выполнить просто update-grub.
Для тех же, кого заинтересовала данная тема, рекомендую прочитать статью: «Начальный загрузчик GRUB 2 — полное руководство».
No doubt Ubuntu is the best Linux distro for beginners. So many Linux beginners prefer to dual boot Windows 10 and Ubuntu , instead of completely removing Windows.
Here in this tutorial you will learn how to install linux and windows alongside on a UEFI based system with GPT partition table.
This tutorial is specially for UEFI based systems, you don’t need to disable UEFI secure boot or enable the legacy boot support.
We’ll assume that Windows 10 is pre-installed on the computer. The hard disk partition type, i.e. GPT or MBR doesn’t matter much.
Contents
Get Ubuntu and Create the bootable USB
As you’re going to install Ubuntu, so first you need to get the ISO file, get it from the official ubuntu website, link here.
After downloading the Ububtu ISO, you need to create a bootable USB to install from it.
There’s many way to do that, in windows 10, you can use the Rufus USB creator, download Rufus from here.
Alternatively you can use MultibootUSB tool from here.
Analyze the system
Although this step is optional, but it’s to know your system before altering anything. First check the hard disk partition type.
You can use the diskpart command on windows to check the HDD, first open up the CMD as administrator and type the command below one by one.
diskpart

list disk
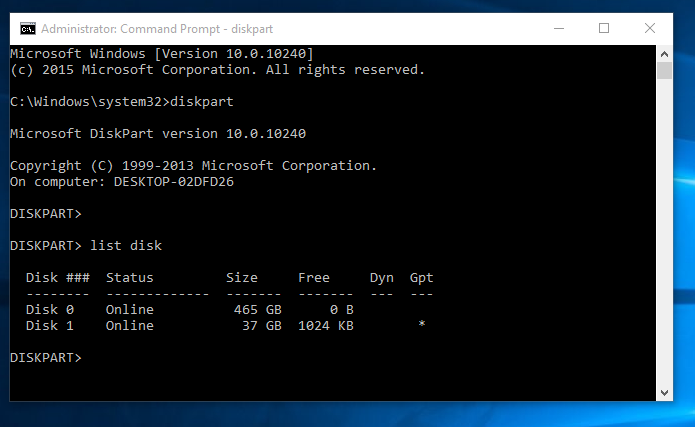
If your HDD has GPT partition table by default, then almost certainly it’s a UEFI system.
Partition the disk on windows 10
You need to free up some HDD space to dual boot ubuntu and windows 10 , at least 6 GB is required to install.
However you can go with 8 GB, but about 20 GB for the linux filesystem root / partition is highly recommended.
You can install Ubuntu without a dedicated /home partition, but it’s always recommended to use a separate home.
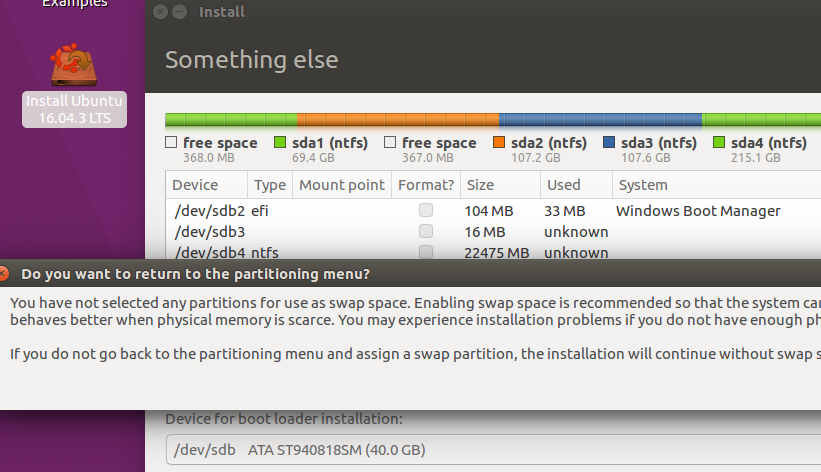
Most probably you don’t need a swap partition, as there’s plenty of RAM on any modern system, swap space is rarely used. If you desperately need a swap space, you can you a swap file instead.
Let’s partition the disk,
I’m using a 40 GB HDD for testing, and there’s around 12.7 GB free space to dual boot windows 10 and ubuntu.
Reboot the computer and boot from USB
Now reboot the PC and boot it from the USB drive. You need to tap the F12 , F10 or F8 key many times to select the boot device.
On Dell, Acer, Lenovo or Toshiba laptops, it’s the F12 key in most cases.
Note: On many laptops with the Fn key, you need to press Fn + F12 key combo to select the boot device option.
You can select any of the Try Ubuntu without installing or Install Ubuntu on the GRUB boot menu entry.
If you’ve not selected the first option, then just click on the Install Ubuntu shortcut on the desktop, else the system will start the installer directly.
There’s 7 total step, excluding the sub steps and disk partitioning to install Ubuntu.
The first step is to select the language, choose your preferred language and press the continue button.
Next you’ll be asked to connect to internet if not connected, this step is optional, you can skip this step by selecting the first ubuntu install option.

Now the installer will ask you to install the updates and third party software like graphics drivers or multimedia codecs. You can skip this step as well, just press Continue.

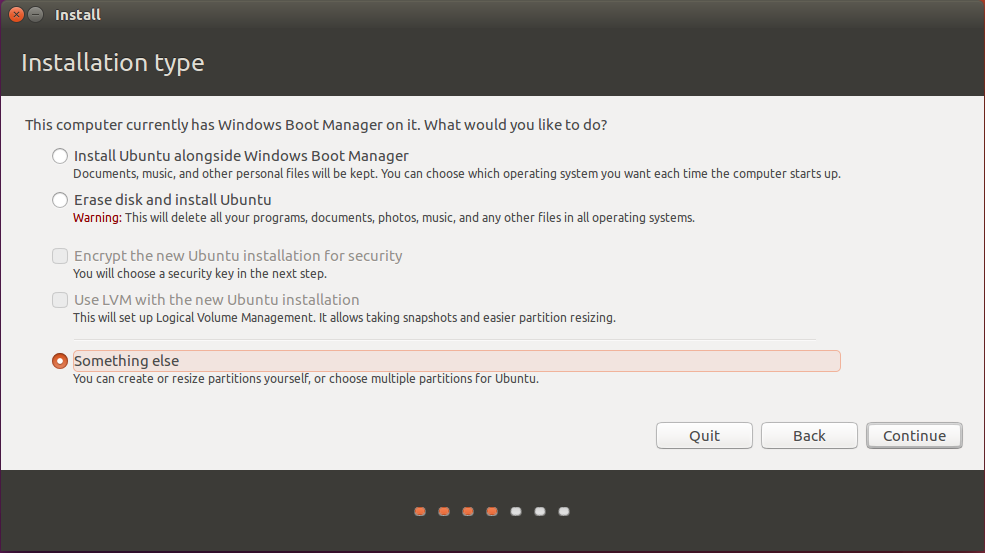
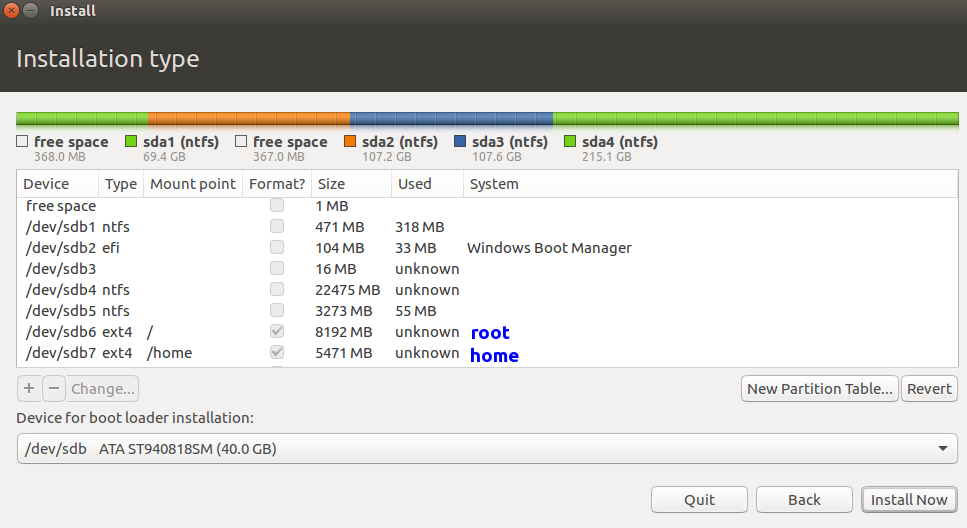
The next step is Installation type, important to dual boot windows 10 and ubuntu . As the PC already has windows 10, you must select the Something else option, highlighted on the screen shot below.
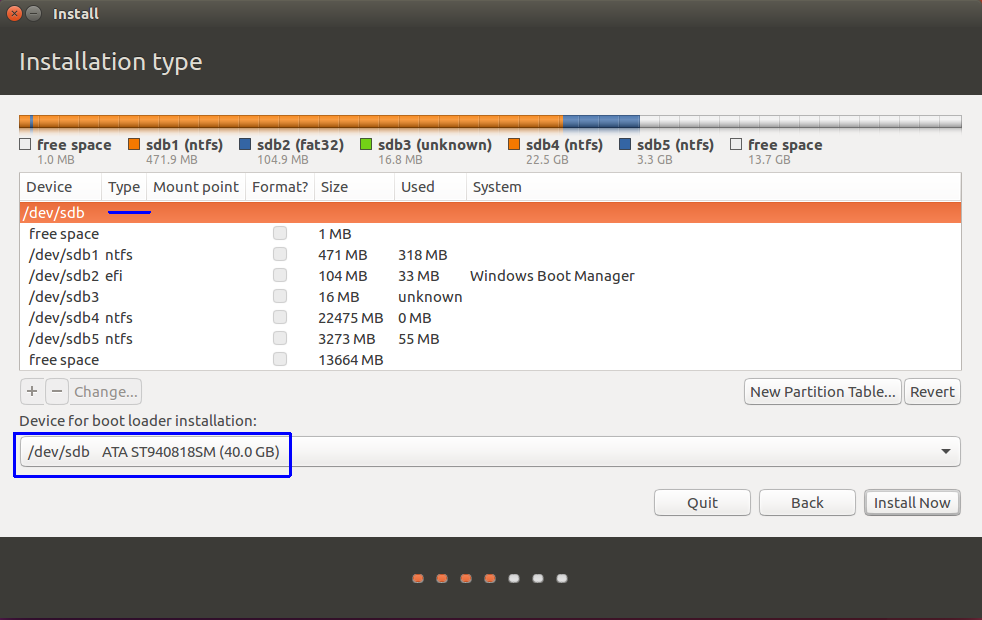
Now you have to partition the hard disk for installation, that’s the most important step. You must be very careful, you could lose important data if anything goes wrong. First select the proper HDD to partition and device to install the boot loader. In my case it’s /dev/sdb , as there’s two HDD in my laptop.
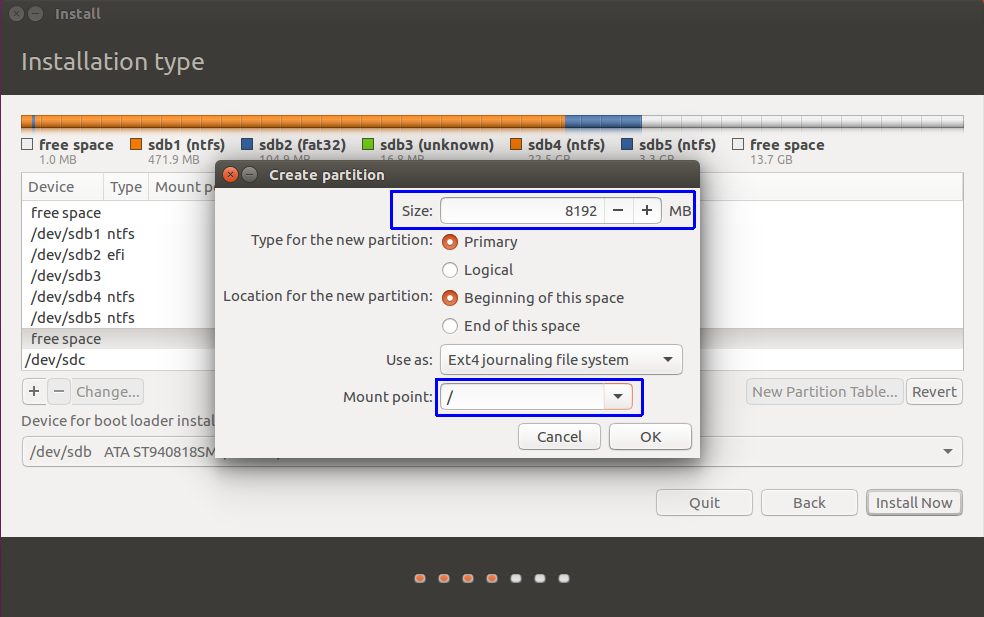
After selecting the proper HDD, you’ve to the select the free space to create the /root partition. Press the + button to create a a new disk partition. I’m creating a 8 GB root partition, which is 8192 MB.
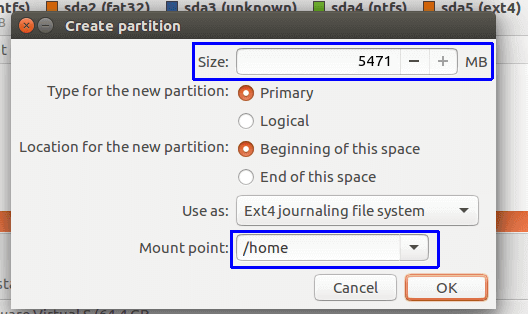
Now you’ve to create the home partition just like above, but the mount point will be /home this time, assign all the free space available to that partition.
How the final partitioned disk looks like, a screenshot below.
Next the installer will ask you, Do you want to return to the partitioning menu? Of course you don’t, just press continue button.
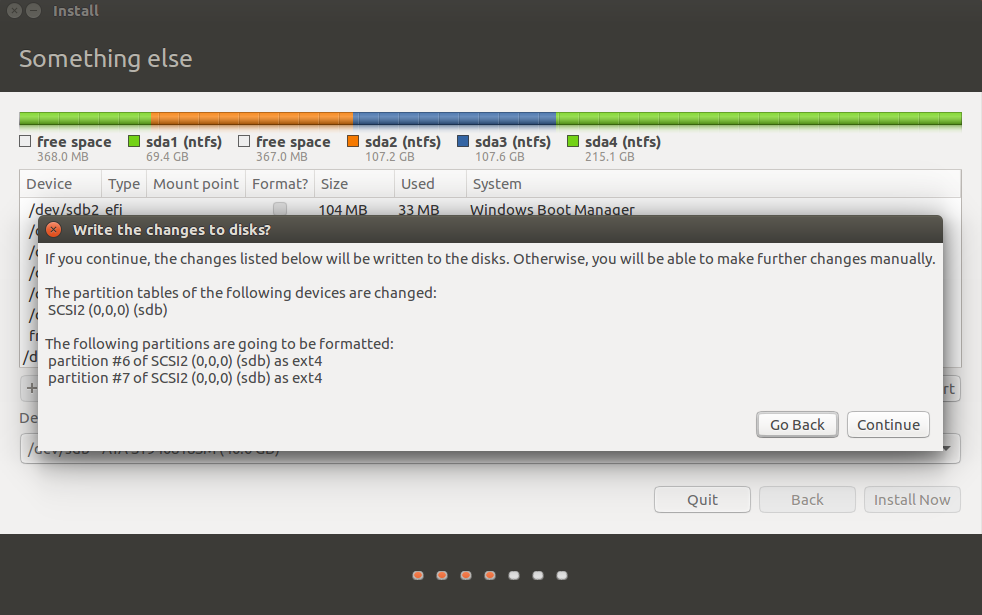
The ubuntu installer will ask you again, Write the changes to the disk? Ironically you have to, just press the continue button again.
Next you’ve to fill some basic information about you and your computer name, password and so on, a screenshot below.
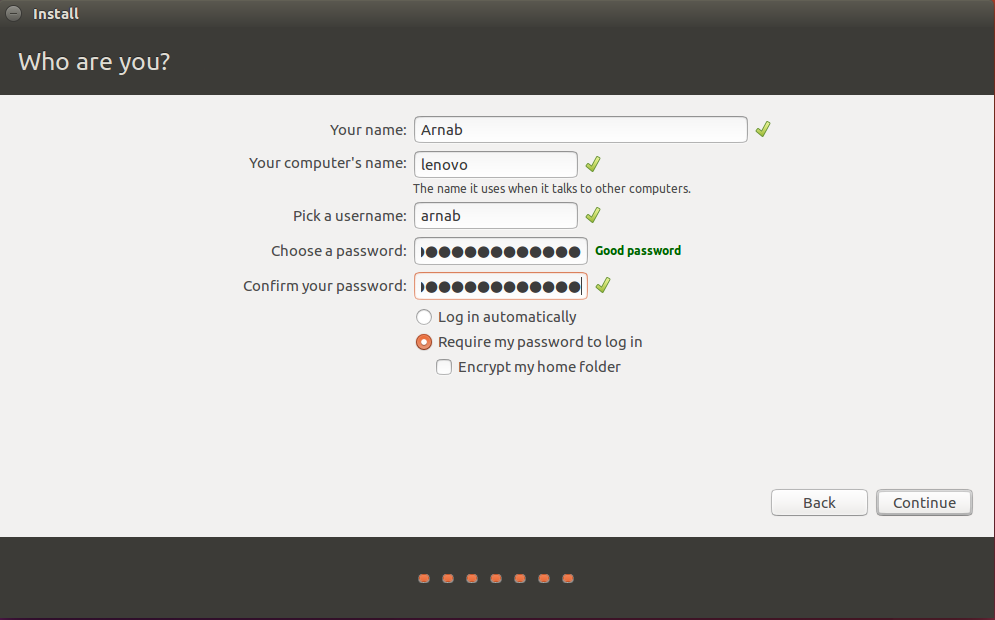
Tip: You might want to change Your computer’s name to something shorter than the default one and choose a long password with special characters. If you’re a linux beginner then you might not want to encrypt home folder right now.
You have to press the Continue button again, and you’re almost done. The installation process will take some time, between 10 to 20 minute, till then watch the slide show.
If everything was done properly, then you’ll be asked to reboot your computer.
Reboot now and draw out the installation USB drive right after seeing the OEM logo on the screen.
Testing the new dual boot Ubuntu installation
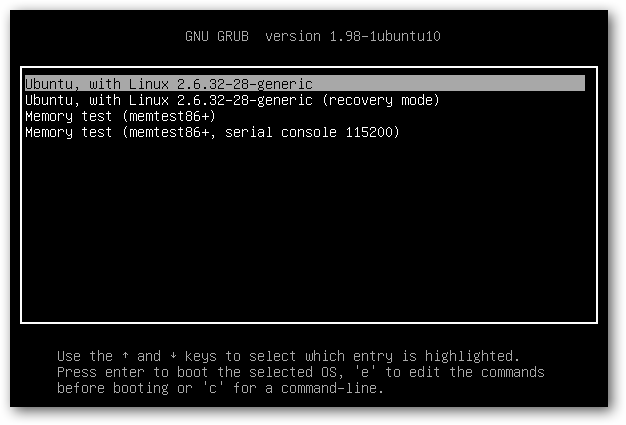
After rebooting, you can see the GRUB boot menu, listing Ubuntu and windows.
You should be able dual boot windows 10 and ubuntu without any problem from the grub menu.
So, that’s all how you can dual boot ubuntu, hope that’s simple enough to understand. I’ll be soon making a video about dual booting stay tuned.
If you have any question or suggestion, please feel free to ask or suggest through the comments.