
Протокол TFTP (Trivial File Transfer Protocol) упрощенный протокол передачи файлов, обеспечивающей простую возможность скачивания и загрузки. Обычно протокол TFTP используется для загрузки по PXE (сетевая загрузка, бездисковые рабочие станции, установка ОС по сети, и пр.), загрузки/обновления конфигурации/прошивок сетевого оборудования и ряда других специфичных задач. В проколе отсутствуют средства защиты, аутентификации и управления. Основное его преимущество – простота реализации клиентской части и высокая производительность при передаче файлов большого объема. Протокол работает по порту 69 UDP.
Содержание:
- Запуск TFTP сервера в Windows
- Установка клиента TFTP в Windows
- Установка встроенного TFTP сервера в Windows Server
Запуск TFTP сервера в Windows
Чаще всего для быстрого запуска TFTP сервера в Windows используют бесплатный opensource Tftpd64 (tftpd32). Вы можете скачать portable или установочный пакет tftpd64 здесь.
- Запустите исполняемый файл tftpd64.exe;
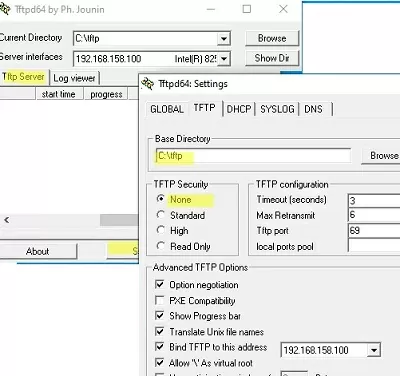
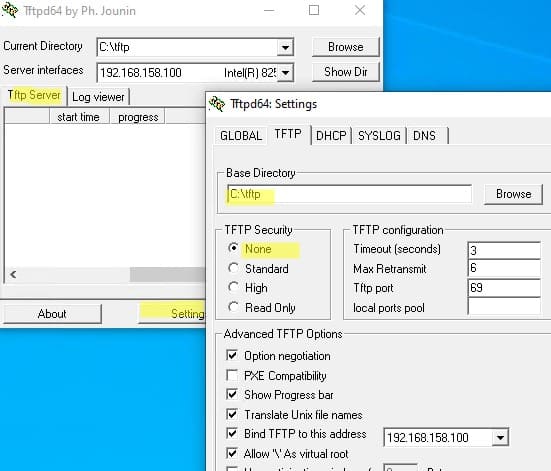
- Интерфейс tftpd64 состоит из нескольких вкладок. На вкладке Tftp Server нажмите кнопку Settings и выберите каталог, который вы хотите опубликовать;

- Выберите TFTP Security = None
- После того, как вы изменили настройки TFTP, нужно перезапустить программу.
- Откройте в Windows Firewall порт 69/UDP для входящего TFTP трафика. Можно создать разрешающее правило в файерволе Windows с помощью PowerShell: N
ew-NetFirewallRule -DisplayName 'TFTP-UDP-In' -Direction Inbound -Action Allow -Protocol UDP -LocalPort 69 - Теперь вы можете подключиться к tftp, чтобы получить или загрузить файл.

Программу tftpd64 можно использовать в качестве TFTP клиента. Перейдите на вкладку Tftp Client, укажите IP адрес TFTP сервера и порт подключения (69 по умолчанию).
Теперь вы можете скачать (Get) или загрузить (Put) файлы на указанный tftp сервер.
На вкладке Log viewer можно посмотреть логи подключений к TFTP.
Установка клиента TFTP в Windows
По умолчанию в Windows не установлен клиент TFTP. Вы можете установить в Windows 10/11 его командой:
Enable-WindowsOptionalFeature –FeatureName TFTP -Online
В Windows Server для установки клиента TFTP используется другая команда:
Install-WindowsFeature TFTP-Client
Теперь вы можете использовать утилиту tftp.exe для скачки и загрузки файлов по TFTP.
- Передать файл на TFTP сервер:
tftp 192.168.1.100 PUT имя_файла.txt - Скачать файл с TFTP:
tftp 168.1.100 GET имя_файла.txt
Установка встроенного TFTP сервера в Windows Server
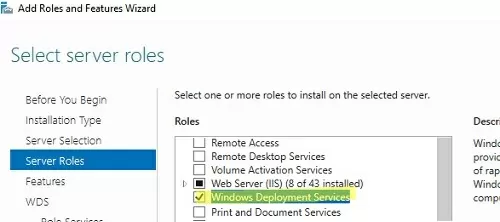
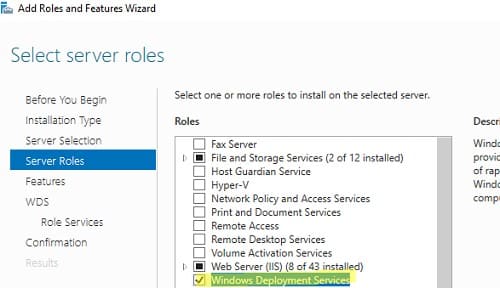
В Windows Server доступен встроенный TFTP сервер, который входит в состав роли WDS и используется для PXE загрузки и установки Windows по сети. Чтобы установить службу TFTP, откройте консоль Server Manager -> Add Roles and Features Wizard -> выберите роль Windows Deployment Services (Службы развертывания Windows).

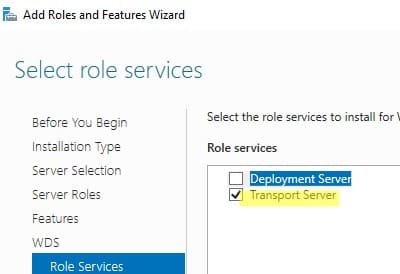
В компонентах роли WDS выберите только Transport Server (Транспортный сервер).

После завершения установки создайте каталог, который будет корневым каталогом для TFTP сервера. Например, C:\tftp.
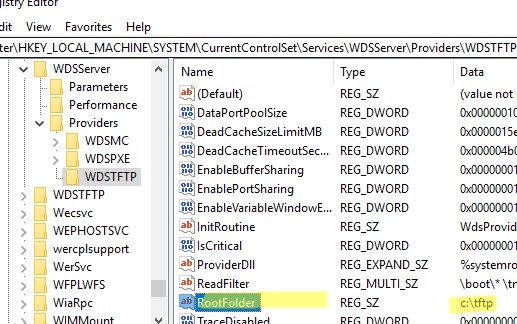
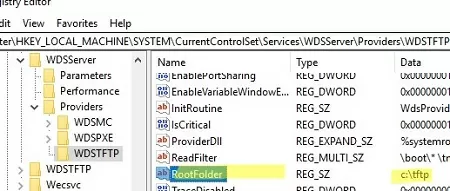
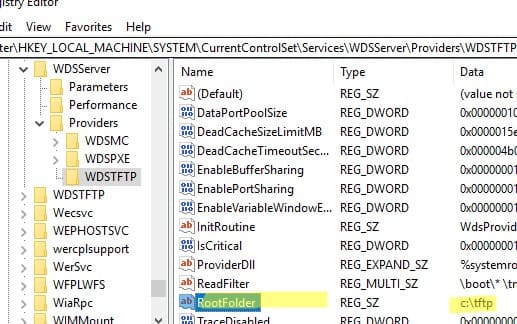
Укажите путь к корневому каталогу TFTP в строковом REG_SZ параметре RootFolder в разделе реестра HKLM\SYSTEM\CurrentControlSet\services\WDSServer\Providers\WDSTFTP
В параметре ReadFilter указан список каталогов, из которых разрешена загрузка файлов. По умолчанию загрузка возможна только из каталогов
\boot\
и
\tmp\
. Если вы используете другую структуру каталогов, нужно добавить разрешенные каталоги в параметр ReadFilter или указать тут
\*
.
Запустите службу WDSServer:
Get-Service WDSServer| Start-Service
Включить автоматический запуск службы с помощью Set-Service:
set-service WDSServer -StartupType Automatic
Проверьте, что служба запущена и ее процесс ожидает подключения на порту UDP 69:
Get-Process -Id (Get-NetUDPEndpoint -LocalPort 69).OwningProcess
В Windows Firewall доступ к UDP порту 69 отрывает правило “Windows Deployment Services (UDP-In)”. Проверьте, что правило брандмауэра включено:
(Get-NetFirewallRule -displayname 'Windows Deployment Services (UDP-In)').enabled
Попробуйте скачать файл с TFTP сервера с помощью встроенного клиента tftp.exe:
tftp -i 192.168.158.10 get test.zip
Основной недостаток встроенного TFTP сервера в Windows Server – он не позволяет открыть папку для записи. Это означает, что клиенты могут только скачивать файлы с такого TFTP сервера, но не загружать.
TFTP (Trivial File Transfer Protocol) is a simplified file transfer protocol that provides an easy way to download and upload files. Typically, TFTP is used for PXE booting (network boot, diskless workstations, etc.), import/export network equipment configs, firmware upgrades, and some other specific tasks. This protocol has no means of security, authentication, or management. Its main advantage is easy client-side implementation and high performance when large files are transferred. The protocol uses UDP port 69.
Contents:
- How to Run TFTPD64 Server on Windows
- Enable TFTP Client on Windows
- Installing Built-in TFTP Server on Windows Server
How to Run TFTPD64 Server on Windows
The most common way to quickly run a TFTP server on Windows is to use the free open-source tftpd64 (tftpd32) tool. You can download the tftpd64 portable or installation package here.
- Run the executable file
tftpd64.exe; - There are several tabs in the tftpd64 interface. In the TFTP Server tab, click the Settings button, and select the root directory you want to share;

- Then set TFTP Security = None;
- You must restart the app after changing the TFTP settings;
- Open UDP port 69 in the Windows Firewall for incoming TFTP traffic. Create a Windows Firewall rule using PowerShell:
New-NetFirewallRule -DisplayName 'TFTP-UDP-In' -Direction Inbound -Action Allow -Protocol UDP -LocalPort 69
Enable-NetFirewallRule 'TFTP-UDP-In' - You can now connect to TFTPserver to send or download files.
The tftpd64 program can be used as a TFTP client. Specify the IP address of the TFTP server and the connection port (69 by default) in the TFTP Client tab.
You can now download (Get) or upload (Put) files to the specified tftp server.
Use the Log Viewer tab to review the TFTP operation and connection logs.
Enable TFTP Client on Windows
The TFTP client is not installed by default on Windows. You can install it on a Windows 10 or 11 machine with the command:
Enable-WindowsOptionalFeature –FeatureName TFTP -Online
A different command is used to install the TFTP client on Windows Server:
Install-WindowsFeature TFTP-Client
You will now be able to use the tftp.exe command line tool to upload and download files via TFTP.
- Send (upload) file to TFTP server:
tftp 192.168.51.100 PUT testfile.bin - Download file from TFTP:
tftp 192.168.51.100 GET testfile.bin
Installing Built-in TFTP Server on Windows Server
Windows Server has a built-in TFTP server that is part of the WDS role. It is used for PXE booting or installing Windows over the network. To install the TFTP service, open the Server Manager -> Add Roles and Features Wizard -> select the Windows Deployment Services role.
Select Transport Server only in the WDS role components.
Create a directory that will be the root directory for the TFTP server. For example, C:\tftp.
Specify the path to the TFTP root directory in the REG_SZ parameter RootFolder under the following registry key HKLM\SYSTEM\CurrentControlSet\services\WDSServer\Providers\WDSTFTP
The ReadFilter parameter contains a list of directories from which files can be downloaded. By default, you can only download files from the \boot\ and \tmp\ directories. You must add allowed directories to the ReadFilter parameter or specify \* here if you are using a different directory structure.
Start the WDSServer service and change the startup type to Automatic.
Get-Service WDSServer| Start-Service
 Set-service WDSServer -StartupType Automatic
Check that the TFTP service is running and that its process is listening on UDP port 69:
Get-Process -Id (Get-NetUDPEndpoint -LocalPort 69).OwningProcess
Windows Deployment Services (UDP-In) should be enabled in Windows Defender Firewall to allow access to TFTP on port UDP/69.
(Get-NetFirewallRule -displayname 'Windows Deployment Services (UDP-In)').enabled
Try downloading a file from a TFTP server using the built-in tftp.exe client:
tftp -i 192.168.158.10 get test.zip
The main drawback of the built-in TFTP server in Windows Server is that it does not allow you to upload files. Clients can only download files from such a TFTP server.
В этой статье мы рассмотрим процесс установки и настройки TFTP сервера в операционной системе Windows. Протокол TFTP (Trivial File Transfer Protocol) представляет собой упрощенный протокол передачи файлов, обеспечивающий простую возможность загрузки и скачивания. Обычно он используется для таких задач, как сетевая загрузка (PXE), установка операционных систем по сети, обновление прошивок сетевого оборудования и другие специфичные задачи. TFTP отличается своей простотой и высокой производительностью при передаче файлов, однако в нем отсутствуют средства защиты и аутентификации.
Основные характеристики TFTP
TFTP работает по порту 69 (UDP) и не предоставляет средств для управления и безопасности. Его основное преимущество — это простота реализации клиентской части и высокая производительность при передаче крупных файлов.
Запуск TFTP сервера в Windows
Для быстрого развертывания TFTP сервера в Windows часто используют бесплатную утилиту Tftpd64 (или Tftpd32), которая является open-source решением. Эту утилиту можно скачать в виде portable версии или в виде установочного пакета.
Шаги по настройке Tftpd64:
1. Скачайте и запустите исполняемый файл tftpd64.exe.
2. В интерфейсе Tftpd64 перейдите на вкладку Tftp Server и нажмите кнопку Settings.
3. Выберите каталог, который вы хотите опубликовать, и установите TFTP Security в положение None.
4. После изменения настроек перезапустите программу.
5. Откройте в Windows Firewall порт 69/UDP для входящего трафика TFTP. Для этого можно создать разрешающее правило с помощью PowerShell:
New-NetFirewallRule -DisplayName 'TFTP-UDP-In' -Direction Inbound -Action Allow -Protocol UDP -LocalPort 69
Теперь сервер готов к подключению для загрузки или скачивания файлов по TFTP.
Использование Tftpd64 в качестве TFTP клиента
Tftpd64 также можно использовать как TFTP клиент. Для этого перейдите на вкладку Tftp Client, укажите IP-адрес TFTP сервера и порт подключения (по умолчанию 69). Теперь вы можете:
— Скачать файл с сервера (Get);
— Загрузить файл на сервер (Put).
Для просмотра логов подключений перейдите на вкладку Log Viewer.
Установка TFTP клиента в Windows
По умолчанию клиент TFTP не установлен в Windows. Для установки в Windows 10 или 11 можно использовать следующую команду PowerShell:
Enable-WindowsOptionalFeature –FeatureName TFTP -Online
Для установки клиента TFTP на Windows Server используется другая команда:
Install-WindowsFeature TFTP-Client
После установки вы сможете использовать утилиту tftp.exe для передачи файлов по TFTP.
Примеры команд:
— Передать файл на TFTP сервер:
tftp 192.168.1.100 PUT имя_файла.txt
— Скачать файл с TFTP сервера:
tftp 192.168.1.100 GET имя_файла.txt
Установка встроенного TFTP сервера в Windows Server
В операционной системе Windows Server доступен встроенный TFTP сервер, который является частью роли WDS (Windows Deployment Services). Он используется для сетевой загрузки (PXE) и установки Windows по сети.
Шаги по установке:
1. Откройте Server Manager и выберите Add Roles and Features Wizard.
2. Установите роль Windows Deployment Services (WDS).
3. В настройках WDS выберите компонент Transport Server.
4. После завершения установки создайте каталог для файлов TFTP сервера (например, C:\tftp).
5. Укажите путь к корневому каталогу TFTP сервера в параметре реестра RootFolder:
HKLM\SYSTEM\CurrentControlSet\services\WDSServer\Providers\WDSTFTP
6. В параметре ReadFilter можно задать каталоги, из которых разрешена загрузка файлов. По умолчанию разрешена загрузка только из каталогов \boot\ и \tmp\. Чтобы разрешить загрузку из других каталогов, добавьте их в этот параметр или установите значение \* для всех каталогов.
Запуск TFTP сервера:
1. Запустите службу WDS с помощью команды:
Get-Service WDSServer | Start-Service
2. Настройте автоматический запуск службы:
Set-Service WDSServer -StartupType Automatic
3. Проверьте, что служба запущена и ожидает подключения на порту UDP 69:
Get-Process -Id (Get-NetUDPEndpoint -LocalPort 69).OwningProcess
4. Убедитесь, что правило брандмауэра для доступа к порту UDP 69 включено:
(Get-NetFirewallRule -DisplayName 'Windows Deployment Services (UDP-In)').Enabled
Пример использования встроенного клиента:
Попробуйте скачать файл с TFTP сервера с помощью встроенного клиента tftp.exe:
tftp -i 192.168.158.10 GET test.zip
Основным недостатком встроенного TFTP сервера в Windows Server является невозможность открыть папку для записи. Это означает, что клиенты могут только скачивать файлы с такого TFTP сервера, но не загружать их.
Заключение
В статье мы рассмотрели процесс установки и настройки TFTP сервера в Windows, используя как сторонние решения, так и встроенные возможности Windows Server. TFTP — это простой и производительный протокол, часто используемый для загрузки прошивок, обновления сетевого оборудования и PXE загрузки операционных систем. Несмотря на свою простоту, TFTP имеет ряд ограничений, таких как отсутствие защиты и невозможность записи файлов на встроенном сервере Windows Server.
В моей практике часто приходится подготавливать новые компьютеры, в плане установки ОС и программного обеспечения. Количество ПК для подготовки может варьироваться от двух и более. Конечно, можно при себе иметь две-три флешки с установочной версией необходимой ОС и прочего ПО, но если компьютеров будет больше трех, к примеру шесть? Это означало бы, подготовку оборудования в два подхода. Что в свою очередь, отнимет драгоценное время и подарит связку из установочных флешек. А если к этому еще и добавить необходимость диагностировать ПК, с какими либо проблемами в работе, параллельно установке вышеописанных шести компьютеров. Связка флешек может пополнится минимум еще одной.
Сама сетевая загрузка выглядит следующим образом. В BIOS материнской платы активируется функция OnBoard LAN Boot ROM (данная функция как раз и включает исполнение кода PXE прошивки) и в качестве первого загрузочного устройства выбирается сетевая карта.
Во время загрузки, BIOS передает управление загрузочной микропрограмме сетевой карты. Цель данной программы, получить сетевые настройки (IP адрес, маску подсети, шлюз), адрес сервера с которого будет производится дальнейшая загрузка, и имя файла который следует загрузить с сервера и выполнить. Запрос, ожидание и принятие всех вышеописанных настроек осуществляется протоколом BOOTP.
Итак, микропрограмма сетевой карты запустилась. Что происходит дальше? А дальше, она посылает широковещательный запрос, с целью найти DHCP сервер, который предоставит все вышеописанные настройки. Это означает, что в сети должен присутствовать DHCP сервер. При наличии DHCP сервера, и получении от него ответа, микропрограмма сетевой карты примет переданные ей настройки. А именно установит сетевые параметры (IP адрес, маску подсети, шлюз), после чего попытается подключится к серверу загрузки по протоколу TFTP и загрузить с него указанный исполняемый файл. То есть, кроме DHCP сервера в сети еще должен присутствовать TFTP сервер.
При наличии TFTP сервера, и присутствии на нем указанного файла, микропрограмма сетевой карты загрузит и попытается его выполнить. Если данный файл действительно исполняемый, то дальнейшая загрузка будет продолжаться согласно инструкциям прописанным в данном файле. Обычно данным файлом является загрузчик (bootmgr, grub4dos, syslinux) которому будет передано дальнейшее управление.
Tftp32(64)
Для операционной системы Windows, а организовывать сетевую загрузку мы будем именно на этой платформе, существует программа, именуемая Tftpd32 или Tftpd64, в зависимости от используемой разрядности ОС. Она сочетает в себе возможность запуска следующих сервисов: TFTP, SNTP, DHCP, DNS, Syslog. И все это при размере программы в ~340 КБ.
Ею мы и воспользуемся для дальнейших действий.
Установка Tftp32(64)
Скачать дистрибутив Tftp32(64) можно отсюда. На странице загрузки доступны несколько редакций программы Standart, Portable и Service Edition.

Первые две ничем не отличаются, разве что наличием установщика, и запускаются вручную. Третья же редакция, устанавливается в виде службы Windows. А это означает что, она может работать до входа пользователя в систему, сразу после загрузки Windows. Её мы и установим.
Так как у меня 64-битная версия ОС Windows, устанавливать я буду Tftp64. Актуальная версия на момент написания этих строк 4.60. Скачиваем установщик и запускаем.

Подтверждаем внесение изменений.

Соглашаемся с условиями лицензии нажатием кнопки I Agree.

На этапе выбора компонент для установки, ставим галочку напротив пункта Start service Tftpd32_svc и нажимаем на кнопку Next.

На данном этапе можно указать расположение для устанавливаемых файлов нажатием на кнопку Browse и выбора нового месторасположения. После жмем на кнопку Install, тем самым запуская процесс установки.

По окончании, установщик оповестит об успешности произведенной операции. Нажимаем OK.

В последнем окне, можно наблюдать отчет о проделанной работе установщиком. Если интересно, изучаем его, а затем закрываем установщик кнопкой Close. Установка на этом завершена.
Настройка Tftp32(64)
После установки Tftp64 на рабочем столе появится соответствующий значок.
Запускаем его двойным щелчком мыши. Откроется главное окно мониторинга запущенных служб программы. Представлены они в виде вкладок с информационными полями.

Перейдем к настройке нажатием на кнопку Settings (в нижней части окна по центру). Откроется окно настроек. Переходим в нем на вкладку GLOBAL.
В секции Start Services оставляем галочки на пунктах TFTP Server и DHCP Server. Так как нам нужны только эти службы.
Теперь настроим каждую службу по отдельности. Начнем с TFTP. Для этого перейдем на одноименную вкладку в окне настроек программы. По умолчанию настройки следующие.
В настройках TFTP сервера, в секции Base Directory, нам необходимо указать папку, которая будет являться корневой директорией для данного сервера. В данной директории будут располагаться все загрузочные файлы, поэтому позаботьтесь чтобы она располагалась на диске с достаточным свободным местом. В моем случае это будет директория D:\TFTP.
Вторым делом, нужно указать сетевой адрес к которому будет привязан TFTP сервер. Ставим галку на пункт Bind TFTP to this address, и выбираем из списка интерфейс, который смотрит в необходимую нам сеть. В моем случае это интерфейс с адресом 192.168.0.2.
И третье, включаем опцию Allow «\» As virtual root. Данный параметр делает каталог, выбранный в разделе Base Directory, корневым для TFTP сервера.
Все вышеописанное будет выглядеть так.
И последнее, настройка DHCP сервера. Переходим на вкладку DCHP. По умолчанию данный раздел выглядит следующим образом.
Небольшое отступление. Если в вашей сети уже есть DHCP сервер, то можно отказаться от встроенного в Tftpd32(64), при условии что в текущем можно прописать опции 66 — адрес TFTP сервера, и 67 — путь до загрузочного файла.
В моем случае, в сети DHCP сервер присутствует. Но настроить указанные выше опции в нем невозможно, так как запущен он на простеньком роутере D-Link DIR-615.

Выходов из данной ситуации два, либо полностью отказаться от DHCP сервера на роутере, но при этом постоянно нужно будет держать включенным компьютер с запущенной программой Tftpd32(64) с активным DHCP. Чтобы остальные клиенты сети, в частности мобильные устройства (планшеты, телефоны) могли работать. Либо использовать сразу оба DHCP сервера, при этом каждому выделить свой диапазон адресов.
Мне больше подходит второй вариант. Разделение сети следующее, диапазон адресов 192.168.0.2-199 отведен под раздачу для DHCP на роутере. А диапазон 192.168.0.200-250 отведен для Tftp32(64) DHCP.
Теперь вернемся к настройкам программы. В секции DHCP Pool Definition, в поле IP pool start address, вписываем начальный IP адрес диапазона адресов, в моем случае 192.168.0.200. В поле Size of pool прописываем размер диапазона адресов, в моем случае 50. Остальные параметры данной секции оставляем без измененеий.
В секции DHCP Options, в поле Def. router (Opt 3) прописываем IP адрес основного шлюза сети, в моем случае это адрес 192.168.0.1. В поле Mask (Opt 1) прописываем маску текущей сети, в моем случае маска следующая 255.255.255.0. В поле DNS servers (Opt 6) прописываем DNS сервер, в данном поле я указал сервер 8.8.8.8.
В секции DHCP Settings ставим галочку у пункта Double answer if relay detected, и галочку Bind DHCP to this address выбрав необходимый сетевой интерфейс к которому будет привязан DHCP сервер, в моем случае 192.168.0.2.
Итак, приведу итоговый скрин с проделанными изменениями.
На этом необходимые настройки программы выполнены. Нажимаем на кнопку OK, в нижней части окна, для сохранения внесенных изменений. Программа попросит перезапустить себя для применения настроек.
Нажимаем OK, после чего закрываем программу и снова ее открываем.
После рестарта, в окне программы видны внесенные нами изменения, а именно, прописана директория TFTP и выбран интерфейс сервера. Так же, пропадут вкладки неиспользуемых служб.
Продолжение следует…
В следующей статье будет рассмотрена тема установки загрузчиков на TFTP сервер, и их конфигурирование. А пока, на сегодня все.
P. S. Дополнения к этому материалу.
Установка загрузчика BOOTMGR на TFTP сервер
TFTP is critical in maintaining embedded device patches and configurations and will be around for a long time to come. We show you the best TFTP servers for both Windows and Linux systems.
Linux and Internet Security Expert
Updated: November 20, 2024

A TFTP (Trivial File Transfer Protocol) server is a simple file transfer protocol commonly used in computer networking environments. It allows for the transfer of files between a TFTP server and client devices over a network.
Unlike other file transfer protocols such as FTP or SFTP, TFTP is a lightweight protocol that provides basic functionality with minimal features.
The main purpose of a TFTP server is to facilitate the efficient transfer of files, particularly in situations where a small and lightweight protocol is sufficient.
Here’s our list of the best free TFTP server software:
- Windows TFTP Utility EDITOR’S CHOICE This is a straightforward tool for transferring files via TFTP protocol. It’s lightweight, easy to use, and ideal for network device configurations.
- TFTPD64 A package of useful network monitors that includes a DHCP server monitor, a DNS monitor, and a Syslog server as well as a TFTP server software.
- haneWIN TFTP server 32-bit and 64-bit TFTP server for Windows environments that can be restricted in operations to IP address or directory.
- Pinkie A bundle of tools delivered in a tabbed interface that runs on Windows systems and includes a TFTP server.
- SolarWinds Free TFTP server This tool runs on Windows and includes an IP-range lock-down and can transfer files up to 4GB in size.
- atftpd Linux command-line utility that is fast at transferring files but has no inherent network security.
- tftpd-hpa Straightforward Linux command line TFTP system.
- macOS TFTP server Simple command line TFTP server for macOS.
What is TFTP?
TFTP stands for Trivial File Transfer Protocol. It is a simple file transfer protocol that is commonly used in computer networking environments. TFTP is a stripped-down version of the File Transfer Protocol (FTP) and is designed to be lightweight and easy to implement.
It operates on UDP (User Datagram Protocol) port 69 and does not require authentication or encryption.
The protocol is not capable of allowing more advanced functionality but compensates by using the lockstep method of fault-tolerance that makes it extremely reliable. Due to this limited functionality, TFTP servers can have an extremely small footprint on the disk as well as in memory, making it ideal for use in embedded network devices.
Caution: TFTP has zero security. There is no concept of user accounts so anyone will be able to connect to your TFTP server. Ensure your server machine is secured in some other way such as with a firewall or by limiting the network interfaces the server listens on.
Linux is far and away the most common operating system on the type of devices where you’re likely to encounter a TFTP server. But, there is also a rich ecosystem of Windows and macOS devices that run device firmware (think Apple TVs and Microsoft Surface for a few examples).
See also:
- Best SCP servers
- Best SFTP servers
The Best Free Windows TFTP server software
Our methodology for selecting free TFTP server software
We reviewed the market for free TFTP servers and analyzed the options based on the following criteria:
- A lightweight program that can be integrated into task automation scripts
- A utility that can be deployed for repetitive tasks on a range of IP addresses
- A fast transmission method with low traffic overheads
- The ability to work with virtual environments
- An activity log
- Status reports on termination conditions for unattended execution
- The ability to allow many transfers to run concurrently
We also looked at reliability, ease of setup and use, sufficient documentation and support, and tool robustness in diverse industry use.
1. Windows TFTP Utility
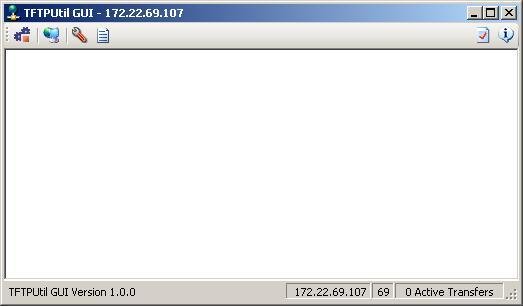
The Windows TFTP Utility is a bare-bones TFTP server for Windows systems. It is extremely small and has almost no configuration options. On the one hand, that allows the utility to be very small and fast. On the other hand, it means that you’re unable to specify some basic configuration such as which network interface to bind.
Key Features:
- Free tool: Permanently free to use
- Low overheads: Doesn’t use much CPU capacity
- .NET utility: Available as a class that can be integrated into custom programs
- Run continuously: Start the program and let it receive files
- Request Logging: Provides a range of logging options, including to an SQL Server database.
Why do we recommend it?
Windows TFTP Utility is a free utility for Windows, but its name is a little confusing. To be clear, this isn’t a Microsoft product and it isn’t part of Windows. Rather, it is a third-party enthusiast-developed tool that can be installed on Windows. The big advantage of this tool is that it is very basic, which is what most people want from a TFTP server.
Who is it recommended for?
This utility is only suitable for internal use on a private network because, like any TFTP system, it doesn’t include encryption. An advantage of this tool is that it has almost no features, so it is very straightforward and uses very little memory. A nice feature of this tool is that it can be included into your own programs as a function call, so administrators who like to write their own scripts will like this solution.
Pros:
- Network utility: Use only on a secure network
- No encryption: Follows the standard protocol of TFTP
- Use with network devices: Receive and store configuration images
- Firmware distribution: Use to update the firmware on switches and routers
- Assists automation: Can be integrated into task automation scripts.
Cons:
- Dated: The utility is nine years old
The small size comes from a reliance on the .NET framework. But, if you do not already have the .NET framework installed for some other application, that can result in a heavy installation footprint so this utility may not be optimal for every use-case. In addition, it comes with a .NET class that developers can use to incorporate TFTP into their own applications.
EDITOR’S CHOICE
Windows TFTP Utility is our top pick for a TFTP server because it offers a lightweight yet powerful solution for transferring files using the Trivial File Transfer Protocol (TFTP). Its streamlined interface ensures that users, regardless of technical proficiency, can quickly set up and manage file transfers. The most important features of this tool include its exceptional speed and reliability, making it an ideal choice for network administrators who need to transfer configurations, firmware, or boot files to routers, switches, and other network devices. Unlike many alternatives, Windows TFTP Utility supports large file transfers and can handle multiple simultaneous connections, making it versatile for both small-scale and enterprise-level applications. The utility also excels in security. It offers customizable access controls, ensuring only authorized devices can access sensitive files. Additionally, its minimal resource footprint allows it to run efficiently on older systems or in constrained environments, which is crucial for IT teams managing diverse networks. Moreover, its comprehensive logging capabilities aid in monitoring and troubleshooting transfers, providing insights into failed or successful operations. Although this utility won’t help users of macOS or Linux, the Windows TFTP Utility is a solid, free tool that implements the Trivial File Transfer Protocol well.
OS: Windows
2. TFTPD64
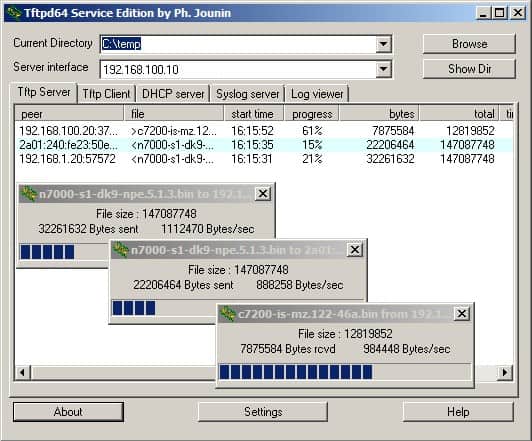
Tftpd64 is a free TFTP server for Windows. The utility also includes a TFTP client, a DNS server, a DHCP server, and a Syslog server. There is also a SNTP receiver in the package to coordinate with the Simple Network Time Protocol.
Key Features:
- Made for Windows: For 64-bit architecture PCs
- Multiple functions: The utility provides both TFTP client and server programs
- Small footprint: Uses few system resources
Why do we recommend it?
TFTPD64 is a package of utilities that includes a TFTP client and a TFTP server. You also get a DHCP server and log management functions in this handy free tool.
It is not only a sleek TFTP server but also bolts on some other features. The list of additional features includes a DHCP server, a DNS server, SNTP (time) server, and a Syslog server, so it will help you manage your IP addresses as well.
Who is it recommended for?
The network administrators of small businesses will enjoy using this utility because it provides a string of useful tools in one interface. Larger networks will need more sophisticated tools.
Pros:
- Other utilities: The tool also provides log management functions and a DNS server
- Syslog: Collects Syslog messages
- Windows utility: Not a command line system
Cons:
- Windows only: No version for macOS or Linux
It’s pretty difficult to come up with a scenario where you’d need that particular set of features in a single application, but using one or two in addition to a TFTP server may fulfill some need. There is also a 32-bit version of this tool, which is called Tftpd32, which is also free to use.
3. haneWIN TFTP server
The haneWIN TFTP server is a full-featured 32-bit and 64-bit TFTP server that runs on Windows XP/VISTA/20xx (servers)/7/8/10. It breaks from the TFTP model a bit by supporting access controls, which are not natively part of TFTP. This TFTP server can restrict IP addresses to only allow downloading or uploading and access to server directories.
Key Features:
- Multiple functions: Both client and server are available
- Permanently free: Not a free trial
- Small footprint: Uses few system resources
Why do we recommend it?
The haneWIN TFTP server is a slight improvement on the traditional TFTP server because it adds access control to its procedures and can restrict the IP addresses that it will deal with, which goes some way to reducing the risk of intruder manipulation of the file transfer process.
Who is it recommended for?
Network administrators will appreciate the ability to integrate this TFTP server into a script. That opens up the possibility to include file verification processes and other security measures to strengthen the security of networks using TFTP.
Pros:
- Made for Windows: Available for 32-bit and 64-bit PCs
- Other utilities: Includes a DHCP server
- Activity logging: Records all events
Cons:
- Windows only: No versions for macOS or Linux
An interesting feature is that it can also be run completely on the command-line which makes it very useful for scripted actions. It also includes a TFTP client that runs as a DLL. HaneWIN Software also produces a DHCP server that has an integrated TFTP server.
4. Pinkie
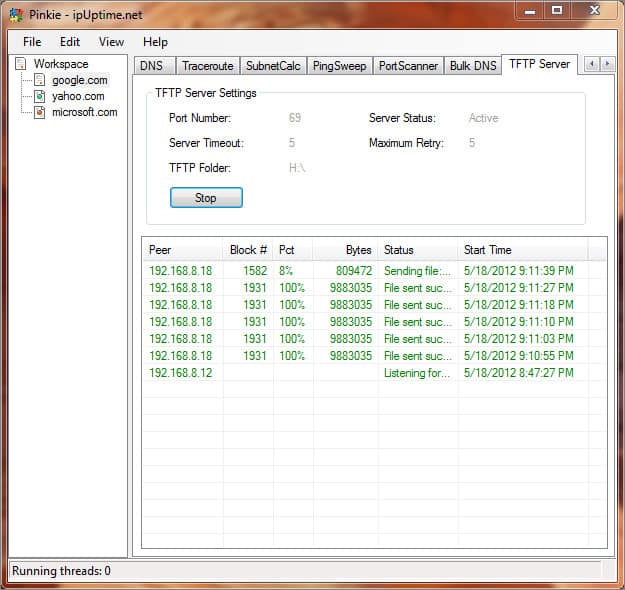
Pinkie is a free Windows-based network monitoring toolset. The different tools in the utility are accessed through tabs at the top of the main dashboard panel of the user interface. This useful little bundle from IPUptime also includes a DNS server, Ping, and Traceroute. The Pinkie TFTP Server just listens. It will pick up any messages sent to its host on port 69.
Key Features
- Multi-function utility: Includes network testing Ping and Traceroute services
- TFTP server: Receives files sent by devices on the network
- No encryption: Only for use within a secure network
Why do we recommend it?
Pinkie is a bundle of useful tools and in many ways, it is very similar to TFTPD64. Both of these systems are free and run on Windows. The main tool at the heart of Pinkie is its Ping implementation, which tests connection conditions. Unlike TFTPD64, there is no TFTP client in this package. However, its TFTP server is respectable and fuss-free.
Who is it recommended for?
This TFTP server is a suitable tool for small networks. A little extra security in the tool would be nice. However, TFTP is an insecure protocol and that isn’t Pinkie’s fault.
Pros:
- Two way: Send and receive files
- Other functions: Subnet calculator, port scanner, and DNS server
- Multi-threaded architecture: Fast transfers
Cons:
- Windows only: Not available for macOS or Linux
The settings for the server can be altered through another tabbed window that can be called up from the top menu. It will overlay the server, so you don’t need to turn it off to access the configuration system. This tool is straightforward and easy to use.
5. SolarWinds TFTP Server
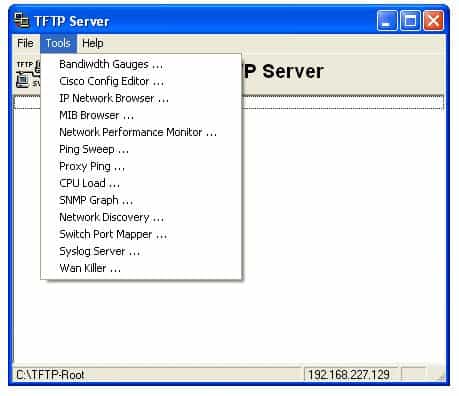
The TFTP Server software offered by SolarWinds is a 100% free version that runs on Windows only. It is not an expiring trial. It offers basic functionality such as IP-range lockdown and can transfer files up to 4GB in size. It runs as a Windows service which makes it easier to manage with native Windows tools.
Key Features:
- Firmware distribution: Use within a network
- Large files: Although TFTP is usually for small file movements
- Configuration backup: Move configuration images to archive and back again
- Concurrent operations: Manage transfers to and from multiple devices simultaneously
- Reliable: Provided by a reputable brand
Why do we recommend it?
SolarWinds TFTP server is a lightweight file transfer utility, which is exactly what a TFTP server should be. This tool is a fuss-free solution and it is free to use. The program runs on Windows and Windows Server and it can be used to manage the movement of files of u to 4 GB in size, which is large for a TFTP system.
Who is it recommended for?
TFTP lacks security measures so its deployment should be used with caution. Traditionally TFTP is used to move network device images into storage and back again and this is a good use for the SolarWinds system. However, file protection needs to be considered even on a private network.
Pros:
- Maximum file size: 4 GB limit is a large allowance per file
- Constant availability: Run continuously to receive scheduled periodic transfers
- Lightweight tool: Like all TFTP systems, this tool has no encryption
- Local use: TFTP is only for use within secure networks
- Network devices: The server receives files from switches and routers
Cons:
- Made for Windows: Doesn’t run on macOS or Linux
If you only need a TFTP server, then this SolarWinds tool is very attractive. However, it is likely that you need many network monitoring and management tools and so you should also look at the Engineer’s Toolset. That package has more than 60 useful tools and it includes the TFTP server.
You can also take a look at the Small Business Network Management Bundle. That package adds on the Kiwi Syslog Server, Kiwi CatTools, and the Network Topology Mapper to the Engineer’s Toolset.
The best Free Linux TFTP servers
There are a variety of TFTP servers available for most Linux distributions. A popular one is the Advanced TFTP server that comes in a package named atftpd. The ‘d’ at the end of many Linux packages stands for daemon, which is a Unix-like term for an application that runs in the background. A Linux daemon is akin to a Windows service.
The ATFTP server supports multicast and is multithreaded which makes it a little more flexible to deploy in non-standard network installations. Use apt-get or yum to install it, depending on your Linux distribution.
1. atftpd
$ sudo apt-get install atftpd
Reading package lists... Done
Building dependency tree
Reading state information... Done
The following NEW packages will be installed:
 atftpd
Key Features:
- Easy to install: This is a package in Linux
- Free to use: Not a free trial
- Server: Receives files from other devices
Why do we recommend it?
The atftpd system is a typical command line system that busy network administrators will enjoy. This is a “set it and forget it” utility for receiving files over TFTP and has very few features – not even a GUI interface.
You’ll find the sparse configuration file for atftpd in `/etc/default/atftpd. Set up some quick options such as what ports to listen on, and whether to run as a daemon or via inet.d, and you’re ready to go.
$catatftpd
USE_INETD=true
OPTIONS="--tftpd-timeout300--retry-timeout5--mcast-port1758--mcast-addr239.239.239.0-255--mcast-ttl1--maxthread100--verbose=5/srv/tftp"
You’ll need a TFTP client. There are many, but the atftp client is a quick and easy command line solution. To install it, use apt-get install atftp. Then connect and upload a file:
$ atftp 192.168.2.146
tftp> put emptyfile
tftp> quit
We can see the emptyfile has been uploaded to the path specified in the config file /srv/tftp
$ ls -l /srv/tftp
-rw-rw-r--1 jdw jdw 0 Nov 510:44 emptyfile
Who is it recommended for?
Network administrators with little time to fiddle with system utilities will appreciate the no-nonsense format of atftpd. There is also an associated free TFTP client available.
Pros:
- Low impact: small resource footprint
- Not encrypted: Only for use on secure networks
- Run as a daemon: Set it to run continuously
Cons:
- No GUI: Only available as a command line tool for Linux
2. tftpd-hpa
Another popular TFTP server for Linux is tftpd-hpa. Since the TFTP protocol is so simple, there are no really obvious advantages to choosing one TFTP server over another. However, due to dependencies and documentation deficiencies, sometimes one server will work better than another. If you’re unable to get atftpd working, give tftpd-hpa a try.
Key Features:
- TFTP option: An alternative to atftpd
- Small footprint: Doesn’t use many system resources
- Run continuously: A demon for receiving small files
Why do we recommend it?
The free tftpd-hpa is almost identical to atftpd. It would be difficult to recommend one over the other, so both of these command line TFTP servers for Linux are included in this list.
$ sudo apt-get install tftpd-hpa
Reading package lists... Done
Building dependency tree
Reading state information... Done
The following package was automatically installed and is no longer required:
 xinetd
Use 'sudo apt autoremove'to remove it.
Suggested packages:
 pxelinux
The following NEW packages will be installed:
 tftpd-hpa
You’ll find the configuration file in /etc/default/tftpd-hpa:
$ cat /etc/default/tftpd-hpa
 #/etc/default/tftpd-hpa
TFTP_USERNAME="tftp"
TFTP_DIRECTORY="/var/lib/tftpboot"
TFTP_ADDRESS=":69"
TFTP_OPTIONS="--secure"
Modify the settings as desired, then startup the server using sudo service tftpd-hpa restart.
Who is it recommended for?
This TFTP server doesn’t have an associated TFTP client. So, that probably puts this tool in second place behind atftpd. However, if you are having trouble with that other recommended free TFTP server for Linux, try this one.
Pros:
- Encryption-free: Follows the TFTP specification and doesn’t manage encryption
- Limited use: Only for use on a secure private network
- Command line tool: No GUI interface
Cons:
- Not user-friendly: The command line system will only appeal to system administrators
The best macOS TFTP server
1. macOS TFTP server
macOS has a built-in TFTP server that won’t be loaded by default. The easiest way to get it running is to simply type:
sudo launchctl load -F /System/Library/LaunchDaemons/tftp.plistThen, provide your password when prompted. You can use something like netstat to confirm it is running:
$ netstat -n | grep *.69
 udp4 0 .69 .*
 udp6 0 .69 .*
The TFTP server is now running on port 69 waiting for connections. You can use any TFTP client to connect to the server and upload or download files. To shut down the TFTP server, simply use the unload command:
sudo launchctl unload -F /System/Library/LaunchDaemons/tftp.plistKey Features:
- Made for Macs: Only available for macOS
- Already on your Mac: You just have to activate it
- Free forever: Not a free trial
Why do we recommend it?
The macOS TFTP server is built into the macOS operating system. It doesn’t have a GUI, so you need to open a Terminal window to launch it. This is a no-frill receiver of files through the TFTP system.
Who is it recommended for?
Network administrators that use a Mac for managing the system will turn to this command line tool as a first choice.
Pros:
- A rare tool: There aren’t many TFTP programs available for macOS
- Command line: No GUI interface
- Low impact: Doesn’t use many system resources
Cons:
- Not for end users: This is a technician tool
Final words
Although TFTP does not incorporate any security procedures, this lack of security is not unique among networking administration systems. DHCP and the widely implemented SNMPv2 do not include security measures. Make sure you only implement TFTP on a secured private network.
TFTP Server Software FAQs
How to set up DHCP for TFTP servers list
In Linux, use the following command structure to set up a list of TFTP servers for DHCP:
config system dhcp serveredit <server ID>set tftp-server <hostname/IP address> <hostname/IP address>nextend
Just list the IP addresses of your TFTP servers separated by spaces.
How to find my TFTP server IP{ address
On Windows, in a command prompt window, issue the command:
netstat -an|more
On Linux, the command is:
netstat -an|grep 69
TFTP uses UDP port 69, so look for an entry in the results list that uses that port in order to identify the IP address of your TFTP server. The relevant line in the results list will be
udp <IP address>:69
How do I copy my router settings to a TFTP server?
Make sure that your TFTP server is running then connect to the device through SSH.
- Issue the command copy running-config tftp
- Enter the IP address of your TFTP server when prompted.
- Enter a file name where the configuration will be saved when prompted.
The extract will take place.
Why does my Linux system fail to network boot with TFTP errors?
A failure for Linux to load could be due to the kernel in the netboot image being incompatible with the kernel module packages due to a patch. Another reason could be insufficient base memory making the install process hang indefinitely or fall over.