
SQL Server 2012 is available in 32-bit and 64-bit. Installation of SQL Server 2012 is fairly easy. The installation wizard provides easy interface to install components of SQL server. In this post, I will show steps to install SQL Server 2012 in Windows Server 2012 R2.
Don’t forget to checkout minimum hardware and software requirements before you install SQL Server 2012. Insert the SQL Server 2012 installation DVD. Before you start to install the SQL server, install the NetFx3 feature, otherwise you will get error while the installation is in progress. To install the NEtFx3, type the following command in command prompt as shown in the snapshot below. Make sure you have inserted the installation media.
c:\> dism /online /enable-feature /featurename:netfx3 /all /source:d:\sources\sxs

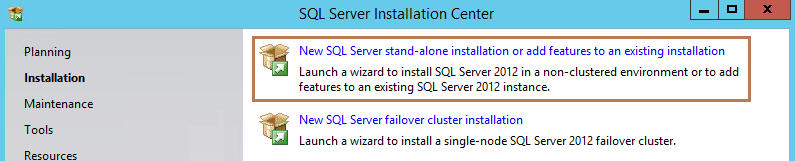
To start the SQL server installation, click the first option after selecting installation tab from the installation center as shown below. Since this is going to be new SQL server installation select the first option.

The installation will then check all the pre-requisites that are required to install the SQL server. If everything is fine, you will see green checks as shown below. Click OK.

Enter the product key and click Next. Or choose evaluation edition and click Next.

Accept the license terms and click Next.

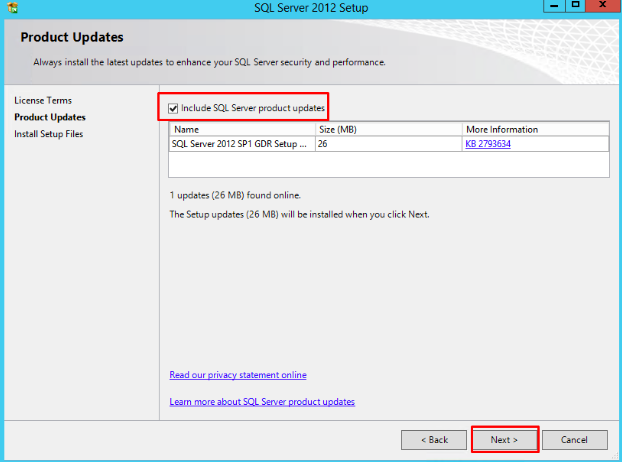
Check to include SQL server product updates and click Next.

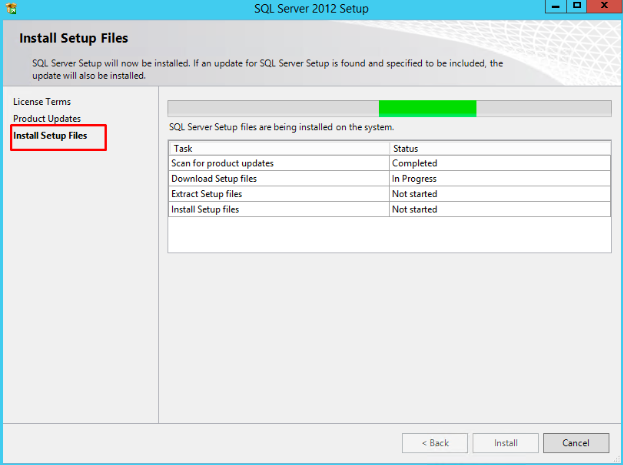
The installation will now download the setup files as shown below.

The installation does the pre-requisite checks once again as you can see below.

On the Setup Role page, choose SQL server feature installation and click Next.

Select the required SQL features and click Next.

After the rules are checked as shown below, click Next.

Under Instance Configuration, choose Default instance. You can also define custom instance name. Similarly, you have the option to choose the location where the instance will be stored. I will leave the defaults and click Next button.

Under Disk Space Requirements, the installation will show the disk spaces as shown below.

Under Server Configuration, review the Service Accounts, I will leave the defaults. Here, you can also use Active Directory user for various SQL services.

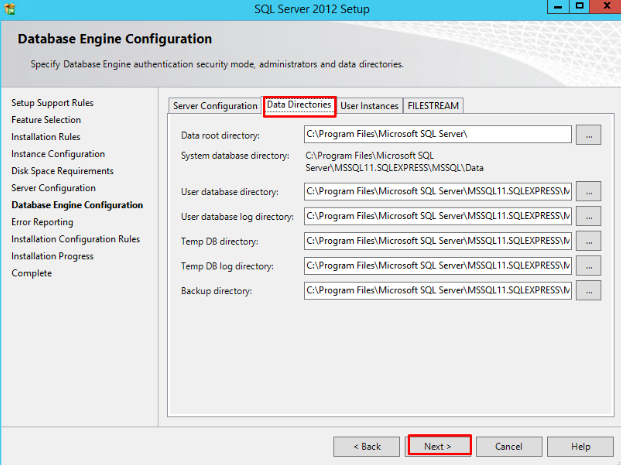
Under Database Engine Configuration, choose Windows authentication mode. You also have option to choose both windows authentication and SQL server authentication. Then, add the users who will be managing this SQL server and click Next.

Under Error Reporting, review the information and click Next. Likewise, under Installation and Configuration Rules as shown below, verify whether all the rules are passed and click Next.

Under Ready to Install, review the installation information and click the Install button.

After the installation is complete, click Close. You can now start creating databases.

In this way you can install SQL Server 2012 in Windows Server 2012 R2.
The following two tabs change content below.
- Bio
- Latest Posts
Bipin is a freelance Network and System Engineer with expertise on Cisco, Juniper, Microsoft, VMware, and other technologies. You can hire him on UpWork. Bipin enjoys writing articles and tutorials related to Network technologies. Some of his certifications are, MCSE:Messaging, JNCIP-SEC, JNCIS-ENT, and others.
Microsoft SQL Server is the best database that almost all the Organizations are using to create databases. It is the most recommended and trusted database for all the critical applications. In this article, we’ll learn the steps to install Microsoft SQL Server 2012 on Windows Server 2012 R2. I am not an expert in SQL Server therefore we’ll talk about the simple steps to install Microsoft SQL Server 2012, moreover I’ve installed all the features even if we are not using all of them.
You can refer to this article, if you are planning to deploy Citrix XenApp, Citrix XenDesktop, VMWare vCenter Server, VMWare Horizon View 7, etc.
Step 1:
Download SQL Server executable and then copy it to the server on which you want to create the Database.
Run an executable to start the installation of SQL Server 2012.
Step 2:
On the SQL Server Installation Center, click on Installation and then click on “New SQL Server stand-alone installation or add features to an existing installation“.
Step 3:
On the Setup support rules window, click on Ok.
On the Product Key window, specify the SQL Server License key and then click on next to continue.
Step 4:
Accept the license term and then click on next.
Product update window would recommend you to keep your Server updated with the latest updates and patches. If you are not connected to internet then you might see an error message. You can ignore the same and click on next to continue.
On the Setup Support Rule, please ensure that all the test passed. You can safely ignore the warning but not the errors. If you see any errors then fix the same.
Step 5:
On the setup role window, select an option “SQL Server feature Installation“.
Click on next to continue.
Step 6:
Select list of features that you are planning to use. For this practical we selected all the features.
Click on next twice to continue.
Step 7:
On the “Instance Configuration” window, we’ll select the default instance and continue.
Click on next again.
Step 8:
On the Server Configuration window click on next.
Step 9:
On the Database Engine Configuration window, we’ll select an option of Mixed mode. This allows us to use dual authentication mechanism i.e. Windows Authentication Mode and SQL Server System Administrator (SA) account. (Steps to create Domain User)
Specify the password for SA (SQL Administrator) account.
Click on Add Current User if you want to authorize current user as SQL Administrator else you can click on Add and select another user.
Step 10:
On the “Analysis Services Configuration” click on “Add Current User” to add Analysis Services Administrator.
Step 11:
If you are planning to user Reporting Services then select an option “Install and Configure”.
Step 12:
Click on “Add Current User” to add Display Replay Controller Administrator.
Step 13:
Specify Controller Name and their working directories else click on next thrice to accept the default settings.
Step 14:
On the “Ready to install” window, review all the settings that you have defined and click on Install to install SQL Server 2012. Once installation is completed, click on Finish.
This concludes this tutorial. Hope you enjoyed the steps to install SQL Server 2012 on Windows Server 2012 R2. Please feel free to leave your comments and suggestions in the comment section and don’t forget to like and share this article with your friends. Happy learning…!!
What’s the version of .Net Framework would be installed as the Pre-requiste of SQL Server 2012, type the answer in the comments.
Complete Guide to Install SQL Server 2012 in Windows Server 2012 R2

Before installing the SQL server 2012 it is always important to know that the computer or rather the windows server has the important components that are important for it. If not, then it is always advised to follow the important things.
- At first, it is vital to download and install the .NET framework 4.0 if the computer has a good internet connection or network. SQL Server will be downloaded whenever needed.
- In the next step, enable .NET framework 3.5 by using the control panel> programs and features > and then turn on/ off the features if required.
Now it is important to move to the next stop for installation.
- First login to the Windows server with the help of the administrator user.
- Now download the proper SQL server with the help of the link.
- In the next step, it is advised to double click on the installer file and then run on the click option. The image will appear like this,

- Soon it will be noticed that the setup file will start extracting the installation files. The extraction files will appear in this way.
- In the next step, it is advised to choose the top option for installing a new standalone installation by simply clicking it. The next image will make the whole thing absolutely clear before the user.
- The setup that has been seen will process the basic operations and thus the user will see the licensing screen when the user has to check the box and see the message” I accept the licensing terms”. On viewing it the user has to click on the next option Now let’s have a glance at the next image.

- The next screen that will appear is purely on the Product updates. Mainly the SQL servers will check for it and install the update safely. The user has to leave it in its usual position and opt for the next option. That will always be a wise decision in this case. Now below is the image that will exactly provide the actual image in an appropriate way.
- In the next page that will appear on the screen, it will be seen that the whole set up is getting ready for the installation process. All the features that are displayed will function in a normal way. Just have a glance at it.
- In the next page, a feature page will appear and it is required to select the features as desired by the user. In many cases, it has been found that each feature will appear on the “feature description” area once you will click on the feature. It is best now to click on the next level. It can be easily understood from the next image.

- An instant configuration page will appear and now it is best to choose the name for the instance or select a default instance. In most of the cases, SQL express is the name of the instance as we have already selected Named instance. Click on the next level to see it properly.

- The next step that will appear on the screen is the server configuration. It is the place where one can change the Windows services that are associated with this instance of SQL Server. The user can keep the defaults unless and until the user wants to specify different user accounts for the services. If required now the user can change the default collation settings provided the user is not in the United States. Simply click on the next option to continue the whole thing.

- The next step that will appear on the screen is the Database Engine Configuration. It is on the server configuration tab the user can select whether SQL Server will only authenticate using Windows accounts or the user can choose the Mixed Mode that will allow Windows accounts and the SQL accounts too. Usually, mixed-mode authentication is used so it will be selected. Provide the password for the user and click on the next level. There is an image that will provide the whole thing clearly.

- Next, on the data directions tab the user can change the locations of the log files and another type of files that SQL will use. On the base of server configuration and the load that will be put on the SQL, the user can put the database and log folders on the separate drivers. Most of the users mainly opt to leave for the default values. Click on the next level to proceed further in this process. Now let’s have a glance at the relevant image.
- The next screen that will appear on the computer is the Error reporting option. The user can choose whether or not they would like to send error reports directly to Microsoft. Now click on the next level. This is a very good step in this matter. In most of the cases, it is seen that all the steps mentioned above are related to each other.
- Most of the SQL server will be installed on the computer very easily. The whole process may take a long time in this case. However, the whole thing depends on the computer or device mainly. In fact, a good image will also make the whole thing clearer.
- The moment installation process is completed the user will notice a receive a screen that will show the details of what was completed. In case if there is a problem then that will also be displayed on the screen.
In fact, the above-mentioned steps are mainly required for setting up SQL inappropriate way. Apart from all this, all this has been possible only due to the advanced techniques and devices. All these advanced things have made the work much simpler and easier. It is expected that in days to come these will benefit many working professionals in the field. It is a really good invention.
Read more: How to Recover Your Windows Password?
This article will guide you on how to perform a new SQL Server 2012 standalone installation. An evaluation copy of SQL Server 2012 can be downloaded from here.
The following are some recommendations before installing SQL Server 2012:
- Access to the Internet and Windows Update Services is required, since SQL Server setup will try to get updates for SQL Server during installation.
- SQL Server 2012 sidebyside with SQL Server 2008. Click here.
Operating Systems Requirements.
Plan to install on a NTFS file system.
Do no try to install SQL Server 2012 on a compressed, encrypted or readonly drive, because setup will block the installation. Do not install SQL Server on a Domain Controller.
Verify Windows Management Instrumentation service (Control Panel > Administrative Tools > Services) is running. Configure your firewall to allow SQL Server access. Click here for more information about protocols and port numbers. The user account that is running SQL Server Setup must have administrative privileges on the computer.
SP1 for Windows Server 2008 R2, SP2 for SQL Server 2008, SP1 for Windows 7 and SP2 for Windows Vista are required. Windows XP, Windows Server 2003 and Windows Server 2000 are not supported.
At least 6.0 GB of disk space are required by SQL Server setup.
Additional software requirements and hardware requirements:
Enable .NET Framework 3.5. Click here to know how.
SQL Server includes .NET Framework 4.0 and will install it .NET Framework 4.0. Express Edition will download it from the Internet.
Step-by-step procedure to install SQL Server 2012
1. Run SQL Server 2012 setup.

2. Once the loading is done you will be on the Panning Screen. Click on Installation.

3. Once on the Installation screen click on New SQL Server-stand-alone installation or add features to an existing installation.


4. It will load the setup process. Should only take a few second/minutes depending on the hardware.

5. SQL Server 2012 Setup will run a diagnostic before it will install. The Next button is only available if the rules pass or the rules do not block the installation.Click Next

6. Product Key is required at this stage. If you do not have a key you can pick Evaluation. Click Next

7. Next step is the License Terms. Read the license agreement and check mark I accept the license terms. Click Next.

8. Product Updates screen appears. This will install any updates for SQL Server 2012. Click Next

a. If you don’t see the above window, it means that you are not connected to the internet. SQL Server 2012 requires an internet connection to update during the installation. Click Next

9. Install Setup Files section will now install SQL Server 2012 to a temp directory. This could take five or ten minutes depending on the hardware.Click Install


10. Once the above step is completed SQL Server 2012 will run another diagnostic to verify that can install on the OS. Click Next

a. About the Windows Firewall warning, you can go ahead with the installation of SQL Server, but when it finishes configure your Windows Firewall to allow SQL Server access or disable it. Click here to know how to configure Windows Firewall for SQL Server access.
b. About the Microsoft .NET Application Security warning, Setup Support Rules verifies Internet connectivity and triggers a warning if there is no Internet connection. The reason to check for Internet connection is “because .NET always tries to connect to CRL.MICROSOFT.COM on startup to check signature validation.”.
c. Computer Domain Controller (DC) warning is only seen if you are installing it on a domain controller. This is highly not recommended. It gives your DC another layer of security issues.
d. Neither of these warnings will prevent you from installing SQL Server.
11. After the Setup Support Rules section you will get the loading setup screen.

12. Setup Roles is the next section. Decide to install specific feature, SharePoint support, or all features. For this guide we will pick SQL Server Feature Installation.

13. On the Feature Selection section, pick the features to install. For a standard install. I have picked the following.


14. Through out the setup of SQL Server, it will give you the message “Please Wait…”. It takes about five to fifteen seconds.
15. Installation Rules section appears. This a diagnostic to see if any of the features selected need anything special on the OS.

The “Prior Visual Studio 2010 instances requiring update.” rule verifies if Service Pack 1 for Visual Studio 2010 has been applied”
16. On the Instance Configuration section, select a default or named instance for the installation. I left it all default, but if you have a SQL Server, make sure the drive has enough memory for feature use.

17.
This page is just for the purpose of reviewing disk usage. Click on the “Next” button to continue setup.
It is recommended to create a local user or use a domain user account to start SQLServer services.


If the computer is not part of a domain, use a local user account without Windows administrator permissions. You can create this account using Control Panel > User Accounts.
Use a Domain User Account if the service must interact with network services or access domain resources. This account should be precreated by a domain administration in your environment.
Whether you create a local user or a domain user account, the password you use to create the account must be a strong password.
You can also use builtin accounts (the Network Service account, Local Service, Local System) as service accounts. However, I would not recommend to use Local Service Account for SQL Server (MSSQLSERVER). Use Local System if you need a very high privileged account. It has extensive privileges on the local system.
Microsoft recommends you to specify an individual account for each service. The service accounts used for this configuration must have a strong password as mentioned above, otherwise you will get the error “Invalid or missing username or password. To continue, provide valid credentials for the SQL Server Agent service”. A strong password is one that has a combination of letters in uppercase, lowercase, numbers and special characters.
On the Database Engine Configuration page, choose the authentication mode to use for your SQL Server installation. Enter and confirm the password for the (sa) login when you choose Mixed Mode Authentication.


Use the “Data Directories” tab on the “Database Engine Configuration” page to change the default location for data directories.


Use this page to enable FileStream on this instance. To enable it, select “Enable FILESTREAM for TransactSQL access”. Select “Enable FILESTREAM for file I/O streaming access” to enable Win32 streaming access for FileStream.
On the “Windows share name” text box, to enter the name of the Windows share in which the FileStream data will be stored.
Select “Allow remote clients to have streaming access to FILESTREAM data” to allow remote clients to access this FileStream data on this server.

Select “Install Analysis Services in Multidimensional and Data Mining Mode” to install Analysis Services with support for online analytical processing databases and data mining models.
Select “Tabular Mode” to install Analysis Services with support for tabular models. Each mode is exclusive of the other.

On the Reporting Services Configuration page, choose to install Reporting Services on Native Mode or SharePoint Integrated Mode.

On the Error Reporting page, optionally clear the check box to disable error reporting.

The above dialog belongs to the Installation Configuration Rules. Setup will be running these rules to determine if the installation process will be blocked.

On the Ready to Install page, review the summary of features and components for your SQL Server installation. To proceed, click Install.


You are now ready to use SQL Server 2012. Enjoy it!
In this post we will be looking at the steps for Installing SQL Server 2012 for Configuration Manager 2012 R2. In this deployment series of Configuration Manager 2012 R2 we started with system center 2012 R2 Configuration Manager system requirements which tells more about the new features of SCCM 2012 R2 and system requirements for Configuration Manager 2012 R2, in the next post we saw the steps for installing prerequisites for SCCM 2012 R2. After installing prerequisites the next step is to install SQL server. Most of the users have a question on where should the SQL server be installed, should it be installed locally on the server where SCCM is installed or on a remote server ?. The answer is you can install it on local server or host the database on remote server. I would prefer to install SQL locally because this it requires less administrative overhead, the license for SQL is included with System Center so no additional license needs to be purchased and with local SQL you can achieve better performance than remote. In this post we will be installing SQL server 2012 with SP1 on windows server 2012 R2, if you have only SQL server 2012 iso copy, you can download the SQL server 2012 service pack 1 and install it.
For System Center 2012 R2 Configuration Manager you can install the SQL server with combinations :-
1) Install SQL Server 2012 + Min Cumulative Update 2

2) Install SQL Server 2012 + Service Pack 1 [no cumulative update required]
3) Install SQL Server 2012 with Service Pack 1 [no cumulative update required]
If you are planning to use SQL server other than 2012 then click here to see the SQL Server Requirements for Configuration Manager 2012 R2.
Here is a video tutorial that shows the steps to install SQL server for SCCM.
Installing SQL Server 2012 for Configuration Manager 2012 R2
So lets look at the steps to install SQL Server 2012 with SP1 (x64 Bit). I have mounted the DVD on to the Windows Server 2012 R2, open the SQL server folder, run the setup as administrator. Click on Installation and click on New SQL server standalone installation.

Click OK once the Setup support rules are run and verified.

Check the box for I accept the license terms and click on Next.

After the Setup Support Rules are completed click on Next.

Select the Setup Role as SQL Server Feature Installation and click Next.

On the Feature Selection window, select Database Engine Services, Reporting Services-Native and Management Tools – Complete.
Note – The features that we have selected are the ones which are required for deploying Configuration Manager 2012 R2. However you can select all features and install them if you want to.

For Instance Configuration click on Default Instance, the instance ID MSSQLSERVER would be created.
Note – If you are creating a Named Instance, then during the SCCM 2012 R2 setup you might come across this error “The specified SQL Server instance is not configured to use dynamic ports” unless you have not configured dynamic ports for SQL server instance. To fix this error launch the SQL Server Configuration Manager, expand SQL Server Network Configuration. Click on Protocols for Instance (Instance is your Named Instance). On the right side pane, right click on the TCP/IP and click on Properties. Click on IP Addresses tab and scroll down to the bottom and under the IPALL, set TCP Port value to 1433. Click on Apply and after this change you must restart SQL Server Service.

For Service Accounts, Microsoft recommends you to use domain service accounts and not the local system accounts. We will be using the account named sccmadmin which is a member of domain admins group. This account will be also used for installing and managing Configuration Manager 2012 R2. You can also create a separate user accounts for each of the SQL server services.
Specify the account name and password and click on Next.
Important – During the SQL install, the collation should be SQL_Latin1_General_CP1_CI_AS.

Click Add Current User, this will add the current user to SQL server administrators. Choose the Authentication Mode as Windows authentication mode. Click Next.

Choose Reporting Services Native Mode and click on Install and Configure. Click on Next.

Click on Install to start the installation.

We have installed SQL server 2012 with SP1 on Windows Server 2012 R2 Datacenter Edition. Click on Close.

During the installation of Configuration Manager 2012 R2, the configuration manager checks if the SQL server memory limit is limited. If the memory is not limited, then a warning is displayed. To avoid that lets limit our server with a memory limit. Launch the SQL Server Management Studio. Login to the server and right click the Server and click on Properties. Click on Memory, set Minimum server memory value to 8192 MB (The minimum value can be less that 8192 MB) and set Maximum server memory as 8192 MB. Click on OK and close the SQL management studio.

Still Need Help?
If you need further assistance on the above article or want to discuss other technical issues, check out some of these options.