
How to install and configure Microsoft SQL Server 2008 R2 on Windows Server 2012 R2, including Microsoft SQL Server Studio.
This guide provides a step-by-step procedure for installing SQL Server 2008 R2 on Windows Server 2012 R2, including the Microsoft SQL Server Studio. Despite being an older version, SQL 2008 R2 remains a popular choice and is still supported by Microsoft (as of the time of writing).
Prerequisites:
- A copy of Microsoft Windows Server 2012 Standard R2 (64-bit edition).
- A copy of Microsoft SQL Server 2008 Standard R2 (64-bit edition).
- Valid licences for both SQL and Windows.
Step 1: Preparing Windows Server for SQL 2008 Installation
- Install .NET Framework 3.5, as it’s a prerequisite for Windows Server 2012 R2.
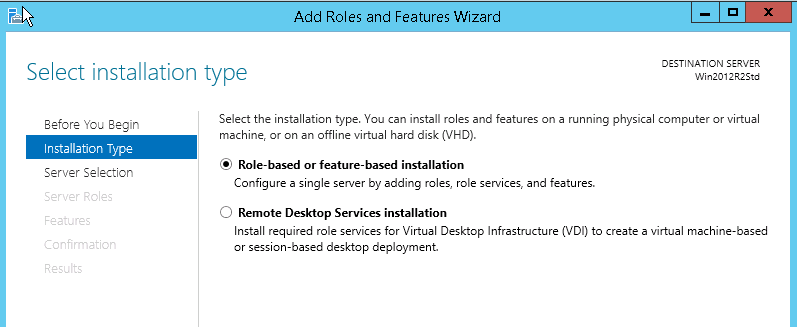
- Open Server Manager > Manage > Add Roles and Features Wizard.
- Choose Role-based or feature-based installation.
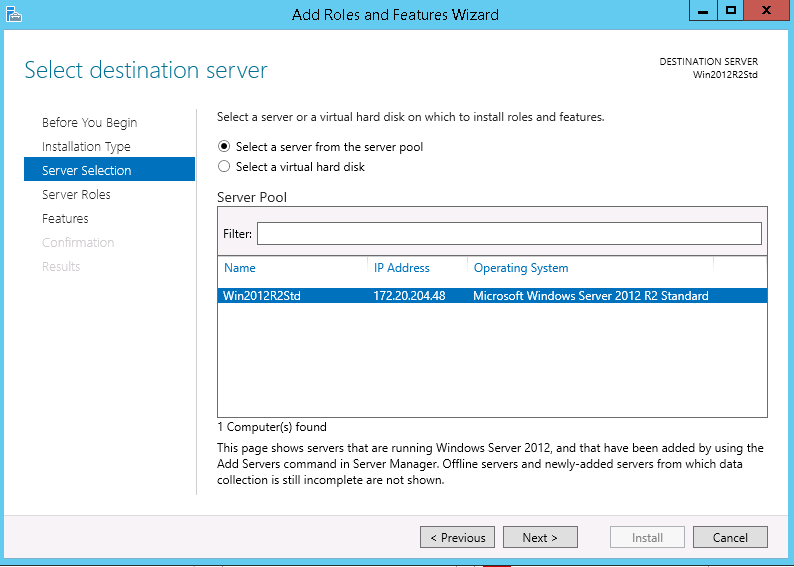
- Select the local server from the server pool.
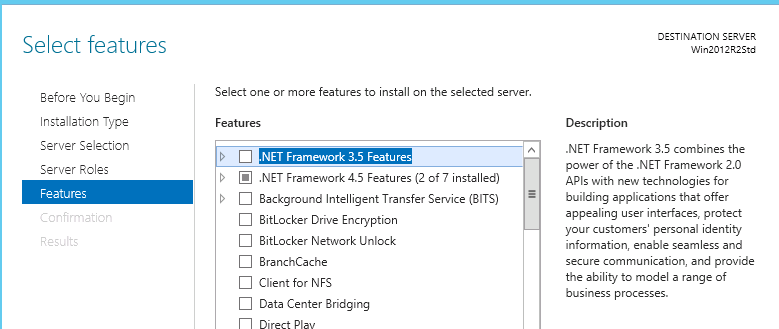
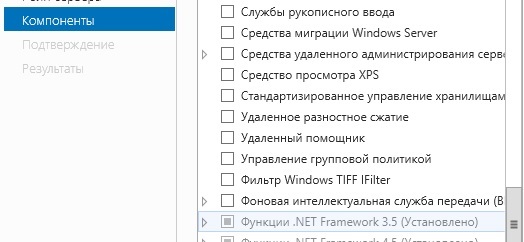
- Navigate to Select Features and choose .NET Framework 3.5 Features.
- Insert the Windows Server 2012 R2 media.
- On the Confirm installation, select “specify an alternative source path”.
- Input the source path, typically
Z:\Sources\SXS(adjust based on your DVD Drive letter). - Click OK and Install.
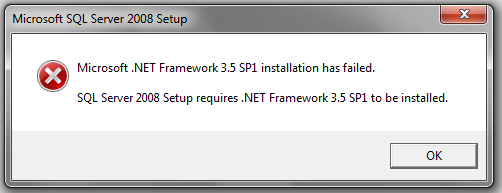
Note: Ensure you point to the .NET 3.5 source files on the Windows Server 2012 media to avoid installation failure.
"error installing microsoft net framework 3.5 sql server"Details:
- From Server Manager, select Manage and then Add Roles and Features Wizard.
- Select Role-based or feature-based installation.
- On the Select Destination, Server screen choose the local server from the server pool
- Skip to Select features and choose .NET Framework 3.5 Features
- Next, insert the Windows Server 2012 R2 media into the Server.
- On the Confirm installation selects select specify an alternative source path

- The source path is usually Z:\Sources\SXS
- (whichever Drive letter you have mapped the DVD Drive to).
- (For the example below the source DVD was the D:)
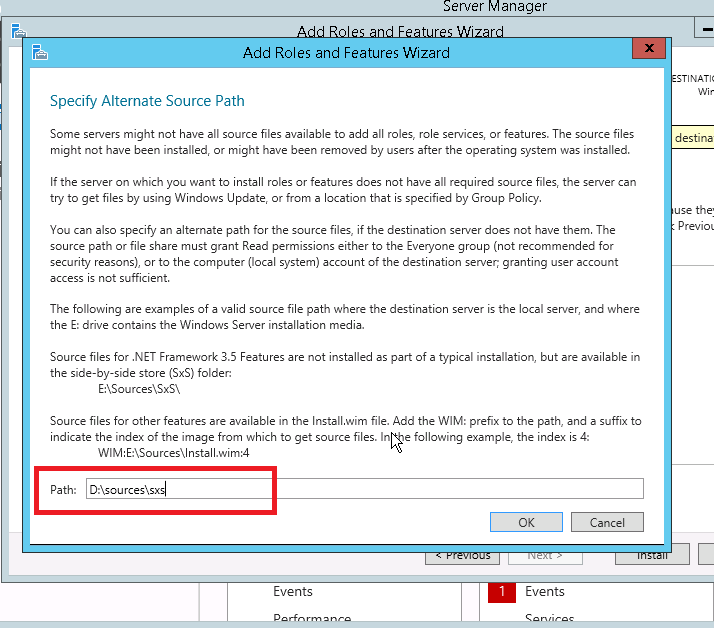
- Click OK and Install
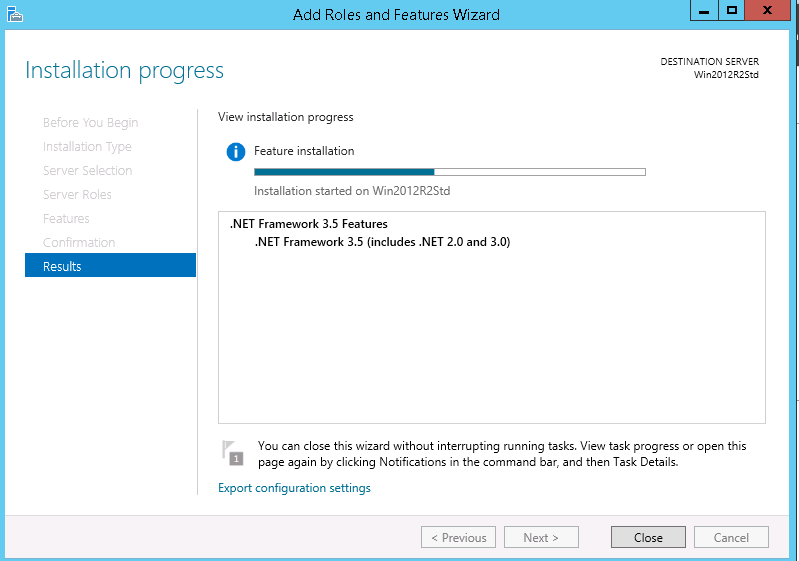
This completes the installation of the .NET 3.5 Framework. The installation will take several minutes. No reboot is required.
Note: If you do not point the source files of .NET 3.5 to the Windows Server 2012 media, the installation will fail, and the SQL Server will also fail to install.
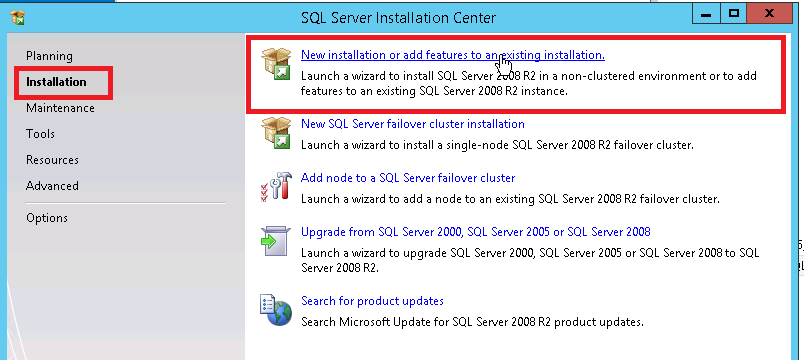
Step 2 – Installing SQL Server
- Insert the SQL Server 2008 R2 Media.
- Run Setup from the DVD.
- Select Installation > New installation or add features to an existing installation.
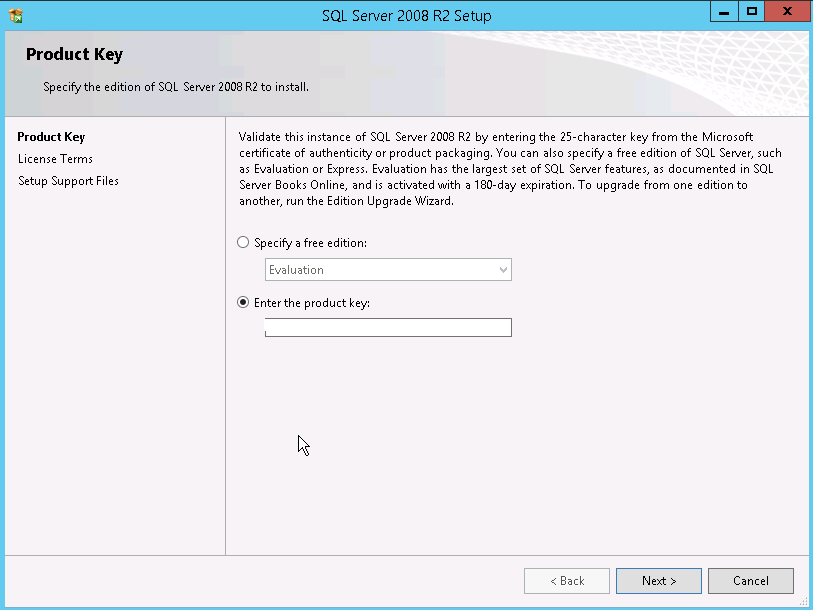
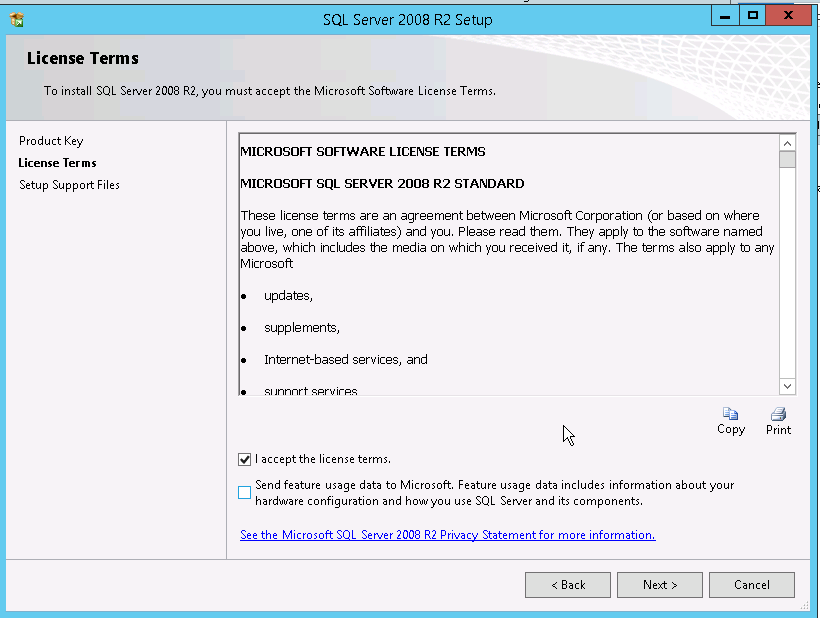
- Follow the on-screen prompts, enter the product key and accept the licence terms.
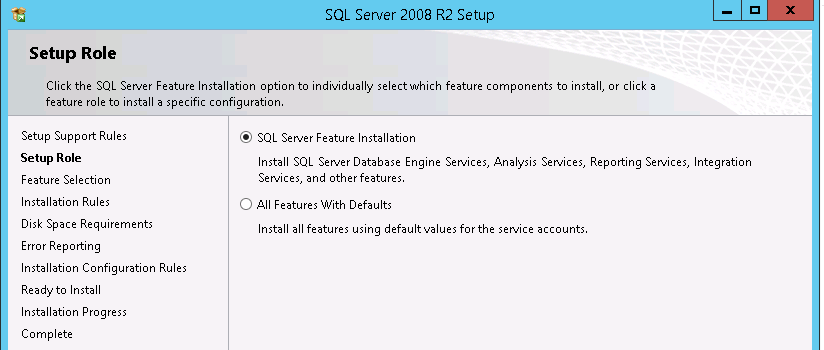
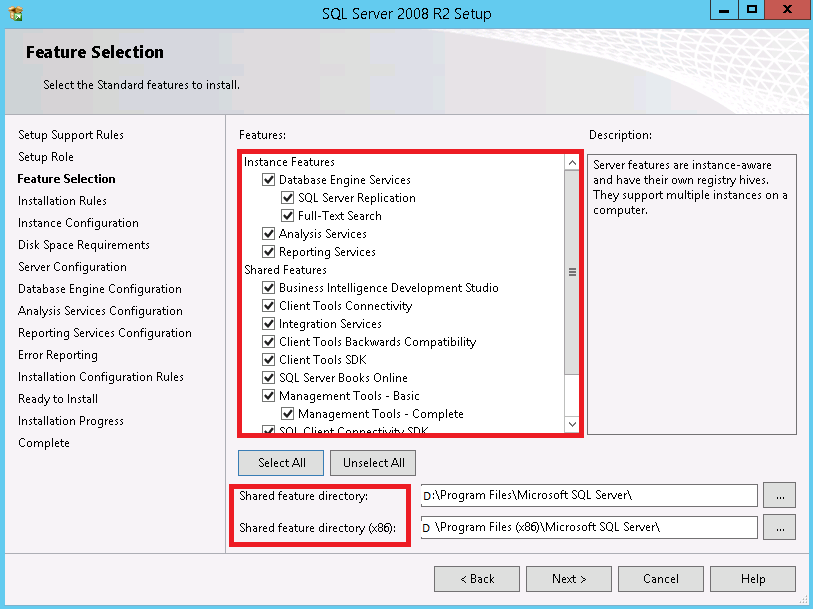
- Choose SQL Server Feature Installation and select all instance features.
- Configure directories, instances, servers, and other settings as detailed in your original procedure.
- Complete the installation.
Details:
- Insert SQL Server 2008 R2 Media into the server.
- Run Setup from DVD.
- Select Installation then select New installation to add features to an existing installation.
- A pre-installation server test will now run.
- Click next after the pre-test completes.
- Enter product key.
- Accept the Licence terms and conditions.
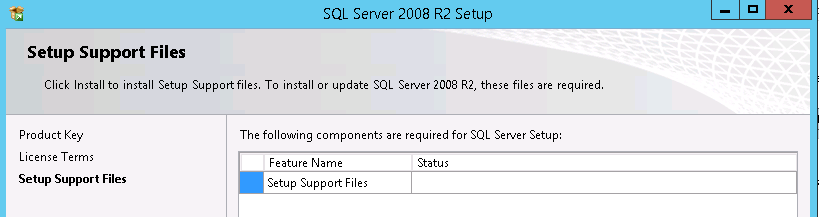
Click install to set up support files.
- Click Next and then select SQL Server Feature Installation
- Select ALL instance features (This has been requested in advance by the customer).
- Ensure Shared Feature Directories are pointing to the D:\ Drive.
- Click next
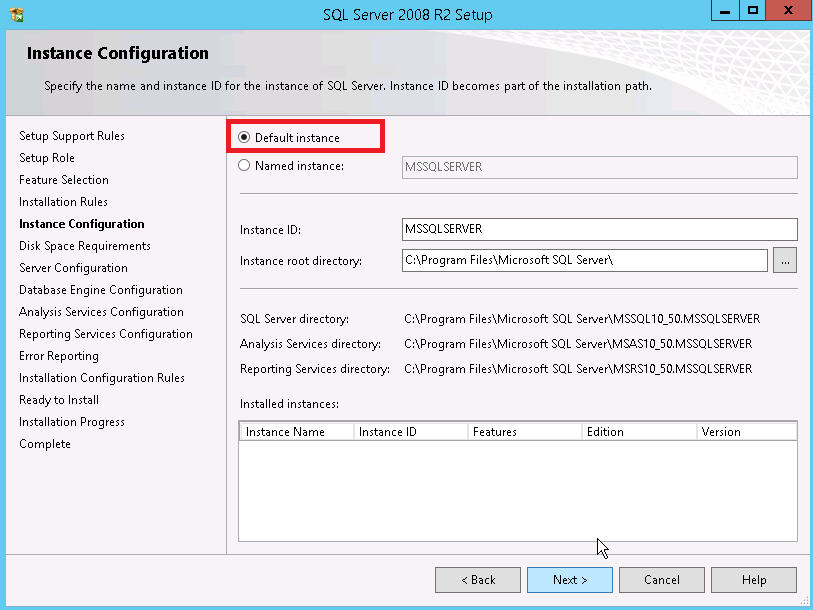
- On Instance Configuration, leave as the Default instance, click next
- On the Server configuration screen, change the account Name to NT AUTHORITY\SYSTEM. No Password is required. This will be changed by the customer after handover
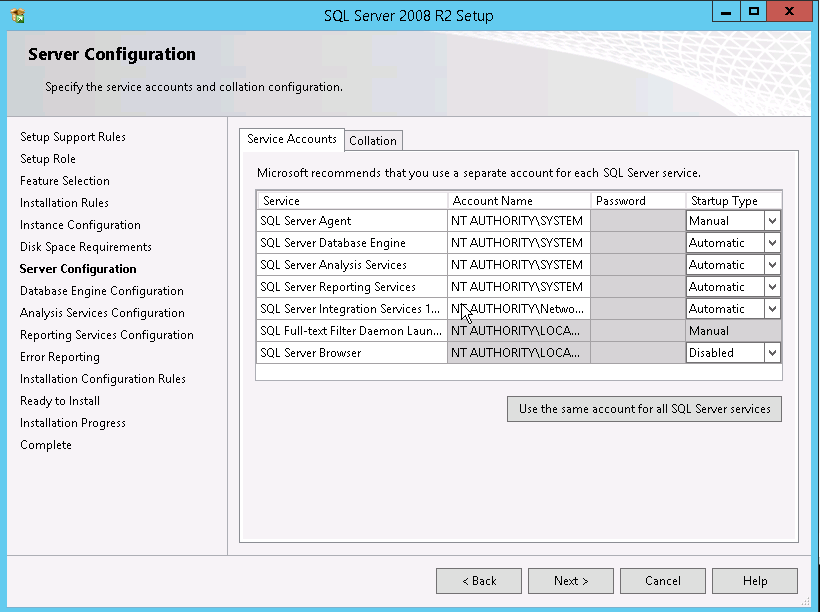
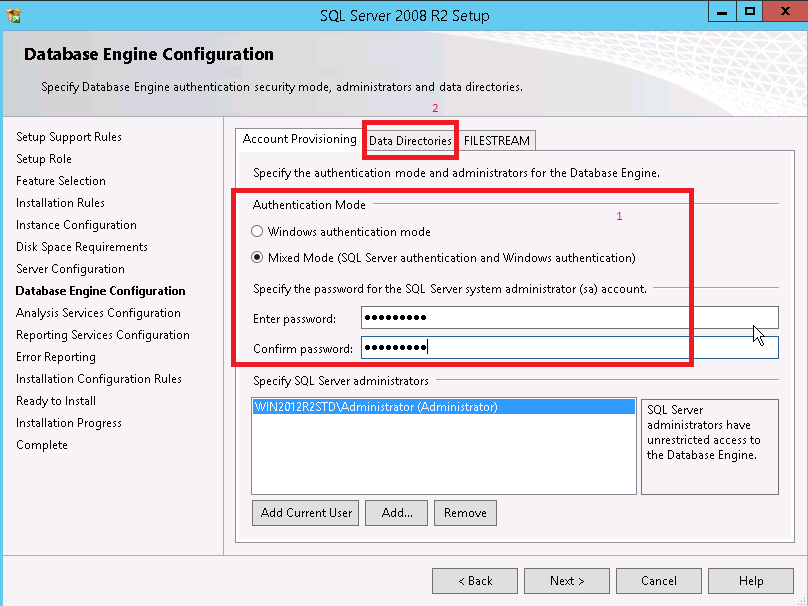
Important :
- On Database Engine Configuration ensure you select
- Mixed Mode (SQL Server authentication and Windows authentication).
- Input the pre-defined password (this is for the SA account).
- It is also advised to add the local administrator as a SQL Admin in the Specify SQL Server administrators section.
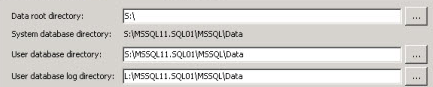
- Under the Data Directories tab ensure you chose:
- S:\ for Database files
- L:\ for Logs
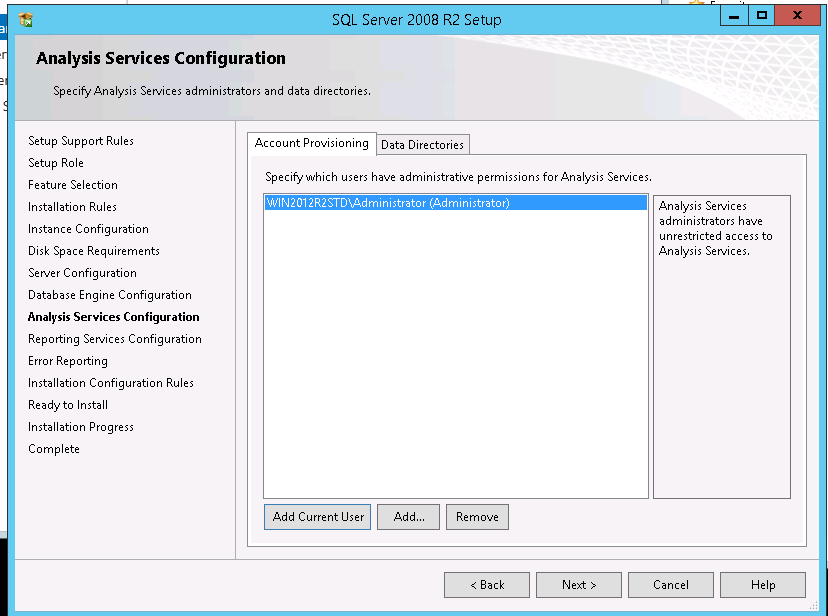
- On the Analysis Services configuration, add the Current User
- (This can be changed by the customer later in SQL Server Management Studio)
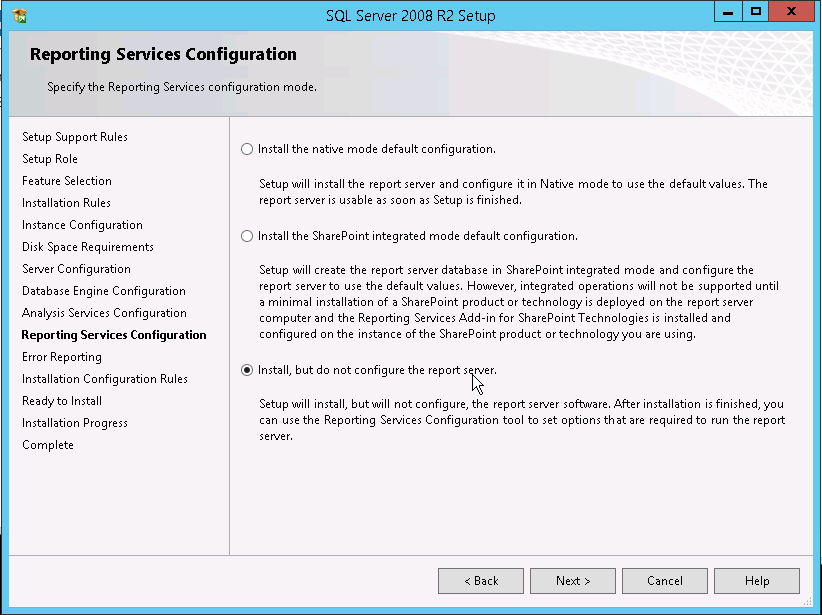
- Under Reporting Services Configuration select “install, but do not configure the report server” – (This can be changed by the customer later in SQL Server Management Studio)
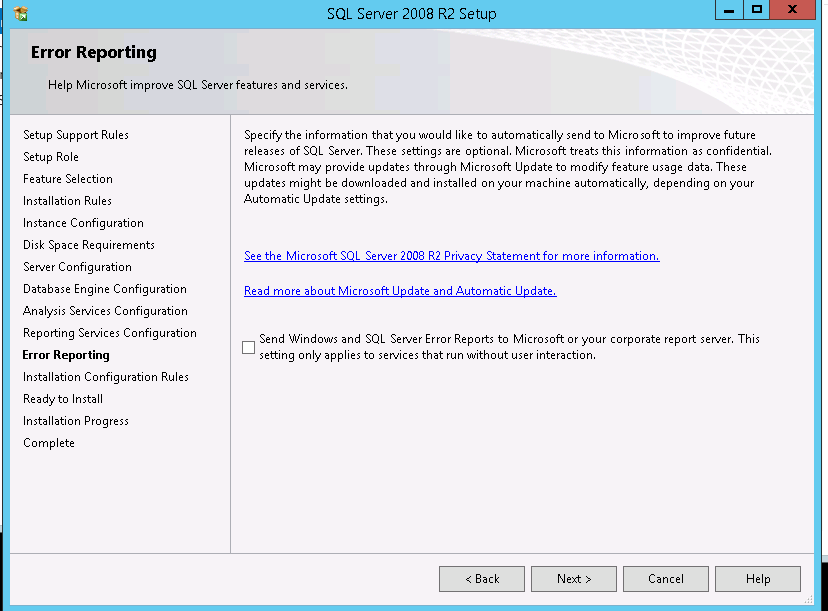
- On the next screen, Error Reporting, ensure the tick box is blank and click next
- Click Next to bring up the final screen “Ready to install” and chose INSTALL
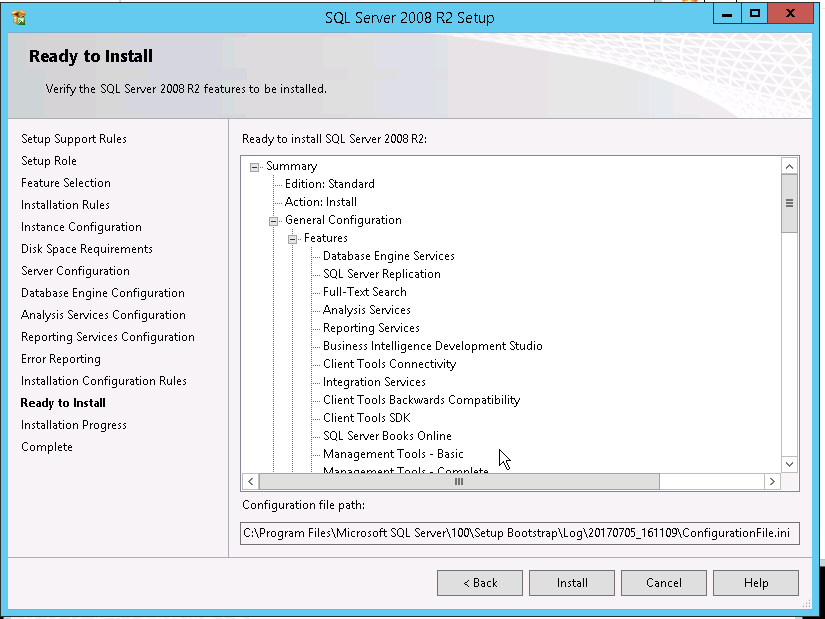
- The installation will take about 15 minutes to complete.
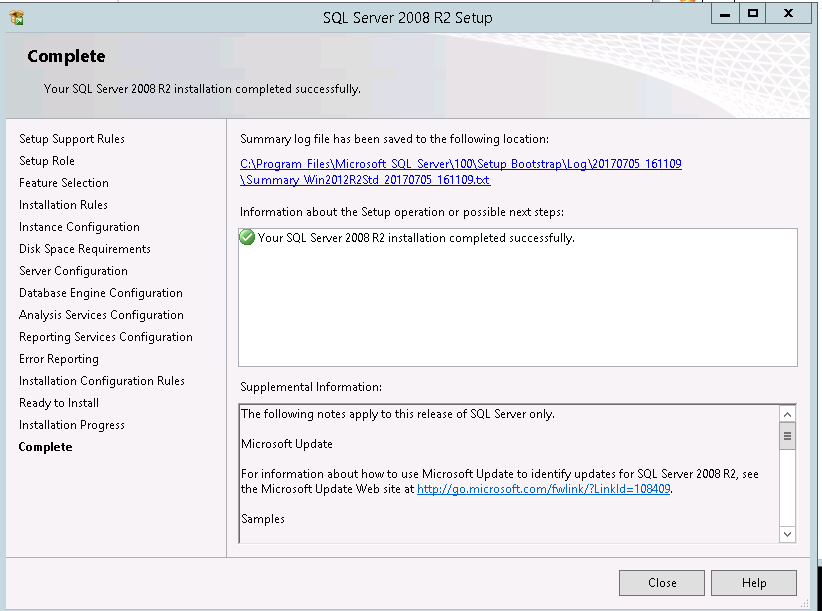
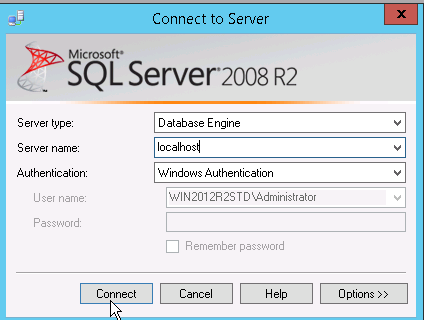
- Once completed, open SQL Server Management Studio and log in with the Mixed Mode SA account you created earlier.
Post-Installation:
Accessing and Updating SQL Server Management Studio (SSMS):
- Logging In:
- Launch SQL Server Management Studio (SSMS).
- Log in using either the ‘SA’ account or ‘Administrator’ credentials.
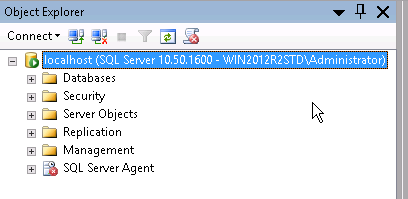
- Verifying SQL Server Status:
- Confirm that SQL Server is operational by locating a green “play” icon.
- Security Updates:
- To ensure your SQL Server is secure and up-to-date, apply the latest patches using Windows Update.
Details:
- Log in with SA account or Administrator
- Expand the column on left, if you have a green “play” button SQL is running
- Upon completion, it is recommended that you update SQL using Windows Update.
If you prefer MySQL or MariaDB, check out this guide for all your Linux sysadmin needs.
Can SQL 2008 R2 run on Windows Server 2012?
Yes, Microsoft SQL Server 2008 R2 can run on Windows Server 2012 Standard Edition. However, it’s crucial to note that Microsoft officially terminated support for SQL 2008 R2 on 19th July 2019. Despite this, the continued high traffic to related pages indicates its widespread use globally.
For businesses that continue to rely heavily on SQL Server 2008 R2, Microsoft offers a solution:
- Migrate your server to Microsoft Azure to receive free security updates.
- If migration isn’t an option, you can directly purchase these updates from Microsoft, though it might be a costly affair.
For more details on this topic, refer to Microsoft’s official statements and guidelines.
This is what Microsoft has to say on the issue:
In Azure: Customers running 2008 or 2008 R2 versions of SQL Server and Windows Server in Azure virtual machines will get Extended Security Updates for free.
On-premises: Customers with active Software Assurance or subscription licenses can purchase Extended Security Updates annually for 75 percent of the full license cost of the latest version of SQL Server or Windows Server. Customers pay for only the servers they need to cover, so they can reduce costs each year as they upgrade parts of their environment.
https://azure.microsoft.com/en-us/blog/announcing-new-options-for-sql-server-2008-and-windows-server-2008-end-of-support/
Post Views: 3,395
Upgrading software can sometimes be a challenging task, especially when dealing with compatibility issues between different versions. In this blog post, we will discuss the process of installing SQL Server 2008 R2 on Windows Server 2012 R2 and address some common errors that may occur during the installation.
Step 1: Slipstream Installation
One of the first issues you may encounter is an error indicating that a 2003 patch is not installed. To resolve this, you will need to slipstream install Service Pack 1 (SP1) or Service Pack 2 (SP2) for SQL Server 2008 R2. Here are the steps to follow:
- Copy your original SQL Server 2008 R2 source media to a new folder, for example, C:\SQLServer2008R2_SP1.
- Download the SQL Server 2008 R2 SP1 packages from the official Microsoft website.
- Extract each of the SQL Server 2008 SP1 packages to the folder C:\SQLServer2008R2_SP1\SP.
- Copy the Setup.exe file from the SP extracted location to the original source media location using the robocopy command.
- Copy all files (excluding the Microsoft.SQL.Chainer.PackageData.dll) from C:\SQLServer2008R2_SP1\SP\ to C:\SQLServer2008R2_SP1\ to update the original files using the robocopy command.
- Determine if you have a DefaultSetup.INI file at the following locations: C:\SQLServer2008R2_SP1\x86, C:\SQLServer2008R2_SP1\x64, and C:\SQLServer2008R2_SP1\ia64. If not, create one with the specified content and copy it to the respective locations.
- Run setup.exe as you normally would to start the installation process.
Step 2: Fixing Cluster Service Verification Error
If you encounter a cluster service verification error during the installation, you can easily fix it by opening a PowerShell window and running the command “add-windowsfeature RSAT-Clustering-AutomationServer”. This will resolve the issue and allow you to proceed with the installation.
It’s important to note that while it is generally recommended to upgrade your operating system when upgrading SQL Server, there may be situations where it is not feasible due to cost or other constraints. In such cases, following the steps outlined above can help you successfully install SQL Server 2008 R2 on Windows Server 2012 R2.
We hope this blog post has provided you with a helpful guide for installing SQL Server 2008 R2 on Windows Server 2012 R2. If you encounter any other errors or have any interesting fixes to share, we would love to hear from you. Feel free to leave a comment below.
This blog post will cover the steps necessary to install SQL Server 2008 R2 SP2 running on Windows Server 2012.
Overview
- Install .NET Framework 3.5 with PowerShell
- Create Active Directory SQL service accounts
- Install SQL Server 2008 R2
- Install SQL Server 2008 R2 Service Pack 2
Install .NET Framework 3.5 with PowerShell
Open a Windows PowerShell prompt as an administrator, and run the following command:
Add-WindowsFeature NET-Framework-Core
Create Active Directory SQL service accounts
Create 3 service accounts in Active Directory. Name the accounts SQLAgent, SQLDB and SQLReport.
1. Mount the SQL Server 2008 R2 ISO to your server.
2. Launch the setup program and click on Installation in the left pane.
3. Click on New installation or add features to an existing installation.
4. Click OK in the Setup Support Rules window.
5. Click Install in the Setup Support Files window.
6. If you have the Windows Firewall enabled, you’ll see a warning about that. Dismiss the warning and click Next in the Setup Support Rules window.
7. Enter your product key and press Next in the Product Key window.
8. Accept the license terms and click Next in the License Terms window.
9. Select SQL Server Feature Installation and click Next in the Setup Role window.
10. Select Database Engine Services, Reporting Services, Management Tools – Basic and Management Tools – Complete and click Next in the Feature Selection window. Note, if you wish to install to another directory than specified at the bottom, select your appropiate location.
11. Click Next in the Installation Rules window when the operation has completed.
12. Select Default Instance, leave all values by their default and click Next in the Instance Configuration window. Note, if you choose a Named instance, remember to specify it later in the ConfigMgr 2012 SP1 installation wizard.
13. Click Next in the Disk Space Requirements window.
14. Enter the Account Name for each Service and click on the Collation tab in the Server Configuration window.
15. Click on Customize in the Server Configuration window.
16. Click on SQL collation, used for backwards compatability and scroll down and select SQL_Latin1_General_CP1_CI_AS. Click on OK and then Next in the Server Configuration window. Note, it’s really important that you choose the correct collation or the installation of ConfigMgr 2012 will not work.
17. Select Windows authentication mode and then click on Add Current User. Click Next in the Database Engine Configuration window.
18. Select Install the native mode default configuration and click Next in the Reporting Services Configuration window.
19. Click Next in the Error Reporting window.
20. Click Next in the Installation Configuration Rules window when the operation has completed.
21. Click Install in the Ready to Install window.
22. Once the installation is completed, click on Close in the Complete window.
Install SQL Server 2008 R2 Service Pack 2
You can download the SQL Server 2008 R2 Service Pack 2 from this link: https://download.microsoft.com/download/3/D/C/3DC6663D-8A76-40A6-BCF2-2808C385D56A/SQLServer2008R2SP2-KB2630458-x64-ENU.exe
1. When the download is complete, launch the installation and click Next in the SQL Server 2008 R2 update window.
2. Accept the license terms and click Next in the License Terms window.
3. Click Next in the Select Features window.
4. Click Next in the Check Files In Use window.
5. Click Update in the Ready to update window.
6. When the update installation is completed, click Close in the Complete window.
That’s it! You can now go ahead and install ConfigMgr 2012 SP1.
Views: 6,119
Nickolaj Andersen
Chief Technical Architect and Enterprise Mobility MVP since 2016. Nickolaj has been in the IT industry for the past 10 years specializing in Enterprise Mobility and Security, Windows devices and deployments including automation. Awarded as PowerShell Hero in 2015 by the community for his script and tools contributions. Creator of ConfigMgr Prerequisites Tool, ConfigMgr OSD FrontEnd, ConfigMgr WebService to name a few. Frequent speaker at conferences such as Microsoft Ignite, NIC Conference and IT/Dev Connections including nordic user groups.
Introduction
Installing lower version SQL Server on a higher version of Windows Server may be problematic at times of installation. Recently we have faced such a scenario. We are sharing installation steps to overcome the problem. At the initial phase of the install, you’ll see a warning dialog of compatibility issues with SQL Server 2008 and 2008R2.
Compatibility issues
If we run SQL Server 2008 or 2008R2 setup on Windows server 2012R2 then we may get bellow notification as a popup window. Two options will be in front of us, 1) Get help online & 2) Run the program without getting help.

If we click on ‘Get help online‘

We may get below the popup window. It’s so funny !!!

Next option is to ‘Run the program without getting help‘

Here we will be suggested to install .NET Framework 3.5.

Installing .NET Framework 3.5
For installing .NET Framework 3.5 we need a Windows Server 2012R2 DVD ISO file. Right click on ISO file and mount windows server 2012R2 DVD ISO as a drive.

We will get the ISO file as a drive as shown in below image. Double click on DVD Drive or Right-click and open in a new window.

Click on ‘Source‘ folder then ‘sxs‘ folder

Copy the location of the ‘sxs‘ folder & save somewhere in notepad.
Now, double on ‘Server Manager‘

We will add the .NET Framework 3.5 feature through the Add Roles and Features Wizard in Server 2012 (R2). Click ‘Next’ after appearing the below window.

By default, the installation type will be ‘Role-based or feature-based installation’. Click Next.

In the server Selection option need to select the SERVER. Here ‘m1’ is the target server. Click Next

Nothing to select in Server Roles section, Click Next

In Features section we need to select .NET Framework 3.5 Features

Here we need to ‘Specify an alternate source path‘. Click on the text ‘specify an alternate source path’ at the left bottom corner of the window.

Below windows will appear, we need to paste that location, which we have saved it in notepad previously.

Paste the location path and hit OK

Installation process started.

Installation succeeded. Hit the close button.

Install SQL Server 2008 R2
Mount MS SQL Server ISO

Open the drive & Double click ‘setup’

Trying recommended setting

Click Test the program… & after that click Next.

Select No, try again using different settings

Select the first option

If you know the windows version on which SQL Server 2008R2 work properly then select that version, but if you don’t know then select ‘I don’t know’

By default Windows compatibility mode will be Windows XP (SP3). Then select Test the program…

If the installation window popup & open, then the problem is fixed. Select ‘Yes, save these setting for this program’

Below window will popup, click OK

In the ‘Planning’ section we need to RUN ‘System configuration checker’

Setup Support Rules report must be all green & pass. The warning also can be accepted.

In the ‘Installation’ section select the first option ‘New installation….’

Again Setup Support Rules will check

Now its time for Product Key. Paste key or select free edition.

Read License Term, accept it & click Next.

Click ‘Install’


Again Setup Support Rules check report.

By default ‘SQL Server feature Installation‘ is selected.

Select the features as per your requirement. Here we have selected all.

Again Installation Rules check

Provide SQL Server instance name or left blank for its default name

Disk Space Requirement, check it

Provide ‘Service Account‘ and ‘Password‘ under which Database Engine and other services will run.

In Database Engine Configuration we can select Authentication Mode. Depending on the requirement we may select Windows authentication mode or Mixed mode. Next, we need to specify SQL Server Administrator, here we have Add Current User.

For Analysis Services we need to select user

Keeping Reporting Services Configuration default

We will not select Error Reporting

Check the report

Check the selected feature list going to be install

Installation Progress

Setup complete !! Enjoy

null
Одному из заказчиков потребовалось установка MS SQL 2008 на сервере, работающим под управлением Windows server 2012R2(русскоязычная версия). По определенным причинам обновлять MS SQL до более поздней версии было невозможно, поэтому было принято решение о тестировании совместимости.
Запускаем установку MS SQL, появляется сообщение об известных проблемах совместимости. Игнорируем.
Установка завершается неудачно — требуется .Net framework 3,5 SP1.
Через оснастку «установка ролей и компонентов», используя оригинальный установочный диск Windows, устанавливаем необходимый компонент.
Казалось бы, все требования соблюдены, проблем быть не должно, однако при следующей попытке установки получаем на этапе проверки требований:
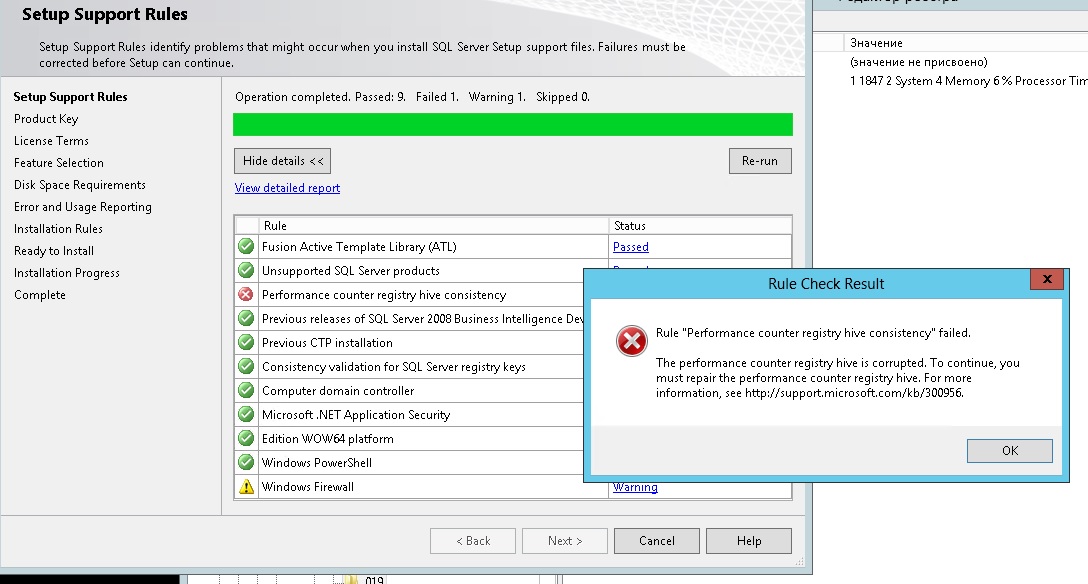
Попытки восстановление счетчиков, используя lodctr /r не привели ни к какому результату.
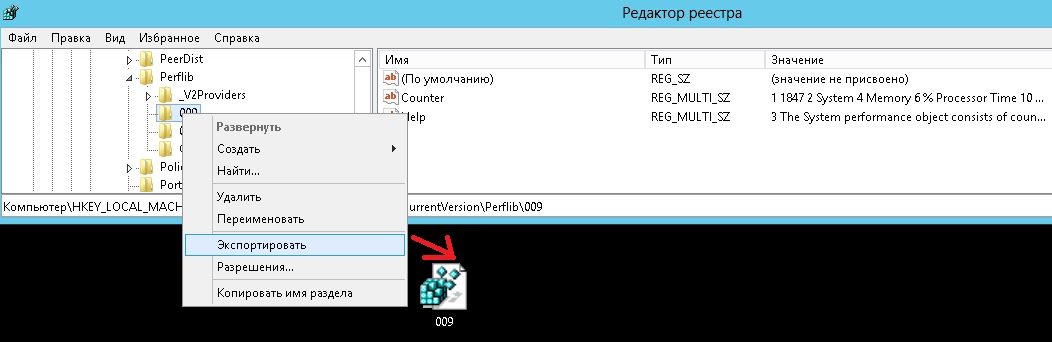
После анализа проблемы было выяснено, что на русскоязычной версии Windows счетчики находятся по адресу HKEY_LOCAL_MACHINE\Software\Microsoft\Windows NT\Current Version\Perflib\009, а MS SQL обращается к HKEY_LOCAL_MACHINE\Software\Microsoft\Windows NT\Current Version\Perflib\019.
Проводим экспорт данных из ветки реестра 009 :
вручную(открыв в «блокноте») изменяем значение на 019 и импортируем данные:
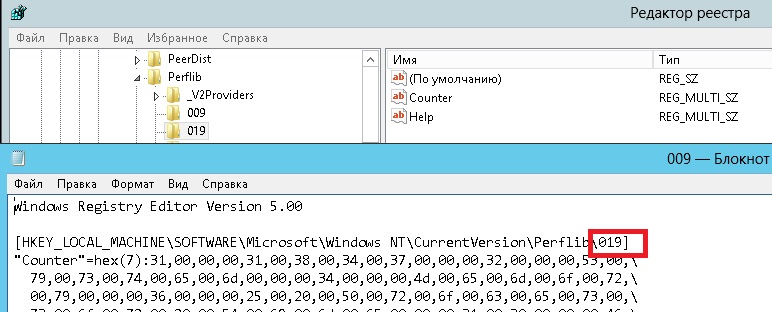
После импорта установка завершилась успешно и работоспособность MS SQL 2008 была проверена и подтверждена.
