
Overview
This article will detail the process of adding a PFX Certificate on a Windows Server.
Instructions
1. Remote Desktop Connection (RDP) into the Virtual Machine.
2. Upload your generated PFX Certificate to the Desktop.
3. Use Control+R on the Keyboard and enter MMC, then select ‘OK’.

4. Select File then Add/Remove Snap–in.

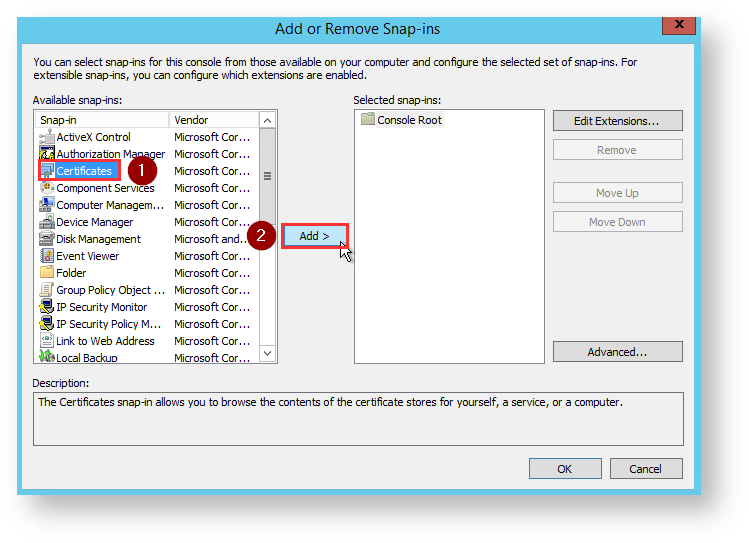
5. Select Certificates and then Add.
6. Select Computer Account then select Next.

7. Select Finish.
8. Select OK.
9. Expand Certificates, right click Personal > All Tasks > Import.

10. Select Next, Browse Files. Navigate to the Desktop, change file type to all then select the relevant .pfx file.


11. Enter the PFX Password. Then select ‘Next’.
12. Select ‘Automatically select the cert store based on type of certificate‘ as shown below.
13. Select ‘Next’.
14. Remove the PFX File from Desktop and Recycling Bin.
You have successfully added a PFX File/SSL Certificate to your Windows Server.
Если вам необходимо установить сертификат на Windows Server, давайте разберёмся, как это сделать. Если вы ещё не получили сертификат, то можете ознакомиться с инструкцией «Как сгенерировать запрос на SSL-сертификат в Windows Server».
Если файлы сертификата у вас на руках, приступаем к установке.
Добавляем сертификат на сервер
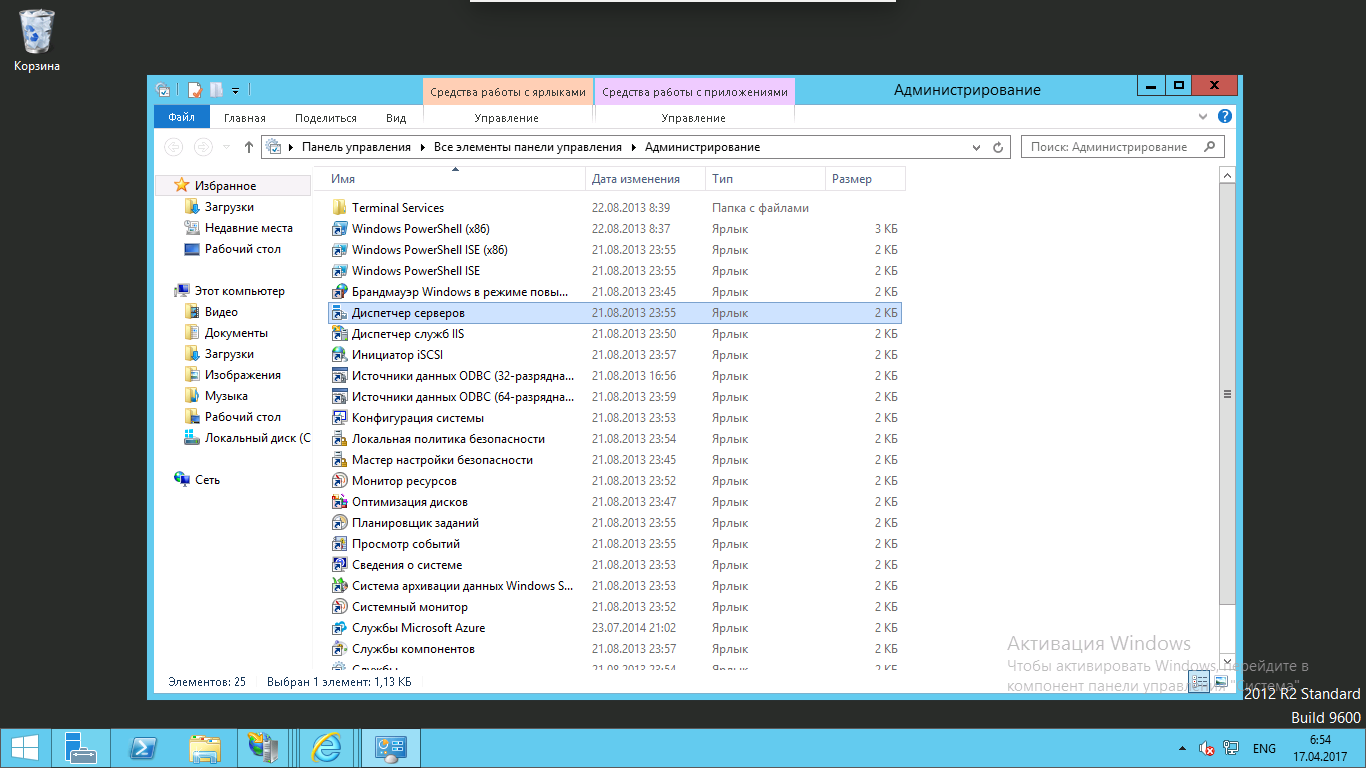
Для того чтобы загрузить сертификат, перейдите в Диспетчер серверов (Пуск — Администрирование — Диспетчер серверов).
Затем откройте Диспетчер служб IIS (Средства — Диспетчер служб IIS) и кликните на Сертификаты сервера.
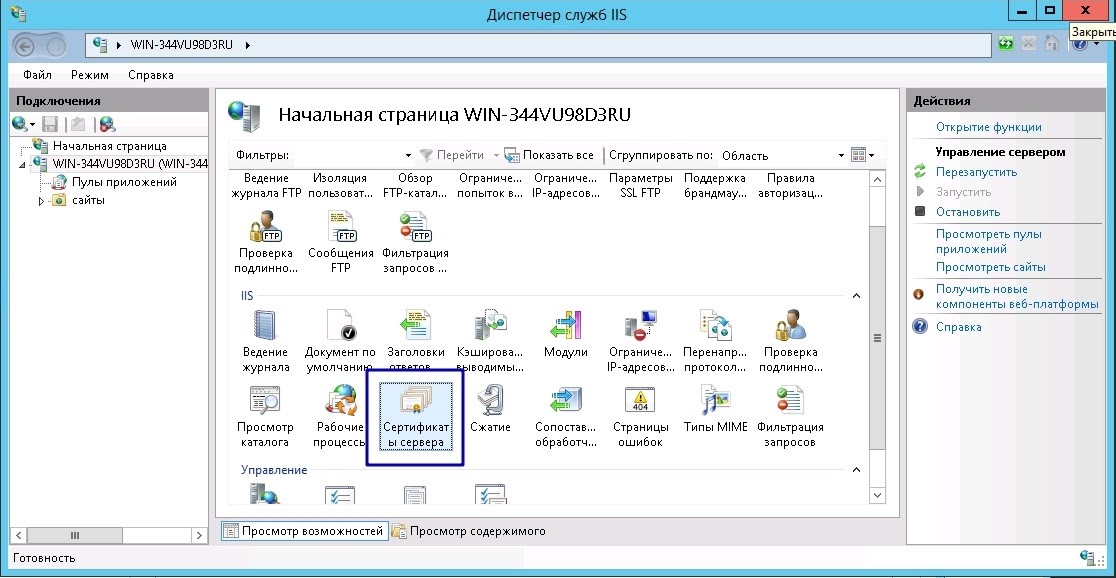
Далее способ установки зависит от того, где вы генерировали CSR:
1) Если Вы генерировали CSR на том же сервере, куда устанавливаете сертификат.
В меню Действия кликните пункт Запрос установки сертификатов.
Добавьте .crt файл, в поле имя — укажите домен сайта и нажмите ОК.

2) Если Вы генерировали CSR через личный кабинет/самостоятельно, то предварительно экспортируйте сертификат с ключом в .pfx файл.
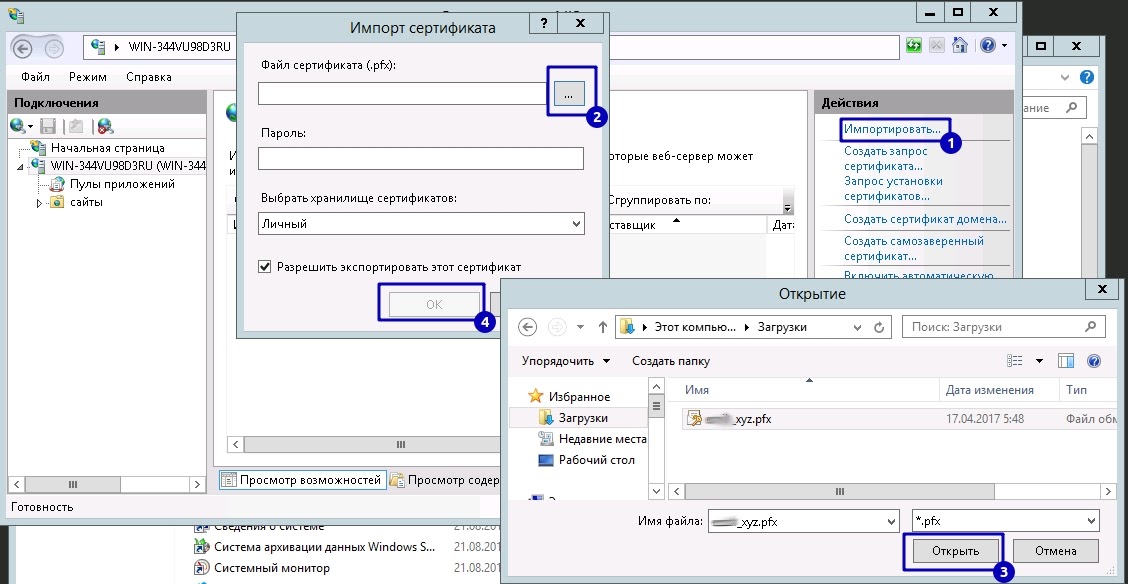
Чтобы добавить сгенерированный .pfx файл на сервер, в меню Действия нажимаем на кнопку Импортировать .
В открывшемся окне укажите расположение файла и пароль. Пароль задается при генерировании файла .pfx.
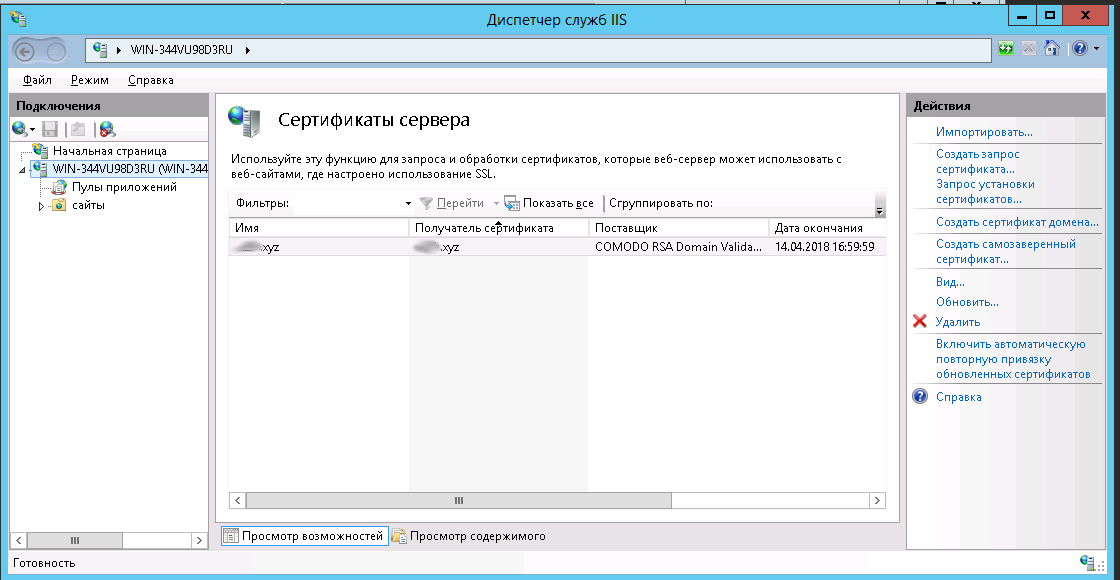
Сертификат загружен. В обоих вариантах, после добавления файла, сертификат будет доступен в разделе Сертификаты сервера. Осталось настроить доменное имя.
Подключаем SSL-сертификат на домен
Переходим в настройки сайта. В меню Подключения выберите сайт и кликните на пункт Привязки.
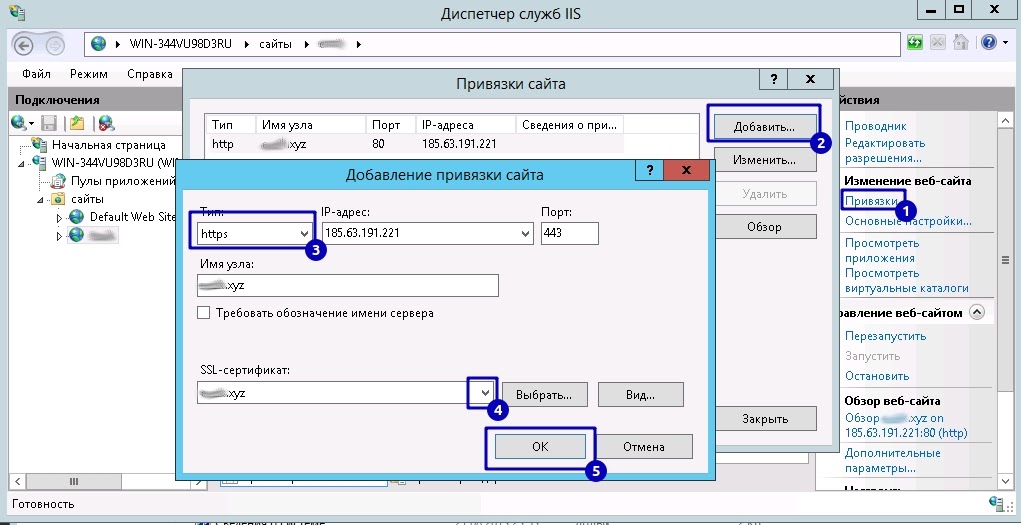
В открывшемся окне нажимаем Добавить и заполняем информацию:
Тип — https
Порт — 443
Имя узла — доменное имя.
IP address — IP-адрес сайта (для сертификата следует выделять отдельный IP для каждого сайта)
В поле SSL-сертификаты указываем созданный сертификат.
Перезагружаем сайт/сервер.
Проверяем — если сертификат установлен, то сайт будет доступен по https://.
Этот материал был полезен?
Данная инструкция описывает процедуру выпуска и установки SSL сертификатов на веб сервере IIS (Internet Information Services) в Windows Server.
Содержание:
- Генерация CSR запроса в IIS
- Установка SSL сертификата в ISS
- Привязать SSL сертификат к сайту IIS
Генерация CSR запроса в IIS
Для генерации SSL/TLS сертификата у внешнего Certificate Authority (CA) вам нужно сгенерировать запрос для выпуска сертификата (CSR, Certificate Signing Request). Вы можете сформировать CSR в ISS:
- Откройте консоль Internet Information Services Manager (
InetMgr.exe
); - Выберите ваш хост Windows Server и откройте раздел Server Certificates;
- В правом меню Actions выберите Создать запрос сертификата (Create Certificate Request);
- Заполните следующие поля в информацию о сертификате:
-
- Common Name – укажите имя сайта (веб-сервера), по которому будут обращаться ваши клиенты. Укажите FQDN имя, например:
reports.winitpro.ru
. Вы можете использоватьWildcard-сертфикат, в этом случае укажите здесь
*.winitpro.ru - Organization – укажите название организации. Для сертификатов с валидацией организации (OV-Organization Validation) и сертификатов с расширенной проверкой (EV-Extended Validation) нужно указать официальное название организации. Для физических лиц можно использовать SSL-сертификатов c домена (DV-Domain Validation). В этом случае указывается полное имя владельца сертификата;
- Organizational unit – yкажите внутреннее название подразделения вашей организации, которое является ответственным за сертификат;
- City/locality
- State/province
- Country/region – двухбуквенный код страны.
- Common Name – укажите имя сайта (веб-сервера), по которому будут обращаться ваши клиенты. Укажите FQDN имя, например:
-
- Выберите крипто провайдер и длину ключу. Рекомендуется использовать Microsoft RSA SChannel Cryptographic Provider с длиной ключа 2048 бит и более;
- Укажите имя файла, в который нужно сохранить CSR запрос.
- Должен сгенерироваться текстовый файл, который начинается с
BEGIN NEW CERTIFICATE REQUEST
и заканчивается
END NEW CERTIFICATE REQUEST
.
Передайте ваш CSR-файл организации, уполномоченной выпускать SSL сертификаты. Если вы используете внутренний CA на базе Microsoft, загрузите CSR файл и подпишите сертификат и скачайте файл.
Установка SSL сертификата в ISS
После того, как вы получили ваш файл (*.CER) с сертификатом SST/TLS от вашего CA, вы можете установить его в IIS.
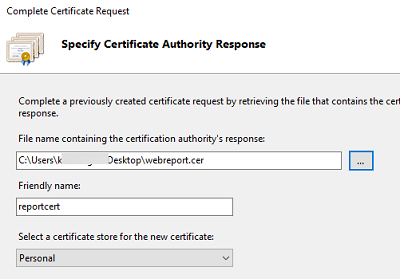
Для этого запустите консоль IIS Manager, перейдите в раздел Certificates и выберите Complete Certificate Request.
В статье описывается установка *.CER сертификатов в формате DER/base64 сертификаты X.509 от Microsoft. Если вы получили от своего CA сертификат в формате *.CRT, его не получится импортировать и установить в IIS. Вам нужно сконвертировать CRT сертификат в формат PFX. Проще всего это сделать с помощью утилиты openssl в любом дистрибутиве Linux. Вам понадобится файл сертификата (*.crt) и закрытый ключ (*.key). Для их конвертации, выполните команду:
$ openssl pkcs12 -export -out target.pfx -inkey source.key -in source.crt
Такой PFX сертификат можно импортировать через меню Import.
Также вы можете конвертировать CRT сертификат прямо из Windows:
- Дважды щелкните по вашем CRT файлу;
- Перелижите на вкладку Details и нажмите Copy to File;
- Выберите формат Base-64 encoded X.509(.CER);
- Укажите путь, куда нужно поместить CER файл сертификата.
Выберите *,crt файл с SSL сертификатом, полученным от центра сертификации. Укажите имя SSL сертификата и хранилище, в которое поместить сертификат (Personal или Web Hosting).
Новый SSL сертификат должен появится в списке доступных сертификатов в IIS.
Привязать SSL сертификат к сайту IIS
Теперь нужно привязать ваш сертификат к сайту IIS, порту и/или IP адресу. Найдите ваш сайт в консоли IIS и выберите Edit Bindings.
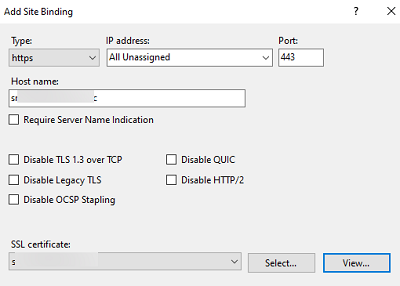
Нажмите Add и заполните следующую информацию:
- Type:
https - IP Address: выберите
All Unassigned
, или выберите конкретный IP адрес, которому нужно привязать SSL сертификат (на одном порту и IP адресе веб сервера IIS можно запустить несколько сайтов) - Port:
443 - Hostname: укажите имя узла, для которого выпущен сертификат
- SSL Certificate: выберите из списка SSL сертификат, который вы установили
Перезапустите сайт IIS (Manage Website -> Restart или командой
iisreset
).
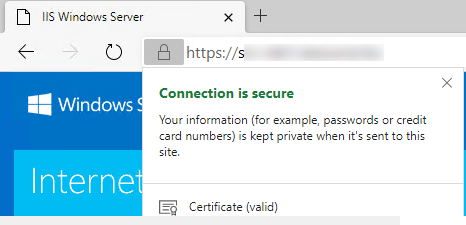
Откройте ваш веб сайт IIS в браузере используя префикс
https://
. Если сертификат установлен правильно в адресной строке браузера появится зеленый замок. Это значит что подключение защищено. Нажмите на замок чтобы просмотреть информацию о вашем SSL сертификате.
Далее нужно настроить правила, которое будет перенаправлять все HTTP запросы к сайту IIS на HTTPS.
In this article, we are going to install an SSL certificate to IIS with .pfx file which is stored at the server’s local drive.
Scenario
We have .pfx file which has an SSL certificate we need to install on IIS in Windows server.
Prerequisites
- Virtual Server Machine (In my case Windows Server 2012 R2 Standard)
- IIS (I have used IIS Version: 8.5)
- .pfx file
Requirement
We need to install an SSL certificate on IIS (internet information service).
Solution
Please follow these steps to install a certificate on IIS with the .pfx file.
I will consider that you already have a .pfx file.
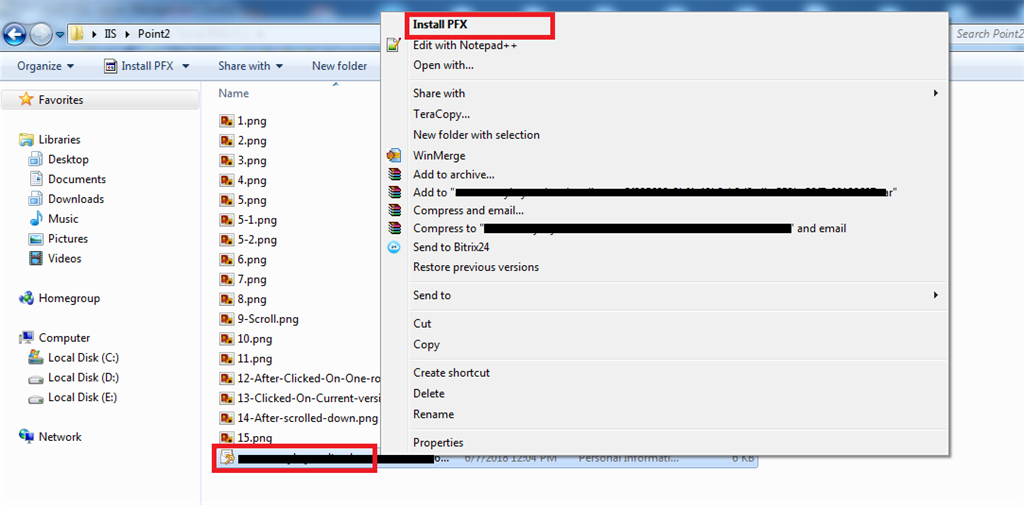
- Go to the folder which has .pfx file.
- Right-click on that .pfx file highlighted with a red border, it will open a popup window with Install PFX option at first as in Screen 1.

Screen 1
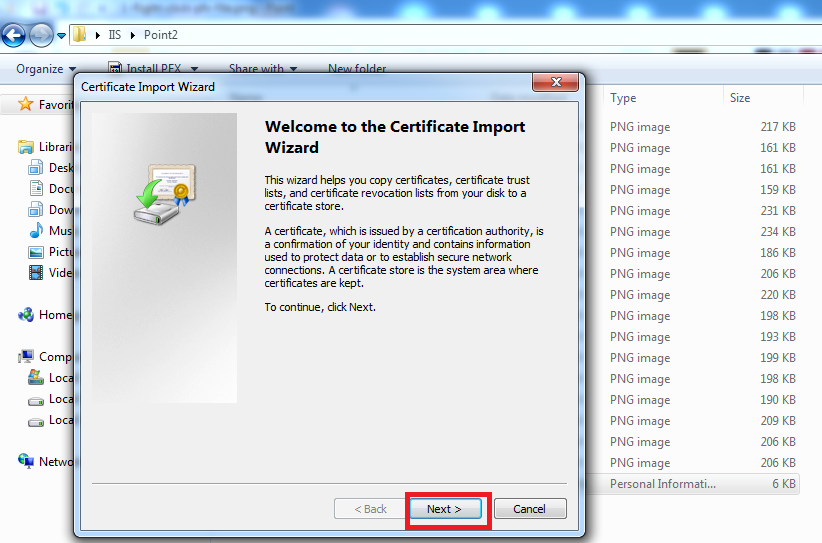
- After clicking on the Install PFX option, it will open a new window called Certificate Import Wizard as in Screen 2. Click on Next button

- After clicking on the Next button, it will go to File to Import window, Notice Filename in File to Import section, It is already filled with .pfx file name, Now, click on the Next button as in Screen 3.

Screen 3
- After clicking on the Next button, it will go to the Password window as in Screen 4, if you have added a password while creating the .pfx file then put that password in the password text box, else leave as it is(blank), and click on Next button.

Screen 4
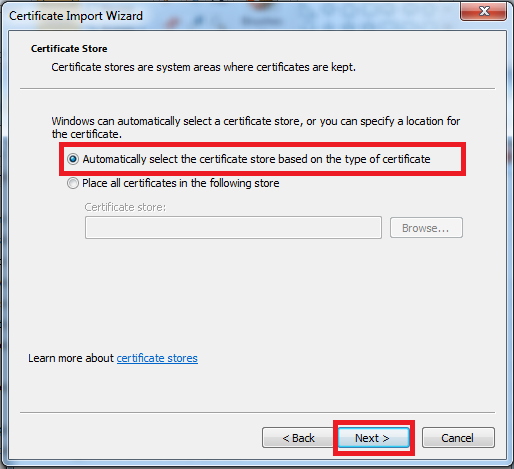
- After clicking on the Next button, it will go to Certificate Store Window as in Screen 5, Leave the default selected option as it is, if you don’t want to change it, else you can go with the second option. For now, I am going with the default option and click on the Next button as in Screen5.

Screen 5
- After clicking on the Next button, it will open Completing the Certificate Import Wizard window, click on the Finish button as in Screen 6.

Screen 6
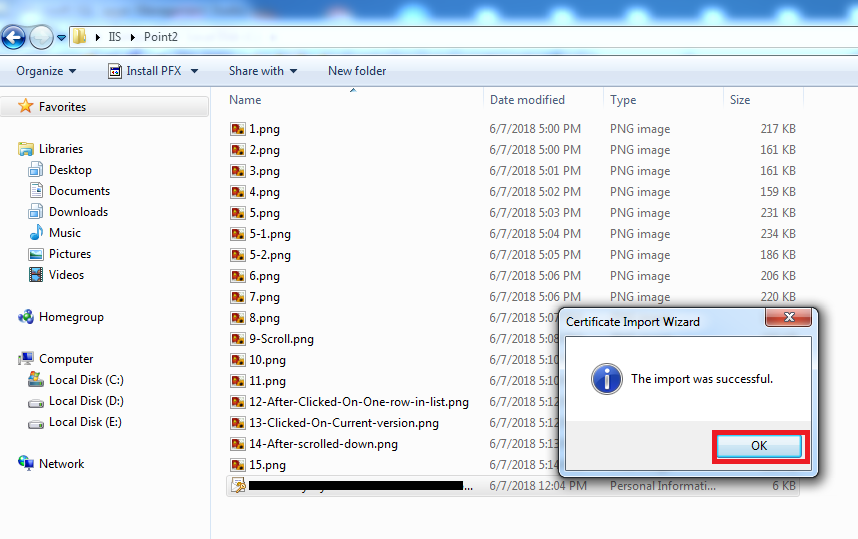
- After clicking on the Finish button, it will be showing the alert message that The Import was successful as in Screen 7.

Screen 7
- Click on Ok.
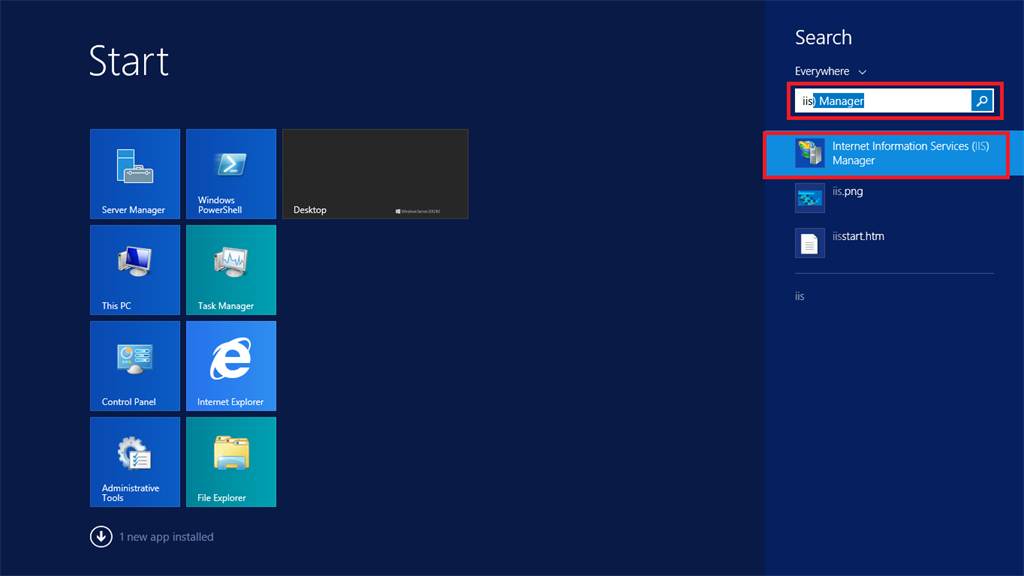
- Now, we need to check whether the Server certificate installed or not, For check it, we need to go to IIS(Internet Information Service).
- Press Window Key on the keyboard, and search IIS Manager as in Screen 8, and click on IIS Manager in the list.

Screen 8
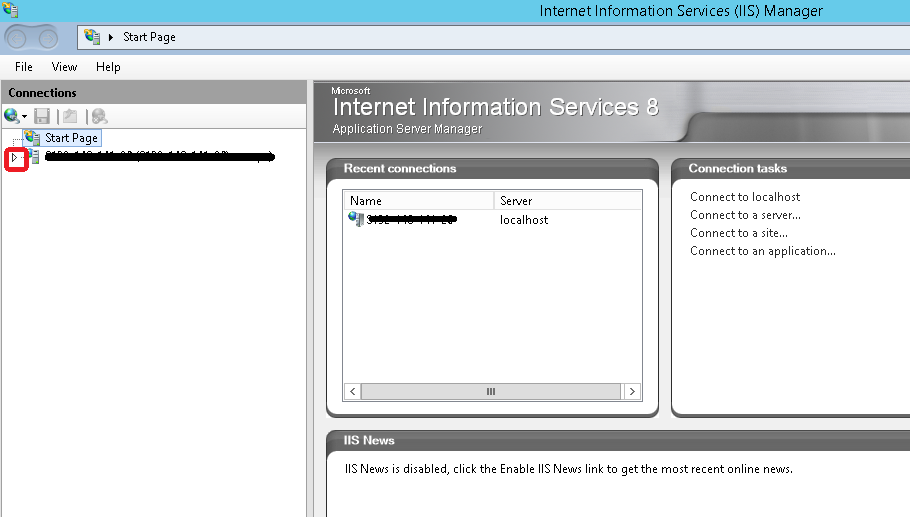
- After clicking on the IIS Manager, it will go to the IIS Manager window, expand the tree structure of the server by clicking on the arrow in the highlighted area in Screen 9.
Screen 9
- After clicking on the arrow, sometime a popup message will come as in Screen 10, for now, click on cancel, and go to step 14.
Screen 10
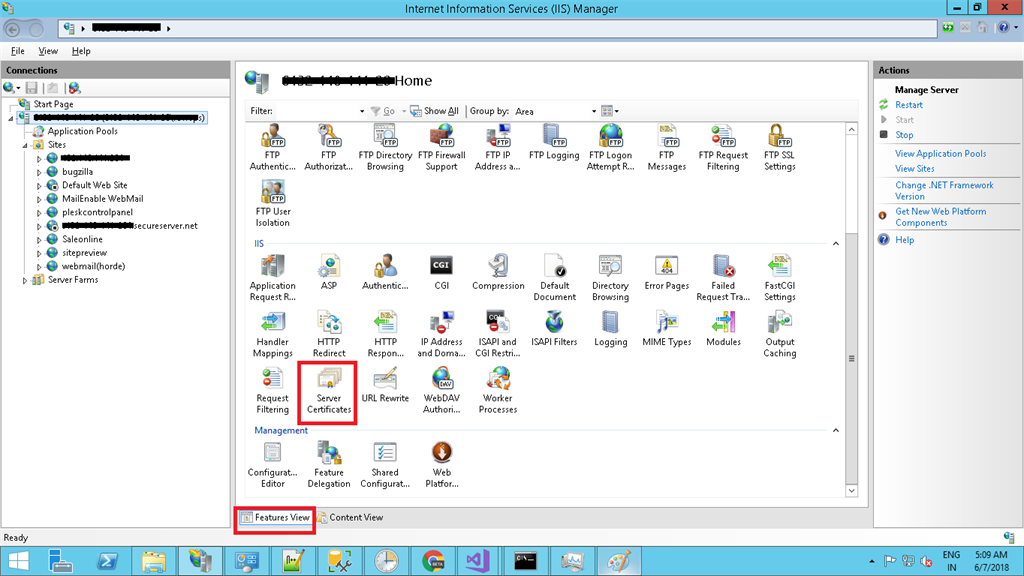
- Now, Select the Server (highlighted with red border) as in Screen 11.
Screen 11
- Now, Scroll down for a bit in Features View as in Screen 12, Find Server Certificates, and Double Click on it as in Screen 12.
Screen 12
- After Double Clicked on Server Certificates, it will open a list of the installed certificate, I have highlighted the installed certificate in Screen 13.

Screen 13


Conclusion
Now, Certificate is successfully imported to IIS after doing this we have also checked whether the certificate imported properly or not.
Skip to content
How to Export and Import SSL Certificate in Windows Server
In this post, we will look into the step-by-step instructions for importing and exporting the SSL Certificate through the Microsoft Management Console (MMC).
The Microsoft Management Console (MMC) with the Certificates snap-in is used to view and manage SSL server certificates, Intermediates certificates, and Trusted Root CA certificates.
Protect Your Data with BDRSuite
Prerequisites:
- Make sure that the MMC and Certificate snap-in are available on the Windows Server computer
Installing Microsoft MMC Certificates Snap-in
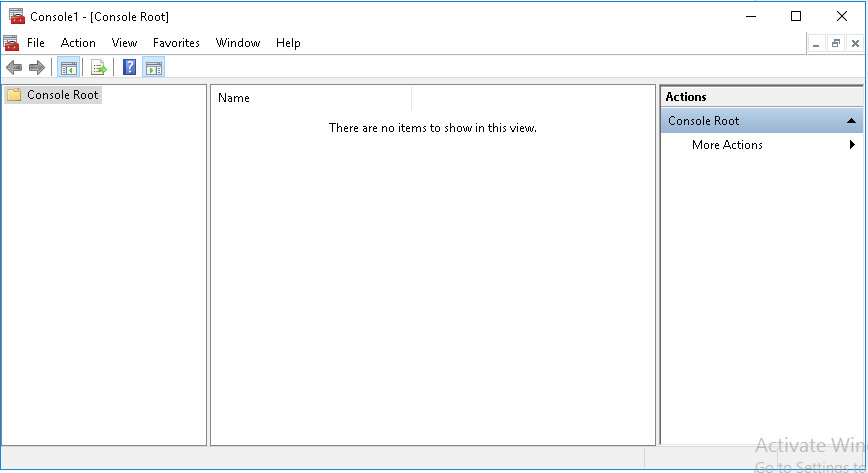
Step 1: Open Run and type MMC and click enter which will open the Microsoft Management Console.
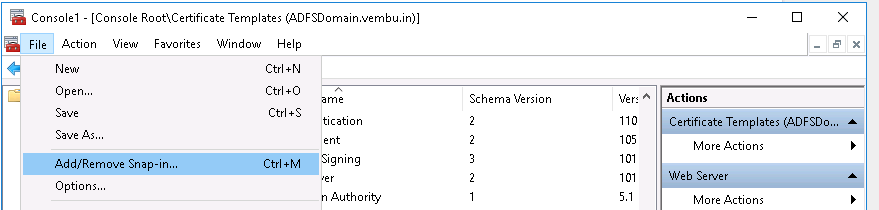
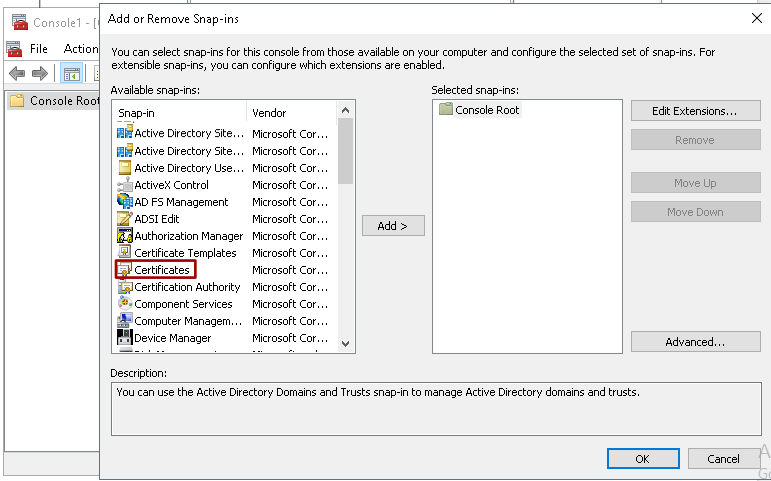
Step 2: Navigate to the file menu and click Add/Remove snap-in

Step 3: Select Certificates from the Available Standalone Snap-ins dialog box and click Add.
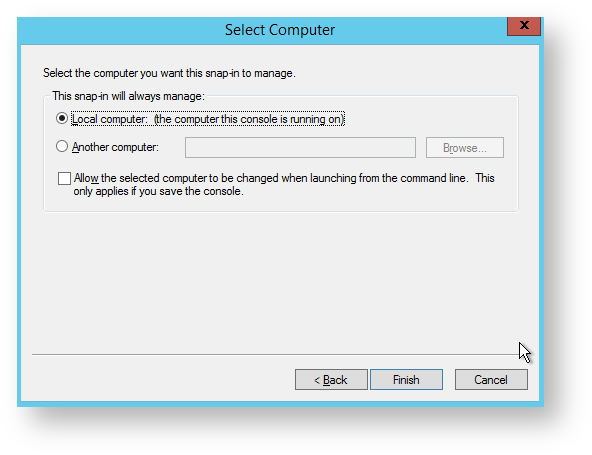
Step 4: In the Certificates snap-in window, select Computer account, click Next, select Local computer, and click Finish.
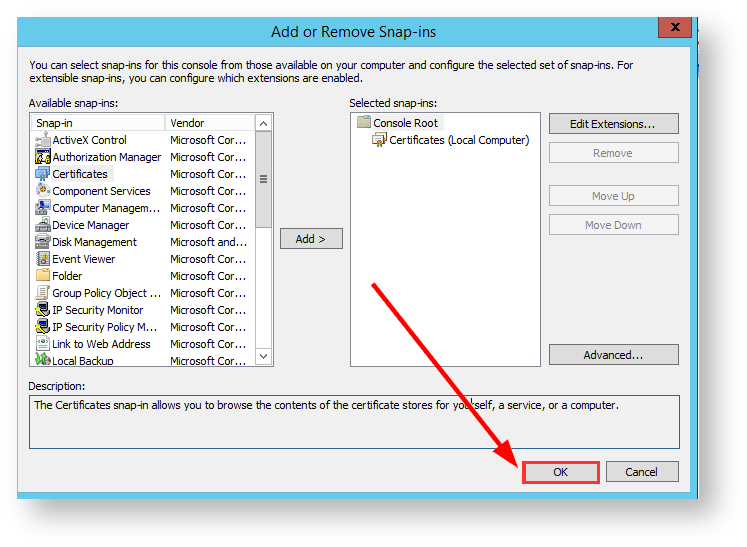
Step 5: In the Add or Remove snap-in window, click OK
The MMC Certificates Snap-in has been installed successfully.
Steps to Export SSL Certificate
Step 1: Open Run and type MMC and click enter which will open the Microsoft Management Console
Step 2: Navigate to the file menu and click Add/Remove snap-in
Step 3: Double Click Certificates, Select Computer Account and Select Local Computer > Finish. Then, click OK to exit the Snap-In window.
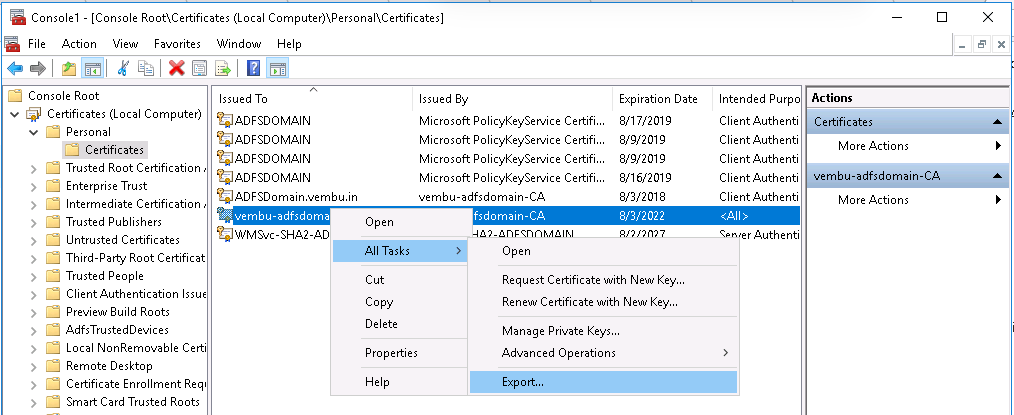
Step 4: Click [+] next to Certificates > Personal > Certificates. Locate and select the certificate for the correct domain. Right-click and select All Tasks > Export. Click Next
Step 5: Select Yes, export the private key.
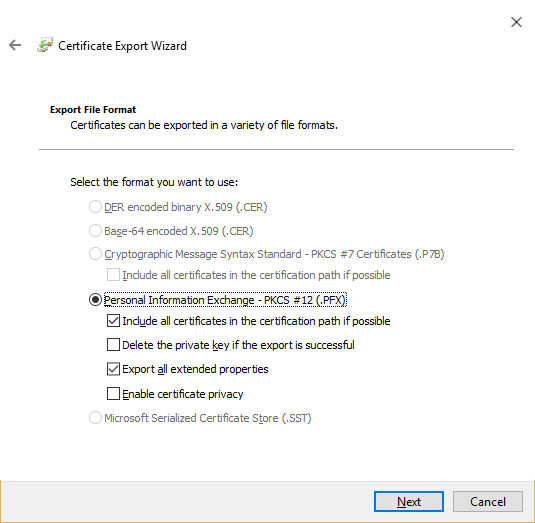
Step 6: Choose Personal Information Exchange – PKCS#12 (.PFX) for the certificate file format. Check the boxes for the following and click Next.
- Include all certificates in the certificate path if possible
- Export all extended properties
Step 7: Enter a password for your private key. Press Next.
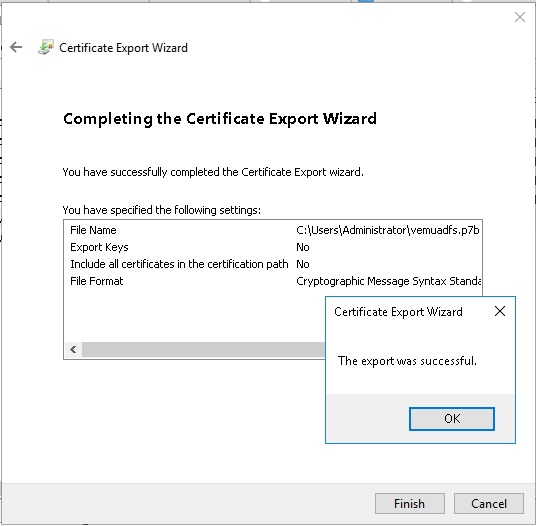
Step 8: Click browse and save your .pfx. Then, click Next > Finish > OK.
Steps to Import SSL Certificate:
Step 1: Open Run and type MMC and click enter which will open the Microsoft Management Console
Step 2: Navigate to the file menu and click Add/Remove snap-in.
Step 3: Double Click Certificates, Select Computer Account and Select Local Computer > Finish. Then, click OK to exit the Snap-In window.
Step 4: Click [+] next to Certificates > Personal > Certificates. Right-click on Certificates and select All Tasks > Import. Click Next.
Step 5: Click Browse. Select the .cer, .crt, or .pfx you would like to import. Click Open.
Step 6: Select Automatically select the certificate store based on the type of certificate. Click Finish & OK. The certificate is now visible in Internet Information Services (IIS) Manager.
Follow our Twitter and Facebook feeds for new releases, updates, insightful posts and more.
Try BDRSuite for Free!
Schedule a live demo with one of our product experts
Start your full-featured 30-day free trial
Explore detailed pricing, editions & features