
Время на прочтение6 мин
Количество просмотров179K
Хотим мы того или нет, но программы, для которых необходима Windows, никуда из офисов не исчезли. В ситуации, когда их использование безальтернативно, лучше иметь виртуальную ОС, например для того, чтобы подключиться к аудио-конференции через Skype for Business.
В этой статье я расскажу, как можно с минимальными издержками установить гостевую ОС Windows на гипервизоре QEMU с помощью графического интерфейса virt-manager. Мы нанесем на карту все подводные камни и рифы, а жучков аккуратно посадим в банку.
Подготовка
Самый первый шаг — настройка параметров ядра. Обязательна поддержка KVM и vhost-net, желательна поддержка туннельных интерфейсов[1] и сетевого моста[2]. Полный список на Gentoo вики-странице QEMU.
Подготовьте дисковое пространство. Я выделил 70 GiB, и Windows 8.1 за пару месяцев использовала почти 50 GiB так, что для обновления до 10-й версии места на диске не хватило.
Далее, нам понадобится набор редхатовских драйверов virtio-win. Если у вас установлен RedHat, достаточно запустить
[root@server ~]# yum install virtio-winи образ iso будет записан в каталог /usr/share/virtio-win/. Также можно его скачать с репозитариев Fedora.
Убедитесь, что поддержка аппаратной виртуализация включена в BIOS/UEFI. Без этого KVM не будет активирован, а virt-manager выдаст вот такую ошибку.

В качестве проверки можно прочитать файл устройства.
(2:506)$ ll /dev/kvm
crw-rw----+ 1 root kvm 10, 232 ноя 9 02:29 /dev/kvm
Если файл не обнаружен, а опции ядра выставлены верно, значит дело в настройках BIOS/UEFI.
Устанавливаем нужные пакеты.
(5:519)$ sudo emerge -av qemu virt-managerДля RedHat 7 достаточно установить только virt-manager, так как QEMU устанавливается по умолчанию.
[root@server ~]# yum install virt-managerДебианщикам надо установить пакет qemu.
root# aptitute install qemuМожно теперь переходить к установке.
Запуск и инсталляция
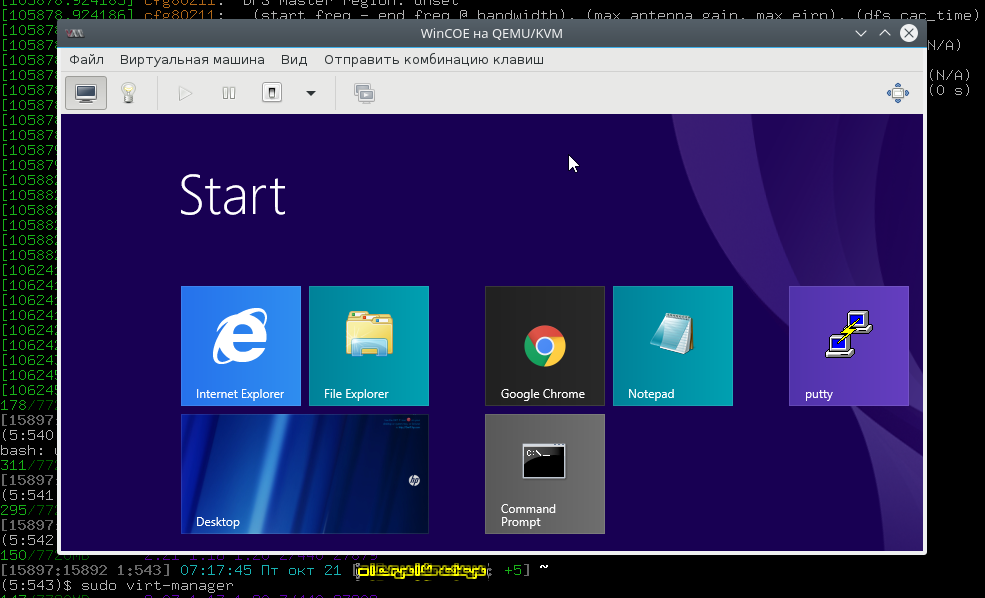
Запускаем virt-manager и создаем новую виртуальную машину из локального хранилища.

Указываем путь к установочному iso образу Windows.

Далее, на 3-м и 4-м шаге будет выбор количества CPU, объем RAM и размер дискового пространства, после чего на 5-м шаге следует выбрать дополнительные конфигурации перед настройкой.

Окно дополнительных настроек нужно для того, чтобы выполнить финт ушами. Его смысл в том, чтобы добавить виртуальный флопарь с драйверами из набора virtio-win. Это даст возможность изменить тип жесткого диска: удалить диск с шиной IDE и добавить его же, но с шиной VirtIO. Подробно, в доках RedHat.
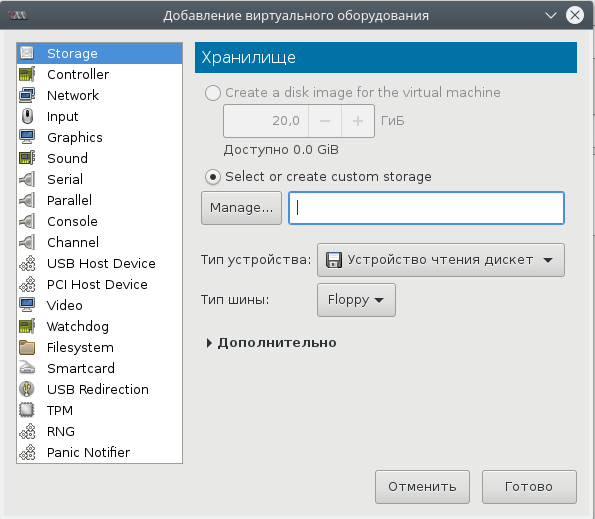
Прописываем драйвер /usr/share/virtio-win/virtio-win.vfd и добавляем виртуальный флоппи-диск. Затем переходим на вкладку [Шина] Диск № и проделываем финт с заменой шины диска: удаляем с IDE и добавляем с VirtIO.
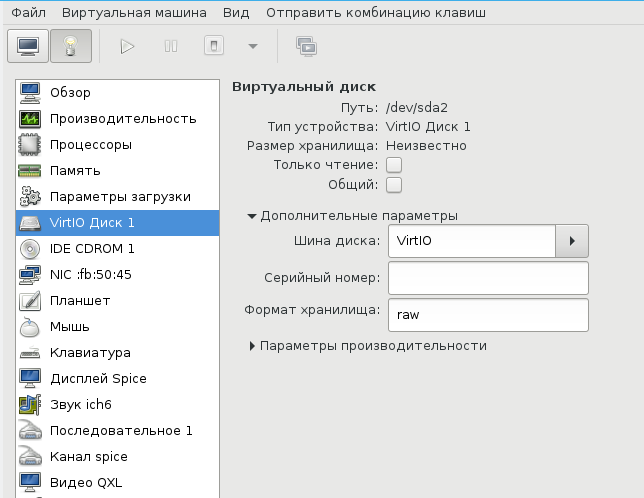
Чуть не забыл сказать, для чего нужен этот фокус. Специалисты утверждают, что с шиной VirtIO, производительность диска ощутимо выше.
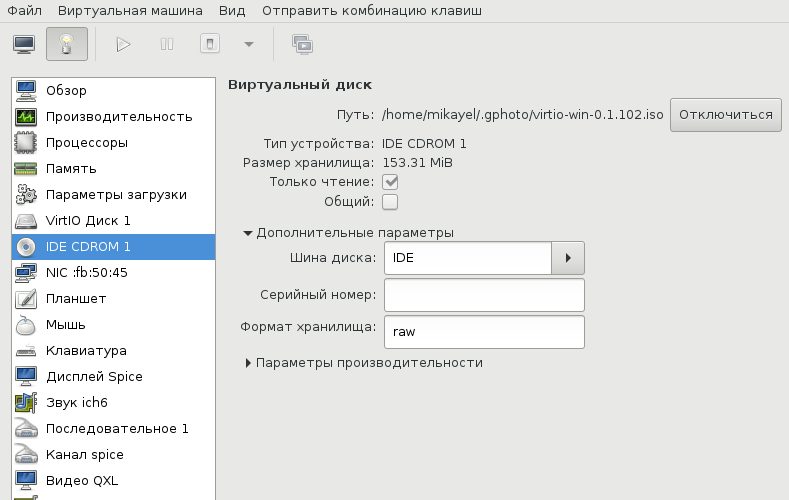
В принципе, уже можно начинать инсталляцию, но мы забыли добавить CD-ROM с драйверами virtio-win, а они нам пригодятся, когда диспетчер устройств засверкает желтыми иконками вопросительного знака.
Ну вот теперь можно начать установку.
Ну хорошо, начали мы установку. А что, если установщик Windows попросит сменить диск? Мне из-за этого пришлось пару раз прервать и начать всю карусель заново, но с вами такого уже не случится.
(qemu) change ide1-cd0 /tmp/windows_8.1_x64_disk2.isoДрайвера и доводка
По окончанию процесса установки диспетчер устройств недосчитается некоторых драйверов. Предположительно, это могут быть:
Ethernet Controller
PCI Simple Communication Controller
SCSI Controller
Нужно скормить им драйвера из набора virtio-win, что подключены через IDE CD-ROM в предыдущем разделе.
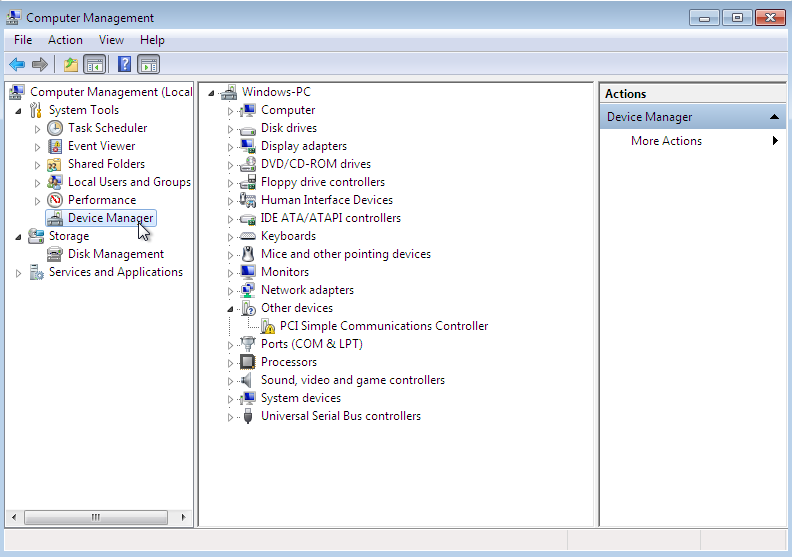
Делается это стандартно: правой кнопкой на желтый знак вопроса, обновить драйвера, путь к файлам.
Вот весь список, а это соседняя страница RedHat доков, где установка драйверов показана подробнее.
- Balloon, the balloon driver, affects the PCI standard RAM Controller in the System devices group.
- vioserial, the serial driver, affects the PCI Simple Communication Controller in the System devices group.
- NetKVM, the network driver, affects the Network adapters group. This driver is only available if a virtio NIC is configured. Configurable parameters for this driver are documented in Appendix E, NetKVM Driver Parameters.
- viostor, the block driver, affects the Disk drives group. This driver is only available if a virtio disk is configured.
Оборудование
Тут постепенно начинается область безграничных возможностей и 101 способов сделать по-своему, поэтому я покажу, как это работает у меня, а вы можете настроить более точно под свои нужды.
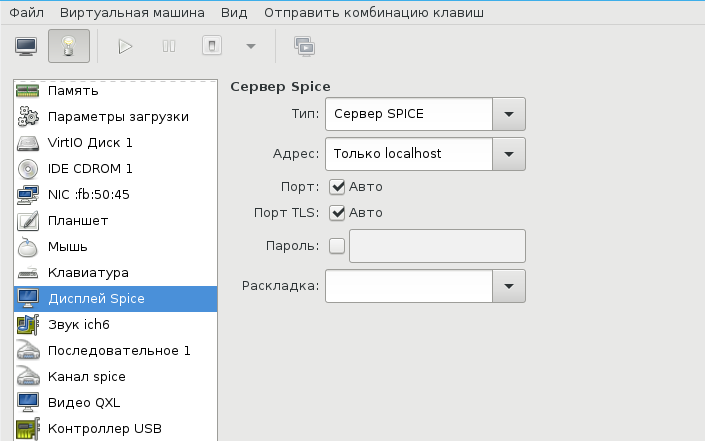
У меня выбран дисплей Сервер Spice и звуковое устройство ich6. Нет, конечно, если у вас уйма времени и желание во всем разобраться до самых тонкостей — дерзайте и пробуйте альтернативные подходы, но у меня звук взлетел, вернее завибрировал, только с такими настройками. Во второй части, посвященной прогулке по граблям и отлову багов, я расскажу об этом подробнее. В закладке видео я выставил QXL, ибо с этой опцией, благодаря волшебному драйверу, мне удалось добиться нормального разрешения экрана.
Подключаться к ВМ можно разнообразно.
- Через графический интерфейс virt-manager
- Выбрать дисплей VNC-сервер и подключаться через vnc-клиента
- Установить Spice-клиента и подключаться через него
- К Windows можно подключиться через rdp, если включен терминальный сервер
У меня вариант 3, для Gentoo это программа spice-gtk
$ eix spice-gtk
[I] net-misc/spice-gtk
     Доступные версии:      0.31 ~0.32-r1 ~0.32-r2 **9999 {dbus gstaudio gstreamer gstvideo gtk3 +introspection libressl lz4 mjpeg policykit pulseaudio python sasl smartcard static-libs usbredir vala webdav PYTHON_SINGLE_TARGET="python2_7 python3_4" PYTHON_TARGETS="python2_7 python3_4"}
     Установленные версии:  0.31(16:05:41 18.06.2016)(gtk3 introspection pulseaudio python usbredir -dbus -gstreamer -libressl -lz4 -policykit -sasl -smartcard -static-libs -vala -webdav PYTHON_SINGLE_TARGET="python2_7 -python3_4" PYTHON_TARGETS="python2_7 python3_4")
     Домашняя страница:     http://spice-space.org https://cgit.freedesktop.org/spice/spice-gtk/
     Описание:              Set of GObject and Gtk objects for connecting to Spice servers and a client GUI
Сеть
Сеть для ВМ можно настроить по-разному, на Хабре умельцы уже об этом писали. Я перепробовал несколько способов, и в конце простота опять взяла вверх. Сама ВМ запускается из под рута[3], но графический интерфейс spice-gtk — из под обычного непривилегированного пользователя. Это позволяет решить дилемму: для сетевых опций нужны права рута, а для звукового демона pulseaudio, рут запрещен. Я пробовал навешать все права на обычного пользователя, но ничего не получалось, то pulse не пульсирует, то сеть не создается, там много а тут мало. В итоге решил так и доволен. Буду рад, если в комментариях будет найден лучший способ.
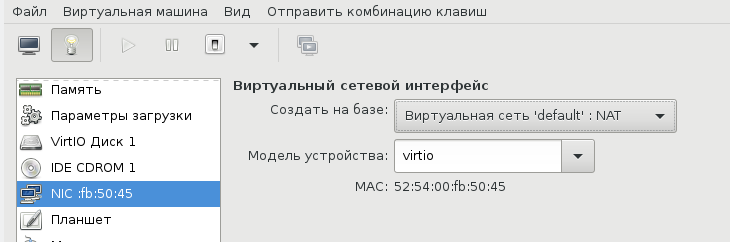
Такой простой выбор сетевых опций дает результат превосходящий ожидания. Создаются 3 дополнительных сетевых интерфейса: virbr0, virbr0-nic, vnet0.
$ ip addr
...
4: virbr0: <BROADCAST,MULTICAST,UP,LOWER_UP> mtu 1500 qdisc noqueue state UP group default qlen 1000
    link/ether 52:54:00:cc:2a:1e brd ff:ff:ff:ff:ff:ff
    inet 192.168.102.1/24 brd 192.168.102.255 scope global virbr0
       valid_lft forever preferred_lft forever
5: virbr0-nic: <BROADCAST,MULTICAST> mtu 1500 qdisc pfifo_fast master virbr0 state DOWN group default qlen 1000
    link/ether 52:54:00:cc:2a:1e brd ff:ff:ff:ff:ff:ff
11: vnet0: <BROADCAST,MULTICAST,UP,LOWER_UP> mtu 1500 qdisc pfifo_fast master virbr0 state UNKNOWN group default qlen 1000
    link/ether fe:54:00:fb:50:45 brd ff:ff:ff:ff:ff:ff
    inet6 fe80::fc54:ff:fefb:5045/64 scope link
       valid_lft forever preferred_lft forever
В iptables создается свод правил, вот основные:
$ sudo iptables -L
...
Chain FORWARD (policy ACCEPT)
target     prot opt source               destination
ACCEPT     all  --  anywhere             192.168.102.0/24     ctstate RELATED,ESTABLISHED
ACCEPT     all  --  192.168.102.0/24     anywhere
Windows ВМ:
C:\Users\user>ipconfig

Windows IP Configuration
Ethernet adapter Ethernet 2:

   Connection-specific DNS Suffix  . :
   Link-local IPv6 Address . . . . . : fe80::90c3:a458:6645:7b9a%7
   IPv4 Address. . . . . . . . . . . : 192.168.102.203
   Subnet Mask . . . . . . . . . . . : 255.255.255.0
   Default Gateway . . . . . . . . . : 192.168.102.1

Tunnel adapter isatap.{BD8F0DA4-92A8-42BD-A557-23AC89AED941}:

   Media State . . . . . . . . . . . : Media disconnected
   Connection-specific DNS Suffix  . :

Tunnel adapter IPHTTPSInterface:

   Connection-specific DNS Suffix  . :
   IPv6 Address. . . . . . . . . . . : 2620:0:a13:8a7:51af:79ae:92b8:828a
   Temporary IPv6 Address. . . . . . : 2620:0:a13:8a7:b49d:81fe:e509:16e7
   Link-local IPv6 Address . . . . . : fe80::51af:79ae:92b8:828a%15
   Default Gateway . . . . . . . . . :
Повторяю, все это libvirtd создает сам, ничего для этого делать не надо. В результате имеем нормальный роутинг между хостом и ВМ, можно обмениваться файлами по ssh / scp. Можно пойти дальше и создать шару на Windows, а на Linux хосте настроить samba, но мне это показалось избыточным.
В завершение
Трудно рассказать в одной статье обо всех аспектах Windows + QEMU/KVM, поэтому завершим в следующей. А там будет самый смак, командный интерфейс, разрешение экрана максимум 1024×768, Сцилла pulseaudio и Харибда сети, команда virsh и настройка ВМ из конфиг файла, фейл с tpm, двоичный синтаксис устройств и прочие тихие радости.
- ↑TUN/TAP interfaces
- ↑Ethernet bridging
- ↑От английского root
Если эта публикация вас вдохновила и вы хотите поддержать автора — не стесняйтесь нажать на кнопку
Do you want to use QEMU for Windows? This post from MiniTool shows you how to download and install the QEMU software on Windows. It also shows you how to use QEMU on Windows to create an Ubuntu VM.
What Is QEMU
QEMU, short for Quick Emulator, is a free open-source hosted virtual machine manager that can execute hardware virtualization. With the help of KVM (Kernel-based Virtual Machine), QEMU can offer fast running speed. Therefore, it develops fast and is going to replace VirtualBox and VMware on Linux.
Tip: On Linux, with the help of quickgui, QEMU can create some macOS, Windows, and Linux virtual machines without downloading the ISO files manually. Please refer to this post: How to Install macOS and Windows 11 Virtual Machines on Ubuntu.
However, on Windows, the advantages of QEMU are not significant, because the KVM technology is not applicable on the Windows host machine. In addition, the quickgui is also not available to Windows. But QEMU develops fast and many people still want to use this VM software on Windows.
QEMU for Windows Download and Install
1. Download QEMU for Windows
To use QEMU for Windows, you should download and install it first. Please refer to the following QEMU download guide:
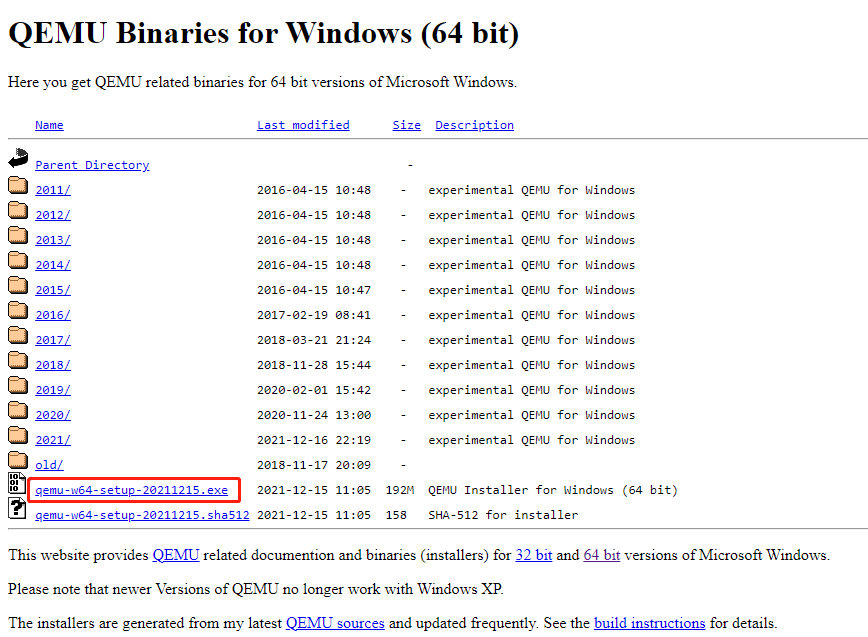
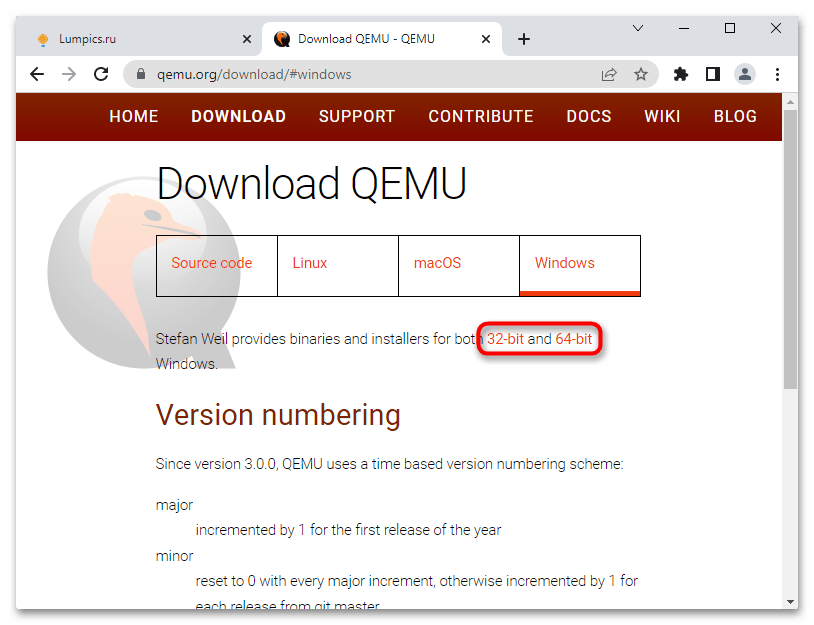
Step 1: Go to the official QEMU website (https://www.qemu.org). Click the Download button at the top section. You will go to the QEMU download page.
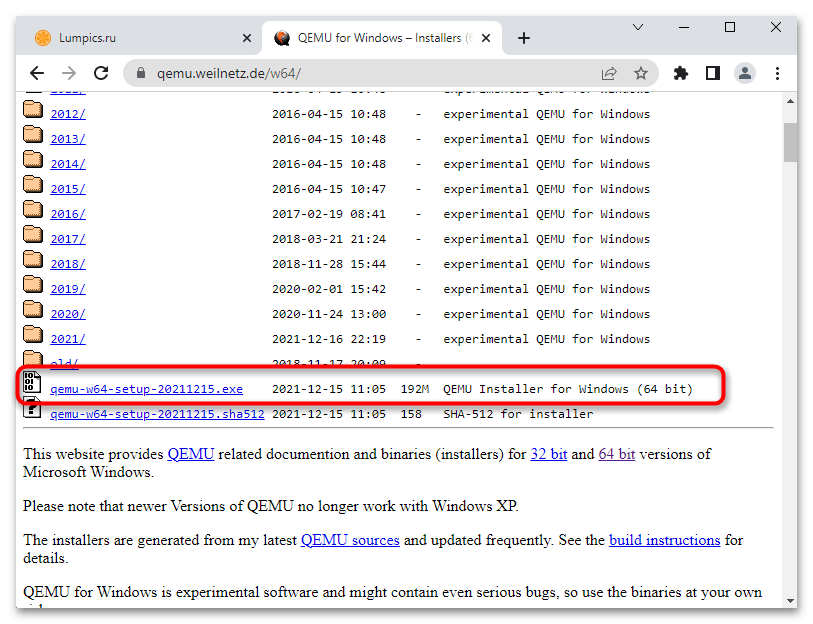
Step 2: Click the Windows tab to get the QEMU Windows version. Click 32-bit or 64-bit according to what OS you are running (for me, I click the 64-bit because my OS is 64-bit).
Step 3: On the new page, click the .exe file to download it. This file is the installer file.
2. Install QEMU for Windows
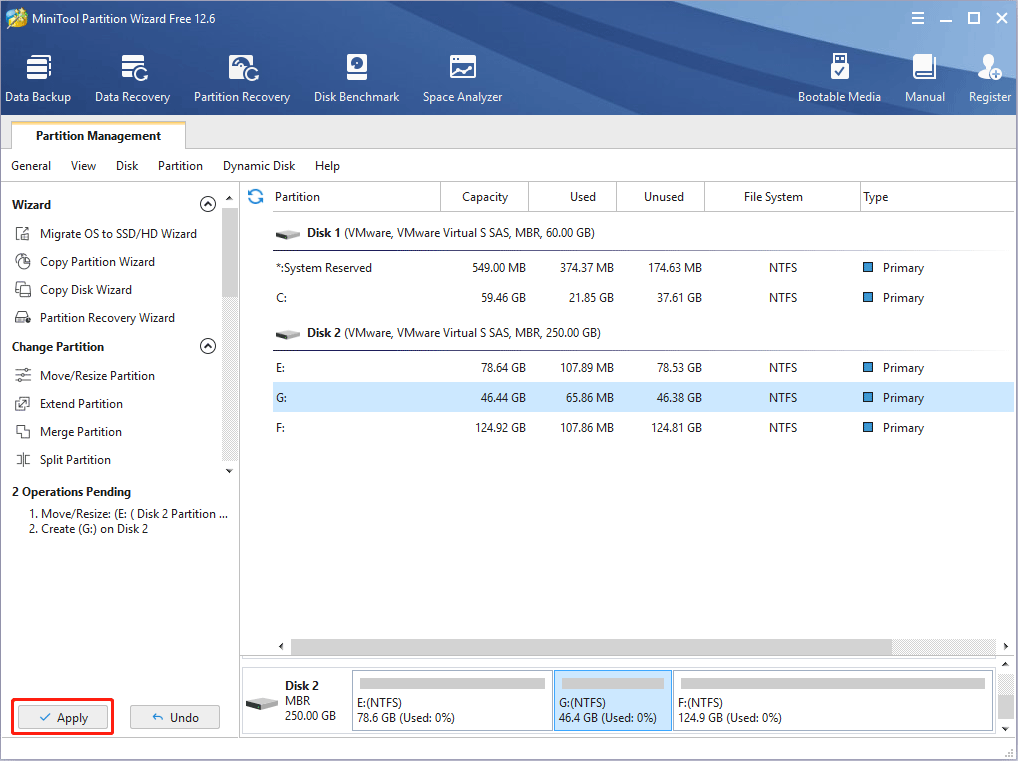
After the installer file is downloaded, you can double-click it to run directly. Before doing that, I recommend you to create a partition separately for it. For any virtual machine software, I will recommend you create a separate partition to store the software and the VM files so that you can manage them better.
To create a separate partition, you can use the shrink feature in the Windows Disk Management tool. But this tool can’t help you move the location of partitions, so I recommend you to use MiniTool Partition Wizard.
If the free space of one partition is not enough, you can move/resize another partition to get more unallocated space and then gather the unallocated space together to create one partition. Here is the guide:
MiniTool Partition Wizard FreeClick to Download100%Clean & Safe
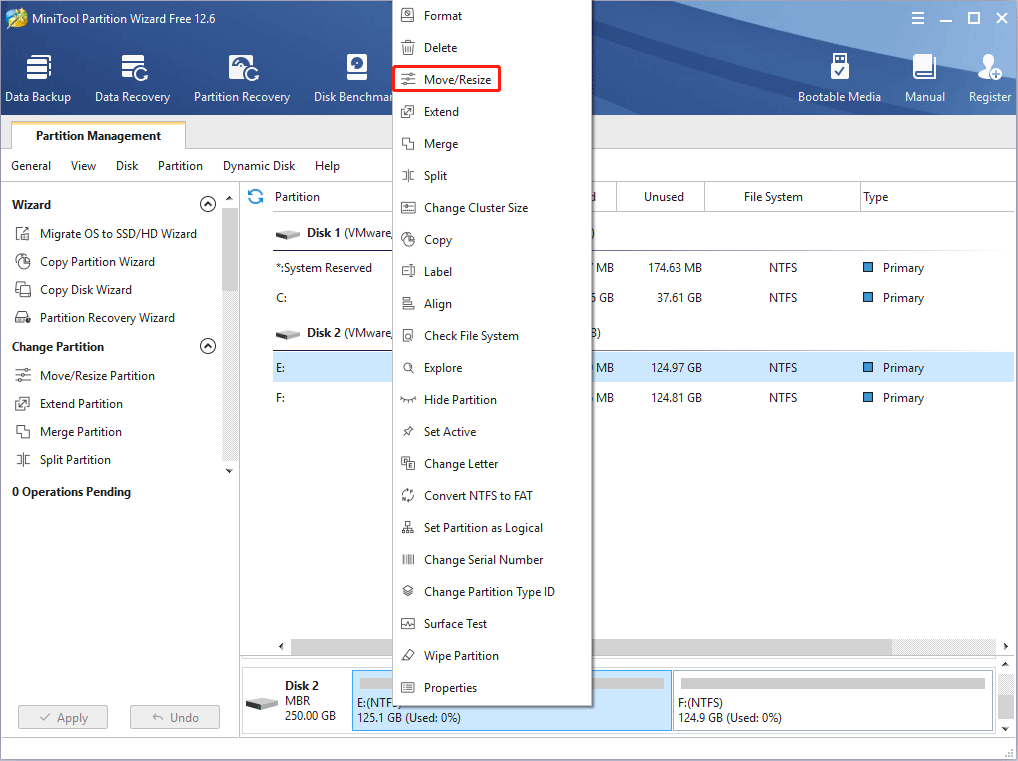
Step 1: Launch MiniTool Partition Wizard and go to its main interface. Right-click a partition and choose Move/Resize.
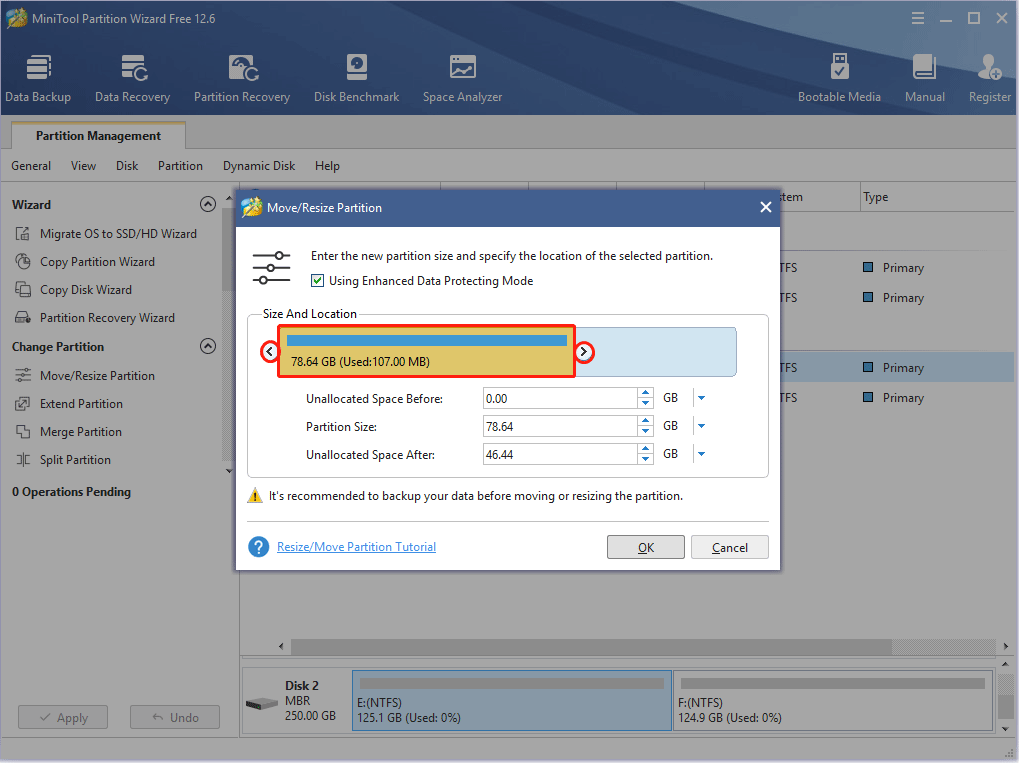
Step 2: Drag the two arrows on the two sides of the partition to shrink the partition, and then drag the block to move the location of the partition. Then, click the OK button. In this way, you can get unallocated space.
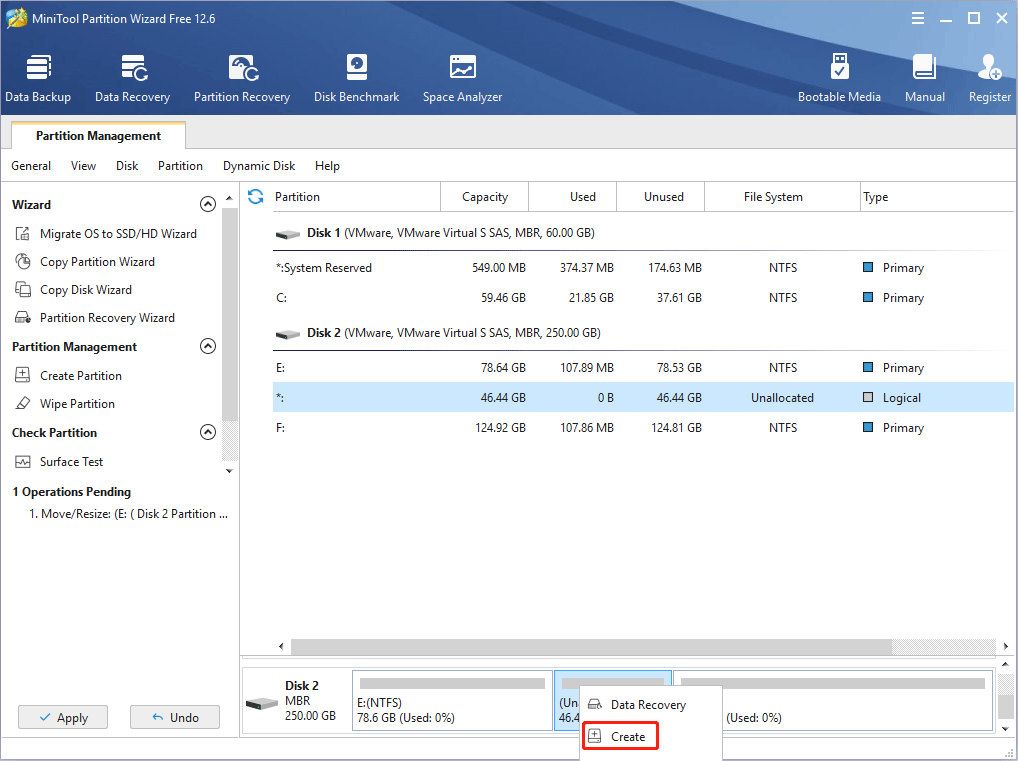
Step 3: Right-click the unallocated space and choose the Create button.
Step 4: Set parameters for the new partition. You can keep all of them to the default value if you don’t have specific demands. Then, click the OK button.

Step 5: Click the Apply button to execute pending operations.
How to Merge Unallocated Space in Windows 10 for a Large Drive
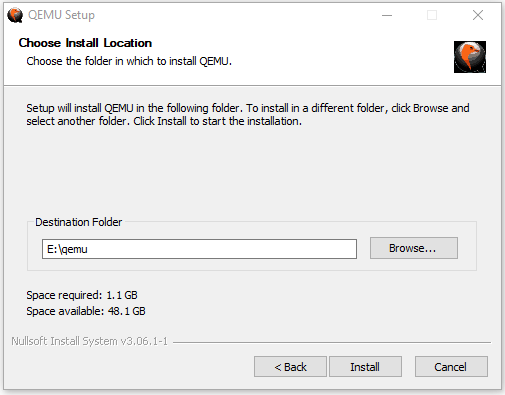
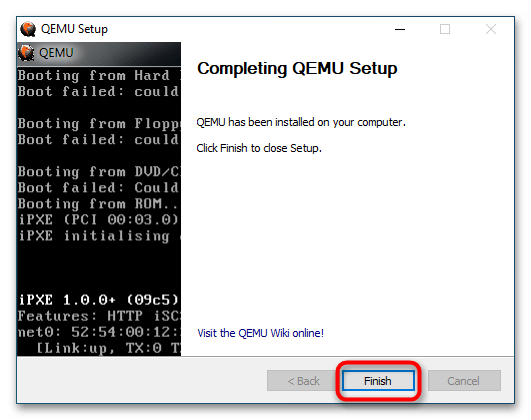
After the new partition is created, you can then double-click the QEMU installer file to install this VM software. You just need to follow the on-screen instructions to complete the installation.
Tip: When you are asked to choose the install location, please choose the newly-created partition (taking E drive as an example).
How to Use QEMU on Windows
After installing the QEMU Windows version, you may want to know how to use QEMU to create a virtual machine. Here are 2 ways and the 2nd way is better.
Way 1. Create a Virtual Machine Using Commands
QEMU doesn’t come with a GUI. If you don’t install a GUI manually, you need to use commands to run QEMU. Here is the guide on how to use QEMU on Windows to create a VM via commands (taking Ubuntu as an example).
Step 1: Download the Ubuntu ISO file from the official website.
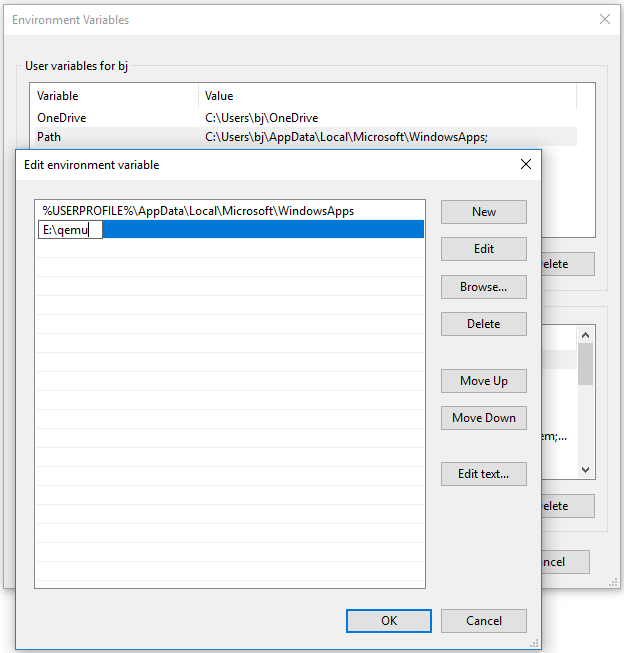
Step 2: Add QEMU path into Environment Variables.
- Open File Explorer, go to the QEMU installation location, and then copy the path (E:\qemu).
- Right-click This PC / Computer, choose Properties, and then click Advanced system settings.
- Under the Advanced tab, click Environment Variables.
- In the User variables box, double-click the Path variable, click New, and then paste the QEMU path.
- Click the OK button to save changes, and then click the OK button again to save and exit the Environment Variables
Tip:
1. If you use Windows 7, the adding process may be a little different.
2. If there is no Path variable under the User box, you can create one, or you can add the QEMU path into the System variables.
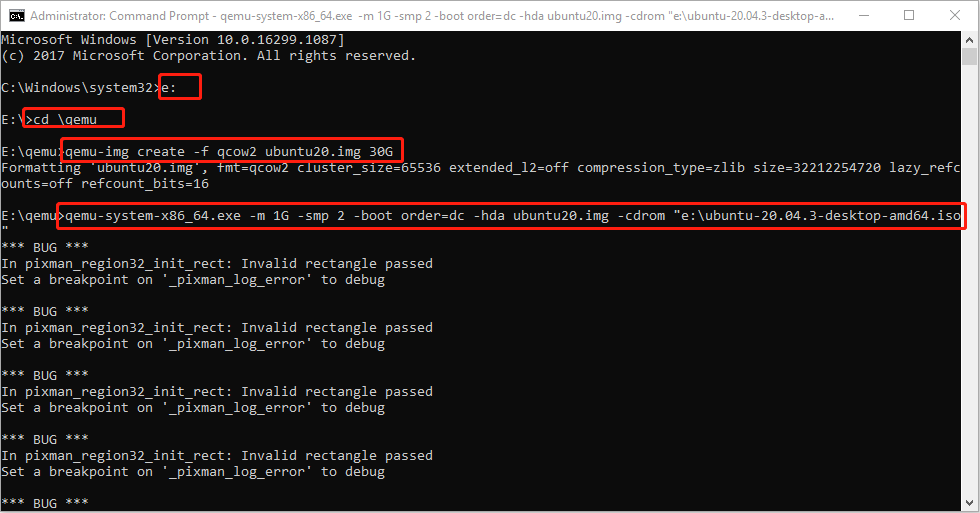
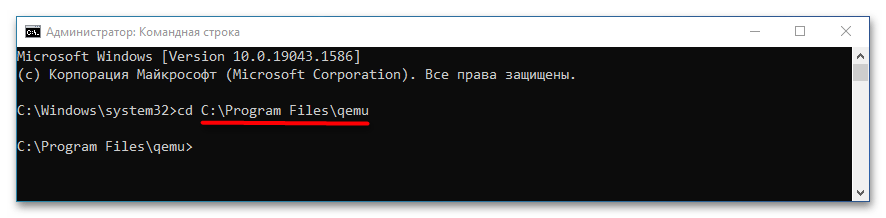
Step 3: Run Command Prompt as administrator and then execute the following commands.
- E: (this will open the e drive where QEMU is installed).
- cd \qemu (this will open the qemu folder).
- qemu-img create -f qcow2 ubuntu20.img 30G (this will create a virtual hard drive of 30GB).
- qemu-system-x86_64.exe -m 1G -smp 2 -boot order=dc -hda ubuntu20.img -cdrom “e:\ubuntu-20.04.3-desktop-amd64.iso” (this will run Ubuntu using CD/ROM).
Tip:
1. If you want to install other VMs (macOS, ARMs, etc.), the qemu-system may vary greatly.
2. The above commands are not perfect. If you have better commands, you can run them.
3. The QEMU installation path and the location of the Ubuntu ISO file in the above commands should be changed accordingly.
Step 4: Go through the Ubuntu installation process. Although there may be many bugs, I launch Ubuntu 20 successfully and then just need to complete the installation process.

How to Install Linux (Ubuntu) on Windows 10 [Ultimate Guide 2022]
Way 2. Create a Virtual Machine Using QtEmu
As you can see, creating a VM using QEMU via commands is a tough job. You need to search for various tutorials online. In addition, once errors occur, you may have no idea how to solve them. Therefore, I recommend you to use QtEmu, an open-source GUI for QEMU Windows.
How to use QEMU on Windows via QtEmu? Here is the guide:
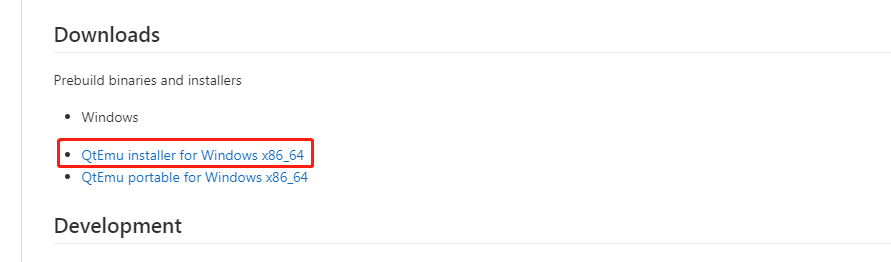
Step 1: Download the Ubuntu ISO file and QtEmu. The QtEmu official website is https://qtemu.org and the QtEmu source is placed on https://gitlab.com/qtemu/gui. Go to the GitLab source page, scroll down to find the Downloads section, and click the first link to download the QtEmu installer.
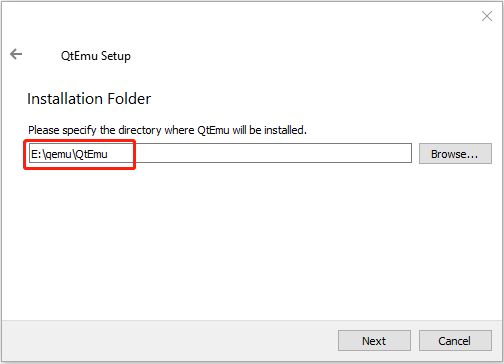
Step 2: Double-click the QtEmu installer file and go through the installation process. When you are asked to specify the installation location (where to create the QtEmu folder), please install the QtEmu under the QEMU folder. For me, I type: E:\qemu\QtEmu.
Step 3: After QtEmu is installed, go to E:\qemu\QtEmu. Right-click the qtemu.exe file and choose Send to > Desktop (create shortcut). Then, create a folder named VMs under the E drive to store all VM files to be created.
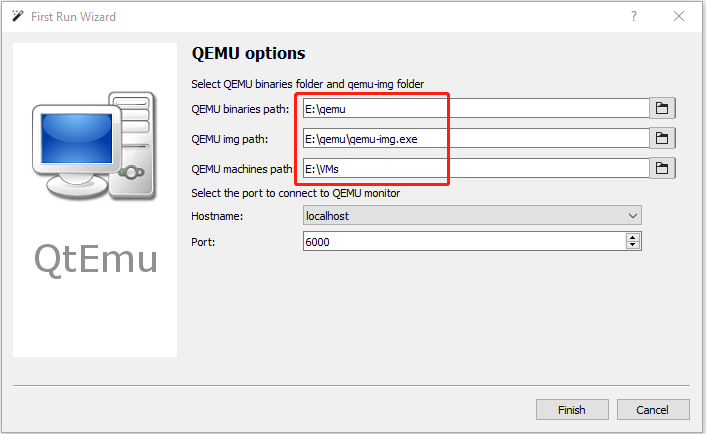
Step 4: Double-click the QtEmu shortcut to launch this software. In the QEMU options window, please set QEMU binaries path to E:\qemu, set QEMU img path to E:\qemu, and set QEMU machines path to E:\VMs. Then, click the Finish button.
Step 5: Click Machine > New Machine. Then, give a name to the new machine (Ubuntu20), choose OS type (GNU/Linux), choose OS version (Ubuntu), and then click Next.
Step 6: On the Filter page, if you don’t need to specify certain motherboard chipsets, you can click the Next button directly to skip this step.
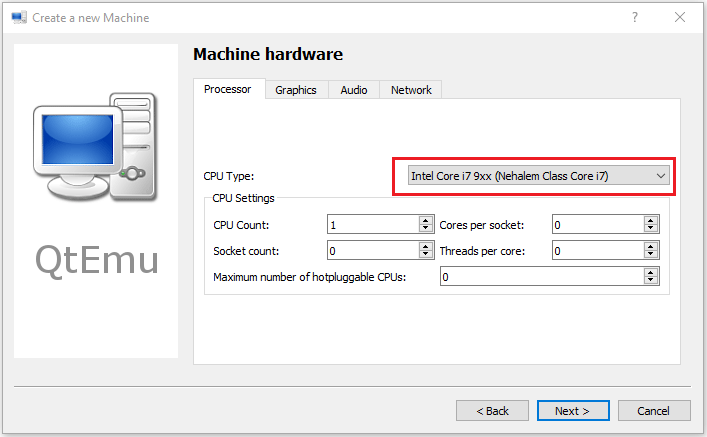
Step 7: Select a correct CPU Type, and set CPU, Graphics, Audio, and Network parameters. If all is OK, click the Next button.
Tip: The Ubuntu 20 version requires a 64-bit CPU. If you choose a 32-bit CPU, the VM may not boot.
What Is the Difference Between 32 Bit and 64 Bit (x86 vs x64)
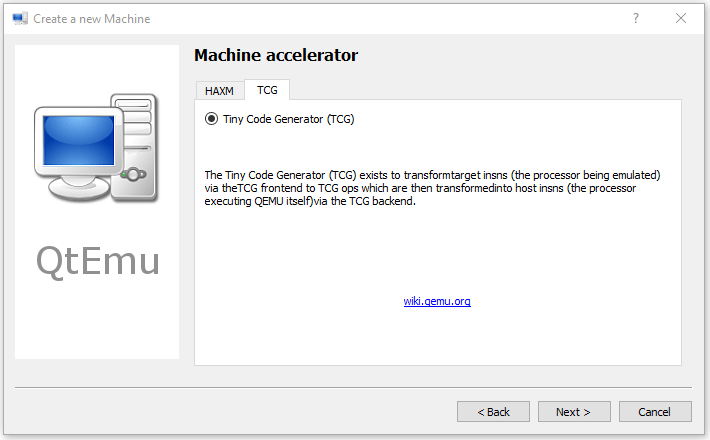
Step 8: Select the machine accelerator. HAXM is chosen by default. However, some computers may not support this technology. Therefore, I recommend you uncheck HAXM and then choose TCG instead. Then, click Next.
Tip: Some people report that nothing happens when they play the VM. The culprit is likely to be the HAXM. To ensure the VM can work on most PCs, TCG is recommended.
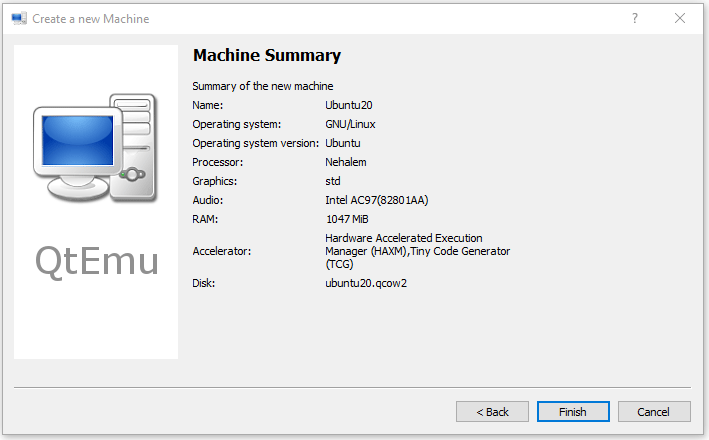
Step 9: Follow the on-screen wizard to set memory size, create a new virtual hard disk, set disk size and type, and then check the VM summary.
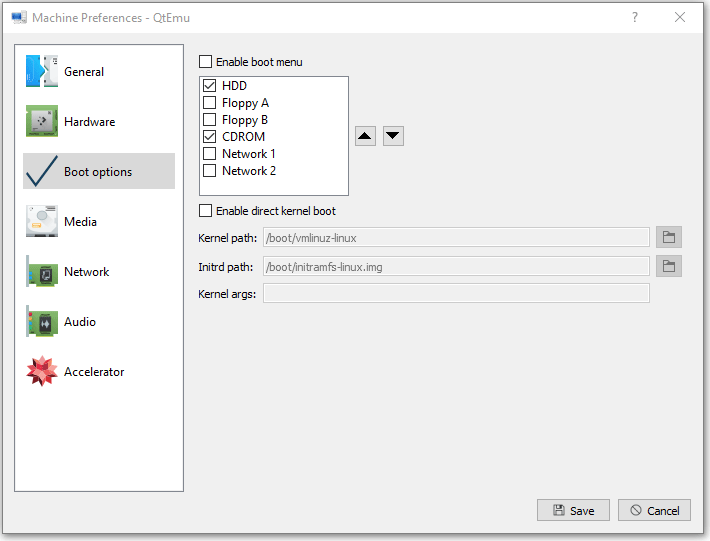
Step 10: Right-click on the newly-created VM and choose Machine Settings. Go to the Boot options tab, and tick CDROM.
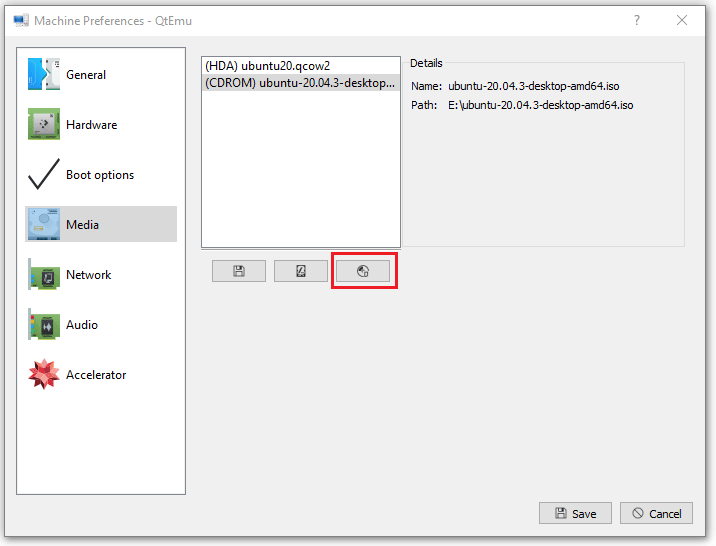
Step 11: Go to the Media tab, click the disc icon, and select the Ubuntu ISO file. Then, click Save.
Step 12: Select the VM and then click the Play icon. Then, you may need to go through the Ubuntu installation process. After the installation process is completed, you can enjoy the VM.
Best Virtual Machine for Windows, Linux, and Mac Systems
Here is a post talking about how to download, install, and use QEMU on Windows. If you are interested in this software, this post may help you.Click to Tweet
Bottom Line
Is this post helpful to you? Do you have other ideas about how to run QEMU on Windows? Please leave a comment in the following zone for sharing. In addition, if you have difficulty in moving or resizing partitions, please feel free to contact us via [email protected]. We will get back to you as soon as possible.
LINUX
Setting up a Windows 10 virtual machine (VM) using KVM (Kernel-based Virtual Machine) and QEMU (Quick Emulator) can seem like a daunting task if you’re new to virtualization. However, with the right guidance and tools, you can create a powerful and efficient virtual environment. This article provides a comprehensive, step-by-step guide to help you successfully set up a KVM/QEMU Windows 10 VM on a Linux host.
Table of Contents
-
Prerequisites
-
Installing KVM and QEMU
-
Configuring KVM
-
Downloading Windows 10 ISO
-
Creating a Windows 10 VM
-
Installing Windows 10 on the VM
-
Optimizing Your Windows 10 VM
-
Common Troubleshooting Tips
-
Conclusion
Prerequisites
Before you start, ensure you have the following:
-
A Linux host operating system (Ubuntu, CentOS, Fedora, etc.)
-
At least 4 GB of RAM (8 GB recommended) and sufficient disk space (at least 20 GB for the Windows VM)
-
Administrative access to install packages and configure settings
-
Basic knowledge of command-line operations
Installing KVM and QEMU
Step 1: Check if your CPU supports virtualization
Run the following command to check if your CPU supports virtualization:
egrep -c '(vmx|svm)' /proc/cpuinfo
A value greater than 0 indicates your CPU can support KVM.
Step 2: Install KVM and QEMU
For Ubuntu, use these commands:
sudo apt update
sudo apt install qemu-kvm libvirt-daemon-system libvirt-clients bridge-utils virt-manager
For CentOS, run:
sudo yum install qemu-kvm libvirt libvirt-python libguestfs-tools virt-manager
After the installation, confirm that the KVM modules are loaded:
Step 3: Add your user to the KVM group
Make sure your user account has the necessary permissions:
sudo usermod -aG kvm $USER
Log out and back in for the changes to take effect.
Configuring KVM
Enable the libvirt service to allow managing VMs seamlessly:
sudo systemctl enable --now libvirtd
Check the status of the libvirt service:
sudo systemctl status libvirtd
Downloading Windows 10 ISO
-
Visit the official Microsoft website.
-
Download the Windows 10 disk image (ISO file).
-
Make sure to save the ISO in a directory accessible to your virtual machine.
Creating a Windows 10 VM
Step 1: Create a disk image for the VM
Run the following command to create a virtual disk image for your Windows 10 installation:
qemu-img create -f qcow2 ~/win10.img 50G
This command creates a 50 GB disk image named win10.img in your home directory.
Step 2: Use virt-install to create the VM
You can launch a new VM using virt-install, specifying the appropriate parameters:
virt-install \
    --name win10 \
    --ram 4096 \
    --disk path=~/win10.img,size=50 \
    --vcpus 2 \
    --os-type windows \
    --os-variant win10 \
    --network network=default \
    --graphics vnc \
    --cdrom /path/to/windows10.iso
Explanation of parameters:
-
--name: Name of the VM (Windows 10). -
--ram: Amount of RAM assigned to the VM. -
--disk: Path and size of the virtual disk. -
--vcpus: Number of virtual CPUs to allocate. -
--os-type: Operating system type. -
--os-variant: Optimization specifics for the OS version. -
--network: Networking mode; typically, the default network. -
--graphics: Graphics display type (VNC in this example). -
--cdrom: Path to the Windows 10 ISO.
Step 3: Access the VM
Once the VM has been created, access it using a VNC viewer, or use virt-manager for a graphical interface:
Select your VM and open the console to start the installation process.
Installing Windows 10 on the VM
Follow the on-screen instructions once the Windows 10 installer loads:
-
Choose the language, time, and keyboard preferences.
-
Select “Install Now.”
-
Enter the product key (if required) or select “I don’t have a product key”.
-
Choose the “Custom: Install Windows only (advanced)” option.
-
Select the virtual disk (unallocated space) for installation.
After the installation completes, you will need to go through Windows setup (user accounts, privacy settings, etc.).
Optimizing Your Windows 10 VM
After installing Windows 10, optimizing the performance of your VM is crucial. Here are some tips:
-
Install VirtIO Drivers: For better disk and network performance, install the VirtIO drivers. Download the drivers from the Fedora Project site and load them during Windows setup.
-
Adjust Resource Allocation: Use
virt-managerto fine-tune the RAM and CPU allocation based on your use-case. -
Disable Unnecessary Services: Inside Windows, you can disable services that are not needed for your specific tasks.
Common Troubleshooting Tips
-
Boot Issues: If the VM fails to boot, double-check that the ISO is correctly attached to the VM and verify the disk settings.
-
Network Issues: Ensure that your network settings in
virt-manageror when usingvirt-installcorrectly link to an active network bridge. -
No VNC Connection: If you can’t connect via VNC, ensure that your VNC viewer is correctly configured and the firewall rules on the host allow VNC connections.
Conclusion
Setting up a KVM/QEMU Windows 10 VM can greatly enhance your productivity by allowing you to run Windows applications seamlessly on a Linux host. By following the steps outlined above, you will have a fully functional Windows 10 environment optimized for performance.
If you encounter issues during the setup or have specific questions, the virtualization community is robust and finding help online is just a search away. Happy virtualizing!
Suggested Articles
LINUX
LINUX
LINUX
LINUX
LINUX
LINUX
Note: I no longer use libvirt, nor do I have a Windows 10 KVM anymore. I strictly use my M1 Mac now and only Hyper-V with Discrete Device Passthrough (PCIe Passthrough) on separate hardware. For future readers who may find this on Google and use this for reference, I’ll give some important things to know about and advice:
- Recommended distribution for QEMU/KVM is Arch Linux. Not Arch-based distros. Arch Linux uses a properly updated kernel that doesn’t freeze on an old LTS version like 4.18 or 4.19 or 5.4. There are KVM fixes and improvements that have not been backported to these distribution-maintained kernels. Not only that, your kernel security patches will be delayed. Distributions to avoid that do this (non-exhaustive) are Debian, Ubuntu, CentOS, Red Hat Enterprise Linux, Manjaro, and Proxmox. These distributions also heavily freeze the qemu package, some being as old as qemu 4.x. Arch Linux uses the latest qemu stable package.
- If your hardware requires the usage of ACS patches, as unfortunate as it sounds you should refrain from using the ACS patches entirely and consider different hardware. ACS patches do not guarantee that the hardware you passthrough despite the IOMMU groups will function properly. These affect the stability of both the guest and the host from issues such as interrupt (IRQ) conflicts. Not only that, completely bypassing IOMMU groups pose a security risk because of false sense of guest-host and device isolation. This can be used to get guest DMA access on the host through other devices that aren’t supposed to be in the same group. Memory corruption can also be exploited to perform guest-host escape. This is exactly why these patches will never ever be upstreamed as IOMMU is heavily used for security isolation and gamble stability. See Android.
- Another awful piece of advice like ACS patches is allowing unsafe interrupts. Allowing unsafe interrupts is for CPUs that has poor/legacy IOMMU and doesn’t support interrupt remapping, something any CPU from 2013 and later can do. This is commonly required if you need the ACS patch. Allowing unsafe interrupts and using Message Signaled Interrupts, a better way of sending interrupts to the interrupt handler necessary to drastically improve interrupt performance and latency, can allow devices to spoof interrupts from other devices and allow the guest to get host DMA write access from a host interrupt block. This is because MSI interrupts are triggered by a DMA write to a special address range. Interrupt remapping in newer IOMMU protects this address range.
- If you’re looking to get Secure Boot working on the VM for improved boot-time and driver security (and maybe nested virtualization for virtualization-based security), you’ll want to compile EDK2 OVMF with secure boot support and add the Microsoft Windows 8.1 keys to OVMF’s trust store. A Docker image exists to do those. You’ll also find that Fedora’s rebuilds of the Virtio drivers are not compatible with Secure Boot on Windows 10 v1607 and above. This is because 1607 was the last version to allow Authenticode signed drivers to be loaded with Secure Boot. Your drivers must be signed by WHQL (Microsoft Hardware Compatibility Labs). Due to licensing issues, Fedora cannot ship these WHQL-signed drivers to their RPM repos. You have to obtain the Virtio drivers ISO from CentOS or Red Hat Enterprise Linux (RHEL) repos. A Docker image also exists for this.
- Best thing to pair Secure Boot with is a TPM chip. A TPM chip is also necessary for more secure Bitlocker through better RNG and key management. It’s recommended to use a vTPM rather than passing through your TPM to avoid possible TPM vulnerabilities leaking to the host. They’re also easier to maintain and handle because BIOS/UEFI issues affecting the host TPM will not affect the vTPM on the guest. Use
swtpmfor this. A simple 3-5 line bash script to create a swtpm vTPM 2.0 socket and telling qemu to create a vTPM 2.0 device and pointing it to the socket will create a simple vTPM with persistence. - The Arch Wiki incorrectly documents some key things about Virtio SCSI. First, use virtio-scsi. Its TRIM support and codebase is newer. Mature codebase != better. Second, do NOT blindly set your scsi controller queues to 8. Yes, it does increase performance because it’s multiqueue, but it can severely decrease performance and cause stuttering if you allocate more than your hardware can handle during high disk operations. This issue is from overallocating, causing lockups and thrashing the entire CPU. This setting should not be set any more than the amount of vCPUs your guest has.
- The same concept of multiqueue processing also applies to the paravirtualized virtio networking. Network intensive tasks will again thrash and lockup threads causing massive stuttering. If you pass through a PCIe NIC, this isn’t a concern for you. But for virtio NICs, you should do the same a you did with the SCSI controller: setting it to no more than the amount of vCPUs you have. Preferably drop one queue from the vCPUs you have. x — 1
- If you intend on using evdev to pass through your USB keyboard and mice, you will absolutely want to add the virtio-keyboard-pci and virtio-mouse-pci devices. The USB tablet device causes awful interrupt latency and is only meant for compatibility with legacy operating systems.
- One more incorrect thing about Virtio SCSI the Arch Wiki gets wrong is the threading model for the SCSI controller. User space is NOT as fast as kernel space. Linux uses a high speed kernel asynchronous I/O (AIO). The
nativethreading model for the disk, the kernel space AIO, is not «single threaded» at all like Arch wiki claims.threadedis more slower and less efficient because it continuously spawns userspace threads based on I/O activity. It’s meant for compatibility only.nativeuses kernel AIO and threads. You will also want to combinecache=nonewith this for maximum performance to completely eliminate all userspace I/O.
- Specs
- Hardware
- Software
- Preinstallation/Setup
- Guest Audio and keyboard+mouse
- Important files modified or added
- Static Hugepages
- Installation
- Post-installation (and performance tweaks!)
- Networking
- Hyper-V enlightenments, APIC, SMM, IOAPIC driver, and vmport
- Passthrough host CPU cache and enable CPU features
- virtio-scsi (and Virtio drivers)
- NVIDIA Drivers
- System and VM internal clock
- Message signal-based interrupts
- Bitlocker
- Reducing VM presence
- Minor performance tweaks
- CPU Pinning, Interrupts, Affinity, Governors, Topology, Isolating, and Priorities
- Topology
- Isolating the CPUs
- Interrupts, Governors, and Affinity coming soon. I need sleep.
Specs
Hardware
- Motherboard: MSI Z370-A PRO
- CPU: Intel i7-8700k OC @ 4.2GHz
- GPU 1: MSI NVIDIA GTX 1070 (Guest GPU)
- GPU 2: EVGA NVIDIA GTX 550 Ti 2048MB (unused)
- Integrated GPU: Intel UHD 630 (Host GPU)
- Memory: 32GB DDR4 2400MHz
- Host SSD: SATA Western Digital Green 250GB
- Guest SSD: SATA Samsung 860 EVO 250GB
Software
- Motherboard firmware version: 7B48v2D2 (Beta) 2021-04-20
- Linux distribution (Host OS): Arch Linux
- Linux kernel and version: linux-hardened
- QEMU version: 6.0.0
- Guest OS: Microsoft Windows 10 Enterprise 20H2 (19042.985)
- Distro is using Pipewire JACK with Pipewire JACK dropin.
- Guest audio is using Pipewire JACK and NVIDIA HDMI Audio. I alter between both if I need a microphone or not. Usually I just use HDMI audio.
Preinstallation/Setup
UPDATE YOUR UEFI/BIOS TO THE LATEST. PLEASE. Many, many, many, many, many, many, many, many, many IOMMU and Intel VT-x/AMD-v bugs are solved with updating your motherboard firmware. Hackintosh users know how painfully true motherboard firmware updates solve so many issues.
Guest Audio and keyboard+mouse
We’re simply using Pulseaudio/Pipewire here. We’re also using evdev to pass through our keyboard and mouse with LCTRL+RCTRL as switch keys.
QEMU Commandline for it:
  <qemu:commandline>
    <qemu:arg value="-audiodev"/>
    <qemu:arg value="driver=pa,id=pa1,server=unix:/run/user/1000/pulse/native,out.buffer-length=4000,timer-period=1000"/>
    <qemu:arg value="-object"/>
    <qemu:arg value="input-linux,id=mouse1,evdev=/dev/input/by-id/usb-Razer_Razer_DeathAdder_Essential_White_Edition-event-mouse"/>
    <qemu:arg value="-object"/>
    <qemu:arg value="input-linux,id=kbd1,evdev=/dev/input/by-id/usb-413c_Dell_KB216_Wired_Keyboard-event-kbd,grab_all=on,repeat=on"/>
    <qemu:env name="PIPEWIRE_RUNTIME_DIR" value="/run/user/1000"/>
  </qemu:commandline>
Important files modified or added
/usr/local/bin/vfio-pci-override.sh
#!/bin/sh

# We know what GPU we want to pass through so we'll define it. Use lspci to find the VGA compat. controller and Audio device of your GPU.
DEVS="0000:01:00.0 0000:01:00.1"

if [ ! -z "$(ls -A /sys/class/iommu)" ]; then
    for DEV in $DEVS; do
        echo "vfio-pci" > /sys/bus/pci/devices/$DEV/driver_override
    done
fi

modprobe -i vfio-pci
Make sure you give it execute permissions or it will not work! sudo chmod +x vfio-pci-override.sh
/etc/mkinitcpio.conf
MODULES=(vfio_pci vfio vfio_iommu_type1 vfio_virqfd i915)
# ...
FILES=(/usr/local/bin/vfio-pci-override.sh)
# ...
# Add modconf if it doesn't exist, usually after autodetect. Order matters.
HOOKS="base udev autodetect modconf ..."
/etc/modprobe.d/kvm.conf
# Ignoring MSRS solves bugcheck issue with 1809+ guests. Second option prevents clogging up dmesg.
options kvm ignore_msrs=1
options kvm report_ignored_msrs=0

# Usually on by default, but just to be safe since we will use Hyper-V virtualization for security such as Windows Sandbox and Windows Defender Application Guard.
options kvm_intel nested=1
/etc/modprobe.d/vfio.conf
install vfio-pci /usr/local/bin/vfio-pci-override.sh
options vfio-pci ids=10de:1b81,10de:10f0
Warning: Do not enable unsafe interrupts. Enabling unsafe interrupts is for CPUs that has poor/legacy IOMMU and doesn’t support interrupt remapping. You might need this if you’re using the ACS patch. You’re killing IOMMU anyways by using ACS patch, killing all virtualization-based security protections and risk of malicious devices attacking your host easier.
Enabling unsafe interrupts and using Message Signaled Interrupts can allow devices to spoof interrupts from other devices, thus VM escaping by getting host DMA write access to the interrupt block from the guest. This is because MSI interrupts are triggered by a DMA write to a special address range. Interrupt remapping in newer IOMMU protects this address range. If your CPU doesn’t support interrupt remapping, throw it out and get something from at least 2013.
If you absolutely need it, check dmesg and see if it tells you to use it.
/etc/default/grub (Kernel commandline)
GRUB_CMDLINE_LINUX_DEFAULT="quiet nohz_full=1,2,3,4,7,8,9,10 rcu_nocbs=1,2,3,4,7,8,9,10 isolcpus=1,2,3,4,7,8,9,10 kvm.nx_huge_pages=force pti=on page_poison=1 mce=0 random.trust_cpu=off efi=disable_early_pci_dma slab_nomerge slub_debug=FZP page_alloc.shuffle=1 transparent_hugepage=never default_hugepagesz=1G hugepagesz=1G hugepages=14 vsyscall=none i915.enable_fbc=1 vfio-pci.ids=10de:1b81,10de:10f0 intel_iommu=on iommu=pt rd.driver.pre=vfio-pci ..."
Static Hugepages
Take note of the following above:
transparent_hugepage=neverdefault_hugepagesz=1Ghugepagesz=1Ghugepages=14
This is allocating huge pages at boot time.
We are using static huge pages for improved performance. We set the page files to 1GB each and allocate 14 of them. The VM has 12GB of memory allocated. It usually requires some extra pages rather than the exact else it fails to launch.
We’re disabling transparent hugepages as it can hinder performance from the kernel dynamically allocating hugepages, increasing CPU usage. Allocating huge pages at boot time reduces memory fragmentation the most.
See https://pingcap.com/blog/why-we-disable-linux-thp-feature-for-databases
While modern CPUs should be able to do 1GB pages, always double check:
cat /proc/cpuinfo | grep -i 'pdpe1gb'
If there is output, you can safely set page sizes to 1GB. Otherwise, you’ll need to use 2MB pages and calculate how many pages you need to allocate.
Set this line in your fstab to be sure hugepages are allocated, and use noatime of course.
hugetlbfs /dev/hugepages hugetlbfs noatime,pagesize=1G 0 0
Add yourself to the libvirt and kvm group: sudo gpasswd -a $USER kvm,libvirt
Then add the following to your XML file:
  <memoryBacking>
    <hugepages/>
    <nosharepages/>
    <locked/>
  </memoryBacking>
continued…
/etc/libvirt/qemu.conf
nographics_allow_host_audio = 1
# ...

# ...
user = "zanthed" # your user
group = "kvm"
# ...

cgroup_device_acl = [
     "/dev/input/by-id/usb-Lite-On_Technology_Corp._USB_Multimedia_Keyboard-event-kbd",
     "/dev/input/by-id/usb-Razer_Razer_DeathAdder_Essential_White_Edition-event-mouse",
     "/dev/null", "/dev/full", "/dev/zero",
     "/dev/random", "/dev/urandom",
     "/dev/ptmx", "/dev/kvm", "/dev/kqemu",
     "/dev/rtc","/dev/hpet", "/dev/sev"
]
cgroup_device_acl is for allow access to pass through keyboard and mouse data to guest via evdev. See: https://wiki.archlinux.org/index.php/PCI_passthrough_via_OVMF#Passing_keyboard/mouse_via_Evdev
Note you will absolutely want to install the virtio-input driver if you take this route instead of a USB passthrough. The default driver causes very, very, very high DPC latency.
Installation
Attach your installation media.
Emulate a SATA disk instead of SCSI for now to avoid driver issues.
Install as normal, setup, everything. Detach installation media after reboot. Boot normally. Now proceed to setting up drivers and networking.
Post-installation (and performance tweaks!)
Networking
Create a bridged connection with nm-connection-editor. Because the «Network Interfaces» tab was removed from virt-managersource you will need to do it via virsh.
First create a temporary file with the bridge defined /tmp/bridge.xml
<network>
  <name>br0</name>
  <forward mode="bridge"/>
  <bridge name="br0"/>
</network>
Replace br0 with your bridge interface if necessary.
Define it: # virsh net-define /tmp/bridge.xml
Start and enable autostarting: # virsh net-start br0 && virsh net-autostart br0
Utilize the bridge in the VM:
<interface type="bridge">
  <mac address="52:54:00:71:69:a7"/>
  <source bridge="br0"/>
  <model type="virtio-net-pci"/>
</interface>
virtio-net-pci is used over virtio for some performance and to solve possible connection issues using some Hyper-V enlightenments that don’t occur on virtio-net-pci.
If you pass through a physical network card, check if it can do SR-IOV. It’s blazing fast. Intel cards can normally do this:
lspci -s "Ethernet controller ID here" -vvv | grep -i "Root"
If there is output, replace the model type with sr-iov.
Model of network card is virtio. Emulating a real card is very CPU intensive and has a lot of overhead compared to virtio which uses paravirtualization. Though, passing through real hardware is always better. I suggest purchasing an Intel card that can do hardware timestamps.
Windows requires NetKVM driver from virtio drivers to utilize virtio model for paravirtualization.
If you use virtio instead of virtio-net-pci, set your driver queues for multiqueue properly to allow faster packet processing!
See https://pve.proxmox.com/pve-docs/chapter-qm.html#qm_network_device
Hyper-V enlightenments, APIC, SMM, IOAPIC driver, and vmport
Special things to speed up VM performance:
  <features>
    <acpi/>
    <apic>
    <hyperv>
      <relaxed state="on"/>
      <vapic state="on"/>
      <spinlocks state="on" retries="8191"/>
      <vpindex state="on"/>
      <runtime state="on"/>
      <synic state="on"/>
      <stimer state="on"/>
      <reset state="on"/>
      <vendor_id state="on" value="eridanampora"/>
      <frequencies state="on"/>
      <reenlightenment state='on'/>
      <tlbflush state='on'/>
    </hyperv>
    <vmport state="off"/>
    <smm state="on"/>
    <ioapic driver="kvm"/>
  </features>
AMD users might need to use
`
Passthrough host CPU cache and enable CPU features
  <cpu mode="host-passthrough" check="full" migratable="on">
    <topology sockets='1' dies='1' cores='4' threads='2'/>
  </cpu>
Intel users do not need to set the require policy on the following features:
    <feature policy="require" name="invtsc"/>
    <feature policy="require" name="vmx"/>
    <feature policy="require" name="topoext"/>
This is only necessary if you are on AMD Ryzen.
virtio-scsi (and Virtio drivers)
Grab the ISO for Fedora’s Virtio drivers: https://fedorapeople.org/groups/virt/virtio-win/direct-downloads/
Note, UEFI Secure Boot guests: As these drivers are rebuilds of Red Hat’s virtio drivers due to their licensing, they are not signed the same way that Windows 10 requires now. Windows 10 now requires, as of 1803 to have drivers signed by Microsoft’s WHQL, otherwise they will fail to load. If you use Secure Boot on the guest like me you will need to obtain Red Hat’s virtio drivers instead of Fedora’s rebuilds. If you use Scream audio, the developer does sign their driver to get around Windows 10 forbidding unsigned drivers, but it is impossible to get it WHQL approved and signed due to the way it works.
Otherwise, continue and ignore.
Mount it, run virtio-win-guest-tools.exe. Install all the drivers and shut down.
Create a virtio-scsi controller:
<controller type="scsi" index="0" model="virtio-scsi">
  <driver queues="5" iothread="1"/>
</controller>
Important! The Arch Wiki poorly documents that to increase performance, you should use multiqueue by setting queues to 8. While this is true, setting too many queues than your hardware can handle can cause lockups and thrash the host CPU, decreasing performance severely on heavy I/O operations. You should use no more than the amount of vCPUs you have on your guest. If you have 6 vCPUs, including hyperthreading, use 6. I personally drop 1 queue just to be safe.
Create a SCSI raw block disk using your real drive:
<disk type="block" device="disk">
  <driver name="qemu" type="raw" cache="none" io="native" discard="unmap"/>
  <source dev="/dev/disk/by-id/ata-Samsung_SSD_860_EVO_250GB_S3YHNX1KB15676F"/>
  <target dev="sda" bus="scsi"/>
  <address type="drive" controller="0" bus="0" target="0" unit="0"/>
</disk>
Important! The AIO (asynchronous I/O) is a major performance factor based on your hardware. The Arch wiki, again, poorly documents and even gets this section completely wrong.
Arch Wiki! Let me correct your incorrect advice: Native does not use a single threaded synchronous model. That’s not how proper asynchronous processing works. It also does not «lower» peak performance. Userspace is slower than kernel space. threads uses userspace threads. native uses kernel space threads. Spawning dozens of threads to do something in userspace is never more efficient just because you have «enough host cores». If you need to spawn dozens of threads, you need to consider using kernel space for better efficiency and avoiding host lockups.
Now, back to the main topic.
QEMU can use two AIO methods: the userspace method by spawning dozens of userspace threads (this is not the same as I/O threads) and the kernel method. Both asynchronous, but are very difference in performance.
Using the userspace method (io='threads') will spawn and scale userspace threads based on the amount of guest I/O operations. This is very compatible and works in all environments, but it is not as efficient as kernel AIO.
Using the kernel AIO (cache=none io=native) is the fastest. This is the best choice for performance for block devices. RAW and QCOW2 (with pre-allocation) also benefit the best from this. Warning though if you do not pre-allocate, you will find using kernel AIO can decrease performance due to writing to not yet allocated sectors and lock up the threads.
If you happen to have more than one VM and all use native, you might find yourself failing to start VMs because you reached the max AIO requests. To see the current value, run # sysctl fs.aio-nr fs.aio-max-nr.
Increase fs.aio-max-nr to a higher number. E.g. sysctl -w fs.aio-max-nr=4194304
TLDR: Use cache=none io=native.
NVIDIA Drivers
I’ll assume you have already got the process of passing through your GPU done and now you just need drivers.
NVIDIA drivers before v465 will require you to simply spoof the Hyper-V vendor ID to avoid error 43:
  <features>
    <hyperv>
      <vendor_id state="on" value="eridanampora"/>
    </hyperv>
  </features>
NVIDIA actually admits that this error 43 issue is a bug and was not intended, but they made fixing this a low priority until 465. In the past, you had to hide the KVM leaf and spoof the Hyper-V vendor ID. However, they did fix in 393 (?) that hiding the KVM leaf was no longer necessary.
System and VM internal clock
Very important so you don’t suffer the pain of awful latency from things like HPET or a clock that fails to catchup properly which would induce DPC latency.
Note: Windows machines use localtime unlike Linux machines which use rtc! Very important to set clock offset to localtime. This is related to Linux and Windows dual booting showing incorrect times because Windows is trying to use localtime where Linux is using rtc and are causing conflicts.
  <clock offset="localtime">
    <timer name="rtc" tickpolicy="catchup" track="guest"/>
    <timer name="pit" tickpolicy="delay"/>
    <timer name="tsc" present="yes" mode="native"/>
    <timer name="hpet" present="no"/>
    <timer name="kvmclock" present="no"/>
    <timer name="hypervclock" present="yes"/>
  </clock>
In your BIOS, disable HPET and make sure Linux is using TSC:
cat /sys/devices/system/clocksource/clocksource0/current_clocksource
See Red Hat’s guide on optimizing the host TSC for low latency/real time: https://access.redhat.com/documentation/en-us/red_hat_enterprise_linux_for_real_time/8/html-single/tuning_guide/index
Message signal-based interrupts
Line-based interrupts are shit. And a lot more hardware supports MSI than just your GPU. The effects of using MSI compared to Line-based are tremendous with a QEMU KVM.
Use MSI_util_v3 (original thread) and enable MSI for all devices that can support it and reboot the guest. If you pass through audio via Pulseaudio like me, the latency and quality will be a LOT better. Hardware acceleration will be smoother.
DO. NOT. ENABLE. MSI. FOR. DEVICES. THAT. DO. NOT. SUPPORT. IT. 9/10 times your system will be rendered unbootable until you restore the registry hive where the key is located, usually by a System Restore or booting with last known good configuration.
Bitlocker
Create a vTPM 2.0.
Requires swtpm.
sudo pacman -S swtpm
<tpm model="tpm-crb">
  <backend type="emulator" version="2.0"/>
  <alias name="tpm0"/>
</tpm>
Reducing VM presence
(Not meant to be exhaustive. Hypervisor detection is very easy no matter how hard you try, but you can do some things to get around basic detections such as Faceit Anti Cheat, ESEA, and EasyAC. Do not use a VM for secure exam testing or tournament matches. Even if your intentions are not illicit, they are always forbidden if found to be using one after the fact.)
Pass through as much physical hardware as you can through IOMMU and remove unused hardware like SPICE displays and graphics and serial controllers.
Hide certain timers (hiding hypervclock may impact performance slightly):
  <clock offset="localtime">
    <timer name="kvmclock" present="no"/>
    <timer name="hypervclock" present="no"/>
  </clock>
Use host’s SMBIOS:
  <os>
    <smbios mode="host"/>
  </os>
Hide KVM leaf and spoof Hyper-V vendor ID
  <kvm>
    <hidden state="on">
  </kvm>
Disable hypervisor feature and pass through your CPU features and model:
  <cpu mode="host-passthrough" check="full" migratable="on">
    <feature policy="disable" name="hypervisor"/>
  </cpu>
Remove as many SPICE, virtio, QEMU, etc drivers and hardware. Pass through as much physical hardware as you can.
Minor performance tweaks
Blacklist the iTCO_wdt (kernel watchdog) module:
sudo echo "blacklist iTCO_wdt" > /etc/modprobe.d/nowatchdog.conf
Then run sudo mkinitcpio -P
Prevent ARP Flux from networks in same segment1:
sudo echo "net.ipv4.conf.all.arp_filter = 1" > /etc/sysctl.d/30-arpflux.conf
Try using performance and latency-optimized kernels like linux-xanmod (https://xanmod.org/) or linux-zen. I personally use xanmod. Both also include the ACS patches. Experiment with real-time kernels too. Everyone’s hardware is different.
Installed tuned and tuned-adm and set the profile to virtual-host to optimize the host for virtualizing guests.
CPU Pinning, Interrupts, Affinity, Governors, Topology, Isolating, and Priorities
This warrants an entirely separate section because of how much of an impact this can make while also requiring a decent amount of time. And I mean a major impact. Even after doing all those tweaks above, I still had awful DPC latency and stutters. After just a bit of messing with interrupts and pinning, I am almost consistently under 800 µs.
My system only has a single CPU and six cores twelve threads so messing with NUMA nodes is not documented here unfortunately.
Topology
Find out how many cores and threads you want to give your VM. Leave at least 2 cores for the host, otherwise both the guest and host performance will suffer. More is not better. For me, I’m giving it 4 cores 8 threads. Set your CPU topology to that, and of course pass through your CPU features by setting CPU mode to host-passthrough (unless you have special AMD CPUs that require EPYC emulation for old QEMU versions)
<topology sockets="1" dies="1" cores="4" threads="2"/>
This says we will have one socket, 4 cores, and 8 threads through hyperthreading. Our CPU pinning will match this too. If you only want physical CPUs and no hyperthreading, set core count to the amount of cores you want and threads to 1. e.g.
<topology sockets="1" dies="1" cores="8" threads="1"/>
Isolating the CPUs
We need to isolate the pinned CPUs from being used by the host. This is pretty easy through the kernel arguments nohz_full, rcu_nocbs, isolcpus.
Append the following arguments based on your pinned CPUs:
nohz_full=0-3,6-9 rcu_nocbs=0-3,6-9 isolcpus=0-3,6-9
Update your bootloader config and reboot.
Interrupts, Governors, and Affinity coming soon. I need sleep.
TODO: Document interrupt pinning, CPU governors, systemd tweaks, memballoon disabling.
Все способы:
- Установка QEMU
- Команды QEMU
- Основные
- Дополнительные
- Установка операционной системы в QEMU
- Запуск в QEMU образов LiveCD
- Qemu Manager
- Вопросы и ответы: 7
Установка QEMU
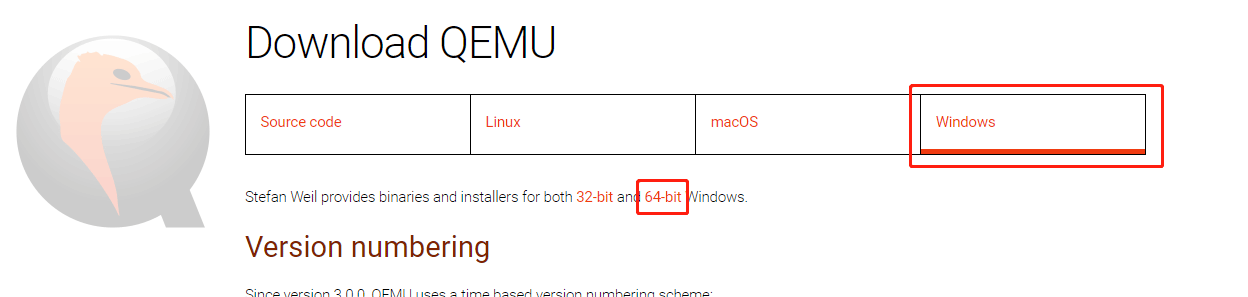
Эмулятор QEMU является кроссплатформенным приложением, доступным в том числе для 32- и 64-битной версии Windows.
Скачать QEMU с официального сайта
- Откройте официальную страницу разработчика и выберите приложение нужной вам разрядности.
- Скачайте актуальную (последнюю) версию эмулятора.
- Запустите исполняемый файл программы и проследуйте указаниям мастера-установщика. В ходе установки вам будет предложено выбрать язык (русский отсутствует), принять условия лицензии, выбрать компоненты и путь установки. Все настройки оставьте по умолчанию, по завершении процедуры инсталляции нажмите кнопку «Finish».
Команды QEMU
QEMU является консольным приложением, то есть для работы с ним вам придется использовать «Командную строку» и вводимые вручную текстовые команды. Команд и параметров много, но для начала достаточно выучить самые главные.
Основные
| Команда | Описание |
|---|---|
| qemu-system-архитектура | Определяет архитектуру эмулируемого устройства. Одноименные исполняемые файлы располагаются в папке установки эмулятора |
| qemu-img create | Команда создает файл в формате IMG, являющийся виртуальным диском, на который производится установка системы. В качестве аргумента передается произвольное имя IMG-контейнера |
| -hda | Параметр подключает созданный виртуальный жесткий диск, название которого передается в качестве аргумента |
| -m | Задает объем оперативной памяти, выделяемый эмулируемому устройству |
| -boot | Задает ресурс, с которого выполняется загрузка операционной системы. Имя ресурса должно соответствовать названию виртуального жесткого диска (без указания расширения) |
| cdrom | Эмулирует дисковод, используется для установки операционных систем и запуска LiveCD, то есть портативных ОС. В качестве аргумента передается путь к образу ISO |
Дополнительные
| Команда | Описание |
|---|---|
| -usb | Активирует поддержку USB |
| -smp | Эмулирует мультипроцессорную архитектуру |
| -full-screen | Запускает виртуальную машину в полноэкранном режиме |
| cpu | Задает тип процессора |
| -k | Задает раскладку клавиатуры по умолчанию |
| -soundhw | Подключает аудиокарту |
| usbdevice | Подключает устройства USB |
Установка операционной системы в QEMU
Предположим, вы хотите эмулировать компьютер с интеловским процессором и операционной системой Windows XP.
- Запустите классическую «Командную строку» и перейдите в расположение установки QEMU, для чего выполните команду
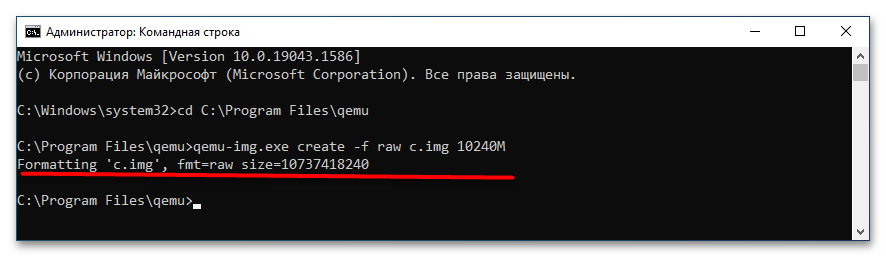
cd C:\Program Files\qemu. Если эмулятор устанавливался в другую папку, после cd укажите путь к ней. - Создайте виртуальный жесткий диск, на который станет устанавливаться операционная система. Для этого выполните команду
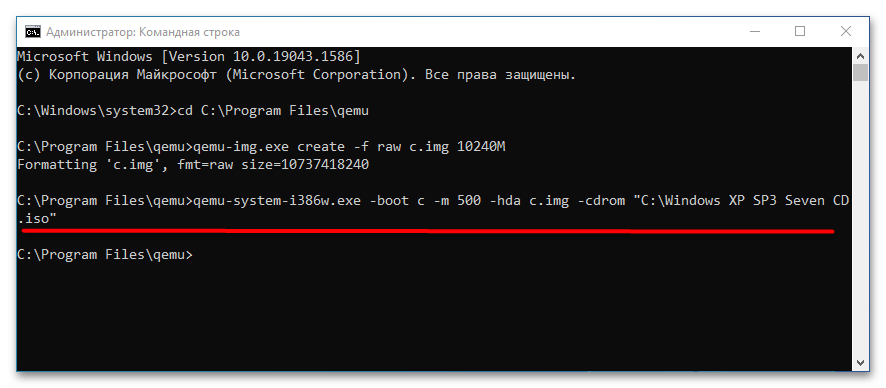
qemu-img.exe create -f raw c.img 10240M, где c.img — название виртуального диска, а 10240 — его размер в мегабайтах. Размер диска-контейнера должен соответствовать требованиям запускаемой/устанавливаемой операционной системы. - Запустите установку дистрибутива операционной системы командой
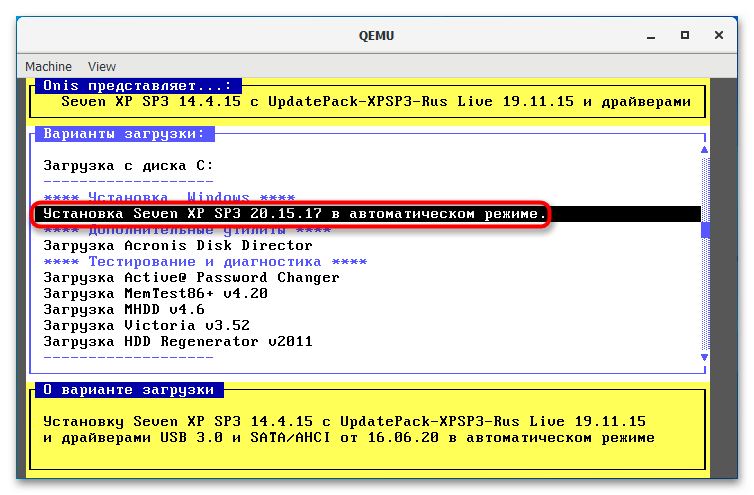
qemu-system-i386w.exe -boot c -m 512 -hda c.img -cdrom "C:\Windows XP SP3 Seven CD.iso". -i386w в данном примере указывает, что виртуальная машина эмулирует архитектуру х86, -boot указывает загрузку с диска с названием «c», -m 512 выделяет виртуальной машине 512 МБ оперативной памяти, -hda c.img указывает, что система будет устанавливаться в файл-контейнер «c.img». Наконец, содержимое прямых кавычек после параметра –cdrom представляет собой путь к установочному образу. - В открывшемся окне QEMU выберите с помощью клавиш-стрелок вниз-вверх нужный пункт, в данном примере это установка операционной системы. Выполните традиционную процедуру установки системы на виртуальный жесткий диск.
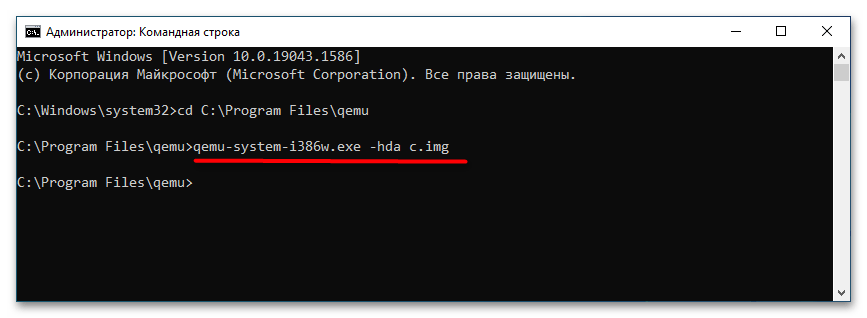
- По завершении установки системы вы сможете запускать последнюю командой
qemu-system-i386w.exe -hda c.img.
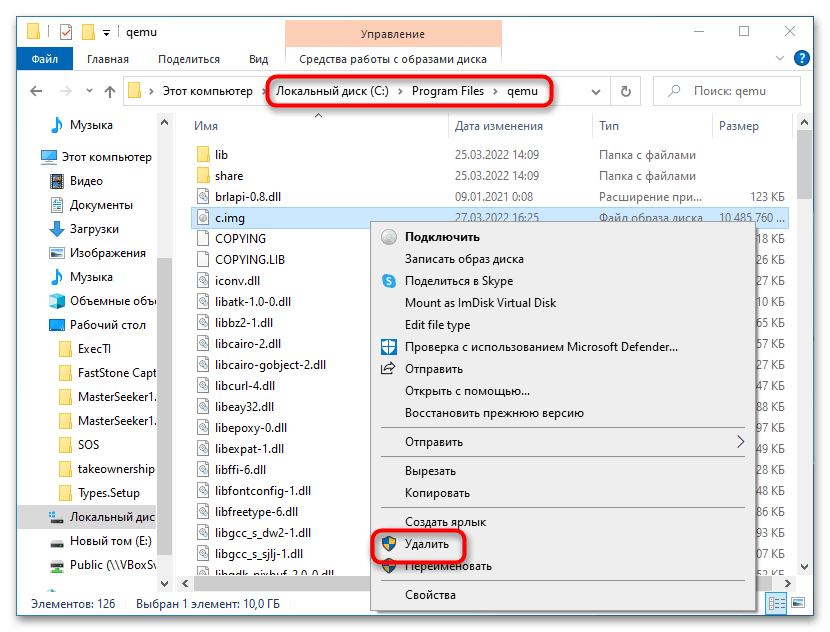
Если виртуальная система станет вам не нужна, удалите IMG-диск, на который она была установлена. По умолчанию файл диска IMG располагается в папке установки QEMU.
Запуск в QEMU образов LiveCD
Процедура запуска портативных операционных систем в QEMU намного проще, чтобы запустить в эмуляторе LiveCD, сформируйте и выполните команду следующего вида, заблаговременно перейдя в «Командной строке» в папку инсталляции эмулятора:
qemu-system-архитектура.exe -m 1024 -cdrom "путь к образу LiveCD"
Поскольку портативная ОС может загружаться в оперативную память, в предварительном создании виртуального диска нет необходимости.
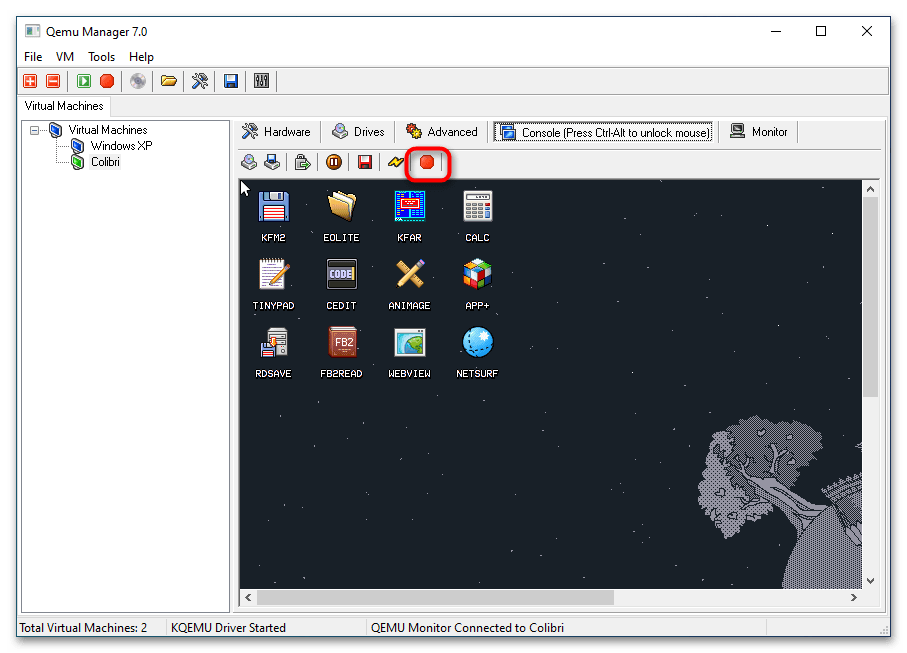
Qemu Manager
Если вы не имеете навыков работы со штатной программой «Командная строка», можете попробовать воспользоваться приложением Qemu Manager — графической оболочкой для эмулятора Qemu. Ниже прилагается краткая инструкция по использованию приложения.
- Скачайте, установите и запустите Qemu Manager. В открывшемся окне настроек по умолчанию нажмите «Save & Finish».
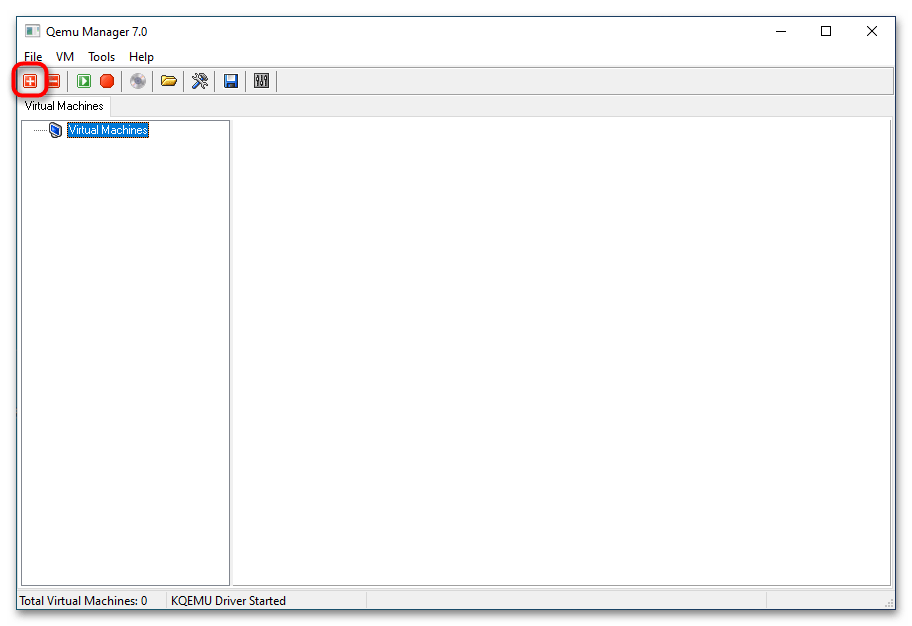
- В основном окне менеджера нажмите кнопку «+», чтобы приступить к созданию новой виртуальной машины (дальше VM).
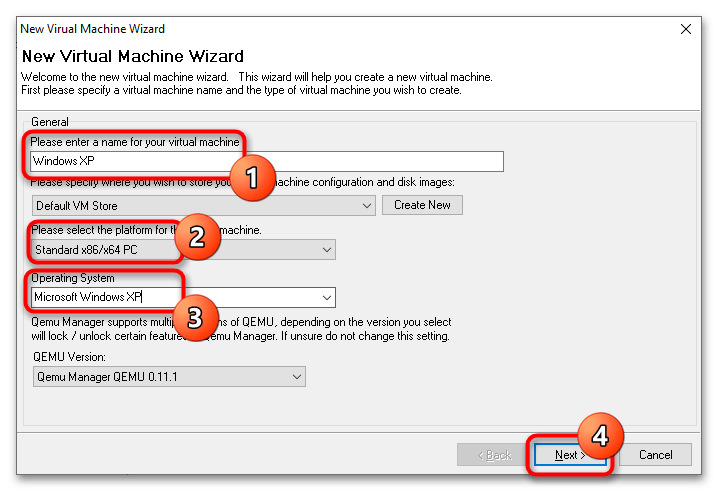
- В поле «Please enter a name for your virtual machine» введите произвольное название VM, в меню «Please select the platform for the virtual machine» укажите архитектуру VM, а из выпадающего списка «Operating System» выберите операционную систему.
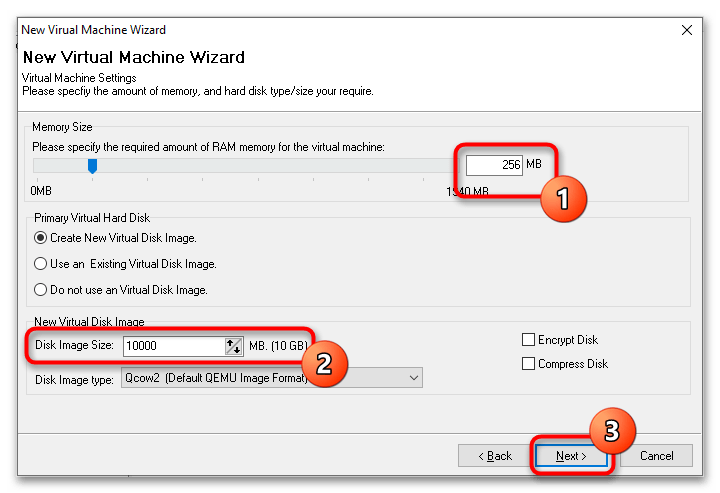
- Выделите с помощью ползунка «Memory Size» требуемый для VM объем оперативной памяти, а в меню «Disk Image Size» укажите размер виртуального диска. Если вы запускаете LiveCD, в настройках «Primary Virtual Hard Disk» следует выбрать опцию «Do not use an Virtual Disk Image».
- В следующем окне нажмите кнопку «Finish».
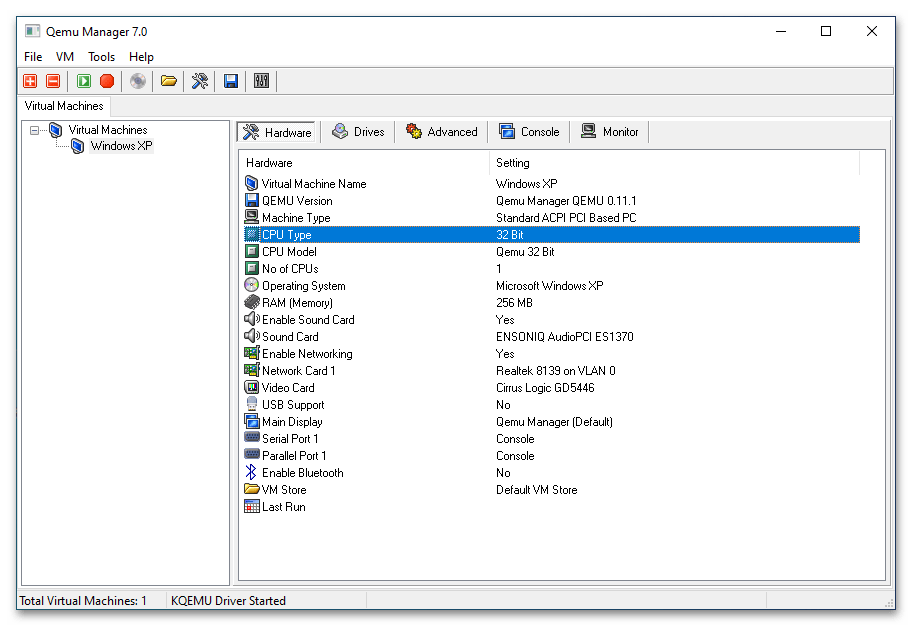
- В результате в основном окне менеджера появится новая виртуальная машина с конфигурацией по умолчанию. При желании вы можете отредактировать параметры VM: например, изменить архитектуру процессора, выделяемый объем памяти, включить поддержку USB, создать и подключить новый виртуальный жесткий диск и так далее.
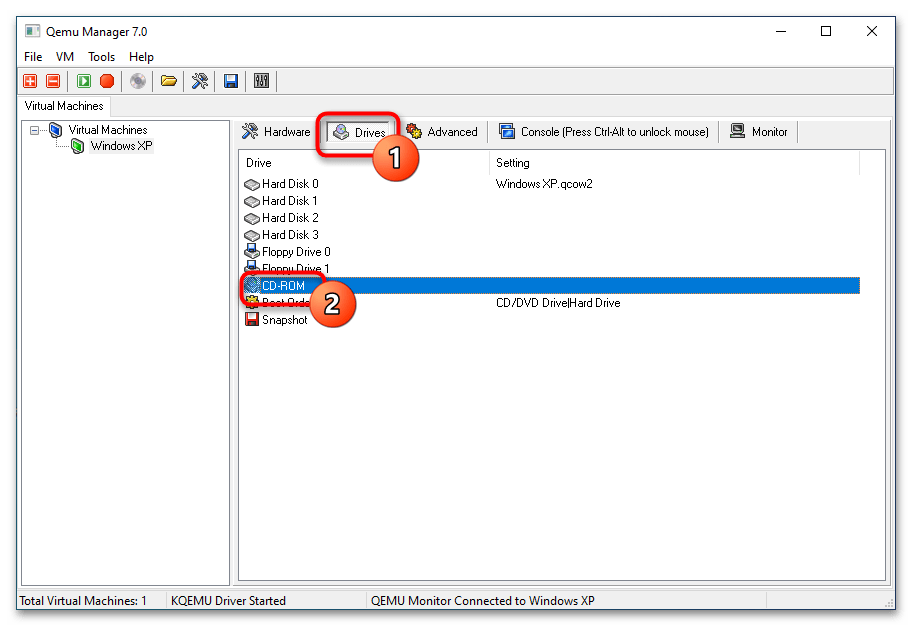
- Переключитесь на вкладку «Drives» и двойным кликом откройте настройку «CD-ROM».
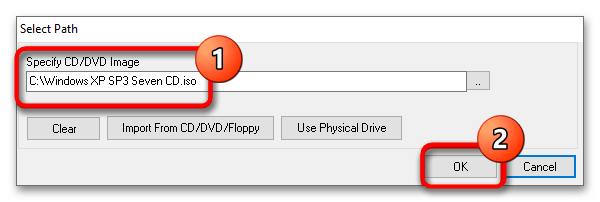
- Укажите путь к установочному образу операционной системы или дистрибутиву LiveCD и сохраните настройки.
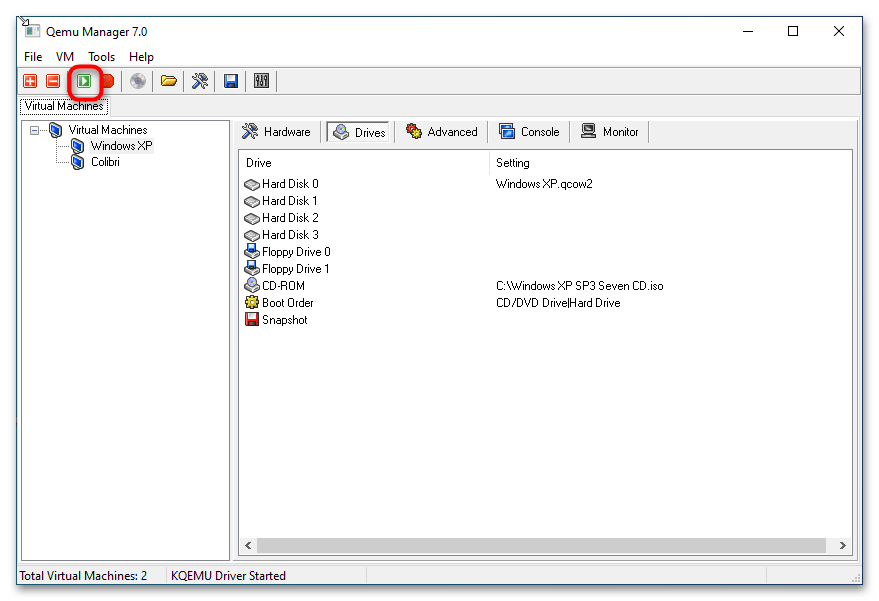
- Запустите виртуальную машину нажатием кнопки «Launch Selected VM». По умолчанию Qemu Manager захватывает мышку, так что она становится недоступной для хостовой операционной системы. Чтобы освободить курсор, нажмите комбинацию клавиш Ctrl + Alt.
- Чтобы завершить работу VM, нажмите кнопку «Quit Qemu».


Несмотря на отсутствие поддержки русского языка, Qemu Manager существенно упрощает работу с платформой Qemu. К сожалению, в настоящее время разработка данной программы прекращена, официальный сайт разработчика недоступен, но приложение по-прежнему доступно для скачивания из свободных источников.
Наша группа в TelegramПолезные советы и помощь