

Сегодня мы будем с вам устанавливать PHP 8.1 на Windows Server 2016 для web-сервера IIS 10.
Начиная с этой версии PHP установка сильно усложнилась. Microsoft Web Platform Installer (WebPI), которым раньше я пользовался для установки PHP больше не работает, так что устанавливать приходится вручную. Возня с дополнительными расширениями тоже приключение. Очень печально, что для Windows Server 2016 нет нормальных способов установки.
Дистрибутив PHP 8.1
https://www.php.net/downloads
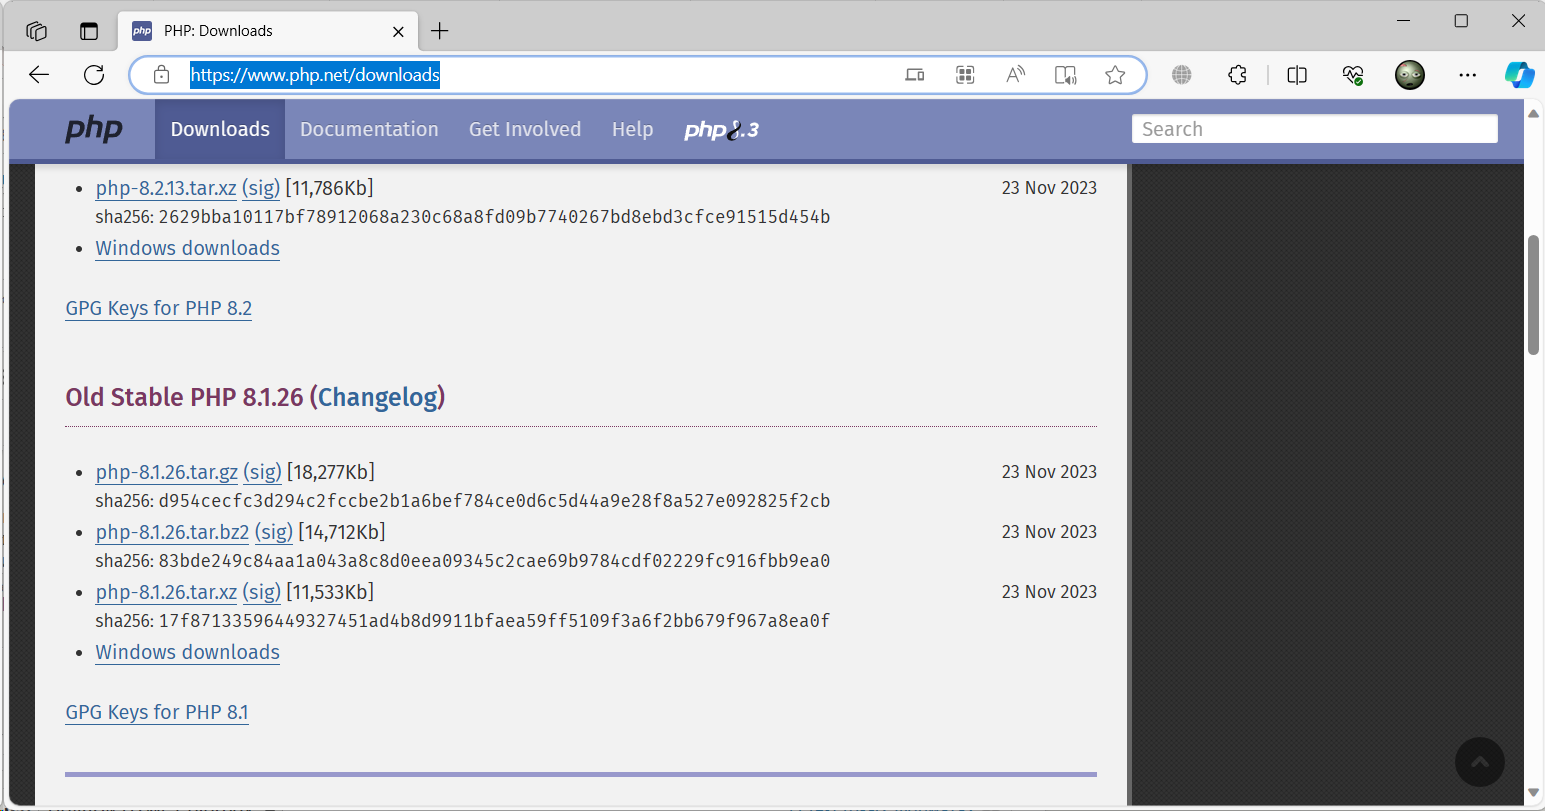
Переходим на официальный сайт PHP в раздел загрузок, находим PHP 8.1, и тыкаем в ссылку Windows downloads.
https://windows.php.net/download#php-8.1
Попадаем на windows.php.net, можно было и сразу сюда пойти.
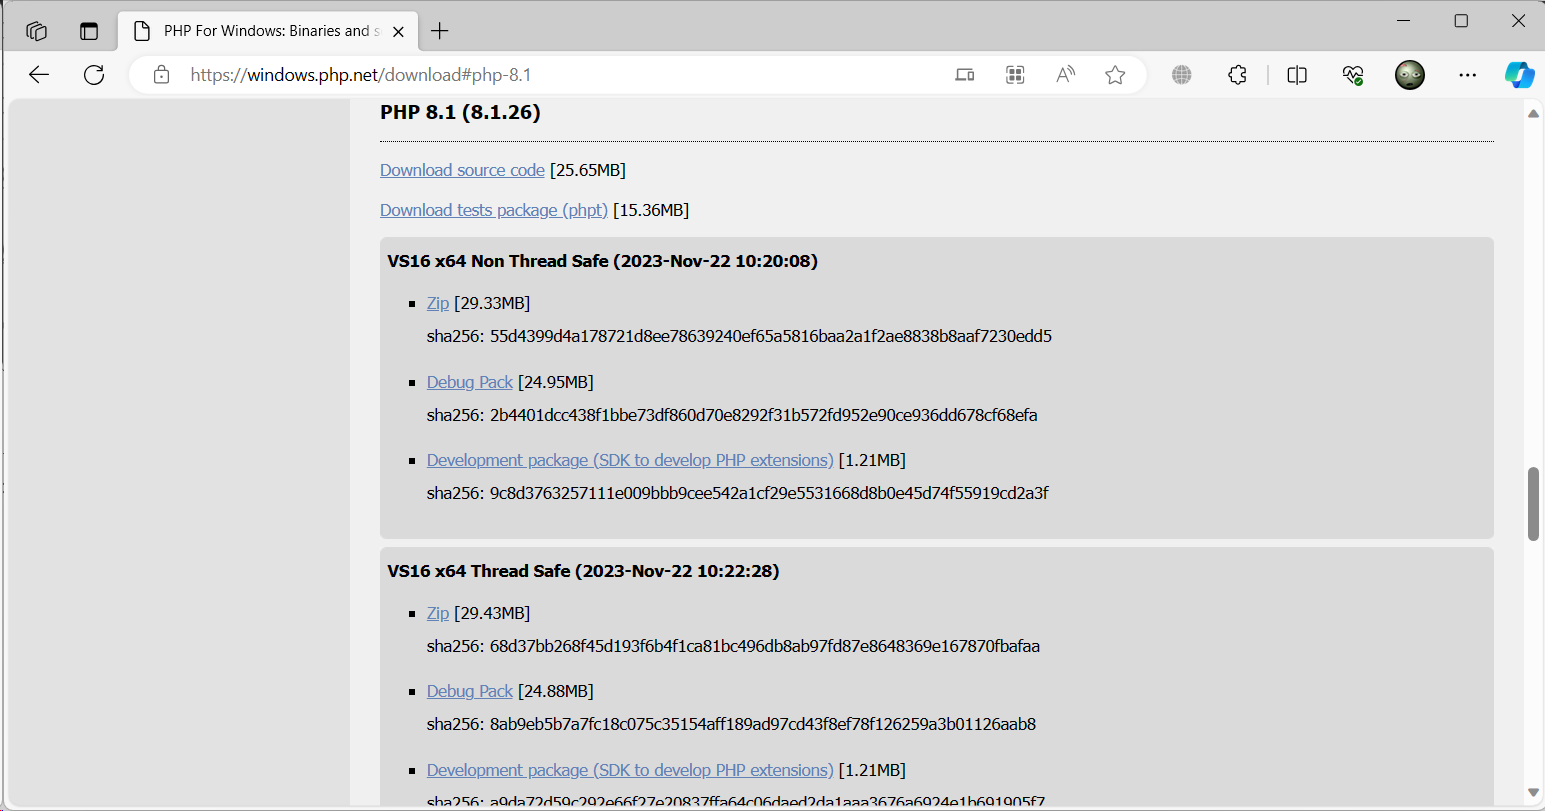
Доступны две версии PHP:
- Non Thread Safe
- Thread Safe
По какой-то странной причине в большинстве инструкций показывают, что нужно ставить версию Thread Safe, это в корне неверно. Примечательно, что про «TS and NTS» на той же странице загрузок всё написано.
Версию нужно выбирать в зависимости от того, как вы интегрируете PHP c веб-сервером. Когда вы используете mod_php, у вас модуль и PHP всегда загружены в память и каждый запрос обрабатывается в отдельном потоке. Из-за этого mod_php работает быстрее, чем CGI. В данном случае нужно использовать потокобезопасную реализацию (thread-safe) поскольку каждый поток имеет доступ к памяти другого потока. Здесь мы мягко намекаем на Linux.
Когда вы работаете с IIS, здесь мы мягко намекаем на Windows, у вас PHP запускается в виде отдельного процесса посредством CGI. В таком случае потокобезопасность не имеет смысла, поскольку у вас один процесс и один поток созданный этим процессом. Операционная система изолирует память процессов по умолчанию, NTS в этом случае работает быстрее.
В случае модели с FastCGI, потокобезопасность также не имеет смысла, поскольку тот же PHP-FPM держит несколько отдельных процессов PHP в памяти, но не потоков. Тоже имейте в виду.
В нашем случае (Windows, IIS, CGI) нам нужна версия PHP NTS — Non Thread Safe. Скачиваем соответствующий ZIP архив, распаковываем.
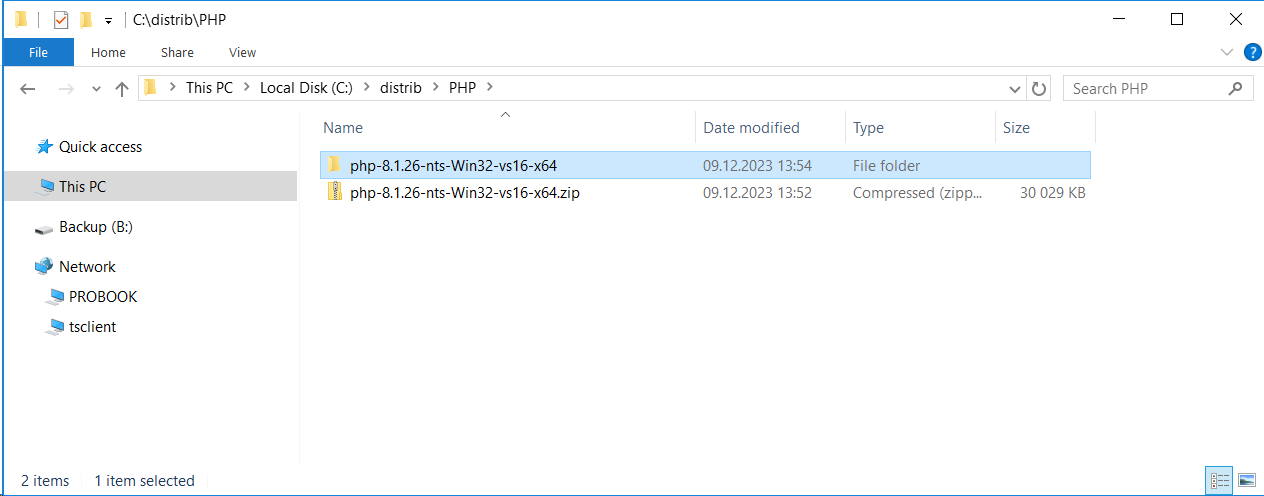
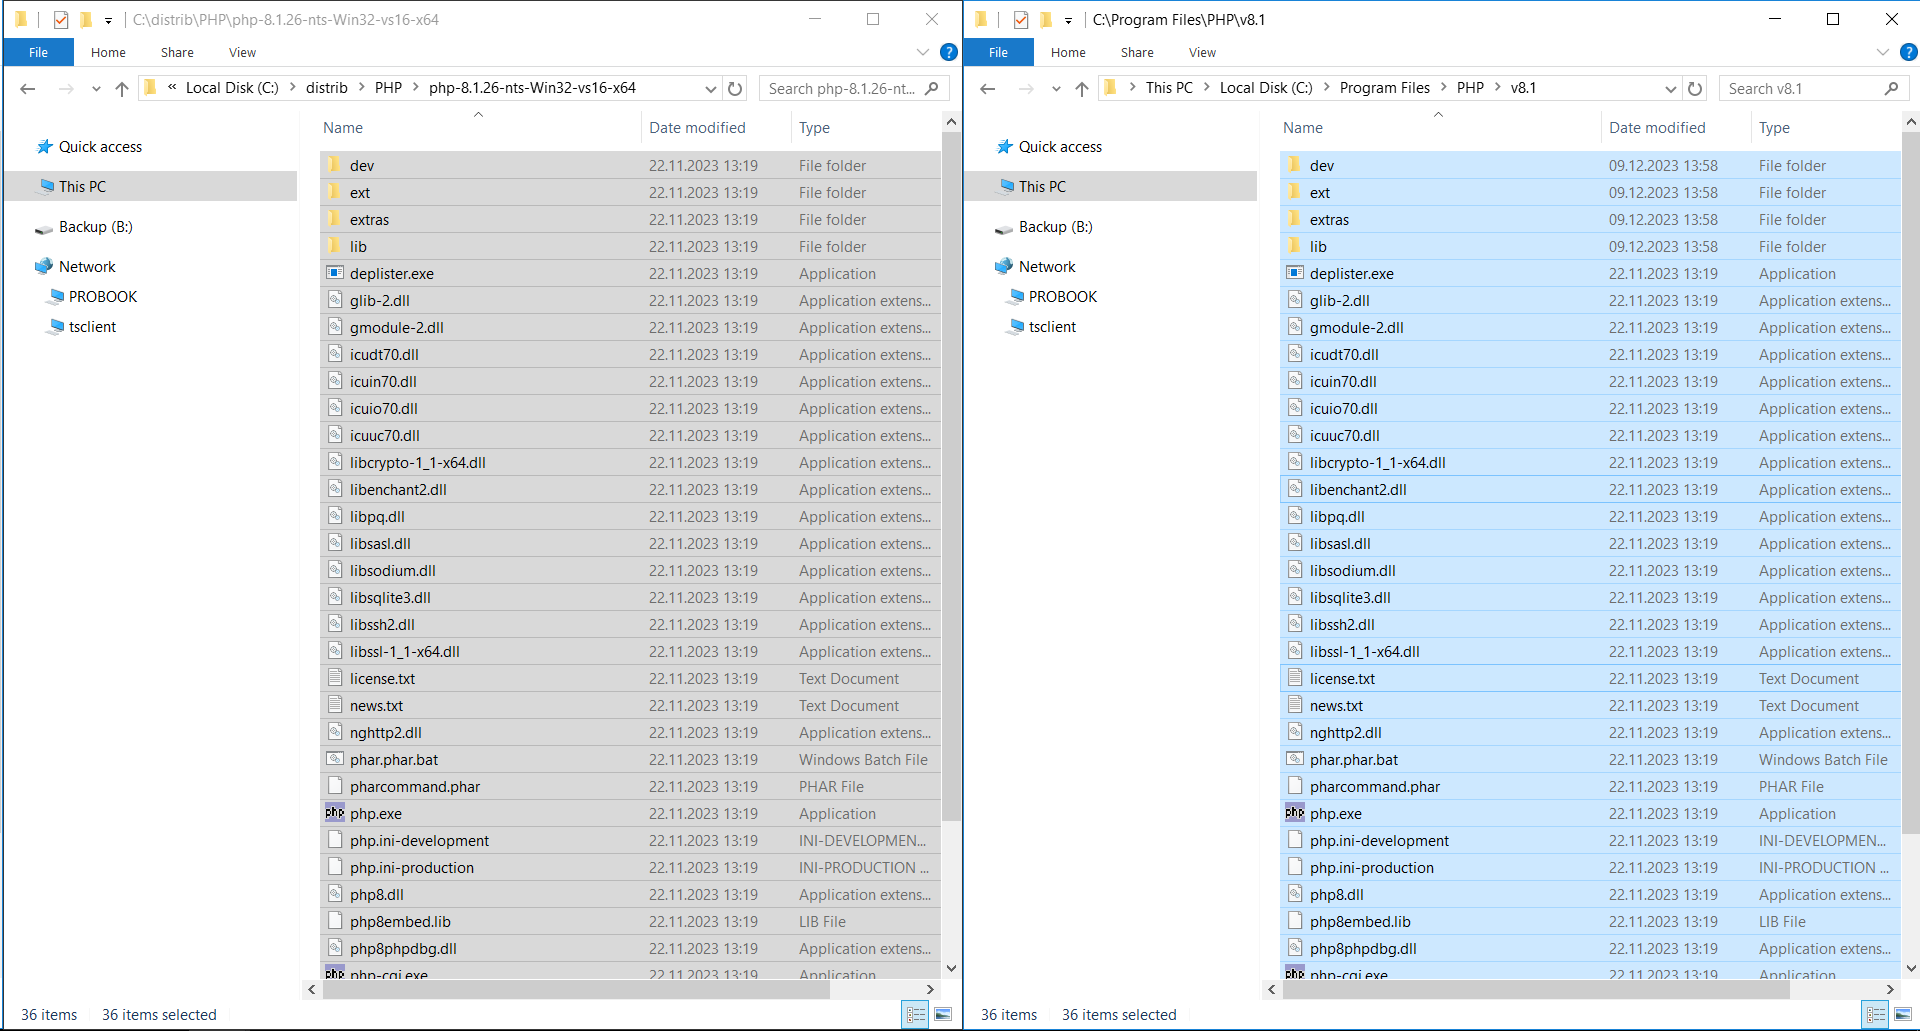
Создаём папку C:\Program Files\PHP\v8.1, копируем в неё содержимое архива.
Права доступа
В папке C:\Program Files\PHP выше уровнем у вас может находиться несколько версий PHP. На неё нужно дать права IIS. Удобнее вешать права на неё, чтобы они применялись ко всем версиям PHP через наследование.
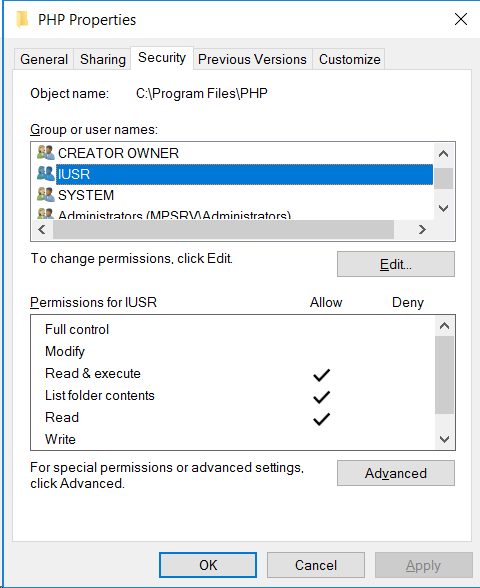
Не помню каким точно юзерам надо права, напишите уточнение в комментариях, кто знает, я даю двум юзерам IUSR и IIS_IUSRS права:
- чтение
- чтение и выполнение
- чтение списка содержимого директории
Серверные переменные
Настроим серверные переменные. Свойства компьютера или Control Panel → System and Security → System. Advanced System Settings.
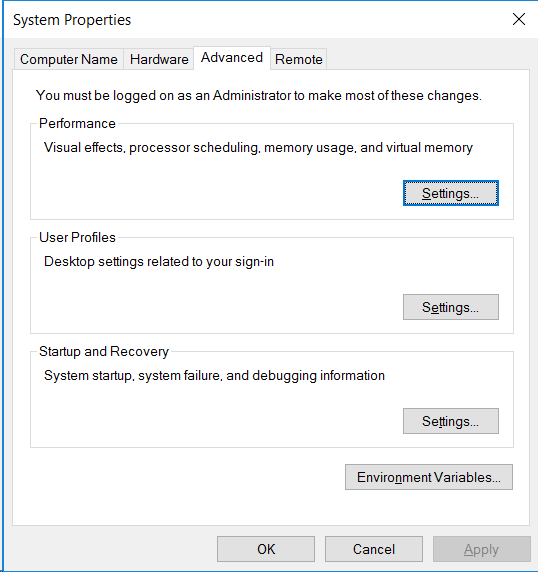
Вкладка Advanced, кнопка Environment Variables…
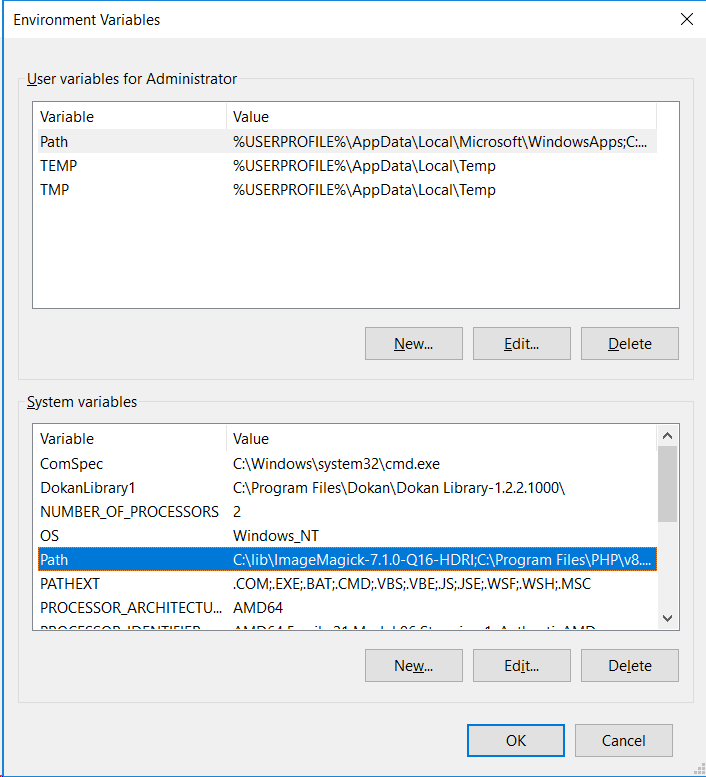
Блок System variables, находим переменную Path, выделяем её. Edit.
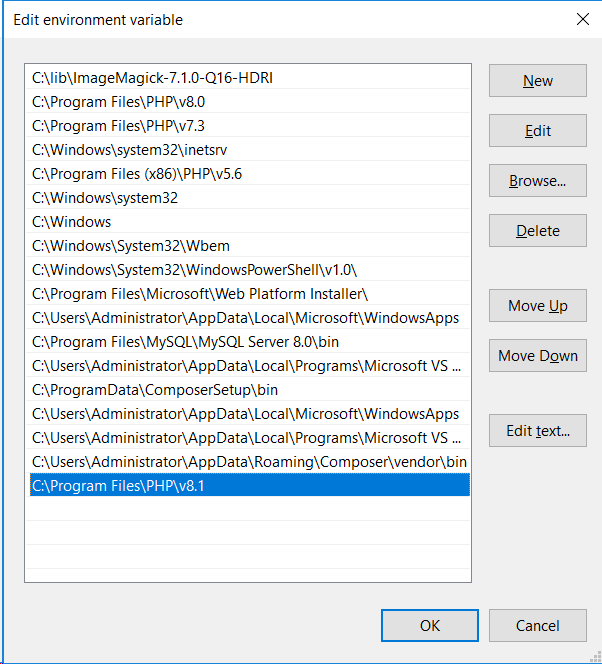
Добавляем новый путь:
C:\Program Files\PHP\v8.1
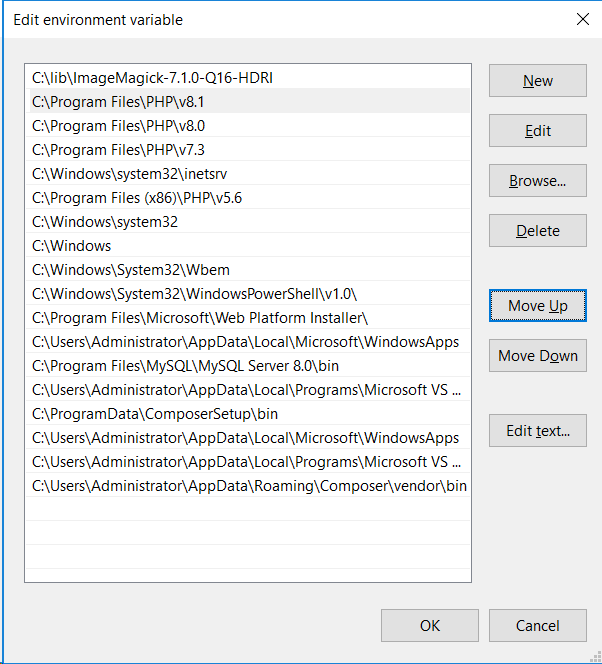
Кнопкой Move Up поднимаем его выше остальных версий PHP, если они у вас есть. OK, OK, OK.
В командной строке проверяем:
php --version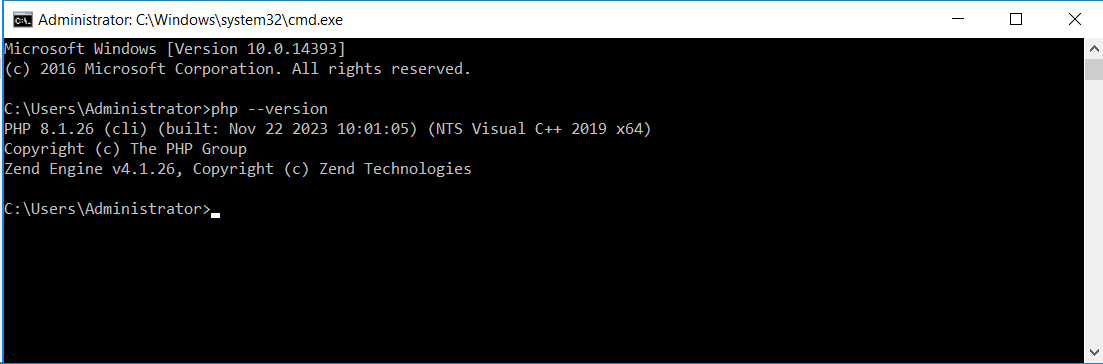
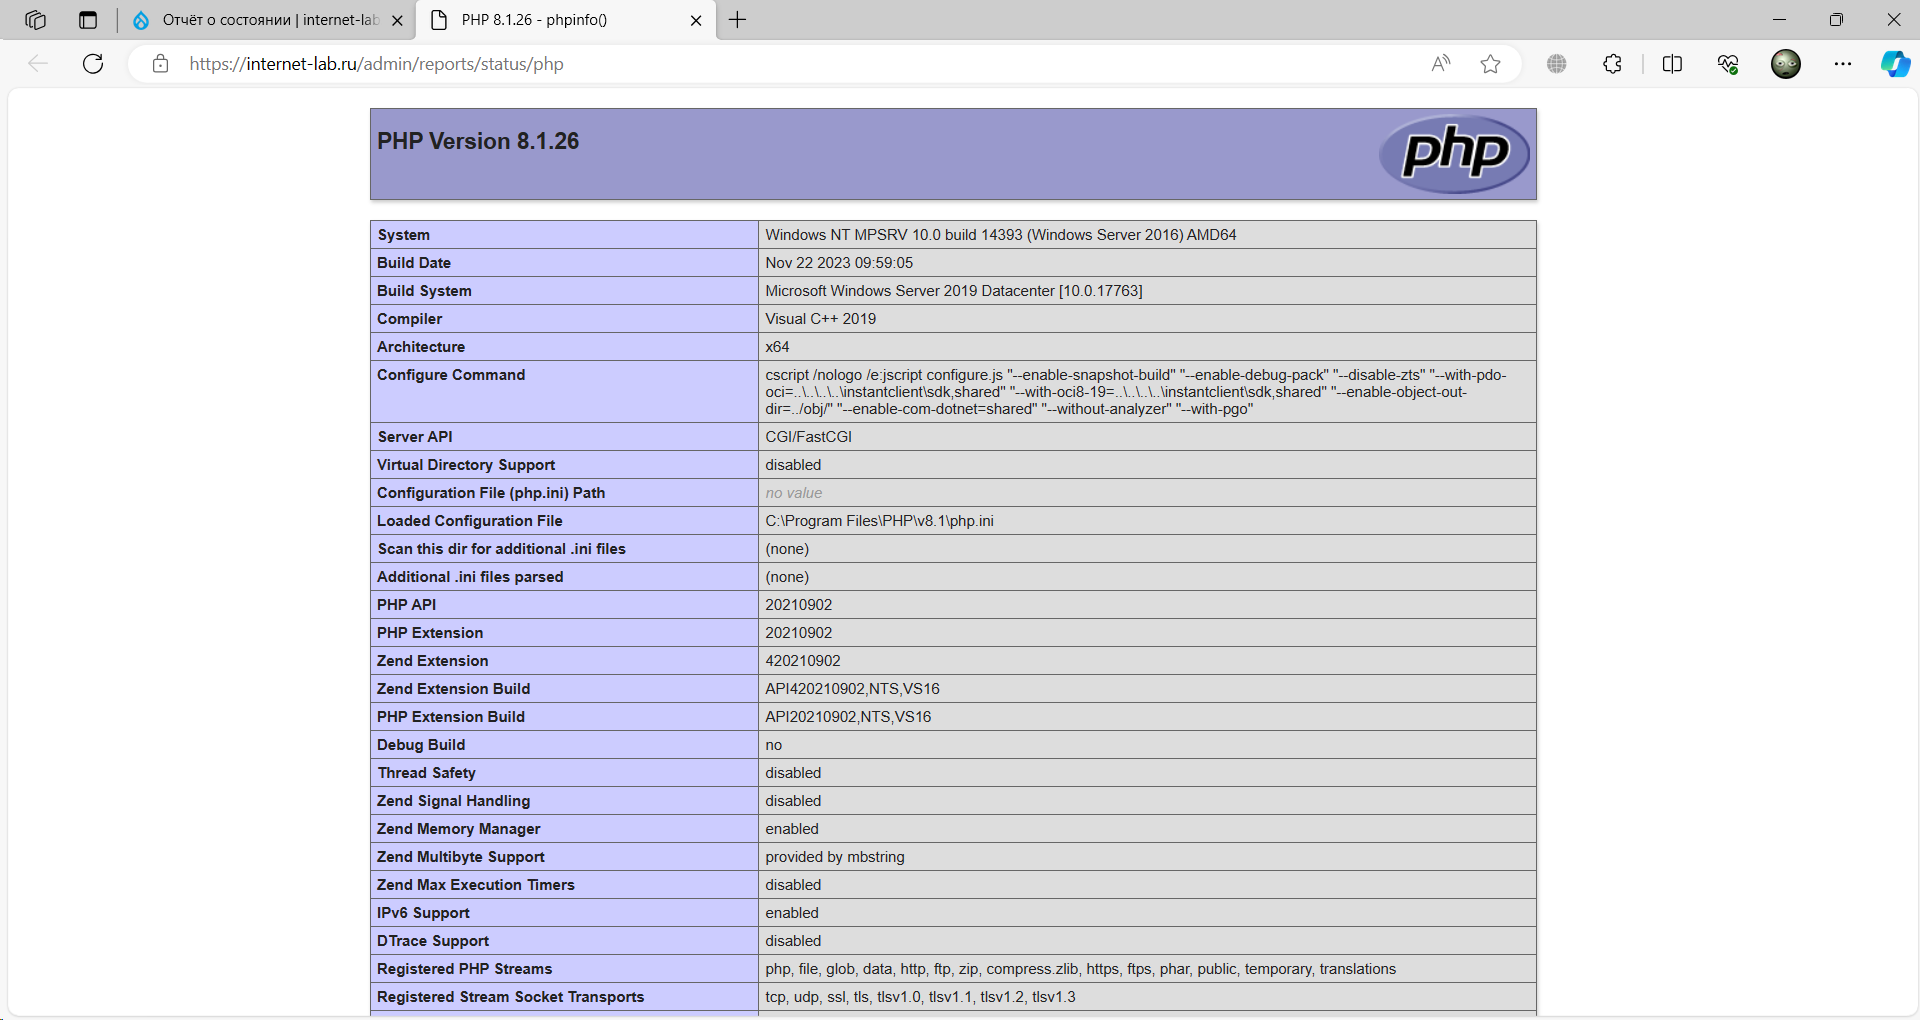
По умолчанию теперь используется PHP 8.1.26.
PHP и IIS
IIS и PHP можно подружить вручную, но мне лень. Использую для этих целей PHP Manager for IIS.
https://github.com/phpmanager/phpmanager/releases
Я уже ставил его ранее, приведу инструкцию для версии 2.4:
Запускаю инсталлятор.
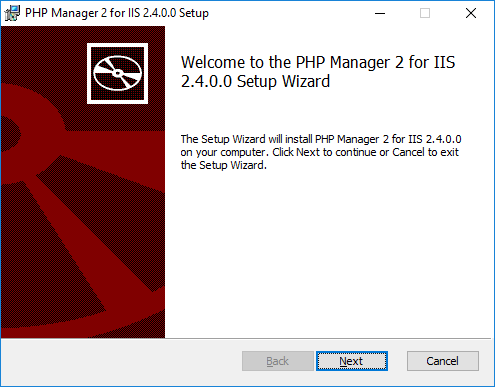
Next.
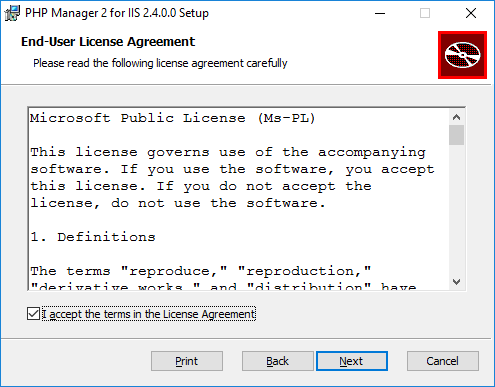
Принимаем лицензионное соглашение, Next.
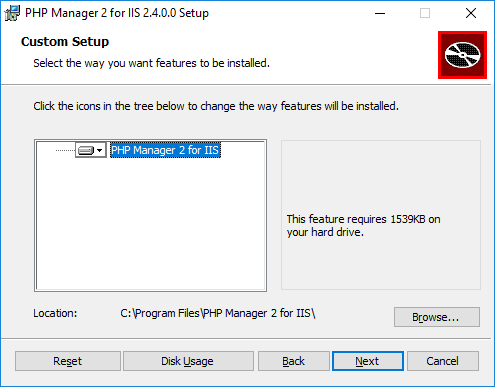
Next.
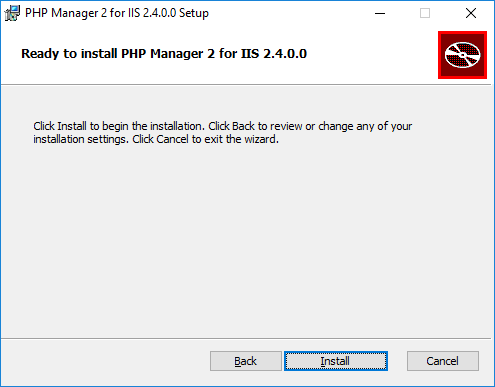
Install.
Ждём.
Finish.
В IIS появляется новая оснастка под названием PHP Manager.
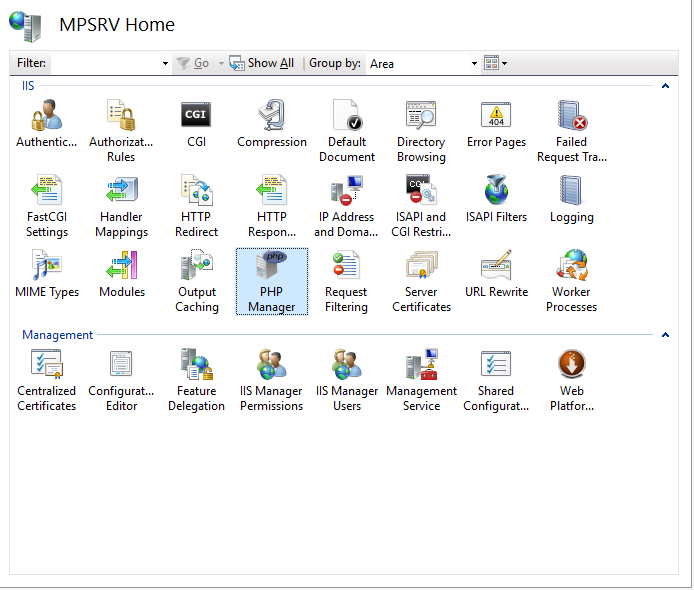
Для каждого сайта можно выбирать свою PHP версию, регистрировать новые, управлять расширениями и т.д.
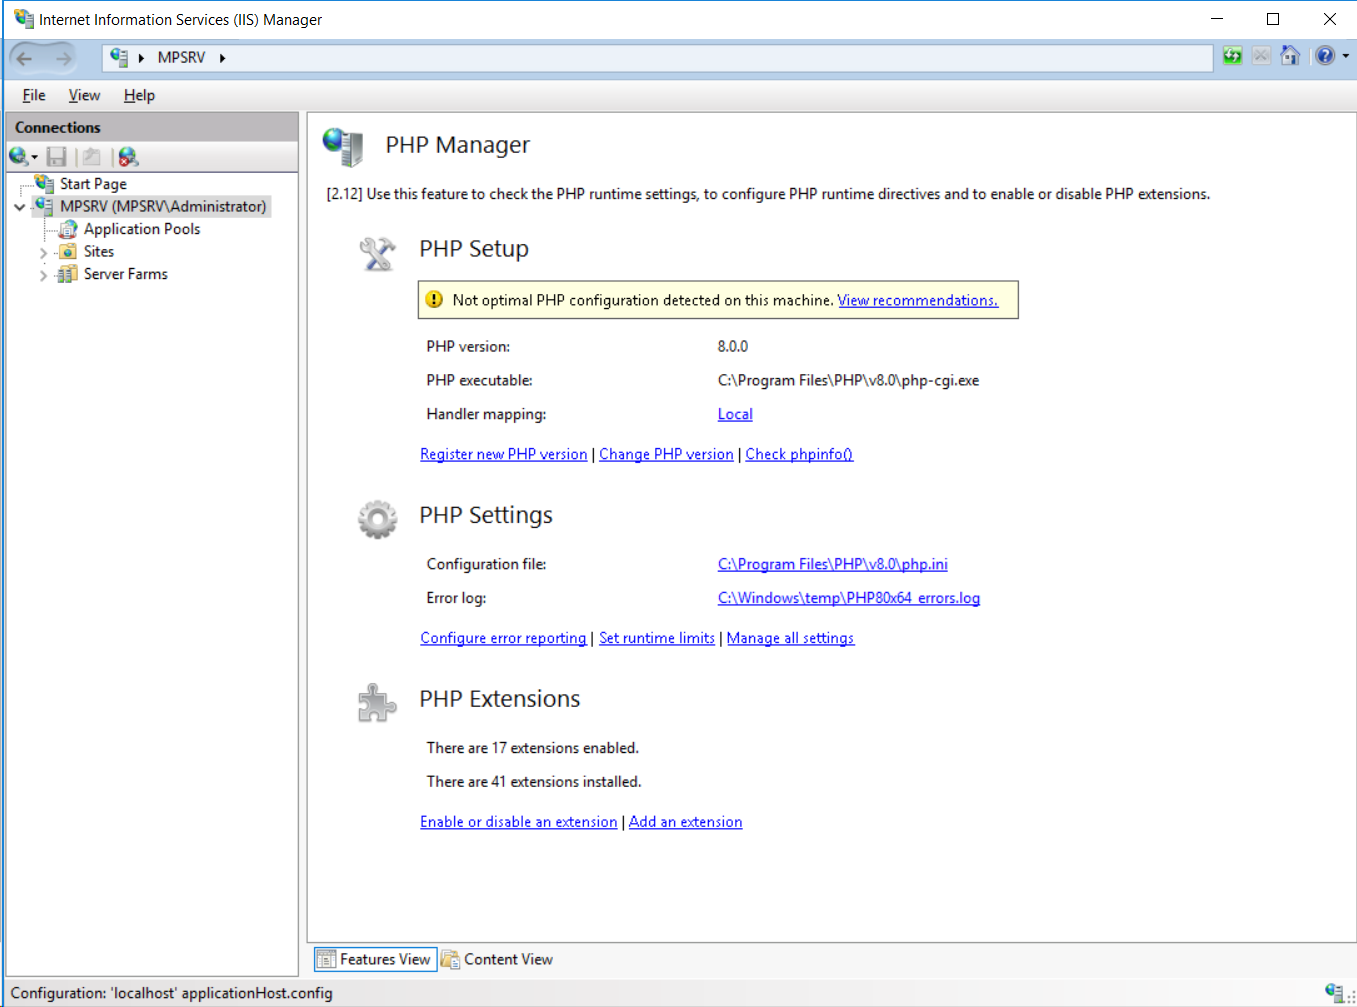
Однако, если вы собираетесь обновить версию PHP Manager for IIS, то сначала удаляйте старую, потом устанавливайте новую. Я обновил до версии 2.12.
Выбираем в IIS сайт или сам сервер, запускаем оснастку PHP Manager.
Зарегистрируем новую версию PHP. Register new PHP version.
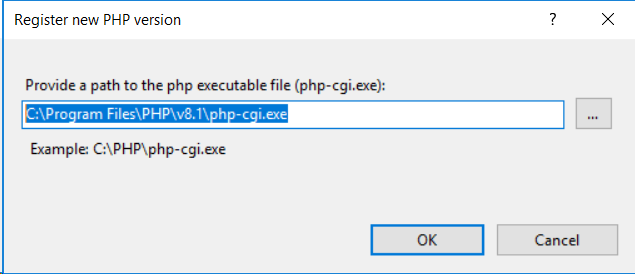
Указываем путь к php-cgi.exe.
C:\Program Files\PHP\v8.1\php-cgi.exe
OK.
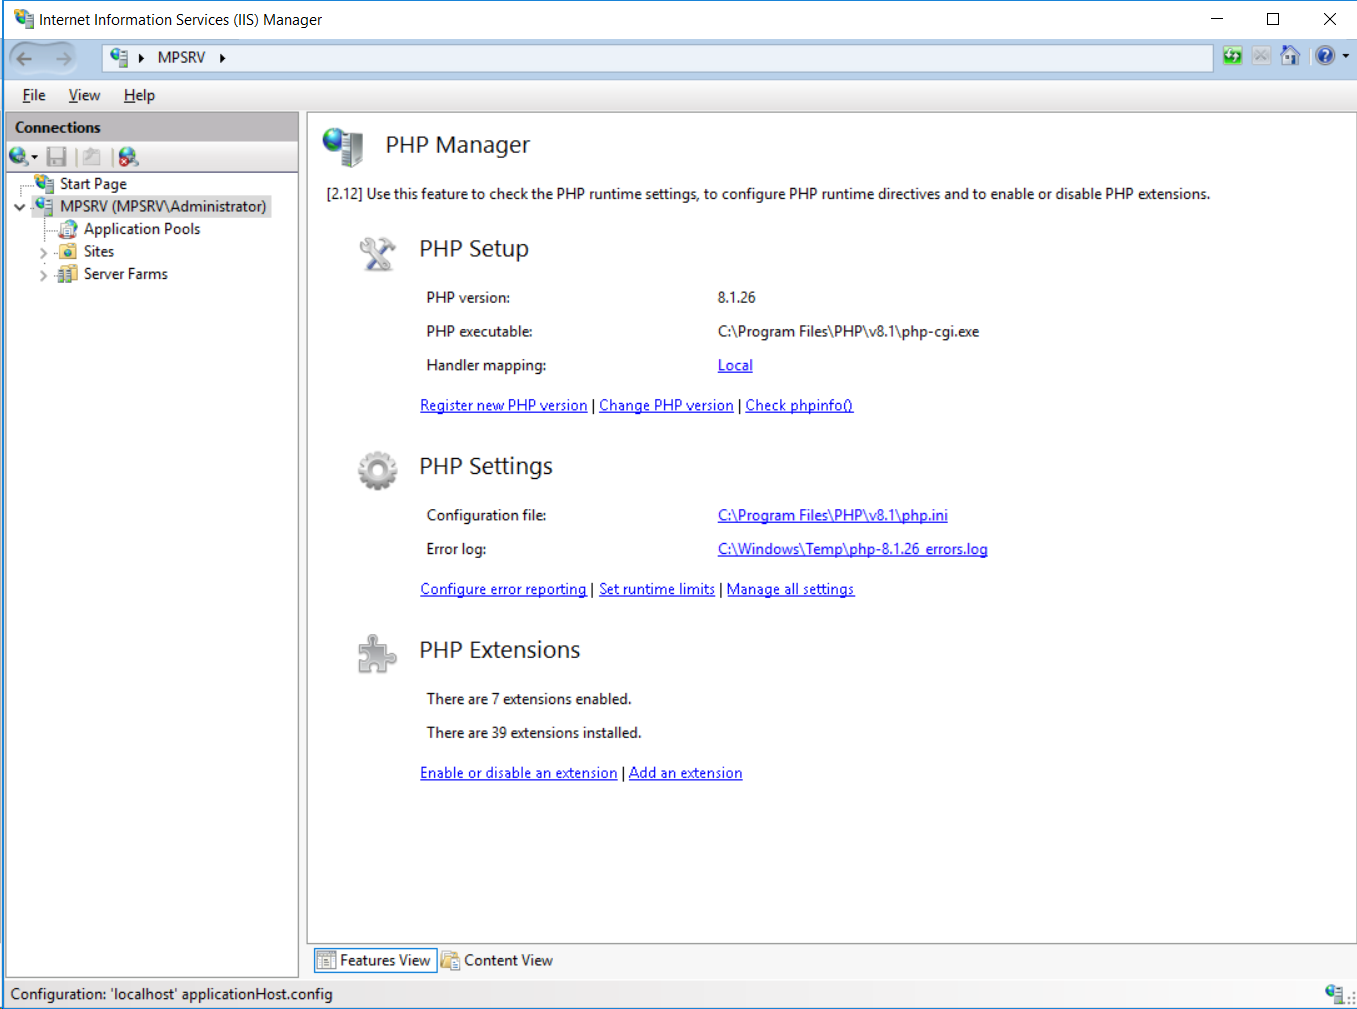
Путь к файлу php.ini и логу ошибок подставляется автоматически.
php.ini
Теперь нужно настроить php.ini я уже не помню что раньше настраивал для прежней версии PHP, поэтому воспользуюсь сравнением файлов с помощью Total Commander.
Сравнить файлы с помощью Total Commander
Расширения можно искать здесь:
http://pecl.php.net/
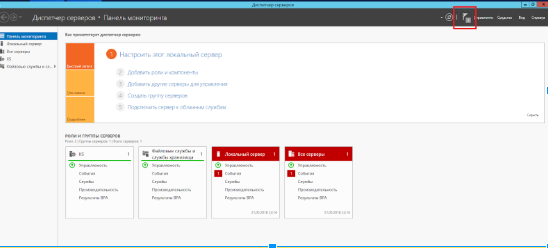
IIS (Internet Information Services) — это службы интернета для ОС Windows. В них входят веб-сервер, ftp-сервер и другие компоненты. Применительно к веб-серверу IIS используется как синоним, что немного неправильно, однако достаточно распространено. В данной инструкции мы будем настраивать веб-сервер IIS с поддержкой php. Это будет делаться в два этапа — сначала установим IIS, потом поставим PHP.
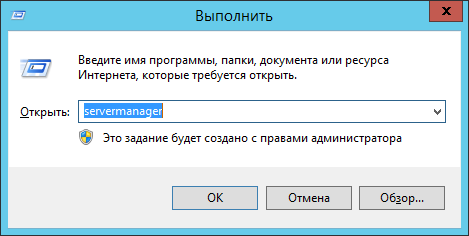
Так как веб-сервер входит в службы IIS (Internet Information Services), необходимо предварительно установить роль “Веб-Сервер (IIS)”. Для этого нажмите комбинацию клавиш Win+R для запуска командной строки и введите туда servermanager.
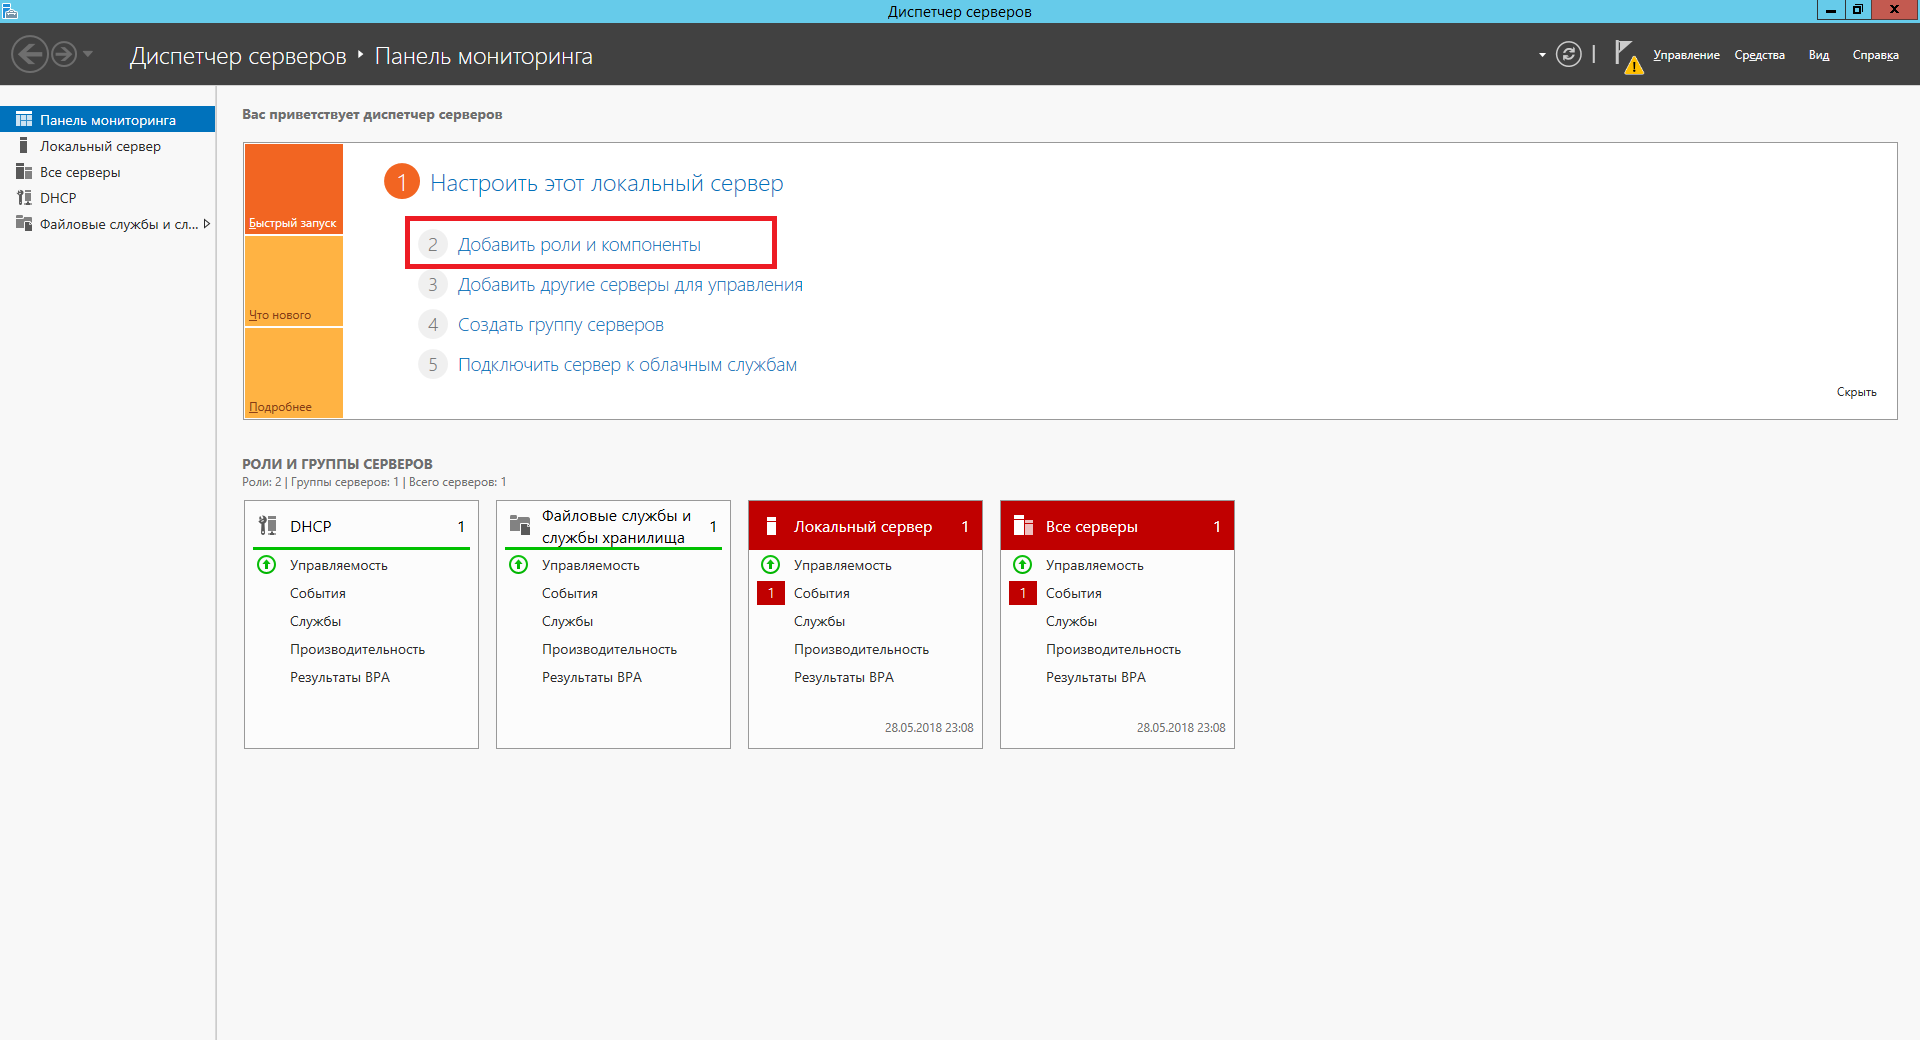
Далее запустить мастер установки ролей и компонентов нажав кнопку “добавить роли и компоненты”.
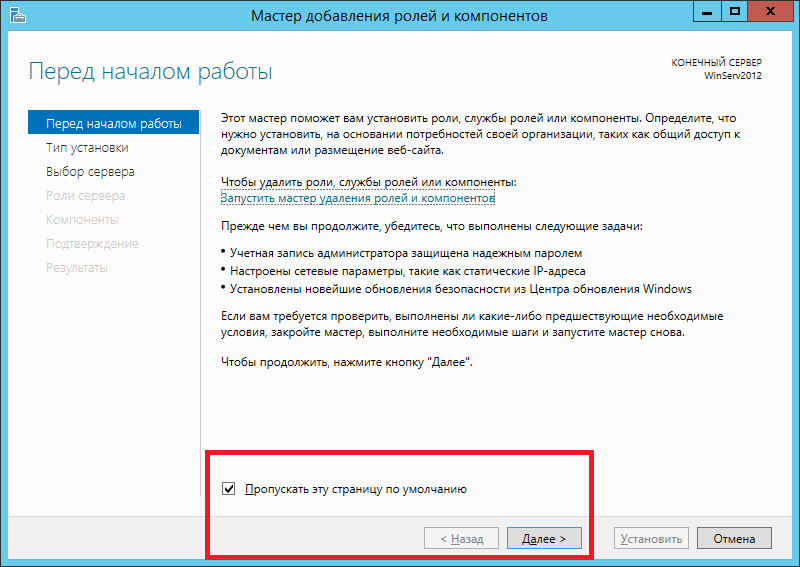
Выйдет страница приветствия на которой можно просто нажать “вперед”, а также поставить галочку “Пропускать эту страницу по умолчанию”, если вы не хотите постоянно видеть эту страницу при запуске мастера установки ролей и компонентов.
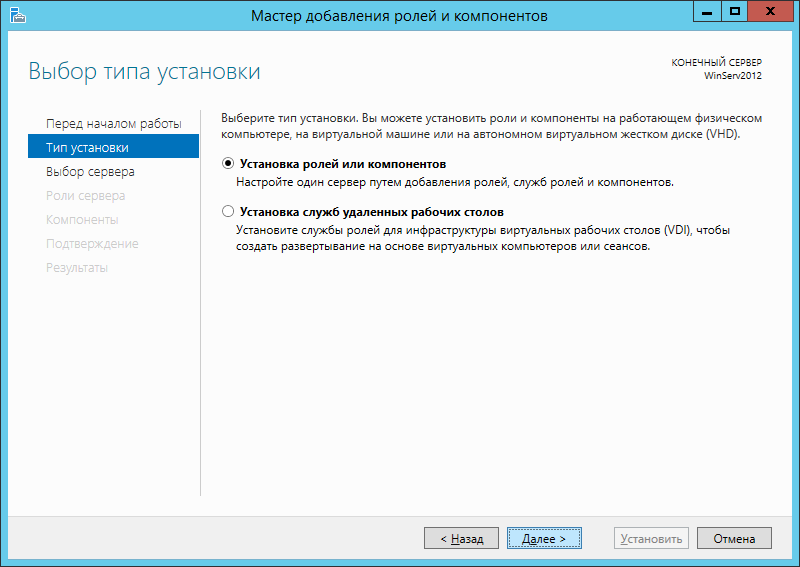
Далее ОС уточнит что именно вы хотите сделать — просто добавить роли и компоненты или установить службы удаленного доступа. Выберем установку ролей и компонентов.
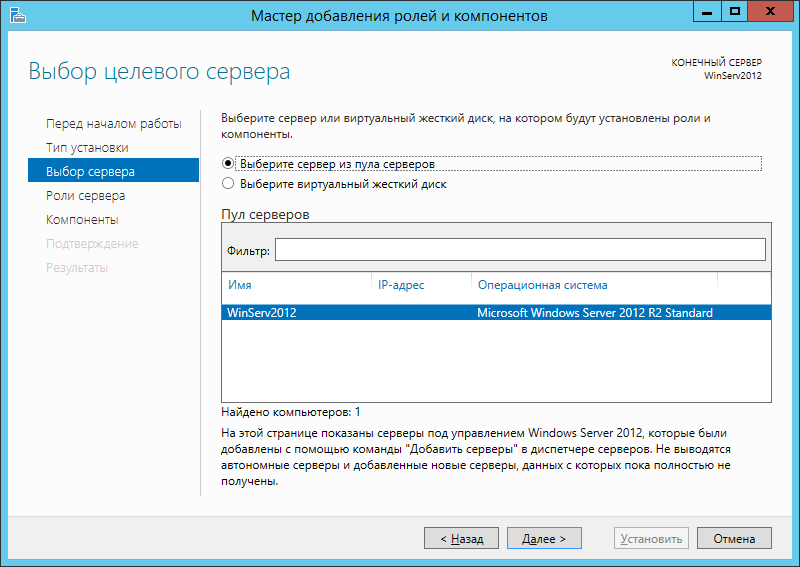
Далее спрашивается на какие сервера устанавливать роли и компоненты. У вас может быть несколько серверов и они могут быть объединены в пул для централизованного управления с одной консоли. Также роль может быть установлена на виртуальный жесткий диск. Выберем интересующий нас сервер и нажмем далее.
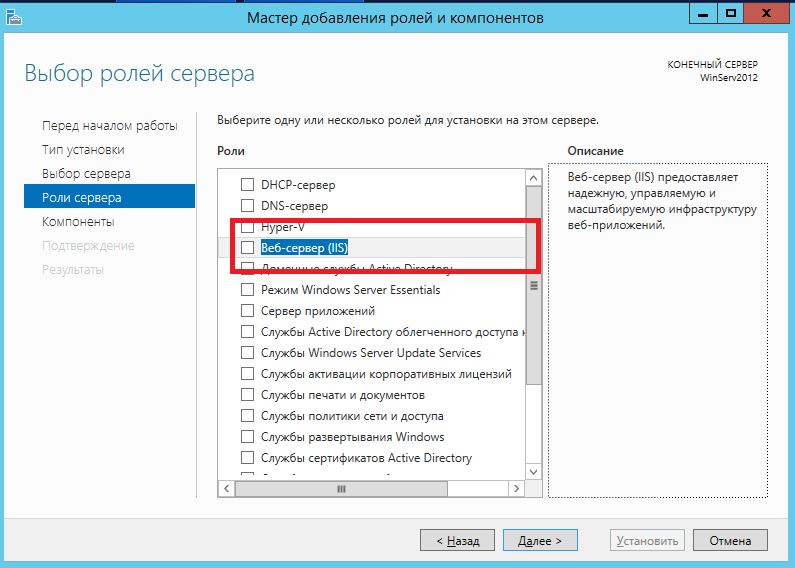
На этом этапе необходимо выбрать роль, которую мы желаем установить на выбранный нами на предыдущем шаге сервер. В данном случае это роль “Веб-сервер (IIS)”.
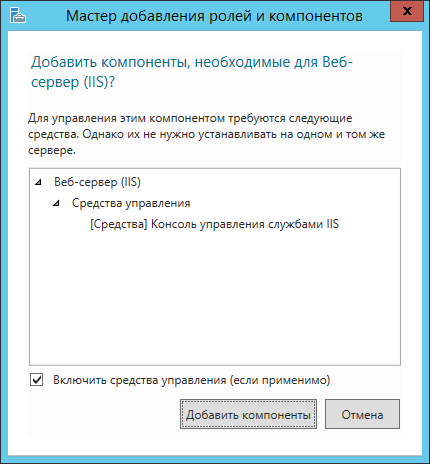
Далее ОС предложит дополнительно установить необходимые компоненты — следует согласиться, нажав кнопку добавить компоненты.
Далее выводится информационное сообщение о том что такое роль iis.
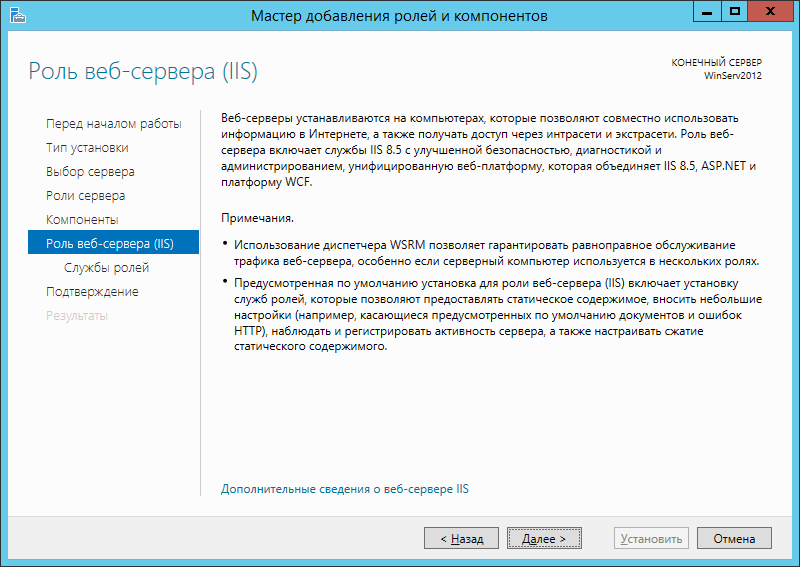
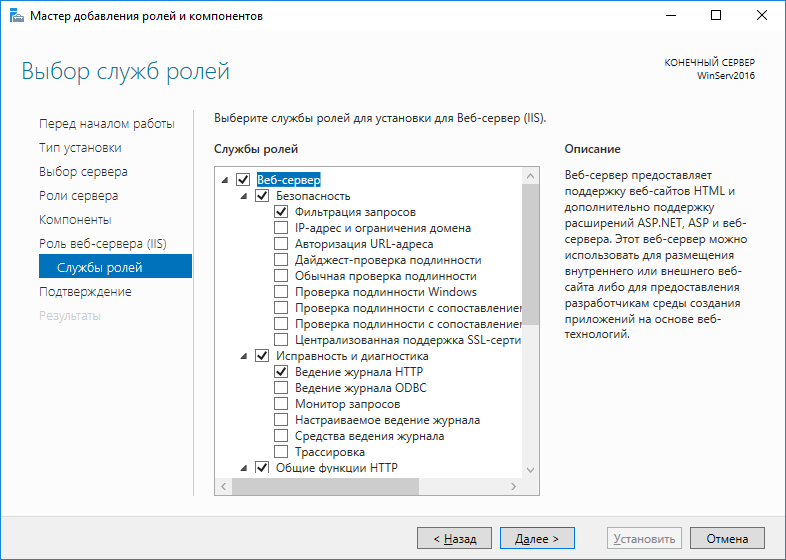
Служба IIS — большой продукт, включающий в себя множество различных компонентов, поэтому далее потребуется указать какие именно компоненты следует установить — нас интересует веб-сервер. Остальные компоненты можно оставить как есть или отключить, если не хотите ставить лишние компоненты. Оставим также и консоль управления.
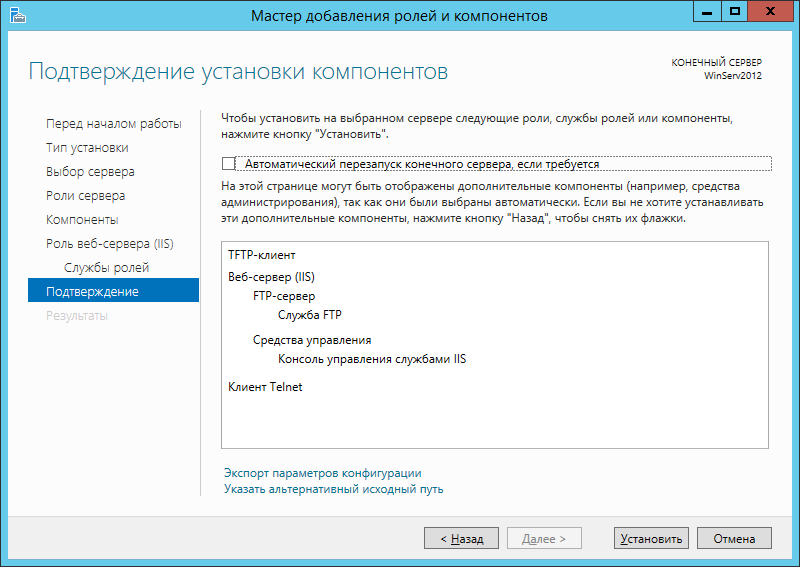
После выбора компонентов выведется финальное предупреждение о том, что роль IIS готова к установке. Нажмите установить. Можно также поставить галочку “Автоматический перезапуск конечного сервера, если требуется” чтобы не перезапускать сервер вручную. Следует иметь ввиду, что нажатие этой галочки перезапускает конечный сервер после установки без дополнительных предупреждений, поэтому используйте ее с осторожностью.
После нажатия кнопки установить запустится процесс установки, можно закрыть это окно нажатием кнопки закрыть. Следует иметь ввиду, что это действие не отменяет процесс установки, а только скрывает текущее окно.
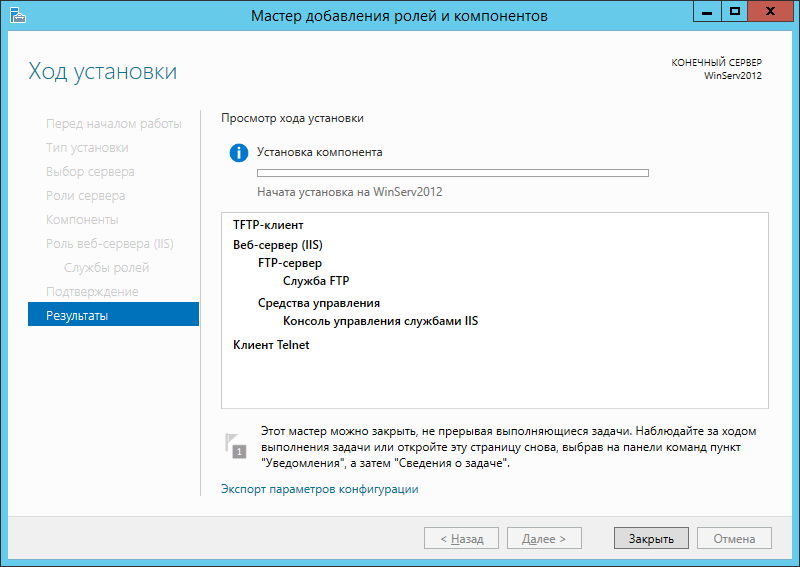
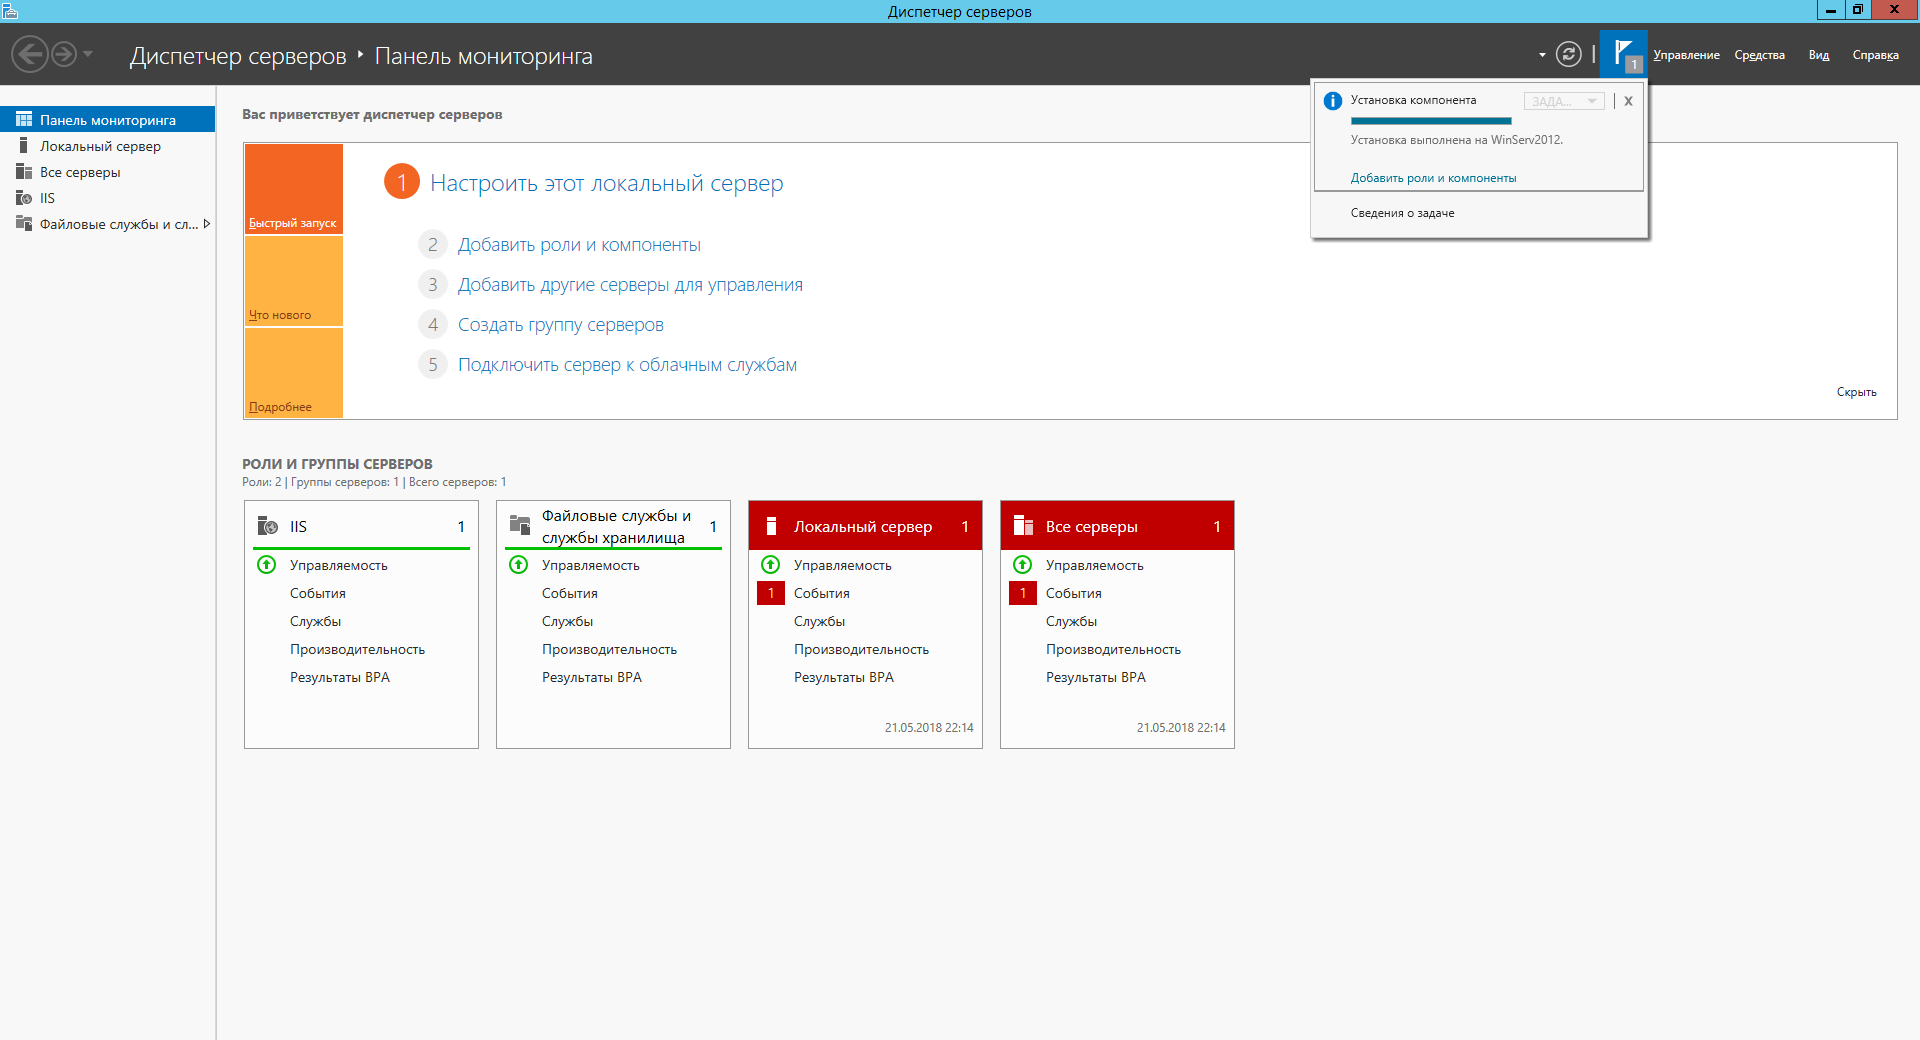
Посмотреть, как идет процесс и сколько их запущено, можно, нажав белый флаг.
В данном случае мы видим что установка уже завершена. Можно приступать к настройке.
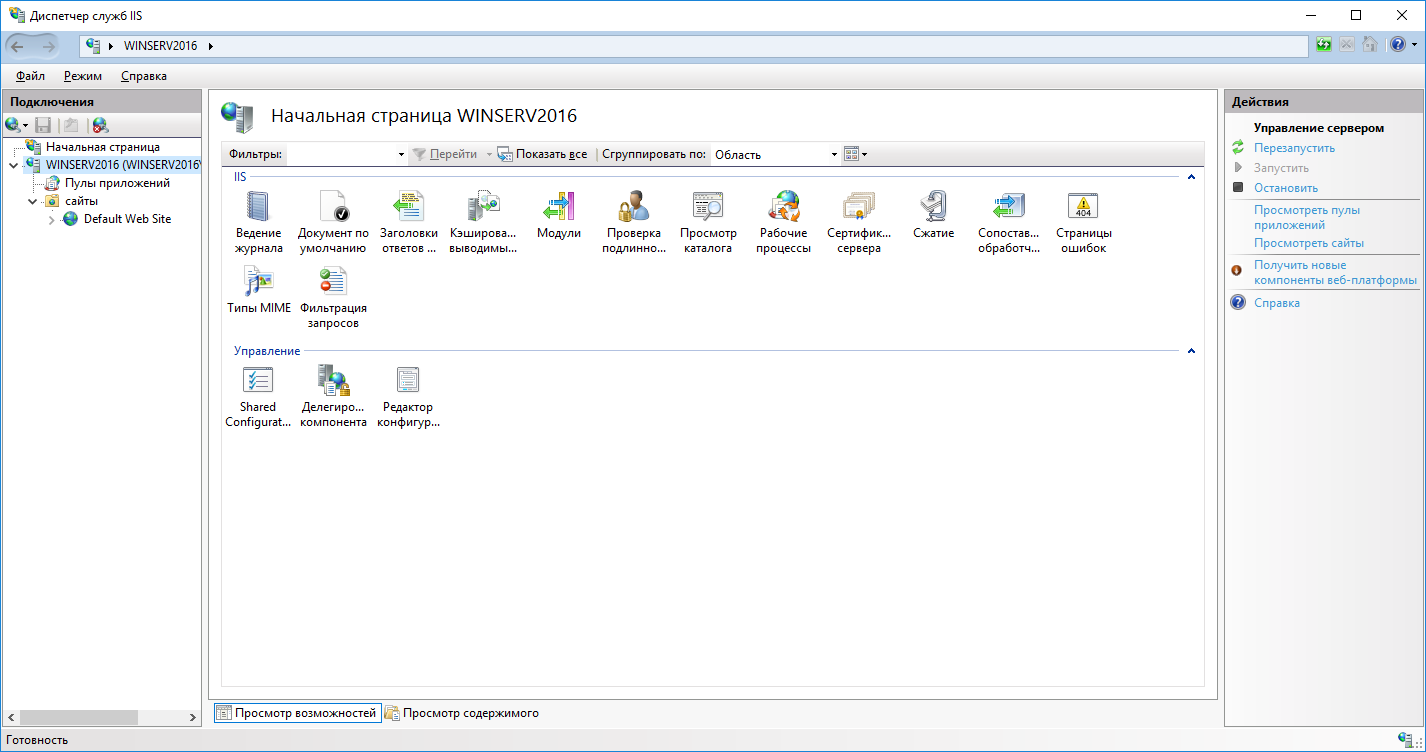
Для настройки перейдем в оснастке “диспетчер сервера” во вкладку IIS, выберем сервер и нажмем правую кнопку мыши. Выбираем из него “Диспетчер служб IIS”. Слева в дереве подключений находим наш сервер и разворачиваем его двойным щелчком мыши. Встаем на закладку “Сайты” и видим что сайт по умолчанию уже настроен.
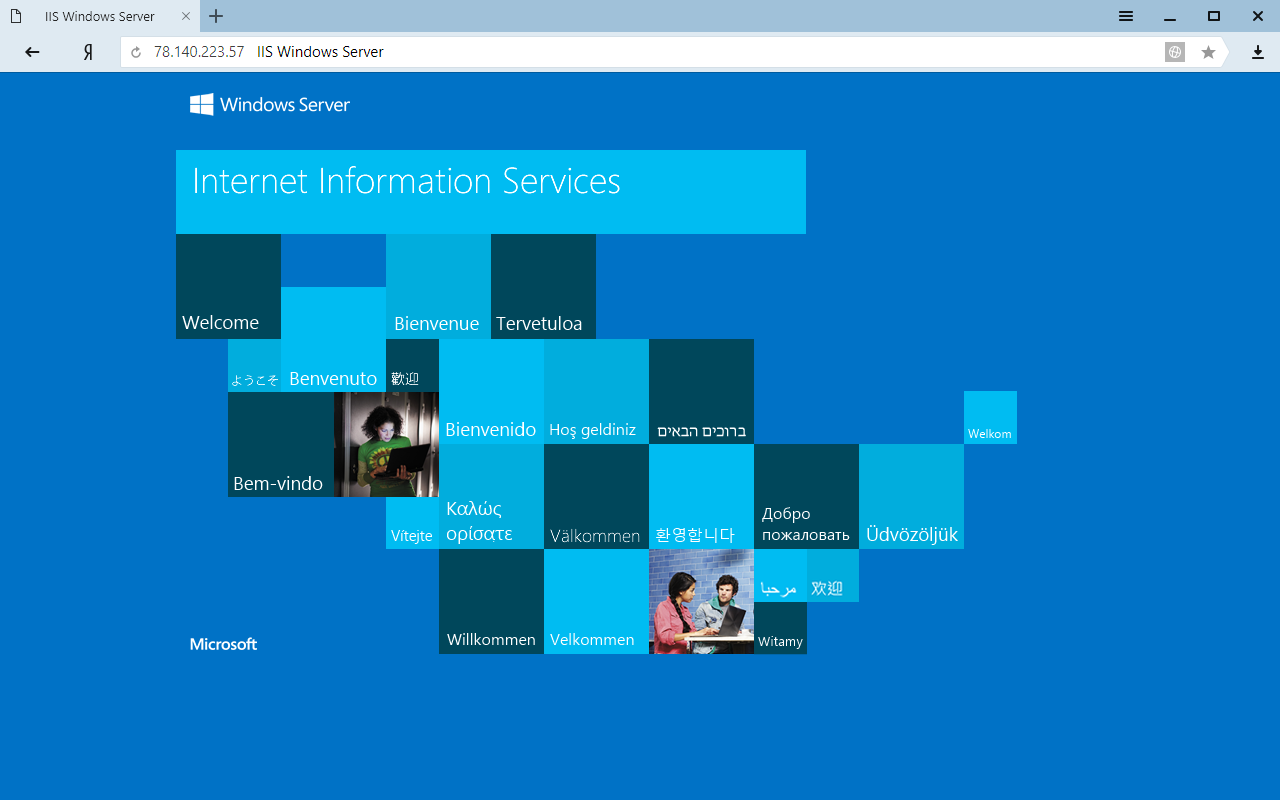
.Для проверки достаточно в проводнике windows набрать http://<имя компьютера> после чего должна открыться тестовая страница iis.
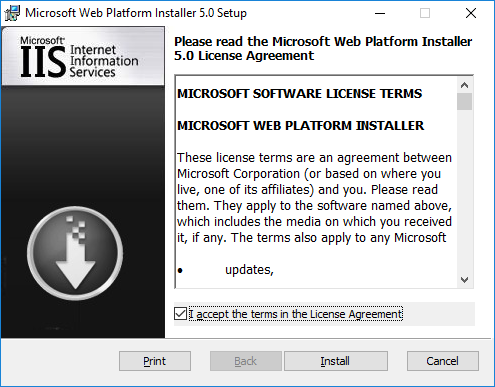
Для установки PHP воспользуемся установщик Microsoft Web Platform Installer 5.0 (WPI), скачать который можно по этой ссылке.
Установим сам инсталлятор. Примем лицензионное соглашение и нажмем install.
Теперь запустим его выбрав в главном меню соответствующий пункт.
В правом верхнем углу введем php для поиска необходимого нам компонента.
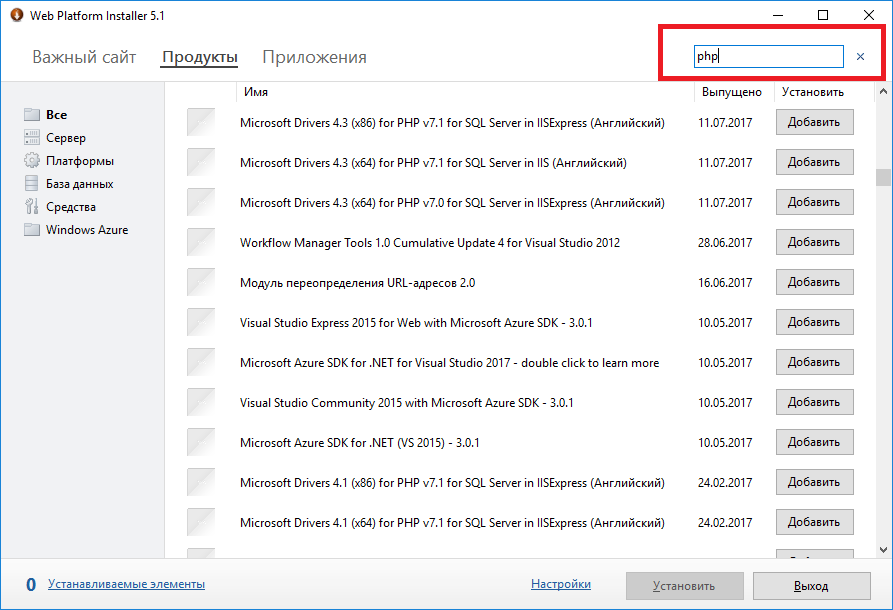
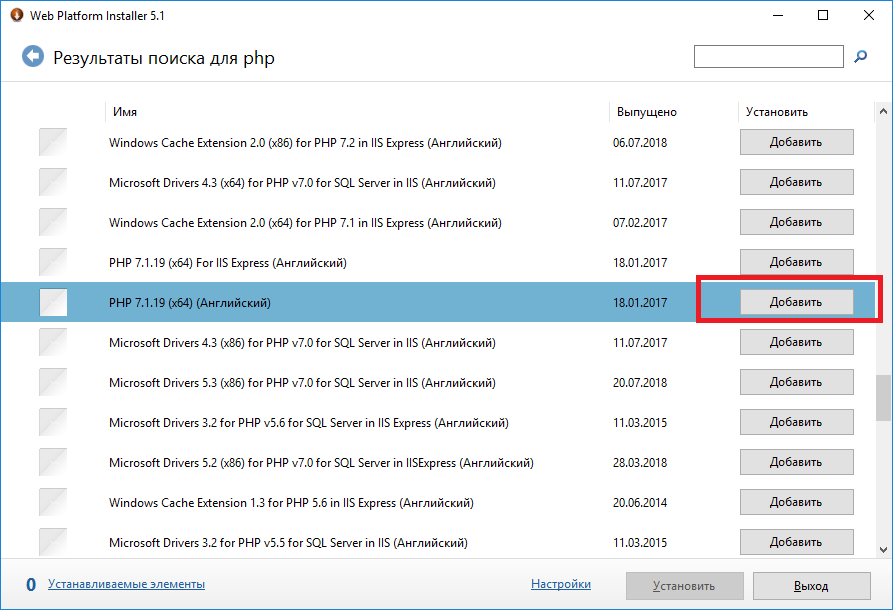
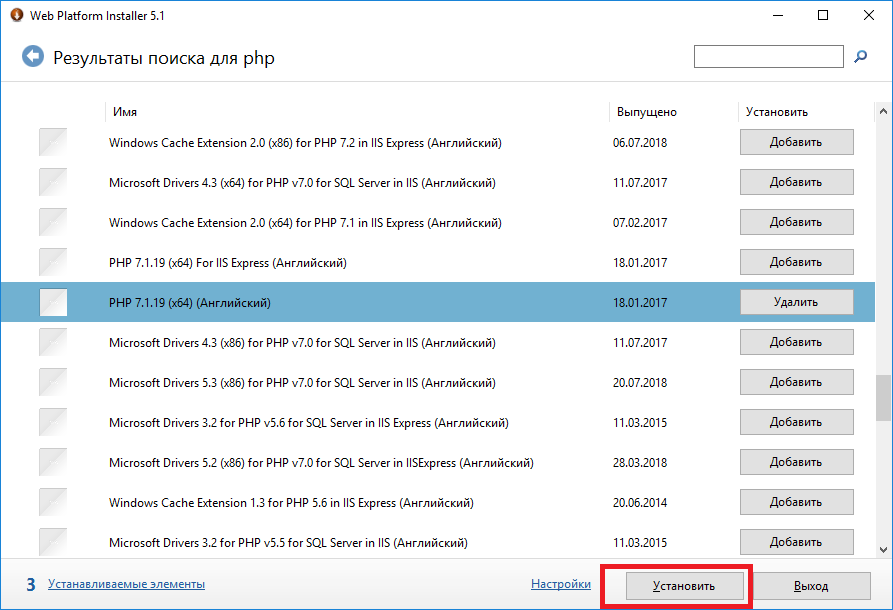
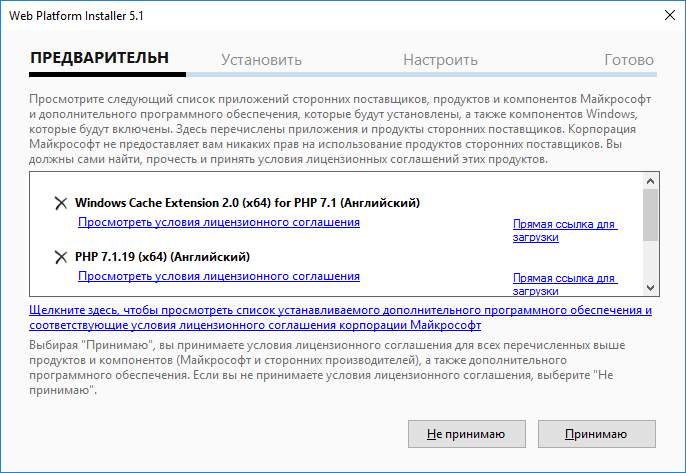
Найдем нужную нам версию php — например 7.1.19 (x64) и добавим ее для установки кнопкой “Добавить”.
После этого нажмем кнопку установить внизу страницы.
Согласимся с лицензионными соглашениями нажав кнопку ”Принимаю”.
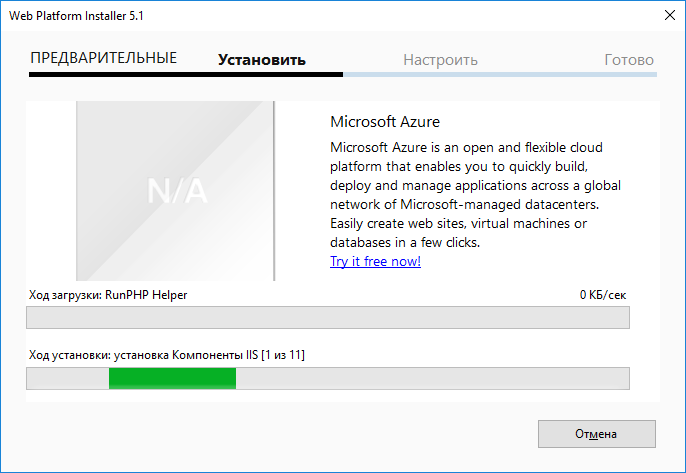
Начнется загрузка и установка компонентов,
По завершении нажмите кнопку “Готово”. Для проверки cоздадим индексный файл php файл c:\inetpub\wwwroot\index.php выводящий версию php.
После этого удаляем файлы iisstart* из папки c:\inetpub\wwwroot, и проверим что php работает набрав в браузере http://<имя или ip сайта>.

На этом настройка PHP+IIS на Windows Server 2016 окончена. В нашей базе знаний вы найдёте ещё множество статей посвящённых различным аспектам работы в Windows, а если вы ищете надежный виртуальный сервер под управлением Windows, обратите внимания на нашу услугу — Аренда виртуального сервера Windows.
In this blog, we will show the steps to install PHP manually on Windows 2016 server.
REQUIREMENTS
- Virtual Machine
- IIS Web Server
- WinCache Extension for PHP
- PHP Binary Files
- VC++ Compiler
INSTALLING IIS
- Open the Windows PowerShell and type the below command to install IIS service with CGI extension.
Install-WindowsFeature -name web-server,web-cgi –IncludeManagementTools

- It will take few minutes to complete the installation.


- Once the installation is completed, verify the CGI feature was installed in the server using the below command.
Get-WindowsFeature web-cgi

INSTALLING PHP
- Go to the below URL to download the PHP 7.1 version.
http://windows.php.net/download/

- Extract the ZIP file to C:\program files folder.

- There will be two PHP.ini files are available in that folder. Rename the php-.ini-development to php.ini.

- Open the php.ini file Add the following line at the end of the file.
extension=php_wincache.dll

- Save and close the php.ini file.
- Right-click on the windows start menu and click on system.
- Click on Advanced system settings.

- Click on Environment Variables.
- Under System Variables, select path variable and click on Edit.

- Click on New button and add the PHP binary path.

- Click OK thrice to close the system properties window.
INSTALL WINCACHE EXTENSION
- Browse the below URL to download the Wincache extension for PHP.
https://www.iis.net/downloads/microsoft/wincache-extension

- Scroll down and download WinCache 2.0 for PHP 7.1 under download section.

Note : In this demo, we are installing PHP 7.1, so we are downloading corresponding wincache version
- Once you download, double-click on the wincache-2.0.0.8-dev-7.1-nts-vc14-x64.exe file and extract the files to a folder.


- Copy the php.wincache.dll file to C:\Program Files\php-7.1\ext folder.

CONFIGURE PHP IN IIS
- Open IIS snap-in and click on the server name.

- Double click on Handler Mappings icon.

- Click on Add Module Mapping… under actions menu.

- Provide the below information as shown below. And click on Request Restrictions, under Mapping make sure you have select the File or Folder button.

- Click OK twice to close configuration window. Now the PHP will be listed under Handler Mappings List.

INSTALLING VC++
- Browse the below URL and download the Microsoft Visual C++ 2015 Redistributable Update 3 RC package.
https://www.microsoft.com/en-us/download/details.aspx?id=52685

- Click on Download and select vc_redist.x86.exe and click Next.

- Once the download is complete, double-click on the vc_redist.x86.exe file. Accept the License Agreement and click on Install button.

- Once the installation is successful click on close button.
VERIFYING PHP
- To Verify the PHP extension, place a file named phpinfo.php in your root folder of IIS website and add the below lines in that file.
<?php
phpinfo();
?>


- Open the web browser and access the URL http://localhost/phpinfo.php and able to see the PHP configuration information.

VIDEO
Thanks for reading this blog. We hope it was useful for you to learn to install PHP manually in windows 2016 server.
Loges
Windows · September 28, 2024
Setting up a web server environment on Windows Server 2016 can be a straightforward process if you follow the right steps. This guide will walk you through the installation and configuration of Internet Information Services (IIS) 10.0, PHP, and MySQL, creating a robust platform for hosting dynamic web applications.
Prerequisites
- Windows Server 2016 installed and running.
- Administrator access to the server.
- Internet connection for downloading necessary software.
Step 1: Install IIS 10.0
Internet Information Services (IIS) is a flexible, secure, and manageable web server for hosting anything on the web. To install IIS 10.0, follow these steps:
- Open the Server Manager from the Start menu.
- Click on Add roles and features.
- In the wizard, click Next until you reach the Server Roles section.
- Check the box for Web Server (IIS) and click Next.
- Continue through the wizard, accepting the default features, and click Install.
- Once the installation is complete, click Close.
Step 2: Install PHP
PHP is a popular server-side scripting language. To install PHP on IIS, follow these steps:
- Download the latest version of PHP from the official PHP website. Choose the Non-Thread Safe version for IIS.
- Extract the downloaded ZIP file to a directory, e.g.,
C:PHP. - Rename
php.ini-developmenttophp.iniand open it in a text editor. - Enable the required extensions by uncommenting the lines (remove the semicolon) for extensions like
extension=mysqliandextension=mbstring. - Set the
extension_dirdirective to point to theextdirectory within your PHP installation, e.g.,extension_dir = "C:PHPext".
Configure IIS to Use PHP
- Open the IIS Manager.
- Select your server in the left pane and double-click on Handler Mappings.
- Click on Add Module Mapping.
- Fill in the fields as follows:
- Request Path:
*.php - Module:
FastCgiModule - Executable:
C:PHPphp-cgi.exe - Name:
PHP_via_FastCGI - Click OK and confirm the dialog that appears.
Step 3: Install MySQL
MySQL is a widely used relational database management system. To install MySQL, follow these steps:
- Download the MySQL Installer from the official MySQL website.
- Run the installer and choose the Developer Default setup type.
- Follow the prompts to install MySQL Server, MySQL Workbench, and other tools.
- During the configuration step, set a root password and configure the server as needed.
Connect PHP to MySQL
To enable PHP to communicate with MySQL, ensure that the MySQL extension is enabled in your php.ini file:
extension=mysqliStep 4: Test Your Setup
Create a simple PHP file to test your setup. Open a text editor and create a file named info.php with the following content:
<?php
phpinfo();
?>Save this file in the default web directory, typically located at C:inetpubwwwroot. Open a web browser and navigate to http://localhost/info.php. If everything is set up correctly, you should see the PHP information page.
Conclusion
Setting up an IIS 10.0, PHP, and MySQL environment on Windows Server 2016 is a manageable task that can be accomplished with careful attention to detail. By following the steps outlined in this guide, you can create a powerful web hosting environment suitable for various applications.
For those looking for reliable hosting solutions, consider exploring options like USA VPS Hosting to enhance your web projects.
Installing PHP on IIS is fairly straight forward using Microsoft’s Web Platform Installer. Unfortuantely numerous resources available on the web as well as the Web Platform Installer’s prerequisite check overlook a few prerequisites when installing PHP on IIS running on Windows Server. I’ve developed a guide and a list of requirements that will make the process of installing PHP on IIS much easier.
Requirements
- Server 2012 R2/2016/2019
- IIS role with CGI feature
- .NET Framework 3.5
- Visual C++ Redistributable for Visual Studio 2012 Update 4 (32-bit)
- Web Platform Installer
Run Windows Update
Install all available updates via Windows Update before continuing. There have been multiple updates in the past that have affected specific components from smoothly installing, specifically .NET Framework. Save yourself the trouble now and install all updates before continuing.
Install IIS role with CGI
The first thing you should do is add the IIS role with FastCGI support. More information on installing IIS and FastCGI can be found on the official PHP website but I’ll cover the basics here.
- Click start and type “Server Manager” and then hit enter. This should launch the Server Manager application.
- Click Manage → Add Roles and Features.
- On the Before you being screen, click Next.
- Select Role-based or feature-based installation and click Next.
- Select the local server and then click Next.
- On the Select server roles screen, select Web Server (IIS), click Add Features when prompted to add additional features, and click Next.
- On the Select features screen, click Next.
- On the Web Server Role (IIS) screen, click Next.
- On the Select role services screen, under Application Development, check off CGI. At this point I also recommend checking off any other IIS features that you may require or you’re interested in. I typically check off ASP, ASP.NET, HTTP Redirection and/or Windows Authentication (some of these options will also automatically select prerequisite features as well). Once you have everything you need selected, click Next.
- On the confirm installation selections screen, click Install.
- Wait for the installation to complete and then click Close. At this point I recommend rebooting the server.
Install .NET Framework 3.5
.NET Framework 3.5 is required for the PHP Manager for IIS application which will install by default when using the Web Platform Installer to install PHP. If you don’t have .NET Framework 3.5 installed on the server, PHP will still install but you’ll be presented with an error regarding PHP Manager – it’s safe to ignore if you don’t need it. With that said, the PHP Manager application can come in handy and I recommend installing it by completing this simple prerequisite.
Although .NET Framework 3.5 can be installed using the Add Roles and Features wizard on Server, it still requires the Windows Server installation media when installing the feature. Before you proceed, obtain the Windows Server installation media and attach it to the server either by physical media or mounting the ISO.
- Click start and type “Server Manager” and then hit enter. This should launch the Server Manager application.
- Click Manage → Add Roles and Features.
- On the Before you being screen, click Next.
- Select Role-based or feature-based installation and click Next.
- Select the local server and then click Next.
- On the Select server roles screen, click Next.
- On the Select features screen, select .NET Framework 3.5 Features and click Next.
- On the confirm installation selections screen, click Specify an alternate source path.
- At this point we’ll need the Server 2012 R2 installation media. For example, if you’ve mounted the Windows Server 2012 R2 installation media to D:\, then the path would be D:\sources\sxs. Enter the path to the sources\sxs directory, click OK and then click Install.
- Wait for the installation to complete and then click Close. At this point I recommend rebooting the server.
Install Visual C++ Redistributable
The Visual C++ Redistributable is required when installing a default installation of PHP. It will install DLL files that are required by numerous PHP extensions. Without it you will receive HTTP 500 errors and PHP will throw the error “The FastCGI process exited unexpectedly”.
You can download the Visual C++ Redistributable from here. Be sure to grab the 32-bit version (VSU_4\vcredist_x86.exe) as the 64-bit version will not work (or maybe it’s not required?).
Install the Web Platform Installer
The Web Platform Installer is a small utility by Microsoft which is supposed to make it quicker and easier to deploy web services and deployment tools. But honestly it falls short of expectations. For example, when installing PHP it does not perform a prerequisites check for CGI, .NET Framework 3.5, or the required DLL files (installed by Visual C++ Redistributable). As long as these prerequisites are installed, PHP and the PHP Manager should install successfully.
You can download the Web Platform Installer from here. After the WPI is installed, it will automatically launch. Close it for now.
Once you’ve installed all the prerequisites you can go ahead and install PHP using the Web Platform Installer.
- Click Start and type “Server Manager” and then hit enter. This should launch the Server Manager application.
- Select Tools → Internet Information Services (IIS) Manager.
- Select your server’s name from the navigation tree.
- Double click Web Platform Installer under Management.
- Enter “PHP” in the search field and select the version of PHP you’d like to install. I recommend the latest version of PHP 7.
- Select Install and accept the terms and conditions. PHP and PHP Manager for IIS should now download and install successfully.
Congratulations. You now have a working IIS Server running PHP meeting all requirements of a default PHP installation. Enjoy!
Troubleshooting
PHP Manager won’t install
I’ve had trouble getting PHP Manager to install on Windows Server 2019. I’ve had much better success with PHP Manager 2. It can be downloaded from here, https://github.com/phpmanager/phpmanager/releases.
PHP Isn’t Working
Create a PHP test file, C:\inetpub\wwwroot\test.php. The contents of the file should include the following:
<?php phpinfo(); ?>
Browse to http://localhost/test.php to see if PHP is loaded and working. If not, try running the script from the command prompt. For example:
"C:\Program Files (x86)\PHP\v5.6\php-cgi.exe" C:\inetpub\wwwroot\test.php
Review and research any errors. I hope this helps!