
Язык PHP
Много слышал про язык PHP, который, в частности, используется для динамического формирования HTML-страниц на веб-сервере в ответ на запросы пользователей. Скрипты на языке PHP пишутся прямо в теле HTML-страниц, а пользователь получает в ответ на свой запрос уже сформированную этими скриптами готовую HTML-страницу. (Сегодня это лишь одно из нескольких применений этого языка, но данный пост касается только способа применения при формировании HTML-страниц.)
Изначально аббревиатура PHP расшифровывалась как «Personal Home Page», так как язык использовался для создания личных интерактивных (для статических HTML-страничек PHP не требуется) HTML-страничек (язык родился в 1995 году). Но с годами применение языка сильно расширилось, поэтому сегодня эта аббревиатура расшифровывается как «PHP: Hypertext Preprocessor».
В интернетах часто пишут про «установку PHP», что может ввести в заблуждение, так как язык программирования — это лишь правила, которые не требуют никакой установки. Фраза про «установку PHP» должна пониматься как «установка интерпретатора PHP», то есть установка программы, которая может интерпретировать (истолковать) скрипт на языке PHP и исполнить его.
Локальный веб-сервер
Самого по себе интерпретатора PHP недостаточно, так как из вышеописанного должно быть понятно, что этот интерпретатор всегда работает в связке с другой программой — веб-сервером. Я устанавливаю PHP для работы локально (в рамках моего компьютера, без выхода в интернет), поэтому мой веб-сервер назовем локальным веб-сервером.
Очень часто при работе с языком PHP используют веб-сервер «Apache» или веб-сервер «Nginx». Мне не хотелось устанавливать на компьютер новые программы, когда в моей операционной системе «Windows 10» уже есть веб-сервер из набора IIS («Internet Information Services»). Набор серверов IIS является частью (компонентой) операционной системы «Windows 10».
В прошлом году я писал про этот веб-сервер пост «JavaScript: локальный веб-сервер из набора IIS». По умолчанию набор IIS в операционной системе отключен. В указанном посте я описывал, как его включить. Это делается довольно просто и быстро.
Схема работы
Насколько я понимаю, схема работы интерпретатора PHP в связке с веб-сервером выглядит примерно так:
1. Пользователь вводит в адресную строку браузера URL-адрес страницы сайта, написанной на языке PHP, например (обработите внимание на расширение .php страницы сайта):
http://localhost/hello.php
2. Браузер формирует HTTP-запрос и отправляет его на веб-сервер (в моем случае — на локальный веб-сервер, это видно по слову localhost в URL-адресе выше);
3. Веб-сервер (в моем случае — из набора IIS) по URL-адресу определяет, что для обработки такой страницы (с расширением .php) требуется интерпретатор PHP и отправляет текст указанной страницы на обработку интерпретатору PHP;
4. Интерпретатор PHP формирует из кода на языке PHP готовую HTML-страницу и передает ее веб-серверу;
5. Веб-сервер формирует HTTP-ответ с готовой HTML-страницей и отправляет этот ответ браузеру;
6. Браузер получает HTTP-ответ от веб-сервера и отображает полученную HTML-страницу в своем окне. Конец.
Получение интерпретатора PHP
Релизы программы-интерпретора PHP для операционных систем «Windows» можно загрузить со следующего адреса:
https://windows.php.net/download/
Я загрузил оттуда архив в формате ZIP (чуть меньше 30 МБ) с файлами интерпретатора версии 8.1.10 (от 30 августа, самая свежая на сегодня):
https://windows.php.net/downloads/releases/php-8.1.10-nts-Win32-vs16-x64.zip
Вообще, по указанной выше ссылке доступно несколько разных вариантов дистрибутива, в том числе два, помеченных аббревиатурами TS (Thread Safe) и NTS (Non Thread Safe). По этому поводу на вышеуказанной странице сказано на английском следующее:
IIS
If you are using PHP as FastCGI with IIS you should use the Non-Thread Safe (NTS) versions of PHP.
TS and NTS
TS refers to multithread capable builds. NTS refers to single thread only builds. Use case for TS binaries involves interaction with a multithreaded SAPI and PHP loaded as a module into a web server. For NTS binaries the widespread use case is interaction with a web server through the FastCGI protocol, utilizing no multithreading (but also for example CLI).
Я выбрал вариант NTS, но не скажу, что четко понимаю, что означают эти аббревиатуры.
Полученные файлы я распаковал из архива и поместил в папку внутри папки «Program Files». В принципе, не имеет значения, где именно размещать на компьютере полученные файлы интерпретатора PHP.
Связываем веб-сервер из набора IIS и интерпретатор PHP
(Все названия пунктов и программ операционной системы «Windows 10» в данном посте даны для варианта операционной системы с интерфейсом на русском языке. В варианте на английском языке эти названия, очевидно, будут на английском языке.)
Локальный веб-сервер из набора IIS у меня уже включен и работает (см. об этом уже упоминавшийся отдельный пост). Я создал небольшой пробный текстовый файл «hello.php» с кодом на языке HTML и с вкраплением скрипта на языке PHP и поместил в папку своего локального сайта, у меня это такая папка:
C:\inetpub\wwwroot\
Веб-сервер отображает ее в уже знакомый нам URL-адрес:
http://localhost/
Я набрал в браузере URL-адрес http://localhost/hello.php, но получил в ответ от веб-сервера страницу с ошибкой «404.3». Там было много текста, но, в частности, было сказано: «Если страница является сценарием, добавьте обработчик.». Это логично, ведь веб-сервер пока что не знает, как обрабатывать страницы с расширением «.php». Ему следует дать нужные указания.
Тут следует отметить, что взаимодействие веб-сервера и интерпретатора PHP будет происходить через так называемый интерфейс CGI (сейчас вместо первоначального CGI используется его более продвинутый потомок FastCGI). Но когда я включал веб-сервер из набора IIS, я просто нажал галку на установку соответствующей компоненты, а более подробных указаний не дал. При таком раскладе по умолчанию компонента с интерфейсом CGI (FastCGI) отключена (по умолчанию изначально веб-сервер из набора IIS работает только со статическими HTML-страницами). Так что компоненту с интерфейсом CGI (FastCGI) сначала следует включить.
Для этого, как и для первоначального включения набора IIS, откроем диалог «Компоненты Windows». Открываю через поиск «Панель управления», выбираю режим просмотра «Крупные значки», выбираю пункт «Программы и компоненты». В открывшемся окне в меню слева выбираю пункт «Включение или отключение компонентов Windows» — открывается искомый диалог:

Как видно на иллюстрации выше, в разделе «Службы IIS – Службы Интернета – Компоненты разработки приложений» включаем галку с названием «CGI». После этого следует нажать на кнопку «OK» внизу и подождать несколько минут, пока операционная система найдет нужные файлы и включит нужную компоненту.
Теперь наш локальный веб-сервер умеет связываться с другими программами по интерфейсу CGI (FastCGI). Осталось только указать ему, где находится интерпретатор PHP и для обработки каких страниц следует вызывать этот интерпретатор через интерфейс CGI (FastCGI).
Настройку веб-сервера из набора IIS можно производить, как просто редактируя соответствующие конфигурационные файлы, так и используя специальную программу-диспетчер. Я предпочитаю второй вариант. Эту программу можно открыть через поиск операционной системы, набрав название «Диспетчер служб IIS». В окне этой программы в меню «Подключения» слева следует в списке найти и выбрать свой сайт (у меня он определен один и название по умолчанию «Default Web Site» я не стал менять). После этого в меню в центре окна будут показаны пункты настройки для выбранного сайта:

Из меню в центре окна следует выбрать пункт «Сопоставления обработчиков». В меню в центре окна откроется список сопоставлений обработчиков. Из меню «Действия» справа следует выбрать пункт «Добавить сопоставление модуля…» и заполнить открывшийся диалог примерно следующим образом:

Диалог на иллюстрации выше несколько отличается от того, который открывается при первоначальном добавлении сопоставления (это я открыл диалог уже добавленного ранее сопоставления), но это не имеет большого значения: тут видно, какие примерно значения следует вписать в поля. Этим сопоставлением мы показываем веб-серверу, что страницы с расширением «.php» следует передать на обработку исполняемому файлу «php-cgi.exe» интерпретатора PHP (у интерпретатора, кстати, есть целый ряд исполняемых файлов, а именно этот указан в рекомендациях по установке) через интерфейс, реализуемый модулем «FastCgiModule» (этот модуль, кстати, был бы недоступен, если бы мы не включили ранее компоненту «CGI» операционной системы).
На этом установка интерпретатора PHP и все нужные настройки закончены.
Тестирование
Поместим в пробный файл «hello.php» следующий код на языке HTML с вкраплением скрипта на языке PHP (пробный код я взял из руководства для начинающих на сайте языка PHP и немного изменил, скрипт на языке PHP выделен синим цветом, после него в коде есть один символ пробела, чтобы в результатном HTML-файле остался символ новой строки в этом месте):
<html>
  <head>
    <title>Тест языка PHP</title>
  </head>
  <body>
    <?php echo '<p>Привет, мир!</p>'; ?>
  </body>
</html>
Вместо этого файла веб-сервер на URL-адрес http://localhost/hello.php возвращает браузеру следующий файл с кодом на языке HTML:
<html>
  <head>
    <title>Тест языка PHP</title>
  </head>
  <body>
    <p>Привет, мир!</p>
  </body>
</html>
Браузер отображает в своем окне фразу «Привет, мир!».
(Кстати, обычно для русского языка в заголовке HTML-страницы следует для кодировки UTF-8 указывать HTML-элемент <meta charset="utf-8">, чтобы русские буквы отобразились правильно. Но в данном случае я контролирую веб-сервер и поэтому настроил его так, чтобы веб-сервер возвращал правильные HTTP-заголовки с нужным указанием на кодировку HTML-страницы. Поэтому в примере выше указание <meta charset="utf-8"> не понадобилось.)
Еще один тест. Заменим содержимое файла «hello.php» на следующее:
<?php phpinfo(); ?>
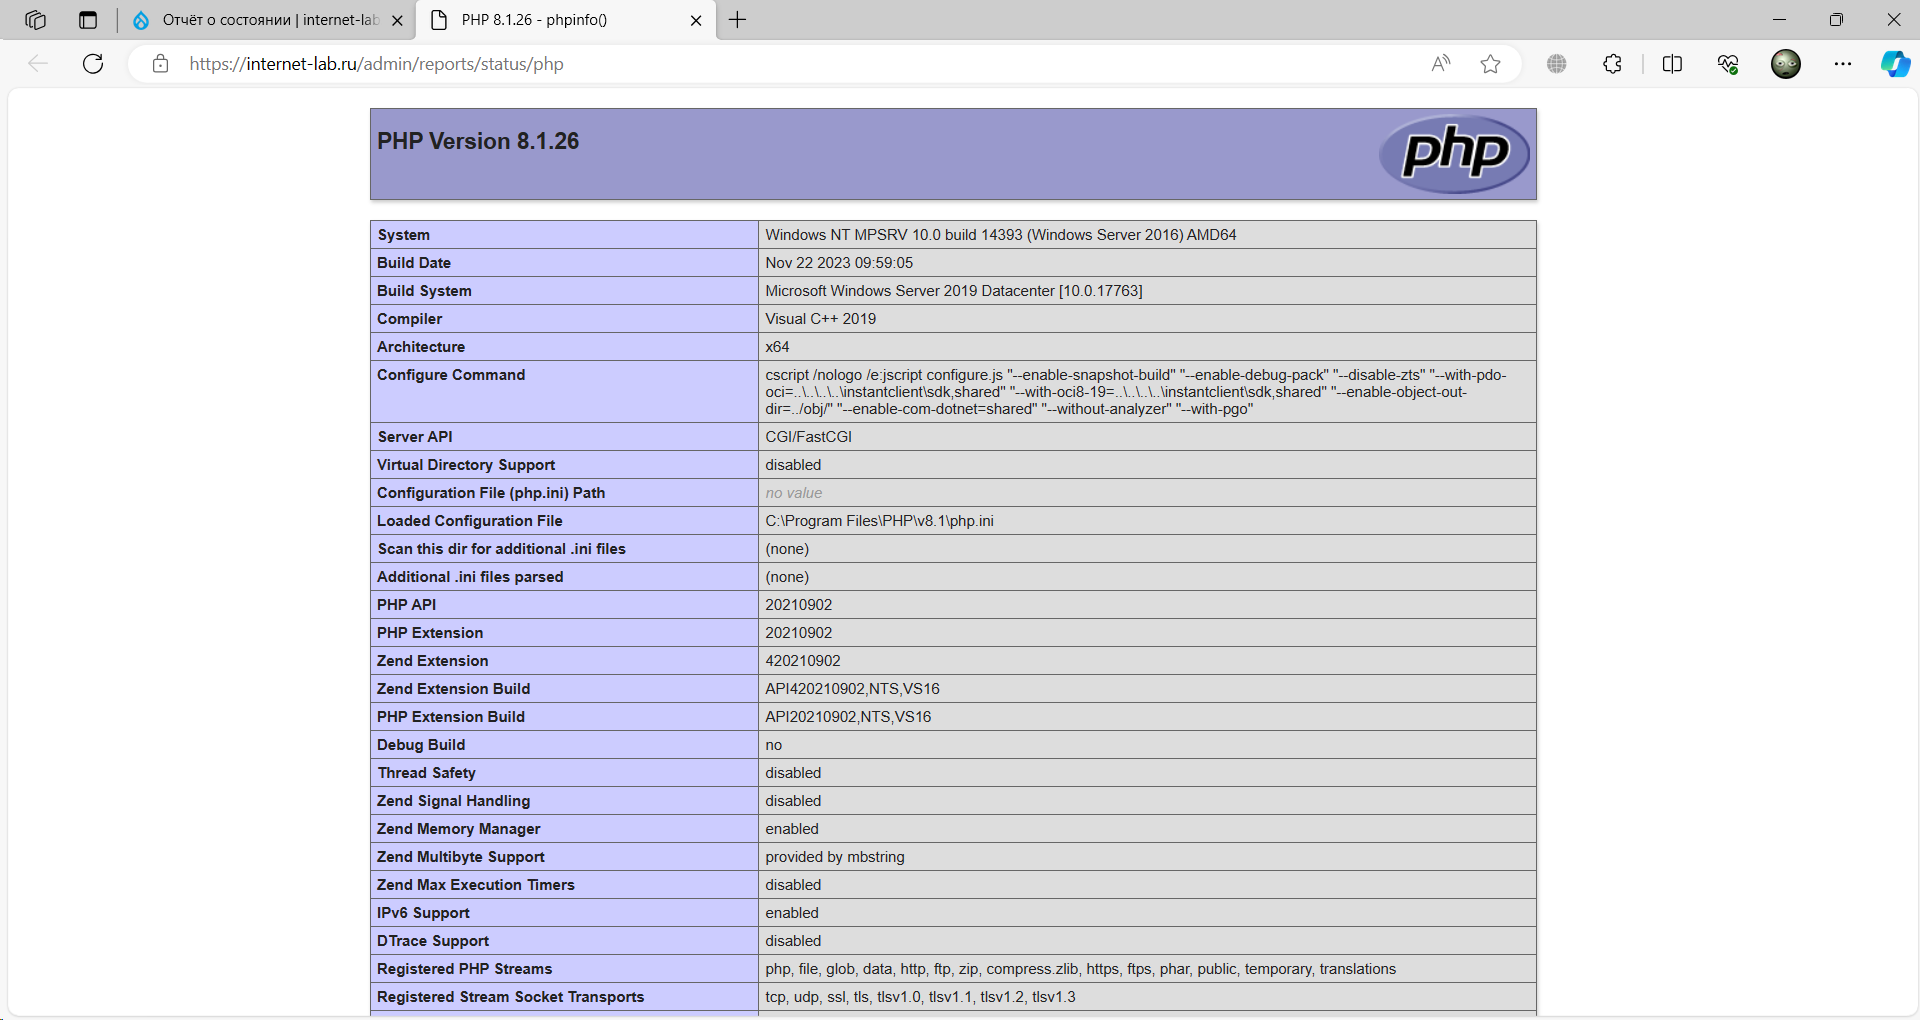
Функция phpinfo сформирует целую HTML-страницу с подробной информацией об используемом интерпретаторе PHP (номере его версии, настройках и так далее), затем веб-сервер вернет ее браузеру на ввод того же URL-адреса, что вводился для первого примера. У меня это получилось.
@echo off

REM download .ZIP file of PHP build from http://windows.php.net/downloads/

REM path to directory into which PHP .ZIP file was decompressed (no trailing \)
set phppath=c:\php


REM Clear current PHP handlers
%windir%\system32\inetsrv\appcmd clear config /section:system.webServer/fastCGI
REM The following command will generate an error message if PHP is not installed. This can be ignored.
%windir%\system32\inetsrv\appcmd set config /section:system.webServer/handlers /-[name='PHP_via_FastCGI']

REM Set up the PHP handler
%windir%\system32\inetsrv\appcmd set config /section:system.webServer/fastCGI /+[fullPath='%phppath%\php-cgi.exe']
%windir%\system32\inetsrv\appcmd set config /section:system.webServer/handlers /+[name='PHP_via_FastCGI',path='*.php',verb='*',modules='FastCgiModule',scriptProcessor='%phppath%\php-cgi.exe',resourceType='Unspecified']
%windir%\system32\inetsrv\appcmd set config /section:system.webServer/handlers /accessPolicy:Read,Script

REM Configure FastCGI Variables
%windir%\system32\inetsrv\appcmd set config -section:system.webServer/fastCgi /[fullPath='%phppath%\php-cgi.exe'].instanceMaxRequests:10000
%windir%\system32\inetsrv\appcmd.exe set config -section:system.webServer/fastCgi /+"[fullPath='%phppath%\php-cgi.exe'].environmentVariables.[name='PHP_FCGI_MAX_REQUESTS',value='10000']"
%windir%\system32\inetsrv\appcmd.exe set config -section:system.webServer/fastCgi /+"[fullPath='%phppath%\php-cgi.exe'].environmentVariables.[name='PHPRC',value='%phppath%\php.ini']"

Сегодня мы будем с вам устанавливать PHP 8.1 на Windows Server 2016 для web-сервера IIS 10.
Начиная с этой версии PHP установка сильно усложнилась. Microsoft Web Platform Installer (WebPI), которым раньше я пользовался для установки PHP больше не работает, так что устанавливать приходится вручную. Возня с дополнительными расширениями тоже приключение. Очень печально, что для Windows Server 2016 нет нормальных способов установки.
Дистрибутив PHP 8.1
https://www.php.net/downloads
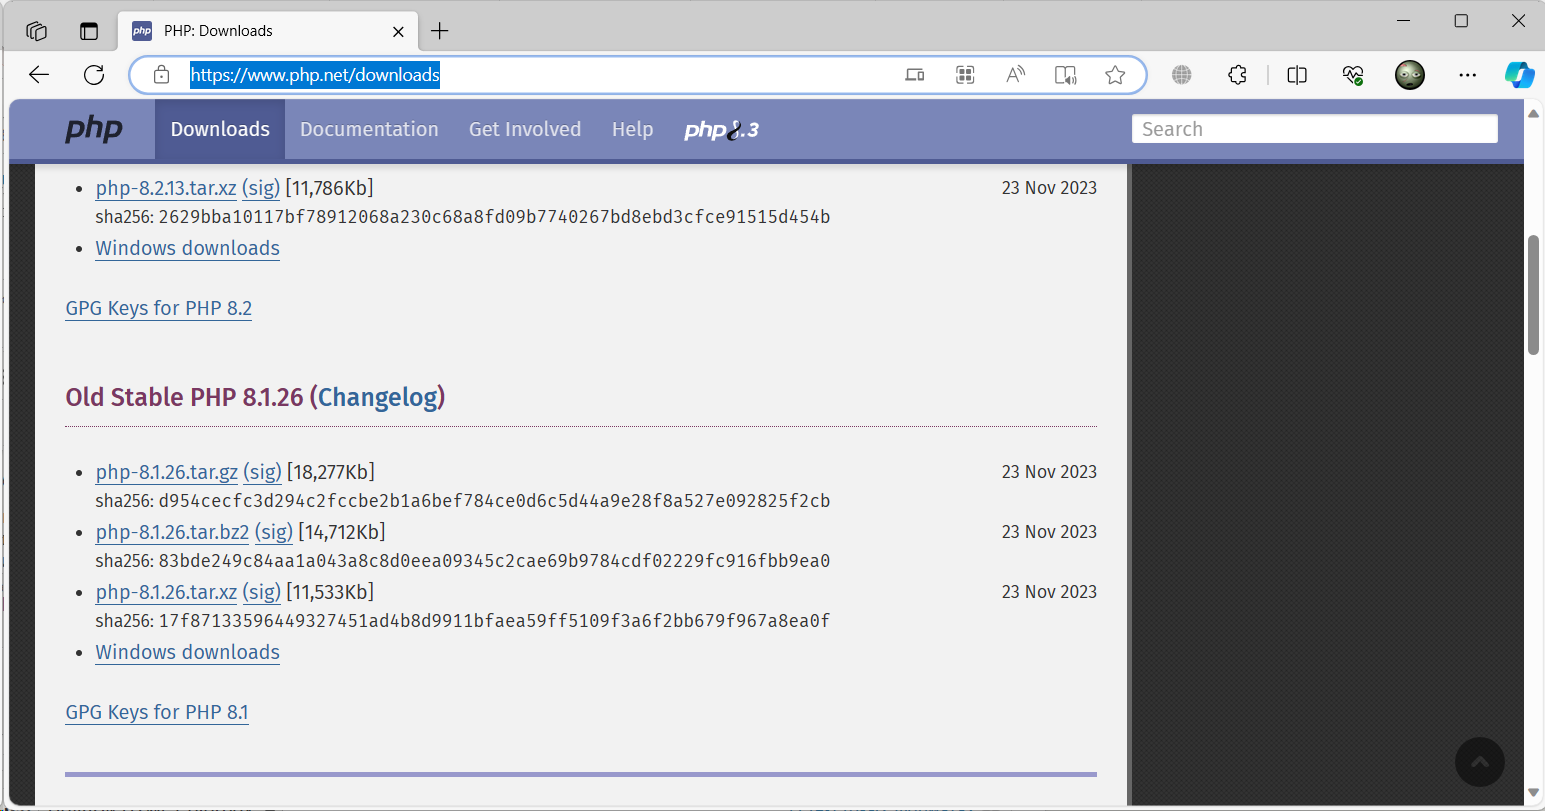
Переходим на официальный сайт PHP в раздел загрузок, находим PHP 8.1, и тыкаем в ссылку Windows downloads.
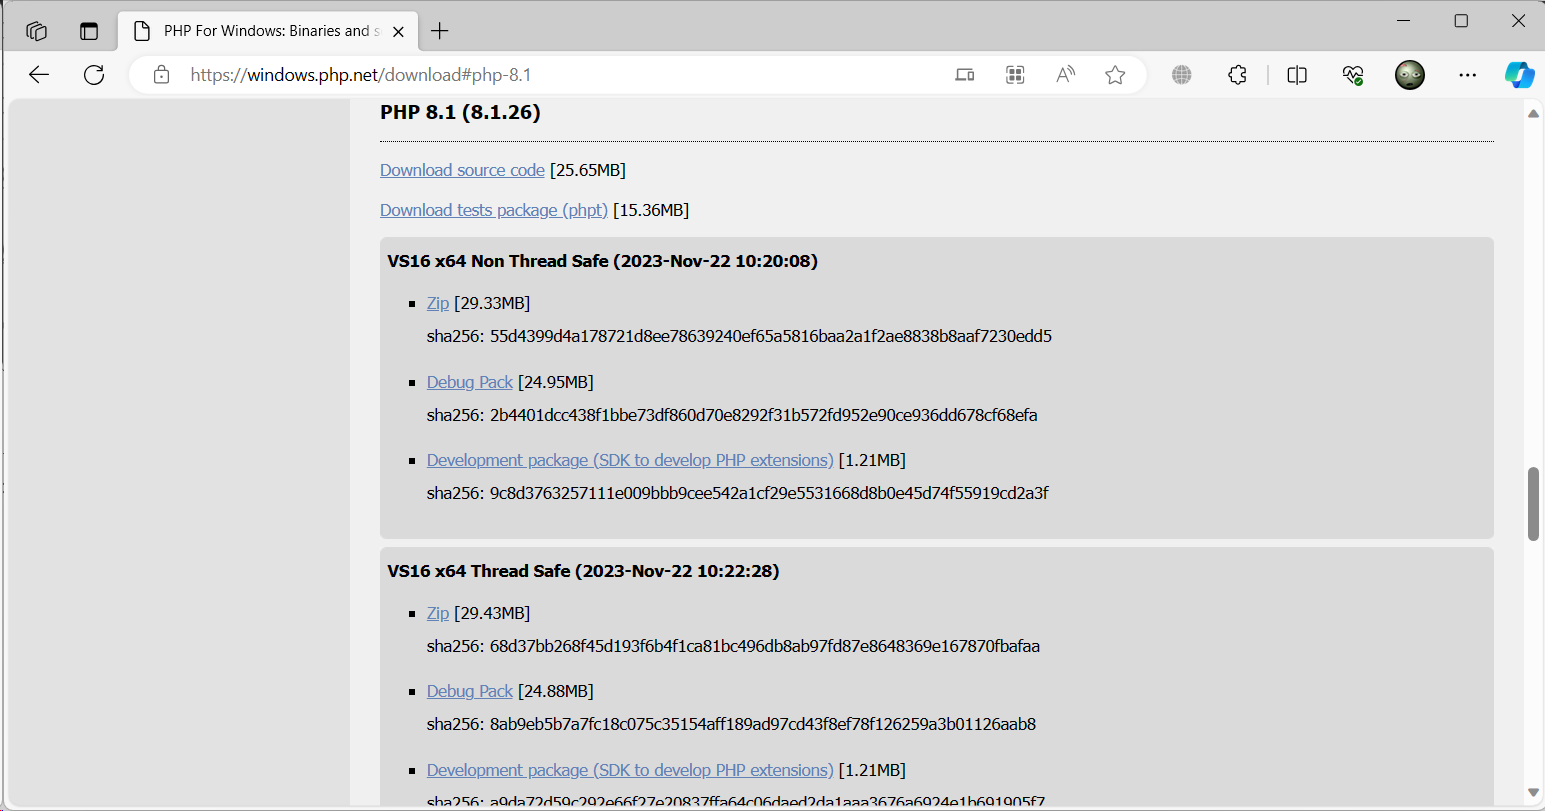
https://windows.php.net/download#php-8.1
Попадаем на windows.php.net, можно было и сразу сюда пойти.
Доступны две версии PHP:
- Non Thread Safe
- Thread Safe
По какой-то странной причине в большинстве инструкций показывают, что нужно ставить версию Thread Safe, это в корне неверно. Примечательно, что про «TS and NTS» на той же странице загрузок всё написано.
Версию нужно выбирать в зависимости от того, как вы интегрируете PHP c веб-сервером. Когда вы используете mod_php, у вас модуль и PHP всегда загружены в память и каждый запрос обрабатывается в отдельном потоке. Из-за этого mod_php работает быстрее, чем CGI. В данном случае нужно использовать потокобезопасную реализацию (thread-safe) поскольку каждый поток имеет доступ к памяти другого потока. Здесь мы мягко намекаем на Linux.
Когда вы работаете с IIS, здесь мы мягко намекаем на Windows, у вас PHP запускается в виде отдельного процесса посредством CGI. В таком случае потокобезопасность не имеет смысла, поскольку у вас один процесс и один поток созданный этим процессом. Операционная система изолирует память процессов по умолчанию, NTS в этом случае работает быстрее.
В случае модели с FastCGI, потокобезопасность также не имеет смысла, поскольку тот же PHP-FPM держит несколько отдельных процессов PHP в памяти, но не потоков. Тоже имейте в виду.
В нашем случае (Windows, IIS, CGI) нам нужна версия PHP NTS — Non Thread Safe. Скачиваем соответствующий ZIP архив, распаковываем.
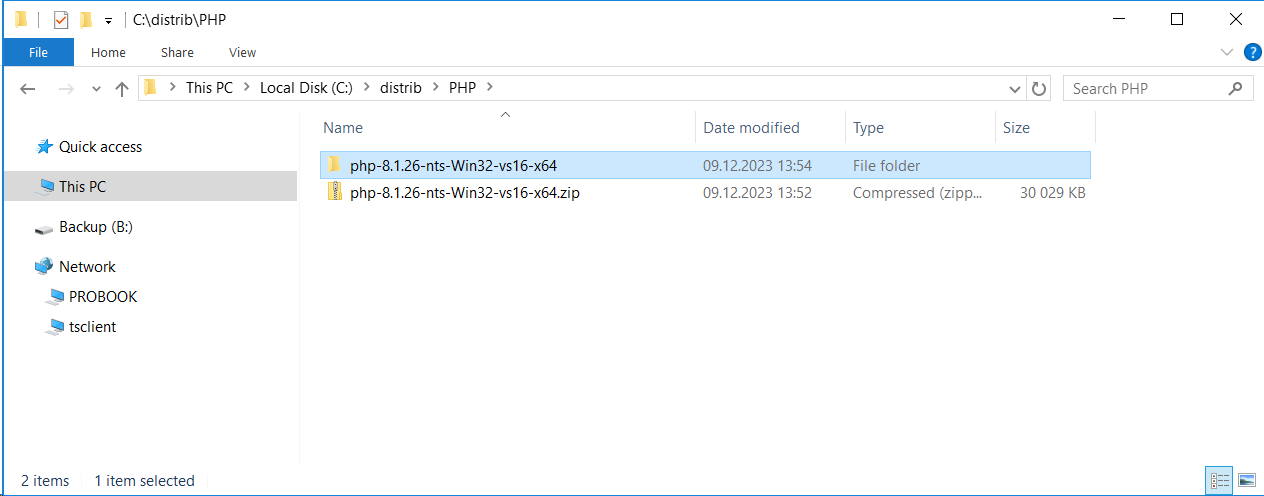
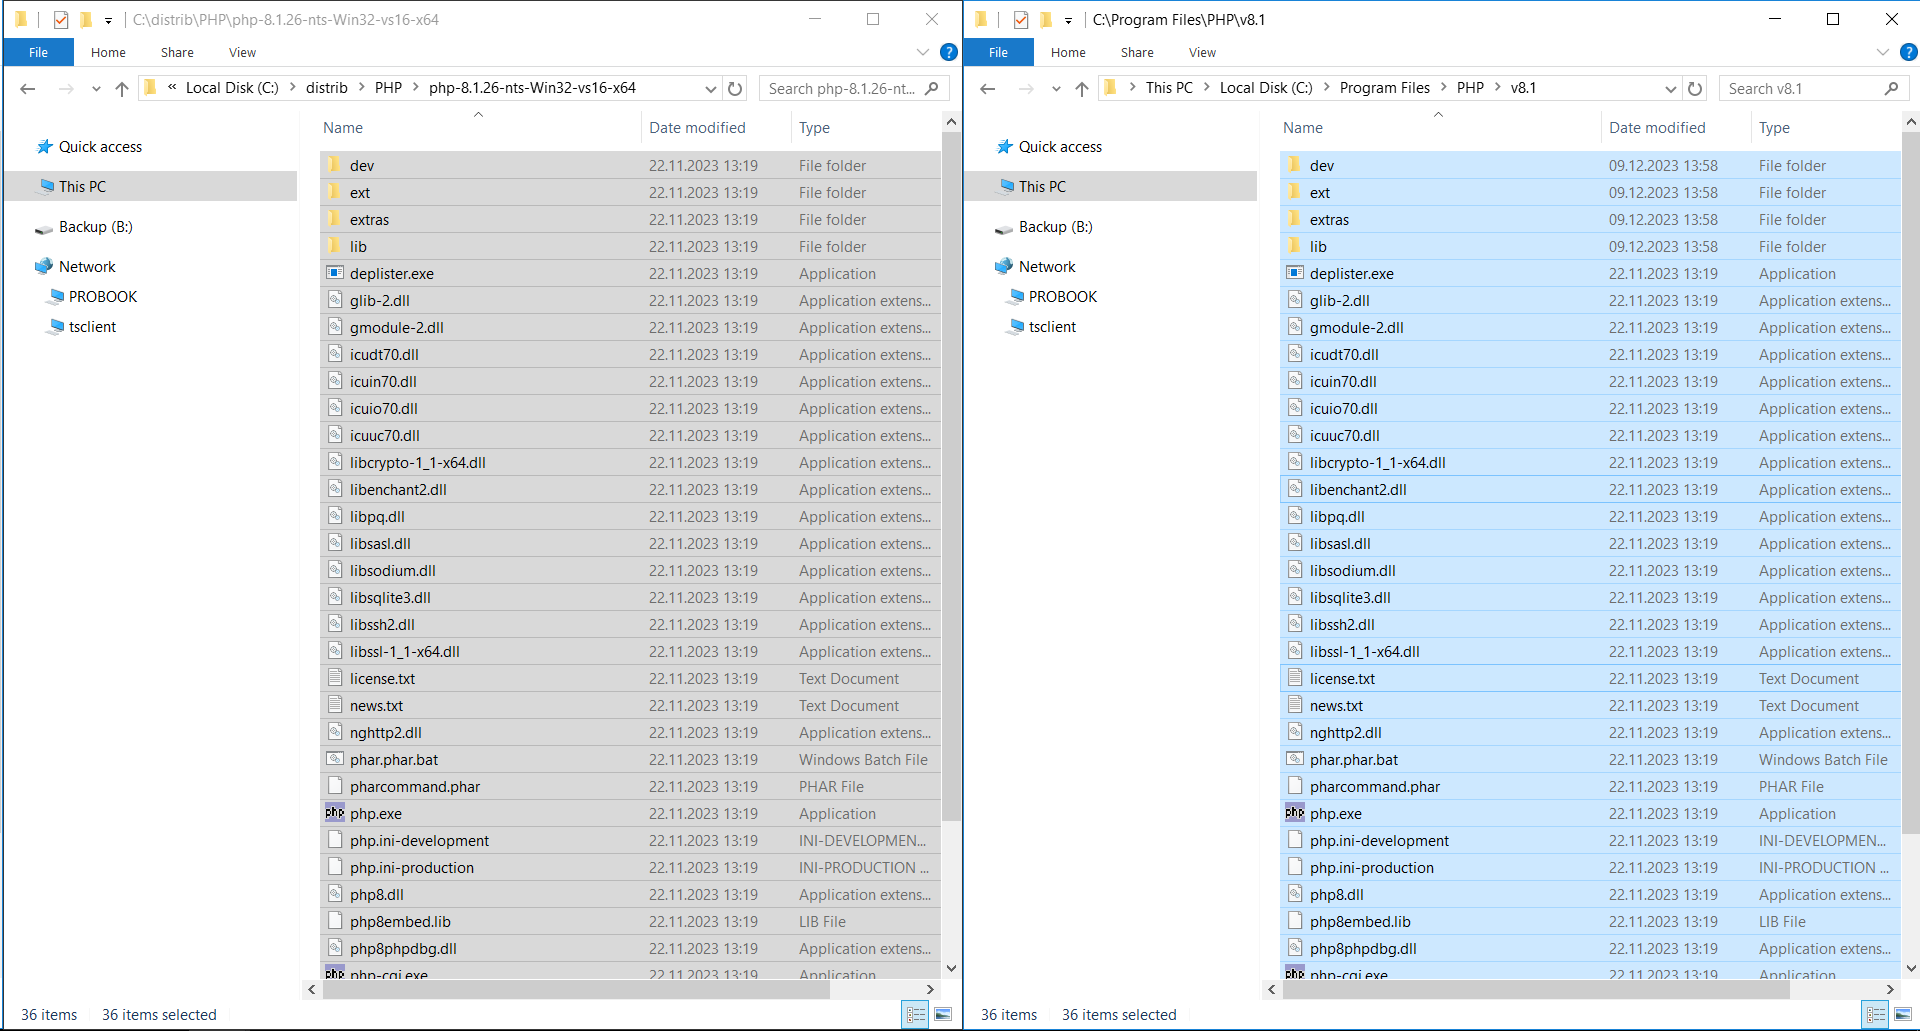
Создаём папку C:\Program Files\PHP\v8.1, копируем в неё содержимое архива.
Права доступа
В папке C:\Program Files\PHP выше уровнем у вас может находиться несколько версий PHP. На неё нужно дать права IIS. Удобнее вешать права на неё, чтобы они применялись ко всем версиям PHP через наследование.
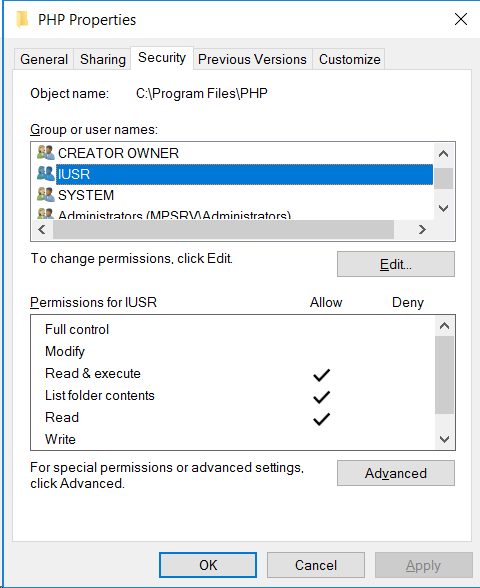
Не помню каким точно юзерам надо права, напишите уточнение в комментариях, кто знает, я даю двум юзерам IUSR и IIS_IUSRS права:
- чтение
- чтение и выполнение
- чтение списка содержимого директории
Серверные переменные
Настроим серверные переменные. Свойства компьютера или Control Panel → System and Security → System. Advanced System Settings.
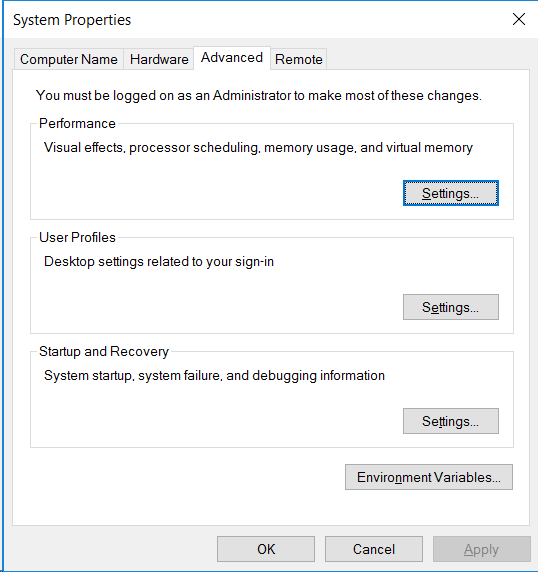
Вкладка Advanced, кнопка Environment Variables…
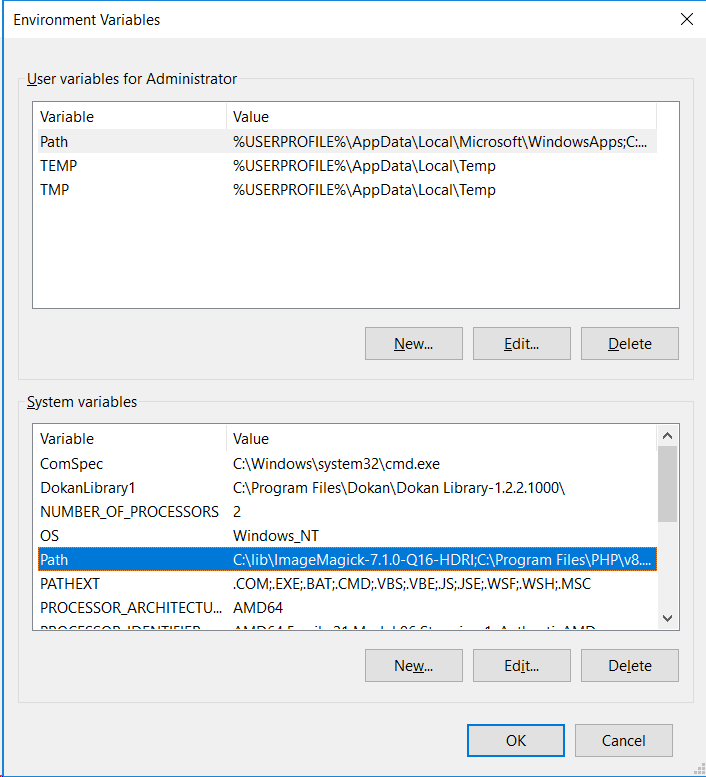
Блок System variables, находим переменную Path, выделяем её. Edit.
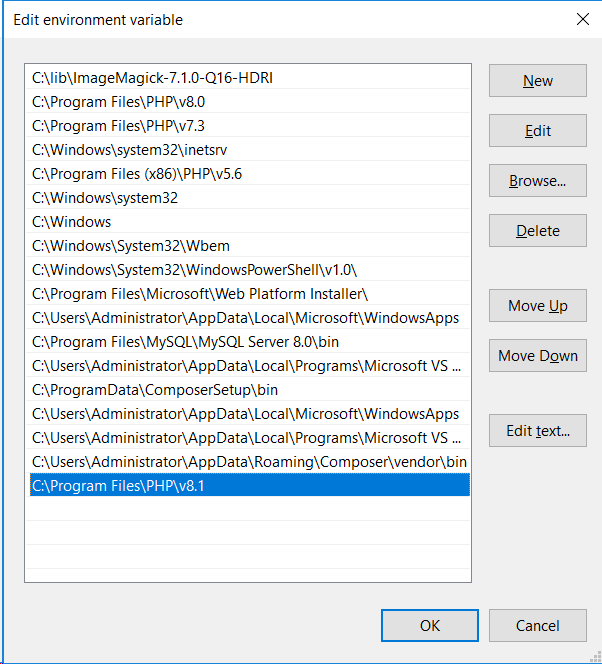
Добавляем новый путь:
C:\Program Files\PHP\v8.1
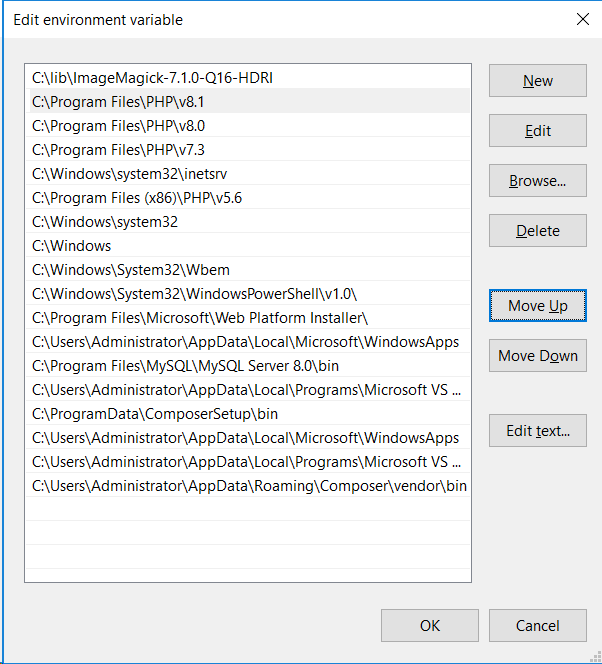
Кнопкой Move Up поднимаем его выше остальных версий PHP, если они у вас есть. OK, OK, OK.
В командной строке проверяем:
php --version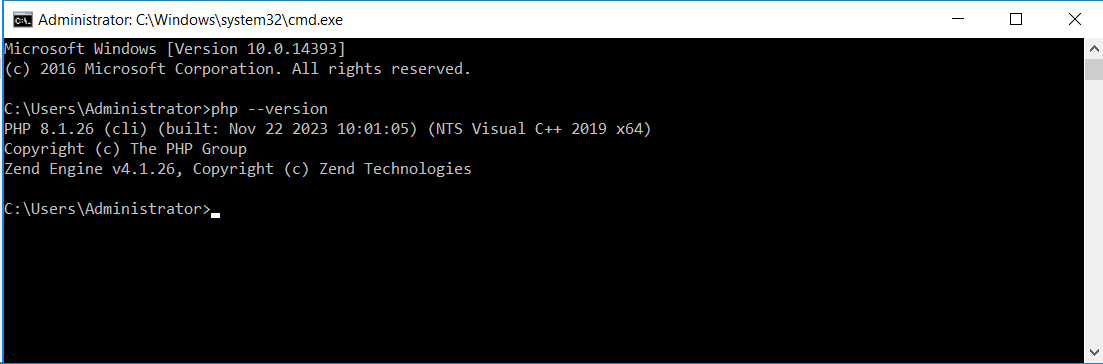
По умолчанию теперь используется PHP 8.1.26.
PHP и IIS
IIS и PHP можно подружить вручную, но мне лень. Использую для этих целей PHP Manager for IIS.
https://github.com/phpmanager/phpmanager/releases
Я уже ставил его ранее, приведу инструкцию для версии 2.4:
Запускаю инсталлятор.
Next.
Принимаем лицензионное соглашение, Next.
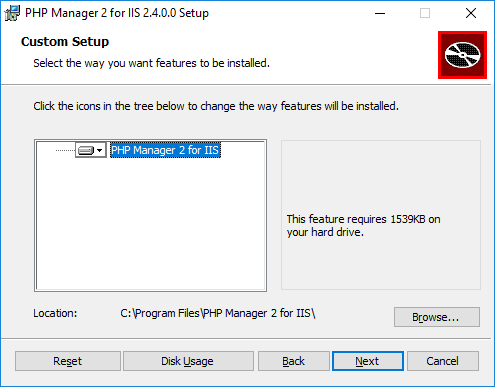
Next.
Install.
Ждём.
Finish.
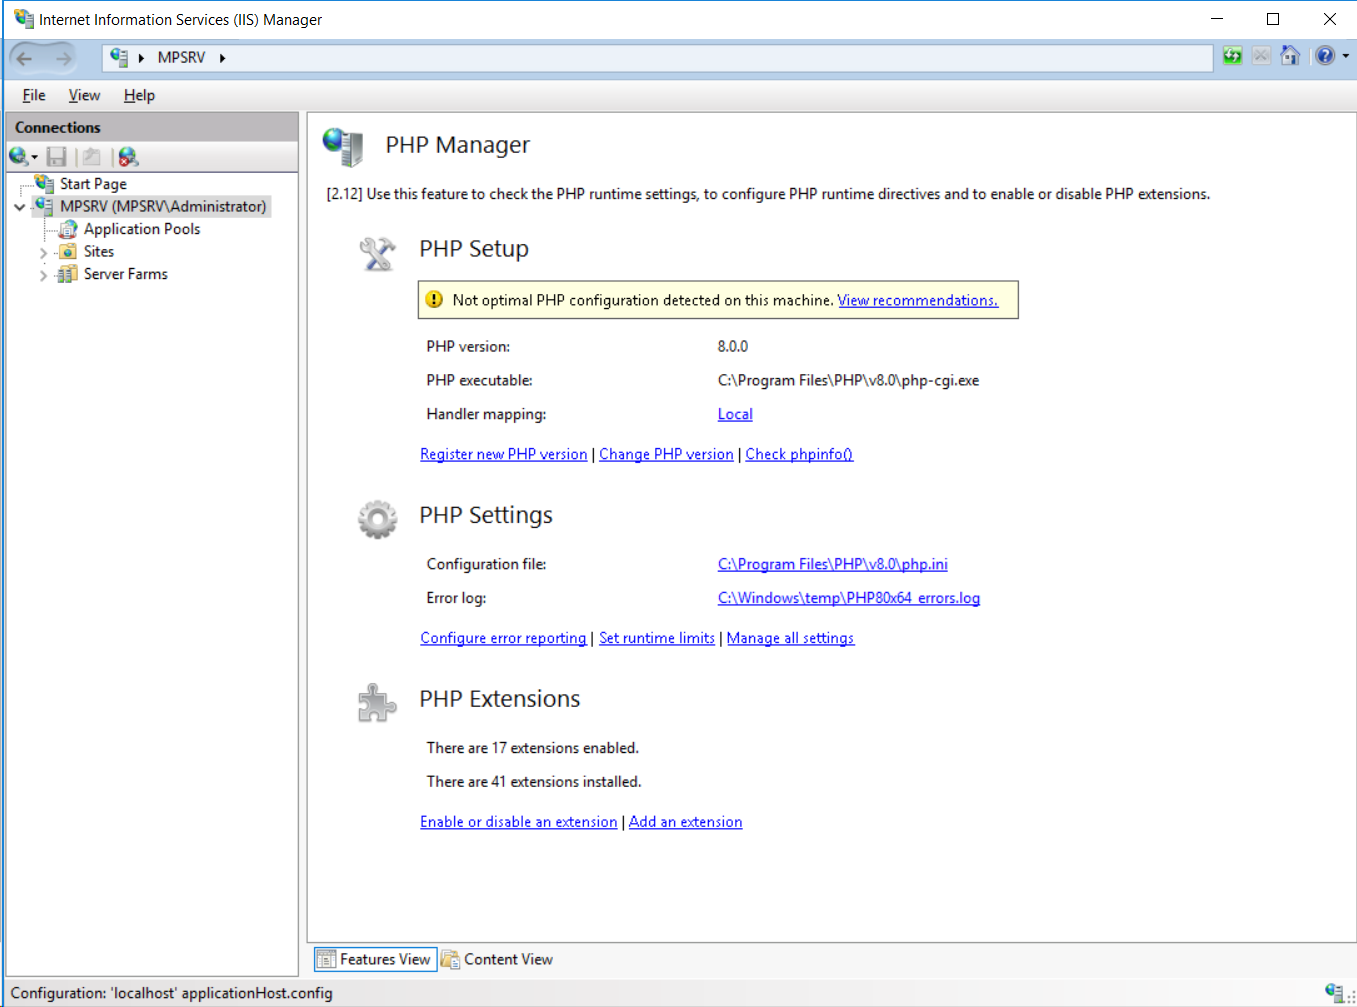
В IIS появляется новая оснастка под названием PHP Manager.
Для каждого сайта можно выбирать свою PHP версию, регистрировать новые, управлять расширениями и т.д.
Однако, если вы собираетесь обновить версию PHP Manager for IIS, то сначала удаляйте старую, потом устанавливайте новую. Я обновил до версии 2.12.
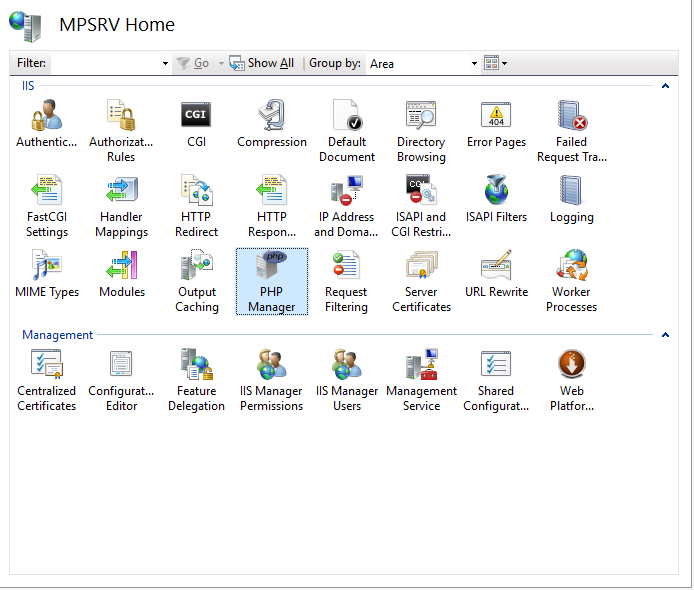
Выбираем в IIS сайт или сам сервер, запускаем оснастку PHP Manager.
Зарегистрируем новую версию PHP. Register new PHP version.
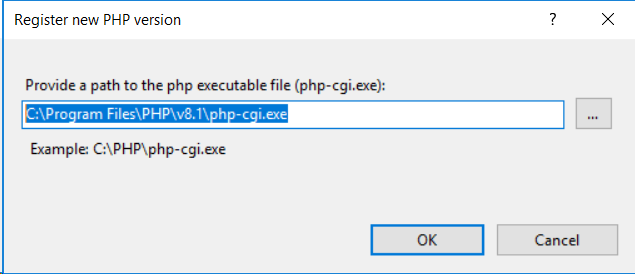
Указываем путь к php-cgi.exe.
C:\Program Files\PHP\v8.1\php-cgi.exe
OK.
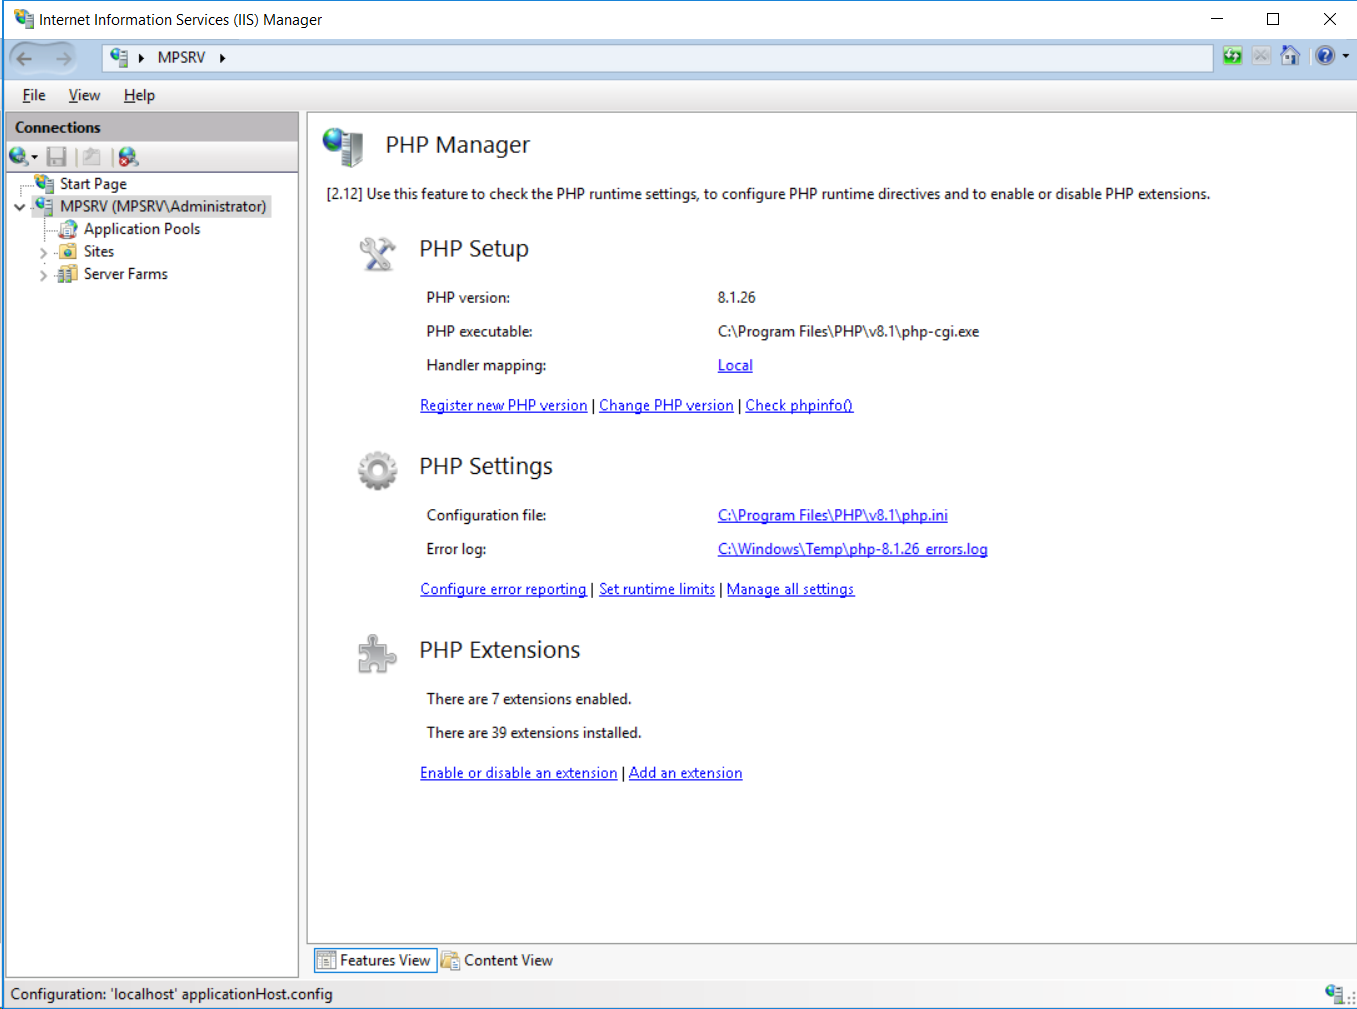
Путь к файлу php.ini и логу ошибок подставляется автоматически.
php.ini
Теперь нужно настроить php.ini я уже не помню что раньше настраивал для прежней версии PHP, поэтому воспользуюсь сравнением файлов с помощью Total Commander.
Сравнить файлы с помощью Total Commander
Расширения можно искать здесь:
http://pecl.php.net/
I’ve always liked PHP for creating dynamic Web pages. I find PHP to be much simpler than ASP.NET for some kinds of Web sites.
However, installing PHP on a Windows machine has always been kind of a pain in the patooty. It is possible install PHP using the Microsoft Web Platform Installer, but I prefer to manually install PHP because if something goes wrong using the Web Installer, it’s very, very difficult to fix, but errors in a manual install are easier to track down.
There are five basic steps to install PHP on a Windows 10 machine:
1. Enable (if necessary) IIS on the machine, and IIS-CGI on the machine.
2. Download and extract PHP to C:\PHP
3. Configure the php.ini configuration file
4. Configure IIS to handle PHP page requests
5. Test everything
So, here we go. My instructions are highly abbreviated and are intended for someone who has a medium amount of familiarity with Windows and IIS.
1. Configure IIS
Control Panel | Programs | Turn Windows features on or off
Check Internet Information Services
Check IIS | World Wide Web Services | Application Development Features | CGI
OK
2. Install the NTS (non-thread safe) 64-bit version of PHP
Download and save onto the machine:
http://windows.php.net/downloads/releases/php-7.x.x-nts-Win32-VC14-x64.zip
Extract all the contents of the zip file to C:\PHP
Now edit the System PATH variable so IIS knows where the PHP executables are:
Control Panel | System and Security | System | Advanced System Settings
Environment Variables
System Variables | Path | Edit
New -> C:\PHP
3. Configure the php.ini file. This is the part you’d never figure out without some help.
Make a copy of file C:\PHP\php.ini-development and save it as C:\PHP\php.ini
Edit file php.ini by finding the following entries, uncomment them, and change values to:
1. fastcgi.impersonate = 1
2. cgi.fix_pathinfo = 0
3. cgi.force_redirect = 0
4. open_basedir = “C:\inetpub\wwwroot”
5. extension_dir = “ext”
6. error_log=”php_errors.log”
7. uncomment the 24 Windows Extensions entries:
extension=php_bz2.dll
extension=php_curl.dll
extension=php_fileinfo.dll
extension=php_ftp.dll
extension=php_gd2.dll
extension=php_gettext.dll
extension=php_gmp.dll
extension=php_intl.dll
extension=php_imap.dll
extension=php_interbase.dll
extension=php_ldap.dll
extension=php_mbstring.dll
extension=php_exif.dll
extension=php_mysqli.dll
extension=php_oci8_12c.dll
extension=php_openssl.dll
extension=php_pdo_firebird.dll
extension=php_pdo_mysql.dll
extension=php_pdo_oci.dll
extension=php_pdo_odbc.dll
extension=php_pdo_pgsql.dll
extension=php_pdo_sqlite.dll
extension=php_pgsql.dll
extension=php_shmop.dll
Save the edited php.ini file.
4. Configure IIS to work with PHP
Run | inetmgr
Handler Mappings | Add Module Mapping
Request path: *.php
Module: FastCgiModule (from the dropdown)
Executable (optional): C:\PHP\php-cgi.exe
Name: FastCGI
OK (Yes)
5. Test the installation and configuration
Launch Notepad with Administrative privleges. Create a file test.php and save it at C:\inetpub\wwwroot. The contents are (I use an image because my blog software would choke on HTML text):
Now launch a browser and navigate to
http://localhost/test.php
And hopefully it works. There’s a LOT that can go wrong, but by Googling one error at a time you should eventually be able to get a Windows 10 machine with IIS to serve up PHP Web pages.
Do you want to set up PHP on IIS in Widows to run PHP applications and websites? You’re in the right place. In this tutorial, I will guide you step-by-step on how to install IIS in Windows, Download PHP, Configure PHP.ini, Configure the environment variables, Configure IIS for PHP, Test the PHP version, and Run a PHP file on IIS.
IIS (Internet Information Server) is one of the most powerful web servers from Microsoft that is used to host your Web applications. It provides localhost environment primarily to run (host) dynamic websites & web applications powered by ASP.NET & PHP.
PHP (Hypertext Preprocessor) is one of the most popular and widely used open-source server scripting languages used for creating dynamic websites and applications.
Following topics will be covered in this post:
- How to Install IIS on Windows
- How to Download & Extract PHP
- How to Configure PHP.ini File
- How to Configure the Environment Variables for PHP
- How to Configure IIS for PHP
- How to Test the PHP Version
- How to Run a PHP File on IIS
RELATED
- How to Download & Install WampServer on Windows
- How to Buy Domain & Hosting – Step by Step
- How to Install WordPress on XAMPP | Beginner’s Guide
01. How to Install IIS on Windows
In this section, I will guide you step-by-step on how to install IIS on Windows.
- Go to Windows Search Bar, located at your bottom-left corner.
- Type Control Panel.
- Click on the Control Panel from the search results.

- Click on the Programs and Features.

- Click on the Turn Windows features on or off link, located at your left side.

- Expand the Internet Information Services.
- Expand the World Wide Web Services.
- Expand the Application Development Features.
- Tick on the CGI.
- Click on the OK button.

- Wait for the changes to be applied.

- Once the changes are applied successfully you can see the message, “Windows completed the requested changes“.

02. How to Download & Extract PHP
In this section, I will guide you on how to download & extract the PHP.
- Go to PHP Official Website.
- Below the Binaries and sources Releases you can see the latest version of PHP. The PHP should be 64 bit version and Non Thread Safe, because it is recommended for IIS.
- Click on the Zip link, located below the VS16 x64 Non Thread Safe to download the PHP.

- Copy the Zip file to your C:\ Drive.
- Right-click on the Zip file and click on the Extract to php-version...

- Rename the extracted folder to PHP.

03. How to Configure PHP.ini File
In this section, I will guide you step-by-step on how to configure the PHP.ini file for IIS.
A PHP.ini is a simple text file that allows you to adjust PHP settings. It is the default configuration file for running the PHP-based applications.
- Open the PHP folder that you had extracted to C:\ Drive.
- Copy the php.ini-production file & Paste in the same folder(place).

- Rename the copied file to php.ini.

- Right click on the php.ini file.
- Go to Open With.
- Click on the Notepad.

- This is how your PHP.ini file looks like. The “;” is a comment symbol. The lines followed by “;” are not executed.
- Now you have to do two things (1) Make changes to lines listed below (2) Remove the “;” symbol from lines, listed below.

- Press Ctrl + F5 to open the Search Box.
- Find the below lines in your php.ini. Remove the “;” symbol and make the changes, which I have made.
- Save the changes.
Find extension_dir = "./"   Replace with  extension_dir = "C:PHPext"
Find fastcgi.impersonate=0  Replace with  fastcgi.impersonate=1
Find cgi.fix_pathinfo=0     Replace with  cgi.fix_pathinfo=0
Find cgi.force_redirect=1   Replace with  cgi.force_redirect=0
Find error_log = php_errors.log and remove ";"- Find the below lines in the php.ini file and remove only “;” from their beginning.
- Save the changes.
extension=curl
extension=gd
extension=mbstring
extension=mysqli
extension=pdo_mysql
04. How to Configure the Environment Variables for PHP
In this section, I will guide you step-by-step on how to configure the Environment Variables for PHP in Windows.
- Open the Control Panel.
- From View by: choose Category.
- Click on the System and Security.

- Click on the System.

- Click on the Advanced system settings link, located under the Related settings.

- Click on the Environmental Variables… button.

- Under the System variables, select Path & click on the Edit… button.

- Click on the New button.

- Type C:\PHP.
- Click on the OK button.

05. How to Configure IIS for PHP
In this section, I will guide you step-by-step on how to configure IIS for PHP in Windows.
- Type Run in the Windows Search Bar.
- Click on the Run from the search results.

- Type inetmgr in the Open: field.
- Click on the OK button or press Enter.

- Click on the Handler Mappings.

- Click on the Add Module Mapping.. link located under the Actions.

- In Request path: type *.php.
- In Module: select FastCgiModule from the dropdown list.
- In Executable (optional), type C:\PHP\php-cgi.exe. You can also add this .exe file using the Browse (…) button.
- In the Name type a name like FastCGI.
- Click on the OK button.

- It will prompt your permission to create a module mapping application for this executable. Click on the Yes button.

- You can see that the Module Mapping is created and enabled.

06. How to Test the PHP Version
In this section, I will guide you on how to test the PHP version in Windows to know whether it is fully-functional or not.
- On Windows Search Bar type CMD.
- Right click on CMD and select Run as administrator.

- Type php -version.
- Press the Enter button.

- You can see that it is showing the information about PHP version and Visual C++ Redistributable package’s version which is NTS Visual C++ 2019 x64.

If Visual C++ Redistributable Package is not installed on your computer, you may receive the error, “The code execution cannot proceed because VCRUNTIME140.dll was not found. Reinstalling the program may fix this problem“.
You can download Visual C++ Redistributable Packages from Microsoft.
07. How to Run a PHP File on IIS
Everything required to run PHP on IIS in Windows is set up, now it is time to run a PHP file.
- Right-click on the Notepad.
- Click on the Run as administrator.

- Copy and Paste this code in your Notepad file.
<html>
<head>
<title>PHP Test</title>
</head>
<body>
<?php echo "<h2>Thanks Meer's World for helping me to set up PHP on IIS </h2>"; ?>
</body>
</html>
- Go to File and click Save As…

- Browse the wwwroot directory on C:\ Drive. This is the complete path: C:\inetpub\wwwroot.
- Info: The inetpub is the default folder for IIS. It is the folder that contains website content and web apps. The wwwroot is the root directory of IIS. IIS executes the projects, apps, and websites deployed (placed) in the wwwroot.
- In the Filename type test.php.
- In Save as type select All Files (*.*).
- Click on the Save button.

- You can see that the test.php is saved to wwwroot directory.

- Open your browser and type http://localhost/folder or file name. For test.php file, I will type this: http://localhost/test.php.
- You can see that the test.php is run without any error. It means that I have successfully set up PHP on IIS in Windows.

If you like this post, don’t forget to share with other people. Share your feedback in the comments section below.
Also Read
- How To Install & Configure XAMPP On Windows 10 – Step By Step | For Beginners
- How To Change The XAMPP Server Port In Windows 10 | XAMPP Apache Server Port | Fix Apache Port Error
- How To Install MAMP On Windows 10 Step By Step | How To Change The MAMP Server Ports
- How To Install WordPress On MAMP Server In Windows 10 – Step By Step | Install WordPress On Localhost
Meer Basit
Meer Basit is the founder of Meer’s World. He’s been running the show since launching the blog back in 2018. By background he is a computer scientist. Primarily, he creates content around blogging (WordPress, Blogger, Tumblr), SEO, affiliate programs, earn-online, & eCommerce. In general, he likes traveling, gardening, watching movies, is a passionate cricketer, creative writer, and a GSD lover.