
В современных версиях Windows уже есть встроенный SSH сервер на базе пакета OpenSSH. В этой статье мы покажем, как установить и настроить OpenSSH сервер в Windows 10/11 и Windows Server 2022/2019 и подключиться к нему удаленно по защищенному SSH протоколу (как к Linux).
Содержание:
- Установка сервера OpenSSH в Windows
- Настройка SSH сервера в Windows
- Sshd_config: Конфигурационный файл сервера OpenSSH
- Подключение по SSH к Windows компьютеру
- Логи SSH подключений в Windows
Установка сервера OpenSSH в Windows
Пакет OpenSSH Server включен в современные версии Windows 10 (начиная с 1803), Windows 11 и Windows Server 2022/2019 в виде Feature on Demand (FoD). Для установки сервера OpenSSH достаточно выполнить PowerShell команду:
Get-WindowsCapability -Online | Where-Object Name -like ‘OpenSSH.Server*’ | Add-WindowsCapability –Online
Или при помощи команды DISM:
dism /Online /Add-Capability /CapabilityName:OpenSSH.Server~~~~0.0.1.0
Если ваш компьютер подключен к интернету, пакет OpenSSH.Server будет скачан и установлен в Windows.
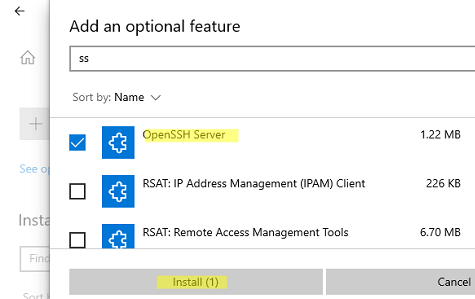
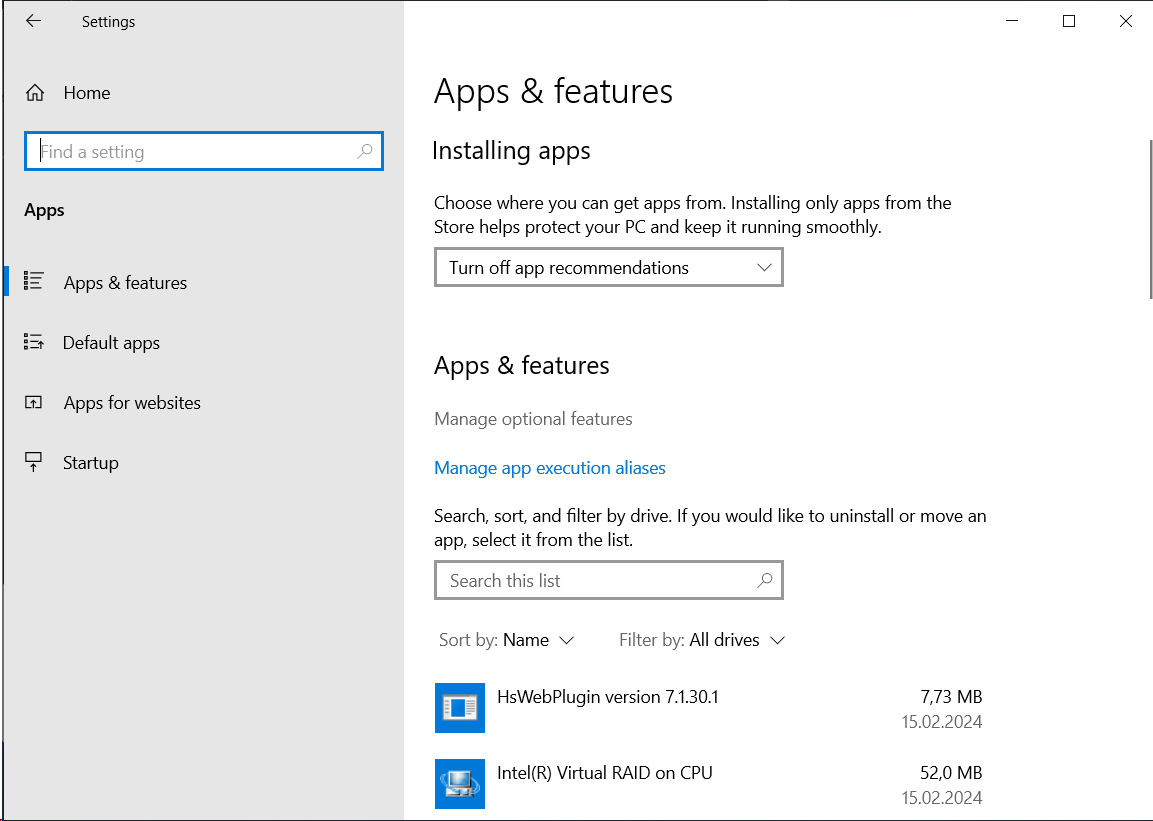
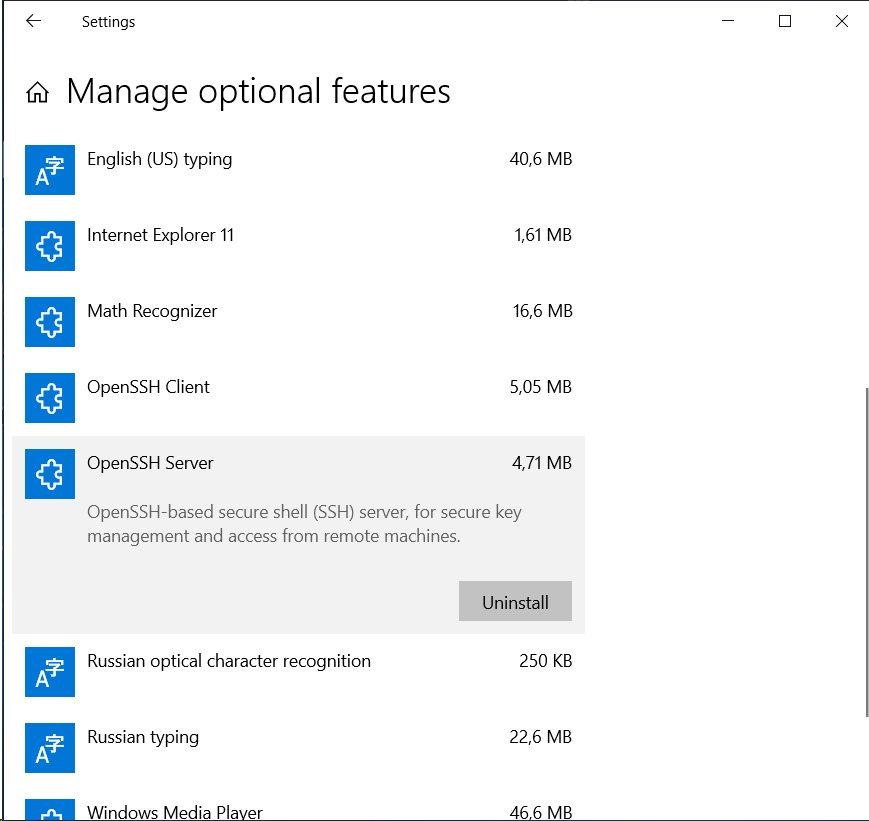
Также вы можете установить сервер OpenSSH в Windows через современную панель Параметры (Settings -> Apps and features -> Optional features -> Add a feature, Приложения -> Управление дополнительными компонентами -> Добавить компонент. Найдите в списке OpenSSH Server и нажмите кнопку Install).
На изолированных от интернета компьютерах вы можете установить компонент с ISO образа Features On Demand (доступен в личном кабинете на сайте Microsoft: MSDN или my.visualstudio.com). Скачайте диск, извлеките его содержимое в папку c:\FOD (достаточно распаковать извлечь файл
OpenSSH-Server-Package~31bf3856ad364e35~amd64~~.cab
), выполните установку из локального репозитория:
Add-WindowsCapability -Name OpenSSH.Server~~~~0.0.1.0 -Online -Source c:\FOD
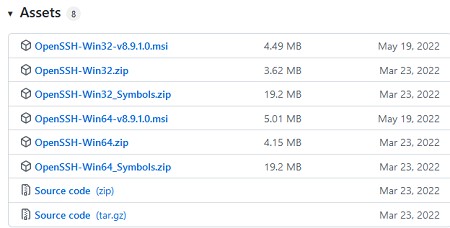
Также доступен MSI установщик OpenSSH для Windows в официальном репозитории Microsoft на GitHub (https://github.com/PowerShell/Win32-OpenSSH/releases/). Например, для Windows 10 x64 нужно скачать и установить пакет OpenSSH-Win64-v8.9.1.0.msi. Следующая PowerShell команда скачает MSI файл и установит клиент и сервер OpenSSH:
Invoke-WebRequest https://github.com/PowerShell/Win32-OpenSSH/releases/download/v8.9.1.0p1-Beta/OpenSSH-Win64-v8.9.1.0.msi -OutFile $HOME\Downloads\OpenSSH-Win64-v8.9.1.0.msi -UseBasicParsing
msiexec /i c:\users\root\downloads\OpenSSH-Win64-v8.9.1.0.msi
Также вы можете вручную установить OpenSSH сервер в предыдущих версиях Windows (Windows 8.1, Windows Server 2016/2012R2). Пример установки Win32-OpenSSH есть в статье “Настройка SFTP сервера (SSH FTP) в Windows”.
Чтобы проверить, что OpenSSH сервер установлен, выполните:
Get-WindowsCapability -Online | ? Name -like 'OpenSSH.Ser*'
State : Installed

Настройка SSH сервера в Windows
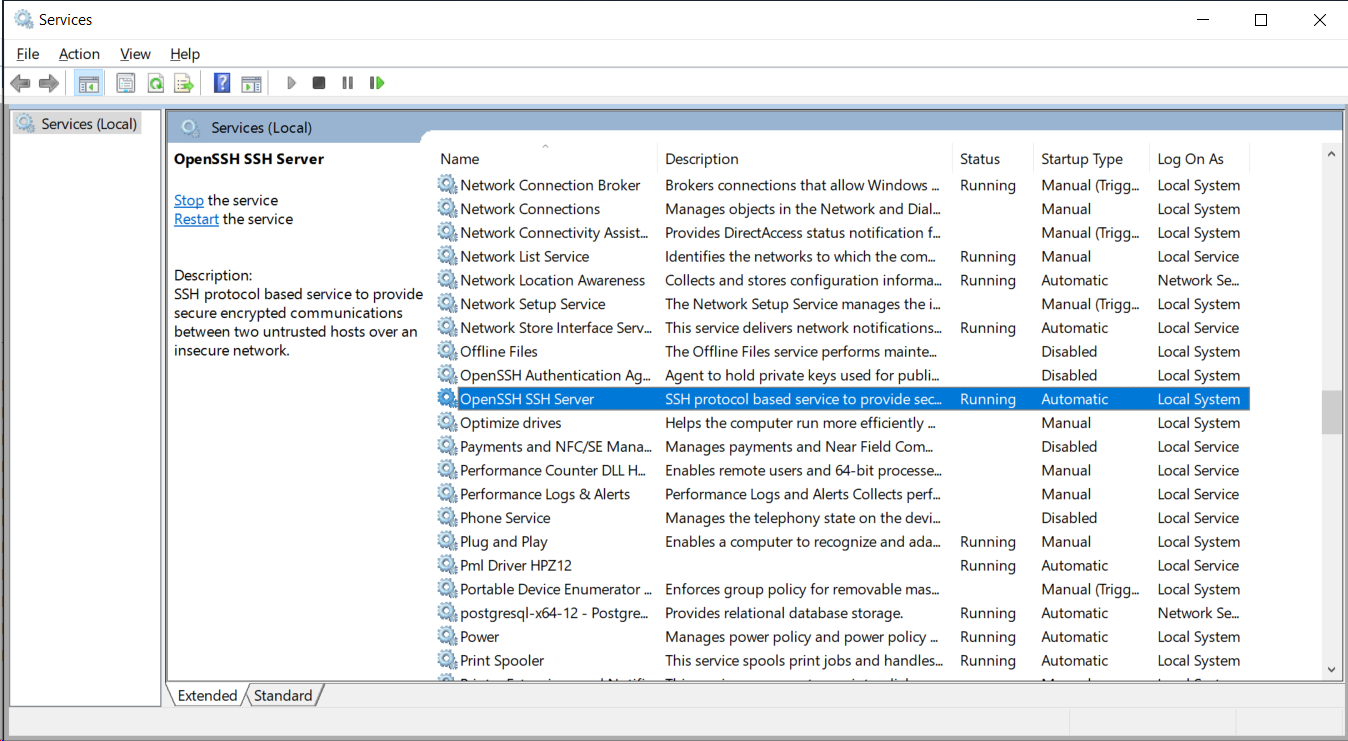
После установки сервера OpenSSH в Windows добавляются две службы:
- ssh-agent (OpenSSH Authentication Agent) – можно использовать для управления закрытыми ключами если вы настроили SSH аутентификацию по ключам;
- sshd (OpenSSH SSH Server) – собственно сам SSH сервер.
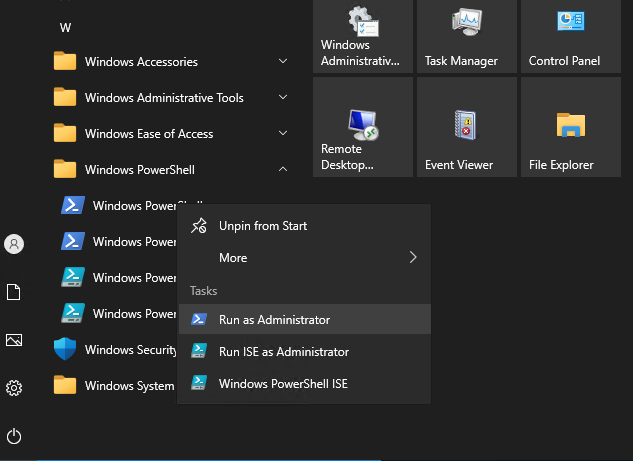
Вам нужно изменить тип запуска службы sshd на автоматический и запустить службу с помощью PowerShell:
Set-Service -Name sshd -StartupType 'Automatic'
Start-Service sshd

С помощью nestat убедитесь, что теперь в системе запущен SSH сервер и ждет подключений на порту TCP:22 :
netstat -na| find ":22"

Проверьте, что включено правило брандмауэра (Windows Defender Firewall), разрешающее входящие подключения к Windows по порту TCP/22.
Get-NetFirewallRule -Name *OpenSSH-Server* |select Name, DisplayName, Description, Enabled
Name DisplayName Description Enabled
---- ----------- ----------- -------
OpenSSH-Server-In-TCP OpenSSH SSH Server (sshd) Inbound rule for OpenSSH SSH Server (sshd) True

Если правило отключено (состоянии Enabled=False) или отсутствует, вы можете создать новое входящее правило командой New-NetFirewallRule:
New-NetFirewallRule -Name sshd -DisplayName 'OpenSSH Server (sshd)' -Enabled True -Direction Inbound -Protocol TCP -Action Allow -LocalPort 22
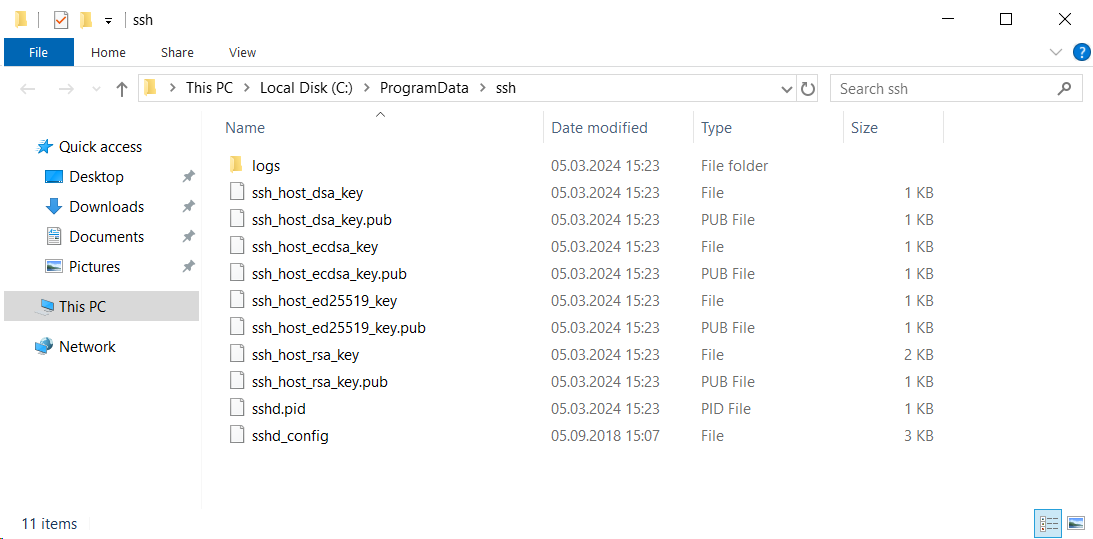
Рассмотрим, где храниться основные компоненты OpenSSH:
- Исполняемые файлы OpenSSH Server находятся в каталоге
C:\Windows\System32\OpenSSH\
(sshd.exe, ssh.exe, ssh-keygen.exe, sftp.exe и т.д.) - Конфигурационный файл sshd_config (создается после первого запуска службы):
C:\ProgramData\ssh - Файлы authorized_keys и ssh ключи можно хранить в профиле пользователей:
%USERPROFILE%\.ssh\
Sshd_config: Конфигурационный файл сервера OpenSSH
Настройки сервере OpenSSH хранятся в конфигурационном файле %programdata%\ssh\sshd_config. Это обычный текстовый файл с набором директив. Для редактирования можно использовать любой текстовый редактор (я предпочитаю notepad++). Можно открыть с помощью обычного блокнота:
start-process notepad C:\Programdata\ssh\sshd_config
Например, чтобы запретить SSH подключение для определенного доменного пользователя (и всех пользователей указанного домена), добавьте в конце файле директивы:
DenyUsers winitpro\[email protected]
DenyUsers corp\*
Чтобы разрешить подключение только для определенной доменной группы:
AllowGroups winitpro\sshadmins
Либо можете разрешить доступ для локальной группы:
AllowGroups sshadmins
По умолчанию могут к openssh могут подключаться все пользователи Windows. Директивы обрабатываются в следующем порядке: DenyUsers, AllowUsers, DenyGroups,AllowGroups.
Можно запретить вход под учетными записями с правами администратора, в этом случае для выполнения привилегированных действий в SSH сессии нужно делать runas.
DenyGroups Administrators
Следующие директивы разрешают SSH доступ по ключам (SSH аутентификации в Windows с помощью ключей описана в отдельной статье) и по паролю:
PubkeyAuthentication yes
PasswordAuthentication yes
Вы можете изменить стандартный SSH порт TCP/22, на котором принимает подключения OpenSSH в конфигурационном файле sshd_config в директиве Port.
После любых изменений в конфигурационном файле sshd_config нужно перезапускать службу sshd:
restart-service sshd
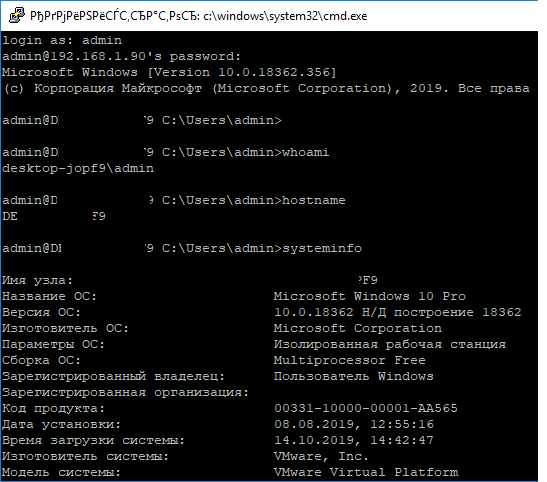
Подключение по SSH к Windows компьютеру
Теперь вы можете попробовать подключиться к своей Windows 10 через SSH клиент (в этом примере я использую putty).
Вы можете использовать встроенный SSH клиентом Windows для подключения к удаленному хосту. Для этого нужно в командной строке выполнить команду:
ssh [email protected]
В этом примере
alexbel
– имя пользователя на удаленном Windows компьютере, и 192.168.31.102 – IP адрес или DNS имя компьютера.
Обратите внимание что можно использовать следующие форматы имен пользователей Windows при подключении через SSH:
-
alex@server1
– локальный пользователь Windows -
[email protected]@server1
–пользователь Active Directory (в виде UPN) или аккаунт Microsoft/ Azure(Microsoft 365) -
winitpro\alex@server1
– NetBIOS формат имени
В домене Active Directory можно использовать Kerberos аутентификацию в SSH. Для этого в sshd_config нужно включить параметр:
GSSAPIAuthentication yes
После этого можно прозрачно подключать к SSH сервер с Windows компьютера в домене из сессии доменного подключается. В этом случае пароль пользователя не указывается и выполняется SSO аутентификация через Kerberos:
ssh -K server1
При первом подключении появится стандартный запрос на добавление узла в список известных SSH хостов.
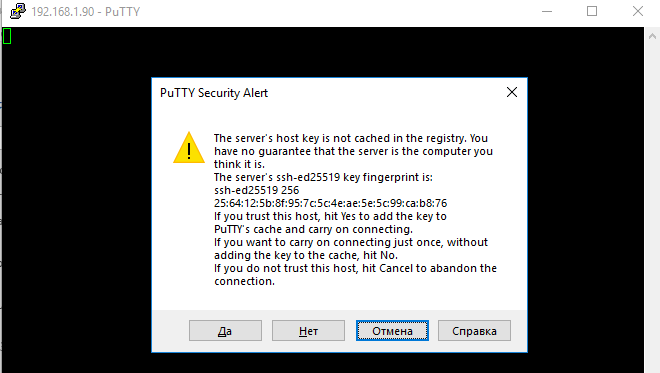
Нажимаем Да, и в открывшееся окне авторизуемся под пользователем Windows.
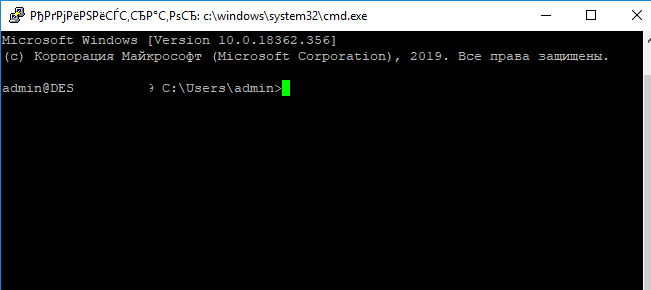
При успешном подключении запускается командная оболочка cmd.exe со строкой-приглашением.
admin@win10tst C:\Users\admin>
В командной строке вы можете выполнять различные команды, запускать скрипты и программы.
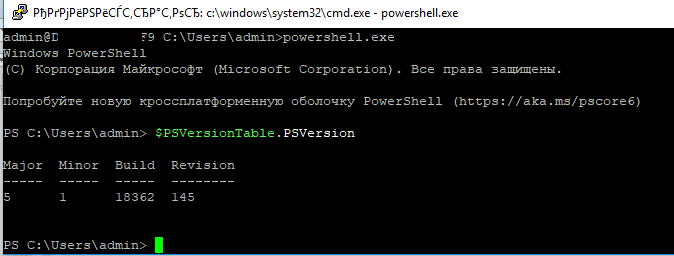
Я предпочитаю работать в командной строке PowerShell. Чтобы запустить интерпретатор PowerShell, выполните:
powershell.exe
Чтобы изменить командную оболочку (Shell) по умолчанию в OpenSSH с cmd.exe на PowerShell, внесите изменение в реестр такой командой:
New-ItemProperty -Path "HKLM:\SOFTWARE\OpenSSH" -Name DefaultShell -Value "C:\Windows\System32\WindowsPowerShell\v1.0\powershell.exe" -PropertyType String –Force
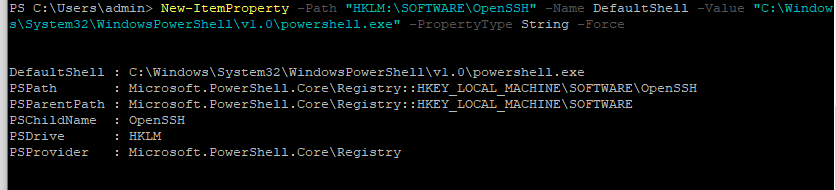
Осталось перезапустить SSH подключение и убедиться, что при подключении используется командный интерпретатор PowerShell (об этом свидетельствует приглашение
PS C:\Users\admin>
).
В SSH сессии запустилась командная строка PowerShell, в которой работают привычные функции: авто дополнение, раскраска модулем PSReadLine, история команд и т.д. Если текущий пользователь входит в группу локальных администраторов, то все команды в его сессии выполняются с повышенными правами даже при включенном UAC.
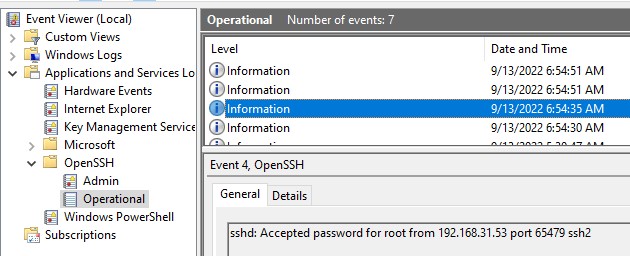
Логи SSH подключений в Windows
В Windows логи подключений к SSH серверу по-умолчанию пишутся не в текстовые файлы, а в отдельный журнал событий через Event Tracing for Windows (ETW). Откройте консоль Event Viewer (
eventvwr.msc
>) и перейдите в раздел Application and services logs -> OpenSSH -> Operational.
При успешном подключении с помощью к SSH серверу с помощью пароля в журнале появится событие:
EventID: 4
sshd: Accepted password for root from 192.168.31.53 port 65479 ssh2
Если была выполнена аутентификация с помощью SSH ключа, событие будет выглядеть так:
sshd: Accepted publickey for locadm from 192.168.31.53 port 55772 ssh2: ED25519 SHA256:FEHDEC/J72Fb2zC2oJNb45678967kghH43h3bBl31ldPs
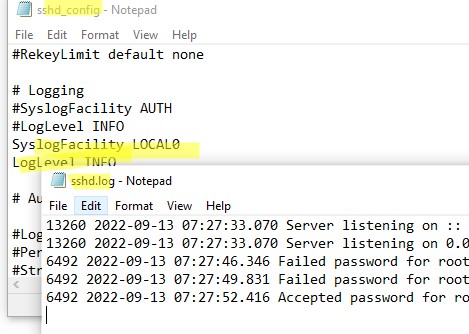
Если вы хотите, чтобы логи писались в локальный текстовый файл, нужно в файле sshd_config включить параметры:
SyslogFacility LOCAL0
LogLevel INFO
Перезапустите службу sshd и провеьте, что теперь логи SSH сервера пишутся в файл C:\ProgramData\ssh\logs\sshd.log
OpenSSH is a robust and widely used tool for secure remote access, enabling encrypted communication between a client and a remote server. By encrypting all transmitted data, OpenSSH ensures confidentiality and integrity, protecting against various network attacks such as connection hijacking, packet sniffing, and eavesdropping. This makes it an essential tool for system administrators who need to manage servers remotely without compromising security.
With OpenSSH natively supported in Windows Server 2019 and 2022, administrators can seamlessly integrate it into their environment to enable secure remote administration, automate tasks, and facilitate file transfers over a protected connection.
In this article, we will walk you through the step-by-step process of installing and configuring OpenSSH on a Windows Server. Whether you’re setting up SSH for the first time or looking to enhance your server’s security, this guide will provide you with the necessary knowledge to get started.
Prerequisites
- Deploy a Windows Server 2019 or 2022 Server at Vultr.
- Connect to the server with RDP
Install OpenSSH on Windows Server 2019 or 2022
Through Windows Settings
Open the Windows Start Menu.
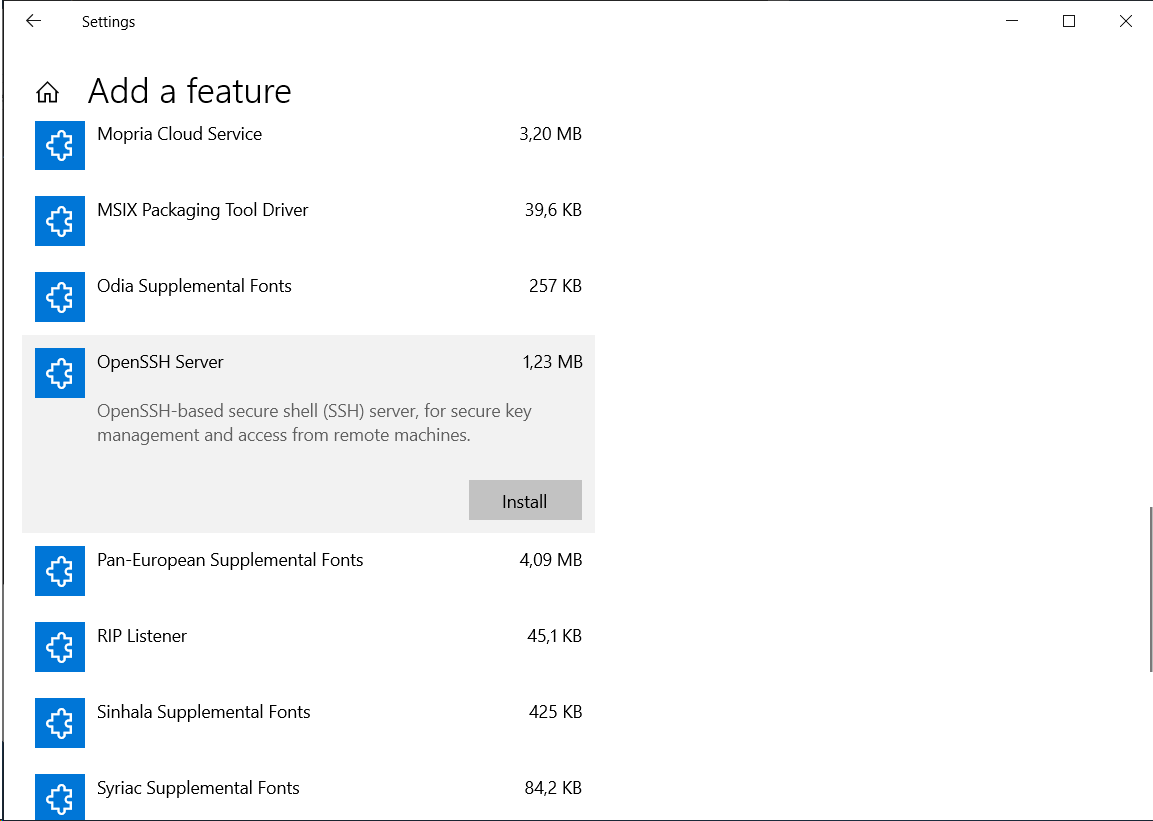
Locate and open Windows Settings. In the new Window, navigate to Apps, and Select Optional Features under Apps & Features.
Click Add Feature, then enter the keyword OpenSSH in the search box. Next, select OpenSSH Server from the list of results, then click Install.
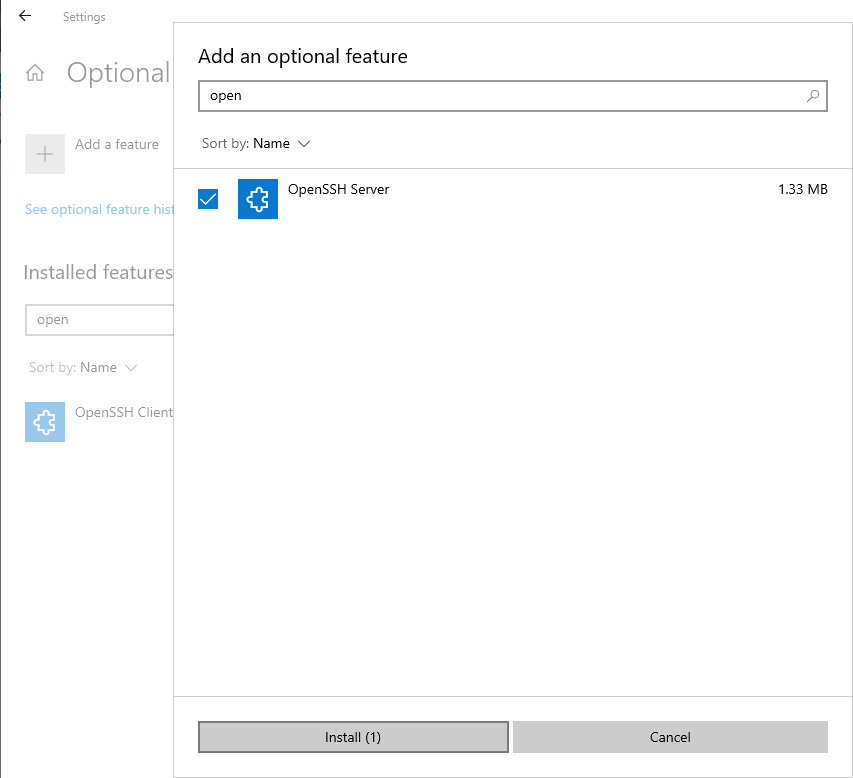
Once installed, both OpenSSH Client and Server will be available on the list of Installed Features.
Using Windows PowerShell
Open PowerShell as an Administrator.
Paste the following commands to Install OpenSSH Server:
Add-WindowsCapability -Online -Name OpenSSH.ServerInstall OpenSSH Client:
Add-WindowsCapability -Online -Name OpenSSH.ClientOutput:
Path          :
Online        : True
RestartNeeded : False
To configure OpenSSH, use the following command to open the main configuration file in Notepad and make your preferred changes.
start-process notepad C:\Programdata\ssh\sshd_configConfigure Firewall
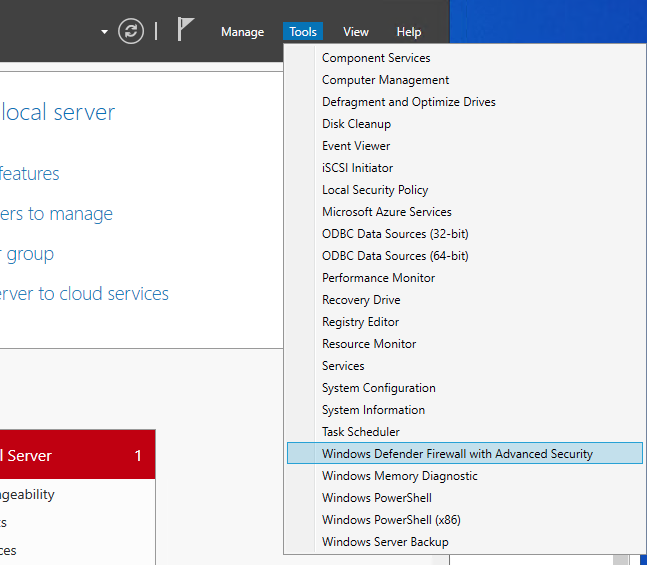
Open the Windows start menu, locate and click Server Manager. In the Server Manager window, navigate to Tools, and select Windows Defender Firewall with Advanced Security from the drop-down list.
Now, click Inbound Rules in the open Firewall window. Then, select New Rule from the right pane.
In the New Inbound Rule Wizard, select Port from the list of options, then click Next. Select ‘TCP’, then enter port 22 in the Specific local ports: section.
Next, allow the connection, assign the rule to server profiles, and set a custom name for easy identification from the list of Firewall rules.
Click Finish to save the new firewall rule.
Login to Windows Server using SSH
First, start the OpenSSH server by entering the following command in your PowerShell terminal.
Start-Service sshdLog out of the RDP session.
Then, initiate an SSH connection from your local computer to the server using the following command:
$ ssh -l Administrator SERVER-IPReplace Administrator with your target username and SERVER-IP with your actual Vultr Windows server address.
ECDSA key fingerprint is SHA256:Vv2A8NOfzCLR/e35Fm5UyqGeJptrn6ZlY6Vabx0wHXQ.
Are you sure you want to continue connecting (yes/no/[fingerprint])?
Verify the server key by accepting with yes. Then, enter the user account password to connect to the remote Windows server over SSH.
Once logged in, your SSH terminal should be similar to the one below:
Microsoft Windows [Version 10.0.20348.405]
(c) Microsoft Corporation. All rights reserved.

Administrator@EXAMPLE C:\Users\Administrator>
Conclusion
Congratulations, you have successfully installed OpenSSH on a Windows Server. To fine-tune your SSH configuration file, consider visiting the Windows SSH configuration documentation here.

Мы ранее уже устанавливали OpenSSH сервер на Windows Server 2012 R2. Тогда мы скачивали пакет с GitHub.
Установка OpenSSH Server в Windows Server 2012 R2
Инструкция не потеряла свою актуальность, но в Windows Server 2019 теперь можно установить OpenSSH Server гораздо проще через Feature on Demand (FoD). Пакет OpenSSH Server включен в Feature on Demand (FoD) современных версий Windows 10 (начиная с 1803), Windows 11 и Windows Server 2022/2019. При этом все основные настройки выполняются автоматически, даже правило в Firewall создаётся и применяется.
Установка OpenSSH в Windows Server 2019
Установим OpenSSH сервер через FoD. Открываем настройки, Apps & features.
Нажимаем Manage optional features.

+ Add a feature.
Находим OpenSSH Server → Install.
Ничего сложного. Если установка не получается, то можно обратить внимание на этот разбор:
Windows — ошибка при установке дополнительных компонентов
Есть альтернативные способы установки, например, через PowerShell:
Get-WindowsCapability -Online | Where-Object Name -like 'OpenSSH.Server*' | Add-WindowsCapability –OnlineИли через командную строку и DISM:
dism /Online /Add-Capability /CapabilityName:OpenSSH.Server~~~~0.0.1.0Можно проверить что пакет установлен через PowerShell:
Get-WindowsCapability -Online | ? Name -like 'OpenSSH.Ser*'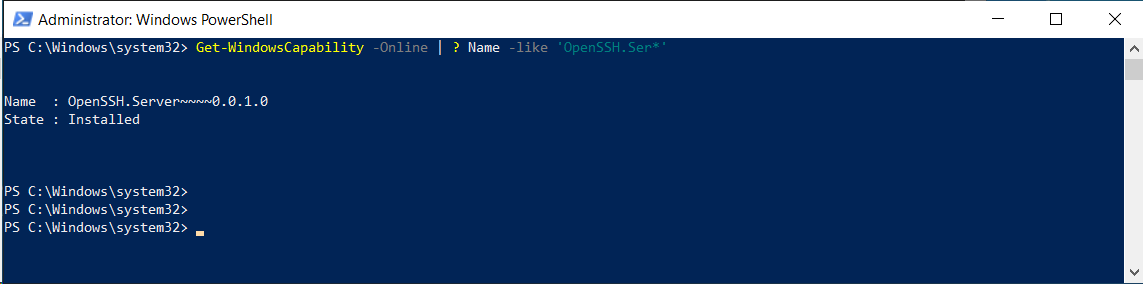
State : Installed.
Запустим службу, можно вручную через GUI:
А можно через PowerShell:
Set-Service -Name sshd -StartupType 'Automatic'
Start-Service sshd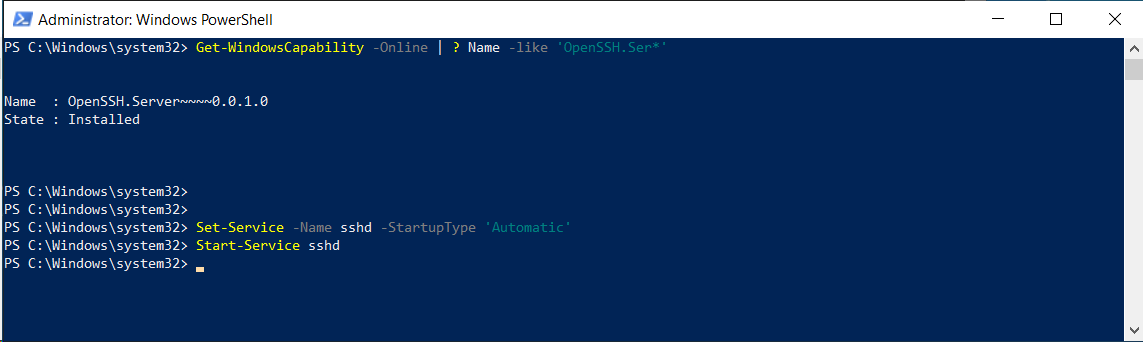
Служба запускается на 22 порту:
netstat -tan | find ":22 "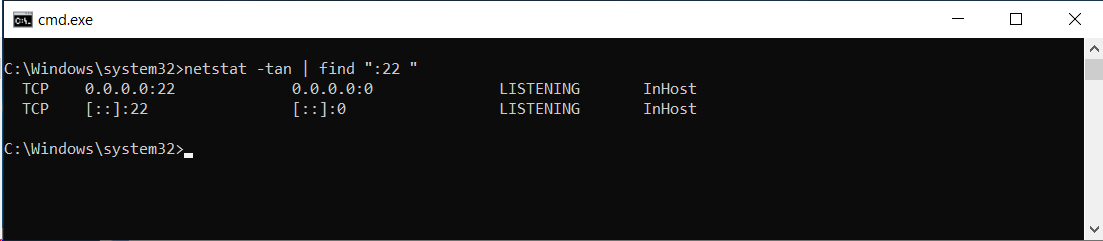
Как я уже говорил, входящее правило на Firewall для 22 порта при таком способе установки создаётся автоматически.
Настройка доступа
Конфигурационный файл находится здесь: C:\ProgramData\ssh\sshd_config.
Собственно, OpenSSH конфигурируется здесь. Информацию о конфигурации можно почерпнуть здесь:
https://learn.microsoft.com/en-us/windows-server/administration/openssh/openssh_server_configuration
Например, чтобы разрешить доступ по OpenSSH определённой группе пользователей, допишу в конец файла:
DenyUsers *
AllowGroups my_domain\my_group_for_ssh_access
Другой вариант, разрешить доступ определённым пользователям и сразу выполнить для них установку корневой директории через ChrootDirectory.
AllowUsers my_domain\user1 my_domain\user2

Match User my_domain\user1
       ChrootDirectory D:\folder_1

Match User my_domain\user2
ChrootDirectory D:\folder_2Goals
We want to install OpenSSH on a Windows Server 2019, so we can remote access it with ssh myuser@win2019.
We want also to turn on PowerShell Remoting over SSH, so we can create PSSession objects from PowerShell Core on Linux/MacOs/Windows.
Acknowledgments
This work is a compilation of the pages found on Microsoft’s official documentation and community:
- https://docs.microsoft.com/en-us/windows-server/administration/openssh/openssh_server_configuration
- https://docs.microsoft.com/en-us/powershell/scripting/learn/remoting/ssh-remoting-in-powershell-core?view=powershell-6
- https://techcommunity.microsoft.com/t5/ITOps-Talk-Blog/Installing-and-Configuring-OpenSSH-on-Windows-Server-2019/ba-p/309540
Login Shell on Windows Server 2019 core
Let me repeat the title… Do this ONLY on Windows Core Edition. This will allow you to login with a PowerShell sessio directly.
If you are on the console, you must be in a cmd.exe, so start a powershell and type these instructions:
Set-ItemProperty -Path "HKLM:\SOFTWARE\Microsoft\Windows NT\CurrentVersion\Winlogon" `
   -Name Shell `
   -Value powershell.exe
Install PowerShell Core
Even if you don’t configure PowerShell Remoting over SSH, PowerShell Core is a Good Thing ™ to have on your machines.
First download the install from PowerShell’s official github (as of this writing we are on 7.2.1):
Invoke-WebRequest https://github.com/PowerShell/PowerShell/releases/download/v7.2.1/PowerShell-7.2.1-win-x64.msi `
    -OutFile $HOME\Downloads\PowerShell-7.2.1-win-x64.msi `
    -UseBasicParsing
Then, go ahead and install it:
cd $HOME\Downloads
msiexec.exe /package PowerShell-7.2.1-win-x64.msi /quiet `
  ADD_EXPLORER_CONTEXT_MENU_OPENPOWERSHELL=1 `
  ADD_FILE_CONTEXT_MENU_RUNPOWERSHELL `
  ENABLE_PSREMOTING=1 `
  REGISTER_MANIFEST=1
Deploy and Configure OpenSSH
First, install both the SSH Client and Server:
Add-WindowsCapability -Online -Name OpenSSH.Client~~~~0.0.1.0
Add-WindowsCapability -Online -Name OpenSSH.Server~~~~0.0.1.0
To be able to use SSH keys to authenticate, install the following module:
Install-Module -Force OpenSSHUtils -Scope AllUsers
Then, start the SSH Agent and the SSH Server services:
Set-Service -Name ssh-agent -StartupType Automatic
Start-Service ssh-agent
Set-Service -Name sshd -StartupType Automatic
Start-Service sshd
You can check the Firewall rule like this:
Get-NetFirewallPortFilter | Where { $_.LocalPort -eq 22  }
Get-NetFirewallRule -Name OpenSSH-Server-In-TCP
Configure Powershell to be the default shell when remoting in via SSH:
New-ItemProperty -Path "HKLM:\SOFTWARE\OpenSSH" -Name DefaultShell -Value "C:\Windows\System32\WindowsPowerShell\v1.0\powershell.exe" -PropertyType String -Force
Configure you SSH environment on the Windows server so you can add your SSH public key to authenticate:
mkdir .ssh
touch .ssh\authorized_keys
Repair-AuthorizedKeyPermission C:\users\gcadmin\.ssh\authorized_keys
Icacls authorized_keys /remove “NT SERVICE\sshd”
Configure PowerShell Remoting over SSH
The final touch is to allow PSSession over SSH. Open the SSHD Config file at C:\ProgramData\SSH\sshd_config,
and modify the line that allow public keys to authenticate:
PubkeyAuthentication yes
Then add a new ssh subsystem after sftp:
Subsystem powershell C:/progra~1/PowerShell/6/pwsh.exe -sshs -NoLogo -NoProfile
Note: Make sure to use the MS-DOS 8.3 path notation with / to point to the PowerShell executable. Otherwise the SSHD server will fail incoming sessions with some obscure error like:
New-PSSession : [win.acme.com] The SSH client session has ended with error message: The SSH transport process has abruptly terminated causing this remote session to break.
Final step! Reboot the server (Restarting the sshd service does not seem sufficient in my experience):
Connect!
ssh
The first test will be to connect via ssh, the first time, you should force password authentication:
ssh -o PreferredAuthentications=password -o PubkeyAuthentication=no myuser@win.acme.com
Then add you public key (typically ~/.ssh/id_rsa.pub) to the authorized keys of the Windows server:
ssh myuser@win.acme.com "Add-Content -Path .ssh/authorized_keys -Value '$(cat ~/.ssh/id_rsa.pub)' -NoNewLine"
Subsequent ssh sessions will look like:
Negociation will happen with the public key… No more passwords!
PowerShell Core sessions
If you are familiar with sessions in PowerShell, this will be easy. The main difference is the SSH parameters:
$session = New-PSSession -Hostname there.acme.com -UserName ACME\myuser -SSHTransport

Invoke-Command $session { ls }
Enter-PSSession $session
> dir
> exit
Remove-PsSession $session
❗ This post is over six years old. It may no longer be up to date. Opinions may have changed.
On hackernews I saw a Microsoft blog post stating that Windows Server
2019 now includes OpenSSH. In this post I’ll try out both the client and server
on a Windows 2019 server, including how to login as a Active Directory Domain
user. All documentation from Microsoft on OpenSSH can be found here. The
bonus this time is how to elevate permissions via SSH on Windows, sudo but way
more complicated. This guide is also applicable on Windows 10, build 1809 and
up.

Installing OpenSSH on Windows
Fire up a powershell prompt as administrator and execute the following command
to see if it’s installed already:
Get-WindowsCapability -Online | ? Name -like 'OpenSSH*'
Example output:
Name  : OpenSSH.Client~~~~0.0.1.0
State : NotPresent
Name  : OpenSSH.Server~~~~0.0.1.0
State : NotPresent
If they are NotPresent, install them with the below powershell commands:
Add-WindowsCapability -Online -Name OpenSSH.Client~~~~0.0.1.0
Add-WindowsCapability -Online -Name OpenSSH.Server~~~~0.0.1.0
Example output for both:
Path          :
Online        : True
RestartNeeded : False
I had to install all Windows updates before the server part would install (up to
december 2018).
Start the openssh server and make sure it starts up automatically. Not required
when you only want to use the openssh client.
Start-Service sshd
Set-Service -Name sshd -StartupType 'Automatic'
The setup automatically creates a firewall rule to allow OpenSSH. Check to make
sure it is actually created.
Get-NetFirewallRule -Name *ssh*
CMD or Powershell?
The default prompt when SSHing in to a windows server is cmd.exe. Rather bare
and sparse, I recommend you change that to Powershell. It’s Windows, so it has
to be changed in the registry, but there is a powershell command to do so:
New-ItemProperty -Path "HKLM:\SOFTWARE\OpenSSH" -Name DefaultShell -Value "C:\Windows\System32\WindowsPowerShell\v1.0\powershell.exe" -PropertyType String -Force
If you have installed bash you can set that to be the default shell by
changing the full -Value path to the bash.exe binary.
Windows OpenSSH client
Using SSH on Windows (open up a powershell window) is as simple as typing in the
command and the server to connect to:
ssh user@example.org
You will be prompted for a password, type it, and you’re in.
However, using passwords is insecure and will get your server compromised
(eventually). SSH has the concept of keys, cryptographicly secure public private
keys which can be used for authentication. The rest of this section covers the
creation and placement of an SSH keypair on Windows.
You want to install the ssh-agent if you are going to use Windows as ssh
client:
Install-Module -Force OpenSSHUtils -Scope AllUsers
Start-Service ssh-agent
Set-Service -Name ssh-agent -StartupType 'Automatic'
With an ssh-agent, you don’t have to type the password for your private key
every time you SSH to a server.
Generating an SSH keypair on Windows
Generate your SSH keypair with the following command:
ssh-keygen
Example output:
Generating public/private rsa key pair.
Enter file in which to save the key (C:\Users\Remy/.ssh/id_rsa):
Created directory 'C:\Users\Remy/.ssh'.
Enter passphrase (empty for no passphrase):
Enter same passphrase again:
Your identification has been saved in C:\Users\Remy/.ssh/id_rsa.
Your public key has been saved in C:\Users\Remy/.ssh/id_rsa.pub.
The key fingerprint is:
SHA256:FSpFs/BY0U8k+kCp6IDW5K4+Lw4RO7kS8c6TrzIXNF8 remy@WIN-EXAMPLESRV
The key's randomart image is:
+---[RSA 2048]----+
|      ..B+o..    |
|   .   B.=.o.    |
|o.+  .o.* .o     |
|.B+o. E. +  .    |
|B.o= .  S .      |
| B.oo            |
|+ *.             |
|=+.o             |
|o*=o.            |
+----[SHA256]-----+
Make sure to enter a passphrase. Create a backup of the folder
(C:\Users\Username\.ssh), if you loose that private key you won’t be able to
login anymore.
Remember that private key files are the equivalent of a password should be
protected the same way you protect your password. To help with that, use ssh- to securely store the private keys within a Windows security context,
agent
associated with your Windows login. To do that, start the ssh-agent service as
Administrator (we already did that when installing) and use ssh-add to store
the private key:
ssh-add ~\.ssh\id_rsa
Add the key to another Windows server
Using the following commands we can copy our public key (not the private, never
share your private parts) to a server running SSH. I assume you know how to do
this on Linux, this example is for another Windows server. The permissions are
managed differently.
In this example I use the user remy in the AD domain SPCS. The format then
to login is remy@spcs@example.org, the first part (remy@spcs) is the
username (and AD domain), the last part (@example.org) is the server to
connect to.
Create the folder where the authorized_keyfile belongs:
ssh remy@spcs@example.org mkdir C:\users\remy\.ssh\
Use scp to copy the public key file generated previously:
scp C:\Users\Remy\.ssh\id_ed25519.pub remy@spcs@example.org:C:\Users\remy\.ssh\authorized_keys
# note that my local user (leftmost part) is also remy. The server path is the rightmost part.
Change the permissions on the authorized_keys file on the server, otherwise
ssh will ignore the file:
ssh --% remy@spcs@example.org powershell -c $ConfirmPreference = 'None'; Repair-AuthorizedKeyPermission C:\Users\Remy\.ssh\authorized_keys
Example output:
  [*] C:\Users\Remy\.ssh\authorized_keys

'NT SERVICE\sshd' needs Read access to 'C:\Users\Remy\.ssh\authorized_keys'.
Shall I make the above change?
[Y] Yes  [A] Yes to All  [N] No  [L] No to All  [S] Suspend  [?] Help (default is "Y"): y
'NT SERVICE\sshd' now has Read access to 'C:\Users\Remy\.ssh\authorized_keys'.
      Repaired permissions
The OpenSSHUtils powershell module needs to be installed for the Repair- cmdlet to work.
AuthorizedKeyPermission
Install-Module -Force OpenSSHUtils -Scope AllUsers
You can now login to the Windows server using your private key.
Windows OpenSSH server
The Windows OpenSSH server is quite simple to configure. It has the regular
sshd_config file for settings, with some parts specific to Windows.
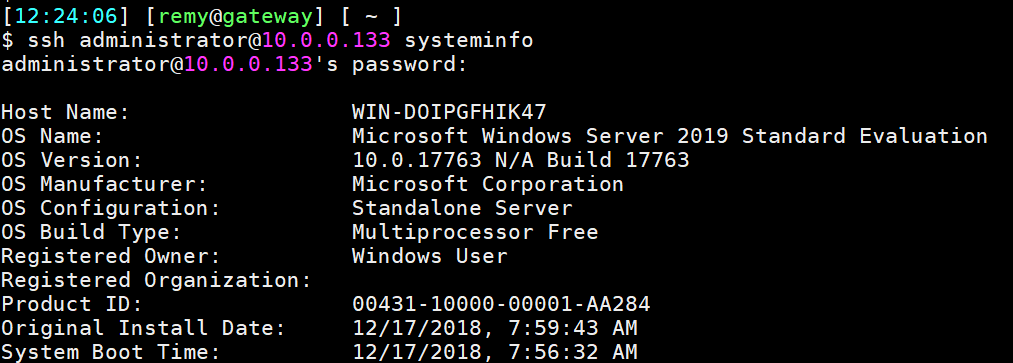
This is a screenshot where I SSH into a Windows server using my linux
workstation:
OpenSSH server configuration
This section is specifically for Windows related settings. I assume you know how
to configure openssh on linux.
The server reads it’s configuration from %programdata%\ssh\sshd_config. You
can copy and paste that path into a Windows Run dialog (WIN+R) to open
Explorer in the correct location.
When configuring user/group based rules with a domain user or group, use the
following format: user?domain*. Windows allows multiple of formats for
specifying domain principals, but many will conflict with standard Linux
patterns. For that reason, * is added to cover FQDNs. Also, this approach uses
? instead of @ avoids conflict with the username@host format.
To allow all users from the domain EXAMPLE in group Domain Admins to login
via SSH:
AllowGroups "EXAMPLE\Domain Admins"
It’s better to create a specific security group (e.g. sshusers) and add the
Domain Admins as a member. With a seperate group you can give or restrict the
ssh permissions more granulary.
To allow local users (non-domain) or local groups:
AllowUsers localuser@192.168.2.23
AllowGroups sshusers
PermitRootLogin on Windows
PermitRootLogin is not applicable in Windows. To deny administrators from
logging in via SSH, use a DenyGroups directive:
DenyGroups Administrators
For Windows OpenSSH, the only available authentication methods are password
and publickey.
At the bottom of this article there is an alternative to sudo. How otherwise
would you elevate permissions? Do note that it is quite complex.
AuthorizedKeysFile location on Windows
The default AuthorizedKeysFile locations are .ssh/authorized_keys and
.ssh/authorized_keys2. This is in the users home folder (C:\Users\Username)
(or the profile image path). If required, an absolute path can be provided
(D:\folder\authorized_keys).
Tips and tricks
Here are a few tips on Windows and SSH I found while using it for some time.
ssh-copy-id
From a linux machine, the command ssh-copy-id can be used to copy your public
key easily to another linux machine. This does not work on Windows:
$ ssh-copy-id administrator@10.0.0.133
/usr/bin/ssh-copy-id: INFO: attempting to log in with the new key(s), to filter out any that are already installed
/usr/bin/ssh-copy-id: INFO: 1 key(s) remain to be installed -- if you are prompted now it is to install the new keys
administrator@10.0.0.133's password:
'exec' is not recognized as an internal or external command,
operable program or batch file.
'cat' is not recognized as an internal or external command,
operable program or batch file.
The system cannot find the path specified.
You need to use the above commands listed under the SSH client section to copy
the key and fix the permissions.
sudo
As you’ve denied access to Administrators via SSH (just as you would not allow
root login on Linux), you now need to have a way for people to elevate their
permissions. On linux you would use sudo su - or the likes. On Windows, there
is no sudo. There is also no way to elevate permissions of an already running
process.
Using the runas command fails because it cannot create a new window or ask UAC
(because you’re in a console SSH session).
There is a complex way of elevating your privileges. You need to run this in a
powershell session as your user. First you create a Credentials object which
has the username and password of the Administrator user. Then you use that
$Cred object with either Invoke-Command to run a single noninteractive
command, or with Enter-PSSession to get an interactive Powershell.
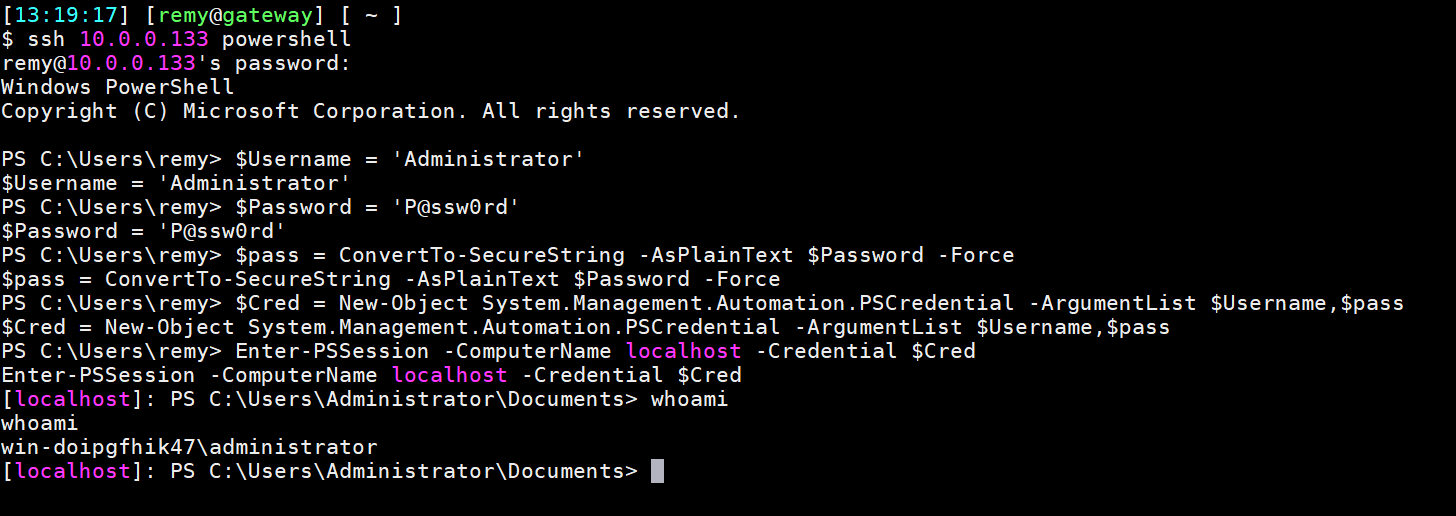
Note that you first need to ssh into your windows server and start powershell.
This can be done with one command:
ssh user@windows.example.org powershell
Non-interactive example:
$Username = 'Administrator'
$Password = 'P@ssw0rd'
$pass = ConvertTo-SecureString -AsPlainText $Password -Force
$Cred = New-Object System.Management.Automation.PSCredential -ArgumentList $Username,$pass

Invoke-Command -Credential $Cred -ComputerName localhost -scriptblock { cmd.exe /c whoami }
Example output:
win-doipgfhik47\administrator
Interactive shell example:
$Username = 'Administrator'
$Password = 'P@ssw0rd'
$Pass = ConvertTo-SecureString -AsPlainText $Password -Force
$Cred = New-Object System.Management.Automation.PSCredential -ArgumentList $Username,$Pass

Enter-PSSession -ComputerName localhost -Credential $Cred
Example output:
[localhost]: PS C:\Users\Administrator\Documents> whoami
win-doipgfhik47\administrator
This is a screenshot of the entire process:
Note that this by default only works on localhost, not from a remote computer.
Unless you change the trustedhosts you will get an Access denied error.
This is also not really like sudo, but more like setting up a new ssh session
from localhost to localhost as root. (But, with powershell remoting).
Tags: microsoft
, openssh
, server
, ssh
, tutorials
, windows
, windows-server