
Readers help support Windows Report. We may get a commission if you buy through our links.
Read our disclosure page to find out how can you help Windows Report sustain the editorial team. Read more
Oracle Database is one of the foremost DBMS (Database Management Systems) for Windows. However, Windows 10 doesn’t include any built-in Oracle ODBC connection tool.
So, you’ll need to install an Oracle ODBC driver to connect to an Oracle database with an ODBC-compliant application.
You have to do more than download and install an ODBC package to connect to an Oracle database with an application.
On top of that, you’ll also need to add new environment variables and set up a DSN for the driver before you can connect with the Oracle database.
How can I install an Oracle ODBC driver in Windows 10?
1. Download and extract the Oracle packages
- First, open the Oracle Instant Client page in your browser.

- Next, click the Instant Client for Microsoft Windows 32 or 64-bit link (or an alternative one that matches your PC’s platform).
- Click the Basic package download link.
- Scroll down and click the SDK package hyperlink to download that archive.
- In addition, click the download link for the ODBC package.
- Open the File Explorer window by clicking the folder taskbar button for it.
- Click the C: root drive in File Explorer.
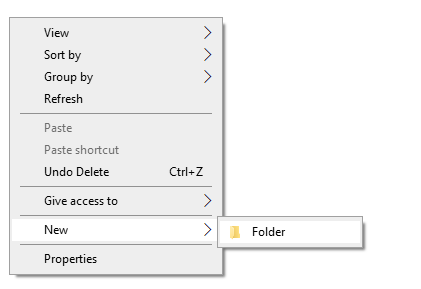
- Then right-click a space within the C: drive and select New > Folder.

- Enter Oracle as the new folder name. Then you should have a new folder with this path:
C:\Oracle - Move all three of the downloaded Oracle ZIP archives into the Oracle folder. You can do that by selecting the ZIP files, clicking the Move to button, and selecting Choose location within File Explorer.
- Next, extract all three of the ZIP archives into the Oracle folder. To extract a ZIP, select it and click the Extract all button on File Explorer’s Compressed Folder Tools tab.
 folders window")
- Then you can click the Browse button in the Extract Compressed window to select the Oracle folder. Click the Extract button.
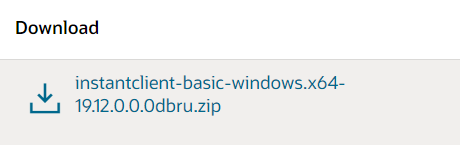
- Open the extracted instantclient-basic-windows.x64-19.11.0.0.0dbru folder.
- Move the instantclient_19_11 subfolder from there into the Oracle folder.
- Then erase the now empty instantclient-basic-windows.x64-19.11.0.0.0dbru folder that previously included the instantclient_19_11 subfolder by right-clicking it and selecting Delete. Thereafter, you’ll have a single instantclient_19_11 folder within the Oracle directory.


 folders window")
The ODBC and basic ZIP archives must be unzipped to exactly the same folder. Select to extract the ODBC ZIP to the path of your unzipped Basic package.
Delete instantclient_19_11 at the end of the path in the Extract Compressed window so that an additional subfolder isn’t included.
The SDK package is a non-essential optional one. However, it’s recommended you download that package too.
The SDK ZIP archive should also be extracted to the same instantclient_19_11 folder that includes the Basic and ODBC package files.
In case that did not help, you can give a try to Outbyte Driver Updater which has a big database of drivers and might have the right ones for Oracle, besides that, updating your drivers is a common good practice for maintaining a functional PC.
2. Add an Oracle Client directory environment variable
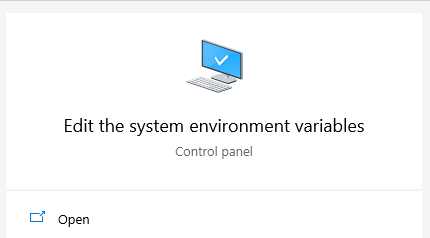
- Press the Windows and S keys simultaneously to open a search box.
- Type the keyword system environment variables with the search text box.
- Click Edit the system environment variables to open the window in the screenshot directly below.

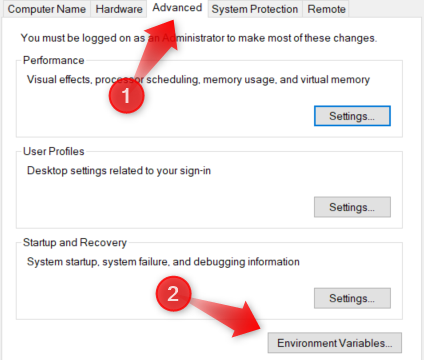
- Press the Environment Variables button.

- Click the New button for system variables.
- Next, input OCI_LIB32 within the Variable name box.
- Input your Oracle folder path in the Variable value box. If you followed the guidelines above, that folder path would be this:
C:\Oracle\instantclient_19_11.
- Next, Double-click Path in system variables to open the window in the snapshot directly below.

- Click the New button, and enter the same folder path you input within the Variable value box.
- Press the OK button.


NOTE
To get the list of TNS services when establishing ODBC connections, you’ll also need to set up a TNS_ADMIN system environment variable that points to the directory that includes the tnsnames.ora file.
3. Install your ODBC Oracle client package
To install the ODBC client, open the instantclient_19_11 folder you extracted the ODBC package to in File Explorer. Then right-click odbc_install.exe and select the Run as administrator option.
Note that there isn’t any kind of GUI installation wizard for that file. So, that’s all you need to do here.

4. Set up the DSN for Oracle driver
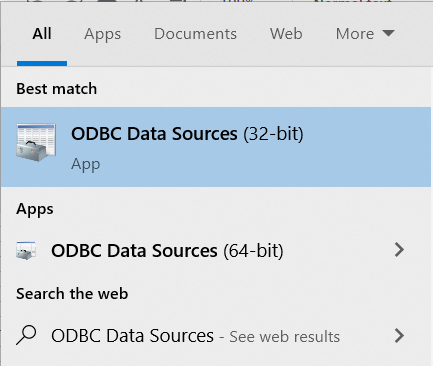
- Bring up the search tool within Windows.
- Enter ODBC Data Sources in the search box.
- Click ODBC Data Sources to open the window in the screenshot directly below.
 window")
- Next, click the Add button on the User DSN (or System) tab to open the Create New Data Source window.

- Select your Oracle ODBC driver, and press the Finish button.
- Fill out the required details on the ODBC configuration window.
- Click Test Connection to check your Oracle Database Server connection.
- Press the OK button to exit.
 window")

5. Install missing Visual C++ libraries
You can’t set up data sources for an Oracle driver with the ODBC Data Source Administration if a required Visual C++ package for it is not installed on your PC.
If an error message pops up when your try to set up an Oracle driver data source, you might be missing a required Visual C++ package.
You’ll need to have Visual Studio 17 installed for the current Oracle 19 client. You can download Visual Studio 2017, and older redistributable packages, via the C++ downloads page.
Then click the VC EXE file you downloaded to install the Visual Studio package. So, that’s how you can install the Oracle ODBC driver on Windows 10.
When you’ve installed the current Oracle ODBC driver, you can connect to Oracle Database DBMS versions from 11.2 up to 19.1 with the 19c client.
Moreover, if you need to fix Windows 10 ODBC issues, just check out our dedicated article. As for your opinion, the comments area is waiting for you.
Matthew Adams
Windows Hardware Expert
Matthew is a freelancer who has produced a variety of articles on various topics related to technology. His main focus is the Windows OS and all the things surrounding it.
He is passionate about the tech world, always staying up-to-date with the latest and greatest. With an analytical view, he likes problem-solving, focusing on errors and their causes.
In his free time, he likes to read and write about history and tries to always develop new skills.

Hello everyone, welcome to my blog. In this article, I am going to show you how to install Oracle ODBC Driver on Windows 10. I have a working Oracle Database 12c on another computer on my home network. I am trying to connect to my Oracle database from Microsoft Access using ODBC connection. By default, Windows 10 does not shipped with Oracle ODBC connection utility. In other word, I was unable to connect to my Oracle database from MS Access.
Installing Oracle ODBC Driver on Windows 10 is a bit tricky. It’s not as simple as installing PostgreSQL ODBC driver or MySQL ODBC Driver. I was struggling to get it works. The following method works very well on my home network. So let’s dig inside.
My Setup
- I have a Windows 10 running Oracle Database 12.2
- I am going to connect to my Oracle Database via ODBC from another computer, running Windows 10 as well.
Step 1. Install Oracle Instant Client Basic
Oracle ODBC Driver needs this Instant Client package to run. So, we need to download this package from the official download website of Oracle.
https://www.oracle.com/technetwork/database/database-technologies/instant-client/downloads/index.html

Select the correct architecture of your system either 32 bit or 64 bit. In this example I am going to install the 32 bit version since I have MS Office 32 bit version.

Next, download the Instant Client Basic package as shown on the picture above. Also, you will need to download the Instant Client SDK and Instant Client ODBC as shown below

So now we have three packages:
- instantclient-basic-nt-12.2.0.1.0.zip
- instantclient-sdk-nt-12.2.0.1.0.zip
- instantclient-odbc-nt-12.2.0.1.0-2.zip
Now Create a new folder for the Oracle client. For example, in this case I created a new folder : C:\Oracle\Product\client. Put all those three zip packages in that new directory. Next, extract them all. It will produce a new directory called: instantclient_12_2. If you download the different version, for example version 18.3, it will create new directory instantclient_18_3.
Step 2. Add the Oracle Client directory to the PATH environment
Now we need to add our Oracle Client directory to the Windows PATH environment. Right-click My Computer >> Advanced System Settings >> Environment Variables

On the System Variables, click New and then enter the following details:
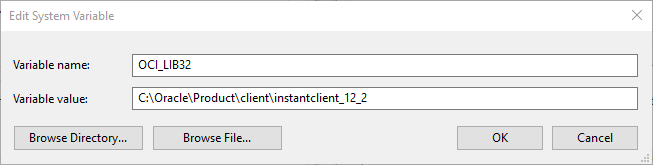
- Variable name: OCI_LIB32
- Variable Value: C:\Oracle\Product\client\instantclient_12_2
Change C:\Oracle\Product\client\instantclient_12_2 with your actual Oracle Client folder.
Next step is to add the Oracle Client directory to system path. Double click the path and create a new entry as follow

Step 3. Install the Oracle ODBC Client
Now open the folder instantclient_12_2, in your Oracle Client folder created on the Step 1 and double click the file odbc_install.

Please note that there is no GUI installation wizard when you open this file.
Step 4. Create a new ODBC Data Source on Windows 10
To create a new Oracle ODBC Data Source, open Control Panel >> Administrative Tools >> ODBC Data Sources (32bit). If you are using 64 bit version, choose the ODBC Data Sources (64bit).
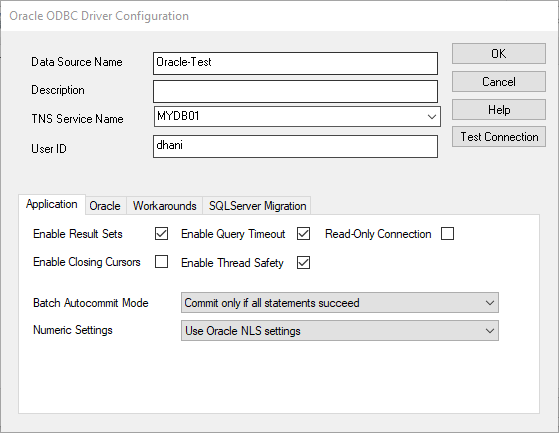
Click Add to add a new DSN. Select “Oracle in instantclient_12_2” from the list. Click Finish. Next, enter the Oracle ODBC Driver Configuration. Give the new Data Source Name, select TNS Service Name and User ID. Click Test Connection to validate the connection to the Oracle Database Server.

Troubleshooting
On my first attempt, I cannot get the list of the TNS Service when creating a new ODBC Connection. To solve this, we need to copy or create the tnsnames.ora in the Oracle Client Directory. Open Notepad and then copy and paste these lines and then save it as tnsname.ora. Save the file in the Oracle Client directory (C:\Oracle\Product\client\instantclient_12_2).
This is the content of my tnsnames.ora which is works well
LISTENER_ORCL =
   (ADDRESS = (PROTOCOL = TCP)(HOST = localhost)(PORT = 1521))
ORACLR_CONNECTION_DATA =
   (DESCRIPTION =
     (ADDRESS_LIST =
       (ADDRESS = (PROTOCOL = IPC)(KEY = EXTPROC1521))
     )
     (CONNECT_DATA =
       (SID = CLRExtProc)
       (PRESENTATION = RO)
     )
   )
ORCL =
   (DESCRIPTION =
     (ADDRESS = (PROTOCOL = TCP)(HOST = 192.168.100.51)(PORT = 1521))
     (CONNECT_DATA =
       (SERVER = DEDICATED)
       (SERVICE_NAME = orcl)
     )
   )
MYDB01 =
   (DESCRIPTION =
     (ADDRESS = (PROTOCOL = TCP)(HOST = 192.168.100.51)(PORT = 1521))
     (CONNECT_DATA =
       (SERVER = DEDICATED)
       (SERVICE_NAME = mydb01)
     )
   )
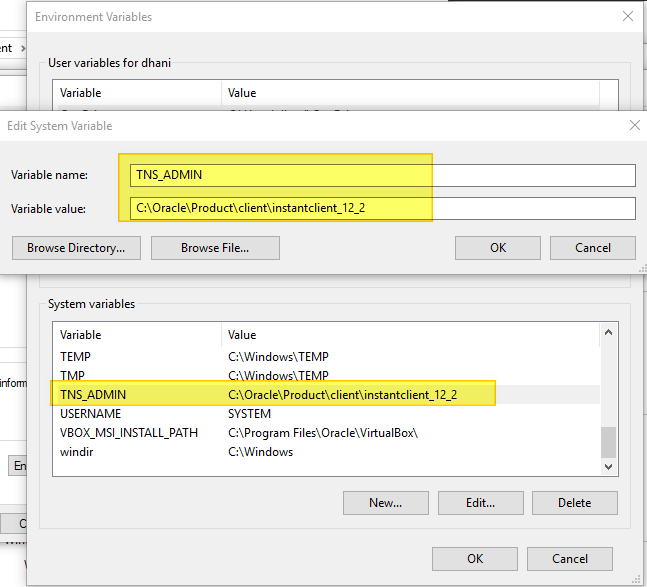
After that, we need to tell the system to use this tnsnames.ora config file. Open the Environment Variable again and add a new entry with the following value:
- Variable Name: TNS_ADMIN
- Variable Value: C:\Oracle\Product\client\instantclient_12_2
Don’t forget to change the variable value with your Oracle Client Directory.
Now you should be able to pick or select the TNS service. Thanks for reading this how to install Oracle ODBC driver on Windows 10. Cheers
Are you planning to install the Oracle ODBC Driver on Windows 10?
Open Database Connectivity (ODBC) is a standard interface that gives one application access to several different data sources. As a result, the Oracle ODBC can be used to access Oracle databases.
This is a great advantage for advanced users and programmers, who need access to the Oracle ODBC for running online transaction processing, data warehousing, and mixed database workloads — which Oracle is widely used for.
However, it is not as easy as installing a program, as it requires downloading and compiling files together. You may also need to input additional data the application will need to run properly. Luckily, we’re here to help.
In this article, we’ll introduce you to a structured process behind procuring and installing the Oracle ODBC Driver in Windows 10.
1. Download the Oracle Instant Client Package From the Website.
Before installing and setting up your driver, you’ll need to download three separate files from the Oracle website and place them into the appropriate folder location. These files are essential in making the software function as it should, enabling your ODBC applications to work by providing additional libraries and resources.
Additionally, you need to download the right files; they must be compatible with each other, as well as your operating system. Downloading or otherwise using the wrong version of each file may cause errors for your driver and your system.
Here’s where you can find and download the Oracle packages:
- Begin by going to the Oracle Instant Client page on your browser.
- Next, click the Instant Client for Microsoft Windows. Look for the link that matches your PC’s platform.
- Follow by choosing the Basic package download link.
- Once it’s finished downloading, scroll down and press the SDK package hyperlink to download that archive.
- Then, click the download link for the ODBC package.
- Now that it’s on your PC, go to your File Explorer window.
- Check the C: root drive in File Explorer.
- Then, right-click a space within the C: drive and make a new folder.
- Name your new folder Oracle and make sure that it has this path: C:\Oracle.
- After that, move the three downloaded Oracle ZIP archives into the Oracle folder and extract them there.
- Look for the extracted instantclient-basic-windows.x64-19.11.0.0.0dbru folder and open it.
- Inside, find a subfolder entitled instantclient_19_11 and move it into the Oracle folder.
- Finally, erase the instantclient-basic-windows.x64-19.11.0.0.0dbru folder.
This process ensures that the ODBC and basic ZIP archives have been extracted to the same folder by the end of this process. You can also get the SDK package and extract it to the instantclient_19_11 folder. It’s not necessary, but we recommend getting it as well.
2. Add an Oracle Client Directory to PATH Environment.
An environment variable is an editable value that other programs and applications can access within your computer. This lets the Oracle driver know where to install files, store them, and find user settings.
After extracting and setting up the necessary files for your driver to work, you’ll need to add the Oracle Client directory as an environment variable. This lets other applications and programs access your ODBC driver, allowing you to access the Oracle Database.
Here’s how to properly add the Oracle Client as an environment variable:
- Press the Windows+S keys. This will open the search bar.
- Type in the phrase system environment variables into the search bar.
- Next, select the Edit the system environment variables option. This should open the System Properties window.
- Select the Environment Variables... under the Advanced tab.
- Next, select New… under the system variables list.
- Input OCI_LIB32 into the Variable Name box.
- Under the Variable Value box, input the directory path of your Oracle folder.
- Considering you properly formatted the folders previously, your directory path should be: C:\Oracle\instantclient_19_11.
- Within the system variables list, double-click the Path variable.
- Once opened, click the New button and input the same directory path you added under the Variable Value box. (This would be C:\Oracle\instantclient_19_11).
- Click OK and exit the window.
Finishing this process should allow your Oracle Client to run its processes properly. Your previously downloaded Oracle packages can now act as an environment variable for your programs that require the Oracle driver.
3. Install the Oracle ODBC Client.
This step is fairly straightforward. We’ll be installing the Oracle client itself, which can be done in just a few moves.
Here’s how you can install the Oracle ODBC client:
- First, start by opening the instantclient_19_11 folder.
- Next, right-click the odbc_install.exe file.
- Finally, select Run as Administrator.
4. Create New ODBC Data Source.
Finally, we’ll be setting up the DSN (Data Source Name) for your newly installed Oracle driver. Note that the information you’ll be adding will be specific to the database you’re trying to connect to. Hence, this information will be different.
Your DSN will contain information that your ODBC driver will need to connect to a specific database. This will include information like the name, directory, and driver of the database. Depending on the type of DSN, it may also include the ID and password of the user.
Here is how to set up your DSN:
- Press both the Windows and S keys to open up the search bar.
- Enter ODBC Data Sources into the search box.
- Select the ODBC Data Sources to open a window.
- Click the Add button to open the Create New Data Sources
- Select your Oracle driver and click Finish.
- Open the Oracle ODBC Driver Configuration window and enter your information; such as the Data Source Name, TNS Service Name, and User ID.
- Press the OK button to exit.
After setting this up, your driver should be able to connect to the Oracle Database server directly.
That wraps it up for this tutorial on how you can install the Oracle ODBC driver in Windows 10. We hope this article has helped you in setting up your own ODBC driver. If you have concerns or inquiries, don’t hesitate to leave a comment don’t below.
If this guide helped you, please share it. 🙂
-
Mako is a staff writer at Saint. He’s been writing about tech for more than a decade. When he isn’t reading about the latest news on Apple, he’s busy studying cybersecurity, cryptocurrency, cloud computing, and other IT-related sectors. His exceptional work graces technology and Apple-related blogs like How-To Geek, VEED.io, Macgasm, onMac, PhotoWorkout, GameRant, and many more. He also has a Bachelors in Computer Science and has been writing since 2018, with over 400 posts published.
LinkedIn
X (Twitter)
View all posts
Installing Oracle ODBC driver for Windows and Linux
Ever since Oracle entered the cloud infrastructure scene, it has provided many handy tools for utilizing its service. Among those is the Oracle Open Database Connectivity (ODBC) driver. If you want to be able to connect to plenty of different data sources from a single compatible application, the Oracle ODBC driver is a must.
If you’ve ever had an interest in what Oracle has to offer in the world of cloud infrastructure, this article is just the place to start. In no time, you can get the ODBC driver up and running and configure your database access however you wish.
This article should help you install and configure an ODBC driver so that you can get it up and running in no time. I’ll also try to shed some light on what exactly you can do with said driver.

The following article will discuss:
- What is an Oracle ODBC driver?
- What is the purpose of the ODBC driver?
- How to Install Oracle ODBC driver for Windows 10.
- How to Install Oracle ODBC driver for Linux.
What is Oracle ODBC?
At its core, the ODBC driver is essentially an interface, or a gateway. It allows an application to access data from any compatible Oracle database. It allows users to either communicate with local Oracle databases set up through ODBC drivers or to the Oracle database. Essentially, it’s Oracle’s own official cloud.
Overall, it’s an extremely useful tool. Oracle has quickly become one of the biggest competitors in the cloud database market due to its competence in running such a massive project, as well as the useful tools that they supply for it. ODBC, of course, being one of them.
What can you do with Oracle ODBC?
Oracle ODBC drivers allow you to connect through an interface to access data in any compatible Oracle database using Structured Query Language (SQL) . You can set up local connections or cloud network connections with any device that you install the ODBC driver onto.
This is a powerful tool for companies, or even individuals who just need a convenient framework to allow multiple devices to communicate with one another. And the best part is that it’s not as challenging to set up as you might expect. Most people associate cloud infrastructure with being rather complicated and technical to get started with or use. Oracle, however, has taken a pretty intuitive approach to the way that systems interact with their databases, allowing for a versatile and user-friendly cloud experience.
Regardless, the installation process isn’t exactly as simple as “one click and you’re done” either. To help you get your driver installed properly, this guide will help walk you through the steps.
Getting Started
First thing’s first, you’re going to want to make sure you’ve downloaded the Oracle packages for your system. Go to the Oracle Instant Client webpage to download the package that suits your platform. You’ll want to get the Oracle SDK package for your system as well as the ODBC package.
Make sure that you are getting the correct package and version for your system. You can check the compatibility to be on the safe side by looking here.
Installing Oracle ODBC driver for Windows 10
Windows 10 users have the easier side of things with this installation. Oracle seems to keep its Windows audience in mind with their programs, as they always tend to run smoothly and have few issues in the long run.
Like I said, while this installation isn’t as simple as “one click and you’re done”, it’s not going to be rocket science. As long as you follow along with this guide, you should have no problem getting things all set up.

The first thing you’ll want to do is create an Oracle folder in your C: drive. You can do that by going to File Explorer and clicking on your (C:) drive in the left column. Then, right-click an open space and navigate to New and Folder, and click.
Simply name the folder Oracle and hit enter. Now, move all of the Oracle ZIP files that you downloaded into the Oracle folder, and extract them there.
Open the instantclient-basic-windows folder that was extracted. It will have a Windows bit type and a version number following it. Inside should be a subfolder. Move that subfolder into the Oracle folder, and delete the now-empty folder that it was inside.
Now, click your Start button to open the Windows search box. Type System Environment Variables and press enter. You should be brought to a control panel menu that says System Properties.
Click the Environment Variables… button at the bottom, and then click New.
Enter OCI_LIB32 into the Variable Name box. Next, you’ll need to input the Oracle folder path into the Variable Value box. That should be C:\Oracle\instantclient_(your version number) if you followed the previous steps.
Next, double-click Path to open the environment variable table. Click New and enter the same folder path again into the Variable Value box. Then click OK.
Now you can install the ODBC client. Open the instantclient folder in your Oracle folder, and right-click odbc_install.exe. Click Run As Administrator. You won’t get a pop-up to confirm the process, but rest assured. The installation should still be complete.
Open up another search in the Start menu, and type ODBC Data Sources, and hit enter. Click the Add button on the User DSN/System tab to create a new data source.
Find your Oracle ODBC driver, select it, and press Finish.
Fill out the details on the configuration window, and then press OK to finish.
Congratulations! You’ve just installed your ODBC driver.
Installing Oracle ODBC driver for Linux
Now, for Linux users, the process gets a bit rockier. You’ll have to dig a bit more in-depth than with the Windows installation, but if you follow along, you shouldn’t have too much trouble. It’s not rocket science, but it is Linux.

Regardless of which Linux operating system you run, the process should be almost identical. I’ll be using Ubuntu as an example, but these steps should apply to you regardless of your system. Just follow along, and you should have no trouble getting this working smoothly.
Once you’ve downloaded the Instant Client packages, you’ll need to install them and their dependencies. Run the following commands:
sudo apt install alien libaio1
sudo alien -i oracle-instantclient(your version number)-*
Now, you’ll want to make the Oracle libraries available for LD_LIBRARY_PATH. Enter the following commands:
echo /usr/lib/oracle/(your version number)/client64/lib/ | sudo tee /etc/ld.so.conf.d/oracle.conf && sudo chmod o+r /etc/ld.so.conf.d/oracle.conf
Sudo lfconfig
echo ‘export ORACLE_HOME=/usr/lib/oracle/(your version number)/client64’ | sudo tee /etc/profile.d/oracle.sh && sudo chmod o+r /etc/profile.d/oracle.sh
. /etc/profile.d/oracle.sh
After you’ve entered in those hefty commands, all you have to do is ensure that there’s no conflicts or issues with library references for SQL. You can do this by entering ldd ‘which sqlplus64’.
Now, install the unixODBC driver manager. You can find your recommended manager version on the Oracle website here.
Now, run the command odbc_update_ini.sh from the Instant Client directory.
At this point, the driver will be installed and freshly updated. Congratulations! It should be running smoothly now.
If you ran into errors with either installation process, there are alternative and further instructions on the official Oracle Database website here.
Final Points
Oracle’s database service is highly versatile, and there are plenty of different reasons why you’d want to set one up or install the drivers to take advantage of the service. However, the driver setup process can be a bit daunting for some. Hopefully this guide has helped you tackle the installation and get your driver running smoothly!
With your driver up and running, you should now be free to use it as you wish. Whether that be to configure a local database and have full access from any compatible device or to connect directly to the Oracle Database is entirely up to you.
Oracle ODBC or Open Database Connectivity driver helps in connecting Windows systems to other oracle networks. The set-up is not in-built in Windows 10 or any other version of the operating system, for that matter. Therefore, you need to install this set up separately and then connect it to other third-party networks.
Moreover, Oracle is a premier data management system for Windows. Installing the driver is complicated, especially if you consider yourself technically challenged. But it’s not impossible.
In this blog post, I have extensively discussed the methods that have come directly from experts in the field. In addition, I have also tried to add tips and answered the common questions that may arise in the process.
Also Read: How To Fix Bluetooth Mouse Not Working In Windows 10?
Step-By-Step Method To Download & Install ODBC Driver
Part 1: Install & Extract The Oracle Packages
Step 1: From your internet browser, go to the Oracle Instant Client website.
Step 2: Depending on your PCs platform, select and click on Instant Client For Microsoft Windows 32-bit or 64-bit link.
Step 3: Go to Basic Package and click on the downloadable link.
Step 4: In the Window that appears, go down with your cursor and tap on the SDK package hyperlink. This will help you in downloading the file.
Step 5: Besides, you will also need to download the link for the ODBC package.
Step 6: Launch File Explorer and tap on the folder taskbar button for it.
Step 7: In File Explorer, click on C: root drive
Furthermore, Follow These Steps
Step 8: Within the C: drive, find a space and right-click on it. Then from the drop-down menu, select New and Folder.
Step 9: Rename the new folder as Oracle, which will give you the path C:\Oracle.
Step 10: Send the Oracle ZIP files into this new folder by selecting them and tapping on Move To. Within the File Explorer section, select Choose Location.
Step 11: Furthermore, you have to extract all the Oracle Zip folders. And to do that, choose all the files, and tap on the Extract All button. You can do this on File Explorer’s Compressed Folder Tools tab.
Step 12: To select the Oracle Folder, go to the Extract Compressed Window and click on the Browse button. Tap on Extract.
Step 13: Moreover, you can open instant client-basic-windows.x64-19.11.0.0.0 dbru folder and send instantclient_19_11 subfolder to the Oracle one.
Step 14: In addition, Delete the old instant client folder so that you end up with only one of them.
Extract all the instant client folders from ZIP folders and finally delete the instant client folder. This will make sure you do not have extra unnecessary subfolders. Moreover, experts recommend that you download the SDK package and save it in the instant_client.
Also Read: How To Review And Delete Your Alexa History And Recordings
Part 2: How To Add Oracle Client Directory Environment Variable
Now that you have downloaded the Oracle Package, you have to add it to the client directory. And if you have trouble doing that all on your own, follow our steps one by one.
Step 1: Simultaneously press the Windows button + S on your keyboard, which will prompt a search box to open.
Step 2: In the Search Text box, type Keyword System Environment Variables.
Step 3: Further, tap on Edit The System Environment Variables, automatically opening the Window we have shown below.
Step 4: Moreover, click on the option that says Environment Variables. Next, tap on the New in System Variable window.
Step 5: Enter OCI_LIB32 in the variable name box. You also have to enter the Oracle folder path, which will look like this: C:\Oracle\Instantclient_19_11.
Step 6: To open the Window in the snapshot, double click on Path in System Variables.
Step 7: Tap on New and type the folder path in the Variable Value box. And click on Okay.
Part 3: Installation Of ODBC Oracle Client Package
The next part is to install the ODBC client by opening the instant_client_19_11 folder from the ODBC package in File Explorer. Moreover, right-click on the option odbc_install.exe and tap Run as Administrator.
Part 4: Setting Up Data Source Network
The fourth part is to set up a data source network or a DSN. To do this:
Step 1: Launch the Search Tool in Windows and type ODBC data sources.
Step 2: Click on ODBC data sources that will open a new window. Moreover, tap on Add from the User DSN system and open the Create New Data Source option.
Step 3: Furthermore, choose your Oracle ODBC driver and click on Finish. On the configuration window, fill out the details necessary.
Step 4: Check the Oracle Database Server Connection by clicking on Test Connection. To leave, click on Exit.
Also Read: How To Set Up 3 Monitors In Windows 10?
Part 5: Installing Visual C++ Libraries That Are Missing
Now we are in the last part, which is simple. To begin with, you can set up data sources with the ODBC data source for an Oracle Driver. However, you can only do this if you have not installed the visual C++ yet. Usually, an error message pops up. In this case, you can download Visual Audio 2017 and other redistribution packages.
Tap on the VC EXE file you downloaded, and this is the way to install the Oracle ODBC driver on Windows 10.
How To Install Oracle Instant Client ODBC On Linux And UNIX?
Step 1: On your Linux and UNIX operating systems, download and install the Oracle Client Package. And once again, unzip it in the directory. If you are using the RPM package on Unix, you can install it with yum.
Step 2: If the UnixODBC driver is not available, install it.
Step 3: Go to the Instant Client Directory and execute odbc_update_ini.sh.
Step 4: Depending on your locale, set an Oracle Globalization variable which will look like export NLS_LANG=JAPANESE_JAPAN.JA16EUC for the JA16EUC in Japanese.
For usage: odbc_update_ini.sh <ODBCDM_HOME> [<Install_Location><Driver_Name><DSN><ODBCINI>]
To understand this further, see this list of parameters and description.
- ODBCDM_Home: unixODBC driver manager home directory path
- Install_Location: The current Oracle instant client directory is the default path
- Driver_Name: It identifies the Oracle ODBC driver in the current residing Oracle Instant Client home. The name can be something like Oracle 19c ODBC Driver.
- DSN: Default name for DSN is Oracle ODBC-19c
- ODBCINI: This is the directory path .odbc.ini file which is the default users home directory.
How To Uninstall Oracle Client ODBC On Windows 10?
Step 1: In Windows 10, you can uninstall Oracle client ODBC by removing the Data source network. It is associated with the Oracle ODBC Driver, present in the ODBC data source administrator console.
Step 2: From the Instant client directory, execute odbc_uninstall.exe.
Step 3: Furthermore, you can remove all the files and directories one by one from the Client ODBC director.
Conclusion
Follow the steps in this article to download the Oracle Client Package and uninstall it when you don’t need it. If there’s any other way that’s easier to do in Windows 10, let us know in the comments below.