
How to install macOS Catalina 10.15 on VirtualBox under Windows.
Small tutorial with all the sources that allowed me to install MacOS Catalina on VirtualBox under Windows.
This tutorial explains how to install macOS Catalina on a virtual machine. Customizable resolution and video memory.
Do not hesitate to open an exit in case of a problem or for any technical question.
Prerequisites
VirtualBox
- Go to this website and download VirtualBox and the Extension Pack.
- Once downloaded, install VirtualBox and the Extension Pack.
Required files
All the necessary files except VirtualBox, the Extension Pack and the macOS ISO are available by downloading the repository.
- Download the ISO of macOS Catalina 10.15 (8.3GB).
- Download the VMware Tools.iso file.
- Download the Boot.vmdk file.
Activate the Virtualization Technology
The virtualization technology is available for Intel and AMD processors under different names. For Intel, it is named VT-X and for AMD, it is named AMD-V. This technology must be enabled in order to run macOS Catalina on VirtualBox.
To activate the virtualization technology option, you need to access either the BIOS or the UEFI of your computer. In order to do this, you need to know the key·s required when booting your PC. It can be one of these keys: F1, F2, F10, F12, or DEL (may require pressing the Fn key).
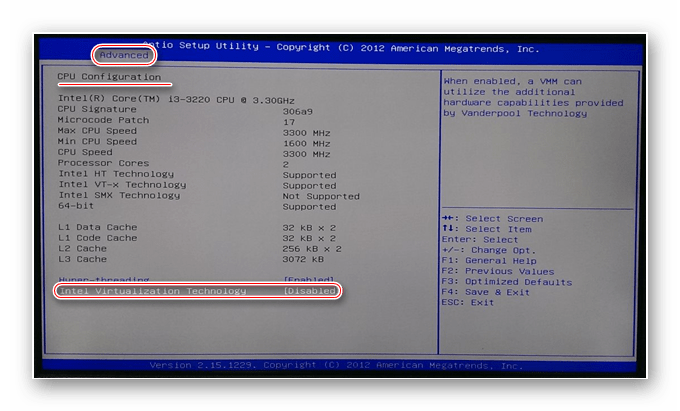
How to activate Intel’s VT-X virtualization technology?
Once on your BIOS or UEFI, you need to find the Virtualization Technology, VT-X or VT option which is usually found in the Advanced options. Make sure you set this option to Enabled.
How to activate AMD’s AMD-V virtualization technology?
Once on your BIOS or UEFI, you need to find the Secure Virtual Machine Mode, AMD-V or SVM Mode option which is usually found in the Advanced options. Make sure you set this option to Enabled.
How do I know if virtualization technology is enabled on my computer?
Open the Task Manager and in the Performance tab check the Virtualization field is enabled.
Configuration of the virtual machine
-
Run VirtualBox.
-
Create a new virtual machine. Enter the name you want, select Mac OS X for the type and Mac OS X (64-bit) for the version.
-
Select the amount of RAM. The minimum is 4096MB, but for best performance, I recommend setting it to 8192MB.
-
Create a VDI virtual disk with a fixed size and a minimum of 80GB.
-
Click on your virtual machine and open the Settings options.
- In System ➜ Motherboard, set the Chipset to PIIX3.
- In System ➜ Processor, set the number of CPUs to a minimum of 2.
- In Display ➜ Screen, set the Graphics Controller to VMSVGA.
- In USB, enable the USB controller and check USB 3.0 (xHCI) Controller.
- In Storage, click on the disk button with a green
+and add the macOS Catalina ISO file. - In Storage, click on the hard disk button with a green
+and add theBoot.vmdkfile.
-
Click OK to confirm the changes.
-
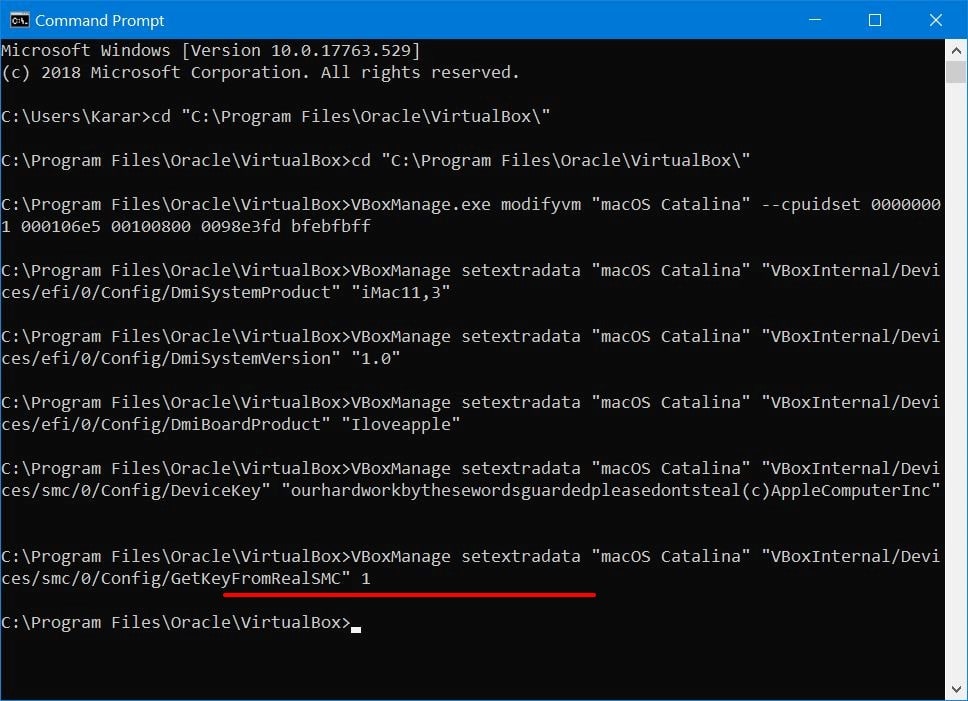
Open a command prompt as administrator and type these commands:
Make sure to replace theVirtual Machinewith the name of your virtual machine.cd "C:/Program Files/Oracle/VirtualBox/" VBoxManage.exe modifyvm "Virtual Machine" --cpuidset 00000001 000106e5 00100800 0098e3fd bfebfbff VBoxManage.exe setextradata "Virtual Machine" "VBoxInternal/Devices/efi/0/Config/DmiSystemProduct" "iMac11,3" VBoxManage.exe setextradata "Virtual Machine" "VBoxInternal/Devices/efi/0/Config/DmiSystemVersion" "1.0" VBoxManage.exe setextradata "Virtual Machine" "VBoxInternal/Devices/efi/0/Config/DmiBoardProduct" "Iloveapple" VBoxManage.exe setextradata "Virtual Machine" "VBoxInternal/Devices/smc/0/Config/DeviceKey" "ourhardworkbythesewordsguardedpleasedontsteal(c)AppleComputerInc" VBoxManage.exe setextradata "Virtual Machine" VBoxInternal2/EfiGraphicsResolution 1920x1080 VBoxManage.exe modifyvm "Virtual Machine" --vram 256The values in the last two lines can be changed.
- The first is the resolution. It can be:
1280×720,1920×1080,2560×1440,2048×1080,3840×2160,5120×2880. - The second is the video memory. It can be a number between 0 and 256. The minimum is 128 and the best is 256.
- The first is the resolution. It can be:
Installation of macOS on the virtual machine
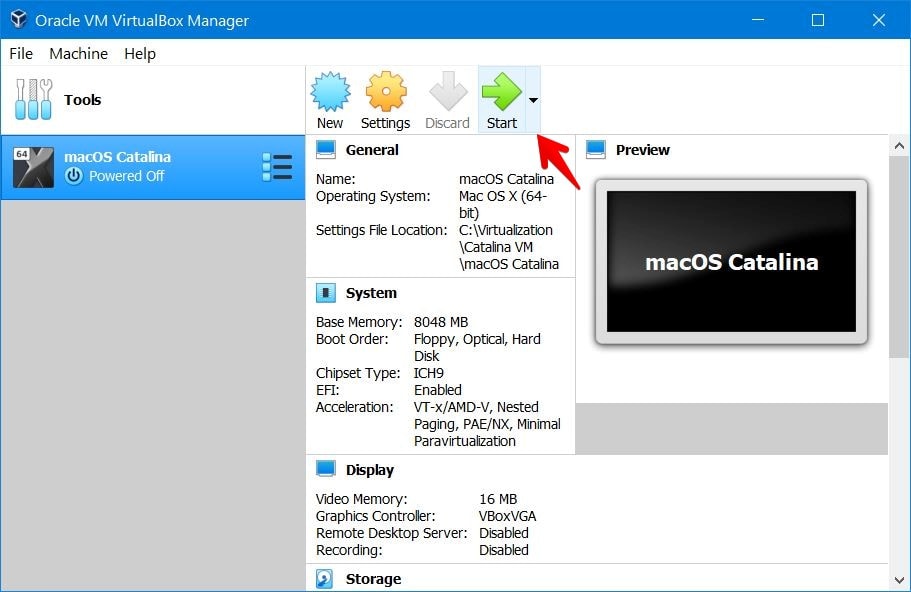
- Start the virtual machine.
- After a few lines of white text on a black background, the macOS installation screen for Catalina should appear.
- Select your language.
- Click on Disk Utility and format the
VBOX HARDDISK Media. - Close the tab and click on Install macOS.
- Continue and accept the terms of the software license agreement.
- Select the hard drive and click Install.
- Important step: during the automatic restart of the virtual machine, stop it.
- Restart the virtual machine and press the
Esckey to open the BIOS. - Move to the Boot Manager menu with the arrow keys and select EFI Internal Shell.
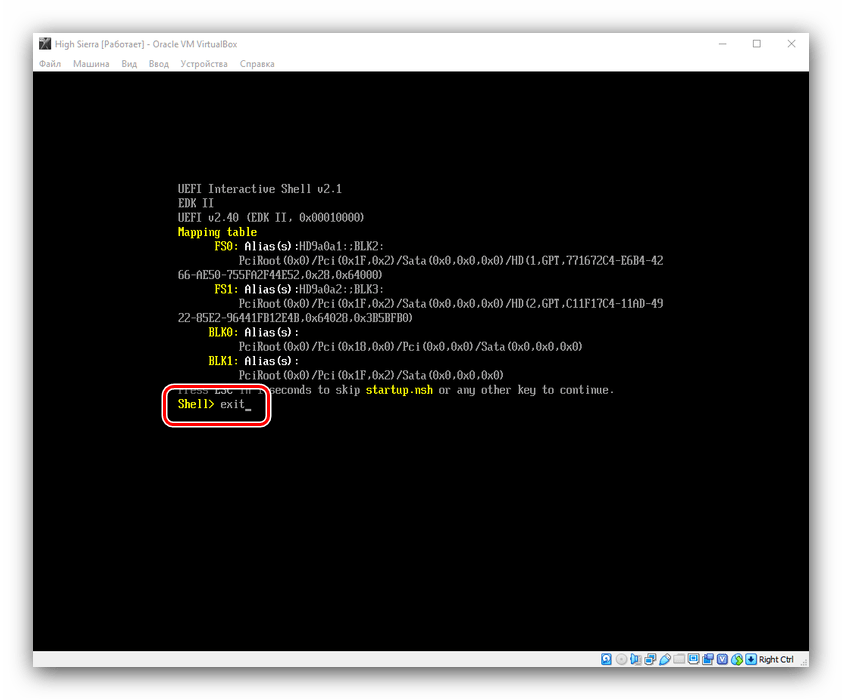
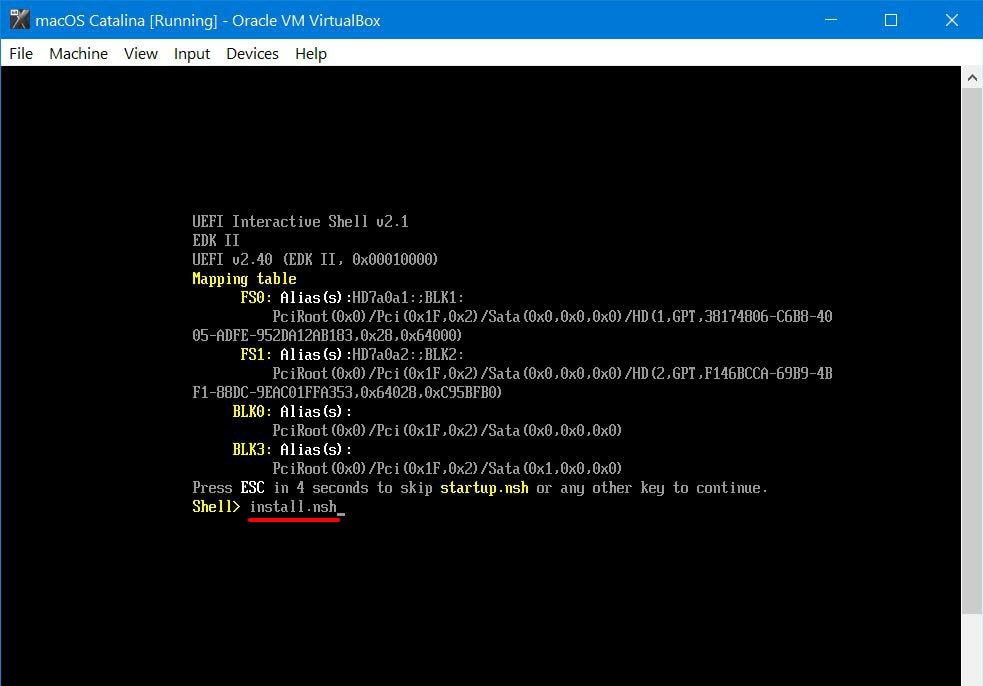
- A few random yellow, gray and white texts should appear. Press
Escand it should get toShell> _. - Type
install.nshand pressEnter. - After a few moments, you will be on the macOS Catalina configuration pages.
- Follow the basic configuration steps and you will be on the macOS Catalina desktop as soon as possible.
Change resolution and video memory
-
Shut down the virtual machine.
-
Open the Settings options and in Storage, eject the macOS Catalina ISO file.
Then click on the disk button with a green+and add theVMware Tools.isofile. -
Restart the virtual machine.
-
Double-click on the VMWare Tools disk and click on Install VMWare Tools.
-
The extension should be blocked, so open the Security and Privacy section in the System Preferences and click Open anyway.
-
Once the installation is complete, restart the virtual machine. Note that the installation may need to be performed twice.
-
Open the Terminal application and type this command:
Replace the1920 1080value with the same value as the screen resolution you set earlier.sudo /Library/Application\ Support/VMware\ Tools/vmware-resolutionSet 1920 1080 -
To automate this command every time you start your system, open the Automator application.
-
Choose Application, open Utilities and add Run Shell Script.
-
Set the Shell to
/bin/bashand type this command line:
Replace the valuepasswordwith the macOS password for your virtual machine.
Replace the1920 1080value with the same value as the screen resolution you set earlier.echo "password" | sudo -S /Library/Application\ Support/VMware\ Tools/vmware-resolutionSet 1920 1080 -
Click on file and save it in Applications.
-
Open the System Preferences and click on Users & Groups.
-
In Login Items, click on the
+button and add the application.
Sources
- French website — Comment installer macOS Catalina 10.15 sur VirtualBox sur Windows?
https://www.tech2tech.fr/comment-installer-macos-catalina-10-15-sur-virtualbox-sur-windows - How to change screen resolution of macOS on VirtualBox?
https://techsviewer.com/how-to-change-screen-resolution-of-macos-on-virtualbox - How to increase the display memory to 256 MB and change the screen resolution under macOS Catalina on VirtualBox?
https://www.youtube.com/watch?v=gDwFdGUsBOo
Все способы:
- Требования к установке
- Особенности инсталляции macOS в VirtualBox
- Установка macOS Mojave
- Этап 1: Загрузка необходимых материалов
- Этап 2: Настройка VirtualBox
- Установка macOS High Sierra и старше
- Этап 1: Загрузка образа
- Этап 2: Настройка среды
- Этап 3: Установка ОС
- Устранение возможных проблем в работе VirtualBox
- Заключение
- Вопросы и ответы: 38
Многие пользователи не прочь познакомиться с преимуществами операционной системы macOS, но не хотят или не могут приобрести iMac или MacBook. Хорошим решением в такой ситуации будет установка этой ОС на виртуальной машине, в частности, посредством VirtualBox, о чём мы и хотим вам рассказать в статье далее.
Требования к установке
Перед тем как приступать к инсталляции макОС на «виртуалку», убедитесь, что ваш компьютер соответствует следующим требованиям:
| Требования | |
|---|---|
| Процессор | Двухъядерный или больше, с поддержкой инструкций SSE 4.2, желательно Intel |
| Оперативная память | 4 Гб и более |
| Основная операционная система | С разрядностью 64-бит, предпочтительно Windows или развитый дистрибутив на ядре Linux |
Также требуется настроить на компьютере виртуализацию – под этим подразумевается включение специфичных настроек в BIOS или UEFI. Обратите внимание, что такие опции поддерживают не все компьютеры – для получения подробностей обратитесь к материалу по ссылке ниже.
Подробнее: Как включить виртуализацию в BIOS
Особенности инсталляции macOS в VirtualBox
Установка рассматриваемой ОС в ВиртуалБокс состоит из нескольких этапов: загрузки необходимых материалов, настройки среды и запуска либо установки образа. Процедура отличается для инсталляции варианта macOS Mojave и более старых версий «яблочной» ОС, поэтому имеет смысл рассмотреть оба.
Установка macOS Mojave
Этап 1: Загрузка необходимых материалов
- Первое, с чего следует начать – скачивание подходящего образа для VirtualBox. Из-за некоторых ограничений мы не можем разместить образ на нашем сайте, поэтому вам нужно самостоятельно его отыскать в интернете по запросу macos mojave virtualbox image.
Обратите внимание, что в большинстве случаев это будет готовый образ виртуального жесткого диска с уже установленной системой. Особенность последней версии макОС в том, что ей для полноценной установки требуется накопитель с файловой системой APFS, которую не поддерживает VirtualBox, его актуальная на момент написания настоящей статьи версия. Если вас интересует полная поэтапная установка, обратитесь к варианту High Sierra, который описан ниже.
- Далее следует загрузить новейшую версию VirtualBox – воспользуйтесь ссылкой ниже.
Скачать VirtualBox
- После загрузки инсталлятора запустите его и установите на компьютер, следуя инструкциям на экране.
Также следует загрузить плагин расширения – это нужно для работы USB-портов версий 2.0 и 3.0. Загрузить нужный пак можно по следующей ссылке.
Скачать Oracle VM VirtualBox Extension Pack
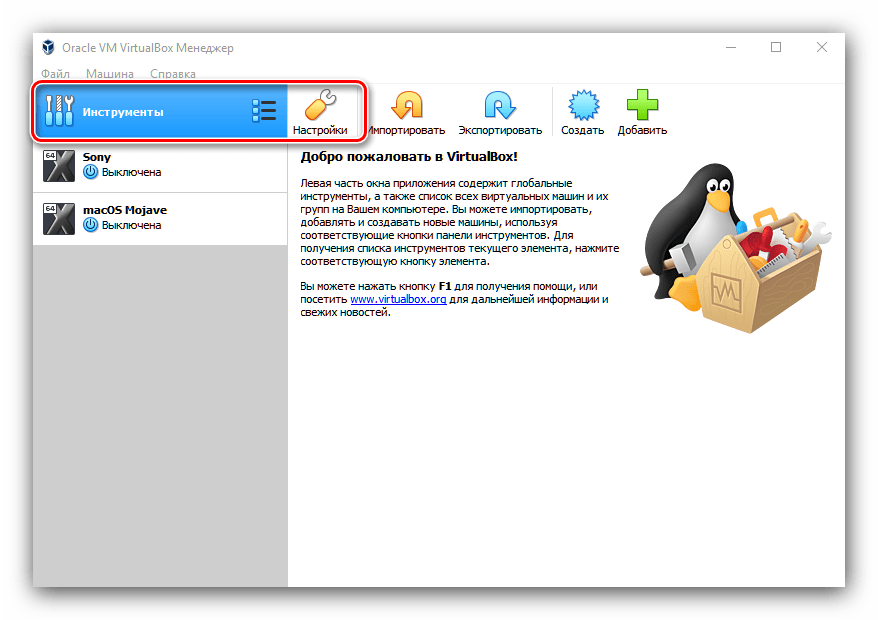
- Загрузите файл инсталлятора, после чего запускайте ВиртуалБокс. Перейдите по пунктам «Инструменты» – «Настройки».
- Далее выберите в меню слева вариант «Плагины». Затем в правой части окошка найдите кнопку с иконкой папки с плюсом и нажмите на неё.
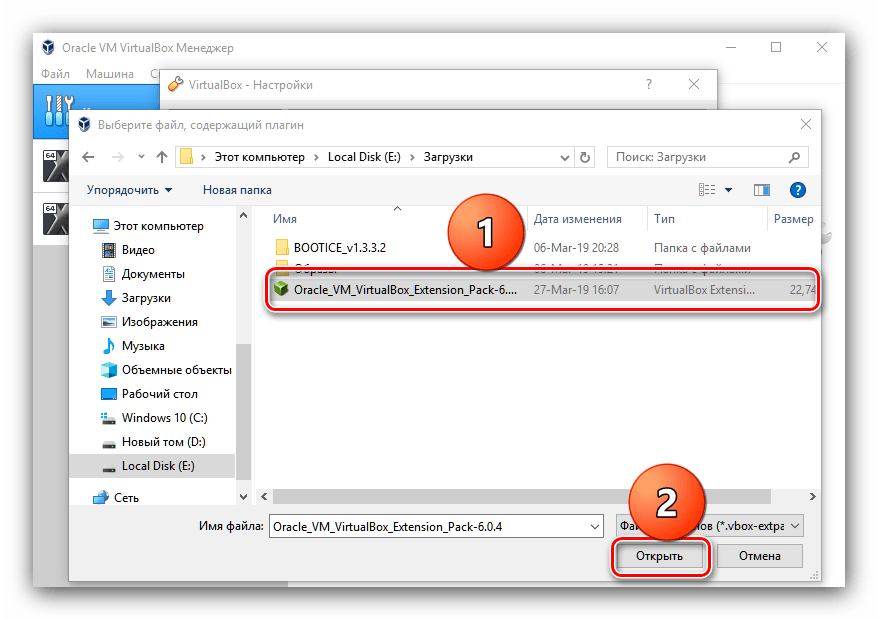
- Откроется «Проводник» – используйте его для перехода к директории с загруженным плагином. Выберите искомый файл и нажмите «Открыть».
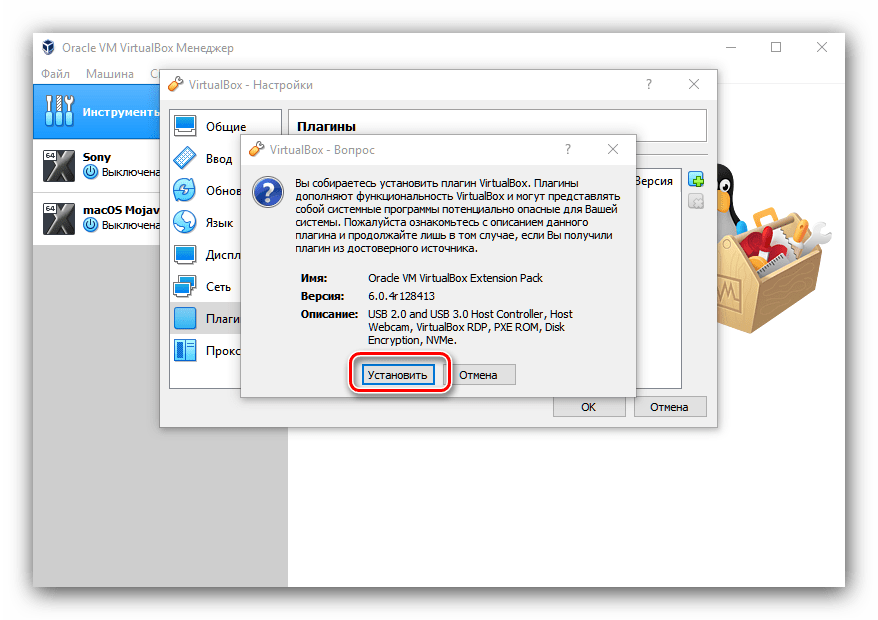
- Нажмите «Установить».

Прочитайте текст лицензионного соглашения, после чего нажимайте на кнопку «Я согласен».
Когда плагин будет инсталлирован, вы получите соответствующее уведомление.


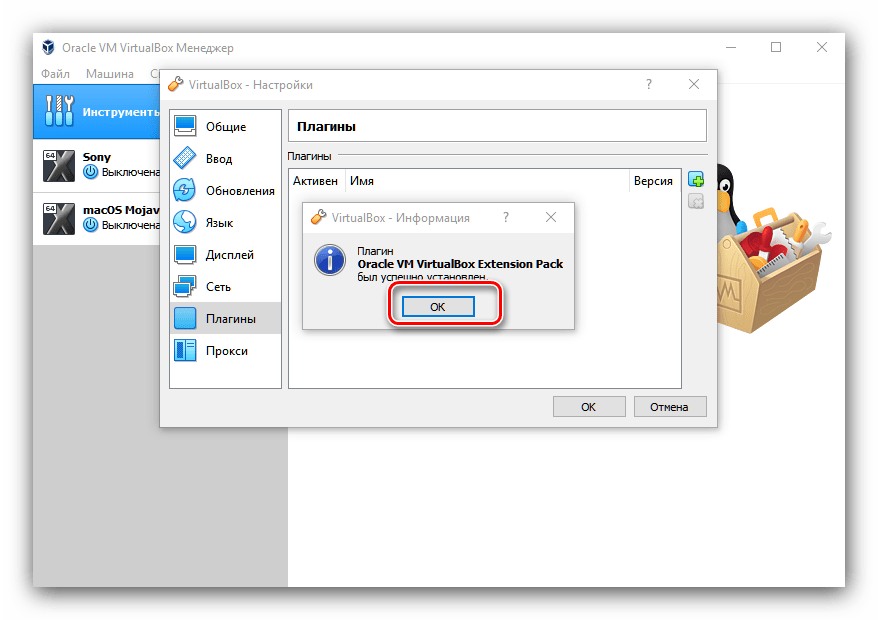
Проверьте, появился ли пак расширения в списке, после чего переходите к следующему этапу.
Этап 2: Настройка VirtualBox
Перед инсталляцией новейшей macOS виртуальную машину следует соответствующим образом настроить. Действуйте по следующему алгоритму:
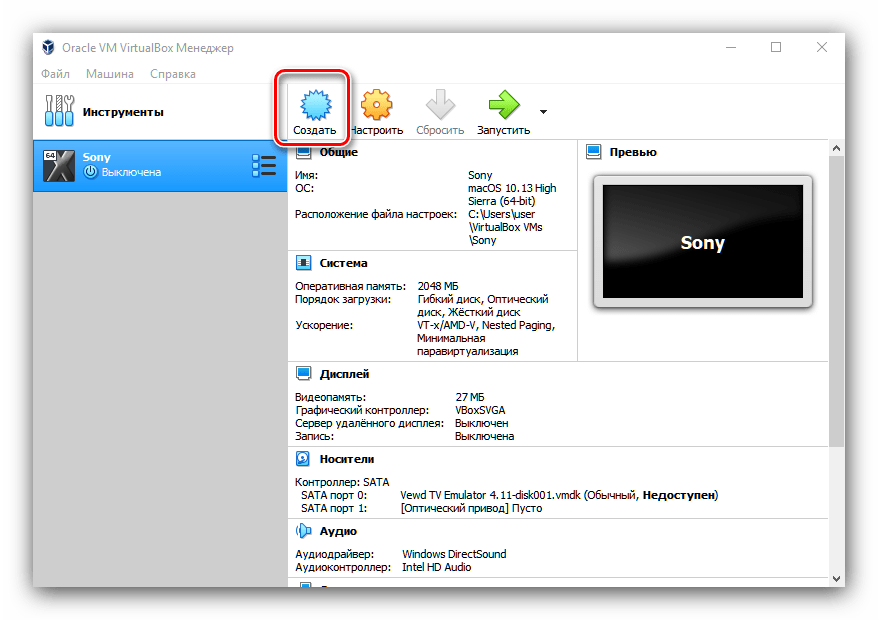
- Запустите ВиртуалБокс и нажмите на кнопку «Создать» на панели инструментов.
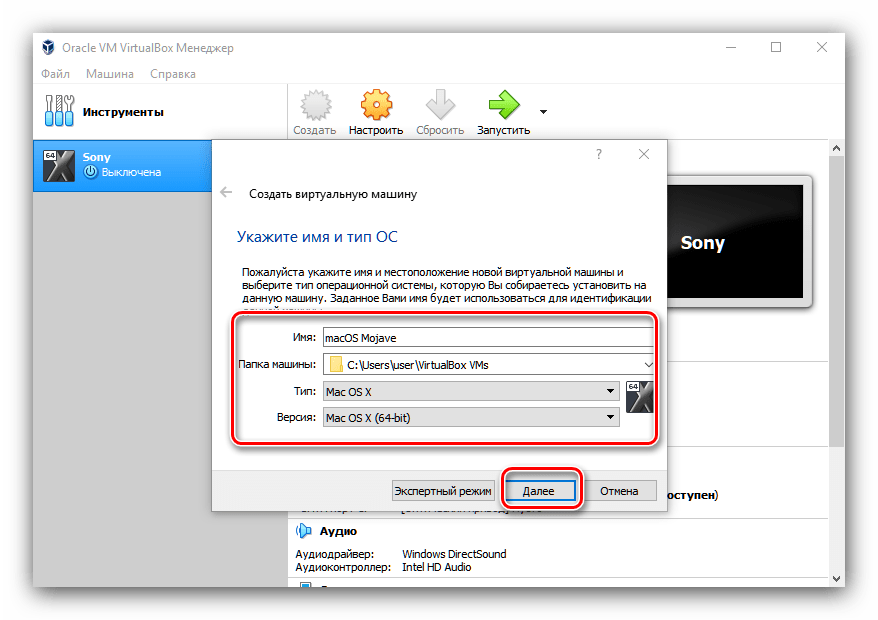
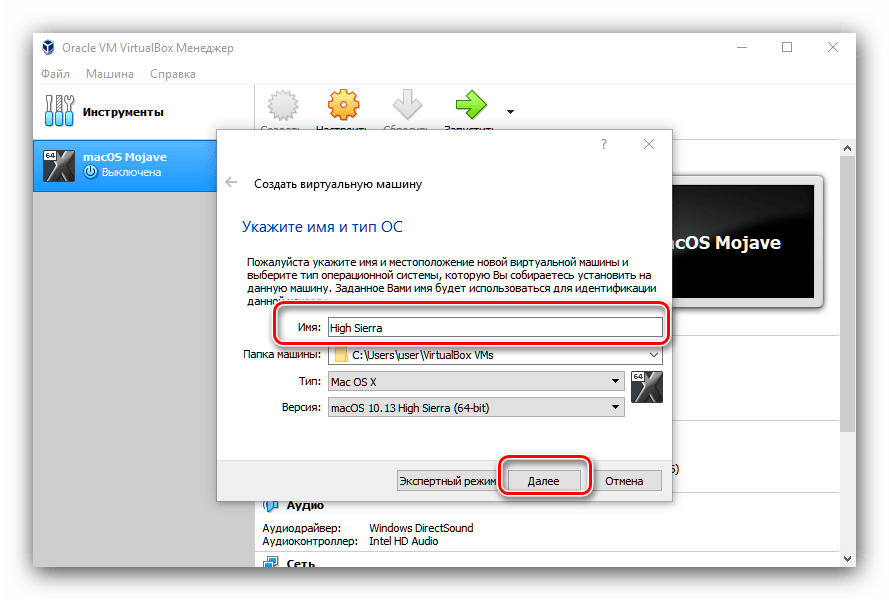
- Появится окошко создания новой виртуальной машины. Первым делом введите имя ОС, в нашем случае macOS Mojave. Далее выберите тип и версию «Mac OS X» соответственно из выпадающих списков, после чего нажмите «Далее».
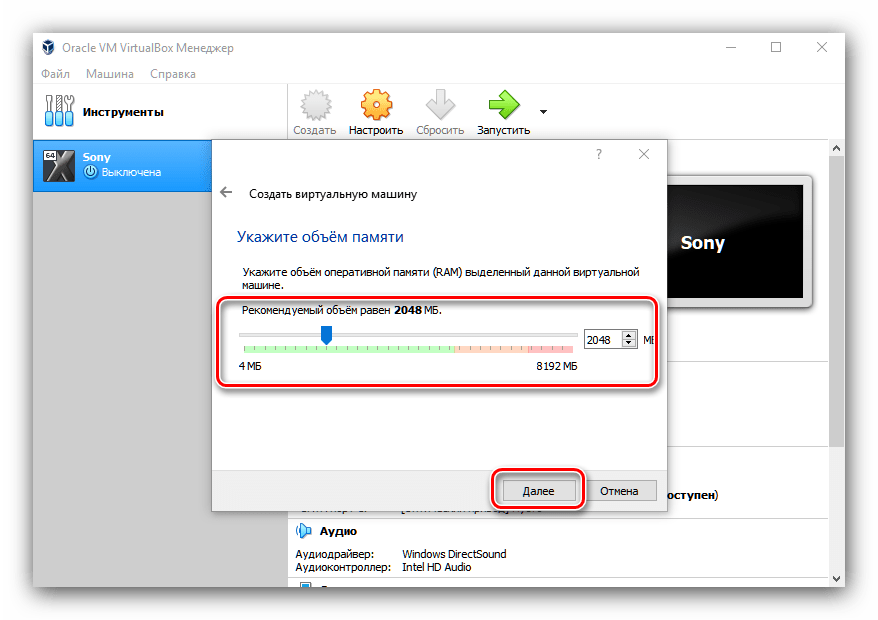
- На этом шаге следует задать количество оперативной памяти, выделенное виртуальной машине. Значение зависит от количества установленной на компьютере RAM: например, для устройств с 4 Гб на борту следует задать 2048 МБ, для машин с 8 Гб – 4096 Мб, и по такому же принципу, если ОЗУ больше.
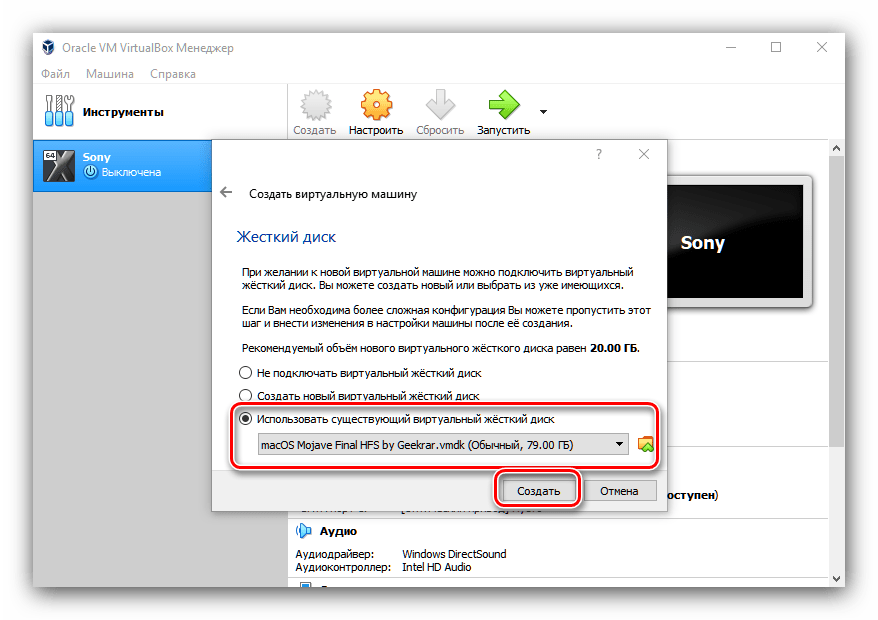
- Для функционирования ОС на виртуальной машине следует создать или подключить образ жесткого диска. Для нашей сегодняшней цели будем использовать последний вариант: выберите позицию «Использовать существующий виртуальный жесткий диск», затем посредством диалогового окна «Проводника» выберите загруженный ранее образ в формате VMDK и нажмите «Создать».
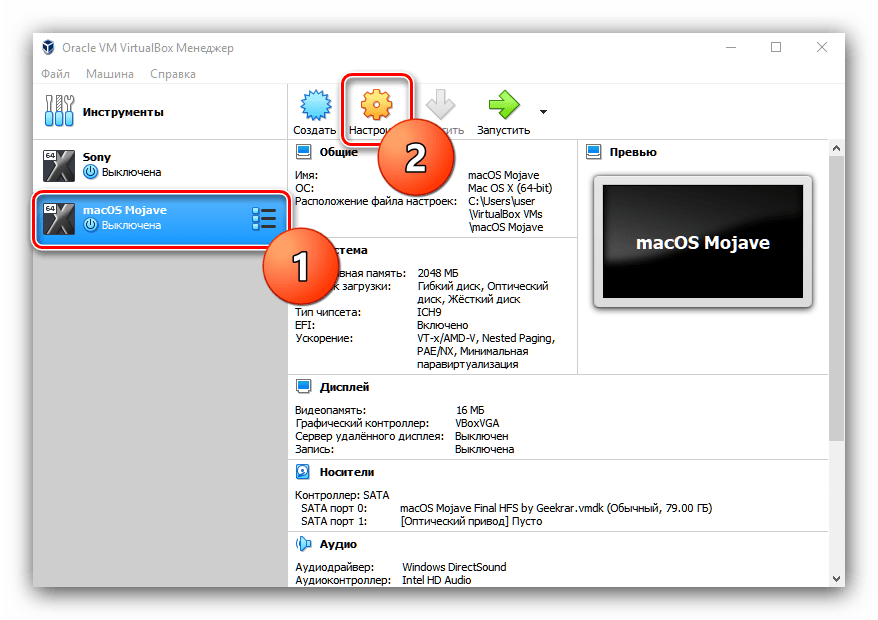
- После создания новой виртуальной машины её следует настроить – для этого выделите нужную позицию в меню слева и нажмите на кнопку «Настроить», которая расположена в меню инструментов.
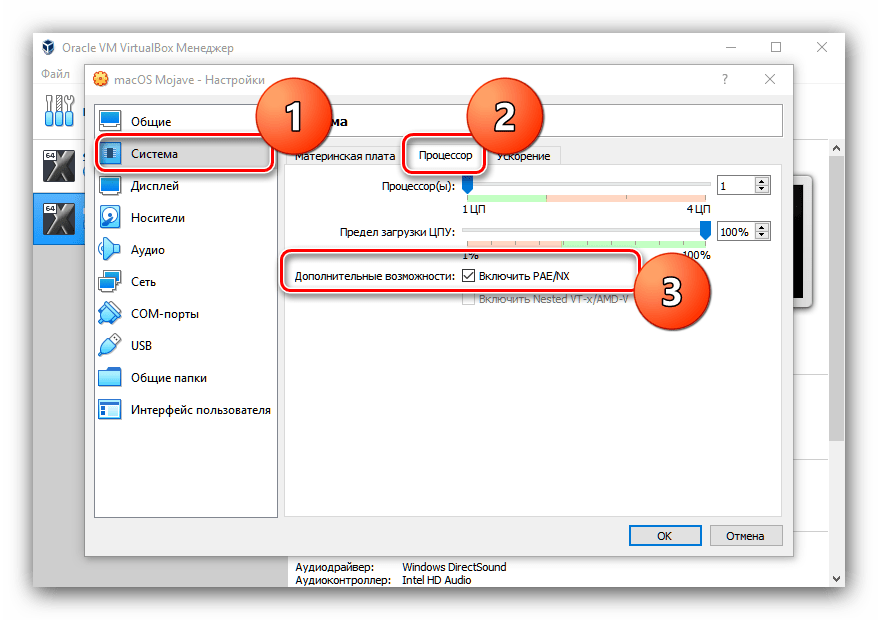
- Первым делом откройте закладки «Система» – «Процессор». Тут нужно отметить опцию «Включить PAE/NX».
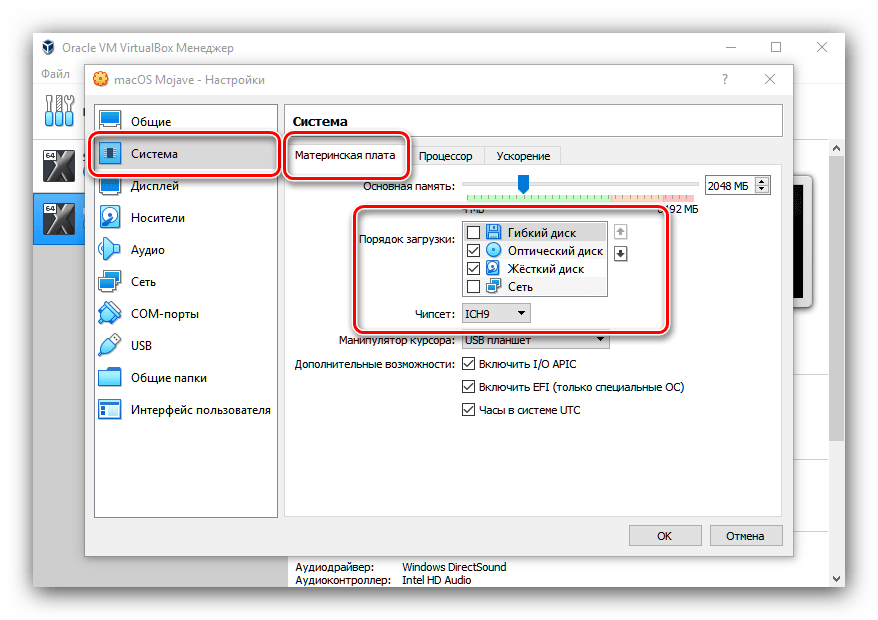
Затем в этом же разделе перейдите ко вкладке «Материнская плата». В блоке «Порядок загрузки» снимите галочку с опции «Гибкий диск». Далее в выпадающем меню «Чипсет» выберите вариант «ICH9», если он не установлен по умолчанию.
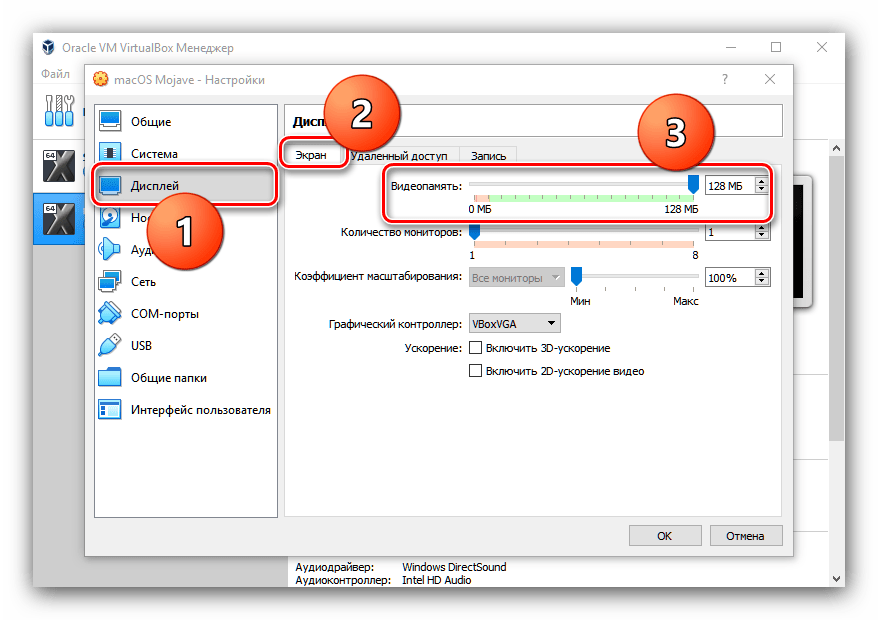
- Перейдите к закладкам «Дисплей» – «Экран», где с помощью ползунка «Видеопамять» выберите значение «128 Мб».
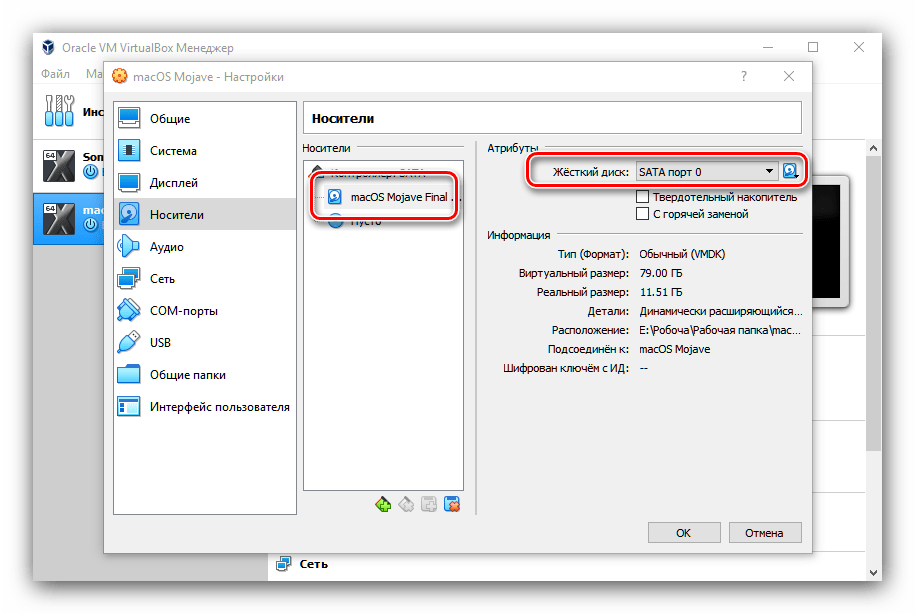
- Далее следует настроить носители – раскройте соответствующий раздел. В нём выделите образ нашей macOS и в списке «SATA» выберите «SATA 0».

Затем кликните по пункту «Контроллер: SATA», и в правой части окна поставьте галочку напротив опции «Кэширование ввода/вывода», после чего жмите «ОК».
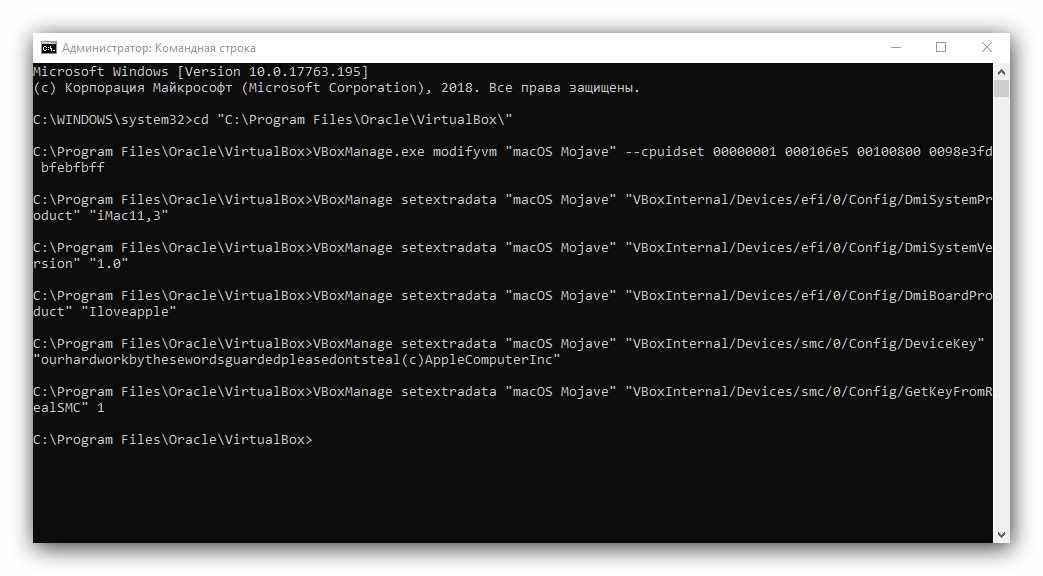
- После выхода из настроек закройте основное окошко VirtualBox и запустите «Командную строку» от имени администратора. Далее введите в окошко интерфейса следующие команды по одной, нажимая Enter после каждой:
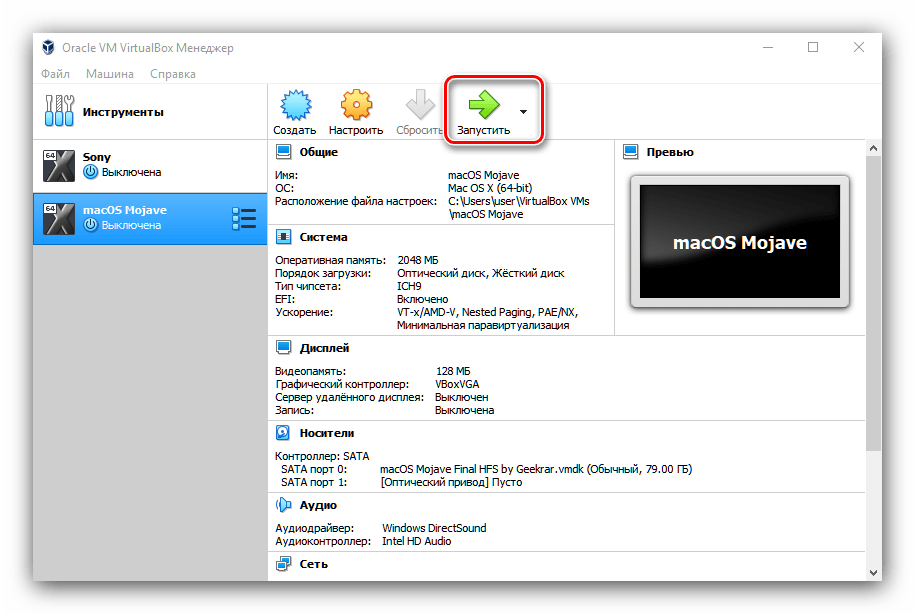
cd "C:\Program Files\Oracle\VirtualBox\"VBoxManage.exe modifyvm "macOS Mojave" --cpuidset 00000001 000106e5 00100800 0098e3fd bfebfbffVBoxManage setextradata "macOS Mojave" "VBoxInternal/Devices/efi/0/Config/DmiSystemProduct" "iMac11,3"VBoxManage setextradata "macOS Mojave" "VBoxInternal/Devices/efi/0/Config/DmiSystemVersion" "1.0"VBoxManage setextradata "macOS Mojave" "VBoxInternal/Devices/efi/0/Config/DmiBoardProduct" "Iloveapple"VBoxManage setextradata "macOS Mojave" "VBoxInternal/Devices/smc/0/Config/DeviceKey" "ourhardworkbythesewordsguardedpleasedontsteal(c)AppleComputerInc"VBoxManage setextradata "macOS Mojave" "VBoxInternal/Devices/smc/0/Config/GetKeyFromRealSMC" 1 - После исполнения команд закрывайте «Командную строку» и запускайте ВиртуалБокс. Нажмите на кнопку «Запустить».
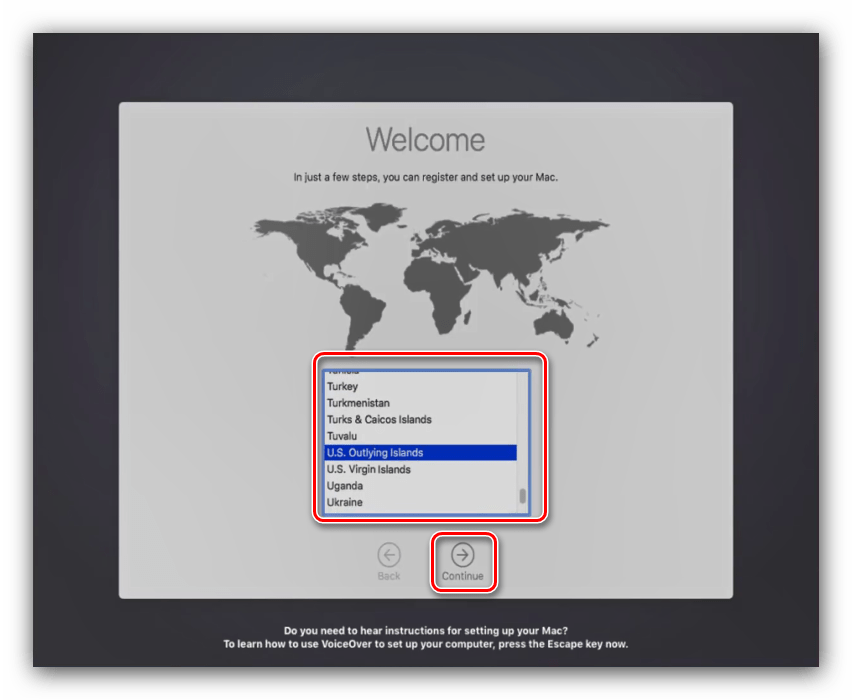
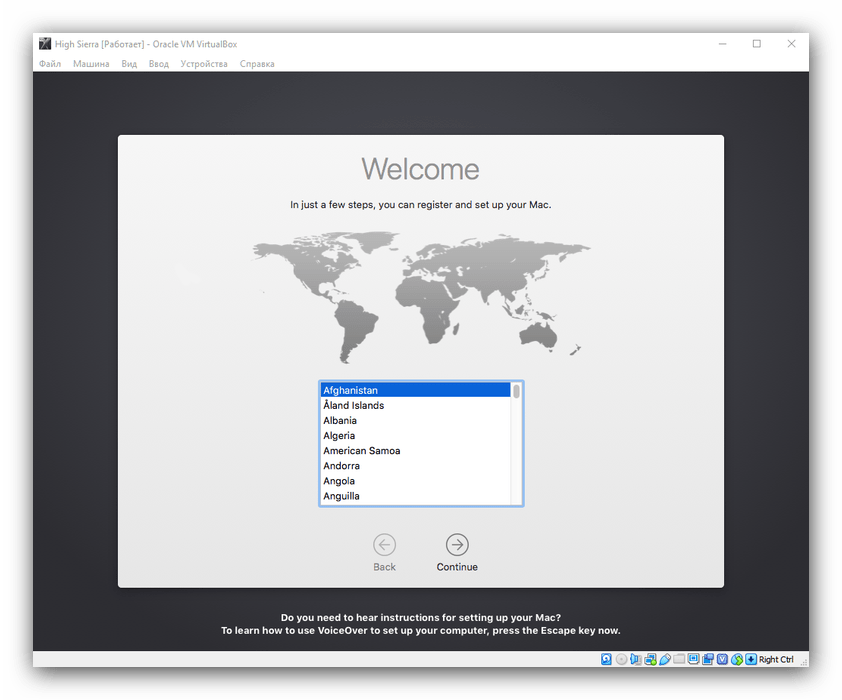
- Первым делом будет предложено выбрать регион. Установите желаемый и нажмите «Продолжить» («Continue»).
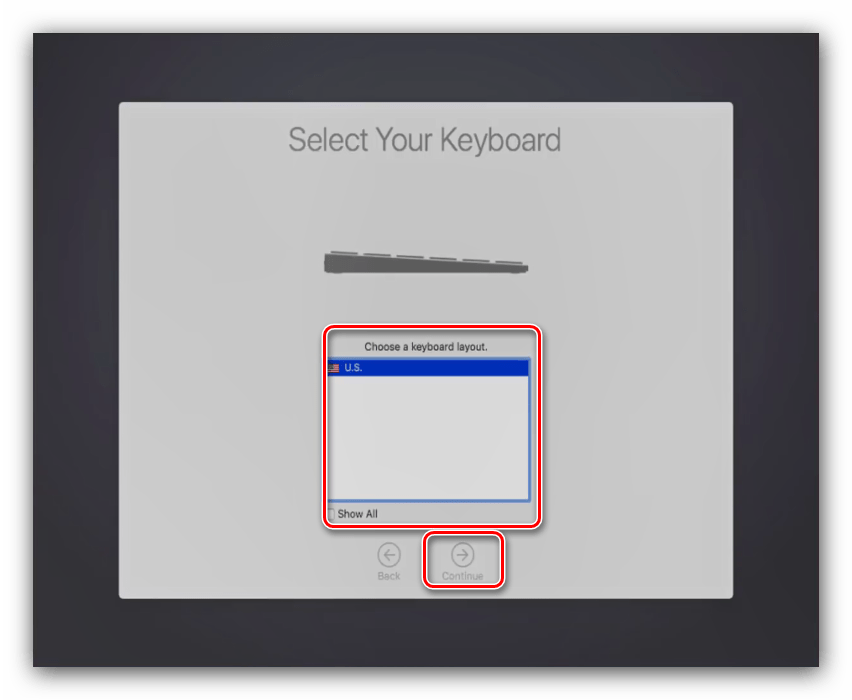
- Далее выберите раскладку клавиатуры – доступные варианты зависят от выбранного региона.
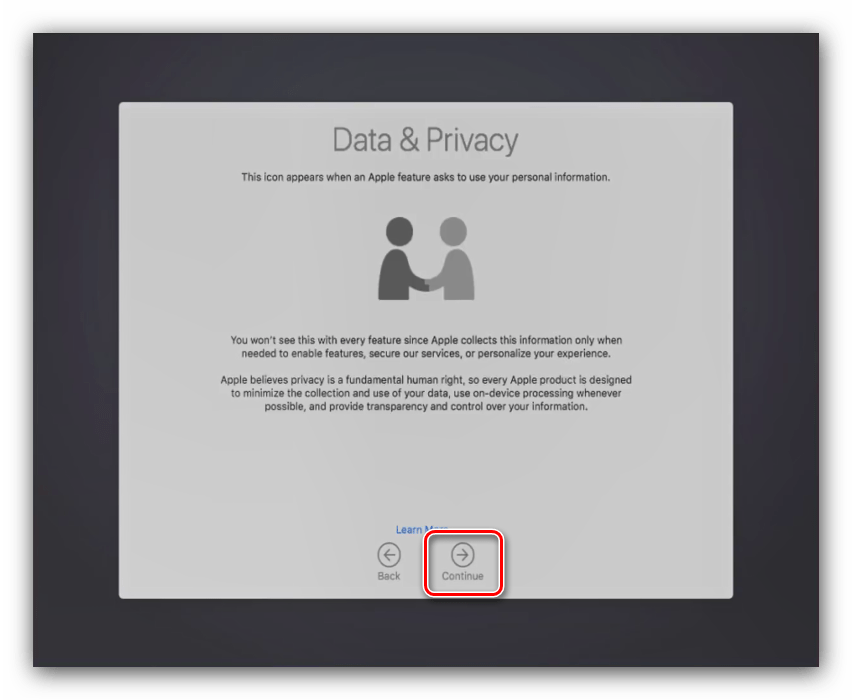
- Здесь требуется прочитать и принять соглашение на использование персональной информации. Поскольку данная инструкция не предполагает проброс сети на виртуальную машину, можно смело продолжать процедуру.
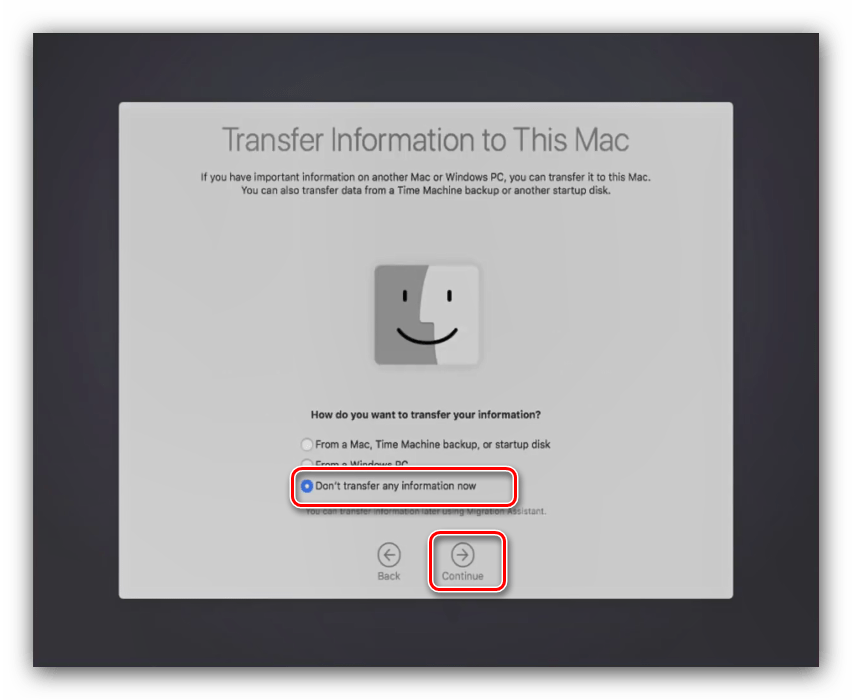
- На этом этапе предполагается перенос данных или восстановление информации с предыдущей версии macOS. Таковой у нас нет, поэтому стоит отказаться от переноса.
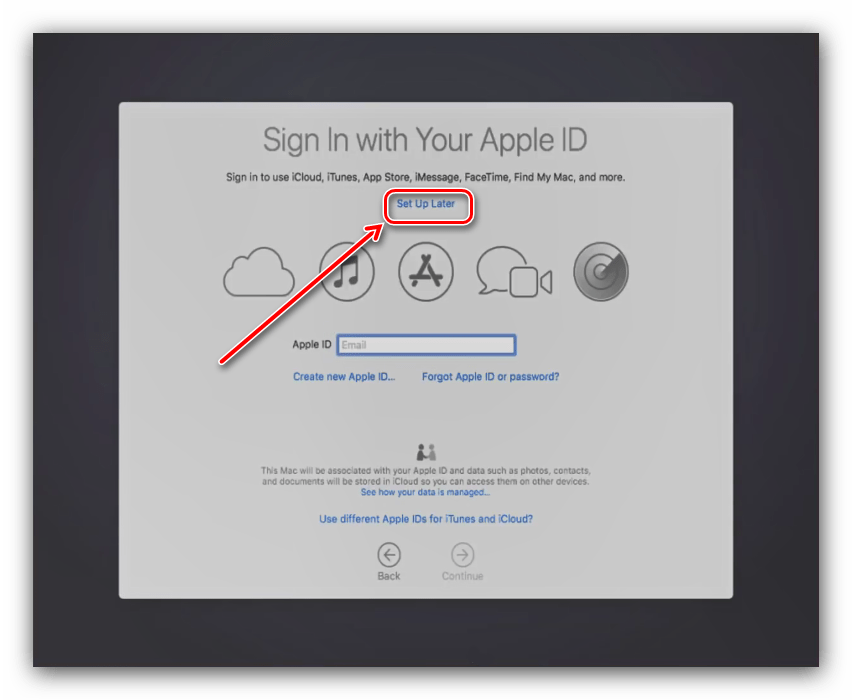
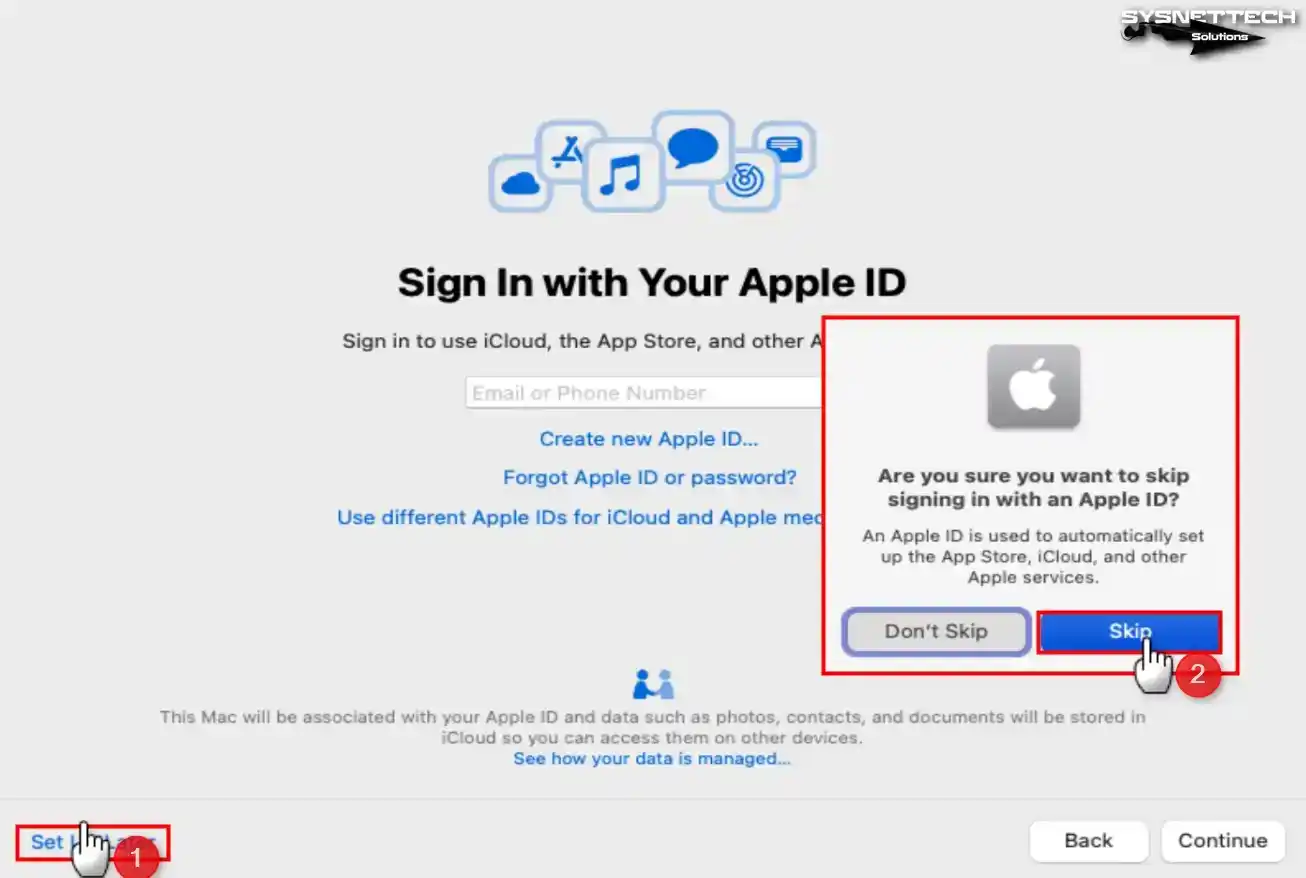
- Система попросит вас ввести Apple ID. Делать это на виртуальной машине не рекомендуется, поэтому выберите вариант «Добавить позже» («Set Up Later»).

Подтвердите отказ от ввода.
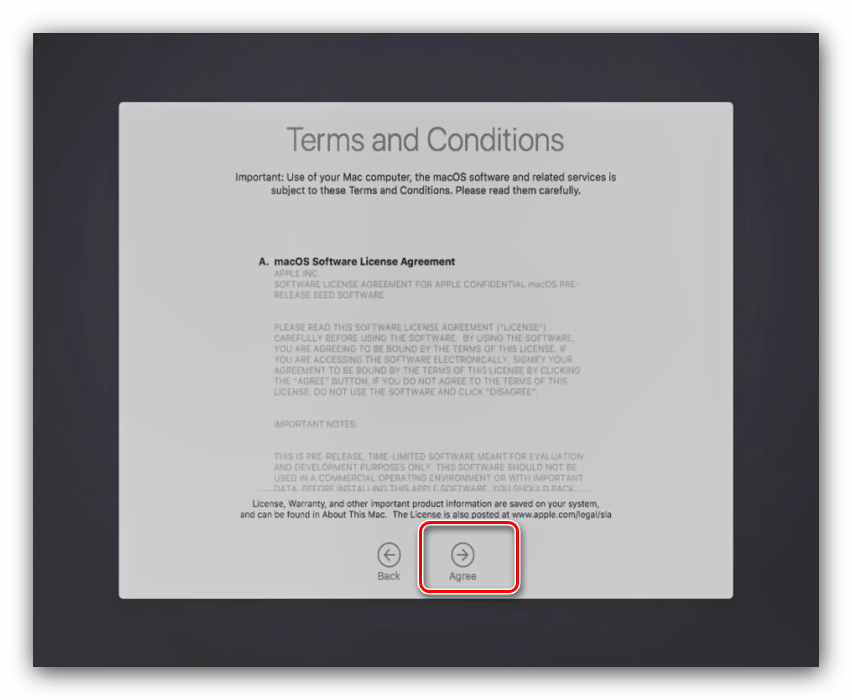
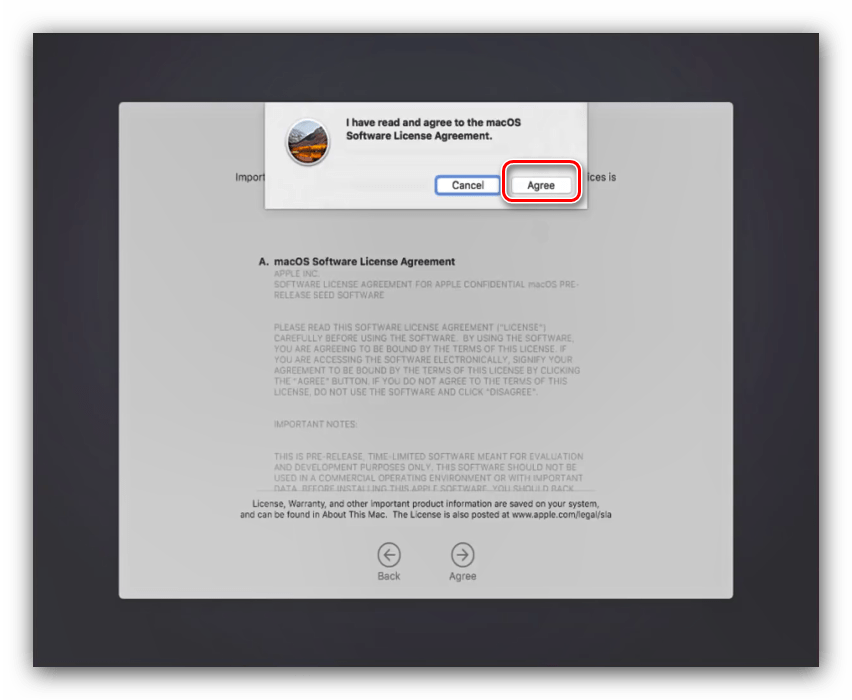
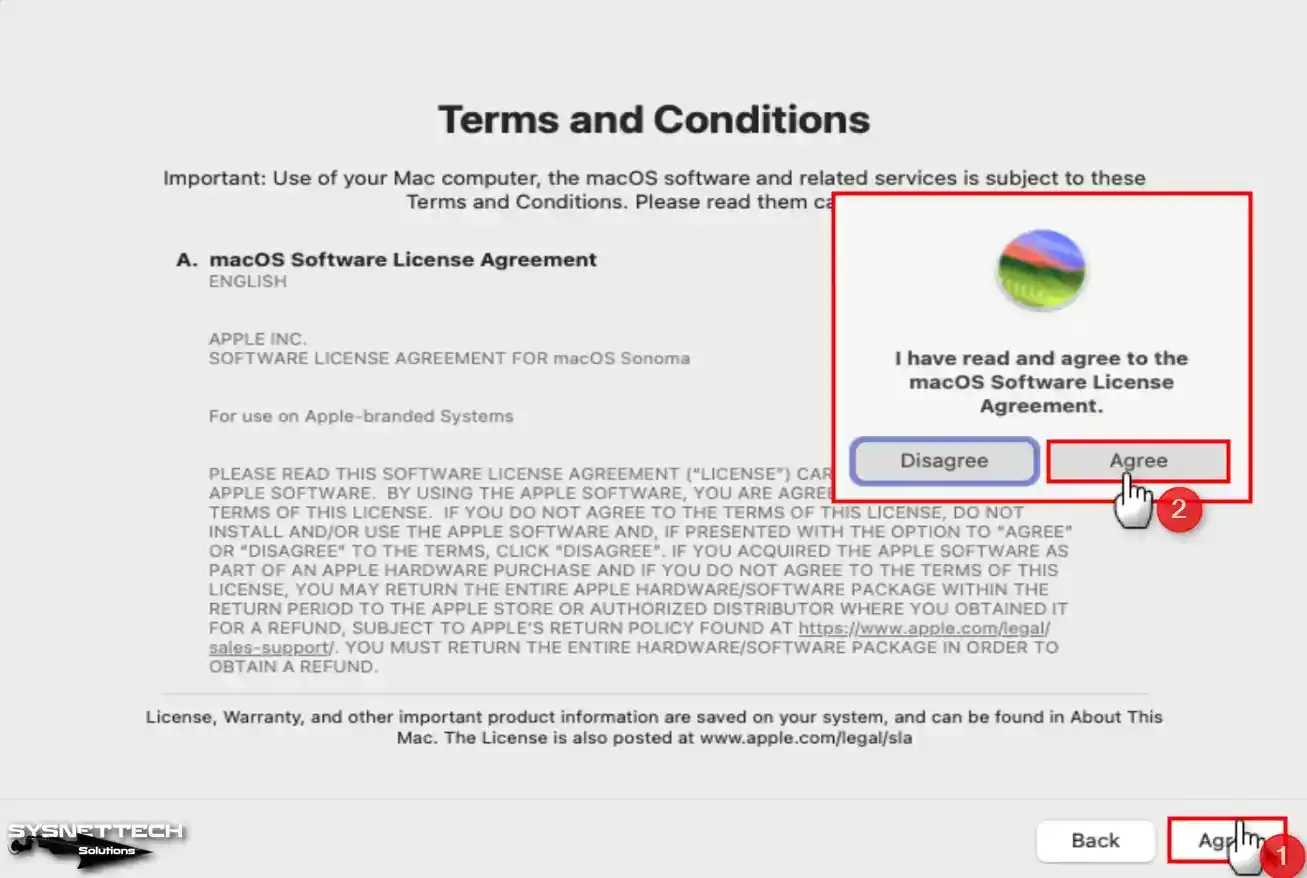
- Также потребуется принять лицензионное соглашение.
Это действие также понадобится подтвердить.
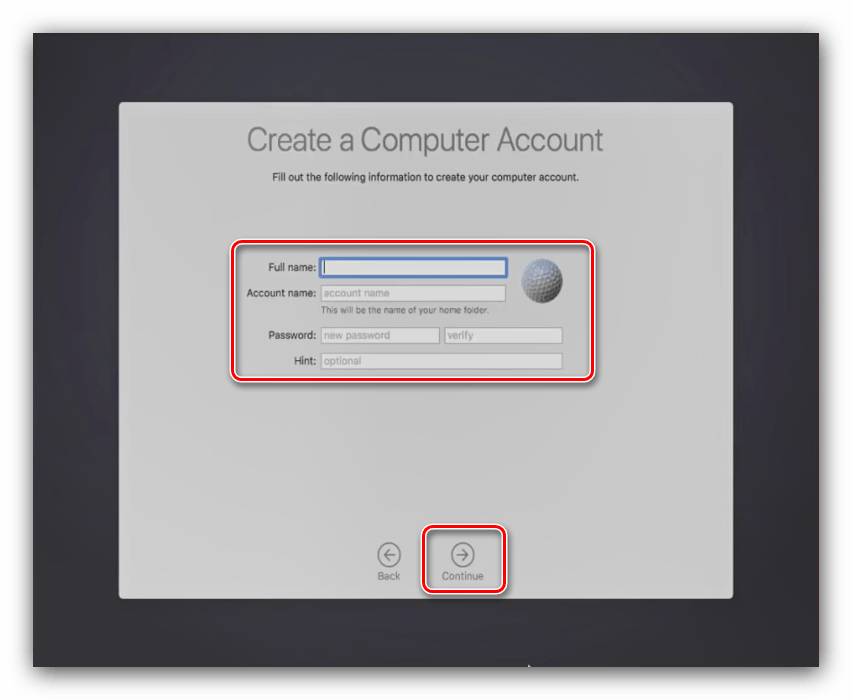
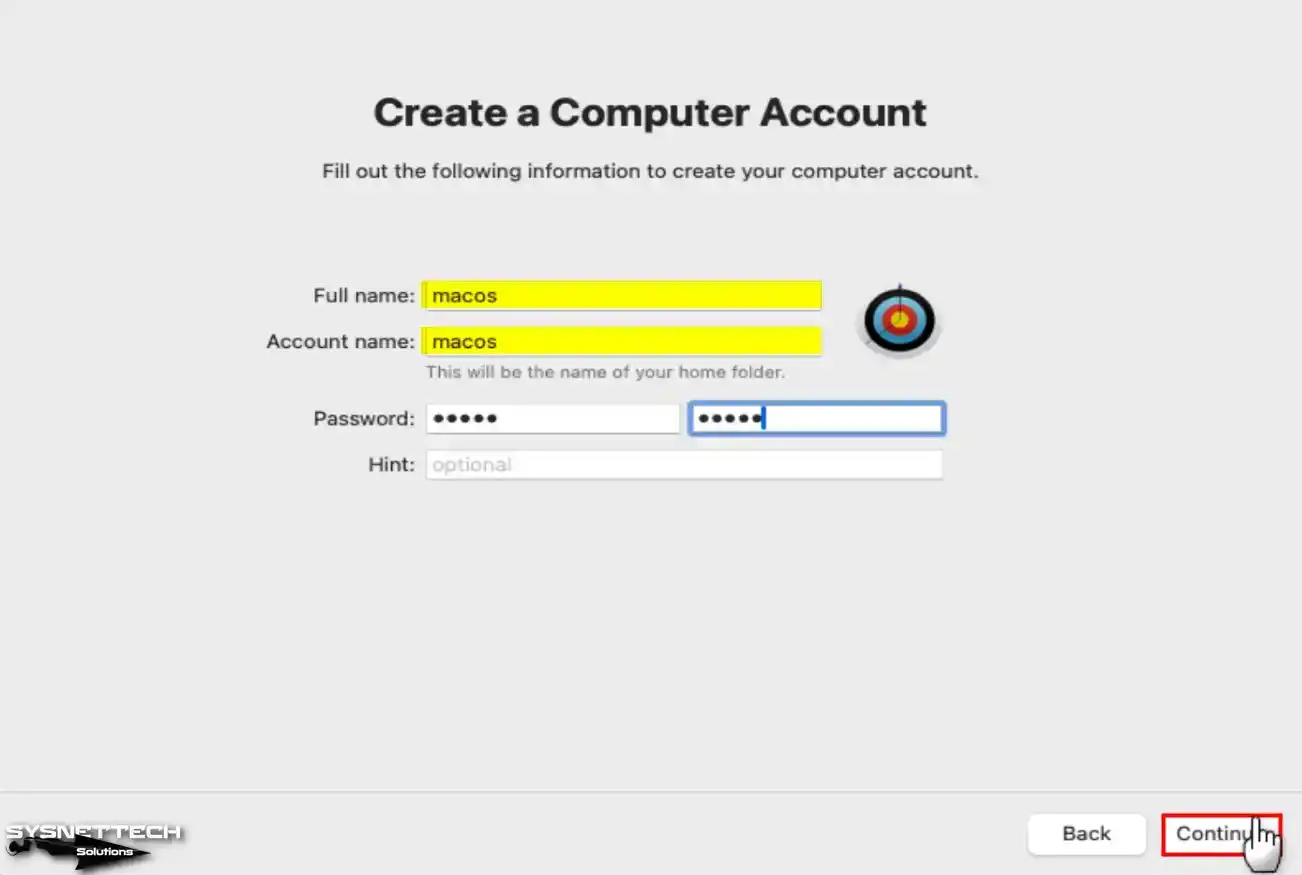
- Следующий шаг – создание учётной записи. Введите все требуемые данные (логин, полное имя и пароль), после чего продолжайте процедуру.
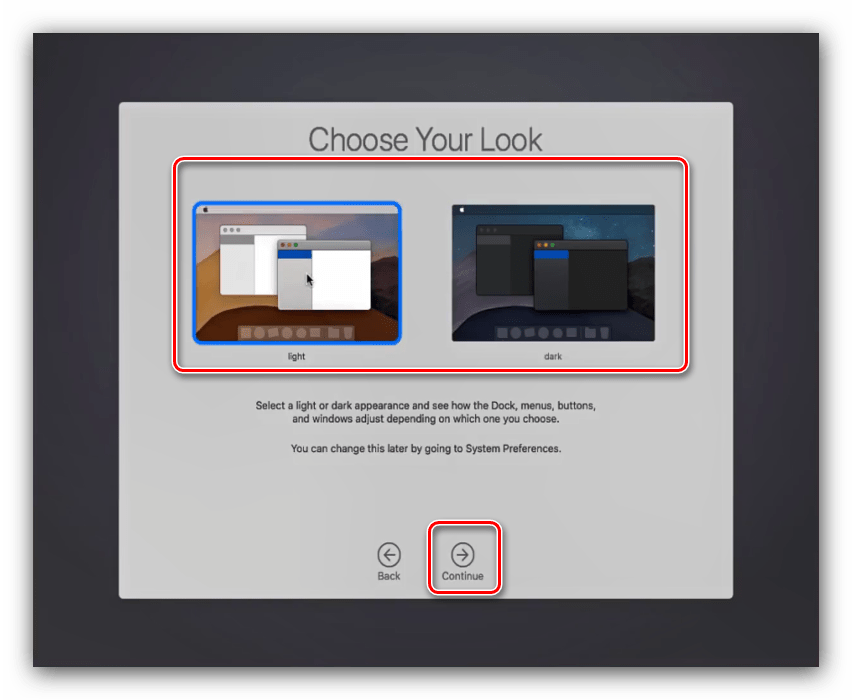
- Последнее действие, которое от вас требуется – выбор светлой или тёмной схемы оформления. Выбирайте по вкусу, а если тема не понравится, её всегда можно будет сменить через системные настройки.
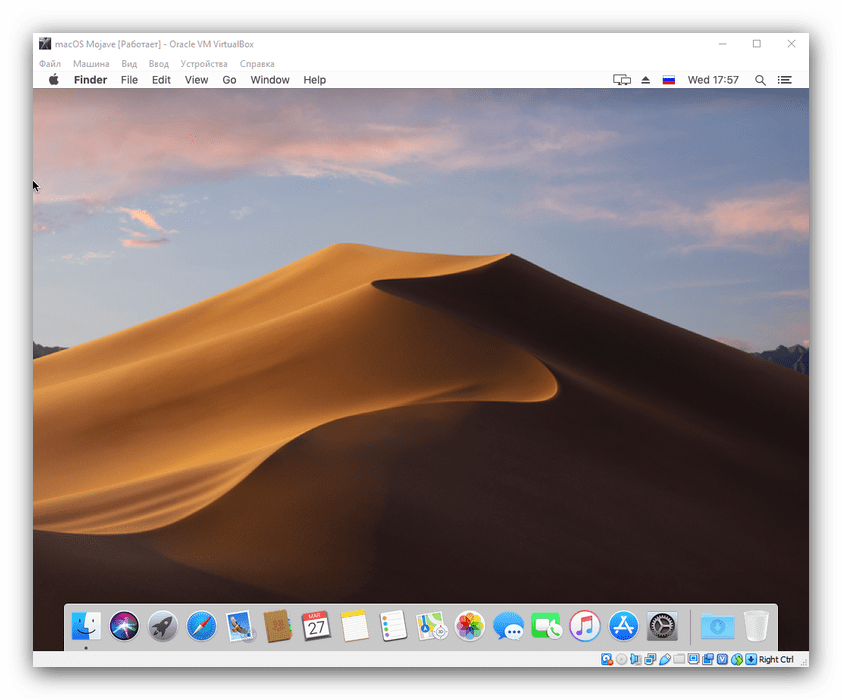
- Через некоторое время перед вами появится рабочий стол настроенной macOS Mojave.


Установка macOS High Sierra и старше
Более старые версии ОС от Apple можно установить на VirtualBox в прямом смысле этого слова, из загрузочного образа, поскольку для них достаточно файловой системы HFS+, которая поддерживается указанной средой. Процедура почти не отличается от таковой для Мохаве, но имеет ряд нюансов, на которые и обратим внимание.
Этап 1: Загрузка образа
Первый этап инсталляции Хай Сьерра в точности повторяет загрузку материалов из инструкции для новейшего варианта, за одним отличием — установочный образ этой ОС следует качать в формате ISO.
Внимание! Образы из AppStore в формате DMG не поддерживаются в VirtualBox!
Этап 2: Настройка среды
Настраивать ВиртуалБокс для macOS High Sierra следует по точно такому же принципу, что и для Mojave.
- Проделайте шаги 1-3 из предыдущей инструкции, только на шаге 2 в качестве имени машины установите High Sierra.
Обратите внимание! Тип ОС нужно установить как «Mac OS X (64-bit)», иначе установка будет идти некорректно!
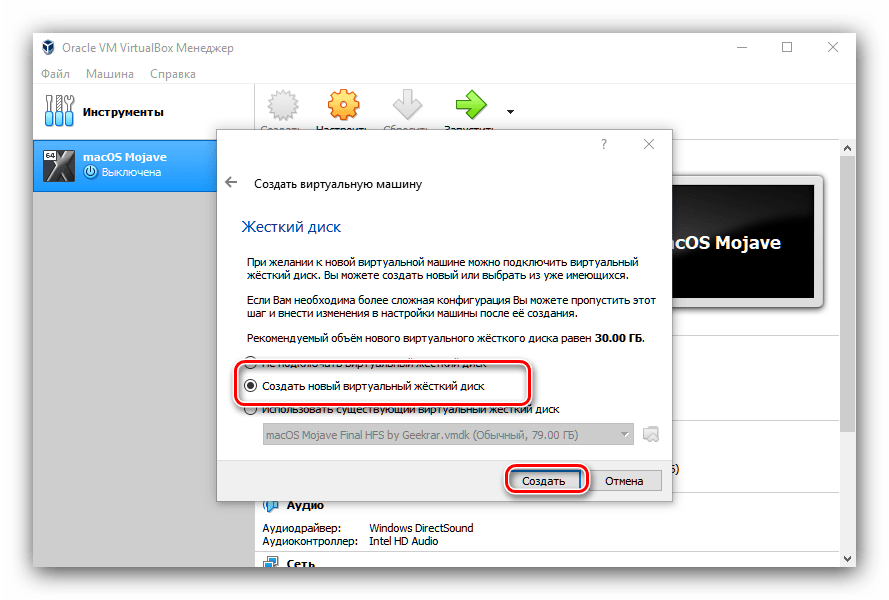
- На шаге настройки виртуального жесткого диска выберите вариант «Создать новый виртуальный жесткий диск».

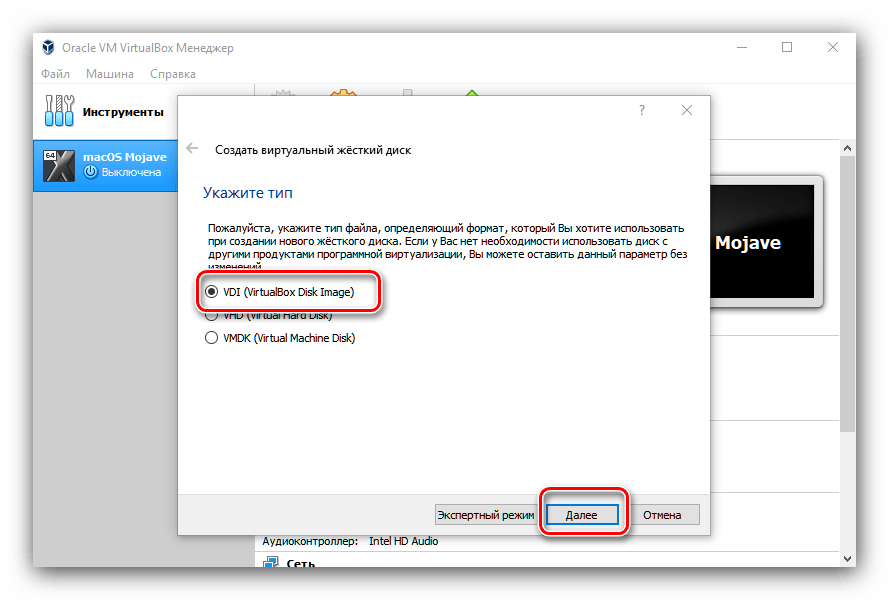
В качестве типа оставьте значение по умолчанию, вариант «VDI».
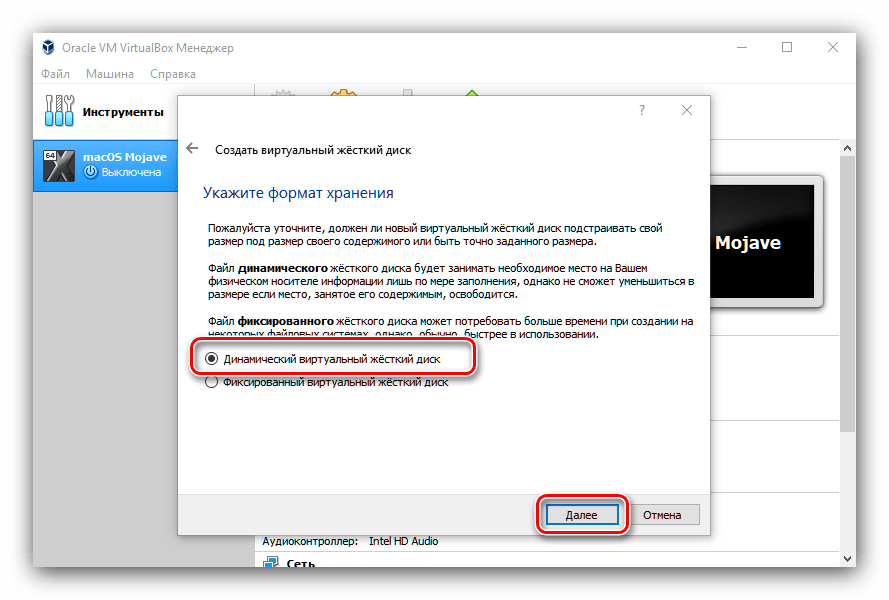
Далее оставьте вариант «Динамический жесткий диск».
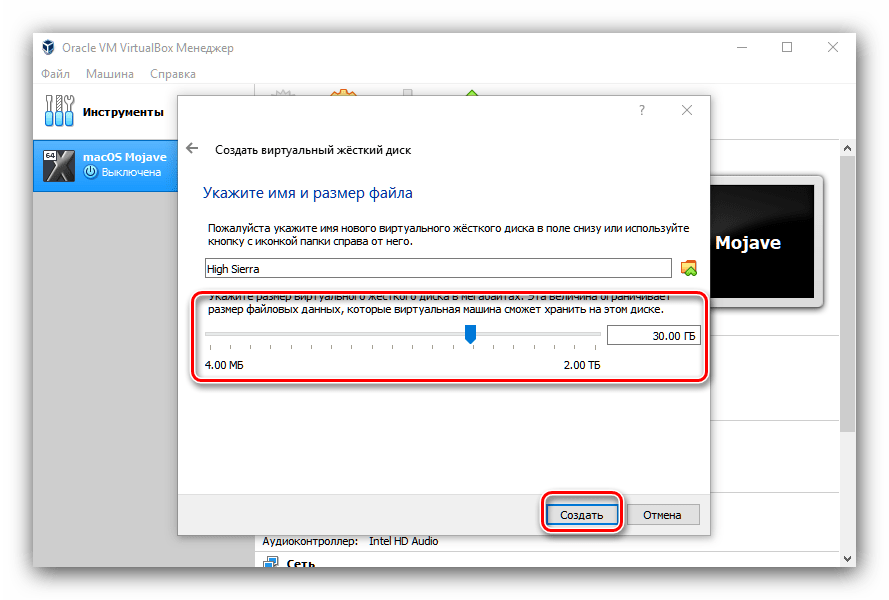
Последнее требуемое действие – выбор объёма. Размера в 30 Гб будет достаточно.
- Повторите действия из шагов 5-7 предыдущей части статьи.
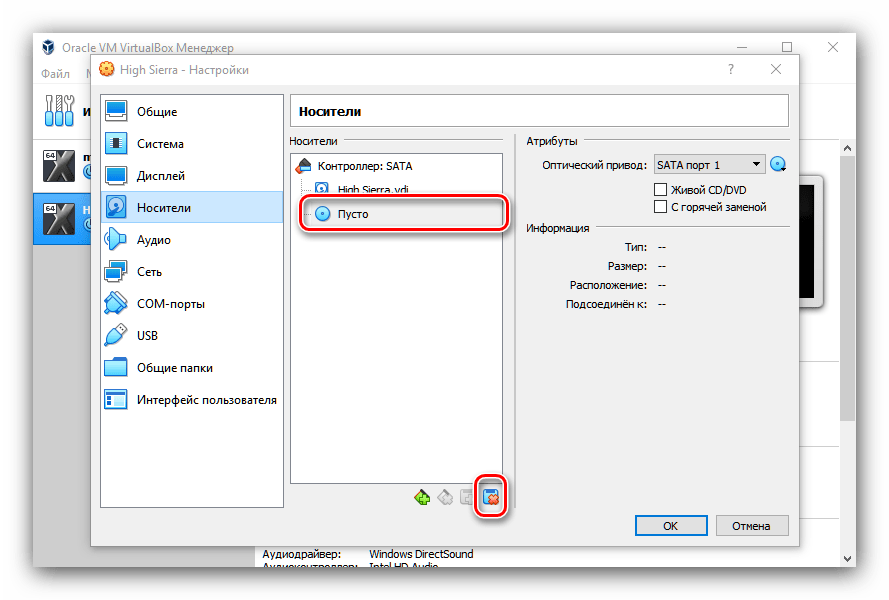
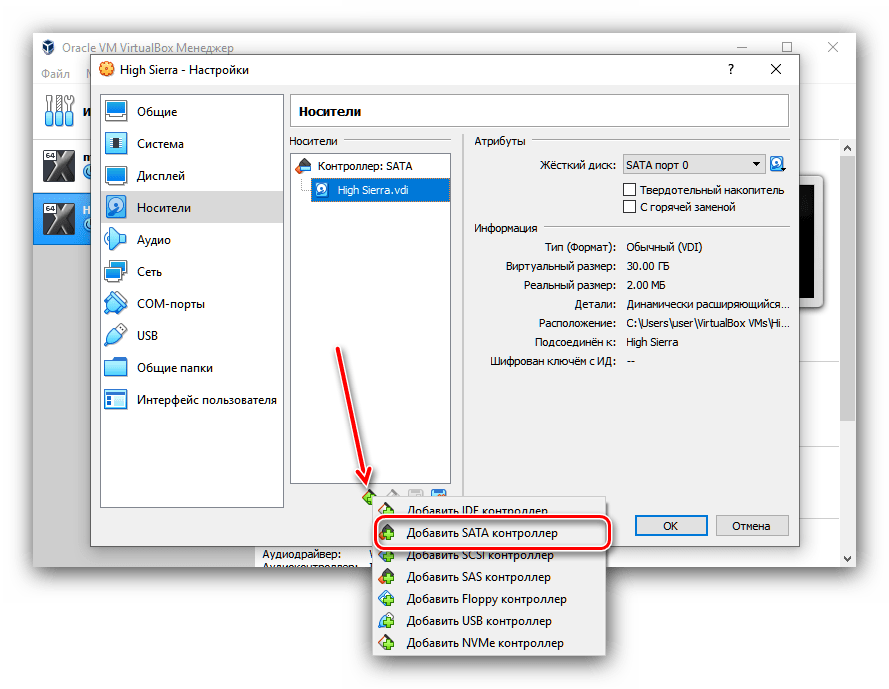
- Во время настройки пункта «Носители» действия несколько отличаются. Первое, что следует проделать – в ветке «Контроллер SATA» выделить позицию виртуального оптического привода и удалить её.
Затем нажмите на кнопку добавления новых контроллеров и выберите вариант «Добавить SATA контроллер».

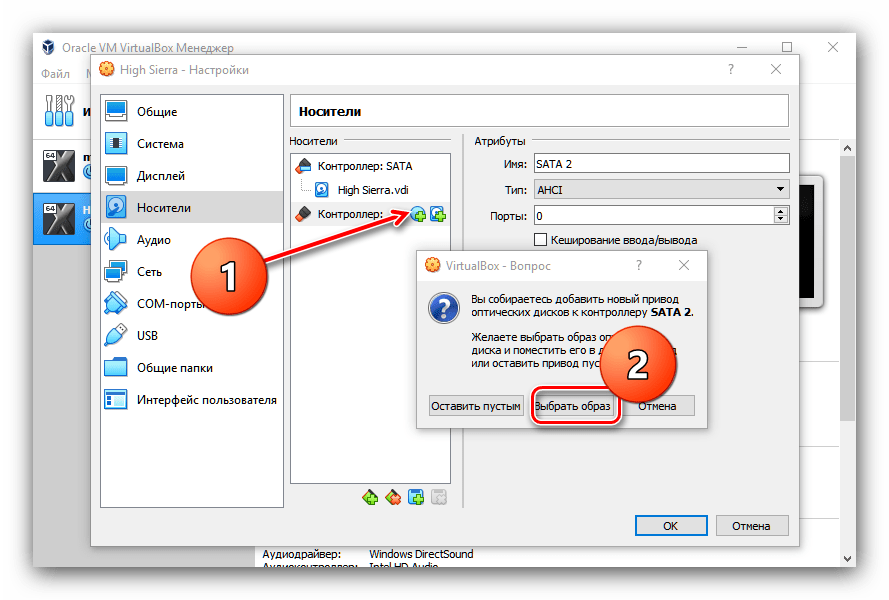
Далее воспользуйтесь кнопкой в виде CD с плюсиком для создания нового привода. Во всплывающем окошке выберите пункт «Выбрать образ».
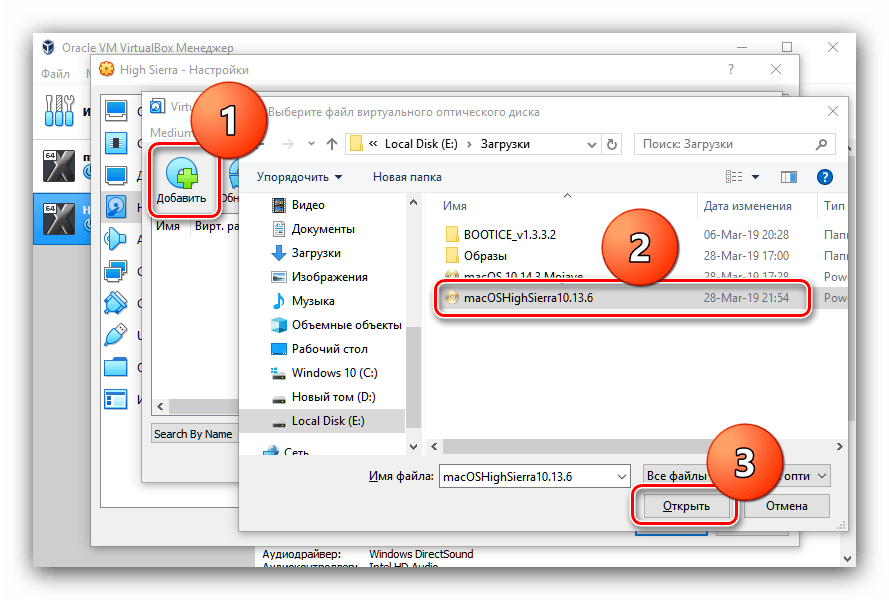
В интерфейсе добавления образов нажмите «Добавить» и с помощью «Проводника» выберите ISO-файл macOS High Sierra.
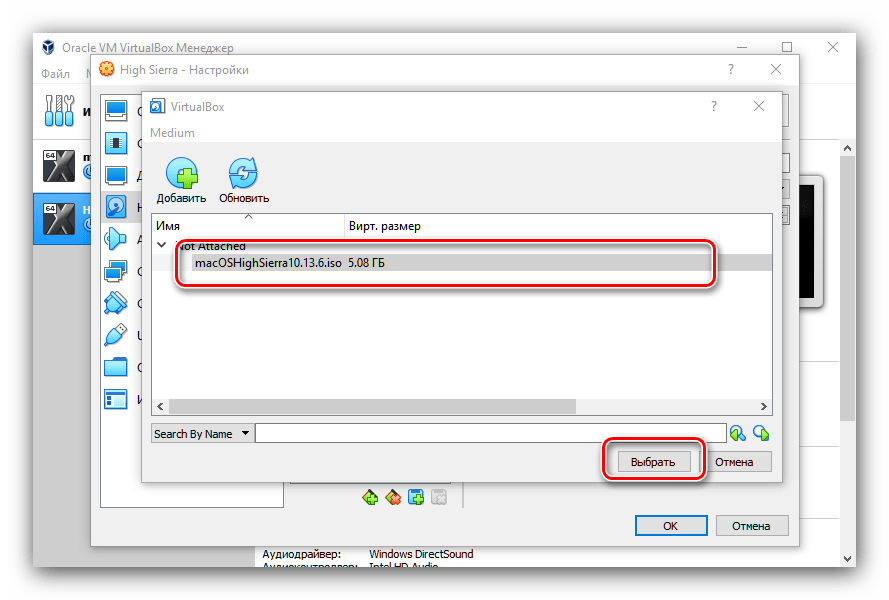
Кликните «Выбрать», после чего закройте ВиртуалБокс.
- В шаге 9 инструкции для Mojave замените в командах название виртуальной машины: вместо macOS Mojave прописывайте High Sierra, вводя указанные команды.
Этап 3: Установка ОС
Процедура полной установки операционной системы происходит по следующему алгоритму:
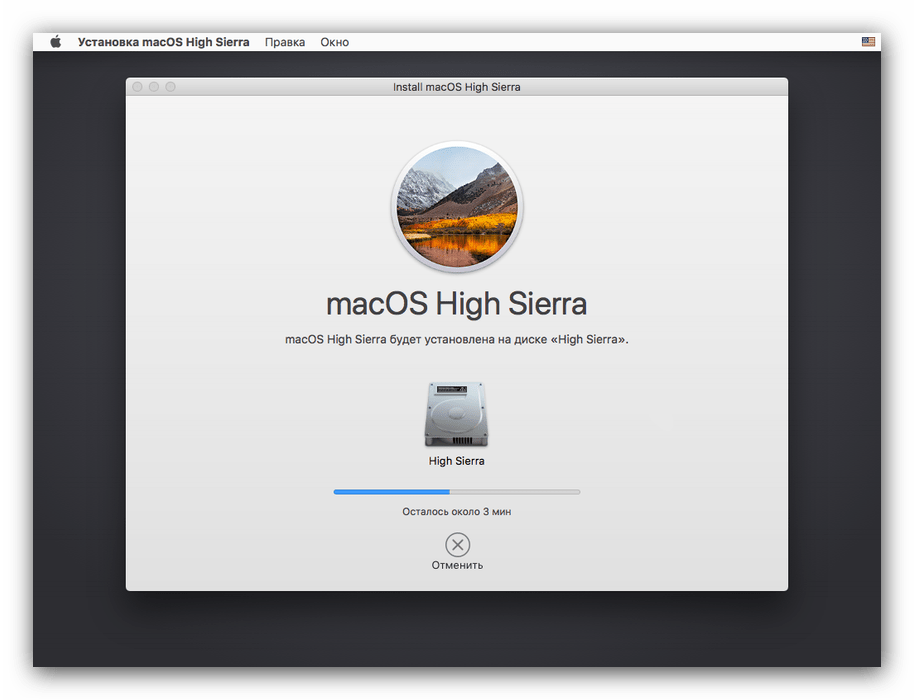
- Как и в варианте Мохаве, откройте VirtualBox, выделите созданную ранее машину и нажмите «Запустить». Начнётся подготовка к установке макОС. Она может занять несколько минут – обязательно дождитесь, пока она закончится.
- Выберите подходящий язык, к примеру, «Русский».
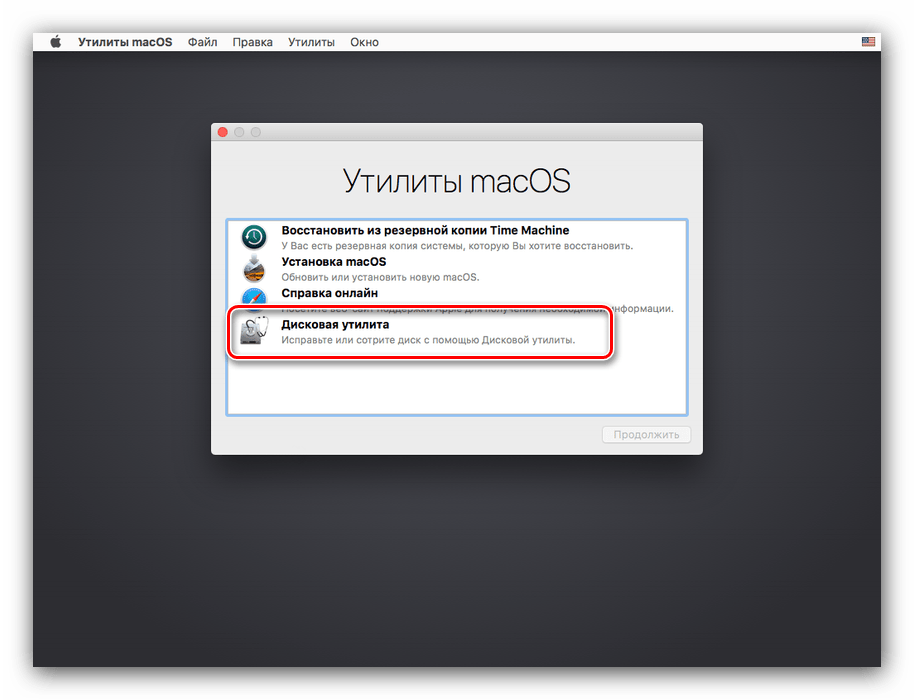
- Появится окошко с утилитами, в котором кликните «Дисковая утилита».

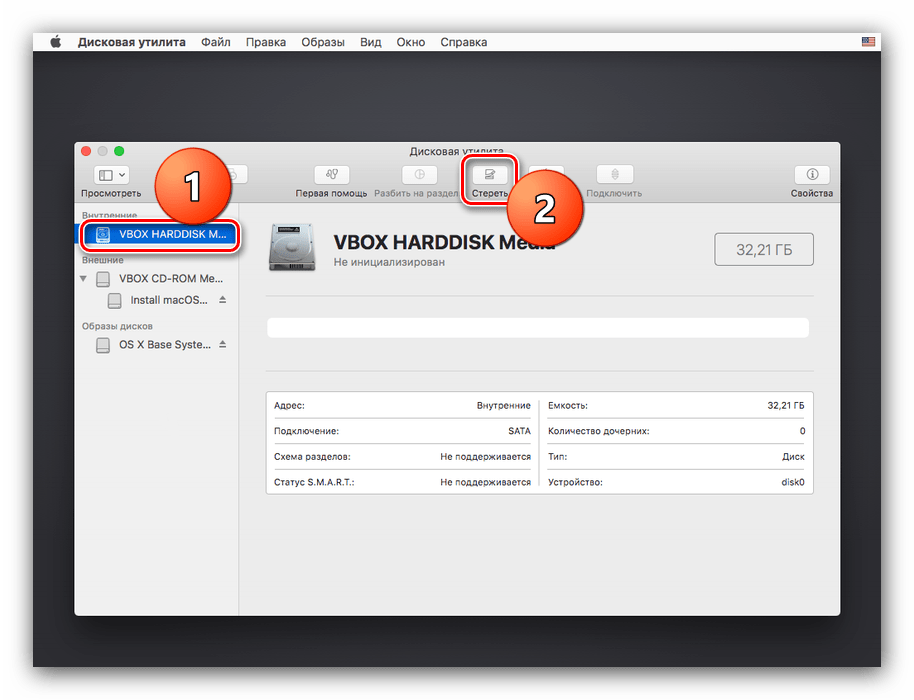
В интерфейсе утилиты выберите диск виртуальной машины и воспользуйтесь кнопкой «Стереть».
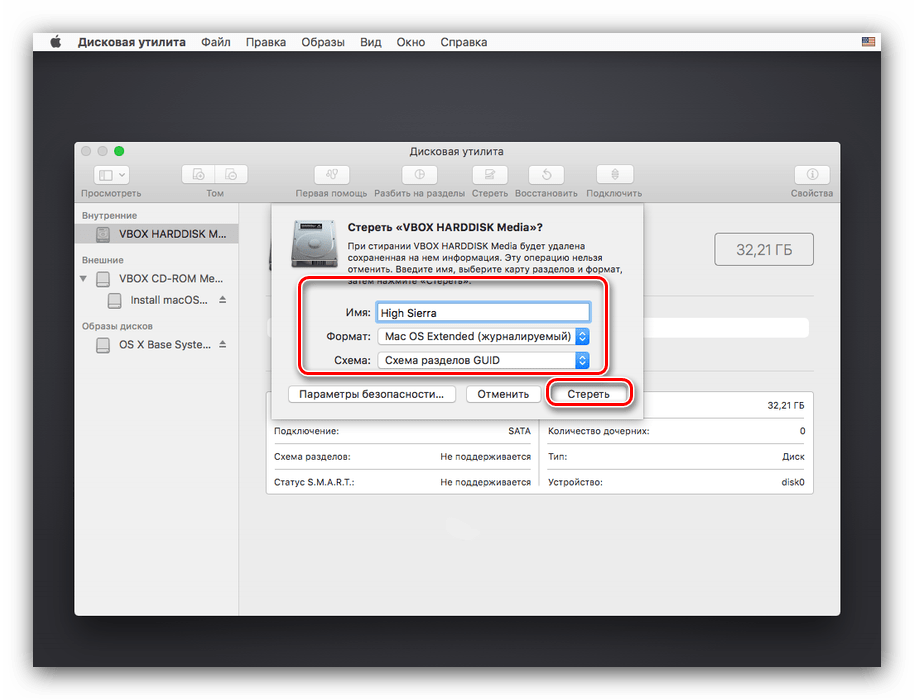
Потребуется задать имя, формат и схему раздела. Выбрать можно любые из доступных. Проделав это, нажимайте «Стереть».
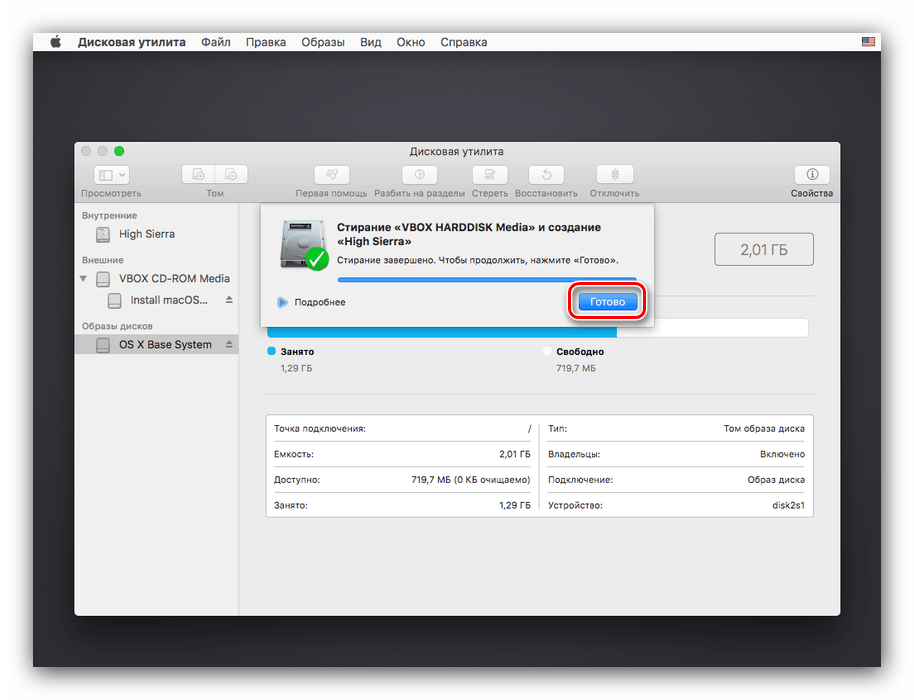
По окончании процедуры очистки нажмите «Готово».
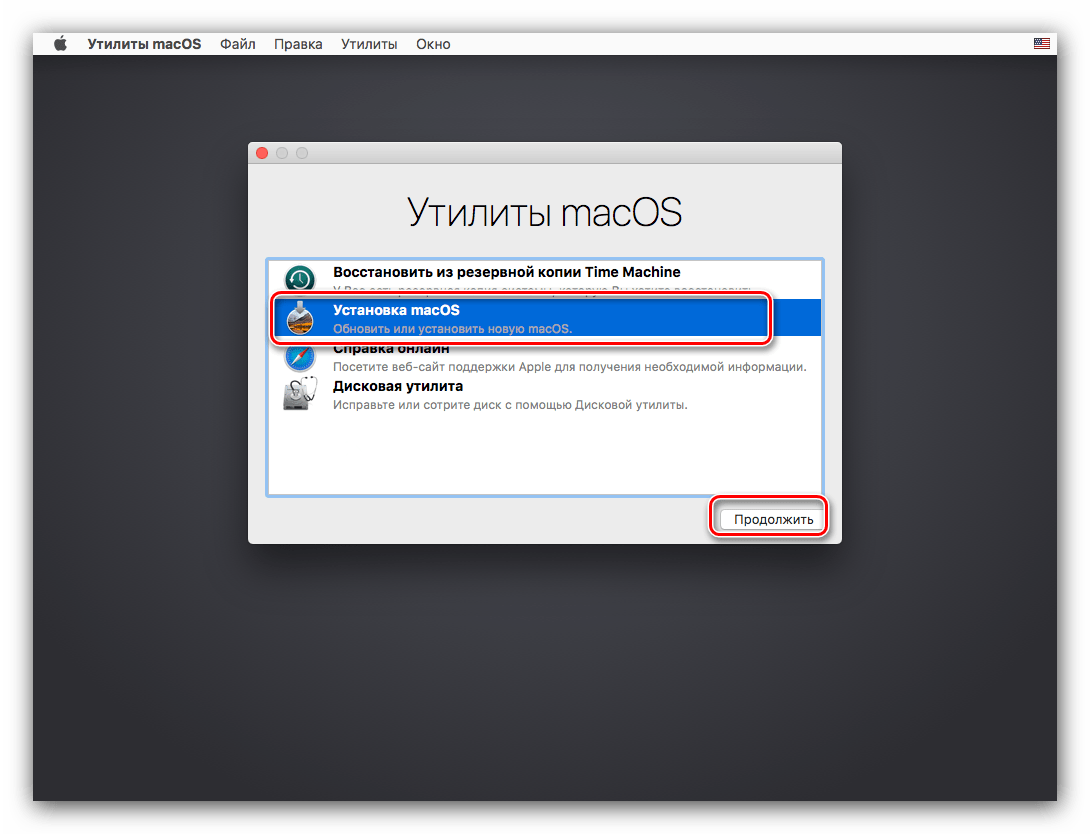
- Закройте «Дисковую утилиту», затем выберите в списке позицию «Установка macOS».
- Здесь нажмите «Продолжить».
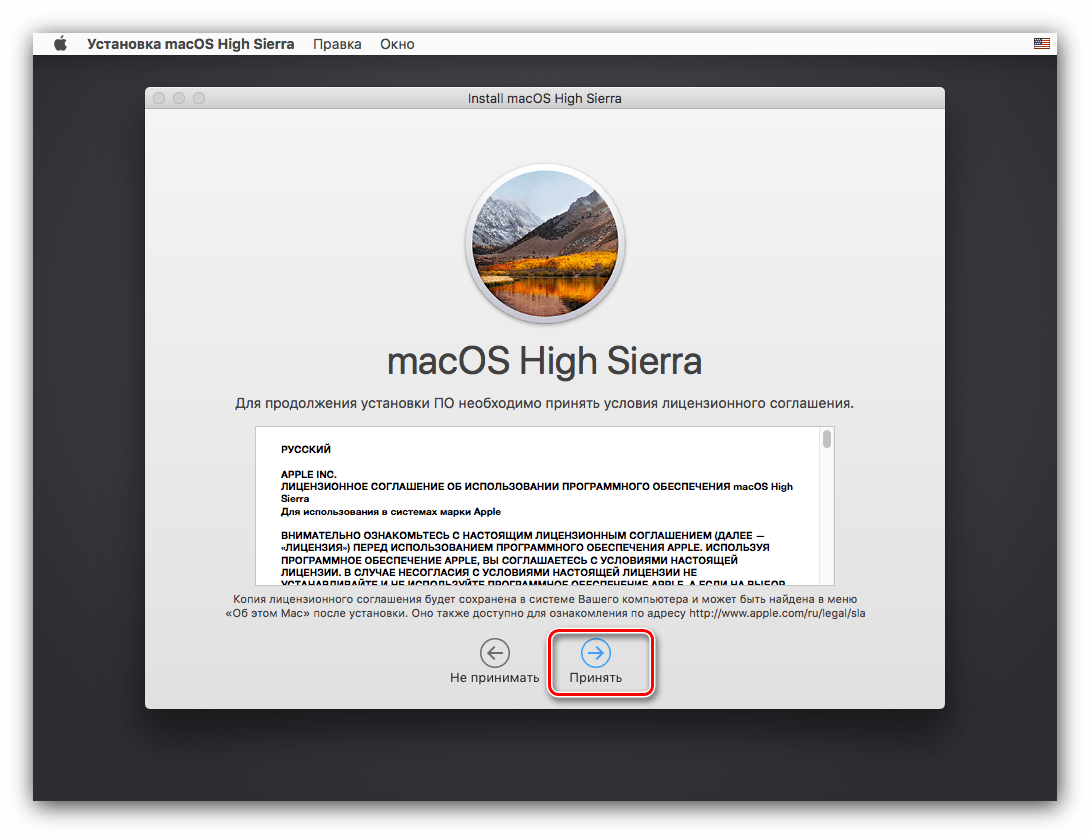
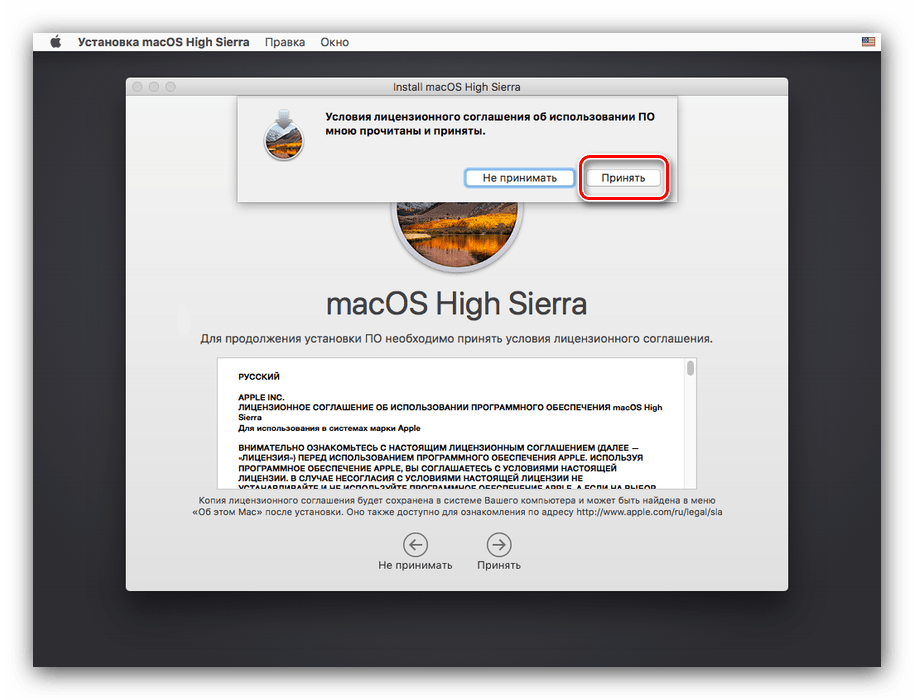
- Примите лицензионное соглашение.

Подтвердите согласие.
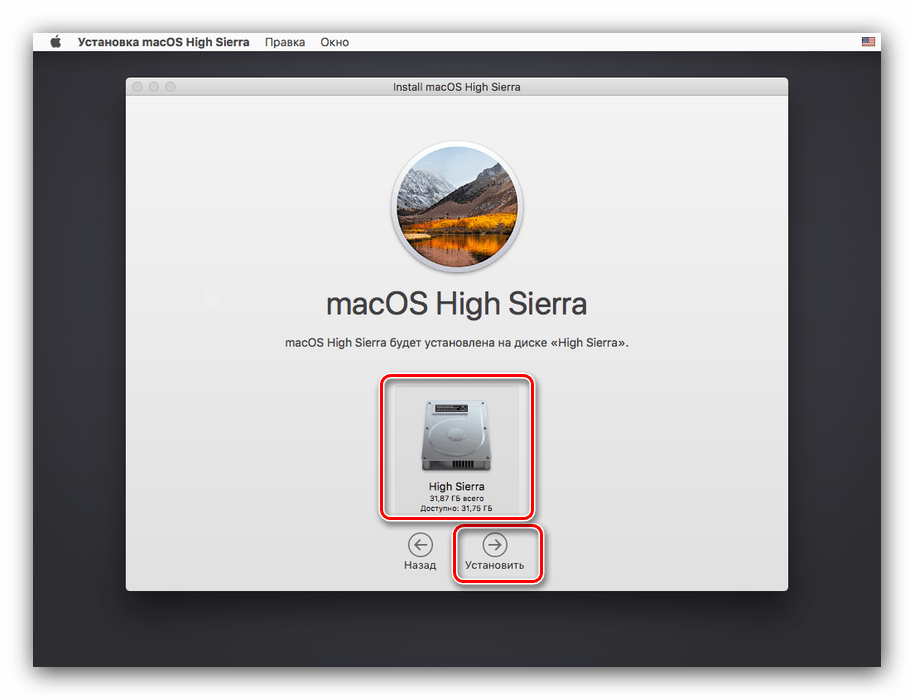
- В окне выбора дисков должен быть форматированный нами ранее виртуальный – выберите его и нажмите «Установить».
- Дождитесь, пока macOS High Sierra подготовит файлы для инсталляции – длительность операции зависит от характеристик вашего компьютера.
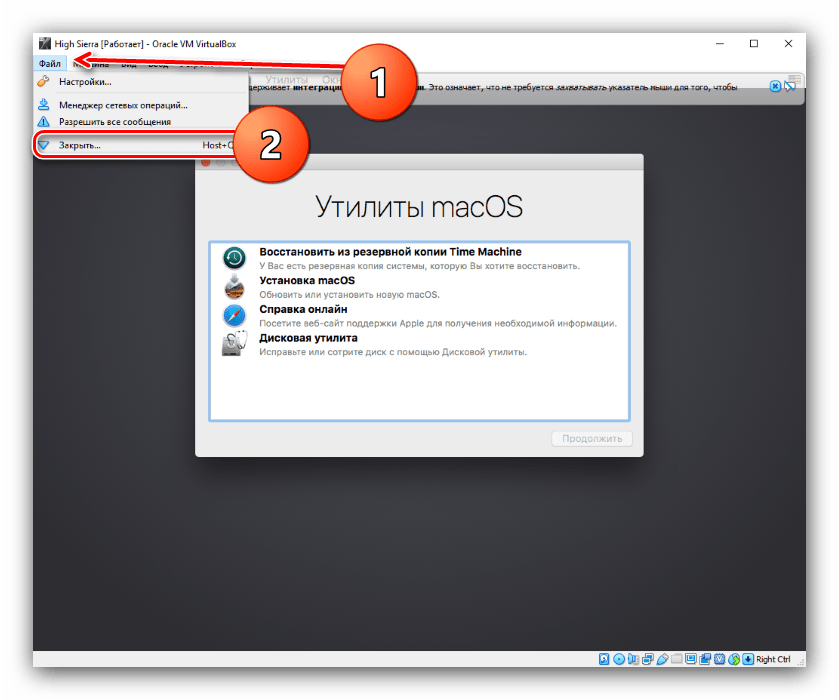
- В процессе установки виртуальная машина будет перезагружена. Когда перед вами снова появится окошко начала установки макОС, воспользуйтесь меню VirtualBox, в котором выберите «Файл» – «Закрыть».

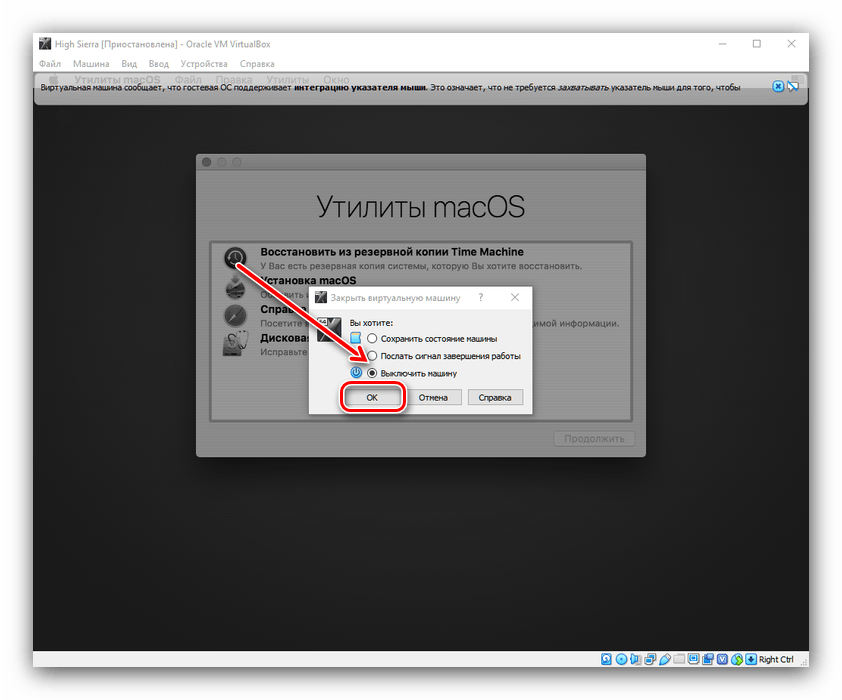
Отметьте вариант «Выключить машину» и нажмите «ОК».

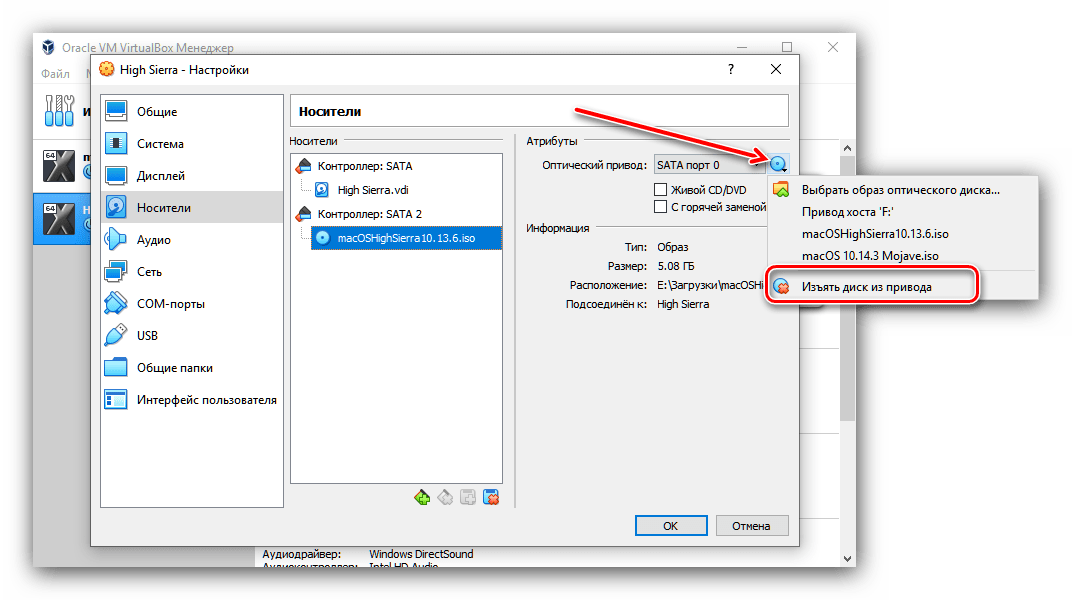
Вернитесь в главное окно VirtualBox и перейдите к настройкам носителей среды, в которую установили Хай Сьерра. Кликните по значку диска рядом с описанием виртуального контроллера, и выберите вариант «Изъять диск из привода».

Действия в следующем шаге требуются исключительно для версии High Sierra: если вы устанавливаете более старый вариант макОС, просто перезапустите среду VirtualBox и переходите к шагу 11.
- Повторно запустите машину с установленной ОС. Подождите, пока прогрузится оболочка, далее напечатайте в ней слово exit.
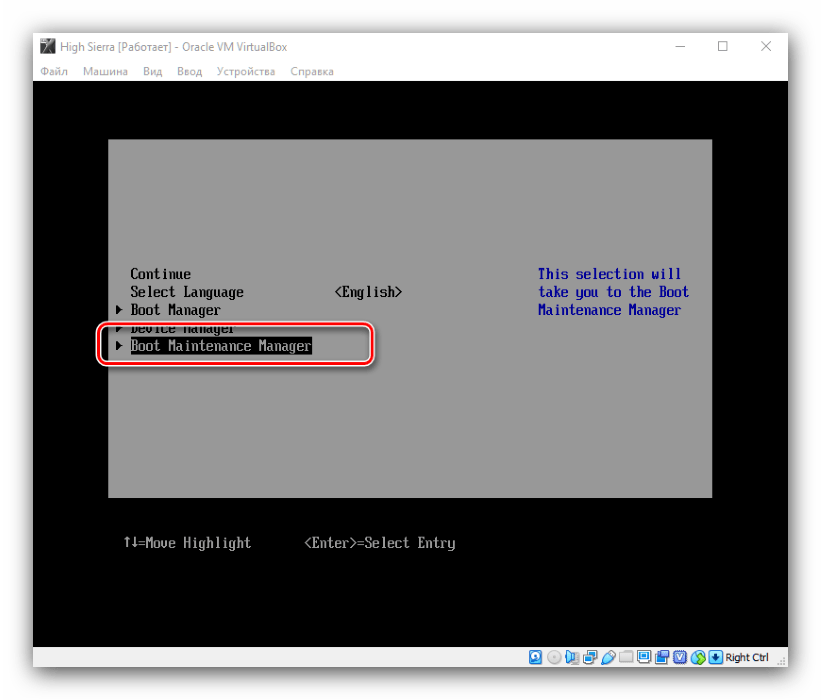
Пользуясь стрелочками, выберите вариант «Boot Maintenance Manager» и нажмите Enter.

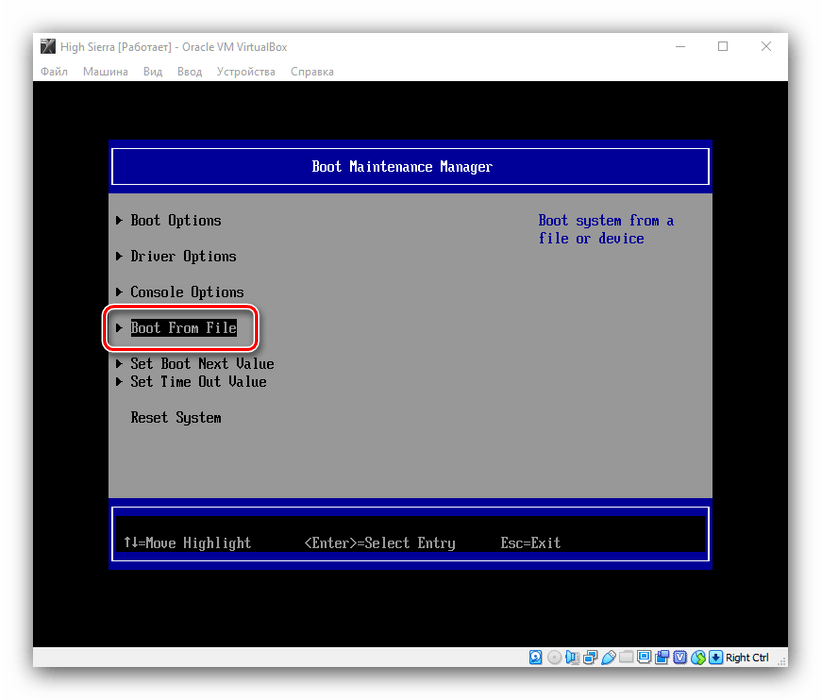
Далее – «Boot from File».
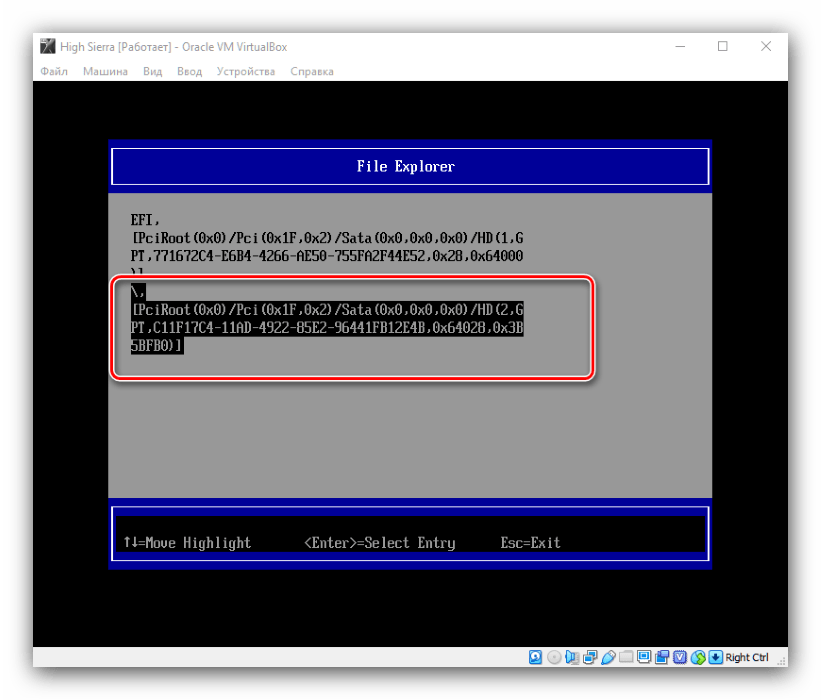
Выделите второй вариант и зайдите в него.
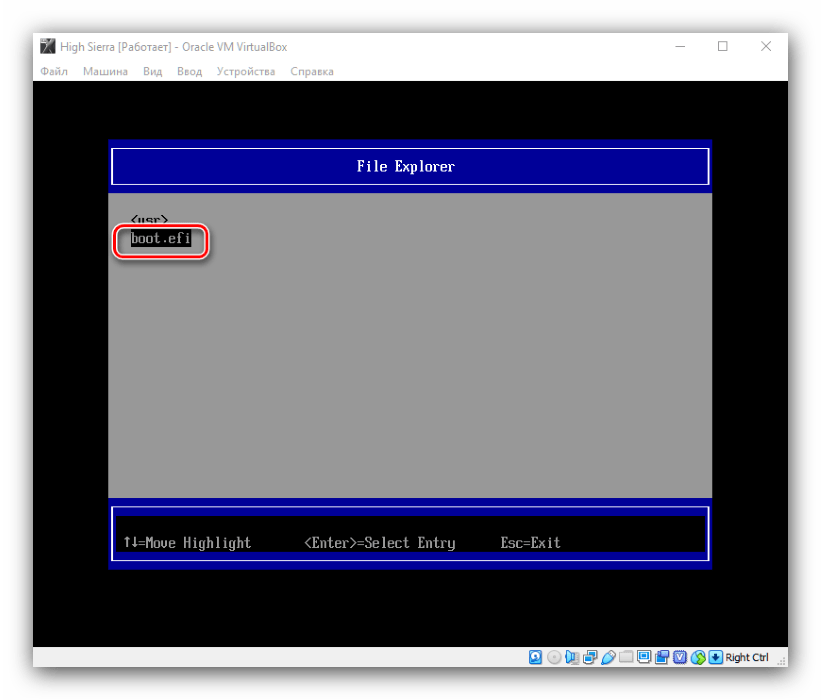
Пройдите по пути «macOS Install Data» – «Locked Files» – «Boot Files». Найдите там файл «boot.efi», выделите его и нажмите Enter.
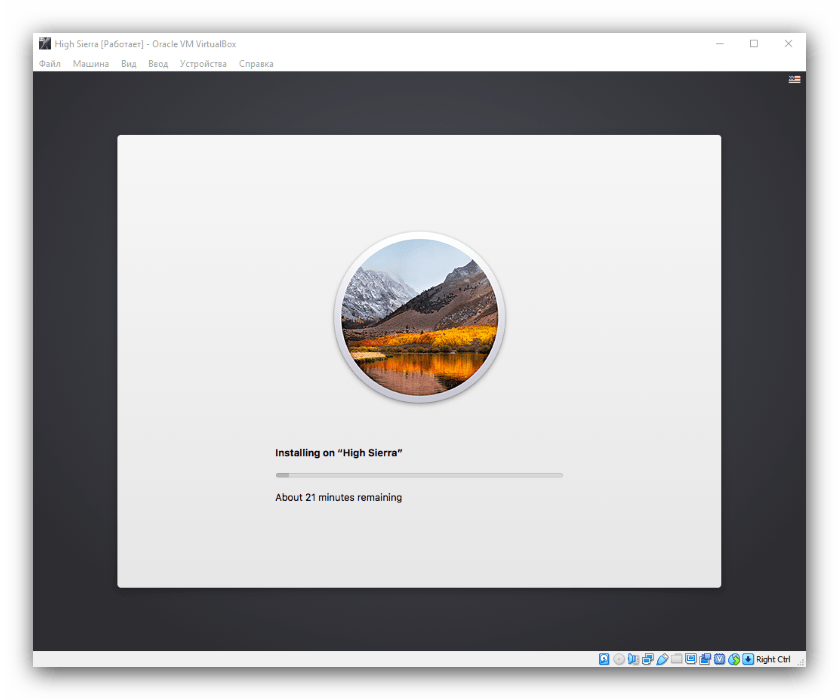
- Виртуальная машина будет автоматически перезапущена, а установка macOS High Sierra продолжена. На этот раз процедура может занять продолжительное время (до 30 минут), так что запаситесь терпением и не используйте компьютер для уменьшения нагрузки.
- После установки появится окошко мастера первой настройки, такое же как и при установке macOS Mojave. Воспользуйтесь шагами 11-19 предыдущей инструкции.


Как видим, установка макОС с нуля сложнее первого варианта. Впрочем, он также доступен для High Sierra и старше – достаточно просто загрузить подходящий VMDK-образ.
Устранение возможных проблем в работе VirtualBox
Если наблюдаются неполадки в работе среды виртуальных машин (не запускается инстанс macOS, приложение целиком, во время работы появляются разные ошибки), обратитесь к материалу по ссылке ниже: один из наших авторов максимально подробно рассмотрел решения большинства проблем с ВиртуалБокс.
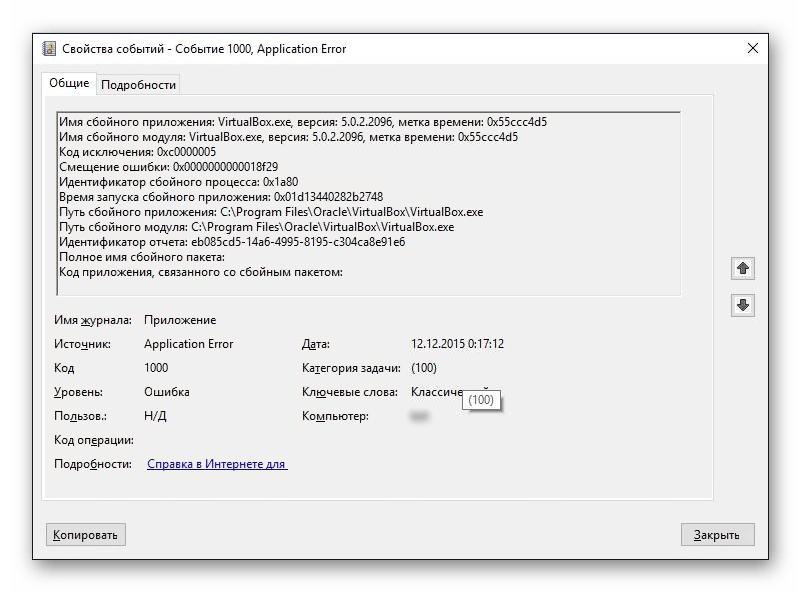
Урок: Решения основных проблем с VirtualBox
Заключение
Установка macOS в среду VirtualBox может выглядеть простой задачей, но только при условии точного выполнения настоящей инструкции, в противном случае могут быть проблемы в работе среды.
Наша группа в TelegramПолезные советы и помощь
Уровень сложностиПростой
Время на прочтение6 мин
Количество просмотров97K
Статья о том как установить себе «macOS Monterey» в виртуальной машине на обычном PC без покупки для этой цели макбука или айМака.
По идее это просто туториал как получить у себя на обычном PC систему macOS и Xcode, но так как я тут нахожусь в состоянии «Отхабренный» я могу отправлять статьи только в «Профильные хабы». По этой статье больше бы подошло «Tutorial», но такого хаба я не нашёл и поэтому выбрал наиболее близкие хабы по теме статьи: «Настройка Linux» и «Разработка под iOS». И КДПВ тоже я выбрал идиотскую — просто сделал скриншот со своего компа где продемонстировал версию macOS и версию установленного у меня Xcode.
Итак сама статья.
Понадобилась мне macOS внезапно, то есть не macOS, а конкретно Xcode. Но Xcode, гад, существует только в версии для macOS, поэтому и macOS понадобилась.
Никаких macbook и никаких iMac у меня нет, только обычный PC. Поэтому ничтоже сумняшеся, куда деваться, полез в интернеты, читать как можно заиметь macOS не покупая компьютер от Apple. Перерыл кучу ссылок. Hackintosh (https://hackintosh.com/) отмёл сразу, у меня компу уже лет семь и он по железу уже не подойдёт для установки Хакинтоша. Решил обойтись малой кровью — в виртуалке попробовать установить macOS. Так как платные программы не особо люблю, то искал исключительно установку макоси в VirtualBox ибо он бесплатен и у меня он уже был установлен.
Только вот не сработали у меня эти рекомендации и руководства из интернета. Вернее сработали, но я смог установить в VirtualBox лишь «macOS Catalina» трёхлетней давности, а более поздние версии macOS, то есть (в порядке повышения версий от «Catalina») ни «Big Sur», ни «Monterey», ни «Ventura», ни тем более бету «Sonoma» установить не удалось.
Делать нечего, установил я что удалось установить, то есть «Catalina». А в «Catalina», блин, в «Swift SDK» не оказалось тех функций которые мне были необходимы. Они появились в более позднем «Swift SDK», в версии для «iOS 16.0», которого для «macOS Catalina» три года назад ещё не существовало, в «Catalina» была максимальная версия «Swift SDK» для «iOS 14.0» и не выше. И подумал я тогда: «А чего это я как дурак сижу с установленной в виртуальной машине «macOS Catalina», которому уже три года и до сих пор старьё такое запускаю в котором «Swift SDK» не отвечает современным традициям, а Xcode 12.4, максимальная версия для «Catalina», даже отказывается читать современные исходники от Xcode четырнадцатой и пятнадцатой версии, посылает меня далеко и надолго? Надо бы мне постараться и ВИРТУАЛЬНУЮ macOS установить посвежее чем Catalina!». Подумал я так и… Сказано — СДЕЛАНО! Решил я сгруппировать все знания которые я до этого нашёл в интернете, добавить к ним до чего додумался сам и попробовать таки установить вместо «macOS Catalina» версию посвежее.
Сначала решил попробовать вместо бесплатного VirtualBox бесплатный VMware Player, в интернете прочёл что с ним проблем почему-то меньше в отношении именно macOS. Установил его и попробовал в нём последовательно, с понижением версии macOS, начиная с текущей и ниже до Catalina, установить следующее (начал со самой старшей на нынешнее время, с «Ventura». Ибо «Sonoma» хотя и самая распоследняя версия, но она пока ещё в бете находится, так что «macOS Ventura» пока что последняя АКТУАЛЬНАЯ версия на сегодняшний день):
-
«macOS Ventura» — не вышло, трапается в kernel panic при установке.
-
«macOS Monterey» — не вышло, уходит в бесконечный цикл «Система готова к установке, нажмите «Continue», далее я нажимаю «Agree» и «Continue», после «Monterey» час устанавливается, перегружается и опять выходит точно туда же, в самое начало установки: «Система готова к установке, нажмите «Continue».
-
«macOS Big Sur» — не вышло по причине того, что он как только перешёл в режим установки то сразу же мышь у меня в нём стала нажиматься с пяти раз хорошо если на шестой, а мышиный курсор двигался такими рывками, что я даже не смог ни разу нажать «Continue» для продолжения установки — пытаюсь выбрать язык системы в самом начале инсталляции, а после не могу мышь подвести к кнопке «Continue» — прыгает по экрану, бегает туда-сюда и всё, а мне не даётся! Минут пятнадцать попробовал мышь подвигать и плюнул я на этот «Big Sur».
-
«macOS Catalina» — вот он установился вообще без проблем, как до этого у меня установился в VirtualBox. Но это у меня и в VirtualBox до этого было, так что это не интересно, я хотел чтобы версия macOS была посвежее.
После посидел ещё немного, поразмышлял, подумал, скачал с торрентов уже не Player, а полноценный VMware Workstation Pro версии 17.0.0 и установил. Да, кракнутый. Но куда же деваться? Попробовал установить в него все версии macOS про которые высказался выше. Точно такая же фигня — или трап при установке, или выходит в бесконечный цикл при установке, или мышиный курсор вообще не адеватен — ни сдвинуть его толком, ни нажать — тормозит как не пойми что и прыгает по экрану так что не поймать. А вот Catalina опять установился «на ура», без проблем вообще. НО МНЕ ЖЕ НАДО БЫЛО ВЕРСИЮ ВЫШЕ ЧЕМ CATALINA!
Полез опять в интернеты, нашёл статью что в VMware просто так macOS не пойдёт, «VMware Workstation» изначально заточен на Linux, Windows, Solaris, QNX и т.д., а мудрая фирма Apple запретила товарищам из VMware делать официальную виртуализацию macOS потому что фирма Apple хочет ЕДИНОЛИЧНО владеть всеми OS’ами и никому их не хочет давать, даже виртуализировано. Полазил по интернетам подальше, нашёл «VMware Unlocker» специально для гостевых систем от Apple чтобы «VMware Workstation» мог воспринимать macOS. Скачал. Пропатчил свой «VMware Workstation». Повторил свою эпопею по установке macOS начиная от текущей версии Ventura и понижая номер версии если установка окончилась фейлом.
-
«macOS Ventura» — опять не вышло, теперь Ventura как ранее Monterey уходит в бесконечный цикл «Система готова к установке, нажмите «Continue», я нажимаю, Ventura полтора часа устанавливается, перегружается и опять: «Система готова к установке, нажмите «Continue»
-
«macOS Monterey» — УРА! ВЫШЛО! УСТАНОВИЛСЯ! Патч от «VMware Unlocker» реально помог!
Но я решил пойти дальше, решил попробовать проапгрейдить Monterey штатным, в нём же предусмотренным способом до Ventura. Зашёл уже в свежеустановленном «macOS Monterey» в апдейты и сказал ему обновиться до Ventura. В результате он скачал образ Ventura, минут сорок после этого его устанавливал, обновлялся, пошёл на перезагрузку и БАЦ! Опять! Опять бутлуп, «Система выполнила некорректную операцию. Нажмите любую клавишу для перезагрузки или подождите несколько секунд для автоматической перезагрузки». И всё, начался бесконечный цикл таких перезагрузок.
Восстановил опять «macOS Monterey» из предварительно сделанного бекапа (ведь известно что пользователи компов деляться на три типа: первые это те кто ещё не делает резервные копии, вторые это те, кто уже делает, и третьи это те, кто восстанавливает систему из сделанных копий — вот я оказался в третьей категории, восстановил ранее сделанный бекап «macOS Monterey»). После восстановления попробовал опять средствами самого macOS зайти в апдейты, но попросил теперь обновить «macOS Monterey» не до Ventura, которая macOS 13, а до более новой версии самого Monterey — у меня он установился 12.0.1, а апгрейд предлагал его обновить до версии 12.6.9
И он, блин, прекрасно обновился до версии 12.6.9, прекрасно перезагрузился и прекрасно заработал! Без всяких кернел паников и без бутлупов!
Установил себе на него Xcode 14.2, это конечно не как на Ventura можно поставить Xcode 15, но 14.2 это всё же не 12.4 как у меня на Catalina было. Да и «Swift SDK» установился для «iOS 16.0».
И да, в VMware Workstation macOS, даже Catalina, работает чисто субъективно побыстрее чем в VirtualBox. Не знаю почему.
В общем получил я у себя полноценную более-менее последнюю версию macOS, пусть не «Ventura», а предыдущая до «Ventura» версия, но всё не «Catalina» времён динозавров и умерших давно мамонтов.
Так что просидел я с восьми утра одного дня до восьми утра следующего дня, безвылазно сидел за компом, 24 часа получается, практически не вылезая из него. Давно я такие «компьютерные марафоны» не совершал, с 90-х годов.
В процессе этого моего дневно-ночного изыскания ни одно животное не пострадало  Все произведённые операции выполнялись на моей основной системе «Fedora Linux 38», на Windows не проверял за неимением Windows, но думаю что на Windows это пройдёт без особых изменений, так же — я лично не вижу никакой разницы.
Предупреждаю что ссылки по которым я брал весь описанный выше софт я не скажу. Вернее бесплатные скажу, а те, по которым платный софт не скажу (в принципе я же названия этого софта озвучил выше, так что кому надо тот по названиям в интернете найдёт). Перечисляю ниже софт в порядке его установки, то есть софт под номером 2 должен быть установлен после софта под номером 1, а софт под номером 3 должен быть установлен соответственно после софта под номером 2.
-
VMware Workstation Pro 17.0.0 (ссылку не скажу т.к. это платная версия, ищите сами по названию)
-
VMware Unlocker, это open source, так что тут пожалуйте ссылку:
https://github.com/paolo-projects/unlocker
Он и под Windows, и под Linux. На версии VMware Workstation Pro 17.0.0 под Linux работает точно, проверено лично.
-
Образ непосредственно «macOS Monterey» версии 12.0.1 тоже ищите сами в интернете, Apple хочет за это денег поэтому ссылку не дам, но находится этот образ довольно легко.
-
И ОБЯЗАТЕЛЬНО после установки ( ПОСЛЕ УСТАНОВКИ !!! ) «macOS Monterey» в «VMware Workstation» установить «VMware Tools». Иначе не будет ни копирования через клипборд из гостевой машины в виртуальную и обратно, и разрешение в гостевой машине «macOS Monterey» будет только 1024×768 и поменять его никак. Но официально скачать с сайта VMware эти «VMware Tools» проблематично: VMware хочет чтобы вы сначала зарегистрировались, а после неделю не даёт ничего скачивать, типа «проверяет ваши данные». А через неделю вполне может дать отлуп по причине того что VMware, к примеру, не понравилась одна буква в вашей фамилии. На «VMware Tools» тоже ссылку не дам потому что это «за регистрацию» на сайте VMware и за их ПЛАТНЫЙ «VMware Workstation», а совсем не просто так, но в интернете находится где скачать эти пресловутые «VMware Tools» для гостевой системы macOS тоже элементарно, по словам «VMware Tools».
После установки macOS надо будет ПРЯМО ИЗ ЭТОЙ ВИРТУЛЬНОЙ МАШИНЫ скачать этот «VMware Tools for macOS», запустить и согласиться со всеми пунктами установки.
Ну вот в принципе. Вот я и всё сказал. Такой вот маленький tutorial получился.
Are you thinking of trying macOS Sonoma 14 but don’t have a Mac? No problem! You can install macOS on your PC with Windows 10 & 11 using the Oracle VM VirtualBox 7.0 program.
In this article, I will guide you through the steps of creating a virtual macOS environment on your Windows PC. First, I will show you how to prepare a new virtual machine on your physical PC. Next, I’ll help you test macOS Sonoma without needing a Mac computer.
How to Run macOS Sonoma 14 on a Virtual Machine using VirtualBox 7 on Windows 11 or 10
Before you buy a MacBook Pro or iMac, if you use a Windows PC, you can try out the Mac system by installing it on a virtual machine.
You can use special programs to make the macOS system work on a regular desktop or laptop, even if it’s not an Apple Mac. So, you can set up Sonoma using programs like VMware Workstation or VirtualBox on Windows 10 or 11.
We can only make a virtual computer for macOS Sonoma with the Unlocker tool on VMware. But if you’re using Oracle VM VirtualBox, you don’t have to use extra tools like Unlocker. After making a fake Mac on VBox, you must type in a few commands before starting the installation.
Before starting the installation, download the Sonoma file and save it on your host computer. As a result, you can also use this file on VMware Workstation, Fusion, or ESXi servers.
How to Create a New VM for macOS Sonoma
Before you make a pretend computer, install VirtualBox on your Windows 10 or 11 computer. Also, get the Extension Pack and add it.
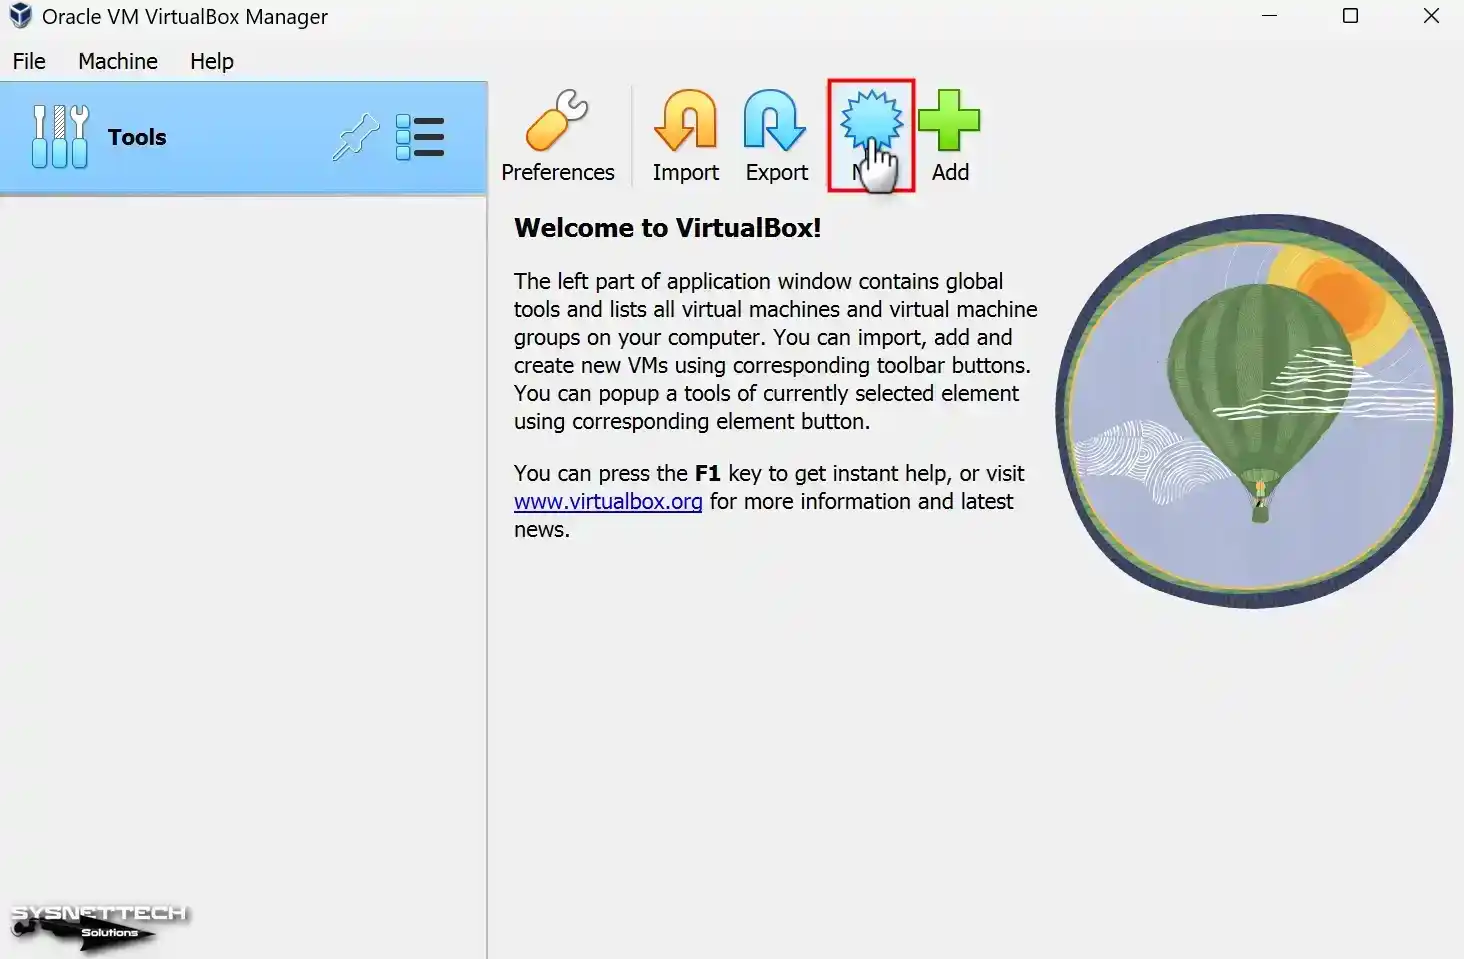
Step 1
When you start Oracle VirtualBox, click on the New button in the menu. This will help you create a new virtual machine for macOS Sonoma.
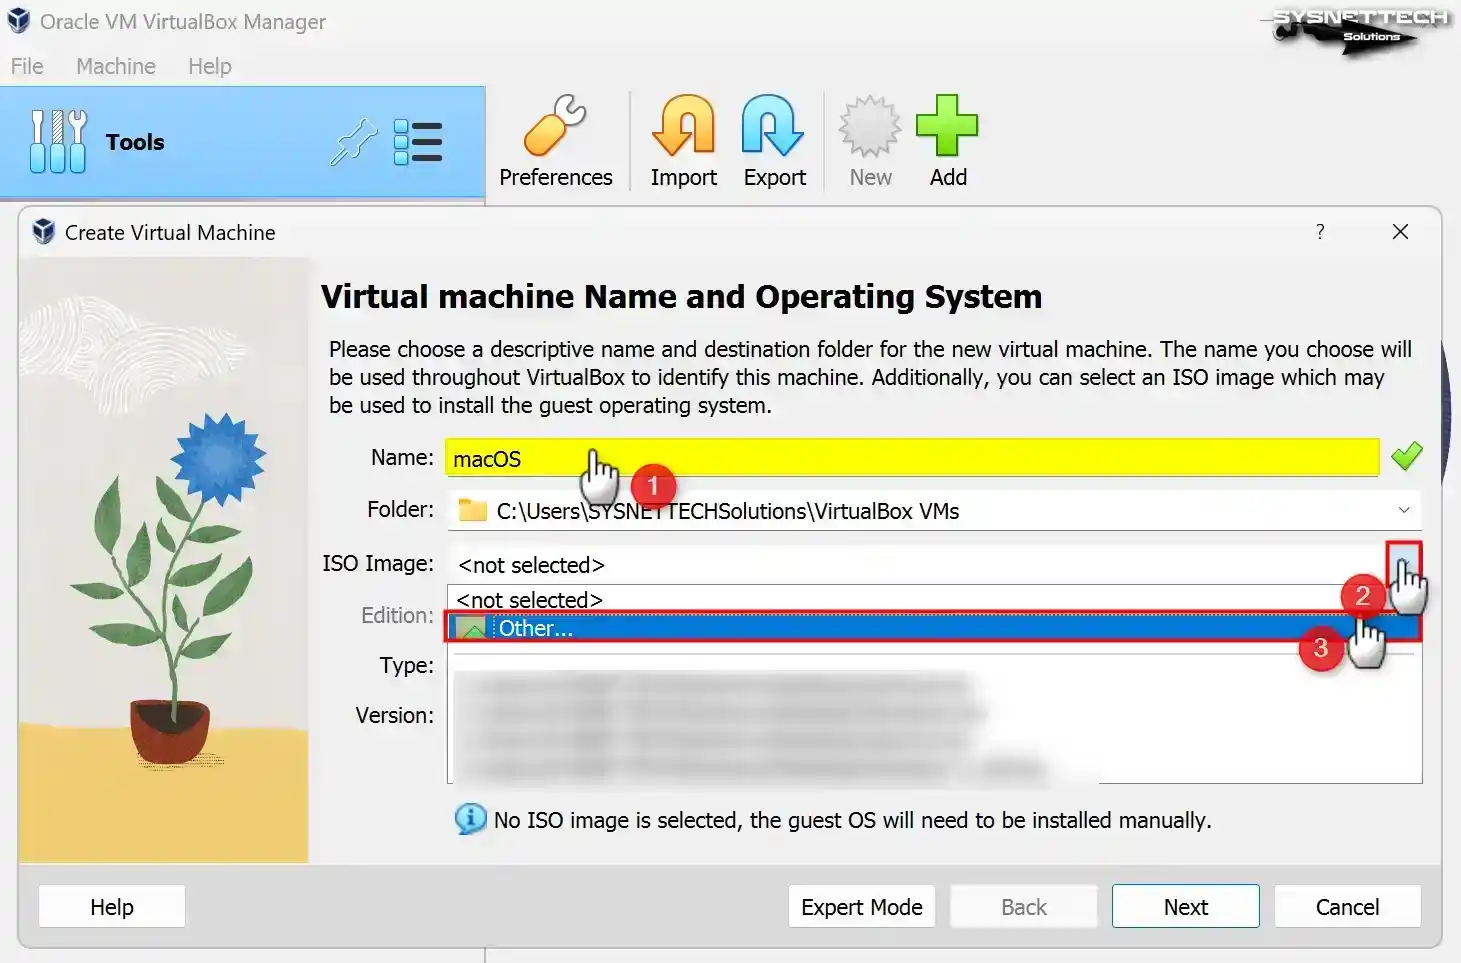
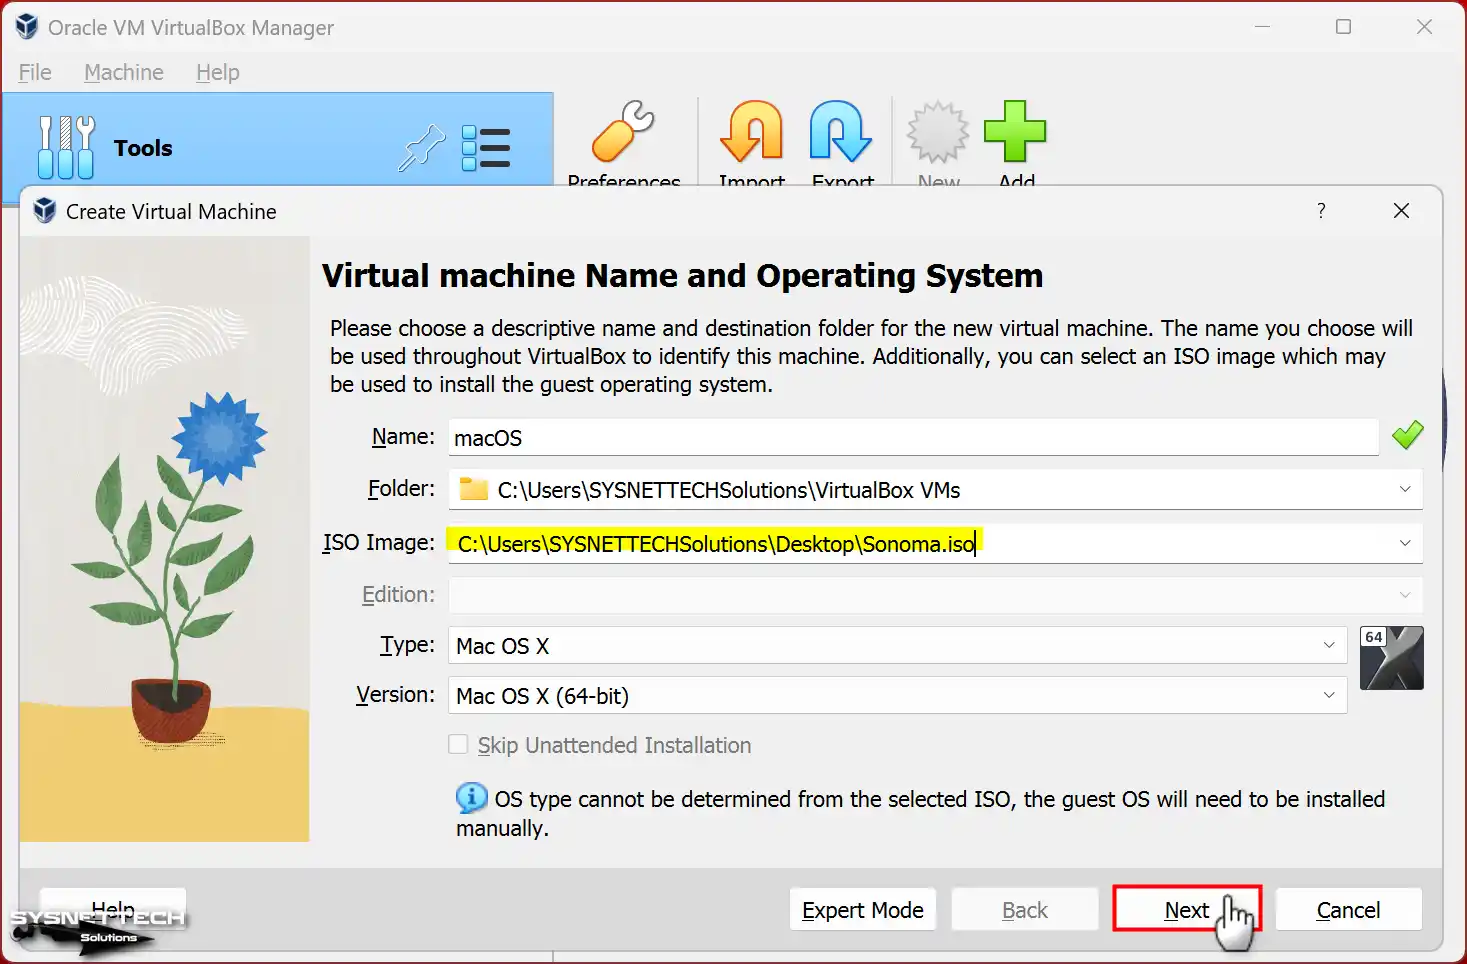
Step 2
When you’re in the window to create a VM, type macOS in the Name, then, choose Mac OS X from the Type field. Afterward, select the macOS you want to install and click the Next button.
Select “Other” from the menu when you click on ISO Image. After that, you add the Sonoma file to the pretend computer.
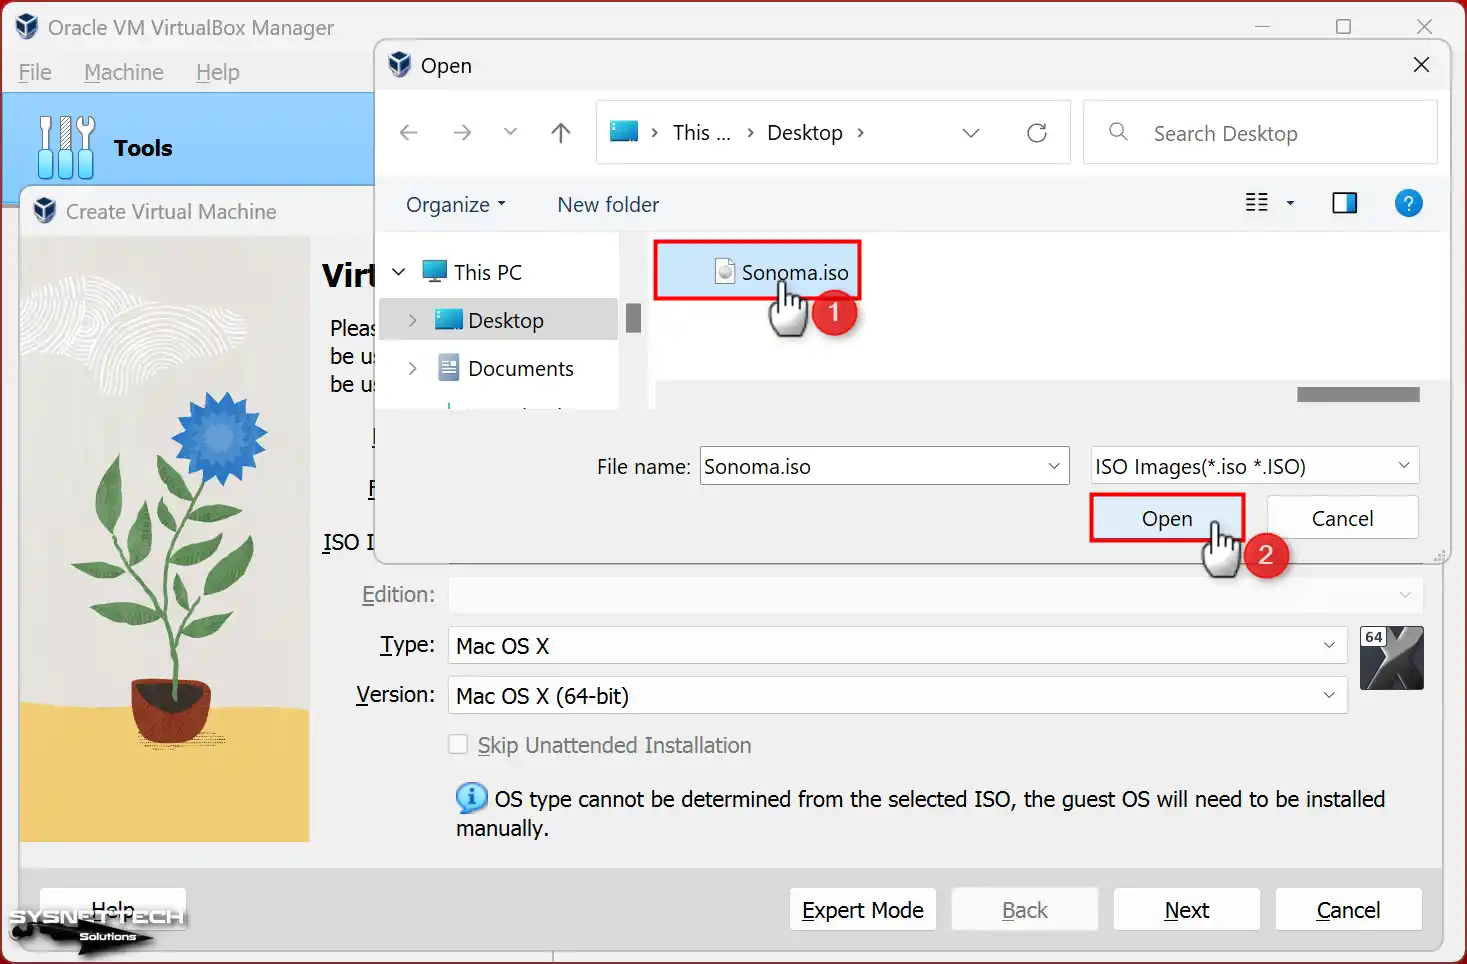
Step 3
When the window opens, go to where you saved the ISO file. Afterward, find the related file and open it up.
Step 4
After completing the initial steps, proceed to the next part by clicking Next.
Step 5
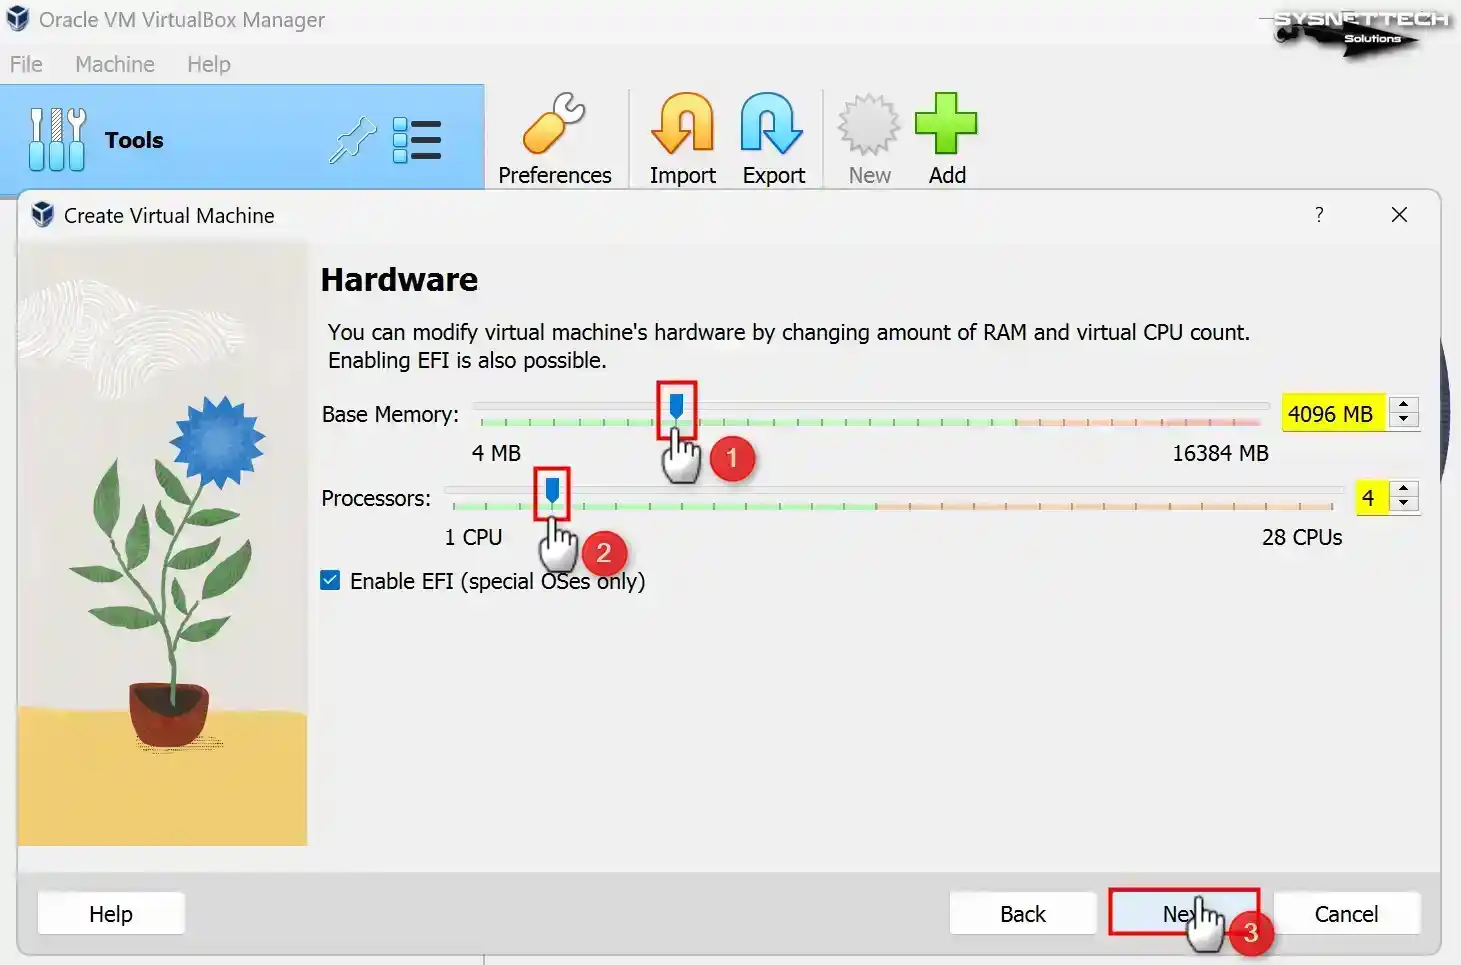
You should divide the RAM and virtual processor based on how well your computer works. So, adjust the virtual machine settings to match your PC’s specifications. If the host RAM is 16 GB, assign 4 GB or 8 GB. Consequently, change the Memory Size in the window accordingly. Under normal conditions, macOS VM runs smoothly with 4096 MB of memory. So, set the memory size to 4096 for optimal performance.
Another thing to do is choose either 2 or 4 virtual CPUs so the virtual macOS computer runs better. If your host PC has problems or gets stuck while installing, set the virtual processor cores to 1 and see if it helps.
Step 6
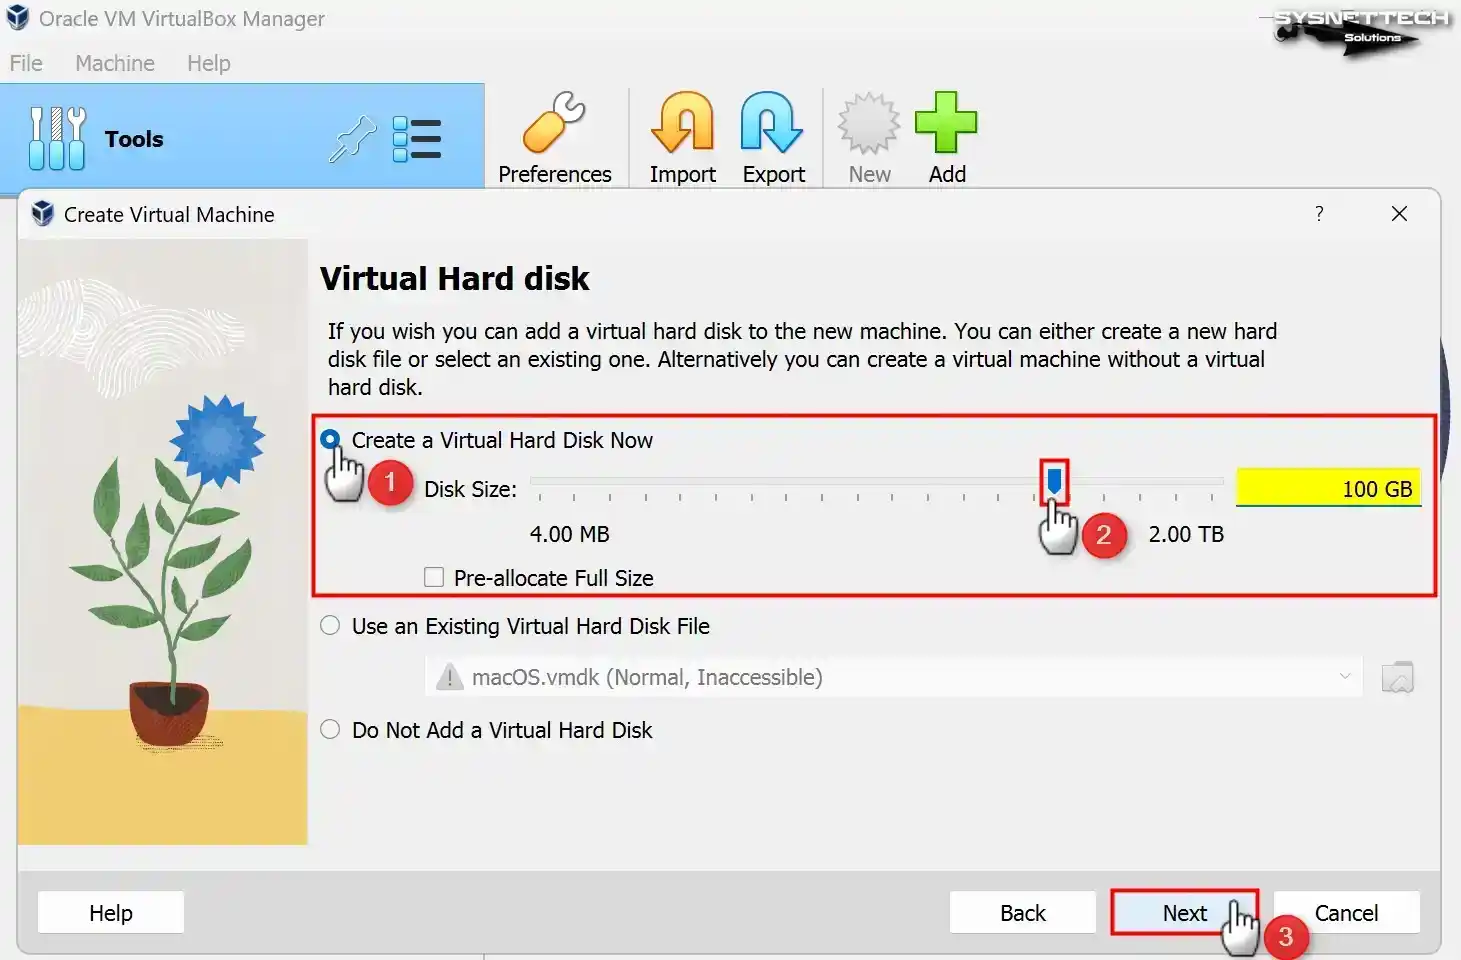
If the virtual machine disk is ready in the Virtual Hard Disk window, you can add it and start your virtual macOS. But if you’re starting fresh, choose the “Create a virtual hard disk now” option and click Create to continue.
If you have any VirtualBox 6.x versions, select the “VDI” (VirtualBox Disk Image) type for the virtual hard disk when setting it up. Then, click the Next button to move forward.
Furthermore, if you make the hard disk a fixed size when setting up the virtual PC in VirtualBox, it will use up space on your computer’s disk equal to the extent you set.
Making the pretend disk a fixed size on older computers can make things work faster. But if your computer’s disk is an SSD or NVMe, it’s better to set up the virtual disk as dynamic, meaning it uses space as needed.
Back up the location of the guest computer’s setup and where the virtual disk is on an external drive. Also, only fill up your computer’s disk with reason. Based on your activities on the simulated macOS system, determine the size of the imaginary disk. A disk size of 100 GB should be enough for installing and trying things out.
Step 7
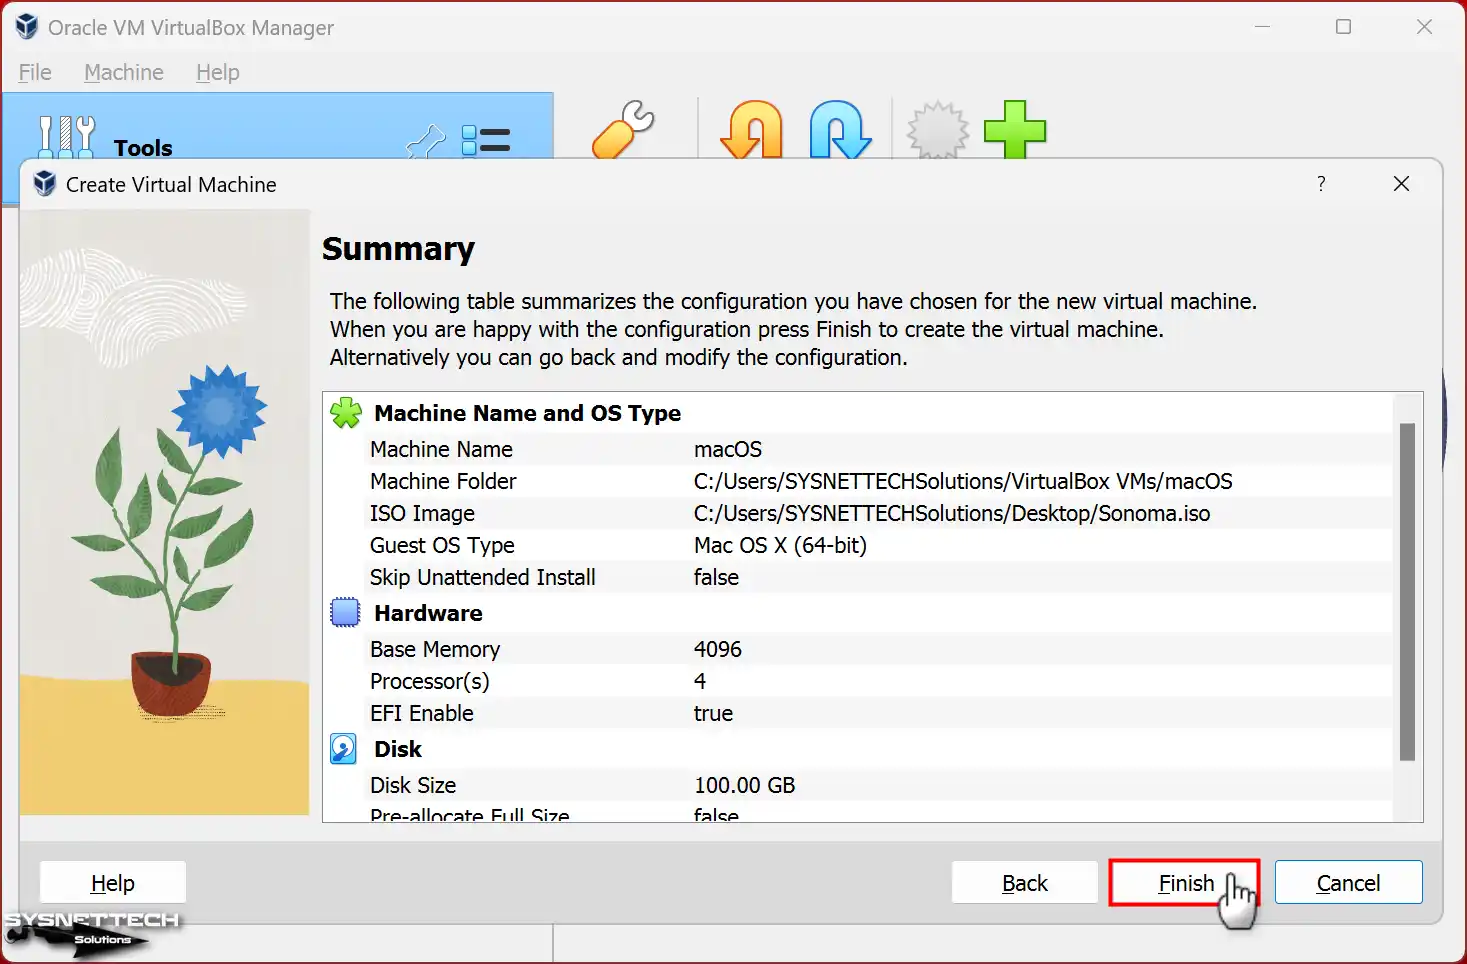
Check the settings for the fake macOS computer’s hardware and then close the wizard.
Step 8
Press the Settings button to adjust the guest computer’s setup in more detail.

Step 9
Take out the pretend floppy from the fake computer’s settings (go to System, then Motherboard, and finally Boot Order). Make the optical drive the primary device. Just adjust the settings as needed.

Step 10
Add four processors to the macOS VM in the System/Processor section. If you don’t do this, you might run into a load_init_program error while installing. Also, if you plan to use special VM software, turn on the Nested VT-x/AMD-V feature.
If you keep running into problems or things keep going in circles when you’re making the pretend Mac in VirtualBox, try turning off the virtualization feature. These issues differ for each computer, so you might have to try a few things and see what works based on your PC.

Step 11
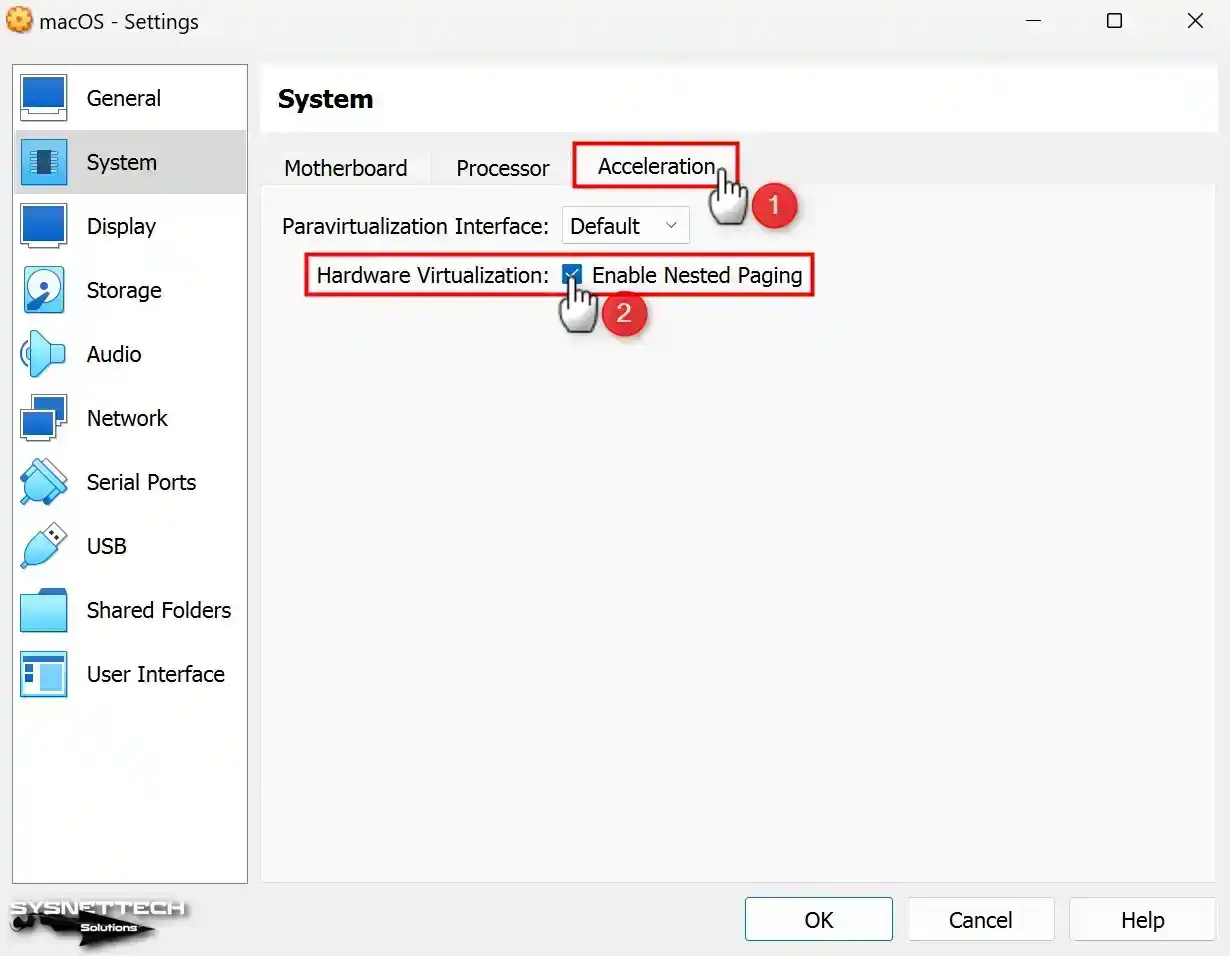
Turning on the virtualization feature on the virtual PC makes things work faster and makes the system run better. To handle memory better between your computer and the pretend one, go to the Acceleration tab and check the box for Nested Paging in the Hardware Virtualization section.
Step 12
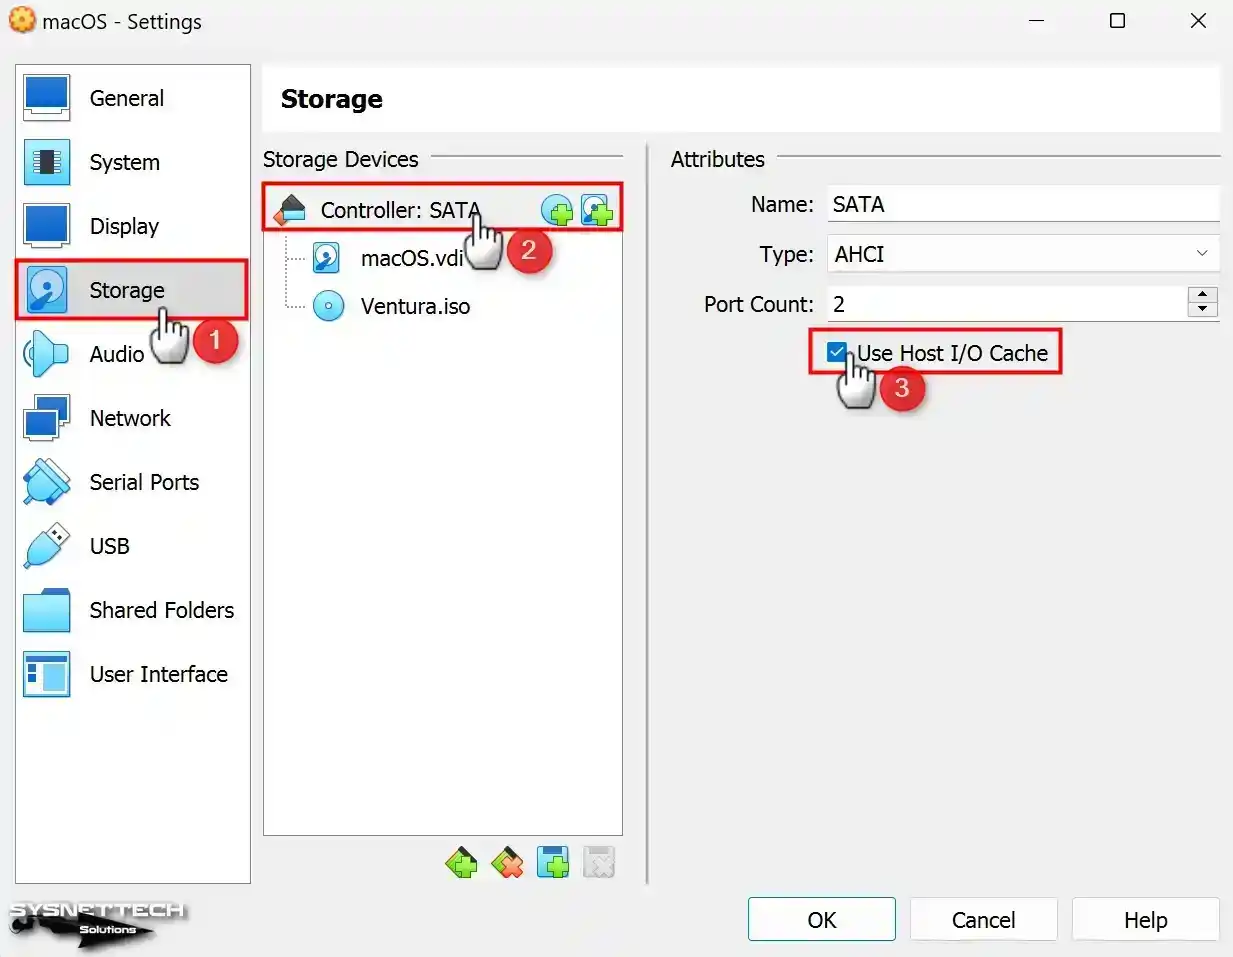
Turn on the Host I/O Cache on the SATA Controller to make the virtual computer’s disk work faster. Thanks to this, the VM’s disk runs faster.
Step 13
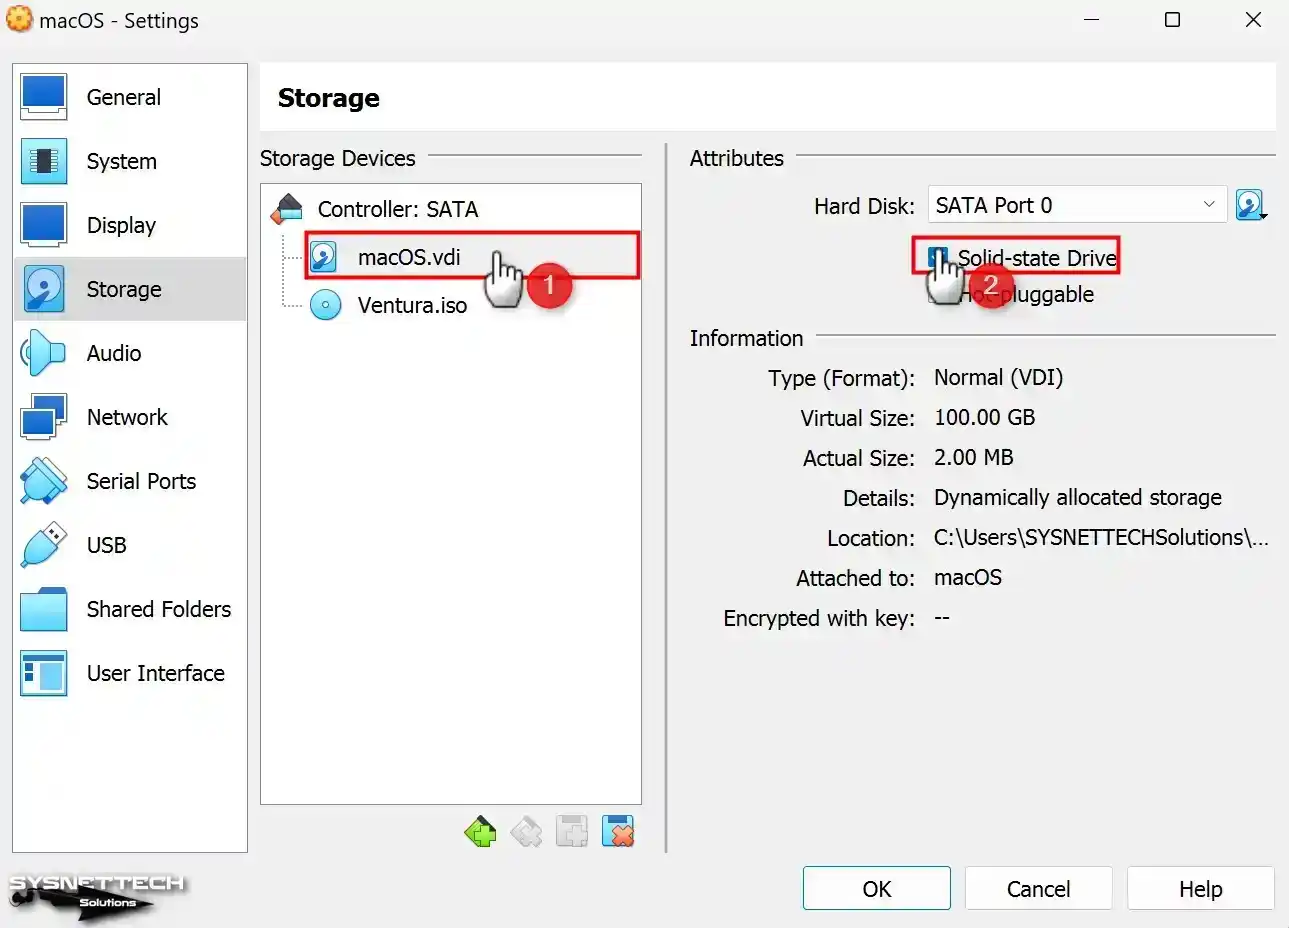
Also, choose the Solid-State Drive (SSD) option in the macOS settings.vdi disk file.
Step 14
You must pay attention to the point here: you enabled USB 3.0. Installing it using USB 1.1 or 2.0 may result in a keyboard and mouse error.

Step 15
Before you start running macOS on the VirtualBox virtualization app, you need to make some extra settings on the virtual machine using the Command Prompt. First, close the program and open the CMD or PowerShell command prompt as an administrator.
Next, please copy and paste the codes I gave you into a text document. After that, change the virtual machine’s name as necessary. Finally, run the commands in the order I provided.
cd "C:\Program Files\Oracle\VirtualBox\"./VBoxManage.exe modifyvm "macOS" --cpuid-set 00000001 000106e5 00100800 0098e3fd bfebfbff./VBoxManage setextradata "macOS" "VBoxInternal/Devices/efi/0/Config/DmiSystemProduct" "MacBookPro15,1"./VBoxManage setextradata "macOS" "VBoxInternal/Devices/efi/0/Config/DmiSystemVersion" "1.0"./VBoxManage setextradata "macOS" "VBoxInternal/Devices/efi/0/Config/DmiBoardProduct" "Mac-551B86E5744E2388"./VBoxManage setextradata "macOS" "VBoxInternal/Devices/smc/0/Config/DeviceKey" "ourhardworkbythesewordsguardedpleasedontsteal(c)AppleComputerInc"./VBoxManage setextradata "macOS" "VBoxInternal/Devices/smc/0/Config/GetKeyFromRealSMC" 1./VBoxManage setextradata "macOS" "VBoxInternal/TM/TSCMode" "RealTSCOffset"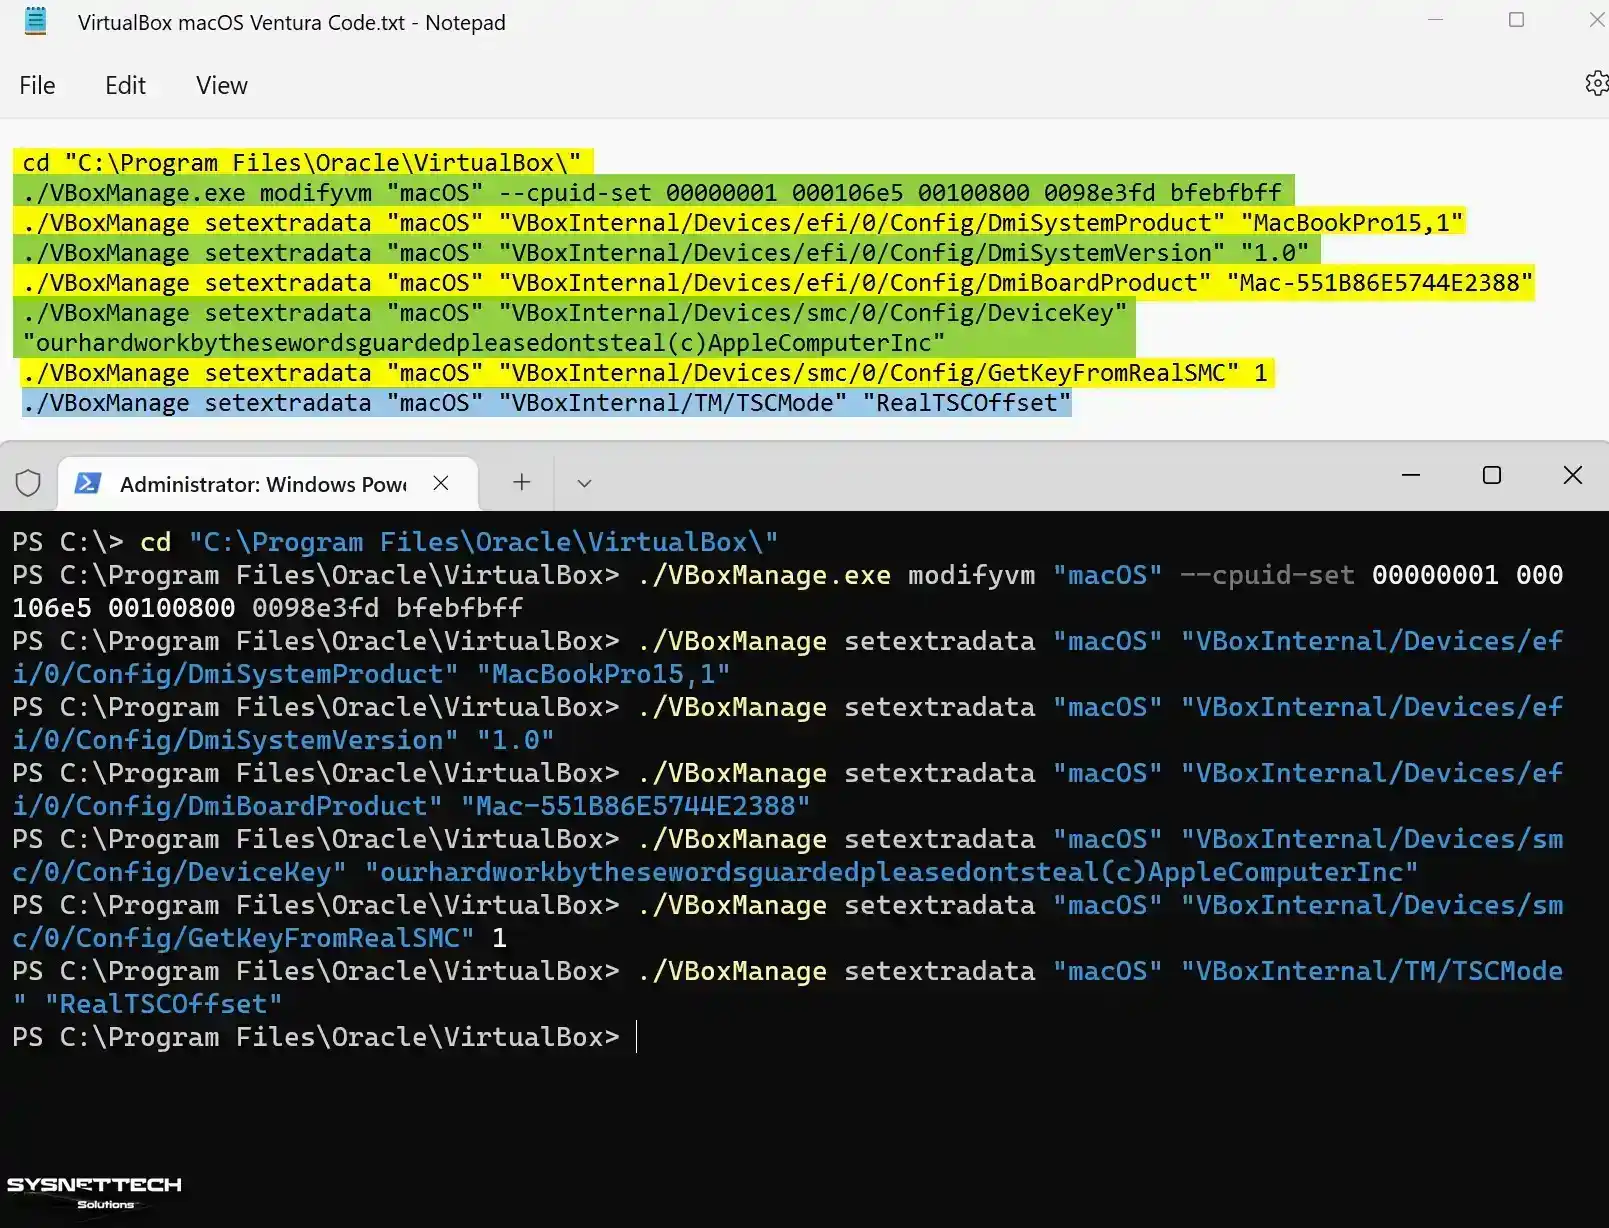
Step 16
Once you’ve set up everything for the macOS VM using VirtualBox, start it for the installation.

How to Install macOS Sonoma 14 on Oracle VirtualBox
Once you’ve done all the setup to install the Mac OS on VirtualBox, start the virtual PC and complete the installation, just like you would on an honest Mac.
Step 1
Wait for the virtual machine to start from the ISO image. Subsequently, choose the language you want to use in your macOS VM and keep going.
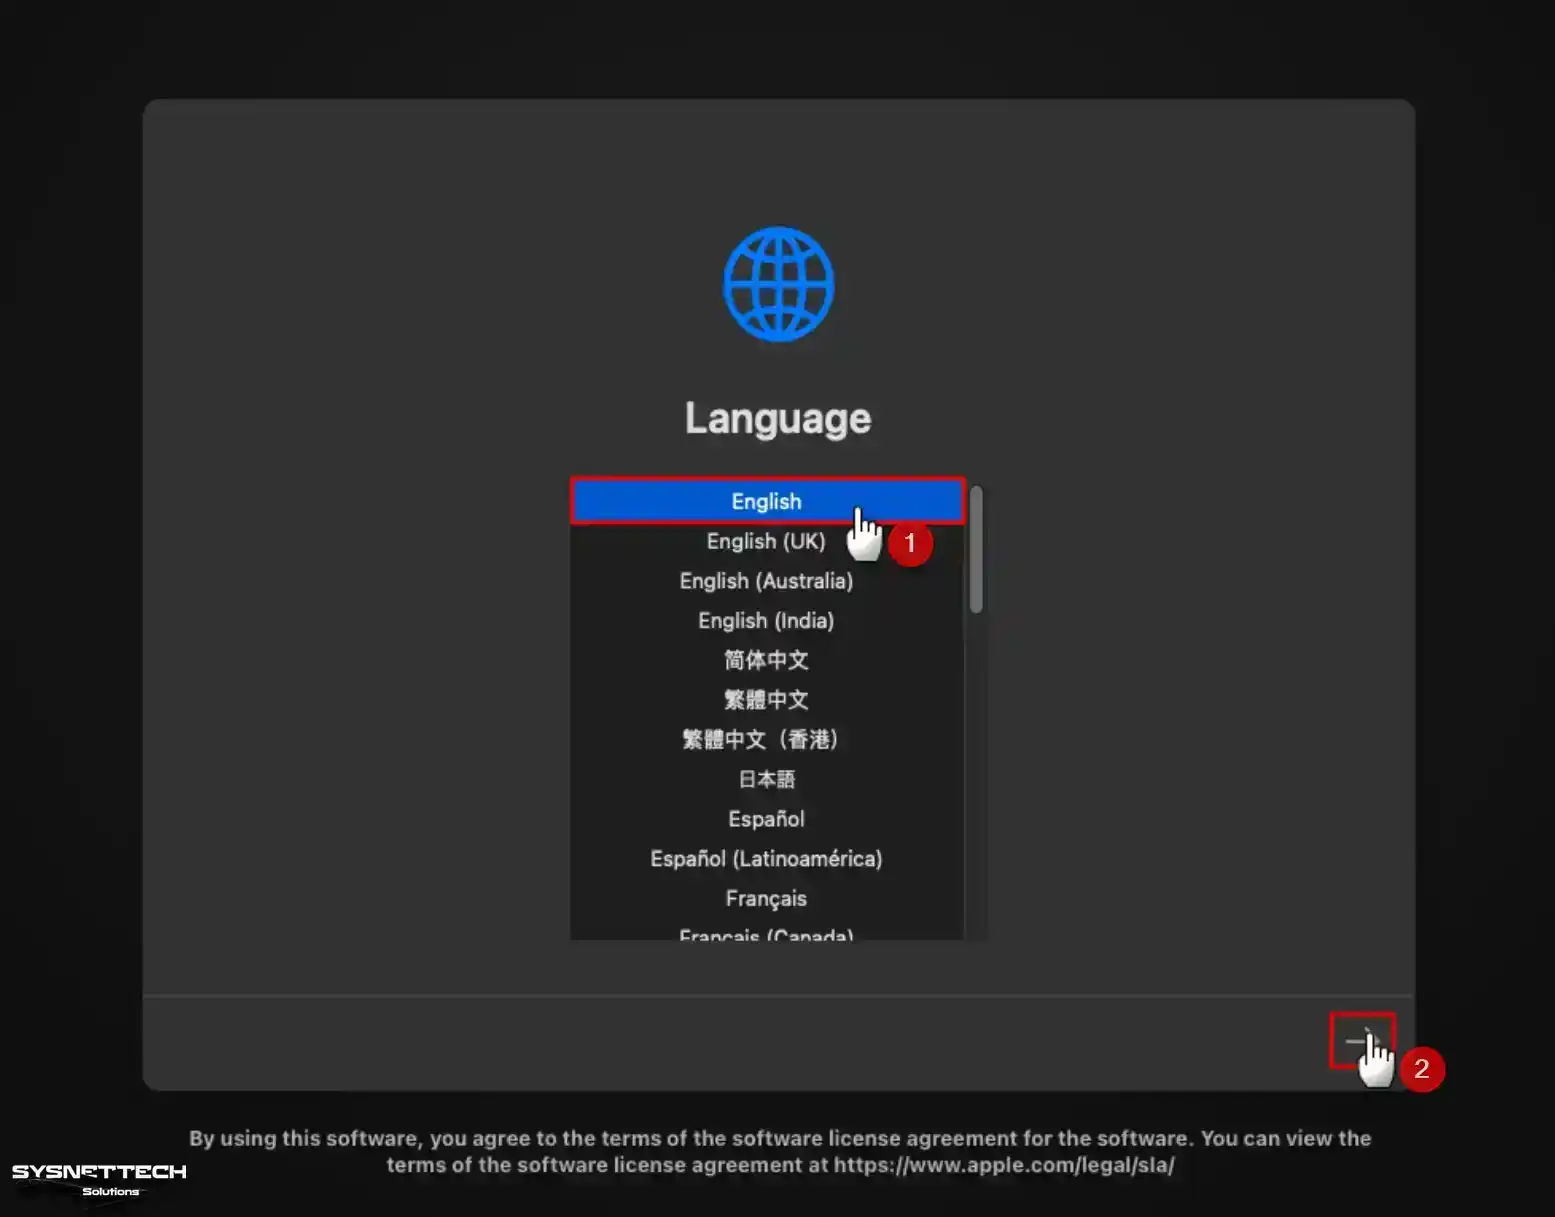
Step 2
Before setting up the system, you must format the pretend disk. To do this, choose Disk Utility on the Recovery screen and click the Continue button.
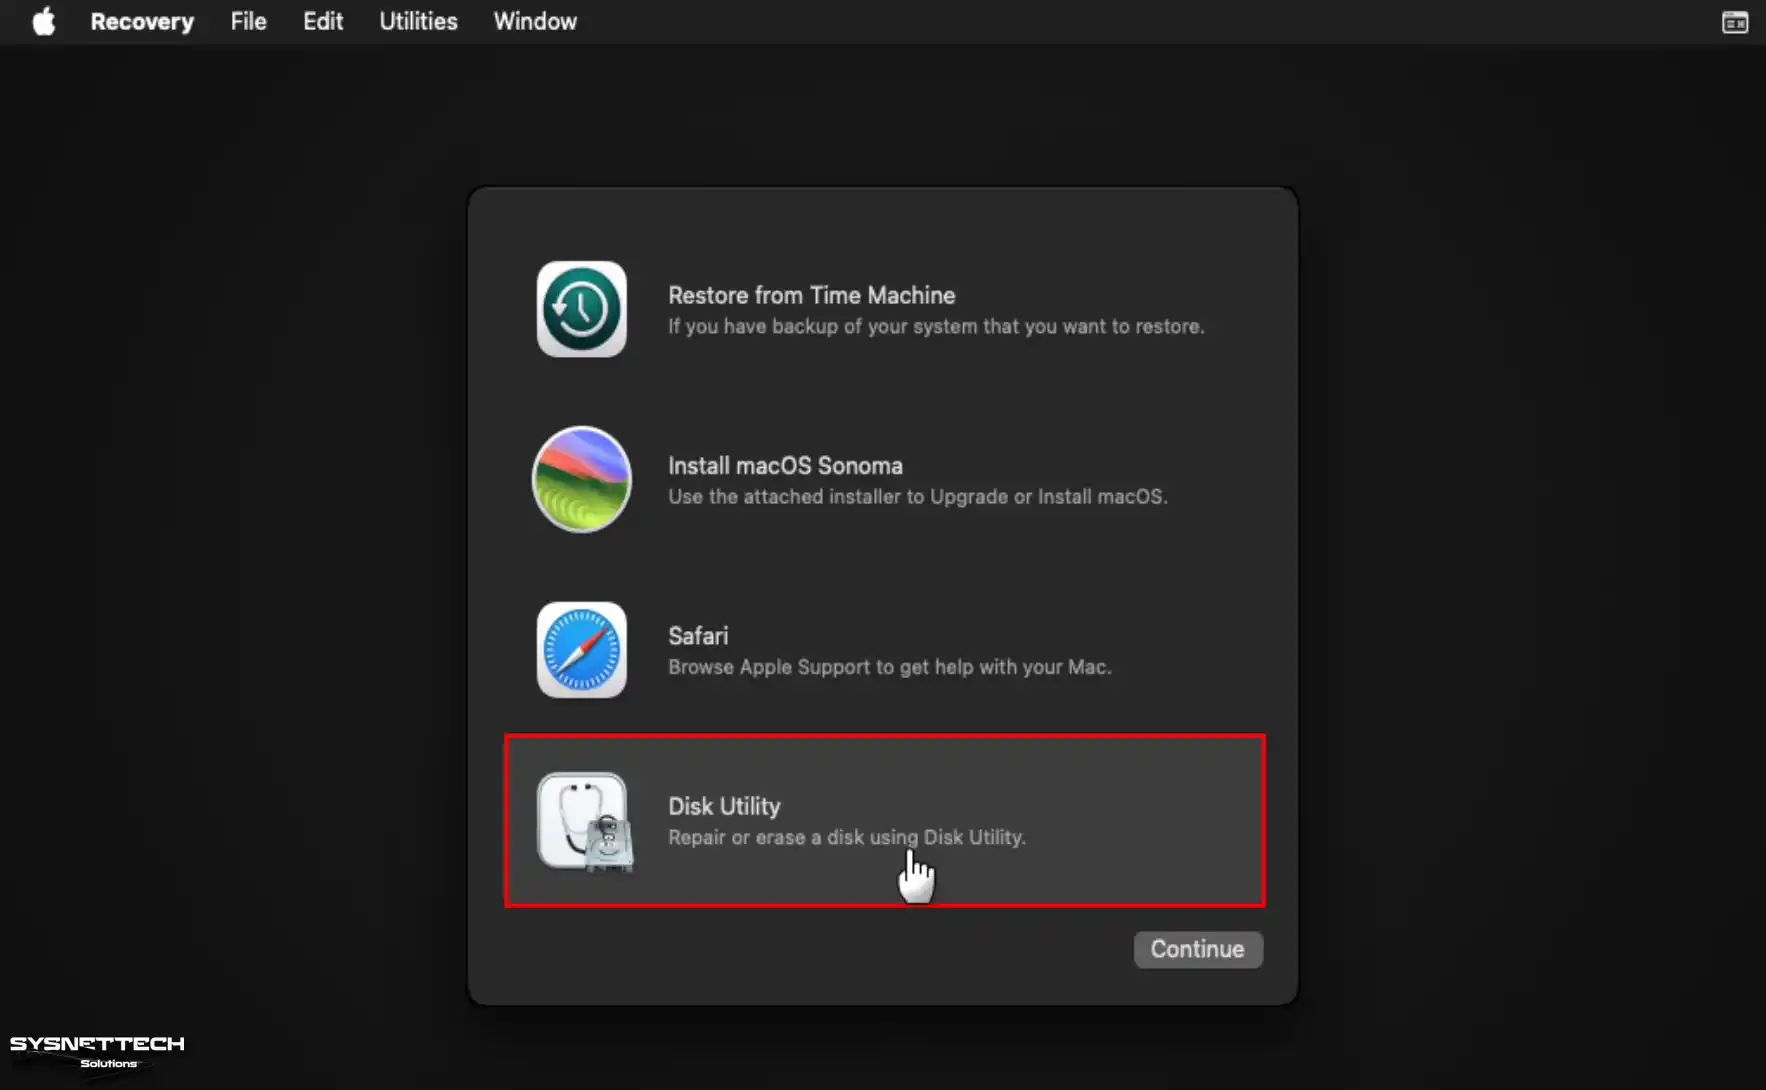
Step 3
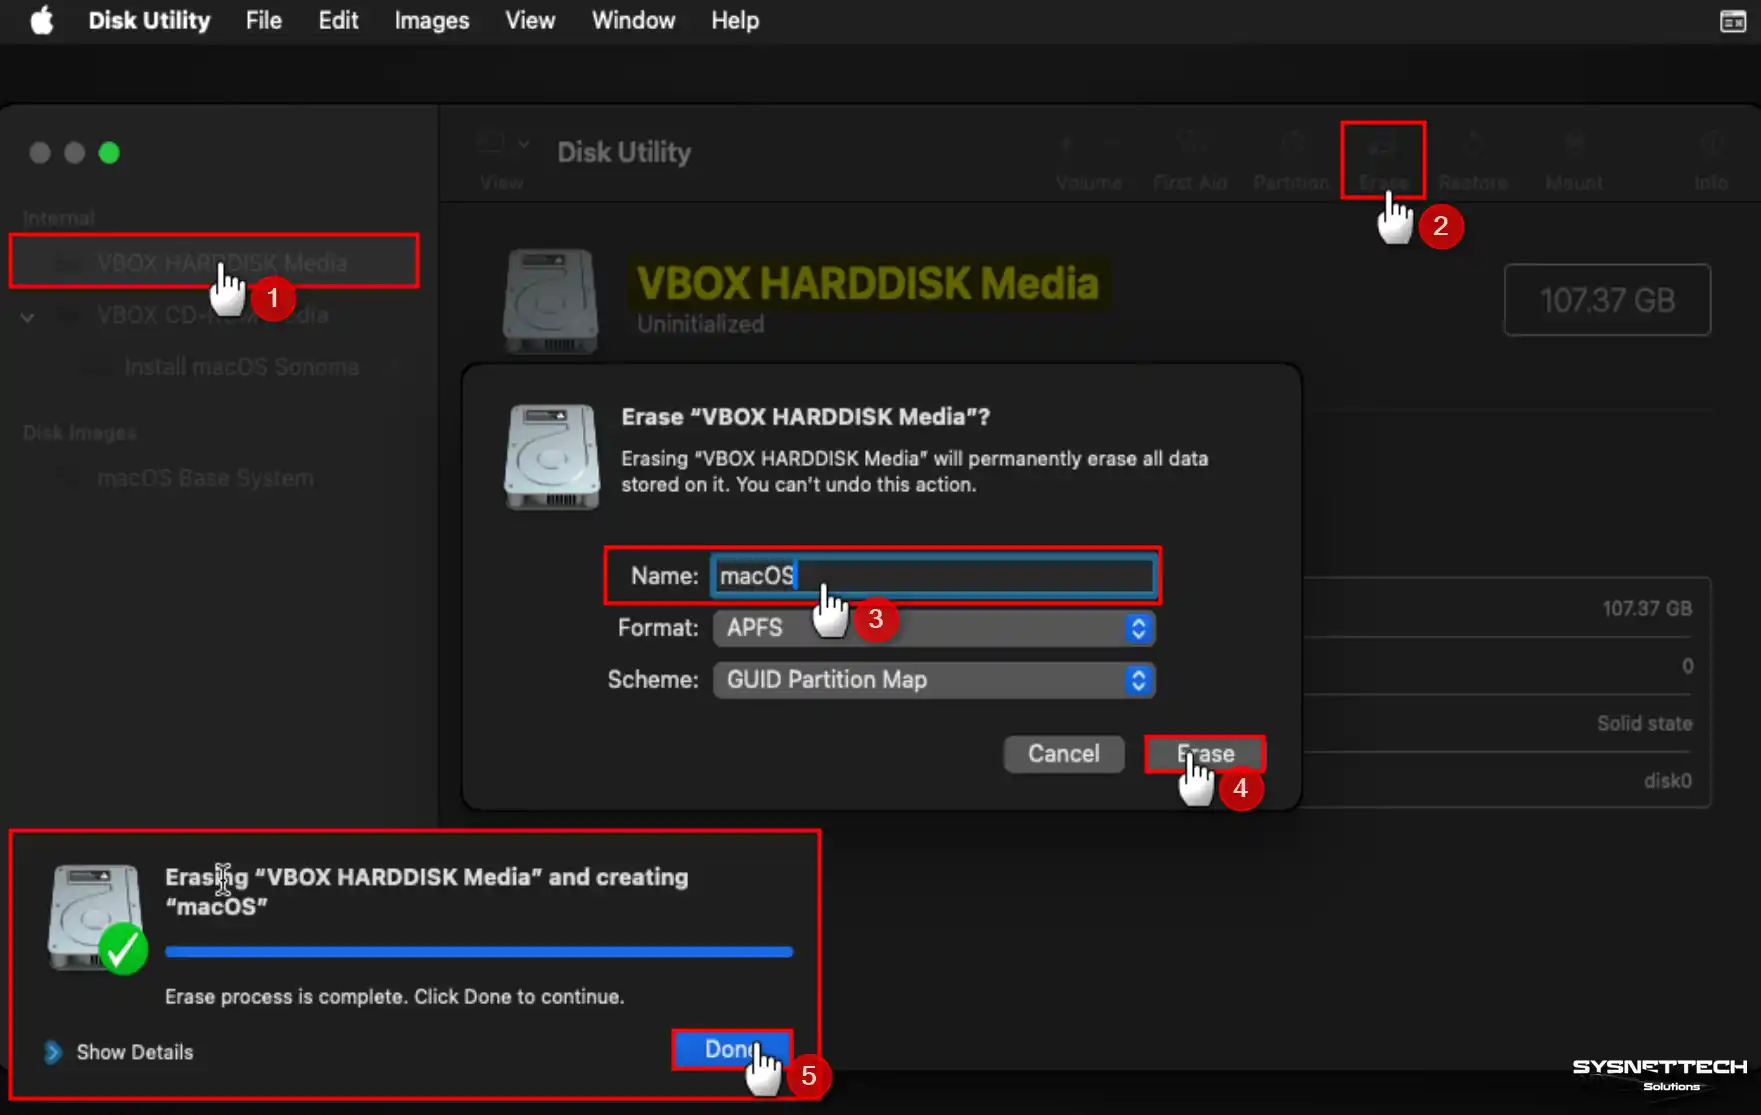
Choose the VBOX HARDDISK Media vdisk and press Erase. Once you click Erase, set up the disk’s name, format, and structure like this, and click Erase again. After the VBOX HARDDISK Media is formatted, click Done.
- Name: macOS
- Format: APFS
- Scheme: GUID Partition Map
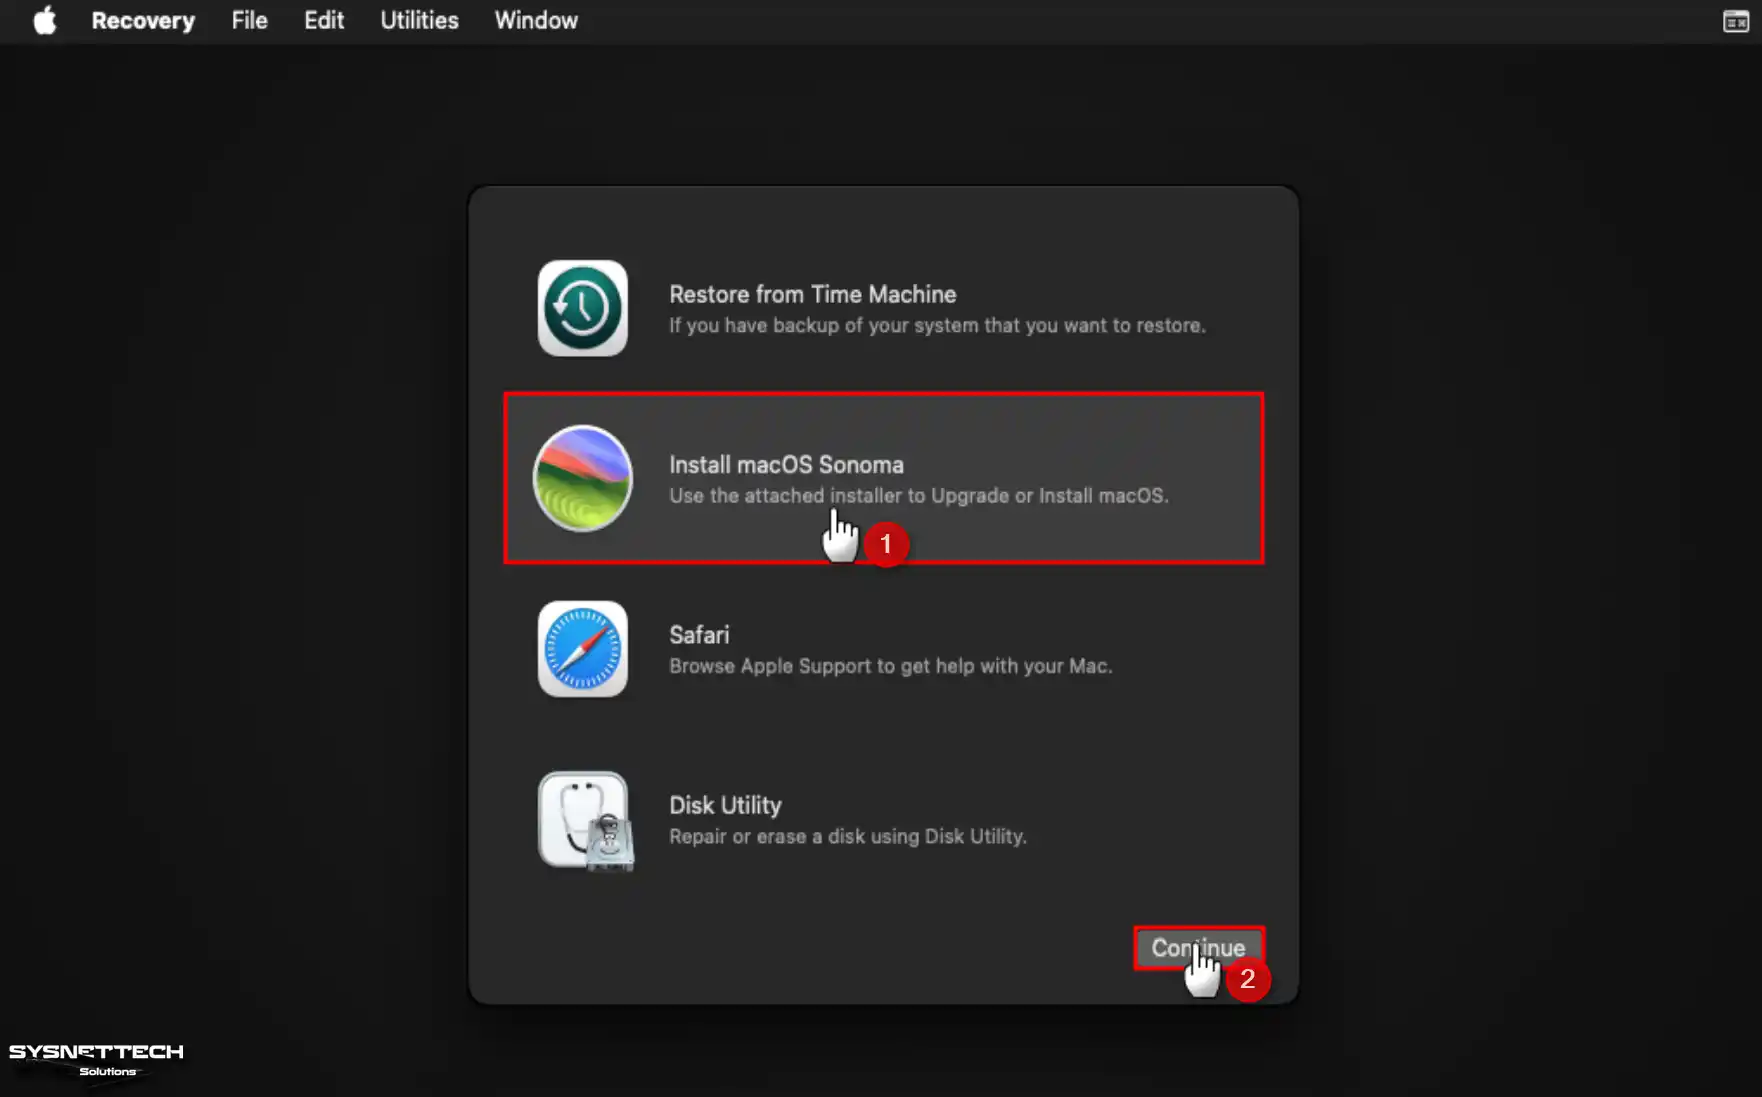
Step 4
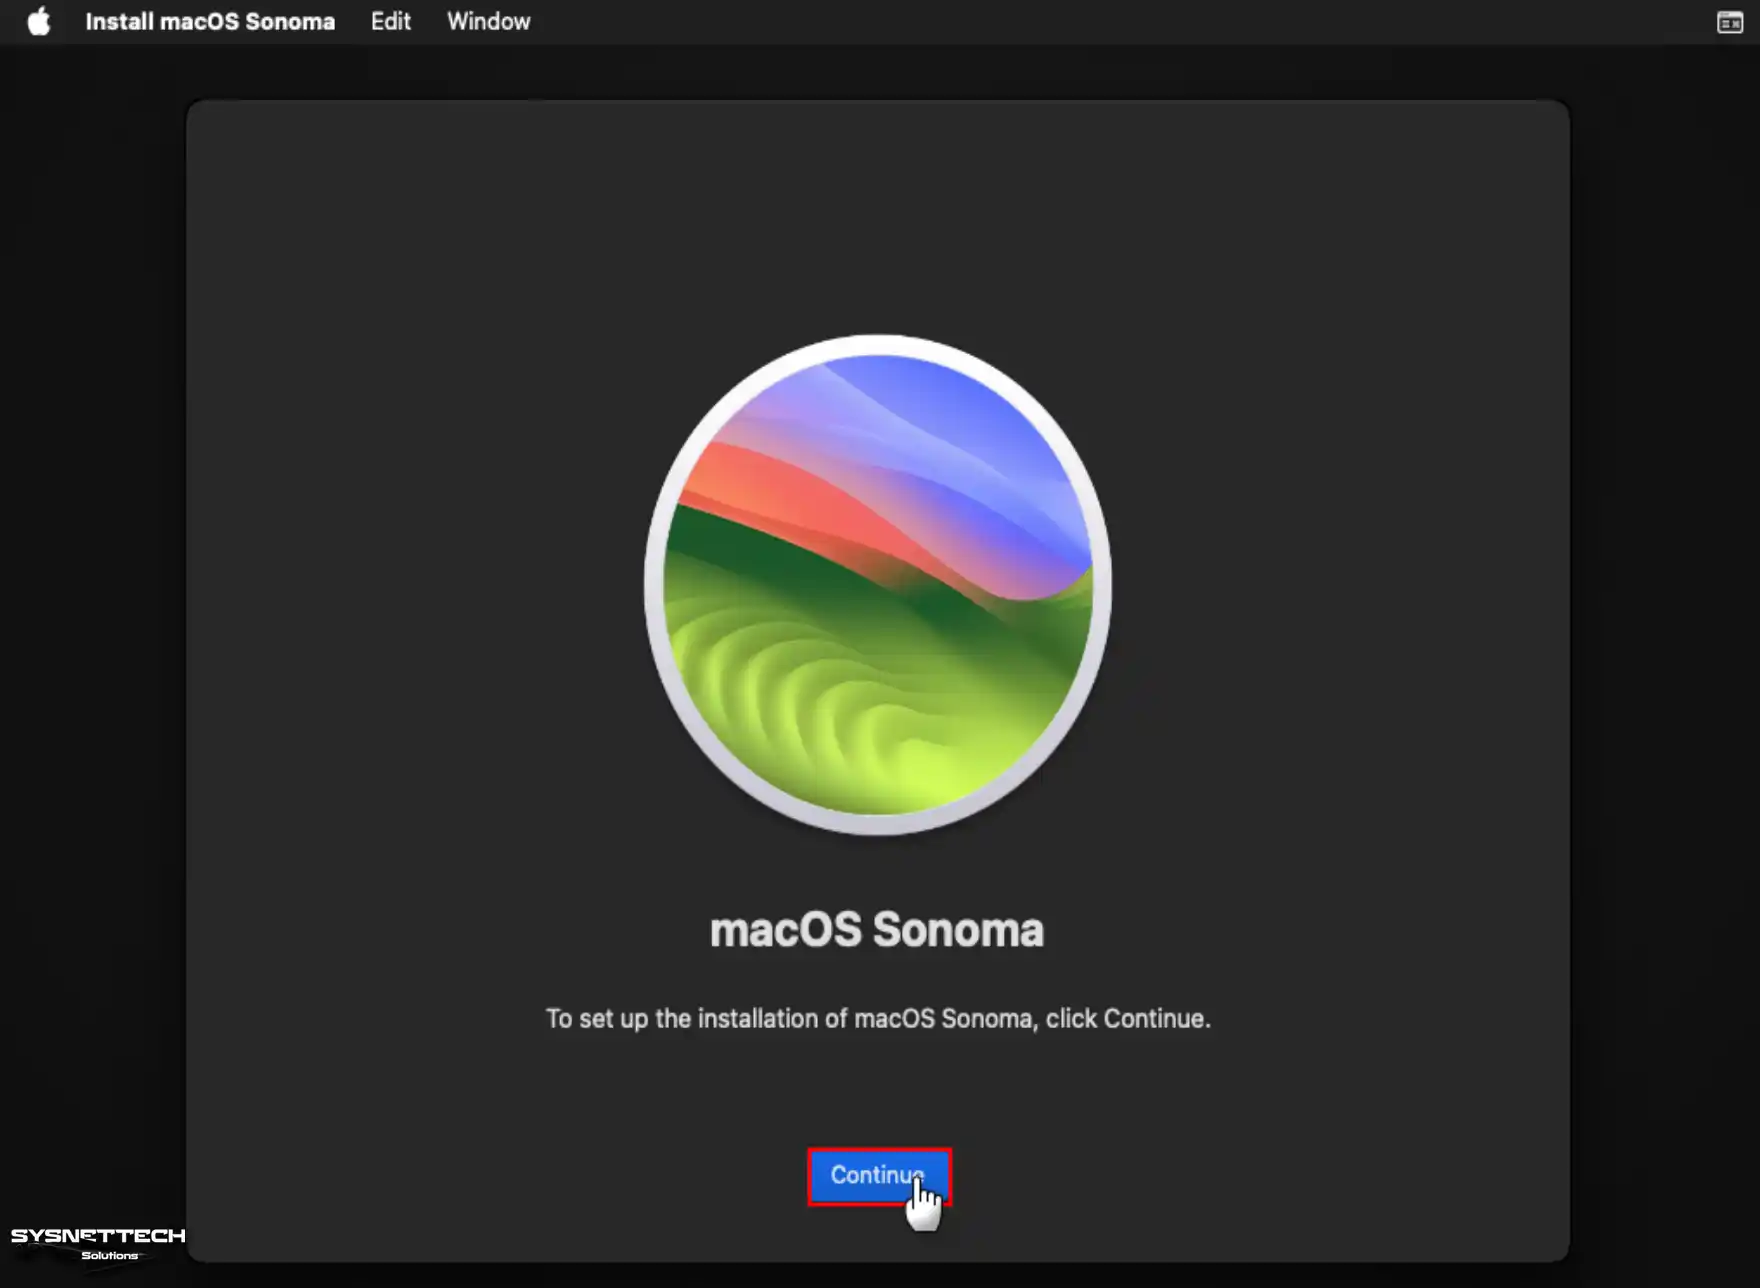
Choose Install Sonoma and click Continue to start installing the system.
Step 5
When the system setup wizard shows up, click the Continue button.
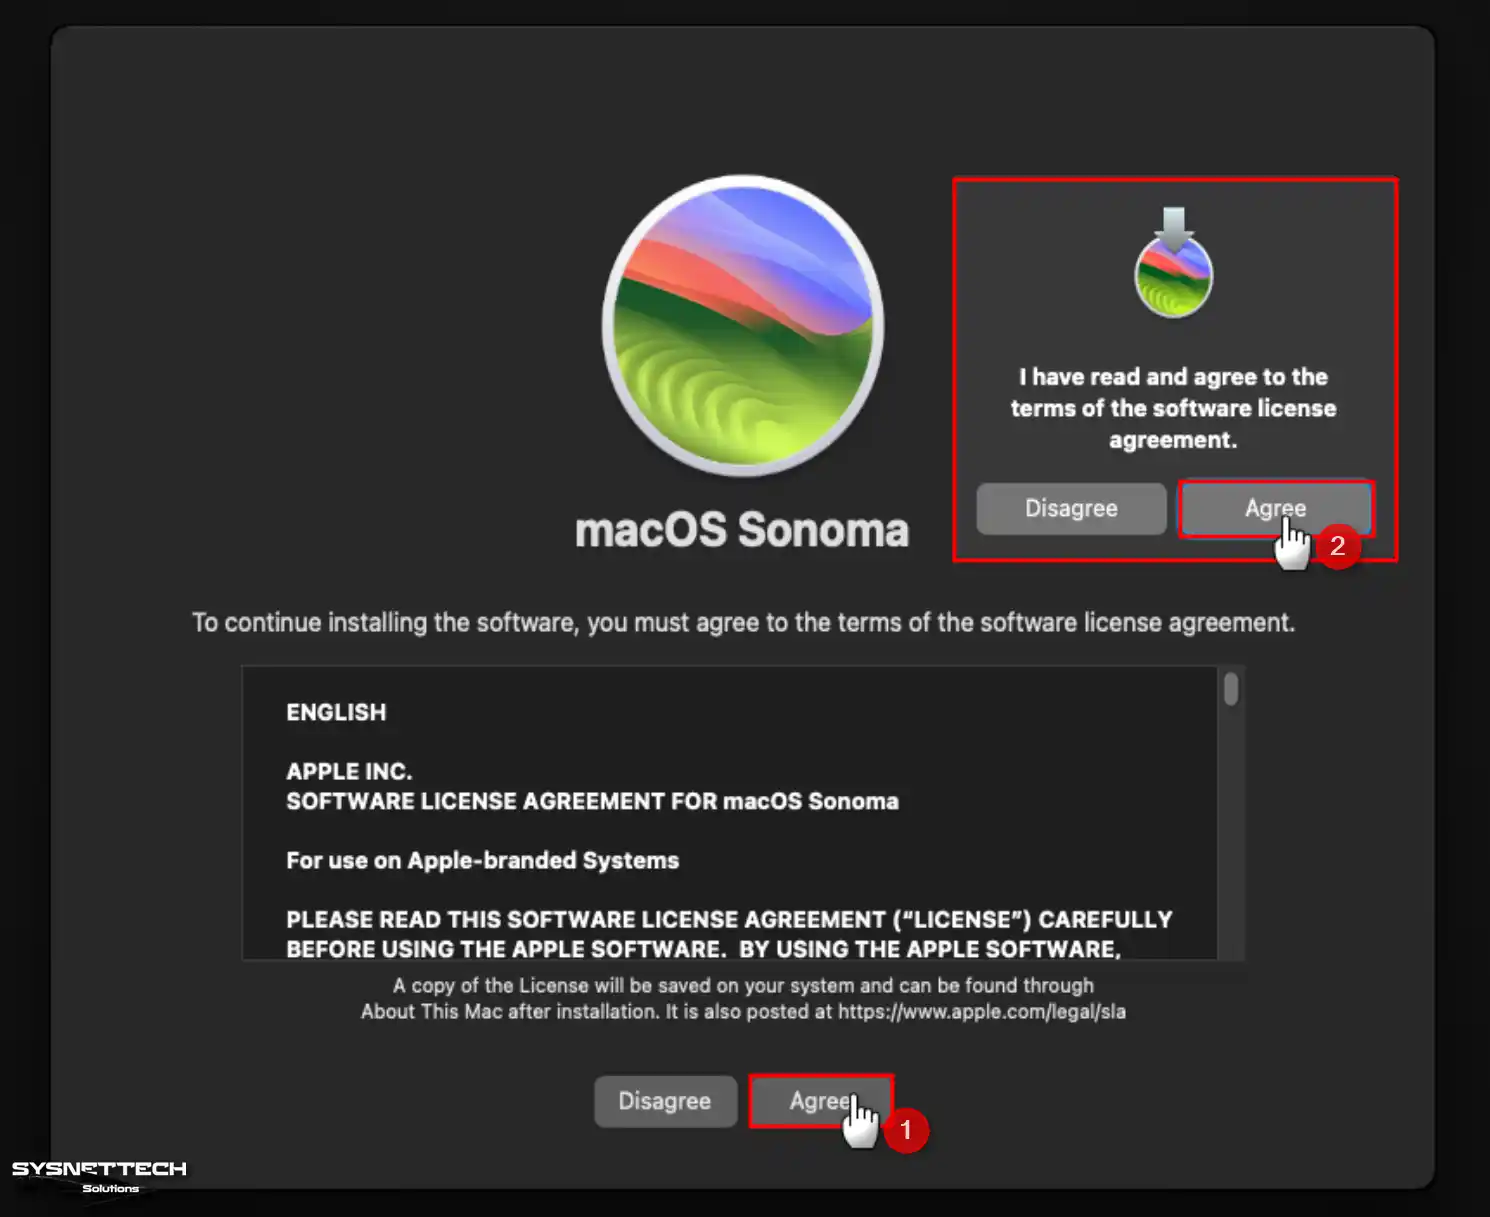
Step 6
After reading the macOS Sonoma terms of use, click Agree to accept.
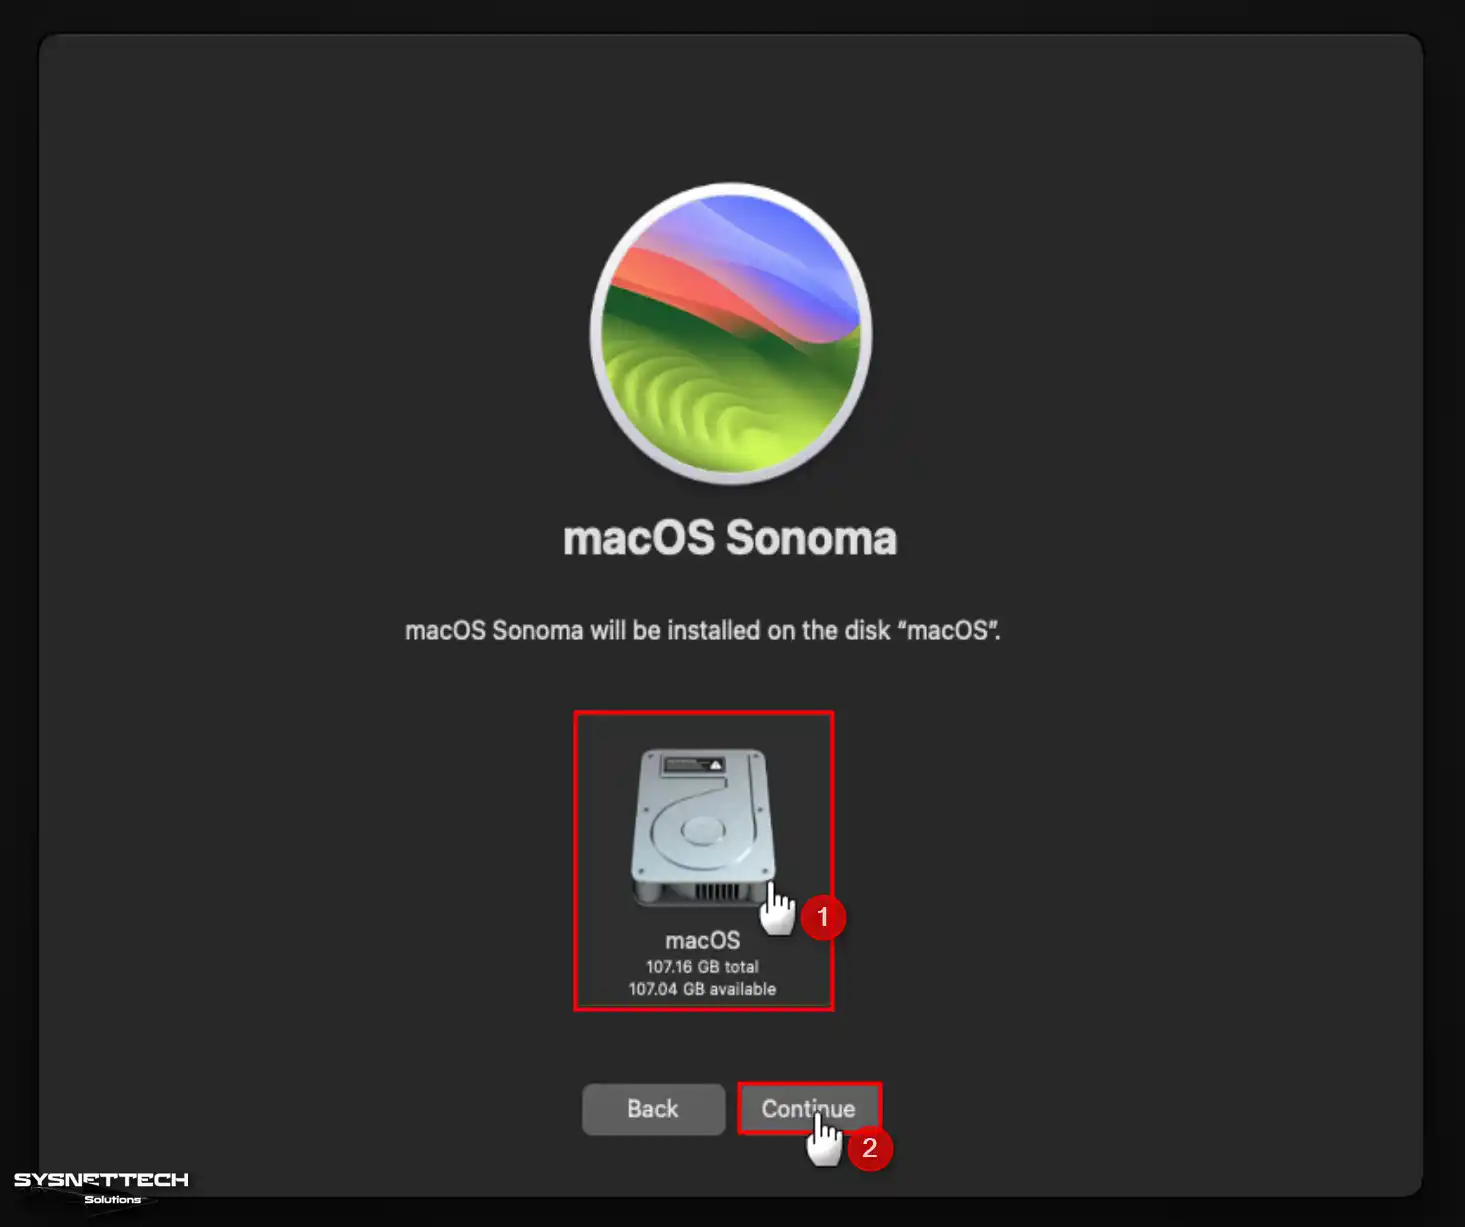
Step 7
Select the virtual disk you set up and press Install.
Step 8
Wait for the wizard to copy the installation files.
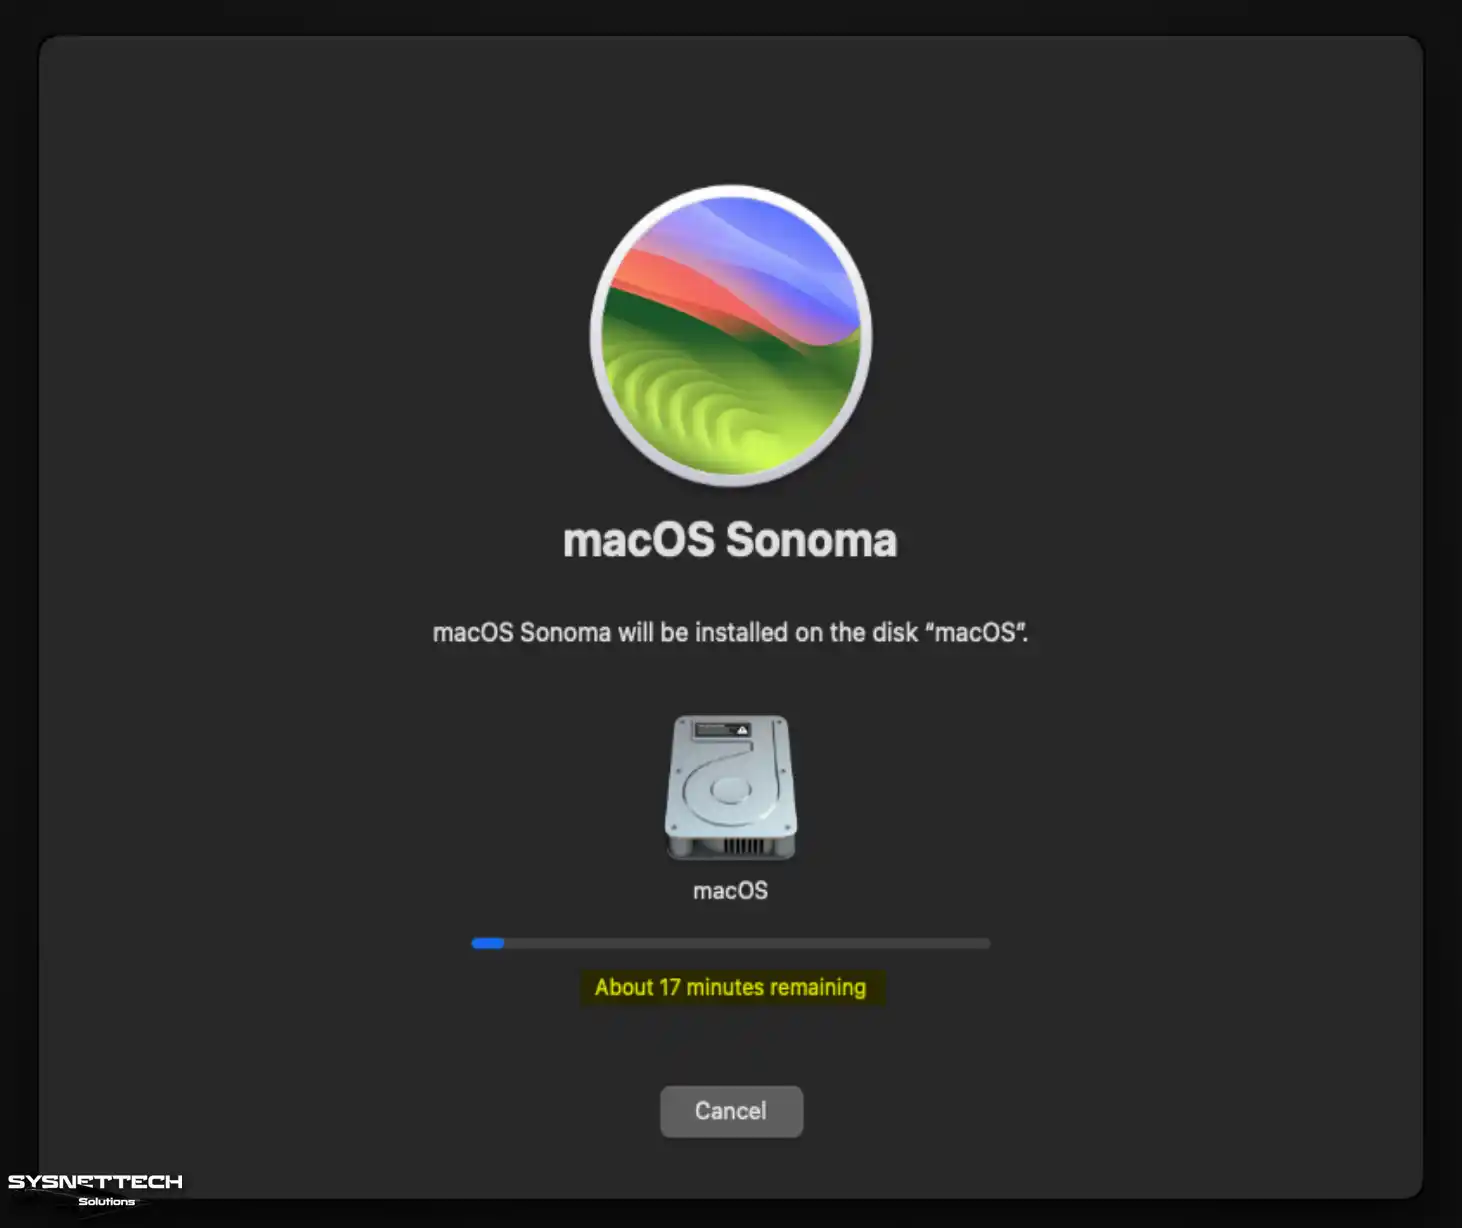
Step 9
When the guest macOS restarts, the setup wizard will continue where it left off. It might take a bit, especially if your computer isn’t super fast, so be patient if it says a minute remaining.

Step 10
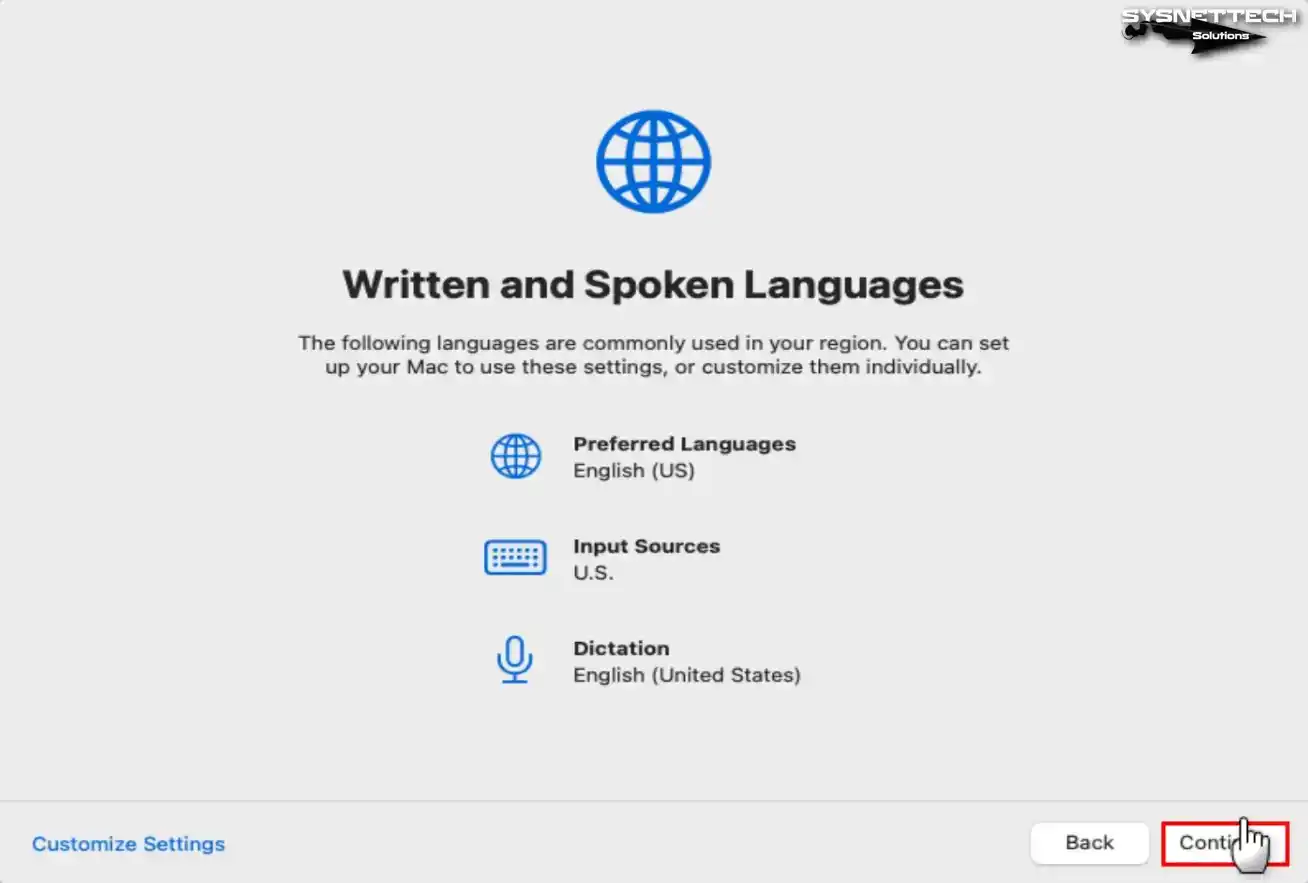
Once you select your country or region, click Continue.

Step 11
Choose the keyboard style and language you want to use in the VM, then click Continue.
Step 12
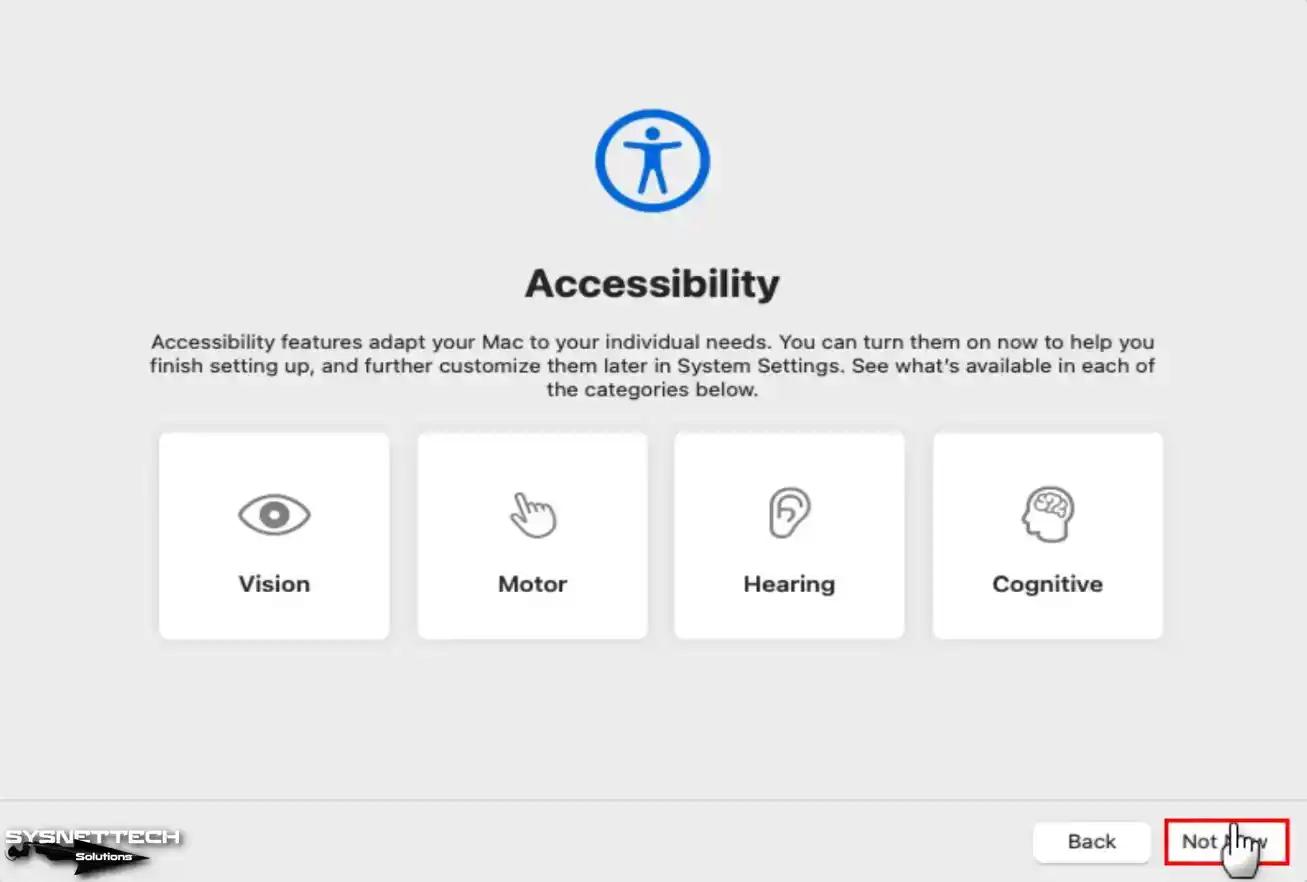
On the Accessibility screen, you can change various settings to suit your liking, making your system behave how you want. You can always tweak these settings later in System Preferences.
Step 13
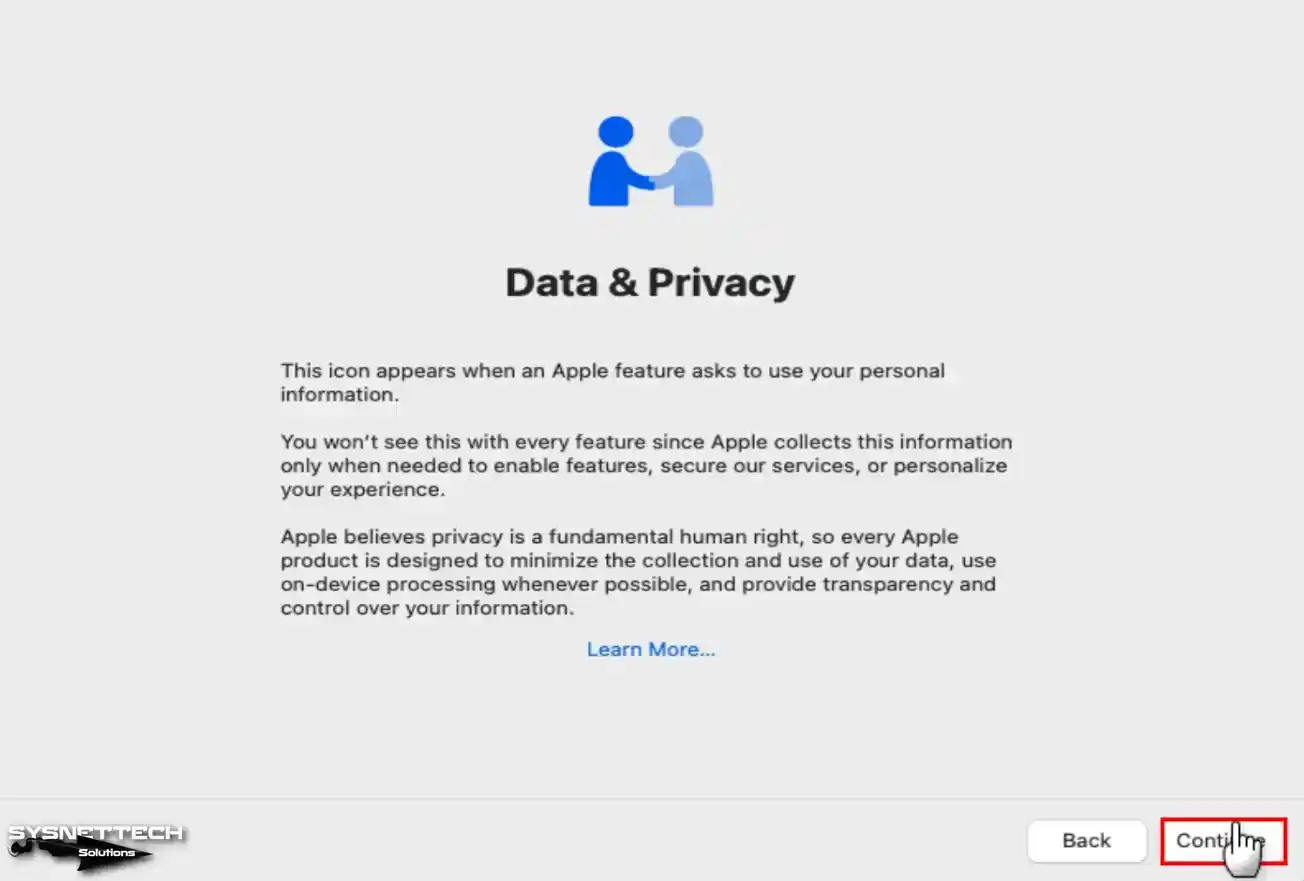
On the Data & Privacy screen, click Learn More if you want more information, or click Continue to move forward.
Step 14
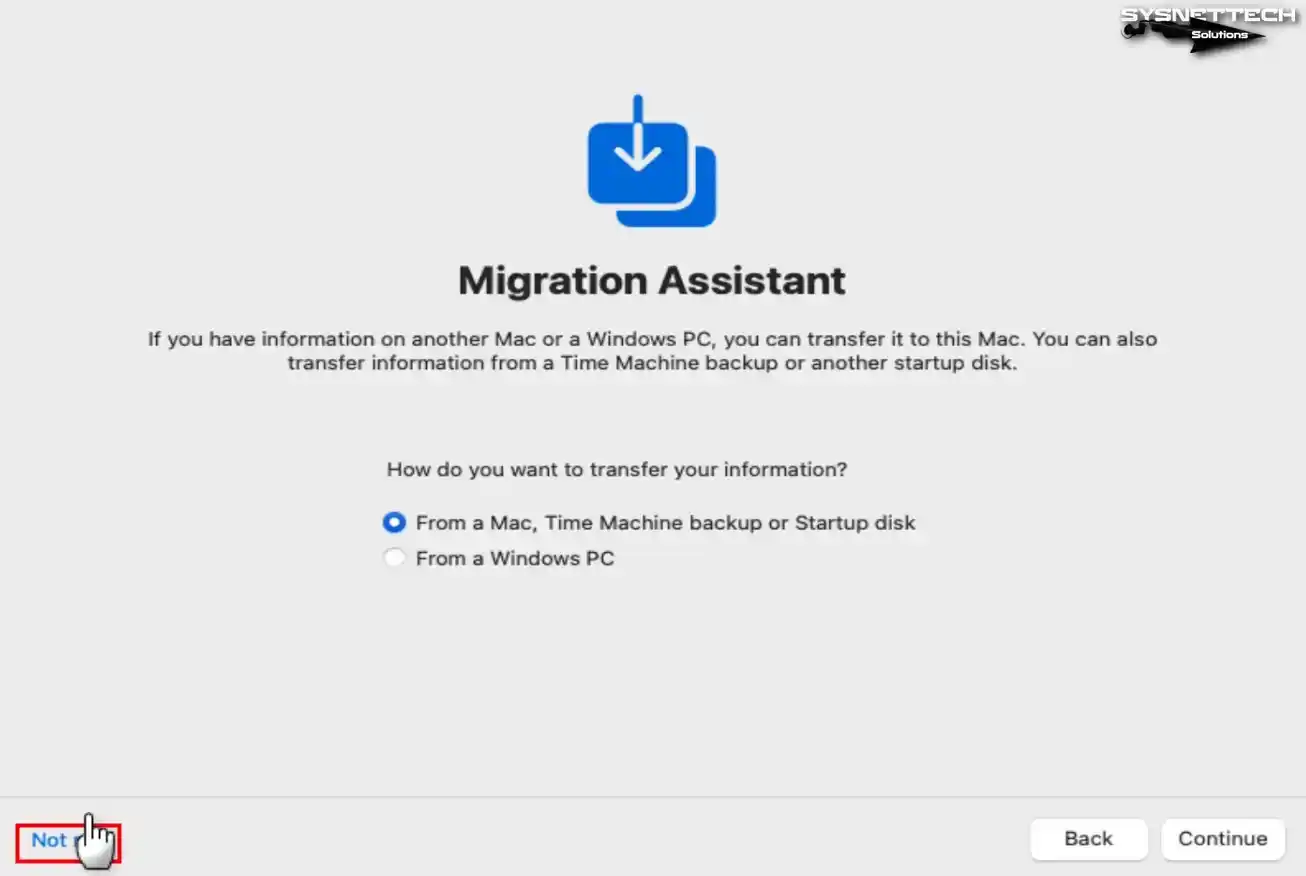
You can quickly transfer your data from a Windows PC or a MAC computer on this screen. However, if you do not hold any data or want to share the files later, click Not Now.
Step 15
To access your ID, input your login information on the designated screen. If you don’t include an existing account, generate one by clicking the “Create New Apple ID” option. If you do not desire to sign in to the macOS VM, click Set Up Later.
Step 16
Accept the license terms of macOS Sonoma 14.
Step 17
Enter your info for the virtual PC’s user account, then click Continue.
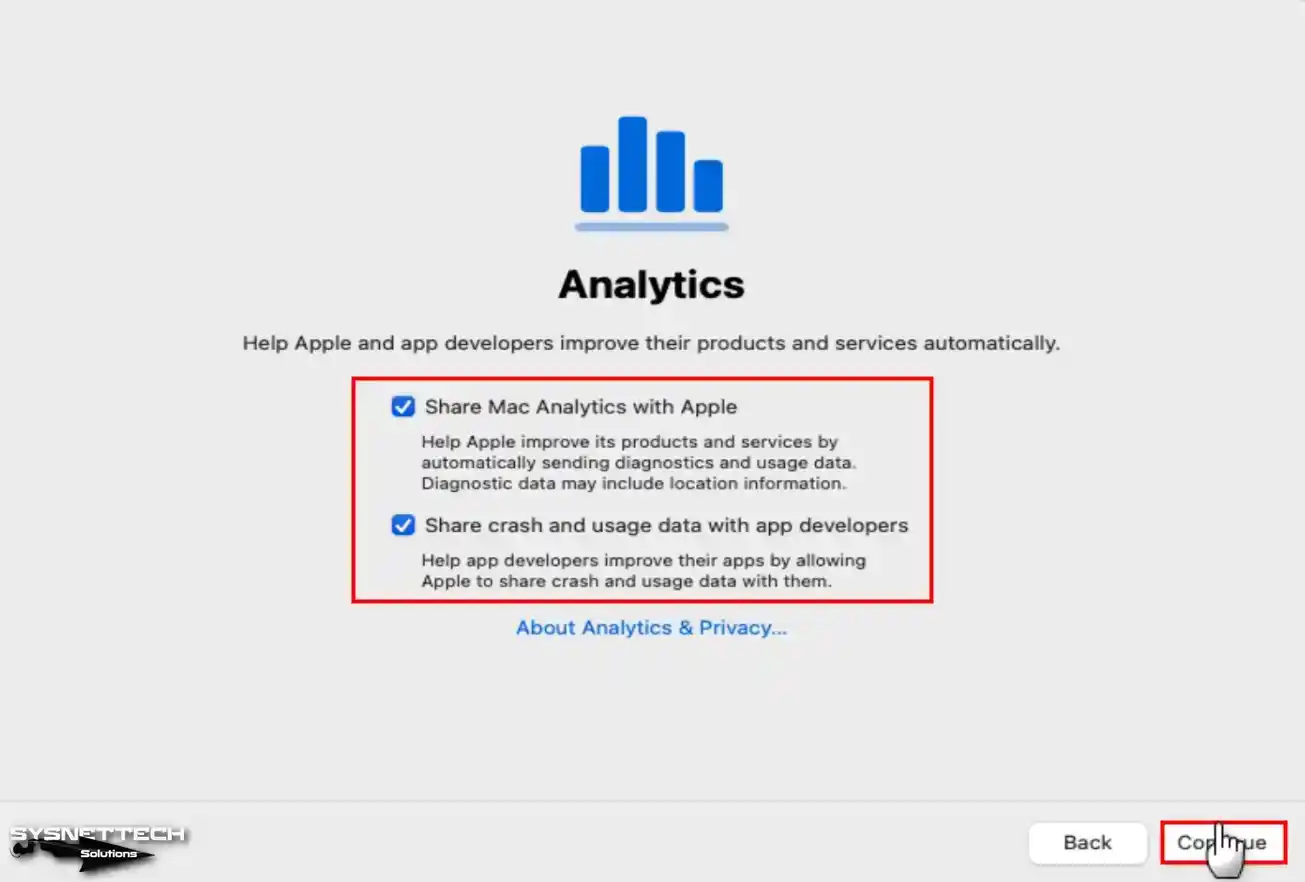
Step 18
If you want Apple services like Find My Mac to know where you are and get data about app problems, click Continue. If you want to change these settings, click Customize Settings to go through the steps and set them up as you want.

Step 19
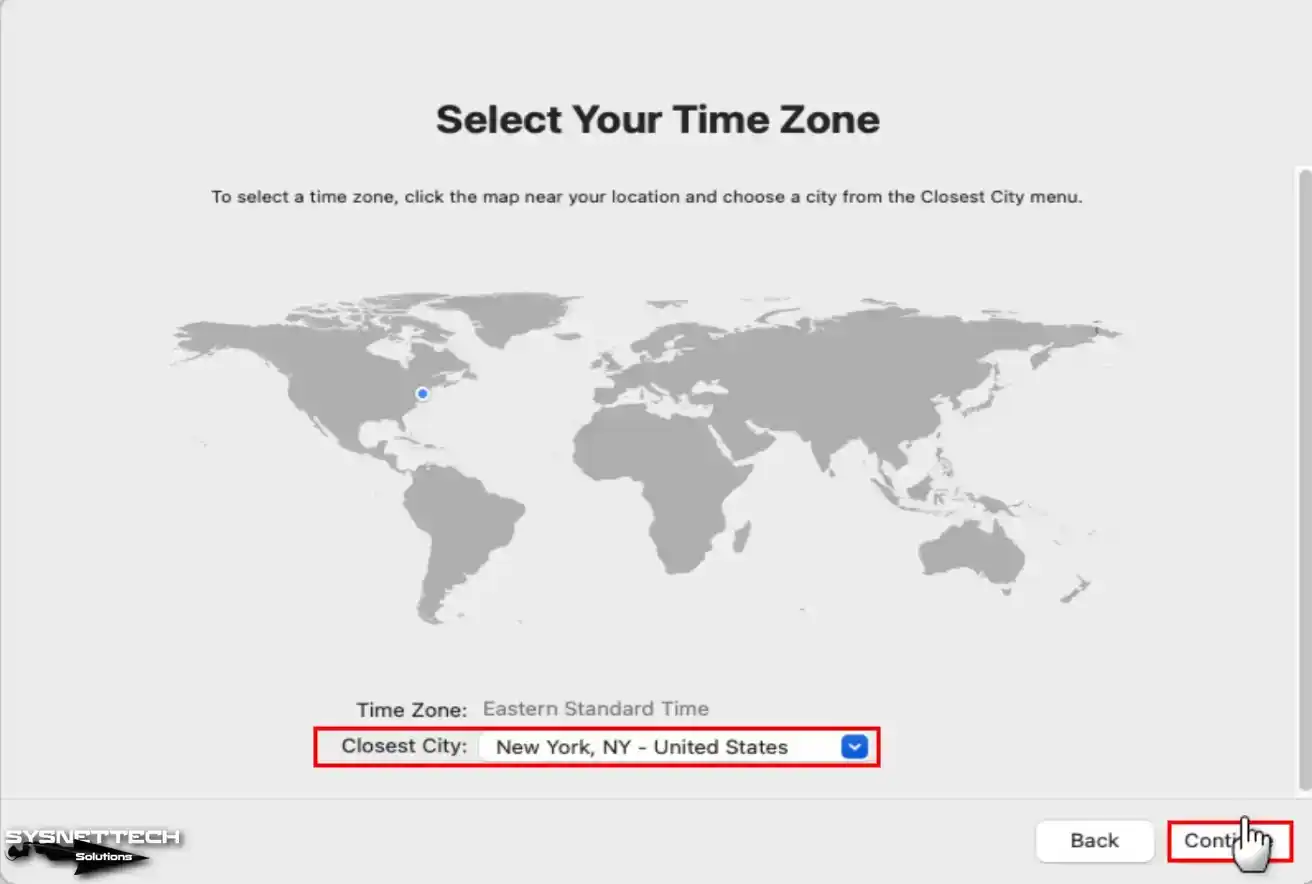
To set the clock right, select the region closest to you and keep going.
Step 20
You can make macOS better by letting the developers of the apps you use see data about how you use them and if there are any errors.
Step 21
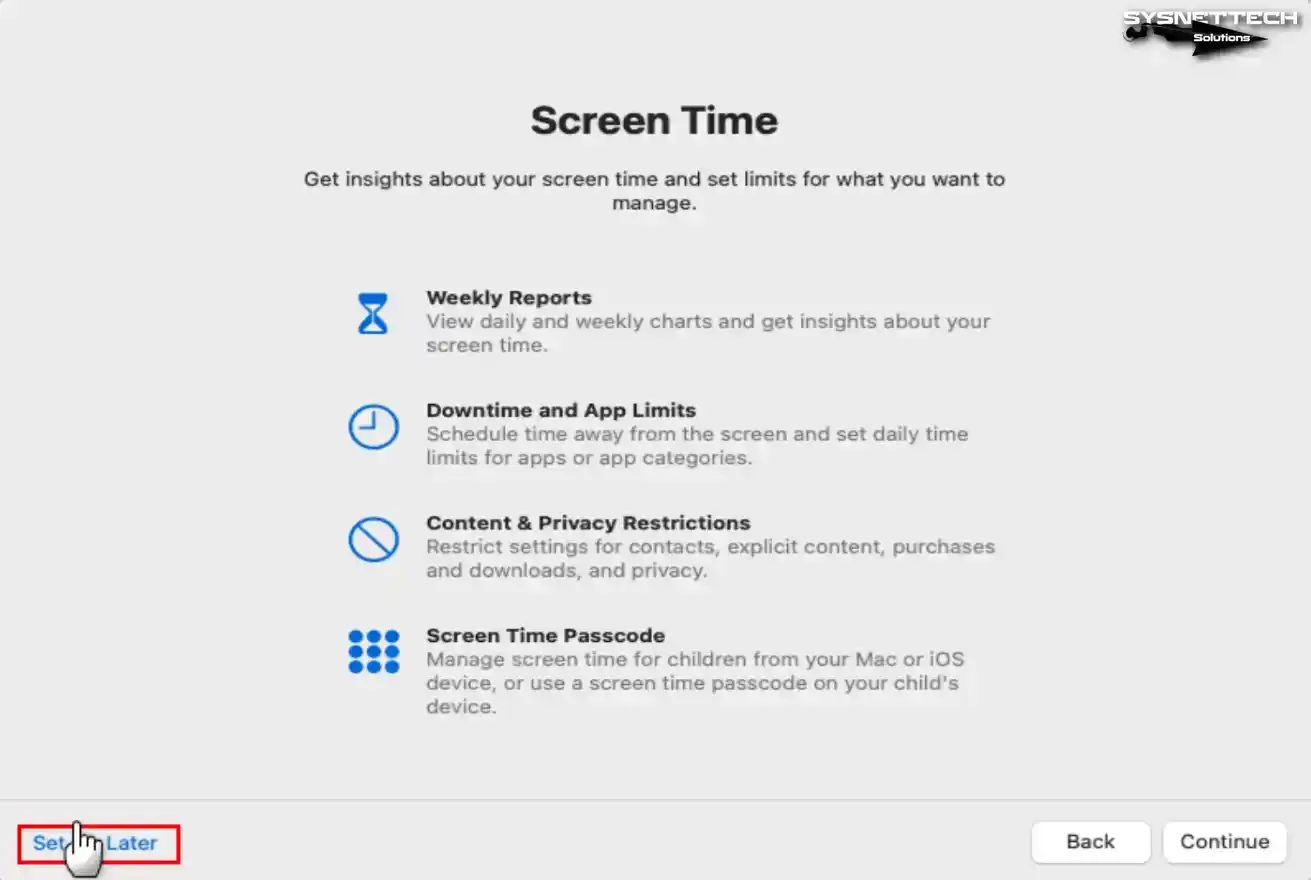
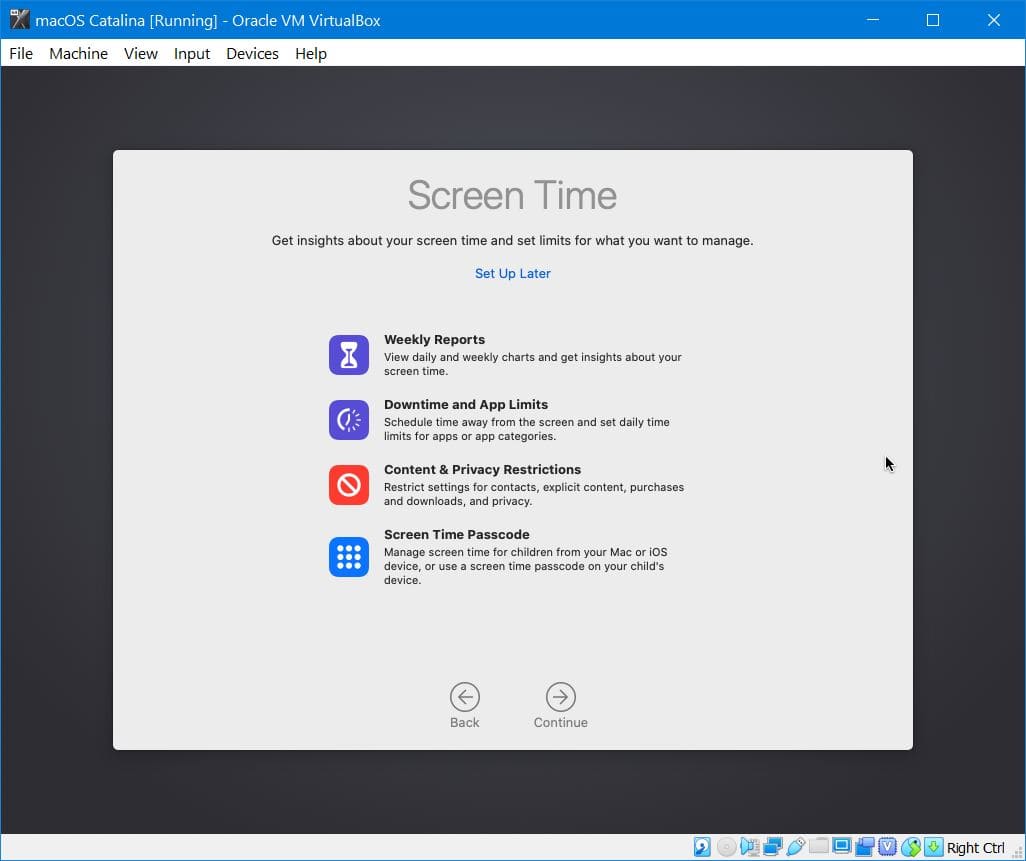
Screen Time details how much you use your favorite apps or visit websites. It’s also handy for parents who want to set up profiles for kids of different ages.
Any tweaks you make in Screen Time will automatically appear on your Mac, iPhone, or iPad if you use the same Apple ID.
Step 22
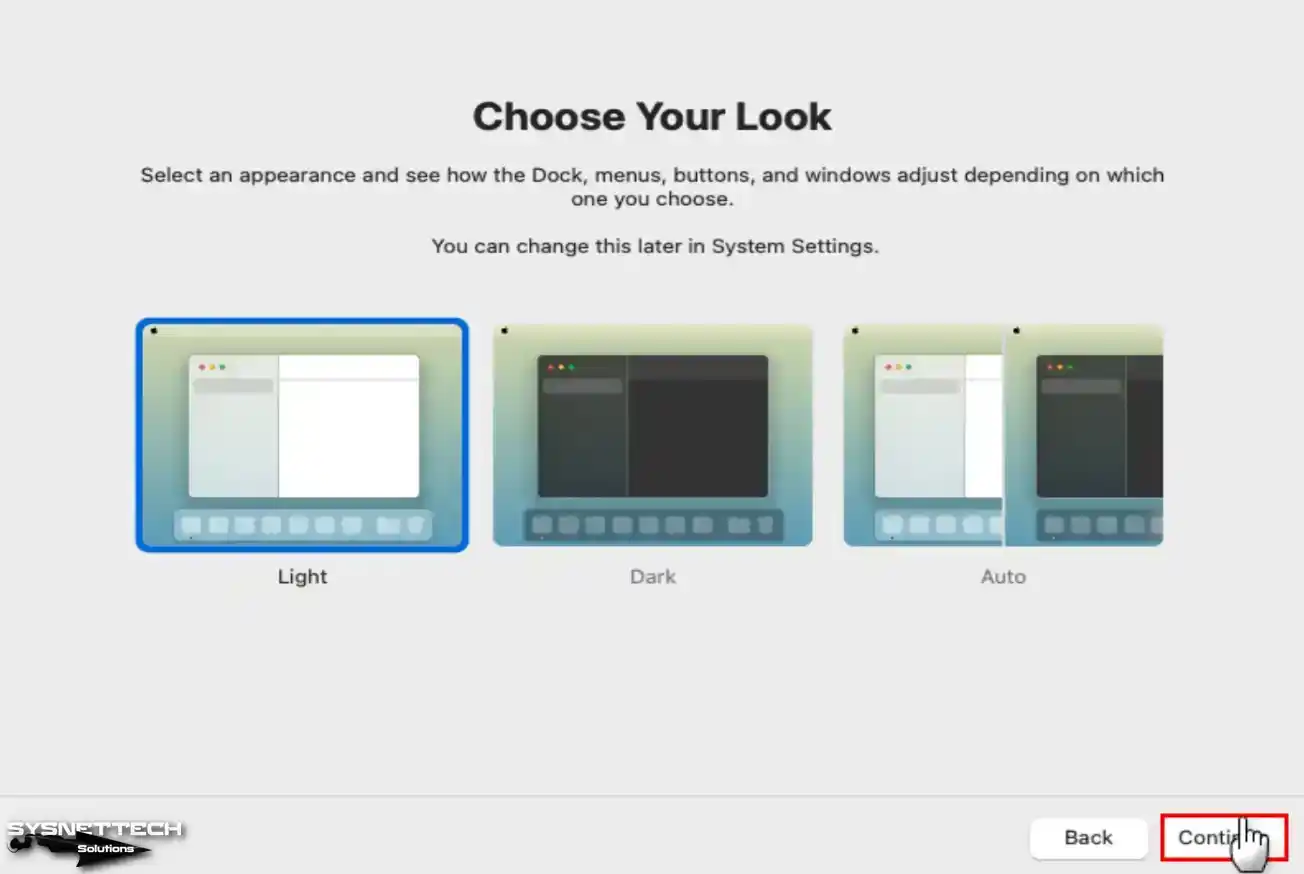
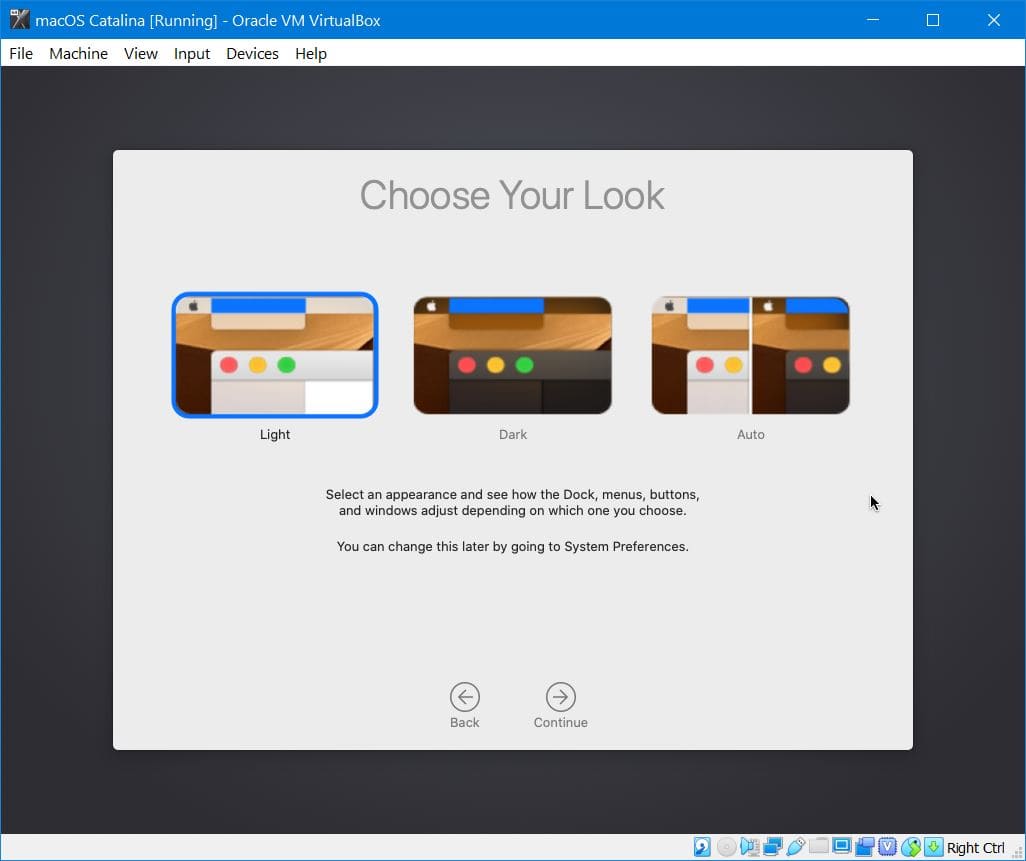
On the Choose Your Look screen, you can change how the Docks, menus, buttons, and windows appear to Light, Dark, and Auto.
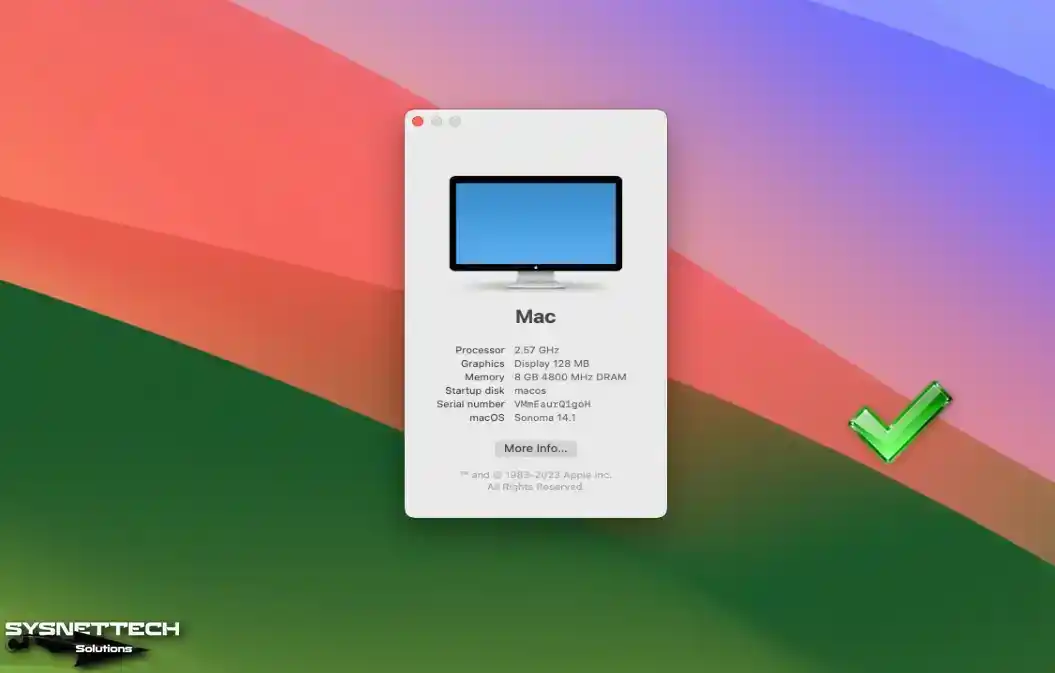
Step 23
After installing the virtual macOS system, open the Finder app and click About This Mac to determine the system version.
How to Change the Screen Resolution of macOS Sonoma
After you install macOS Sonoma using VirtualBox, the default screen resolution is 1024×768. So, it would be best if you changed it for better visibility. Adjust the VM screen dimensions with Ctrl+C, but look for more efficient ways. Additionally, you can explore other methods to improve screen adjustments.
Due to the Guest Additions, there is a problem with the screen resolution in macOS. So, explore alternative methods to enhance the display effectively. This way, you can optimize your virtual machine display for better performance.
Step 1
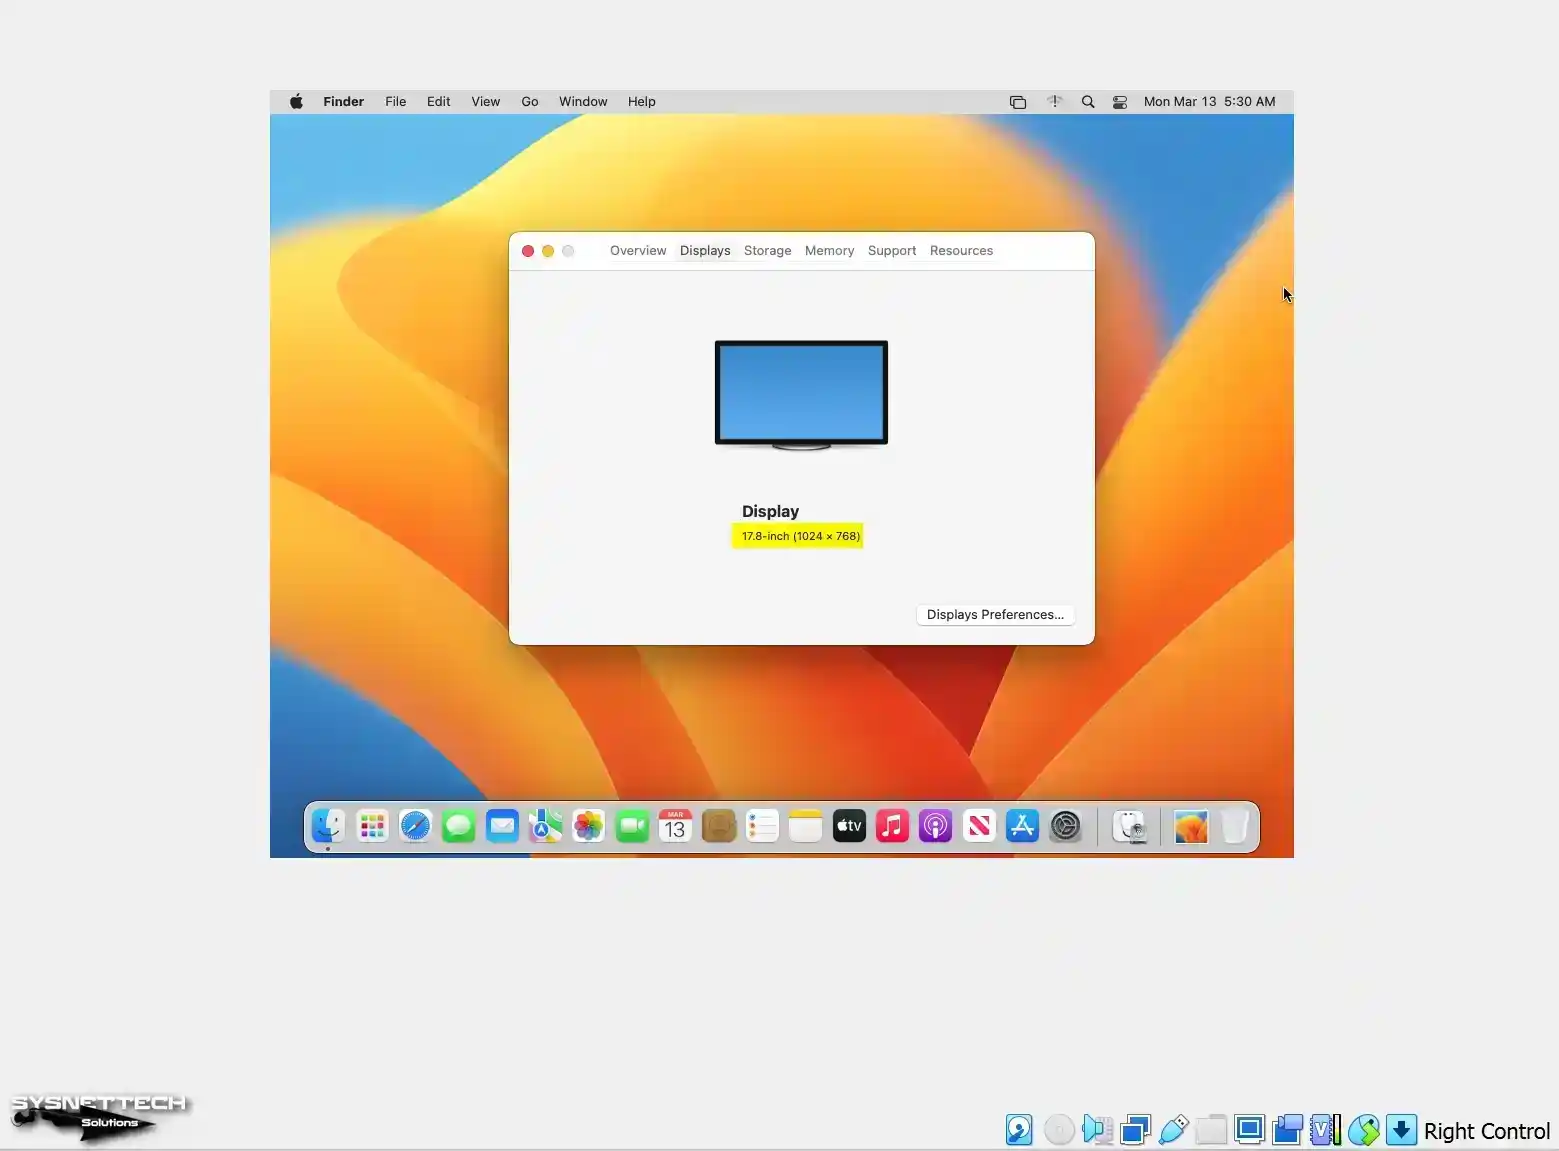
To find out the size of your Mac screen, follow these easy steps. First, click on ‘About This Mac’ in the Finder tool. Then, look for the Displays tab in the window that pops up. You’ll see the screen size value right there.
Step 2
Once you turn off the VirtualBox macOS system, open Command Prompt (CMD) as an administrator. Then, type in the following commands to change the screen resolution.
cd "C:\Program Files\Oracle\VirtualBox\"./VBoxManage setextradata "macOS" VBoxInternal2/EfiGraphicsResolution 1920x1200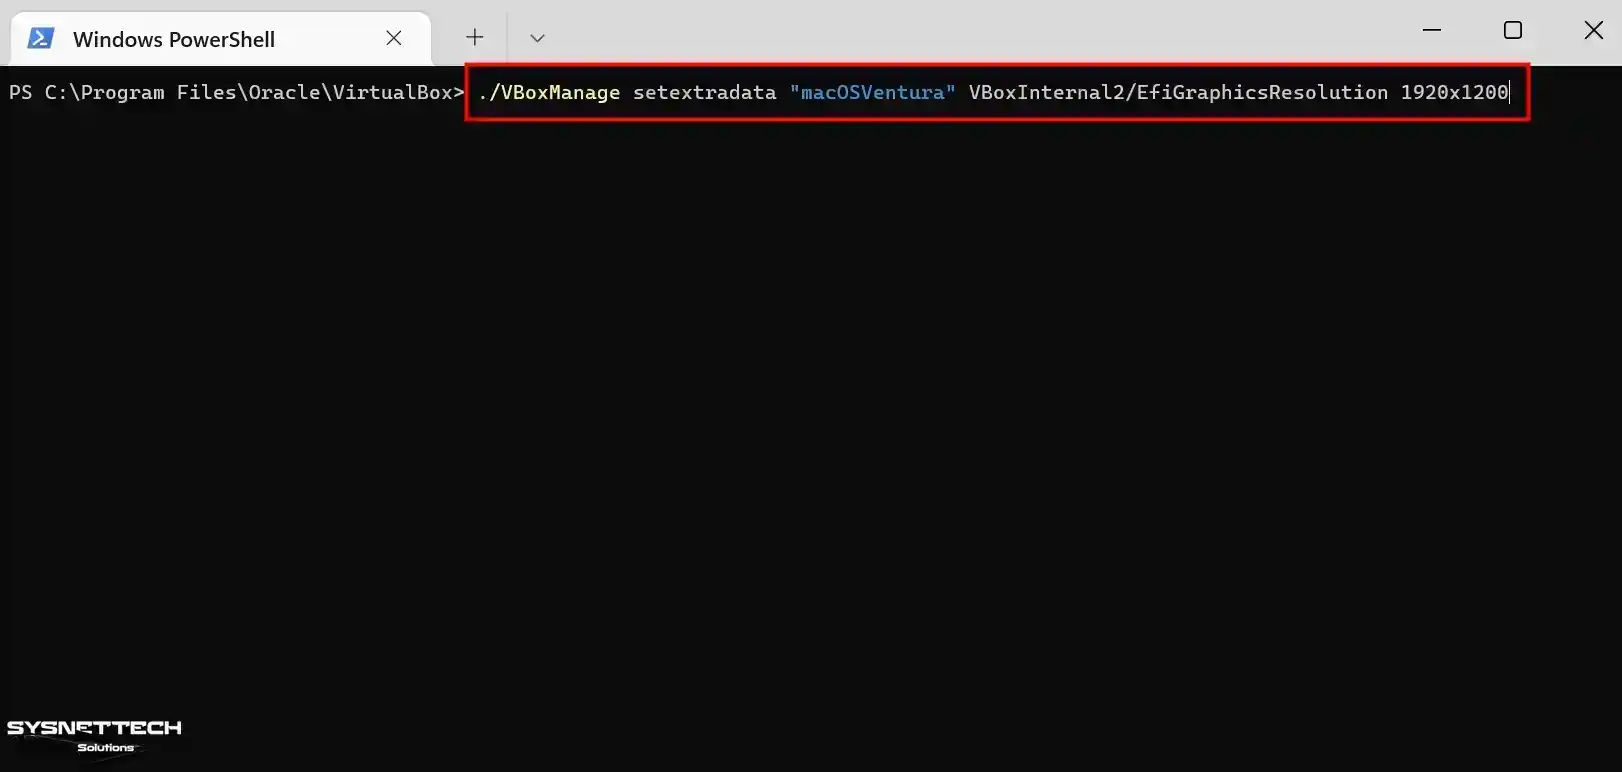
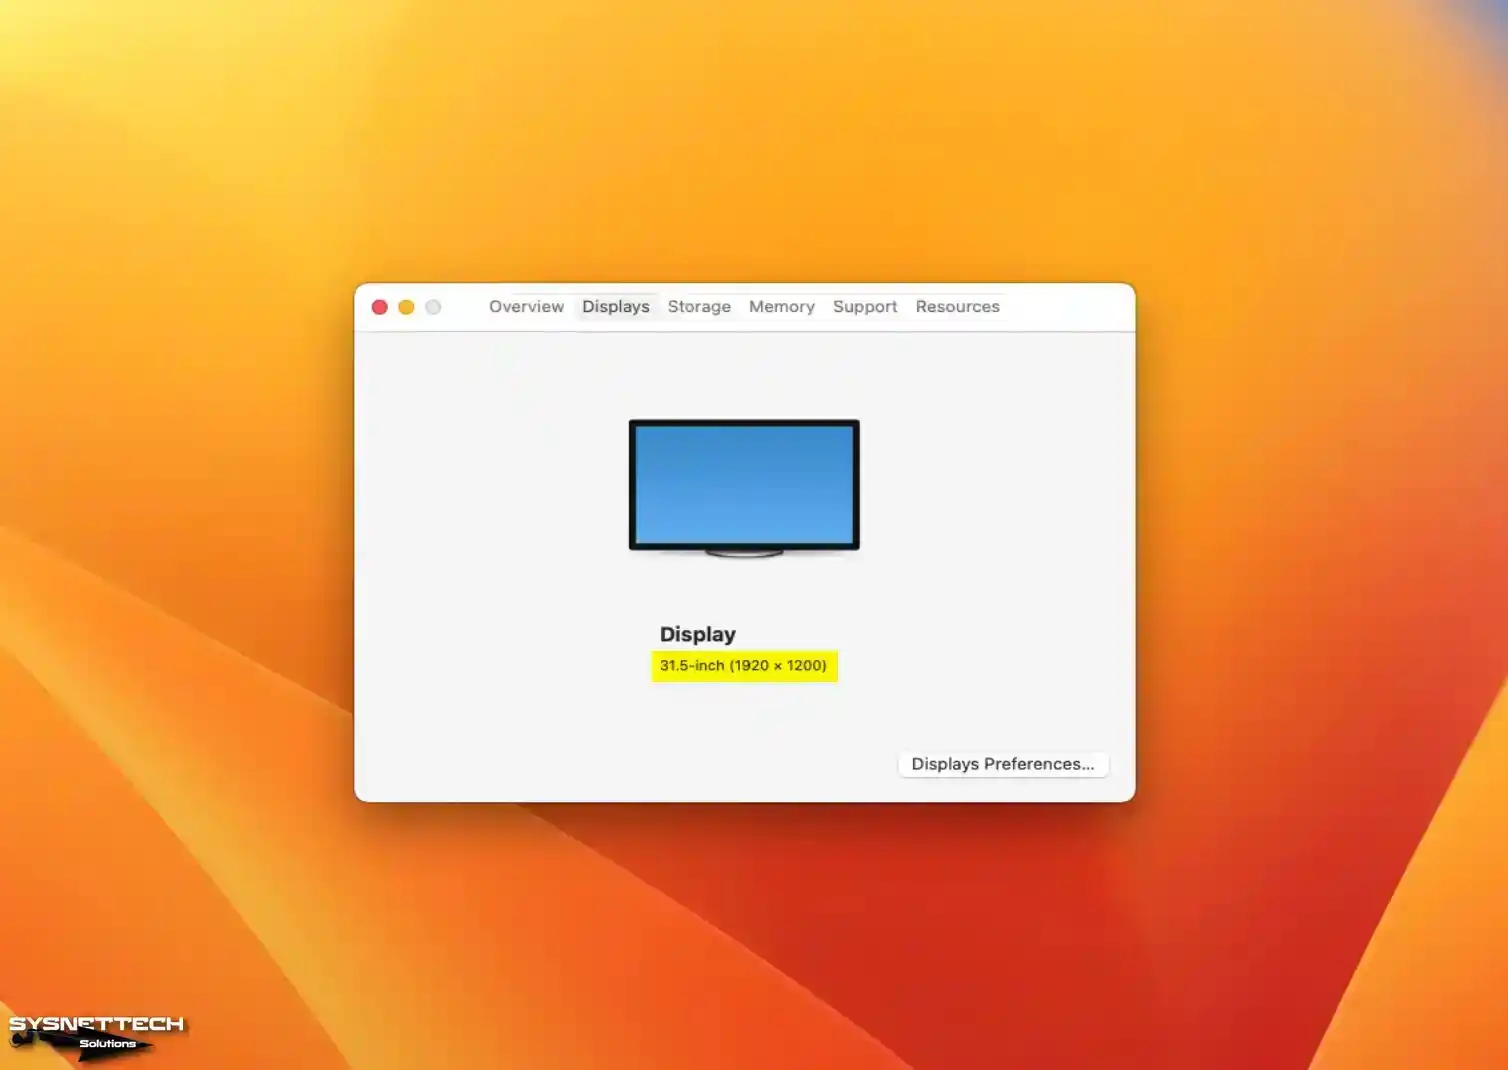
Step 3
After you reopen macOS in VirtualBox, the resolution is 1920 x 1200.
How to Use USB Flash Memory in macOS
I can’t drag files; the macOS guest machine has no guest additions. Instead, share files easily using a USB flash drive. Consequently, it enhances virtual computer functionality with straightforward file transfers.
Step 1
Plug the USB into the host computer, and click “Devices/USB/Name of your USB” in Oracle. As a result, you can easily link your USB flash drive to the virtual machine.

Step 2
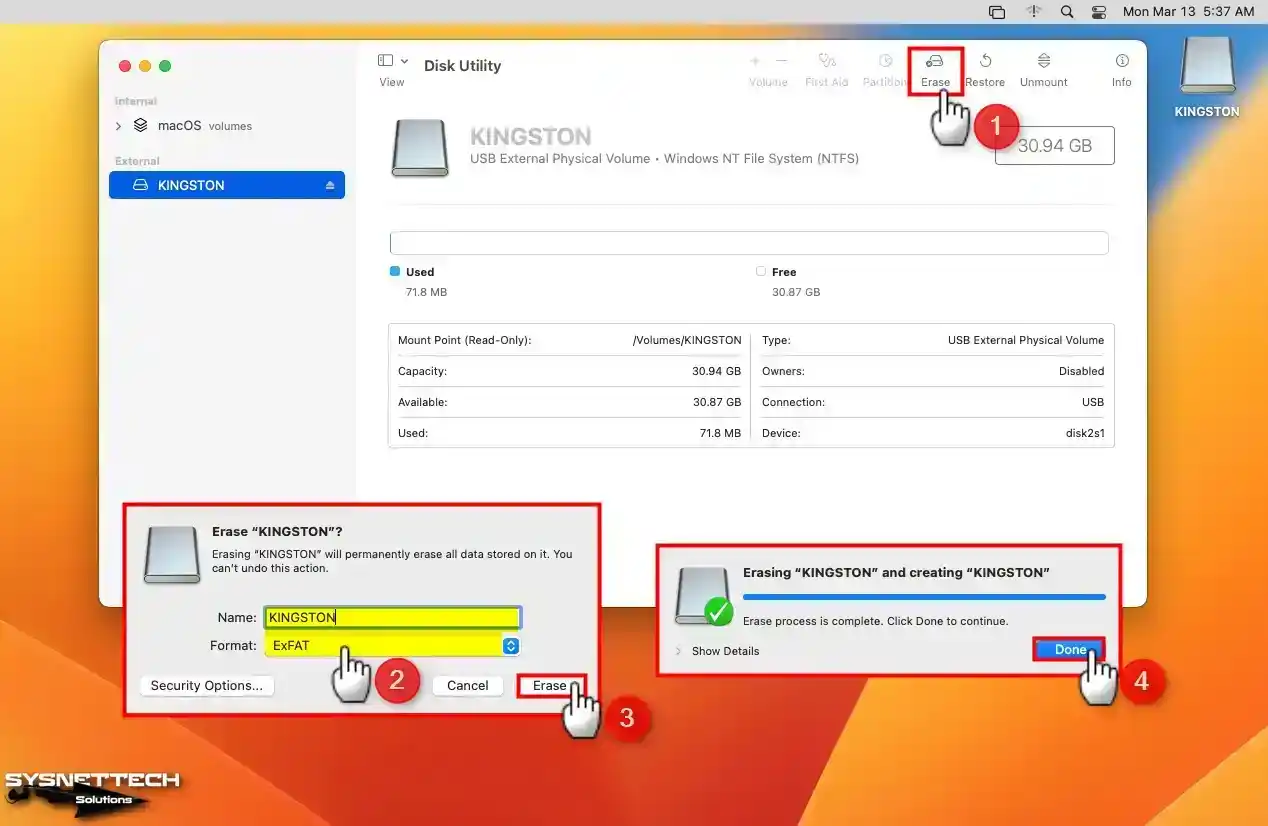
Open Disk Utility, select your flash disk from the External section, and click Erase. In the window, type USB brand in Name, and choose ExFAT. Afterward, click Erase to complete the process successfully.
When using macOS on Oracle VirtualBox, format your USB as ExFAT. As a result, avoid using NTFS for better compatibility and performance.
Otherwise, you won’t be able to copy any folders or documents onto your disk.
Step 3
Link USB to VM: “Devices/USB/Name of your USB” in the menu. Therefore, connect the USB drive to your VM easily. Then, look at the folder or documents you made on your flash drive.
How to Increase macOS VM Performance in VirtualBox
As you know, Oracle and other virtualization software don’t wholly support Apple’s macOS. Even if your real computer is speedy, macOS won’t run smoothly. So, a pretend computer might not give you the best performance.
Some developers want to run Mac systems on virtual machines. Hence, they use virtual machines to experience them.
Depending on your planned use, you may need help with system performance. Still, you can change the system settings to minimize these problems.
So, use terminal commands to make your macOS VM work better. Therefore, apply these commands to improve your VirtualBox experience.
Turning off Spotlight for Database Operations
sudo mdutil -a -i offSpeeding Up Animations
defaults write NSGlobalDomain NSWindowResizeTime -float 0.001Reducing the Delay in the Dock
defaults write com.apple.Dock autohide-delay -float 0defaults write com.apple.dock autohide-time-modifier -float 0.5killall DockTurn Off Finder Animations
defaults write com.apple.finder DisableAllAnimations -bool truekillall FinderTurning Off the Quick Edit Window
defaults write NSGlobalDomain NSAutomaticWindowAnimationsEnabled -bool falseStopping Time Machine Backup Processes
sudo tmutil disablelocalTurning Off Automatic Check for Software Updates
sudo softwareupdate --schedule offTurning On Faster File Previews for Finder
defaults write com.apple.finder QLPanelAnimationDuration -float 0Possible Installation Errors
The setup can’t go on, and the system goes into Recovery Mode by itself
Let’s assume the VM enters recovery mode after the installation wizard copies the system files. In this case, start the operating system by typing commands in the UEFI Shell screen. Therefore, use the following steps to fix your operating system.
When you’re in the UEFI Shell, type commands until you get to boot.efi. Then, follow these easy steps to find the boot.efi command.
fs1:
cd "macOS Install Data"
cd "Locked Files"
cd "Boot Files"
Add the ISO file to the virtual device and perform the “boot.efi” command to proceed.
boot.efi
Installing Old Versions
| Version | Slide |
|---|---|
| macOS High Sierra 10.13 | View |
| macOS Big Sur 11 | View |
| macOS Ventura 13 | View |
Frequently Asked Questions (FAQ) About macOS with VirtualBox
- Can I run macOS Sonoma on a virtual machine using VirtualBox?
macOS Sonoma is the latest version of Apple’s operating system. Yes, you can run it in a virtual machine using VirtualBox on a Windows 10 or 11 PC.
- Do I need any special tools to run macOS Sonoma in VirtualBox?
No, you don’t need any special tools to run macOS Sonoma on Oracle software. VirtualBox, unlike VMware, doesn’t need extra tools like Unlocker. Hence, VBox is more straightforward for macOS virtualization without additional tools.
- How much RAM and virtual processor cores should I allocate to my virtual machine for optimal performance?
The RAM and processor cores depend on your host computer’s capabilities. So, adjust virtual machine settings accordingly for optimal performance. Providing 4 GB or 8 GB of RAM and 2 or 4 virtual processor cores will be enough for optimal performance.
- What should I do if I encounter problems during virtual machine installation?
If you encounter issues, tweak the virtualization feature or switch it off. This way, troubleshoot to make sure your virtual machine setup works smoothly. Try reducing the number of virtual processors. Also, decreasing the RAM size can help. Additionally, we recommend downloading the ISO file from reliable sources like us.
Conclusion
As a result, you can install macOS using VirtualBox 7 or newer on Windows 11 or 10. You can run either Sonoma 14 or the older versions in a virtual machine.
VirtualBox is a great way to experience the Mac system without purchasing a MacBook or iMac. If you follow all the things I have explained here, you can create a virtual Mac environment on your Windows PC.
Additionally, you can explore the features of the latest macOS Sonoma. Moreover, do not forget to adjust the virtual machine settings according to the specifications of your computer for optimal performance. In summary, with the development of virtualization technology, you can experience both macOS and other systems!
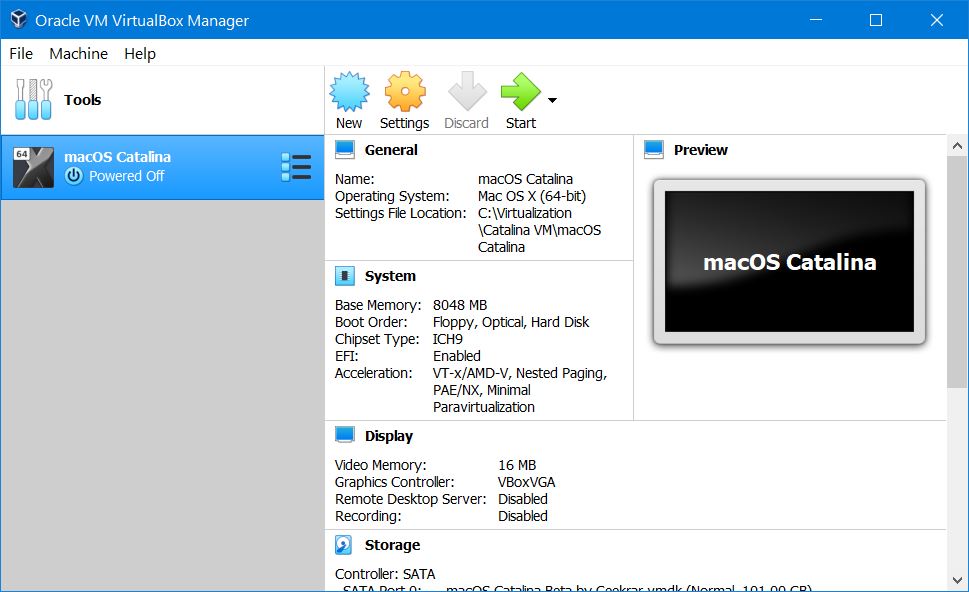
On the morning of 3rd June, Apple kicked off its 2019 annual developer conference with all the new stuff Apple has been working on for the last year will be front and center. The keynote was significantly exciting mostly for software but a little for hardware lovers. While WWDC is one of the most important and significant events with the biggest update to Mac, iPhone, iPad, Mac Pro, Apple Watch and Apple TV. In this post, we’ll install macOS Catalina on VirtualBox on Windows PC.
With all those things updated, the biggest update to macOS is the more exciting new version of macOS which is popular by macOS Catalina. With the new version of macOS – Catalina arriving on Mac’s, it’s fine to some Windows users wanting it within their computer. While Catalina works perfectly on Mac, but when it comes to installing it on Windows, it’s not the case. If you’re would like to install Catalina on a Mac, all you do is enroll in the developer program and download it. Once you’ve the installer file, you will straightly boot into and install Catalina in your Mac.
Instead, if you’re willing to install macOS Catalina on VirtualBox on Windows PC, first of all, you’ll need to download macOS Catalina VirtualBox image, (not from App Store or Apple’s developer program, they don’t work with virtual machines) which is pretty difficult to figure out. Getting a copy of the Catalina VirtualBox installer is even very tricky. If you Google, you’ll find some broken or corrupt files or download links that are completely rubbish. Even searching deep and more and more won’t help you out.
In terms of installing Catalina on Windows, there is no such question. Even Catalina is now risky to install but you have the perfect option which is a virtual machine. The virtual machines solve almost all questions and make riskiness faraway. It will completely work separate from your actual operating system without harming a single thing. If there’s some problem at some point, you’ve two solid options whether to delete the virtual machine or use the snapshot that is pretty easy. That’s the best option to try everything up without taking a risk.
Excited about Catalina, but don’t want to wait until fall? The public beta is now available to try on your Windows PC; here’s how to install macOS Catalina on VirtualBox. If you want to install macOS Catalina on VirtualBox worth of new features to play with, the Public Beta of Catalina VirtualBox image gives you access right now.
Table of Contents
Whether you would like to install macOS Mojave on VirtualBox or would like to install macOS Catalina on VirtualBox, we are with you. In this tutorial, we’ll walk you through how to install macOS Catalina on VirtualBox on your Windows PC.
- Related: Install macOS Catalina on VirtualBox on Windows PC [New Method]
What You’ll Need
This process requires some necessary tools that are very easy to get at this point. We’ve prepared the things for you that you won’t have to dig around. These images are straightforward to obtain. They are securely created, compressed, uploaded to two powerful servers. All you’ve to do is click on the images and acquire those.
- VirtualBox — This virtual machine app makes the process quite easy. With VirtualBox, it’s pretty easy to understand everything, and not only that but is easy to install and use it. There’s nothing more you’d need that VirtualBox needs to run with. All of its components are integrated into it. The nice thing is, it supports installing macOS no matter which version, unlike VMware. But still, there’s a simple trick which we need to do.
Join us on Patreon and support us for making better content.
https://bit.ly/39ZB1FR
macOS Catalina Final Version (19A602) 15 Oct 2019 (Recently Uploaded)
Download Now link 1
Download Now link 2
Download Now link 3
Finally, when you’re done, you’ll need to extract the files into a single folder.
Before we get to the important part, one last thing before we jump in: make sure the Intel VT-x is turned on for Intel users. If you’re an AMD user, you could definitely ignore this.
Done downloading things? Good. Now it turns to Install macOS Catalina on VirtualBox on Windows PC which is pretty simple.
- Related: Install macOS Catalina on VirtualBox on Windows PC [New Method]
Step One: Install VirtualBox on Windows
The first thing you need to do is start the VirtualBox installation with the setup.exe from the VirtualBox setup files.
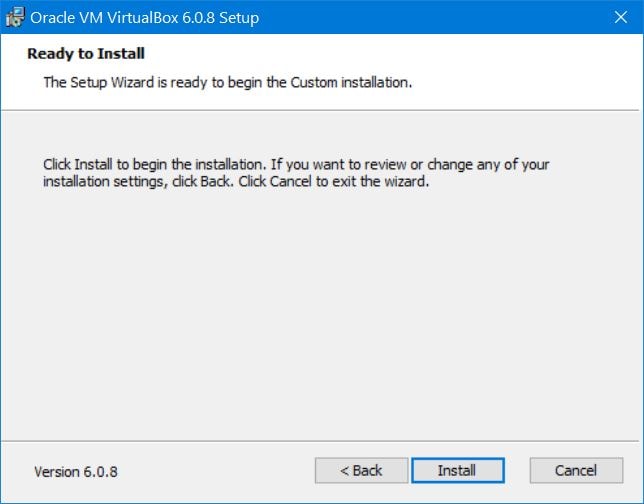
The installation part is simple, with a few clicks you’ll end up installing it.
At the end, start the VirtualBox from the installation and click Finish.
Step Two: Set Up A New Virtual Machine
Speaking of installing Catalina, you’ll need to set up a new virtual machine in order to install macOS Catalina.
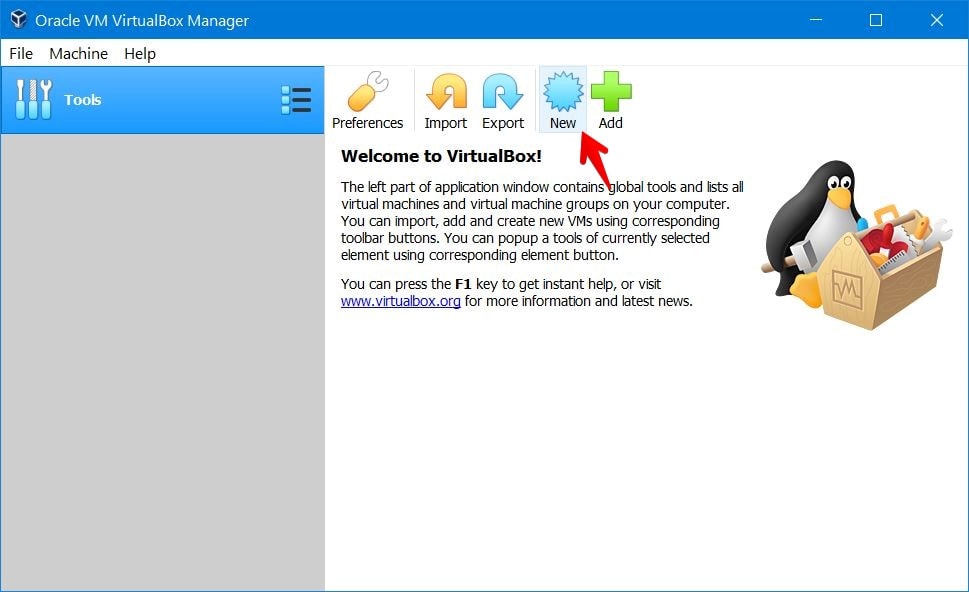
From the VirtualBox, click on New.
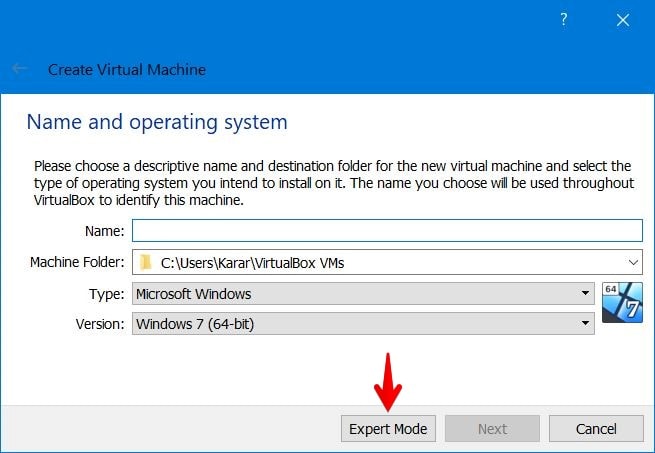
Now choose Expert Mode from the bottom.
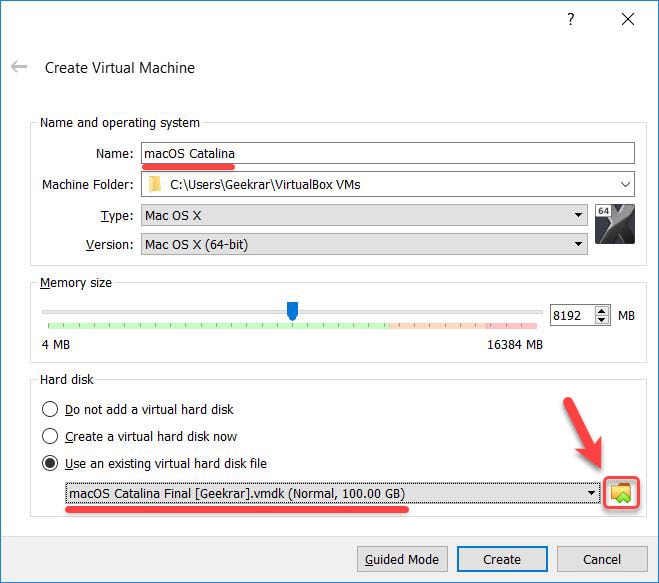
For the Name & operating system, write down the name of the virtual machine. In my case, I will write down “macOS Catalina”. Select “Mac OS X” for the Type and Mac OS X (64-bit) for the version.
For Memory, I recommend you to go with the 50-50 rule which is to assign 50 to 60% of your computer’s memory for the virtual machine. For Hard Disk, select Use an existing virtual hard disk file and choose the macOS Catalina’s extracted VirtualBox image which is Catalina’s VMDK file. In the end, click Create. Here’s the preview of how it looks like.
With the virtual machine created, simply close the VirtualBox (Important!). If you didn’t, you would likely end up with EFI Internal Shell. Here’s how to fix EFI Internal Shell on VirtualBox.
Done all that? Alright, here’s what else you need to do.
Step Three: Configure macOS Catalina Virtual Machine
Install macOS Catalina on VirtualBox on Windows PC will essentially work straightforward similar to a Mac, and devotes most of your Windows power and its graphics card to running Catalina. How much ever you allocate, it will get more thirsty of power. The more you allocate, the better the performance. That is what makes the experience better and better. So note this!
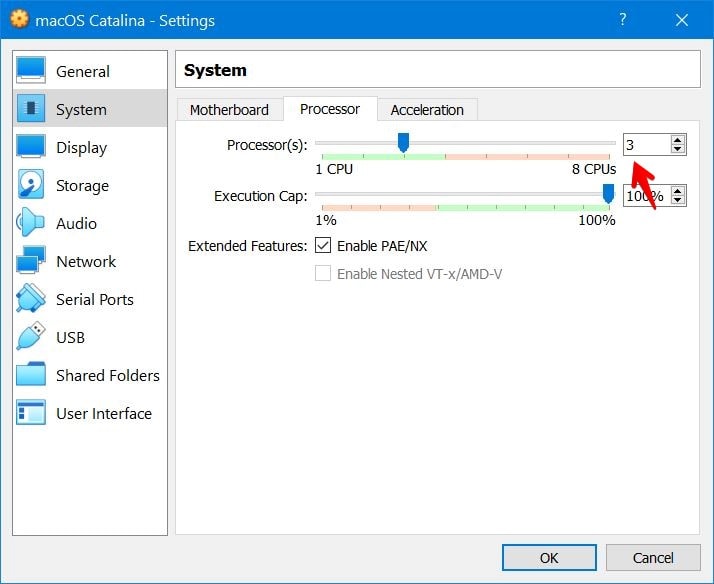
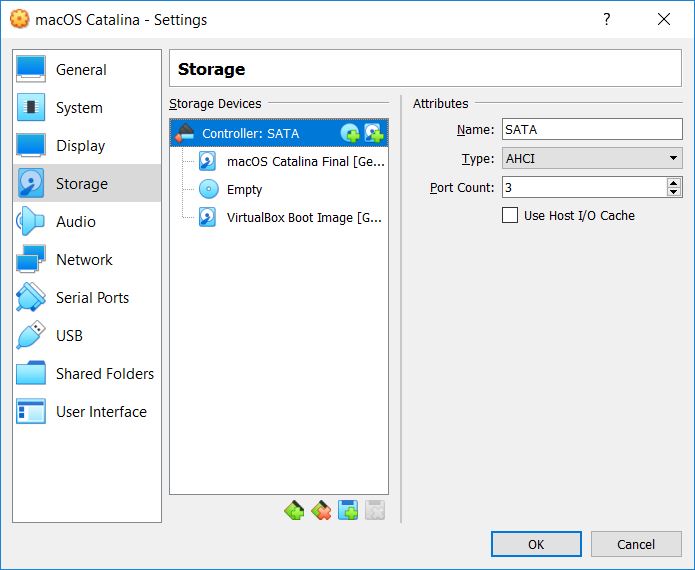
The virtual machine won’t work without configuring. We need to do some quick configuration from the virtual machine settings. From the top of the window, click on Settings.

Now select the System tab and click on Processor. Increase the processor to 2 at least or more (Seriously, otherwise, the virtual machine won’t boot).
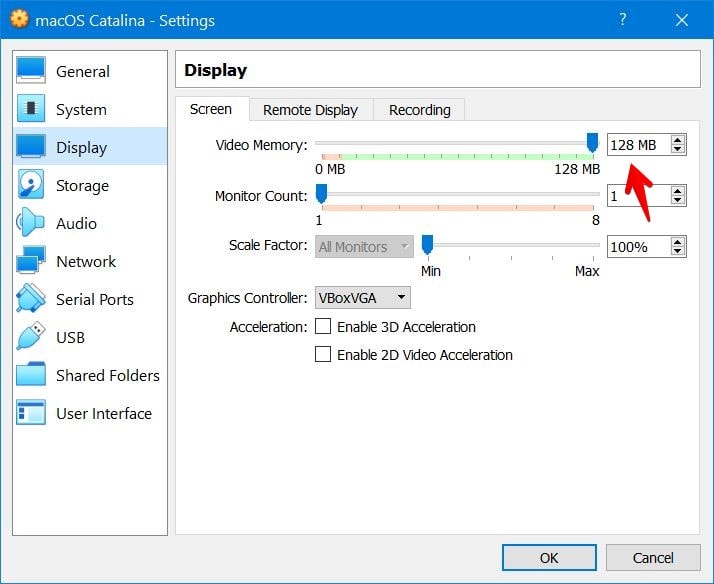
Under it, click the Display tab. Increase the video memory to the highest which is 128 MB. When you’re done, click OK.
Next head to the storage tab and click on the hard disk plus icon at then choose existing disk on the pop up that appears.
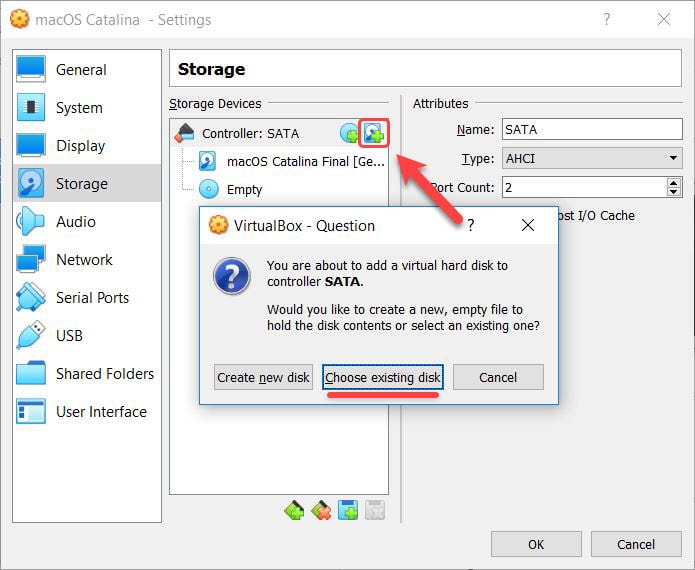
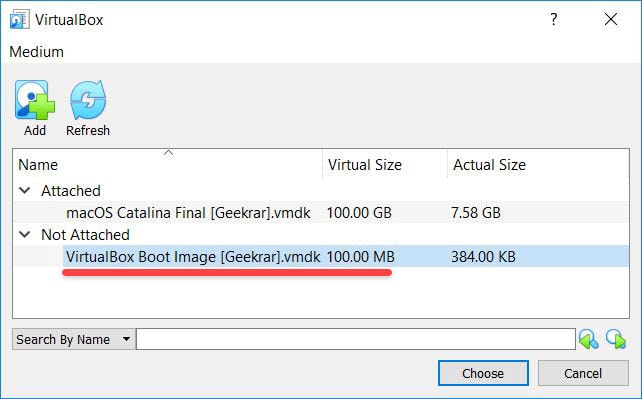
Now first click on Add button and choose VirtualBox Boot Image by Geekrar.
If the top one didn’t work, here’s another one.
- Download macOS Catalina VirtualBox Boot Image
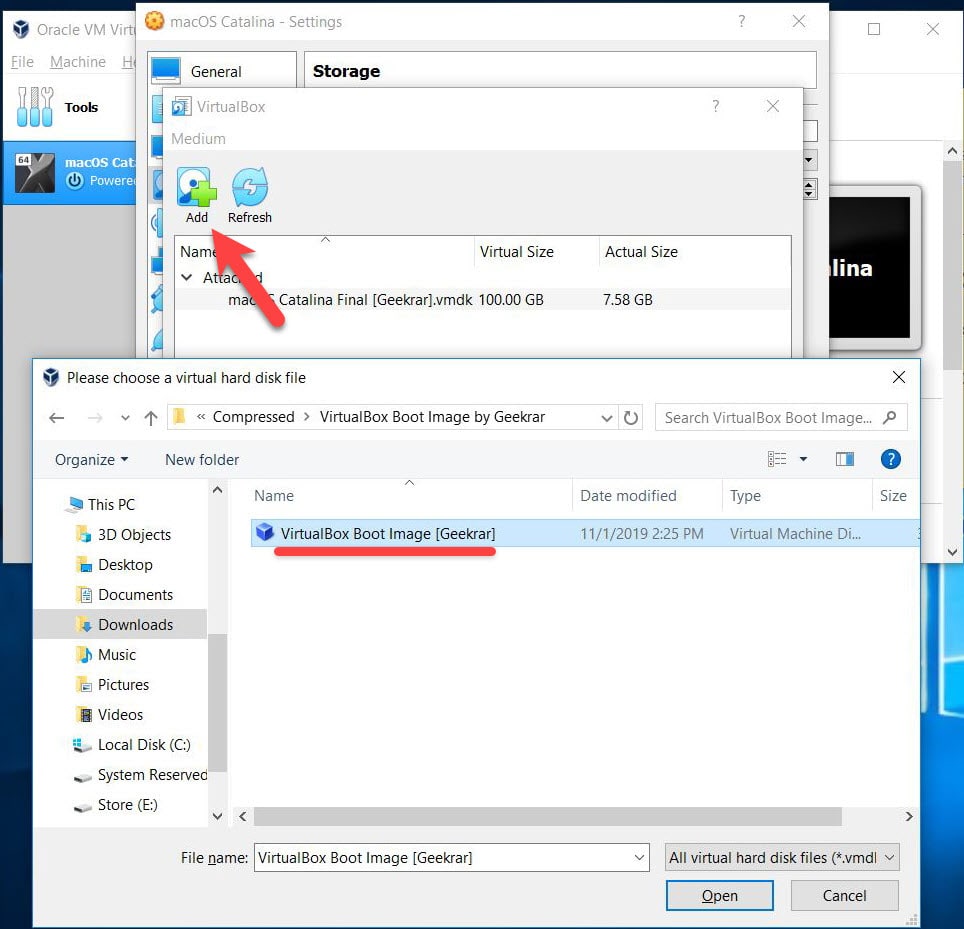
When that’s added, click choose.
When done, click OK on the virtual machine settings.
Step Four: Install VirtualBox Extension Pack
The virtual machine is nearly finished configuration. In order to work mouse and keyboard, you’ll need to install the VirtualBox extension pack. Here’s how to do it.
- Related: How to Install VirtualBox Extension Pack
Go to the VirtualBox downloads page and scroll down for the VirtualBox extension pack. Click on the All supported forms to download it.
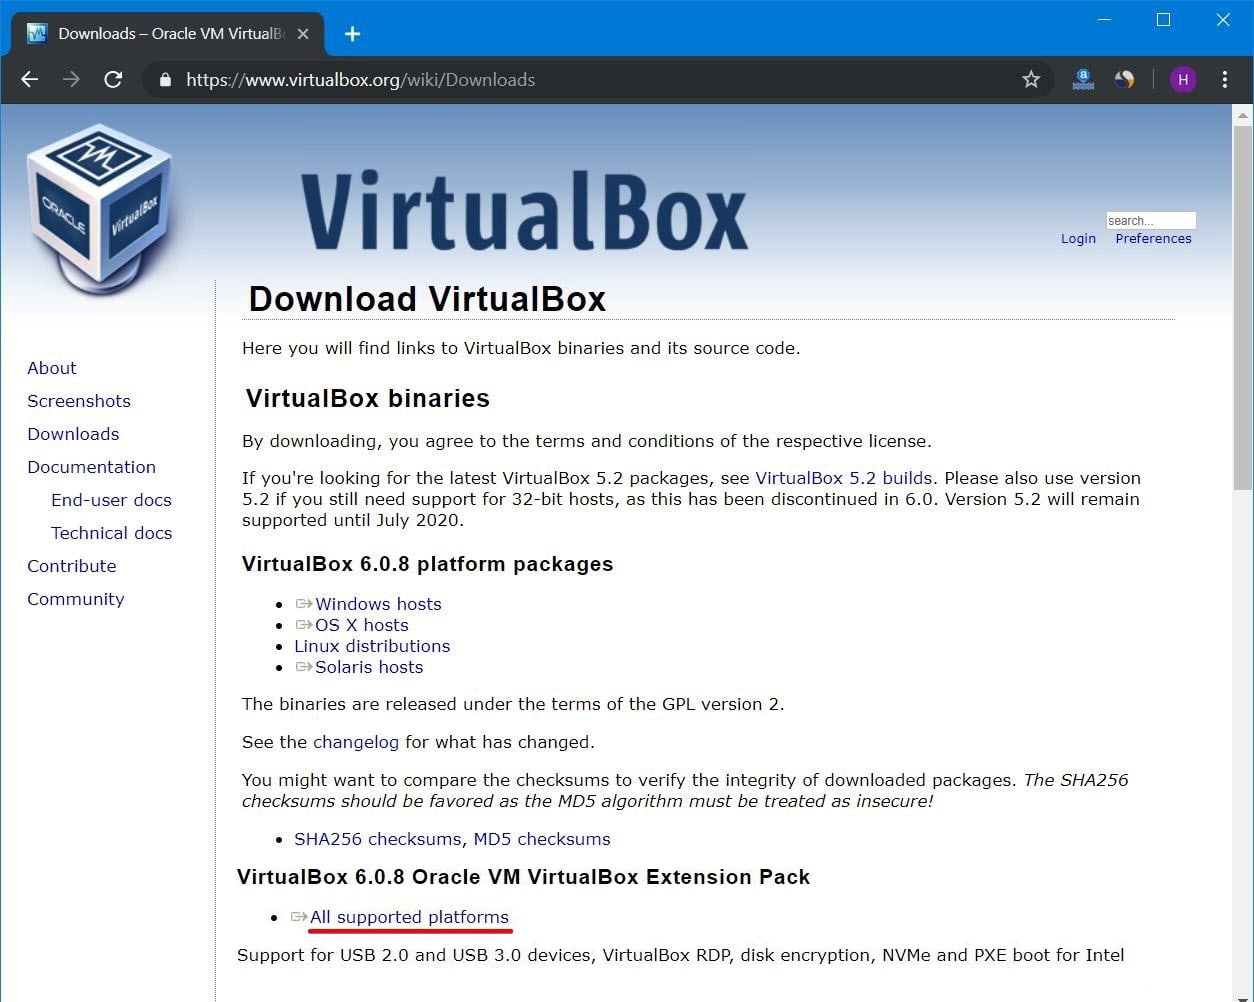
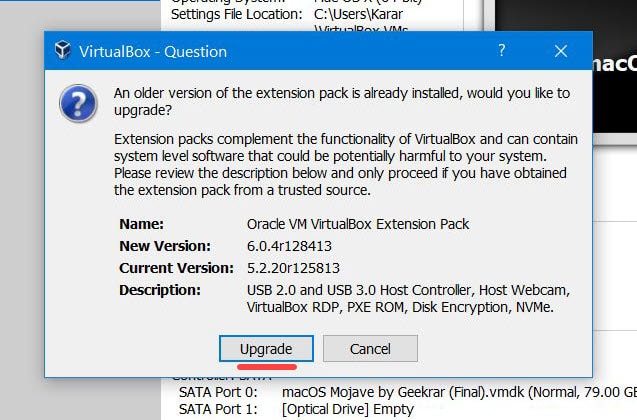
When it’s finished, open it. It will pop up the extension installing a window, click on Install. It will immediately upgrade the VirtualBox extension. If you haven’t installed yet, you need to Install VirtualBox Extension Pack.
Step Five: Apply Commands on VirtualBox
Once you’ve accomplished those, there are some commands which you need to apply in order to run macOS Catalina.
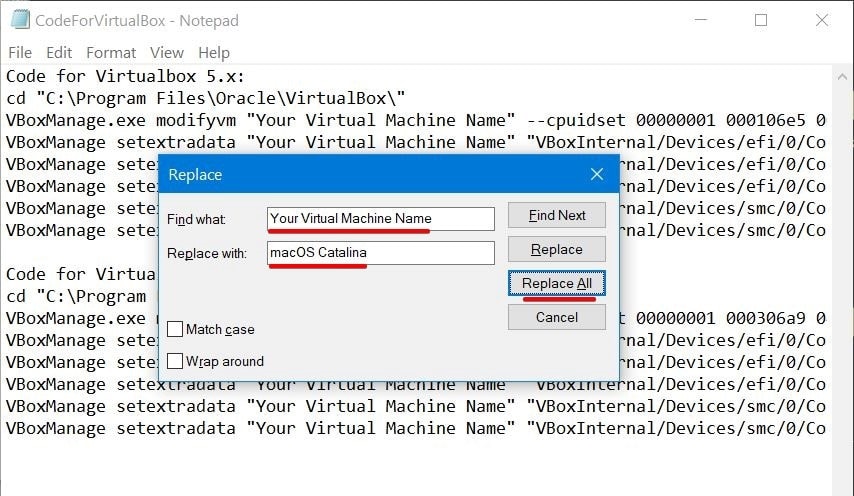
Open the commands and press Ctrl + H. When the window popped up, write “macOS Catalina” (your machine name) in front of Find What and write “Your Virtual Machine Name” in front of Replace with.
Note: If you’ve an AMD Ryzen or AMD Radeon, you need a different command. This won’t work for you. Here’s how to install macOS Catalina on VirtualBox on AMD system.
cd "C:\Program Files\Oracle\VirtualBox\"
VBoxManage.exe modifyvm "Your Virtual Machine Name" --cpuidset 00000001 000106e5 00100800 0098e3fd bfebfbff
VBoxManage setextradata "Your Virtual Machine Name" "VBoxInternal/Devices/efi/0/Config/DmiSystemProduct" "iMac11,3"
VBoxManage setextradata "Your Virtual Machine Name" "VBoxInternal/Devices/efi/0/Config/DmiSystemVersion" "1.0"
VBoxManage setextradata "Your Virtual Machine Name" "VBoxInternal/Devices/efi/0/Config/DmiBoardProduct" "Iloveapple"
VBoxManage setextradata "Your Virtual Machine Name" "VBoxInternal/Devices/smc/0/Config/DeviceKey" "ourhardworkbythesewordsguardedpleasedontsteal(c)AppleComputerInc"
VBoxManage setextradata "Your Virtual Machine Name" "VBoxInternal/Devices/smc/0/Config/GetKeyFromRealSMC" 1
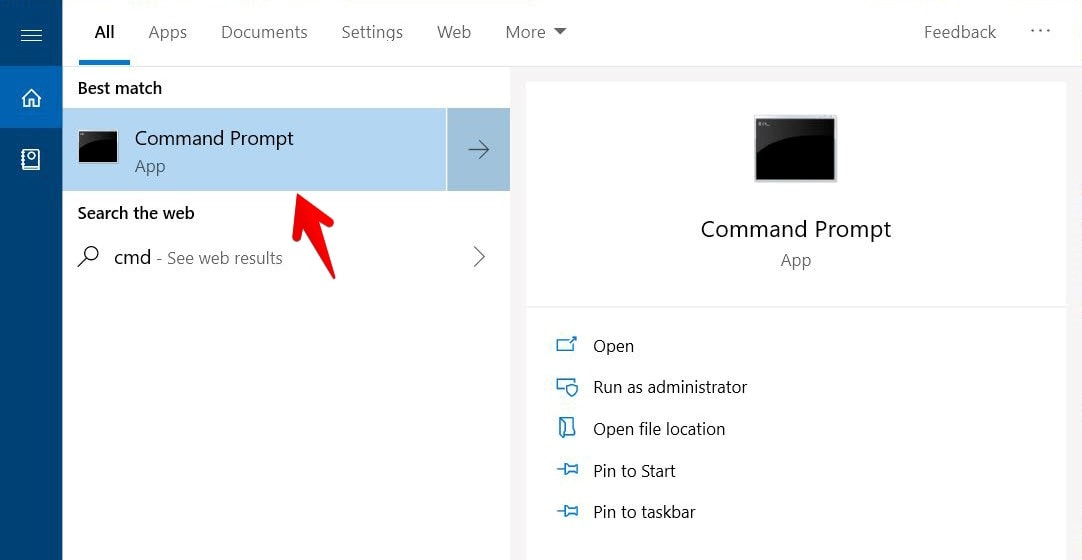
Now open up Command Prompt (CMD) without administrator privileges.
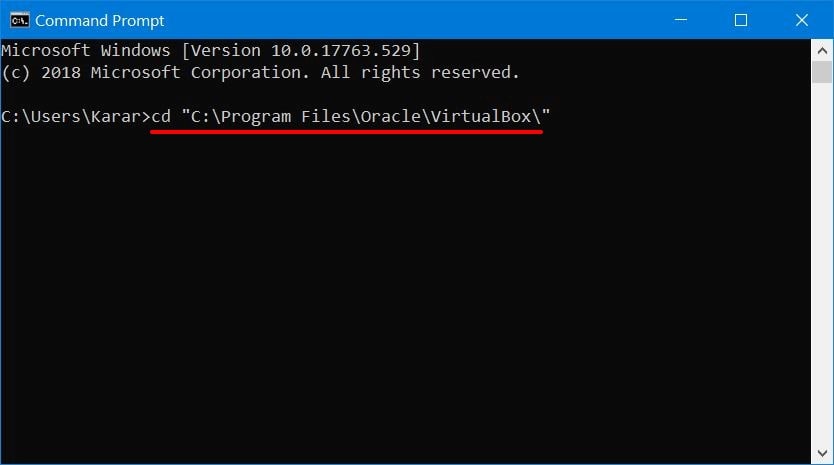
First, copy and paste the first line of the commands.
cd "C:\Program Files\Oracle\VirtualBox\"
VBoxManage.exe modifyvm "Your Virtual Machine Name" --cpuidset 00000001 000106e5 00100800 0098e3fd bfebfbff
VBoxManage setextradata "Your Virtual Machine Name" "VBoxInternal/Devices/efi/0/Config/DmiSystemProduct" "iMac11,3"
VBoxManage setextradata "Your Virtual Machine Name" "VBoxInternal/Devices/efi/0/Config/DmiSystemVersion" "1.0"
VBoxManage setextradata "Your Virtual Machine Name" "VBoxInternal/Devices/efi/0/Config/DmiBoardProduct" "Iloveapple"
VBoxManage setextradata "Your Virtual Machine Name" "VBoxInternal/Devices/smc/0/Config/DeviceKey" "ourhardworkbythesewordsguardedpleasedontsteal(c)AppleComputerInc"
VBoxManage setextradata "Your Virtual Machine Name" "VBoxInternal/Devices/smc/0/Config/GetKeyFromRealSMC" 1
Then, copy and paste all the remaining part of the commands.
Step Six: Install macOS Catalina on VirtualBox on Windows PC
The time has come to succeed with the installation war. Start Install macOS Catalina on VirtualBox on Windows PC. Now fire up VirtualBox and click Start.
Once the booting finished, press ESC to skip startup.nsh. Now type “install.nsh” and hit Enter. This will definitely take a while.
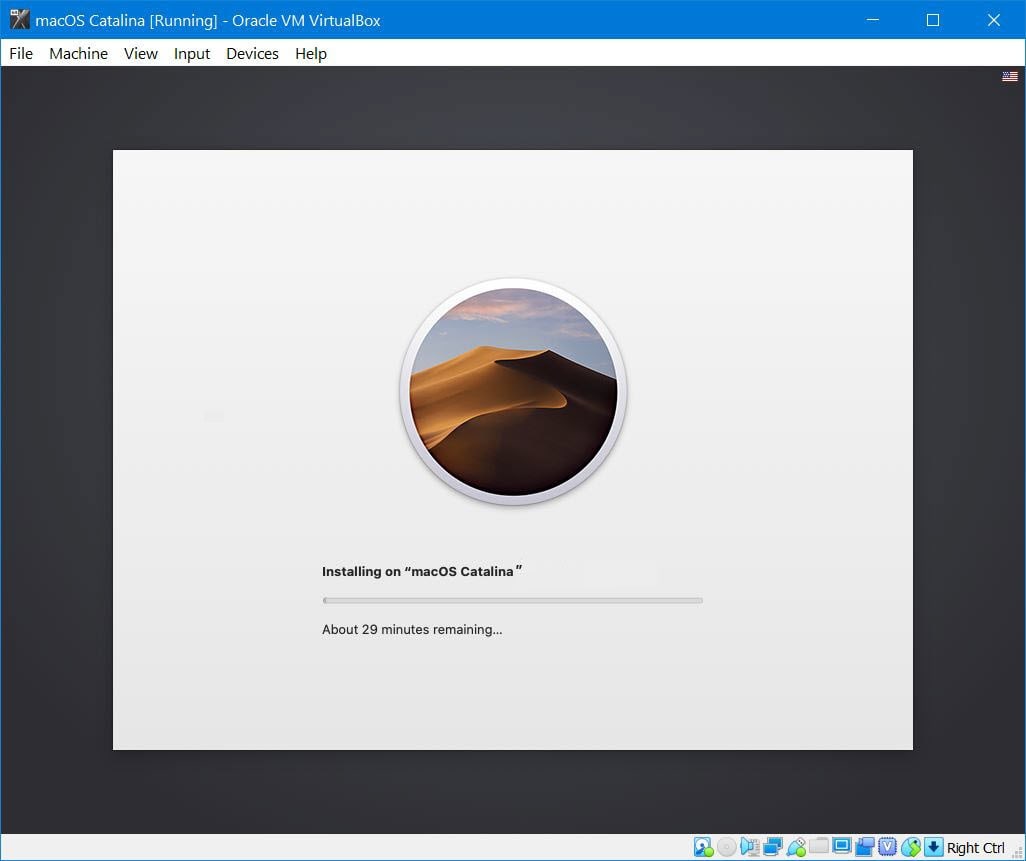
The installation will begin in a moment that will look like this.
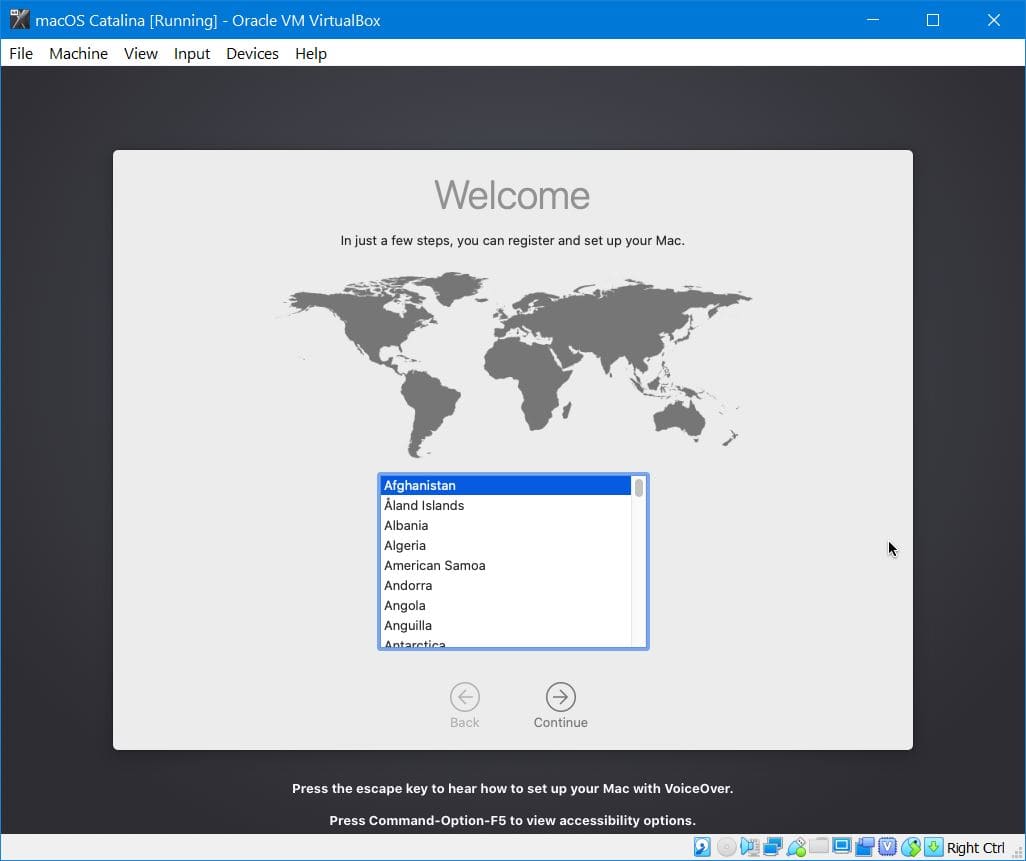
After this, it will restart with hundreds of lines of codes appearing. Don’t worry, that’s fine. When the machine boots up, you’ll figure out the Welcome screen. There you go! Choose where you are located and click Continue.
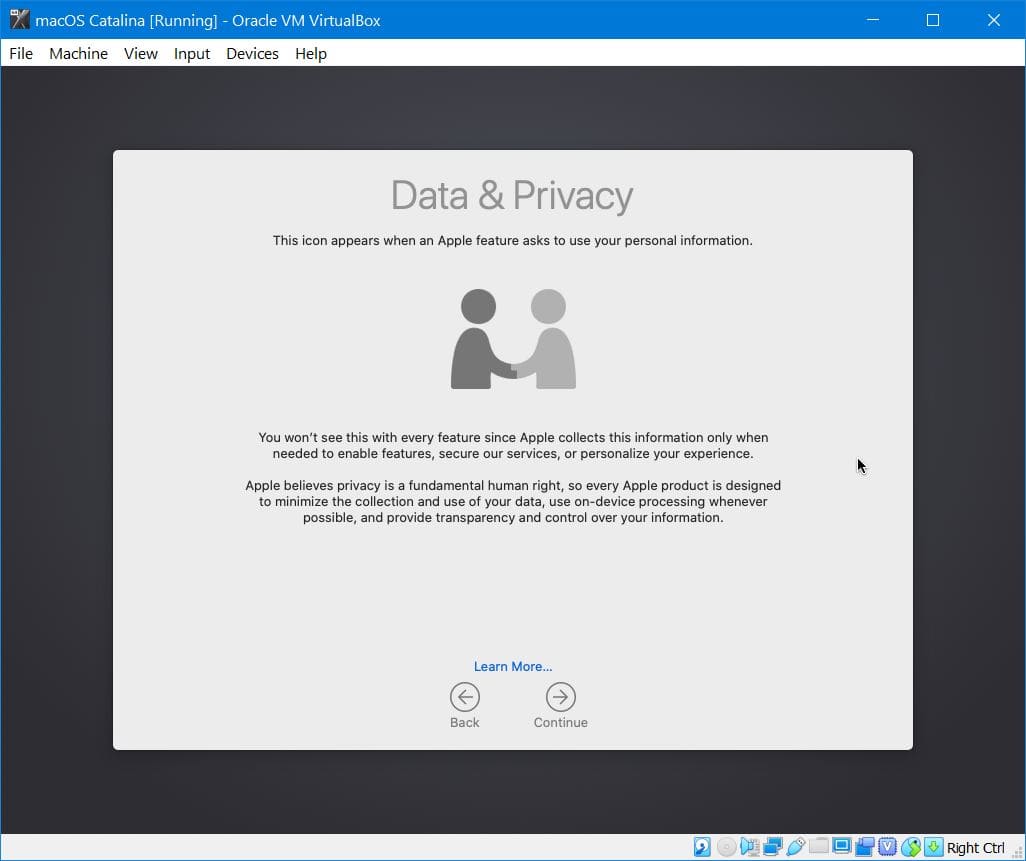
Great! From now, whenever you use an Apple feature, Apple might collect some information of you, simply Continue. There’s no risk in it.
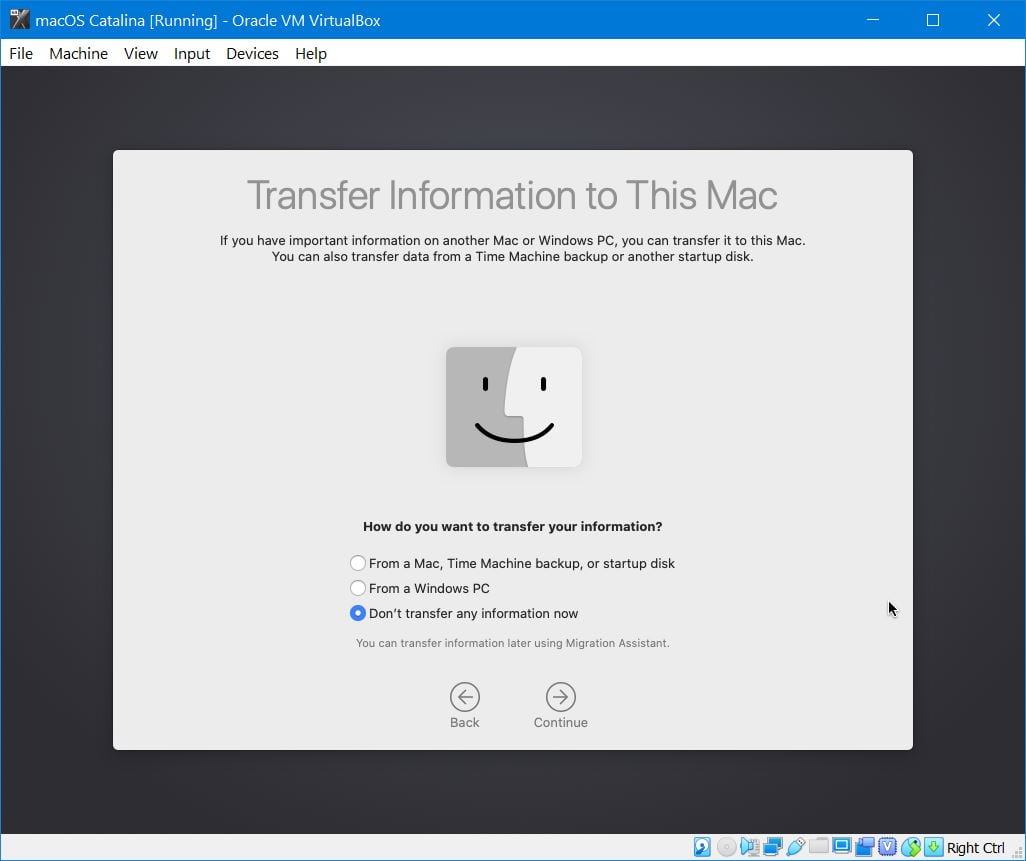
Next, if you would like to make your information here, you’re free to go. In my case, I’ll use the Don’t transfer any information now.
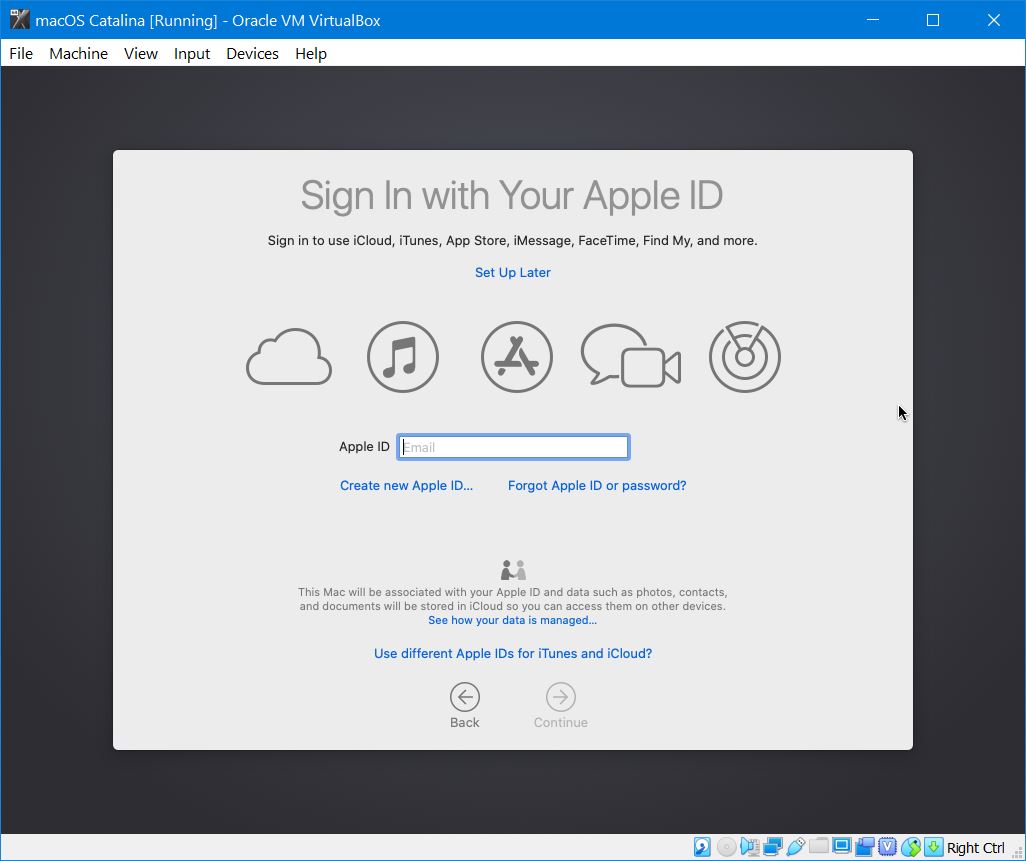
The sign in option is there. If you have an Apple ID, use it to sign in there. Next, you’ll be asked for your credential, type it and click Continue.
Since I’ve signed in with my Apple ID, Apple recommends using two-factor authentication.

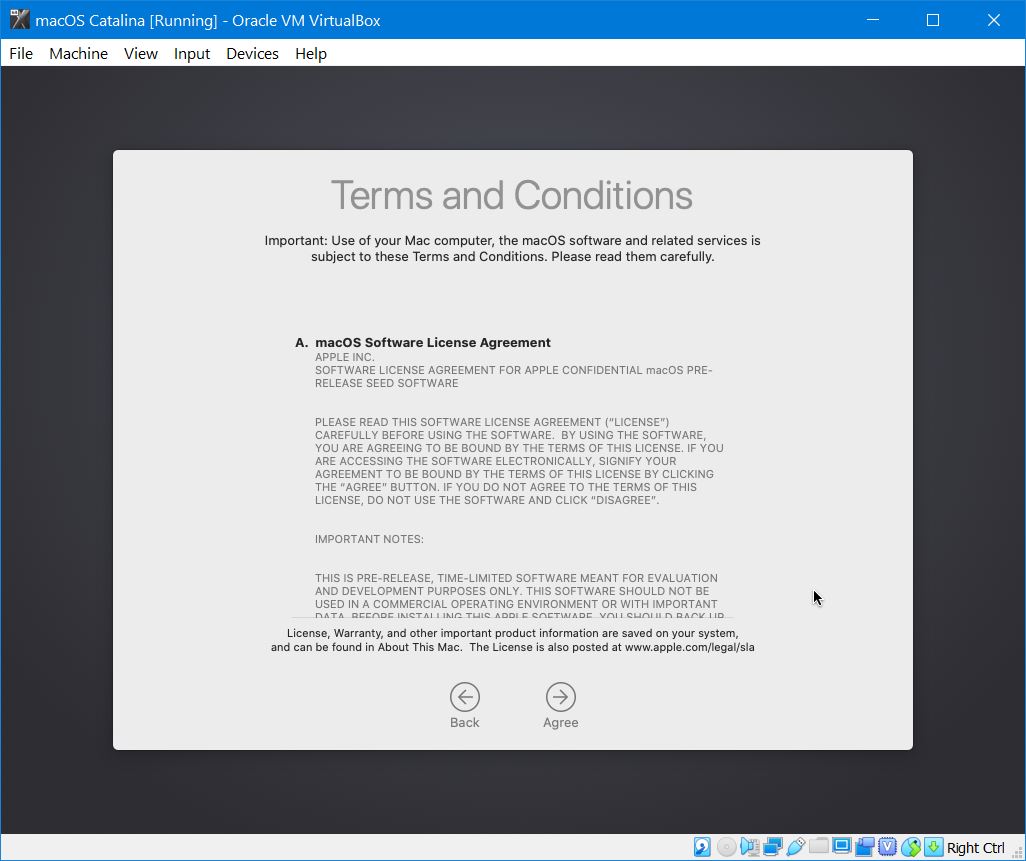
The use of the macOS Catalina points to the terms and conditions. Click Agree and continue with the installation.
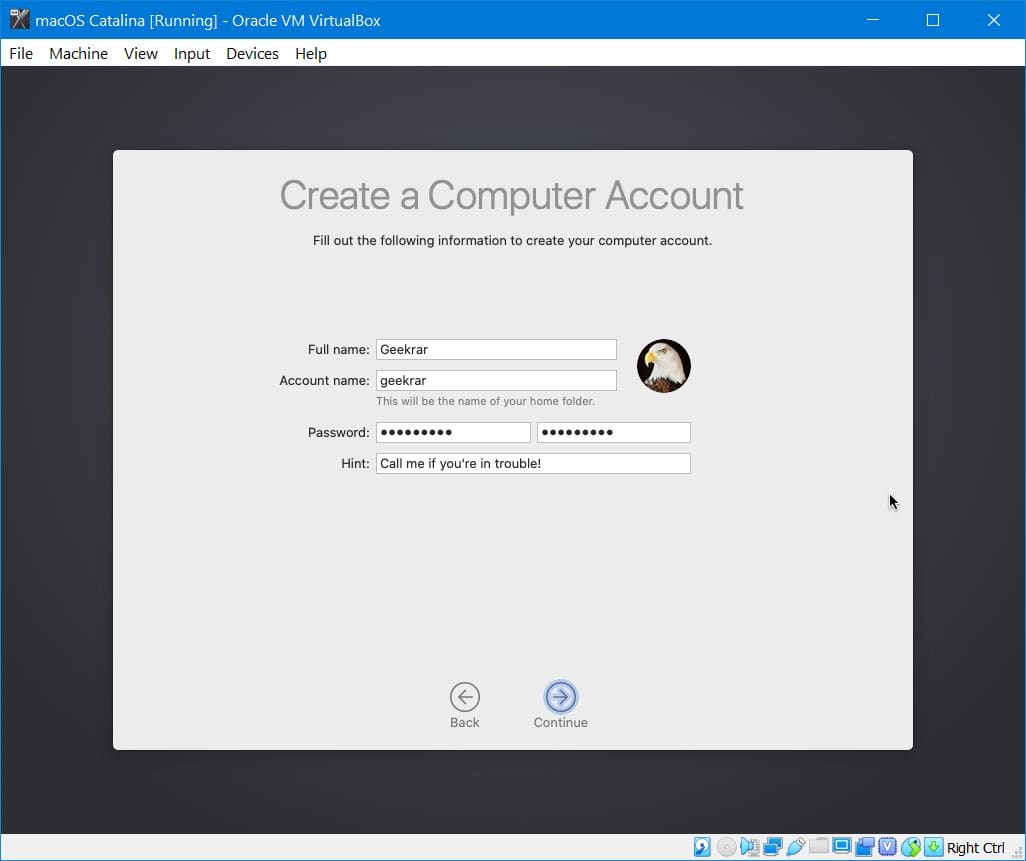
Create your account with the following details and Continue.
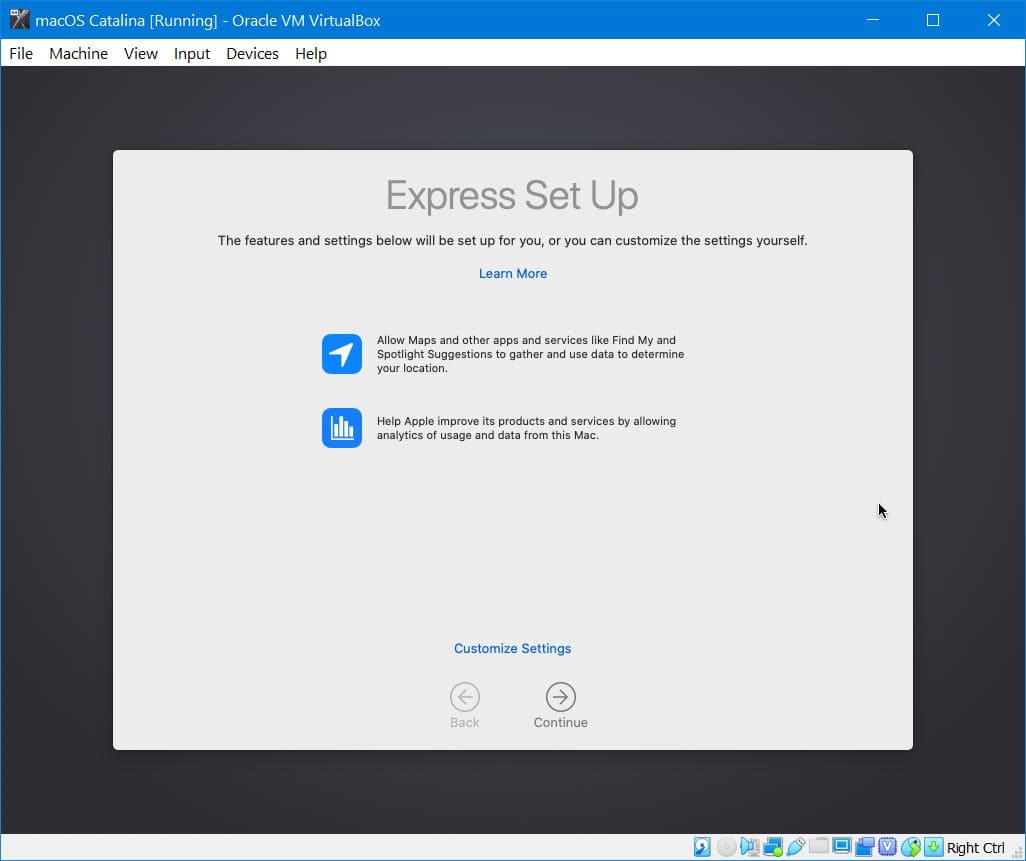
There are some useful features which will be set up for you, Continue with it.
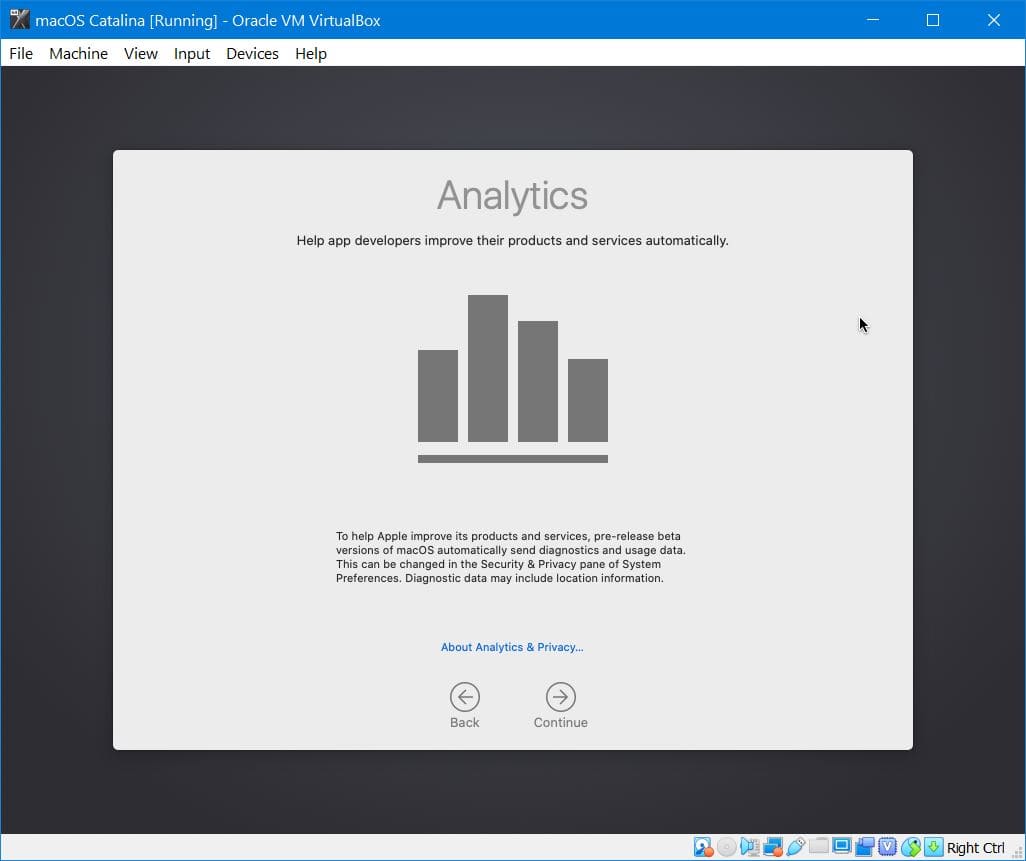
Apple might receive some information about the software, Continue with it. This can be changed from the System Preferences later.
Wonderful! The new screen time feature is under your hands, Continue with it.
Select your desired interface which looks the best to you and click Continue.
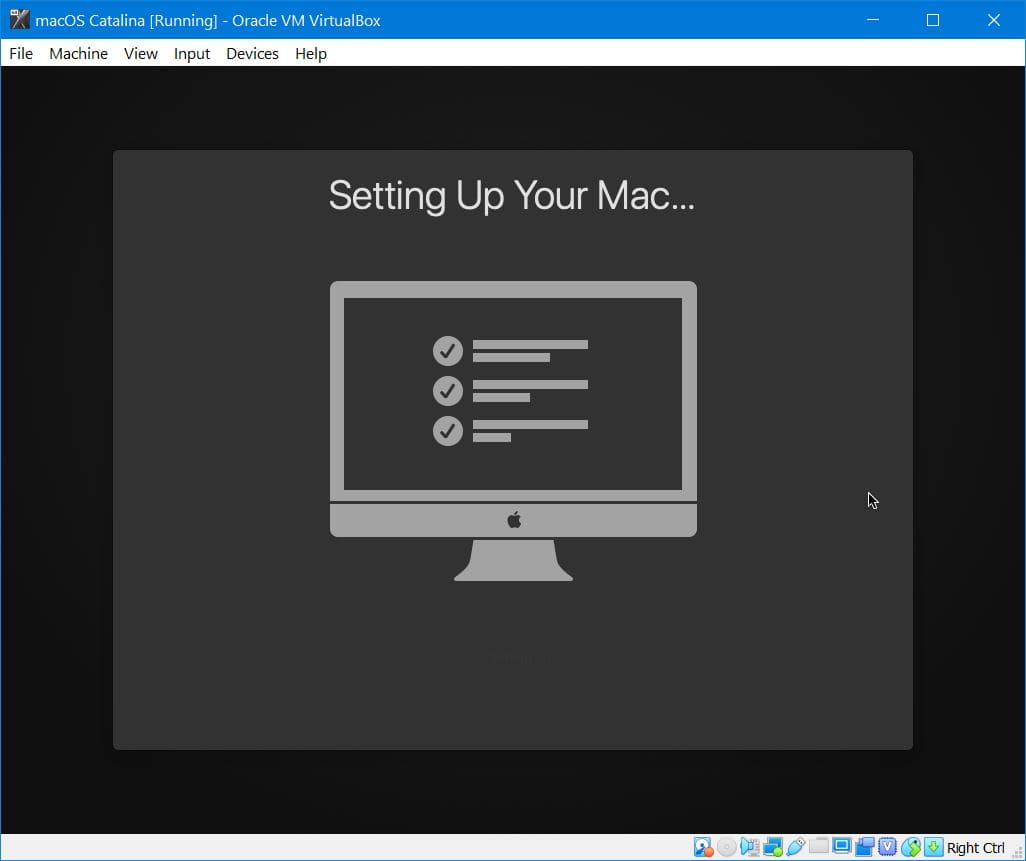
Once you’ve done the settings, your Mac will begin setting up.
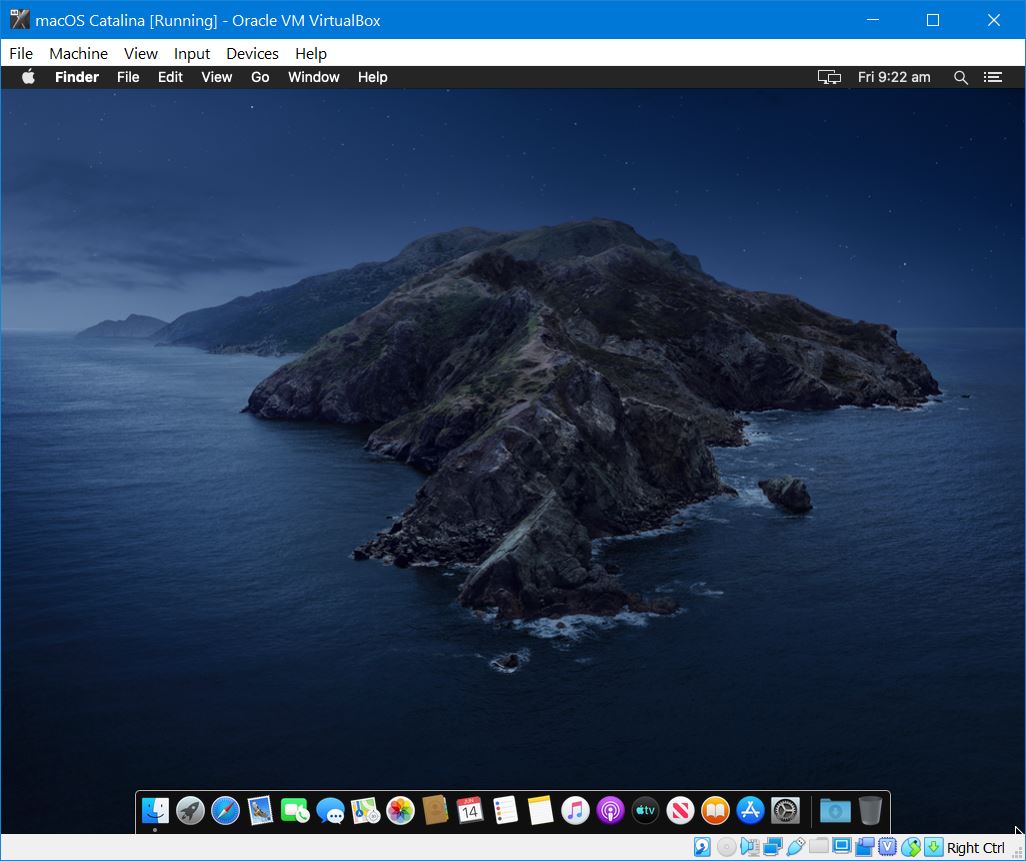
When it’s finished, you’ll see the newest version of macOS which is macOS Catalina. The dark mode of Catalina is super stunning. Here’s a quick look at what we expect to see.
Optional Step: Fix macOS Catalina Small Screen Resolution
With all the things done, you will likely notice a small resolution when you turn into a full screen. Here’s how to fix macOS Catalina screen resolution.
- Fix macOS Catalina Screen Resolution on VirtualBox
With the assigned resources, you should now do speed experience a speed surf of Catalina. Here’s how to speed up macOS Catalina or Mojave on Virtual Machine.
One More Step: Take A Snapshot
We recommend taking a backup of your virtual machine and when something goes wrong, you may simply switch to backup. This is really easy on VirtualBox.
- How to Take and Use Snapshots on VirtualBox

From now, you can surf, try new apps and features, develop apps on XCode and even install Windows on Catalina. Including these, there’s plenty of things you could do. While running macOS on VirtualBox mightn’t be the best, but however, it’s the most convenient and cheapest way to try and even work. It’s worth giving a try! Now that you’ve done all these, there’s nothing more you’ve to do. This isn’t probably perfect experience for trying out Catalina on an actual computer, but with virtual machine, you’ll experience nearly the most similar experience. That way, whenever a new version is dropped, you don’t need to wait for us to upload an image, instead, you can directly update your macOS to the latest version.
However, if there were some issues with slow performance, you can always speed up slow running macOS Catalina.
That’s the end line of Install macOS Catalina on VirtualBox on Windows PC. If you’ve some questions, suggestions or ideas for improvement, we are here to know.