
From this point, we’ve now provided plenty of installation files whether for installing macOS on Windows or on Mac. Such as macOS Sierra DMG, macOS High Sierra DMG, and more. That’s not the only thing. We’ve also provided the files for installing macOS on Windows via VMware or VirtualBox. That is macOS Catalina ISO, macOS Catalina VMDK, and a few more. With that ends up pretty much lots of downloads that help thousands of users every day to create, download, install, and enjoy making use of it. Now for installing El Capitan, we’ve shown how to Create Bootable USB Installer for macOS X El Capitan on Windows 10.
While Apple’s operating systems and as well as Apple products are the most well-known things on the planet. Which has millions of users, Apple’s operating system particularly macOS, provide the ultimate user experience with the outstanding features and apps. With that so, those features and things are only interesting when you’ve installed. The installation or upgrade can be complex but not with a bootable USB installer, so here’s how to create one.
- Related: How to Create macOS Catalina Bootable USB Installer in Windows
Table of Contents
macOS X El Capitan
El Capitan is the twelfth significant drop of the Macintosh operating system. After Yosemite, Apple announced its super new OS X El Capitan. In addition to Yosemite’s features and updates, Apple has included new features and tons of updates and new features. El Capitan is complete and even more of what a user needs. It’s entirely full of features and useful options and apps that even Windows and other operating systems users wish for. But that doesn’t mean Mac users aren’t excited for. In this post, I’ll show how to Create Bootable USB Installer for macOS X El Capitan on Windows 10.
Pretty much every single Mac user waits for Apple’s annual event for watching the only excellent product and software revealing event. That’s what happened with El Capitan. The reason for that is, El Capitan has such amazing features that none of them has been in the past or even now in other operating systems. Which makes you work and do things in easy and smart ways such as working on multiple programs at the same time with SplitView.
Now what happens is, there are lots of users who have access to both Windows & Mac. Most of those who want to install macOS X El Capitan would like to create a bootable USB installer on Windows. That’s because most of those users don’t have their Mac in use or without macOS installed or for some other reasons so here we are. Within this post, I’ll show how to Create Bootable USB Installer for macOS X El Capitan on Windows.
- Related: How to Create macOS Catalina Bootable USB Installer in Windows via TransMac
What You’ll Need
To create Bootable USB for Mac OS X El Capitan on Windows, you’ll need a few keys things. These are some necessary things that can’t the process can’t be done without. We’ll head over to how to create Bootable USB for macOS X El Capitan on Windows files. Go ahead and start collecting up the required files.
- An 8GB Pen Drive (USB Flash Drive)
- Get TransMac
- Download OSX El Capitan DMG
What is TransMac
Similar to what we did with other ones, we’ll also use TransMac for this part which is really useful and most users find it easy to do. Like every other USB Creation Tool that makes bootable USB but different from those. TransMac from Acute system is a Windows program that can copy and manage files and folders on Apple’s drives and devices, including Mac hard drives, flash drives, and other storage devices. It opens and writes disk images and .DMG files. This is a premium application but it has a 15-day free trial.
The features are completely supported by Windows. TransMac has also lots of new features and updates also TransMac for Windows can open disk drives in Macintosh format, flash drives, CD / DVD / Blu-ray media, DMG, software package, and scattered image files. Let’s see how to Create Bootable USB Installer for macOS X El Capitan on Windows 10.
- Related: How to Create macOS Mojave Bootable USB Installer in Windows
Creating bootable USB Installer can be done in different ways specifically create bootable USB Installer for macOS X El Capitan on Windows and other macOS versions. The first way to do manually and the second way is to do a software that is pre-build to do all those with a click or two. From the software, we’ve chosen the easiest way despite we are neither sponsored or paid to do so. Here’s how to Create Bootable USB Installer for macOS X El Capitan on Windows.
After the TransMac is installed, open it up.
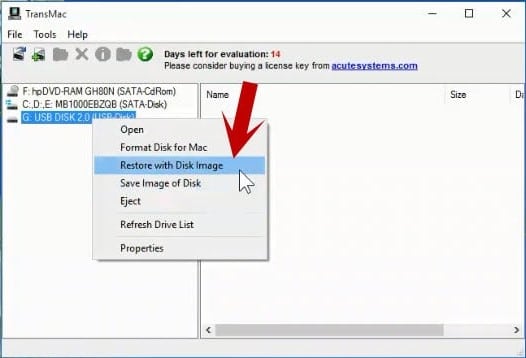
Once it’s there, insert the USB drive and right-click on the USB drive and select Restore with Disk Image.
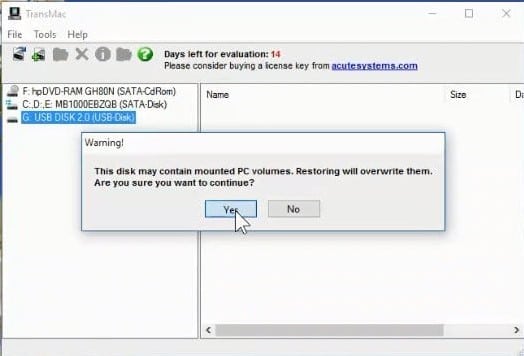
In here when the window will come up, you just have to click OK.
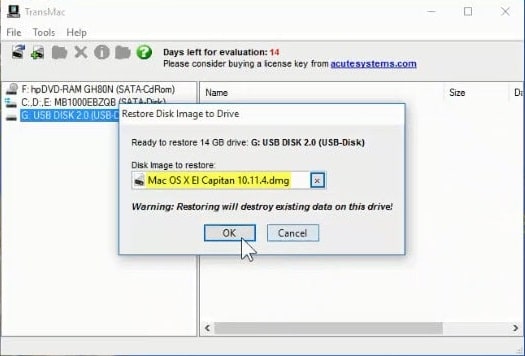
A new pop up box will appear, click on the three-dots, and then select the macOS X El Capitan.DMG file from Windows. Then click on OK.
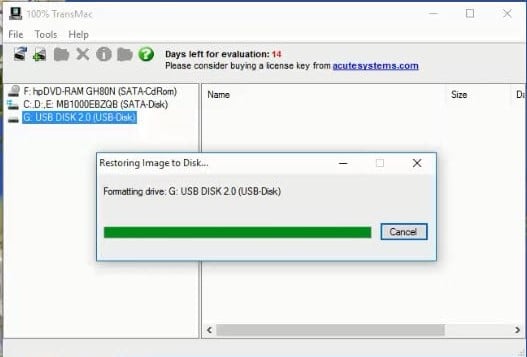
Since the file is huge so it will take quite time to complete. It may take about 20 to 30 mins or more.
Once everything is done, it should finish without any problem and most likely it won’t. Aside from this, there is another way to create bootable USB for Mac OS El Capitan on Windows with other software like Unibest & DiskMakerX. The installation steps are also not much different but for that, you’ll need different software and a little bit different steps. But the nice thing is, both of them works fine and will work so choose whatever is easy and do it as yourself.
One nice thing that now you can upgrade any operating system to Capitan El because its one of the most amazing operating systems also has the most helpful features even you can upgrade from macOS X Yosemite and previous versions to El Capitan. If you haven’t still create Bootable USB for Mac OS El Capitan on Windows so do it right now and enjoy El Capitan with its unique things.
Уровень сложностиПростой
Время на прочтение3 мин
Количество просмотров80K
Описываю свой рабочий опыт установки macOS на старенький macbook, так как другие способы описанные в интернете не дали результатов, либо привели к новым ошибкам.
Для начала скачиваем дистрибутив в формате *.dmg. Сделать это можно из App Store со второго macbook, либо с торрент (важно чтобы это была чистая копия из App Store).
Берем флешку на 8Гб и более, вставляем в компьютер с Windows, нажимаем Win+R, пишем cmd.
Запускается консоль и в ней уже пишем diskpart потом list disk, на экран выводиться список дисков windows, теперь важно не перепутать диски и выбрать именно диск с флешкой. Пишем select disk (номер флешки):

Теперь нам нужно преобразовать загрузочную область в формат GPT, набираем по очереди команды:
clean, convert GPT, create partition primary, exit.
C сайта https://www.acutesystems.com/ скачиваем программу TransMac, она платная, но работает 15 дней которых должно хватить. Запускаем, выбираем наш флеш накопитель, сначала выбираем пункт Format Disk fo Mac. И после завершения процесса выбираем Restore with Disk Image где нам нужно будет указать наш дистрибутив с macOS в формате *.dmg.

Все флешка готова, но загрузиться с нее не выйдет. Если загрузить мак удерживая клавишу alt, слоты загрузки будут пустые. Поэтому загружаем Recovery system удерживая клавиши cmd+R (нажимать нужно сразу после кнопки включения до появления яблока или земного шара).
Тут нам понадобиться дисковая утилита, запускаем ее, смотрим что флешка определилась и далее нам нужно отформатировать основной диск (Тут я подразумеваю что все ваши нужные файлы лежат в облаке, важных файлов на самом маке нет, так как после форматирования все файлы будут УТЕРЯНЫ).
Нажимаем в меню пункт вид-показывать все устройства. Выбираем APPLE SSD, нажимаем кнопку стереть. Вводим имя, Mac OS Extended, Схема разделов GUID.

Ну а теперь можно и загрузочную флешку сделать. Выходим из дисковой утилиты и в меню выбираем пункт Утилиты-Терминал. Пишем команду df -h и смотрим что в файловой системе есть флеш накопитель с названием который был в дисковой утилите (у меня это /Volumes/Install macOS Mojave) после этого копируем дистрибутив на жесткий диск командой
cp -R "/Volumes/Install macOS Mojave/Install macOS Mojave.app" "/Volumes/Macintosh HD"
После копирования закрываем терминал cmd+Q. Выбираем флешку и форматируем также как форматировали жесткий диск (Имя: USB, Mac OS Extended, Схема разделов GUID.).
Теперь запускаем терминал и создаем загрузочный образ:
"/Volumes/Macintosh HD/Install macOS Mojave.app/Contents/Resources/createinstallmedia" --volume /Volumes/USB
Соглашаемся, вводим y и возможно потребуется пароль от системы.
Теперь можно перезагрузить мак с зажатой клавишей alt и в пункте загрузки мы увидим картинку Install macOS Mojave. Теперь можно нажать пункт Установить macOS.
Если в процессе установки вылетела ошибка “Экземпляр программы установка macOS Mojave поврежден и не может быть использован.”
Нужно найти в интернете дату выпуска дистрибутива, отключить WiFi, запустить терминал ввести команду установки даты date: месяц-число-время-год в формате ммддччммгггг
Например, 12 декабря 10:00 2017 будет выглядеть так:
date 120110002017
Если не помогло, перезагружаем, отключаем интернет, ставим дату и после этого только запускаем установку.
После этого устанавливаем mac OS как обычно.
P.S.1: Чтобы восстановить флешку для пользования под Windows скачиваем программу SD Memory Card Formatter for Windows с сайта https://www.sdcard.org/ так как в проводнике вряд ли получиться отформатировать.
P.S.2: У других дистрибутивов названия путей будут другие, так что смотрите по возможности название папок например командой ls в терминале.
парпар
В этой пошаговой инструкции подробно о том, как создать загрузочную флешку с OS X 10.11 El Capitan для чистой установки на iMac или MacBook, а также, возможно для переустановки системы при возможных сбоях. Также такой накопитель может быть полезен, если вам требуется быстро обновиться до El Capitan на нескольких Mac без необходимости скачивать его из App Store на каждом из них. Обновление: Загрузочная флешка MacOS Mojave.
Основное, что потребуется для описываемых ниже действий — флешка размером не менее 8 гигабайт, отформатированная для Mac (будет описано, как это сделать), права администратора в OS X и возможность загрузить установку El Capitan из App Store.
Подготовка флешки
Первый шаг — отформатировать флешку с помощью дисковой утилиты, используя схему разделов GUID. Запустите дисковую утилиту (проще всего воспользоваться поиском Spotlight, также можно найти в Программы — Утилиты). Учтите, следующие шаги удалят все данные с флешки.
В левой части выберите подключенный USB-накопитель, перейдите на вкладку «Стереть» (в OS X Yosemite и более ранних) или нажмите кнопку «Стереть» (в OS X El Capitan), выберите формат «OS X Extended (журналируемый)» и схему разделов GUID, также укажите метку диска (используйте латиницу, без пробелов), нажмите «Стереть». Дождитесь завершения процесса форматирования.
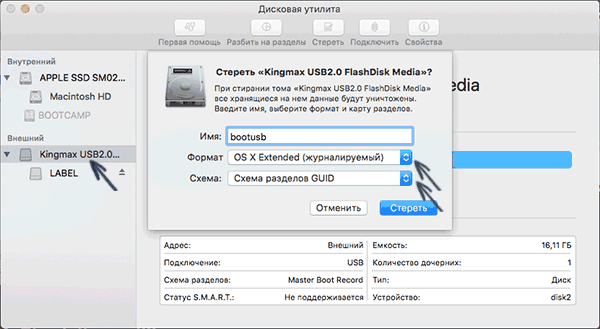
Если все прошло успешно, можно продолжать. Запомните метку, которую вы задавали, она пригодится на следующем этапе.
Загрузка OS X El Capitan и создание загрузочной флешки
Следующее действие — зайти в App Store, найти там OS X El Capitan и нажать «Загрузить», после чего ожидать завершения загрузки. Общий размер составляет около 6 гигабайт.

После того, как файлы установки будут загружены и откроется окно настройки параметров установки OS X 10.11 не нужно нажимать «Продолжить», вместо этого закройте окно (через меню или Cmd+Q).
Само создание загрузочной флешки OS X El Capitan выполняется в терминале с помощью утилиты createinstallmedia, которая содержится в дистрибутиве. Запустите терминал (опять же, быстрее всего это сделать с помощью поиска Spotlight).
В терминале введите команду (в этой команде — bootusb — метка USB диска, которую вы задавали при форматировании):
sudo /Applications/Install\ OS\ X\ El\ Capitan.app/Contents/Resources/createinstallmedia --volume /Volumes/bootusb --applicationpath /Applications/Install\ OS\ X\ El\ Capitan.app --nointeraction

Вы увидите сообщение «Copying installer files to disk…», означающее, что файлы копируются, а сам процесс копирования на флешку займет довольно продолжительное время (около 15 минут для USB 2.0). По завершении и сообщении «Done.» можно закрыть терминал — загрузочная флешка для установки El Capitan на Mac готова.

Для того, чтобы загрузиться с созданного USB накопителя для установки, при перезагрузке или включении вашего Mac, нажмите клавишу Option (Alt) для появления меню выбора устройства загрузки.
While you don’t need a fresh install of macOS to use OpenCore, some users prefer having a fresh slate with their boot manager upgrades.
To start you’ll need the following:
-
4GB USB Stick
-
For USB larger than 16 GB to format in FAT32 use Rufus method
-
macrecovery.py (opens new window)
- This will require Python 3 installed (opens new window)
# Downloading macOS
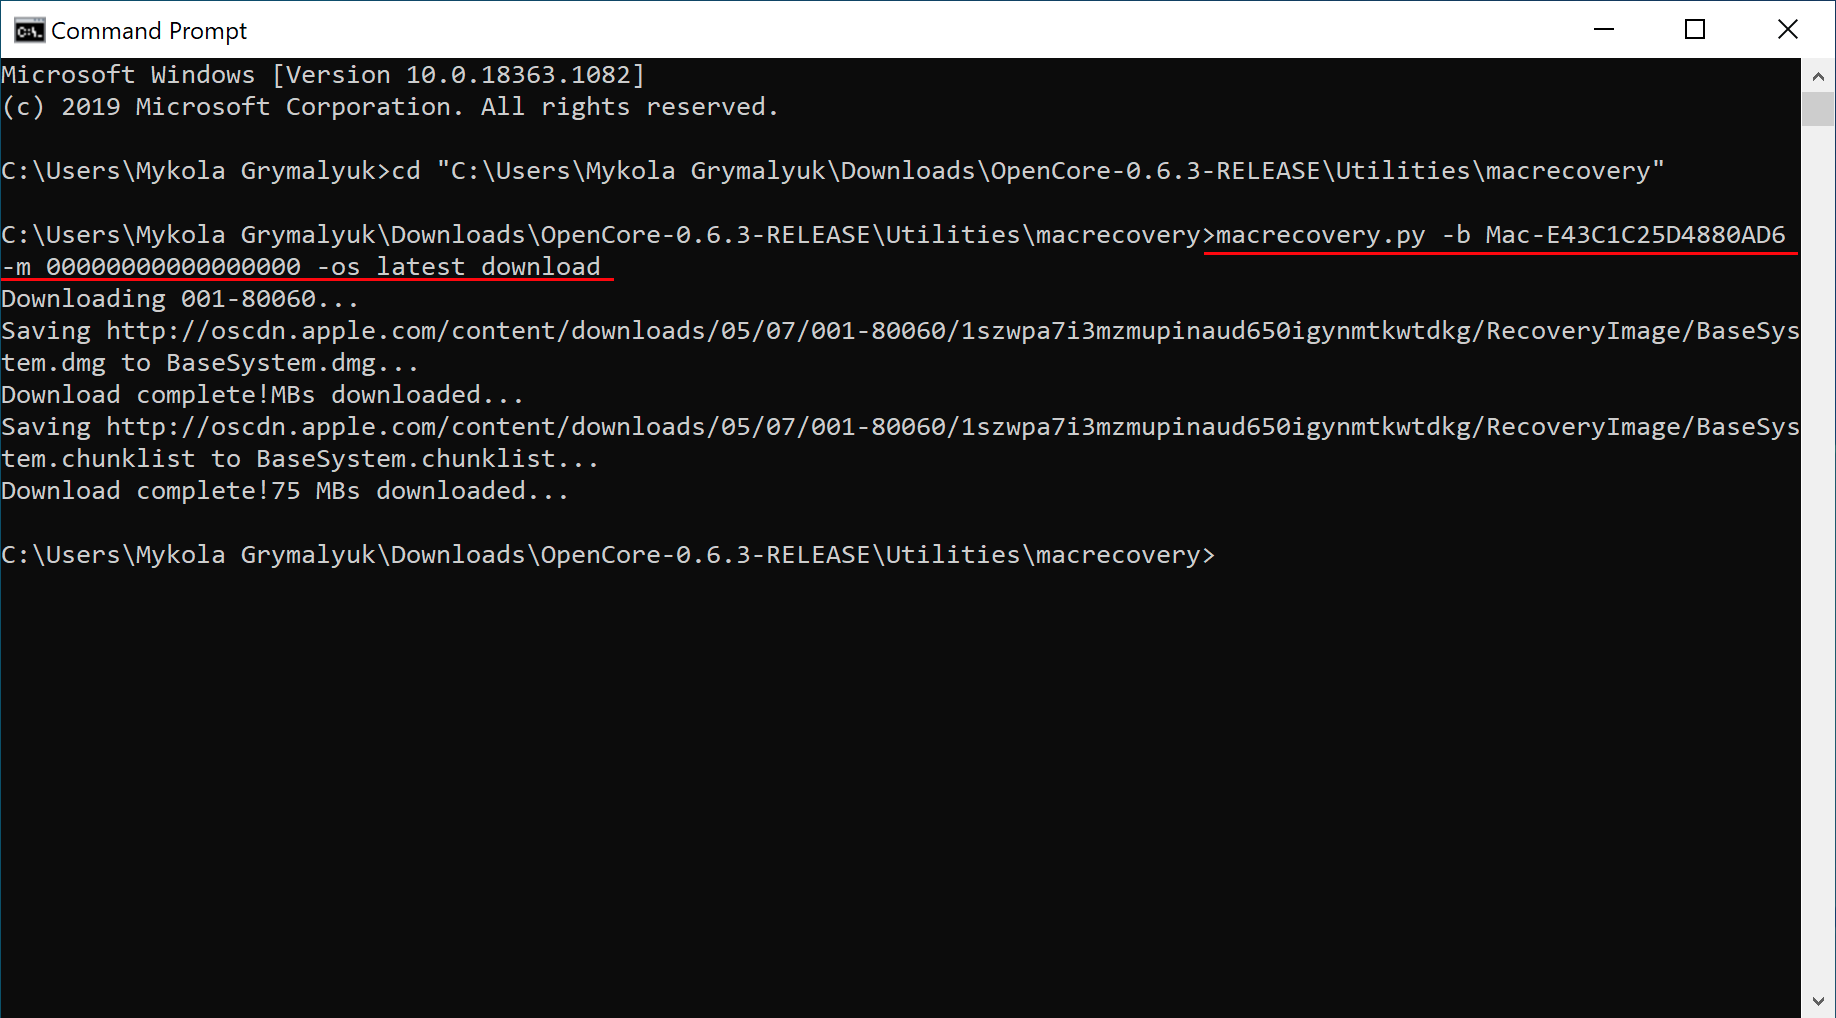
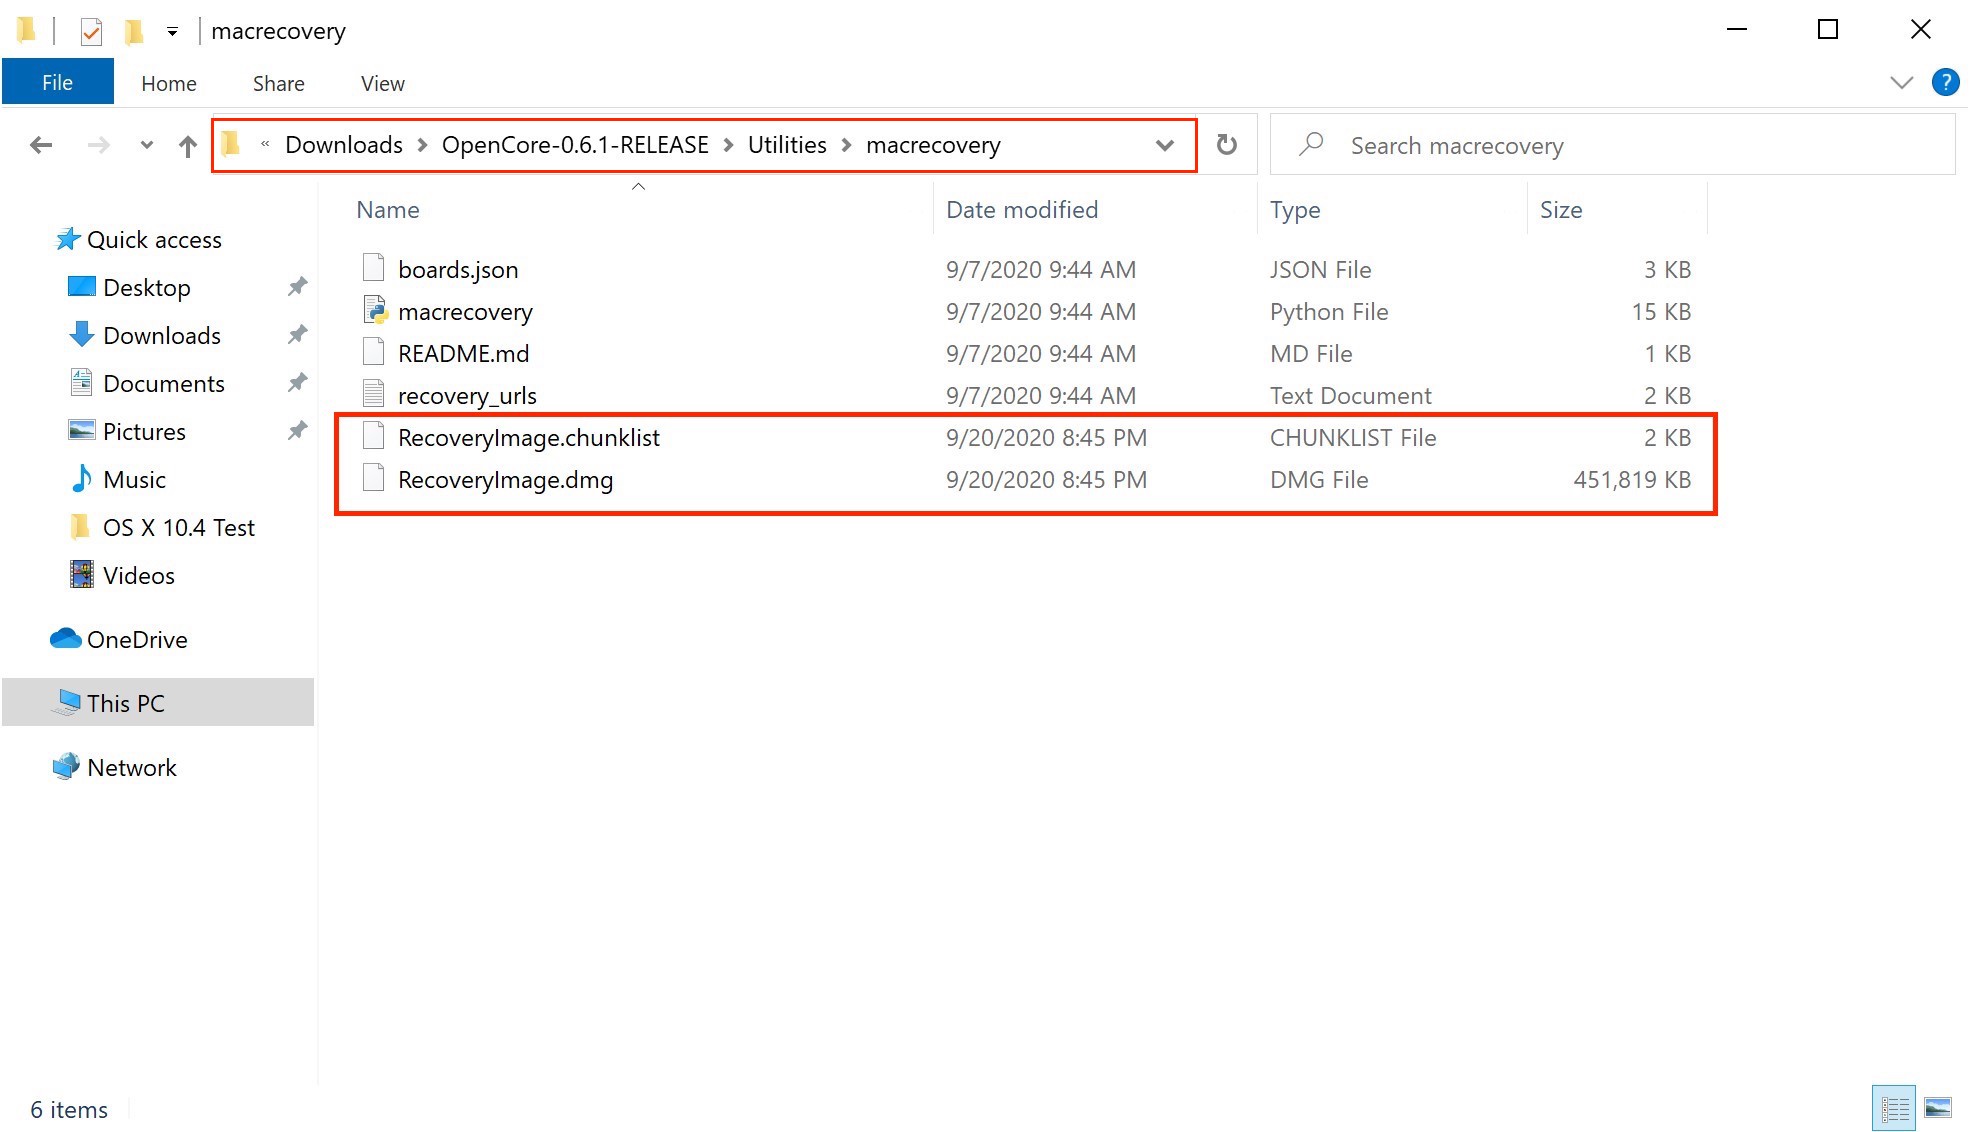
To grab legacy installers is super easy, first grab a copy of OpenCorePkg (opens new window) and head to /Utilities/macrecovery/. Next, click next to the current folder path and type cmd to open a Command Prompt in the current directory:
Now run one of the following depending on what version of macOS you want(Note these scripts rely on Python 3 (opens new window) support, please install if you haven’t already):
- macOS 12 and above note: As recent macOS versions introduce changes to the USB stack, it is highly advisable that you map your USB ports (with USBToolBox) before installing macOS.
- CAUTION: With macOS 11.3 and newer, XhciPortLimit is broken resulting in boot loops (opens new window).
- If you’ve already mapped your USB ports (opens new window) and disabled
XhciPortLimit, you can boot macOS 11.3+ without issues.
- If you’ve already mapped your USB ports (opens new window) and disabled
- CAUTION: With macOS 11.3 and newer, XhciPortLimit is broken resulting in boot loops (opens new window).
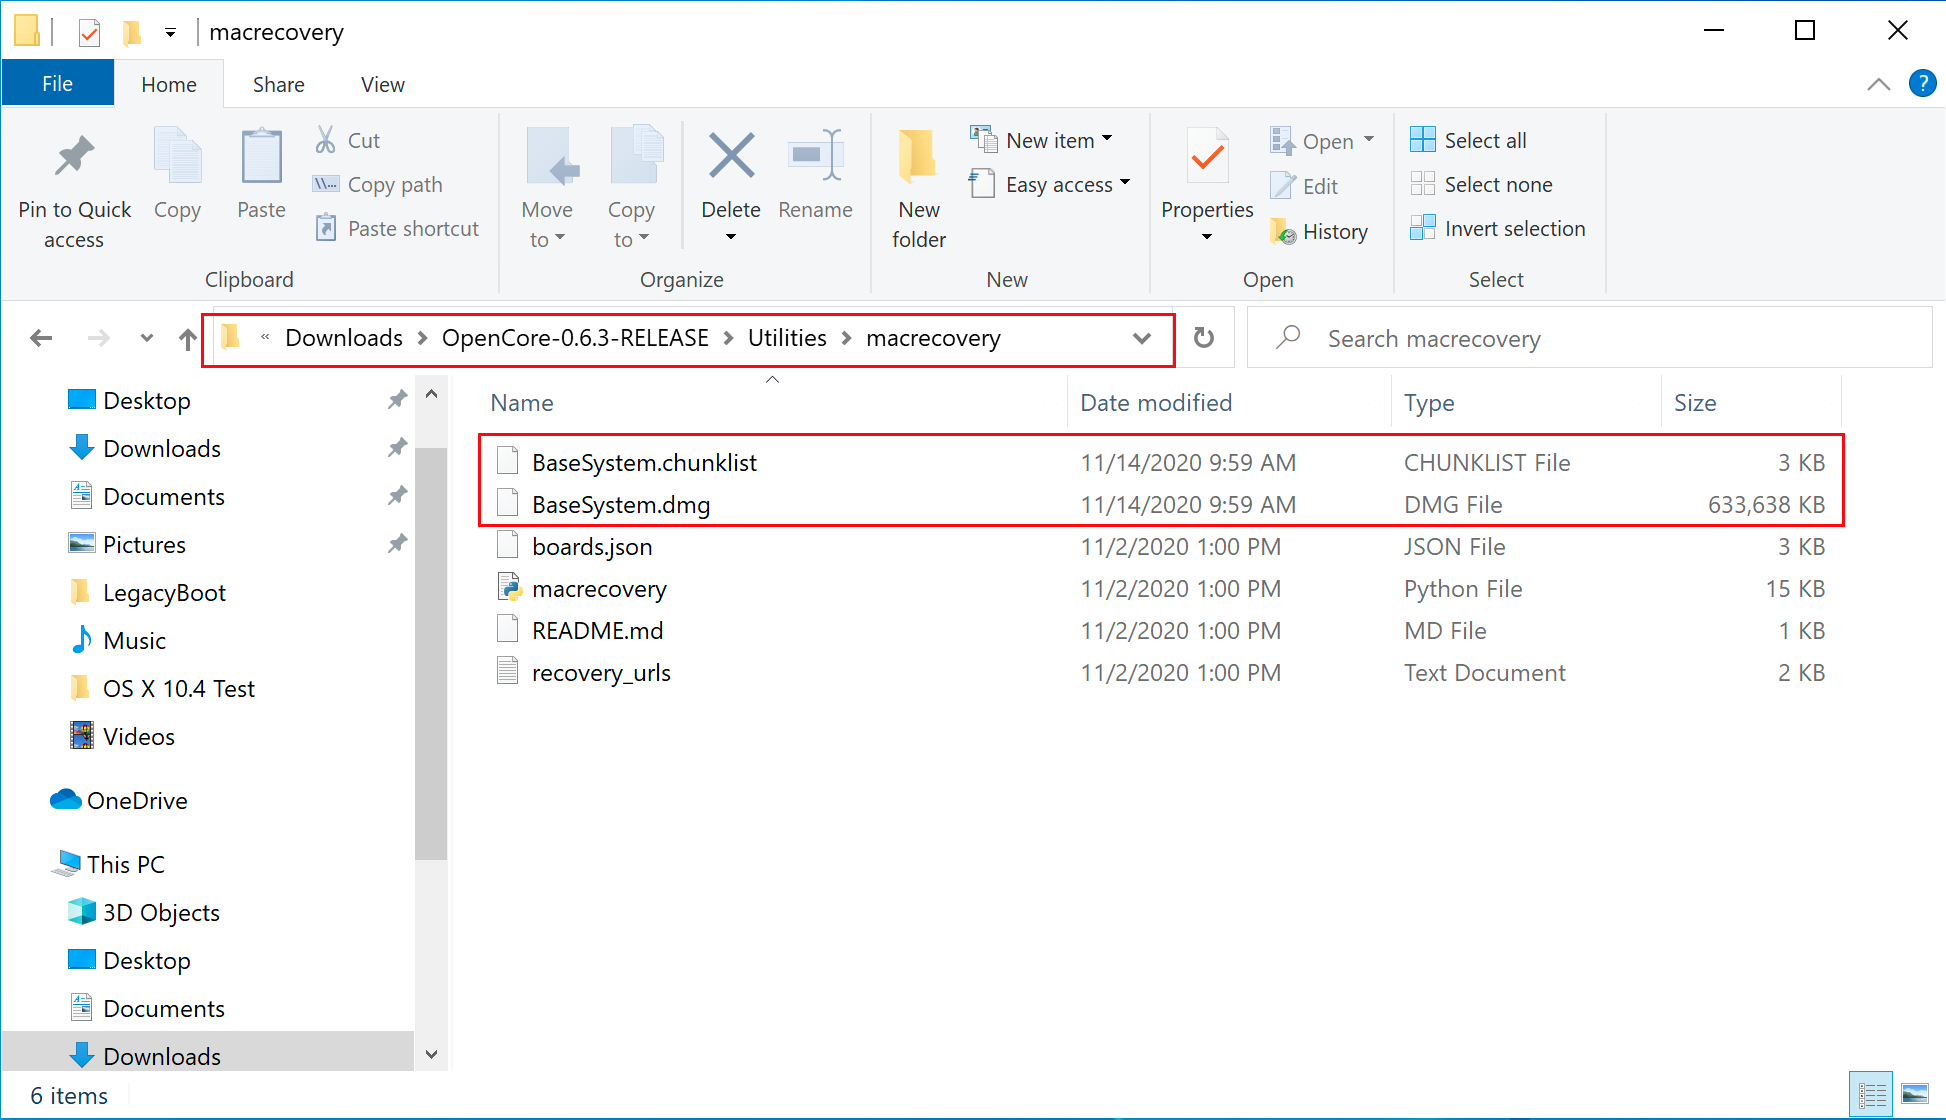
This will take some time, however once you’re finished you should get either BaseSystem or RecoveryImage files:
| BaseSystem | RecoveryImage |
|---|---|
|
|
Now with our installer downloaded, we’ll next want to format our USB.
# Making the installer
Here we’ll be formatting our USB and adding macOS onto it, we have 3 options:
- Disk Management method
- GUI Based, simplest way
- Only UEFI systems are supported(ex. 2012+)
- Rufus method
- GUI Based, simplest way
- For larger USB drives(16GB+)
- diskpart method
- Command line based, little more work
- Required for legacy systems(ie. non-UEFI, pre-2012)
# Disk Management method
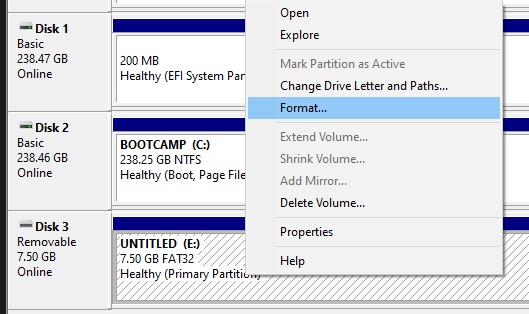
Simply open up Disk Management, and format your USB as FAT32:
- Right click the Start Button on your task bar and select Disk Management.
- You should see all of your partitions and disks. On the bottom half, you’ll see your devices. Find your USB.
- You’ll want to format the USB to have a FAT32 partition.
- If you have multiple partitions on the USB, right click each partition and click Delete Volume for your USB (This will remove data, make sure you have backups and only remove partitions from your USB)
- Right click the unallocated space and create a new simple volume. Make sure it is FAT32 and at least a gigabyte or two big. Name it «EFI».
- Otherwise, right click the partition on the USB and click Format and set it to FAT32.
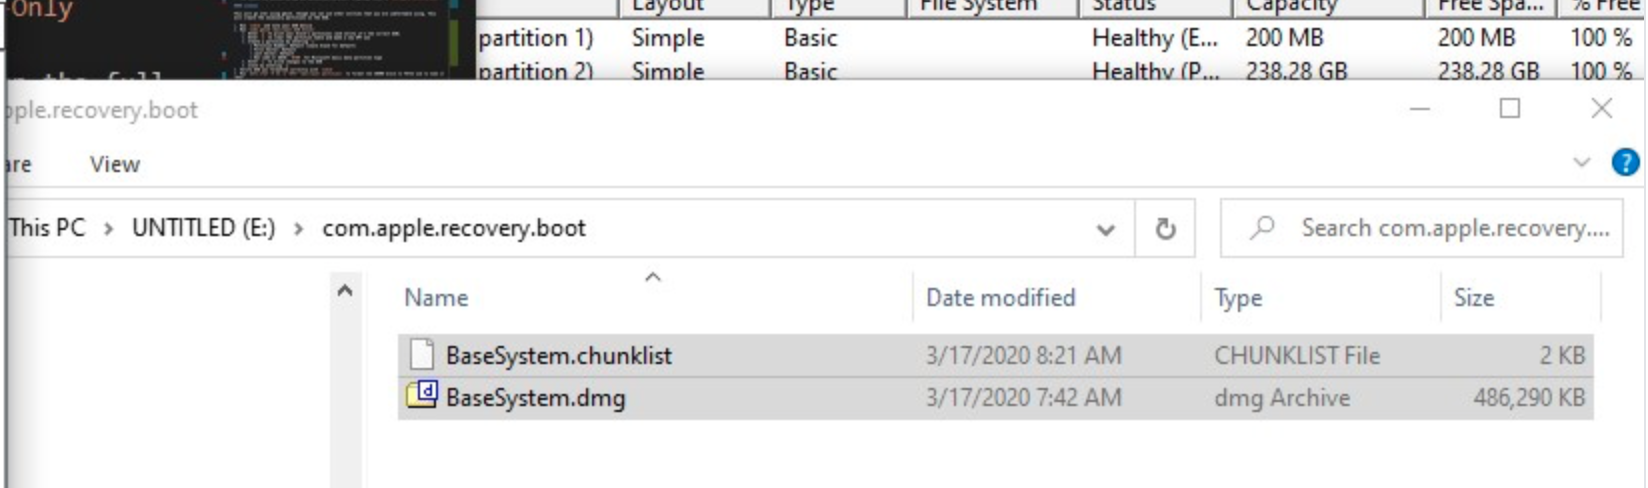
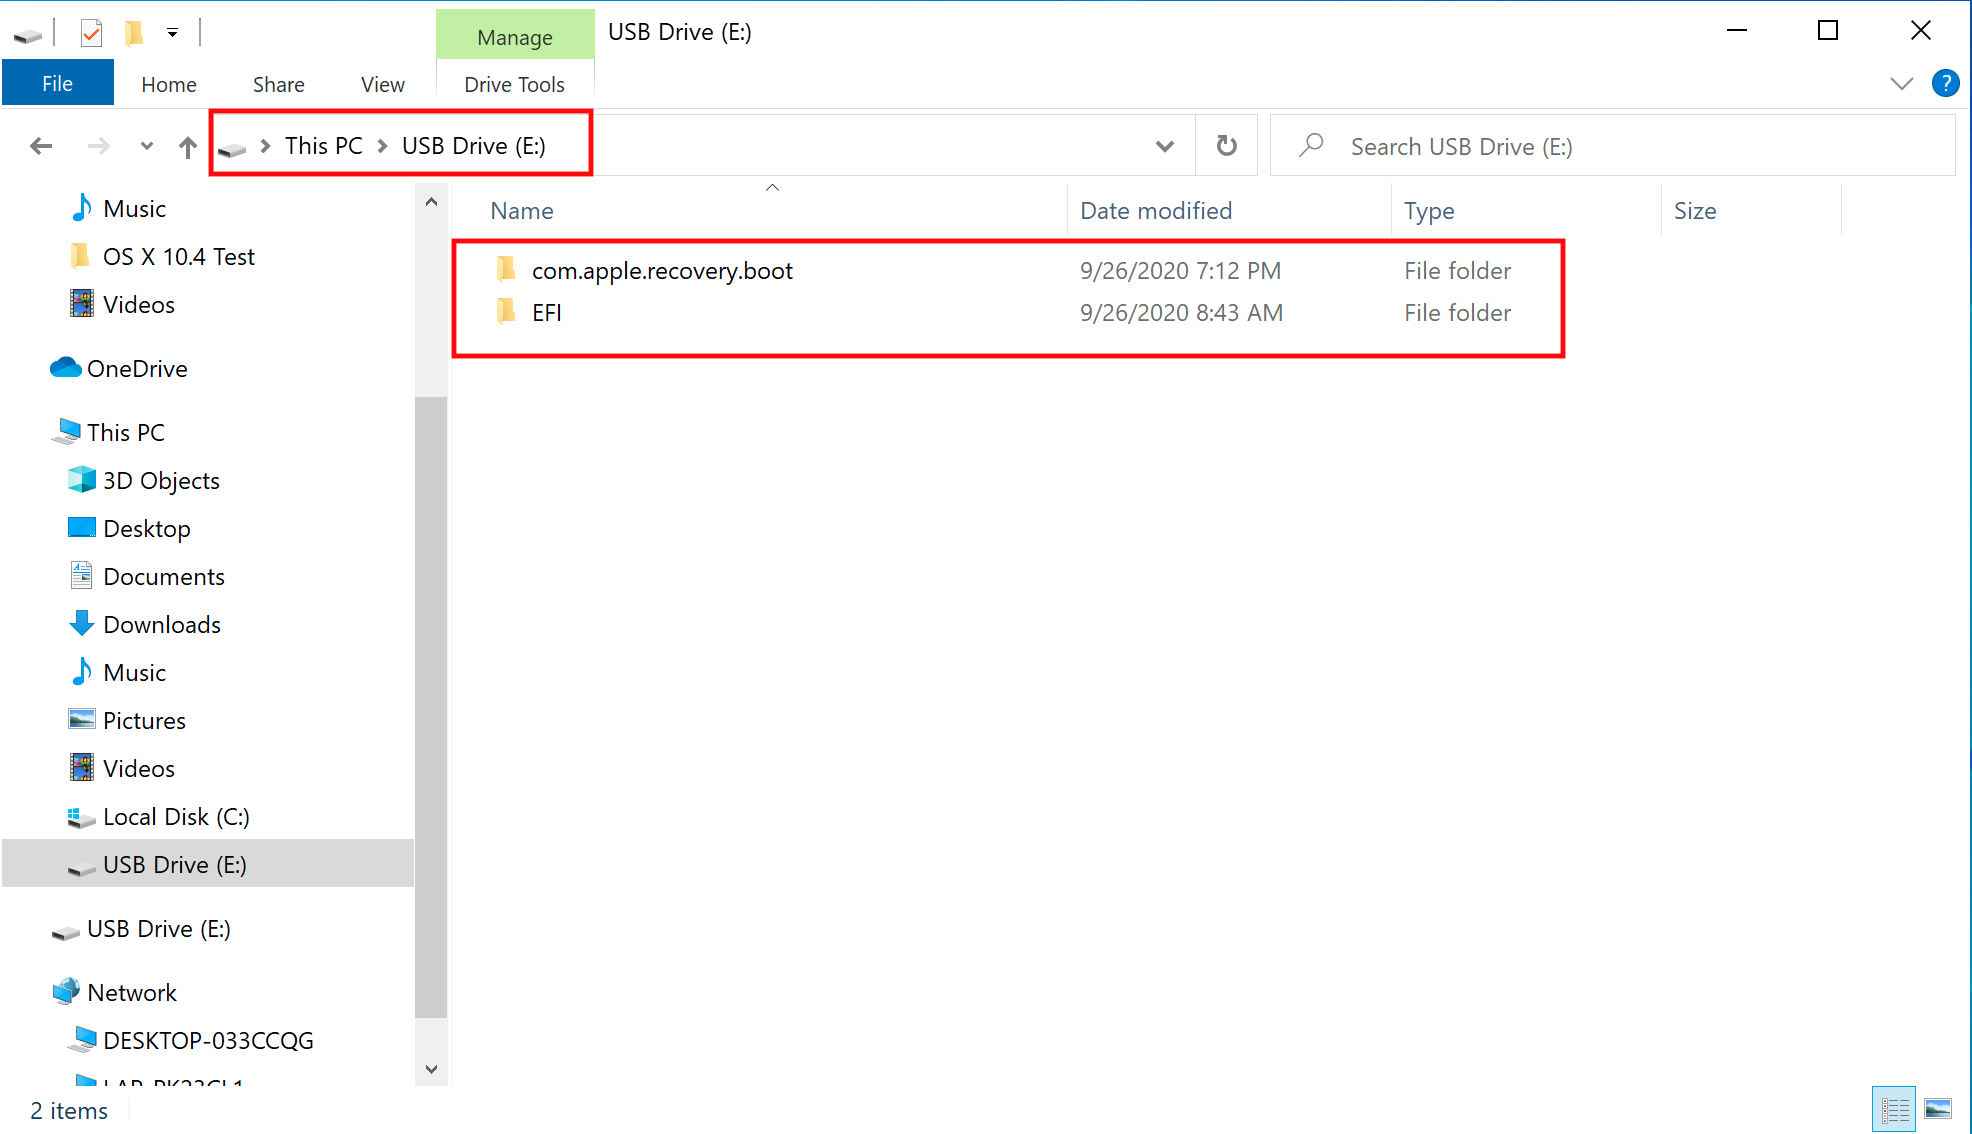
Next, go to the root of this USB drive and create a folder called com.apple.recovery.boot. Then move the downloaded BaseSystem or RecoveryImage files. Please ensure you copy over both the .dmg and .chunklist files to this folder:
Now grab OpenCorePkg you downloaded earlier and open it:
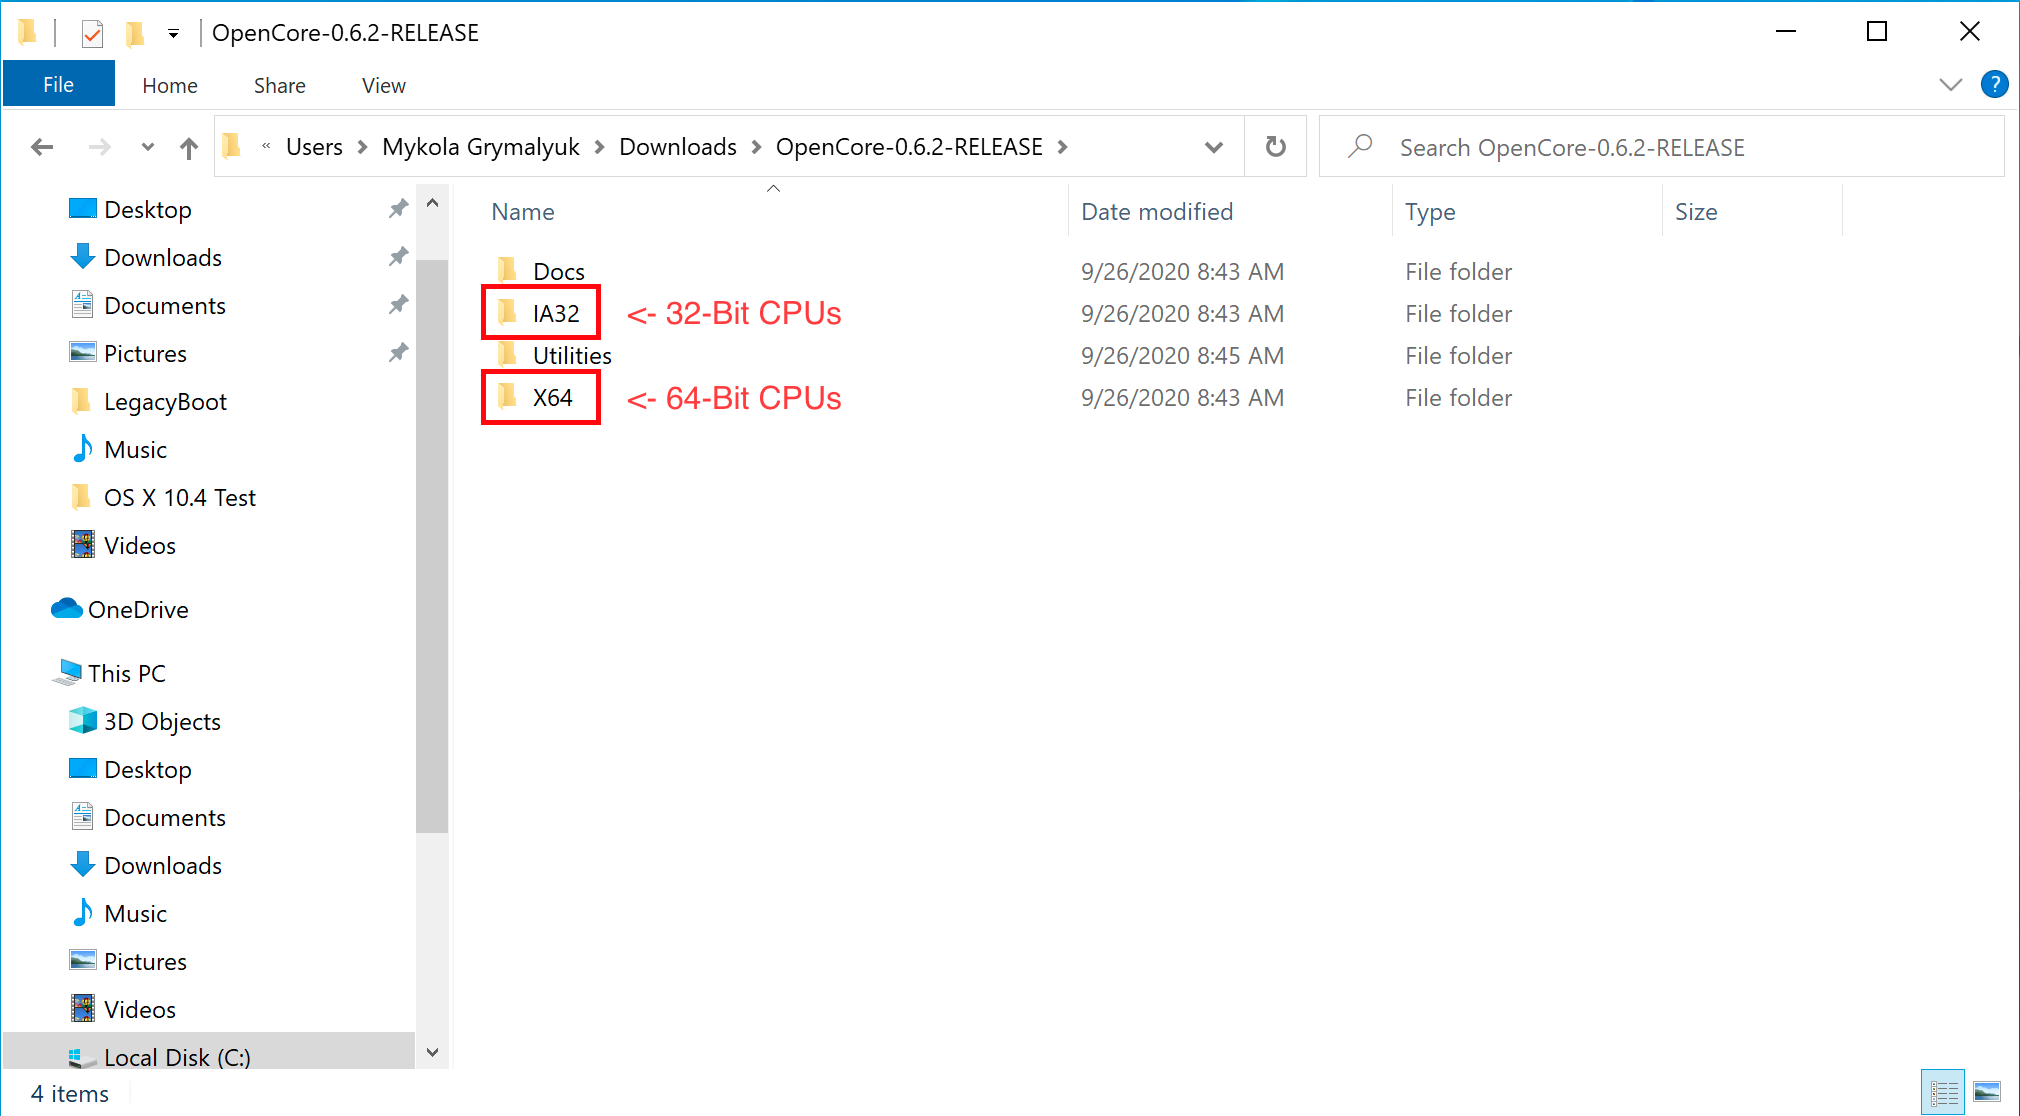
Here we see both IA32(32 Bit CPUs) and X64(64 Bit CPUs) folders, choose the one that’s most appropriate to your hardware and open it. Next grab the EFI folder inside and place this on the root of the USB drive along side com.apple.recovery.boot. Once done it should look like this:
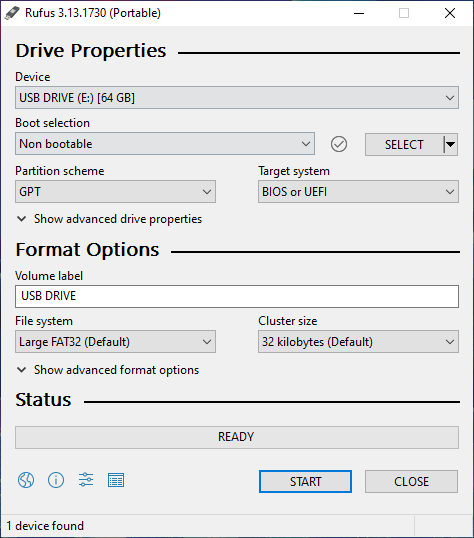
# Rufus method
- Download Rufus (opens new window)
- Set the BOOT selection as not bootable
- Set File System as Large FAT32
- Click Start
- Delete all file autorun in USB Drive partition
Next, go to the root of this USB drive and create a folder called com.apple.recovery.boot. Then move the downloaded BaseSystem or RecoveryImage files. Please ensure you copy over both the .dmg and .chunklist files to this folder:
Now grab OpenCorePkg you downloaded earlier and open it:
Here we see both IA32(32 Bit CPUs) and X64(64 Bit CPUs) folders, choose the one that’s most appropriate to your hardware and open it. Next grab the EFI folder inside and place this on the root of the USB drive along side com.apple.recovery.boot. Once done it should look like this:
# diskpart method
diskpart method
Press Windows + R and enter diskpart.
Now run the following:
Next, go to the root of this USB drive and create a folder called com.apple.recovery.boot. Then move the downloaded BaseSystem or RecoveryImage files. Please ensure you copy over both the .dmg and .chunklist files to this folder:
Now grab OpenCorePkg you downloaded earlier and open it:
Here we see both IA32(32 Bit CPUs) and X64(64 Bit CPUs) folders, choose the one that’s most appropriate to your hardware and open it. Next grab the EFI folder inside and place this on the root of the USB drive along side com.apple.recovery.boot. Once done it should look like this:
Legacy Install Setup
If your firmware does not support UEFI, see below instructions:
To start, you’ll need the following:
- 7-Zip (opens new window)
- BOOTICE (opens new window)
- OpenCorePkg (opens new window)
Next, open up BOOTICE and ensure you’ve selected the right drive.
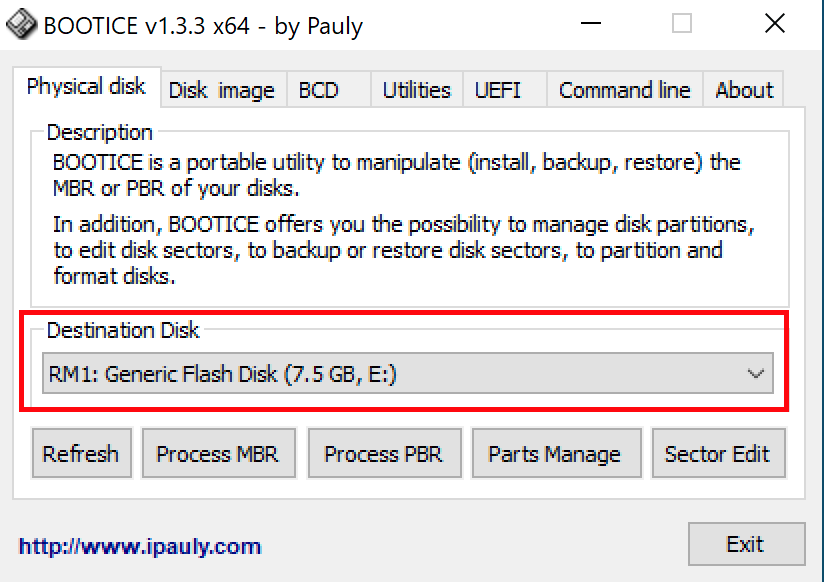
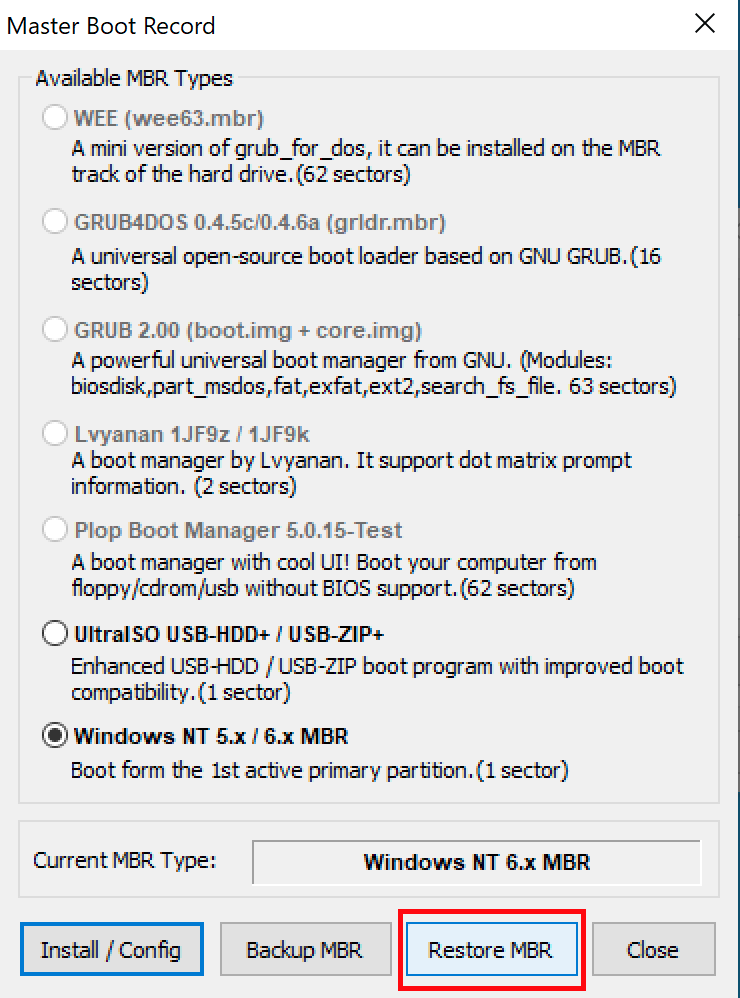
Next, enter «Process MBR» then select «Restore MBR» and select the boot0 file from Utilities/LegacyBoot/ in OpenCorePkg:
| Restore MBR | Restore boot0 file |
|---|---|
|
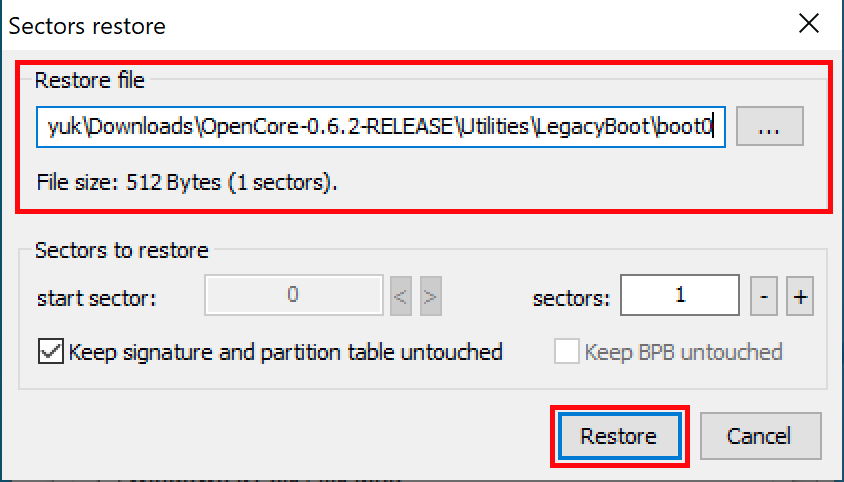
|
Then head back to the main screen and select «Process PBR» then «Restore PBR». From here, choose the boot1f32 file from Utilities/LegacyBoot/ in OpenCorePkg:
| Restore PBR | Restore boot1f32 file |
|---|---|
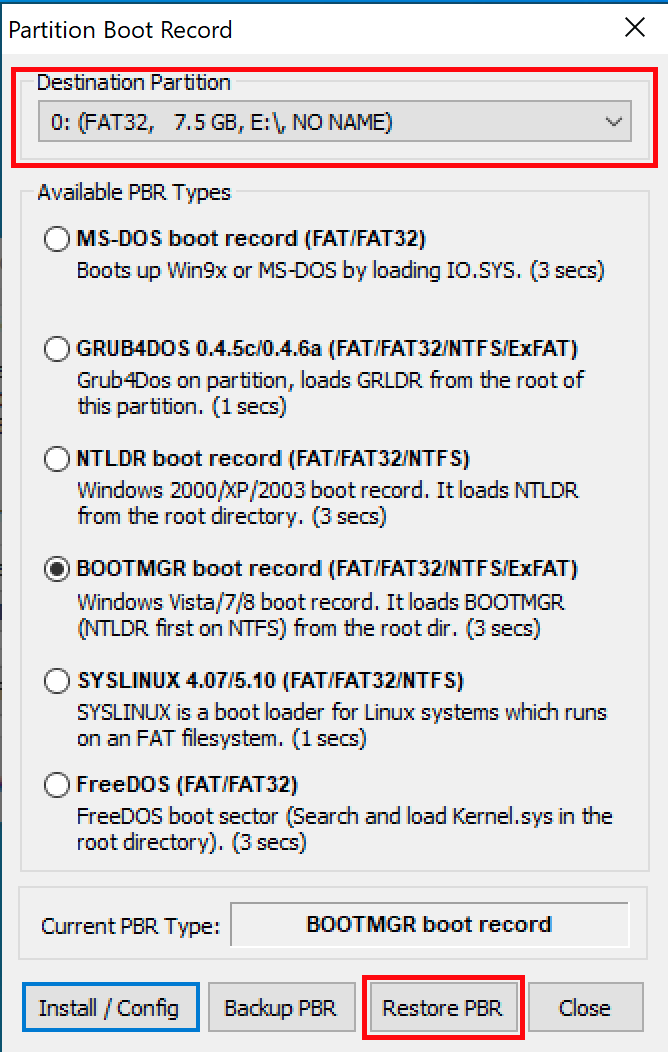
|
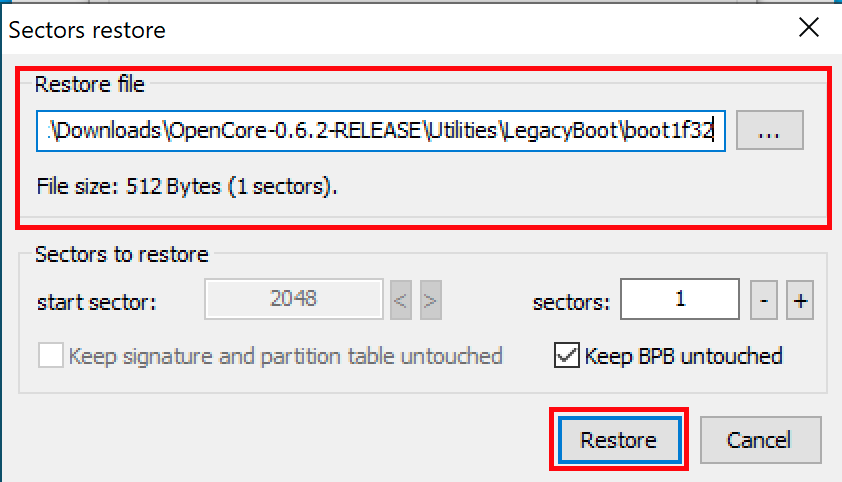
|
Once this is done, head back to your USB and do 1 final thing. Grab either the bootx64(64 Bit CPUs) or bootia32(32 Bit CPUs) file from Utilities/LegacyBoot/ and place it on the root of your drive. Rename this file to boot to ensure DuetPkg can properly:
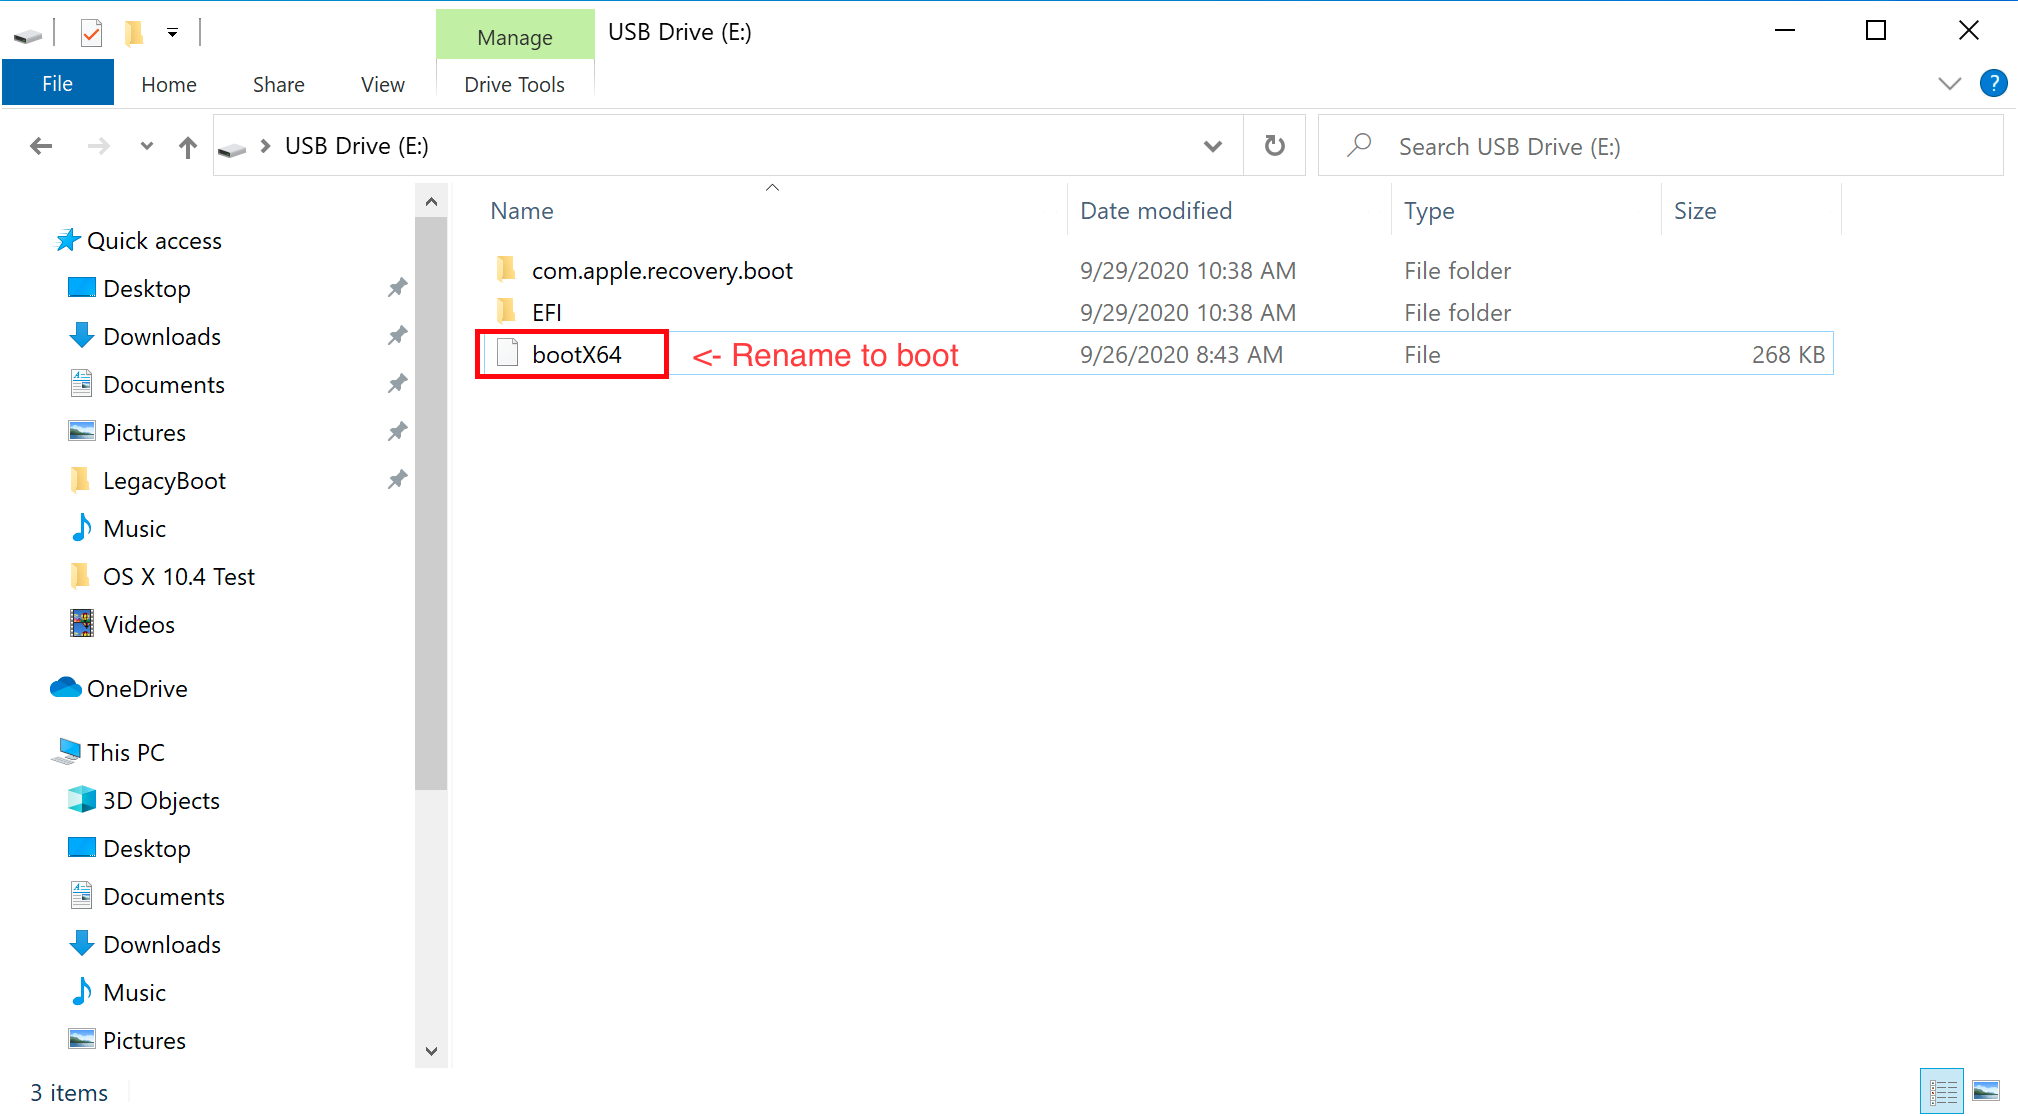
# Now with all this done, head to Setting up the EFI to finish up your work
Last Updated: 11/2/2024, 2:53:15 PM