
В Windows 10 и Windows Server 2019 появился встроенный SSH клиент, который вы можете использовать для подключения к *Nix серверам, ESXi хостам и другим устройствам по защищенному протоколу, вместо Putty, MTPuTTY или других сторонних SSH клиентов. Встроенный SSH клиент Windows основан на порте OpenSSH и предустановлен в ОС, начиная с Windows 10 1809.
Содержание:
- Установка клиента OpenSSH в Windows 10
- Как использовать SSH клиенте в Windows 10?
- SCP: копирование файлов из/в Windows через SSH
Установка клиента OpenSSH в Windows 10
Клиент OpenSSH входит в состав Features on Demand Windows 10 (как и RSAT). Клиент SSH установлен по умолчанию в Windows Server 2019 и Windows 10 1809 и более новых билдах.
Проверьте, что SSH клиент установлен:
Get-WindowsCapability -Online | ? Name -like 'OpenSSH.Client*'

В нашем примере клиент OpenSSH установлен (статус: State: Installed).
Если SSH клиент отсутствует (State: Not Present), его можно установить:
- С помощью команды PowerShell:
Add-WindowsCapability -Online -Name OpenSSH.Client* - С помощью DISM:
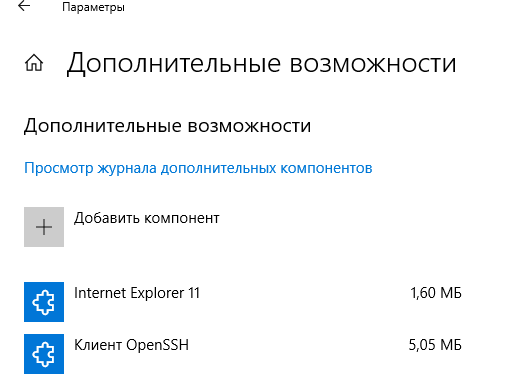
dism /Online /Add-Capability /CapabilityName:OpenSSH.Client~~~~0.0.1.0 - Через Параметры -> Приложения -> Дополнительные возможности -> Добавить компонент. Найдите в списке Клиент OpenSSH и нажмите кнопку Установить.
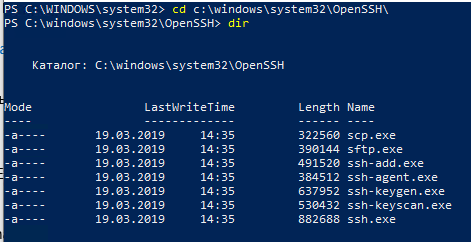
]Бинарные файлы OpenSSH находятся в каталоге c:\windows\system32\OpenSSH\.
- ssh.exe – это исполняемый файл клиента SSH;
- scp.exe – утилита для копирования файлов в SSH сессии;
- ssh-keygen.exe – утилита для генерации ключей аутентификации;
- ssh-agent.exe – используется для управления ключами;
- ssh-add.exe – добавление ключа в базу ssh-агента.
Вы можете установить OpenSSH и в предыдущих версиях Windows – просто скачайте и установите Win32-OpenSSH с GitHub (есть пример в статье “Настройка SSH FTP в Windows”).
Как использовать SSH клиенте в Windows 10?
Чтобы запустить SSH клиент, запустите командную строку
PowerShell
или
cmd.exe
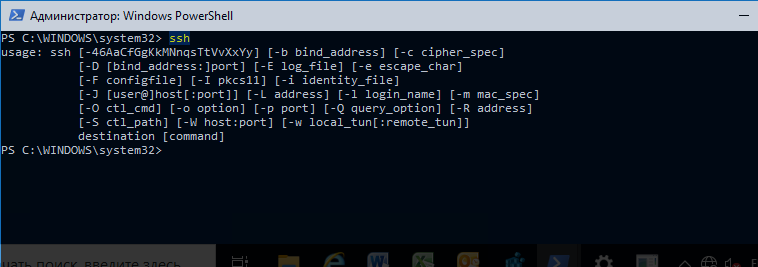
. Выведите доступные параметры и синтаксис утилиты ssh.exe, набрав команду:
ssh
usage: ssh [-46AaCfGgKkMNnqsTtVvXxYy] [-b bind_address] [-c cipher_spec]
[-D [bind_address:]port] [-E log_file] [-e escape_char]
[-F configfile] [-I pkcs11] [-i identity_file]
[-J [user@]host[:port]] [-L address] [-l login_name] [-m mac_spec]
[-O ctl_cmd] [-o option] [-p port] [-Q query_option] [-R address]
[-S ctl_path] [-W host:port] [-w local_tun[:remote_tun]]
destination [command]
Для подключения к удаленному серверу по SSH используется команда:
ssh username@host
Если SSH сервер запущен на нестандартном порту, отличном от TCP/22, можно указать номер порта:
ssh username@host -p port
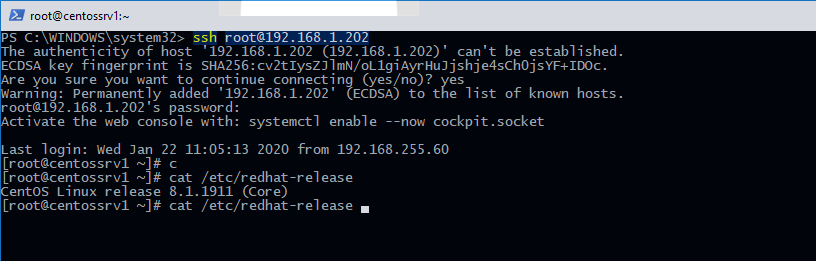
Например, чтобы подключиться к Linux хосту с IP адресом 192.168.1.202 под root, выполните:
ssh [email protected]
При первом подключении появится запрос на добавление ключа хоста в доверенные, наберите yes -> Enter (при этом отпечаток ключа хоста добавляется в файл C:\Users\username\.ssh\known_hosts).
Затем появится запрос пароля указанной учетной записи, укажите пароль root, после чего должна открытся консоль удаленного Linux сервера (в моем примере на удаленном сервере установлен CentOS 8).
С помощью SSH вы можете подключаться не только к *Nix подобным ОС, но и к Windows. В одной из предыдущих статей мы показали, как настроить OpenSSH сервер на Windows 10 и подключиться к нему с другого компьютера Windows с помощью SSH клиента.
Если вы используете SSH аутентификацию по RSA ключам (см. пример с настройкой SSH аутентификации по ключам в Windows), вы можете указать путь к файлу с закрытым ключом в клиенте SSH так:
ssh [email protected] -i "C:\Users\username\.ssh\id_rsa"
Также вы можете добавить ваш закрытый ключ в SSH-Agent. Сначала нужно включить службу ssh-agent и настроить ее автозапуск:
set-service ssh-agent StartupType ‘Automatic’
Start-Service ssh-agent
Добавим ваш закрытый ключ в базу ssh-agent:
ssh-add "C:\Users\username\.ssh\id_rsa"
Теперь вы можете подключиться к серверу по SSH без указания пути к RSA ключу, он будет использоваться автоматически. Пароль для подключения не запрашивается (если только вы не защитили ваш RSA ключ отдельным паролем):
ssh [email protected]
Еще несколько полезных аргументов SSH:
-
-C
– сжимать трафик между клиентом и сервером (полезно на медленных и нестабильных подключениях); -
-v
– вывод подробной информации обо всех действия клиента ssh; -
-R
/
-L
– можно использовать для проброса портов через SSH туннель.
SCP: копирование файлов из/в Windows через SSH
С помощью утилиты scp.exe, которая входит в состав пакета клиента SSH, вы можете скопировать файл с вашего компьютера на SSH сервер:
scp.exe "E:\ISO\CentOS-8.1.1911-x86_64.iso" [email protected]:/home

Можно рекурсивно скопировать все содержимое каталога:
scp -r E:\ISO\ [email protected]:/home
И наоборот, вы можете скопировать файл с удаленного сервера на ваш компьютер:
scp.exe [email protected]:/home/CentOS-8.1.1911-x86_64.iso e:\tmp
Если вы настроите аутентификацию по RSA ключам, то при копировании файлов не будет появляться запрос на ввод пароля для подключения к SSH серверу. Это удобно, когда вам нужно настроить автоматическое копирование файлов по расписанию.
Итак, теперь вы можете прямо из Windows 10 подключаться к SSH серверам, копировать файлы с помощью scp без установки сторонних приложений и утилит.
Step-by-Step Guide to Installing OpenSSH Client on Windows 11
Published
7 min read
How To Install OpenSSH Client On Windows 11 [Tutorial]
OpenSSH is a suite of tools that offers secure communication over a network, primarily utilized for remote login over the SSH protocol. With its growing importance in modern computing environments, particularly for developers, system administrators, and security professionals, knowing how to install and configure OpenSSH Client on Windows 11 is crucial.
In this comprehensive tutorial, we will guide you through every step necessary to install the OpenSSH Client on Windows 11, explaining various aspects along the way. By the end of this article, you will have a clear understanding of the installation process and how to start using OpenSSH.
Understanding OpenSSH
Before diving into the installation process, let’s discuss what OpenSSH is and why it is essential.
OpenSSH provides the ability to secure remote shell access and file transfers through authentication, encryption, and integrity checks. It is widely used in various operating systems, including Unix-based systems, and has been incorporated natively into Windows 10 and Windows 11.
The OpenSSH suite includes:
- ssh: A secure shell client for connecting to remote servers.
- scp: For secure copy over SSH.
- sftp: An interactive file transfer program that uses the SSH protocol.
- ssh-keygen: A tool for generating SSH keys, which enhances the security of SSH connections.
Windows 11, like its predecessor Windows 10, comes with built-in options for installing OpenSSH. The native client is streamlined, easy to use, and integrates well with the Windows operating system. Let’s get started with the installation process.
Checking for OpenSSH Client in Windows 11
Before installing OpenSSH, check if it is already installed on your Windows 11 system. Here’s how to do so:
-
Open the Settings App: Press
Windows + Ito open the Settings app. -
Navigate to Apps: In the Settings window, select the “Apps” section from the left sidebar.
-
Optional Features: Click on “Optional features.” This is where Windows allows users to add various features, including OpenSSH.
-
Look for OpenSSH Client: Scroll through the list of installed features. If you see «OpenSSH Client» listed, then it is already installed, and you do not need to install it again.
If you don’t see the OpenSSH Client on your system, follow the steps below to install it.
Installing OpenSSH Client on Windows 11
Method 1: Using Settings
-
Open the Settings App: Press
Windows + Ito access the Settings menu. -
Navigate to Apps: In the left sidebar, click on “Apps.”
-
Optional Features: Under the Apps section, you will see “Optional features.” Click on it.
-
Add a Feature: At the top of the Optional Features window, click on the “Add a feature” button.
-
Search for OpenSSH Client: In the search box, type “OpenSSH Client.” This will filter the features.
-
Install OpenSSH Client: Once you find “OpenSSH Client,” click the checkbox next to it and then click the “Install” button.
-
Installation Confirmation: Installation will begin, and once it is complete, you will receive a notification indicating that “OpenSSH Client” has been installed successfully.
Method 2: Using Windows PowerShell
If you prefer command-line tools or are more comfortable with PowerShell, you can install the OpenSSH Client using PowerShell:
-
Open PowerShell as Administrator: Right-click on the Start menu (Windows icon) and select “Windows Terminal (Admin)” to open PowerShell with administrative privileges.
-
Check for OpenSSH Client: Before proceeding, check if the OpenSSH Client is already installed using the command:
Get-WindowsCapability -Online | Where-Object Name -like 'OpenSSH.Client*' -
Install OpenSSH Client: If it is not installed, you can proceed with the installation command:
Add-WindowsCapability -Online -Name OpenSSH.Client~~~~0.0.1.0 -
Wait for Installation: After you enter the command, the PowerShell will begin the installation process. Wait until the process completes.
-
Verify Installation:
To confirm that the installation was successful, you can check again with:Get-WindowsCapability -Online | Where-Object Name -like 'OpenSSH.Client*'
Method 3: Using Windows Command Prompt
Alternatively, you can use the Command Prompt to install OpenSSH Client:
-
Open Command Prompt as Administrator: Right-click on the Start menu and select “Windows Terminal (Admin)” or “Command Prompt (Admin).”
-
Use DISM to Install:
Enter the following command to install:DISM /Online /Add-Capability /CapabilityName:OpenSSH.Client~~~~0.0.1.0 -
Wait for Installation: The installation may take a few moments.
-
Check Installation:
You can verify the installation by executing the same command used in PowerShell:Get-WindowsCapability -Online | Where-Object Name -like 'OpenSSH.Client*'
Configuring OpenSSH Client on Windows 11
After the installation is successful, there are a few configurations you might consider and understand how to use OpenSSH effectively.
Generating SSH Keys
Using SSH keys for authentication is more secure than traditional passwords. To generate SSH keys in Windows 11:
-
Open PowerShell or Command Prompt: Right-click on the Start menu and launch ‘Windows Terminal’ or ‘Command Prompt.’
-
Generate SSH Keys: Enter the following command:
ssh-keygen -
Follow Prompts: You will be prompted to specify a file to save the key. By default, it saves to
C:Users\.sshid_rsa. You can press Enter to accept the default path. -
Set a Passphrase (Optional): You may also set a passphrase for an extra layer of security. If you don’t want to set one, just press Enter.
-
Complete the Process: Your keys will be generated, and you will see output indicating where your public and private keys are stored.
Copying SSH Key to Remote Server
To use your SSH keys for remote connections, you must copy the public key to the remote server:
-
Use SCP to Copy Public Key: Use the following command to transfer your public key to the remote server. Replace
andwith your appropriate remote server credentials.type $env:USERPROFILE.sshid_rsa.pub | ssh @ "mkdir -p ~/.ssh && cat >> ~/.ssh/authorized_keys" -
Verify: Log into your remote server to ensure that you can authenticate using your SSH key without requiring a password.
Using OpenSSH Client
Now that the OpenSSH Client is installed and configured, you can use it to connect to remote servers:
Connecting to a Remote Server
To establish a connection to a remote server using OpenSSH:
-
Open Command Prompt/PowerShell: Launch Windows Terminal or PowerShell.
-
Use SSH Command: Use the following format:
ssh @For example, if your username is “user” and the remote host is “example.com,” the command would be:
ssh [email protected] -
Accept Host Key: The first time you connect, you will receive a prompt to accept the server’s host key. Type “yes” and press Enter.
-
Enter Password (If Needed): If you haven’t set up SSH key authentication, you’ll be prompted to enter your password.
-
You’re In!: If the credentials are correct, you will be connected to the remote server, and you can start executing commands remotely.
Transferring Files
You can also securely transfer files to and from the remote server using scp:
-
Copying from Local to Remote:
scp @: -
Copying from Remote to Local:
scp @:
Troubleshooting Common Issues
While the installation and configuration process is straightforward, you may encounter some common issues. Here are solutions to a few:
-
SSH Command Not Found: If you receive a message indicating that the
sshcommand is not recognized, it means that the OpenSSH Client is not installed correctly. Verify the installation using the methods discussed. -
Connection Timeout: If you’re unable to connect to the remote server, confirm that you are using the correct IP address or hostname. Ensure that the server is running and is accessible through your network. Network configurations, such as firewalls, may block the connection.
-
Authentication Failures: If authentication fails, ensure that you are using the correct username and password. If you’re using SSH keys, confirm that the public key has been copied to the
~/.ssh/authorized_keysfile on the server. -
Permission Denied Errors: If you see permission denied errors when trying to access directories or files, ensure that the user account you’re using has the necessary permissions on the remote server.
Conclusion
Installing and configuring the OpenSSH Client on Windows 11 is a vital step for enhancing security and enabling remote connectivity in various applications. In this tutorial, we have covered the installation methods, key generation, and usage of the OpenSSH Client, as well as troubleshooting common issues.
As remote work and secure communications continue to gain importance, mastering OpenSSH will equip professionals with the tools necessary to operate more effectively across diverse environments. Whether you are a developer, IT professional, or someone interested in improving security practices, OpenSSH serves as a fundamental skill in your toolkit.
Take the knowledge you have gained and start using OpenSSH on your Windows 11 system. Happy connecting!
- OpenSSH for Windows allows you to securely access remote computers with Windows-native tools using the command line interface.
- To install OpenSSH Client and Server on Windows, go to Settings > System > Optional features > View features, search for “OpenSSH“, and continue to install the components.
Windows users normally use the Remote Desktop Protocol to access other Windows devices remotely. As RDP offers a remote graphical user interface (GUI), it is a convenient method for remote access. However, it offers limited functionality, especially if you are a sysadmin. For that purpose, some people prefer to use the Secure Socket Shell (SSH) protocol.
SSH provides a command-line interface to remote computers and servers, and therefore, a more granular control over them. Previously, we used third-party apps like “PuTTY” and “MobaXterm” to develop an SSH connection with the remote devices. However, Microsoft has made a Windows-native SSH client available which can be used instead.
OpenSSH for Windows is a Feature on Demand (FoD) add-on for the Windows operating system. This means that although it is free, it is not installed by default, and needs to be installed manually. If you install it, you can use the SSH protocol through the native command line to access and control the remote computers, provided that your user account has the required privileges.
This guide will show you how to install and use OpenSSH for Windows. These will work on both Windows 11 and Windows 10 (version 1809 and above). Using this guide, you can install both OpenSSH Client and OpenSSH Server in a few easy steps.
Table of Contents
What is OpenSSH
The Secure Socket Shell, or Secure Shell is a networking protocol that allows a remote connection with another device securely. SSH uses a client-server model to communicate with remote computers and ensures data integrity through encryption. It uses multiple layers of the OSI reference model to make sure that the communicated data between the devices is secure.
Originally, OpenSSH was a tool used for remote connection with other devices which comes preinstalled in Linux-based operating systems. Since it is an open-source utility, it has been modified for other platforms, including Windows.
Microsoft has now made “OpenSSH for Windows” available that you can install with a small update package.
Before installing OpenSSH, your system needs to meet a few requirements.
Requirements for OpenSSH for Windows
Before proceeding to install either OpenSSH Client or Server, you must make sure that your PC satisfies the prerequisites, which are:
- OS should be Windows 10 version 1809 or later.
- The PowerShell version should be 5.1 or above
- The user account must be a member of the Administrators group.
To check the OS version, run the following command in the Run Command box:
WinVerTo check the PowerShell version, run the following command in PowerShell:
$PSVersionTable.PSVersionTo check if your user is a member of the Administrators group, run the following command in PowerShell. If it returns “True“, it means that you are a member of the Administrator group.
(New-Object Security.Principal.WindowsPrincipal([Security.Principal.WindowsIdentity]::GetCurrent())).IsInRole([Security.Principal.WindowsBuiltInRole]::Administrator)Once you have made sure that your PC satisfies these requirements, you may continue to install OpenSSH Client, OpenSSH Server, or both.
Install OpenSSH on Windows
Implement the following steps to install OpenSSH on your Windows computer to access it remotely. Optionally, you can also install “OpenSSH Server” to access this device from another PC using the SSH protocol.
-
Press the Windows key + i to open the Settings app.
-
Click System.
-
Go to “Optional Features“.

Open the optional features settings page -
Click “View features“.
View optional features -
Search for “OpenSSH“.
-
Select “OpenSSH Client” and optionally, “OpenSSH Server“, and then click Next.
Select OpenSSH Client and Server -
Click Install.
Install OpenSSH Client and Server on Windows


After performing these steps, OpenSSH Client (and Server) will be installed on your computer.
Note: These features can take some time to install.
Alternative to the steps above, you can also run the following command in an elevated PowerShell instance to install OpenSSH for Windows:
Get-WindowsCapability -Online | Where-Object Name -like 'OpenSSH*'This command will install both OpenSSH Client and OpenSSH Server.
Using OpenSSH Client for Windows
Once OpenSSH Client for Windows has been installed, you can begin using it to connect with remote PCs on the network. Of course, OpenSSH has to be configured on the remote PC first, the method for which has been given below in this post.
First, confirm that it has been installed successfully by running the following command in Command Prompt:
ssh
Once confirmed, you can access a remote PC on the network which has SSH configured using this command:
ssh [Username]@[ServerName]
Note: You may be asked for user credentials if connecting for the first time.
Note that the command above will try to connect to the remote device using the default port, which is 22. If you want to use a different port, then you will need to use this command instead:
ssh [Username]@[ServerName] -p [PortNumber]
Configuring OpenSSH Server for Windows
If you have installed the OpenSSH Server on your Windows PC, you will need to configure it before you can connect to this PC using the SSH protocol.
Configuring the OpenSSH server can be a bit thicker. You need to make sure that it is allowed through the firewall and the proper ports. Therefore, it involves a few steps. Here is what you need to do:
-
First, run the following command in an elevated PowerShell to run the “sshd” service automatically.
Set-Service -Name sshd -StartupType 'Automatic' -
Now start the service with this command:
Start-Service sshd -
Now use the following command to ensure that the SSH server is running and waiting for the connections on port 22:
netstat -na| find ":22" -
Now ensure that the Windows Defender Firewall allows inbound connections to Windows through the TCP port 22 with this command:
Get-NetFirewallRule -Name *OpenSSH-Server* |select Name, DisplayName, Description, Enabled
Confirm rules for SSH server connection -
[Conditional] If you find that the rule is missing or disabled, run the following command to create a new inbound rule:
New-NetFirewallRule -Name sshd -DisplayName 'OpenSSH Server (sshd)' -Enabled True -Direction Inbound -Protocol TCP -Action Allow -LocalPort 22 -
To change the default rules for the SSH connection, run the following command in PowerShell which will open the respective OpenSSH file in Notepad:
start-process notepad C:\Programdata\ssh\sshd_config -
Make the necessary changes in the file to manage the permissions, and then save the file using the CTRL + S shortcut keys.
Here are a few examples of the rules:
- Deny domain user:
DenyUsers itt\administrator@192.168.10.10 - Allow a domain group:
AllowGroups itt\sshadmins - Allow local groups:
AllowGroups Administrators

Manage SSH permissions - Deny domain user:
-
After making the changes, run the following command in PowerShell:
restart-service sshd


After performing the steps above, you should be able to connect to this PC using the SSH protocol. For that purpose, use the command ssh [Username]@[ServerName] as discussed above.
Conclusion
With SSH, you do not need to perform a long string of operations to perform a simple task. Instead, you can access it with Windows-native OpenSSH and continue to manage the remote PC using commands. This makes OpenSSH for Windows an excellent utility for network and system administrators.
Прочитано: 3 772
В виду того факта, что теперь рабочая система на работе – это как правило Windows 10 Pro x64, то нужно как-то выходить из ситуации когда нужно подключаться к оборудованию или системам Ubuntu Bionic по безопасному каналу. Можно это делать, либо скачивать и использовать клиент Putty, либо же обойтись тем что имеет в своем распоряжении сама система Windows 7 Pro amd64
Текущая система:
- Windows 10 Pro x64 Russian
- Version 10.0.17134.112
Запускаю консоль PowerShell с правами локального администратора:
Win + X → Power Shell (Admin)
PS C:\Windows\system32> get-windowscapability -online | ? Name -like 'OpenSSH*'
Доступна клиентская часть SSH для установки если нужно
Name : OpenSSH.Client~~~~0.0.1.0State : Installed
Доступна серверная часть SSH для установки если нужно
Name : OpenSSH.Server~~~~0.0.1.0State : NotPresent
Мне нужен клиент, потому и устанавливаю:
PS C:\Windows\system32> Add-WindowsCapability -online -name OpenSSH.Client~~~~0.0.1.0
Path :Online : TrueRestartNeeded : False
Из вывода видно, что клиент SSH установлен, перезагружать систему не требуется:
PS C:\Windows\system32> ssh
usage: ssh [-46AaCfGgKkMNnqsTtVvXxYy] [-b bind_address] [-c cipher_spec]
[-D [bind_address:]port] [-E log_file] [-e escape_char]
[-F configfile] [-I pkcs11] [-i identity_file]
[-J [user@]host[:port]] [-L address] [-l login_name] [-m mac_spec]
[-O ctl_cmd] [-o option] [-p port] [-Q query_option] [-R address]
[-S ctl_path] [-W host:port] [-w local_tun[:remote_tun]]
destination [command]
Пробую подключиться к Ubuntu 18.04 Server amd64 с Windows 10 используя установленный нативный ssh клиент:
PS C:\Windows\system32> ssh -l ekzorchik 192.168.100.143 -p 22
The authenticity of host '192.168.100.143 (192.168.100.143)' can't be established.
ECDSA key fingerprint is SHA256:BQTN+Vc7LxC1zGeHc9oZRskg1ECaI/bELDUL8L3GJsw.
Are you sure you want to continue connecting (yes/no)? yes
Warning: Permanently added '192.168.100.143' (ECDSA) to the list of known hosts.
ekzorchik@192.168.100.143's password:
Welcome to Ubuntu 18.04.1 LTS (GNU/Linux 4.15.0-29-generic x86_64)
* Documentation: https://help.ubuntu.com
* Management: https://landscape.canonical.com
* Support: https://ubuntu.com/advantage
System information as of Wed Oct 31 11:20:42 MSK 2018
System load: 0.16 Processes: 96
Usage of /: 7.6% of 48.02GB Users logged in: 1
Memory usage: 8% IP address for enp0s3: 192.168.100.143
Swap usage: 0%
28 packages can be updated.
7 updates are security updates.
Last login: Wed Oct 31 11:20:05 2018
ekzorchik@srv-bionic:~$
Работает. Можно и не ставить/скачивать клиент Putty. Правда в Putty больше возможностей чем в средствах операционной системы Windows 10 Pro или я не прав и это только по моему не знанию. Ладно, заметка имеет место быть, как расширение кругозора. На этом я прощаюсь, с уважением автор блога Олло Александр aka ekzorchik.
Introduction:
OpenSSH is a free, open-source, secure remote connections tool from your Windows system. It lets you access servers remotely in a secure manner, transfer files securely, Install OpenSSH on Windows OpenSSH Windows with this step-by-step guide. Follow these simple instructions to set up secure remote connections., all through an encrypted SSH protocol. By the way, whether you work in IT, are a software developer, or want to access your system from afar, OpenSSH is a must.
What is OpenSSH for Windows?
OpenSSH for Windows is an open-source suite of secure networking utilities that lets you establish encrypted connections between your local Windows machine and a remote server. It supports the Secure Shell protocol for safe communication across networks. Users can manage systems, transfer files, and run commands over a network, with security never compromised in these operations.
Thanks to the integration of OpenSSH in Windows, Install OpenSSH on Windows. Whether it’s a developer, an admin of the systems, or just needing remote access, OpenSSH is the perfect tool to reliably and securely interact with different systems across various platforms.

Getting OpenSSH for Windows Started
Getting SSH open and running for Windows has always been challenging. Now, if you have Windows 10 and above, there is good news for you. Open SSH will already be installed natively on your Windows, so you will not be required to download any further applications. Install OpenSSH on Windows from the system settings.
Launch the Apps & Features Settings app and tap on Optional Features. Scroll down to see OpenSSH Client and OpenSSH Server; install these features if Installed OpenSSH Windows. You should now be able to use SSH commands to securely connect to your remote servers, run commands, and transfer files from your Windows terminal.
In-built Commands of OpenSSH for Windows
SSH:
The SSH protocol allows you to connect securely to the remote system and control the remote server from your local machine.
SCP:
SCP securely copies files between local and remote systems, which means it transfers the file with encryption.
SFTP:
It is an FTP-like interface that transfers files securely using SSH for communication.
Ssh-keygen:
Creates the SSH key pair to store your password-free authentication, increasing security for remote logins.
Ssh-agent:
manages and caches private keys so that key-based authentication can be achieved automatically without re-entering keys.
Ssh-add:
Provides your private key to the SSH agent, making it easy to utilize key-based authentication across sessions.
Useful Resources for OpenSSH
Whether you’re new to OpenSSH or just looking to expand your knowledge, you’ll find plenty of resources to help you. An excellent resource is the official documentation from Microsoft, and you want to start there with Install OpenSSH on Windows. You can head directly to Microsoft Docs.
The OpenSSH Project website is another vital resource. It contains detailed information for configuring, advanced usage, and security practices. Specific community support is best gained through forums such as Stack Overflow and GitHub discussions by others using OpenSSH.
Configure OpenSSH Server on Windows
In settings, Go to Settings > Apps & Features > Optional Features. Scroll down to find the OpenSSH Server and tap on Install if it has not been enabled already.
Start OpenSSH Service
Once installed, open services by typing them. msc into your search bar. Tap on OpenSSH Server, right-click, and select the Start option. Alternatively, you can configure it to Automatic to automatically start when Windows starts.
Open Windows Firewall, click Advanced Settings and select Inbound Rules. You will now create a new rule allowing traffic through Port 22, the default SSH port.
Configure SSH settings
Open sshd_config located at C:\\ ProgramData\\ssh. Here, you can set settings such as the authentication methods, port number, and root login permissions to suit your needs.
Test SSH Connection:
Use the following command in another machine to check whether your server is correctly configured and accepts connections: ssh username@your_ip_address.
Uninstall OpenSSH from Windows
Open Settings:
You will need to open the Settings application on your Windows computer. Access is possible through the Start menu by clicking on the gear icon.
Go to Apps:
Now, in the window for Settings, click on Apps > Optional Features. This is a list of features on your system that have been installed.
Locate OpenSSH:
Scroll down this list to find OpenSSH Client and OpenSSH Server. You can safely remove both if you want to remove the OpenSSH features altogether.
Key-Based Authentication with OpenSSH on Windows
Create SSH Key Pair
Open a command prompt or PowerShell window and type ssh-keygen. This will guide you through accepting a location for your key (the defaults are usually fine) and, optionally, input a passphrase to lock it down further.
Locate Your Public Key:
Once you have generated your key pair, find your user profile – e.g., this could be C:\Users\YourUsername\.ssh\, where you’ll find your public key file, id_rsa.pub.
Copy Your Public Key to the Server
You’ll use the ssh-copy-id username@your_server_ip command to copy your public key to the remote server. This will prompt you to enter your password and add the key to ~/.ssh/authorized_keys on the server.
Edit SSH Configuration if Needed
For other key-based authentication in your server, edit the file C:\ ProgramData\ ssh\ sshd_config if it requires any specific configuration. Do not forget to set PubkeyAuthentication and AuthorizedKeysFile .ssh/authorized_keys to yes:
PubkeyAuthentication yes
AuthorizedKeysFile .ssh/authorized_keys
Test Key-Based Authentication:
When you attempt to connect to your server using the SSH username@your_server_ip command, if everything is done correctly, you will enter your server without typing your password!
How to Install and Activate OpenSSH for Windows
Open Settings:
Click on the Settings button from the Start menu or use the Windows + I keyboard shortcut to open it.
Go to Apps:
In the Settings window, click on Apps and then click on Optional features. This is the place where you can control additional features that Windows offers.
Add a Feature:
At the top right, click Add a feature. This will bring up a list of optional features available for installation.
Locate OpenSSH Client and Server:
Scroll through the list to find both OpenSSH Client and OpenSSH Server. You can use the search bar to get results faster.
Install OpenSSH:
Select both OpenSSH Client and OpenSSH Server, then click Install and wait a few moments for the installation to complete.
Enabling the OpenSSH Client on Windows 10
Access Settings:
Instead of searching for it in the start menu, you can tap the Windows key + I keys to open it quickly.
Apps:
In the Settings window, click on Apps. This will take you to the apps and features section.
Optional Features:
On the left sidebar, click Optional Features to see what features are installed on your Windows system.
Add a Feature:
Click the button at the top and add a feature. This will lead to a drop-down menu with a list of all features that you may install on your system.
OpenSSH Client:
Search through the list for OpenSSH Client or use the search bar. It should be included in the list of optional features.
How to Log in to Windows Server via SSH
Step 1. Open Command Prompt or PowerShell
Open the Command Prompt or PowerShell from your local machine. You can search for “cmd” or “PowerShell” within the Start menu.
Step 2.Execute the SSH Command
Execute the SSH command by the syntax shown below:
ssh username@server_ip
Here, replace the username with your actual username on your Windows Server and the server_ip with the actual server’s IP address or its hostname.
Enter Your Password:
After typing the command, you will be prompted to enter your password. Enter your password and then tap the Enter key. Be aware that, for security reasons, you won’t see characters appear on your screen as you type them.
Accept the Host Key:
You may be prompted to accept the server host key the first time you connect. You have to answer yes and then enter. This will ask once for a secure connection.
Access the Server:
Once authenticated, you will be logged into the Windows Server through SSH. From here, you can execute your commands or manage the server as necessary.
Conclusion:
One of the benefits of adopting OpenSSH in Windows is improving your computing experience. You will, hence, easily control your servers from a distance while transferring files without losing security. You are thus able to have key-based authentication and secure tunneling. Key features, such as powerful functionality in the routine workflow under OpenSSH, are enjoyed.
FAQs:
What is OpenSSH?
OpenSSH is a set of tools for accessing and running applications remotely over a network on other computers and servers. This suite provides encryption to ensure safe communication when transmitting data.
How do I get OpenSSH installed for Windows?
You can get OpenSSH from the Settings application. First, go to Settings > Apps > Optional features and then click the Add a feature under it to find and install OpenSSH Client and Server.
Can I use OpenSSH when no internet is available?
Absolutely, since once installed, one may use OpenSSH without an internet connection for a local connection. However, remote connections would require an internet or network connection.
What are the options or commands available on OpenSSH?
Some of the built-in commands available in the tool include the command SSH to access the server, SCP to securely transfer files between computers, and sftp, which can be used for file management.
Is OpenSSH safe?
Absolutely! OpenSSH implements robust encryption protocols, so you know the connection is safe, and you are truthful-you can trust it for access and file transfers from elsewhere.
Latest post:
- How to convert the putty key to openssh windows?
- How to openssh via terminal windows?
- How to change default sftp location in openssh windows?
- What is the difference between OpenSSH and PuTTY?
- How to Install OpenSSH on Windows?