
At Cardinal Peak, we’re big fans of GStreamer, a very good open-source multimedia framework supported on almost every platform conceivable, including Linux, OS/X, Android, iOS, and even tiny clients like Raspberry Pi.
What is GStreamer Used For?
The framework is largely utilized to create media applications (streaming, media playback, nonlinear editing, etc.). Designed to simplify the writing of applications that handle audio or video or both, GStreamer uses plug-ins that provide various codec and other functionalities to process streaming content.
Providing well-tested elements to meet many challenging engineering needs, GStreamer makes application development easy. Plus, the framework counts with an extensive list of multimedia plug-ins (encoders, decoders, content filters, etc.) and allows for uncomplicated third-party integration.
Recently, we’ve needed to use GStreamer on a couple of Windows projects. Because we use advanced features of GStreamer — such as multiple synchronized video feeds with synchronized audio — we want to be able to build the Gstreamer libraries from source in case we uncover a bug under advanced scenarios that might affect our client.
Introduction to the GStreamer Windows Setup
Unfortunately, building GStreamer on Windows is fairly complex, and the existing Gstreamer windows deployment instructions available on the web are woefully out of date. I recently worked through the legacy instructions, updating, correcting and augmenting them to ultimately build GStreamer-1.0 (1.8.0) on Windows. The end result was a successful build of the GStreamer Windows MSI and merge module release artifacts. (Thank you to the current maintainers of GStreamer, who provided helpful advice along the way.)
Building GStreamer on Windows is not for the faint of heart! But if you need to build it from source, this GStreamer tutorial should help you out.
Note that the software is built in the Unix/POSIX-compatible MingGW/MSYS subsystem for Windows, so the instructions below assume at least some basic familiarity with Unix conventions.
Prerequisites for Installing GStreamer on Windows
This GStreamer install was tested on:
- Windows 10 Professional
- Windows 7 Professional
- Using Visual Studio 2015 Community and Microsoft Windows SDK/DDK 10
The below assumes you are on 64-bit, building for 64-bit, and your Windows username does not contain spaces.
Git
When using GStreamer in Windows, Git can be added as part of VS 2015 or installed stand-alone.
Microsoft Visual Studio and GStreamer SDK for Windows
These instructions for installing GStreamer on Windows used:
- Visual Studio 2015 Community
- Windows SDK 10 (which includes DDK 10)
The instructions should also work with:
- SDK/DDK 7.1 or later (which may be a manual download/install for earlier versions of VS)
- Visual C++
- Add as part of VS 2015 (Tools 1.x + Windows SDK 10)
Note that the build does not use the Microsoft C/C++ compiler but will need the Visual C++ libraries installed.
GST Build Windows Downloads Needed
Python 2.7
Git (if not already installed, e.g., integrated in VS)
MinGw/MSYS
CMAKE
– Windows Installer: msi
YASM
– Win64.exe (note: this will be renamed/copied later)
WIX (3.5)
– wix35.msi
GStreamer Installation Steps
- Install Visual Studio 2015 Community (or greater)
– Make sure to add prerequisites in the components dialog.
– You can try using an earlier version of VS. - Install Python to C:\Python27
– Install for all users.
– Add Python.exe to Path. - Install CMake
– Add CMake to the System Path for all users.
– Suggested to install to C:\CMake. - Install Wix
– You may get a warning that Votive cannot be installed to Visual Studio; this is harmless.
MinGW/MSYS
This installation is quite involved, please follow the steps carefully. The later Cerbero build steps will automatically download the necessary components of MinGW/MSYS, so you don’t need to worry too much here.
- Install MinGW/MSYS Installation Manager
- When the Installation Manager opens at the end, select the following items in the “Basic System”:
- MinGW-developer-toolkit
- MinGW32-base
- MinGW32-gcc-c++
- msys-base
- Click Installation\Apply Changes.
- Click Apply.
This process will take many minutes to finish.
YASM
Copy the YASM file you downloaded earlier (example name below) to:
yasm-1.3.0-win64.exe to C:\MinGW\bin
Rename to:
yasm.exe
Make a shortcut icon on the desktop, taskbar or start menu:
target: C:\MinGW\msys\1.0\msys.bat
Run as administrator. When you run this (as administrator) for the first time, it will create:
\C:\MinGW\msys\1.0\home\<username>
This is where you will add a .profile file and where you will build Cerbero.
Note that it is not known if the MinGW subsystem accepts Windows line endings.
It is suggested you use Notepad++ (or a similar programmer editor) and set EOL (line endings) to Unix if you edit files in MinGW (use menu Edit\EOL Conversion\Unix).
Create fstab. You can copy:
copy C:\MinGW\msys\1.0\etc\fstab.sample to fstab
Make sure it has this line enabled:
c:/mingw /mingw
Create a file in ~/.cerbero/cerbero.cbc with the following lines:
Note that parallel builds do not work (as of 1.8.0), so don’t enable that option.
Import os from cerbero.config import Platform, Architecture, Distro
target_arch = Architecture.X86_64
You must now set up the following inside your C:\MinGW installation (run the msys shell as Administrator). Create a ~/.profile file:
$ echo “export PATH=\”\$PATH:/c/Python27\”” >> ~/.profile
$ echo “alias cerbero=’~/cerbero/cerbero-uninstalled’” >> ~/.profile
Set wget to not check certificates:
$ echo “check_certificate=off” >> ~/.wgetrc
Git Config
You need to set up the following items otherwise they halt the build process.
Note that Git run inside the MinGW shell doesn’t pick up settings from Git Windows.
$ git config -global user.email “[email protected]”
$ git config -global user.name “Your Name”
$ git config -global core.autocrlf false
Cerbero and GStreamer
The following basic steps will be done to build a specific version of GStreamer. The recipe files in the version of Cerbero you check out will by default build the same version of GStreamer. (Cerbero and recipe files are beyond the scope of this section.)
Note that the entire process can take MANY hours, so be prepared!
- List the available branches and tags of GStreamer.
- Clone the desired version you want into your msys home folder.
- Run the “bootstrap” process, which builds Cerbero (this can take hours).
- Build GStreamer (this can take many hours!).
Open the msys shell in Administrator mode. List the available builds:
$ git ls-remote http://cgit.freedesktop.org/gstreamer/cerbero
Check out a specific build or tag (this uses tag 1.8.0):
$ git clone -b 1.8.0 http://cgit.freedesktop.org/gstreamer/cerbero
Run bootstrap:
$ cd cerbero
$ cerbero -c config/win64.cbc bootstrap
WARNING: This could take several hours!
Finally, build GStreamer!
$ cerbero -c config/win64.cbc package gstreamer-1.0
WARNING: This could take up to eight hours or more.
The output artifacts can be found in:
C:\MinGW\msys\1.0\home\<username>\cerbero
gstreamer-1.0-devel-x86_64-<version>.msi
gstreamer-1.0-x86_64-<version>.msi
gstreamer-1.0-x86_64-<version>-merge-modules.zip
Does GStreamer Work on Windows?
Phew! So many steps and lots of waiting, but hopefully you learned a few useful things along the way. Long story short, yes, building GStreamer on Windows is possible, and since GStreamer is a multiplatform framework, you can run the same code for Windows as you would Linux, OSx, Android or iOS.
Now, get cracking on building (or porting!) your awesome GStreamer-based software to Windows. (Rumor has it that the Windows operating system has a substantial user base.) If you need help installing GStreamer on Windows or designing audio/video products, tap our expertise!
Содержание
- Знакомство с GStreamer: инициализация
- Среда разработки
- Инициализация
- Деинициализация
- Практика
- Заключение
- Материалы по теме
- Читают сейчас
- Редакторский дайджест
- Похожие публикации
- Как разработать аналог Zoom для ТВ-приставок на RDK и Linux. Разбираемся с фреймворком GStreamer
- Пишем плагин для GStreamer на MS Visual Studio
- Знакомство с GStreamer: Источники данных
- Заказы
- Минуточку внимания
- Комментарии 2
- Знакомство с GStreamer: Источники данных
- Вступление
- Поехали
- Пояснения
- Примеры
- Ну вот и все
- Литература
- Installing on Windows
- Supported platforms
- Prerequisites
- Download and install GStreamer binaries
- Configure your development environment
- Building the tutorials
- Running the tutorials
- Creating new projects manually
- Include the necessary GStreamer Property Sheet
- Remove the dependency with the Visual Studio runtime
- Creating new projects using the wizard
- Пишем плагин для GStreamer на MS Visual Studio
Знакомство с GStreamer: инициализация
Чуть больше года назад пользователь POPSuL опубликовал серию статей (1, 2 и 3) о мультимедийном фреймворке GStreamer (за что ему огромное спасибо). Я бы хотел продолжить его начинание, сделав больший упор на кодовую составляющую, нежели на инструменты командной строки, входящие в состав GStreamer.
В данной статье я расскажу о самой первой операции при работе с фреймворком — инициализации. А в качестве закрепления материала мы напечатаем версию GStreamer.
Среда разработки
Пример из статьи выполнен в Ubuntu 14.04 c установленным GStreamer версии 1.2.4. Компиляция выполняется следующим образом:
Также в исходном файле должен быть подключен заголовочный файл:
Инициализация
Перед использованием библиотек GStreamer их нужно инициализировать. Для этого существуют две функции:
Обе они подготавливают внутреннюю структуру библиотек к использованию и подгружают стандартные плагины. Разница лишь в том, что при невозможности инициализации gst_init() прервет выполнение вашей программы, а gst_init_check() вернет FALSE и отправит отчет в структуру GError.
Деинициализация
Вообще процесс деинициализации (т.е. освобождения ресурсов) происходит автоматически, когда программа завершает свою работу. Однако нелишним будет знать, что можно сделать это и вручную, с помощью функции:
Это может понадобиться при отладке приложения, например для поиска утечек.
Важно! После деинициализации никаких обращений к библиотеке GStreamer быть не должно (кроме, разумеется, повторной инициализации).
Практика
Для закрепления теоретического материала напишем приложение, которое выводит версию библиотеки GStreamer. В данном контексте существует два понятия версии:
Для второго варианта используются следующие макросы:
Все вышесказанное сведено в следующий пример:
Компилируем и запускаем:
Заключение
В следующей статье постараюсь подробно описать процесс создания элементов и компоновки из них конвейера (pipeline), а в практическом разделе попробуем создать что-нибудь поинтереснее.
Материалы по теме
AdBlock похитил этот баннер, но баннеры не зубы — отрастут
Читают сейчас
Редакторский дайджест
Присылаем лучшие статьи раз в месяц
Скоро на этот адрес придет письмо. Подтвердите подписку, если всё в силе.
Похожие публикации
Как разработать аналог Zoom для ТВ-приставок на RDK и Linux. Разбираемся с фреймворком GStreamer
Пишем плагин для GStreamer на MS Visual Studio
Знакомство с GStreamer: Источники данных
Заказы
AdBlock похитил этот баннер, но баннеры не зубы — отрастут
Минуточку внимания
Комментарии 2

Признаюсь, несколько лет был, что называется, очарован этим набором библиотек, применял его и в своих личных, и в рабочих проектах, старался при любой имеющейся возможности предпочитать GStreamer пересекающимся по предметной области ffmpeg/libav. Привлекает и красивая концепция конвейера, и модульная архитектура, и с виду грамотное разделение API на уровни, когда для клиентского использования нет необходимости залезать во внутренности. Но, к сожалению, реализация сильно подкачала. Тут и огромное количество ошибок и «белых пятен» в элементах, и противоречивость некоторых частей API, и тёмные стороны в тонкостях работы конвейера. Фактически, начав писать какой-нибудь простенький плеер ты в определённый момент осознаёшь себя отлаживающим глубокие внутренности какого-нибудь элемента, который вроде бы должен был просто работать.
Разработчиков винить трудно, судя по опыту взаимодействия и их выступлениям, это действительно высококлассные специалисты. Проблема, наверное, в выборе языка C для продукта такого уровня сложности при ограниченном количестве активных разработчиков. Красноречиво об этом свидетельствует, например, функция set_name для GstObject, сама занимающая около 40 строк, вызывающая в них другую, «рабочую» функцию ещё на 50 строк, при этом они несколько раз захватывают и отпускают мьютексы не самым очевидным на свете образом и делают другие интересные вещи. В общем, чаще всего ситуация выглядит как «должно работать, но не работает». Так что в последнее время я хоть и по-прежнему люблю GStreamer, но уже с осторожностью.
В любом случае, спасибо автору за статью и интерес к этому мультимедийному фреймворку.
Только полноправные пользователи могут оставлять комментарии. Войдите, пожалуйста.
Источник
Знакомство с GStreamer: Источники данных
Здравствуй, хабраюзер, интересующийся фреймворком GStreamer! Сегодня мы поговорим о источниках медиа-данных (sources), и тем самым продолжим курс статей посвященный GStreamer.
Вступление
Источники данных — это класс плагинов GStreamer который позволяет читать медиаданные из различных источников, таких как файловая система или аудио-входы звуковой карты. Также, они позволяют получать медиапоток с различных серверов потокового вещания, такие как HTTP (ICECast, ShoutCast), RTSP, RTMP, TCP и UDP. А еще имеется возможность читать данные с DVB карт, CDDA-дисков (народе известных просто как «компакт-диски»), и еще много всего, при помощи различных плагинов, которых на данный момент около 30.
Примечание: как говорилось в прошлой статье, источники данных имеют только один pad с названием src, так как его можно подключить к другому элементу, но к нему подключить ничего нельзя.
В этой статье мы разберем некоторые (пожалуй, наиболее востребованные) источники данных, напишем немного кода на Python и узнаем много нового.
Поехали
0. gst-launch-1.0
Утилита gst-launch-1.0 позволяет запускать GStreamer pipeline без написания единой строчки кода. Я буду ее использовать для запуска небольших примеров, и что нам требуется знать сегодня — так это то, что запуск pipeline имеет примерно такой вид:
а описание pipeline, в свою очередь, делится на описание элементов вида
Вроде в этой схеме все понятно, есть элемент типа element1 с свойствами property1 и property2 которые имеют значения value1 и value2 соответственно, и есть элемент типа element2. Символ «!» указывает на то, что выход element1 необходимо соединить с входом element2.
На этом возможности gst-launch не ограничиваются, просто в сегодняшней статье они нам не пригодятся и будут рассмотрены в дальнейшем.
1. filesrc
filesrc — на мой взгляд, это самый часто используемый источник мультимедийных данных. Как можно понять из его названия, он является элементом для чтения данных из файлов. В прошлой статье мы рассматривали схему примитивного плеера, в котором фигурировал filesrc как источник данных.
Элемент filesrc имеет несколько параметров. Рассмотрим некоторые из них.
location
Свойство location должно содержать путь к файлу, из которого необходимо производить чтение.
Пример: /foo/bar.mp3
blocksize
Данный параметр устанавливает размер буфера чтения. Значение должно быть описано беззнаковым числом.
num-buffers
Количество блоков, после прочтения которых будет отправлено сообщение EOS.
Свойства blocksize и num-buffers можно не указывать. В этом случае будут использованы значения по умолчанию. А еще указанные свойства имеются у всех источников данных, и далее рассматриваться не будут.
Пример использования источника filesrc возьмем из предыдущей статьи:
2. souphttpsrc
Элемент souphttpsrc предоставляет возможность чтения данных поверх HTTP (HTTPS) протокола. Чтение может производиться как из обычного файла, доступного через HTTP протокол, так и с ICECast/ShoutCast сервера. Также данный элемент позволяет производить чтение данных поверх протоколов ICY и ICYX. По данным протоколам я никакой информации найти не смог.
souphttpsrc имеет чуть больше параметров чем filesrc, рассмотрим наиболее важные.
location
Данный параметр аналогичен одноименному параметру элемента filesrc, за исключением того, что поддерживаются только схемы URI http, https, icy или icyx.
user-agent
Название говорит само за себя — данный параметр устанавливает, какой использовать User-Agent при отправке HTTP-запросов.
automatic-redirect
Устанавливает автоматический переход в случае, если сервер ответил, что ресурс был перемещен (статусы 301 и 302).
user-id и user-pw
Данные свойства устанавливают имя пользователя и пароль, на случай, если ресурс требует авторизации (HTTP Basic Authentication).
proxy, proxy-id и proxy-pw
Данные свойства устанавливают адрес прокси сервера, имя пользователя и пароль для авторизации (если необходимо). Поддерживаются HTTP и HTTPS прокси.
Использование источника souphttpsrc, ничем не отличается от использования источника filesrc:
3. giosrc
В наборе плагинов GStreamer имеется интересный элемент giosrc. Это почти то же самое что и filesrc, только работает он через библиотеку GIO, и позволяет получать данные из различных источников с которыми может работать GIO. Таких источников 22, начиная от file, заканчивая mtp. Также, данный элемент поддерживает протоколы ftp, sftp, smb и webdav.
Данный элемент имеет параметры аналогичные элементу filesrc. Пример использования данного источника аналогичен использованию предыдущих:
4. rtspsrc
Как можно понять из названия, данный элемент позволяет читать данные с RTSP сервера. Подробно рассматривать свойства данного элемента не будем, скажу только то, что он имеет свойство location для указания адреса источника данных, proxy, proxy-id и proxy-pw для указания настроек прокси, и с десяток свойств специфичных для RTSP протокола, рассмотрение которого не входит в наши планы.
Но, у rtspsrc есть одна особенность, у него несколько pad-ов, и имеют они названия подходящие под шаблон source_%u. Это связано с тем, что сервер может транслировать несколько потоков одновременно, например, аудио и видео могут быть разбросаны по двум потокам.
Примечание:
Я не знаком c протоколом RTSP, поэтому я мог ошибиться в предположении выше.
Пример использования rtspsrc аналогичен предыдущим элементам:
5. multifilesrc
Суть элемента multifilesrc такая же, как и у элемента filesrc — читать файлы с диска, но имеется одно отличие — multifilesrc читает файлы последовательно (1.mp3, 2.mp3. ), в то время как filesrc может читать только по одному файлу. У данного элемента есть один недостаток — имена файлов должны различаться только числом, например, file-1.mp3, file-2.mp3 и так далее. Но такой недостаток можно списать в разряд фич, так как с помощью данного «недостатка» можно с легкостью слепить из изображений 0000.png-9999.png видеоролик из фотографий, ну или мелодию из семплов, или микс из треков.
Элемент multifilesrc имеет немного параметров, и как ни странно — они все полезные. Рассмотрим их подробнее.
location
Путь к файлу может (и должен) включать в себя управляющую последовательность %d, которая будет автоматически заменена с помощью функции sprintf() на число равное текущему индексу.
Пример: /foo/bar-%04d.mp3
index, start-index и stop-index
Данные свойства содержат в себе текущий индекс, стартовый индекс, и финальный индекс. Данные свойства содержат целочисленное число.
Данное свойство может содержать булево значение, и в случае если оно равно true — чтение файлов будет зациклено. Грубо говоря, это аналог функции «Repeat All».
Пример использования элемента multifilesrc который читает файлы с именами начиная от bar-1.mp3 с включенной опцией loop:
6. fdsrc
На мой взгляд, самый бесполезный элемент. Читает данные из файлового дескриптора. Может применяться когда лень описывать filesrc для gst-launch.
Данный элемент имеет один параметр:
Данный параметр должен содержать число, равное открытому файловому дескриптору. По умолчанию равняется нулю.
7. fakesrc
Как следует из названия, данный элемент ничего не делает — он просто является dummy-источником пустых буферов.
8. alsasrc, pulsesrc, osssrc, jackaudiosrc, autoaudiosrc
Данные элементы предназначены для получения потока с микрофонного входа звуковой карты. Из названий следует, что они используются для работы с различными звуковыми подсистемами, такими, как Alsa, PulseAudio, OSS, Jack. Элемент autoaudiosrc является «оберткой» над остальными элементами, и упрощает разработку, забирая на свои плечи всю работу по выбору источника звука.
Свойств у данных элементов не очень много. Основным свойством является device, оно присутствует в первых трех элементах и должно содержать название девайса (hw:0, hw:1. ). Остальные свойства используются специфичны для каждой звуковой подсистемы, и рассматривать мы их не будем.
9. v4l2src
Этот элемент предназначен для открытия видеопотока через интерфейс Video4Linux2. Интерфейс V4L2 поддерживает большинство веб-камер, ТВ-тюнеры, DVB-карточки и карточки видеозахвата.
Рассмотрим наиболее важные параметры:
device
Указывает имя устройства с которого нужно производить захват. Узнать список доступных устройств можно с помощью
В качестве значения этого параметра должен быть указан полный путь к устройству.
Пример: device=/dev/video0
hue, saturation, contrast. brightness
Пример использования элемента:
10. audiotestsrc
Этот элемент аналогичен элементу fakesrc, но отличается тем, что генерирует реальный аудиосигнал. Его можно использовать как для тестирования сложных pipeline запущенных посредством gst-launch, для тестирования работоспособности pipeline в написанном приложении, а также его можно использовать как эталонный генератор для измерения АЧХ и искажений которые вносят разнообразные фильтры.
Рассмотрим наиболее интересные параметры данного элемента.
Данный параметр устанавливает форму сигнала. Доступно 13 значений: sine, square, saw, triangle, silence, white-noise, pink-noise, sine-table, ticks, gaussian-noise, red-noise, blue-noise, violet-noise.
volume
Не сложно догадаться, что этот параметр устанавливает уровень сигнала (громкость). Допустимые значения располагаются в диапазоне от 0 до 1.
Это свойство устанавливает частоту сигнала, и значение может располагаться в диапазоне от 0 до 20000.
Пример использования элемента audiotestsrc:
11. videotestsrc
Этот элемент, как и audiotestsrc, используется для генерации тестовых данных, а именно, видеопотока. Его можно использовать как для проверки работоспособности всего pipeline, или же для проверки на наличие искажений которые вносятся фильтрами.
Параметров у этого элемента очень много, рассмотрим мы только один, самый интересный на мой взгляд.
pattern
Данный параметр устанавливает шаблон видеосигнала. Допустимым значением может быть одно из 21. Полный список: smpte, snow, black, white, red, green, blue, checkers-1, checkers-2, checkers-4, checkers-8, circular, blink, smpte75, zone-plate, gamut, chroma-zone-plate, solid-color, ball, smpte100, bar.
На всех значениях останавливаться не буду, скажу только то, что значения smpte, smpte75 и smpte100 — это настроечные таблицы SMPTE которые применяются в настройках теле/видео-аппаратуры. Шаблоны checkers-* — это сетка NxN пикселей, где N равняется числу в имени шаблона. Остальные же значения устанавливают шаблон с монотонным изображением, например заливку цветом.
Пояснения
и в секции «Element Properties» вы можете наблюдать все свойства (в том числе и унаследованные).
Примеры
Сегодня мы рассмотрим один простой пример использования GStreamer. В примере я буду использовать Python 2.7, GStreamer 1.0 и GObject Introspection.
Сразу оговорюсь, код может быть не идеальным, и может быть даже так называемым «говнокодом», но его единственное назначение показать, как использовать GStreamer, не более.
Простой плеер
Примеры запуска этого скрипта:
В случае, если все пойдет как нужно — вы услышите нужный вам трек и увидите список ID3 тегов, если таковые имеются.
Пример доступен на GitHub.
Ну вот и все
Сегодня мы рассмотрели около половины имеющихся источников данных которые доступны «из коробки», рассмотрели примеры запуска этих элементов, а также рассмотрели пример простого плеера основанного на GStreamer. В следующих статьях мы будем рассматривать остальные классы плагинов, рассмотрим еще больше примеров использования GStreamer, и конечно же, напишем больше кода.
До встречи через неделю!
Литература
UPD 1: Добавлены элементы audiotestsrc, videotestsrc.
Источник
Installing on Windows
Supported platforms
Prerequisites
To develop applications using GStreamer for Windows we recommend using Windows 7 or later. Windows Vista may also work but it is not supported.
The recommended system is Windows 7 or newer with Microsoft Visual Studio 2010 or newer. Take a look at its system requirements).
Installing GStreamer for 32-bit platforms requires approximately 286MB of free disk space for the runtime and 207MB for the development files (as of some older version).
Installing GStreamer for 64-bits platforms requires up to approximately 350MB of free disk space for the runtime and 400MB for the development files (as of version 1.15.1).
Download and install GStreamer binaries
There are 3 sets of files in GStreamer binaries:
Get the Runtime and Development files installers appropriate for your architecture from here:
Execute the installers and choose an installation folder. The suggested default is usually OK.
On Windows 8 and Windows 10, it might be necessary to log out and log back in to your account after the installation for the newly defined environment variables to be picked up by Visual Studio.
It is the application’s responsibility to ensure that, at runtime, GStreamer can access its libraries and plugins. It can be done by adding %GSTREAMER_ROOT_X86%\bin to the PATH environment variable, or by running the application from this same folder.
At runtime, GStreamer will look for its plugins in the following folders:
Additionally, if you want to prevent GStreamer from looking in all the default folders listed above, you can set the GST_PLUGIN_SYSTEM_PATH environment variable to point where the plugins are located.
Configure your development environment
Building the tutorials
The tutorials code, along with project files and a solution file for Visual Studio 2010, are in the gst-docs in the examples/tutorials folder.
In order to prevent accidental modification of the original code, and to make sure Visual Studio has the necessary permissions to write the output files, copy the entire tutorials folder to a place of your liking, and work from there.
Use the GSTREAMER_ROOT_X86_64 environment variable if you have installed GStreamer binaries for 64-bit platforms. Both GStreamer packages (32 and 64-bit) can be installed simultaneously, hence the separate environment variables.
Make sure you select the Solution Configuration that matches GStreamer that you have installed: Win32 for 32-bit or x64 for 64-bit.
You can launch Visual Studio 2010 and load your copy of the tutorials.sln solution file (Click on the screen shots to enlarge them).
Hit F7, press the Build Solution button or go to Build в†’ Build Solution. All projects should build without problems.
Running the tutorials
You should now be able to run the tutorials.
Creating new projects manually
If you want to create 64-bit applications, remember also to create x64 Solution and Project configurations as explained here.
Include the necessary GStreamer Property Sheet
The included property sheets make creating new projects extremely easy. In Visual Studio 2010 create a new project (Normally a Win32 Console or Win32 Application ). Then go to the Property Manager (View→Property Manager), right-click on your project and select “Add Existing Property Sheet. ”.
In Visual Studio 2017, the property manager can be found in View→Other Windows→Property Manager
This property sheet contains the directories where the headers and libraries are located, and the necessary options for the compiler and linker, so you do not need to change anything else in your project.
If you cannot find the Property Manager, you might need to enable Expert Settings. Go to Tools в†’ Settings в†’ Expert Settings. Upon first installation of Visual Studio, Expert Settings are disabled by default.
The tutorial’s project files already contain all necessary property pages. When developing your own applications, the GStreamer documentation will tell you what library a function belongs to, and therefore, what property pages you need to add.
Remove the dependency with the Visual Studio runtime
At this point, you have a working environment, which you can test by running the tutorials. However, there is a last step remaining.
Applications built with Visual C++ 2010 depend on the Visual C++ 2010 Runtime, which is a DLL that gets installed when you install Visual Studio. If you were to distribute your application, you would need to distribute this DLL with it (e.g. via the Visual C++ 2010 Redistributable Package). This happens with every version of Visual Studio, and the Runtime DLL is different for every version of Visual Studio.
Then, add the x86.props or x86_64.props (for 32 or 64 bits) property sheet found in %GSTREAMER_ROOT_X86%\share\vs\2010\msvc to your project. This will make your application use the ubiquitous MSVCRT.DLL saving you from some troubles in the future.
That’s it. Accept the changes, right click on the config property sheet and select “Save”. The path to the DDK is now stored in config.props and you do not need to perform this operation anymore.
Creating new projects using the wizard
Go to File → New → Project… and you should find a template named GStreamer Project. It takes no parameters, and sets all necessary project settings, both for 32 and 64 bits architectures.
Источник
Пишем плагин для GStreamer на MS Visual Studio
В качестве бонуса, я позволил себе провести ряд экспериментов с GStreamer для захвата и обработки видео.
Для начала я решил попробовать захватить поток с одной из камер, направленных на весы для взвешивания автотранспорта, передать фрейм в подсистему распознавания автомобильных номеров и наложить на видео результат распознавания. В приведенном примере я не буду вызывать функционал LPR, просто перехвачу кадр и нарисую на нем прямоугольник.
Установка GStreamer
Загружаем и устанавливаем GStreamer gstreamer-1.0-ххх-1.2.4.msi. Его можно взять здесь.
Для разработки, нам также понадобится дистрибутив gstreamer-1.0-devel-xxx.msi например, gstreamer-1.0-devel-x86-1.2.4.msi, В процессе установки выбираем необходимые опции:

Забегая вперед, скажу, лучше будет установить Windows Device Driver Kit 7.1.0. По-умолчанию он ставится в C:\WinDDK\7600.16385.1 и именно там его будет искать Visual Studio при построении проекта. Если у вас уже установлен DDK по другому пути, это можно будет поправить потом, непосредственно в настройках проекта.
На сайте проекта GStreamer среди прочей документации есть руководство для разработчиков плагинов. Можно прочитав руководство написать весь код самому, но есть возможность скачать шаблон проекта плагина, из репозитория.
В результате выполнения мы получим два файла: gstdummy.c и gstdummy.h. Внутри будет скелет плагина dummy, который еще глупый и нечего не делает, но уже может быть встроен в систему плагинов фреймвока.
Небольшая ремарка: все, что сказано выше, справедливо для Linux, Unix машин, а как быть скорбным обладателям Windows? Cmd.exe не станет выполнять make_element. Если заглянуть внутрь make_element станет ясно, что ничего сложного он не делает, а с помощью потокового редактора sed производит генерацию целевых исходников на основании данных ему параметров. Это можно сделать и самому. На всякий случай, я создал репозиторий, куда по ходу развития буду помещать свой тестовый проект: github.com/nostrum-service/gst.
После того, как мы проделали предварительную работу, настал черед формирования проекта непосредственно в MS Visual Studio 2010. К счастью, разработчики GStreamer позаботились о пользователях Visual Studio и поместили в дистрибутив все необходимое для создания проекта. Надо только правильно разместить файлы в каталогах Visual Studio.
Все необходимое лежит в директории gstreamer\1.0\x86\share\vs\2010.
Выполняем:
Запускаем Visual Studio (или перезапускаем, чтобы она увидела новые настройки), создаем новый проект, и выбираем из установленных шаблонов Visual C++\gst-dk-template.
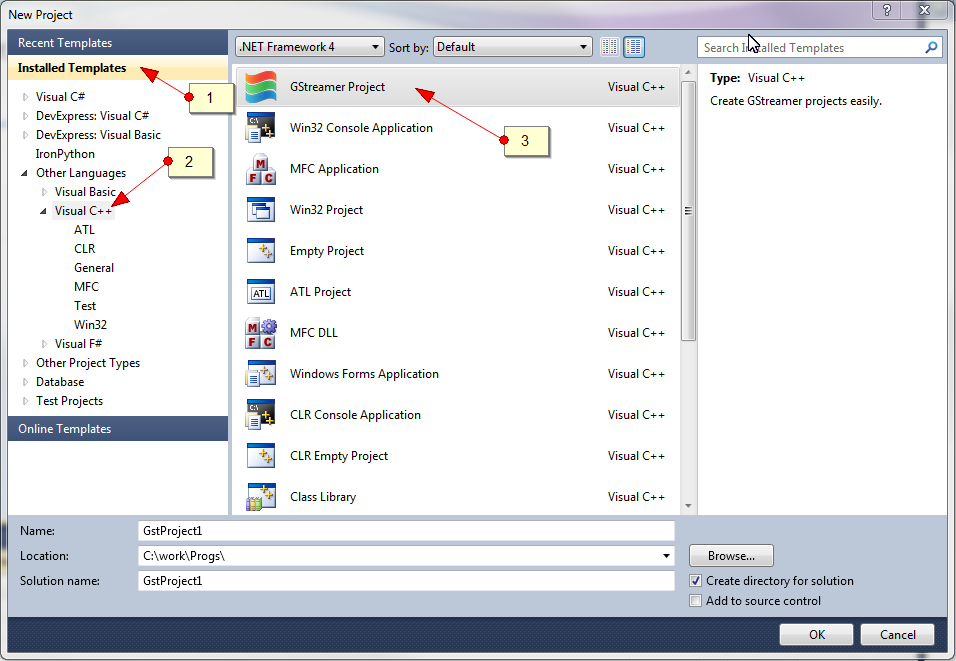
Если все прошло нормально, создастся пустой проект с необходимыми настройками. Поскольку, мы хотим создать плагин, идем в настройки проекта и меняем в Project Details Configuration Type с Application (.exe) на Dynamic Library (.dll).

В окне Property Manager наблюдаем следующую картину (включить Property Manager можно View->Other Windows->Property Manager):
В созданный пустой проект необходимо включить файлы, которые были созданы ранее с помощью утилиты make_element.
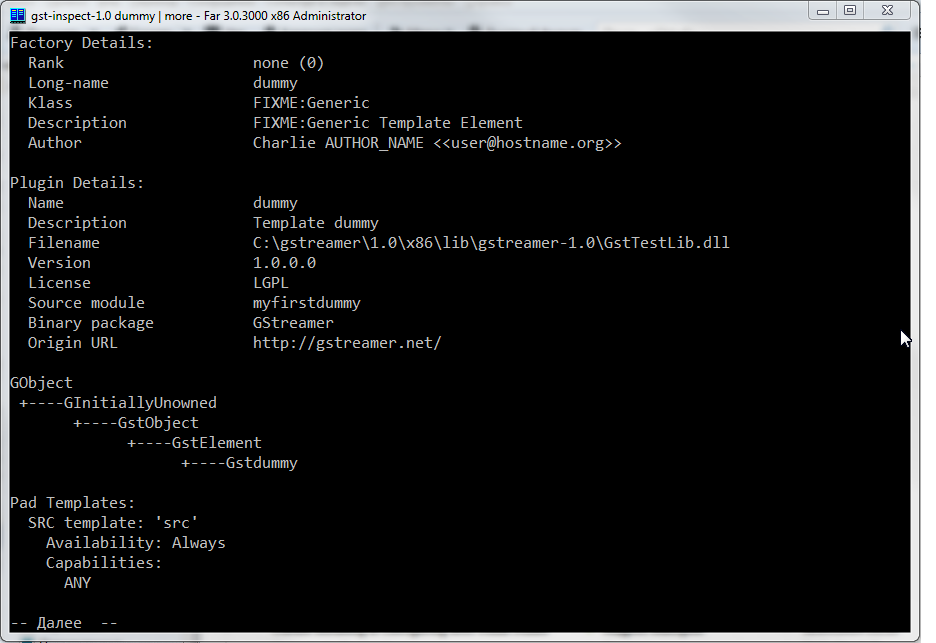
Компилируем, если все правильно, получаем готовый DLL, который надо скопировать в каталог плагинов GStreamer (у меня — C:\gstreamer\1.0\x86\lib\gstreamer-1.0\).
На всякий случай проверим: gst-inspect-1.0 dummy. Здесь мы увидим, что узнал GStreamer о нашем плагине.
Минимальный набор функций плагина
Метаданные
За предоставление метаданных о плагине у нас отвечает функция
static void gst_dummy_class_init (GstdummyClass * klass)
В нашем примере элемент dummy имеет свойство Silent типа Boolean, отвечающее за вывод текста при обработке потока.
Этим кодом мы сообщаем среде GStreamer о том, что у плагина есть свойство Silent, оно имеет тип Boolean, за его установку отвечает делегат gst_dummy_set_property, чтение — gst_dummy_get_property, оно доступно по чтению и записи, значение по-умолчанию – FALSE. Далее мы регистрируем точки подключения к плагину – pads.
Определяем входной pad sink, который имеется всегда в наличие — GST_PAD_ALWAYS и принимает любой формат GST_STATIC_CAPS («ANY»).
Определяем выходной pad src, который имеется всегда в наличие — GST_PAD_ALWAYS и выдает любой формат GST_STATIC_CAPS («ANY»).
Инициализация экземпляра
В процессе построения pipeline, среда GStreamer вызывает функцию инициализации экземпляра плагина:
на вход которой подается структура, которую необходимо заполнить:
Для того, чтобы обрабатывать события, происходящие на входе плагина, необходимо указать соответствующий делегат:
Подключение к потоку
При возникновении событий на входе плагина, в нашем случае будет вызвана функция:
которая пока ничего не делает.
Пробный запуск
Теперь можно попробовать запустить — gst-launch-1.0 videotestsrc! dummy! autovideosink –v. Данная команда передает тестовый поток видео сгенерированный videotestsrc на наш плагин, который передает его дальше без изменений на видео проигрыватель autovideosink. Ключ v позволяет увидеть, как происходит обработка всей цепочки.
Если мы увидели тестовую картинку – значит наш плагин успешно передал данные со своего входа на выход.
Для нашего случая, вывод обработки будет содержать следующее:
Из этого следует, что экземпляр класса GstVideoTestSrc с именем videotestsrc0 предоставил pad src, выдающий поток video/x-raw в формате I420 размерами кадра 320 на 240 и т.д.
Поскольку наш плагин может принять любой формат, его вход связался с выходом videotestsrc0:
Дальнейшее погружение
Выяснив, что механика работает, попробуем сделать несколько шагов к нашей цели. Чтобы проиллюстрировать эволюцию решения, я добавил в проект еще один плагин painter, который будет рисовать поверх изображения прямоугольник.
Прямоугольник можно рисовать без привлечения каких-либо библиотек, но мне захотелось продолжить эксперименты с использованием OpenCV.
При добавлении нового плагина возникает проблема его регистрации, т.к. регистратор должен быть один на проект. В связи с этим, был введен файл GstTestLib.cpp, в котором размещен код регистрации обоих плагинов.
Для painter я создал более жесткие ограничения на входной формат потока. Теперь это выглядит следующим образом:
Это значит, что на вход может подаваться потоковое видео в формате BGRx с любым разрешением и частотой кадров. OpenCV по-умолчанию использует схему BGR. Про цветовые схемы и преобразования можно почитать здесь.
Поскольку, интересующая меня камера выдает RTSP H264 поток, нам необходимо его раскодировать и подать на вход преобразователя videoconvert. Наш тестовый пример будет выглядеть следующим образом:
(10.10.0.15 – мой внутренний адрес, взят для примера).
Теперь на входе буфер у нас будет в BGRx формате. Если вы не знаете, как построить pipeline, можно воспользоваться универсальным контейнером decodebin. Он попытается сам подобрать и связать подходящие плагины:
ключ –v необходим для диагностического вывода, там и будет видно как сформирован pipeline.
Вернемся к нашему плагину. Вся наша обработка будет заключаться в формировании нового изображения на основе входного и отрисовке поверх него прямоугольника. Рабочая функция имеет вид:
В обработкчике событий от sink pad мы можем узнать информацию о входном потоке
Задача решена в лоб. Эксперимент удался. По мере осовения GStreamer, открываются новые возможности, о которых по мере моего продвижения и наличия интереса к теме я буду рассказывать дальше.
Источник

Use Gstreamer To View Video Thumbnails And Previews On Windows Camera Universal in its appeal, this image weaves a mesmerizing tapestry of details and hues, transcending specialized interests to captivate a wide and diverse audience. Its enchanting fusion of elements serves as a magnetic force, drawing enthusiasts from diverse backgrounds into its world of beauty and fascination. Within this striking image, a radiant harmony of colors, shapes, and textures captures the imagination and admiration of people from all walks of life. Its rich interplay of elements creates a visual experience that transcends niche limitations, leaving a lasting impression.

Step 1 Setting Gstreamer Environment Advance Innovation Centre Within this captivating image, intricate details and vibrant colors come together seamlessly, creating a harmonious symphony for the eyes. Rich hues cascade like a waterfall, from deep indigos to sun-kissed oranges, inviting viewers from diverse niches to appreciate its timeless allure. This image is an exquisite blend of aesthetics, seamlessly bridging the gap between different niches. Its captivating fusion of colors, textures, and forms creates a universally enchanting masterpiece, evoking admiration and curiosity. This image is a testament to the power of artistry, seamlessly drawing viewers from diverse backgrounds into its spellbinding narrative. Its intricate details and vivid hues create a mesmerizing visual experience that knows no boundaries. In this remarkable image, a mesmerizing blend of elements coalesce to form a captivating visual experience that transcends niche boundaries. The interplay of light and shadow, vibrant colors, and intricate details creates an alluring composition that sparks curiosity and admiration. Whether you’re an art enthusiast, nature lover, or tech aficionado, this image enchants with its universal charm, inviting all to appreciate its undeniable allure.

Step 1 Setting Gstreamer Environment Advance Innovation Centre This image is a testament to the power of artistry, seamlessly drawing viewers from diverse backgrounds into its spellbinding narrative. Its intricate details and vivid hues create a mesmerizing visual experience that knows no boundaries. In this remarkable image, a mesmerizing blend of elements coalesce to form a captivating visual experience that transcends niche boundaries. The interplay of light and shadow, vibrant colors, and intricate details creates an alluring composition that sparks curiosity and admiration. Whether you’re an art enthusiast, nature lover, or tech aficionado, this image enchants with its universal charm, inviting all to appreciate its undeniable allure. This image, a harmonious blend of artistry and creativity, invites all to admire its captivating essence. A mesmerizing fusion of colors, textures, and shapes transcends niche boundaries, leaving an indelible mark on all who behold it. Within this captivating image, a symphony of colors, textures, and forms unfolds, evoking a sense of wonder that resonates universally. Its timeless beauty and intricate details promise to inspire and captivate viewers from every corner of interest.

Step 1 Setting Gstreamer Environment Advance Innovation Centre This image, a harmonious blend of artistry and creativity, invites all to admire its captivating essence. A mesmerizing fusion of colors, textures, and shapes transcends niche boundaries, leaving an indelible mark on all who behold it. Within this captivating image, a symphony of colors, textures, and forms unfolds, evoking a sense of wonder that resonates universally. Its timeless beauty and intricate details promise to inspire and captivate viewers from every corner of interest.
Aaron Boxer
November 26, 2019
Note: In September 2021, the GStreamer project merged all its git repositories into a single, unified repository, often called
monorepo. The build system referred in this post as «gst-build» is now in the root of this combined/mono repository.
Given GStreamer’s roots in the Linux/GTK world, Windows has seemed at times like a second-class citizen when it came to hacking GStreamer code. With the advent of meson and gst-build, however, this is no longer the case. It is now possible to set up a Windows development environment that rivals the finest Linux has to offer, with full support for Visual Studio debugging into the library.
Here’s how:
Background
There are two official ways of building GStreamer on Windows — using cerbero or gst-build. As gst-build is a lot quicker, we will use this approach in this post.
Setup
We are going to use not one but two IDEs ! Vi vs EMACS people : Nothing to see here, move along.
(note on step 3: we will be running meson from source, so please skip the pip install of meson)
- meson
- pkg-config
- gst-build pre-requisites for Windows
- Visual Studio 2019 community edition
- Eclipse CDT (optional) (you will need to have a Java JRE/JDK installed)
pkg-config
While not frequently used on Windows, pkg-config allows us to manage GStreamer dependencies on other projects. After unzipping the binaries, put their location on your Windows PATH.
Meson
After cloning meson, create a meson.cmd file with the following contents:
@echo off

c:\\PATH\TO\CLONED\MESON\SRC\meson.py %*
and put the file location on your Windows PATH.
Git
I recommend the superb Git client Git Extensions.
Important: once Git is installed, ensure that line endings are configured to core.autocrlf in your Git configuration. Otherwise, you may get Windows line endings breaking GStreamer shell scripts.
Environment
Next, we set up a few environment variables (note the backslash at the end of the first three variables):
| Environment Variable | Value |
|---|---|
SOURCE_DIR |
c:\\PATH\TO\YOUR\SOURCE\ |
GSTREAMER_1_0_ROOT_X86_64 |
%SOURCE_DIR%x86_64\ |
GST_SRC_BUILD_PATH |
%SOURCE_DIR%gst-build\build\subprojects\ |
PKG_CONFIG_PATH |
%GSTREAMER_1_0_ROOT_X86_64%lib\pkgconfig |
GST_PLUGIN_PATH |
%GST_SRC_BUILD_PATH%gst-plugins-good;%GST_SRC_BUILD_PATH%gst-plugins-bad;%GST_SRC_BUILD_PATH%gst-plugins-base |
Clone
Now, we will clone gst-build into our SOURCE_DIR directory, like so:
> cd %SOURCE_DIR%
> git clone https://gitlab.freedesktop.org/gstreamer/gst-build.git
And finally we add the following entry to our PATH environment variable
%GSTREAMER_1_0_ROOT_X86_64%bin
Build
- Open a Visual Studio x64 command prompt from the Windows start menu:
Visual Studio 2019 \ x64 Native Tools Command Prompt - Run
mesonongst-build:> cd %SOURCE_DIR%gst-build > meson --prefix=%GSTREAMER_1_0_ROOT_X86_64% build
Option 1: Build with ninja from command line
- Run
ninjato build and installgst-build> ninja -C build install
Option 2: Build GStreamer with Eclipse
- Launch Eclipse from the
x64command prompt:C:\\PATH\TO\ECLIPSE\eclipse.exe
- Under the
EclipseFile \ Importmenu, chooseimport C++\Existing code as Makefile Projectand select the%SOURCE_DIR%gst-buildfolder. You now have a fully-indexed, fully searchable project containing GStreamer code for base, plugins etc. Since gst-build is a big project, and Eclipse uses a lot of resources, we can filter out thebuildfolder from the project by:- typing
Alt Enterto open the projectProperties - Under
Resource \ Resource Filters, add a filter to exclude thebuildfolder (choose theProject Relative Pathsetting)
- typing
- Eclipse by default does not save files before building. Under
Windows \ Preferences \ General \ Workspace \ Build. selectSave automatically before build. - Right click on the gst-build project, select
Properties \ C++ Build \ Builder Settings, un-checkUse default build commandand enterninja -C build installas the build command. - Right click on the gst-build project, select
Properties \ C++ Build \ Behaviourand deleteallfrom theBuild (incremental build)box. - Press
Ctrl + Bto build and install GStreamer.
Hack
- Open your project in Visual Studio. Your compile and link settings should use the
GSTREAMER_1_0_ROOT_X86_64environment variable to ensure you are linking to the gst-build version of GStreamer. - To set Visual Studio breakpoints in GStreamer, open a file from the appropriate sub-project inside
GST_SRC_BUILD_PATHand set the breakpoint. - To modify GStreamer code, edit the code and build in Eclipse (or your favorite editor) — your Visual Studio project will automagically pick up the changes when it next runs. Don’t forget to run the
ninja -C build installstep.
Push
Inside GST_SRC_BUILD_PATH, the Git repositories can be modified to point to different branches. The only issue here is when executing ninja -C build update, which will stop on the modified repositories.
The only tool missing on Windows is gst-indent. To indent new code, we need to:
- Install Windows Subsystem for Linux (WSL), with Ubuntu 18.04
- Open WSL and:
  $ sudo apt install git autoconf autopoint libtool make texi2html wget
  $ mkdir src && cd src
  $ wget https://ftp.gnu.org/gnu/indent/indent-2.2.11.tar.gz
  $ tar xvzf indent-2.2.11.tar.gz
  $ cd indent-2.2.11 && ./configure
  $ make && sudo make install
Now we can indent new code in the Ubuntu terminal like so:
$ /mnt/c/PATH/TO/SOURCE/gst-build/subprojects/gstreamer/tools/gst-indent /mnt/c/PATH/TO/FILE.c
Finally, we take the potentially dangerous step of removing the gst-indent pre-commit hook from the GStreamer sub-project we are working on:
  > cd %SOURCE_DIR%gst-build\subprojects\SOME_GST_SUBPROJECT\.git\hooks
  > del pre-commit
We must now be careful to remember to run gst-indent from the Ubuntu terminal before committing.
Now sit back and give yourself a big high-five !
If you have any questions about GStreamer on Windows or any other platform, please contact us.
In the previous tutorial, we successfully developed a Flutter FFI plugin that compiles into a library, enabling us to generate a sine wave using GStreamer. We also created a Flutter application that calls the functions from this library. In this tutorial, we will focus on adapting this application to run on Windows.
This guide is tailored specifically for Windows, and all instructions will be provided accordingly.
Prerequisites
Before you begin, make sure you have the following foundational knowledge:
-
Basic understanding of the C programming language.
-
Familiarity with Dart/Flutter.
-
Basic knowledge of CMake.
-
Basic knowledge of GStreamer.
For this tutorial, we will demonstrate on a Windows PC. The following tools and software are necessary:
-
GStreamer Libraries: Install GStreamer and its development libraries. Follow the GStreamer documentation for installation instructions.
-
Code Editor: You can use any code editor, but we will use Visual Studio Code (VSCode).
-
Flutter: Install Flutter by following the guidelines on the official Flutter website.
-
Visual Studio: Required for Flutter for Windows development. Download it from the official Visual Studio website.
-
CMake: Download from cmake.org. You can also install it through the Visual Studio installer on Windows.
Installing Dependencies
To proceed, we need to install GStreamer and other dependencies. We will use Chocolatey, a package manager for Windows. Open a PowerShell window with administrative privileges and run the following command to install Chocolatey:
Set-ExecutionPolicy Bypass -Scope Process -Force; [System.Net.ServicePointManager]::SecurityProtocol = [System.Net.ServicePointManager]::SecurityProtocol -bor 3072; iex ((New-Object System.Net.WebClient).DownloadString('https://community.chocolatey.org/install.ps1'))After Chocolatey is installed, run the following command to install GStreamer and Git:
choco install git gstreamer gstreamer-develThis command will install the GStreamer runtime libraries as well as the development libraries. Note that we are also installing Git for version control.
Running the App Without Modifications
First, open the app project in Visual Studio Code. Try running it, and you will likely encounter several errors leading to a build failure. To diagnose the issue, build the project in verbose mode by running:
flutter build windows -vvv --debugYou will see errors similar to the following:
[  +78 ms] LINK : warning LNK4044: unrecognized option '/LC:/gstreamer/1.0/msvc_x86_64/lib'; ignored
[C:\Users\username\Projects\flutter_gst\app\flutter_gst\build\windows\x64\plugins\native_binding\shared\native_binding.vcxproj]
[   +4 ms] LINK : warning LNK4044: unrecognized option '/lgstreamer-1.0'; ignored
[C:\Users\username\Projects\flutter_gst\app\flutter_gst\build\windows\x64\plugins\native_binding\shared\native_binding.vcxproj]
...
[   +1 ms] native_binding.obj : error LNK2019: unresolved external symbol g_thread_new, referenced in function run_mainloop
[C:\Users\username\Projects\flutter_gst\app\flutter_gst\build\windows\x64\plugins\native_binding\shared\native_binding.vcxproj]
...
Debugging the Build Failure
The error messages indicate that the build is failing due to unrecognized options or unresolved symbols. One notable error is:
[        ]   C:\Program Files\Microsoft Visual Studio\2022\Community\VC\Tools\MSVC\14.40.33807\bin\HostX64\x64\link.exe /ERRORREPORT:QUEUE
/OUT:"C:\Users\fengj\Projects\fltgst\app\fltgst\build\windows\x64\plugins\native_binding\shared\Debug\native_binding.dll" /INCREMENTAL
/ILK:"native_binding.dir\Debug\native_binding.ilk" /NOLOGO "-LC:/gstreamer/1.0/msvc_x86_64/lib" "-lgstreamer-1.0" "-lgobject-2.0"
"-lglib-2.0" "-lintl" kernel32.lib user32.lib gdi32.lib winspool.lib shell32.lib ole32.lib oleaut32.lib uuid.lib comdlg32.lib advapi32.lib
/MANIFEST /MANIFESTUAC:"level='asInvoker' uiAccess='false'" /manifest:embed /DEBUG
/PDB:"C:/Users/fengj/Projects/fltgst/app/fltgst/build/windows/x64/plugins/native_binding/shared/Debug/native_binding.pdb"
/SUBSYSTEM:CONSOLE /TLBID:1 /DYNAMICBASE /NXCOMPAT
/IMPLIB:"C:/Users/fengj/Projects/fltgst/app/fltgst/build/windows/x64/plugins/native_binding/shared/Debug/native_binding.lib" /MACHINE:X64
/machine:x64 /DLL native_binding.dir\Debug\native_binding.obj
And we can see from the warning when linking the library LINK : warning LNK4044: 无法识别的选项“/LC:/gstreamer/1.0/msvc_x86_64/lib”;已忽略, this error translates to «unrecognized option ‘/LC:/gstreamer/1.0/msvc_x86_64/lib’; ignored.» This suggests that the pkg-config output is using Unix-style options, which are not recognized by the MSVC linker on Windows.
Modifying CMakeLists.txt for Windows
To resolve these issues, we need to modify the CMakeLists.txt to handle the options correctly for the MSVC environment. Follow these steps:
-
Open
CMakeLists.txtin thenative_binding/srcdirectory. -
Modify the script to use
pkg-configwith MSVC syntax. Add the following code afterpkg_search_module(GST REQUIRED gstreamer-1.0):IF(WIN32) find_program(CMAKE_PKGCONFIG_EXECUTABLE pkg-config) IF(CMAKE_PKGCONFIG_EXECUTABLE) # pkg-config.exe gstreamer-1.0 --libs --msvc-syntax EXEC_PROGRAM(${CMAKE_PKGCONFIG_EXECUTABLE} ARGS " --libs --msvc-syntax gstreamer-1.0" OUTPUT_VARIABLE GST_LDFLAGS) message("GST_LDFLAGS: ${GST_LDFLAGS}") ENDIF() ENDIF()Update the linking settings in
CMakeLists.txtto use the generatedGST_LDFLAGS. Replace the existingtarget_link_librariesline with the following:IF(WIN32) target_link_options(native_binding PRIVATE ${GST_LDFLAGS}) ELSE() target_link_libraries(native_binding PRIVATE ${GST_LDFLAGS}) ENDIF()Then we update the dependencies in app project, and then build it again with
flutter pub getand thenflutter build windows -vvv --debug.
And we still got error when building:
[  +88 ms] native_binding.obj : error LNK2019: 无法解析的外部符号 g_thread_new,函数 run_mainloop 中引用了该符号
[C:\Users\fengj\Projects\fltgst\app\fltgst\build\windows\x64\plugins\native_binding\shared\native_binding.vcxproj]
[   +2 ms] native_binding.obj : error LNK2019: 无法解析的外部符号 g_main_loop_new,函数 setup_pipeline 中引用了该符号
[C:\Users\fengj\Projects\fltgst\app\fltgst\build\windows\x64\plugins\native_binding\shared\native_binding.vcxproj]
[   +1 ms] native_binding.obj : error LNK2019: 无法解析的外部符号 g_main_loop_run,函数 run_main_loop_thread 中引用了该符
号
[C:\Users\fengj\Projects\fltgst\app\fltgst\build\windows\x64\plugins\native_binding\shared\native_binding.vcxproj]
[   +1 ms] native_binding.obj : error LNK2019: 无法解析的外部符号 g_main_loop_unref,函数 run_mainloop 中引用了该符号
[C:\Users\fengj\Projects\fltgst\app\fltgst\build\windows\x64\plugins\native_binding\shared\native_binding.vcxproj]
[   +1 ms] native_binding.obj : error LNK2019: 无法解析的外部符号 g_main_loop_is_running,函数 run_mainloop 中引用了该符
号
[C:\Users\fengj\Projects\fltgst\app\fltgst\build\windows\x64\plugins\native_binding\shared\native_binding.vcxproj]
[   +1 ms] native_binding.obj : error LNK2019: 无法解析的外部符号 g_printerr,函数 setup_pipeline 中引用了该符号
[C:\Users\fengj\Projects\fltgst\app\fltgst\build\windows\x64\plugins\native_binding\shared\native_binding.vcxproj]
[   +4 ms] native_binding.obj : error LNK2019: 无法解析的外部符号 g_type_check_instance_cast,函数 setup_pipeline 中引用
了该符号
[C:\Users\fengj\Projects\fltgst\app\fltgst\build\windows\x64\plugins\native_binding\shared\native_binding.vcxproj]
[  +13 ms] native_binding.obj : error LNK2019: 无法解析的外部符号 __imp_gst_object_unref,函数 setup_pipeline 中引用了该
符号
[C:\Users\fengj\Projects\fltgst\app\fltgst\build\windows\x64\plugins\native_binding\shared\native_binding.vcxproj]
[   +3 ms] native_binding.obj : error LNK2019: 无法解析的外部符号 __imp_gst_element_factory_make,函数 setup_pipeline 中
引用了该符号
[C:\Users\fengj\Projects\fltgst\app\fltgst\build\windows\x64\plugins\native_binding\shared\native_binding.vcxproj]
[   +1 ms] native_binding.obj : error LNK2019: 无法解析的外部符号 __imp_gst_element_set_state,函数 start_pipeline 中引用
了该符号
[C:\Users\fengj\Projects\fltgst\app\fltgst\build\windows\x64\plugins\native_binding\shared\native_binding.vcxproj]
[   +1 ms] native_binding.obj : error LNK2019: 无法解析的外部符号 __imp_gst_bin_get_type,函数 setup_pipeline 中引用了该
符号
[C:\Users\fengj\Projects\fltgst\app\fltgst\build\windows\x64\plugins\native_binding\shared\native_binding.vcxproj]
[   +3 ms] native_binding.obj : error LNK2019: 无法解析的外部符号 __imp_gst_pipeline_new,函数 setup_pipeline 中引用了该
符号
[C:\Users\fengj\Projects\fltgst\app\fltgst\build\windows\x64\plugins\native_binding\shared\native_binding.vcxproj]
[   +2 ms] native_binding.obj : error LNK2019: 无法解析的外部符号 __imp_gst_element_link_many,函数 setup_pipeline 中引用
了该符号
[C:\Users\fengj\Projects\fltgst\app\fltgst\build\windows\x64\plugins\native_binding\shared\native_binding.vcxproj]
[   +2 ms] native_binding.obj : error LNK2019: 无法解析的外部符号 __imp_gst_bin_add_many,函数 setup_pipeline 中引用了该
符号
[C:\Users\fengj\Projects\fltgst\app\fltgst\build\windows\x64\plugins\native_binding\shared\native_binding.vcxproj]
[   +4 ms] native_binding.obj : error LNK2019: 无法解析的外部符号 __imp_gst_init,函数 init 中引用了该符号
[C:\Users\fengj\Projects\fltgst\app\fltgst\build\windows\x64\plugins\native_binding\shared\native_binding.vcxproj]
[   +1 ms]
C:\Users\fengj\Projects\fltgst\app\fltgst\build\windows\x64\plugins\native_binding\shared\Debug\native_binding.dll :
fatal error LNK1120: 15 个无法解析的外部命令
[C:\Users\fengj\Projects\fltgst\app\fltgst\build\windows\x64\plugins\native_binding\shared\native_binding.vcxproj]
And again, few lines above, we find the command that caused the error:
[   +1 ms]   C:\Program Files\Microsoft Visual Studio\2022\Community\VC\Tools\MSVC\14.40.33807\bin\HostX64\x64\link.exe
/ERRORREPORT:QUEUE
/OUT:"C:\Users\fengj\Projects\fltgst\app\fltgst\build\windows\x64\plugins\native_binding\shared\Debug\native_binding.dll"/INCREMENTAL /ILK:"native_binding.dir\Debug\native_binding.ilk" /NOLOGO kernel32.lib user32.lib gdi32.lib winspool.lib
shell32.lib ole32.lib oleaut32.lib uuid.lib comdlg32.lib advapi32.lib /MANIFEST /MANIFESTUAC:"level='asInvoker'
uiAccess='false'" /manifest:embed /DEBUG
/PDB:"C:/Users/fengj/Projects/fltgst/app/fltgst/build/windows/x64/plugins/native_binding/shared/Debug/native_binding.pdb"/SUBSYSTEM:CONSOLE /TLBID:1 /DYNAMICBASE /NXCOMPAT
/IMPLIB:"C:/Users/fengj/Projects/fltgst/app/fltgst/build/windows/x64/plugins/native_binding/shared/Debug/native_binding.lib" /MACHINE:X64  /machine:x64 "/libpath:C:/gstreamer/1.0/msvc_x86_64/lib gstreamer-1.0.lib gobject-2.0.lib glib-2.0.lib
intl.lib" /DLL native_binding.dir\Debug\native_binding.obj
Pay attention to the last two argument, you will see a double quote, and when you find the start of that double quote, it’s from the GST_LDFLAGS we generated from pkg-config! And my guess is, the double quote makes the linker thinks the entire object inside the double quote is a single option, which is not what we want, so we need to find a way to get rid of the double quote.
Luckly, microsoft has drop some hint on what we can do:
https://learn.microsoft.com/en-us/cpp/build/reference/linking?view=msvc-170#link-environment-variables :
The
LIBvariable can contain one or more path specifications, separated by semicolons. One path must point to the\libsubdirectory of your Visual C++ installation.
So we replace the white space with a semicolon.
Head back to native_binding/lib/CMakeListst.txt, and add some text to the first IF(WIN32) block, so it look like this:
...
IF(WIN32)
  find_program(CMAKE_PKGCONFIG_EXECUTABLE pkg-config)
  IF(CMAKE_PKGCONFIG_EXECUTABLE)
  # pkg-config.exe gstreamer-1.0 --libs --msvc-syntax
    EXEC_PROGRAM(${CMAKE_PKGCONFIG_EXECUTABLE}
    ARGS " --libs --msvc-syntax gstreamer-1.0"
    OUTPUT_VARIABLE GST_LDFLAGS)
    # replace spaces with semicolons so that we don't have quotation marks in command line option
    string(REPLACE " " ";" GST_LDFLAGS ${GST_LDFLAGS})
    message("GST_LDFLAGS: ${GST_LDFLAGS}")
  ENDIF()
ENDIF()
...
Rebuilding the Project
After making the changes, update the dependencies in your app project and rebuild it:
-
Update the dependencies:
-
Build the project:
flutter build windows -vvv --debug
And the build success:
[  +40 ms] Building Windows application... (completed in 15.6s)
[   +5 ms] √ Built build\windows\x64\runner\Debug\fltgst.exe
[   +2 ms] "flutter windows" took 16,516ms.
[ +274 ms] ensureAnalyticsSent: 267ms
[   +1 ms] Running 0 shutdown hooks
[        ] Shutdown hooks complete
[        ] exiting with code 0
Run the app, and you should hear the sine wave.
Debugging
Just like before, but add the following too configurations in .vscode/launch.json file:
        {
            "name":"Windows native",
            "type":"cppvsdbg",
            "request": "launch",
            "program": "${workspaceRoot}/build/windows/runner/Debug/fltgst.exe",
            "cwd": "${fileDirname}",
        },
Conclusion
By following this tutorial, you have adapted a Flutter FFI plugin to work on a Windows platform, including handling the specific requirements of the MSVC linker. Ensure you follow each step carefully to resolve any build issues, and consult the GStreamer and Flutter documentation for further troubleshooting tips. Happy coding!
GitHub Repository
Find the repository and files updated in this tutorial at:
-
Repository: https://github.com/fengjiongmax/fltgst
-
Files after changes: https://github.com/fengjiongmax/fltgst/tree/199f63aa6915ce8ad1f489af6ea536c4404fbfc2