
- Tier: Free, Premium, Ultimate
- Offering: GitLab.com, GitLab Self-Managed, GitLab Dedicated
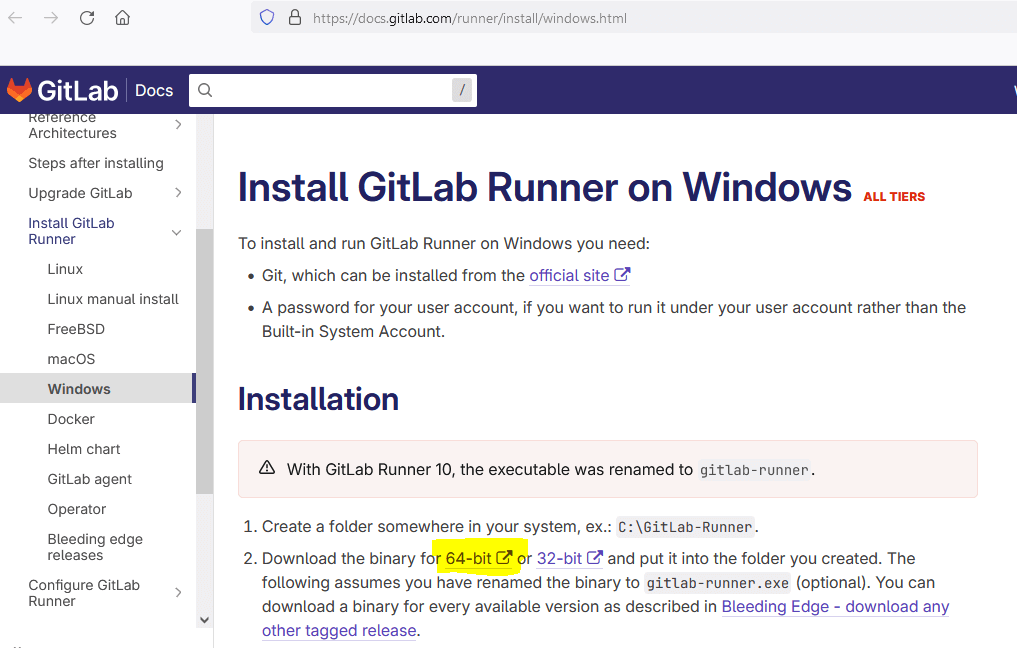
To install and run GitLab Runner on Windows you need:
- Git, which can be installed from the official site
- A password for your user account, if you want to run it under your user
account rather than the Built-in System Account. - The system locale set to English (United States) to avoid character encoding issues.
For more information, see issue 38702.
Installation
-
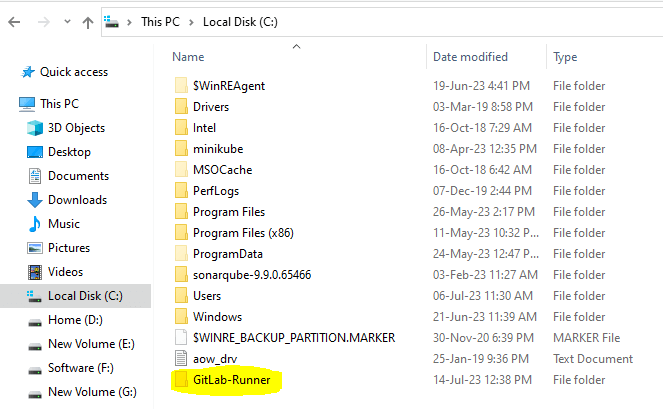
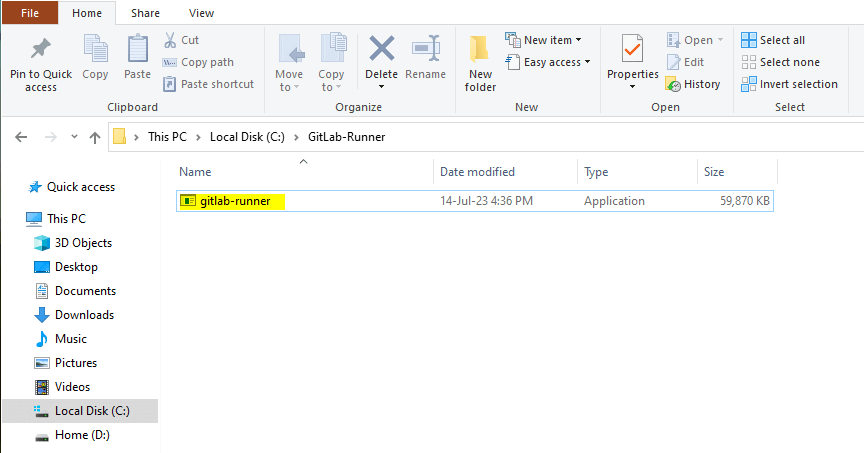
Create a folder somewhere in your system, for example,
C:\GitLab-Runner. -
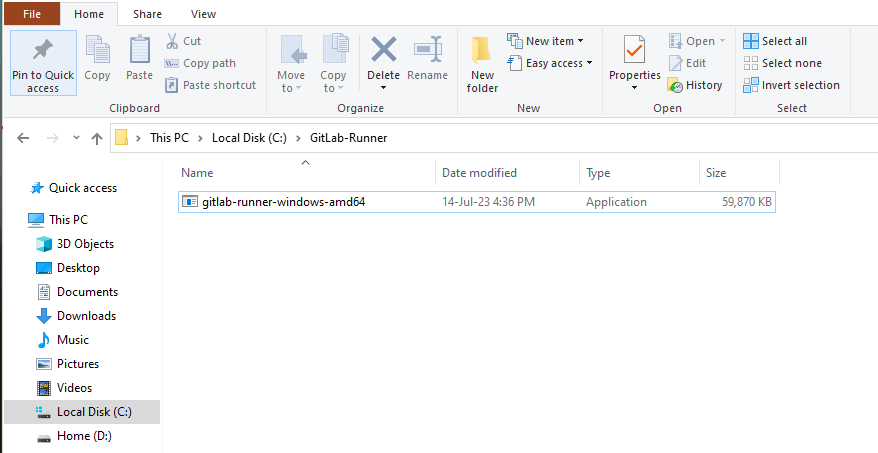
Download the binary for 64-bit or 32-bit and put it into the folder you
created. The following assumes you have renamed the binary togitlab-runner.exe(optional).
You can download a binary for every available version as described in
Bleeding Edge — download any other tagged release. -
Make sure to restrict the
Writepermissions on the GitLab Runner directory and executable.
If you do not set these permissions, regular users can replace the executable with their own and run arbitrary code with elevated privileges. -
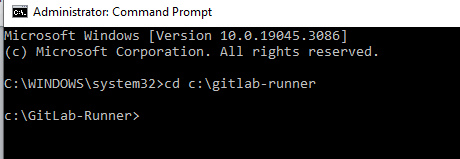
Run an elevated command prompt:
-
Register a runner.
-
Install GitLab Runner as a service and start it. You can either run the service
using the Built-in System Account (recommended) or using a user account.Run service using Built-in System Account (under the example directory created in step 1,
C:\GitLab-Runner)cd C:\GitLab-Runner .\gitlab-runner.exe install .\gitlab-runner.exe startRun service using user account (under the example directory created in step 1,
C:\GitLab-Runner)You have to enter a valid password for the current user account, because
it’s required to start the service by Windows:cd C:\GitLab-Runner .\gitlab-runner.exe install --user ENTER-YOUR-USERNAME --password ENTER-YOUR-PASSWORD .\gitlab-runner.exe startSee the troubleshooting section if you encounter any
errors during the GitLab Runner installation. -
(Optional) Update the runner’s
concurrentvalue inC:\GitLab-Runner\config.toml
to allow multiple concurrent jobs as detailed in advanced configuration details.
Additionally, you can use the advanced configuration details to update your
shell executor to use Bash or PowerShell rather than Batch.
Voila! Runner is installed, running, and starts again after each system reboot.
Logs are stored in Windows Event Log.
Upgrade
-
Stop the service (you need an elevated command prompt as before):
cd C:\GitLab-Runner .\gitlab-runner.exe stop -
Download the binary for 64-bit or 32-bit and replace runner’s executable.
You can download a binary for every available version as described in
Bleeding Edge — download any other tagged release. -
Start the service:
.\gitlab-runner.exe start
Uninstall
From an elevated command prompt:
cd C:\GitLab-Runner
.\gitlab-runner.exe stop
.\gitlab-runner.exe uninstall
cd ..
rmdir /s GitLab-Runner
Windows troubleshooting
Make sure that you read the FAQ section which describes
some of the most common problems with GitLab Runner.
If you encounter an error like The account name is invalid, try:
# Add \. before the username
.\gitlab-runner.exe install --user ".\ENTER-YOUR-USERNAME" --password "ENTER-YOUR-PASSWORD"
If you encounter a The service did not start due to a logon failure error
while starting the service, see the FAQ section to check how to resolve the problem.
If you don’t have a Windows Password, you cannot start the GitLab Runner service but you can
use the Built-in System Account.
For Built-in System Account issues, see
Configure the Service to Start Up with the Built-in System Account
on the Microsoft support website.
Get runner logs
When you run .\gitlab-runner.exe install it installs gitlab-runner
as a Windows service. You can find the logs in the Event Viewer
with the provider name gitlab-runner.
If you don’t have access to the GUI, in PowerShell, you can run
Get-WinEvent.
PS C:\> Get-WinEvent -ProviderName gitlab-runner

   ProviderName: gitlab-runner

TimeCreated                     Id LevelDisplayName Message
-----------                     -- ---------------- -------
2/4/2021 6:20:14 AM              1 Information      [session_server].listen_address not defined, session endpoints disabled  builds=0...
2/4/2021 6:20:14 AM              1 Information      listen_address not defined, metrics & debug endpoints disabled  builds=0...
2/4/2021 6:20:14 AM              1 Information      Configuration loaded                                builds=0...
2/4/2021 6:20:14 AM              1 Information      Starting multi-runner from C:\config.toml...        builds=0...
I get a PathTooLongException during my builds on Windows
This error is caused by tools like npm which sometimes generate directory structures
with paths more than 260 characters in length. To solve the problem, adopt one of the
following solutions.
-
Use Git with
core.longpathsenabled:You can avoid the problem by using Git to clean your directory structure.
- Run
git config --system core.longpaths truefrom the command line. - Set your project to use
git fetchfrom the GitLab CI project settings page.
- Run
-
Use NTFSSecurity tools for PowerShell:
The NTFSSecurity PowerShell module provides
a “Remove-Item2” method which supports long paths. GitLab Runner
detects it if it is available and automatically make use of it.
A regression introduced in GitLab Runner 16.9.1 is fixed in GitLab Runner 17.10.0.
If you intend to use the GitLab Runner versions with regressions, use one of the following workarounds:
Use
pre_get_sources_scriptto re-enable Git system-level settings (by unsettingGit_CONFIG_NOSYSTEM).
This action enablescore.longpathsby default on Windows.build: hooks: pre_get_sources_script: - $env:GIT_CONFIG_NOSYSTEM=''Build a custom
GitLab-runner-helperimage:FROM registry.gitlab.com/gitlab-org/gitlab-runner/gitlab-runner-helper:x86_64-v17.8.3-servercore21H2 ENV GIT_CONFIG_NOSYSTEM=
I can’t run Windows bash scripts; I’m getting The system cannot find the batch label specified - buildscript
You need to prepend call to your Batch file line in .gitlab-ci.yml so that it looks like call C:\path\to\test.bat. Here
is a more complete example:
before_script:
  - call C:\path\to\test.bat
For more information, see issue 1025.
How can I get colored output on the web terminal?
Short answer:
Make sure that you have the ANSI color codes in your program’s output. For the purposes of text formatting, assume that you’re
running in a UNIX ANSI terminal emulator (because it is the web interface output).
Long Answer:
The web interface for GitLab CI emulates a UNIX ANSI terminal (at least partially). The gitlab-runner pipes any output from the build
directly to the web interface. That means that any ANSI color codes that are present are honored.
Older versions of Windows’ command prompt terminal (before Windows 10, version 1511) do not support
ANSI color codes. They use win32 (ANSI.SYS) calls instead which are not present in
the string to be displayed. When writing cross-platform programs, developers typically use ANSI color codes by default. These codes are converted
to win32 calls when running on a Windows system, for example, Colorama.
If your program is doing the above, you must disable that conversion for the CI builds so that the ANSI codes remain in the string.
For more information, see GitLab CI YAML documentation
for an example using PowerShell and issue 332.
The service did not start due to a logon failure error when starting service
When installing and starting the GitLab Runner service on Windows you can
meet with such error:
gitlab-runner install --password WINDOWS_MACHINE_PASSWORD
gitlab-runner start
FATA[0000] Failed to start GitLab Runner: The service did not start due to a logon failure.
This error can occur when the user used to execute the service doesn’t have
the SeServiceLogonRight permission. In this case, you need to add this
permission for the chosen user and then try to start the service again.
- Go to Control Panel > System and Security > Administrative Tools.
- Open the Local Security Policy tool.
- Select Security Settings > Local Policies > User Rights Assignment on the
list on the left. - Open the Log on as a service on the list on the right.
- Select Add User or Group….
- Add the user (“by hand” or using Advanced…) and apply the settings.
According to Microsoft documentation,
this should work for:
- Windows Vista
- Windows Server 2008
- Windows 7
- Windows 8.1
- Windows Server 2008 R2
- Windows Server 2012 R2
- Windows Server 2012
- Windows 8
The Local Security Policy tool may be not available in some
Windows versions, for example in “Home Edition” variant of each version.
After adding the SeServiceLogonRight for the user used in service configuration,
the command gitlab-runner start should finish without failures
and the service should be started properly.
Job marked as success or failed incorrectly
Most Windows programs output exit code 0 for success. However, some programs don’t
return an exit code or have a different value for success. An example is the Windows
tool robocopy. The following .gitlab-ci.yml fails, even though it should be successful,
due to the exit code output by robocopy:
test:
  stage: test
  script:
    - New-Item -type Directory -Path ./source
    - New-Item -type Directory -Path ./dest
    - Write-Output "Hello World!" > ./source/file.txt
    - robocopy ./source ./dest
  tags:
    - windows
In the case above, you need to manually add an exit code check to the script:. For example,
you can create a PowerShell script:
$exitCodes = 0,1

robocopy ./source ./dest

if ( $exitCodes.Contains($LastExitCode) ) {
    exit 0
} else {
    exit 1
}
And change the .gitlab-ci.yml file to:
test:
  stage: test
  script:
    - New-Item -type Directory -Path ./source
    - New-Item -type Directory -Path ./dest
    - Write-Output "Hello World!" > ./source/file.txt
    - ./robocopyCommand.ps1
  tags:
    - windows
Also, be careful of the difference between return and exit when using PowerShell
functions. While exit 1 marks a job as failed, return 1 does not.
Job marked as success and terminated midway using Kubernetes executor
For more information, see Job execution.
Docker executor: unsupported Windows Version
GitLab Runner checks the version of Windows Server to verify that it’s supported.
It does this by running docker info.
If GitLab Runner fails to start and displays an error without
specifying a Windows Server version, then the Docker
version might be outdated.
Preparation failed: detecting base image: unsupported Windows Version: Windows Server DatacenterThe error should contain detailed information about the Windows Server
version, which is then compared with the versions that GitLab Runner supports.
unsupported Windows Version: Windows Server Datacenter Version (OS Build 18363.720)Docker 17.06.2 on Windows Server returns the following in the output
of docker info.
Operating System: Windows Server DatacenterThe fix in this case is to upgrade the Docker version of similar age, or later,
than the Windows Server release.
Kubernetes executor: unsupported Windows Version
Kubernetes executor on Windows might fail with the following error:
Using Kubernetes namespace: gitlab-runner
ERROR: Preparation failed: prepare helper image: detecting base image: unsupported Windows Version:
Will be retried in 3s ...
ERROR: Job failed (system failure): prepare helper image: detecting base image: unsupported Windows Version:
To fix it, add node.kubernetes.io/windows-build node selector in the section [runners.kubernetes.node_selector]
of your GitLab Runner configuration file, For example:
   [runners.kubernetes.node_selector]
     "kubernetes.io/arch" = "amd64"
     "kubernetes.io/os" = "windows"
     "node.kubernetes.io/windows-build" = "10.0.17763"
I’m using a mapped network drive and my build cannot find the correct path
When GitLab Runner runs under a standard user account instead of an administrator
account, it cannot access mapped network drives.
When you try to use mapped network drives, you get the
The system cannot find the path specified. error.
This error occurs because service logon sessions have
security limitations
when accessing resources. Use the UNC path
of your drive instead.
The build container is unable to connect to service containers
To use services with Windows containers:
- Use the networking mode that creates a network for each job.
- Ensure that the
FF_NETWORK_PER_BUILDfeature flag is enabled.
The job cannot create a build directory and fails with an error
When you use the GitLab-Runner with the Docker-Windows executor, a job might fail with an error like:
fatal: cannot chdir to c:/builds/gitlab/test: Permission denied`When this error occurs, ensure the user the Docker engine is running as has full permissions to C:\Program Data\Docker.
The Docker engine must be able to write to this directory for certain actions, and without the correct permissions it fails.
Read more about configuring Docker Engine on Windows.
Blank lines for Windows Subsystem for Linux (WSL) STDOUT output in job logs
By default the STDOUT output for the Windows Subsystem for Linux (WSL) is not UTF8 encoded and displays as blank lines in the job logs. To display the STDOUT output, you can force UTF8 encoding for WSL by setting the WSL_UTF8 environment variable.
job:
  variables:
WSL_UTF8: "1"По натуре своей многие разработчики слишком ленивые не любят делать одно и то же действие много раз. Нам проще научить компьютер, чтобы он делал монотонные действия за нас.
Как только кто-либо из нашей команды вносит изменения в код (читай «мерджит feature-ветку в develop»), наш билд-сервер:
- Собирает исходный код и установщик приложения
- проставляет номер сборки, каждый раз увеличивая последнюю цифру. Например, текущая версия нашего ПО 3.3.0.202 – часть 3.3.0 когда-то ввёл разработчик (привет, SemVer), а «202» проставляется в процессе сборки.
- В процессе анализирует качество кода (с использованием SonarQube) – и отправляет отчёт во внутренний SonarQube,
- Сразу после сборки запускает автотесты (xUnit) и анализирует покрытие тестами (OpenCover),
Также, в зависимости от ветки, в которую были внесены изменения, могут быть выполнены:
- отправка сборки (вместе с changelog-ом) в один или несколько телеграм-каналов (иногда удобнее брать сборки оттуда).
- публикация файлов в систему автообновления ПО.
Под катом о том, как мы научили Gitlab CI делать за нас бОльшую часть этой муторной работы.
Оглавление
- Устанавливаем и регистрируем Gitlab Runner.
- Что нужно знать про .gitlab-ci.yml и переменные сборки.
- Активируем режим Developer PowerShell for VS.
- Используем CI для проставления версии во все сборки решения.
- Добавляем отправку данных в SonarQube.
- «Причёсываем» автотесты xUnit + добавляем вычисление покрытия тестами через OpenCover.
- Послесловие.
Перед началом
Чтобы быть уверенными, что написанное ниже работает, мы взяли на github небольшой проект, написанный на WPF и имеющий unit-тесты, и воспроизвели на нём описанные в статье шаги. Самые нетерпеливые могут сразу зайти в созданный на сайте gitlab.com репозиторий и посмотреть, как это выглядит.
Устанавливаем и регистрируем Gitlab Runner
Для того чтобы Gitlab CI мог что-либо собрать, сначала установите и настройте Gitlab Runner на машине, на которой будет осуществляться сборка. В случае проекта на .Net Framework это будет машина с ОС Windows.
Чтобы настроить Gitlab Runner, выполните следующие шаги:
- Установите Git для Windows с сайта git.
- Установите Visual Studio с сайта Microsoft. Мы поставили себе Build Tools для Visual Studio 2019. Чтобы скачать именно его, разверните список Инструменты для Visual Studio 2019.
- Создайте папку C:\GitLab-Runner и сохраните в неё программу gitlab runner. Скачать её можно со страницы [документации Gitlab] (https://docs.gitlab.com/runner/install/windows.html) — ссылки скрыты прямо в тексте: «Download the binary for x86 or amd64».
- Запустите cmd или powershell в режиме администратора, перейдите в папку C:\GitLab-Runner и запустите скачанный файл с параметром install (Gitlab runner установится как системная служба).
.\gitlab-runner.exe install - Посмотрите токен для регистрации Runner-а. В зависимости от того, где будет доступен ваш Runner:
- только в одном проекте — смотрите токен в меню проекта Settings > CI/CD в разделе Runners,
- в группе проектов — смотрите токен в меню группы Settings > CI/CD в разделе Runners,
- для всех проектов Gitlab-а — смотрите токен в секции администрирования, меню Overview > Runners.
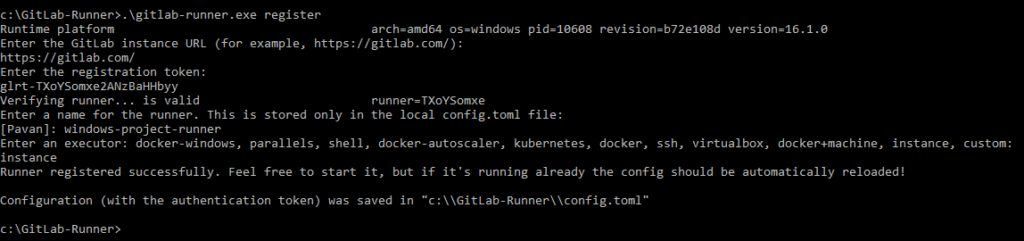
- Выполните регистрацию Runner-а, с помощью команды
.\gitlab-runner.exe register
Далее надо ввести ответы на вопросы мастера регистрации Runner-а:
- coordinator URL — http или https адрес вашего сервера gitlab;
- gitlab-ci token — введите токен, полученный на предыдущем шаге;
- gitlab-ci description — описание Runner-а, которое будет показываться в интерфейсе Gitlab-а;
- gitlab-ci tags — через запятую введите тэги для Runner-а. Если вы не знакомы с этим механизмом, оставьте поле пустым — отредактировать его можно позднее через интерфейс самого gitlab-а. Тэги можно использовать для того, чтобы определённые задачи выполнялись на определённых Runner-ах (например, чтобы настроить сборку ПО на Runner-е, развёрнутом на копьютере ОС Windows, а подготовку документации на Runner-е с ОС Linux);
- enter the executor — ответьте
shell. На этом шаге указывается оболочка, в которой будут выполняться команды; при указании значения shell под windows выбирается оболочка powershell, а последующие скрипты написаны именно для неё.
Что нужно знать про .gitlab-ci.yml и переменные сборки
В процессе своей работы Gitlab CI берёт инструкции о том, что делать в процессе сборки того или иного репозитория из файла .gitlab-ci.yml, который следует создать в корне репозитория.
Вбив в поиске содержимое .gitlab-ci.yml для сборки приложения .NET Framework можно найти несколько шаблонов: 1, 2. Выглядят они примерно так:
variables:
  # Максимальное количество параллельно собираемых проектов при сборке решения; зависит от количества ядер ПК, выбранного для сборки
  MSBUILD_CONCURRENCY: 4
  # Тут куча путей до утилит, которые просто обязаны лежать там, где ожидается
  NUGET_PATH: 'C:\Tools\Nuget\nuget.exe'
  MSBUILD_PATH: 'C:\Program Files (x86)\Microsoft Visual Studio\2017\BuildTools\MSBuild\15.0\Bin\msbuild.exe'
  XUNIT_PATH: 'C:\Tools\xunit.runner.console.2.3.1\xunit.console.exe'
  TESTS_OUTPUT_FOLDER_PATH: '.\tests\CiCdExample.Tests\bin\Release\'

# Тут указываются стадии сборки. Указывайте любые названия которые вам нравятся, но по умолчанию используют три стадии: build, test и deploy.
# Стадии выполняются именно в такой последовательности.
stages:
  - build
  - test

# Далее описываются задачи (job-ы)

build_job:
  stage: build # указание, что задача принадлежит этапу build
  # tags: windows # если тут указать тэг, задача будет выполняться только на Runner-е с указанным тэгом
  only: # для каких сущностей требуется выполнять задачу
    - branches
  script: # код шага
    - '& "$env:NUGET_PATH" restore'
    - '& "$env:MSBUILD_PATH" /p:Configuration=Release /m:$env:MSBUILD_CONCURRENCY /nr:false /clp:ErrorsOnly' # сборка; ключ clp:ErrorsOnlyоставляет только вывод ошибок; ключ nr:false завершает инстансы msbuild
  artifacts: # где по завершении задачи будут результаты, которые надо сохранить в gitlab (т.н. артефакты) и которые можно будет передать другим задачам по цепочке
    expire_in: 2 days # сколько хранить артефакты
    paths: # список путей, по которым находятся файлы для сохранения
      - '$env:TESTS_OUTPUT_FOLDER_PATH'

test_job:
  stage: test
  only:
    - branches
  script:
    - '& "$env:XUNIT_PATH" "$env:TESTS_OUTPUT_FOLDER_PATH\CiCdExample.Tests.dll"'
  dependencies: # указание, что для запуска этой задачи требуется успешно завершенная задача build_job
    - build_job
И последнее: если нам требуется передавать в скрипт значение параметра, который мы не хотим хранить в самом скрипте (например, пароль для подключения куда-либо), мы можем использовать для этого объявление параметров в gitlab. Для этого зайдите в проекте (или в группе проекта) в Settings > CI/CD и найдите раздел Variables. Прописав в нём параметр с именем (key) SAMPLE_PARAMETER, вы сможете получить его значение в в скрипте .gitlab-ci.yml через обращение $env:SAMPLE_PARAMETER.
Также в этом разделе можно настроить передачу введенных параметров только при сборке защищённых веток (галочка Protected) и/или скрытие значения параметра из логов (галочка Masked).
Подробнее о параметрах окружения сборки смотрите в документации к Gitlab CI.
Активируем режим Developer PowerShell for VS
Скрипт, приведённый выше, уже можно использовать для сборки и вызова тестов. Правда, присутствует НО: крайне неудобно прописывать абсолютные пути к разным установкам Visual Studio. К примеру, если на одной билд-машине стоит Visual Studio 2017 BuildTools, а на другой Visual Studio Professional 2019, то такой скрипт будет работать только для одной из двух машин.
К счастью, с версии Visual Studio 2017 появился способ поиска всех инсталляций Visual Studio на компьютере. Для этого существует утилита vswhere, путь к которой не привязан ни к версии Visual Studio, ни к её редакции. А в Visual Studio 2019 (в версии 16.1 или более новой) есть библиотека, которая умеет «трансформировать» консоль Powershell в режим Developer Powershell, в котором уже прописаны пути к утилитам из поставки VS.
Как применить
Дописываем переменную к секции Variables:
variables:
  VSWHERE_PATH: '%ProgramFiles(x86)%\Microsoft Visual Studio\Installer\vswhere.exe'
Затем создаём новую секцию before_msbuild якорем enter_vsdevshell и следующим текстом:
.before_msbuild: &enter_vsdevshell
  before_script:
    - '$vsWherePath = [System.Environment]::ExpandEnvironmentVariables($env:VSWHERE_PATH)'
    - '& $vsWherePath -latest -format value -property installationPath -products Microsoft.VisualStudio.Product.BuildTools | Tee-Object -Variable visualStudioPath'
    - 'Join-Path "$visualStudioPath" "\Common7\Tools\Microsoft.VisualStudio.DevShell.dll" | Import-Module'
    - 'Enter-VsDevShell -VsInstallPath:"$visualStudioPath" -SkipAutomaticLocation'
И всюду, где нам надо использовать утилиты Visual Studio, добавляем этот якорь. После этого задача сборки начинает выглядеть намного более опрятно:
build_job:
  <<: *enter_vsdevshell
  stage: build
  only:
    - branches
  script:
    - 'msbuild /t:restore /m:$env:MSBUILD_CONCURRENCY /nr:false /clp:ErrorsOnly'
    - 'msbuild /p:Configuration=Release /m:$env:MSBUILD_CONCURRENCY /nr:false /clp:ErrorsOnly'
  artifacts:
    expire_in: 2 days
    paths:
      - '$env:TESTS_OUTPUT_FOLDER_PATH'
Подробно о том, что написано в .before_msbuild
- Утилита vswhere.exe умеет находить и выдавать список найденных инсталляций Visual Studio. Расположен она всегда по одному и тому же пути (этот путь записан в переменной VSWHERE_PATH). Поскольку в переменной фигурирует подстановка
%programfiles%, её требуется раскрыть до пути к этой папке. Такое раскрытие проще всего сделать через статический метод .NET System.Environment.ExpandEnvironmentVariables.
Результат: мы имеем путь к vswhere.
- Вызовом vswhere получим путь к папке с установленной Visual Studio.
Все параметры утилиты можно посмотреть, если запуститьvswhere.exeс параметром-help, в статье же только перечислю использованные:- -latest (искать самые свежие установки),
- -property installationPath (вывести параметр пути установки),
- -format value (при печати параметра вывести только значение параметра, без его имени),
- -products <список искомых инсталляций Visual Studio, пробел считается разделителем элементов списка> (указание искомых редакций Visual Studio). Например, при запуске с параметром
-products Microsoft.VisualStudio.Product.Community Microsoft.VisualStudio.Product.BuildToolsутилита попробует найти Visual Studio редакций Community или BuildTools. Подробнее об идентификаторах продуктов смотрите по ссылке https://aka.ms/vs/workloads.
Результат: в переменную $visualStudioPath записан путь к Visual Studio или пустая строка, если инсталляций Visual Studio не найдено (обработку этой ситуации мы ещё не добавили).
- Команда Import-Module загружает библиотеку Microsoft.VisualStudio.DevShell.dll, в которой прописаны командлеты трансформации консоли Powershell в Developer-консоль. А командлет Join-Path формирует путь к этой библиотеке относительно пути установки Visual Studio.
На этом шаге нам прилетит ошибка, если библиотека Microsoft.VisualStudio.DevShell.dll отсутствует или путь к установке Visual Studio нужной редакции не был найден — Import-Module сообщит, что не может загрузить библиотеку.
Результат: загружен модуль Powershell с командлетом трансформации.
- Запускаем «переделку» консоли в Developer Powershell. Чтобы корректно прописать пути к утилитам, командлету требуется путь к установленной Visual Studio (параметр
-VsInstallPath). А указаниеSkipAutomaticLocationтребует от командлета не менять текущее расположение (без этого параметра путь меняется на<домашнаяя папка пользователя>\source\repos).
Результат: мы получили полноценную консоль Developer Powershell с прописанными путями к msbuild и многим другим утилитам, которые можно использовать при сборке.
Используем CI для проставления версии во все сборки решения
Раньше мы использовали t4 шаблоны для проставления версий: номер версии собиралась из содержимого файла в формате <major>.<minor>.<revision>, далее к ней добавлялся номер сборки из Gitlab CI и он передавался в tt-шаблон, добавляющий в решение везде, где требуется, номер версии. Однако некоторое время назад был найден более оптимальный способ — использование команд git tag и git describe.
Команда git tag устанавливает коммиту метку (тэг). Отметить таким образом можно любой коммит в любой момент времени. В отличие от веток, метка не меняется. То есть если после помеченного коммита вы добавите ещё один, метка останется на помеченном коммите. Если попробуете переписать отмеченный коммит командами git rebase или git commit —amend, метка также продолжит указывать на исходный коммит, а не на изменённый. Подробнее о метках смотрите в git book.
Команда git describe, к сожалению, в русскоязычном gitbook не описана. Но работает она примерно так: ищет ближайшего помеченного родителя текущего коммита. Если такого коммита нет — команда возвращает ошибку fatal: No tags can describe '<тут хэш коммита>'. А вот если помеченный коммит нашёлся — тогда команда возвращает строку, в которой участвует найденная метка, а также количество коммитов между помеченным и текущим.
На заметку: чтобы данная команда работала корректно во всех случаях, автор gitflow даже чуть-чуть поменял скрипты finish hotfix и finish release. Если кому интересно посмотреть обсуждение с автором gitflow, а также увидеть что изменилось (картинка с актуальной схемой в последнем сообщении в треде).
Кстати, по этой же причине если вы используете gitflow, после вливания feature-ветки в develop требуется удалить влитую локальную ветку, после чего пересоздать её от свежего develop:
(обратите внимание на историю git в левой части картинки: из-за отсутствия пути из текущего коммита до коммита с меткой 1.0.5, команда git describe выдаст неверный ответ)
Но вернёмся к автопроставлению версии. В нашем репозитории царит gitflow (точнее его rebase-версия), метки расставляются в ветке master и мы не забываем пересоздавать feature-ветки от develop, а также merge-ить master в develop после каждого релиза или хотфикса.
Тогда получить версию для любого коммита и сразу передать её в msbuild можно добавив всего пару строк к задаче сборки:
build_job:
  <<: *enter_vsdevshell
  stage: build
  only:
    - branches
  script:
    - 'msbuild /t:restore /m:$env:MSBUILD_CONCURRENCY /nr:false /clp:ErrorsOnly'
    - '$versionGroup = git describe --long | Select-String -Pattern "(?<major>[0-9]+)\.(?<minor>[0-9]*)\.(?<patch>[0-9]*)\-(?<commit>[0-9]+)\-g[0-9a-f]+" | Select-Object -First 1'
    - '[int]$major, [int]$minor, [int]$patch, [int]$commit = $versionGroup.Matches[0].Groups["major", "minor", "patch", "commit"].Value'
    - '[string]$version = "$major.$minor.$patch.$commit"'
    - 'msbuild /p:Configuration=Release /p:AssemblyVersionNumber=$version /m:$env:MSBUILD_CONCURRENCY /nr:false /clp:ErrorsOnly'
  artifacts:
    expire_in: 2 days
    paths:
      - '$env:TESTS_OUTPUT_FOLDER_PATH'
Как это работает:
- Мы проставляем метки в формате
<major>.<minor>.<revision>. - Тогда
git describe --longвозвращает нам строку, описывающую версию в формате<major>.<minor>.<revision>-<количество новых коммитов>-g<хэш текущего коммита>. - Парсим полученную строку через регулярные выражения, выделяя нужные нам части — и записывем части в
$versionGroup. - Преобразовываем четыре найденные подстроки в 4 числа и пишем их в переменные
$major,$minor,$patch,$commit, после чего собираем из них строку уже в нужном нам формате. - Передаём указанную строку в msbuild чтобы он сам проставил версию файлов при сборке.
Обратите внимание: если вы, согласно gitflow, будете отмечать (тэгировать) ветку master после вливания в неё release или hofix, будьте внимательны: до простановки метки автосборка будет вестись относительно последней существующей ветки. Например, сейчас опубликована версия 3.4, а вы создаёте release-ветку для выпуска версии 3.5. Так вот: всё время существования этой ветки, а также после её вливания в master, но до простановки тэга, автосборка будет проставлять версию 3.4.
Добавляем отправку данных в SonarQube
SonarQube — это мощный инструмент контроля качества кода.
SonarQube имеет бесплатную Community-версию, которая способна проводить полный анализ. Правда, только одной ветки. Чтобы настроить её на контроль качества ветки разработки (develop), требуется выполнить следующие шаги (разумеется, помимо установки и развёртывания сервера SonarQube):
- Создайте в SonarQube новый проект, после чего запомните его ключ.
- Скачайте SonarScanner for MSBuild (с сайта sonarqube.org)[https://docs.sonarqube.org/latest/analysis/scan/sonarscanner-for-msbuild/] — мы используем версию .NET Framework 4.6+.
- Распакуйте содержимое архива в папку. Например, в
C:\Tools\SonarScanner.
На заметку: эту утилиту также можно скачать на сборочную машину через NuGet, но тогда надо будет чуть по-иному указывать её путь. - Зайдите в параметры CI/CD в свойствах проекта Gitlab и добавьте следующие параметры:
- SONARQUBE_PROJECT_KEY — ключ проекта,
- SONARQUBE_AUTH_TOKEN — токен авторизации.
Прописывать параметр ключа проекта необходимо для каждого проекта отдельно (ведь у каждого проекта свой уникальный ключ). А параметр токена авторизации желательно скрыть (отметить как Masked) чтобы он не был доступен всем, кто имете доступ к репозиторию или логам сборки.
- Допишите переменные к секции Variables:
variables: SONARSCANNER_MSBUILD_PATH: 'C:\Tools\SonarScanner\SonarScanner.MSBuild.exe' SONARQUBE_HOST_URL: 'url вашего сервера SonarQube' - Допишите в задачу тестирования ветки разработки (test_job) команды для запуска анализа кода и уберите зависимость от задачи build_job:
    test_job:
      stage: test
      only:
        - /^develop$/
      <<: *enter_vsdevshell
      script:
        - '$versionGroup = git describe --long | Select-String -Pattern "(?<major>[0-9]+)\.(?<minor>[0-9]*)\.(?<patch>[0-9]*)\-(?<commit>[0-9]+)\-g[0-9a-f]+" | Select-Object -First 1'
        - '[int]$major, [int]$minor, [int]$patch, [int]$commit = $versionGroup.Matches[0].Groups["major", "minor", "patch", "commit"].Value'
        - '[string]$version = "$major.$minor.$patch.$commit"'
        - '& "$env:SONARSCANNER_MSBUILD_PATH" begin /key:$env:SONARQUBE_PROJECT_KEY /d:sonar.host.url=$env:SONARQUBE_HOST_URL /d:sonar.login=$env:SONARQUBE_AUTH_TOKEN /d:sonar.gitlab.project_id=$CI_PROJECT_PATH /d:sonar.gitlab.ref_name=develop /v:$version /d:sonar.dotnet.excludeGeneratedCode=true'
        - 'msbuild /t:rebuild /m:$env:MSBUILD_CONCURRENCY /nr:false /clp:ErrorsOnly'
        - '& "$env:SONARSCANNER_MSBUILD_PATH" end /d:sonar.login=$env:SONARQUBE_AUTH_TOKEN'
        - '& "$env:XUNIT_PATH" "$env:TESTS_OUTPUT_FOLDER_PATH\CiCdExample.Tests.dll"'
Теперь при каждой сборке ветки develop в SonarQube будет отправляться подробный анализ нашего кода.
На заметку: вообще команда msbuild /t:rebuild полностью пересобирает решение. Вероятно, в большинстве проектов анализ можно было бы встроить прямо в стадию сборки. Но сейчас у нас анализ в отдельной задаче.
Пара слов об использованных параметрах:
- key — ключ проекта на сервере SonarQube,
- v — собираемая версия. Отлично комбинируется с предыдущим шагом автопроставления версии,
- sonar.gitlab.project_id — ID проекта на сервере Gitlab,
- sonar.gitlab.ref_name — название ветки, которое получает сервер SonarQube при передаче результатов анализа,
- sonar.dotnet.excludeGeneratedCode — не включать в анализ объекты, отмеченные атрибутом System.CodeDom.Compiler.GeneratedCode (чтобы не оценивать качество автосгенерированного кода).
«Причёсываем» автотесты xUnit + добавляем вычисление покрытия тестами через OpenCover
Со сборкой более-менее разобрались — теперь приступаем к тестам. Доработаем код прогона тестов, чтобы он:
- сам находил библиотеки с тестами,
- прогонял их пачкой через xUnit,
- вычислял тестовое покрытие через OpenConver,
- отправлял результаты покрытия тестами в SonarQube.
На заметку: обычно в паре с OpenCover используют ReportGenerator, но при наличии SonarQube мы с тем же успехом можем смотреть результаты через его интерфейс.
Для настройки выполним следующие шаги:
- Скачайте OpenCover в виде zip-файла с сайта github.
- Распакуйте содержимое архива в папку. Например, в
C:\Tools\OpenCover.
На заметку: эту утилиту также можно скачать на сборочную машину через NuGet, но тогда надо будет чуть по-иному указывать её путь. - Допишите переменные к секции Variables:
variables: OBJECTS_TO_TEST_REGEX: '^Rt[^\n]*\.(dll|exe)$' OPENCOVER_PATH: 'C:\Tools\opencover-4.7.922\xunit.console.exe' OPENCOVER_FILTER: '+[Rt.*]* -[*UnitTests]* -[*AssemblyInfo]*' OPENCOVER_REPORT_FILE_PATH: '.\cover.xml' - Модифицируйте задачу тестирования ветки разработки (test_job), чтобы она включала и команды вызова OpenCover:
    test_job:
      stage: test
      only:
        - /^develop$/
      <<: *enter_vsdevshell
      script:
        - '$versionGroup = git describe --long | Select-String -Pattern "(?<major>[0-9]+)\.(?<minor>[0-9]*)\.(?<patch>[0-9]*)\-(?<commit>[0-9]+)\-g[0-9a-f]+" | Select-Object -First 1'
        - '[int]$major, [int]$minor, [int]$patch, [int]$commit = $versionGroup.Matches[0].Groups["major", "minor", "patch", "commit"].Value'
        - '[string]$version = "$major.$minor.$patch.$commit"'
        - '& "$env:SONARSCANNER_MSBUILD_PATH" begin /key:$env:SONARQUBE_PROJECT_KEY /d:sonar.host.url=$env:SONARQUBE_HOST_URL /d:sonar.login=$env:SONARQUBE_AUTH_TOKEN /d:sonar.gitlab.project_id=$CI_PROJECT_PATH /d:sonar.gitlab.ref_name=develop /v:$version /d:sonar.cs.opencover.reportsPaths="$env:OPENCOVER_REPORT_FILE_PATH" /d:sonar.dotnet.excludeGeneratedCode=true'
        - 'msbuild /t:rebuild /m:$env:MSBUILD_CONCURRENCY /nr:false /clp:ErrorsOnly'
        - '$dllsToRunUnitTesting = @(Get-ChildItem "$env:TESTS_OUTPUT_FOLDER_PATH" -Recurse) | Where-Object {$_.Name -match $env:OBJECTS_TO_TEST_REGEX} | ForEach-Object { """""$_""""" } | Join-String -Separator " "'
        - '& "$env:OPENCOVER_PATH" -register -target:"$env:XUNIT_PATH" -targetargs:"$dllsToRunUnitTesting -noshadow" -filter:"$env:OPENCOVER_FILTER" -output:"$env:OPENCOVER_REPORT_FILE_PATH" | Write-Host'
        - 'if ($?) {'
        - '[xml]$coverXml = Get-Content "$env:OPENCOVER_REPORT_FILE_PATH"'
        - '$sequenceCoverage = $coverXml.CoverageSession.Summary.sequenceCoverage'
        - '$branchCoverage = $coverXml.CoverageSession.Summary.branchCoverage'
        - 'Write-Host "Total Sequence Coverage <!<$sequenceCoverage>!>"'
        - 'Write-Host "Total Branch Coverage [![$branchCoverage]!]"'
        - '} else {'
        - 'Write-Host "One or more tests failed!"'
        - 'Throw'
        - '}'
        - '& "$env:SONARSCANNER_MSBUILD_PATH" end /d:sonar.login=$env:SONARQUBE_AUTH_TOKEN'
Обратите внимание: в begin-команде запуска sonar scanner-а появился дополнительный параметр —
/d:sonar.cs.opencover.reportsPaths.(необязательный пункт) Ненадолго возвращаемся в Gitlab, заходим в меню проекта Settings > CI/CD и находим на странице настроек параметр
Test coverage parsing. Указываем в нём регулярное выражение, которое позволит Gitlab-у также получать информацию о покрытии тестами приложения:- если хочется видеть значение покрытия тестов по строкам кода (его ешё называют Sequence Coverage или Statement Coverage), указываем выражение
<!<([^>]+)>!>, - если хочется видеть значение покрытия тестов по веткам условных операторов (его называют Decision Coverage или Branch Coverage), указываем выражение
\[!\[([^>]+)\]!\].
- если хочется видеть значение покрытия тестов по строкам кода (его ешё называют Sequence Coverage или Statement Coverage), указываем выражение
Только зарегистрированные пользователи могут участвовать в опросе. Войдите, пожалуйста.
Какие примеры использования автосборки/автопубликации вам интересны?
10% Публикация артефактов сборки: на сайт, в телеграм-канал1
30% Создание и сборка инсталлера3
20% Оповещение об этапах сборки и ошибках: в телеграм, в слак, по почте2
90% Автосборка и тестирование в .NET 5/.NET Core9
10% Другое, напишу в комментариях1
Проголосовали 10 пользователей. Воздержались 2 пользователя.
Last Updated :
16 Sep, 2024
GitLab is a popular DevOps platform that provides a robust solution for source code management, continuous integration/continuous deployment (CI/CD), and other development workflows. While GitLab is typically hosted on Linux servers, it can also be installed on Windows using a virtual machine or Docker.
In this article, we will walk you through the steps to install GitLab on Windows using Docker, which provides a manageable and efficient way to run GitLab without needing to configure a full Linux environment.
Prerequisites
Before installing GitLab on Windows, ensure you have the following prerequisites:
- Windows 10 Pro, Enterprise, or Education: Required for Docker Desktop.
- Docker Desktop: A platform that allows you to run Docker containers on Windows.
- Sufficient System Resources: At least 4 CPU cores and 4GB of RAM for GitLab to run smoothly. Higher specifications are recommended for production environments.
Installing Docker on Windows
To run GitLab on Windows, you’ll need to install Docker Desktop, which enables running containers on Windows systems.
Step 1: Download Docker Desktop
Go to the Docker Desktop website and download the installer for Windows.
Step 2: Install Docker Desktop
- Run the installer and follow the on-screen instructions.
- When prompted, enable the option for Windows Subsystem for Linux (WSL 2) for better performance.
Step 3: Start Docker Desktop
- Once installed, launch Docker Desktop and ensure it is running. You should see the Docker icon in the system tray.
Step 4: Verify Docker Installation
Open Command Prompt or PowerShell and type:
docker --version
You should see the version of Docker installed, confirming that Docker is set up correctly.
Downloading and Running GitLab Using Docker
With Docker installed, you can now download and run GitLab using Docker containers.
Step 1: Pull the GitLab Docker Image
Open PowerShell or Command Prompt and pull the GitLab image from Docker Hub:
docker pull gitlab/gitlab-ee:latest
This command pulls the latest version of GitLab Enterprise Edition. If you prefer the Community Edition, use gitlab/gitlab-ce:latest.
Step 2: Run GitLab in a Docker Container
Create a new directory on your Windows system to store GitLab configuration and data. This ensures data persists even if the container is removed:
mkdir C:\gitlab\data
mkdir C:\gitlab\logs
mkdir C:\gitlab\config
Step 3: Start the GitLab container:
docker run --detach `
  --hostname gitlab.local `
  --publish 443:443 --publish 80:80 --publish 22:22 `
  --name gitlab `
  --restart always `
  --volume C:\gitlab\config:/etc/gitlab `
  --volume C:\gitlab\logs:/var/log/gitlab `
  --volume C:\gitlab\data:/var/opt/gitlab `
  gitlab/gitlab-ee:latest
Options:
- —hostname: Sets the hostname for GitLab (e.g., gitlab.local).
- —publish: Maps ports from the container to the host (HTTP, HTTPS, and SSH).
- —name: Names the container gitlab.
- —restart always: Ensures GitLab restarts automatically if the container stops or the host reboots.
- —volume: Maps local directories to container directories for persistent storage.
Step 3: Wait for GitLab to Initialize:
It may take several minutes for GitLab to initialize. You can monitor the process using:
docker logs -f gitlab
Wait until you see the message indicating that GitLab is ready.
Configuring GitLab
After GitLab starts, you can configure it through the GitLab interface:
Step 1: Access GitLab
- Open a web browser and navigate to http://localhost.
- You should see the GitLab login screen.
Step 2: Set Up the Root Password
The first time you access GitLab, you’ll be prompted to set the root password. Enter a secure password and save it.
Step 3: Log In:
Log in using the username root and the password you just set.
Step 4: Configure GitLab Settings
Navigate to the Admin area to configure GitLab settings, such as email notifications, user management, and project settings.
Accessing GitLab
To access GitLab, simply navigate to the hostname you set during the Docker run command (e.g., http://localhost if using the default setup). If you mapped the ports differently or used a different hostname, adjust the URL accordingly.
Setting Up GitLab Runner (Optional)
GitLab Runner is a tool used for running CI/CD jobs on your GitLab instance. Installing GitLab Runner on Windows allows you to leverage GitLab’s powerful CI/CD pipelines.
Step 1: Download GitLab Runner
Visit the GitLab Runner downloads page and download the binary for Windows.
Step 2: Install GitLab Runner:
- Extract the binary to a directory, for example, C:\GitLab-Runner.
- Open Command Prompt as Administrator and register the runner:
C:\GitLab-Runner\gitlab-runner.exe register
- Follow the prompts to configure the runner with your GitLab instance, including:
- GitLab URL.
- Registration token (found in GitLab’s Admin area under Runners).
- Runner description, tags, and executor type (use shell for simplicity on Windows).
Step 3: Start the Runner
Install and start GitLab Runner as a service:
C:\GitLab-Runner\gitlab-runner.exe install
C:\GitLab-Runner\gitlab-runner.exe start
In this article we are going to cover How to download and install GitLab runner on windows, Register GitLab Runner and GitLab Runner commands.
Table of Contents
What is GitLab Runner ?
GitLab Runner is used in GitLab CI/CD(continuous integration/continuous delivery) to run jobs in a pipeline. It is open source continuous integration service. GitLab runner is a build instance which is used to run the jobs over multiple machines and send the results to GitLab and which can be placed on separate users, servers, and local machine. You can register the runner as shared or group or project after installing it.
Types of GitLab runner
- Share Runners
- Group Runners
- Project Runner
Share Runners: Share runner are available for jobs that have same requirement for multiple projects. If you use multiple runner for many jobs/projects then it avoid using single runner or minimum runners for many projects. It is use FIFO (first in first out) queue. Share runners are available to all groups and projects in a GitLab executor.
Group Runners: Group Runner are available for many projects or multiple subgroup in single group to have access to a set of runners. It is use FIFO (first in first out) queue.
Project Runner: Project runner are available for specific requirement for jobs in one project at a time.
Step #1:Download and install GibLab Runner on windows
Go to official GitLab Runner download web page and download binary exe file.
After downloaded binary File copy it , Go to c drive and create new folder ex: C:\GitLab-Runner
and paste binary in that folder which you created.
Rename downloaded file ex: gitlab-runner
Open command prompt and go to directory where GitLab Runner file saved using below command.
cd c:\GitLab-Runner
To install GitLab Runner run the below command.
.\gitlab-runner.exe install
To verify GitLab Runner version using below command
.\gitlab-runner –v

Step #2:Register GitLab Runner on Windows
To register GitLab runner run below command
.\gitlab-runner.exe register
Enter the GitLab instance URL
https://gitlab.com/

Enter the registration token:
To get token, you have to go your GitLab project -> setting -> CI/CD -> Runner
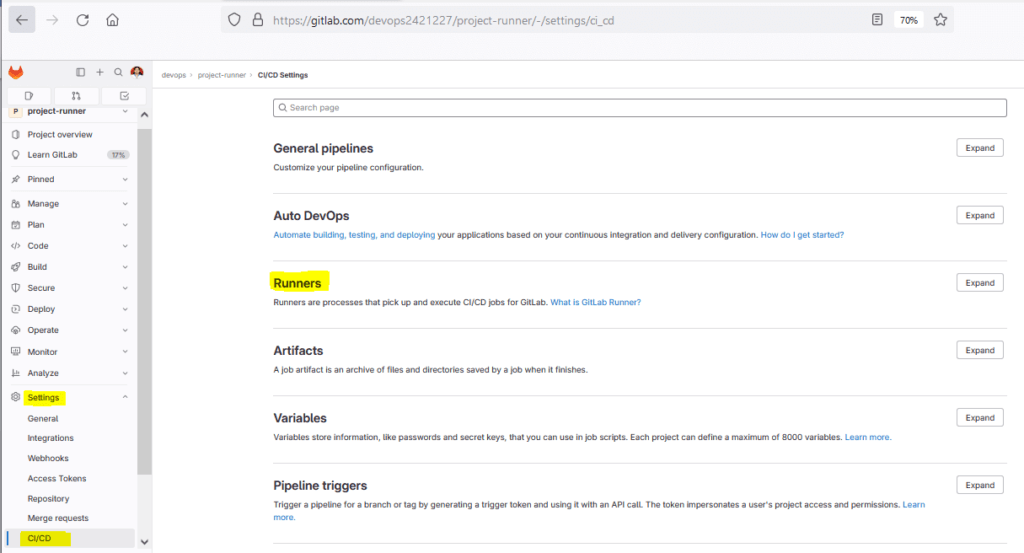
Expand runner to access token

glrt-TXoYSomxe2ANzBaHHbyy
Enter a description for the runner:
Project runner
Enter tags for the runner (comma-separated):
windows
Enter an executor:
instance
Then you will get Runner registered successfully.
If you are refresh the gitlab page and again go to project -> setting -> CI/CD -> runner -> expand it then you can see assigned project runner.
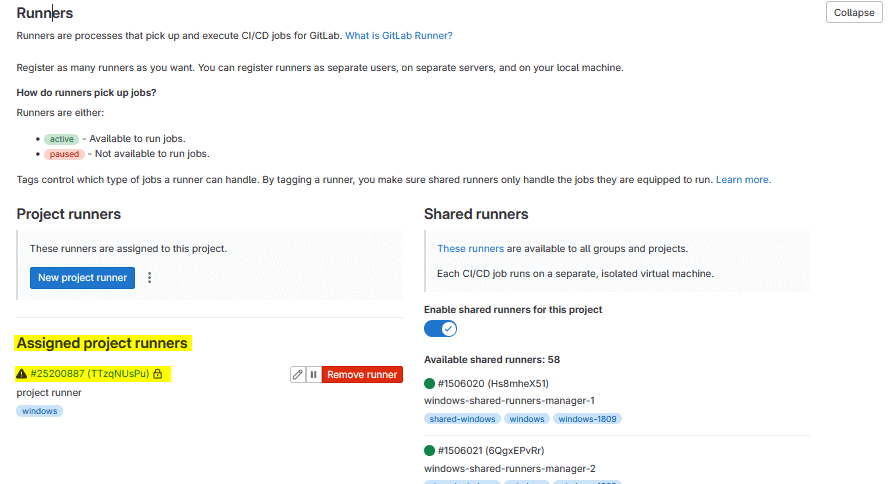
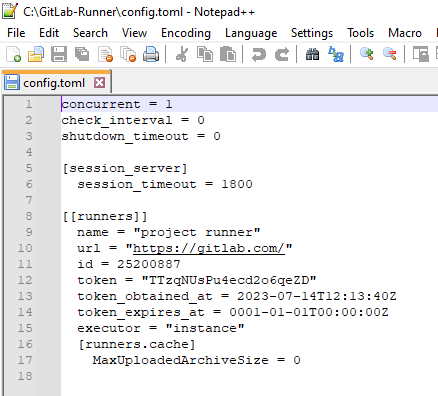
You can see the GitLab Runner configuration in the config.toml file under the GitLab-Runner folder as shown below.
Step #3:GitLab Runner Service command
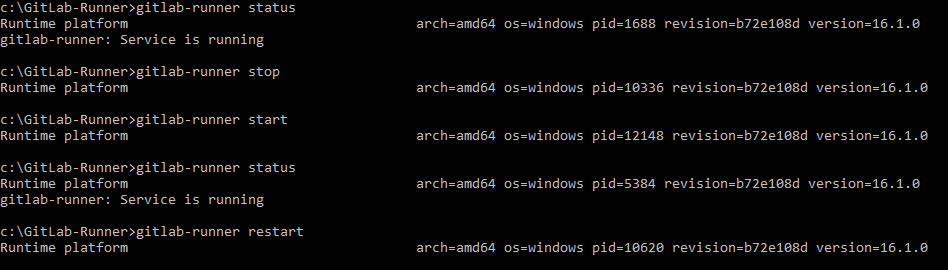
To prints the status of the GitLab Runner service.
gitlab-runner status
To start gitlab runner service
gitlab-runner start
To stop the gitlab runner service.
gitlab-runner stop
To stop and then start the gitlab runner service
gitlab-runner restart
Step #4:Uninstall GitLab runner on Windows
To uninstall gitlab runner on your system.
gitlab-runner uninstall
In this article we have covered How to download and install GitLab runner on windows, Register GitLab Runner, GitLab Runner Services.
Conclusion:
In this article we have covered How to download and install GitLab runner on windows, Register GitLab Runner and GitLab Runner commands.
Related Articles:
How to Create Group and Users in GitLab [2 Steps]
Overview
What is GitLab Runner?
GitLab Runner is an open-source project that is used to run jobs and send the results back to GitLab. It is a tool that enables you to define and run your jobs as code, making it easier to automate your software development process. With GitLab Runner, you can easily test, build, and deploy your applications. It is a key component of the GitLab CI/CD pipeline and plays a crucial role in enabling DevOps practices.
Why use GitLab Runner?
GitLab Runner is a powerful tool that allows you to run your jobs and pipelines directly on your own infrastructure. It provides a seamless integration with GitLab and helps automate your development workflow. Whether you’re building, testing, or deploying your code, GitLab Runner has got you covered. With its easy setup and configuration, you can quickly get started and enjoy the benefits of continuous integration and delivery. So why wait? Start using GitLab Runner today and take your development process to the next level!
System requirements
Before installing GitLab Runner on Windows, make sure your system meets the following requirements:
– Operating System: Windows 7 or later
– Processor: 1.4 GHz or faster
– Memory: 2 GB RAM
– Storage: 50 MB available space
GitLab Runner is a DevOps tool that allows you to run jobs and pipelines on your Windows machine. It is essential for automating your software development and deployment processes.
Installation

Downloading GitLab Runner
To get started with GitLab Runner on Windows, you need to download the installation package. Head over to the GitLab website and navigate to the Downloads section. Look for the Windows version of GitLab Runner and click on the download link. Once the download is complete, you can proceed with the installation process.
Installing GitLab Runner
To install GitLab Runner on Windows, follow these steps. First, make sure you have a compatible version of Windows installed. The installation process may vary depending on your system upgrade. Next, download the GitLab Runner installer from the official website. Run the installer and follow the on-screen instructions to complete the installation. Once the installation is complete, you can configure GitLab Runner by editing the configuration file. Make sure to specify the correct URL and token for your GitLab instance. After configuring GitLab Runner, you can start using it to run your CI/CD pipelines.
Configuring GitLab Runner
Now that you have successfully installed GitLab Runner on Windows, it’s time to configure it. Configuration is an important step as it allows you to customize the behavior of GitLab Runner according to your needs. You can configure GitLab Runner to build, test, and deploy applications. This flexibility makes GitLab Runner a powerful tool for your development workflow. To configure GitLab Runner, you need to modify the runner’s configuration file. This file contains settings such as the GitLab URL, the registration token, and the executor type. Once you have made the necessary changes, you can restart the GitLab Runner service to apply the new configuration.
Registering Runner

Generating a registration token
To start using GitLab Runner, you need to generate a registration token. This token is used to authenticate the Runner with your GitLab instance. The registration process is simple and can be done through the GitLab web interface. Once you have the token, you can proceed with the installation process. GitLab Runner is an essential tool in the software development process as it allows you to run jobs and pipelines on your own infrastructure. By using GitLab Runner, you can automate the testing, building, and deployment of your applications, making the development process faster and more efficient.
Registering the Runner
To use GitLab SaaS runners, you need to register the runner with your GitLab instance. This allows your GitLab instance to communicate with the runner and assign it tasks. To register the runner, you will need the registration token provided by your GitLab instance. Once you have the registration token, you can execute the registration command in your GitLab Runner installation. After successful registration, your runner will be available for executing jobs.
Verifying the Runner registration
After completing the GitLab Runner installation, it’s important to verify the registration process. This step ensures that the Runner is properly connected to your GitLab instance and ready to execute jobs. To verify the registration, navigate to your GitLab project’s settings and click on the ‘CI/CD’ tab. Under the ‘Runners’ section, you should see the newly installed Runner listed. If the Runner is present, it means that the installation was successful and the registration process is complete. You can now start using the Runner to run your CI/CD pipelines and automate your development workflow.
Running Jobs

Creating a .gitlab-ci.yml file
Once you have installed GitLab Runner on your Windows machine, the next step is to create a .gitlab-ci.yml file in your project’s root directory. This file is used to define the stages and jobs for your CI/CD pipeline. It is important to follow the best practices for GitHub download when creating this file. The .gitlab-ci.yml file should be written in YAML format and should include the necessary configuration for your project’s build, test, and deployment processes. Make sure to include the appropriate keywords and commands to ensure your pipeline runs smoothly.
Defining stages and jobs
Once you have set up your GitLab Runner and registered it with your GitLab instance, the next step is to define the stages and jobs for your pipeline. Stages represent the different phases of your pipeline, such as build, test, and deploy. Jobs are the individual tasks that need to be executed within each stage. You can use various tools and scripts to define your stages and jobs, depending on your specific requirements. For example, you can use shell scripts, Docker containers, or even external tools like Jenkins. The flexibility of GitLab Runner allows you to choose the most suitable tools for your pipeline.
Running jobs with GitLab Runner
Now that you have successfully installed GitLab Runner on your Windows machine, it’s time to start running jobs! GitLab Runner is a powerful tool that allows you to execute your CI/CD pipelines on your local environment. With GitLab Runner, you can easily build, test, and deploy your applications with just a few simple commands. Whether you’re a developer or a DevOps engineer, Windows GitLab Runner has got you covered. So, let’s dive in and explore the power of GitLab Runner on Windows!
Conclusion
Summary of the installation process
Installing GitLab Runner on Windows can be a straightforward process if you follow these steps. First, download the GitLab Runner installer from the official website. Next, run the installer and follow the on-screen instructions. Make sure to choose the appropriate options for your system. Once the installation is complete, open the GitLab Runner configuration file and configure the runner according to your needs. Finally, start the GitLab Runner service and verify that it is running correctly. These expert tips will help you ensure a smooth installation process.
Tips and troubleshooting
When working with GitLab Runner on Windows, there are a few tips and tricks that can help make your life easier. First, make sure you have the latest version of GitLab Runner installed. This will ensure that you have access to all the latest features and bug fixes. Second, double-check your configuration file to ensure that it is set up correctly. Incorrect configurations can lead to unexpected errors and issues. Third, if you encounter any problems during the installation or configuration process, don’t hesitate to reach out to the GitLab community for help. They are a friendly and knowledgeable group of people who can provide guidance and assistance. Lastly, remember that GitLab Runner is an essential tool for DevOps teams, enabling seamless integration and automation in your development workflow. With its powerful features and flexibility, it’s a must-have for any DevOps enthusiast.
Next steps
Now that you have successfully installed GitLab Runner on your Windows machine, it’s time to explore its benefits. GitLab Runner allows you to automate your CI/CD pipelines, making it easier to build, test, and deploy your applications. With GitLab Runner, you can save time and effort by automating repetitive tasks and ensuring consistent and reliable software delivery. Take advantage of the benefits that GitLab Runner offers and streamline your development process.
In conclusion, the Home Page – DevSecOps website offers valuable insights and resources for anyone interested in the field of DevSecOps. With a focus on security, development, and operations, this website provides a comprehensive guide to implementing secure practices in software development. Whether you are a developer, an operations professional, or a security enthusiast, Home Page – DevSecOps has something for everyone. Visit the website today to explore the latest articles, tutorials, and tools that can help you enhance your DevSecOps skills and stay up-to-date with industry trends.