
Настройка будет состоять из пунктов:
- Настройка Брандмауэра
- Создание пользователей
- Настройка FTP-сайта
- Изоляция пользователей
Установка FTP-сервера
Для начала нужно установить FTP-сервер.
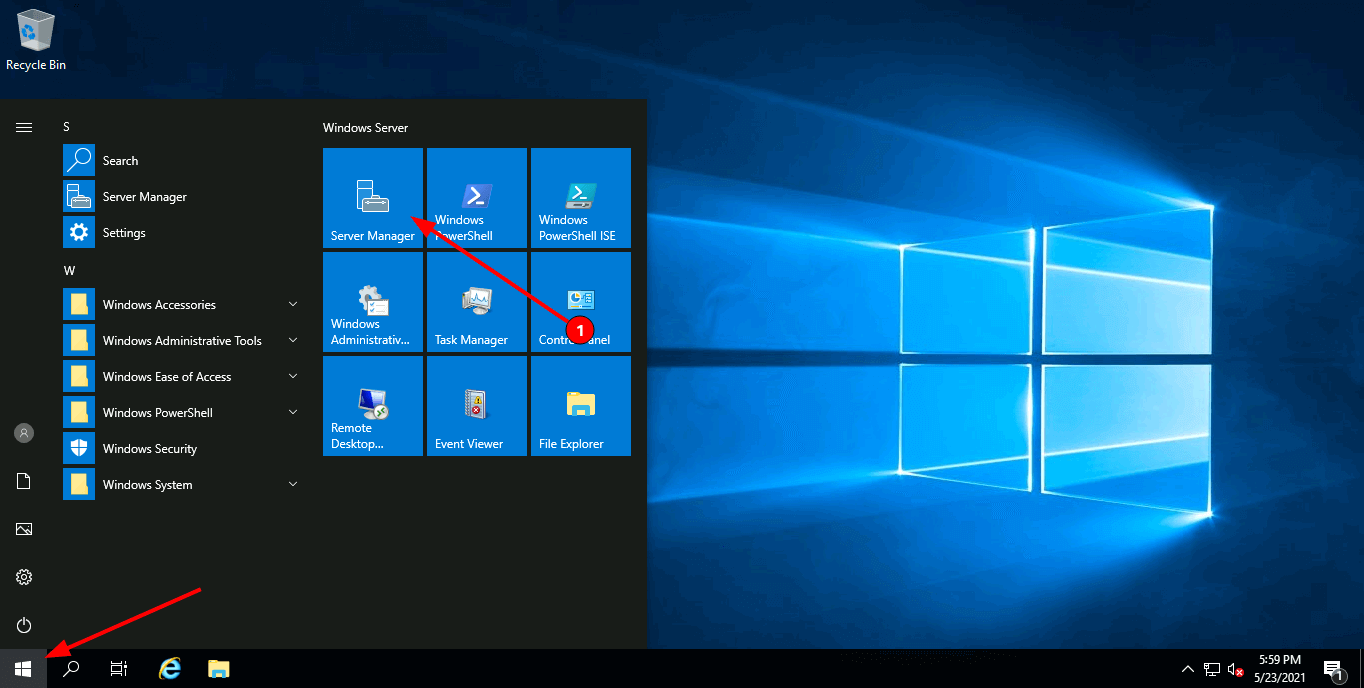
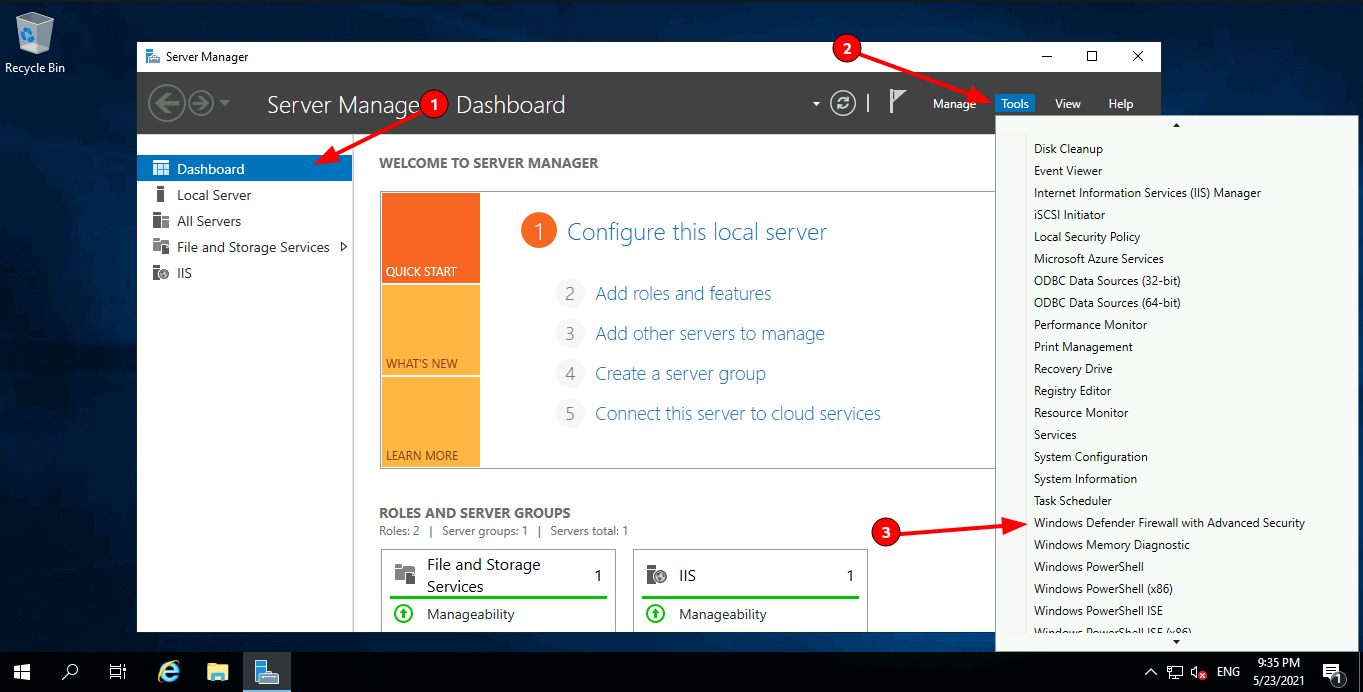
Открываем Пуск в нижнем левом углу, Диспетчер серверов (Server Manager), плитка которого закреплена по умолчанию. Далее все основные действия по настройке будем совершать здесь.
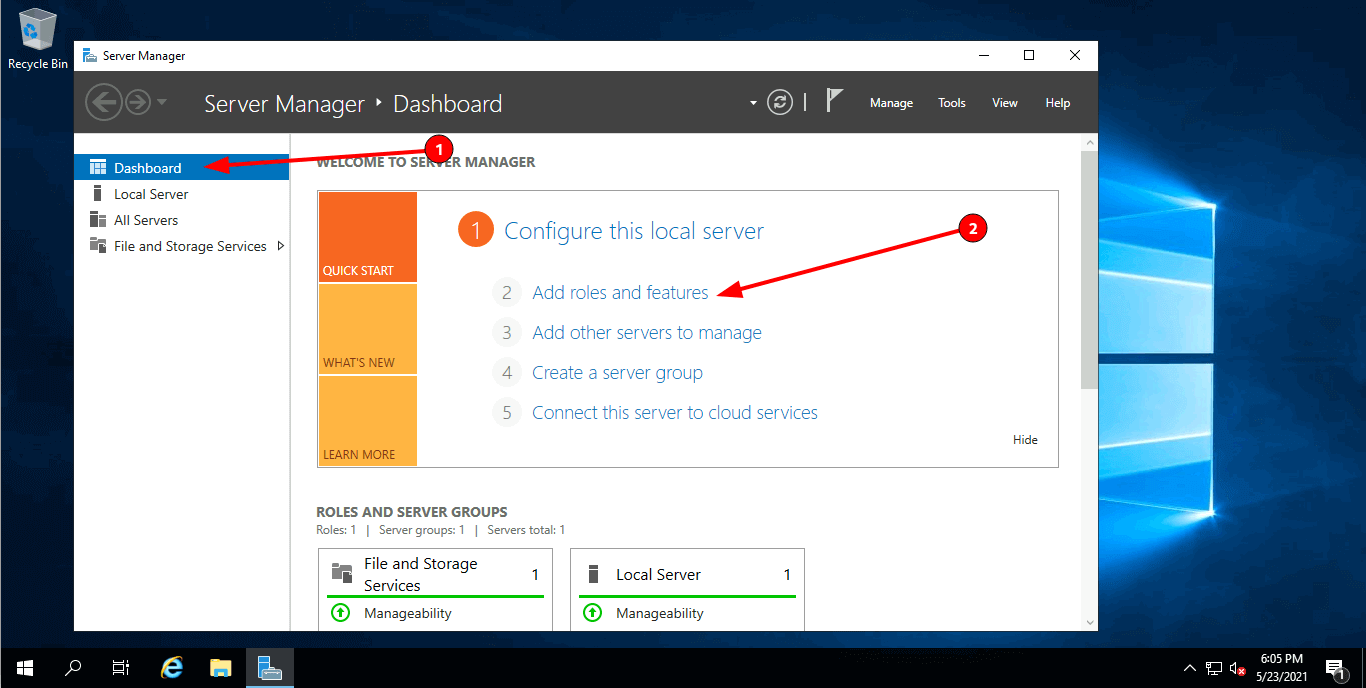
Находим пункт Добавить Роль и Функции (Add roles and features).
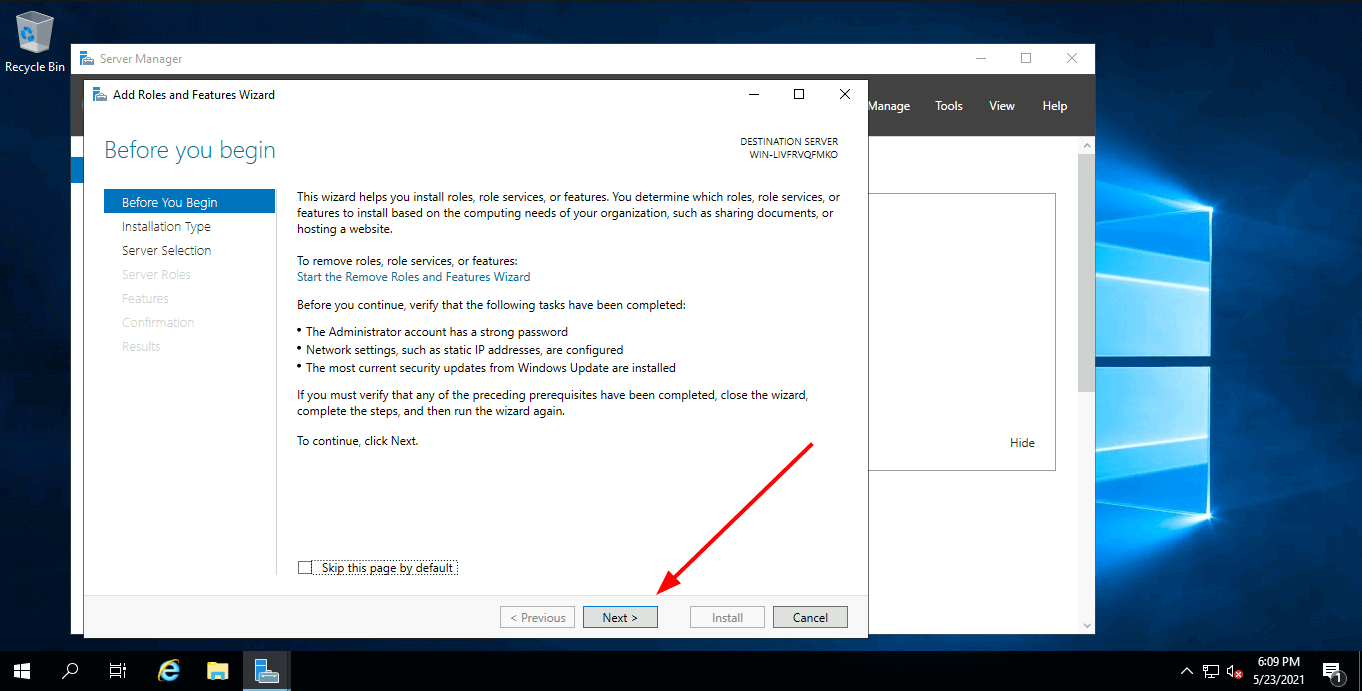
Появится мастер добавления ролей, для продолжения нажимаем Далее (Next).
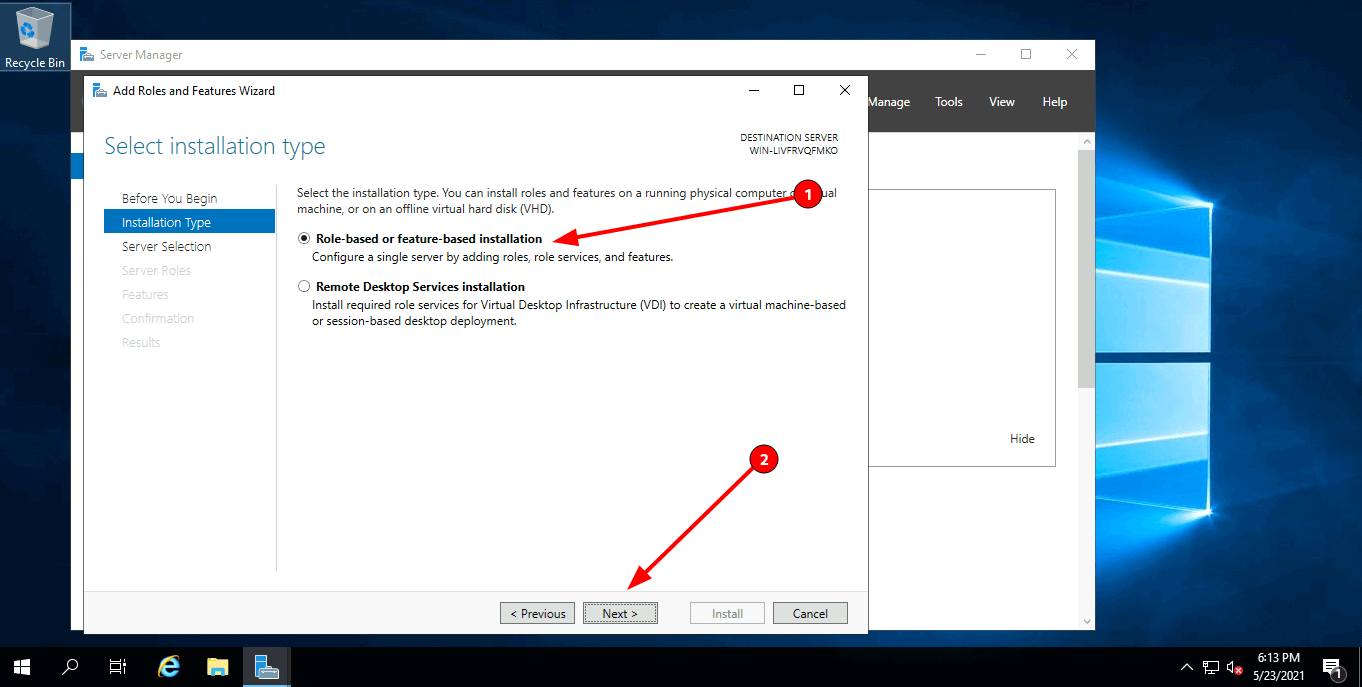
В качестве типа установки выбираем Базовая Роль или Базовая Функция (based-roles or feature-based installation).
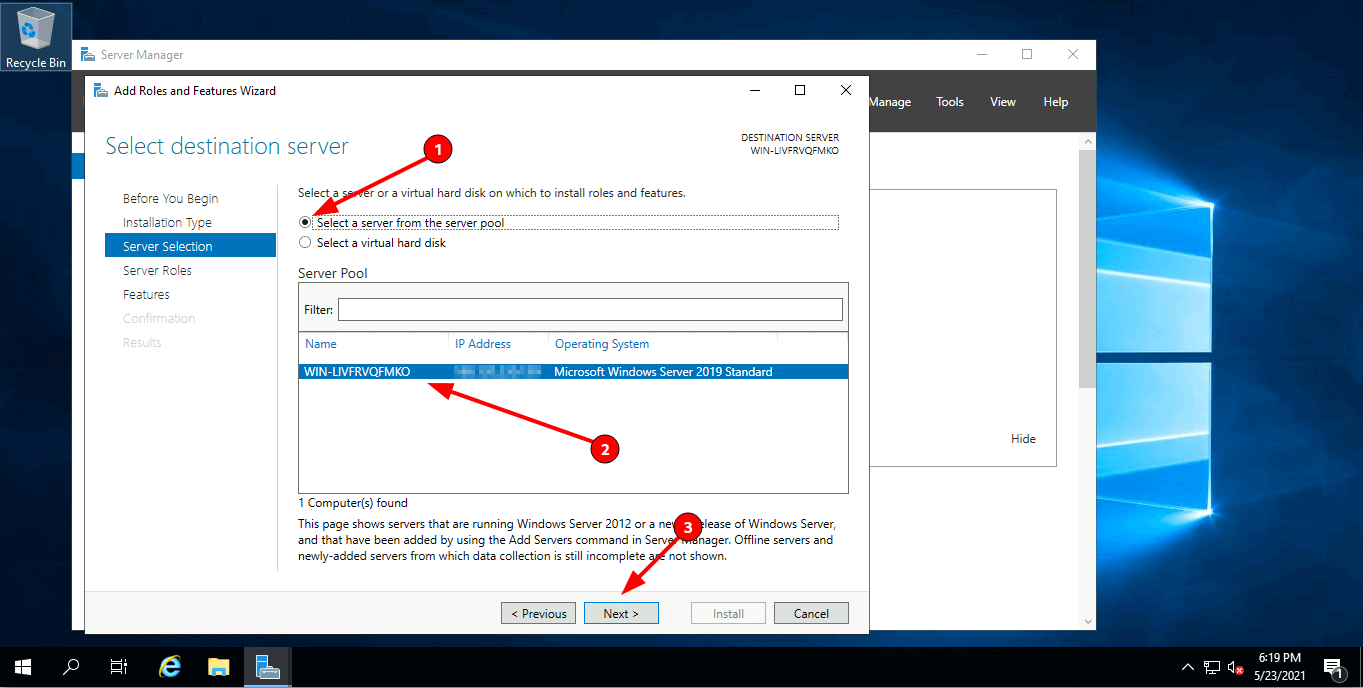
Далее из списка серверов, выбираем нужный сервер, в качестве примера он один, поэтому жмём Далее (Next).
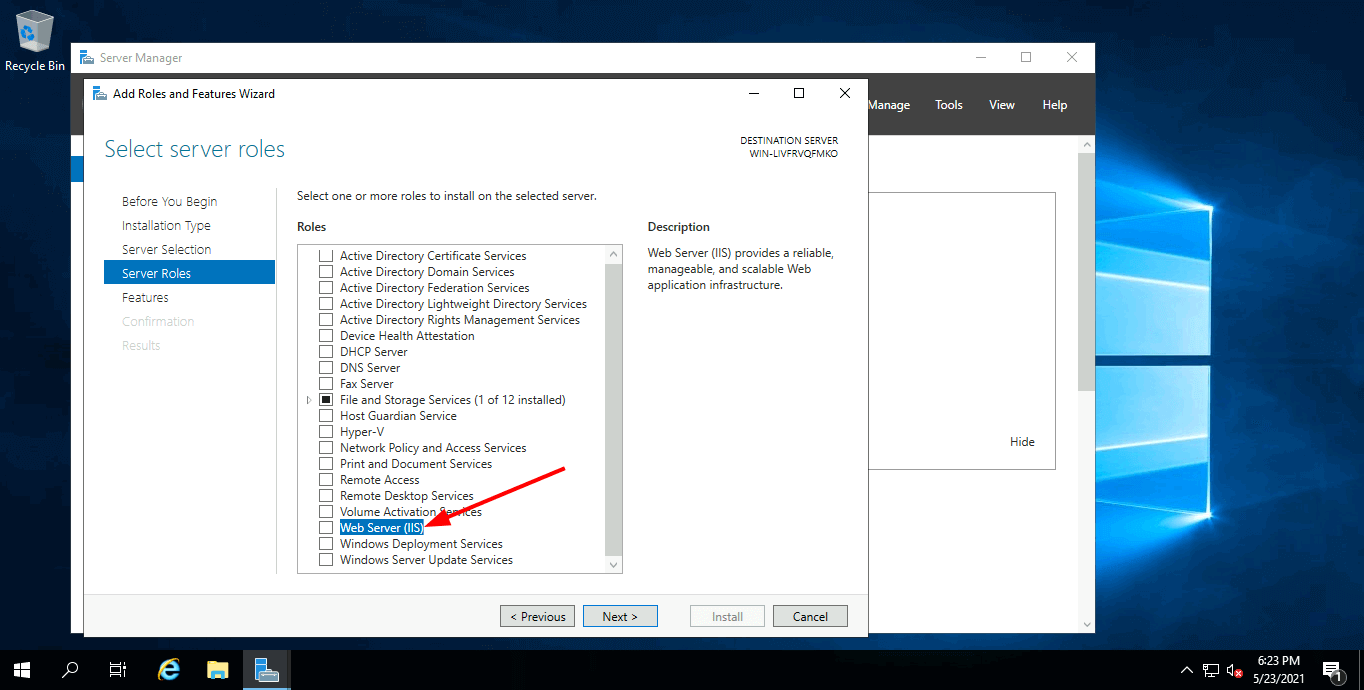
На этапе выбора ролей отмечаем роль Веб-сервер (IIS) (Web Server (IIS)).
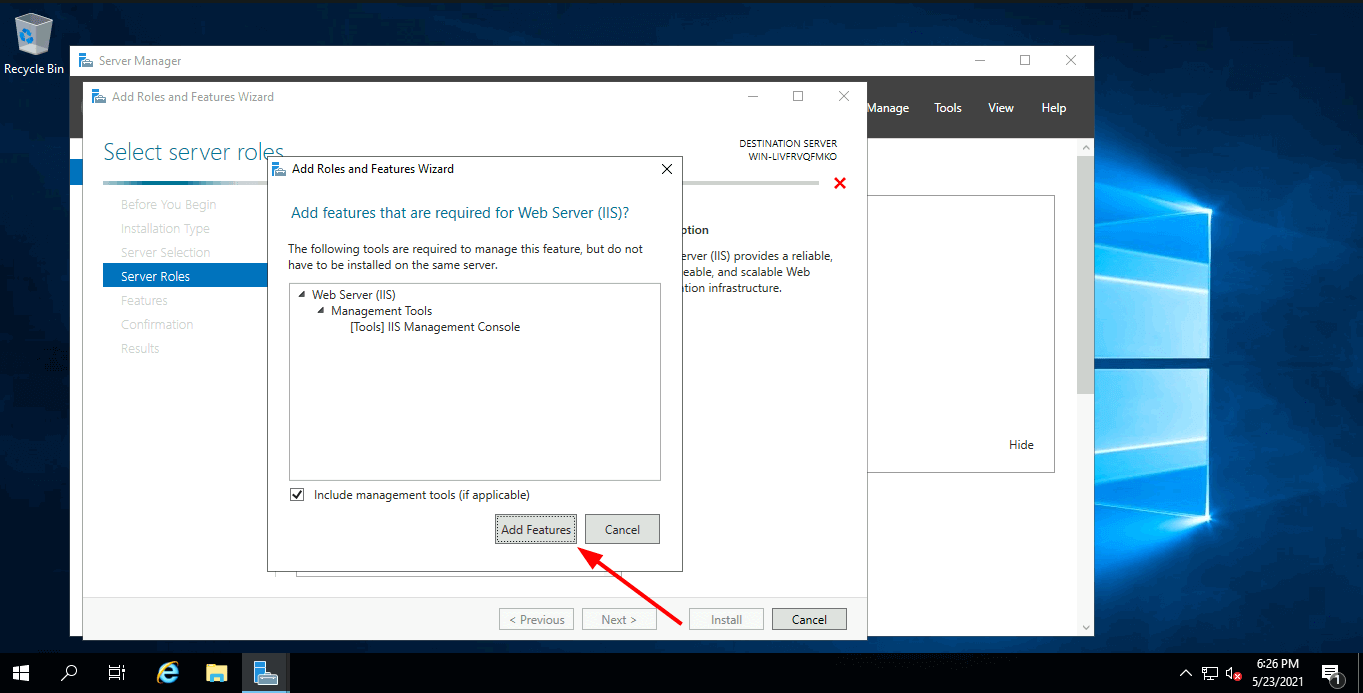
Откроется окно и предложит установить Консоль управления службами IIS (IIS Management Console), жмем Добавить компоненты (Add Featues), они понадобятся, чтобы администрировать FTP-сервер, жмем Далее (Next).
Следующие 2 шага пропускаем, нажимая Далее (Next).
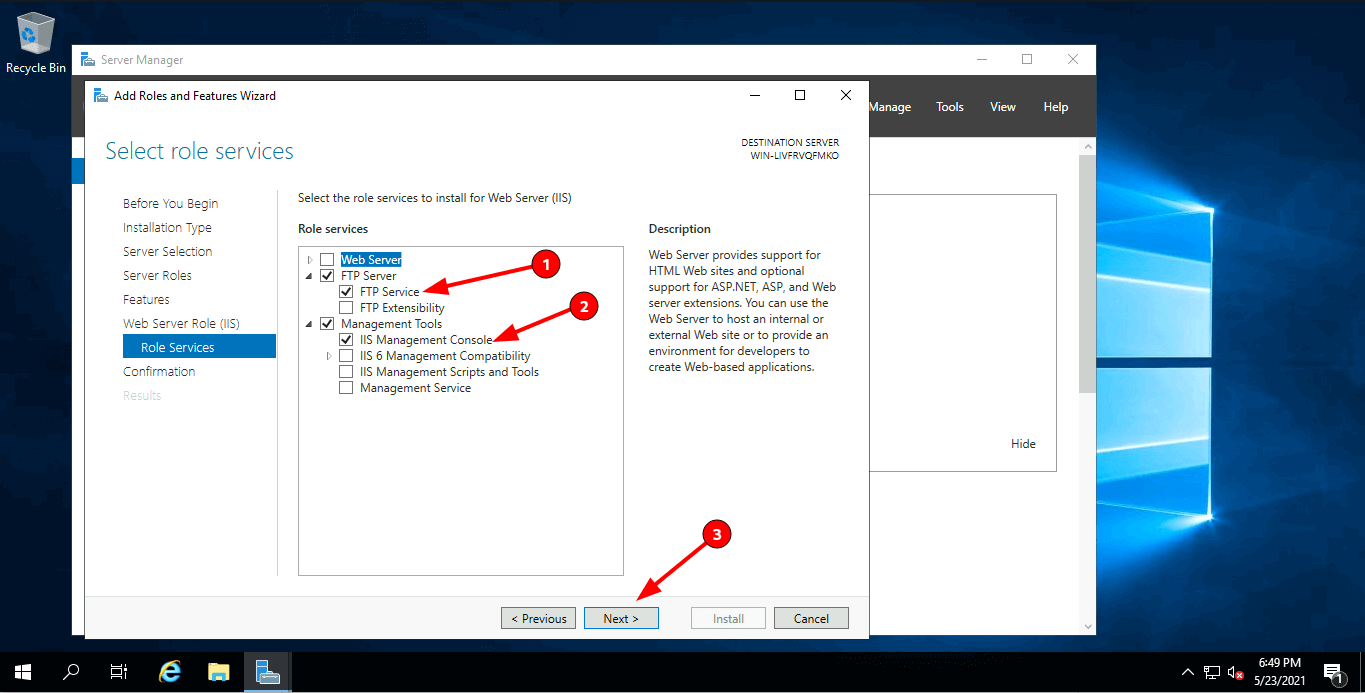
Дойдя до пункта Службы ролей (Role Services), снимаем все галочки и выбираем Служба FTP (FTP Service) и Консоль управления службами IIS (IIS Management Console), жмем Далее (Next).
На следующем пункте проверяем все компоненты и жмём Установить (Install).
Дожидаемся окончания установки, после чего жмём Закрыть (Close).
Далее ещё нужно настроить пару моментов, не торопитесь перезагружать сервер.
Настройка Брандмауэра
Для подключения к FTP-серверу необходимо настроить Firewall. Для этого откройте Брандмауэр Windows в режиме повышенной безопасности (Windows Firewall with Advanced Security).
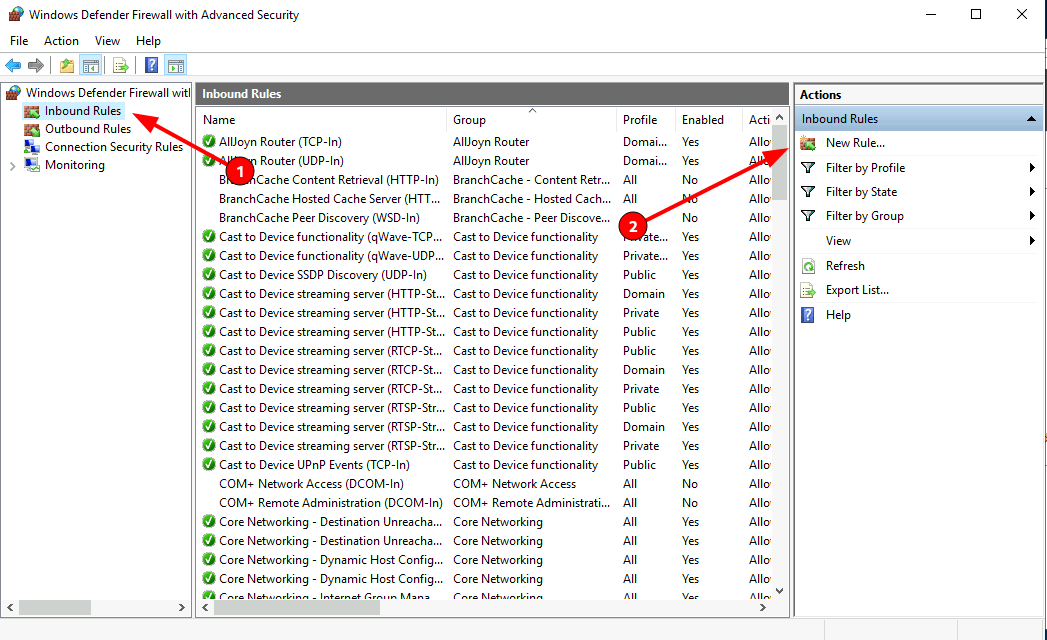
В вертикальном меню слева выберите Правила для входящих подключений (Inbound rules), затем в вертикальном меню справа Создать правило (New Rule).
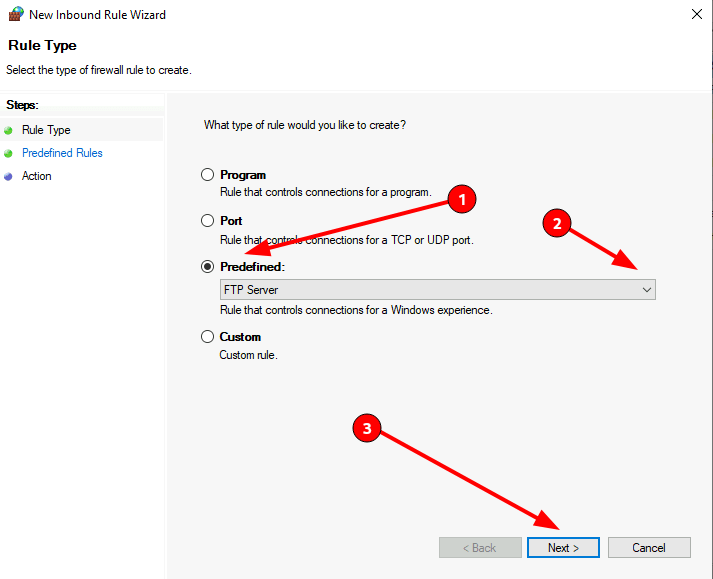
В открывшемся окне отмечаем тип Предопределенные (Predefined) и в выпадающем списке выберите FTP-сервер (FTP Server). Нажмите Далее (Next).
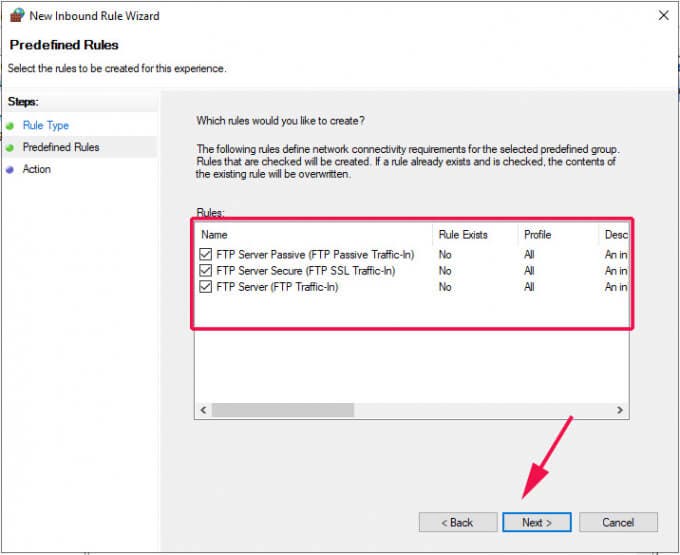
Отмечаем все галочки, Далее (Next), Готово (Finish). Перезагружаем сервер для применения всех настроек.
Создание пользователей
Теперь нужно создать пользователей, которым дадим право подключаться к FTP-серверу.
Открываем Управление компьютером (Computer Management).
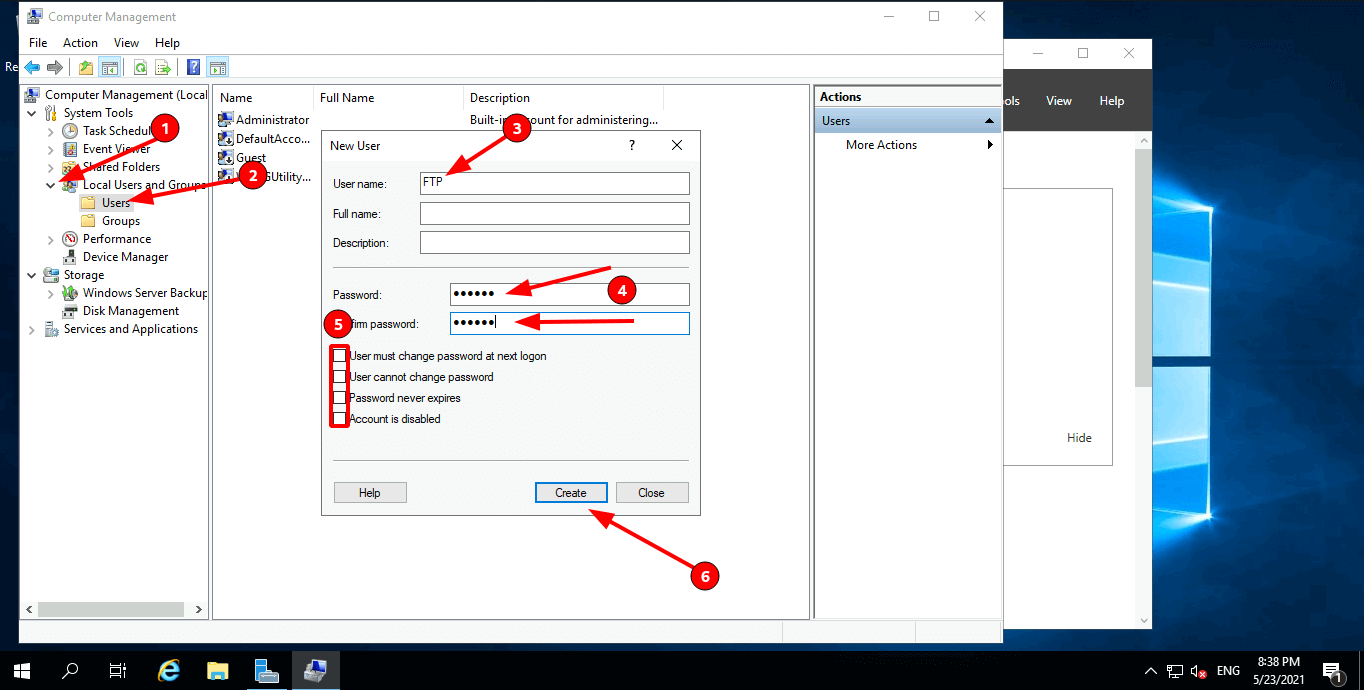
Открываем пункт Локальные пользователи и группы (Local Users and Groups), щелкаем правой кнопкой мыши по пункту Пользователи (Users) и выбираем Новый пользователь (New User). Заполняем необходимые поля, снимаем все галочки и жмем Создать (Create).
Если появилась следующая ошибка при создании пользователя, значит пароль не соответствует нужным требованиям:
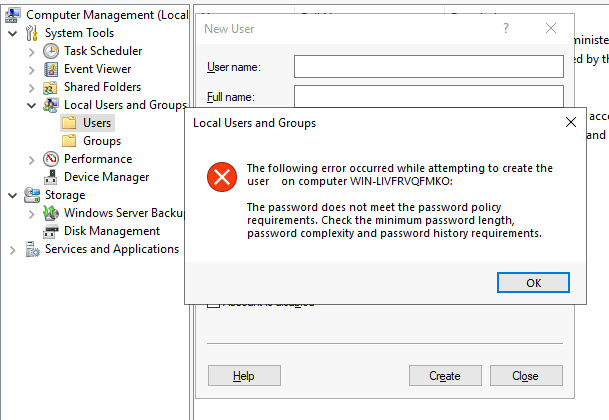
Пароль должен соответствовать как минимум трём условиям из списка перечисленного ниже:
- Наличие прописных букв английского алфавита от A до Z;
- Наличие строчных букв английского алфавита от a до z;
- Наличие десятичных цифр (от 0 до 9);
- Наличие неалфавитных символов (например, !, $, #, %).
Настройка FTP-сайта
Открываем Диспетчер служб IIS (Internet Information Server (IIS) Manager).

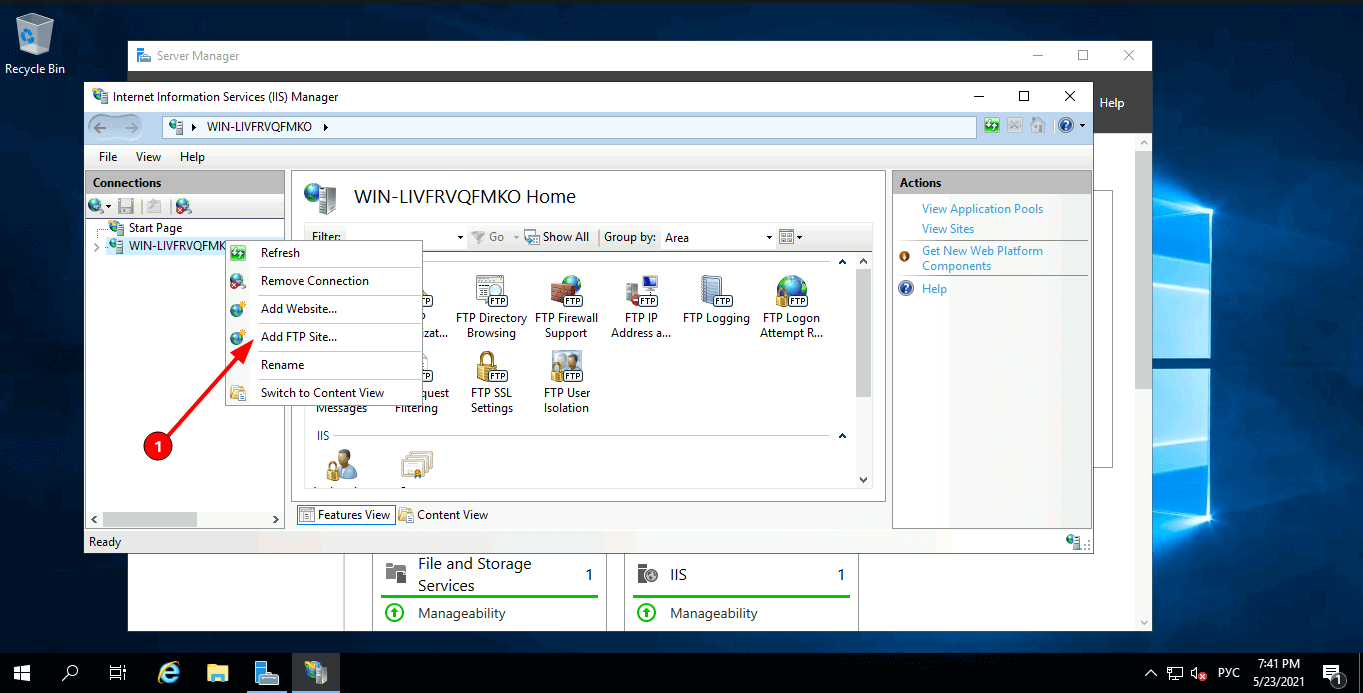
В окне Подключения (Connections), кликаем правой кнопкой мыши по нашему сайту, выбираем Добавить FTP-сайт (Add FTP Site).
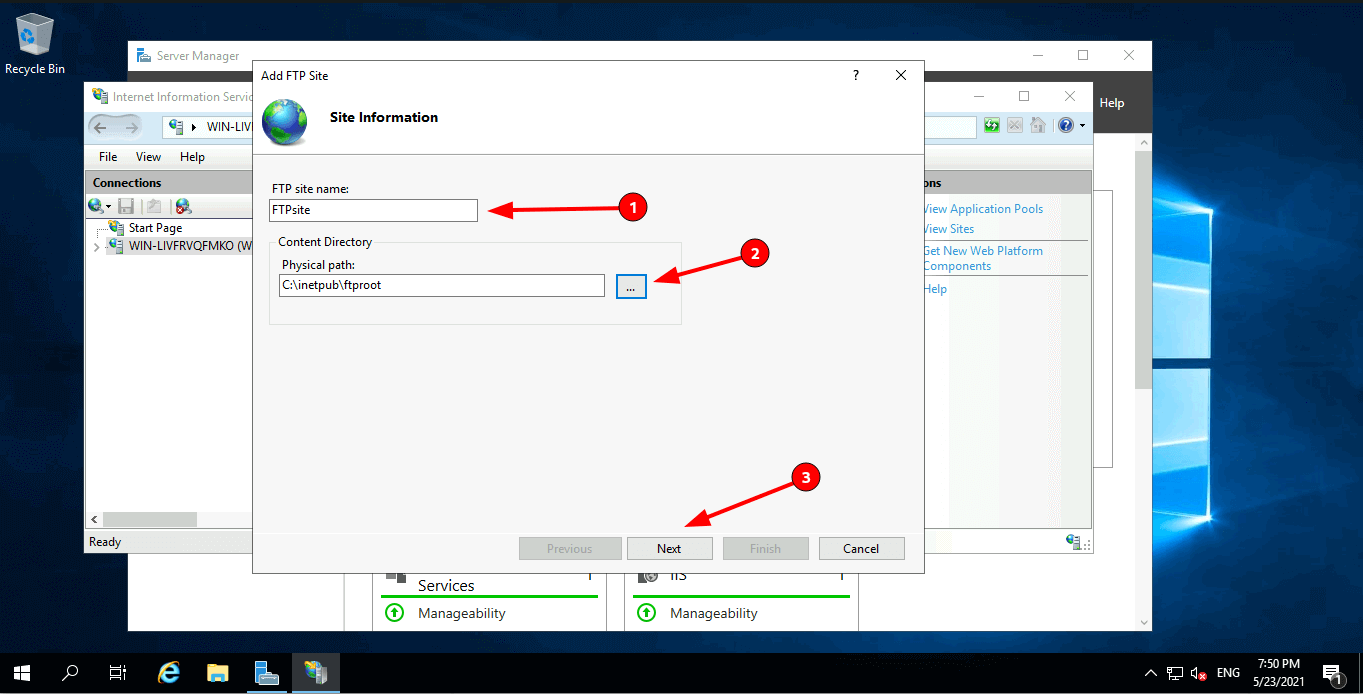
В открывшемся окне Добавить FTP-сайт (Add FTP Site) вводим название нашего FTP-сайта, указываем нужную директорию и жмём Далее (Next).
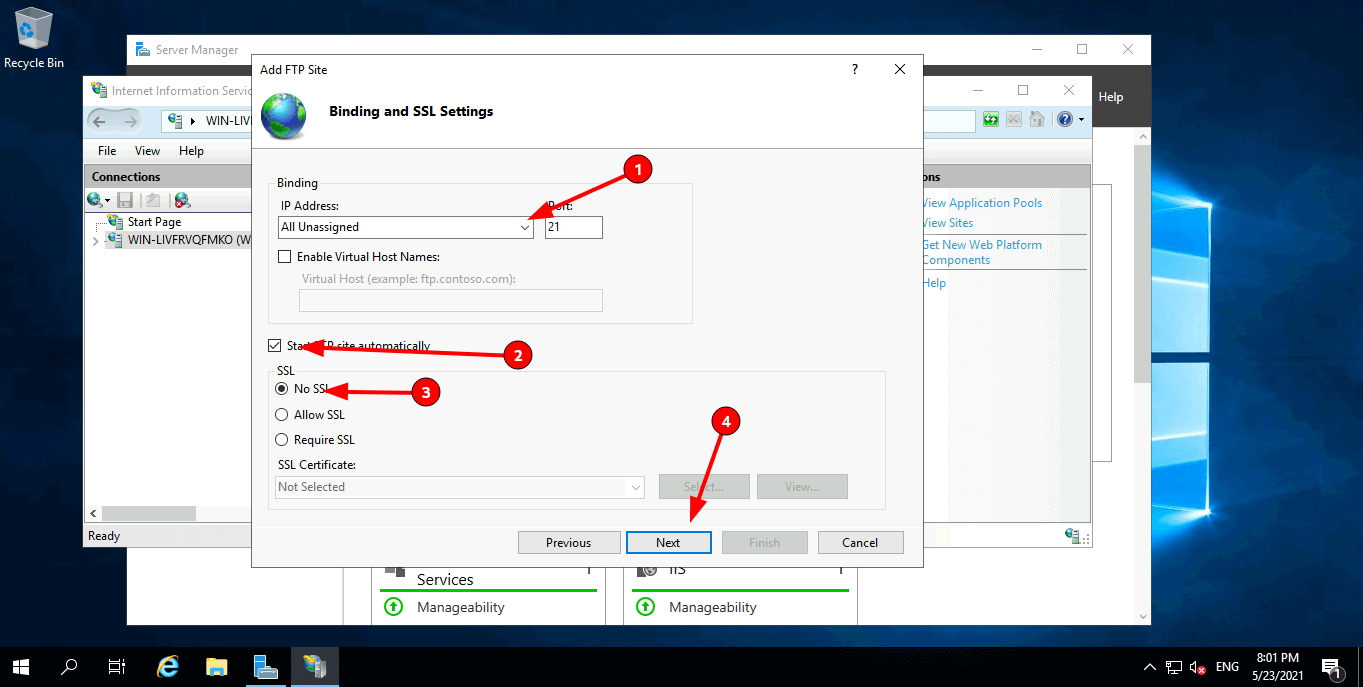
Далее указываем IP-адрес из выпадающего списка, или указываем Все свободные (All Unassigned). Отмечаем галочку ниже. Указываем настройки SSL, если нужно чтобы использовалось шифрование, устанавливаем SSL-сертификат, если нет, то выбираем первый вариант, как показано в примере. Жмём Далее (Next).
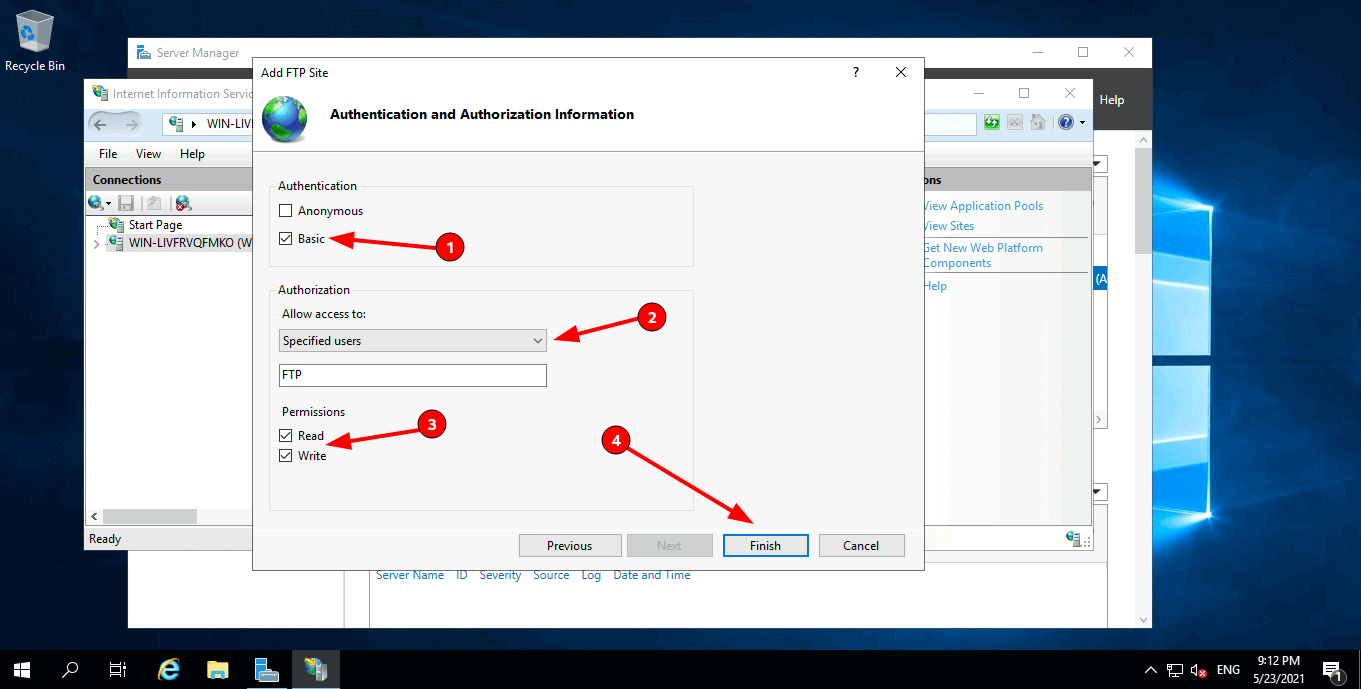
Выбираем проверку подлинности как Обычную (Basic). Из выпадающего списка выбираем Указанные пользователи (Specified users), и вводим имя ранее созданного пользователя. Ставим галочки напротив необходимых разрешений: Чтение (Read) или Запись (Write). Нажимаем Готово (Finish).
Изоляция пользователей
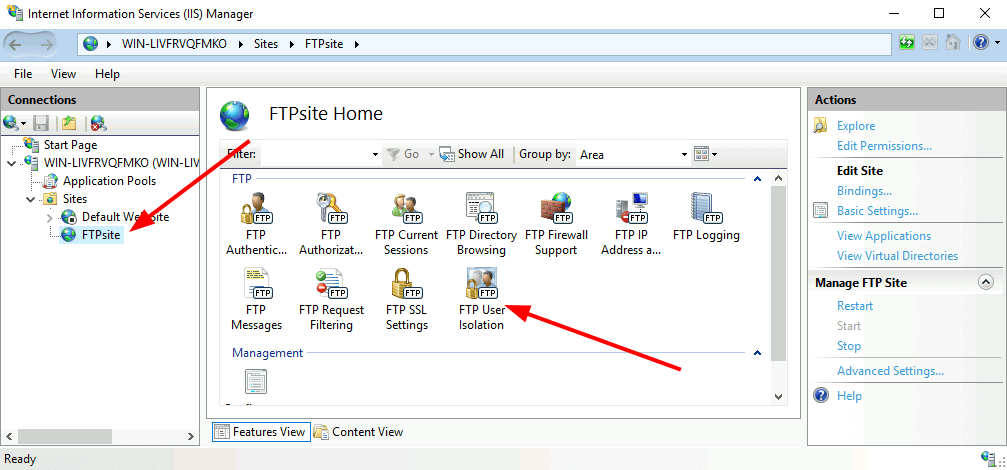
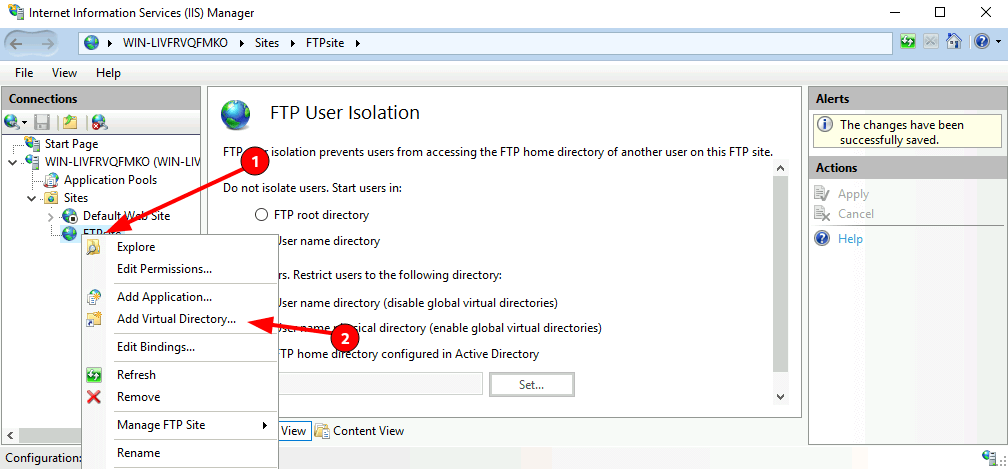
Чтобы после подключения к FTP-серверу пользователь попадал в свою директорию и не имел доступ к чужим файлам других пользователей, необходимо настроить их изоляцию. Для этого откройте настройки вашего ftp сайта и выберите Изоляция пользователей (FTP User Isolation).
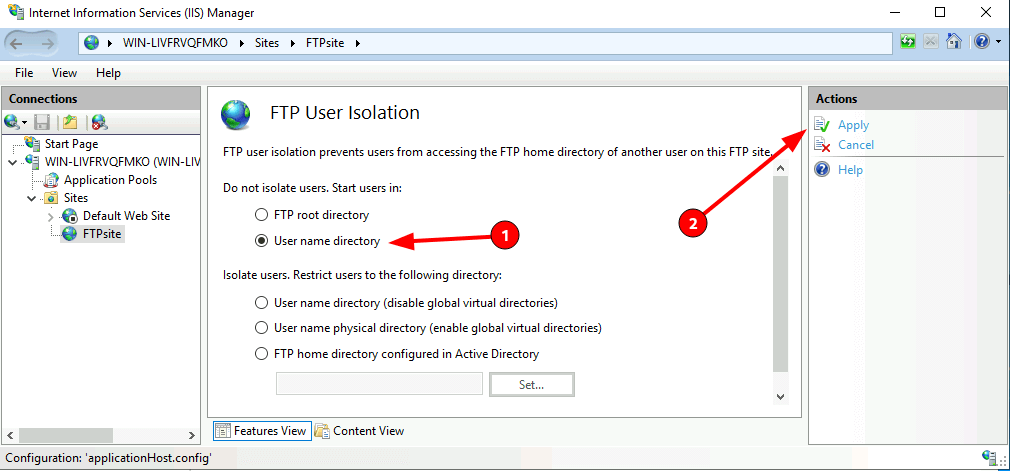
Выберите Каталог имени пользователя (User name directory) и Примените (Apply).
Кликаем правой кнопкой мыши по нашему FTP-сайту, выбираем Добавить виртуальный каталог (Add Virtual Directory).
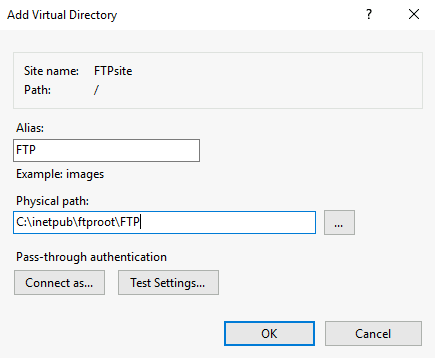
В первой строке указываем имя FTP-пользователя, ниже полный путь к директории пользователя. Её нужно создать заранее. Для понимания какая директория кому принадлежит, лучше создавать директорию с именем пользователя.
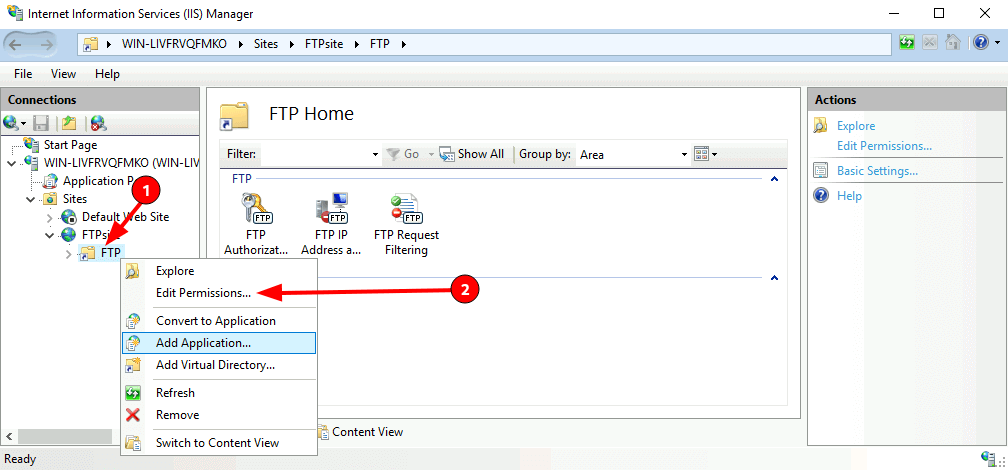
Необходимо настроить права на виртуальный каталог, кликаем правой кнопкой мыши по нему, выбираем Редактировать разрешения (Edit Permission).
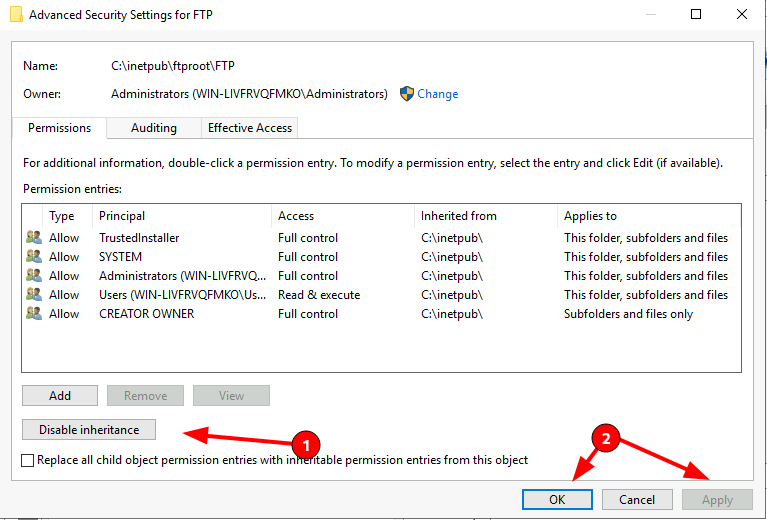
Переходим во вкладку Безопасность (Security) и жмём кнопку Дополнительно (Advanced).
В окне жмём кнопку Отключение наследования (Disable inheritance), в новом окне выбираем первый вариант, затем Применить (Apply) и ОК.
Жмём кнопку Изменить (Edit).
Удаляем группу пользователей Users, и добавляем нового пользователя.
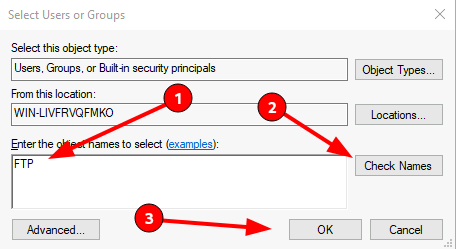
В новом окне, нужно ввести имя FTP-пользователя, для проверки нажмите Проверить имена (Check Names). Если пользователь есть, строка, где вводили имя, дополнится, нажмите ОК.
Даём все права пользователю на его директорию, отметив все галочки в первой колонке, жмём Применить (Apply) — ОК.
На этом все настройки завершены. Чтобы подключиться к серверу, используйте следующие доступы:
- Хост: IP сервера
- Пользователь: FTP-пользователь, которого вы создали
- Пароль: Пароль от FTP-пользователя
Подключиться можно через разное ПО, например FileZilla или, если вы используете Windows — Проводник, введя в адресной строке ftp://IP-сервера, после чего откроется окно для входа.
FTP-серверы широко используются для обмена файлами между клиентами и серверами. Если вы работаете в среде Windows Server 2019 и хотите установить и настроить FTP-сервер, то в этой статье мы покажем вам, как это сделать.
IIS FTP-сервер является одним из вариантов FTP-сервера, который можно установить на сервере Windows Server 2019. Он обеспечивает простоту управления и безопасность передачи файлов. Для установки и настройки IIS FTP-сервера на сервере Windows Server 2019 следуйте инструкциям ниже.
Шаг 1: Установите IIS
Первым шагом является установка IIS на сервере Windows Server 2019. Для этого необходимо открыть Server Manager и выбрать опцию «Add Roles and Features». Следуйте инструкциям мастера установки, чтобы установить IIS на сервере.
Для этого выполните следующие действия:
Выберите «Установка ролевых служб или функций» и нажмите «Далее». Выберите ваш сервер из пула серверов и нажмите «Далее».
Нажмите «Add Features» во всплывающем окне.
Нажмите «Далее» и затем «Установить», чтобы установить функцию FTP-сервера.
Шаг 2: Установите FTP-сервер
После установки IIS необходимо установить FTP-сервер. Чтобы это сделать, откройте Server Manager и выберите опцию «Add Roles and Features». В мастере установки выберите опцию «FTP Server», а затем выберите опцию «FTP Service».
После установки, перезагрузите сервер.
Шаг 3: Настройте FTP-сервер
После установки FTP-сервера необходимо настроить его. Для этого выполните следующие шаги:
Откройте Internet Information Services (IIS) Manager.
-
В окне IIS Manager слева у вас будет дерево серверов. Раскройте его, выберите свой сервер, затем выберите Sites, затем нажмите правой кнопкой мыши и выберите Add FTP Site….
-
Введите имя для вашего FTP-сайта, а также полный путь к папке, которую вы хотите сделать доступной через FTP. Нажмите Next.
-
В следующем окне укажите IP-адрес для FTP-сайта. Если вы хотите, чтобы сайт был доступен для всех IP, просто оставьте это поле пустым. Также можно указать порт (по умолчанию 21).
-
В секции SSL можно выбрать No SSL для простой настройки, но для продакшн-сервера лучше использовать SSL.
-
На следующем экране в секции Authentication and Authorization Information выберите Basic для Authentication, а для Authorization выберите «Specified users» и введите имя пользователя. Для Permissions выберите Read и Write. Нажмите Finish.
После успешного добавления можем увидить такой результат.
Шаг 4: Проверьте работу FTP-сервера
После настройки FTP-сервера необходимо проверить его работу. Мы можем это сделать через любимый браузер FileZilla. Но при подключении может возникнуть такая ситуация.
Ошибка «Не удалось получить список каталогов» часто связана с проблемами активного и пассивного режимов FTP. Но в нашем случае мы не открыли нужные порты в Брандмауере. Сделаем это.
Шаг 5: Настройте доступ через брандмауэр
Для FTP-сервера, вам нужно убедиться, что соответствующие порты открыты. Обычно FTP использует порт 21 для командного канала и порты 1024-65535 для пассивного режима. Вот как это можно сделать:
-
Откройте Control Panel. Выберите System and Security, затем Windows Defender Firewall.
-
Слева выберите Advanced settings. Это откроет окно Windows Defender Firewall with Advanced Security.
-
Здесь вы можете увидеть все входящие и исходящие правила, а также создать новые. Для создания нового правила выберите Inbound Rules слева, затем New Rule… справа.
-
В мастере создания нового правила выберите Port и нажмите Next.
-
Убедитесь, что выбрано TCP. В поле Specific local ports введите «21,1024-65535» и нажмите Next.
-
Выберите Allow the connection и нажмите Next.
-
Оставьте все три опции (Domain, Private, Public) отмеченными и нажмите Next.
-
Введите имя для правила, например, «FTP» и нажмите Finish.
Повторите процесс для исходящих правил. Теперь брандмауэр должен разрешить трафик через необходимые порты для вашего FTP-сервера.
Помните, что если у вас есть сторонний брандмауэр или аппаратный брандмауэр, вам может потребоваться настроить их отдельно.
После этого FTP-сервер будет доступен через брандмауэр.
Выводы
Установка и настройка IIS FTP-сервера на сервере Windows Server 2019 не является сложной задачей. Следуя инструкциям, приведенным выше, вы сможете быстро настроить FTP-сервер и обмениваться файлами между клиентами и сервером. Не забудьте также настроить доступ через брандмауэр, чтобы обеспечить безопасность передачи файлов.
Configuring an FTP server on Windows Server 2019 consists of several stages. First, you need to install the server itself, then create and isolate users, configure a firewall, and establish an FTP connection. This guide will explain all the steps in detail.
First, let’s quickly remember what an FTP server is. It is only the first part of the infrastructure that allows data to be transferred between hosts. The second part is the client. A connection is established between them that uses the File Transfer Protocol.
The main advantage of this connection is that it is cross-platform. However, there are many disadvantages: the file sharing is not very fast, and there are security issues. Despite all that, the protocol is still widely used.
Install FTP server
To continue with this guide, you need a host with Windows Server 2019 installed and configured.
To install an FTP server:
-
Open the Start menu and launch Server Manager. You will configure the basic settings through this utility.
-
Click Add roles and features.
-
The Add Roles and Features Wizard will launch. Click Next.
-
Select the Role-based or feature-based installation option and click Next.
-
In the next window, select the default server; this is the server where roles should be installed.
-
Check the role Web Server (IIS).
-
In the next window, click Add features.
-
Skip the next two steps by clicking Next; nothing needs to be changed.
-
In Role Services select FTP Service and IIS Management Console.
-
Check the list of components ready for installation and click Install.
After installation is complete, close the wizard window.
Firewall setup
To configure a firewall that protects an FTP server on Windows, go to the Tools menu in the Server Manager top right and run Windows Defender Firewall with Advanced Security.
-
In the left menu, go to Inbound rules.
-
In the right menu, select New rule.
-
In the rule settings, select the Predefined type and the FTP server value.
-
Select all the options, click Next, and then Finish.
To apply the new configuration, reboot the server.
User management
One of the protocol’s main problems is its low level of security. Therefore, you need to be very strict about the list of users who can connect to the server. For this purpose, groups or individual users are configured.
-
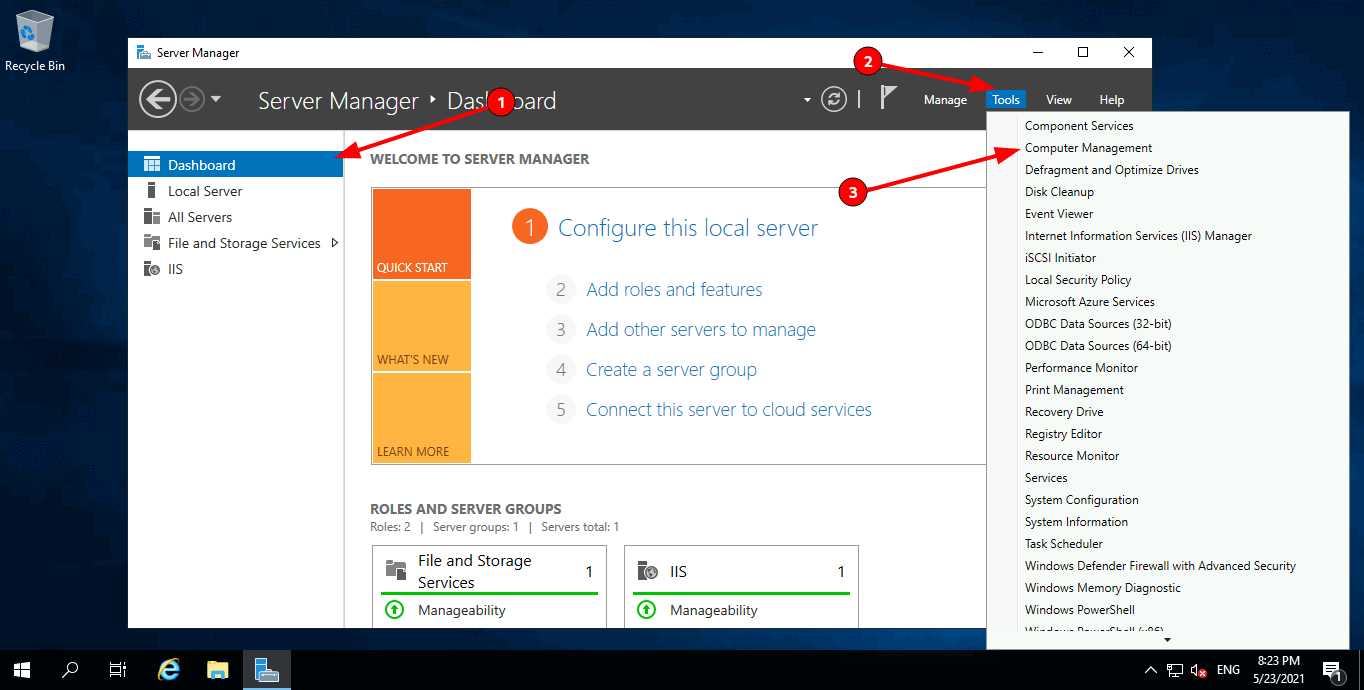
Go to the Tools menu in the Server Manager and select Computer Management.
-
Go to Local Users and Groups.
-
Right-click the context menu of the Users item and proceed to create a new account.
-
Enter your username and password. Select your account settings. For example, you can enable a requirement to change your password the first time you connect. Or vice versa, prohibit changing passwords.
For the system to accept a password, it must meet at least three of the four following security requirements:
-
Have lowercase Latin letters.
-
Have uppercase Latin letters.
-
Have numbers.
-
Have special characters like !, $, #, %.
Adding a site
For further work, we need to add an FTP site. After creating users, we return to the Server Manager. All Windows FTP server setup will take place here.
-
Go to the Tools and launch the Internet Information Services Manager tool.
-
In the Connections section, double-click the sever and select Add FTP Site.
-
Enter the site name and select the folder with its content.
-
Specify the IP address to connect or set the mode to All Unassigned.
-
Configure SSL settings. You can choose not to use encryption or enable it and add your own certificate. Click Next.
-
Select Basic authentication. Grant authorization permission to Specified Users.
-
Enter the name of the created account.
-
Grant the read and write permissions.
-
Click Finish.
Directory Isolation
In one of the previous steps, we showed how to create users which can connect to the server. However, more is needed to provide even minimal security. Another critical point is isolation.
Let’s say we are setting up a server for a television company. The company needs to share videos between departments: the camera operators upload the footage, the editors edit it, and the correspondents watch it.
Isolation allows you to ensure that each type of user has access only to specific directories.
We have an FTP site. Let’s go to the settings and restrict availability zones between different accounts.
-
Go to the Tools and launch the Internet Information Services Manager tool.
-
Right-click on your FTP site and select FTP User Isolation.
-
Select User name directory and click Apply.
-
Right-click on the FTP site and add a virtual directory.
-
Enter your login and, in the line below, the full path to the folder this account can use.The directory should already exist. We recommend using the login in the directory name to make it easier to figure out who can go where.
We have one virtual directory. Let’s change access permissions.
-
Right-click on our new virtual directory and go to editing permissions.
-
Open the Security tab and click Advanced.
-
Disable inheritance and save changes.
-
Return to the Security options.
-
Click Edit under the list of groups/users.
-
Remove the Users group and add a new user.
-
Enter the FTP user name and run name checking.
-
Click OK to save your changes.
-
Select the new user, check all the permission checkboxes in the Allow column, and click Apply.
The configuration of the FTP server for Windows is complete.
Connection via FTP
We figured out how to create an FTP server on Windows Server 2019 and set up user accounts. Finally, let’s see how to connect to our file storage.
A client is required to establish a connection. One of the most popular is FileZilla. You can also use WinSCP.
To connect, you will need:
-
The server IP address.
-
Name and password for the created account.
After establishing the connection, the user will see the directory you specified in the site settings. If you have configured directory isolation, the user will go to the virtual directory and cannot move to other people’s folders.
FTP, an acronym for File Transfer Protocol, is a standard protocol for sharing files over the internet or a simple LAN. FTP servers have existed for over 30 years and have facilitated file sharing in a simple, yet effective manner.
Nowadays, FTP has been replaced by more secure options, such as SFTP (Secure File Transfer Protocol) and FTPS (FTP over SSL), that encrypt data sent to and from the servers. Nonetheless, it’s prudent that we appreciate the basics of installing an FTP server and see how it can be configured for simple file sharing.

In this guide, we take you through the installation and configuration of the FTP server on Windows Server 2019. There are two ways you can install the FTP server. You can use the Server Manager graphical tool, or use Windows Powershell if you enjoy working on the terminal. We will cover each of these in turn.
How to Install FTP Server using Server Manager
Server Manager is a graphical console that was introduced in Windows Server 2008. The objective was to help System Administrators easily install and manage various features and roles on the server. To install the FTP server using Server Manager, follow the steps as illustrated.
Step 1: Launch Server Manager
Usually, the server manager utility launches automatically upon logging in. Alternatively, you can click on the ‘Start’ menu button and select ‘Server Manager’ from the pull-up menu that appears.
Once launched, click on the ‘Add roles and features’ option as shown.

Step 2: Proceed with the installation
Clicking the ‘Add roles and features’ option launches the installation wizard. The Wizard gives you a summary of the tasks you can perform such as adding/removing roles and features. You will be required to have a few prerequisites in order before proceeding.
Once you have gone over the summary, simply click ‘Next’.

Step 3: Select the Installation Type
In the next step choose ‘Role-based or feature-based’ installation and click ‘Next’.

Step 4: Select the Destination Server
You will thereafter be required to select the server upon which you will install the roles and features. By default, the server you are working on will be selected. Just accept the defaults and hit ‘Next’.

Step 5: Select Server Roles to be Installed
In the next step, a list of server roles will be listed. Click on the ‘Web Server IIS’ option.

This launches a pop-up window that lists the roles to be installed as shown.
Click on ‘Add features’ and hit the ‘Next’ button to proceed to the next step.

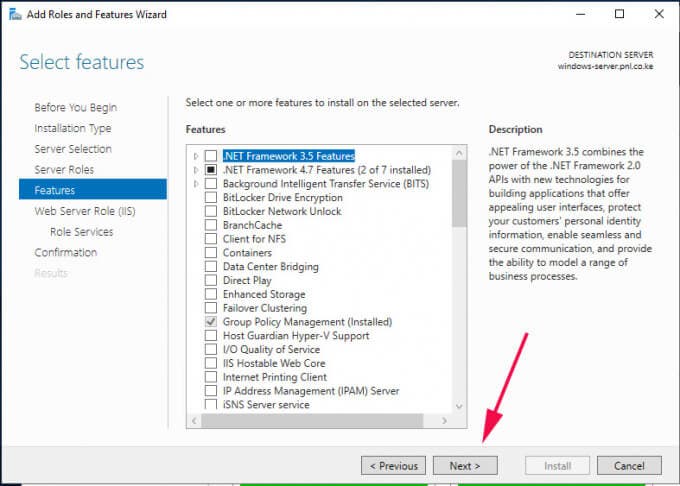
Step 6: Select Server Features
Nothing much is required in this step, so once again, click on the ‘Next’ button.
Step 7: Web IIS overview
The next step gives you a glance about what a web server is and the role it plays. So, once again, simply click ‘Next’ to proceed to the next step.

Step 8: Select Role Services
This is the quintessential step where we shall select the FTP feature. Simply scroll and check off the ‘FTP Server’ checkbox and the corresponding FTP sub-options (FTP service and FTP extensibility). Then click ‘Next’.

Step 9: Confirm Installation
Finally, you will be presented with a summary of the roles and features that you have selected to be installed. To confirm and initiate the installation process, click on the ‘Install’ button.

The installation will take a while, so some patience will come in handy. Once the installation is complete, reboot your server for the roles and features to be fully enabled.

As we mentioned, we can install FTP using Windows Powershell. All the steps that we have just gone through can be summarized in one single command on Windows Powershell as follows:
Install-WindowsFeature Web-FTP-Server -IncludeManagementTools
Step 10: Create and FTP directory
To this point, we have installed the FTP server feature on the system, and a root default directory is created to that effect. The path of the root directory is at C:\inetpub.
We are going to create a custom FTP directory where we are going to place files and directories which can be accessed by authorized users across the network.
Therefore, navigate to the C:\inetpub path. Right click and select ‘New’ then ‘Folder’. Give the folder your preferred name. In this case, we have created a folder called myFTPdirectory.

We need to assign this directory the required permissions so that an authorized user can read from its contents. To achieve this, right-click on the directory and select ‘Properties’.

In the ‘Properties’ window pop-up, click on the ‘Security’ tab to adjust the permissions. Select the group which you want to allow access to the directory. In this case, I have selected the ‘Users’ group. Then click on the ‘Edit’ button to assign permissions to the group.
For our example, we clicked on ‘Full control’ and hit the ‘Apply’ button.
Then click ‘Ok’. This takes you back to the Properties window where, once again, you will click on the ‘Ok’ button.
Step 11: Create an FTP Site
We have assigned all permissions on our FTP directory to the Users group. The next step will be to create an FTP site which we shall map to the FTP directory.
On the Server manager, click on ‘Tools’ then select ‘Internet Services Information (IIS) Manager’ option.

On the IIS Manager window that appears, click the server name at the left pane to reveal more options. Right-click on the ‘Sites’ option and select ‘Add FTP site’.

In the next step, provide the FTP site name and the Physical Path by clicking on the adjacent button with three dots and navigating to the FTP directory that we created in the previous step.

Then click ‘Ok’ then ‘Next’ to go to the next step.
In the ‘Binding and SSL settings’ step, provide your server’s IP address, FTP port. Be sure to select the -‘No SSL’ option since we are not using an SSL certificate to secure the site.

The final step requires you to select the authentication type and configure which users will have access to the FTP site. Select ‘Basic’ authentication.
Under authorization, click on the ‘Specified users’ option – if you want a single user to access the site – and right below that specify the username of the user.
Alternatively, you can allow a group of users by selecting ‘Specified roles or user groups’ and specifying the user group in the ‘text field’ provided. Then check off ‘Read’ and ‘Write’ permissions and hit ‘Finish’.

Up until this point, we have successfully configured the FTP server. The only bit remaining is to configure the firewall to allow remote users to access the FTP site.
Step 12: Configure the Firewall
FTP listens on port 21, and therefore, we need to allow this port across the firewall. To start off, click on the ‘Start’ menu button and search for ‘Firewall with Advanced security’

On the left pane, click on ‘Inbound rules’ and the head over to the extreme right and click on ‘New rule’.

On the ‘Rule Type’ window, select the ‘Predefined’ option and select ‘FTP server’ in the drop-down menu. Click ‘Next’.

Ensure that all the firewall rules are checked off and click ‘Next’.
Finally, click on ‘Allow the connection’ and click ‘Finish’.

Our FTP server can now be accessed remotely from either a Windows or Linux/UNIX system. The only thing remaining is to test if we can make a connection to the server.
Step 13: Test FTP server
To test if your FTP server is working as expected, head over to a remote system and launch command prompt. Next, type the command below:
ftp server-ip
You will be required to authenticate, so provide your username and password.

The output above confirms that we have been able to successfully log in.
Let’s try something more ambitious. We are going to create a directory and navigate into it using the commands shown:
ftp> mkdir reports
ftp> cd reports

To verify the existence of the directory, use the ls command , just as you would in a Linux system when listing files.
ftp> ls

Alternatively, You can head over to your browser and head over to the URL shown:
ftp://server-ip
In the authentication pop-up, provide your username and password and click on the ‘Sign In’ button.

And voila! There goes your directory!

This confirms that our FTP server is working as expected.
Conclusion
This brings to an end our topic today. We have successfully installed and configured FTP server on Windows Server 2019. An FTP server provides a convenient way of hosting and sharing files and directories across a network to specific users or groups of users in Active directory.
However, as we pointed out earlier, FTP is now considered unsafe and extra steps are needed to secure it using an SSL certificate to keep malicious users from eavesdropping on the communication between the FTP server and the client PC. Let us know your thoughts in the comments. Enjoy!
How to Install and Configure FTP Server on Windows Server 2019
Key Points From the Articles:
- The File Transfer Protocol (FTP) enables file transfers between a server and a service user via a TCP/IP network.
- As one of the most prominent OS servers, Windows Server features built-in setup and configuration support via installation wizards that enable you to install services and configure roles as needed.
- You can install and configure an FTP server using an interface-based server OS like Windows Server.
- Installing and configuring an FTP server using Server Manager is a process that entails several steps.
The File Transfer Protocol (FTP) is a service that enables files to be transferred between a server and a client system via a TCP/IP network. In other words, it is a collection of guidelines regulating how you share and edit files by creating, renaming, or deleting them. It enables users to upload or download files from an FTP server.
Window Server is a popular OS server designed for network engineers and administrators. Its main advantage is that it simplifies installing other features, such as configuring it as an FTP server. That’s, if your Windows Server has a set of specific features, you can install and configure FTP on it. Here are the steps you need to take to install and configure FTP using Server Manager.
What You Need to Know About FTP Server and Windows Server
FTP adheres to the client-server model, which means that for a client’s request, such as a download or upload, to be completed, there must be a server on the receiving end. As a result, it serves as a proxy and can be set to limit file and folder transfers.
For an FTP server to function correctly, it must have two ports, one for sending orders and other interactions and the other for routing data back and forth. It also has two modes of operation: active and passive. In active mode, the client connects with the command channel; however, for the data channel to be established, the server has to satisfy the data request.
On the other hand, in passive mode, the client initiates both channels and then instructs the server to listen on a port instead of attempting to set up a connection to the client’s end. And for a perfect connection, the server returns to the user the port number it has picked to listen on.
Windows Server features Microsoft’s sophisticated PowerShell command line and the classic Windows GUI to enable comprehensive user control. With an interface-based server OS like Windows Server, you can establish virtual machines and set the server to whatever purpose you want. It has built-in setup and configuration assistance in the form of installation wizards that allows the user to install services and set functions as requested.
The most recent updates to Window Servers have focused on adding new features that help with network speed, enhancing security, network encryption, and containerization.
Steps to Install and Configure FTP Server on Window Server
To install the FTP server using Server Manager, follow the steps as illustrated.
Step 1: Start Server Manager
To launch a Server Manager, visit the menu button, click ‘Start’ followed by Server Manager and the ‘Add roles and features’ option.
Step 2: Installation
When you select the ‘Add role and feature’ option, the installation wizard will launch, summarizing tasks that you may perform, such as adding or eliminating roles and features. Click ‘Next’ to continue.
Step 3: Choose the Type of Installation
Select role-based or feature-based installation, then click ‘Next’. Accept the default because this is the server where the roles and features will be installed, then click ‘Next’ to proceed.
Step 5: Pick Roles to Install
From the list of Server Roles, click ‘Web Server (IIS)’, then ‘Add Features’ in the pop-up that appears, and then ‘Next’.
Step 6: Choose Features
Just click ‘Next’ in the Select Feature stage, then again in the “Web Server Role (IIS)” stage.
Step 7: A Glance at Web IIS
This step gives you a view of what a web server is and the function it plays. Hence, select ‘Next’ to progress to the next phase.
Step 8: Choose Role Services
This step allows you to choose the FTP feature. Scroll down and check the ‘FTP Server’ option and the associated FTP sub-options, primarily FTP service and FTP extensibility. Then press the ‘Next’ button.
Step 9: Confirm FTP Server Installation
After carefully reviewing the summary of roles and features you picked, click ‘Install’ to confirm and begin the procedure. Once the installation is complete, restart your server to activate the roles and features properly.
If you want to install an FTP server using Windows Powershell, use the following command: Install-WindowsFeature Web-FTP-Server -IncludeManagementTools
Step 10: Create a Custom FTP Directory
After installing the FTP server feature on the system, you can now use C:inetpub to establish a root default directory. This is critical since it is where you will store files and folders that will be accessible to approved clients across the network.
Open C:inetpub and Right-click to choose ‘New Folder’. Assign the folder the name you wish. After that, right-click on the directory and pick ‘Properties’ to grant the directory the necessary permissions to allow an authorized user to view its contents.
To change the permissions, click on the ‘Security’ option in the property window pop-up. Choose the group to which you want to grant directory authority. Next, click the ‘Edit button’ to apply group permissions, followed by ‘OK’. You will be redirected to the Properties window; click ‘OK’ once more.
Step 11: Add FTP Website
This step assists you in creating an FTP site that you will connect to the FTP directory. To do so, navigate to the Server Manager, click ‘Tools,’ and thereafter choose the ‘Internet Services Information (IIS) Manager’ option. Hit the server name in the left pane of the IIS Manager window that displays to provide more choices. Right-click on the ‘Sites’ tab, followed by ‘Add FTP site’.
Next, enter the Physical Path and FTP site name by tapping the adjacent three-dot button and opening the FTP directory you established in the previous step. Then select ‘Ok’ and then ‘Next’ to continue.
The subsequent step is ‘Binding and SSL settings,’ in which you will input your server’s IP address and FTP port. If you aren’t utilizing an SSL certificate to safeguard your site, ensure that you pick the ‘No SSL’ choice.
Finally, choose the authentication method and specify which clients will have accessibility to the FTP site. If you want one user to navigate the site, set ‘Basic’ authentication and ‘Specified users’ for authorization.
Step 12: Set up the Firewall
FTP usually listens on port 21; thus, allow this port via the firewall. You can do this by going to the ‘Start’ menu and searching for ‘Firewall with Advanced security’. Select ‘Inbound rules’ from the left pane and ‘New rule’ from the far right.
On the ‘Rule Type’ window, select ‘Predefined,’ then ‘FTP server’ from the drop-down selection. To ensure that all firewall options are set, click ‘Next’ and then ‘Next’ again. Then select ‘Allow the connection’ and then ‘Finish’.
The Bottom Line
The steps described above can help you successfully install an FTP server on Windows Server 2019. An FTP server allows users to host and share files across networks in a convenient manner. It can, however, be risky, necessitating the deployment of additional security measures, such as an SSL certificate, to lock out malicious users.