
FileZilla Server – это сервер который поддерживает FTP и FTP через SSL/TLS и обеспечивает безопасное шифрованное подключение к серверу.
FileZilla поддерживает SSL. Такой же уровень шифрования поддерживает ваш браузер, чтобы защитить вашу информацию. Когда вы используете SSL ваша информация шифруется так, что никто не сможет подсмотреть её, поэтому ваша конфиденциальность гарантирована. Также поддерживается функция сжатия «на лету», что ускоряет передачу данных.
К сожалению, опция сжатия данных может иногда работать некорректно, поэтому рекомендуется пользоваться ею с осторожностью. Есть вероятность, что уже сжатые файлы будут переданы, имея больший размер, чем исходные.
Поддержка SFTP (SSH File Transfer Protocol) не предусмотрена в Filezilla Server.
Загрузить FileZilla Server
Смотрите также
Настройка сети, Параметры командной строки (сервер)
Установка и настройка в Windows
- Запустите exe установщик
- Нужно выбрать admin port и запомнить его
- Запустите FileZilla Server Interface
- Введите admin port и пароль для администратора, нажмите ok/connect
- Создайте профиль пользователя и/или группу с разрешениями для home directory.
- Создайте еще один каталог и включите отображение alias name в home directory (/AliasName)
- Завершите установку
Установка на Windows 7 с встроенным брандмауэром
После установки убедитесь, что FileZilla Server внесен в список разрешенных программ встроенного брандмауэра. В Control Panel, откройте System and Security. В разделе Windows Firewall, нужно выбрать ‘Allowed Programs’ для того чтобы открылось окно настроек. Нужно выбрать обе Частную и Общественную сеть для «FileZilla Server» (Не «FileZilla Server Interface». Если «FileZilla Server» нету в списке, нужно добавить»C:\Program Files\FileZilla Server\FileZilla server.exe» в соответсвии с тем куда был установлен клиент). Если не выбрать Частную Сеть, входящее FTP соединение будет заблокировано.
FileZilla — один из лучших бесплатных FTP-менеджеров, который поможет вам скачать и загрузить
файлы с FTP-серверов.
Программа обладает удобным и приятным интерфейсом, присутствует множество поддерживаемых языков, а также
разнообразие настроек и возможностей.
Доступна для разных операционных систем, существует portable версия, которую вы можете установить на
флэш-диск, кроме того, удобна для обновления файлов на вашем хостинге.
| Burgundy.ru – команда ведущих экспертов по винам Бургундии и Шампани в России | |
Здравствуйте админ, объясните мне пожалуйста, что такое FTP сервер и могу ли я сам создать его на своём компьютере? Короче, у меня дома есть обычный системный блок и три ноутбука, все эти машины подключены к интернету через роутер, могу ли я из стационарного компьютера сделать настоящий FTP сервер, и прямо со всех ноутбуков скачивать и закачивать на него файлы? Просто на обычном компьютере установлен жёсткий диск на 3 ТБ и получается, что им никто не пользуется, все родичи предпочитают ноутбуки, на которых уже заканчивается дисковое пространство.
Во-первых, FTP — это протокол передачи файлов по сети интернет по принципу «клиент-сервер», а FTP сервер, это хранилище файлов в интернете, то есть — обычный компьютер с установленной Windows 7, 8.1 или Windows Server 2012 и несколькими жёсткими дисками большого объёма, на которых могут быть расположены любые ваши файлы. На этом компьютере установлена программа, например — FileZilla Server, подключиться к этому компьютеру может любой другой с помощью: командной строки, проводника Windows и различных программ, рассмотрим в нашей статье две: FileZilla Client, и Total Commander. После подключения к FTP-серверу вы можете закачивать на него любые файлы (фильмы, музыку и т.д) и также скачивать. Управление FTP-сервером будет осуществлять администратор, установивший программу — FileZilla Server. Именно в ней можно каждому пользователю присвоить различные права доступа (возможность изменения файлов на сервере): Append (возможность изменения файлов), Read (только чтение), Write (запись), Delete (удаление). Естественно, большей части пользователей можно не давать права Delete (удаление).
Примечание: Практически из любого компьютера или ноутбука (пусть даже с одним жёстким диском) можно сделать FTP сервер и подключать к нему другие компьютеры для получения файлов и вовсе необязательно то, чтобы все компьютеры были подсоединены к одному роутеру, FTP-сервер можно создать на просторах интернета и открыть к нему доступ сотням и тысячам пользователей.
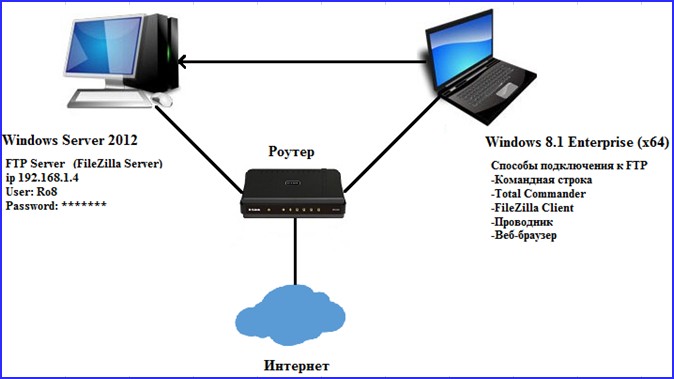
В качестве программной реализации FTP сервера в статье будет рассмотрена программа FileZilla Server, которая будет установлена на машину с Windows Server 2012. Также в качестве машины с которой будет производится подключение к созданному FTP серверу выступает компьютер с предустановленной Windows 8.1 Enterprise (x64). Для того, чтобы машина с Windows 8.1 могла подключиться к FTP серверу, на нее будет произведена установка программы FileZilla Client (один из способов подключения с помощью данной программы). Переходим по адресу https://filezilla-project.org и скачиваем FileZilla Server и FileZilla Client
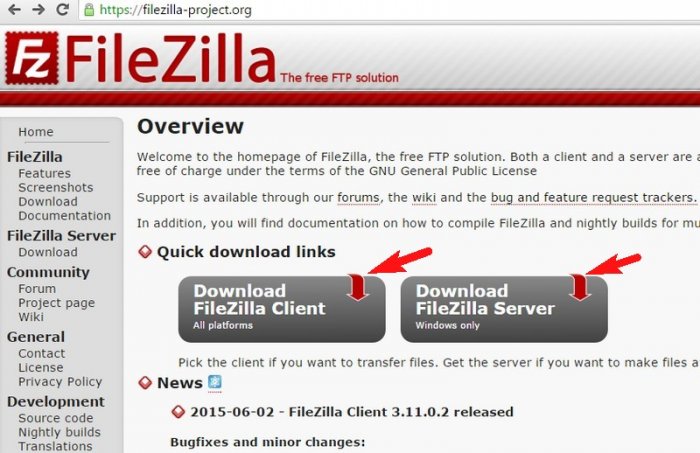
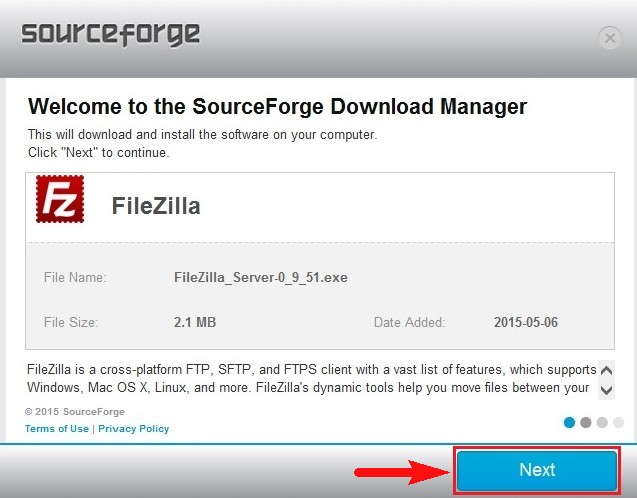
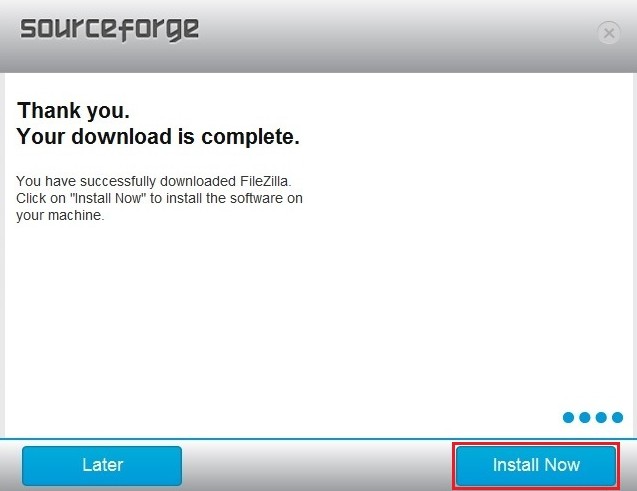
Скачанный файл FileZilla Server запускаем на машине с Windows Server 2012, а файл FileZilla Client на машине с Windows 8.1. Обе программы устанавливаются одинаково. В первую очередь установим программу FileZilla Server.
После запуска скачанного файла FileZilla Server на Windows Server 2012 нажимаем далее
Нажимаем Установить
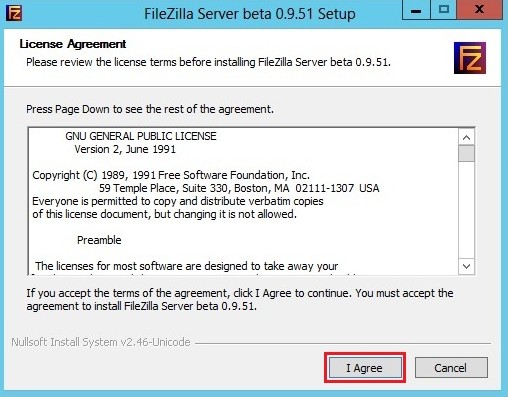
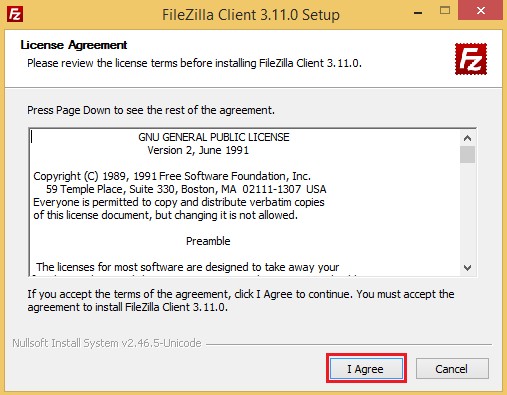
Принимаем лицензионное соглашение
Далее
Далее
Далее
Установить
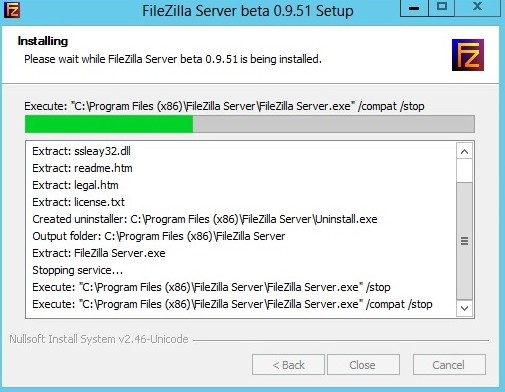
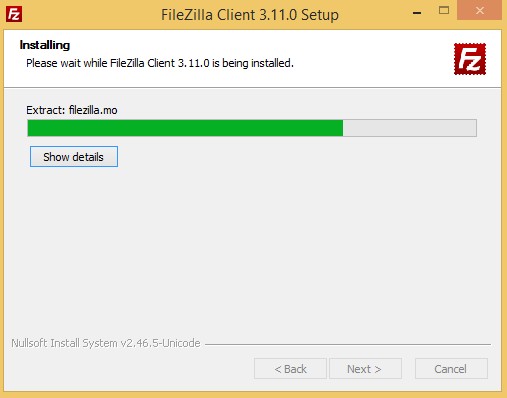
Процесс установки FileZilla Server
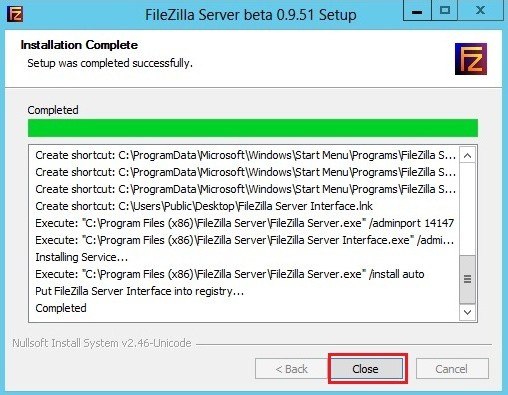
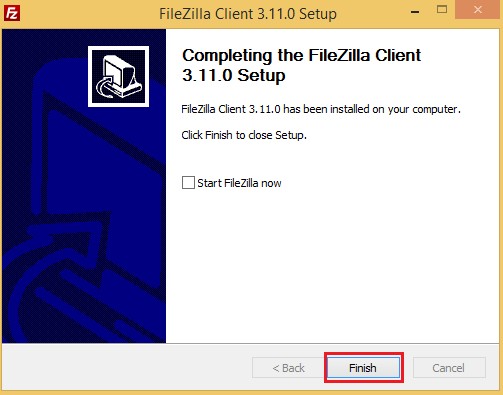
Установка завершена
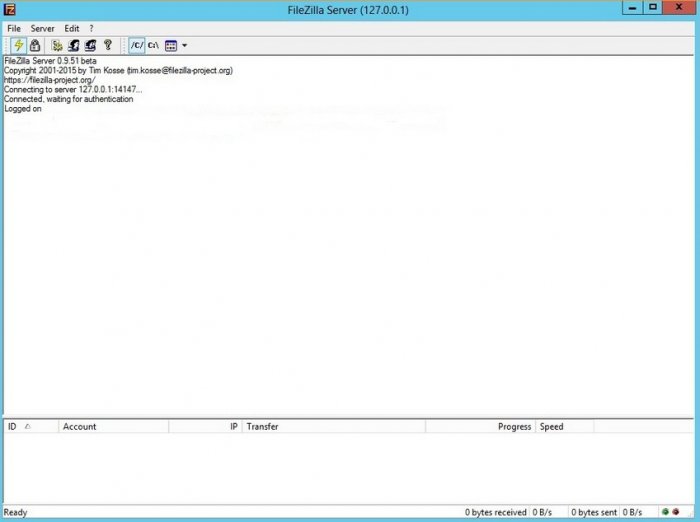
После установки откроется вот такое окно, в котором вводим локальный адрес FTP сервера и нажимаем OK
После ввода локального адреса FTP сервера появится основное окно программы FileZilla Server
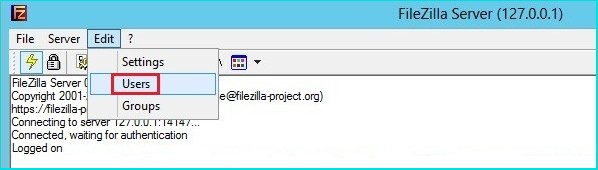
Произведем некоторые настройки выбрав Edit-Users
На вкладке General для добавления нового пользователя нажимаем на кнопку Add
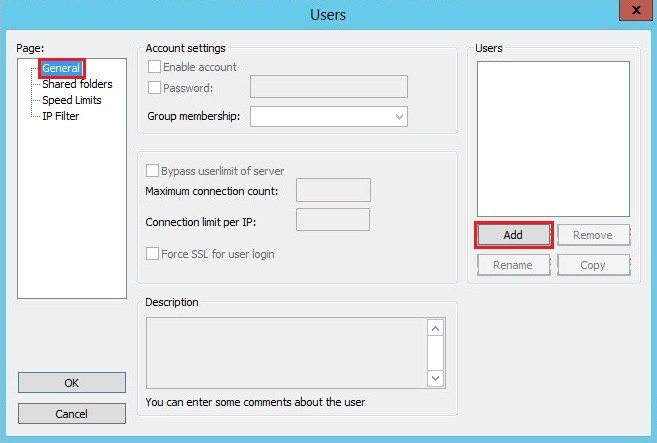
Вводим имя пользователя. ОК
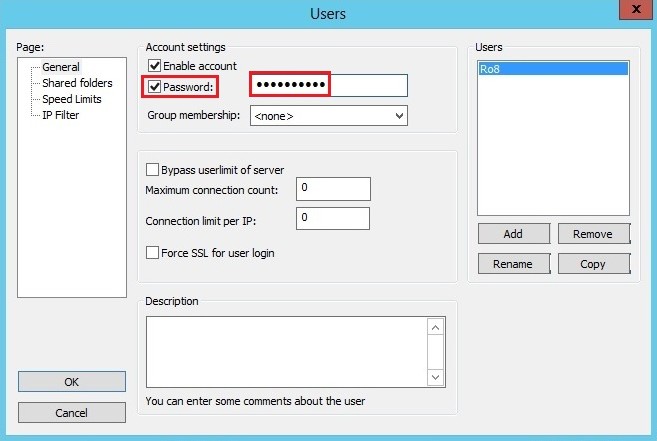
Напротив Password ставим галочку и вводим пароль добавленного пользователя
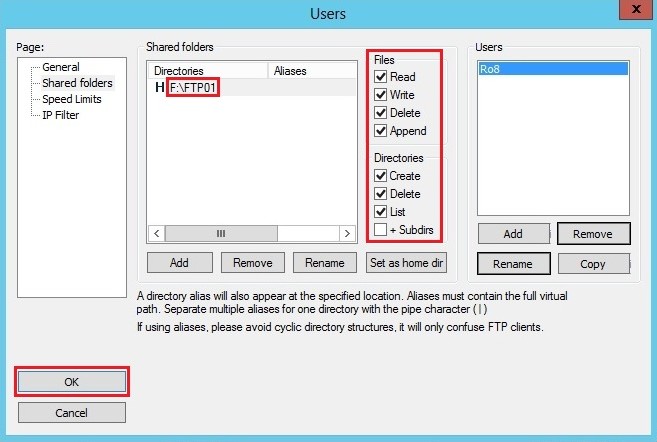
Переходим на вкладку Shared Folders. На данной вкладке добавим папку FTP01 которая будет доступна созданному пользователю Ro8. Нажимаем Add

Указываем заранее созданную папку FTP01. ОК
Выделяем добавленную папку и указываем для нее права доступа: — Read (только чтение), Write (запись), Delete (удаление), Append (возможность изменения файлов в данной папке)
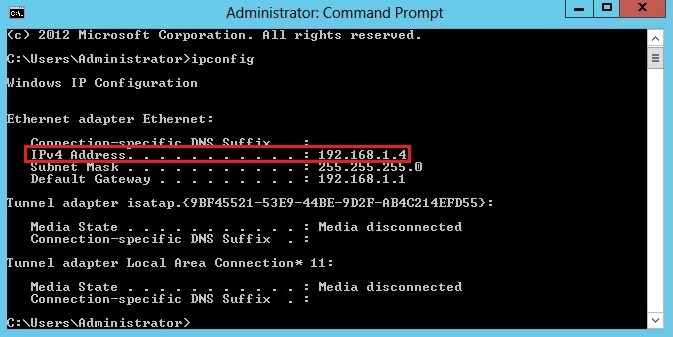
Определяем ip адрес машины с Windows Server 2012 (192.168.1.4)
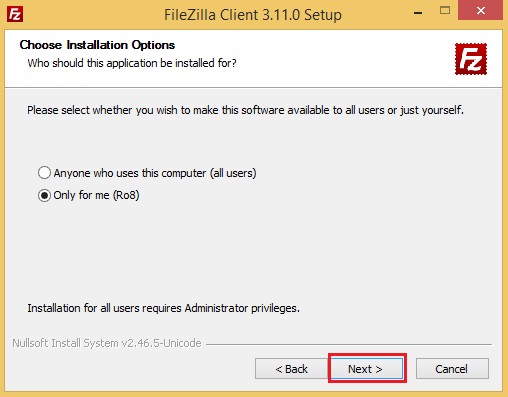
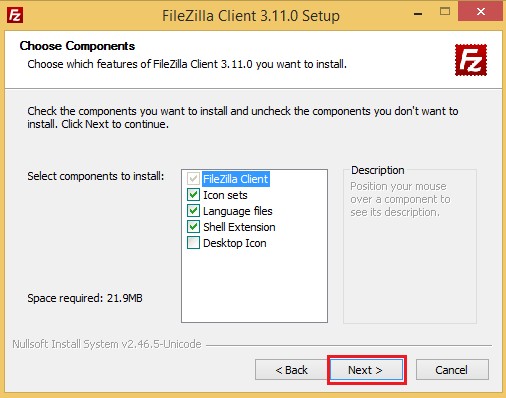
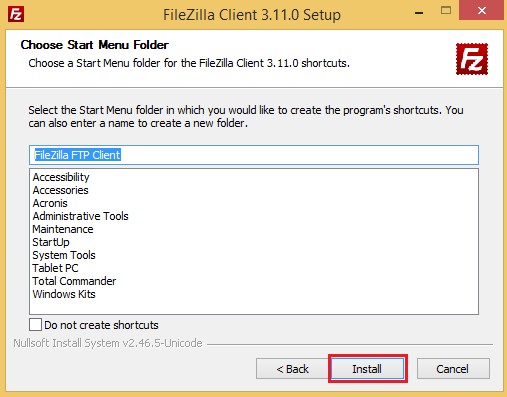
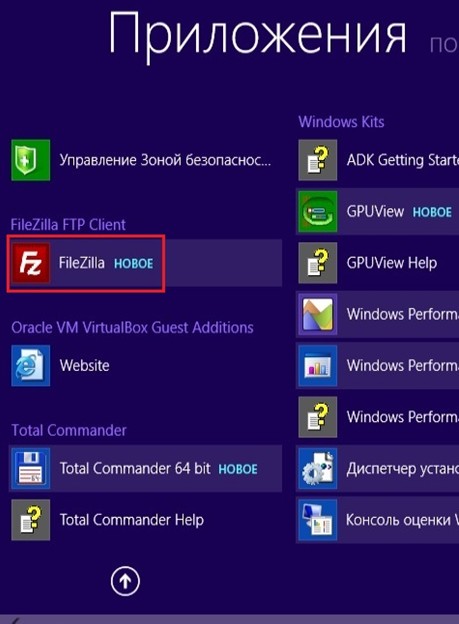
Переходим на машину с Windows 8.1 и производим установку программы FileZilla ClientПринимаем лицензионное соглашение
Далее
Далее
Далее

Установка
Установка завершена
У нас есть сеть, представленная на схеме
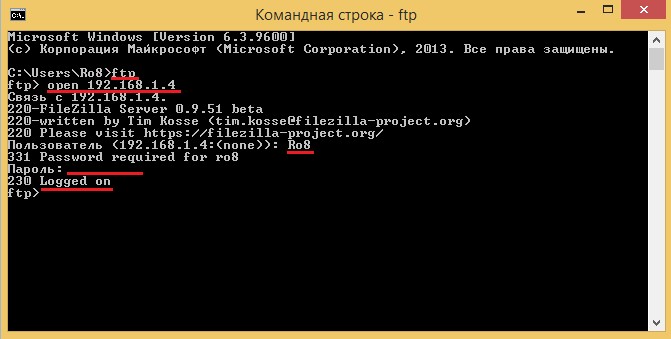
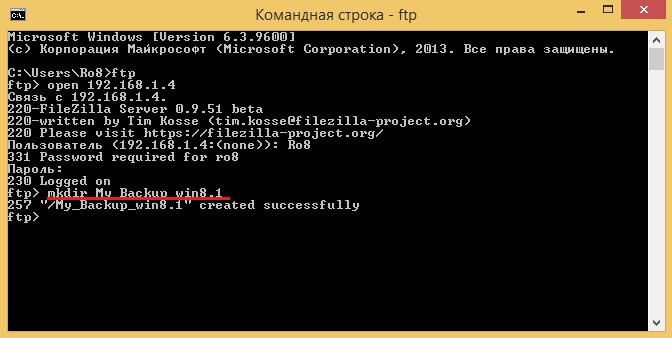
Подключимся к FTP серверу используя командную строку На машине с Windows 8.1 запустим командную строку. Вводим команду ftp
Далее вводим команду open 192.168.1.4, где 192.168.1.4 — ip адрес FTP сервера. Указываем имя пользователя (Ro8) и вводим пароль. Пароль при вводе не отображается Logged onозначает что мы произвели вход на FTP сервер
Создадим папку My_Backup_win8.1 на FTP сервере — введя команду mkdir My_Backup_win8.1
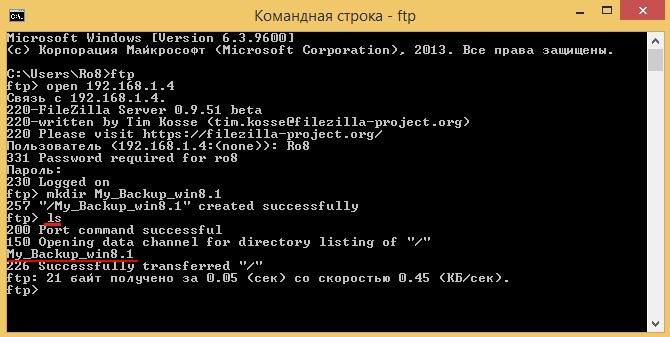
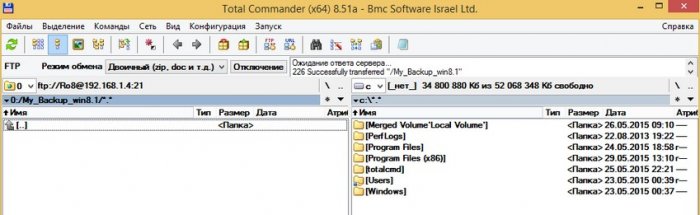
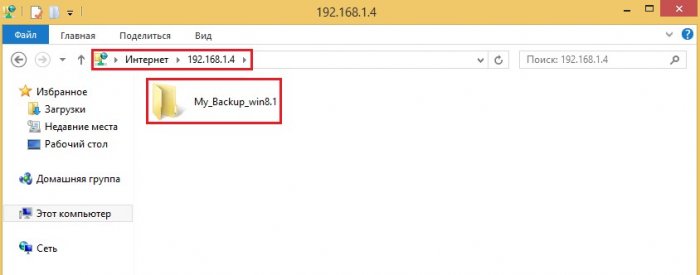
Посмотрим список папок на FTP сервере — введя команду lsКак видим, на FTP сервере присутствует папка My_Backup_win8.1
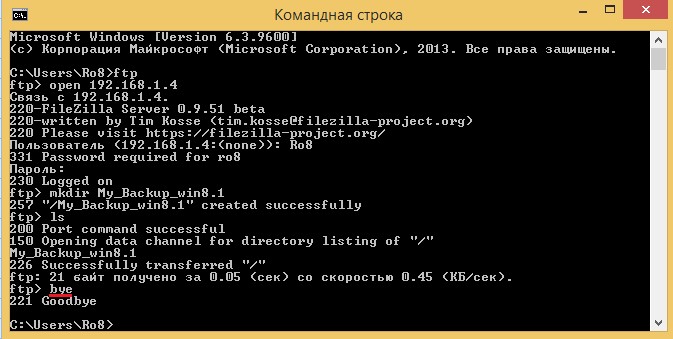
Закрываем соединение с FTP сервером введя команду bye
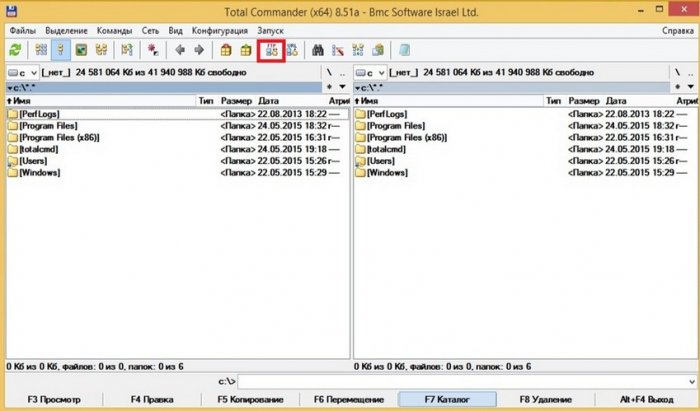
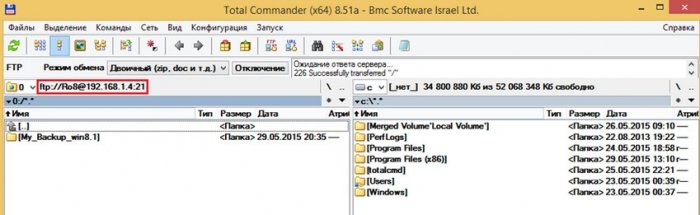
Запустим на машине с Windows 8.1 файловый менеджер Total Commander. Для настройки подключения к FTP серверу нажимаем на кнопку указанную на скриншоте
Нажимаем Добавить
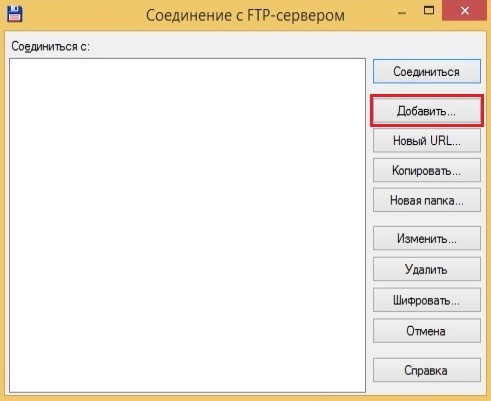
Указываем имя соединения (произвольно), сервер и порт (сервер это ip адрес FTP сервера, порт прописываем 21). Также указываем имя пользователя и пароль. ОК

Выделяем созданное FTP соединение и нажимаем Соединится
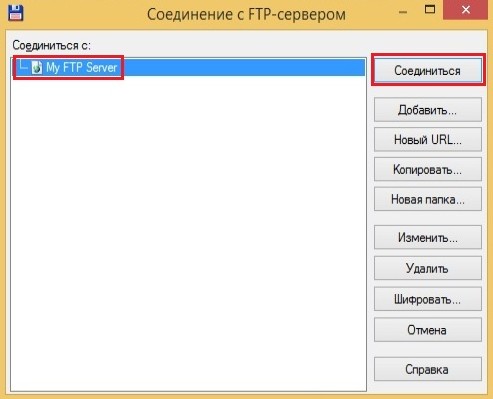
Соединение с FTP сервером установлено
Для отключения от FTP сервера нажимаем Отключение
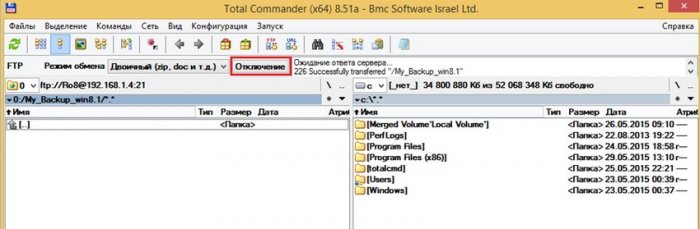
Отключение от FTP сервера выполнено

Подключение к FTP-серверу с помощью программы FileZilla Client
Запустим программу FileZilla Client
Откроется главное окно программы

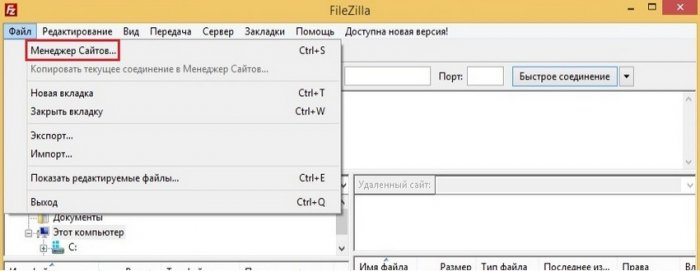
Выбираем Файл-Менеджер сайтов
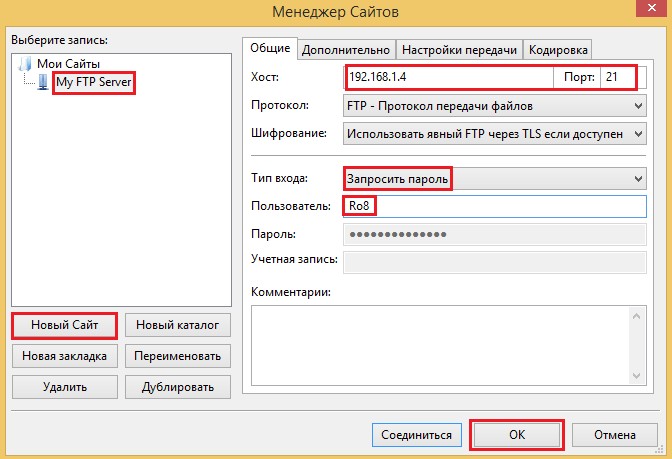
Нажимаем Новый Сайт (вводим его название), указыавем Хост (192.168.1.4) и порт (21). Тип входа выставляем Запростить пароль. Также указываем имя пользователя
Щелкаем по созданному FTP соединению

Вводим пароль для подключения к FTP серверу. ОК
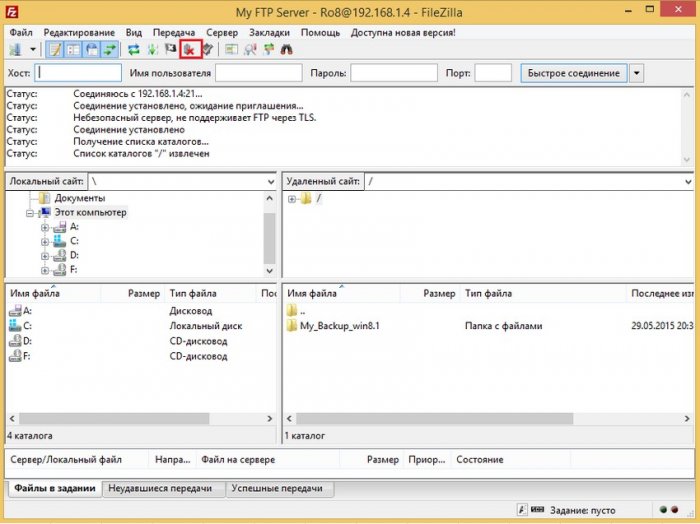
Подключение к FTP серверу выполнено. Как видим, на нашем FTP сервере находится папка My_Backup_win8.1

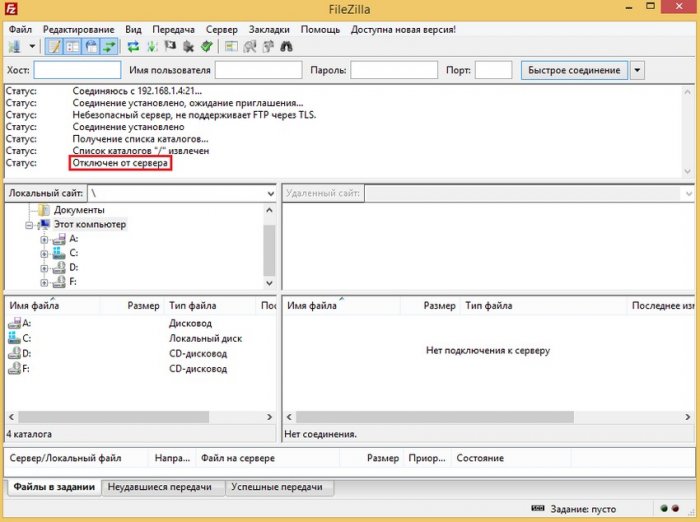
Для отключения от FTP сервера нажимаем на кнопку с красным крестиком
Отключение выполнено
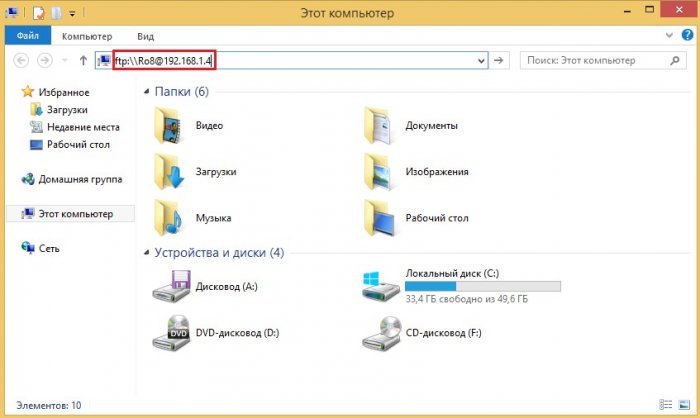
На машине с Windows 8.1 откроем Мой компьютер и в адресной строке введём ftp:\\Ro8@192.168.1.4, где Ro8 — имя пользователя, 192.168.1.4 — ip адрес FTP сервера.
Вводим пароль для входа на FTP сервер
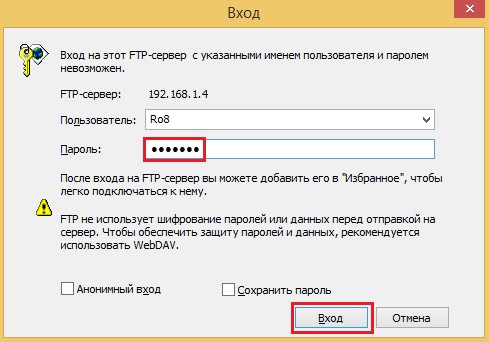
Вход на FTP сервер произведен
Запустим обычный веб-браузер и в адресной строке введем ftp://Ro8:1234567@192.168.1.4
где Ro8 — имя пользователя, 1234567 — пароль пользователя, 192.168.1.4 — ip адрес FTP сервера

Вход на FTP сервер выполнен

Друзья, читайте продолжение в статье «Создание резервной копии ноутбука с Windows 8.1 в программе Acronis True Image 2015 и ее сохранение на FTP сервере. Создание загрузочного носителя Acronis и сохранение его на WDS. Восстановление ноутбука из резервной копии».
How to Install FileZilla FTP Server on Windows Server 2022. In this post, we introduce FileZilla software, its features, and advantages then explain how to install FileZilla server on Windows server 2022.
What is FileZilla?

On the other hand, Filezilla’s paid pro version enables you to connect to several strong online providers. Even more, it includes WebDAV, Amazon S3, Backblaze B2, Dropbox, Microsoft OneDrive, Google Drive, Google Cloud Storage, Microsoft Azure Blob, and File Storage.
Setting up FileZilla is straightforward, even though it is only supported on Windows. Well, to create a new server site, you need to download the software, open it, and go to the file menu. Then, you need to choose a site manager. After that, you get the best hostname, type of FTP protocol, login method, and change from a passive connection.
Features of FileZilla
In some situations, file transfer needs to go beyond sending a couple of videos. There, you need to look back up your entire laptop data or run a scheduled file transfer in the background without interrupting your business hours.
Indeed, FileZilla is one of the most trusted FTP servers, that provide no frills transfer between a server and clients. Following, it offers the following features:
- Run Multiple Server Transfer Simultaneously – enables you to run several tabbed instances to connect with different servers. Associated with internet speeds and the number of files transferred. Further, with the help of transfer menu, you limit the number of simultaneous server connections.
- Search Remote Files – keep track of the ongoing transfers by viewing remote files in the Dashboard. Generally, this steady improvement minimizes the window and frequently checks server progress.
- Remote File Editing – Searching for remote files has an essential application, especially editing files remotely.
- Connecting to FTP through VPN – FileZilla works remotely with the VPN of your choice. However, to enable this feature, Windows users have to download the FileZilla server.
- Transfer and Resume Very Large Files at Fast Speed – enables you to transfer and resume very large files. Very crucial feature of a good FTP application.
- Encryption – You may prefer to encrypt your files to further protect the data transfer process. In this case, only the recipient decrypts the file, so there is no possibility of data being tampered with in transit.
Advantages of FileZilla
Being that, FileZilla Server and FileZilla Client contain a variety of features, tools, and utilities that make FileZilla Combine an essential FTP solution. Henceforth, the advantages of FileZilla are as follows:
No Cost
Free to Download is probably one of the most unique benefits of any FTP server program. Surely, FileZilla Server is GNU licensed and you don’t need to pay to download and configure FTP. We customize it hassle free to meet our exact needs.
Security
Easy to Use
Although the system’s standard FTP tools are difficult to configure and manage, FileZilla Server has an easy to use graphical user interface for configuring and managing file transfers. Even novice users who have a basic understanding of the online file transfer process can use the application to host and access data.
Multi Language Support
In addition to English, FileZilla servers support the world’s most popular languages, including Spanish, French, German, French, and Japanese. The multilingual aspect makes it easier and more convenient to use this free FTP service available.
We have reached the main part of the article How to Install FileZilla FTP Server on Windows Server 2022.
How to Install FileZilla FTP Server on Windows Server 2022
In this section, we explain how to set up FileZilla FTP server on Windows Server 2022.
Prerequisites
- A server running Windows Server 2022
- An administrator account is set up and accessible.
Install FileZilla Server
Follow the below steps to install the FileZilla FTP server on your Windows Server:
Step 1 – Go to the FileZilla download page as shown below:
Step 2 – Click on the Download FileZilla Server to download it on your server machine.
Step 3 – Once the download is complete, double click on the downloaded file to start the FileZilla installation. For instance, you should see the FileZilla license agreement scree,

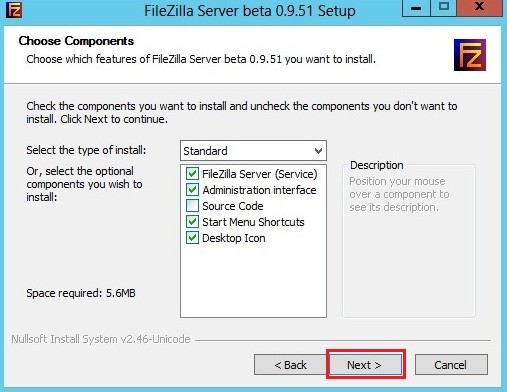
Step 4 – Illustration of the next step is to click on the I Agree button to accept the license agreement. See the component selection screen.

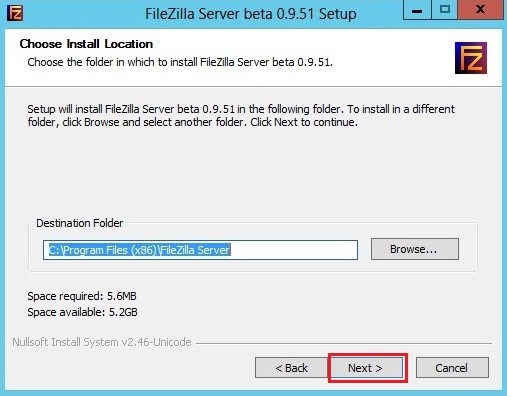
Step 5 – Select all the components and click on the Next button. Following, there should be choose install location screen.

Step 6 – Pick your FileZilla installation location and click on the Next button. Then, choose start menu folder screen.

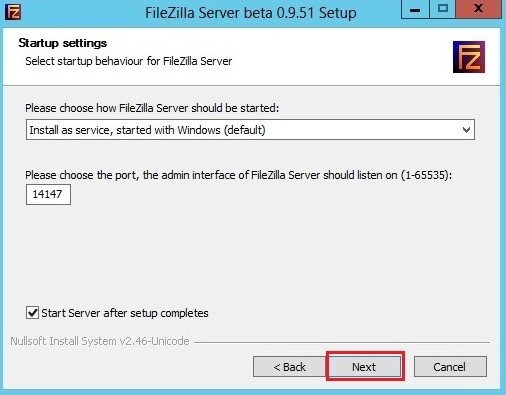
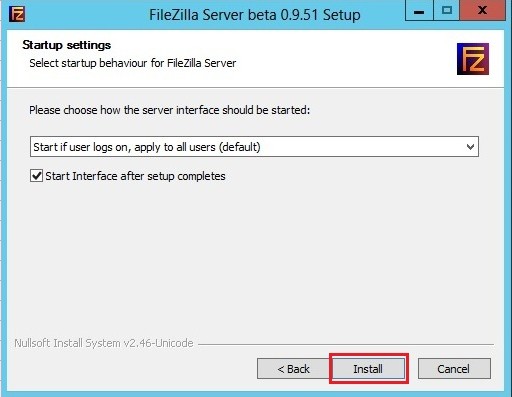
Step 7 – Choose your start menu folder and click on the Next button. Further, you should see the Server Setting screen.

Step 8 – Define all required settings then click on the Next button. After that step, you shall see the port selection and admin password setup screen.

Step 9 – Set your port, set an administrative password then click on the Next button. Nevertheless, next you shall see the Admin setting screen.

Step 10 – Click on the Install button to start the installation. Once the FileZilla server is installed, you should see the following screen.

Step 11 – Press Close button to close the installation windows.
Configure FileZilla Server
At this point, the FileZilla server is installed on your server. Now, you need to configure it to use it. Navigate through the below steps to configure the FileZilla server.
Step 1 – Double click on the FileZilla server icon on the Desktop or Start menu to launch the FileZilla server. As a result, you should see the following screen.

Step 2 – This brings you to step to, where you click on the Connect to Server button. Login screen for FileZilla server should appear.

Step 3 – Provide the FileZilla host, port, and administrative password, and click on the OK button. Once you are connected to the FileZilla server, you should see the following screen.

Step 4 – Go to the FileZilla Menu => Settings and click on Users. See the following screen.

Step 5 – Here, please click on the Add button to create a new FTP user. Significantly, that brings you to this screen.

Step 6 – Define your username, password then add your virtual path and click on the OK button to save the changes.
Access FileZilla FTP Server
As seen, FileZilla server is now installed and configured on your Windows server. In this instance, you need to install the FileZilla client software on your remote machine and connect to the FileZilla server.
Firstly, open the FileZilla client on the remote machine. This screen should appear.

Press on the create a new connection. See the FTP connection creation screen.

Define your FileZilla server IP, Port, Username, Password then clicks on the Connect button. Now, once you are connected to the FTP server, you should see the certificate warning in the following screen.

Please click on the OK button to trust the above certificate. As shown, you should see the content of your ftpuser user on the following screen.

Thank you for reading How to Install FileZilla FTP Server on Windows Server 2022. We shall conclude the article now.
How to Install FileZilla FTP Server on Windows Server 2022 Conclusion
Summing up, in this post we showed you how to install and set up FileZilla FTP server on Windows Server 2022. As a result, you can follow this guide to set up your own FTP server on a Windows environment. Lastly, FileZilla Server is one of the comprehensive FTP server applications as it supports clients for almost all platforms (Windows, Mac OS, Linux). In conclusion, you access it from any device over the internet.
How to configure FileZilla server on your Windows server
This guide covers how to install and setup FileZilla on your Windows server. There are four parts to this guide:
Installing the FileZilla Server
Configuring FileZilla Server
Configuring the Windows firewall
Connecting to FileZilla
Installing FileZilla Server
Prerequisites
Before installing FileZilla server, you’ll need the below:
At least 25 MB of free disk space
Administrator Permissions
The Installation
Please connect to your Windows server BEFORE attempting to setup FileZilla server. All actions should be completed on the server. See our Logging Into Your Windows VPS guide for help.
Firstly, head to the FileZilla server download page, and download the latest version of FileZilla server.

Once downloaded, click the file to run it.
Now, agree to the GNU Affero General Public License (AGPL), the free opensource license under which terms FileZilla Server is provided.

Now, select everything which you want to be installed:
All will install both the Administration interface and the Server;
Server will install only the Server;
Administration interface will install only the Administration interface;
Desktop icons adds a link to FileZilla Server to your desktop, making it easy to find and run the program. See Administration and Starting and Stopping FileZilla Server from the desktop or Start Menu;
Start menu shortcuts will install shortcuts in start menu.
Note: You need to install at least one of them.
In this tutorial, we will leave all of them selected, with the Full installation.

Then click Next
Now you can choose where you want FileZilla to be installed. Leave this in the default area, and click Next .

Here you can select a start menu folder. Leave this as default and press Next.

FileZilla Server needs to be installed as a service on Windows ( Windows Service). Select the launch option you prefer from the top-downmenu, you can either get it started automatically (default) or manually.
Leave this as default, and press Next

8. Now, set the port that FileZilla server will use for connections to the Administrator interface. Leave this as default.
You should now set a password for the administrator interface.
Passwords must meet the following security criteria:
A minimum length of 12 characters.
At least one numeral (0-9).
At least one special character (e.g., !, @, #, $).
At least one uppercase letter (A-Z).
At least one lowercase letter (a-z).
You can choose to not enter in any password if you wish.
If you do not choose a password, a warning dialog will appear warning you about the risks.

As a security measure, if no password is set, you can only configure a server that responds on localhost (127.0.0.1)

Click Next .
Here you can select if you want the interface to start for every user, or for only the current user, or manually. In this guide, we are leaving it as default.

11. Click Install .

12. You will be asked to take note of the fingerprint of the TLS certificate that the server uses for administrative connections.

The installation is complete, you can press Close .
Configuring FileZilla Server
Firstly, make sure FileZilla server is running, and open the administrator interface.

Click on Connect to server
A dialogue will appear prompting you to enter in your login details. Enter in your password here, and optionally you can select Save the password .
Press Ok .
If this is the first time you have connected to this server, you will be asked to trust the certificate. If the fingerprint matches what was shown in the installation, you can press yes .

6. You are now in the configuration area of FileZilla server
Adding a user
If you want to add a user, you can do by following the steps below:
Click on Server, then Configure .
Wait while the window loads.
Click on Users
Now click on Add .
Enter in the username, and then type in a password for the user.

Now, select what path you want them to have access to:
To share files and directories with FTP users, FileZilla Server uses the concept of mount points.
A mount point includes a virtual path and a native path. The native path is a local file path, the virtual path is the path that the FTP users will see and it is mapped to the native path by FileZilla Server.
To add a mount point click on the Add button and enter a virtual path (eg. \) and a native path (eg, C:\ftproot\sample).
Virtual path format
The format of the virtual path is the same one used by UNIX-like operating systems: files and directories are separated by the slash / character and all files and directories belong to a unique root, whose name is exactly /. Virtual paths are normalized by resolving all . and .. directories and removing any trailing / character.
Native path format
The format of the native path is the same used by the operating system. On Windows UNC paths are supported too, and both the slash / and backslash \ characters are valid separators. Native paths are normalized just like virtual paths. In addition, on Windows the slash / is normalized to become a backslash \, path segments are not allowed to terminate with dots and they cannot contain the colon : character, except for the device name.
Note: While setting up native paths, make sure they exist or ask the server to create them for you by selecting the checkbox Create native directory if it doesn’t exist.
Example
In this example, we are going to give the user access to a folder on the Administrators Desktop.
Locate the folder and open it.
Click on the whitespace by the name of the folder and copy the folders path.


3. Head back to FileZillas administrator interface.
Under Mount Points click Add
Enter a Virtual Path of `/`and the Native Path of your folder as shown in the screenshot below.

Press Apply on the bottom right.
FileZilla server is now configured!
Configuring the Windows Firewall
So that users can actually connect to FTP, you need to open the firewall to allow this.
On the windows search bar, search for Firewall and select Windows Defender Firewall

Click on Advanced Settings

On Inbound Rules right click, and select New Rule
Select Port on the Rule Type page.

Select TCP and under Specific Local Ports, enter 21,49152-65534
Then click Next

On the Action page, select Allow the Connection, then Next.

On the Profile page, you can leave this as default, and press Next.

On the Name page, give it a title and description which makes sense to you, then press Finish.

The firewall is now configured!
Connecting to the FileZilla Server
Finally, now its time to connect to the FTP/FileZilla server (yay!).
Download FileZilla CLIENT from the download site.
Run the installer, once installed, open FileZilla.
You will see a bar at the top of the window. There are 4 important fields you need to fill in:
Host: This is the servers IP address
Username: This is the username for the user you created earlier.
Password: This is the password for the user you made earlier
Port: This is the port for the protocol you’re using. This will be autofilled when connecting, so you can leave this field alone (unless you have a custom port setup).
Fill in the details using the details noted above. An example is provided below:

Click Quickconnect .
If its the first time you’ve connected to this, you may get a Unknown Certificate warning. If the fingerprint matches, you can click Ok, and optionally Always trust this certificate in future sessions .

You should now be connected! You should see all your files in your directory.

The left hand side is your local storage/files, and the right hand side is the servers storage/files.
If you have any questions, feel free to reach out to the VoltHosting support team!
Updated on: 08/11/2024
FileZilla Server is a server that supports FTP and FTP over TLS which provides secure encrypted connections to the server.
Support for SFTP (SSH File Transfer Protocol) is available only in FileZilla Pro Enterprise Server
Download FileZilla Server
See also
Network Configuration, Command-line arguments (Server)
Installation and Setup — Windows
FileZilla Server manual is now available to purchase
- Prerequisites: 25MB of space free on your drive and administrator privileges.
- Download FileZilla Server from FileZilla website
- Locate the installer in your download folder and run it
- Confirm you allow FileZilla Server to make changes to your device
- Accept the AGPL license terms, the terms under which FileZilla Server is offered
- Select what to install (Server, Admin interface, desktop icons, shortcuts)
- To decide where to install by clicking Browse, otherwise click Next
- To add the icons for FileZilla Server choose a Start menu folder or create one
- FileZilla Server is installed as a Windows Service, you can start it manually if you want
- Set the port on which FileZilla Server will listen to connections from the Admin interface
- Choose a password and enter it twice to confirm it
- By default the Admin interface will start up automatically, you can deselect that option
- The installation is complete, now you can start configuring FileZilla Server
- Create a user and/or group with permissions to one or more mount point (mount points include a virtual path and a native path)
- You can now use FileZilla Server, select ‘Configure’ menu item to set other elements
Setup on Windows with built-in firewall
After installation, make sure FileZilla Server is registered as an allowed program to the built-in firewall’s allowed programs. In the Control Panel, select System and Security. In the Windows Firewall section, choose ‘Allowed Programs’ to open configuration window. Check both private and public network selection for «FileZilla Server» (Not «FileZilla Server Interface». If «FileZilla Server» is not listed, remember to add «C:\Program Files\FileZilla Server\FileZilla server.exe» or wherever it is installed). If private network is not selected, the incoming FTP connection would be blocked.
Wizard
To simplify the network configuration process FileZilla Server provides a wizard that can be started from the Administration interface by selecting Server › Start a guided configuration of the network menu item. Make sure to follow the instructions carefully, as you’ll need to properly configure any router and firewall you might have.
The wizard dialog window asks you to set the range of ports, then you need to set on the NAT device the appropriate port forwarding rules accordingly.
FileZilla Server’s wizard then asks you to set either the public IP or its hostname.
Eventually all the settings are shown in the final dialog window, check them and if you wish use our online FTP client tester to check if everything works.