
Мы уже рассматривали установку Exchnage 2019 в цикле статей по миграции с Exchange 2010 на Exchange 2019. Почему я решил написать отдельную статью, в которой будет рассмотрена установка и первоначальная настройка Exchange 2019? В первую очередь потому, что в тех статьях рассматривалась установка в контексте процедуры миграции, т.е. в инфраструктуре уже был установлен сервер Exchange. Во-вторых, для тех, кто только начинает знакомиться с продуктом или для тех, кому нужно относительно быстро развернуть продукт разбираться с контекстом миграции будет местами не так очевидно. И в третьих, основная идея этой статьи, чтобы пройдя шаги из неё можно было получить рабочий продукт, пусть и в минимальной конфигурации (усложнить вы всегда успеете :)). Например, для тестовой или демонстрационной среды.
Отмечу, что предполагается, что в вашей инфраструктуре до начала процесса установки не был развернут продукт Microsoft Exchange. В противном случае нужно опираться на информация из цикла статей по миграции.
Мы будем развертывать Exchange 2019 в самой простой конфигурации – один сервер без группы высокой доступности. В следующих публикациях мы добавим еще один сервер и создадим группу высокой доступности. Пока же начнем с базовых вещей.
Аппаратные характеристики нашего почтового сервера с Exchange 2019 приведена ниже:
- 6 vCPU.
- 8 ГБ RAM.
- 120 ГБ диск для системного раздела.
- 60 ГБ диск для баз данных.
Поскольку в Exchange 2019 нет разделения на сервера клиентского доступа и сервера почтовых ящиков, то процесс установки довольно прямолинеен.
Требования к Active Directory
Для того, чтобы добавить сервер с Microsoft Exchange 2019 в вашу инфраструктуру необходимо, чтобы функциональный уровень домена и леса вашей AD был Windows Server 2012 R2 или выше.
Более подробно требования к Active Directory приведены в соответствующем разделе официальной документации.
Предварительная подготовка сервера
Непосредственно перед началом установки ролей Exchange необходимо выполнить подготовку операционной системы. Наша операционная система Windows Server 2019 Standard.
В последующем для настройки группы высокой доступности (DAG) нам необходимо будет установить компонент Failover Clustering. Для Windows Server 2019 редакции Standard будет достаточно:

Что нам необходимо сделать:
1. Установить и выполнить первоначальную настройку Windows Server 2019.
2. Выполнить настройку IP-адресации.
3. Установить все обновления для ОС.
4. Присоединить сервера к домену. В нашем случае домен будет itproblog.ru.
5. Загрузить актуальный дистрибутив Microsoft Exchange 2019.
6. Начиная с Exchange 2016 Update Rollup 10 также предварительным требованием является модуль IIS URL Rewrite.
Установка необходимых предварительных компонентов
Полный перечень всех предварительных требований приведен в документации на сайте Microsoft. Ниже мы приведем весь перечень необходимых компонентов и дополнительного ПО применительно к Windows Server 2019.
Для предварительной подготовки Windows Server 2019 к установке роли сервера почтовых ящиков Exchange 2019 нам необходимо выполнить следующие действия:
1. Установить предварительные компоненты следующим PowerShell командлетом:
Install-WindowsFeature Server-Media-Foundation, NET-Framework-45-Features, RPC-over-HTTP-proxy, RSAT-Clustering, RSAT-Clustering-CmdInterface, RSAT-Clustering-Mgmt, RSAT-Clustering-PowerShell, WAS-Process-Model, Web-Asp-Net45, Web-Basic-Auth, Web-Client-Auth, Web-Digest-Auth, Web-Dir-Browsing, Web-Dyn-Compression, Web-Http-Errors, Web-Http-Logging, Web-Http-Redirect, Web-Http-Tracing, Web-ISAPI-Ext, Web-ISAPI-Filter, Web-Lgcy-Mgmt-Console, Web-Metabase, Web-Mgmt-Console, Web-Mgmt-Service, Web-Net-Ext45, Web-Request-Monitor, Web-Server, Web-Stat-Compression, Web-Static-Content, Web-Windows-Auth, Web-WMI, Windows-Identity-Foundation, RSAT-ADDS2. Установить NET Framework 4.8.
3. Установить Visual C++ Redistributable Package for Visual Studio 2012.
4. Также установить Visual C++ Redistributable Package for Visual Studio 2013.
5. Установить компонент Server Media Foundation:
Install-WindowsFeature Server-Media-Foundation6. И установить Microsoft Unified Communications Managed API 4.0, Core Runtime 64-bit.
На этом установка предварительных компонентов для Exchange 2019 завершена.
Подготовка схемы Active Directory
Если в вашей инфраструктуре еще не был развернут Microrosft Exchange, то необходимо подготовить схему Active Directory для его установки. В процессе подготовки будут добавлены классы объектов и расширены свойства текущих классов для того, чтобы они могли содержать необходимые дополнительные сведения в части хранения почтовых атрибутов.
Вообще, можно не выносить процедуру обновления схемы в отдельный предварительный шаг, т.к. мастер установки Exchange может это сделать за нас автоматически. Однако, для подготовки схемы Active Directory нужны дополнительные разрешения (об этом чуть ниже). Также мы можем в более интерактивном режиме наблюдать за процессом расширения схемы Active Directory. Еще один аргумент в копилку отдельного шага – это отслеживание статуса репликации изменений на все контроллеры домена. Например, у вас три контроллера домена. Мы выполняем процедуру расширения схемы, ждем пока изменения отреплицируются на оставшиеся контроллеры (если у вас их несколько) и только потом переходим к непосредственной установки сервера Microsoft Exchange.
Учетная записи, от имени которой будет выполняться расширение схемы Active Directory должна быть включена в следующие группы безопасности домена:
- Schema Admins.
- Enterprise Admins.
- Domain Admins.
Шаг 1. Расширение схемы Active Directory
Самый первый шаг – это расширение схемы.
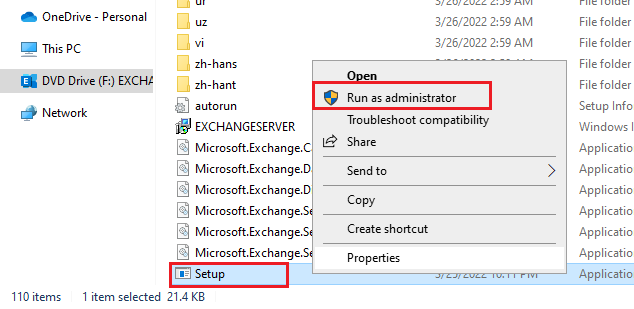
Переходим с директорию с дистрибутивом Exchange 2019 и выполняем команду (для Exchnage 2019 ниже CU11):
.\Setup.EXE /IAcceptExchangeServerLicenseTerms /PrepareSchemaКомандлет для Exchange 2019 CU11 или выше.
.\Setup.EXE /IAcceptExchangeServerLicenseTerms_DiagnosticDataON /PrepareSchemaЗапуститься процесс расширения схемы Active Directory:

Дожидаемся окончания процесса расширения схемы. Об успешном процессе расширения схемы будет свидетельствовать соответствующее заключение мастера:

Теперь необходимо запустить процесс репликации изменений в Active Directory:
repadmin /syncallПрежде чем переходить к следующему шагу необходимо дождаться окончания процесса репликации изменений в Active Directory на все контроллеры домена.
Шаг 2. Подготовка Active Directory
Теперь необходимо, чтобы мастер подготовки Active Directory создал необходимые объекты.
Выполните следующую команду в директории с дистрибутивом Exchange (для Exchnage 2019 ниже CU11):
.\Setup.EXE /IAcceptExchangeServerLicenseTerms /PrepareAD /OrganizationName:"Itproblog"Командлет для Exchange 2019 CU11 или выше.
.\Setup.EXE /IAcceptExchangeServerLicenseTerms_DiagnosticDataON /PrepareAD /OrganizationName:"Itproblog"В параметре OrganizationName укажите имя организации Exchange. Имя может быть произвольным.

Дожидаемся окончания процесса подготовки Active Directory.

Теперь если посмотреть в нашу Active Directory, то мы увидим, что мастер создал необходимые группы безопасности:

Далее необходимо запустить процесс репликации изменений в Active Directory:
repadmin /syncallПрежде чем переходить к следующему шагу необходимо дождаться окончания процесса репликации изменений в Active Directory на все контроллеры домена.
Шаг 3. Подготовка все остальных доменов Active Directory
Если у вас всего один домен, то этот шаг можно пропустить, т.к. параметр PrepareAD в предыдущем шаге уже выполнил всю необходимую подготовку.
Если же у вас несколько доменов, то вы можете:
- Подготовить сразу все оставшиеся домены.
- Подготовить домены каждый в отдельности.
Для того, чтобы подготовить сразу все домены выполните следующую команду в директории с дистрибутивом Exchange (для Exchnage 2019 ниже CU11):
.\Setup.EXE /IAcceptExchangeServerLicenseTerms /PrepareAllDomains
Командлет для Exchange 2019 CU11 или выше.
.\Setup.EXE /IAcceptExchangeServerLicenseTerms_DiagnosticDataON /PrepareAllDomainsЧтобы подготовить определенный домен выполните следующую команду в директории с дистрибутивом Exchange (для Exchnage 2019 ниже CU11):
.\Setup.EXE /IAcceptExchangeServerLicenseTerms /PrepareDomain:itproblog.ruКомандлет для Exchange 2019 CU11 или выше.
.\Setup.EXE /IAcceptExchangeServerLicenseTerms_DiagnosticDataON /PrepareDomain:itproblog.ruТолько в параметре PrepareDomain укажите FQDN имя вашего домена.

Проверка версии схемы
Для того, чтобы проверить текущую версию конфигурации схемы для Microsoft Exchange мы можем использовать, например, оснастку ADSI Edit.
Подключимся к контексту конфигурации и в контекстном меню нашей установки выберем пункт “Properties“. В списке атрибутов найдите атрибут objectVerison:

objectVerison 16757 – это Exchange Server 2019 CU9. Именно его мы и устанавливали. Полный перечень доступен в документации.

Установка Exchange 2019
Начиная с Exchange 2016 Microsoft решила больше не разделять роли на Client Access и Mailbox (как это было в Exchange 2013). Соответственно, у Exchange 2019 только две роли – Mailbox и Edge. В Exchange 2013 Edge сервер также присутствовал. Роли Client Access и Mailbox объединены в одну роль – Mailbox.
На момент написания статьи самой последней версией была Exchange Server 2019 CU11. Однако, мы установим Exchange 2019 CU9, а в одной из следующий статей разберем процесс установки актуальной Update Rollup. Посмотреть актуальный список версий Exchange 2019 можно в документации на сайте Microsoft.
Для Exchange 2013 и более новых версий для установки вы загружаете самый последний Cumulative Update и выполняете установку из него. Он уже содержит все необходимые файлы и все необходимые обновления.
Установка через графический мастер установки
Для того, чтобы установить Exchange через графический мастер установки выполните следующие шаги:
1. Запустить установщик из дистрибутива. Если вы еще не подготовили Active Directory, как было указано в предыдущем разделе, то учетная запись, от имени которой будет выполняться установка должна быть включена в следующие группы Active Directory: Schema Admins, Enterprise Admins и Domain Admins.

2. На шаге проверки обновлений укажем, что мы не будем проверять наличие последних обновлений:

3. На следующем шаге мастера нажмем “Next”.
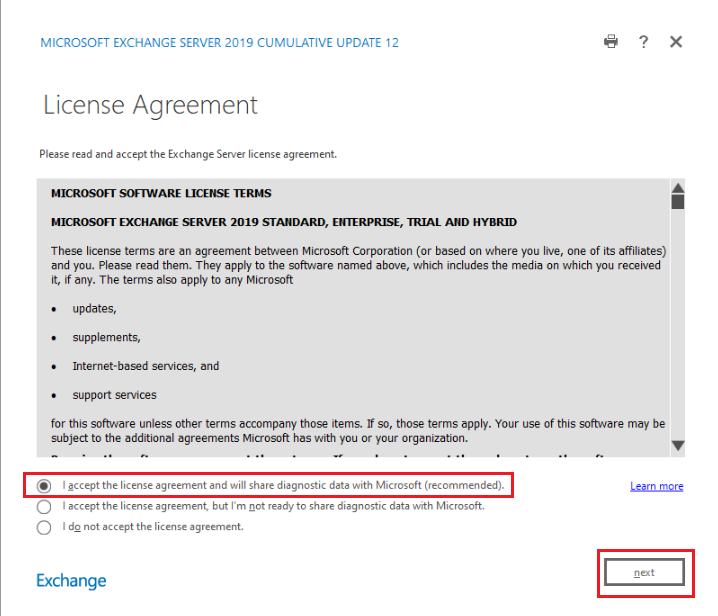
4. При согласии принимаем лицензионное соглашение:

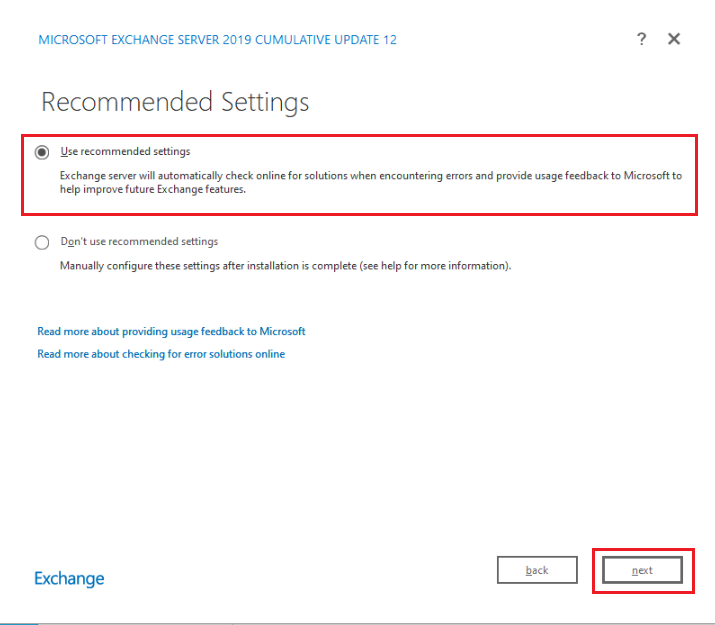
5. Укажем, что мы не планируем принимать участие в программе улучшения качества продукта:

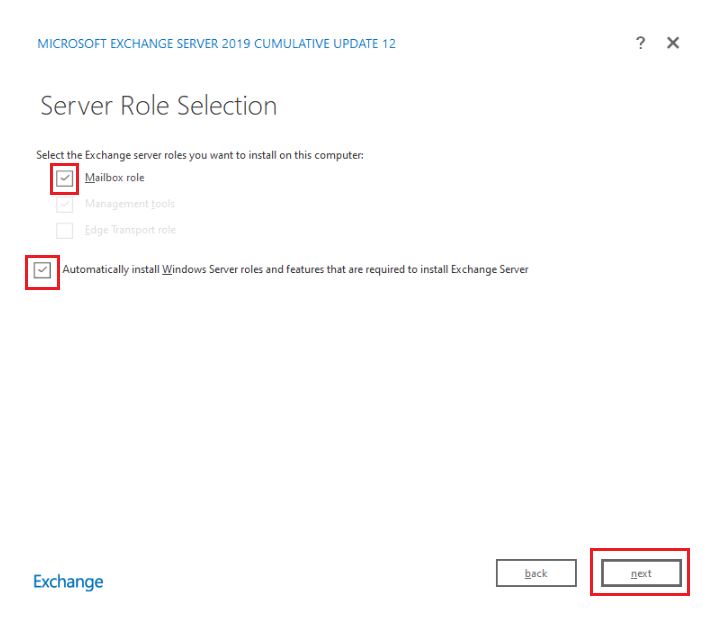
6. Укажем, что мы будем устанавливать сервер почтовых ящиков:

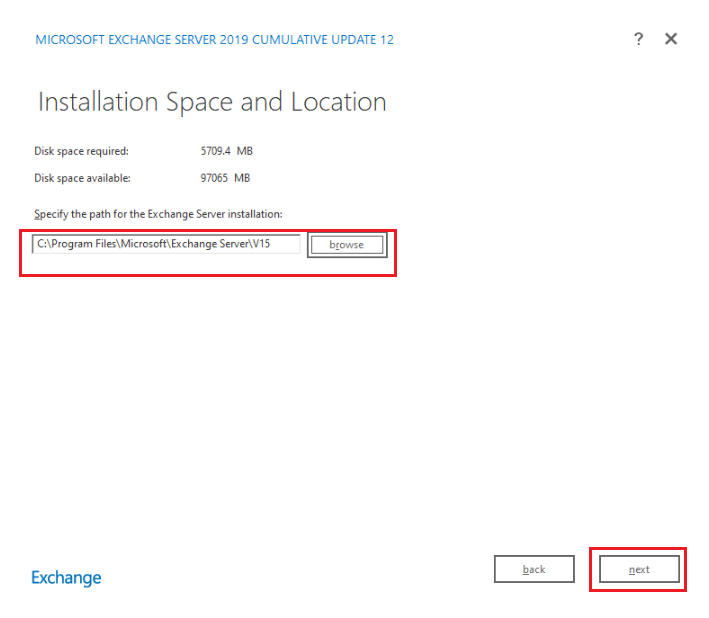
7. Укажем директорию установки:

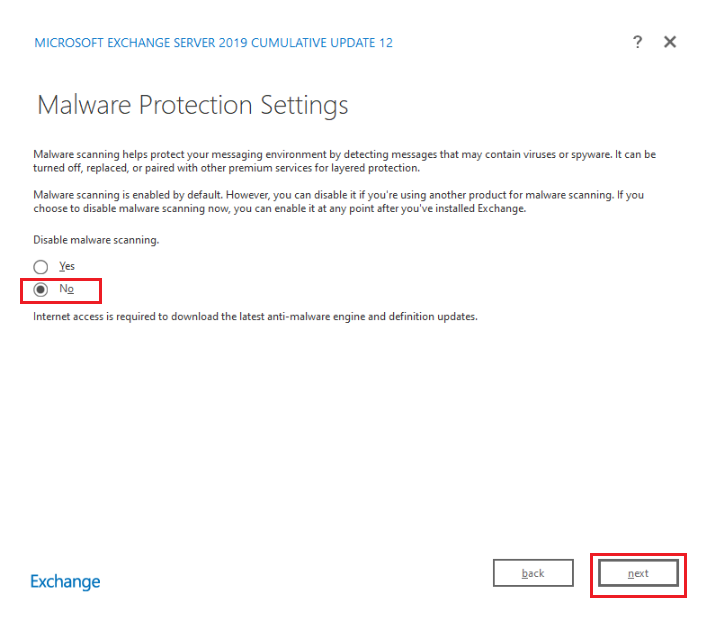
8. Мы не будем отключать сканирование на предмет вредоносного ПО:

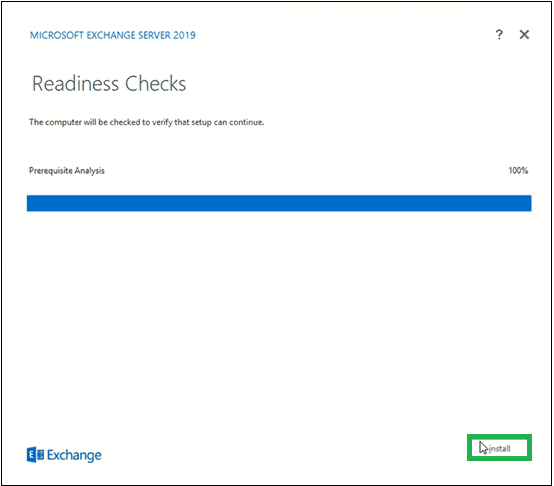
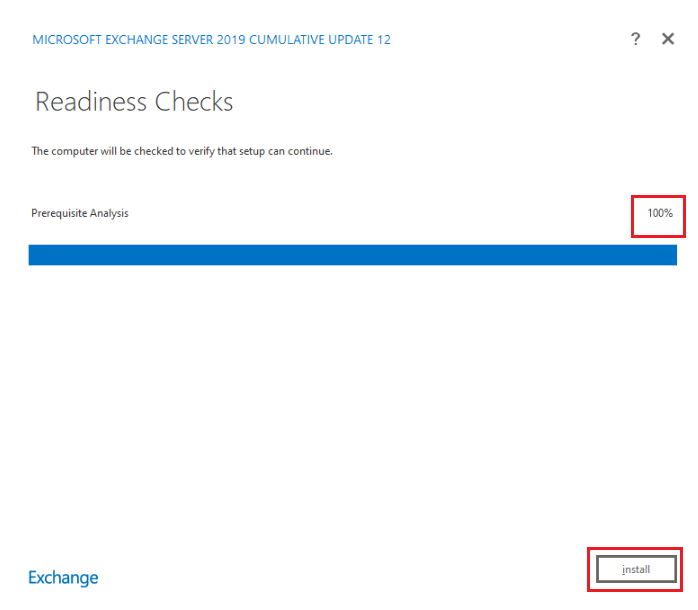
9. Мастер установки Exchange 2019 выполнит проверку предварительных требований. Если какой-то пункт не будет выполнен, то мастер установки сообщит об этом. Нажимаем кнопку “Install”.

10. Дожидаемся окончания процедуры установки.
11. В случае успешного завершения установки мастер сообщит нам об этом:

12. Перезагружаем сервер.
Установка через командную строку
Вариант установки через командную строку гораздо более лаконичен.
Для того, чтобы установить Exchange через командную строку выполните следующие шаги:
1. Перейдите в директорию с дистрибутивом Exchange. Если вы еще не подготовили Active Directory, как было указано в предыдущем разделе, то учетная запись, от имени которой будет выполняться установка должна быть включена в следующие группы Active Directory: Schema Admins, Enterprise Admins и Domain Admins.
2. Запустите установку Exchange сервера (для версии Exchange 2019 ниже CU11):
.\Setup.exe /IAcceptExchangeServerLicenseTerms /mode:Install /r:MBКомандлет для версии Exchange 2019 CU11 или выше:
.\Setup.exe /IAcceptExchangeServerLicenseTerms_DiagnosticDataON/mode:Install /r:MB
3. Дождитесь окончания процесса установки.
4. Перезагрузите сервер.
Проверка корректности установки
В большинстве случаев маркером успешной установки является то, что вы можете перейти в панель управления Exchange (Exchange Control Panel – ECP). Для перехода в ECP перейдите по следующей ссылке:
https://sr-mail01.itproblog.ru/ecp

При переходе по ссылке выше вы скорее всего получите предупреждение о недоверенном сертификате (т.к. сертификат самоподписанный самим сервером Exchange). В одной из следующей статье мы рассмотрим, как установить сертификат с нужным нам доменным именем и настроить пространство имен для доступа к серверу.
Первоначальная настройка Exchange 2019
После того, как мы выполнили установку нам необходимо сделать еще некоторые настройки для работы минимального набора функций. Как минимум, транспорта почты как наружу, так и из вне. Рассмотрим эти настройки в следующих подразделах.
Переименование и перенос стандартной базы данных
В процессе первоначальной настройки Exchange уже создается база данных. Правда, она носит не сильно легко запоминающееся имя и расположений в одной из директорий того пути, который вы указали и в процессе установки. С большой долей вероятности это будет системный раздел.
Что необходимо сделать:
1. Запустить модуль PowerShell для Microsoft Exchange:

2. Посмотреть список текущих баз данных. Выполните следующий командлет:
Get-MailboxDatabase -Server SR-MAIL01
2. Переименовать базу данных в конфигурации:
Get-MailboxDatabase -Identity "Mailbox Database 0284994124" | Set-MailboxDatabase -Name DB01
3. Физически база данных все еще расположена на системном разделе (в нашем случае). Имя файла с базой данных теперь не соответствует тому имени, что мы указали в конфигурации. Исправим это.

Мы перенесем её на отдельный диск, который у нас подключен к серверу. Для этого выполним следующий командлет:
Move-DatabasePath -Identity DB01 -EdbFilePath e:\DB01\db01.edb -LogFolderPath e:\DB01Нас предупредят о том, что на время переноса почтовая база будет недоступна:

Теперь наша почтовая база расположена на нужном нам диске и наименована так, как мы и просили:

4. Процесс переноса и переименоваия базы данных завершен.
Настройка списка обслуживаемых доменов
В дальнейшем для маршрутизации почты мы будем использовать доменное имя itproblog.ru. Для того, чтобы наш сервер Exchange начал принимать почту для домена itproblog.ru необходимо ему об этом сказать. Для этого создается отдельная запись в списке обслуживаемых доменов (accepted domains).
Если домен вашей электронной почты отличается от FQDN имени домена Active Directory, то выполните следующий командлет в модули PowerShell для Microsoft Exchange:
New-AcceptedDomain -DomainName itproblog.ru -DomainType Authoritative -Name ITProBlogТекущий список обслуживаемых доменов можно посмотреть следующим командлетом:
Get-AcceptedDomainВ списке обслуживаемых доменов вы должны увидеть ваш почтовый домен. В нашем случае это домен itproblog.ru:

Настройка адресов получателей
Если домен вашей электронной почты отличается от FQDN имени домена Active Directory, то вам необходимо добавить адреса вашего почтового домена всем необходимым получателям.
Перейдите в панель управления Exchange:
https://sr-mail01.itproblog.ru/ecpПерейдите в раздел “Recipients” – “Mailboxes“:

На вкладке “email address” добавьте новой дополнительный адрес электронной почты.

Альтернативный способ – это использование политики именования адресов (email address policy). Пока мы не будем касаться этой темы, но для массового добавления адресов это будет более оптимальное решением.
Настройка внешних DNS записей
Для того, чтобы почтовые сервера в сети Интернет могли отправлять почту на ваш домен они должны запросить соответствующую запись у DNS сервера, который обслуживает ваш домен. Для маршрутизации почты используются MX записи. С тем, что такое MX запись и для чего она нужна более детально можно ознакомиться вот тут.
Если же кратко, то в параметрах MX записи вы определяете – на какое DNS имя должна отправляться почта для вашего домена. Что здесь указывать – зависит от вашей инфраструктуры. У кого-то “белый” IP-адрес непосредственно настроен на одном из интерфейсов почтового сервера. Тогда вы указываете этот адрес. У кого-то стоит пограничное анти-спам решение, тогда в параметрах MX записи указывается “белый” IP-адрес антиспам решения. Кто-то через NAT “пробрасывает” порт TCP/25 на внутренний IP-адрес сервера. В таком случае в параметрах MX записи вы указываете “белый” IP-адрес вашего пограничного маршрутизатора. Одно только абсолютно точно – для маршрутизации почты вам нужен “белый” IP-адрес.
Формат MX записи следующий:
| Доменное имя | Приоритет | Имя почтового сервера |
| Указывается для какого доменного имени будет настроена MX запись. | Если у вас несколько почтовых серверов. Например, основной и резервный, то сервер с более меньшим значением приоритета будет иметь преимущество. Например, у сервера со значением приоритета 10 будет превалировать над серверов со значением приоритета 20. | Указывается доменное имя на которое необходимо направлять поток почты. |
Например, настройки MX записи для домена itproblog.ru следующие:

т.е.:
Доменное имя – itproblog.ru.
Приоритет – 10.
Имя почтового сервера – mail.itproblog.ru.
Стоит отметить, что регистрация MX записи очень сильно зависит от того, кто предоставляет вам услуги DNS сервера.
Настройка коннектора отправки
На текущем этапе на сервер уже должен уметь принимать почту из вне, но он все еще не умеет отправлять почту во внешний мир. причина – он просто не знает куда и как её отправлять. Для этого необходимо ему помочь и настроить коннектор отправки.
Коннектор отправки определяет – через какой маршрут какому серверу и на какой домен разрешено отправлять электронную почту.
Создадим коннектор отправки, который ращрешит нашему сервер Exchange отправлять почту на любой домен через разрешение MX записи соответствующего домена. Если кратко – разрешим отправлять почту на любой домен. Выполните следующий командлет в модули PowerShell для Microsoft Exchange:
New-SendConnector -Name "Internet" -Usage "Internet" -SourceTransportServers "SR-MAIL01" -DNSRoutingEnabled $True -AddressSpaces ("SMTP:*;5")
Проверка корректности маршрутизации электронной почты
Собственно, теперь вы можете попробовать отправить электронное письмо как с внешней электронной почты, так и с вашего почтового ящика Exchange на адрес нашней электронной почты.

Если же транспорт почты не работает, т.е. вы не можете отправить письма наружу или получить письма из вне, то не спешите думать, что вы сделали что-то не так. В ночь с 31 декабря на 1 января 2022 у многих, кто использует Exchange 2016/2019 перестала доставляться почта. Причина – баг в программном коде встроенного антивируса.
Можете для начала выполнить вот этот командлет:
Get-MalwareFilteringServer | Set-MalwareFilteringServer -BypassFiltering $true
Restart-Service MSExchangeTransport
Если же этот “фикс” вам не помог, то далее уже нужно анализировать конфигурацию системы в целом:
- Правильно ли зарегистрирована MX запись во внешней DNS зоне.
- Попробуйте еще добавить SPF запись. SPF запись для домена itproblog.ru:
v=spf1 a mx -all
- Правильно ли выполнена публикация порта TCP/25. Можете использовать, например, вот этот интсрумент для внешней проверки.

- Правильно ли настроен коннектор отправки Exchange.
- Не блокирует ли ваш брандмауэр входящий/исходящий SMTP траффик.
- Может ли ваш сервер Exchange разрешать MX записи внешних почтовых доменов.
Выше приведен лишь перечень основных шагов, которые я обычно выполняю при устранении ошибок с транспортом почты.
Заключение
В этой публикации была рассмотрена установка и первоначальная настройка Exchange 2019. Мы рассмотрели довольно тривиальный вариант развертывания, но именно он позволит вам понять основные шаги на всех этапах установки. Мы рассмотрели предварительную подготовку инфраструктуры Active Directory для установки первого сервера Exchange. Далее мы выполнили непосредственно установки нашего первого сервера Exchange. В заключении мы настроили минимальные основные параметры Exchange, чтобы наш сервер электронной почты мог как отправлять электронную почту во внешний мир, так и принимать электронную почту из сети Интернет.
Надеюсь, что статья будет вам полезна, а в следующих публикация мы рассмотрим процесс обновления сервера Exchange – установку актуального Update Rollup и обновлений безопасности Exchange.
All the Exchange Server admirers and interested ones know about the latest Exchange Server version, i.e. Exchange 2019. Its advanced features and security measures are alluring Exchange users to seek the migration. This blog is focused on the manual process to install Exchange Server 2019. But before that let us know about some main points or features in Exchange 2019 which are encouraging the older version Exchange users to install this latest version.
- Exclusive compatibility to Windows Server Core
- Supports 256GB RAM & 48 CPU cores
- Security enhancements
- Improved calendar management
- Improved search mechanism
- Outstanding look and features in Outlook Web Access
- New Client Access Rules for Exchange administration through internal network
There are more facilities provided with the latest Exchange Server 2019 for the users. Now, let us focus on the installation process of the Exchange Server 2019.
Manual Installation Procedure of Exchange Server 2019
Exchange users or administrators need to fulfill some requirements before starting the procedure of Exchange Server 2019 installation. We are providing you the main pre-requisites here.
Pre-Requisites
Hardware Requirements
| Processor | Intel 64-bit processor (EM64T), AMD 64-bit processor) |
| Minimum Disk Space | 30GB Free |
| Minimum Memory | 128GB (for Mailbox), 64GB (for Edge Transport) |
| File System | NTFS |
| Screen Resolution | 1024*768 |
Software Requirements
Operating System Requirements
| Mailbox and Exchange Transport | Windows Server 2019 Standard/Data Center |
| Management Tools | Windows 10 (64-bit) or Windows Server 2019 Standard/Data Center |
Outlook Clients Requirements
Outlook 2013/Outlook 2016/Outlook 2016 for Mac/Outlook 2019/Outlook for Mac for Office 365
Network & Directory Server Requirements
| Active Directory Forests | Windows Server 2012 R2 or later versions |
| Active Directory Site | With Writeable Domain Controller, Undeletable |
| Domain Controller | Windows Server 2019 Standard/ Windows Server 2016 Standard/Windows Server 2012 R2 Standard |
| DNS Namespace | Contiguous/ Non-Contiguous/Disjoint/ Single label domains |
| IPv6 Support: | Both IPv4 and IPv4 required |
When all the above pre-requirements are fulfilled, Exchange administrators can follow on to prepare an Active Directory.
For smaller organizations, it is enough that the account is a member of Schema Admin as well as Enterprise Admin security groups to move on to the Exchange set up stage.
But for larger organizations with multiple mailboxes, there is a need to prepare an Active Directory environment before going to the Exchange set up process. Let us know this process in points.
Active Directory Environment Preparation for Exchange 2019
- First install .NET framework (4.7.2 or 4.7.1), Visual C++ Redistributable Packages for Visual Studio and Unified Communications Managed API on your Exchange system.
- Once all the above software requirements are installed, restart your system.
- Launch Windows PowerShell (as an administrator). Here run a command as below.
Install-WindowsFeature RSAT-ADDS - Next step is to run another command in the Windows PowerShell to install Server requirements.
Install-WindowsFeature NET-Framework-45-Features, RPC-over-HTTP-proxy, RSAT-Clustering, RSAT-Clustering-CmdInterface, RSAT-Clustering-Mgmt, RSAT-Clustering-PowerShell, Web-Mgmt-Console, WAS-Process-Model, Web-Asp-Net45, Web-Basic-Auth, Web-Client-Auth, Web-Digest-Auth, Web-Dir-Browsing, Web-Dyn-Compression, Web-Http-Errors, Web-Http-Logging, Web-Http-Redirect, Web-Http-Tracing, Web-ISAPI-Ext, Web-ISAPI-Filter, Web-Lgcy-Mgmt-Console, Web-Metabase, Web-Mgmt-Console, Web-Mgmt-Service, Web-Net-Ext45, Web-Request-Monitor, Web-Server, Web-Stat-Compression, Web-Static-Content, Web-Windows-Auth, Web-WMI, Windows-Identity-Foundation, RSAT-ADDS - Now, mount Exchange Server 2019 Preview Installation Media on the system.
- Type cmd in the Search box, right-click Command Prompt and select Run as administrator option. On the opened Command Prompt window, run this command for schema preparation.
Setup.exe /PrepareSchema /IAcceptExchangeServerLicenseTerms - Next, run this final command for domain preparation.
Setup.exe /PrepareAllDomains /IAcceptExchangeServerLicenseTerms - Hence, you have successfully prepared an Active Directory environment (Schema and Domain) to install Exchange Server 2019.
Now, you need to move on to the Exchange Server set up installation with the set up application on your Exchange system.
Exchange Server 2019 Installation and Set-up Procedure
Perform the following steps to complete the Exchange 2019 set-up installation.
- Go to the Setup.exe, double click on it to start the installation procedure.
- On the next Check for updates? window, select from the options – Connect to the Internet and check for updates and Don’t check for updates right now as per your requirement and click on next.

- Next, the copying process of Exchange files required to install the Exchange Server will get started. Watch the process.
- The screen with Initializing Setup will be displayed next.
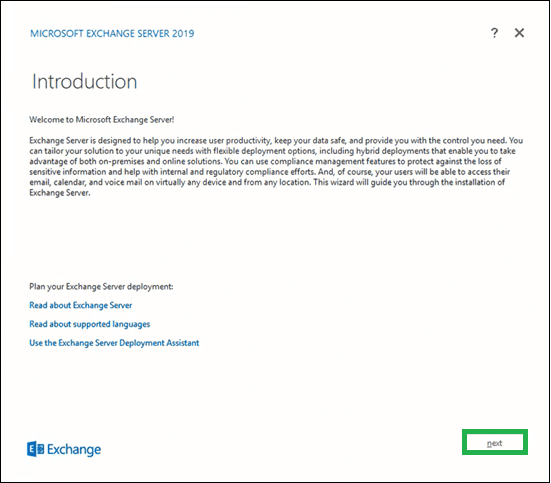
- Now, you come across the Introduction page for the Exchange Server 2019. Read the brief introduction about the server. You can click on the provided links to get more information. Click next to continue.

- On the License Agreement page, read all the instructions, select the option saying I accept the terms in the license agreement and click next.

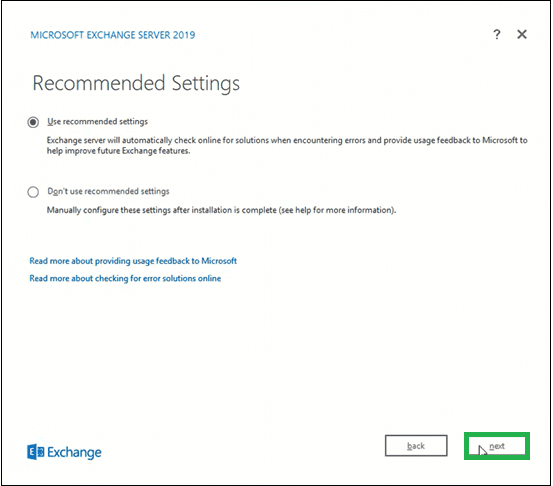
- On the Recommendation Settings page, select Use recommendation settings option and click next.

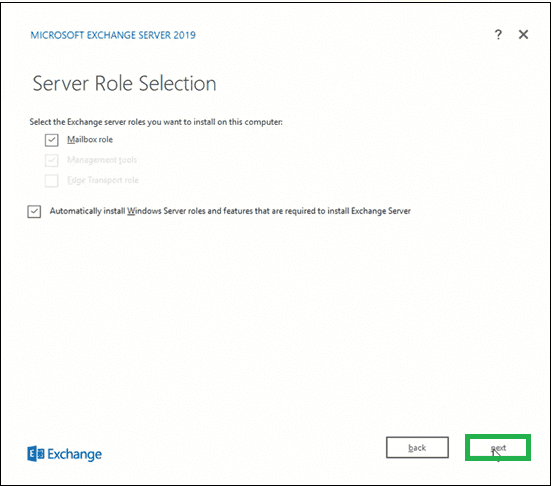
- Here, select Mailbox role option under Exchange Server roles section and select the checkbox Automatically install Windows Server roles and features that are required to install Exchange Server. Click next.
- Click browse to specify the path for Exchange Server installation or leave it to the default selected path. Click next.

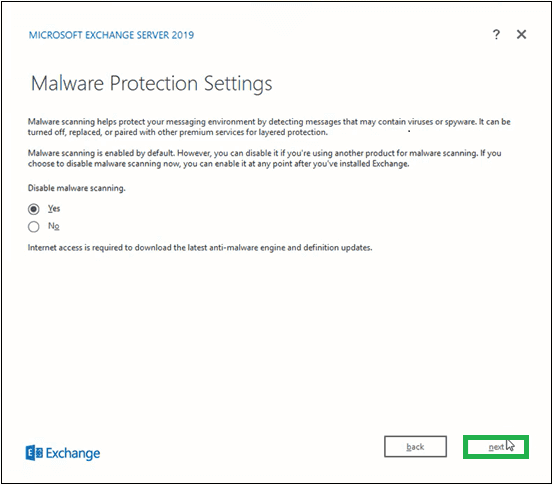
- For Malware Protection Settings, select Yes or No option (to disable malware scanning) and click next.

- Wait for the completion of Readiness Checks to verify the setup and then click install.

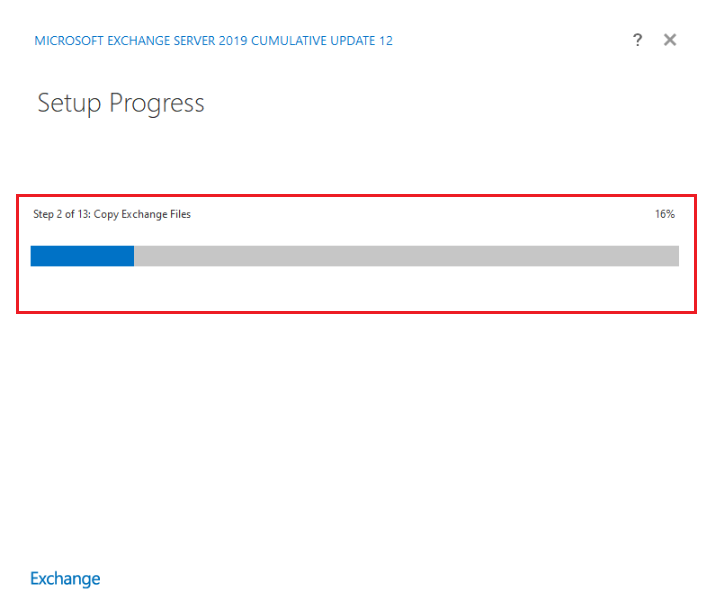
- The Setup Progress will start copying the Exchange files.
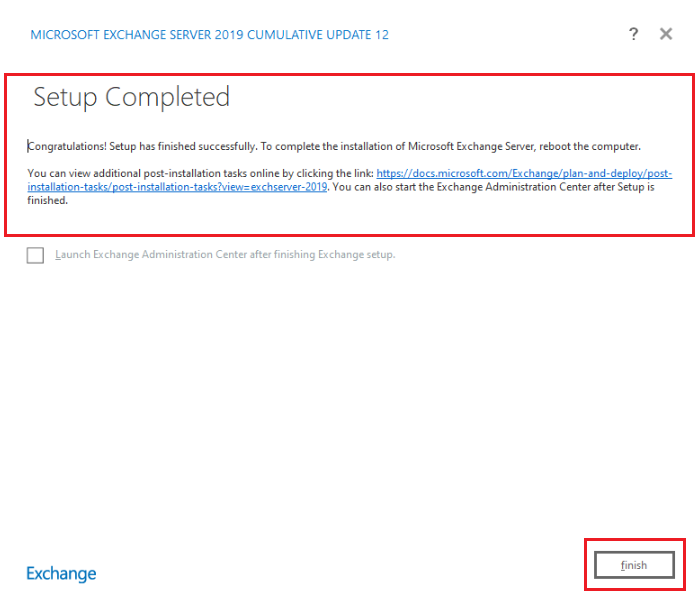
- Once the setup is completed, it will display a page Setup Completed.


To launch the Exchange Server instantly, select the checkbox Launch Exchange Administration Center after Finishing Exchange setup. Click finish.
Hence, the Exchange Server 2019 is successfully installed on your system. By running these two commands in the Exchange Management Shell, you will get the complete information about your newly installed Exchange Server.
Get-ExchangeServer
And
Get-ExchangeServer -Identity MailboxName | Format-List
Exchange 2019 administrators can also login to the Exchange Admin Center to confirm for the successful Exchange Server installation.
Note: An Exchange administrator should follow the post installation tasks for the Exchange Server such as providing Exchange product key, Exchange management tools installation on client machine, Edge subscriptions, security certifications configuration and more.
Certificate Requirements for Exchange services
We need to install the certificate for the services like IIS, SMTP, and so on. Login to Exchange Admin Center and go to Service Certificate to create certificate signing request (CSR) file to generate a certificate from third party Certification Authority.
Configure Exchange Server 2019 Certificate
It is the most important post installation task to configure SSL certificate in Exchange 2019. For delivering a secure messaging infrastructure, ensure that certificates are installed and configured properly. Certificate management in the EAC can help administrators:
- Minimizing the number of certificates that are required.
- Minimizing the interaction that’s required for certificates.
- Allowing the centralized installation and management of certificates on all Exchange servers in organization.
There are 2 methods available in Exchange 2019 to configure SSL Certificate.
- SSL Certificate using Exchange Admin Center
- SSL Certificate using Exchange Management Shell
This was the whole process of installing Exchange Server 2019 on your system.
If you are interested in performing mailboxes migration from your older version of Exchanger Server to to Exchange Server 2019 or other version easily, you can simply trust on our Exchange Migration tool. It provides the easiest migration without any data hampering or integrity loss. It supports all Exchange Server versions for migration and includes intelligent filters for selective migration. Know better about this tool by working on its free trial version (can be accessed from its website) yourself.
Download Now
Read Related Blogs
- Perform Soft & Hard Exchange Recovery using Eseutil Commands
- Free Methods to Convert Exchange EDB to PST File
- Cached Exchange Mode in Outlook & How to Enable or Disable?
- On-Premises Exchange Vs Microsoft 365 Differences
- Quick Fix for Exchange Server is Unavailable Error
Installing Exchange Server is an essential task for businesses looking to streamline their email communication in a secure environment. Microsoft Exchange Server 2019 is the latest one launched by the Microsoft. In this guide, we will go through the steps to Install Exchange Server 2019. First we will understand the requirements and pre-requisites needed to install the Exchange Server. We will setup the Exchange Server on the Azure Virtual Machine running on Windows Server 2022. If you want to learn about setting up Azure VM, then read this article on Create Azure Virtual Machine.
Important: Tired of managing your own servers? We get it – running Exchange on-prem takes time and money away from growing your business. But there’s a better way. With our seamless migration services, we lift that burden, transitioning you to the Office 365 Exchange Online while keeping disruptions at bay. If you are looking for Exchange Server to Exchange Online Migration, feel free to reach out to us at [email protected].
Contents
- 1 Requirements for Exchange Server 2019
- 1.1 Install Active Directory Domain Services, DNS Server and Create a New Domain Forest.
- 1.2 Join the server to the domain.
- 1.3 Prerequisites to Install Exchange Server 2019
- 2 Install Exchange Server 2019
- 2.1 Verify Exchange Server 2019 Installation
- 2.1.1 Conclusion:
- 2.1 Verify Exchange Server 2019 Installation
Requirements for Exchange Server 2019
Below are some requirements needed to smoothly install Exchange Server 2019.
- Network and Directory Server:
|
Network and Directory Server |
|
|
Components |
Requirements |
| Active Directory Forests | Windows Server 2012 R2 or later |
| DNS Namespace | Contiguous, Non-Contiguous, Single label domains, Disjoint. |
|
Active Directory Site |
The Active Directory Site should have a writeable domain controller. Also, after you install the Exchange Server 2019, then you cannot delete the Active Directory Site. |
| IPv6 | All the Exchange Server versions since 2013 support IPv6, but IPv4 should also be installed. |
| Domain Controller | Windows Server 2022, Windows Server 2019 Standard, Windows Server 2016 Standard, Windows Server 2012 R2 Standard |
- Hardware:
|
Hardware |
|
| Processor | 64-bit processor |
| Memory | Minimum 128 GB for Mailbox, minimum 64 GB for Edge Transport. |
| Disk Space | Minimum 30 GB of free space |
- Operating System
|
Operating System |
|
|
Exchange Components |
Requirement |
| Management Tools | Windows Server 2016/2019/2022 Standard/Data Center or Windows 10 (64-bit) |
| Mailbox and Edge Transport | Windows Server 2016/2019/2022 Standard/Data Center |
Install Active Directory Domain Services, DNS Server and Create a New Domain Forest.
First, we need to install active directory domain services. This can be done by following the steps mentioned below.
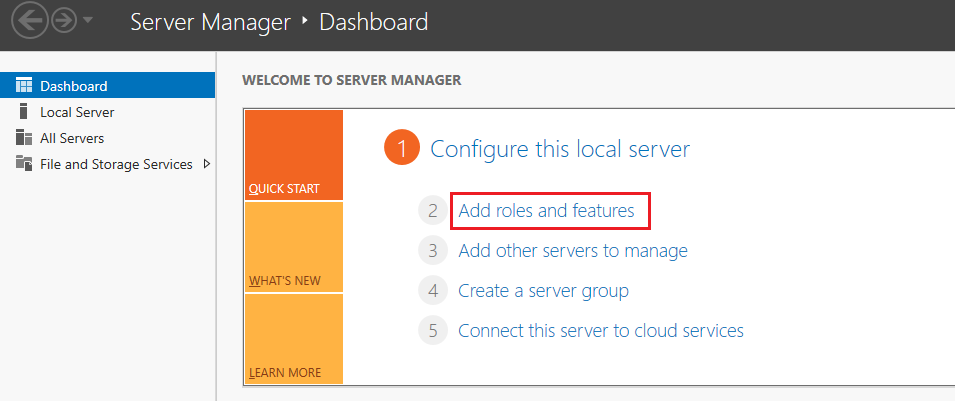
- Search Server manager in the windows search bar and open it.
- Click on Add roles and features.
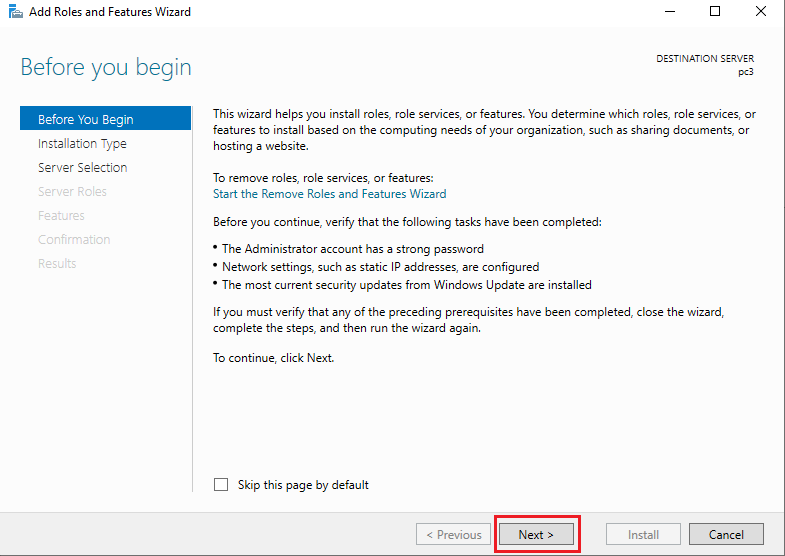
- In the before you begin window, just click on the next button.
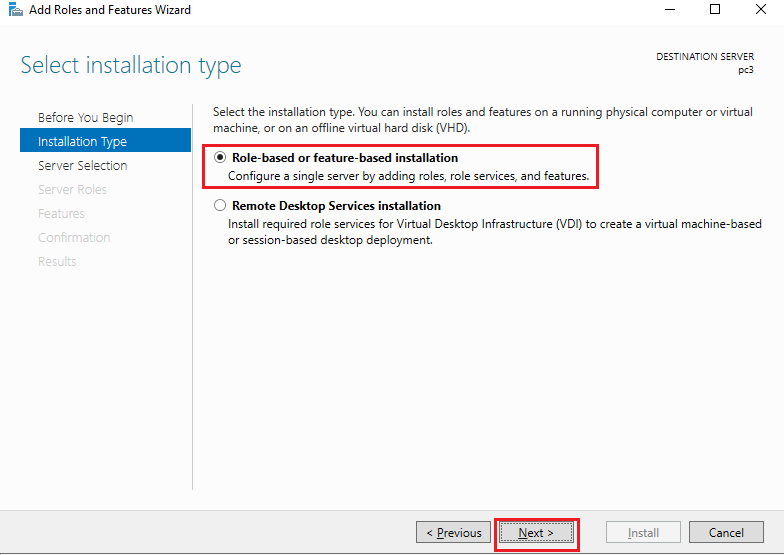
- Choose Role-based or Feature-based installation in the installation type and click on the next button.
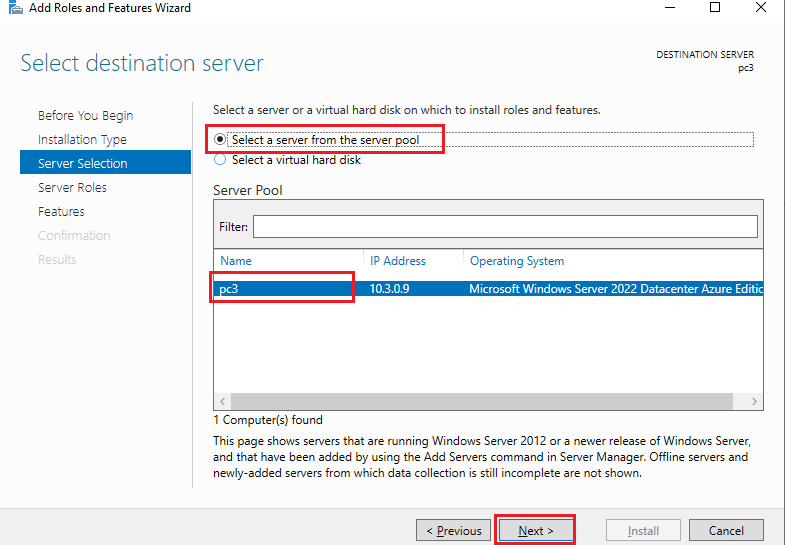
- In the server selection window, choose to select a server from the server pool, then choose your sever and click on the next button.
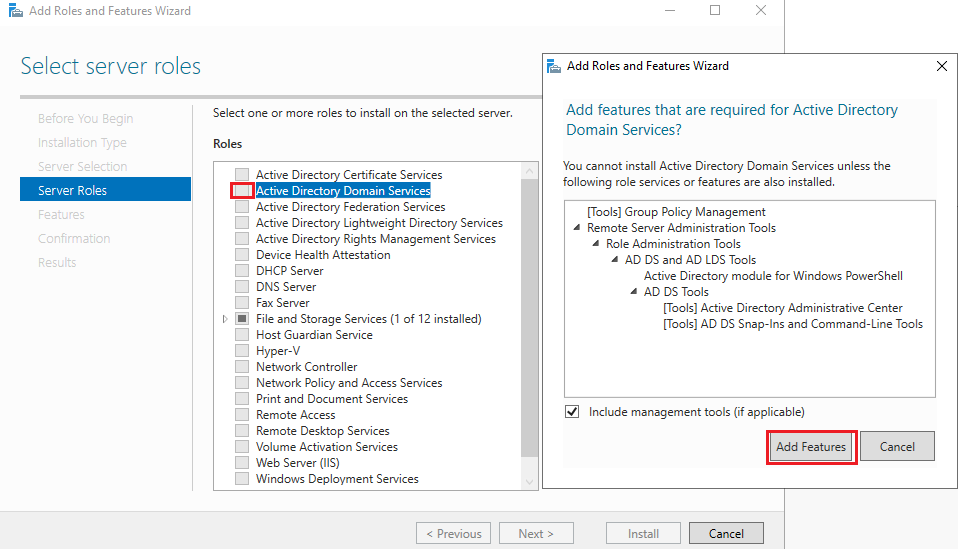
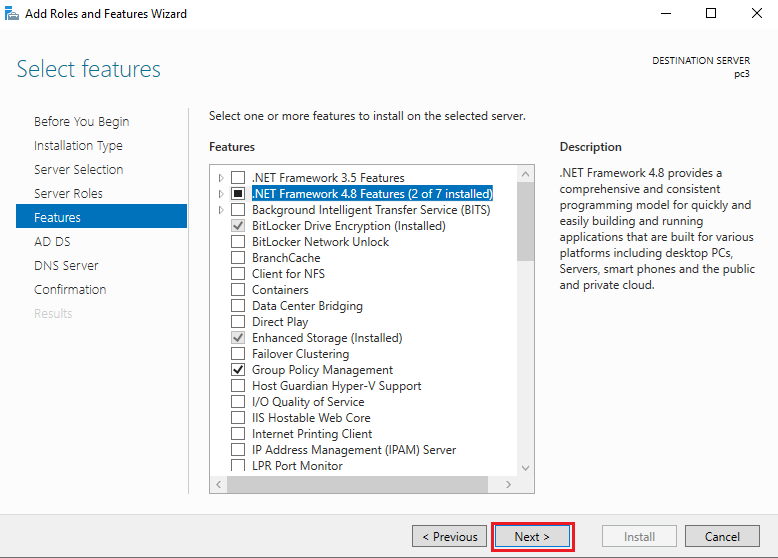
- In the server roles, select Active Directory Domain Services, a new Window will open, click on the Add feature.
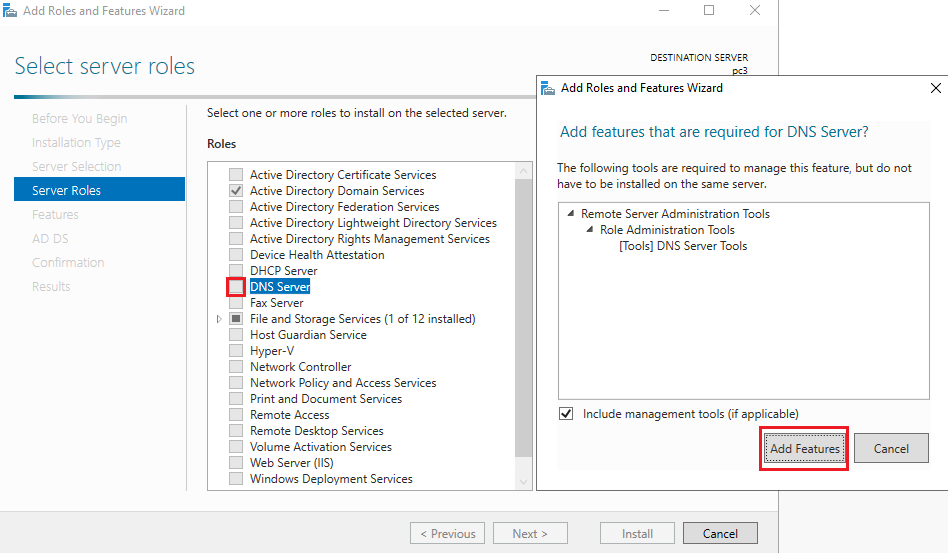
- On the same window choose the DNS Server and click on Add feature when asking.
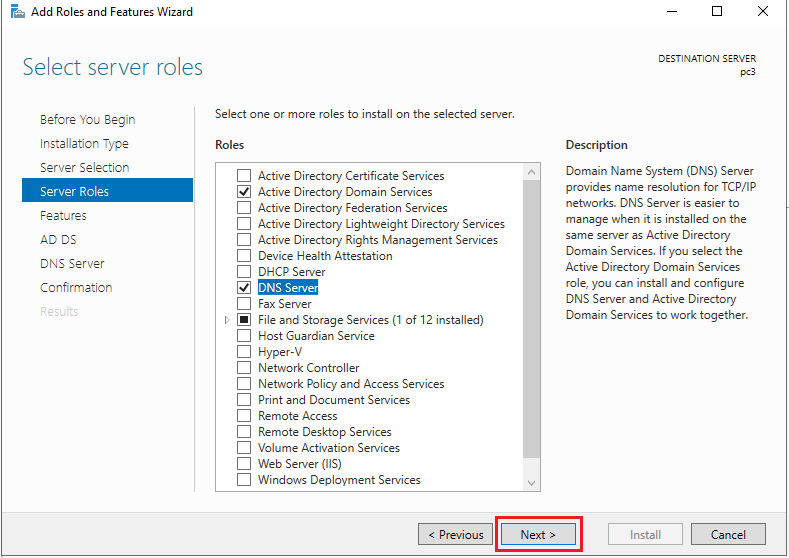
- Once done, click on the next button.
- In the features window, if you need to add more features, then choose otherwise, click on the next button.
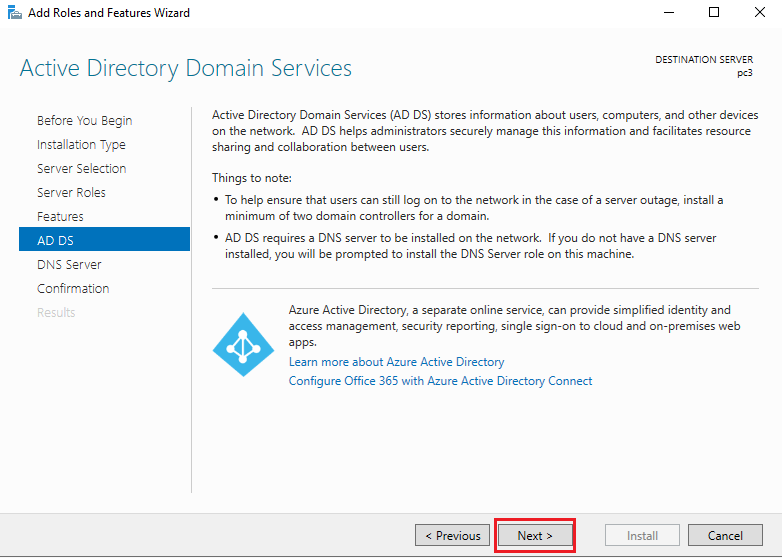
- Again, click next in the AD DS window.
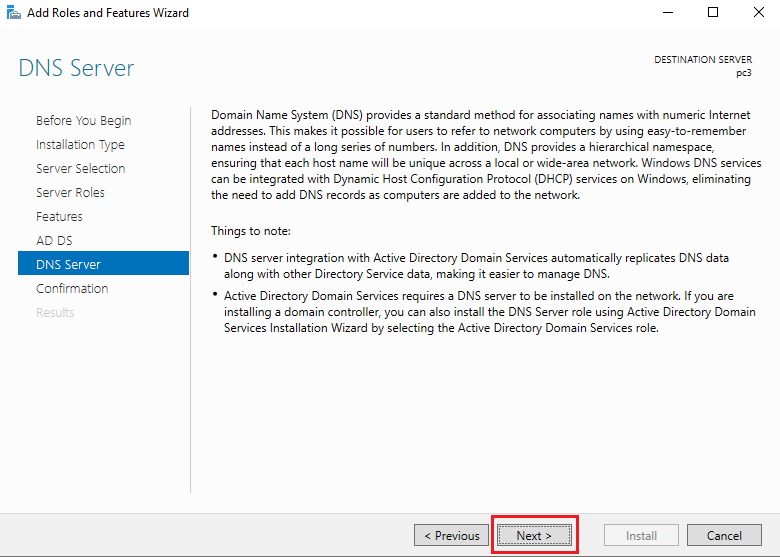
- In the DNS server, simply click on the next button.
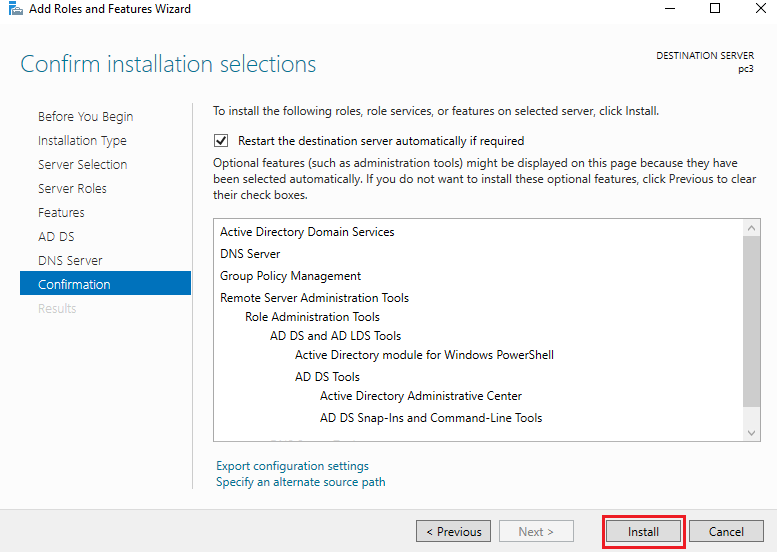
- In the confirmation, window choose automatically restart if required and click on the Install button.
- Once installed, click on the notifications and click on promote this server to a domain controller.
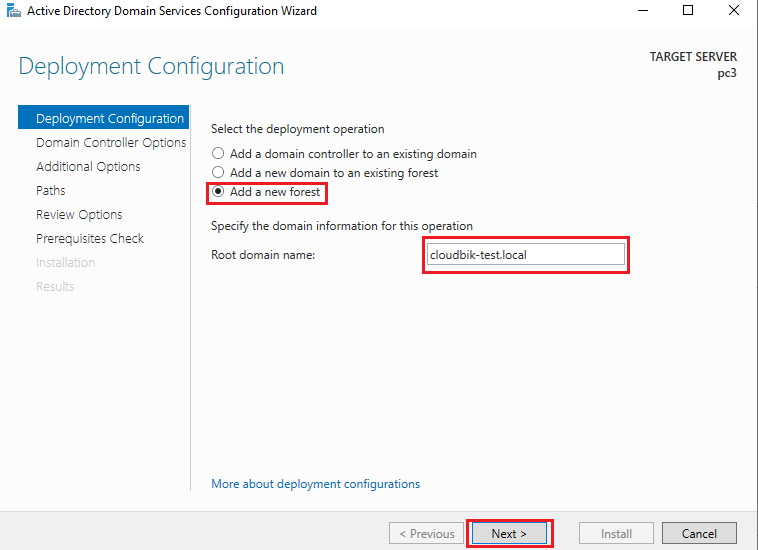
- Click on Add a new forest, type your root domain name like cloudbik.com and click on the next button.
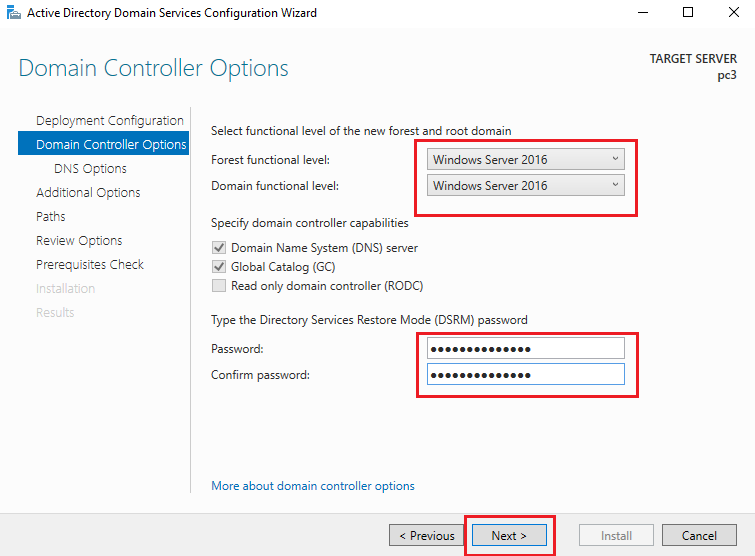
- In the domain controller options window, choose windows server 2016 in both the forest and domain function level, create new password and click on the next button.
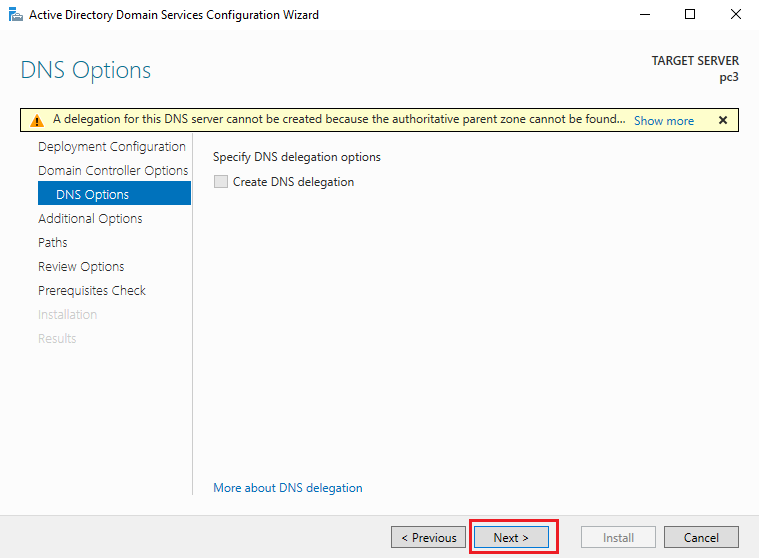
- Simply click next in the DNS options window.
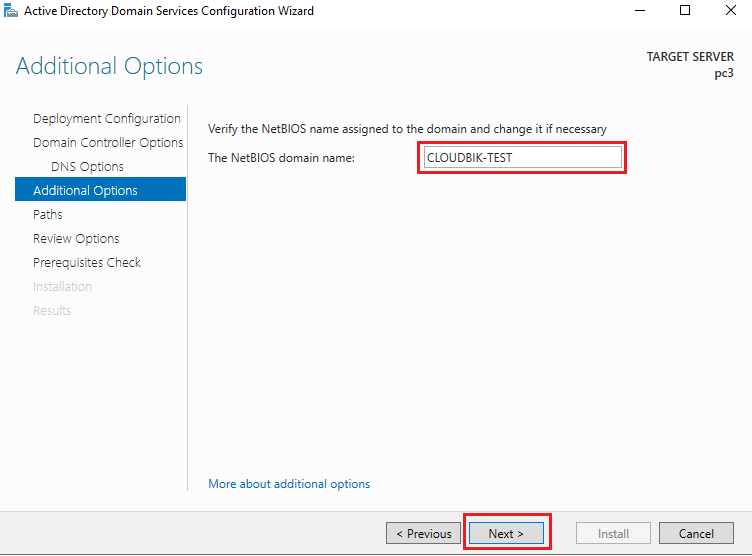
- In the Additional Options window, change the NET-BIOS domain name if required, otherwise leave it as it is and click on the next button.
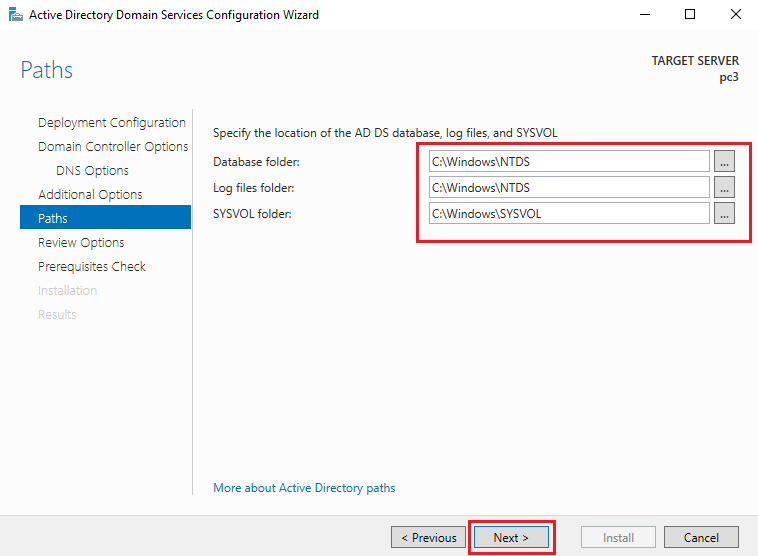
- In the path, change the installation path if needed, otherwise click on the next button.
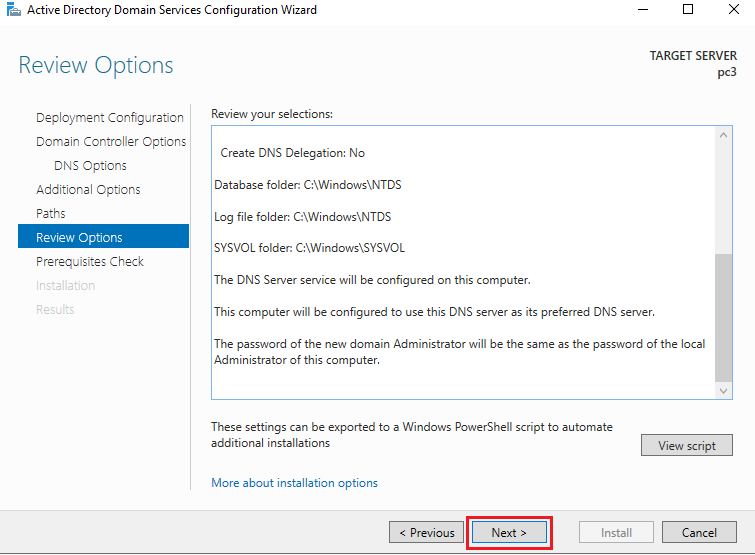
- Now review your selections and click on the next button.
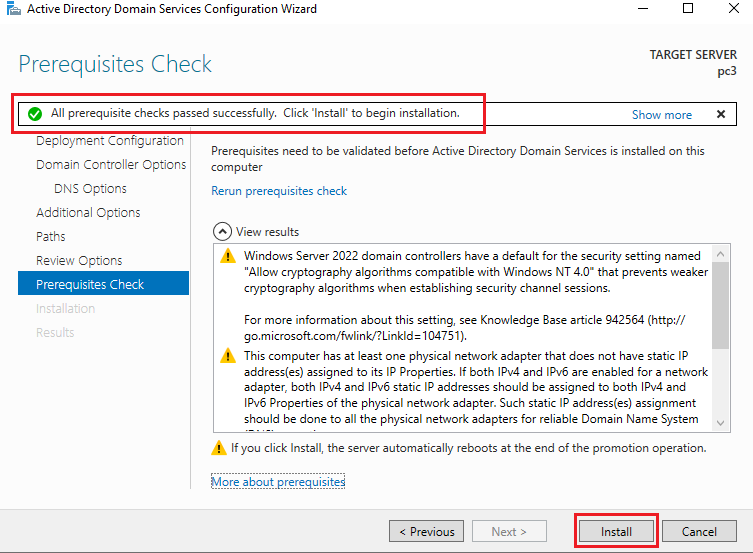
- It will check for prerequisites, one done you can click on the Install button. If there are errors, then you need to correct that. Warnings can be skipped.
Once done, it will automatically restart. Now your active directory setup has been completed successfully.
Join the server to the domain.
Now we need to join the server to the domain. For this follow the below steps.
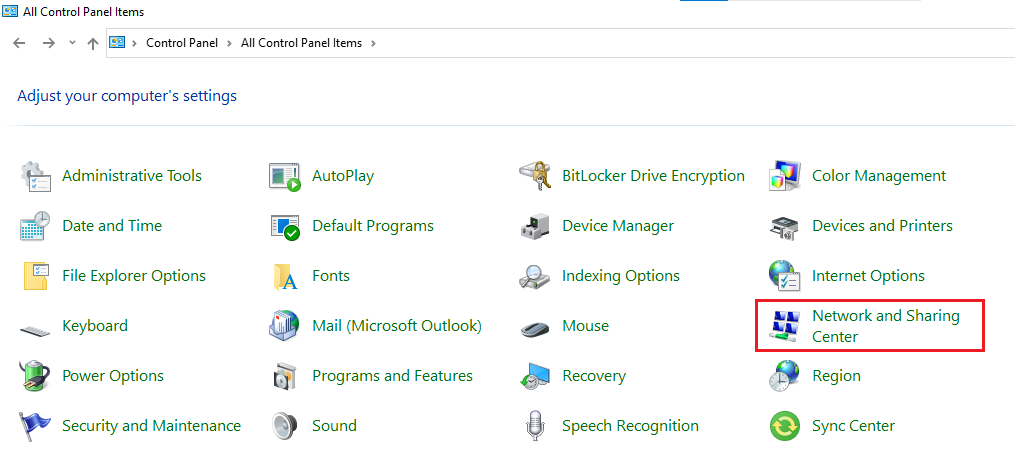
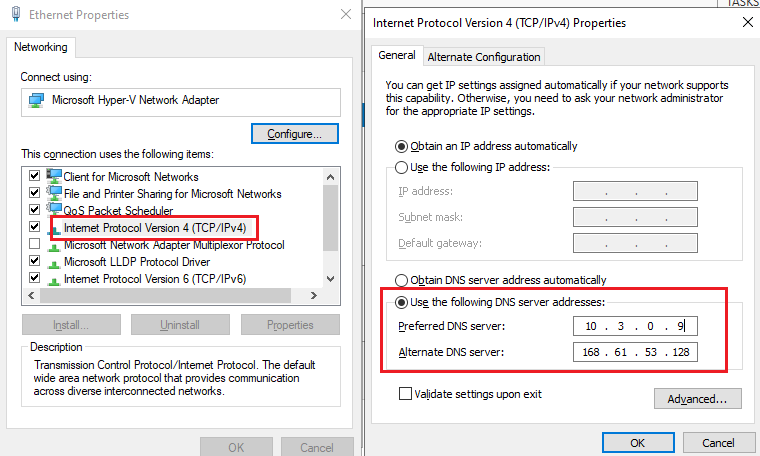
- Open control panel and click on the Network and sharing center.
- Now click on Ethernet then properties.
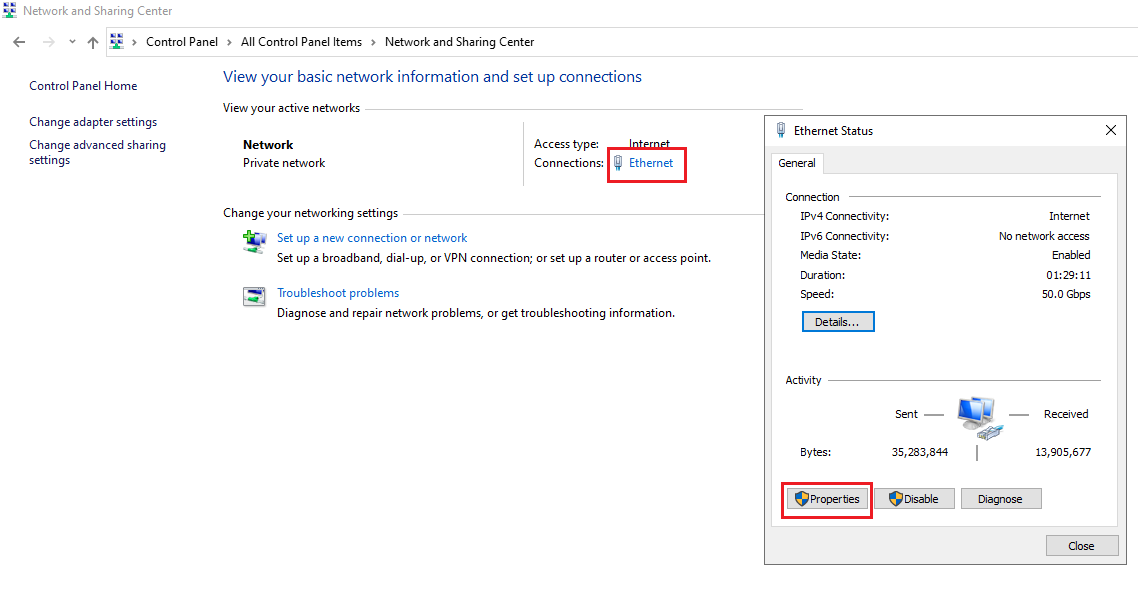
- Double click on Internet Protocol version 4 and in preferred DNS type, fill the server IP address. In the Alternate DNS Server, type the IP address of the PC. Once done, click on the OK button.
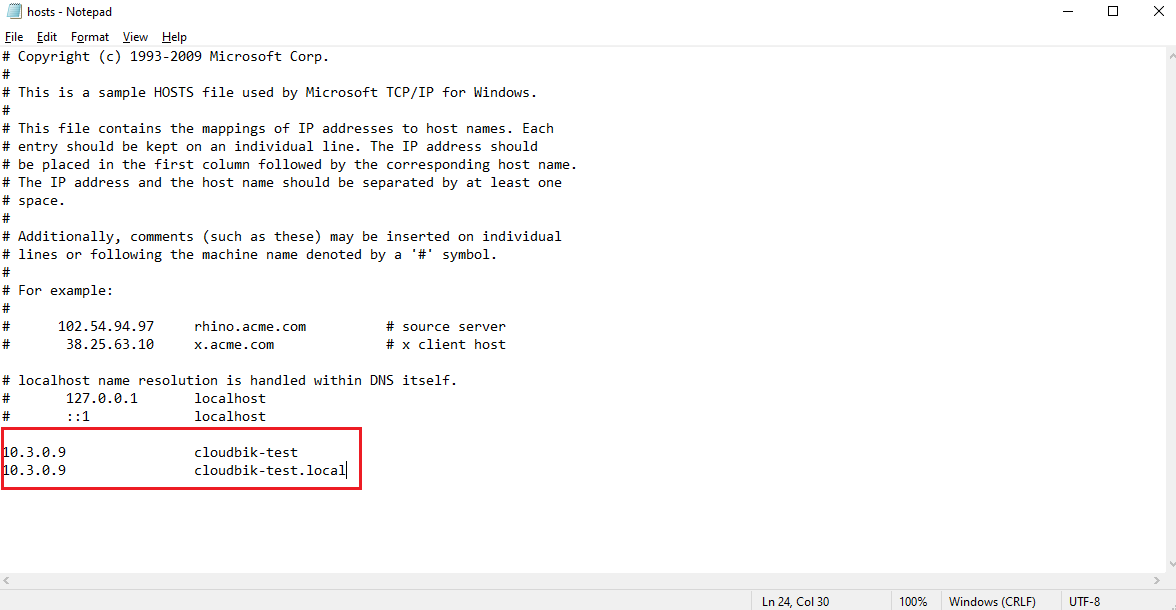
Now, we need to add the IP address of the server and domain in the hosts file of the windows.
- First go to C:\Windows\System32\drivers\etc and open the hosts file with notepad and at the end of the file add your domain with server I.P address as shown in the image and save it.
Now you need to connect your PC to the domain. For this follow the below steps.
- Open the properties of your PC and click on rename this PC (advanced). Once done click on the change button to connect PC to domain.
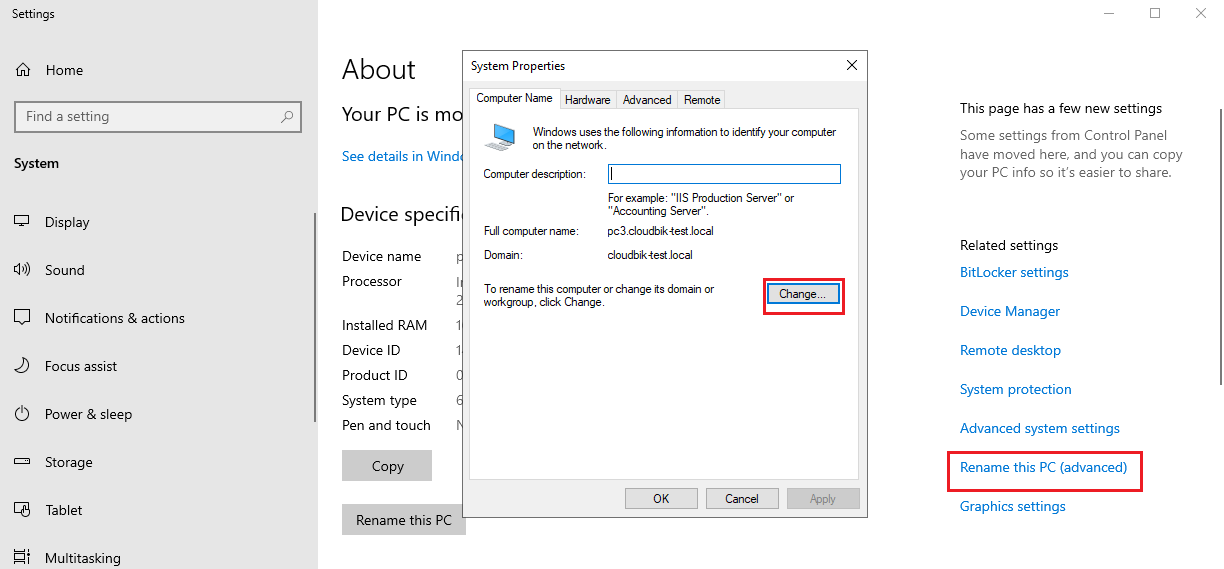
- In the member of, choose domain and type your domain name. Once done, click on apply and then OK button.
Once everything has been completed, restart your PC. Now we can install exchange server, but first we need to install some prerequisites for installing Exchange Server 2019.
Prerequisites to Install Exchange Server 2019
To install Exchange server, you need to install some pre-requisites needed before installing the exchange setup.
Install latest .NET Framework
Download the .NET 4.8 and install it on your pc. Remember to install it as an administrator. Once installed you need to restart your PC for completing the installation.
Install Visual C++ Redistributable Package
Download Visual C++ Redistributable Package for Visual Studio 2012 and Visual Studio 2013 and install it as administrator on your PC.
Install IIS Rewrite Module
Download and install the IIS Rewrite Module on your PC from this link: IIS Rewrite Module
Install Unified Communications Managed API 4.0
Download and Install Unified Communications Managed API 4.0 on your system.
Install Server Media Foundation
To install server media foundation, you need to use the Windows PowerShell.
- Open Windows PowerShell and run it as administrator.
- Run the below command in the PowerShell.
Install-WindowsFeature Server-Media-Foundation
Install Remote Server Administration Toolkit
In the Windows PowerShell, run the below command.
Install-WindowsFeature NET-Framework-45-Features, RSAT-ADDS, RPC-over-HTTP-proxy, RSAT-Clustering, RSAT-Clustering-CmdInterface, RSAT-Clustering-Mgmt, RSAT-Clustering-PowerShell, Web-Mgmt-Console, WAS-Process-Model, Web-Asp-Net45, Web-Basic-Auth, Web-Client-Auth, Web-Digest-Auth, Web-Dir-Browsing, Web-Dyn-Compression, Web-Http-Errors, Web-Http-Logging, Web-Http-Redirect, Web-Http-Tracing, Web-ISAPI-Ext, Web-ISAPI-Filter, Web-Lgcy-Mgmt-Console, Web-Metabase, Web-Mgmt-Console, Web-Mgmt-Service, Web-Net-Ext45, Web-Request-Monitor, Web-Server, Web-Stat-Compression, Web-Static-Content, Web-Windows-Auth, Web-WMI, Windows-Identity-Foundation
Check for Windows Updates
You need to install all windows update before installing any version of Exchange Server including 2019.
Once all the updates have been installed successfully, you are good to go to install Exchange Server.
Steps to Install Exchange Server 2019
First you need to download the Exchange server 2019 setup file if you do not have it. Once downloaded, mount the setup file.
Prepare Active Directory Schema
Run the below command in the windows PowerShell.
F:\Setup.exe /IAcceptExchangeServerLicenseTerms_DiagnosticDataOn /PrepareSchema
Prepare Active Directory
In Windows PowerShell, run the below command.
F:\Setup.exe /IAcceptExchangeServerLicenseTerms_DiagnosticDataOn /PrepareAD /OrganizationName: “CLOUDBIK-TEST"
Prepare Active Directory Domain
Run the below mentioned command in the Windows PowerShell.
F:\Setup.exe /IAcceptExchangeServerLicenseTerms_DiagnosticDataOn /PrepareDomain:cloudbik-test.local
Follow the below procedure to completely install Exchange Server 2019 on your Azure Virtual Machine.
- Run setup.exe file as administrator.
- Accept the terms in the License Agreement and click next.
- Choose use recommended settings and click on the next button.
- In the server role selection window, choose Mailbox rule and also check on automatically install windows server roles and features. Once done, click on the next button.
- On installation space and location window, specify the path for Exchange Server 2019 installation and click next.
- In the malware protection setting window, choose the No option and click on the next button.
- Once done, it will check for the prerequisite needed to Install Exchange Server 2019 has been installed or not. If not, it will provide you with errors that you need to resolve. Once the analysis has been completed successfully, you need to click on the Install button.
- Setup progress window will open and show the progress of Installation of the Exchange Server 2019.
- Once the setup has been completed, click on the finish button.
Now you have successfully installed the Exchange Server 2019. You can verify the installation.
Verify Exchange Server 2019 Installation
To verify exchange server installation, open Exchange Management Shell and run the below command.
Get-ExchangeServer
It will provide you the result of the Exchange Server Database, Server Role, Site, Edition and Version.
Conclusion:
This article describes how to install Exchange Server 2019 on Windows Server 2019 running on Azure Virtual Machine. Exchange Server provides full control to admin over their organization and is very secure. I hope this article has provided you with valuable insight on installing exchange server from scratch. If you have any queries regarding this, feel free to ask.
Read time 3 minutes
Microsoft released Exchange Server 2019, the latest version in October 2018. Now it is the single Exchange Server version which you can deploy on Windows Server Core. It has enhanced security features and improved performance; it supports up to 48 processor core and 256 GB of RAM. Many users do not consider Exchange 2019 as a new Exchange Server version, but just as an upgrade to the previous version as the number of new features is very less in it. Microsoft did not even change the logo of the Exchange Server.
In the following article, we will go through a step-by-step procedure to install Exchange Server 2019. There are multiple steps to complete the process. Let’s go through each step sequentially –
- Install Exchange Server 2019, Complete installing Process Part 1
- Install Exchange Server 2019, Part 2
1st Step – Prepare the environment
Before you install the Exchange Server, you need to ensure a given set of prerequisites involving hardware, software, .NET frameworks, and supported platforms. You must ensure that all the elements fulfill the requirement of installation.
Network and Directory Server
| Components | Requirements |
| Active Directory Forests | Windows Server 2012 R2 or later |
| DNS Namespace | Contiguous, Non-Contiguous, Single label domains, Disjoint. |
| Active Directory Site | The Active Directory Site should have a writeable domain controller. Also, after you install the Exchange Server 2019, then you cannot delete the Active Directory Site. |
| Domain Controller | Windows Server 2019 Standard, Windows Server 2016 Standard, Windows Server 2012 R2 Standard |
| IPv6 | All the Exchange Server versions since 2013 support IPv6, but IPv4 should also be installed. |
Hardware
| Processor | Intel 64-bit processor (EM64T), AMD 64-bit processor. |
| Memory | Minimum 128 GB for Mailbox, minimum 64 GB for Edge Transport. |
| Disk Space | Minimum 30 GB of free space |
| Screen Resolution | 1024*768 |
| File System | NTFS |
Operating System
| Exchange Components | Requirement |
| Mailbox and Edge Transport | Windows Server 2019 Standard/Data Center |
| Management Tools | Windows Server 2019 Standard/Data Center or Windows 10 (64-bit) |
Outlook Clients
- Outlook 2013
- Outlook 2016
- Outlook 2016 for Mac
- Outlook 2019
- Outlook for Mac for Office 365
2nd Step – Prepare the Active Directory
Before installing the Exchange Server 2019, the first step you should complete is preparing the Active Directory.
If your organization is not a large one, and there is no separate team dedicated to the Active Directory management, then you can directly use the setup wizard. Make sure that the account which you are using is a member of the Schema Admin and Enterprise Admin Security groups.
If you are going to place a large number of mailboxes in the Active Directory, then you should follow the upcoming procedure. It will give you complete information on setting the Active Directory and preparing the environment.
Here is a brief procedure for preparing the environment –
-
- Install the .NET framework (4.7.2 or 4.7.1).
- Install Visual C++ Redistributable Packages for Visual Studio.
- Install Unified Communications Managed API.
- Reboot the computer system.
- Run Windows Powershell as an Administrator and input the following command –
Install-WindowsFeature RSAT-ADDS
- Run the following command –
Install-WindowsFeature NET-Framework-45-Features, RPC-over-HTTP-proxy, RSAT-Clustering, RSAT-Clustering-CmdInterface, RSAT-Clustering-Mgmt, RSAT-Clustering-PowerShell, Web-Mgmt-Console, WAS-Process-Model, Web-Asp-Net45, Web-Basic-Auth, Web-Client-Auth, Web-Digest-Auth, Web-Dir-Browsing, Web-Dyn-Compression, Web-Http-Errors, Web-Http-Logging, Web-Http-Redirect, Web-Http-Tracing, Web-ISAPI-Ext, Web-ISAPI-Filter, Web-Lgcy-Mgmt-Console, Web-Metabase, Web-Mgmt-Console, Web-Mgmt-Service, Web-Net-Ext45, Web-Request-Monitor, Web-Server, Web-Stat-Compression, Web-Static-Content, Web-Windows-Auth, Web-WMI, Windows-Identity-Foundation, RSAT-ADDS
This command will install the server prerequisites.
- Now, mount the Exchange Server 2019 Preview installation Media.
- Start the command prompt and change the directory to the Exchange installation media path.
- Run the command –
Setup.exe /PrepareSchema /IAcceptExchangeServerLicenseTerms
- Run the following command –
Setup.exe /PrepareAD /OrganizationName:”<organization name>” /IAcceptExchangeServerLicenseTerms
- Run the command –
Setup.exe /PrepareAllDomains /IAcceptExchangeServerLicenseTerms
The command will enable the Active Directory Domain for Exchange Server 2019.
This is the complete procedure of preparing the Active Directory and Domain for Exchange Server 2019. Please read our next article to see the procedure of installing the Exchange Server 2019.
HomeOffice 365Install Microsoft Exchange Server 2019 Step by Step
Office 365, Technical
📒✍4 minutes to read
Microsoft released the first Exchange version 4.0 in the year 1996. In October 2018, Microsoft released its latest Exchange Server 2019. Its minimum Server OS requirement is Windows Server 2019 and can be deployed on Windows Server 2019 Core Edition as well.
Exchange 2019 Standard can only be installed on Windows Server 2019 Standard. Similarly, Exchange 2019 Datacenter can only be installed on Windows Server 2019 Datacenter. Exchange 2010 is not supported, however, Exchange 2013 CU21 and later and Exchange 2016 CU11 and later are supported as co-existence.
Exchange 2019 will not be supported with any Domain Controller running on Windows Server 2012 or older in the organization, however, will support Domain Controller running Win Server 2012R2 or later. If you have any Win Server 2012, you need to first upgrade it to Win Server 2012R2. Domain & Forest Functional Level should also be at least Win Server 2012R2.
On the client side, Exchange Server 2019 will not support any workstation running Windows 8 or older, however, it will support Windows 10. If you have client machines running Windows 7 or Windows 8, you can use OWA access. The browsers supported for OWA are Edge, IE11, chrome, firefox.
Outlook 2019, 2016 and 2013 will be supported with Exchange 2019.
Unified Messaging has been completely removed from it, now the organizations using Skype For Business now have to move to alternative solutions for voicemail like Azure Cloud Voicemail, etc.
Exchange 2019 can support up to 48 processor cores and 256 GB of RAM. All roles (Mailbox, CAS, Hub) are consolidated into one Exchange Server 2019 as seen its predecessor Exchange 2016. You can install Exchange 2019 as an Edge Transport Server as well in DMZ.

a) .Net Framework 4.7.2
b) Visual C++ Redistributable Package for Visual Studio 2012
Note: Do not install Windows Management Framework 5 i.e., Powershell V5, else Exchange Management Shell will not be able to connect.
c) Open Powershell in Admin mode:
Install-WindowsFeature RSAT-ADDS
Install-WindowsFeature NET-Framework-45-Features, RPC-over-HTTP-proxy, RSAT-Clustering, RSAT-Clustering-CmdInterface, RSAT-Clustering-Mgmt, RSAT-Clustering-PowerShell, Web-Mgmt-Console, WAS-Process-Model, Web-Asp-Net45, Web-Basic-Auth, Web-Client-Auth, Web-Digest-Auth, Web-Dir-Browsing, Web-Dyn-Compression, Web-Http-Errors, Web-Http-Logging, Web-Http-Redirect, Web-Http-Tracing, Web-ISAPI-Ext, Web-ISAPI-Filter, Web-Lgcy-Mgmt-Console, Web-Metabase, Web-Mgmt-Console, Web-Mgmt-Service, Web-Net-Ext45, Web-Request-Monitor, Web-Server, Web-Stat-Compression, Web-Static-Content, Web-Windows-Auth, Web-WMI, Windows-Identity-Foundation
d) Open CMD in Admin mode and cd into the Exchange Installation Directory:
Setup.exe /PrepareSchema /IAcceptExchangeServerLicenseTerms
Setup.exe /PrepareAD /OrganizationName: XYZCompany /IAcceptExchangeServerLicenseTerms
Note: Replace XYZCompany by your Organization Name. If you have two words enter them in quotes e.g., “Xyz Company”.
Setup.exe
GUI mode of Installation will open – Connect to Internet and check for Updates – Select Mailbox + Management Tools + check Automatically Install Windows Server Roles and Features. It will perform the Prerequisites check and if you get Warning, kindly ignore it unless you get an error message. Click Install.
Note: I highly recommend you to create a new user e.g, [email protected] with Domain Admin, Organization Management & Enterprise Admin Roles. Enable his mailbox on Exchange 2016 Database.
Enable-Mailbox -Identity [email protected] -Database DatabaseOn2019
It will help you open the Exchange Admin Center 2019 directly if you type https://localhost/ecp
Error:
A hybrid deployment with Office 365 has been detected. Please ensure that you are running setup with the /TenantOrganizationConfig switch.
Cause: If you have an existing Exchange 2010 Server and have configured Hybrid Setup with Office 365, you may find an error:
Fix:
1. Connect to Exchange Online Powershell.
2. Run the command
Get-OrganizationConfig | Export-Clixml -Path C:\MyTenantOrganizationConfig.XML
Setup.exe /PrepareAD /TenantOrganizationConfig C:\MyTenantOrganizationConfig.XML /IAcceptExchangeServerLicenseTerms
Setup.exe
Restart the machine and you will find your newly Exchange 2019 environment. Open Google Chrome and type:
https://localhost/ecp
Login with Administrator credentials. Configure it properly.
If you have Exchange 2010 and wants to decommission it, follow the steps below:
1) Export 3rd party SSL Certificate from Exchange 2010 and import it into Exchange 2019. Assign the services IIS & SMTP to imported certificate.
2) Export all the Receive connectors using the script and run the command in Exchange 2019 Management Shell:
.\Copy-ReceiveConnector.ps1 -SourceServer DC1 -ConnectorName "Specific Receive Connector" -Targ etServer DC5 -MoveToFrontend -ResetBindings -DomainController DC1.exolab.tk
3) Point all Firewalls & Load Balancers to Exchange 2019 Private Ip Address.
4) Try validating with [email protected] user from Office 365 – Outbound to On-Premises Connector in to check mail flow is working. Try sending one test email from 2016Admin user to migrated cloud user and vice versa.
5) Point all Multi-Functional Devices / Applications using SMTP Relay to the Private Ip Address of Exchange 2016 Server.
6) Migrate all three Arbitration/System Mailboxes from Exchange 2010 to Exchange 2019 using Migration Tab in Exchange 2019 Admin Center.
7) Shut down Exchange 2010 server and check mail flow working fine. Leave it shut down for one week to check reporting from any end-user. Once everything seems working for 1-2 weeks, then think of De-commisioning the Exchange 2010 Server.
There are total 13 Steps. I have included the Live Demo of all the above steps. I hope if you are facing any issues, the tutorial will help you:
Thanks a ton for reading my blog, don’t leave without mentioning your comments, errors and I will try to revert with a best possible resolution. Please do Subscribe our Youtube Channel for more upcoming videos like this.
Ajey Kumar Gupta
(Exchange Admin)
Must Read:
a) Install Windows 2016 Step by Step
b) How to create Linkedin Learning Premium Account for free?
Subscribe Us
😀👊👆
Total Page Visits: 11766 — Today Page Visits: 3