
Install Exchange Server 2016 / 2019 prerequisites first. After need to do prepare Active Directory for Exchange Server. Need to be done before installation of Exchange Server 2016 / 2019. Exchange Server 2016 / 2019 can install on Windows Server 2016 or 2019 / 2022. Also the Exchange can install on both Windows Server Standard & Datacenter. Exchange Server 2016 / 2019 can be installation on Windows Server with a GUI (Desktop Experience). In this article, we are going to preparing a Exchange Server 2019 prerequisites on a Windows Server 2019.
Install Exchange Mailbox server prerequisites
Below steps to install Exchange Mailbox server prerequisites on Windows Server.
Step 1. Open a PowerShell as administrator. Run the following command to install the required Windows components.
Install-WindowsFeature Server-Media-Foundation, NET-Framework-45-Features, RPC-over-HTTP-proxy, RSAT-Clustering, RSAT-Clustering-CmdInterface, RSAT-Clustering-Mgmt, RSAT-Clustering-PowerShell, WAS-Process-Model, Web-Asp-Net45, Web-Basic-Auth, Web-Client-Auth, Web-Digest-Auth, Web-Dir-Browsing, Web-Dyn-Compression, Web-Http-Errors, Web-Http-Logging, Web-Http-Redirect, Web-Http-Tracing, Web-ISAPI-Ext, Web-ISAPI-Filter, Web-Lgcy-Mgmt-Console, Web-Metabase, Web-Mgmt-Console, Web-Mgmt-Service, Web-Net-Ext45, Web-Request-Monitor, Web-Server, Web-Stat-Compression, Web-Static-Content, Web-Windows-Auth, Web-WMI, Windows-Identity-Foundation, RSAT-ADDS

Step 2. Install .NET Framework 4.8 . This .NET package installed after may need to be restart a server. If not available in your server you can download on Microsoft website.

Step 3. Install Visual C++ Redistributable for Visual Studio 2012. The installer package is available on Microsoft Website.
Step 4. Install Visual C++ Redistributable Packages for Visual Studio 2013. This installer package also available on Microsoft Website.
Step 5. Install IIS URL Rewrite Module.

Please Note: The IIS URL Rewrite Module is required with Exchange Server 2016 CU22 and Exchange Server 2019 CU11 or later.
Step 6. Install Unified Communications Managed API 4.0 Runtime.

Summary
So in this article, You already learned how to prepare for Exchange Server prerequisites. The next step is to prepare Active Directory domains for Exchange Server.
Thank you for visit my blogs. I’m hope will see you again next Exchange Post. Have a nice learn day for you and all. 🙂
Ref: Microsoft, ALI TAJRAN
Мы завершили подготовку Exchange 2010 и серверов для Exchange 2016. Следующий шаг – Установка Exchange 2016.
Начиная с Exchange 2016 Microsoft решила больше не разделять роли на Client Access и Mailbox (как это было в Exchange 2013). У Exchange 2016 только две роли – Mailbox и Edge. В Exchange 2013 Edge сервер также присутствовал. Роли Client Access и Mailbox объединены в одну роль – Mailbox.
Мы будем добавлять два сервера Exchange 2016 в нашу организацию Exchange 2010 – для отказоустойчивости (позже мы создадим DAG) и распределения нагрузки.
На момент написания статьи самой последней версией была Exchange Server 2016 CU20. Посмотреть актуальный список версий Exchange 2016 можно в документации на сайте Microsoft.
Для Exchange 2013 и более новых версий для установки вы загружаете самый последний Cumulative Update и выполняете установку из него. Он уже содержит все необходимые файлы и все необходимые обновления.
Для установки Exchange Server 2016 необходимо выполнить следующие шаги:
1. Запустить установщик из дистрибутива. Учетная запись, от имени которой будет выполняться установка должна быть включена в следующие группы Active Directory: Schema Admins, Enterprise Admins и Domain Admins.

2. На шаге проверки обновлений укажем, что мы не будем проверять наличие последних обновлений:

3. На следующем шаге мастера нажмем “Next”.
4. При согласии принимаем лицензионное соглашение:

5. Укажем, что мы не планируем принимать участие в программе улучшения качества продукта:

6. Укажем, что мы будем устанавливать сервер почтовых ящиков:

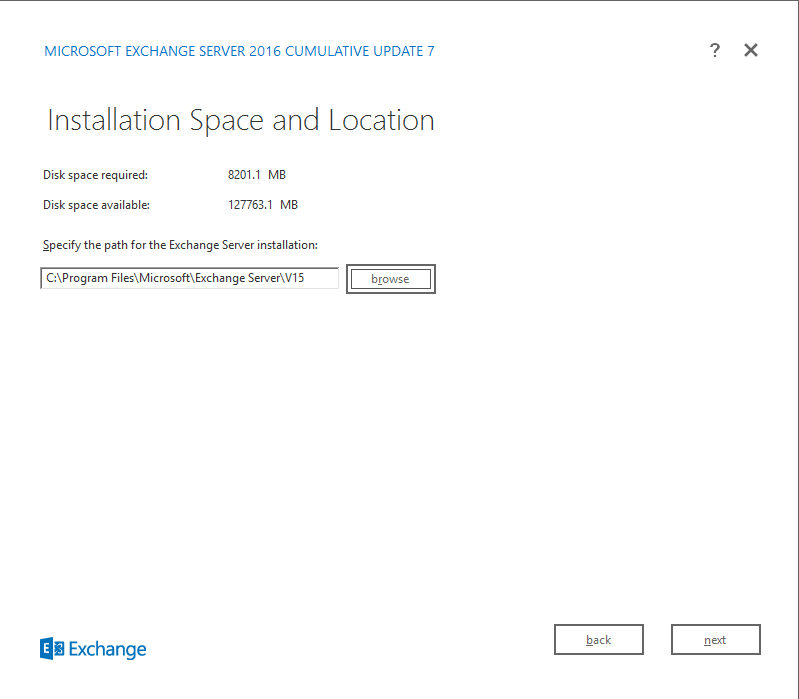
7. Укажем директорию установки:

8. Мы не будем отключать сканирование на предмет вредоносного ПО:

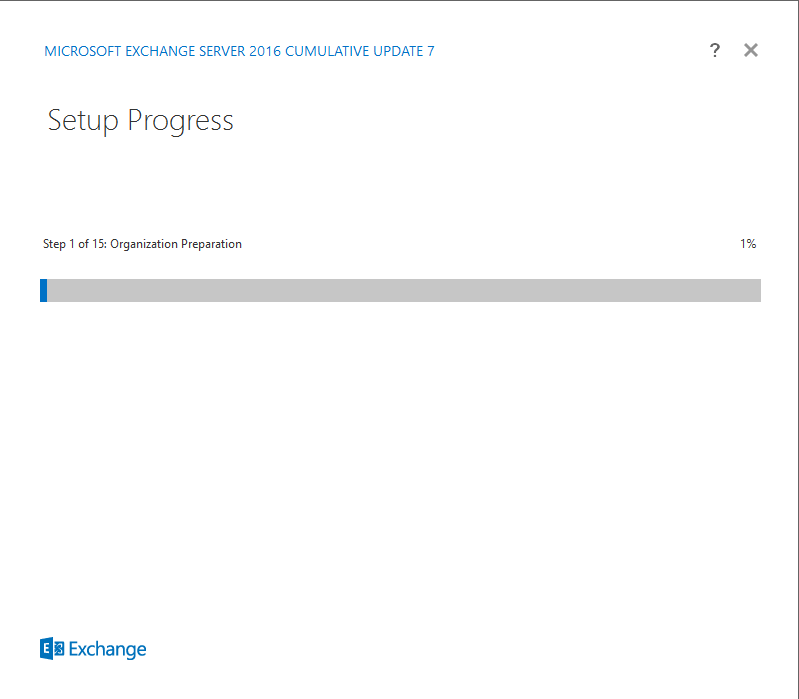
9. Мастер установки Exchange 2016 выполнит проверку предварительных требований. Если какой-то пункт не будет выполнен, то мастер установки сообщит об этом. В нашем случае будет только одно предупреждение о необходимости обновления схемы Active Directory. Нажимаем кнопку “Install”.

10. Дожидаемся окончания процедуры установки.
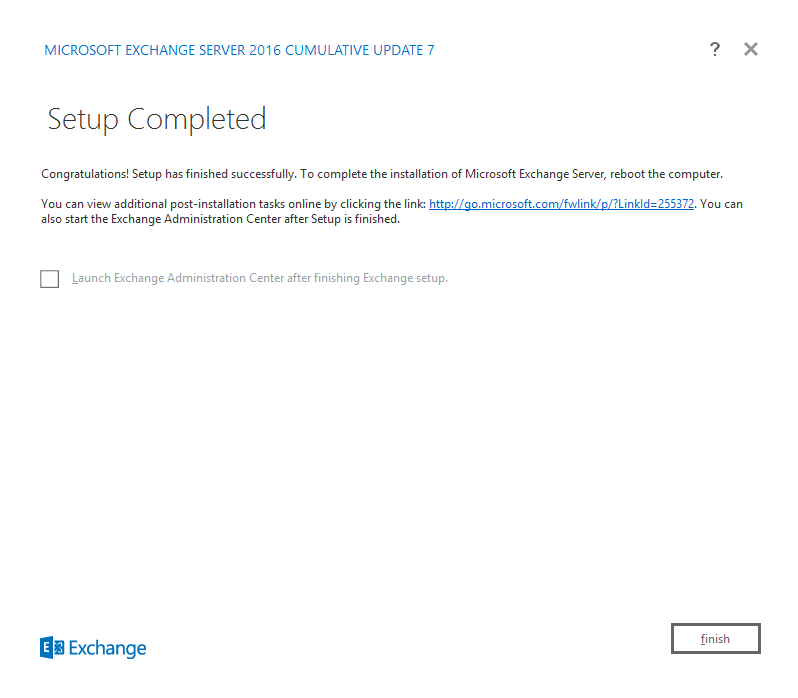
11. В случае успешного завершения установки мастер сообщит нам об этом:

12. Перезагружаем сервер.
Установка Exchange 2016 на второй сервер
Установка второго сервера почтовых ящиков Exchange 2016 выполняется аналогично первому серверу.
После установки Exchange 2016 необходимо установить последние обновления безопасности.
Установка актуальных обновлений безопасности
После завершения установки обоих серверов почтовых ящиков последнее что нам остается установить – это обновления безопасности.
Последовательность установки обновления безопасности на сервера Exchange не регламентирована – вы можете устанавливать обновления в любой последовательности.
На момент написания этой статьи определить и загрузить последние обновления безопасности Exchange 2016 можно вот по этой ссылке.
Для установки обновления необходимы выполнить следующие шаги:
1. Запустить командную строку от имени администратора:

2. Запустить установщик обновления безопасности:

3. На шаге приветствия мастера установки обновления нажмем “Next”.

4. В случае согласия принимаем лицензионное соглашение. После нажатия на кнопку “Next” запустится процесс установки обновлений.

5. Дожидаемся окончания процесса установки обновления безопасности.
6. При успешном завершении процедуры установки обновлений безопасности мастер установки сообщит нам об этом:

7. Перезагружаем сервер.
Выполняем аналогичные действия по установке обновления безопасности на оставшемся сервере почтовых ящиков Exchange 2016.
Заключение
Мы добавили сервера Exchange 2016 в нашу организацию Exchange 2010. Дополнительно мы установили актуальные обновления безопасности на сервера Exchange 2016.
В следующей статье мы рассмотрим процесс первоначальной настройки Exchange 2016 и процесс создания группы высокой доступности (Database Availability Group) на Exchange 2016.
In this guide we’ll show you how to install Microsoft Exchange Server 2016 or 2019 on your Windows VPS. For writing this guide, we’ve made use of Server 2016 with Exchange Server 2016 — Standard and Server 2019 with Exchange Server 2019 — Standard. In your control panel you’ll find your license key and the download link of the ISO for Exchange Server 2016.
On this page you can order an Exchange Server 2016 or 2019 license if you don’t have one yet.
Before you begin:
- For this guide we assume the basic configuration of your VPS has been performed. For security reasons and to prevent errors we recommend installing Exchange on a different VPS then the one on which your Active Directory has been installed.
- In order to be able to install Exchange there are a couple of prerequisits your VPS and Active Directory must meet. You can find these prerequisits here.
- Please note! This is relatively complex material and we recommend Dit is relatief complexe materie en het is dan ook altijd aan te raden om eerst een snapshot te maken van je VPS voordat je deze handelingen uitvoert. Zodoende kun je in het geval van een verkeerde configuratie hier altijd op terugvallen.
Installation of Exchange Server 2016 or 2019
Step 1
When you start the installation of Exchange Server you’ll be offered the option to check for updates. For security reasons we recommend always doing so.

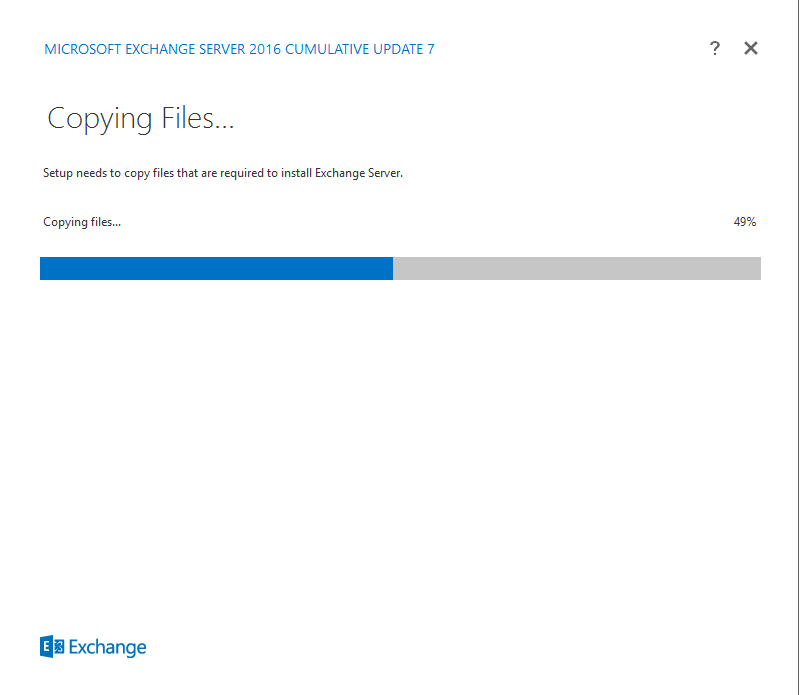
Step 2
Setup then copies the required files to your hard disk (%winDir%\Temp\ExchangeSetup). You’ll automatically pass this part and land on the introduction page.
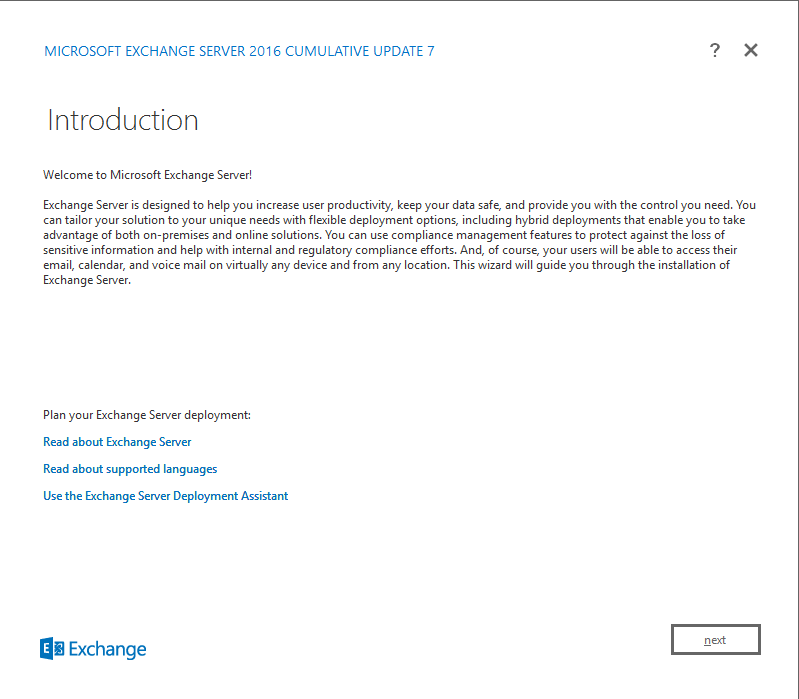
Step 3
The introduction page shows general information about Exchange. If you haven’t consulted the Exchange installation prerequisits we recommend clicking the Deployment Assistant link before proceeding.
Step 4
The license agreement is shown. Read the license agreement, accept them and click ‘Next’.

Step 5
You can then choose whether to use the recommended settings or not. These settings are mainly used to send error reports, information about your hardware and the usage of Exchange to Microsoft.
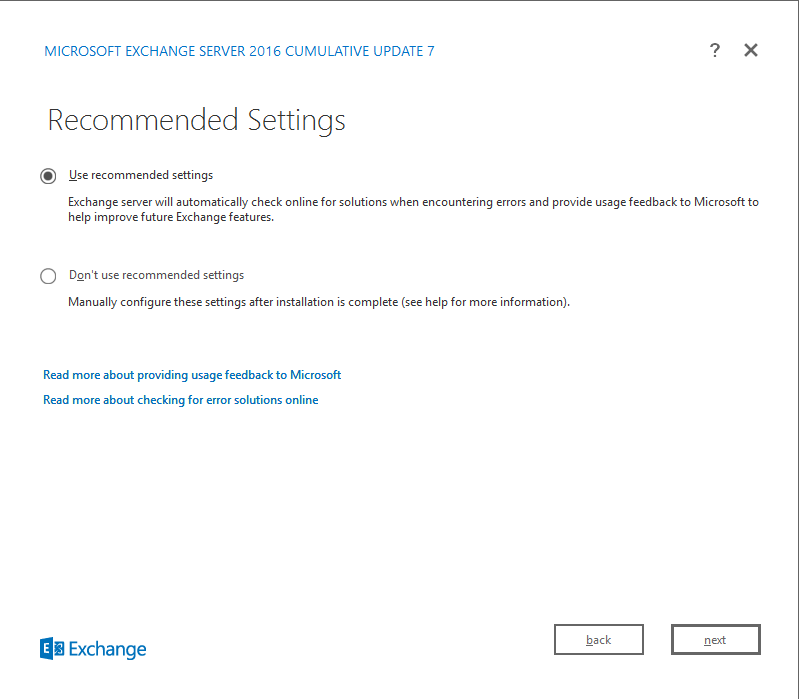
- If you select ‘Don’t use recommended settings‘ this will not happen. You can always change these settings after the installation. gebeuren.
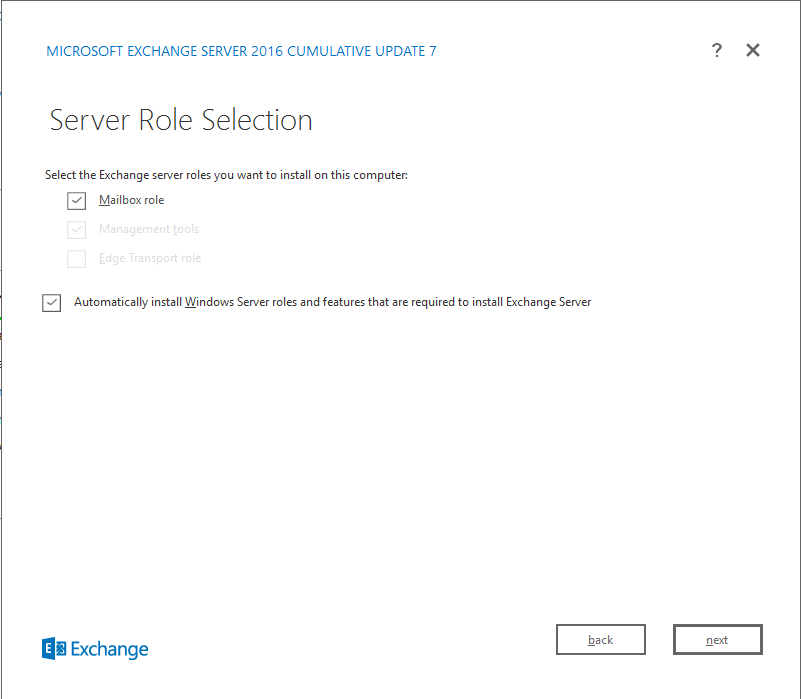
Step 6
On the ‘Server Role Selection‘ page you can indicate which server roles are installed by Exchange on your VPS. For a standard installation select the ‘Mailbox role‘. The ‘Management tools’ will automatically be installed along with the ‘Mailbox role’.
Select ‘Automatically install Windows Server roles and features that are required to install Exchange‘. The installation wizard will automatically install missing required Windows features.
Step 7
You can now change the installation directory. For our installation we’ll use the default directory. Click ‘Next‘ to proceed.
Step 8
The first Exchange server installation in your company (i.e. on a VPS listed in your AD) the ‘Exchange Organization’ page will appear. Provide your company name and click ‘Next’. Split permissions are usually not required unless the management of your AD and Exchange Server are split over various persons (usually the case with larger organizations).
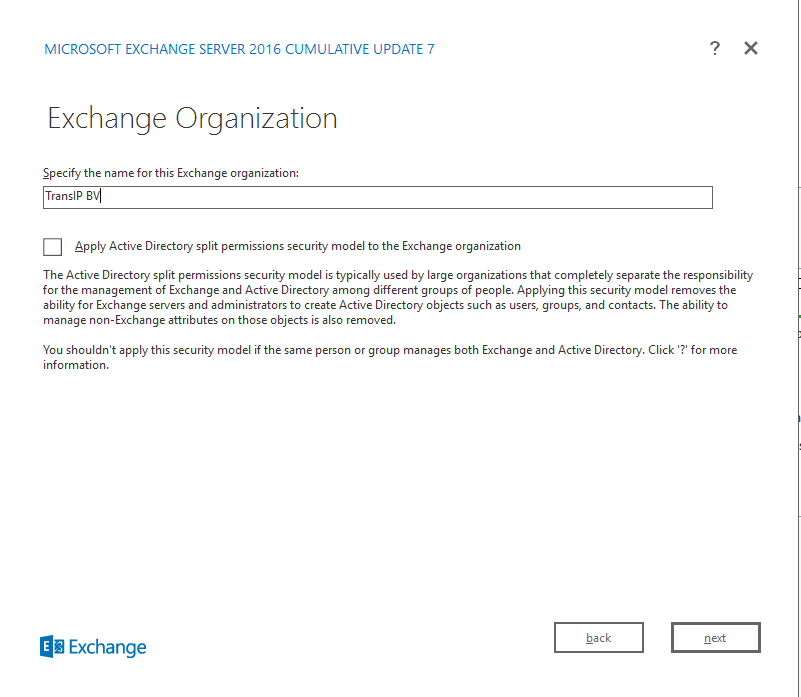
- Please note that this option cannot be changed afterwards and that only A — Z, a-z, 0-9 and — are accepted.
Step 9
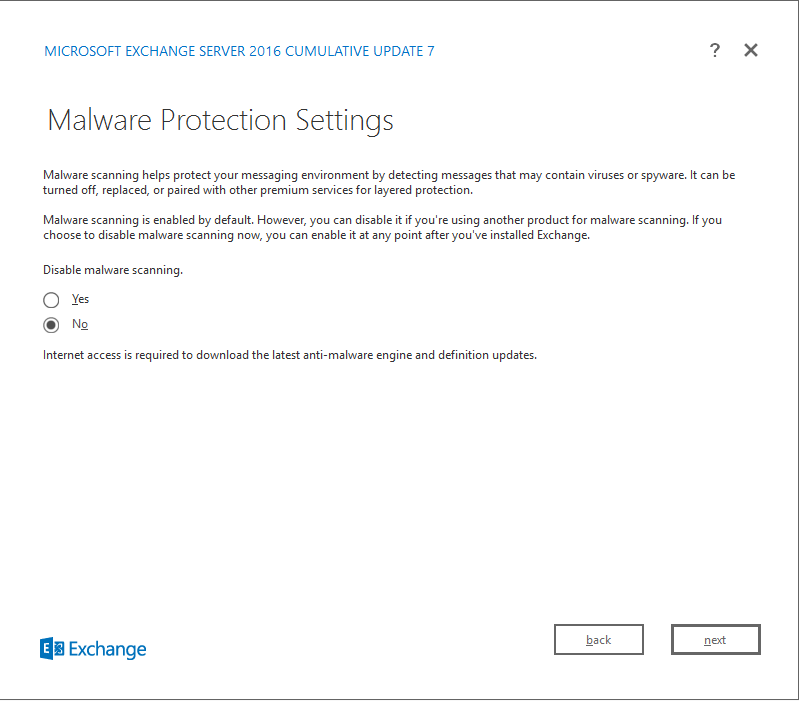
The ‘Malware Protection Settings‘ page allows you to enable or disable malware protection. The malware protection automatically scans messages for virusses and spyware. We recommend leaving malware protection turned on (the ‘No’ option), but you can always enable or disable it after the installation.
Step 10
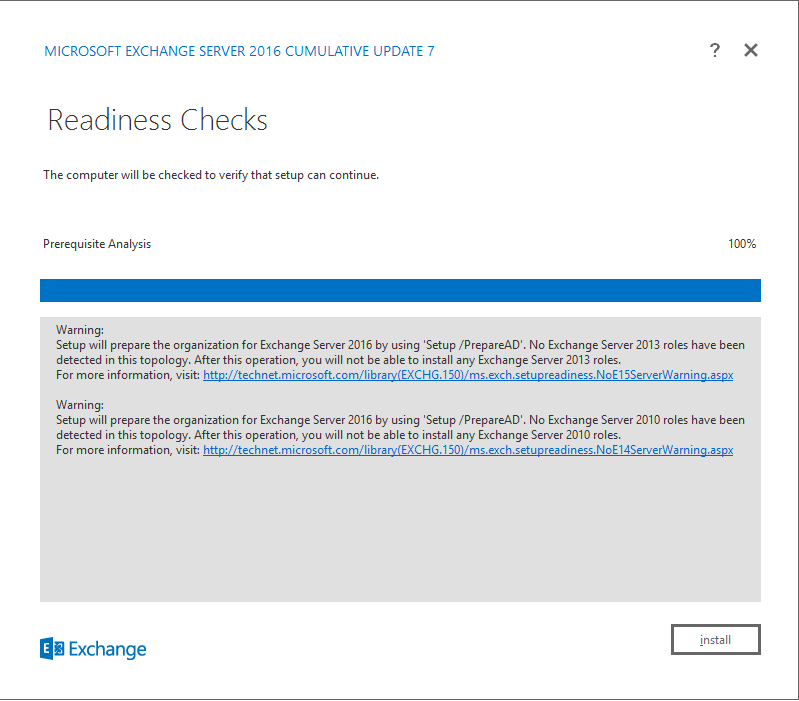
The ‘Readiness Checks‘ step checks if your VPS is ready to install Exchange. We encountered two warnings ourselves as in the screenshot below.
- If there’s an ‘error’ in the overview the installation will not proceed until the problem is solved. A link will be provided with additional information about the problem and the ‘install’ button will be replaced by a ‘retry’ button so that you can perform a new readiness check.
Step 11
The installation process shall now begin. This can take some time before it finishes.
Step 12
Click ‘Finish‘ after completing the installation of Exchange and restart your VPS. You’re now ready to work with Exchange!
Firewall settings
After installing Exchange it’s important to configure your firewall, or Exchange won’t be able to receive or send mail. The following ports are used by Exchange:
- Publiekelijk:
- 25: SMTP
- 53 (TCP&UDP): DNS Name Resolution
- 80: HTTP
- 110: POP3
- 143: IMAP
- 443: HTTPS
- 465: SMTP
- 993: Secure IMAP
- 995: Secure POP3
- Private network/AD-environment:
- 25: SMTP
- 53 (TCP&UDP): DNS Name Resolution
- 50636: EdgeSync synchronization
For a more indepth explanation, see Microsoft’s article about Exchange’s port usage and configuration.
Should you have any questions left regarding this article, do not hesitate to contact our support department. You can reach us via the ‘Contact Us’ button at the bottom of this page.
Set Exchange Prerequisites
This script will help you in Exchange Server 2016 and 2019 prerequisites install process. This code is without mine or Microsoft’s garranty. Execution and management of the script is therefore under your direct responsibility.
Overview
This script is intended to help you install all Exchange server 2016 and 2019 prerequisites. The prerequisites include all the components you need to install on windows server plus the best practices we recommend before installing Exchange server. For example: Disabling SMB 1.0, paging file configuration etc ..
Instructions
To execute this script you need to be ad least a local admin of the machine in wich you are going to install Exchange.
You will have to execute a powershell session as admin, move to the path in wich you’ve saved the ps1 file and execute it in this way:
«.\Set-ExchangePrerequisites.ps1»
Script overview after execution
This script checks the OS Version and than calles the function of each version of Exchange Server and OS. Exchange server 2016 can be installed on Windows 2012,2012R2 or 2016 and Exchange 2019 on Windows 2019. At his part Windows Server 2019 supports only Exchange server 2019.

Exchange Server supportability matrix

Microsoft launched Exchange Server 2019 as the latest version of the on-premises Exchange Server in 2018. Still, many users only see it as the extension of the previous Exchange Server 2016 as it has not brought any significant changes. Many existing features like MetaCache Database and Dynamic Database Cache have improved their database disk sizes, etc. As Exchange 2019 has the same structure as the previous ones, the Exchange Experts have advised using the same migration procedure as 2010/2013/2016 to 2019.
Why should you migrate to Exchange Server 2019?
Exchange Server 2019 has not brought any revolutionary changes in its system, but it has more improved security features which are quite remarkable. So, if you are considering migrating to the latest version, then here are the reasons –
- Exchange Server 2019 is the safest and most stable version of Exchange till date.
- It handles the meeting request forwarding in a much better way.
- Email Address Internationalization is active in Exchange 2019. It means you can add distinct characters in the email address based on a particular language.
Prerequisites of Exchange Server 2019 migration
- You cannot perform a direct migration from Exchange 2010 to Exchange 2019. So, you need to first upgrade to either from Exchange 2010 to 2013 or 2016 and then go for 2019.
- There is no dedicated Unified Messaging role in Exchange Server. So, you should go for Skype for Business Server 2019
- Update your Active Directory, DNS, & Exchange environment.
- Supported versions: Windows Server 2016 (Standard and Datacenter) and Windows Server 2012 (R2 Standard and Datacenter).
- Run the command in Exchange Management Shell:
Install-WindowsFeature AS-HTTP-Activation, Desktop-Experience, NET-Framework-45-Features, RPC-over-HTTP-proxy, RSAT-Clustering, RSAT-Clustering-CmdInterface, RSAT-Clustering-Mgmt, RSAT-Clustering-PowerShell, Web-Mgmt-Console, WAS-Process-Model, Web-Asp-Net45, Web-Basic-Auth, Web-Client-Auth, Web-Digest-Auth, Web-Dir-Browsing, Web-Dyn-Compression, Web-Http-Errors, Web-Http-Logging, Web-Http-Redirect, Web-Http-Tracing, Web-ISAPI-Ext, Web-ISAPI-Filter, Web-Lgcy-Mgmt-Console, Web-Metabase, Web-Mgmt-Console, Web-Mgmt-Service, Web-Net-Ext45, Web-Request-Monitor, Web-Server, Web-Stat-Compression, Web-Static-Content, Web-Windows-Auth, Web-WMI, Windows-Identity-Foundation, RSAT-ADDS
Install Exchange Server 2019
Follow these steps to install Exchange Server 2019 to your Windows Server –
- Download and install the latest version of .Net, MS Unified Communications API, and Microsoft Visual C++.
- Input the Exchange Server 2019 DVD and launch its setup.
Note: The Server setup will automatically extend the schema, forest, and domain for you. But, you can also choose to do it manually. - Select ‘Mailbox Role’ and ‘Automatically install Windows Server roles and features.’
- Select the option for readiness checks.
- Finally, reboot the Server.
- Now, you can go in the Exchange Admin Center and see the latest Exchange Server 2019 in the Server list.
- Enter the Product key to validate the Exchange setup.
- If you have any certificate for your Domain Name Service, then migrate the certificate to the new server. In EAC, go to certificates under server. Select the certificate and choose the option to export Exchange Certificate. Provide the UNC path and password. Finally, click OK.
- Go to Exchange Server 2019 EAC and under the certificates, select the option to import Exchange Certificate.
- Add the Services to the Certificates.
- Rename the default Exchange database name to a convenient name.
Note: A warning message will tell you that the changes will not take place until you restart the Information Store Service. So, open the Exchange Services and restart the Microsoft Exchange Information Store.
Start the Exchange Server 2019 Migration
After preparing Exchange Server 2019 environment for migration, you can take the assistance of Exchange Admin Center to initiate the migration procedure.
- Open Exchange Admin Center and follow Recipients >> Migration and click Add+, and select Move to a different database.
- In the New local mailbox move wizard, add the mailboxes to migrate and provide necessary details.
- On the Move configuration page, provide a new batch name, select the archive mailboxes (optional), select the destination Exchange Server 2019 database as a destination, start the migration, and other details. Click Next.
- On the Start the batch page, configure the migration settings as per the requirements and click Next.
- When you have migrated the entire database, you can delete the Exchange database using the following command
- Uninstall the Exchange Server 2016 using the command –
The batch migration will start, and you can see its status as ‘Scheduled.’ After successful migration, the status will change to ‘Completed.’
Apart from using the Exchange Admin Center to migrate the database, you can use the Exchange Management Shell commands to migrate mailboxes, arbitrary mailboxes, audit log mailboxes, and monitoring mailboxes.
Get-MailboxDatabase -Identity “DatabaseName” | Remove-MailboxDatabase
cd “C:\Program Files\Microsoft\Exchange Server\V15\Bin setup.exe /mode:uninstall
Conclusion
After completing the migration to Exchange 2019 and deleting the Exchange 2016, you can proceed to post-migration tasks so that your users can access their mailboxes. The process is really time consuming and only a seasoned Administrator can complete the process expertly. If you do not want to face any unwanted situation, then use Exchange Migrator tool. It is a business-friendly Exchange Migration software which can access the entire database from Exchange Server 2016 and place them directly in Exchange Server 2019. It provides best suited filtering and scheduling options. It also shows a complete migration report after completion of each job.
×
Try Exchange Migrator
×