
Напомним, что полная поддержка работы Exchange Server 2010 на платформе Windows Server 2012 впервые появилась в последнем пакете обновлений для почтового сервера — Exchange 2010 Service Pack 3. Это означает, что Exchange 2010 с SP3 теперь можно установить на Windows Server 2012. Сама процедура установки крайне проста, но есть несколько моментов, касающихся подготовительных шагов и установке ряда необходимых системных компонентов в Windows Server 2012.
Одно из основных отличий Windows Server 2012 от Windows 2008 R2 – он поставляется с обновленными версиями .NET и Powershell: .NET Framework 4.5 и Management Framework 3.0 (в его состав входит новая версия Powershell 3.0), в то время как Exchange 2010 для своей работы требует .NET Framework 3.5 и Powershell 2.0. Хорошей новостью является тот факт, что Powershell 2.0 и Powershell 3.0 (как и различные версии .NET) могут спокойно сосуществовать в одной системе без каких-либо последствий.
Установка .NET Framework 3.5 и Powershell 2.0
Установить .NET Framework 3.5 (который в Windows Server 2012 включает в себя Powershell 2.0) можно с помощью уже знакомой нам консоли Server Manager, однако тут есть маленькая загвоздка — данная консоль не знает, где находятся установочные файлы для .NET 3.5. Дело в том, что.NET Framework 3.5 – функция, доступная в Windows 2012 по запросу (“on demand”) и требующая при установке доступ к интернету (к сайту Windows Update). На самом деле .NET Framework 3.5 присутствует на установочном диске Windows Server 2012 и для его установки придется немного повозится.
То же самое, но гораздо быстрее можно сделать с помощью командной строки, запущенной с правами администратора:
dism /online /enable-feature /featurename:NetFx3 /All /Source:d:\sources\sxs

Указанная команда установит в Windows 2012 компоненты .NET Framework 3.5 и Powershell 2.0
Установка зависимостей и компонентов Exchange Server 2010 SP3
При установке Exchange 2010 на Windows Server 2008 R2 возможно было использовать подготовленные Microsoft специальные XML файлы, хранящиеся в каталогах \Scripts и \Setup\Serverroles\Common, однако в Windows Server 2012 эти XML не применимы, вероятно, их нужно сконвертировать во что-то, понятное Server Manager. Чтобы установить компоненты, требующиеся для разворачивания сервера Exchange 2010 SP3 (типового почтового сервера с ролями Mailbox, Client Acсess и HUB), выполните следующие команды PowerShell:
Import-Module ServerManager
Install-WindowsFeature RSAT-ADDS, Web-Server, Web-Basic-Auth, Web-Windows-Auth, Web-Metabase, Web-Net-Ext, Web-Lgcy-Mgmt-Console, WAS-Process-Model, RSAT-Clustering, Web-Mgmt-Console, Web-Mgmt-Service, Web-ISAPI-Ext, Web-Digest-Auth, Web-Dyn-Compression, Web-WMI, Web-Asp-Net, Web-ISAPI-Filter, Web-Client-Auth, Web-Dir-Browsing, Web-Http-Errors, Web-Http-Logging, Web-Http-Redirect, Web-Http-Tracing, Web-Request-Monitor, Web-Static-Content, NET-HTTP-Activation, RPC-over-HTTP-proxy, Telnet-Client
Примечание. Отметим, что консоль RSAT-Web-Server в Windows Server 2012 заменена Web-Mgmt-Console и Web-Mgmt-Service. Клиент telnet как и в Windows 8 устанавливается опционально.
И хотя после установки данных компонентов сервер и не требует перезагрузки, в этот момент его рекомендуется все-таки перезагрузить. После перезагрузки необходимо установить пакеты Microsoft Office 2010 Filter Packs, скачать которые можно тут:
Microsoft Office 2010 Filter Packs (http://www.microsoft.com/en-us/download/details.aspx?id=17062).
Microsoft Office 2010 Filter Packs Service Pack 1 (http://www.microsoft.com/en-us/download/details.aspx?id=26604).

Далее осуществляется подготовка Active Directory: обновление схемы леса и домена. Последовательно выполним команды:
Setup.com /PrepareSchema

Setup.com /PrepareAD

Setup.com /PrepareDomain
Примечание. Если установка Exchange Server 2010 выполняется с «нуля» (предыдущие версии отсутствуют), параметр /PrepareAD нужно водить вместе с ключом /OrganizationName.
Установка типового сервера Exchange Server 2010 SP3 на Windows Server 2012 выполняется с помощью команды:
Setup.com /mode:install /roles:ca,mb,ht /ExternalCASServerDomain:webmail.winitpro.ru

Естественно, установку сервера Exchange можно выполнить и с помощью графического мастера (который, кстати говоря, не требует ручного обновления схемы Active Directory, выполняя его самостоятельно).
В данном примере был установлен сервер Exchange 2010 deployments с ролями Client Access, Hub Transport и Mailbox Server. В таблице мы привели список минимально необходимых ролей и функций Windows Server 2012, которые нужно установить для работы той или иной роли сервера Exchange 2010. Перед выполнением данных команд не забудьте импортировать модуль управления Server Manager командой:
Import-Module ServerManager
| Роль Exchange 2010 SP3 | Примечание | Команды, устанавливающие необходимый для данной роли Exchange набор компонентов |
| Client Access | Выделенный сервер CAS (либо сочетающийся с ролью HUB) | Install-WindowsFeature Web-Server, Web-Basic-Auth, Web-Windows-Auth, Web-Metabase, Web-Net-Ext, Web-Lgcy-Mgmt-Console, WAS-Process-Model, RSAT-Clustering, Web-Mgmt-Console, Web-Mgmt-Service, Web-ISAPI-Ext, Web-Digest-Auth, Web-Dyn-Compression, Web-WMI, Web-Asp-Net, Web-ISAPI-Filter, Web-Client-Auth, Web-Dir-Browsing, Web-Http-Errors, Web-Http-Logging, Web-Http-Redirect, Web-Http-Tracing, ,Web-Request-Monitor, Web-Static-Content, NET-HTTP-Activation, RPC-over-HTTP-proxy |
| Hub Transport | Install-WindowsFeature Web-Server, Web-Basic-Auth, Web-Windows-Auth, Web-Metabase, Web-Net-Ext, Web-Lgcy-Mgmt-Console, WAS-Process-Model, Web-Mgmt-Console, Web-Mgmt-Service | |
| Mailbox | Install-WindowsFeature Web-Server, Web-Basic-Auth, Web-Windows-Auth, Web-Metabase, Web-Net-Ext, Web-Lgcy-Mgmt-Console, WAS-Process-Model, RSAT-Clustering, Web-Mgmt-Console, Web-Mgmt-Service | |
| Unified Messaging (UM) | Install-WindowsFeature Desktop-Experience, Web-Server, Web-Basic-Auth, Web-Windows-Auth, Web-Metabase, Web-Net-Ext, Web-Lgcy-Mgmt-Console, WAS-Process-Model, Web-Mgmt-Console, Web-Mgmt-Service | |
| Edge Transport | Install-WindowsFeature ADLDS |
Installing Exchange 2010 onto Windows Server 2012 R2 is a request that frequently heard on the TechNet Exchange forums. You may have seen posts from me in the past saying that this was not supported, and at the time that was the correct statement. There has been a change though! Exchange 2010 SP3 RU26 added support for installing Exchange 2010 onto Windows Server 2012 R2.
This post will step through the install, and note some of the important steps and activities. Please do not consider this to be a complete installation guide, which configures all the aspects of Exchange.
Exchange OS Support Details
As always, please refer to the Exchange Support Matrix
The steps to install Exchange on to Windows Server 2012 R2 are going to be very similar.
Install OS Prerequisites
Note that the OS pre-requisites have slightly different names than in older versions of Windows Server so be sure to copy the right section.
The below are the OS components for Exchange 2010 CAS, Mailbox and Hub Transport roles on Windows Server 2012 R2. Note that the Restart option is added at the end, so if you want to manually restart the server omit that parameter.
Add-WindowsFeature NET-Framework-Core,RSAT-ADDS,Web-Server,Web-Basic-Auth,Web-Windows-Auth,Web-Metabase,Web-Net-Ext,Web-Lgcy-Mgmt-Console,WAS-Process-Model,Web-Mgmt-Tools,Web-ISAPI-Ext,Web-Digest-Auth,Web-Dyn-Compression,NET-HTTP-Activation,Web-Asp-Net,Web-Client-Auth,Web-Dir-Browsing,Web-Http-Errors,Web-Http-Logging,Web-Http-Redirect,Web-Http-Tracing,Web-ISAPI-Filter,Web-Request-Monitor,Web-Static-Content,Web-WMI,RPC-Over-HTTP-Proxy –Restart

Install Office 2010 Filter Packs
The Exchange 2010 Hub Transport and Mailbox role require the installation of the Office 2010 Filter packs. For convenience the link to SP2 for the filter pack is also included. Please ensure that you run Windows Update to install the latest security updates for the Office 2010 Filter Pack.
You require the x64 version of the Filter Packs.
Microsoft Office 2010 Filter Packs
Service Pack 2 for Microsoft Office 2010 Filter Pack (KB2687447) 64-Bit Edition
Installing Exchange 2010 SP3
The SP3 media can be used to install a brand new Exchange 2010 Server. We will install SP3 and then install the latest Rollup Update (RU).
I prefer to use command line setup, the choice is yours.

Once setup has completed, restart the server.
Install Visual C++
Since Exchange 2010 SP3 RU 22, it is now necessary to manually install Visual C++ as this is a hard requirement.
If you do not install Visual C++2013 Runtime, setup will halt as it will check for its presence. As noted in KB 429508
A component used within Exchange requires a new Visual C++ prerequisite to be installed with Exchange Server. This change is effective with all supported Exchange Server releases that are released after June 19, 2018. Exchange Setup will enforce this prerequisite during cumulative update installation or when it updates an affected version. The prerequisite component can be downloaded at Visual C++ Redistributable Packages for Visual Studio 2013.
Install latest Exchange 2010 SP3 RU
Install the latest Exchange 2013 SP3 Rollup. At the time of writing this is Exchange 2010 SP3 RU26 which is also the initial version of Exchange 2010 that is supported on Windows Server 2012 R2.
Enter Product key
The Exchange server will need to be licensed. Enter your product key.
Restart the Information Store service if you entered and Enterprise Edition key to unlock the capability to create more than 5 databases.
Install Trusted Certificate
Exchange setup will create a self signed certificate with a five year validity. This certificate will not be trusted by clients, and it will generate TLS certificate pop-ups in Outlook.
That is not acceptable.
Install a trusted certificate if you already have one, or if not complete the process to obtain one.
Assign Exchange Services to Certificate
Once the new certificate is installed and validated, you will need to bind the certificate to the Exchange services.
Set CAS Namespaces
This is probably the most overlooked aspect of Exchange. The server will have virtual directories which point to the server FQDN by default.
The below are sample commands that must be tailored and edited to your environment. Note that lab server used here was called Exch-2010 — I know, imaginative…
Get-OWAVirtualDirectory –Server Exch-2010 | Set-OWAVirtualDirectory –InternalURL «https://owa.tailspintoys.ca/OWA» –ExternalURL «https://owa.tailspintoys.ca/OWA»
Get-ECPVirtualDirectory –Server Exch-2010 | Set-ECPVirtualDirectory –InternalURL «https://owa.tailspintoys.ca/ECP» –ExternalURL «https://owa.tailspintoys.ca/ECP»
Get-OABVirtualDirectory –Server Exch-2010 | Set-OABVirtualDirectory –InternalURL «https://mail.tailspintoys.ca/OAB” –ExternalURL «https://mail.tailspintoys.ca/OAB”
Get-WebServicesVirtualDirectory –Server Exch-2010 | Set-WebServicesVirtualDirectory –InternalURL «https://mail.tailspintoys.ca/EWS/Exchange.asmx” –ExternalURL «https://mail.tailspintoys.ca/EWS/Exchange.asmx”
Get-ActiveSyncVirtualDirectory –Server Exch-2010 | Set-ActiveSyncVirtualDirectory –InternalURL «https://mail.tailspintoys.ca/Microsoft-Server-ActiveSync” –ExternalURL «https://mail.tailspintoys.ca/Microsoft-Server-ActiveSync”
Not setting the Autodiscover Virtual Directory
Set-ClientAccessServer –Identity Exch-2010 –AutodiscoverServiceInternalURI «https://autodiscover.tailspintoys.ca/Autodiscover/Autodiscover.xml” –AutodiscoverSiteScope «Default-First-Site-Name”
Enable-OutlookAnywhere –Server Exch-2010 –ExternalHostName «mail.tailspintoys.ca” –ClientAuthenticationmethod «NTLM” –IISAuthenticationMethods «NTLM” –SSLOffloading $False
Create CAS Array
Create a CAS array if necessary.
Load Balancer
If load balancing this server configure the load balancer and add to the pool.
Public Folders
If necessary add PF Replicas
Update OAB Generation
If desired, move OAB generation
Update Transport Config
You will need to review and update the transport configuration on the server. For example:
Add Receive Connectors
Add/Remove Hub Transport Source servers
Enable Receive Connector Logging
Enable Intra-Org Connector Logging
Increase logging size
Create and Update Mailbox Databases
As per your design, create and configure Mailbox databases. Set the OAB and Public Folder defaults.
Other Tasks
This is not an exhaustive list, and should not be considered so. I wanted to include the most important topics and those that are often overlooked.
Cheers,
Rhoderick
The steps to install Exchange on to Windows Server 2012 R2 are going to be very similar.
- Install OS Prerequisites.
- Install Office 2010 Filter Packs.
- Installing Exchange 2010 SP3.
- Install Visual C++
- Install latest Exchange 2010 SP3 RU.
- Enter Product key.
- Install Trusted Certificate.
- Assign Exchange Services to Certificate.
Is Exchange 2010 still supported?
Exchange Server 2010 reached its end of support on October 13, 2020. If you haven’t already begun your migration from Exchange 2010 to Microsoft 365, Office 365, or Exchange 2016, now’s the time to start planning.
Is Windows 2012 R2 still supported?
SQL Server 2012 will reach the end of support on July 12, 2022, and Windows Server 2012/2012 R2 will reach the end of support on October 10, 2023. After this date, these products will no longer receive security updates, non-security updates, bug fixes, or technical support.
Is Windows Server 2012 R2 obsolete?
The Windows Server 2012 R2 End of Life deadline (October 10, 2023) is almost here. After this date, Windows Server 2012 and 2012 R2 will stop receiving regular patches or critical security updates, making their security and compliance a serious concern.
How do I install Microsoft Exchange 2010?
Installing Microsoft Exchange 2010 – YouTube
What is Microsoft Exchange Server 2010?
Exchange Server 2010 is the first server in a new generation of Microsoft server technology that is designed and developed to work on-premises as well as as an online service. Exchange 2010 introduces a new integrated email archive and features to reduce costs and improve the user experience.
Is Exchange Server 2013 still supported?
Exchange Server 2013 will reach its end of support on April 11, 2023. If you haven’t already begun your migration from Exchange 2013 to Microsoft 365, Office 365, or Exchange 2019, now’s the time to start planning.
Is Windows Server 2012 R2 Standard supported?
Windows Server 2012 R2 entered mainstream support on November 25, 2013, though, but its end of mainstream is January 9, 2018, and end of extended is January 10, 2023.
What is the latest version of Server 2012 R2?
6.3
Windows Server 2012 R2
| Source model | Closed source / Shared source |
| Released to manufacturing | August 27, 2013 |
| General availability | October 18, 2013 |
| Latest release | 6.3 (Build 9600) / October 17, 2013 |
| Support status |
|---|
Can Windows Server 2012 R2 be upgraded to 2019?
Can Windows Server 2012 r2 be upgraded to 2019? First of all, the answer is yes. In-place upgrade enables you to upgrade older system to the newer one directly while keeping the same hardware and all the settings, server roles, data intact without flattening the server.
Where can I download Exchange 2010?
To learn more about Exchange Server 2010, visit http://www.microsoft.com/exchange/2010.
…
- Communities for Exchange Users.
- Exchange Server 2010 TechCenter.
- Exchange Server Online.
- Other Exchange Server Downloads.
Is Outlook same as Exchange?
Although both the applications work together, Microsoft Exchange provides the back end to a centralized system for your emails, messages, calendars, and tasks, whereas Outlook is a desktop email client which keeps in sync with the Exchange Server.
Will there be an exchange 2022?
Instead of rolling out in 2021 or 2022, the next on-premises release of Exchange Server now is coming in 2025, Microsoft announced today.
How long will Exchange 2016 be available?
End of Mainstream Support for Exchange 2016 is planned for October 13, 2020. It means that 5 years after its release, this on-premises server enters the Extended Support period. The end of extended support (or end of life) for Exchange Server 2016 is planned for October 14, 2025.
What is Windows Server 2012 R2 used for?
Windows Server 2012 R2 is configured, like Server 2012, via Server Manager. It’s a modern-style desktop application that gives you an overview of running services from its dashboard, as well as launching the familiar Windows Server management tools and handling role and feature installation.
What is the latest update for Windows Server 2012 R2?
Windows Server 2012 R2 Standard Edition (x64) Patches
| S.No | Patch Description |
|---|---|
| . | Windows Server 2012 R2 Update (KB2937592) |
| . | Windows Server 2012 R2 Update (KB2938439) |
| . | Security Update for Windows Server 2012 R2 (KB2928120) |
| . | Security Update for Windows Server 2012 R2 (KB2961899) without KB2919355 |
How long is Server 2012 R2 supported?
Support Dates
| Listing | Start Date | Extended End Date |
|---|---|---|
| Windows Server 2012 R2 | Nov 25, 2013 | Oct 10, 2023 |
What is the difference between Windows Server 2012 and 2012 R2?
When it comes to the user interface, there’s little difference between Windows Server 2012 R2 and its predecessor. The real changes are under the surface, with significant enhancements to Hyper-V, Storage Spaces and to Active Directory.
How do I update Windows Server 2012?
Detailed steps for Windows 8.1 and Windows Server 2012 R2
In the search box, type Windows Update, and then tap or select Windows Update. In the details pane, select Check for updates, and then wait while Windows looks for the latest updates for your computer.
What’s the latest Windows Server version?
Windows Server
| Developer | Microsoft |
|---|---|
| Initial release | July 27, 1993 |
| Latest release | 2022 (10.0.20348.1070) / September 20, 2022 |
| Latest preview | vNext (10.0.25206) / September 21, 2022 |
| Update method | Windows Update Windows Server Update Services Configuration Manager Docker Hub Intune |
Can I use Outlook without an Exchange Server?
It is possible to use Outlook without connecting to Exchange, although this would require you to work offline, eliminating access to email and other collaboration capabilities.
What is the difference between IMAP and Exchange?
When using IMAP, incoming mail is stored on the mail server but sent items are stored locally. Using Exchange, each user has an individual mailbox on the server running Exchange. Email messages, contacts and the user’s calendar are stored in their mailbox.
What is the latest Exchange Server?
In this article
- View the build number of an Exchange-based server.
- Exchange Server 2019.
- Exchange Server 2016.
- Exchange Server 2013.
- Exchange Server 2010.
- Exchange Server 2007.
- Exchange Server 2003.
- Exchange 2000 Server.
Is Exchange Server still used?
Exchange 2019 is the only version of Exchange Server in mainstream support. Exchange 2016 is in extended support and will exit support on October 14, 2025.
Is Server 2012 still getting updates?
Extended Security Updates can be bought using the Volume Licensing model of Microsoft. The first year’s Extended Security Updates for Windows Server 2012 costs 75% of the Windows Server 2012 license. The first Extended Security Update will commence on October 11, 2023. It will end on October 8, 2024.
Now that Exchange 2010 SP3 is available it’s also possible to install it on Windows Server 2012. Normally that’s not a problem, but you have to be careful with the prerequisite software. Windows Server 2012 comes with .NET Framework 4.5 and Management Framework 3.0 (including Powershell 3.0) but Exchange 2010 still requires .NET Framework 3.5 and Powershell 2.0. Luckily Powershell 2.0 and Powershell 3.0 can coexist on the same box with any issues.
Install .NET Framework 3.5 and Powershell 2.0
To install .NET Framework 3.5 (which automatically includes Powershell 2.0 on Windows Server 2012) you can use Server Manager, but there’s a little snag because Server Manager does not know where the install files are located 🙂
- Open Server Manager, click Manage in the top right menu and select Add Roles and Features.
- Click Next and select Role-based or feature-based installation. Click Next to continue.
- Select the server you want to manage, click Next and you’ll get in the Select server roles window. The .NET Framework is a feature so don’t select anything and click Next to get to the Select features window. Expand the .NET Framework 3.5 Features option and select the .NET Framework 3.5 (includes .NET 2.0 and 3.0) option. Also select the HTTP Activation option and in the additional Add features that are required for HTTP Activation pop-up click Add Features. Personally I also install the Telnet Client at this point since this client can be extremely useful for troubleshooting purposes. Click Next three times to continue.
- Now pay attention. For some reason you have to specify the location where setup can find the installation files, by default this is D:\Sources\SXS (where D:\ is the DVD that contains Windows 2012 but this can also be a share on the network of course).
- In the confirm installation selections window click on Specify an alternate source path and enter the location of the source files. Click OK to continue and click Install to install the .NET feature.
It is also possible to install the .NET Framework 3.5 and Powershell 2.0 from a (elevated privileges!) command line:
dism /online /enable-feature /featurename:NetFx3 /All /Source:d:\sources\sxs

My personal experience: this is way faster than the Server Manager 😉
When installing Exchange 2010 on Windows Server 2008 R2 you can use the XML files found on the DVD in \Scripts or in \Setup\Serverroles\Common directories, but unfortunately these don’t work on Windows Server 2012 so the XML files need to be converted to something the Server Manager in Windows 2012 accepts. To install a typical Exchange 2010 SP3 server (MBX, CAS and HUB) you can use the following Powershell commands:
Import-Module ServerManager
Install-WindowsFeature RSAT-ADDS, Web-Server, Web-Basic-Auth, Web-Windows-Auth, Web-Metabase, Web-Net-Ext, Web-Lgcy-Mgmt-Console, WAS-Process-Model, RSAT-Clustering, Web-Mgmt-Console, Web-Mgmt-Service, Web-ISAPI-Ext, Web-Digest-Auth, Web-Dyn-Compression, Web-WMI, Web-Asp-Net, Web-ISAPI-Filter, Web-Client-Auth, Web-Dir-Browsing, Web-Http-Errors, Web-Http-Logging, Web-Http-Redirect, Web-Http-Tracing, Web-Request-Monitor, Web-Static-Content, NET-HTTP-Activation, RPC-over-HTTP-proxy, Telnet-Client
Note. The difference is that the RSAT-Web-Server is now replaced by Web-Mgmt-Console and Web-Mgmt-Service. The Telnet-Client is optional of course.
Although the Server Manager does not report back to reboot the server I personally do prefer to reboot the server at this point. After rebooting install the Microsoft Office 2010 Filter Packs which can be downloaded from http://go.microsoft.com/fwlink/?LinkID=191548
To prepare Active Directory (when needed of coure) you can use the following commands:
Setup.com /PrepareSchema
Setup.com /PrepareAD
Setup.com /PrepareDomain
Note. When this is a green-field installation of Exchange Server 2010 you have to use the /PrepareAD parameter in combination with the /OrganizationName parameter.
To install the actual (typical) server you can use the following command:
Setup.com /mode:install /roles:ca,mb,ht /ExternalCASServerDomain:webmail.contoso.com

Of course you can use the graphical setup (without the separate AD preparation commands) as well and just like the unattended setup it does not differ from previous Exchange 2010 deployments.
The previous example was for a typical Exchange 2010 deployments, i.e. a server with the Client Access, Hub Transport and Mailbox Server role installed. Below are the Server Manager commands you can use for dedicated server roles. Not mentioned below, but for all server roles you have to enable .NET Framework 3.5 and Powershell 2.0 as outlined in the beginning of this blog.
Exchange 2010 CAS Prerequisites
This can be used for a dedicated CAS server as well as a combined CAS and HUB server.
Import-Module ServerManager
Install-WindowsFeature Web-Server, Web-Basic-Auth, Web-Windows-Auth, Web-Metabase, Web-Net-Ext, Web-Lgcy-Mgmt-Console, WAS-Process-Model, RSAT-Clustering, Web-Mgmt-Console, Web-Mgmt-Service, Web-ISAPI-Ext, Web-Digest-Auth, Web-Dyn-Compression, Web-WMI, Web-Asp-Net, Web-ISAPI-Filter, Web-Client-Auth, Web-Dir-Browsing, Web-Http-Errors, Web-Http-Logging, Web-Http-Redirect, Web-Http-Tracing, ,Web-Request-Monitor, Web-Static-Content, NET-HTTP-Activation, RPC-over-HTTP-proxy
Exchange 2010 HUB Prerequisites
Import-Module ServerManager
Install-WindowsFeature Web-Server, Web-Basic-Auth, Web-Windows-Auth, Web-Metabase, Web-Net-Ext, Web-Lgcy-Mgmt-Console, WAS-Process-Model, Web-Mgmt-Console, Web-Mgmt-Service
Exchange 2010 MBX Prerequisites
Import-Module ServerManager
Install-WindowsFeature Web-Server, Web-Basic-Auth, Web-Windows-Auth, Web-Metabase, Web-Net-Ext, Web-Lgcy-Mgmt-Console, WAS-Process-Model, RSAT-Clustering, Web-Mgmt-Console, Web-Mgmt-Service
Exchange 2010 UM Prerequisites
Import-Module ServerManager
Install-WindowsFeature Web-Server, Web-Basic-Auth, Web-Windows-Auth, Web-Metabase, Web-Net-Ext, Web-Lgcy-Mgmt-Console, WAS-Process-Model, Web-Mgmt-Console, Web-Mgmt-Service
Exchange 2010 Edge Prerequisites
Import-Module ServerManager
Install-WindowsFeature ADLDS
Among all Microsoft’s solution Exchange is considered a bit tough to master in. But your learning curve will be much more smoother if you follow a few simple steps described in the following paragraphs.
Before starting to install exchange, you always need to prepare the schema and domain. Also, you need to install a few mandatory services and features. Make sure you server meet the hardware requirements and OS requirements.Take into account of the following four during the installation planning phase.
- Choose the appropriate Windows server version for exchange.
- Prepare schema and domain
- Server hardware requirement
- Choose the roles you want to install
Which windows serve should I use for exchange 2010
- Windows server 2008 with SP2
- Windows server 2008 R2
Preparing the server
At first, join the server to your main as a member server.
Go to the location where you have copied the exchange installation file. For example, all of your exchange files are in a folder called exchange1 in C drive. Go to that location in the command prompt.
C:\ cd exchange1
C:\exchange1\
If it is your first exchange installation in your Active directory domain, then you have to prepare you active directory and the domain for exchange installation.
To prepare AD for exchange use the command:
C:\exchange1> Setup /PrepareAD /OrganizationName: mydomin
Note: mydomain is the name of your domain.
Next, prepare your domains. Use the following command in your command prompt.
C:\exchange1> Setup /PrepareAllDomains
The above command will prepare all the domains for exchange server installation in windows 2012. Alternatively, you can specify a specific domain name, but if you prepare all the domains you do not have to prepare your domains the next time you install another exchange server in your network. Besides, preparing all the domains will not cause you any trouble. Therefore, it is better to prepare all the domains when you install the first exchange server in your forest.
Note: if you are planning to install the unified messaging role in you require having desktop experience features.
For installation in Windows 2008 r2
- The server where you will install the hub transport and mailbox role will need to have filter pack installed.
- In the power shell type “Import-Module ServerManager.”
- Use the Add-WindowsFeature cmdlet
- Set TCP port server to automatic. To make it automatic, open services and then select NetTCPPportSharing and make it automatic.
Detailed Steps
- Install filter pack
- Open PowerShell. Type “import-module ServerManager”
- In the power shell type “Add-WindowsFeature” and then type the following lines (these codes will add the required features for exchange 2010).
NET-Framework,RSAT-ADDS,Web-Server,Web-Basic-Auth,Web-Windows-Auth,Web-Metabase,Web-Net-Ext, Web-Lgcy-Mgmt-Console, WAS-Process-Model,RSAT-Web-Server, Web-ISAPI-Ext, Web-Digest-Auth,Web-Dyn-Compression, NET-HTTP-Activation,RPC-Over-HTTP-Proxy, Desktop-Experience –Restart
After adding these features, the server will restart automatically.
- Open the folder where you stored Exchange 2010 setup files. Double click on setup.exe.
- Choose exchange language option. Select “install only the language from the DVD.”
- Click on ‘Next’ and ‘Accept’ and ‘Next.’
- Click ‘Yes’ or ‘No’ to the error reporting. If you want the errors in the exchange server to be reported to Microsoft then click ‘Yes.’
- Choose ‘custom’ exchange server installation.
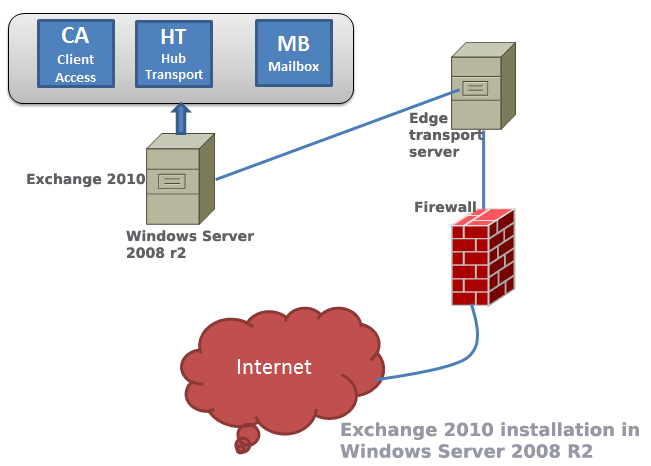
- You may install hub transport (HT), Mailbox (MB), ClientAccess (CA) and Unified Messaging (UM) roles in a single server. And if you want to install edge transport role, you need to install it in a standalone server that is not part of the domain. Remember that edge transport server cannot be installed in a server with other roles. For example, you want to install the mailbox, client access, hub transport and unified messaging roles, then select all these four roles and click Next.
- In client setting, click ‘No.’
- Client access server role will be Internet facing. Type mail.yourdomain.com. Make sure that the public DNS pointing to this server’s IP.
- Let the installation process check that if your server meets all the requirements for exchange server. Click Install and then click Finish to the installation process.
Points to remember:
- Exchange server 2010 is not compatible with Windows server 2012 r2. You need to have exchange 2013 for windows server 2012 r2.
- It is not recommended to install exchange server in a server hosting Active directory. You should consider installing Exchange in separate server that is part of the domain.
- When you prepare the server for exchange using the Setup command (as shown at the beginning of this post), you need to run those command in the site or in the DC (domain controller) that is the schema master.
After installation, you need to configure the exchange so as your active directory users can start using mail server within the internal network. To send mail to the Internet, you have to configure the either the hub transport or the edge transport server, depending on your deployment strategy and design. But remember that you must set up an mx record in the public DNS if you want to send and receive mail from the outside world. Besides, you have to a create a send connector in your hub transport server and allow your firewall for SMTP traffic.