
The Eclipse Installer 2025‑03 R now includes a JRE for macOS, Windows and Linux.
Try the Eclipse Installer 2025‑03 R
The easiest way to install and update your Eclipse Development Environment.
- 762,444 Installer Downloads
5 Steps to Install Eclipse
We’ve recently introduced the Eclipse Installer, a new and more efficient way
to install Eclipse. It is a proper installer (no zip files), with a
self-extracting download that leads you through the installation process. For
those who prefer not to use the Installer, the packages and zip files are still
available on our package download page.
1. Download the Eclipse Installer
Download Eclipse Installer from http://www.eclipse.org/downloads
Eclipse is hosted on many mirrors around the world. Please select
the one closest to you and start to download the Installer
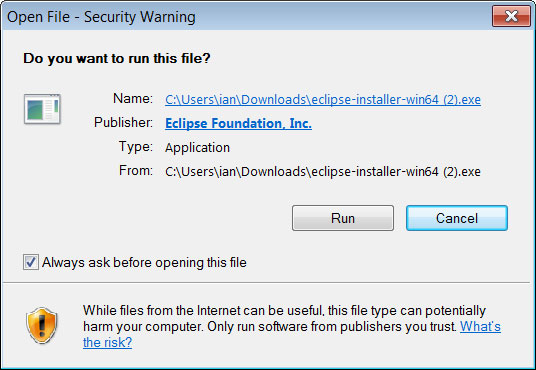
2. Start the Eclipse Installer executable
For Windows users, after the Eclipse Installer executable has finished downloading it should be
available in your download directory. Start the Eclipse Installer executable.
You may get a security warning to run this file. If the Eclipse Foundation is
the Publisher, you are good to select Run.
For Mac and Linux users, you will still need to unzip the download to create the Installer.
Start the Installer once it is available.
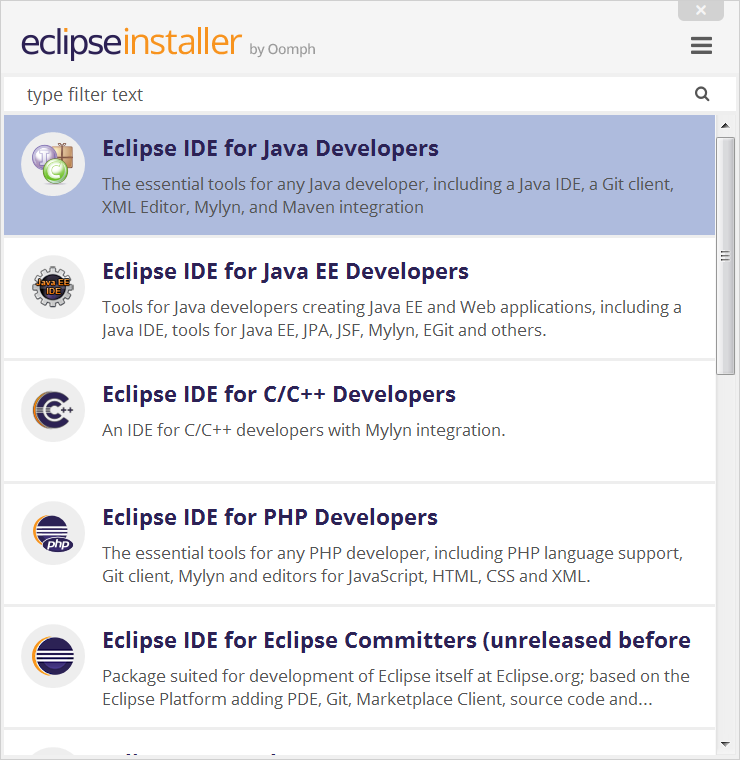
3. Select the package to install
The new Eclipse Installer shows the packages available to Eclipse users.
You can search for the package you want to install or scroll through the list.
Select and click on the package you want to install.
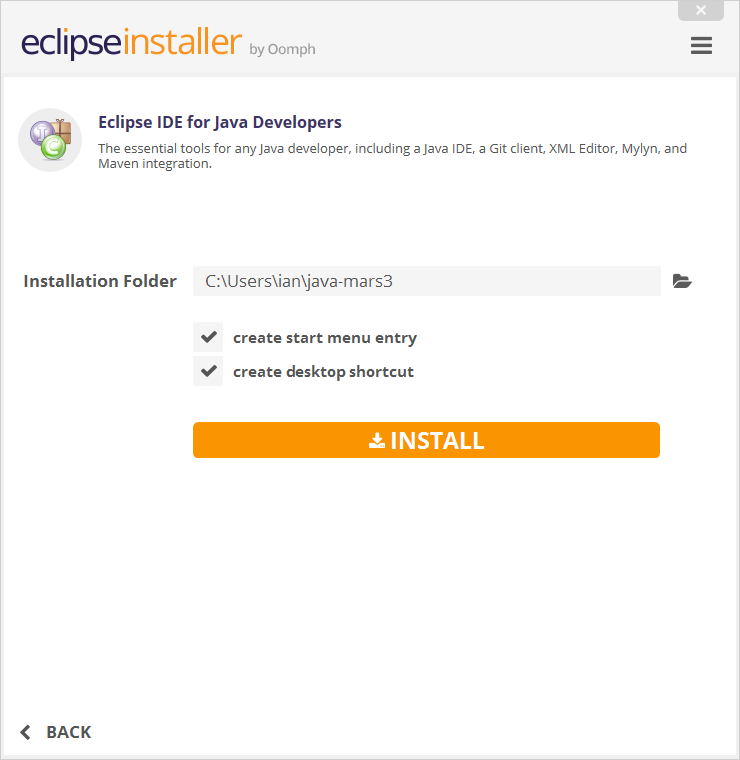
4. Select your installation folder
Specify the folder where you want Eclipse to be installed. The default folder will be in your User directory.
Select the ‘Install’ button to begin the installation.
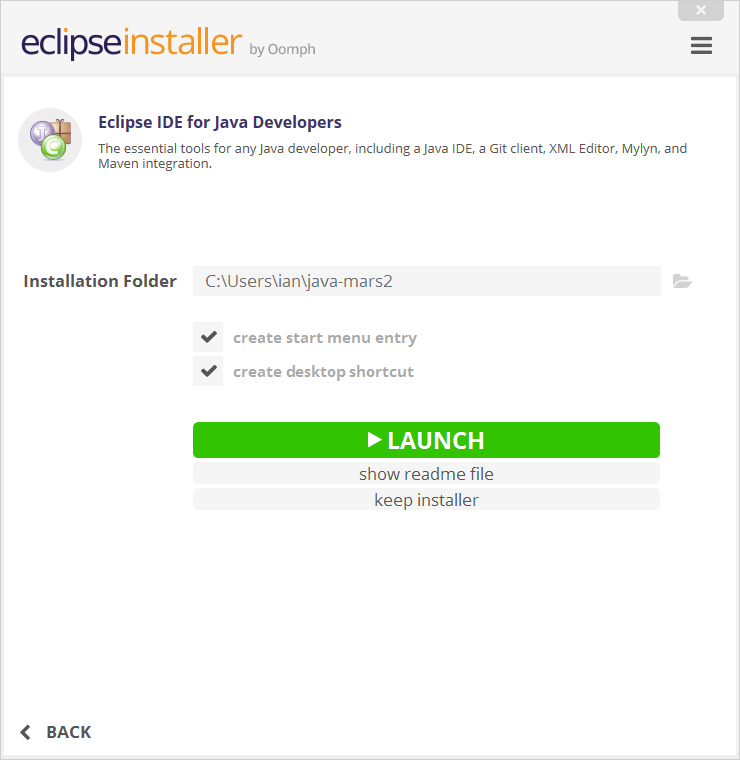
5. Launch Eclipse
Once the installation is complete you can now launch Eclipse.
The Eclipse Installer has done it’s work. Happy coding.
Last Updated :
05 Apr, 2025
Eclipse is one of the most popular Integrated Development Environments (IDEs) used by developers worldwide. Whether you’re coding in Java, Python, C++, or any other programming language, Eclipse provides a powerful and flexible platform to write, debug, and test your applications. However, if you’re new to Eclipse or setting it up on Windows for the first time, the process might seem a bit daunting.
In this blog, we’ll walk you through the straightforward steps to download and install Eclipse on Windows 10 and Windows 11. From ensuring you have the right prerequisites (like Java) to configuring Eclipse for your development needs, this guide will make the setup process smooth and hassle-free.
Why Use Eclipse as IDE
Eclipse is a completely free open-source platform, Integrated Development Environment (IDE) with the help of which several types of applications are made using the Java programming languages and other programming languages are also used such as C/C++, PERL, Python, Ruby, etc.
Eclipse is a preferred choice for developers for several reasons. It provides a user-friendly interface that makes it easy for both beginners and experienced coders. It supports multiple programming languages. It also offers collaborative tools that allow multiple developers to contribute to a project simultaneously.
Eclipse Software incorporates of many plug-ins and is designed to be extensible to the use of extra plug-ins. Eclipse IDE can be used for any programming language for which a plug-in is available.
Famous Plugins Used in Eclipse IDE
Following are some famous plug-ins used in Eclipse IDE :
- The Java Development Tools (JDT) is a plugin that allows Eclipse to be used as a Java IDE.
- PyDev is a plugin that allows Eclipse to be used as a Python IDE.
- C/C++ Development Tools (CDT) is a plug-in that lets in Eclipse for use as C/C++ development.
- The Scala is a plug-in is a plug-in that permits Eclipse for used as an IDE to broaden Scala applications.
- PHPeclipse is a plug-in that permits Eclipse for used as an IDE to increase PHP applications.
Steps to Download and install Eclipse on Windows :
Now let’s look at the step by step process to Download and install Eclipse on Windows:
Step 1: Open Browser
- In the first step, Open your browser and navigate to this URL.

Step 2: Download Eclipse
- Then, click on the “Download” button to download Eclipse IDE.

Step 3: Download EXE
- Now, click on the “Download x86_64” button.

- Then click on the “Download” button. After clicking on the download button the .exe file for the eclipse will be downloaded.

Step 4: Open Download EXE
- Now go to File Explorer and click on “Downloads” after that click on the “eclipse-inst-jre-win64.exe” file for installing Eclipse IDE.

Step 6: Install Eclipse
- Then, click on “Eclipse IDE for Java Developers”.
- Then, click on the “Install” button.

Step 8: Create New Project
- Now click on “Create a new Java project”.

- Now, you’re prepared to make new Java initiatives the usage of eclipse IDE and the display screen will appear like this :
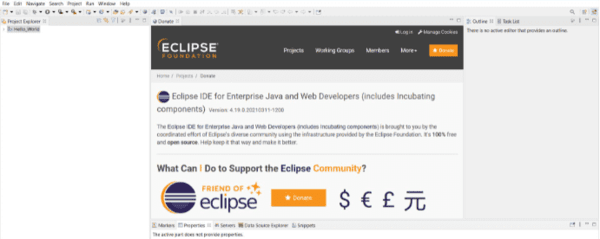
Congratulations! you have successfully Eclipse software download for your Windows PC.
Also Read
- How to Install Eclipse IDE For Java?
- How to Turn on Code Suggestion in Eclipse or Spring Tool Suite?
- How to Use MongoDB in Eclipse?
- How to Use Git with Eclipse?to
Conclusion
Setting up your development environment by installing Eclipse on Windows is a straightforward process that can be completed in just a few steps. By following this guide, you’ll have the Eclipse IDE ready for coding in no time. Whether you’re a beginner or an experienced developer, knowing how to download and install Eclipse IDE on Windows ensures that you have a powerful tool at your disposal for all your programming needs.
Overview
In this tutorial, we show you how to install Eclipse and get started with Java JDK 10 on Windows 10.

Step 1: Install Eclipse on Windows 10
For more details please see the below link. Install Java JDK 10 Step by Step
- Go to Oracle Java SE Downloads to download the JDK 10 latest version.
- Double click the JDK installer «jdk-10.0.1_windows-x64_bin.exe» file to install both the JDK on windows 10.
Step 2: Download Eclipse support java 10
- Go to Eclipse Page to download the Eclipse Photon R Packages: http://www.eclipse.org/downloads/packages/release/Photon/R.
- For Platform, choose «Windows 64bit«, then select the ‘Eclipse IDE for Java EE Developers‘. We will receive a ‘eclipse-jee-photon-R-win32-x86_64.zip’ file.
- To run Eclipse, unzip the ‘eclipse-jee-photon-R-win32-x86_64.zip’ file and open the «eclipse-jee-photon-R-win32-x86_64\eclipse\» folder and click on the «Eclipse» icon.
Step 3: Write a Hello Java 10! Program
Click File -> New -> Other … -> Choose Java Project. Click Next

Enter the ‘Hello Java 10‘ in Project Name input and select Java Runtime Environment (JRE) is ‘JavaSE-10‘. Click Next
")
Then, choose Don’t Create module-info.java file.
Finish

Create a Hello class under com.jackrutorial package and write the following code in it.
Hello.java
package com.jackrutorial;

public class Hello {

 public static void main(String[] args) {
  var helloWorld = new String("Hello Java 10!");
  System.out.println(helloWorld);
 }
}
Run Application and check Eclipse console
Output
Hello Java 10!
- Tweet
- Share
- Share
- Share
- Share
This article is for newbies, looking for step by step instructions on “How to install Eclipse IDE” in Windows 10. I will also help you to run your first “Hello World” Program in Eclipse Java IDE.
Before diving into details, let’s understand a little bit about Eclipse.
What is Eclipse
Eclipse is an open-source IDE (Integrated development environment) available for cross platforms like Windows, Linux and macOS. The primary use of Eclipse is to develop Java applications but can be used to develop apps in other programming languages also.
Its run-time system is based on Equinox, an implementation of the OSGi core framework specification. Eclipse is flexible and supports different programming plugins like Ruby, Perl, PHP, C, C++, C#, COBOL, D, FORTRAN, GROOVY, JAVASCRIPT and many more to develop applications.
Most of the old versions of Eclipse are scientific names based on moons like Callisto, Europa, Ganymede, Helios, Juno, Neon, Kepler etc.
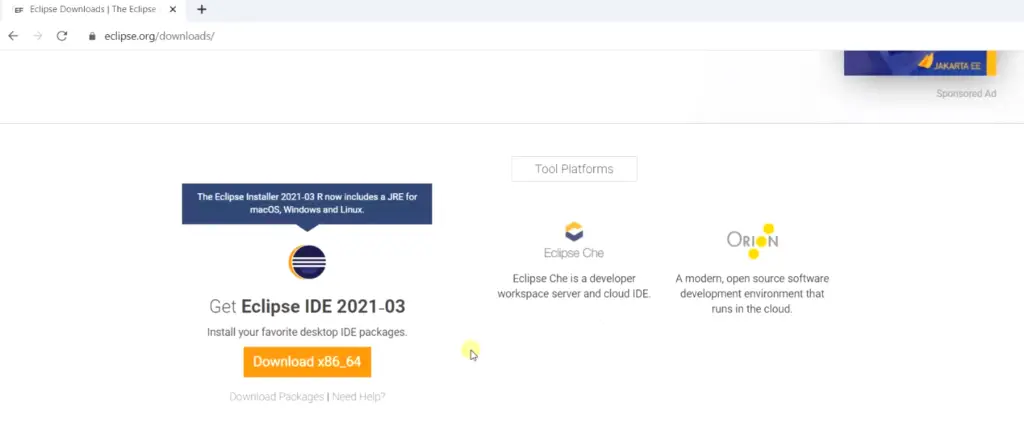
To Install Eclipse IDE, you need to download the latest version of Eclipse IDE first. The latest version available while writing this article is Eclipse IDE 2021‑03.
Download Eclipse
Step 1.1 – Visit Eclipse.org website
Open your favourite browse and visit “https://www.eclipse.org/downloads/“.
Step 1.2 – Download Eclipse IDE 2021-03 for x86_64 systems
You can simply click on this “Download button” to avoid all hassles and get Eclipse IDE 2021-03 installer for Windows 10.
Alternatively, Click on “Download x86_64” button as shown in image on the download page of Eclipse.org.
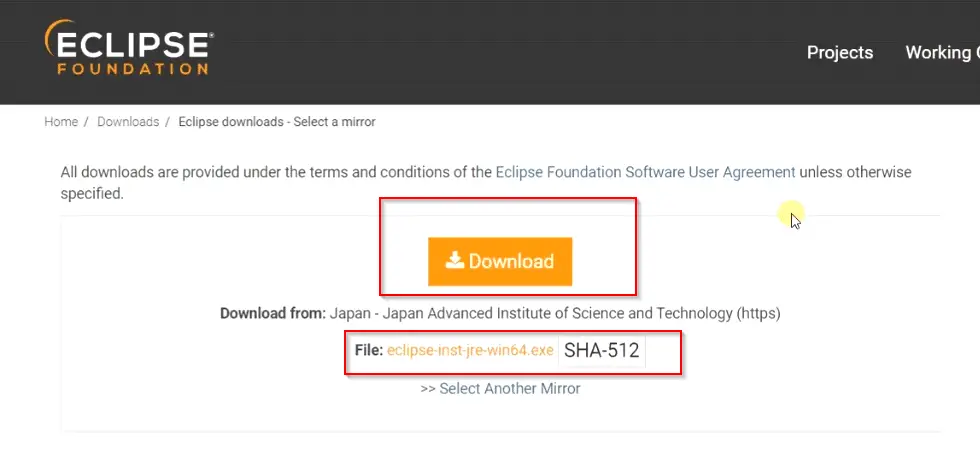
It will take you to download the mirror page. Click on “Download” to get “eclipse-inst-jre-win64.exe“.
By default, it selects a mirror near to your country. For example, Japan in my case. You can always change it to your preferred location. Just click on “<<select another mirror” as visible in the image.
If you are looking for an older version of Eclipse for Windows, Linux or macOS. Visit https://www.eclipse.org/downloads/packages/ to download your preferred version.
Install Eclipse IDE 2021-03 for java developers in Windows 10
Step 2.1 – Run Eclipse Installer
Visit your Download directory and <Double click> to run “eclipse-inst-jre-win64” installer.

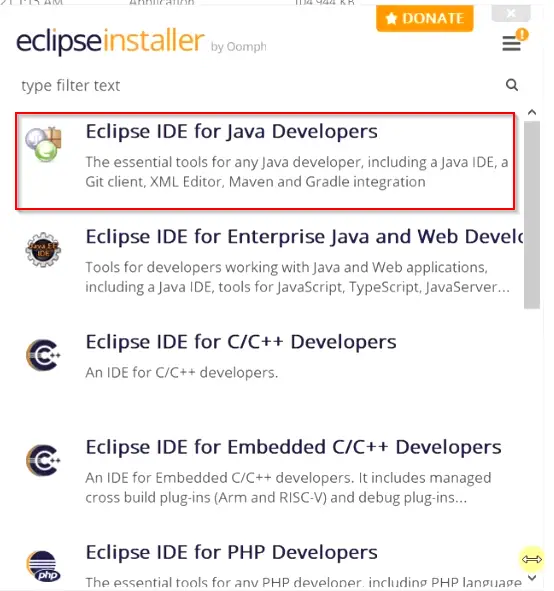
Step 2.2 – Select Eclipse IDE for Java Developers
Select “Eclipse IDE for Java developers” option on edition selection page.
There are lot of other editions are also available. I would recommend you to just have a quick look by scrolling down.
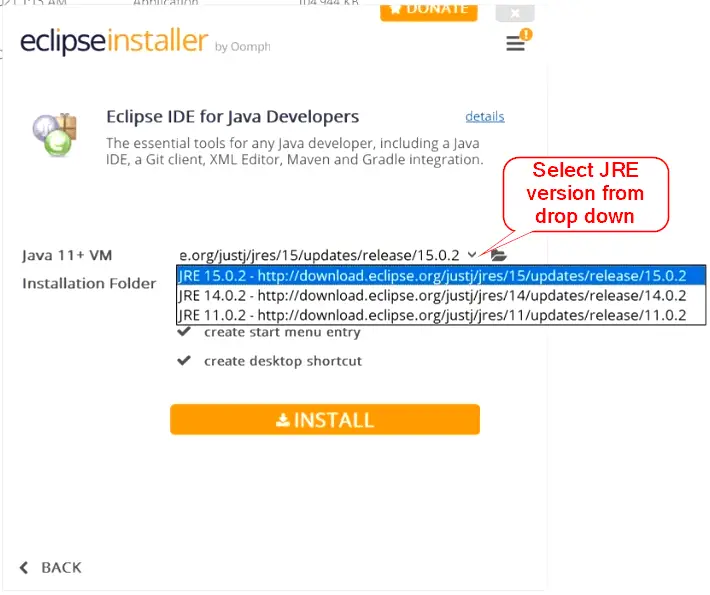
Step 2.3 – Select your preferred JRE version
In the older version, it was a pre-requisite to install Java first. But now-a-days, JRE is built in Eclipse installer.
Also, you get the list and flexibility to download and install your preferred JRE version. For example, JRE 15.0.2, JRE 14.0.2 and JRE 11.0.2 are available.
I will got with latest and default available JRE 15.0.2 for this tutorial.
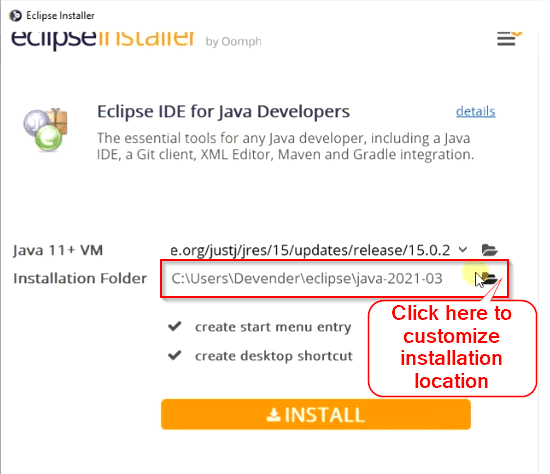
Step 2.4 – Customize Eclipse IDE installation location, if required
The default location of the Eclipse IDE 2021-03 installation would be your “user’s home” directory. But in case you want to customize it. You can click on Browse (“Folder icon”) and navigate to your preferred drive or directory to install Eclipse.
I would leave it by default with “C:\users\Devender\eclipse\java-2021-03“.
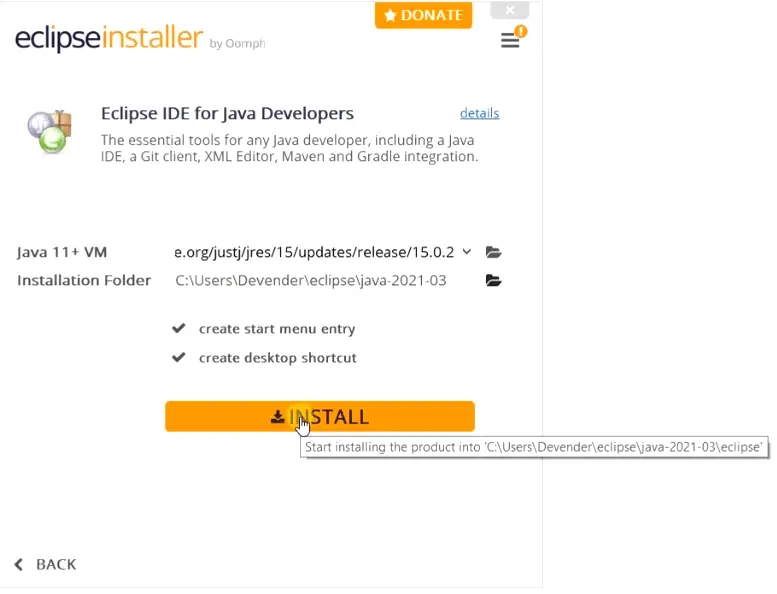
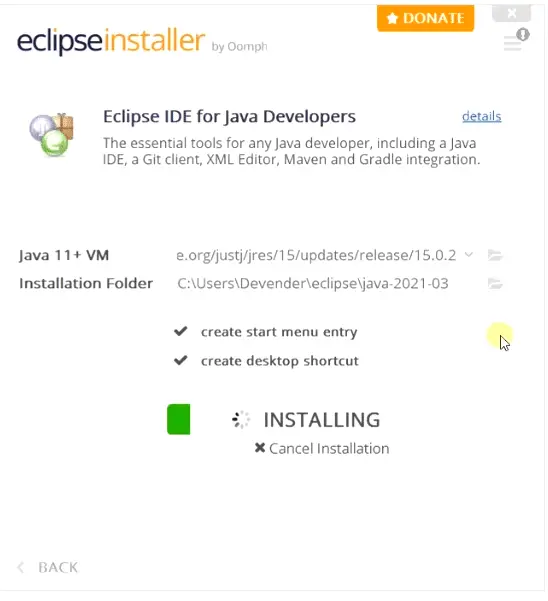
Step 2.6 – Click on “Install” Eclipse IDE for Java developers
Once you are done with Java virtual machine and Installation folder location. You are ready to Install Eclipse.
You can leave below mentioned options checked –
- Create start menu entry
- Create desktop shortcut
<Click> on “Install” to start Eclipse ide 2021-03 for java developers.
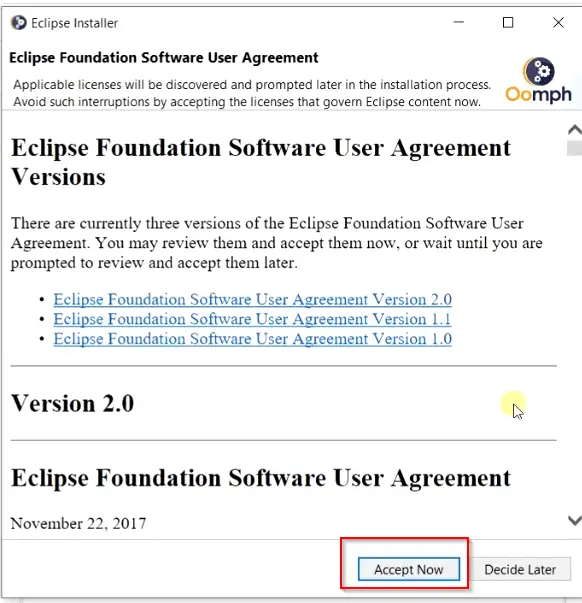
Step 2.7 – Accept Eclipse end user license agreement (EULA)
Like all other software, Eclipse IDE also ask you to agree with End User License Agreement (EULA).
Click “Agree Now” and move further.
Step 2.8 – Let Eclipse IDE installation complete
Now the installation will kick in. It may take some time depending upon “internet” and your system speed. So sit back and relax.
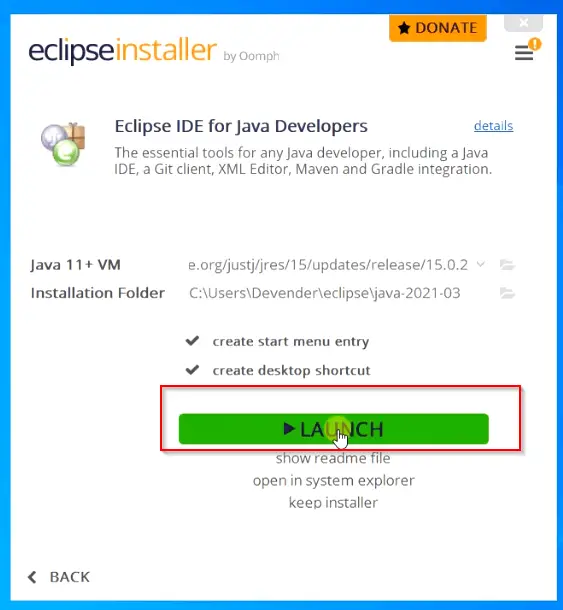
Step 2.9 – Launch Eclipse IDE
Once Eclipse IDE installation completes, You can start Eclipse by clicking on “Launch” button.
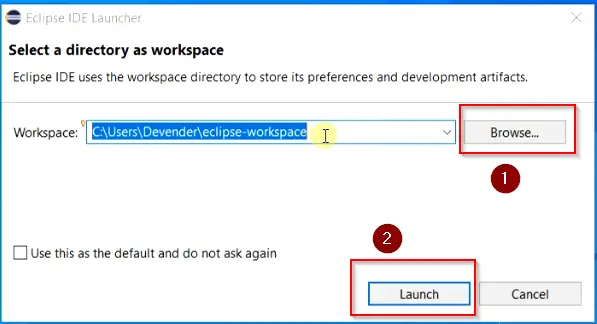
Step 2.10 – Select a directory workspace for Eclipse Projects
On the Next Screen after you Launched Eclipse. It will ask you to setup directory for your workspace. Here you can save all your projects and application files.
The default workspace directory would be under “user’s home directory“. For example “C:\Users\Devender\eclipse-workspace” in my case. You can click on “Browse” and customize it as per your wish.
*** To avoid this pop up to bother you again and again, you can select checkbox "Use this as the default and do not ask again".
I will leave it default.
Click on “Launch“.
It will take you to the Welcome page of Eclipse IDE for java developers.
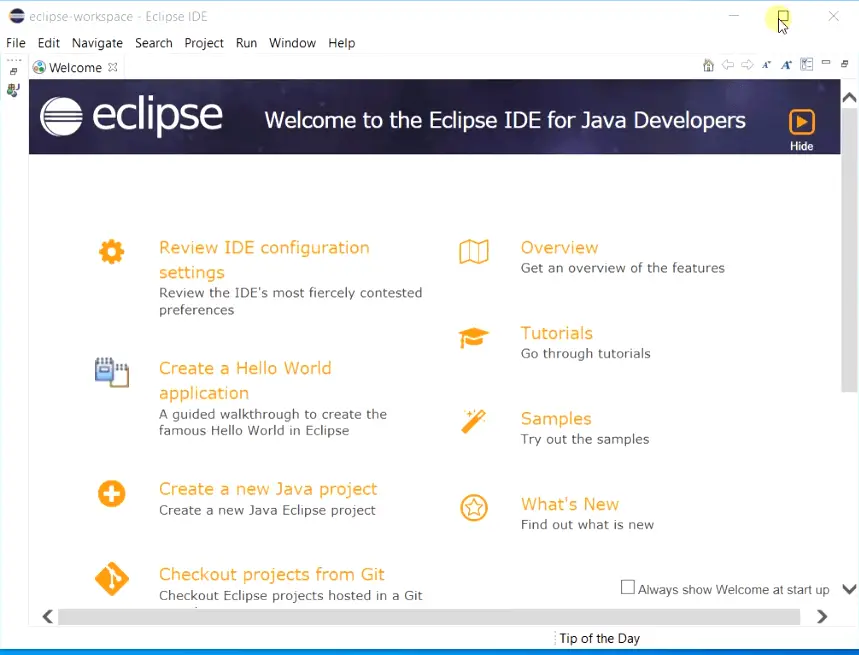
Congrats!! you are done with the latest Eclipse 2021-03 installation in your Windows 10 system.
Now, let me show you, How to run your first java code in Eclipse.
Create a Java project and run your First “Hello World” application
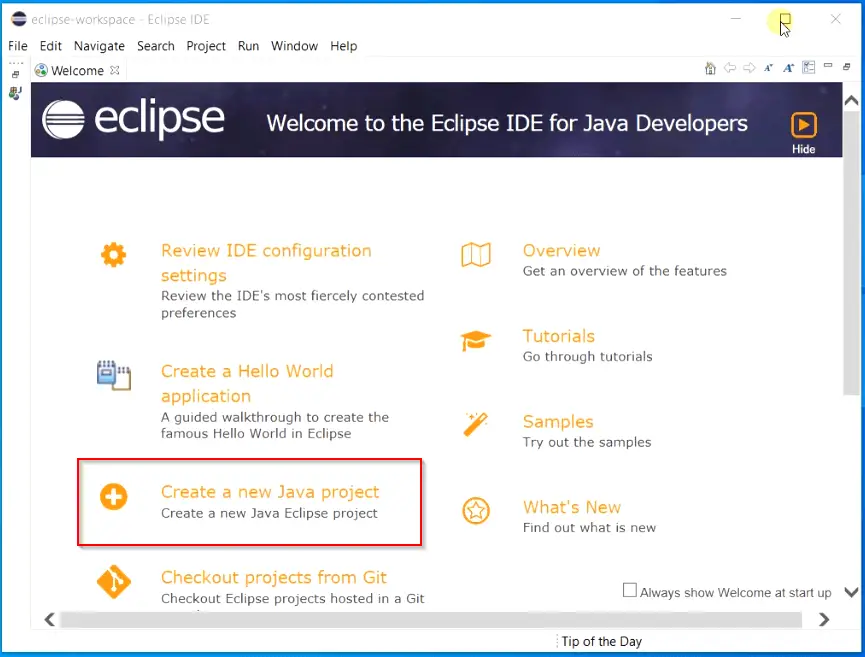
Step 3.1 – Select “Create a new Java project”
Lets create our first java project.
- Select “Create a new Java project” on welcome page of Eclipse IDE for Java developers.
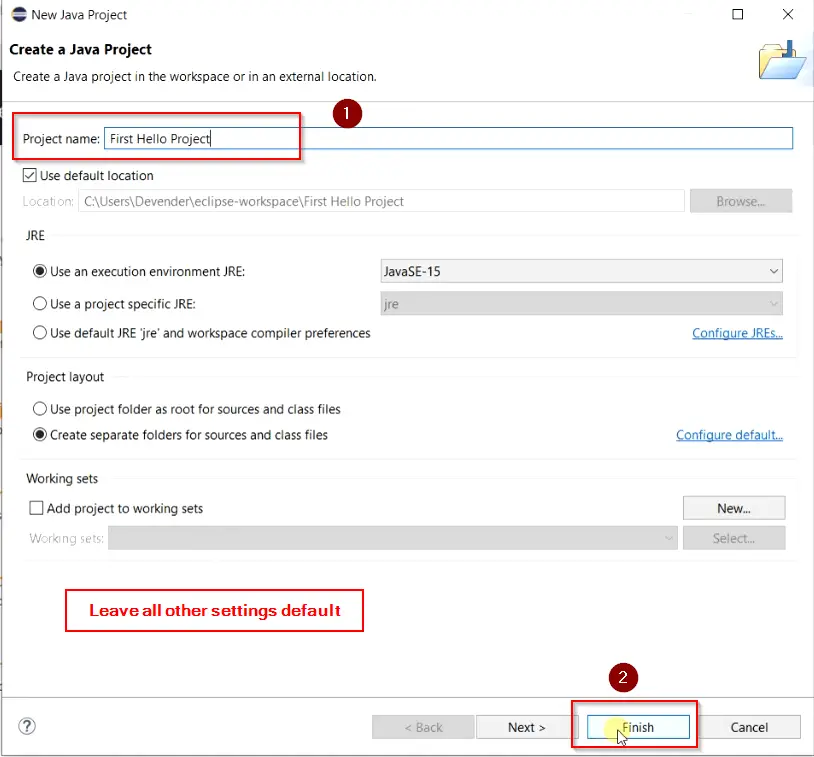
Step 3.2 – Enter a Project name and leave all other settings default
- Provide “project name“. For example, I will give it a name “First Hello project“.
- Leave all settings default and hit “Finish“.
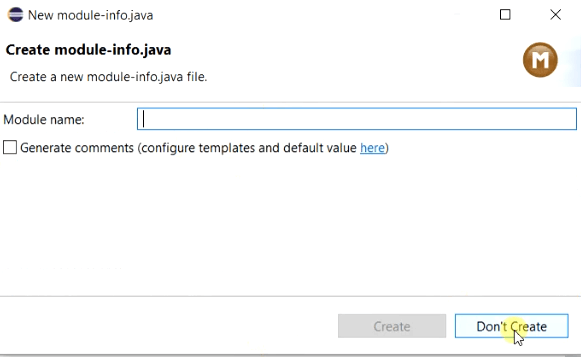
Step 3.3 – Don’t create module-info.java file
Select “Don’t create“, when it asks you to provide a module-info.java name to create it.
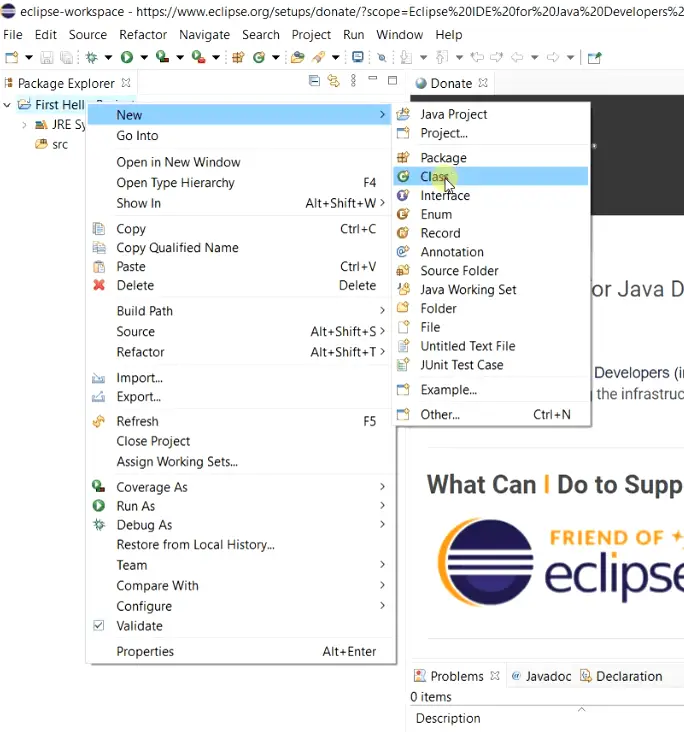
Step 3.4 – Create a new java class
To create a Java class, follow these simple steps –
- <Right click> on “First Hello Project” in the left pane of “package explorer”
- Select “New” from drop-down
- Select “Class“
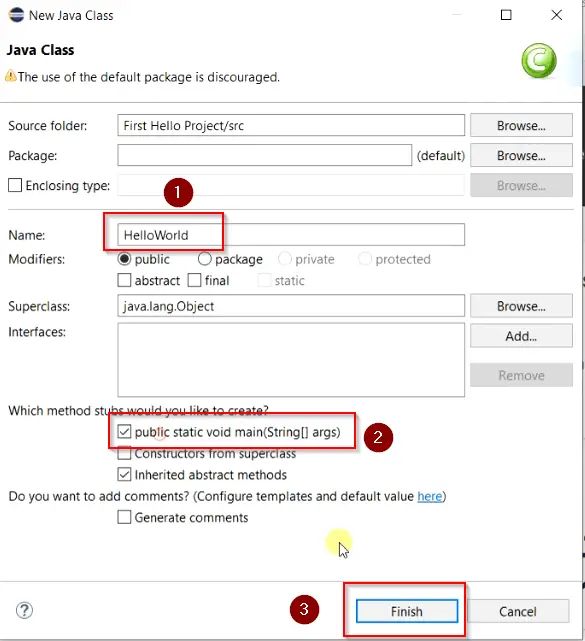
Step 3.5 – Give a Name to Java class and make it “Public static void main“
On this screen, You need to enter Java “Class name“. for example, I have given “HelloWorld” as name.
Also, Select “Public static void main (String[] args)” option in “which method stubs would you like to create section“.
Leave all other settings default and click Finish.
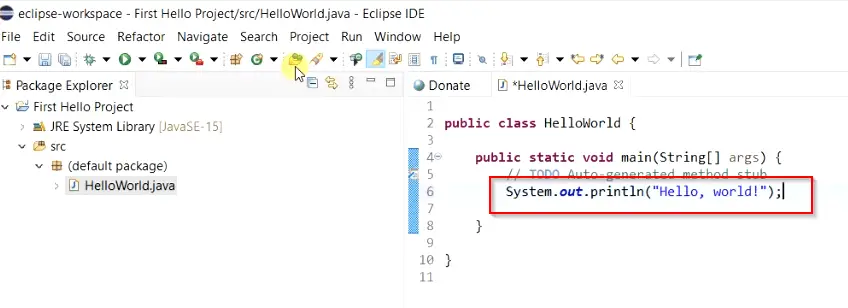
Step 3.6 – Write your first code “Hello World”
Now type the below-mentioned code into your first “HelloWorld.java” file. Please refer to the image, don’t delete or modify the already available code.
System.out.println("Hello, World!");
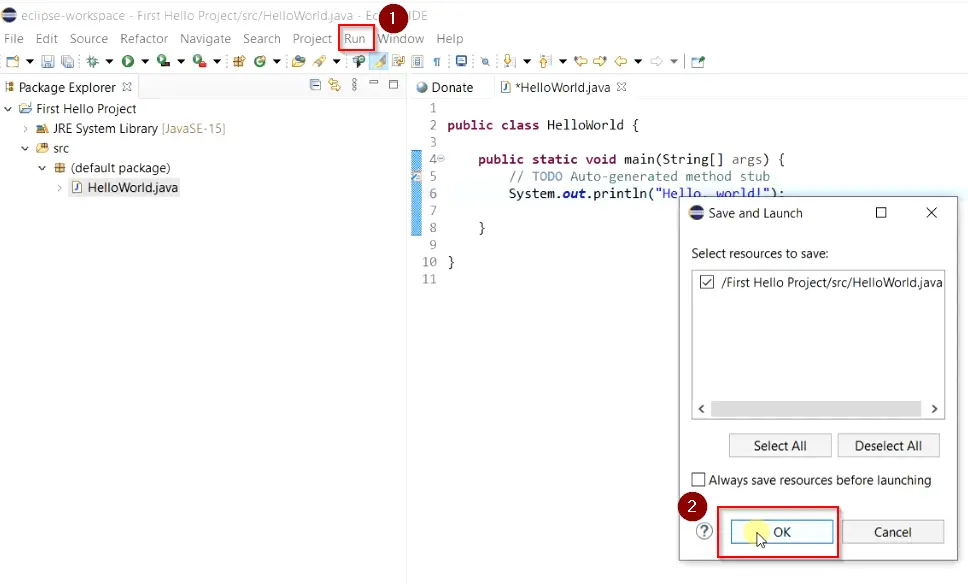
Step 3.7 – Run your first program
To execute your program follow theses steps –
- Click on Run or press <Ctrl + F11> on your keyboard.
- Click “OK” on Save and Launch dialogue box as shown in the image.
Step 3.8 – Validate Program output
Verify Program output in console. You will see “Hello World!” text, if you program runs perfectly.
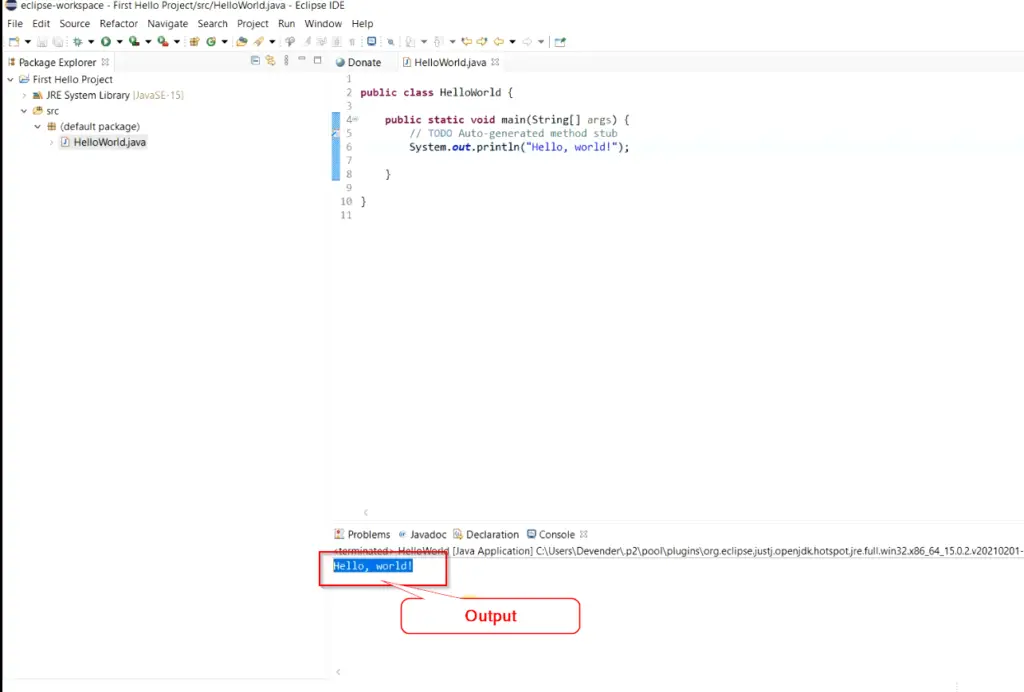
Hurray!! you have ran your first Java program in Eclipse IDE 2021-03.
Video tutorial
In case you have any doubt in tutorial, You can watch out this useful video on “How to install Eclipse IDE in Windows 10“.
Ending note
I hope you liked this tutorial on “How to Install Eclipse IDE 2021-03 for Java developers. Now you free to explore the Java world in Eclipse IDE.
Which is your favourite IDE for java development application? You can let me know through your comments!!
Further readings –
Keep learning and stay safe in this pandemic.
This tutorial guides you on how to install Oracle JDK and Eclipse on Windows 10 Machine. For system requirements to install JDK on Windows please check this link Oracle JDK Certified System Configurations. For Eclipse installation let’s use Eclipse installer 2020-06 R, a new and more efficient way to install Eclipse.
Following are the steps to download and install JDK SE 11 (LTS) software on Windows 10.
Step 1: Download JDK from the following link Java SE Downloads. I chose Java SE 11 (LTS), then clock JDK Download link
Step 2: Then choose Windows x64 Installer (jdk-11.0.8_windows-x64_bin.exe)
Step 3: Review and Accept Oracle Technology Network License Agreement for Oracle Java SE popup will come. You need to select the check box to accept, then click Download button.
Step 4: Once download is complete, run the .exe installer to install JDK on Windows 10 machine.
Step 5: While installation it will ask you to choose PATH for the Java JDK installation (C:\Program Files\Java\jdk-11.0.8)
Step 6: Once installation is complete, click close. You are done with the installation
Step 7: Now you need to set environment variables i.e., update path environment variable to set Java path.
- Use Windows 10 search, type “environment variables” -> Select “Edit the system environment variables”
- Go to System Properties -> Advanced tab -> Environment Variables
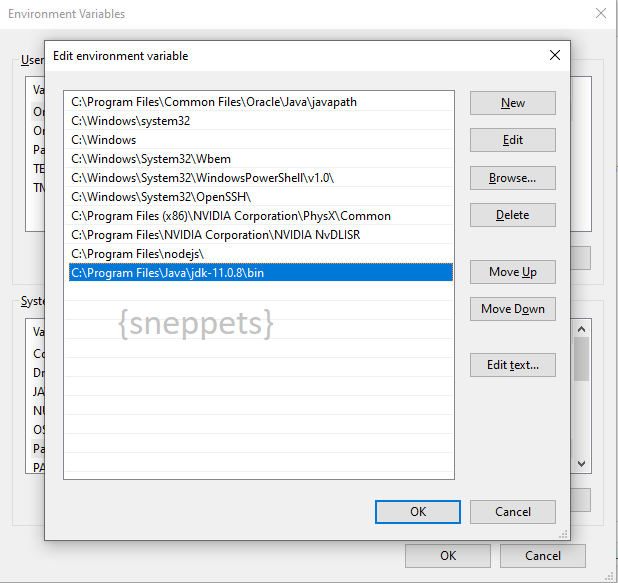
- Under System variables choose Path variable and click “Edit“
- Then copy the path of bin folder of your JDK installation (i.e., “C:\Program Files\Java\jdk-11.0.8\bin“) and paste as shown below.
Step 8: You can type the following java command from command prompt to verify your JDK installation on Windows 10.
Microsoft Windows [Version 10.0.18363.693]
(c) 2019 Microsoft Corporation. All rights reserved.

C:\Users990>java -version
java version "11.0.8" 2020-07-14 LTS
Java(TM) SE Runtime Environment 18.9 (build 11.0.8+10-LTS)
Java HotSpot(TM) 64-Bit Server VM 18.9 (build 11.0.8+10-LTS, mixed mode)
That’s it. JDK is installed on Windows 10 machine successfully.
Install Eclipse on Windows 10
Follow the 5 steps below to install eclipse on Windows 10 machine. As I said earlier we are going to use recently introduced Eclipse Installer 2020-06 R. This method is new and more efficient way of installing Eclipse on Windows 10.
Step 1: Download the Eclipse installer
Step 2: Start the Eclipse installer executable.
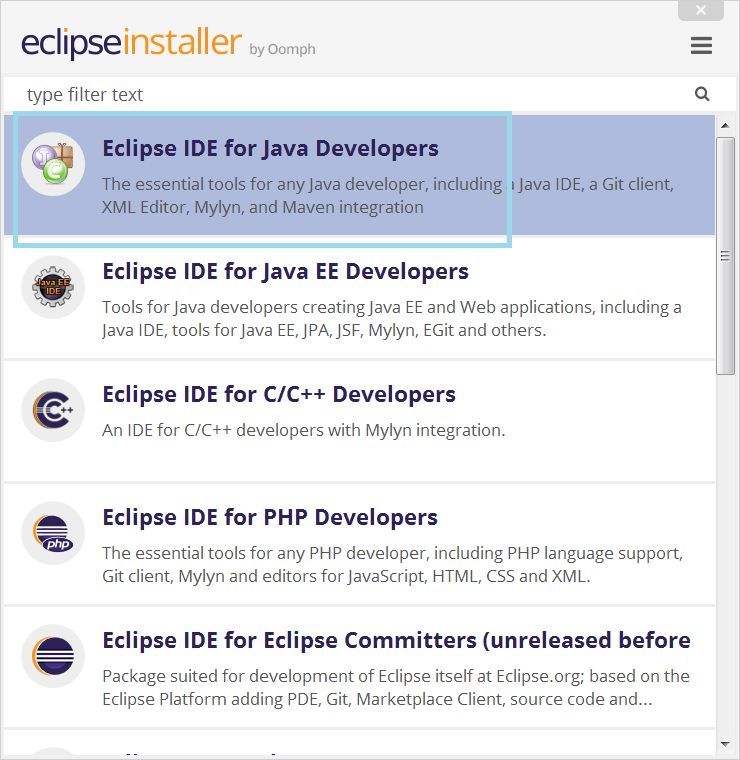
Step 3: Once you start the installer, you would see the following screen which shows the list of available packages. You can search the required package that you want. I chose “Eclipse IDE for Java Developers”
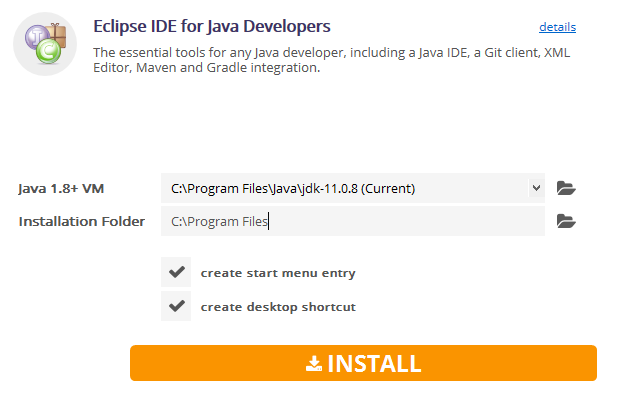
Step 4: Then select your installation folder as shown below. Note, we have installed JDK in our previous section. Therefore Java Runtime is automatically chosen or pointing to the path “C:\Program Files\Java\jdk-11.0.8 (Current)“.
Step 5: Once the installation is complete, you can launch eclipse and start writing Java code. The Eclipse Installer has done everything for you :-).
You have successfully installed JDK and Eclipse on Windows 10. Hope it helped 🙂
Also See:
- Visual Studio Code install location and Path issues from Terminal
- Change Terminal from powershell to cmd in VS Code
- Set Windows PowerShell Environment Variables
- Deploy an Application to Kubernetes running on Google Cloud Kubernetes Engine (GKE)
- The Java Collection Interface and Examples
- SSH Connection Error “Host key verification failed”
- How to unzip a zip file from Terminal (Google Cloud Shell)
References:
- eclipse foundation
- JDK Oracle