
Чтобы Windows могла взаимодействовать и корректно обращаться к физическому оборудованию компьютера, в операционной системе должны быть установлены соответствующие драйвера. В этой статье мы рассмотрим, как вручную установить драйверы устройств в Windows 10/11 и Windows Server 2016-2025.
Содержание:
- Автоматический поиск драйверов в Windows
- Поиск драйверов для неизвестных устройств
- Ручная установка драйвера с помощью INF файла в Windows
- Экспорт и импорт драйверов в Windows
Автоматический поиск драйверов в Windows
В образ современных версий Windows включены базовые драйвера для распространенных типов устройств. После подключения устройства к компьютеру, Windows попытается выбрать наиболее подходящий драйвер из локального хранилища драйверов. Кроме того, Windows может автоматически установить драйвера некоторых устройств, которые опубликованы в каталоге Microsoft Update:
- Попробуйте выполнить автоматический поиск подходящих драйверов через диспетчер устройств. Откройте Device Manager (
devmgmt.msc
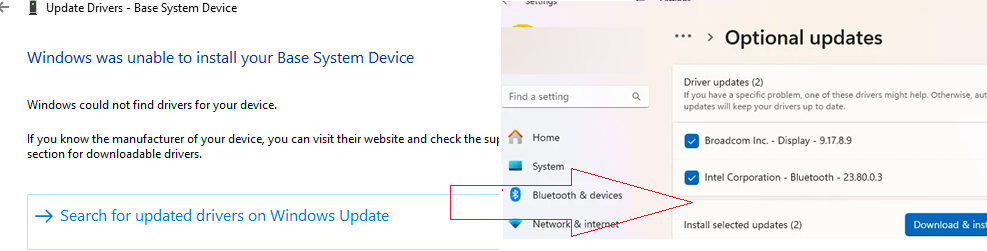
), щелкните по устройству, для которого отсутствует драйвер, и выберите Update Driver -> Search automatically for updated driver software. - Если драйвер не найден, диспетчер оборудования предложит выполнить автоматический поиск драйвера через Windows Update. Нажмите на ссылку Search for updated drivers on Windows Updates или перейдите: Settings -> Windows Update -> Check for Updates.

Для брендовых (OEM) устройств, все необходимые драйвера обычно можно найти по названию модели компьютера на сайте производителя. Если компьютер собран из разных комплектующих, искать и устанавливать драйвера скорее всего придется по отдельности.
Если Windows не смогла автоматически подобрать подходящие драйвера, их придется установить вручную.
Поиск драйверов для неизвестных устройств
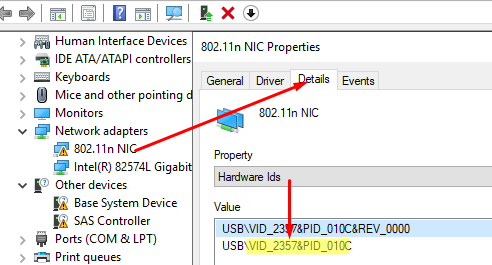
Начать нужно с определения производителя и модели оборудования подключенного устройства. Если для устройства отсутствует драйвер, он отображается в диспетчере оборудования Windows с желтой восклицательной иконкой.
- Откройте свойства неизвестного устройства и перейдите на вкладку Details
- В выпадающем списке выберите свойство Идентификаторы оборудования (Hardware IDs)
- Скопируйте идентификатор. В нашем примере это VID_2357&PID_010C
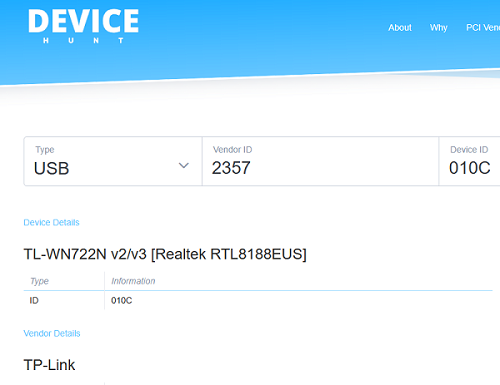
В идентификаторе оборудования указан ID производителя (VID) и ID продукта (PID). В нашем случае VID=2357 и PID=010C. Затем на сайте https://devicehunt.com/ определите название устройства по его VID и PID. В этом примере это внешний USB сетевой адаптер TP-Link (TL-WN722N v2/v3 [Realtek RTL8188EUS])
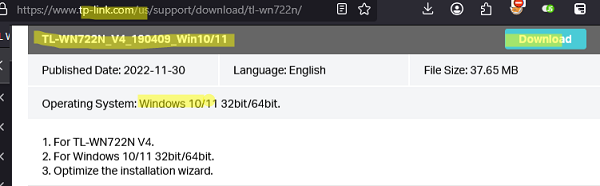
Теперь перейдите на сайт вендора и по модели оборудования найдите драйвер для вашей версии Windows. В моем случае это драйвер для Windows 10/11 (TL—WN722N_V4_190409_Win10/11). Скачайте драйвер.
Категорически не рекомендуем скачивать драйвера с любых сайтов, кроме официальных сайтов производителей.
Ручная установка драйвера с помощью INF файла в Windows
В нашем примере драйвер упакован в ZIP архив, который содержит автоматический установщик setup.exe. Он используется для автоматической установки драйвера, а также различных дополнительных программ и утилит от вендора (в этом примере мы не будем использовать установку драйверов через такой инсталлятор).
Если же распаковать содержимое архива, можно найти в нем папку, в которой хранятся только файлы драйвера. В каталоге драйвера обязательно должен быть INF файл (текстовый файл с конфигурацией драйвера, описанием зависимых файлов, правилами установки и т.д.), а также CAT и DAT, SYS, DLL файл(ы) (опционально).

Драйвер из INF файла можно установить несколькими способами.
Установка драйвера из Device Manager.
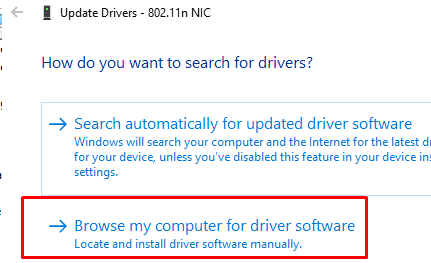
- Щелкните по вашему устройству в диспетчере оборудования и выберите Update Driver
- Выберите Browse my computer for driver software
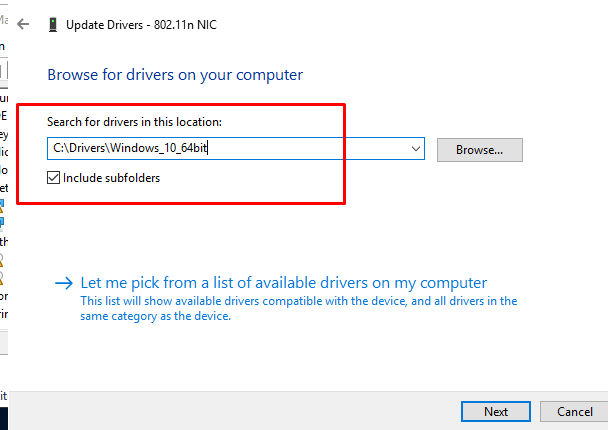
- Нажмите кнопку Browse и укажите путь к распакованной папке с драйвером. Включите опцию Include subfolders для автоматического сканирования вложенных папок на наличие драйверов

- Нажмите Next, чтобы продолжить установку драйвера.
Также можно вручную добавить любой драйвер в хранилище драйверов Windows. Для этого щелкните правой кнопкой по INF файлу драйвера в проводнике и выбрать Install.
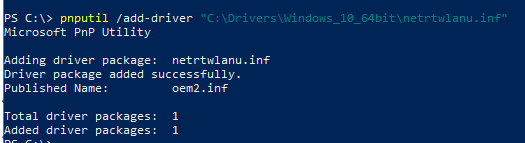
Или можно установить драйвер из командной строки с помощью утилиты pnputil.
pnputil /add-driver c:\drivers\windows_10_64bit\netrtwlanu.inf
Можно рекурсивно установить все драйвера хранящиеся в каталоге (включая подпапки) с помощью команды:
pnputil /add-driver C:\Drivers\*.inf /subdirs /install
Это также добавит драйвер в хранилище драйверов Windows (
C:\Windows\System32\DriverStore\FileRepository
). Осталось выбрать пункт Update Driver в диспетчере задач, и драйвер для вашего устройства автоматически будет установлен из локального хранилища драйверов.
После того, как устройство корректно определилось в Device Manager, можно перейти к следующему устройству, для которого отсутствуют драйвера.
Оптимально использовать такой
порядок установки драйверов в Windows
: в первую очередь нужно установить драйвера чипсета и контроллеров материнской карты. Драйвера сетевого адаптера, затем драйвера для видео и аудио карт, и в последнюю очередь для внешних устройств (драйвера принтера, сканера, проектора, других USB устройств).
Экспорт и импорт драйверов в Windows
Можно вывести все сторонние драйвера (кроме встроенных), которые установлены в хранилище драйверов Windows:
DISM /online /get-drivers /format:table
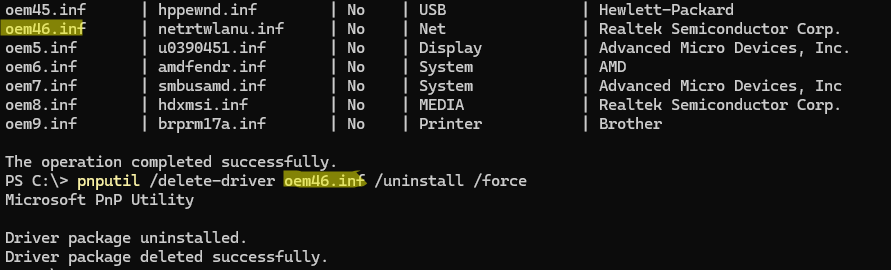
Чтобы удалить любой драйвер из хранилища, нужно указав его INF файл в формате oemxx.inf. Например:
pnputil /delete-driver oem46.inf /uninstall /force
Если у вас есть несколько однотипных компьютеров, вы можете экспортировать все установленные драйвера на одном компьютере, а затем импортировать их на другом.
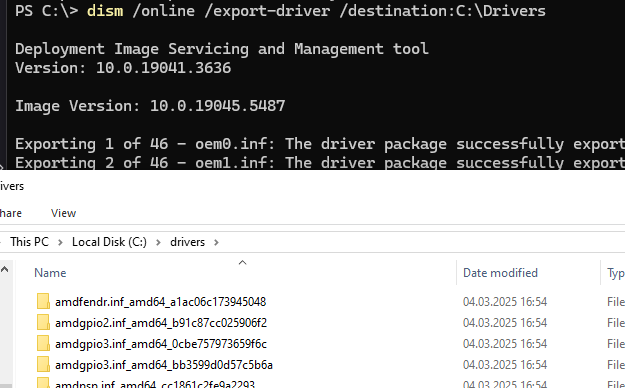
Выгружаем все установленные в Windows драйвера в каталог C:\Drivers:
dism /online /export-driver /destination:C:\Drivers
Теперь папку Drivers нужно скопировать на другой компьютер и установить (импортировать) все драйвера одной командой:
pnputil.exe /export-driver * c:\drivers
Также можно предварительно интегрировать эти драйвера в установочный образ Windows. В этом случае все оборудование компьютера будет определено автоматически сразу после установки, а ручная установка драйверов не понадобиться.
Download Windows Speedup Tool to fix errors and make PC run faster
The Command Prompt is one utility that many power users love to use and have grown with it. It is possible to run Windows Update from the command line. Similarly, it is also possible to install or update drivers using the Command Prompt.
Microsoft offers a built-in utility PnPUtil.exe that allows an administrator to add a driver package, install or update and delete a driver package from the driver store. You can also find out the list of driver packages currently installed in the driver store. In this post, we will show how you can upload drivers using the Command Prompt.
If you want to check if you have this tool on your computer, all you need to do is open the command prompt, type PNPUtil.exe and press the Enter key. If there is no error, you are good to go.

This method will not download the driver package from the internet. You will have to download the package from the OEM website or copy it from USB or storage media, and copy it to the computer.
Once done, you can then use the driver with the utility to install or update the driver. You will have to provide the path to the INF file which holds information of the driver to be installed.
PnPUtil Syntax
pnputil [/add-driver <...> | /delete-driver <...> | /export-driver <...> | /enum-drivers | /disable-device <...> | /enable-device <...> | /restart-device <...> | /remove-device <...> | /scan-devices <...> | /enum-devices <...> | /enum-interfaces <...> | /?]
Here is the syntax, as stated in microsoft.com:
pnputil /add-driver * <filename.inf | .inf> [/subdirs] [/install] [/reboot]

/subdirs - traverse sub directories for driver packages.

/install - install/update drivers on any matching devices.

/reboot - reboot system if needed to complete the operation.
Examples of using the PnPUtil command
You can use the /install option to install a new driver or update an existing one.
Add driver package
pnputil /install x:\driver.inf
Add multiple driver packages
pnputil /install c:\oem\*.inf
Add and install the driver package
pnputil /install device.inf /install
That said, the utility can return information, which can suggest if a reboot is required. If you do not get anything or a zero, all is well. However, if you get ERROR SUCCESS REBOOT REQUIRED (3010) then a system reboot is required. It happens when the reboot is not used during installation or update. In case a restart is needed, then you will receive ERROR SUCCESS REBOOT INITIATED (1641) which means the update was successful, and the system reboot is underway.
Related: PnPUtil Failed to delete driver package
The utility can also find or enumerates the driver packages that are currently in the driver store. However, it will only list driver packages that are not in-box packages are listed. An in-box driver package is included in the default installation of Windows or its service packs.
What is Drvload?
There is another command called Drvload, but it only works in the Windows PE environment. Drvload is a tool that adds out-of-box drivers to a booted Windows PE image. So from a consumer or admin perspective, you will have to use the PnPUtil to update or install a new driver in Windows 11/10.
Read: Unable to install drivers on Windows.
Anand Khanse is the Admin of TheWindowsClub.com, a 10-year Microsoft MVP (2006-16) & a Windows Insider MVP (2016-2022). Please read the entire post & the comments first, create a System Restore Point before making any changes to your system & be careful about any 3rd-party offers while installing freeware.
The Command Prompt is near and dear to the users who are familiar with all the right and wrong-doings of the system. From installation/uninstallation of apps to complete system scan, from registering or de-registering any program to fix any glitch in the system the Command Prompt is a utility to extract help from in the matters of system errors.
You can also use Command Prompt to update the driver in your Windows 10. How to do that? Well, this article is all about that where you can know how to update drivers using Command Prompt in Windows 10.
Windows offers you a PnPUtil tool integration which can help you download a driver package, install/add the driver and if you wish to uninstall it in the future, it also allows you to remove the driver from the list. Let us take a look at the steps that can help use Command Prompt to update drivers in Windows 10.
To begin with this process, you first have to download or transfer the driver package on your computer. You can download it by visiting the OEM website or use the pen drive to transfer the package into your PC.
Once you have downloaded/transferred the driver package to your computer, you can install it using the PnPUtil.exe tool by entering the path to the INF file that has details of the driver which needs to be installed.
Read Also: Update Drivers Using the Best Driver Updater For Windows
PnPUtil Syntax
pnputil [/add-driver <…> | /delete-driver <…> |
/export-driver <…> | /enum-drivers |
/disable-device <…> | /enable-device <…> |
/restart-device <…> | /remove-device <…> |
/scan-devices <…> | /enum-devices <…> |
/enum-interfaces <…> | /?]
Here are the steps to update the driver in your Windows 10 using command prompt:
- Go to the Start button (Windows icon), in the bottom left of your desktop.
- Now, type Command Prompt in the search bar.
- Then, right-click on the result and choose Run as administrator from the right-click menu and open the Command Prompt with admin rights.
- Once you are on the Command Prompt window, run the command to pull up the syntax and the examples and then click Enter: Pnputil

How to Add a Driver
If you are looking for a way to add the driver, here are the steps that you can follow:
- Open File Explorer and go to the folder location where the driver you want to add is saved.
- Now that you have opened the folder location, copy the driver folder.
- Then you have to open the drive where you wish to paste the copied driver folder. Once you are in the drive, paste the copied folder.
- Next, go to the Command Prompt and run the command to add and install the driver package.
Read Also: How to Update Wifi Drivers on Windows 10, 8, 7
How to Remove a Driver
So far you have come across the steps to install a driver using Command Prompt. If you want to remove the installed driver, here are the steps that you need to follow.
- Open the Command Prompt window and run the following command. Then click Enter: pnputil.exe -e
- Now, note down the OEM number of the driver you want to delete.
- Then, run the below-written command to delete the driver package and hit Enter: pnputil.exe -d OEM number
Manage Your Drivers Using Command Prompt
So, that was it for updating drivers using Command Prompt in Windows 10. It is quite a simple method to update, install or even delete a driver in your Windows PC. Did you find this article helpful? We’d love to read your views and suggestions in the comment lane.

Installing drivers on your computer is a crucial task that ensures your hardware works optimally. While many users prefer to use GUI-based methods, using the Command Prompt can offer more control and precision. This guide will walk you through the process of installing drivers via Command Prompt, providing a detailed explanation of the commands and parameters used.
Installing drivers via Command Prompt allows for more control and precision compared to GUI-based methods. By using commands like pnputil and navigating to the driver location, you can easily install drivers on your computer. However, it is not possible to provide a quick answer to the entire process as it involves multiple steps and commands.
- What is Command Prompt?
- Why Use Command Prompt for Driver Installation?
- Preparing for Installation
- Installing Drivers via Command Prompt
- Step 1: Open Command Prompt
- Step 2: Navigate to the Driver Location
- Step 3: Install the Driver
- Step 4: Restart Your System
- Conclusion
What is Command Prompt?
Command Prompt, also known as cmd.exe or cmd, is a command-line interpreter application available in most Windows operating systems. It’s used to execute entered commands, allowing users to automate tasks via scripts and batch files, perform advanced administrative functions, and troubleshoot or solve certain kinds of Windows issues.
Why Use Command Prompt for Driver Installation?
While graphical user interfaces (GUIs) are user-friendly and visually appealing, they don’t always provide the level of control and detail that Command Prompt does. By using Command Prompt, you can directly interact with your system and perform tasks more efficiently.
Preparing for Installation
Before you start, it’s essential to know the exact model of the hardware for which you’re installing the driver. You can usually find this information in the device manager on your system. Once you have this information, you can download the appropriate driver from the manufacturer’s website.
Here’s a step-by-step guide on how to install drivers using the Command Prompt:
Step 1: Open Command Prompt
Press Win + X and select Command Prompt (Admin). This will open the Command Prompt with administrative privileges.
Step 2: Navigate to the Driver Location
Use the cd command to navigate to the location where the driver is saved. For example, if your driver is saved in a folder named “Drivers” on the desktop, you would type:
cd C:\Users\YourUsername\Desktop\DriversStep 3: Install the Driver
Once you’re in the correct directory, you can install the driver. The command to do this will depend on the type of driver file you have. If it’s an .inf file, you can use the pnputil command:
pnputil /add-driver .\driver.infIn this command, pnputil is a utility that allows you to manage the driver store, and /add-driver is a parameter that tells the utility to add the specified driver to the driver store. .\driver.inf is the name of your driver file.
If you’re installing an .exe file, you can simply type the name of the file:
driver.exeStep 4: Restart Your System
After the driver has been installed, you may need to restart your system for the changes to take effect. You can do this by clicking on the Start button and selecting Restart, or by typing the following command into the Command Prompt:
shutdown /rIn this command, shutdown is a command that allows you to shut down or restart your computer, and /r is a parameter that tells the command to restart the computer.
Conclusion
Installing drivers via Command Prompt may seem daunting at first, but with a little practice, you can enjoy the level of control and efficiency it offers. Remember to always download drivers from trusted sources, and ensure they are compatible with your hardware and system to avoid any potential issues.
If you need further assistance, you can refer to the official Microsoft documentation on Command Prompt here.
No, Command Prompt is primarily available on Windows operating systems. Other operating systems may have their own command-line interfaces or methods for installing drivers.
You can usually find the exact model of your hardware in the device manager on your system. To access the device manager, press Win + X and select «Device Manager» from the menu. In the device manager, expand the category related to your hardware, right-click on the specific device, and select «Properties.» The model information should be listed in the «Details» or «General» tab.
It’s best to download drivers from the manufacturer’s official website. They usually provide the most up-to-date and compatible drivers for their hardware. Avoid downloading drivers from third-party websites, as they may contain malware or outdated versions.
No, you’ll need to install each driver individually using the appropriate command. However, you can navigate to the folder containing multiple driver files and install them one after another.
If the driver installation fails, double-check that you have downloaded the correct driver for your hardware and operating system. Ensure that you have administrative privileges when running Command Prompt. If the issue persists, you can try restarting your system and attempting the installation again. If all else fails, you may need to seek assistance from the hardware manufacturer or a technical support professional.
Yes, you can uninstall drivers using the Command Prompt. You can use the pnputil command with the /delete-driver parameter followed by the driver’s .inf file to remove it from the driver store. For example: pnputil /delete-driver driver.inf. However, be cautious when uninstalling drivers, as removing the wrong driver can cause issues with your hardware or system.
Let’s check how to use PnPUtil Driver Manager to install drivers using the command prompt on Windows 10 and Windows 11 PCs. PnPUtil is the command-line tool for adding, installing, or deleting driver packages.
PnPUtil.exe is a command line utility that you can use to manage the driver store. That lets an administrator perform the following actions on driver packages including:
- Adding a driver package to the driver store.
- Installing a driver package on the computer.
- Deleting a driver package from the driver store.
- Enumerating the driver packages that are currently in the driver store. Only driver packages that are not in-box packages are listed. An in-box driver package is one which is included in the default installation of Windows or its service pack.
Windows 10 and Windows 11 comes with an integrated PnPUtil.exe tool that allows the system administrator to easily manage the driver, update or remove the driver from the list of drivers.
Driver packages are using the INF files for installing device drivers for hardware components. A setup information (INF) file is a text file in a driver package that contains all of the information that device installation components used to install a driver package on a device.

When a physical device is deployed without a driver for a device or missing or incompatible drivers, you may experience a question mark or error inside Device Manager; here, you can check to Fix Unknown Device Drivers in Device Manager.
- Best Guide for Dell Driver Management Using SCCM
- Easily Download SCCM Driver Package for Lenovo
- Easy Steps to Download HP Driver Packs for SCCM
Where to Get PnPUtil?
PnPUtil is included in every version of Windows in the %windir%\system32 directory folder of all Windows 10 and Windows 11 installations. There isn’t a separate PnPUtil download package.
- Open a Command Prompt window (Run as administrator).
- Type
pnputil /?to view command options.

The PnPUtil command-line installs or manages drivers from the command line. You can use this command to add driver packages, remove driver packages, and list driver packages in the store.
It is designed to manage the driver on every version of Windows devices. The following are the supported PnPUtil command-line options.
PNPUTIL [/add-driver <...> | /delete-driver <...> |
         /export-driver <...> | /enum-drivers |
         /enum-devices [<...>] | /enum-interfaces [<...>] |
         /disable-device <...> | /enable-device <...> |
         /restart-device <...> | /remove-device <...> |
         /scan-devices [<...>] | /?]
Let’s see how to use the PnPUtil tool for managing driver packages –
Add Multiple Driver Packages – PnpUtil Driver Manager
To add multiple driver packages from the folders, you can use the below command line –
/add-driver <filename.inf | *.inf> [/subdirs] [/install] [/reboot]/subdirs – traverse subdirectories for driver packages.
/install – install/update drivers on any matching devices.
/reboot – reboot system if needed to complete the operation.
For example, I have downloaded the driver package from the manufacturer site that doesn’t include an installer application (like setup.exe or install.msi) and extracted the file.
Now I want to install the all drivers part of the package bundle, and the folder structure looks like this –

To add multiple packages, you can type the command. I have used the following command from Windows 11 and Windows 10 PCs. For Example:
Note: Make sure that you adjust the paths as per your environment.
pnputil /add-driver "C:\Users\jitesh\Desktop\5420\win10\*.inf" /subdirs /install /rebootThe process started running. Importing drivers may take a long time, especially if you are importing multiple driver packages. Once the process is completed, you will see the driver package added successfully with the total count at the end.

Add Individual Driver Package
To add individual driver packages from the folders, You can use the Setup Information file (.INF) to install the driver or use the PnpUtil driver manager utility from the command line manually.
Here you will have to provide the path or name to the INF file of the driver to be installed, and you can use the below command line –
pnputil /add-driver driverfilename.inf /install Find .INF Name for Installed Device Driver
Every installed driver has an OEM number. Let’s check how you can retrieve the INF name for the installed drivers in the system. This method only works for INF files that are installed in the system.
It’s important to check the file name if you are required to install or uninstall a particular driver installed in your system.
- To open Device Manager. Type devmgmt.msc or hdwwiz.cpl into Run, and click on OK.
- Scroll and find the driver from the lists
- Double-click or Right-click on the Driver and select Properties.
- Switch to the Details tab and from the drop-down box under the Property tab, select Inf Name.
The value should show the inf name for this driver. For example, the value may look something like oem156.inf.

To match a driver in an INF file, You need to locate the INF files from (C:\Windows\INF). Next, Double click on the selected file, and it will be opened in Notepad as follows, looking at Abstract.
You will get to know the purpose of the drivers accordingly carefully you need to proceed to perform actions.

Command Line Option
Here’s how you can also use the command line to check the OEM number of the driver you want to delete –
pnputil.exe -e or pnputil.exe -e <INF name> where -e Specifies to enumerate all third-party INF files.
You will see the list of driver packages that are already installed in the driver catalog with the details, you need to look for the driver package which you want to delete or uninstall. For Example, The OEM number is located in the published name for individual installed drivers.

Delete or Uninstall Driver Package – PnpUtil Driver Manager
Let’s see how to Delete or Uninstall Driver Using the PnPUtil driver manager utility. You can specify the Setup Information file (.INF) of the driver to be uninstalled –
pnputil /delete-driver <oem#.inf> [/uninstall] [/force] [/reboot]

Delete driver package from the driver store.
  /uninstall - uninstall driver package from any devices using it.
  /force - delete driver package even when it is in use by devices.
  /reboot - reboot system if needed to complete the operation.
Similarly, you can use PnPUtil to perform various operations. Here, the below table provides examples of how to use the PnPUtil driver management tool.
| Descriptions | Command line Syntax (Example) |
| Add driver package | pnputil /add-driver x:\driver.inf |
| Add multiple driver packages | pnputil /add-driver c:\oem*.inf |
| Add and install driver package | pnputil /add-driver device.inf /install |
| Enumerate OEM driver packages | pnputil /enum-drivers |
| Delete driver package | pnputil /delete-driver oem0.inf |
| Force delete driver package | pnputil /delete-driver oem1.inf /force |
| Export driver package | pnputil /export-driver oem6.inf |
| Export all driver packages | pnputil /export-driver * c:\backup |
| Disables device specified by device instance ID | pnputil /disable-device “USB\VID_045E&PID_00DB\6&870CE29&0&1” |
| Enables device specified by device instance ID | pnputil /enable-device “USB\VID_045E&PID_00DB\6&870CE29&0&1” |
| Restarts device specified by device instance ID | pnputil /restart-device “USB\VID_045E&PID_00DB\6&870CE29&0&1” |
| Removes device specified by device instance ID | pnputil /remove-device “USB\VID_045E&PID_00DB\6&870CE29&0&1” |
| Scan the system for any device hardware changes | pnputil /scan-devices |
| Enumerate only connected devices on the system | pnputil /enum-devices /connected |
| Enumerate device with specific instance ID | pnputil /enum-devices /instanceid “ACPI\PNP0A08\1” |
| Enumerate all devices with specific class | pnputil /enum-devices /class Display |
| Enumerate all devices with specific problem code | pnputil /enum-devices /problem 28 |
| Enumerate all devices with problems and display hardware/compatible IDs | pnputil /enum-devices /problem /ids |
| Enumerate only enabled interfaces on the system | pnputil /enum-interfaces /enabled |
Troubleshooting
Here based on the parameters added to the command line, you can check the logs for additional information –
If the /add-driver and /delete-driver options were specified, check %windir%\inf\setupapi.dev.log for more information.
If the /enable-device and /disable-device options were specified, set the SetupAPI log verbosity to full (0x2000ffff) and re-attempt the operation. If it fails again, check %windir%\inf\setupapi.app.log
Author