
Общие сведения:
Эта статья — пошаговая инструкция по установке драйвера USB-UART преобразователя на чипе CH340 для операционной системы Window 10.
Внимание! Для установки драйверов необходимы права администатора. Зайдите от имени пользователя с правами администратора или попросите администатора компьютера дать повышенные права аккаунту, от имени которого будет производиться установка драйвера.
Драйвер — исполняемая программа-модуль, предоставляющая интерфейсы высокого уровня для управления устройствами на низком уровне.
Шаг 1. Подключение устройства.
Подключите устройство с USB-UART перобразователем к персональному компьютеру. Если компьютер не подключён к сети интернет или на нём не работает Windows Update, то драйвера для USB-UART преобразователя придётся установить вручную.
Шаг 2. Диспетчер устройств.
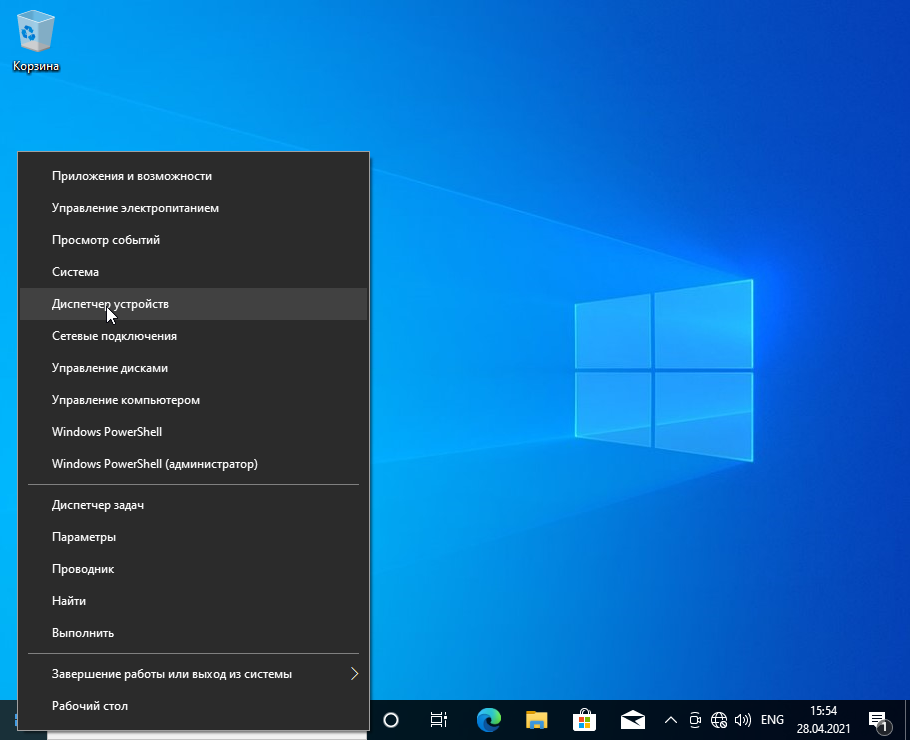
Нажмите правой клавишей мыши на кнопку с логотипом Windows в левом нижнем углу и нажмите на пункт «Диспетчер устройств» в открывшемся меню.
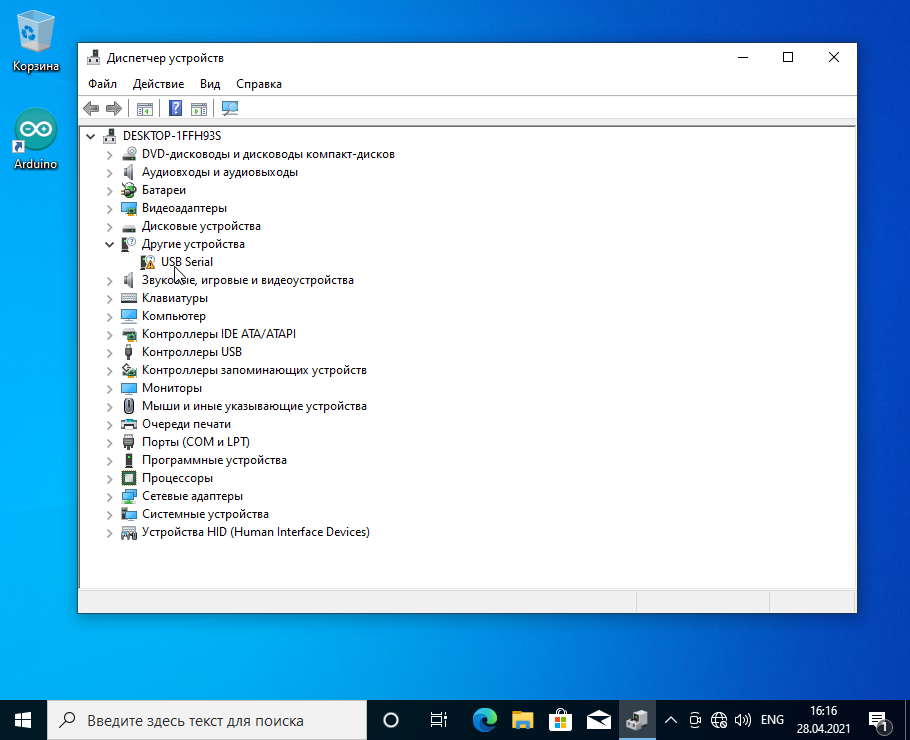
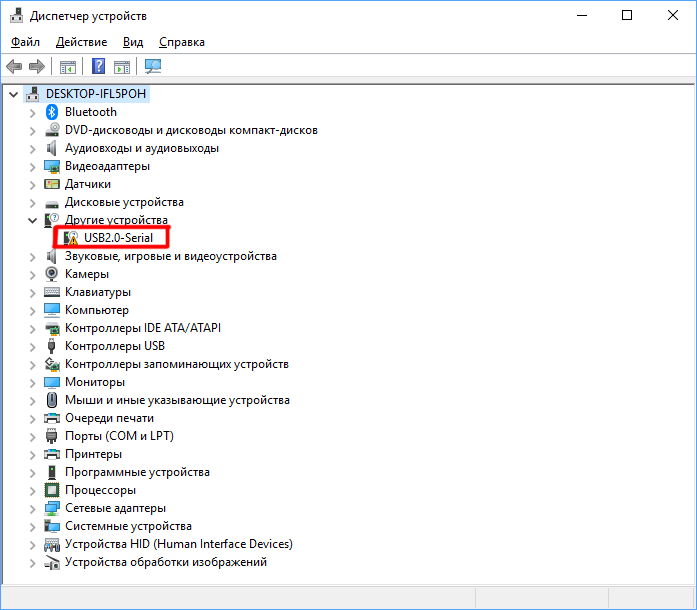
Откроется окно Диспетчера устройств, в нём должен быт пункт «Другие устройства -> USB Serial» с пиктограммой в виде жёлтого треугольника с восклицательным знаком.
Шаг 3. Скачивание драйвера.
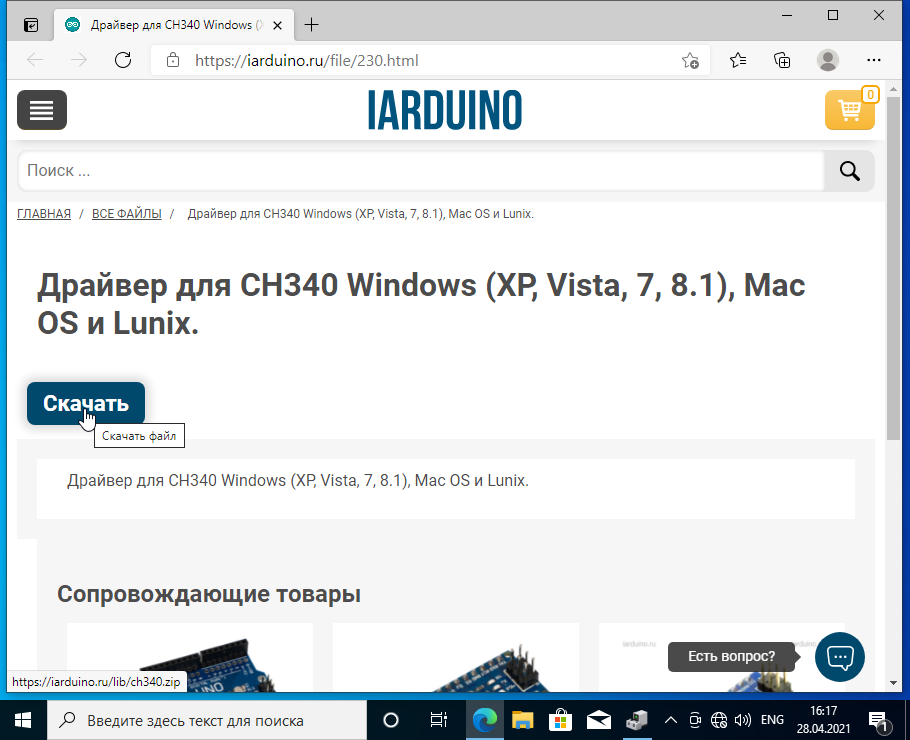
Нажмите на эту ссылку и скачайте драйвер, нажав на кнопку скачать.
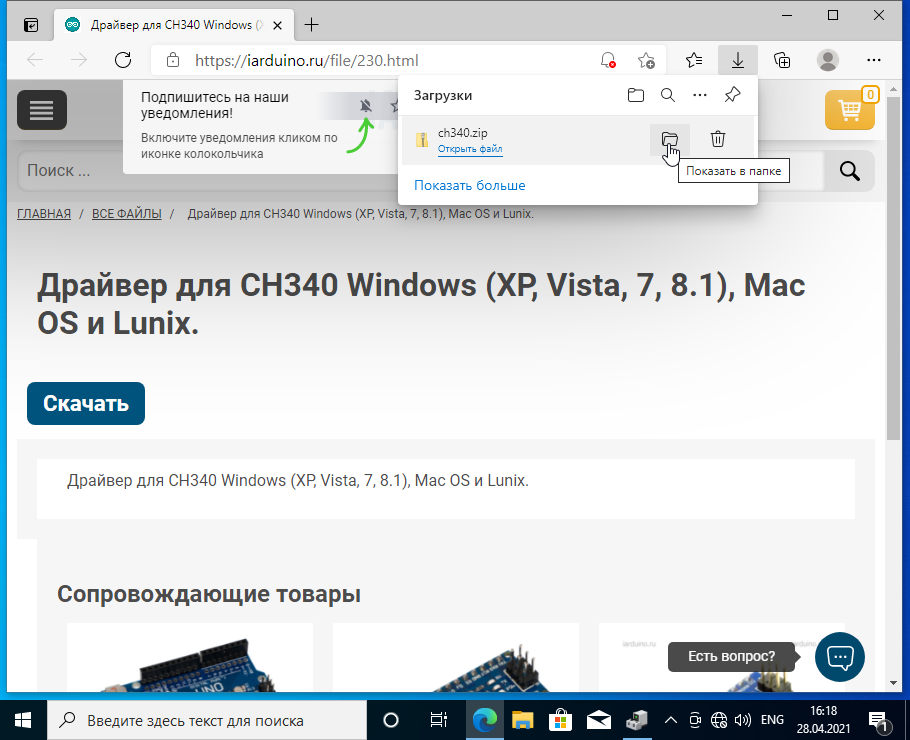
После того как файл скачался, нажмите на иконку «Показать в папке» в окне загрузок.
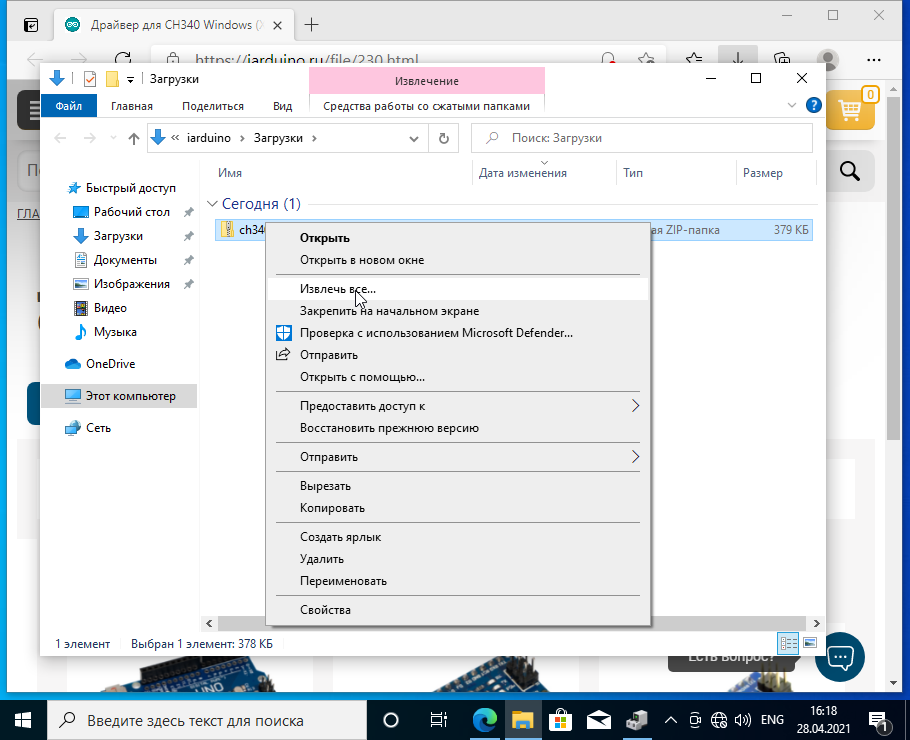
Откроется окно Windows Explorer. Нажмите на только что скачанный файл правой клавишей мыши и выбирите пункт «Извлечь все…» из меню.
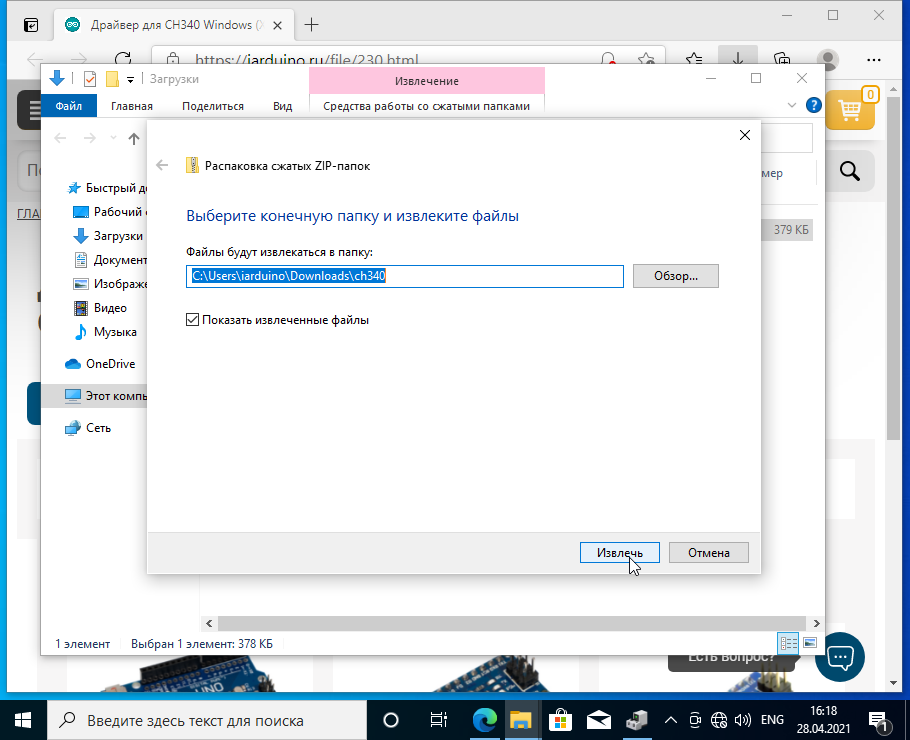
Во вновь открывшемся окне нажмите «Извлечь«. Убедитесь, что стоит галочка слева от фразы «Показать извлечённые файлы».
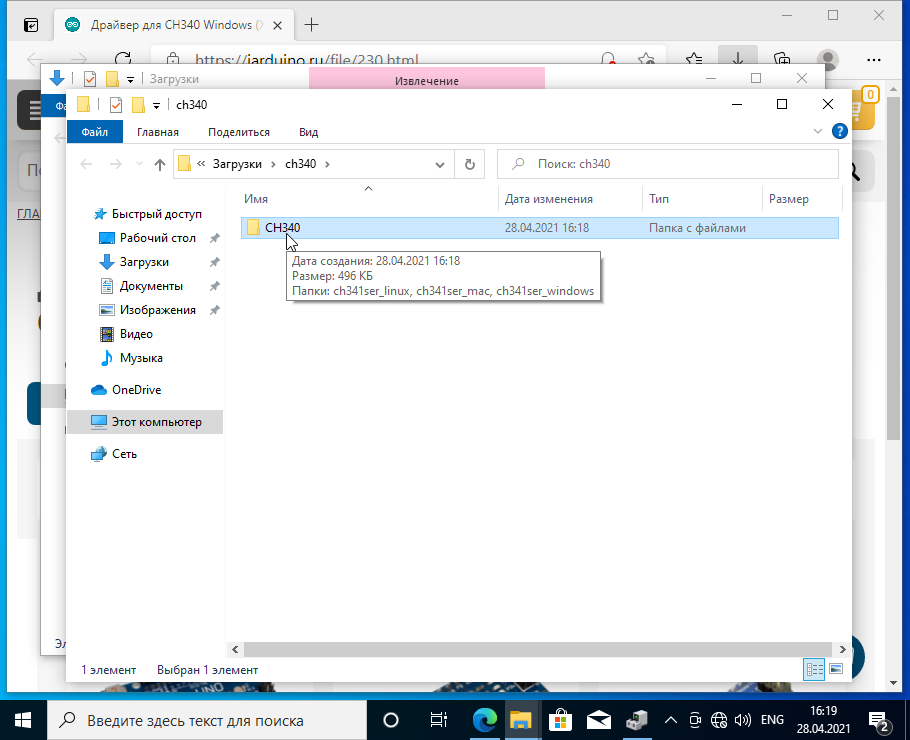
Откроется окно Windows Explorer с распакованными файлами драйверов. Откройте папку CH340.
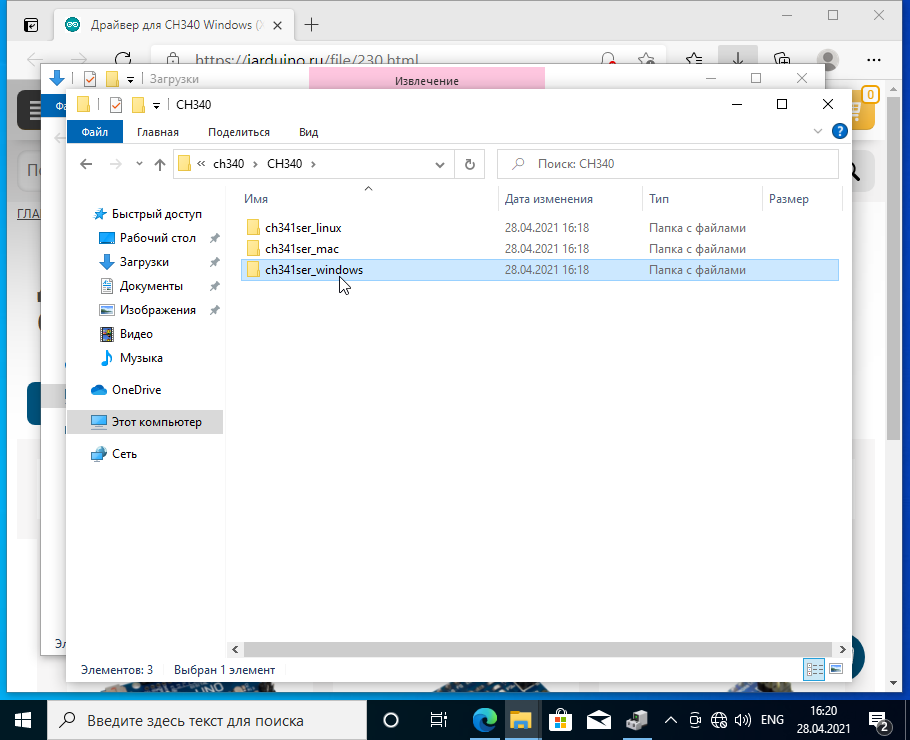
Откройте папку ch341ser_windows
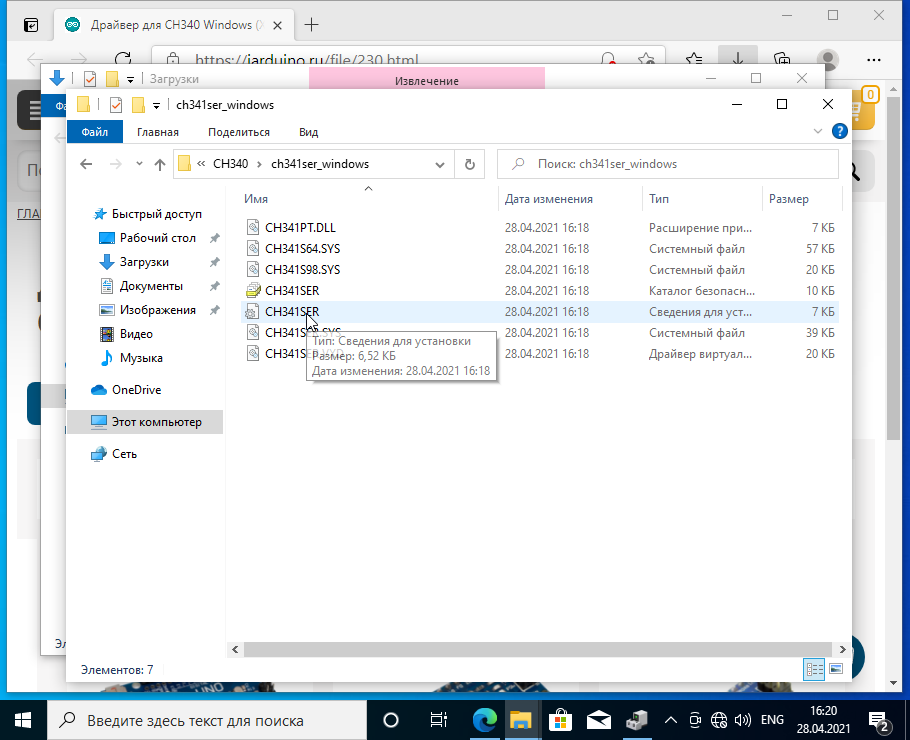
В папке находится файл сведений для установки CH341SER.INF. Если Ваша система настроена не отображать расширения известных типов файлов, то распознать этот файл можно по иконке с одной шестерёнкой и всплывающей подсказке при наведении на него. Подсказка должна выглядеть как на рисунке.
Шаг 4. Установка драйвера.
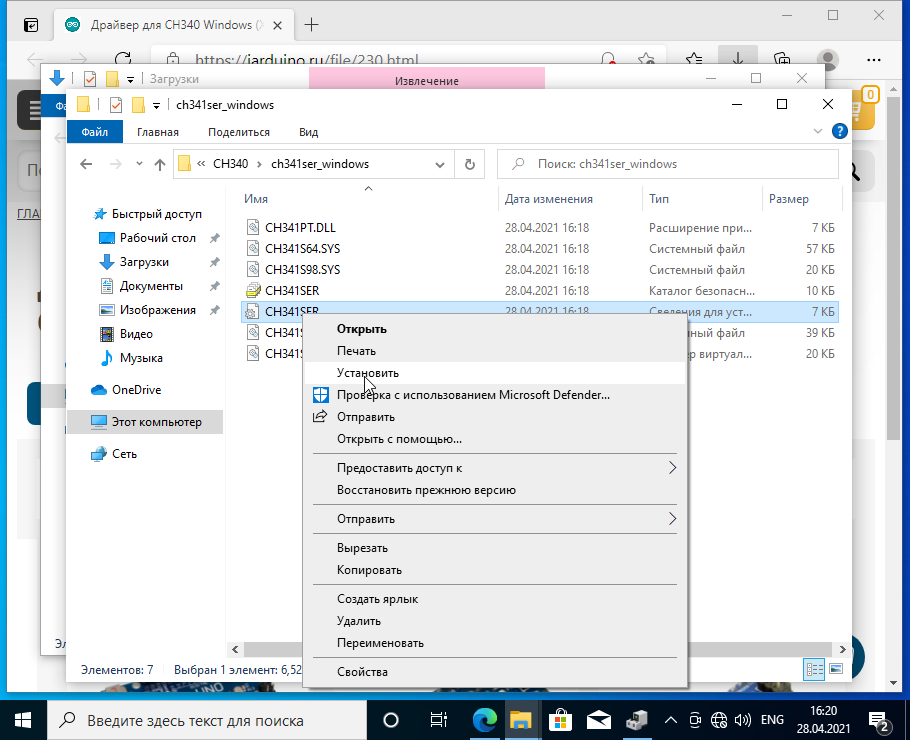
Нажмите правой клавишей мыши на файл CH341SER.INF и выберете из меню пункт «Установить«.
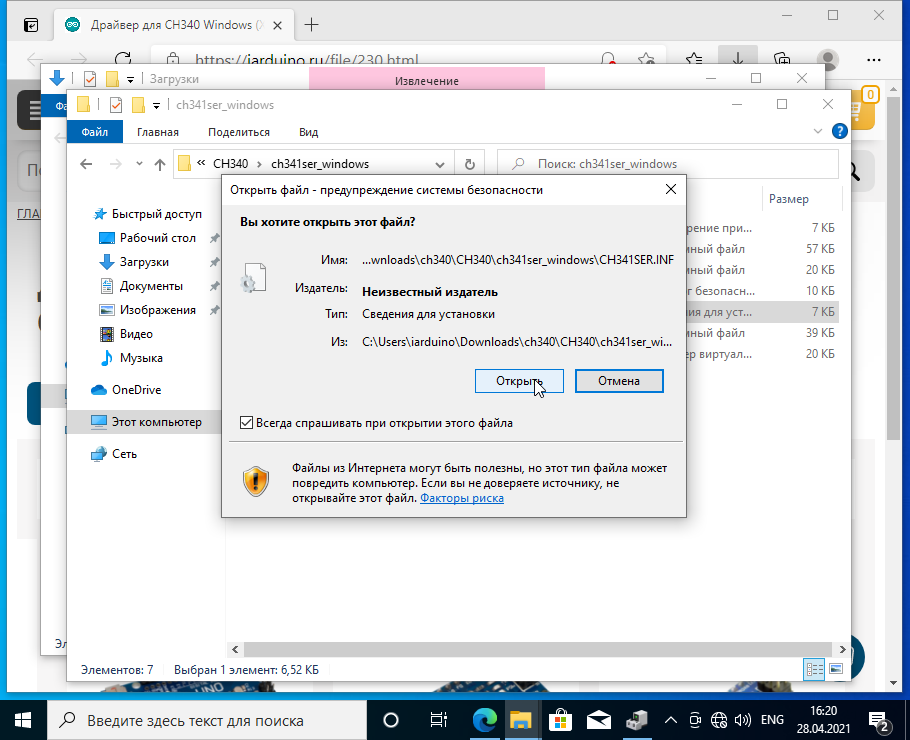
Во вновь открывшемся окне нажмите «Открыть«.
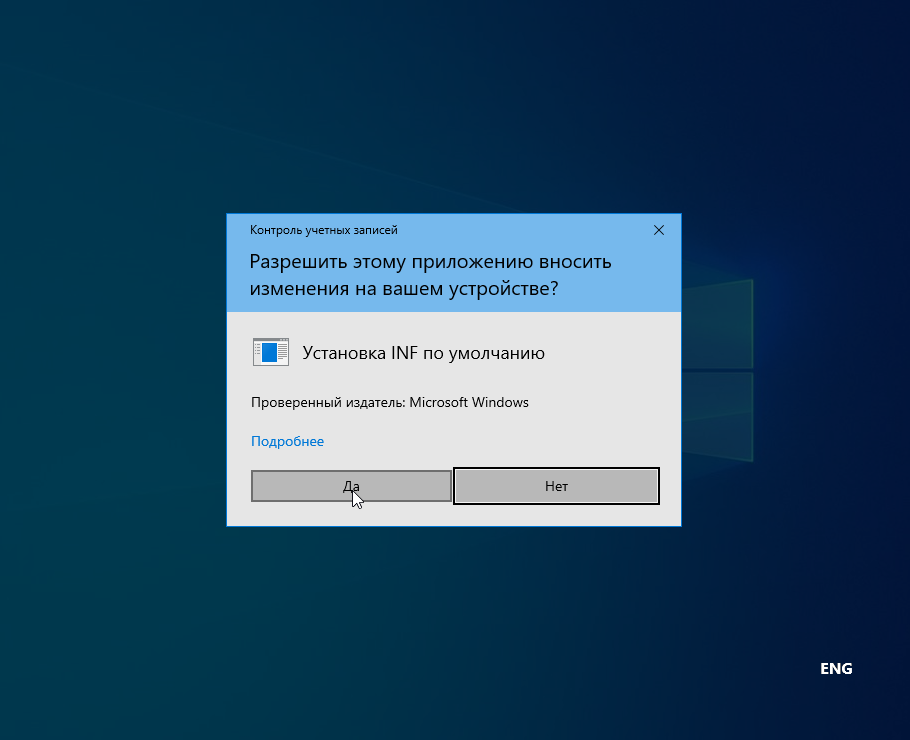
Нажмите «Да».
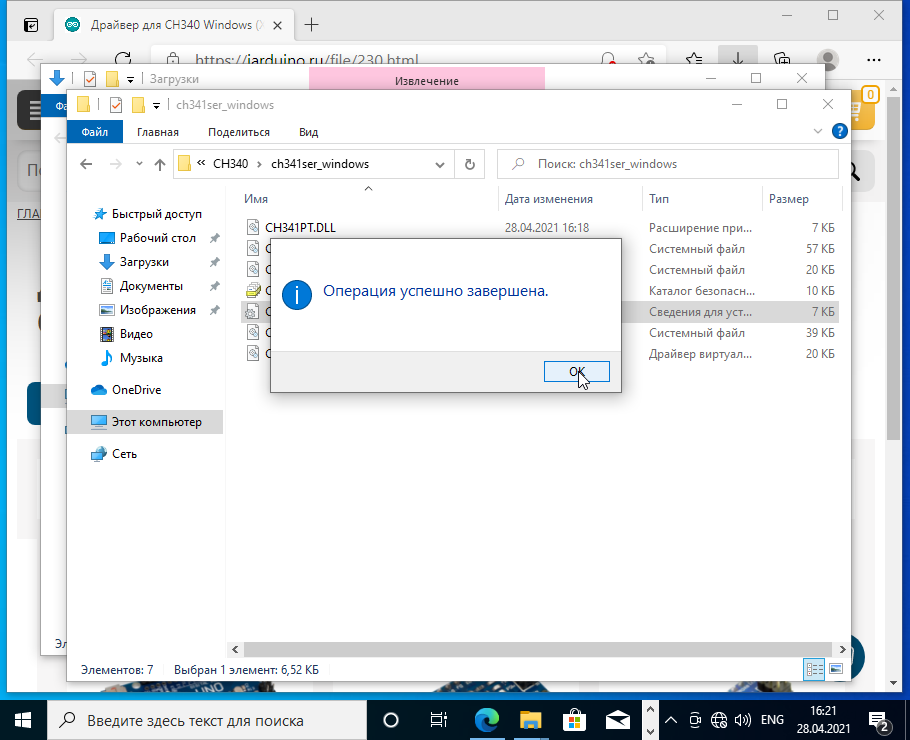
После завершения установки нажмите «OK».
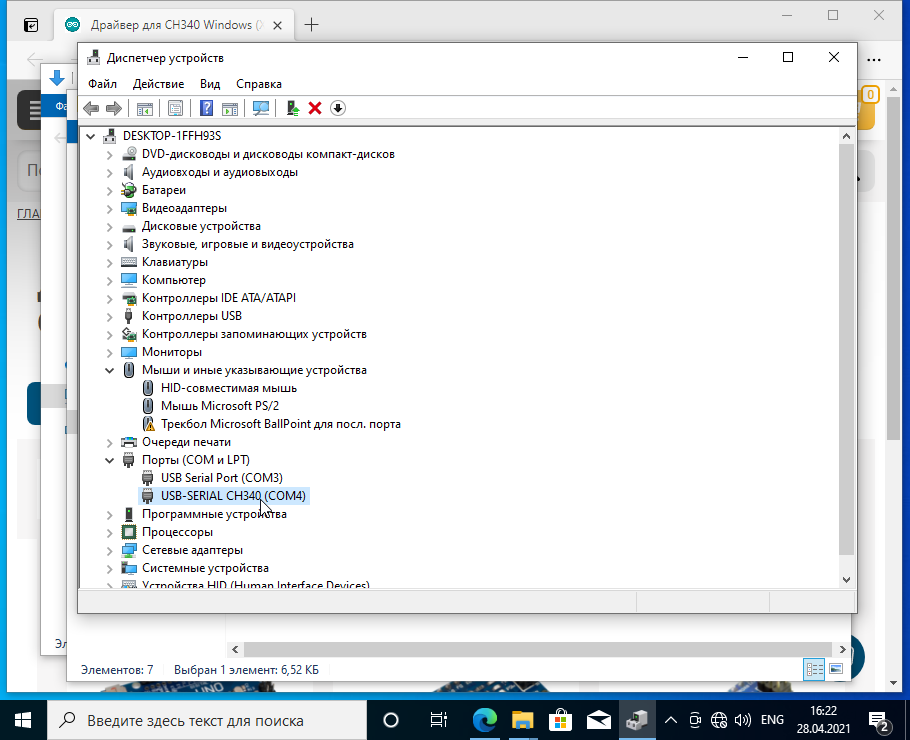
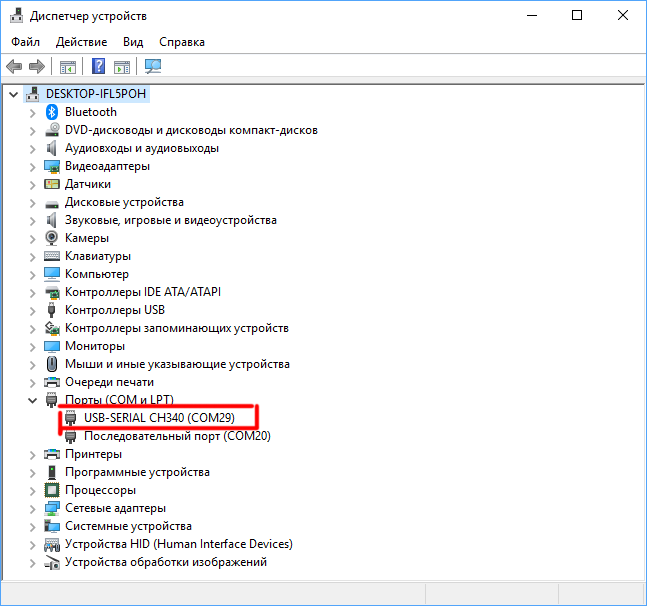
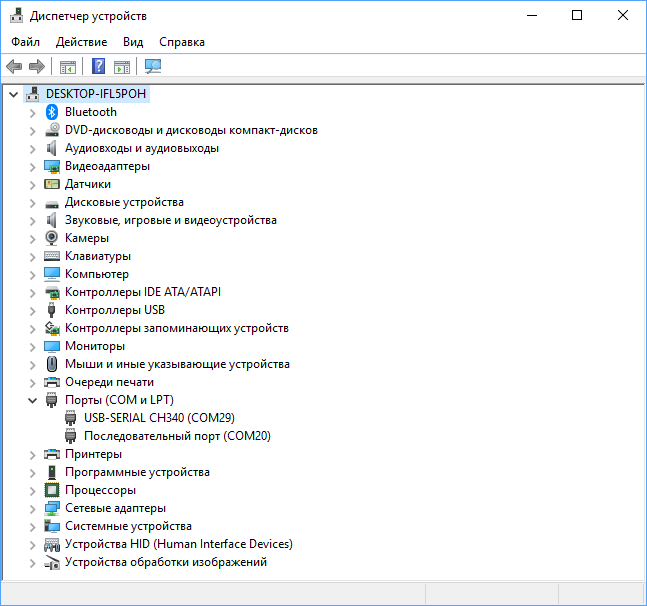
В Диспетчере устройств, в разделе «Порты (COM и LPT)» должен появиться новый виртуальный COM-порт «USB-SERIAL CH340«.
Шаг 5. Проверка.
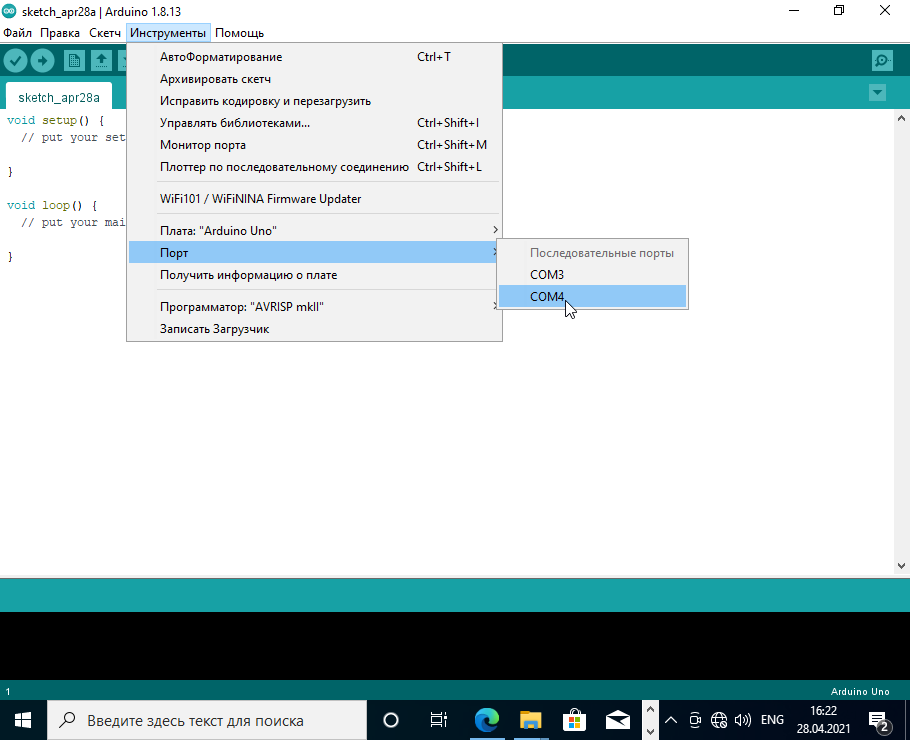
После установки драйвера откройте Arduino IDE и убедитесь, что появился новый виртуальный COM-порт.
При подключении платформ разработки на базе Arduino к компьютеру, вы связываете между собой два мира: микроконтроллерный и микропроцессорный.
Стандартным интерфейсом плат Arduino на микроконтроллерах ATmega328P является UART, а у современных компьютеров используется USB. Чип USB-UART CH340G служит мостом между микроконтроллером и USB-портом компьютера, который позволяет загружать прошивку в плату, а также передавать между собой данные.
Список поддерживаемых плат
Зачем нужен драйвер?
При подключении любого устройства к USB-порту компьютера необходимо подсказать операционной системе, как с ним общаться. На стороне компьютера таким переводчиком является специальная программа, называемая драйвером. Например, драйвер преобразователя USB-UART работает в режиме эмуляции последовательного COM-порта. Т. е. при подключении вашей платы к компьютеру чип моста с помощью драйвера попросит операционную систему открыть виртуальный COM-порт, через который начнётся общение между платой и ПК.
Каждый производитель делает свои чипы с соответствующими драйверами. К сожалению, не все драйверы предустановлены в операционных системах по умолчанию. Когда нужного драйвера нет, ОС пытается найти его для нового подключённого устройства, не находит, и вместо виртуального COM-порта вы видите надпись «USB 2.0 SERIAL» или «Неизвестное устройство». Для решения проблемы скачайте и установите драйвер CH340 для вашей операционной системы.
Установка драйвера
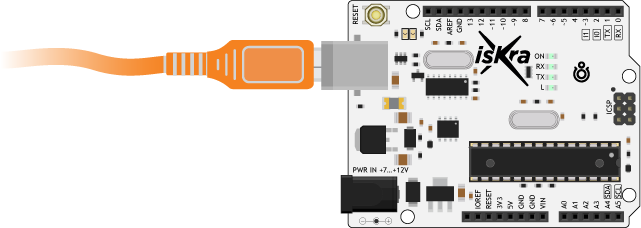
Рассмотрим установку драйвера на примере платы Iskra Uno в операционной системе Windows. С остальными платами ситуация будет аналогичная.
-
Подключите плату к компьютеру по USB. Для коммуникации используйте кабель USB (A — B).

-
Установите и настройте интегрированную среду разработки Arduino IDE.
-
Откройте диспетчер устройств Windows и раскройте вкладку «Порты (COM и LPT)».
-
Если во вкладке отображается пункт
USB-SERIAL CH340 (COMx)— значит, всё получилось, и можно переходить к прошивке платформы.
-
Если пункта не обнаружено или вкладка «Порты (COM и LPT)» вовсе отсутствует, следуйте дальнейшей инструкции.
-
-
В диспетчере устройств Windows раскройте вкладку «Другие устройства» и найдите пункт
USB2.0-Serial.
-
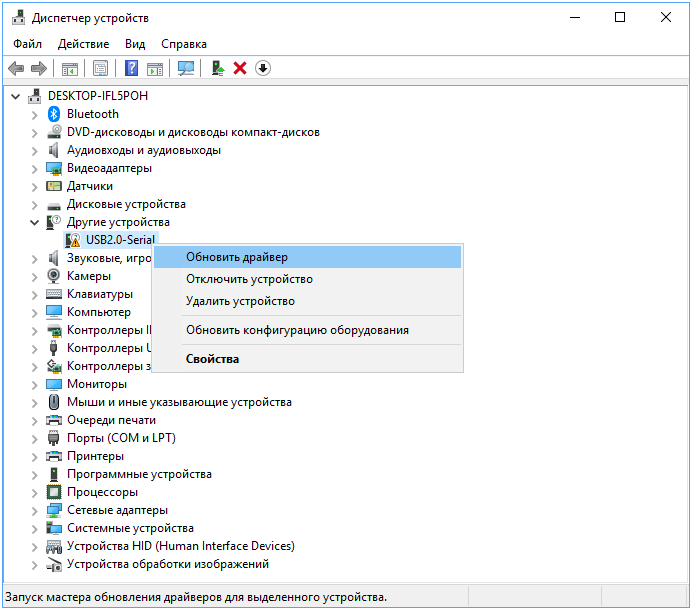
Далее кликните правой кнопкой мыши по пункту
USB 2.0 Serialи выберите раздел «обновить драйвер».
-
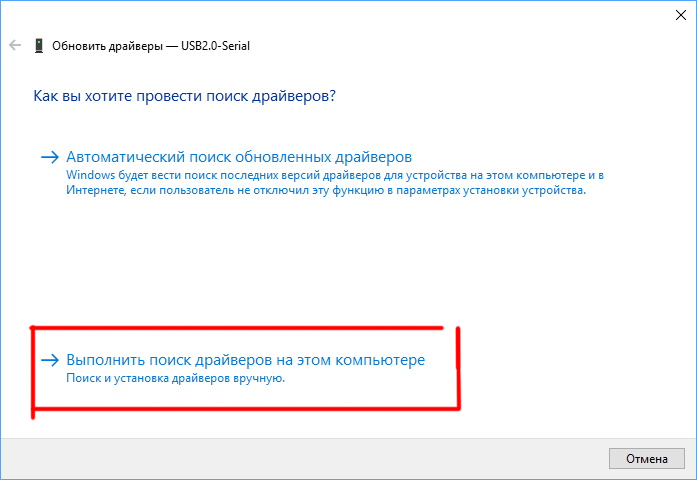
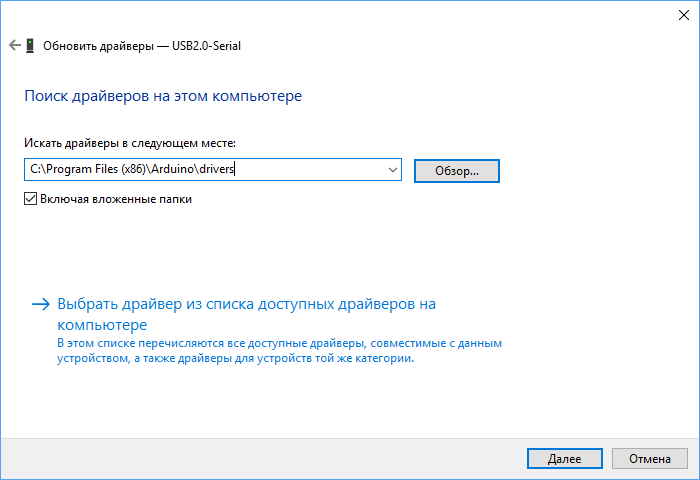
Выберите пункт «Выполнить поиск драйверов на этом компьютере».
-
Укажите путь к директории драйвера и нажмите кнопку «установить». В нашем случае:
-
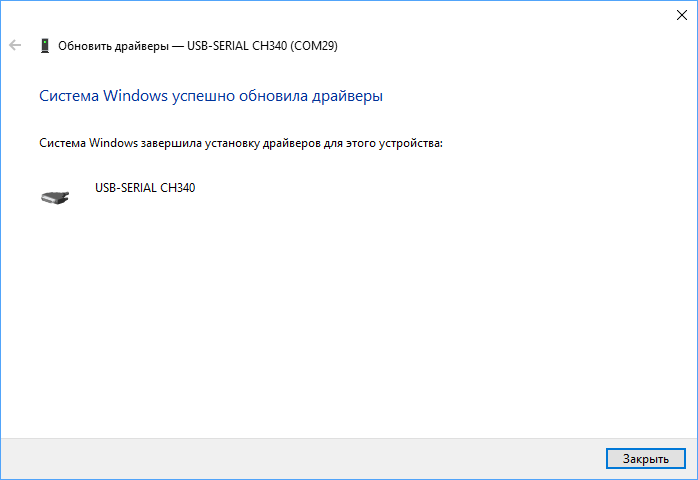
Если всплывёт окно с текстом «Не удалось проверить издателя драйверов», кликните по вкладке «Всё равно установить этот драйвер». По завершении процесса вы должны увидеть сообщение об удачной установке драйвера.
-
Откройте повторно вкладку «Порты (COM и LPT)» в диспетчере устройств. Если там отображается пункт
USB-SERIAL CH340 (COMx)— значит, всё получилось, и теперь можно переходить к прошивке платформы.
Ресурсы
-
Скачать драйвер CH340
- Актуальная информация: при скачивании с официального сайта в архиве можно найти инструкцию по установке
- Статья со ссылкой на драйвер и инструкциями
В Linux уже встроен необходимый драйвер, но Arduino IDE может отказаться с ним работать: Linux определяет ардуинку как устройство ttyUSB*, обычно это ttyUSB0 (это можно узнать командой dmesg в терминале), то есть в системе появляется интерфейс /dev/ttyUSB0. Чтобы с ним работать, нужны права доступа. Читать и писать на устройство /dev/ttyUSB0 имеет пользователь root и пользователи группы dialout. Работы с правами суперпользователя лучше избегать, поэтому следует занести своего пользователя в группу dialout. Это можно сделать следующей командой (обратите внимание, команда whoami в обратных кавычках)
sudo usermod -a -G dialout `whoami`
После этого нужно перелогиниться. Дальше запускаем Arduino IDE и в меню «Инструменты/Порт» ставим галочку напротив /dev/ttyUSB0.
Download: https://fs.keyestudio.com/CH340-WINDOWS
Windows 10 (and later systems) boasts their own drivers, so there is no need to install additional drivers.
Connect the control board to your computer.
Click Computer– Properties – Device Manager, as shown below. This indicates a successful connection, so the installation of driver is not required.

If the following situation occurs, you need to manually install the driver.
.png)
Click to select “Update driver”. And then the driver will start to install.
.png)
Tap “Browse my computer for drivers”.
.png)
Find the file usb_ch341_3.1.2009.06 or cp210x you have downloaded, and click “Next”.
.png)
After finishing installing, click “Close” and the serial port number will show up.
.png)
The driver is successfully installed!
Click Computer– Properties – Device Manager to check:
Introduction
The CH340 line of chips is often found on microcontroller breakout boards and acts as the communication device between your computers USB to the microcontrollers serial.
Most computers will automatically have this driver installed although, for those who don’t, this tutorial will take you through the steps required to get it installed and get your devices talking to each other
You may have either the CH340G or the CH340C variant of the chip. Both work in the same way and use the same drivers although the G variant requires a seperate external crystal oscillator for timing and the C variant uses an internal one
Required Materials
Depending on which board you have, the CH340 chip may be populated. Below are a number of boards we stock that use it
Drivers
The driver works with both Windows, Mac and Linux based PCs. We’ve provided a quick link to the latest drivers below
- Windows EXE
- Windows (ZIP)
- Mac (ZIP)
- Linux (Zip)
Alternatively you can visit the manufacturers website and browse and download the drivers directly:
Note to Educators
The installation of this driver will require administrator rights to complete so please consult with your local IT adminstrator for help. We recommend checking and installing the driver before class begins to ensure that student contact time is not inhibited by driver installation
Installing on Windows
Download and run the executable
Click the button to ensure any old drivers are cleaned. Then, click the button.

Driver Verification
Theres a few ways to check if the driver installed properly so you dont spend hours scratching your head. Plug your CH340 based device into your computers USB port and follow one of the below checks
Option 1: Checking through device manager
After the driver is installed and your device is plugged in the CH340 should enumerate to a one of your computers COM ports
Open device manager by opening the and typing
After opening the device manager, expand the tree section. The CH340 chip should show up as where the ## will be a random number depending on your individal computer
Option 2: Checking through Arduino IDE
If you have the Arduino IDE installed you should be able to see a change in the number of COMs ports available with and without the CH340 device connected. Firstly, without the CH340 device connected to your computer, open > and observe the number of Serial ports available

Next, connect the CH340 device to your computer and recheck the available serial ports. You should notice a new port that wasnt their previously, this is your new CH340 device connected and communicating with your computer

Note:
Depending on your computer, COM ports via both verification methods will show a different number to what we have shown in our image examples
Installing on MAC
Warning
Note some users have reported MACs on certain operating systems have been restarting when CH340 based devices are first connected to the USB port. Our recommendation is that you uninstall and reinstall the CH340 driver as per the below directions before connecting the device to your computers USB port
Open the terminal program by going to >

Open the terminal program in >

You’ll now need to point your terminal to where the files are stored
- For MAC OSX v10.8 and below, use the following command:
cd /Library/Extensions - For MAC OSX v10.8 and below, use the following command:
cd /System/Library/Extensions
In this example we will be using a version higher than V10.9 so we will be using the first command

To check if the CH340 driver is in the correct path, use the following command to show the contents of the folder
ls
Now check for the CH340 driver files use the following command
ls | grep usb
You should see something that resembles the below. If you see either or ), the CH340 driver is installed

If you found the above files in the path, we’ll start by deleting them to prepare for installing the new drivers. Run the following commands to delete the drivers
sudo rm -rf /Library/Extensions/usb.kext
sudo rm -rf /Library/Extensions/usbserial.kext
Now its time to install the new driver. First download and extract the following driver:
Now, open the file in the unzipped folder and follow the instructions to install. You will need to restart your computer
Note:
Depending on the security settings on your computer, you may need to adjust your security and privacy settings to allow the installation of the driver. If you get a pop-up saying that the installation has been blocked, open settings and click on the allow button to enable the driver install
Driver Verification
Use one of the following methods to verify if your driver has been successfully installed
Option 1: Through Command Line
With the CH340 device unplugged, open the terminal by going to > >

Next, run the following command
ls /dev/cu*
You will see a list of devices connected to your MAC. You should see something similar to the below

Connect the the CH340 device to your MAC and run the command again. You should see the CH340 device show up in the terminal. The device should show up as the number will be different depending on your individual computer

Option 2: Through the Arduino IDE
If you have the Arduino IDE installed you should be able to see a change in the number of COMs ports available with and without the CH340 device connected. Firstly, without the CH340 device connected to your computer, open > and observe the number of Serial ports available

Next, connect the CH340 device to your computer and recheck the available serial ports. You should notice a new port that wasnt their previously, this is your new CH340 device connected and communicating with your computer

Note:
Depending on your computer, COM ports via both verification methods will show a different number to what we have shown in our image examples
Installing on Raspberry Pi (Raspbian)
Run the following commands in the terminal. After running, the latest CH34O drivers should be installed
sudo apt-get update
sudo apt-get upgrade
Installing on Linux
Download the CH340 linux Zip file with the following link
Driver Verification
Option 1: Through Command Line
Plug the device into your computer and run the following command
ls /dev/ttyUSB*
The port should show up as a result

Option 1: Through Arduino IDE
If you have the Arduino IDE installed you should be able to see a change in the number of COMs ports available with and without the CH340 device connected. Firstly, without the CH340 device connected to your computer, open > and observe the number of Serial ports available

Next, connect the CH340 device to your computer and recheck the available serial ports. You should notice a new port that wasnt their previously, this is your new CH340 device connected and communicating with your computer
