
In this guide we’ll run you through installing Confluence in a production environment, with an external database, using the Windows installer.
This is the most straightforward way to get your production site up and running on a Windows server.
Other ways to install Confluence:
- Evaluation — get your free trial up and running in no time.
- Zip – install Confluence manually from a zip file.
- Linux – install Confluence on a Linux operating system
Before you begin
Before you install Confluence, there’s a few questions you need to answer.
| Are you using a supported operating system? |
Tell me more… Check the Supported Platforms page for the version of Confluence you are installing. This will give you info on supported operating systems, databases and browsers. Good to know:
|
| Do you want to run Confluence as a Windows Service? |
Tell me more… Running Confluence as a service in Windows means that Confluence will automatically start up when Windows is started. If you choose to run Confluence as a service:
If you choose not to run Confluence as a service:
|
| Are ports 8090 and 8091 available? |
Tell me more… Confluence runs on port 8090 by default. If this port is already in use, the installer will prompt you to choose a different port. Synchrony, which is required for collaborative editing, runs on port 8091 by default. If this port is already in use, you will need to change the port that Synchrony runs on after your Confluence installation is complete. See Administering Collaborative Editing to find out how to change the port Synchrony runs on. You won’t be able to edit pages until Synchrony has an available port. See Ports used by Atlassian Data Center Applications for a summary of all the ports used. |
| Is your database set up and ready to use? |
Tell me more… To run Confluence you’ll need an external database. Check the Supported Platforms page for the version you’re installing for the list of databases we currently support. If you don’t already have a database, PostgreSQL is free and easy to set up. Good to know:
|
|
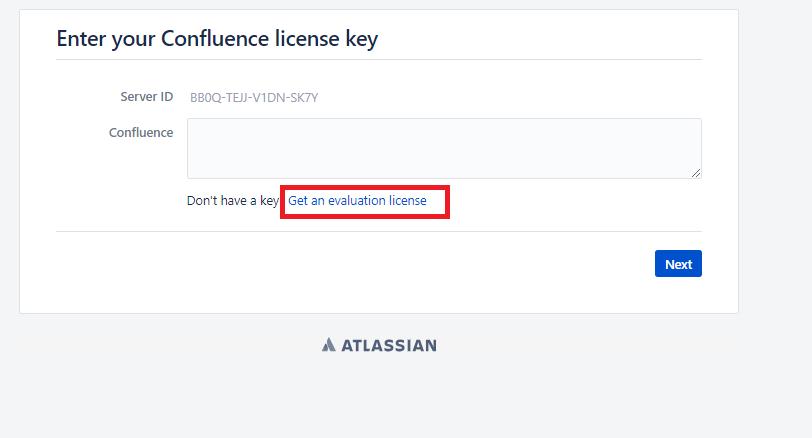
Do you have a Confluence license? |
Tell me more… You’ll need a valid license to use Confluence. Good to know:
|
| Do you want to store your attachment data on object storage? |
Tell me more… By default, Confluence stores attachments in the home directory (e.g. in a file system). If your team has large or increasing data sets and requires the ability to scale efficiently, we recommend you use S3 object storage. Amazon S3 is currently the only Confluence-supported object storage solution. Good to know:
|
There’s a known issue during setup where a load balancer (or proxy) pings the server and breaks Confluence installation or migration to Data Center. See
CONFSERVER-61189
—
Getting issue details…
STATUS
During installation, you need to disable load balancer health checks and make sure you don’t open multiple tabs that point to the same Confluence URL.
Install Confluence
1. Download Confluence
Download the installer for your operating system — https://www.atlassian.com/software/confluence/download
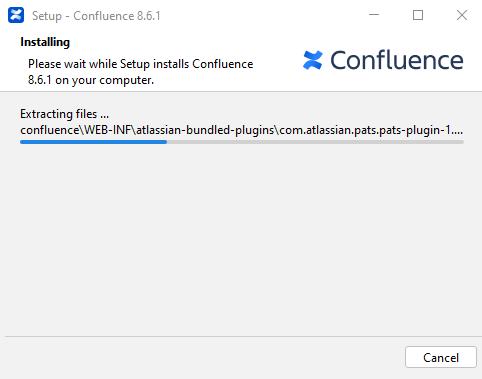
2. Run the installer
- Run the installer. We recommend using a dedicated Windows administrator account.
- Follow the prompts to install Confluence. You’ll be asked for the following info:
- Destination directory – this is where Confluence will be installed.
- Home directory – this is where Confluence data like logs, search indexes and files will be stored.
- TCP ports – these are the HTTP connector port and control port Confluence will run on. Stick with the default unless you’re running another application on the same port.
- Install as service – this option is only available if you ran the installer as administrator.
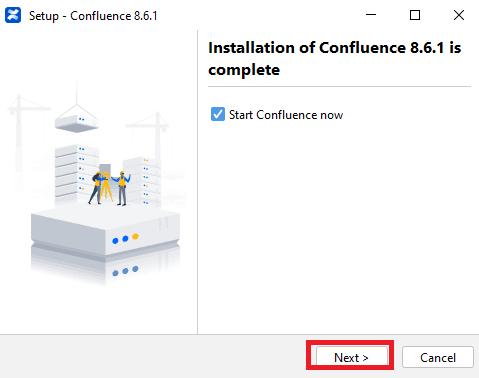
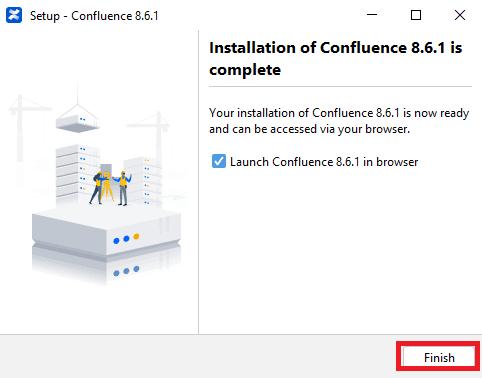
- Confluence will start up in your browser once installation is complete.
Set up Confluence
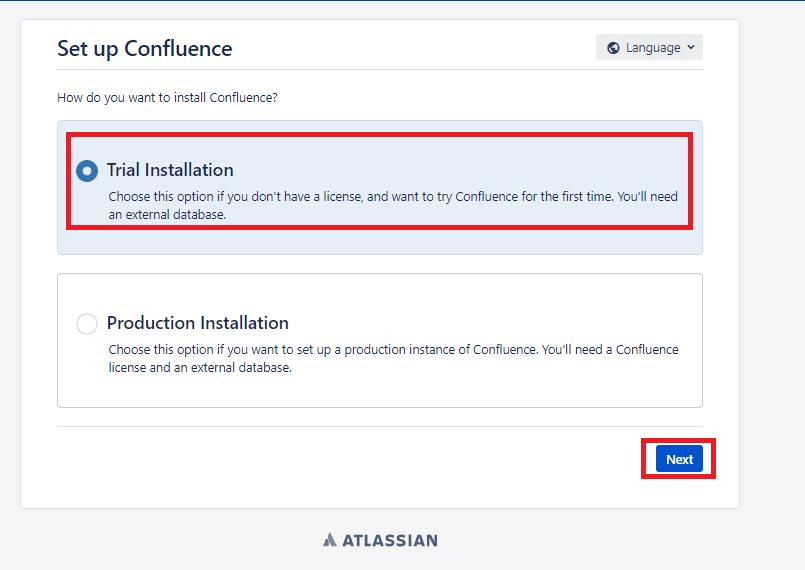
3. Choose installation type
- Choose Production installation.
- Choose any apps you’d also like to install.
4. Enter your license
Follow the prompts to log in to my.atlassian.com to retrieve your license, or enter a license key.
5. Connect to your database
- If you’ve not already done so, it’s time to create your database. See the ‘Before you begin’ section of this page for details and connection options.
- For MySQL and Oracle, follow the prompts to download and install the required driver.
-
Enter your database details. Use test connection to check your database is set up correctly.
Advanced setup options…
If you want to specify particular parameters, you can choose to connect By connection string. You’ll be prompted to enter:
- Database URL – the JDBC URL for your database. If you’re not sure, check the documentation for your database.
- Username and Password – A valid username and password that Confluence can use to access your database.
6. Populate your new site with content
Choose whether you’d like Confluence to populate your site with content:
Demonstration space…
This option will create a space that you and your users can use to get to know Confluence. You can delete this space at any time.
Import data from an existing site…
Use this option if you have a full site export of an existing Confluence site. This is useful when you’re migrating to another database or setting up a test site.
Good to know:
- You can only import sites from the same or earlier Confluence version.
- The system administrator account and all other user data and content will be imported from your previous installation.
In the setup wizard:
- Upload a backup file – use this option if your site export file is small (25mb or less).
-
Restore a backup file from the file system – use this option if your backup file is large. Drop the file into your
<confluence-home>/restoredirectory then follow the prompts to restore the backup. -
Build Index – we’ll need to build an index before your imported content is searchable. This can take a long time for large sites, so deselect this option if you would rather build the index later. Your content won’t be searchable until the index is built.
7. Choose where to manage users
Choose to manage Confluence’s users and groups inside Confluence or in a Jira application, such as Jira Software or Jira Service Management:
Manage users and groups in Confluence…
Choose this option if you’re happy to manage users in Confluence, or don’t have a Jira application installed.
Good to know:
- If you do plan to manage users in a Jira application, but have not yet installed it, we recommend installing Jira first, and then returning to the Confluence setup.
- You can add external user management (for example LDAP, Crowd or Jira) later if you choose.
Connect to Jira…
Choose this option if you have a Jira application installed and want to manage users across both applications.
Good to know:
- This is a quick way of setting up your Jira integration with the most common options.
- It will configure a Jira user directory for Confluence, and set up application links between Jira and Confluence for easy sharing of data.
- You’ll be able to specify exactly which groups in your Jira app should also be allowed to log in to Confluence. Your license tiers do not need to be the same for each application.
- You’ll need either Jira 4.3 or later, Jira Core 7.0 or later, Jira Software 7.0 or later, or Jira Service Management 3.0 or later.
In the setup wizard:
-
Jira Base URL – the address of your Jira server, such as
http://www.example.com:8080/jira/orhttp://jira.example.com/ - Jira Administrator Login – this is the username and password of a user account that has the Jira System Administrator global permission in your Jira application. Confluence will also use this username and password to create a local administrator account which will let you access Confluence if Jira is unavailable. Note that this single account is stored in Confluence’s internal user directory, so if you change the password in Jira, it will not automatically update in Confluence.
- Confluence Base URL – this is the URL Jira will use to access your Confluence server. The URL you give here overrides the base URL specified in Confluence, for the purposes of connecting to the Jira application.
- User Groups – these are the Jira groups whose members should be allowed to use Confluence. Members of these groups will get the ‘Can use’ permission for Confluence, and will be counted in your Confluence license. The default user group name differs depending on your Jira version:
- Jira 6.4 and earlier:
jira-users. - Jira Software 7.x and later:
jira-software-users - Jira Core 7.x and later:
jira-core-users - Jira Service Management (formerly Jira Service Desk) 3.x and later:
jira-servicedesk-users
- Jira 6.4 and earlier:
- Admin Groups – provide one or more Jira groups whose members should have administrative access to Confluence. The default group is
jira-administrators. These groups will get the system administrator and Confluence administrator global permissions in Confluence.
8. Create your administrator account
Enter details for the administrator account.
Skip this step if you chose to manage users in a Jira application or you imported data from an existing site.
9. Start using Confluence
That’s it! Your Confluence site is accessible from a URL like this: http://<computer_name_or_IP_address>:<port>
If you plan to run Confluence behind a reverse proxy, check out Proxy and SSL considerations before you go any further.
Here’s a few things that will help you get your team up and running:
- Set the server base URL – this is the URL people will use to access Confluence.
- Set up a mail server – this allows Confluence to send people notification about content.
- Add and invite users – get your team on board!
- Start and stop Confluence – find out how to start and stop Confluence.

Troubleshooting
In this guide we’ll run you through installing Confluence in a production environment, with an external database, using the Windows installer.
This is the most straightforward way to get your production site up and running on a Windows server.
Other ways to install Confluence:
- Evaluation — get your free trial up and running in no time.
- Zip – install Confluence manually from a zip file.
- Linux – install Confluence on a Linux operating system
Before you begin
Before you install Confluence, there’s a few questions you need to answer.
| Are you using a supported operating system? |
Tell me more… Check the Supported Platforms page for the version of Confluence you are installing. This will give you info on supported operating systems, databases and browsers. Good to know:
|
| Do you want to run Confluence as a Windows Service? |
Tell me more… Running Confluence as a service in Windows means that Confluence will automatically start up when Windows is started. If you choose to run Confluence as a service:
If you choose not to run Confluence as a service:
|
| Are ports 8090 and 8091 available? |
Tell me more… Confluence runs on port 8090 by default. If this port is already in use, the installer will prompt you to choose a different port. Synchrony, which is required for collaborative editing, runs on port 8091 by default. If this port is already in use, you will need to change the port that Synchrony runs on after your Confluence installation is complete. See Administering Collaborative Editing to find out how to change the port Synchrony runs on. You won’t be able to edit pages until Synchrony has an available port. See Ports used by Atlassian Data Center Applications for a summary of all the ports used. |
| Is your database set up and ready to use? |
Tell me more… To run Confluence you’ll need an external database. Check the Supported Platforms page for the version you’re installing for the list of databases we currently support. If you don’t already have a database, PostgreSQL is free and easy to set up. Good to know:
|
|
Do you have a Confluence license? |
Tell me more… You’ll need a valid license to use Confluence. Good to know:
|
There’s a known issue during setup where a load balancer (or proxy) pings the server and breaks Confluence installation or migration to Data Center. See
CONFSERVER-61189
—
Getting issue details…
STATUS
During installation, you need to disable load balancer health checks and make sure you don’t open multiple tabs that point to the same Confluence URL.
Install Confluence
1. Download Confluence
Download the installer for your operating system — https://www.atlassian.com/software/confluence/download
2. Run the installer
- Run the installer. We recommend using a dedicated Windows administrator account.
- Follow the prompts to install Confluence. You’ll be asked for the following info:
- Destination directory – this is where Confluence will be installed.
- Home directory – this is where Confluence data like logs, search indexes and files will be stored.
- TCP ports – these are the HTTP connector port and control port Confluence will run on. Stick with the default unless you’re running another application on the same port.
- Install as service – this option is only available if you ran the installer as administrator.
- Confluence will start up in your browser once installation is complete.
Set up Confluence
3. Choose installation type
- Choose Production installation.
- Choose any apps you’d also like to install.
4. Enter your license
Follow the prompts to log in to my.atlassian.com to retrieve your license, or enter a license key.
5. Connect to your database
- If you’ve not already done so, it’s time to create your database. See the ‘Before you begin’ section of this page for details and connection options.
- For MySQL and Oracle, follow the prompts to download and install the required driver.
-
Enter your database details. Use test connection to check your database is set up correctly.
Advanced setup options…
If you want to specify particular parameters, you can choose to connect By connection string. You’ll be prompted to enter:
- Database URL – the JDBC URL for your database. If you’re not sure, check the documentation for your database.
- Username and Password – A valid username and password that Confluence can use to access your database.
6. Populate your new site with content
Choose whether you’d like Confluence to populate your site with content:
Demonstration space…
This option will create a space that you and your users can use to get to know Confluence. You can delete this space at any time.
Import data from an existing site…
Use this option if you have a full site export of an existing Confluence site. This is useful when you’re migrating to another database or setting up a test site.
Good to know:
- You can only import sites from the same or earlier Confluence version.
- The system administrator account and all other user data and content will be imported from your previous installation.
In the setup wizard:
- Upload a backup file – use this option if your site export file is small (25mb or less).
-
Restore a backup file from the file system – use this option if your backup file is large. Drop the file into your
<confluence-home>/restoredirectory then follow the prompts to restore the backup. -
Build Index – we’ll need to build an index before your imported content is searchable. This can take a long time for large sites, so deselect this option if you would rather build the index later. Your content won’t be searchable until the index is built.
7. Choose where to manage users
Choose to manage Confluence’s users and groups inside Confluence or in a Jira application, such as Jira Software or Jira Service Management:
Manage users and groups in Confluence…
Choose this option if you’re happy to manage users in Confluence, or don’t have a Jira application installed.
Good to know:
- If you do plan to manage users in a Jira application, but have not yet installed it, we recommend installing Jira first, and then returning to the Confluence setup.
- You can add external user management (for example LDAP, Crowd or Jira) later if you choose.
Connect to Jira…
Choose this option if you have a Jira application installed and want to manage users across both applications.
Good to know:
- This is a quick way of setting up your Jira integration with the most common options.
- It will configure a Jira user directory for Confluence, and set up application links between Jira and Confluence for easy sharing of data.
- You’ll be able to specify exactly which groups in your Jira app should also be allowed to log in to Confluence. Your license tiers do not need to be the same for each application.
- You’ll need either Jira 4.3 or later, Jira Core 7.0 or later, Jira Software 7.0 or later, or Jira Service Management 3.0 or later.
In the setup wizard:
-
Jira Base URL – the address of your Jira server, such as
http://www.example.com:8080/jira/orhttp://jira.example.com/ - Jira Administrator Login – this is the username and password of a user account that has the Jira System Administrator global permission in your Jira application. Confluence will also use this username and password to create a local administrator account which will let you access Confluence if Jira is unavailable. Note that this single account is stored in Confluence’s internal user directory, so if you change the password in Jira, it will not automatically update in Confluence.
- Confluence Base URL – this is the URL Jira will use to access your Confluence server. The URL you give here overrides the base URL specified in Confluence, for the purposes of connecting to the Jira application.
- User Groups – these are the Jira groups whose members should be allowed to use Confluence. Members of these groups will get the ‘Can use’ permission for Confluence, and will be counted in your Confluence license. The default user group name differs depending on your Jira version:
- Jira 6.4 and earlier:
jira-users. - Jira Software 7.x and later:
jira-software-users - Jira Core 7.x and later:
jira-core-users - Jira Service Management (formerly Jira Service Desk) 3.x and later:
jira-servicedesk-users
- Jira 6.4 and earlier:
- Admin Groups – provide one or more Jira groups whose members should have administrative access to Confluence. The default group is
jira-administrators. These groups will get the system administrator and Confluence administrator global permissions in Confluence.
8. Create your administrator account
Enter details for the administrator account.
Skip this step if you chose to manage users in a Jira application or you imported data from an existing site.
9. Start using Confluence
That’s it! Your Confluence site is accessible from a URL like this: http://<computer_name_or_IP_address>:<port>
If you plan to run Confluence behind a reverse proxy, check out Proxy and SSL considerations before you go any further.
Here’s a few things that will help you get your team up and running:
- Set the server base URL – this is the URL people will use to access Confluence.
- Set up a mail server – this allows Confluence to send people notification about content.
- Add and invite users – get your team on board!
- Start and stop Confluence – find out how to start and stop Confluence.

Troubleshooting
Managing the software project is fine and scaling it to multiple teams is awesome! But, making it consistent throughout its lifecycle using effective collaboration and communication is a key factor to its success. Confluence addresses this issue and provides an easy-to-use team workspace where the team members can manage their project workflow.
We can create dynamic content using Page trees and whiteboards to visualize the work which is accessible easily to other team members. In this article, we will learn about Confluence, including its overview, features, and simple steps to install it on your Windows System. So, without any delay, let us get started with Confluence.
Table of Contents
- Overview of Confluence
- Features of Confluence
- Prerequisites for Installing Confluence
- Steps for Confluence Installation
- Frequently Asked Questions
Overview of Confluence
Confluence is a Workspace Tool developed by Atlassian to manage communication among the team members and key stakeholders associated with the project. It enables us to manage teams of any size and type so that risk-driven projects can be easily completed. It supports multiple configuration options to create the dynamic pages that are stored in the Space, typically a workspace.
Now, let us look at some of its notable features before moving on to installation.
Want to get certified and build your career in Confluence? Then enroll in «Confluence Online Training» this course will help you to achieve excellence in this domain.
Features of Confluence
- It supports multiple hosting options
It can be installed and configured on the Cloud Storage as well as our local hardware machine. Along with this, it can be configured on the Data Center which is a self-managed service.
- It allows integration with other platforms
We can easily integrate with other apps and third-party platforms for better collaboration. It also supports integration with Jira, a project management tool.
- It allows to track the history of content
Confluence supports page versioning using which we can track the history of the page content. Thus, it is easy to know the changes, compare versions, and revert the unnecessary changes in the workspace content.
- Confluence provides multiple templates for the workspace
There are multiple templates available in Confluence. This feature is useful for beginners to easily create a workspace for a project without creating it from scratch.

Prerequisites For Installing Confluence
Hardware Requirements
Before installing Confluence, make sure that minimum hardware requirements are fulfilled as stated below:
- CPU: Quad-core processor with minimum 2GHz capacity.
- Memory: 6GB of free RAM.
- Storage: 10GB of free database storage.
It is important to note that Confluence is only supported on x86 hardware and 64-bit derivatives of x86 hardware. So, check for these requirements before installation.
Supported Platforms
You can install Confluence on Microsoft Windows and most of the Linux distributions. However, on MacOS or OSX, only Confluence evaluation can be done. We cannot run our production Confluence site on a Mac. We recommend you visit the official documentation https://confluence.atlassian.com/doc/system-requirements-126517514.html to get more information about System requirements.
Database Configuration
To run confluence, we have configured the database where the workspace data will be stored. Confluence supports various databases such as PostgreSQL, MySQL, Oracle, Amazon Aurora, Microsoft SQL Server, etc. Here, we are using Microsoft SQL Server which is configured using the following set of steps.
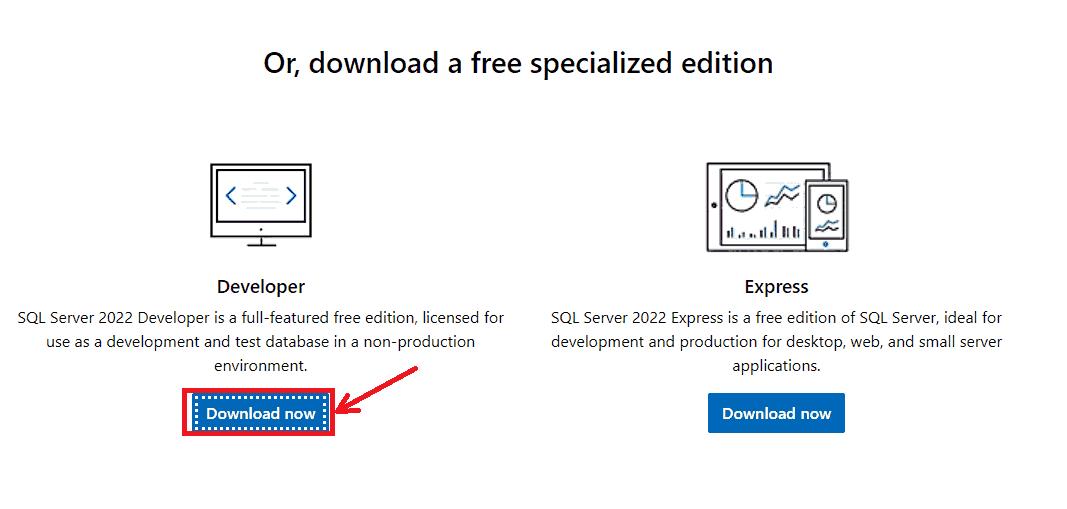
- Step 1: Go to https://www.microsoft.com/en-us/sql-server/sql-server-downloads. Choose the SQL Server developer edition and click on the download button.
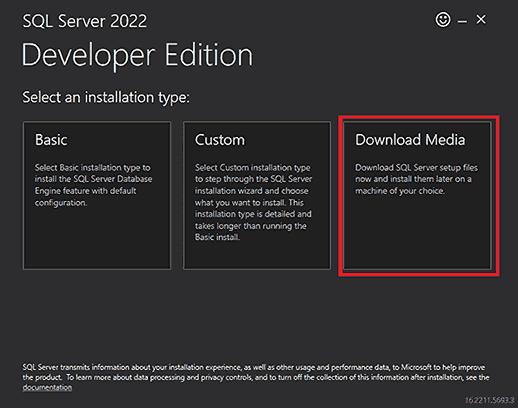
- Step 2: Locate the downloaded file and double-click on it to start the installation. Now, choose the ‘Download Media’ Installation as shown below.
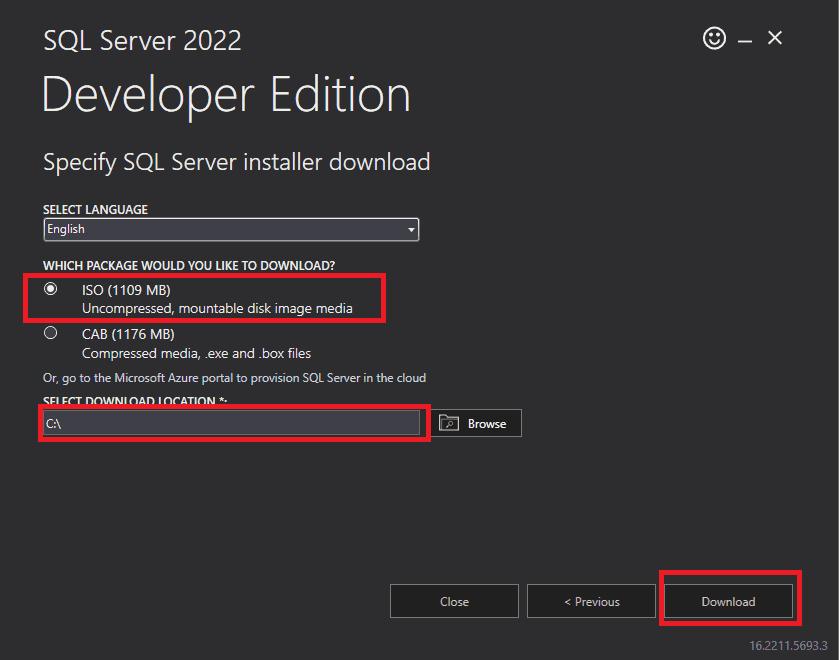
- Step 3: Specify the path to the directory where you want to download the file and click on the ‘Download’ button.
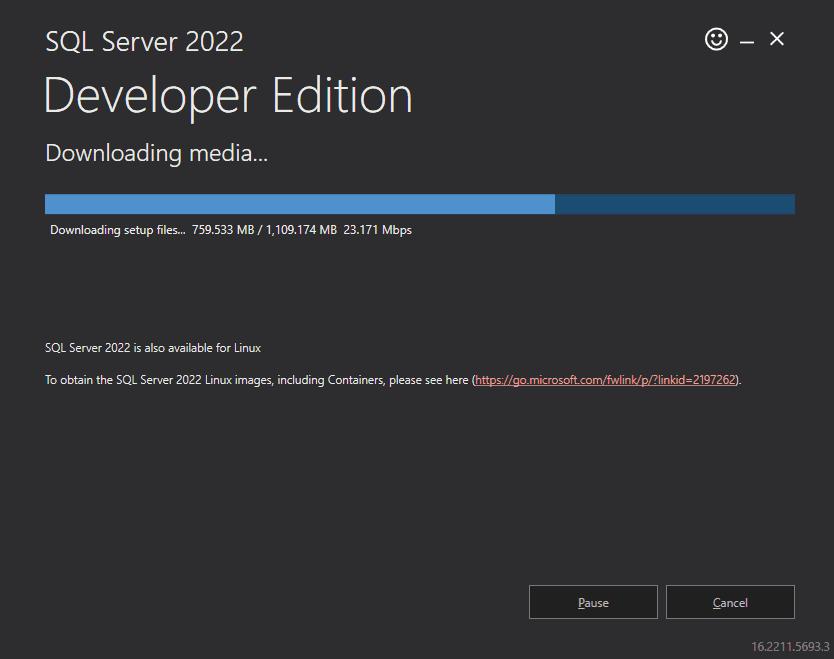
- Step 4: The ISO file starts downloading as depicted below.
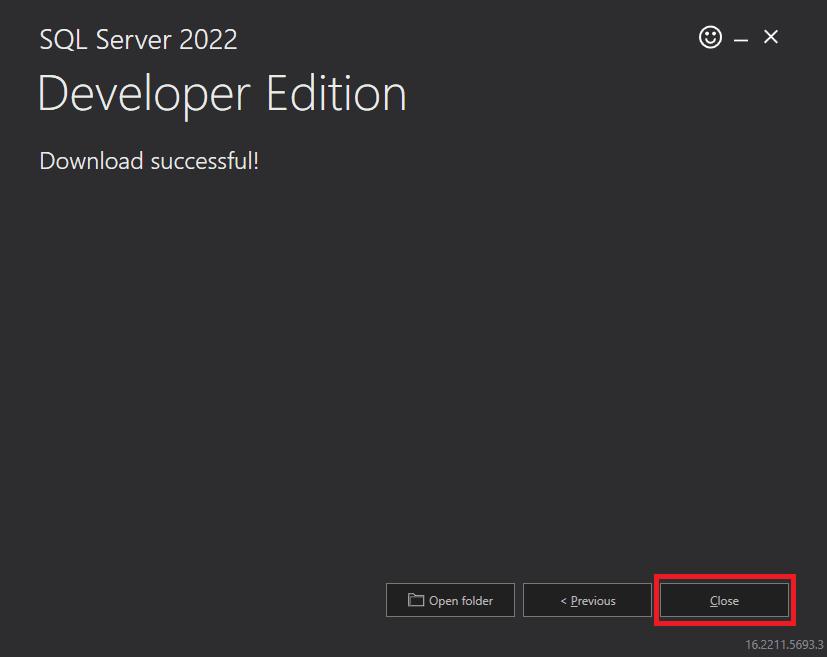
- Step 5: Close the setup once the download is complete.
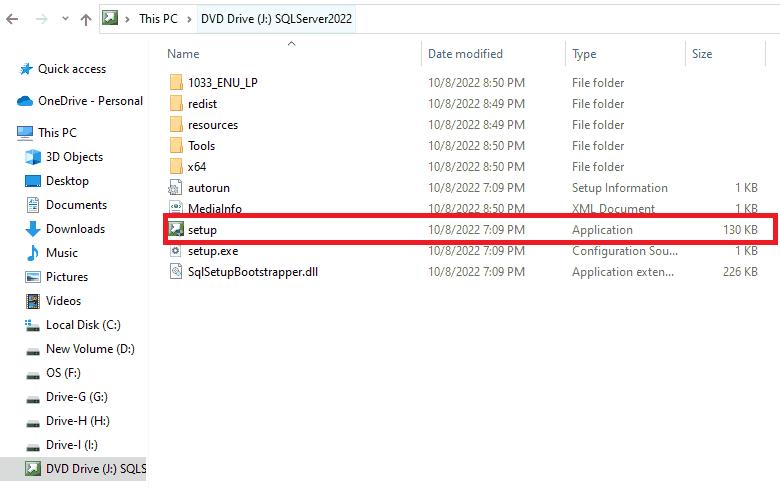
- Step 6: Navigate to the directory where the ISO file has been downloaded. Double-click on the file to mount it. Then, go to the mounted disk as shown below. Click on the ‘setup’ file.
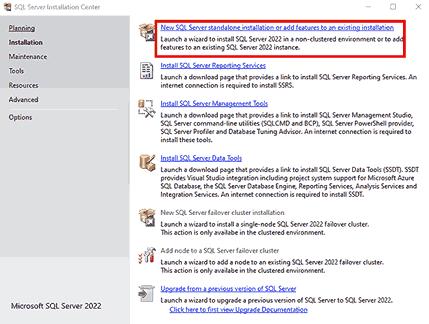
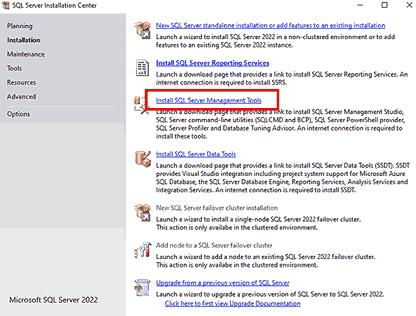
- Step 7: The installation wizard appears as shown below. Go to the installation tab and select the SQL Server Installation as illustrated below.
- Step 8: Keep the ‘Developer’ edition as selected and select ‘Next.’
- Step 9: Accept the licensing terms and continue by clicking on ‘Next.’
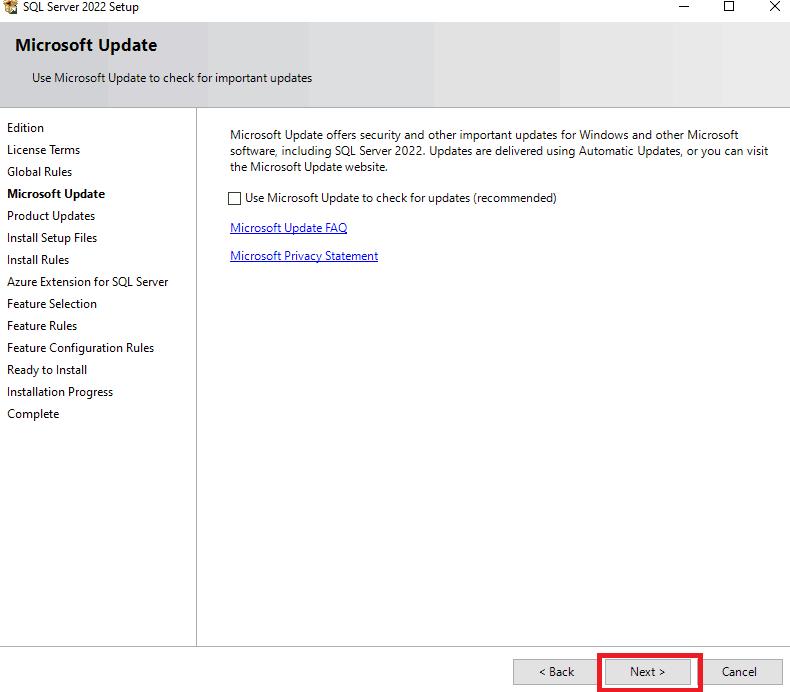
- Step 10: If you wish, you can select the Microsoft Update option to regularly check the updates. Then, click on ‘Next.’
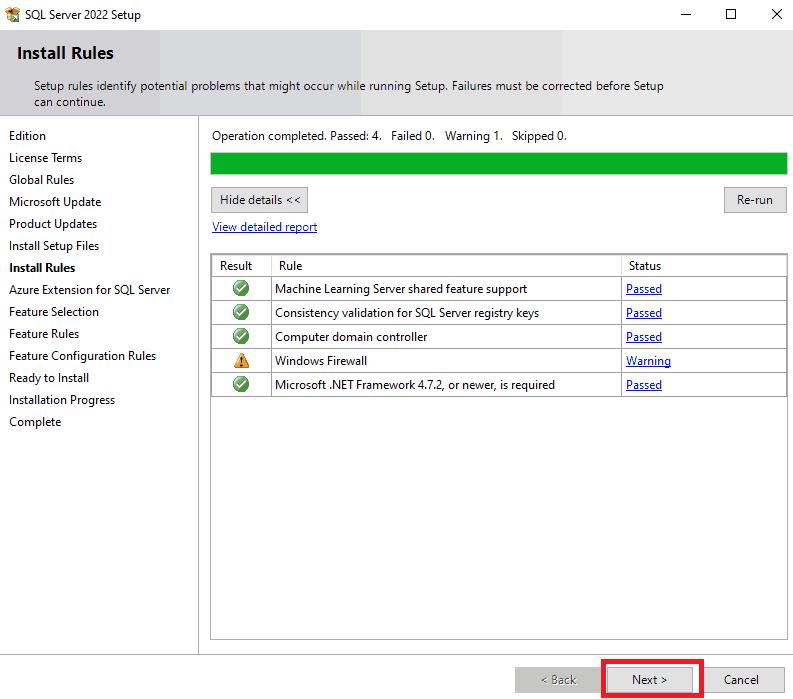
- Step 11: After the checks are performed, click on the ‘Next’ button to continue.
- Step 12: Uncheck the option for Azure Extension and select the ‘Next’ option.
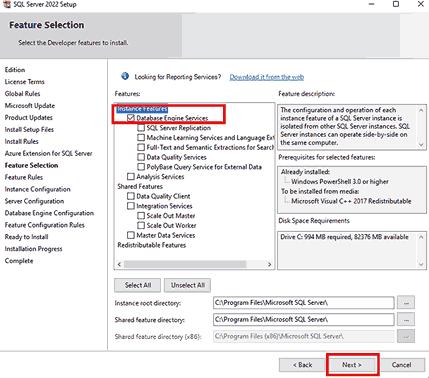
- Step 13: Select the ‘Database Engine Feature’ and click ‘Next.’
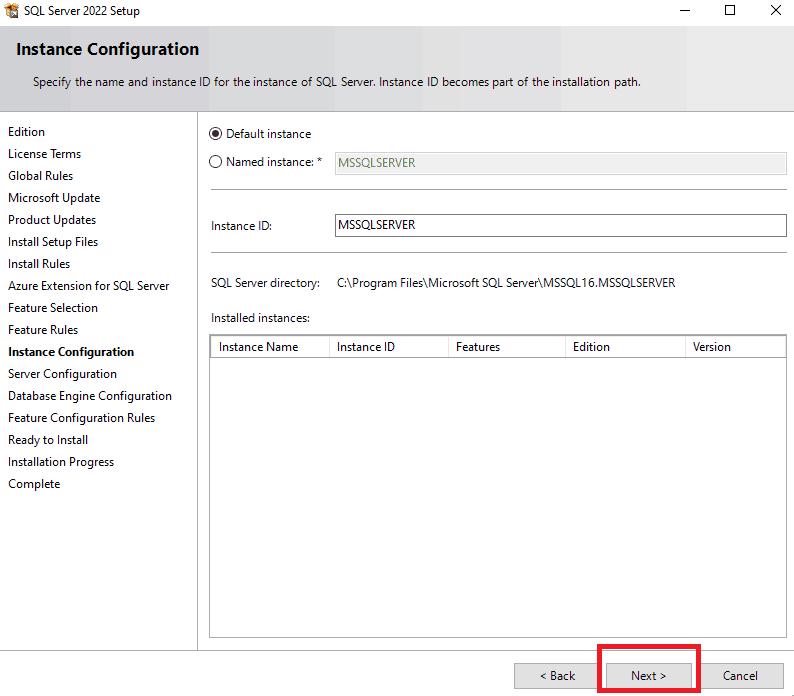
- Step 14: Leave the default instance name and continue to ‘Next.’
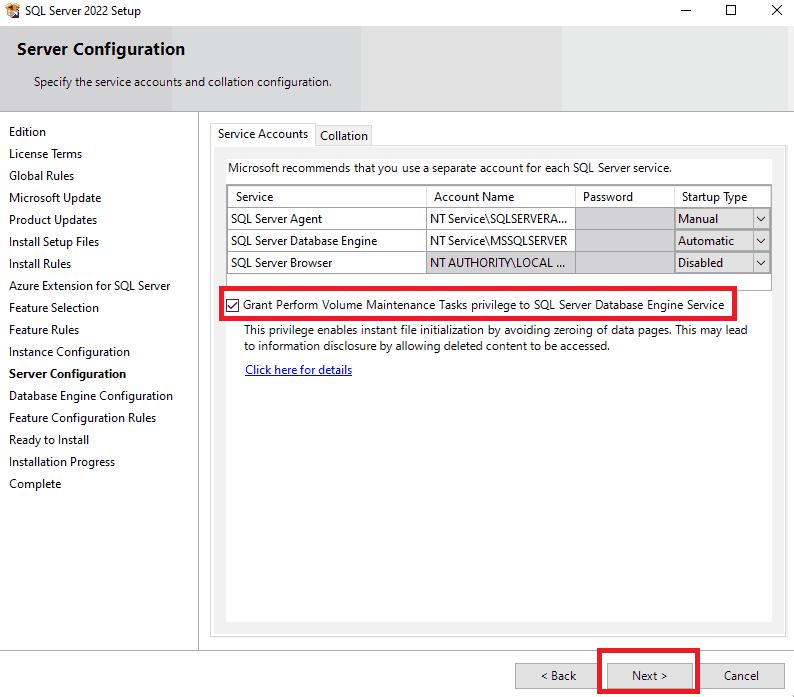
- Step 15: Select the checkbox as shown below and select ‘Next.’
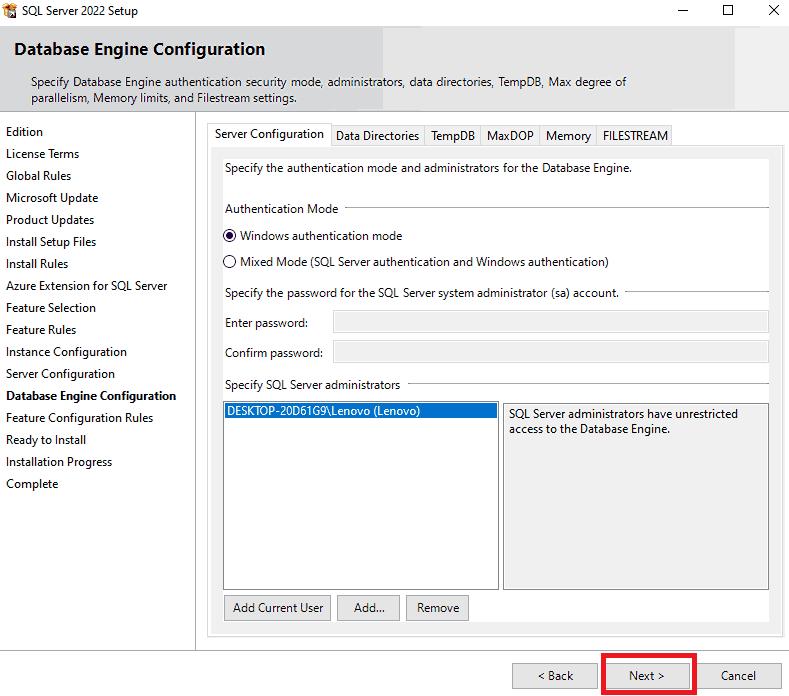
- Step 16: Keep the authentication mode default and click on the ‘Next’ button.
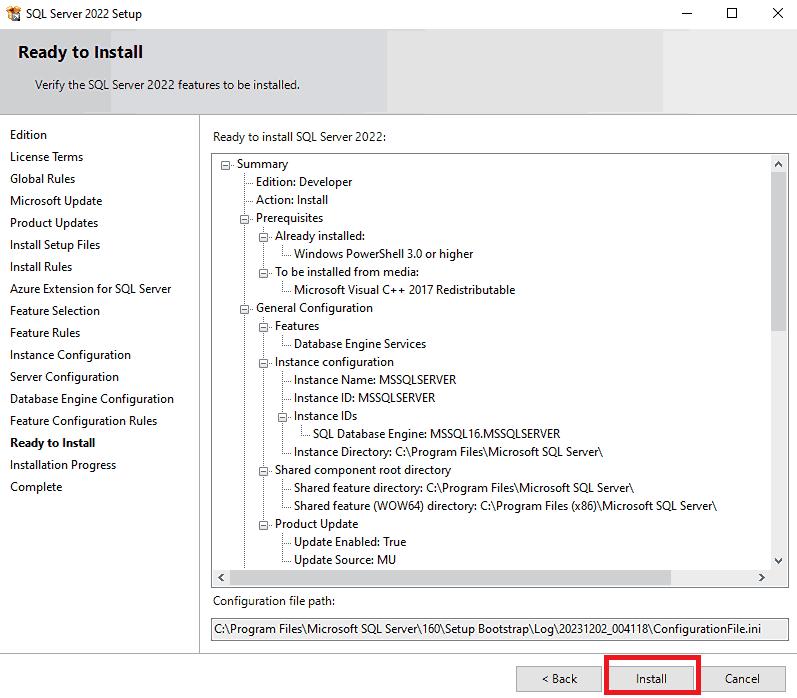
- Step 17: Click on the ‘Install’ button to start the installation.
- Step 18: Close the setup after the installation is complete as shown below.

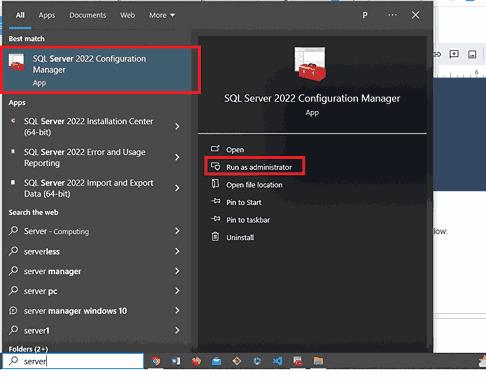
- Step 19: Now, open the server configuration manager as demonstrated below.
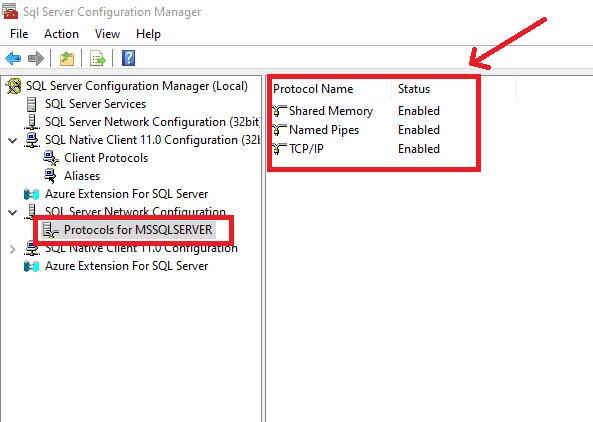
- Step 20: Enable the protocols for the SQL Server.
- Step 21: On the setup file that is opened, choose the ‘Install Server Management Tools’ option.
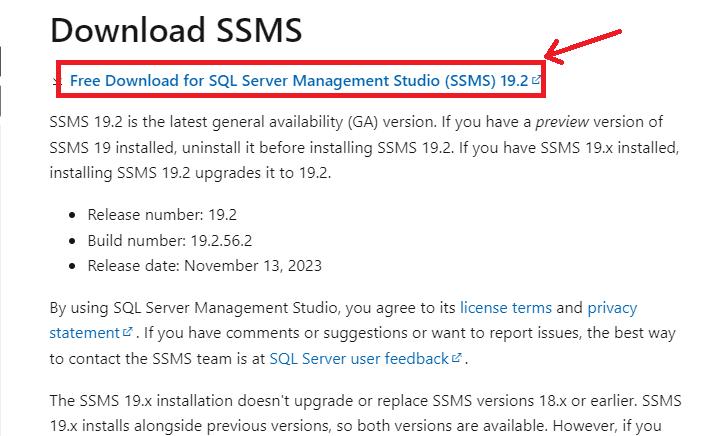
- Step 22: You will be redirected to the Microsoft Official site. Click on the download link as illustrated below.
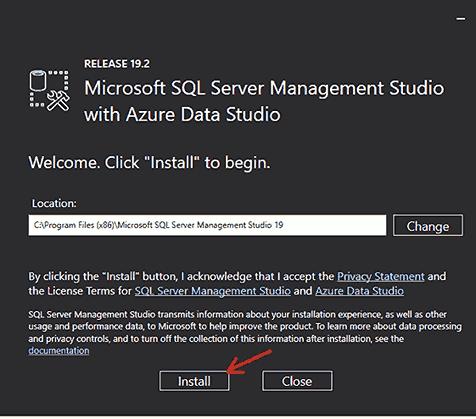
- Step 23: Go to the folder where the SSMS setup is downloaded and run it. The installation launches as outlined below. Click on the ‘Install’ button to continue. The installation begins as shown below:
- Step 24: Close the setup after the installation is completed.
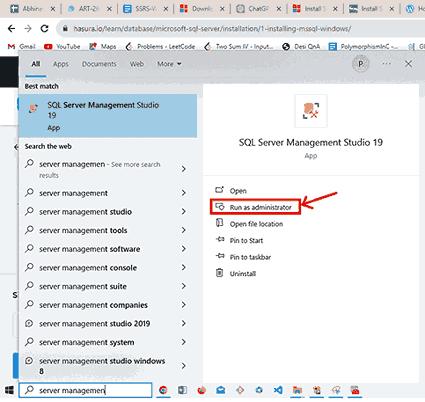
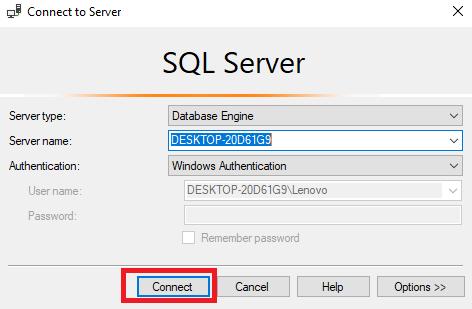
- Step 25: Launch the Server Management Studio by running it as administrator.
- Step 26: Connect to the database server with default credentials as shown below:
- Step 27: The server connection is visible in the studio as shown below.
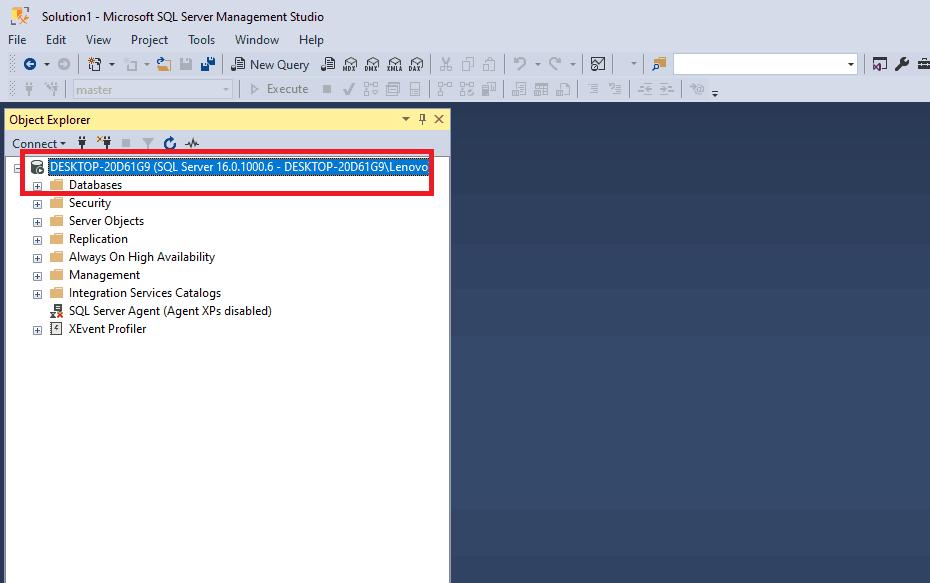
- Step 28: Create a new database with any name. Here, we are naming the database as ‘confluence’ for simplicity.

Thus, we can now install the Confluence on our Windows System.
Steps for Confluence Installation
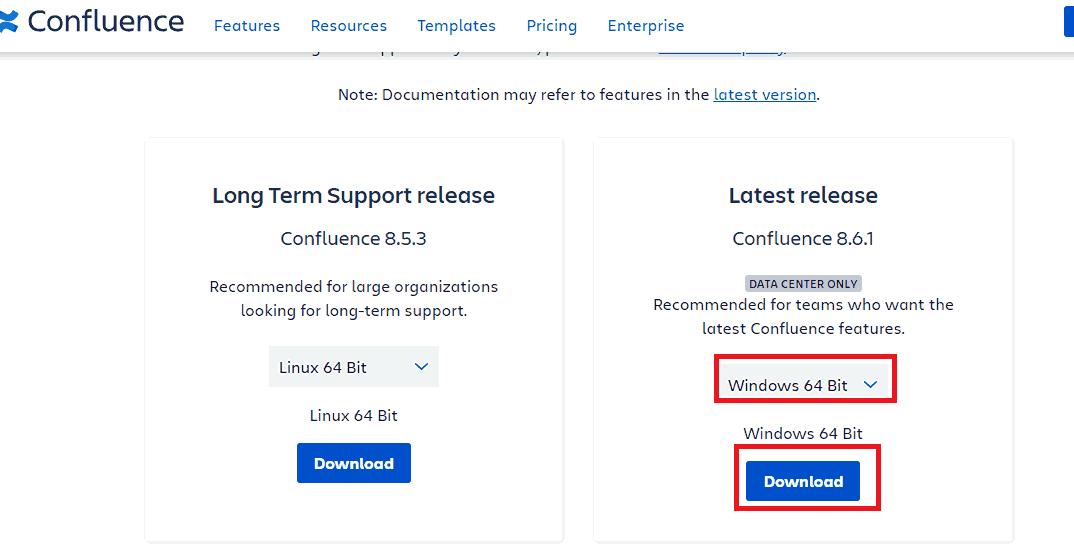
- Step 1: Go to the website https://www.atlassian.com/software/confluence/download-archives and choose the version for ‘Windows 64-bit as shown below.
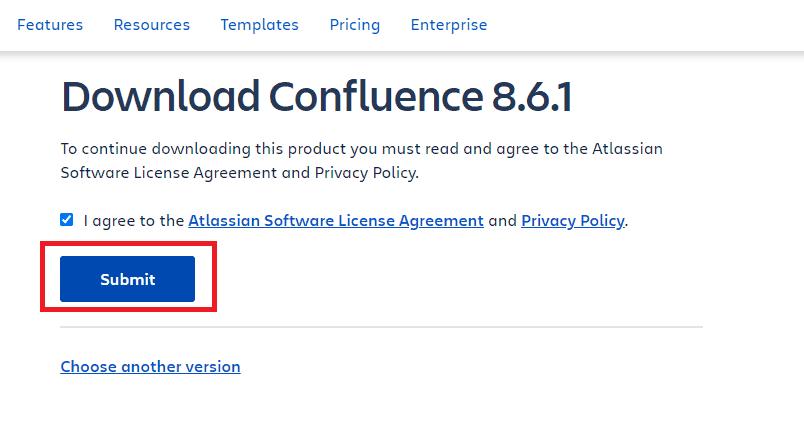
- Step 2: Accept the licensing terms and click the ‘Submit’ button to download the file.
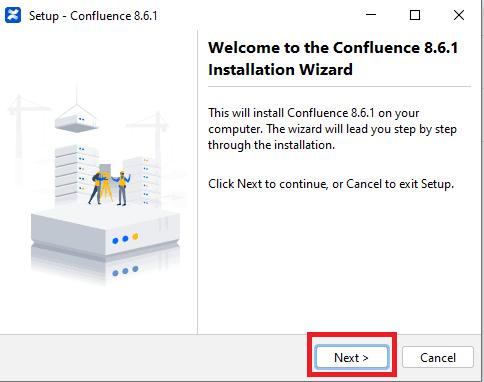
- Step 3: Locate the file where it has been downloaded and double-click on it to start the wizard. Click on ‘Next.’
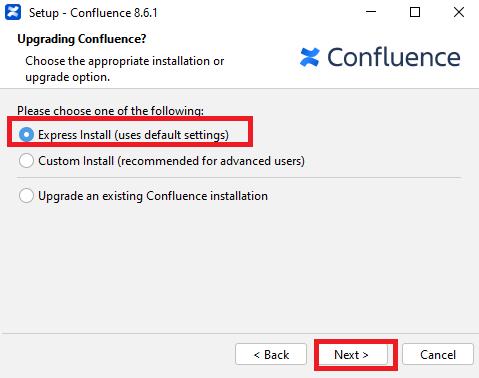
- Step 4: Choose the ‘Express Install’ option and continue by clicking on ‘Next.’
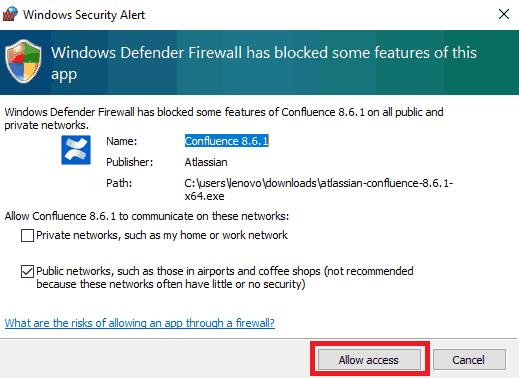
- Step 5: The Windows security pop-up may appear. Select the ‘Allow access’ option so that the confluence can access the Network.
- Step 6: Now, click on the ‘install’ button.
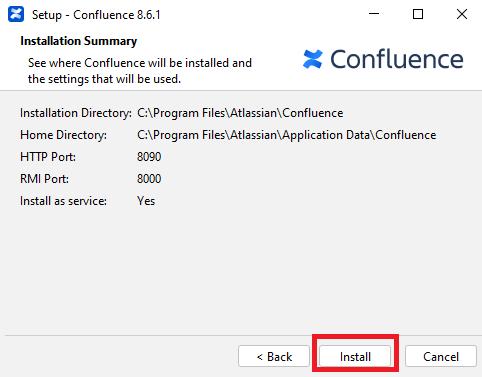
- Step 7: The installation starts as shown below.
- Step 8: Keep the ‘Start Confluence’ option checked and select ‘Next.’
- Step 9: Now, mark the launch option as selected and click on the ‘Finish’ button.
- Step 10: The Confluence home screen appears on the browser as shown below. Select ‘Trial Installation’ and click ‘Next.’
- Step 11: Now, select ‘Get the evaluation license’ to obtain the trial license for Confluence.
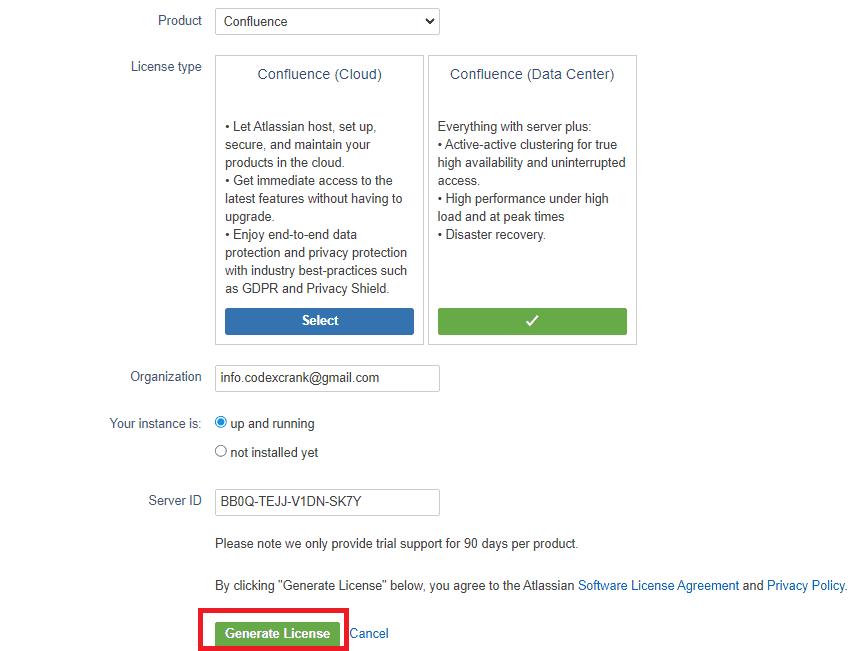
- Step 12: Keep the default options selected and click the ‘Generate License’ option.
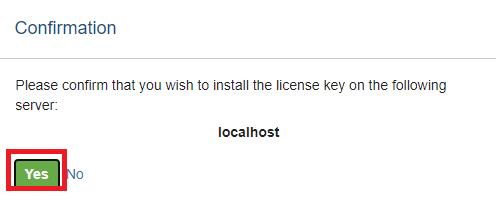
- Step 13: Now, click on the ‘Yes’ option to confirm installing the license key.
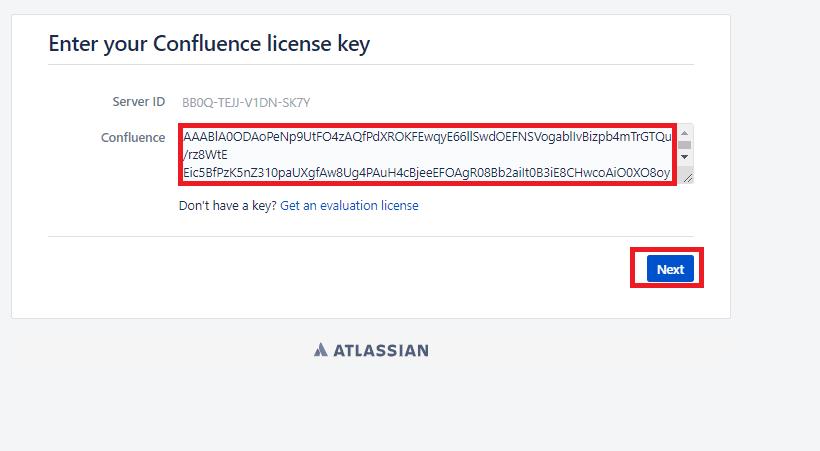
- Step 14: The license key appears in the text area. Click on ‘Next.’
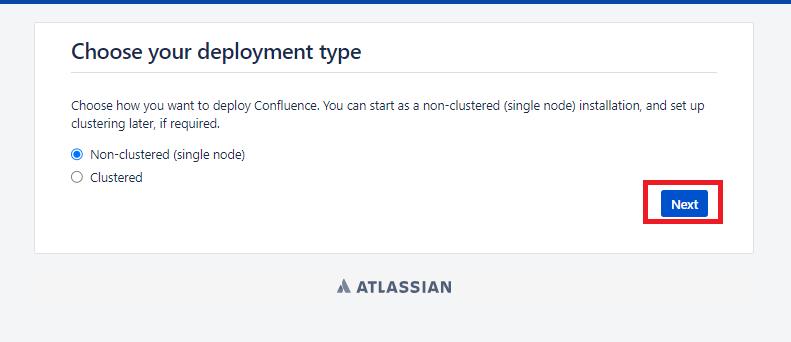
- Step 15: Select the ‘Non-clustered’ mode and click ‘Next.’
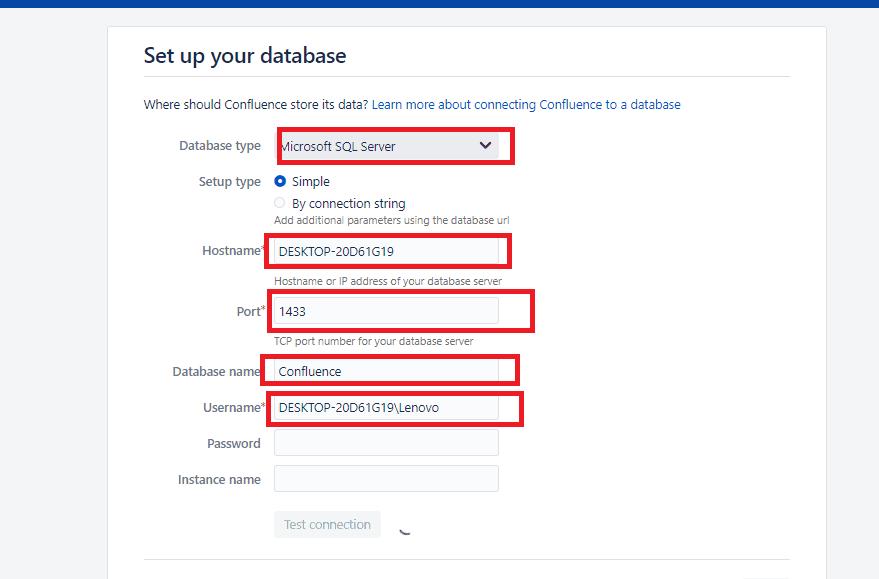
- Step 16: Enter the details of the database server instance that we created in the previous section. Then, click ‘Next.’
- Step 17: After the Confluence setup is done, the message appears as illustrated below.
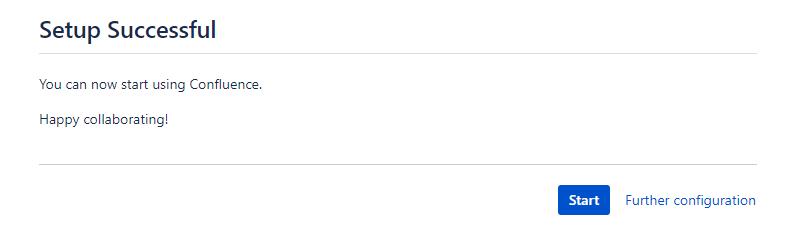
Thus, Confluence has been successfully installed on our Windows Platform.
Frequently Asked Questions
1. What is the Whiteboard Feature of Confluence?
It is a beta feature of Confluence that allows us to visualize the work within the workspace. It has features such as shapes, voting, timers, etc. to make the workspace visually more appealing.
2. What is the pricing of Confluence?
Confluence is available as Free, Standard, Premium, and Enterprise plans. The free plan supports up to 10 users and 2 GB of file storage. The pricing for the Standard plan starts at $60.50 per month and the Premium Plan at $115.5 per month. You can visit https://www.atlassian.com/software/confluence/pricing for more detailed information about the pricing.
3. Do I need to install Java and Tomcat before installing Confluence?
No, the Apache Tomcat application server and Java are bundled in the Confluence distribution. But, if you want to install an archive version of Confluence you need to install the supported Java version. You should visit the official documentation for Java configuration at https://confluence.atlassian.com/doc/installing-java-for-confluence-144212101.html.
4. What is the Confluence Data Center?
Confluence Data Center Hosting is a self-managed service that comes up with a custom configuration as per the organization’s requirement and complete control over the environment. The pricing for the Data Center plan of Confluence is $27,000 per year.
5. Does Confluence support the Technical Documentation feature?
Yes, Confluence helps us to create the documentation easily with multiple macros. We can also reuse the existing content through the inclusions library provided by Confluence. Additionally, we can also manage the versions of the document to track the changes.
Conclusion
Confluence enables us to manage projects of small as well as large size with efficient workspace collaboration. It allows us to integrate with Jira and other platforms to effectively build the team culture and keep the various stakeholders updated with the project’s progress. Thus, we can also manage the project’s timeline. After successfully installing Confluence on Windows, you have gained sufficient information to get started with the workspace management using Confluence. Go ahead and get your team collaboration aligned in a perfect way to manage the project.
Beware of low-flying worms. You are embarking on stage 3 of the Atlassian Dragon Quest.
In this stage, you will install Atlassian Confluence, the enterprise wiki. You will configure JIRA to manage your Confluence users, and get your JIRA and Confluence sites talking to each other. Then you will create a wiki space and add a dynamic display of JIRA issues to a wiki page.
Step 1. Create your Confluence Database in PostgreSQL
Now you will create a database where the Atlassian Confluence application will store its data, and the database user that Confluence will use to connect to the database. We are assuming that you have already created your PostgreSQL database server in Dragons Stage 1.
pgAdmin 4 is not supplied with the installer, so you will need to download it separately and install it. I am using v4.21 for this. If you installed it during the JIRA Install for Stage 1, you should already have it.
- Start pgAdmin 4.
- Right-click (or double-click) the database server name and log in using the password that you specified for the ‘postgres’ super user.
- Add a new login role called ‘confuser’:
- Right-click Login Roles and select New Login Role.
- Enter the Role name:
confuser - Click the Definition tab
- Enter a Password and enter it again to confirm it.
- Click the Role privileges tab.
- Select Can Login.
- Select Can create databases.
- Select Can create roles.
- Click OK to create the user.
- Add a new database called ‘confluence’:
- Right-click Databases and select New Database.
- Enter the database Name:
confluence - Select the Owner:
confuser - Click OK to create the database.
Alternatively, If you are on UNIX and do not have pgAdmin III, you can use the command line interface instead. Assuming that you are using the default installation directory of /opt/PostgreSQL/8.4/bin/, enter the following commands:
sudo -s -H -u postgres
# Create the Confluence user:
/opt/PostgreSQL/8.4/bin/createuser -S -d -r -P -E confuser
# Create the Confluence database:
/opt/PostgreSQL/8.4/bin/createdb --owner confuser --encoding utf8 confluence
exit

Requirements: Confluence 7.4.0
For Windows:
- Go to the Atlassian download centre.
- Download the Confluence 7.4.0 installer for your Windows system.
Please use the Confluence version specified in this documentation. If the download centre shows a Confluence version later than 7.4.0, click downloads archive and get Confluence 7.4.0.
Why? We have tested the integration suite with this version. There is a chance that you will have problems integrating the other applications if you use a different version. - Log in to your computer as a Windows administrator.
To install Confluence as a service, you must run the Windows installer using a Windows administrator account. While you can run the Windows installer with a non-administrator account, your installation options will be limited. - Run the Confluence installer
.exefile.
On Windows 7 or Vista, right-click the file name and click Run as administrator. - If a Windows 7 or Vista ‘User Account Control’ dialog box asks you to allow the installation wizard to make changes to your computer, specify ‘Yes’.
- Select Express Install as the installation option.
- The installer will display the ‘Installation Summary’. Click Install to confirm that you want the default options.
- When prompted, click Finish. The installer will finish installing Confluence and start the Confluence server.
- Because Confluence will be running on the same machine as JIRA (already installed), you need to ensure that the URL paths are different for Confluence and JIRA. Change the default Confluence path as follows:
- Stop the Confluence server: Go to your Windows Start menu and choose Confluence > Stop Confluence Service [8090].
- Go to your Confluence ‘destination directory’. This is the directory where the Confluence installation files are stored. For example, if you used the ‘Express Install’ as described in step 6 above then the destination directory is
C:\Program Files\Atlassian\Confluence. Let’s call this directory ‘{CONFLUENCE_INSTALLATION}‘. - Edit the configuration file at {
CONFLUENCE_INSTALLATION}\conf\server.xml. - Change the value of the
pathattribute in theContextelement to/confluence:<Contextpath="/confluence"docBase="../confluence"debug="0"reloadable="false"useHttpOnly="true"> - Save the file.
If Windows tells you that the file may be in use by another program, check whether you have stopped the Confluence server, as described above. If the server is stopped, then the problem is one of permissions. To get round the problem, copy the file to another directory and save the changes. Delete the file from the {CONFLUENCE_INSTALLATION}\confdirectory and copy the updated version back into that directory.
- Start your Confluence server: Go to your Windows Start menu and choose Confluence > Start Confluence Service [8090]. (If this doesn’t work, use service.msc to start Confluence.)
- The next step is to open the Confluence Setup Wizard in your web browser. See below for instructions.
For Unix or Linux
- Go to the Atlassian download centre.
- Click the Linux tab and download the Confluence 7.4.0 installer for your UNIX system.
Please use the Confluence version specified in this documentation. If the download centre shows a Confluence version later than 7.4.0, click downloads archive and get Confluence 7.4.0.
Why? We have tested the integration suite with this version. There is a chance that you will have problems integrating the other applications if you use a different version.- If you are running some other flavor of UNIX, download the Standalone (TAR.GZ Archive) file for Confluence 7.4.0 and follow the Confluence guide to installing from an archive through the end of Step 4, then return here and skip to part 8, Start your Confluence Server.
- Open a Linux console and change directory (
cd) to the directory containing the.binfile.
If the.binfile is not executable after downloading it, make it executable. For example:chmod a+x atlassian-confluence-X.Y.bin
(where X.Y represents your version of Confluence) - Execute the
.binfile with root user privileges, to start the Confluence installer.
If you execute the installer with root user privileges, the installer will create and run Confluence using a dedicated user account. You can also execute the installer without root user privileges, but your installation options will be limited. To run Confluence as a service, you must execute the installer with root user privileges. - Select Express Install as the installation option. During the installation, take note of the directory where the Confluence installation files are saved (this is called the ‘destination directory’). You will need to reference this directory later.
- The installer will finish installing Confluence and start the Confluence server.
- Because Confluence will be running on the same machine as JIRA (already installed), you need to ensure that the URL paths are different for Confluence and JIRA. Change the default Confluence path as follows:
- Go to your Confluence ‘Installation Directory’. This is the directory where the Confluence installation files are stored. Let’s call this directory ‘{
CONFLUENCE_INSTALLATION}‘. - Stop your Confluence server by running {
CONFLUENCE_INSTALLATION}/bin/stop-confluence.sh. - Edit the configuration file at {
CONFLUENCE_INSTALLATION}/conf/server.xml. - Change the value of the
pathattribute in theContextelement to/confluence:<Contextpath="/confluence"docBase="../confluence"debug="0"reloadable="false"useHttpOnly="true"> - Save the file.
- Go to your Confluence ‘Installation Directory’. This is the directory where the Confluence installation files are stored. Let’s call this directory ‘{
- Start your Confluence server by running {
CONFLUENCE_INSTALLATION}/bin/start-confluence.sh. - The next step is to open the Confluence Setup Wizard in your web browser. See below for instructions.
Step 3. Set Up Confluence
Now you can run Confluence’s Setup Wizard and change some configuration settings. As part of this process, you will connect Confluence to JIRA, so that you can manage all your users via JIRA and share information between JIRA and Confluence.
- To access Confluence, go to your web browser and type this address: http://localhost:8090/confluence.
- The Confluence Setup Wizard will start up, to guide you through the process of setting up your Confluence server and creating an administration user. Detailed instructions are in the Confluence documentation.
- Click Start setup under ‘Production Installation’.
- Click Next on the Get apps page – we will cover this in Stage 4
- Enter your Confluence license into the License Key field. If you do not already have a Confluence license, click the generate an evaluation license online link and follow the prompts.
- The ‘Choose a Database Configuration’ screen will appear. Connect Confluence to your PostgreSQL database:
- Select “My own database”, then Next
- The ‘Set up your database’ screen will appear.
- Enter the following information:
- Database Type:
PostgreSQL - Hostname: localhost
- Port: 5432
- Database name: confluence
- Username:
confuser– This is the user you created in step 1. - Password: Enter the password that you chose in step 1.
- Database Type:
- Click the Next button. You might need to wait a few minutes while Confluence sets up its database.
- On the ‘Load Content’ screen, click the Example Site button to include the demonstration space content into your Confluence installation.
- The ‘User Management Setup’ screen will appear. Click Connect to JIRA.
- The ‘Connect to JIRA’ screen will appear. Enter the following information:
- JIRA Server Location: Enter the web address of your JIRA server. For example:
http://localhost:8080/ - JIRA Administrator Login Username:
charlie
This is Charlie’s username in JIRA. - Password: Enter Charlie’s password for JIRA.
- JIRA Server Location: Enter the web address of your JIRA server. For example:
- Leave the other fields (the ‘advanced options’) at their default values and click Next.
- The ‘Load users and groups from JIRA’ screen will appear, informing you that Confluence has created an administrative account for Charlie, to match his JIRA account. Click Next.
Note: The Next button may appear greyed out, preventing progress to the next stage. A workaround is available in CONF-23184.
The ‘Confluence Setup Successful’ screen will appear. Click Start using Confluence. - Confluence will ask you to setup a space. Type in “Test” and click Continue
- The home page of the Confluence ‘Demonstration Space’ will appear.
- Finally, you need to enable the remote API:
- Click > General Configuration. Confirm your password when prompted. This is Charlie’s password in Confluence, and is the same as his password in JIRA.
- Click Further Configuration under ‘Configuration’ in the left-hand panel.
- The ‘Further Configuration’ screen will appear. Click any of the Edit links.
- Click the check box next to Remote API (XML-RPC & SOAP), to enable the remote API.
- Scroll down to the end of the page and click Save.

Step 4. Create a Wiki Space
Now you can create a space in Confluence. A ‘space’ is a logical collection of pages, comparable to a library. A space is configurable and managed independently within the wiki site. It is almost like a wiki within a wiki.
The Atlassian Confluence demonstration space was created for you when you set up Confluence above.
- Click Confluence at the top left of the Confluence screen.
- Click Create Space in the Spaces menu. The ‘Create Space’ screen will appear.
- Click Create and choose Blank Space.
- Configure your space settings:
- Enter a space name:
Dragons - Enter a space key:
DRA - Click Create.
- Enter a space name:
- The ‘Home’ page of your new ‘Dragons’ space will appear, with some default content. Now you can edit the home page as you like. For this exercise, you will add a Charlie badge:
- Right-click on the image of the Charlie badge at the bottom of this documentation page and save it to your desktop. The file name is ‘
dragon_badge03.png‘. - Click Edit at the top right of your new Dragons home page in your own Confluence site.
- The wiki editor will open. If prompted, allow Gears access to your site. This will allow you to drag and drop images and other attachments onto your wiki page.
- Select and delete all the text in the editor pane, so you can start with an empty page. You will need to delete the text from each section.
- Make sure your cursor is at the top of the editor pane.
- Choose > Files and images in the editor toolbar.
- The ‘Insert Image’ popup window will appear. Browse to your desktop and upload the Charlie badge image that you saved earlier.
- A preview of the image will appear in the ‘Insert Image’ window. Click Insert.
- The image will appear in the editor pane of your home page. Click Update to save your updated wiki page.
- Right-click on the image of the Charlie badge at the bottom of this documentation page and save it to your desktop. The file name is ‘
Step 5. Add Some JIRA Issues to your Confluence Page
Now you can put some interesting JIRA content into your page. What’s more, you can insert an issue into JIRA directly from your Confluence page and then display the issue on the page.
- Edit the Confluence page again.
- Place your cursor immediately after your Charlie badge image and press Enter to start a new line.
- Enter the following text onto the page:
My JIRA issues - Select the text that you have just entered and format it as a heading level 2. (Click the formatting dropdown menu on the left-hand edge of the editor tool bar. By default it formats your text as ‘Paragraph’. Select Heading 2.)
- Deselect the text and then press Enter to start a new line.
- Follow the steps below to add a JIRA macro to your page. The macro will show a dynamic list of issues drawn from the ‘Dragons’ project on your JIRA site.
- Start a new line.
- Enter the following text onto the page, and format it as a heading level 2:
Reporting a new issueHint: Press Ctrl+2 or Cmd+2 as a keyboard shortcut to format a heading level 2. Click the question mark on the right of the editor toolbar to see all the keyboard shortcuts. - Start a new line.
- Follow the steps below to add a new issue into JIRA and display the issue on your Confluence page:
- Choose > JIRA Issue/Filter in the editor toolbar.
- The ‘Insert JIRA Issue/Filter’ popup window will appear. Click Create New Issue in the left-hand panel.
- Enter the following information:
- Project:
Dragons (DRA) - Issue Type:
Bug - Summary:
The purple dragon melted my chocolate - Description:
The dragon tried to eat my chocolate and flamed it by mistake
- Project:
- Click Insert.
- You now have a new issue,
DRA-2, in the Dragons project in JIRA. In addition, a new JIRA macro will appear on your Confluence page, showing only the new issue that you have created in JIRA.
- Save the page.
Note: The new issue will appear immediately under the heading ‘Reporting a new issue’. To see the new issue appear in the table under ‘My JIRA issues’, you may need to click the refresh icon at the bottom of the table. This is because the issues shown in the table are cached. - JIRA knows about the link between the new JIRA issue and the Confluence page! Go to your JIRA URL in your browser (for example,
http://www.foobar.com:8080/)and find issueDRA-2. The Issue Links section includes a link to the wiki page.
While you are looking at the issue, click Assign to me to assign it to yourself .

Victory!
Your Confluence page has a dynamic list of JIRA issues.
Go to Dragons Stage 4 – Install Team Calendars in Confluence.
This article will focus on a step-by-step on detailing a Confluence installation process. This will entirely give the how to install Confluence from start process.
The images provided here are from a Windows 8 hosted machine example. However installing on other OS will be under the same steps.
- Windows 7/ Windows 8/ Windows Server 2008/ 2012
Preparation steps
Download the setup file from Atlassian Confluence. The url may change but it should be: https://www.atlassian.com/software/confluence
You can then select ‘Try it free’ for Evaluation purpose or purchase it (choices of 1-10 users / more (corporate pricing).
It makes perfect sense for individuals to purchase the 1-10 users Option as it currently is priced at $10 USD. Atlassian is even using this amount for charity, so get on the bandwagon to support Atlassian for this!

Download Confluence Installation File
There is no lack of functionality even with the $10 USD version, except the user count is for 10 max users only.
Start installation – Confluence
- Double click installation file: eg atlassian-confluence-5.10.7×64

Select Custom Install
2. Select ‘Use default ports’ – Your service port after installation is 8090

Select default port (change only if you really require customised port)
3. Select ‘Install Confluence as Service’

Install Confluence as a service
4. After the installation process is completed, you will be redirected onto your browser for further configuration process.
- Trial Installation – Just as the described words, the only reason why you should use this installation is for ‘Testing purpose’. Even for personal wiki, you should consider yourself to set under Production Installation category.
Trial installation is a no-frills installation with ’embedded DB’. This impacts performance purposes greatly in future.
- Production Installation – This is for any usage of Atlassian Confluence for long-term purpose usage.

Trial Installation / Production Installation
If you select trial Installation
5a. You will need a license key – either Evaluation key or a Production key from Atlassian Account.
Create an account under Atlassian and purchase a license key. We recommend 1-10 users for personal and small company usage.

Key in license key – confluence
6a. The only reason you will choose Connect to JIRA is when your company uses JIRA concurrently for development tracking purposes.
Choose ‘Manage users and groups within Confluence’.

Select Manage Users And Groups Within Confluence
7a. Select ‘Start’. Configuration has completed with Confluence Install with ‘Trial Installation’.

Press Start – Configuration completed
You will then be able to start right off away and you will see the below screen.
Confluence is installed and you can get to work!

Confluence – Completed Installation
If you select Production Installation
If you had selected this, the only difference here is “You need to use an ‘external database source’ to keep all the data of your wiki”. Not using an embedded database means you are not using Atlassian coded database for immediate deployment.
Hence you need a little more steps.
5b. Select External Database – PostgreSQL. This is the easiest installation method with Production Installation.

Select External Database – PostgreSQL
6b. Download Postgresql and install using its installation file.
Download page: https://www.postgresql.org/download/windows/
Remember, DO NOT Choose the latest Postgresql version. You should always choose a backdated 1-2 versions away from the newest postgresql. As shown in image I am using Postgresql-9.5.4-2 in order to cater to Confluence 5.10.7
Any newer and it might not work. You will have to uninstall and reinstall everything again with correct versions in that case.

Install Postgresql with its installation file
7b. Go to pgAdmin III / pgAdmin to access the GUI for PostgreSQL.
So the goal here is to “create a Database and user with access to the Database” using PostgreSQL. After doing this, you can let Confluence access the database with the very settings you have input.
pgAdmin is installed together with PostgreSQL installation.

Postgresql – PGAdmin
8b. This is what you see on pgAdmin

pgAdmin page Main
9b. Right click Login Roles – New Login Role

Right click Login role, create user
10b. Create the login role eg confAdmin
Ensure you set the password for this user and allow it to create databases + create roles.

Settings for login role
11b. After create login role, right click Database and select ‘New Database’.

Create database – postgresql
12b. Select created login role, ie confAdmin in this case

Select created login role as its owner
13b. This is what you see on the created database.

What you see on postgresql DB Creation
14b. From here, you have a ready user – able to access Database: confluence.
What you need to do is to get back to your browser and input the exact details you just created with postgreSQL. Put them in and voila.

Input parameters to access postgresql confluence
15b. Select Example Site – and you are good to go.

Always select example site. It just makes things easier
16b. Select “Manage users and groups within Confluence”

Select Manage users and groups in Confluence
17b. Create a system admin account. This is typically your system account where you should not give access to any users. Each user should have his/her own account, with a System Admin account as a spare. (Recommended)

Create the site admin details
18b. Select start and you can finally begin adding items to the wiki.

Select ‘Start’ and start rolling
19b. This is an example once you have fully setup and followed the steps above.
If you ever face problem where it says “Unable to connect to Database”, 2 main problems likely present here:
- You are either using an unsupported DB (eg too new Postgresql / mysql versions)
- Or you have configured the instance where it cannot poll to its DB, due to firewall rules etc. A local DB hosted on the same machine will not present this problem.

Example of a working Confluence
And test to add a few pages and ensure things are working before you call your boss and say “Job Completion!”.