
Active Directory (AD) – сервис, являющийся разработкой корпорации Microsoft, который используется для управления и аутентификации в корпоративной сети. По сути, AD – это централизованная база данных, хранящую информацию о пользователях, группах, компьютерах, и других объектах в сети.
Сервис обеспечивает функциональность процесса аутентификации и авторизации пользователей. Это позволяет им получать доступ к ресурсам в сети в соответствии с их правами доступа. Также AD сохраняет информацию о пользователях, группах, компьютерах, принтерах и других объектах сети, облегчая управление ими. Сервис является основным компонентом учётных записей Windows. Таким образом обеспечивается единый вход в систему для пользователей и централизованное управление их учётными данными. Используя AD с помощью групповой политики администраторы могут устанавливать и применять настройки безопасности и параметры конфигурации для пользователей и компьютеров в сети.
В данном руководстве рассмотрим процесс установки Active Directory на сервер, который работает на Windows Server 2022.
Предварительная настройка сервера
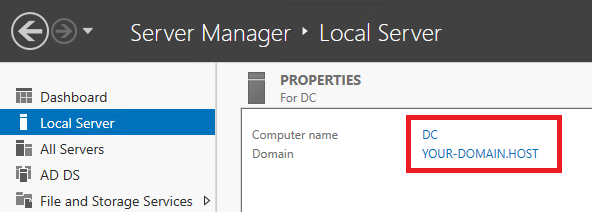
Перед установкой Active Directory необходимо переименовать сервер для того, чтобы его имя соответствовало планируемой структуре создаваемого домена. В нашем примере мы не только включим сервер в домен, но и повысим его роль до контроллера домена. Исходя из этого мы присвоим нашему серверу имя DC, то есть Domain Controller.
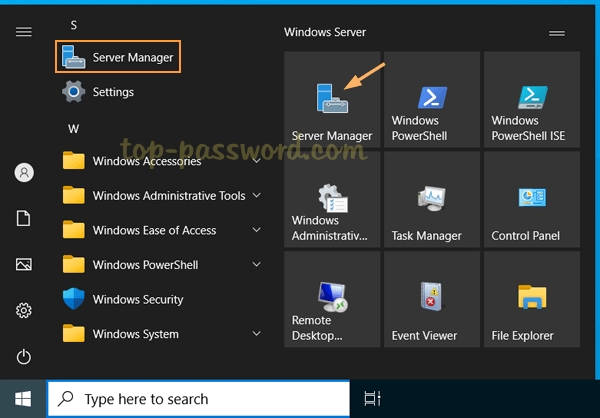
Чтобы переименовать VPS, запустите из стартового меню Server Manager.
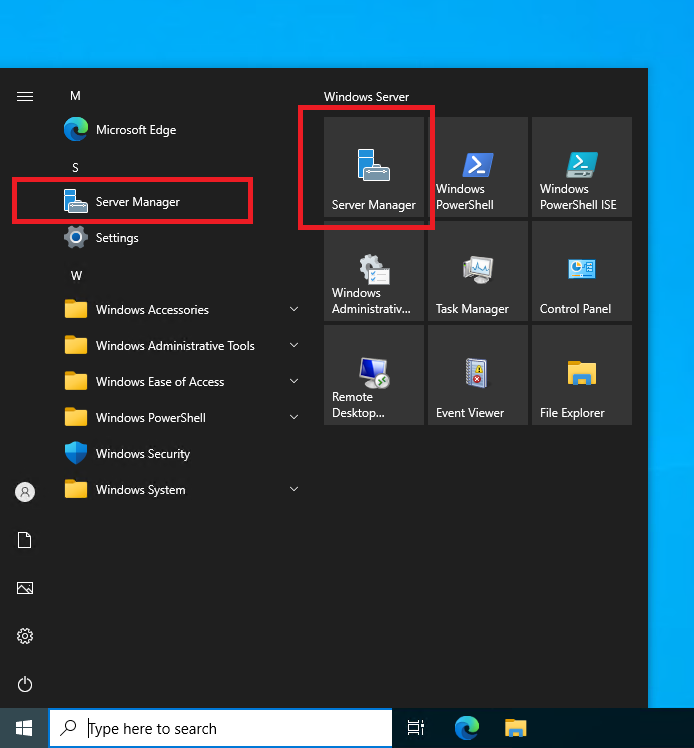
Затем перейдите в Local Server и кликните в текущее имя сервера, которое прописано в строке Computer name.
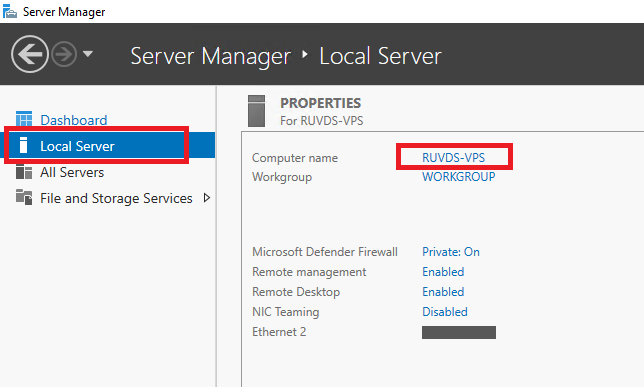
В открывшемся окне нажмите Change из вкладки Computer Name.
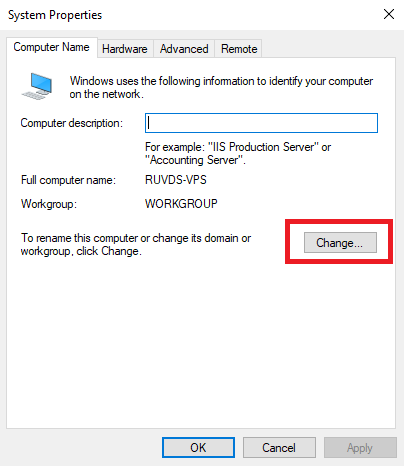
После чего наберите новое имя сервера и нажмите OK.
Затем закройте окно при помощи кнопки Close.
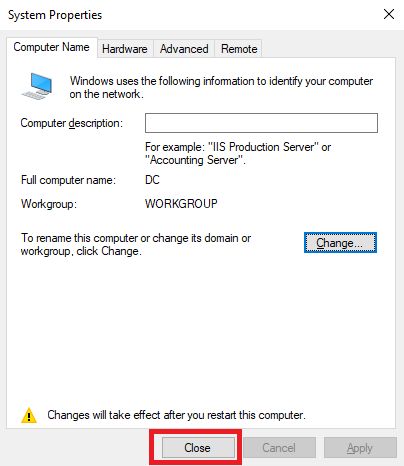
Далее необходимо будет перезагрузить VDS для того, чтобы изменения вступили в силу.
Установка Active Directory
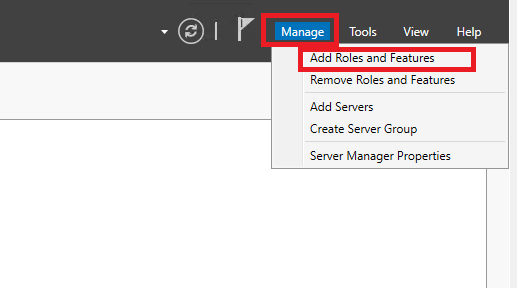
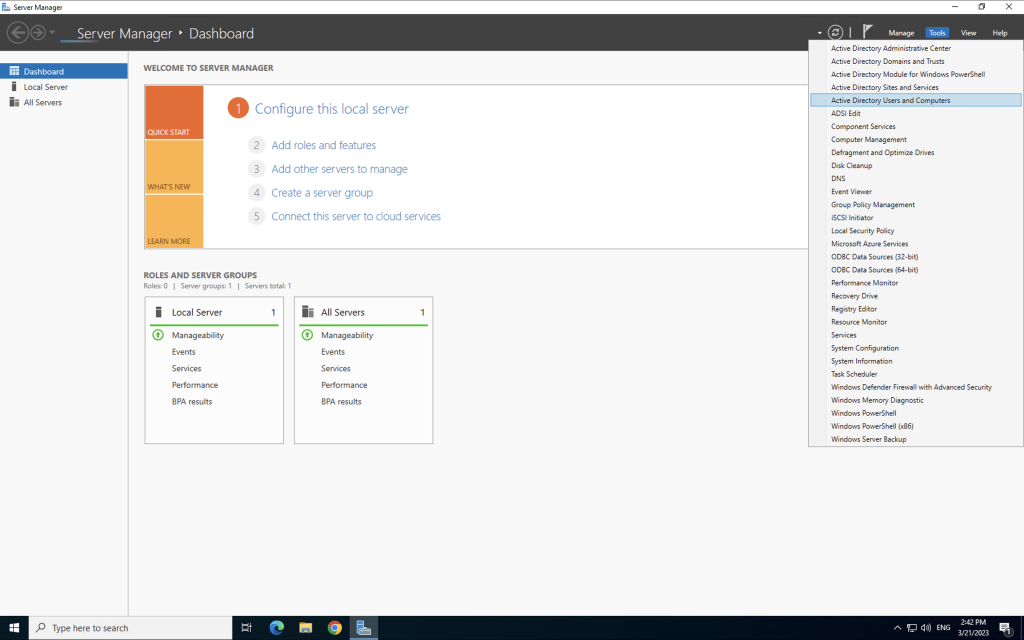
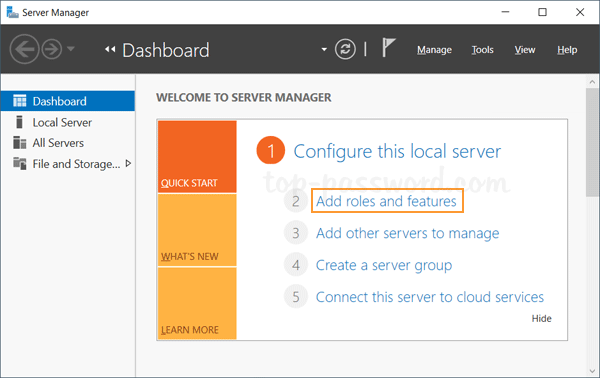
После того, как сервер перезагрузится, снова запустите Server Manager и перейдите Manage 🠖 Add Roles and Features.
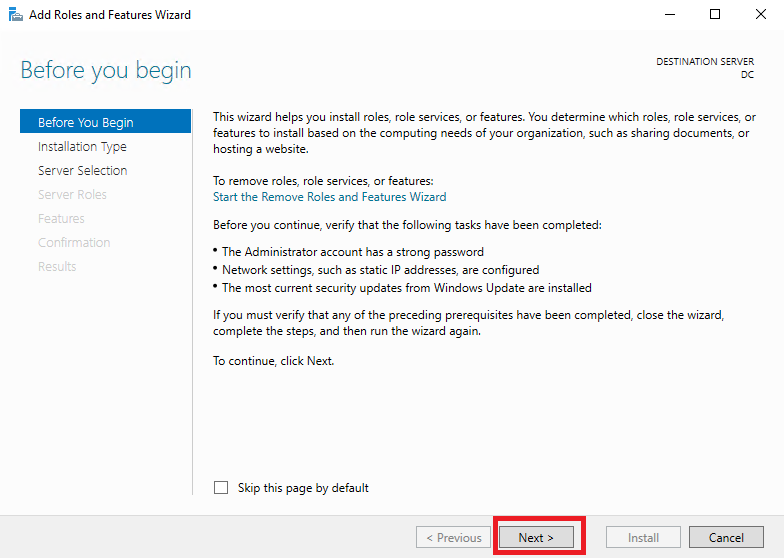
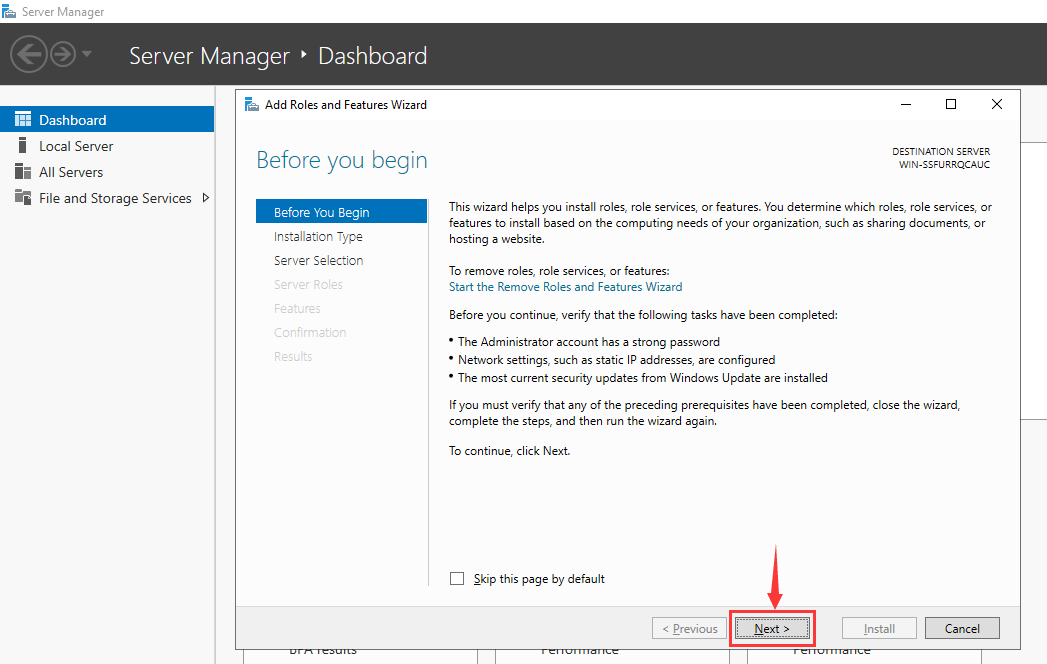
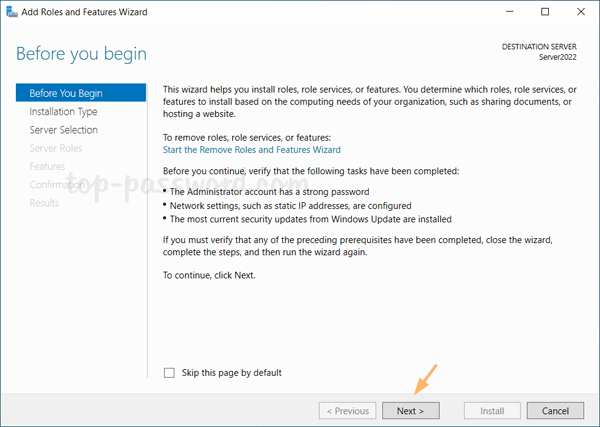
В открывшемся окне нажмите Next.
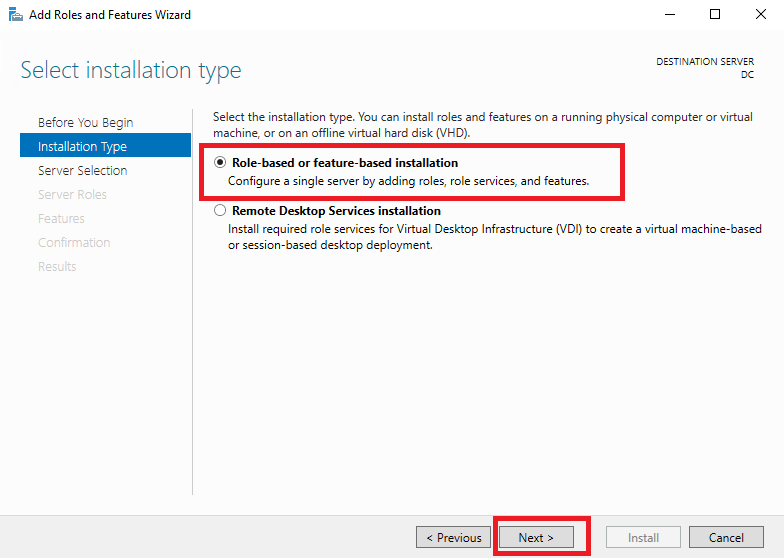
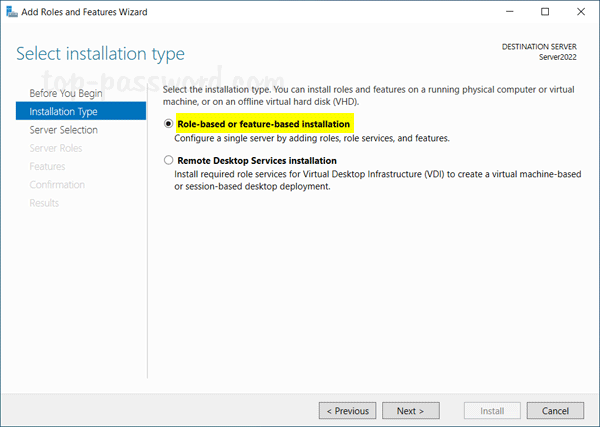
После чего выберите Role based or features-based installation и нажмите Next.
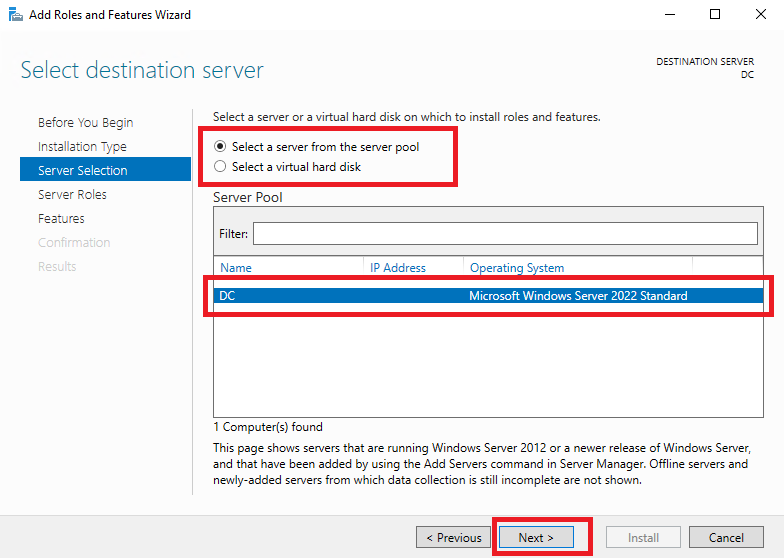
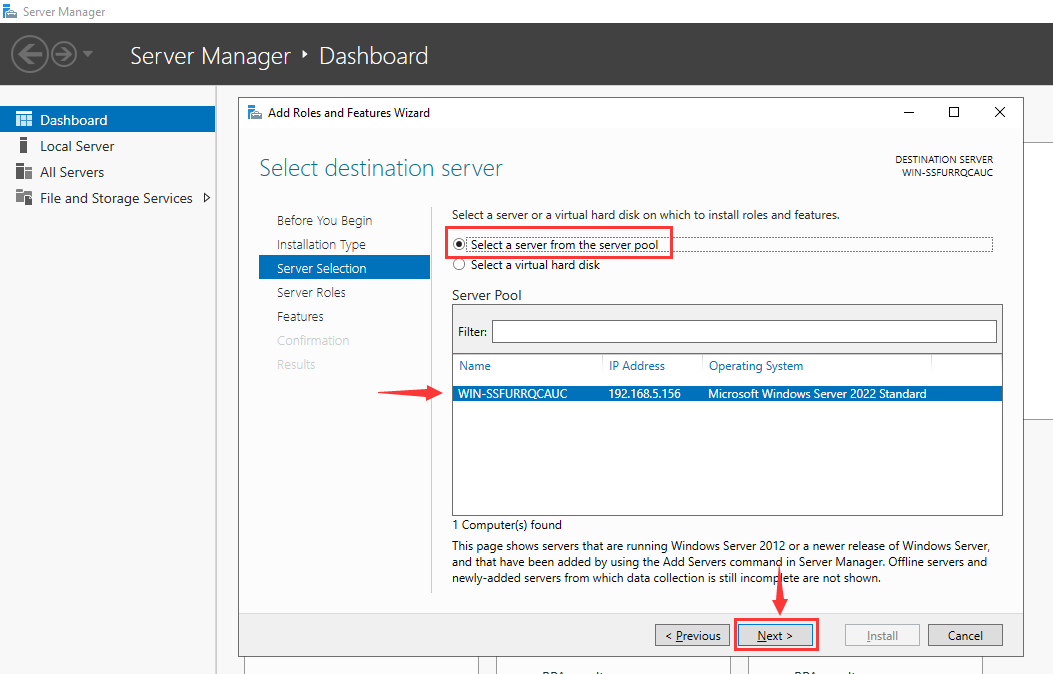
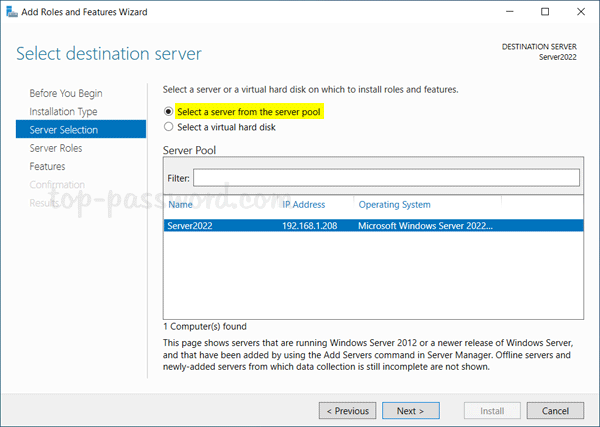
В следующем окне выберите Select a server from the server pool и в списке серверов выделите свой. В нашем примере такой список состоит из всего одной записи, которая и является нашим сервером. Для продолжения нажмите Next.
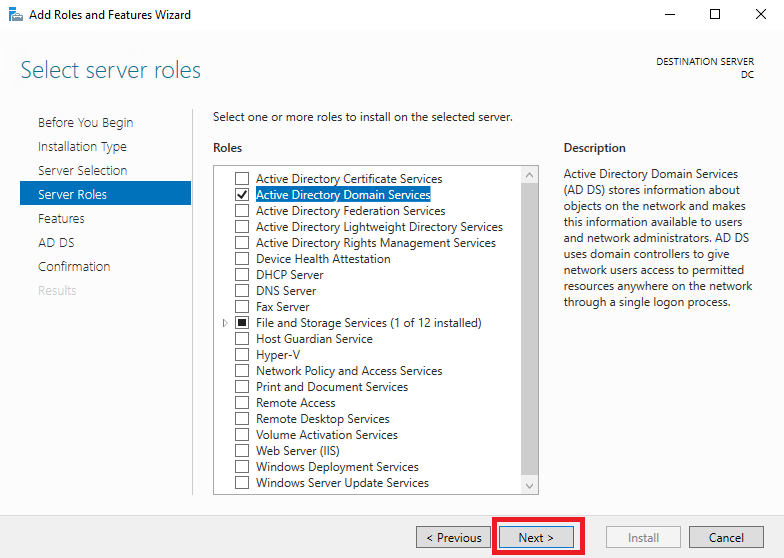
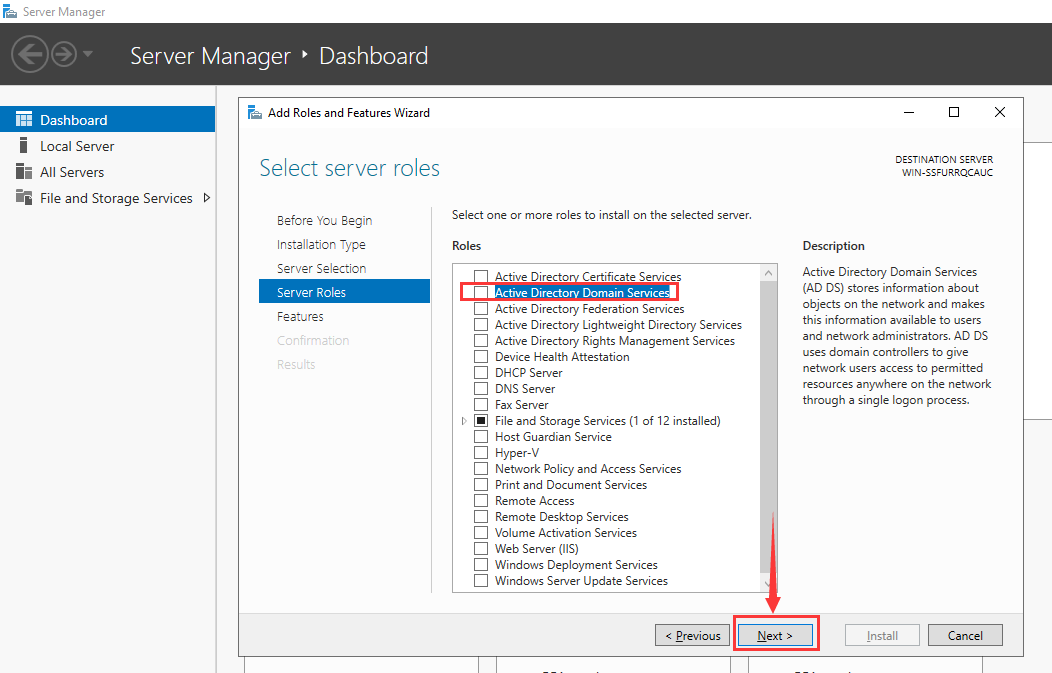
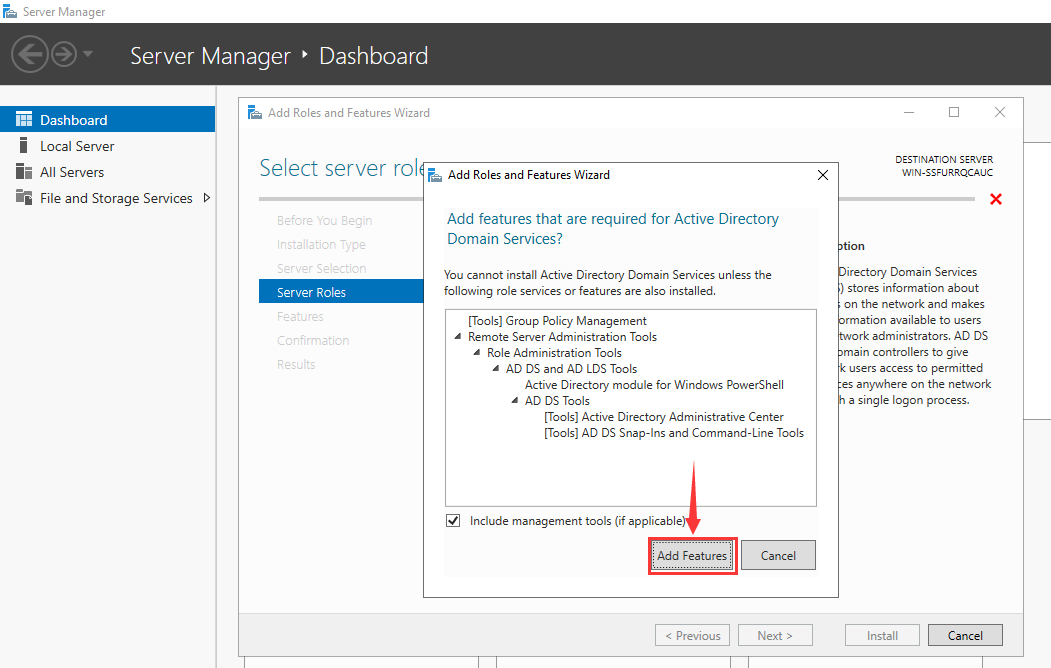
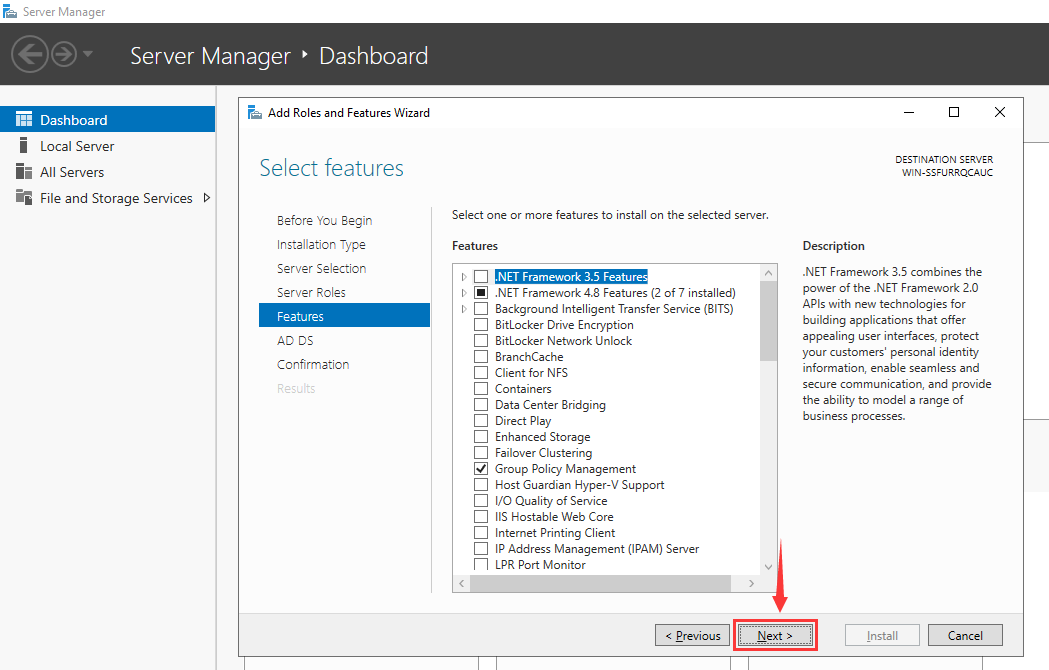
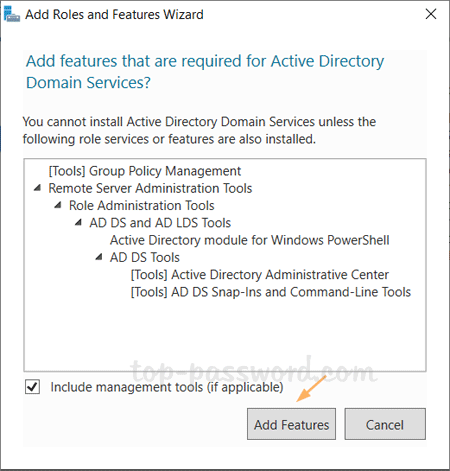
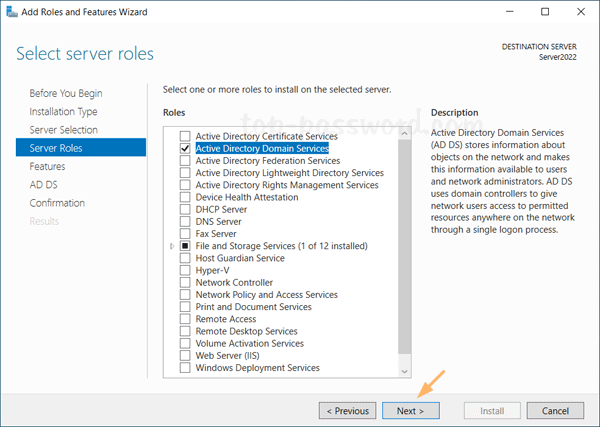
На следующем этапе активируйте строку Active Directory Domain Services и в окне добавления роли нажмите Add Features.

Для перехода к следующему шагу нажмите Next.
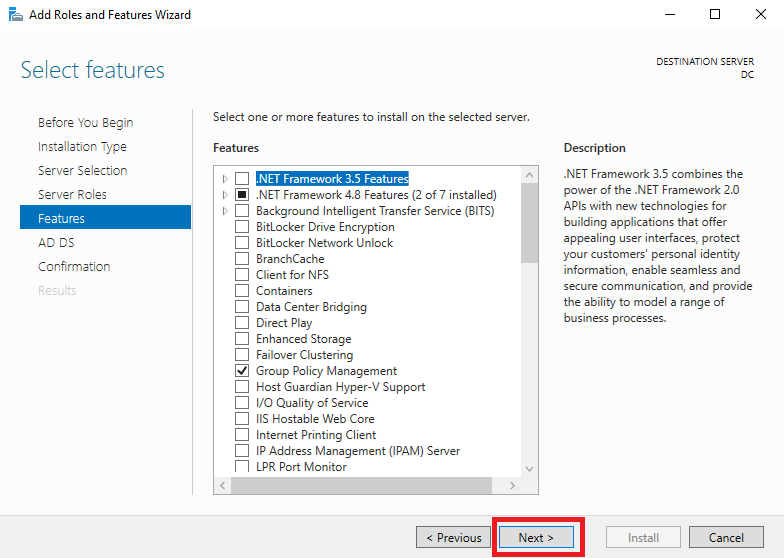
Следующие два окна нужно пройти при помощи кнопки Next не внося никаких изменений.
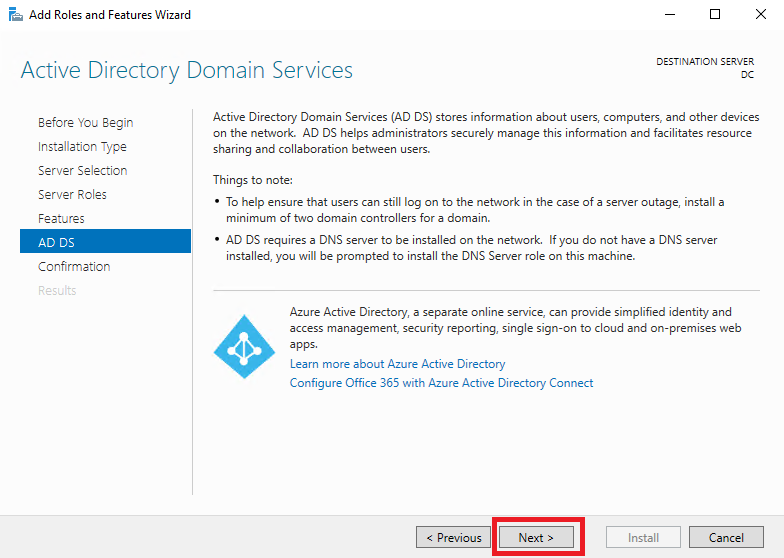
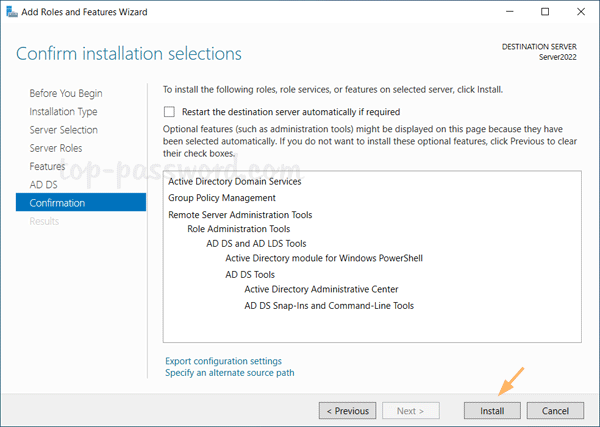
Наконец на этапе Confirm installation selections нажмите Install. Таким образом вы запустите установку требуемой роли.

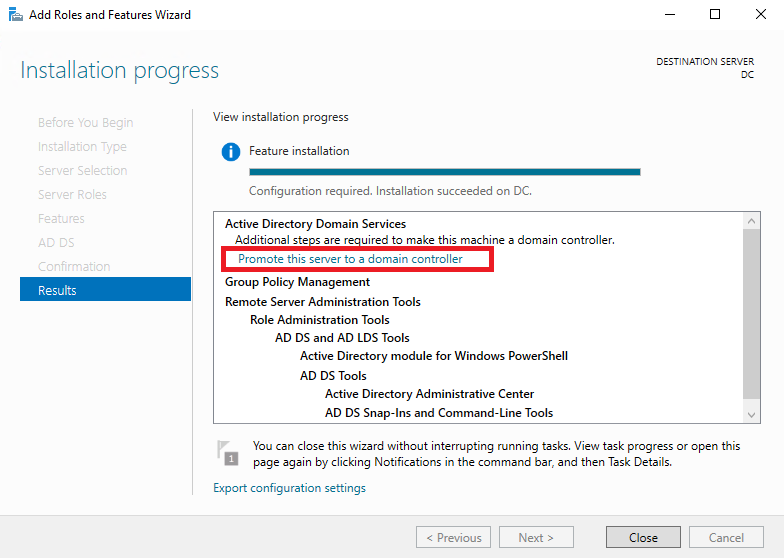
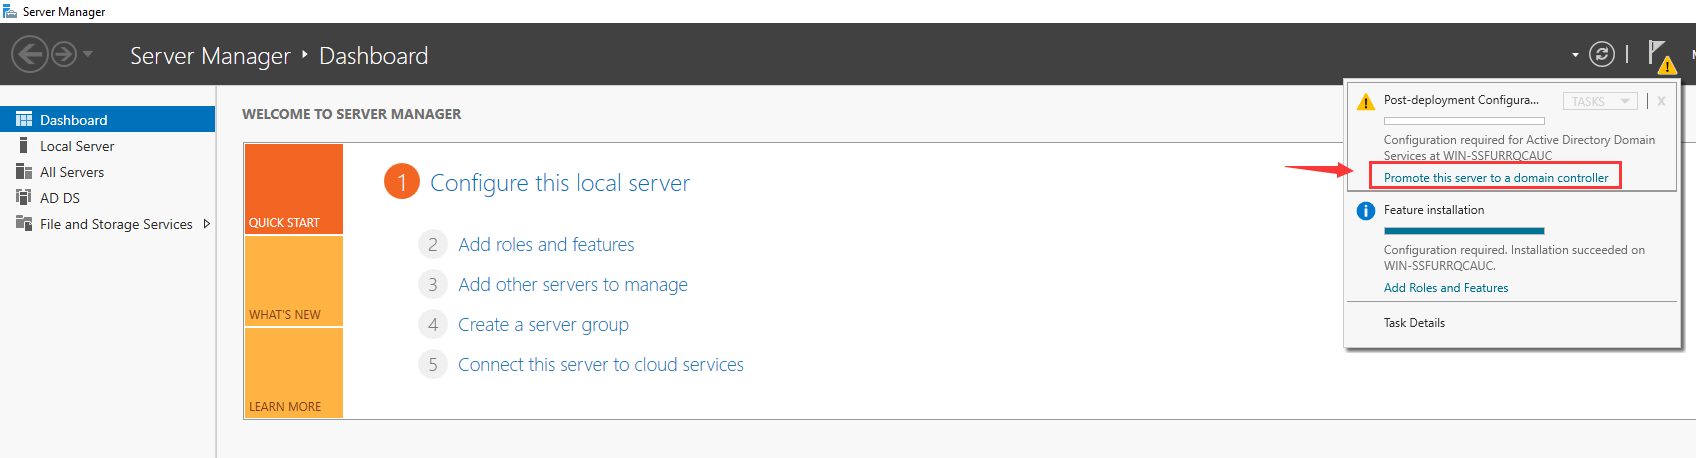
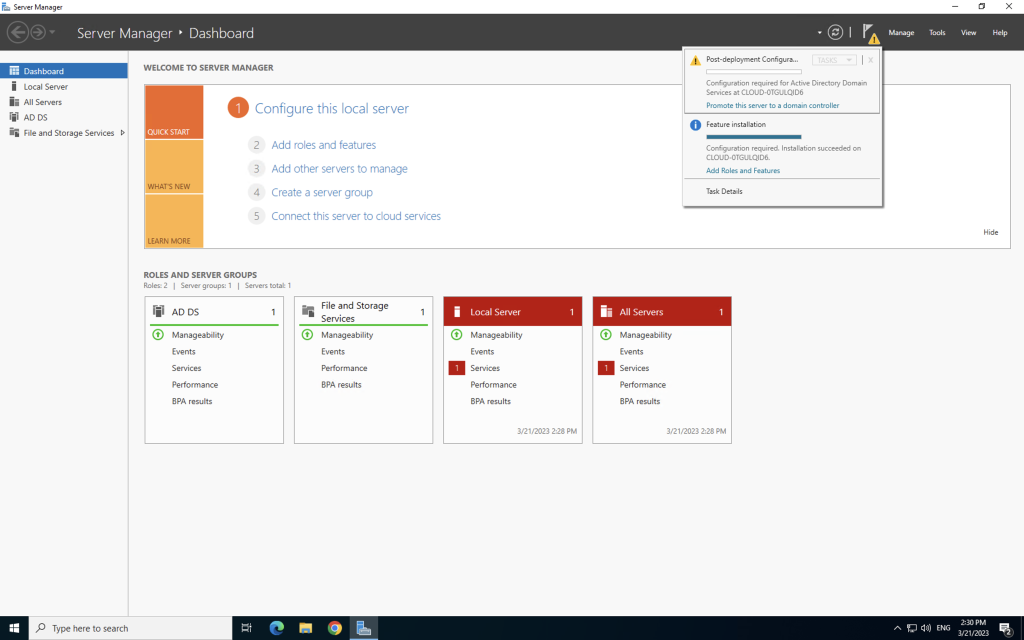
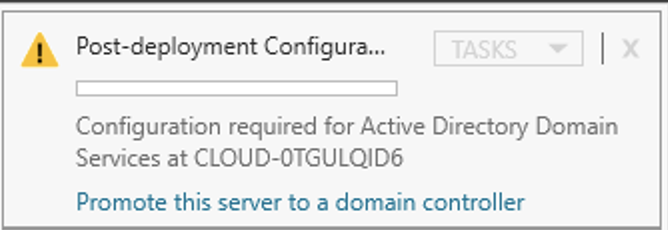
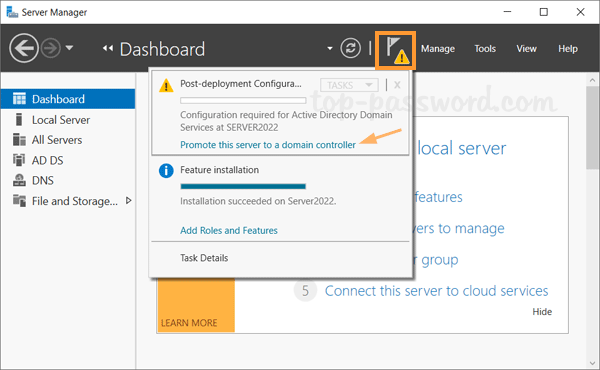
По окончании установки кликните в Promote this server to a domain controller.
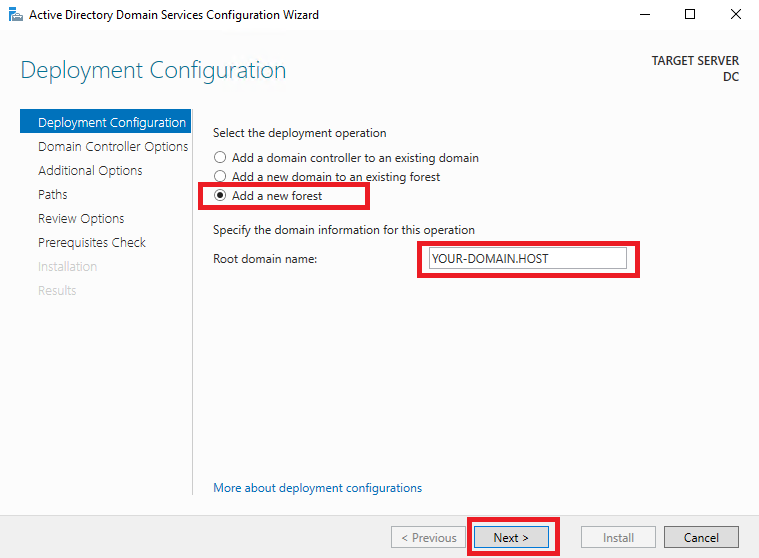
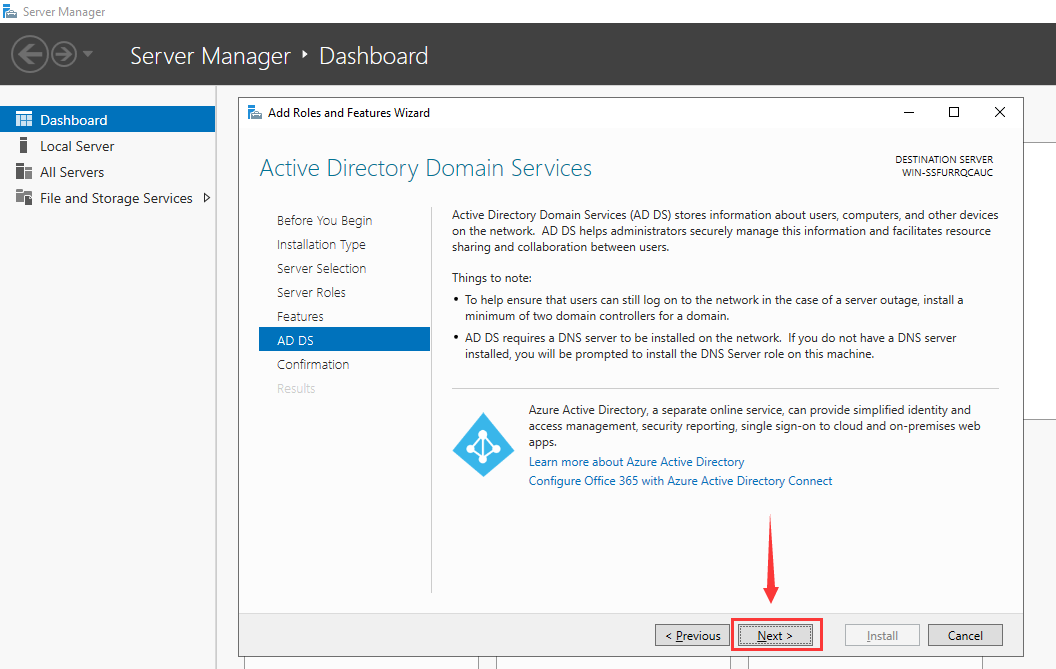
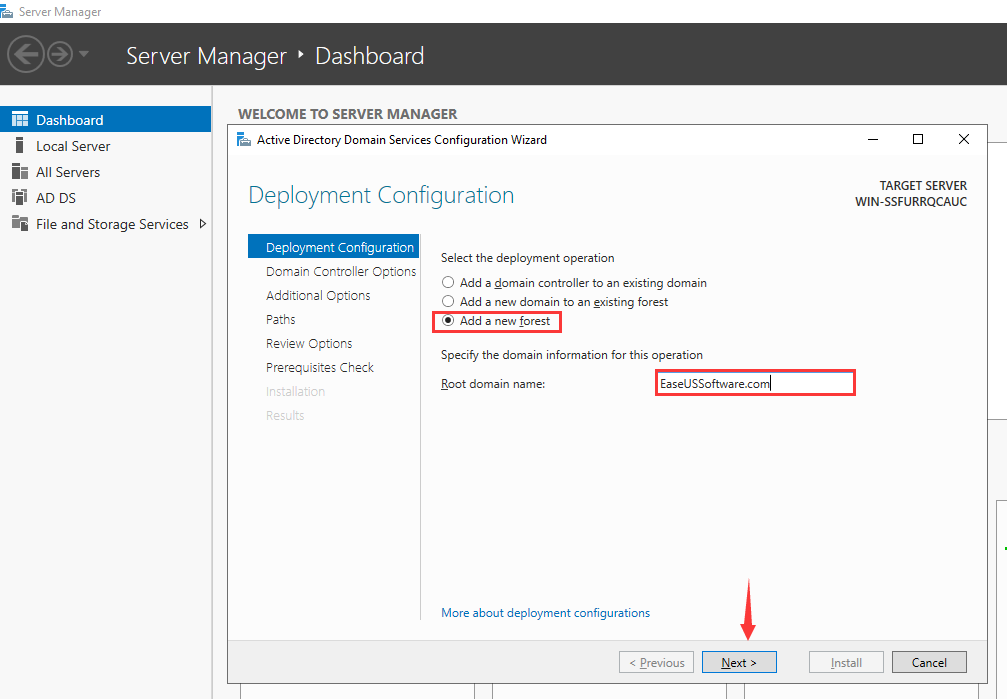
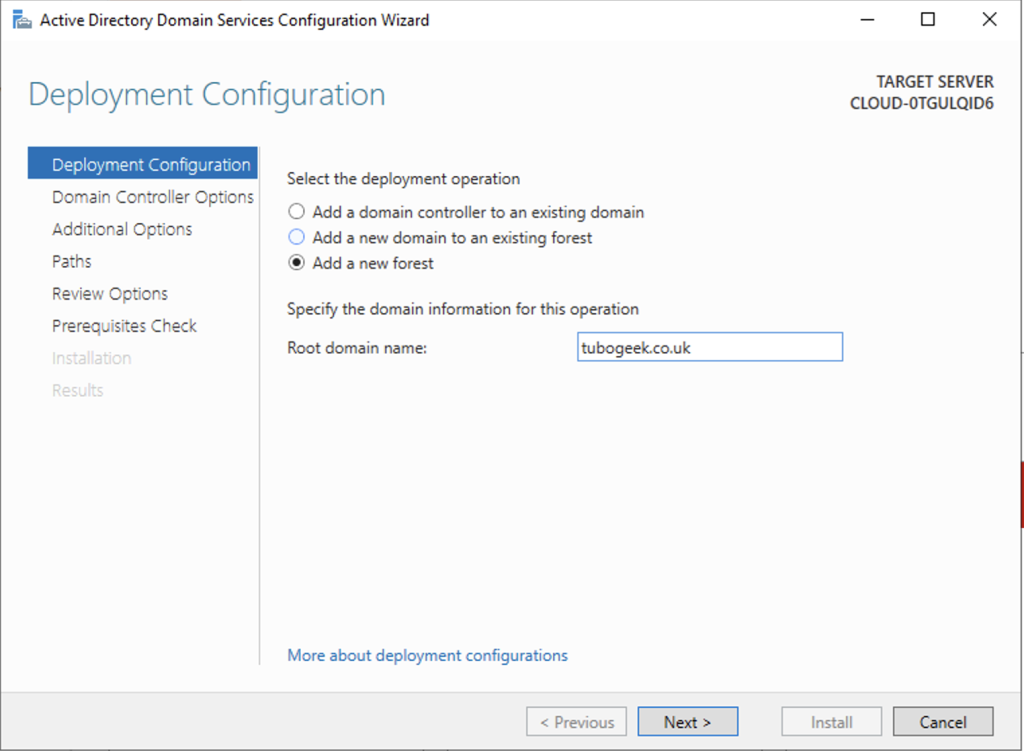
Здесь выберите Add a new forest и в строке Root domain name укажите полное имя своего домена. Для продолжения нажмите Next.
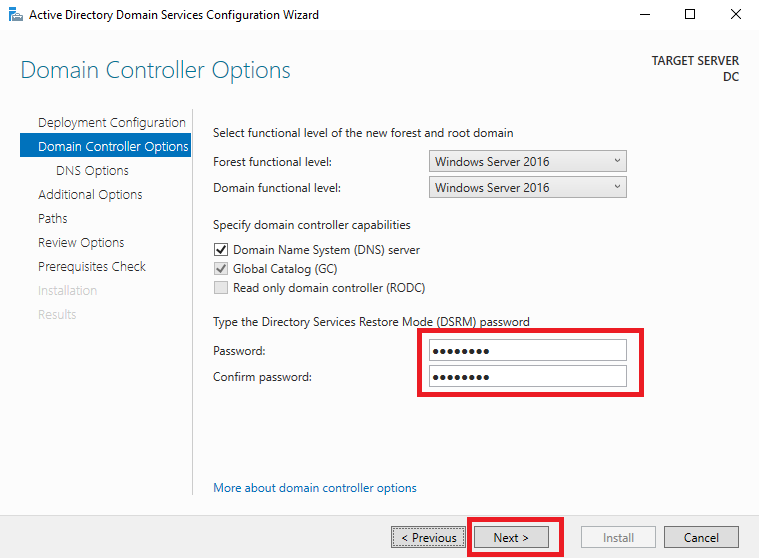
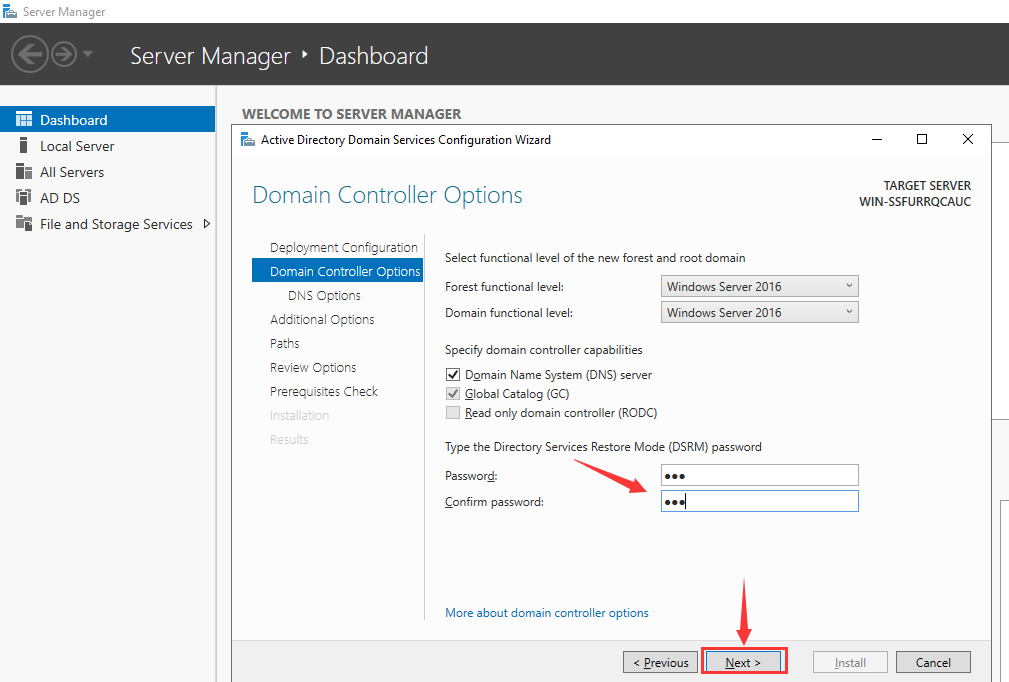
В окне Domain Controller Options придумайте и дважды введите пароль, который будет использоваться для доступа к режиму восстановления служб каталогов. Данный режим предназначен для восстановления служб каталогов Active Directory в случае серьёзных проблем, таких как повреждение БД Active Directory или утеря данных. Для продолжения нажмите Next.
На следующих шагах используйте кнопку Next для продолжения без внесения каких-либо изменений.
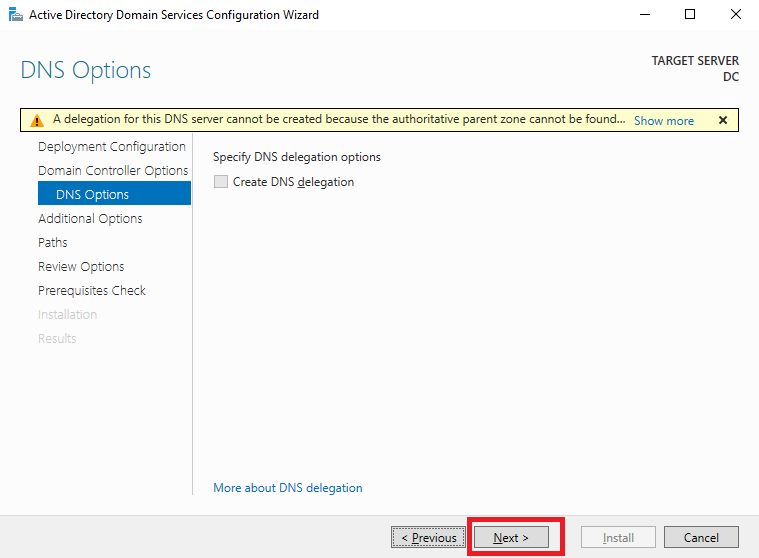
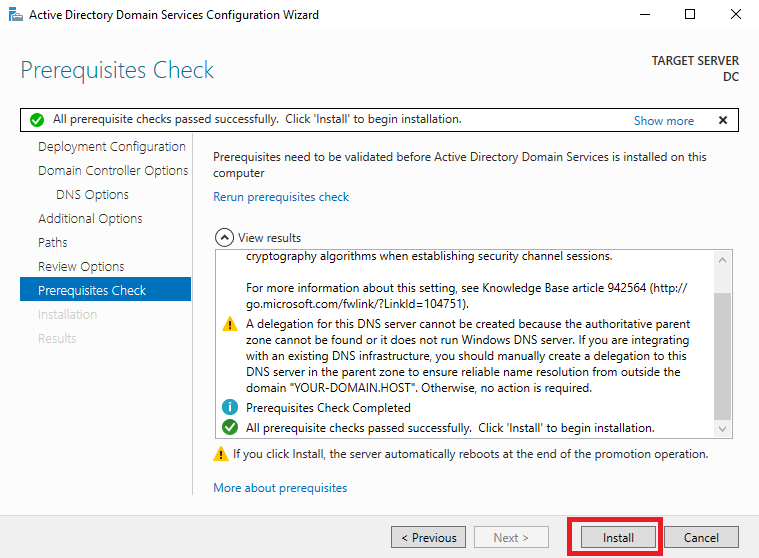
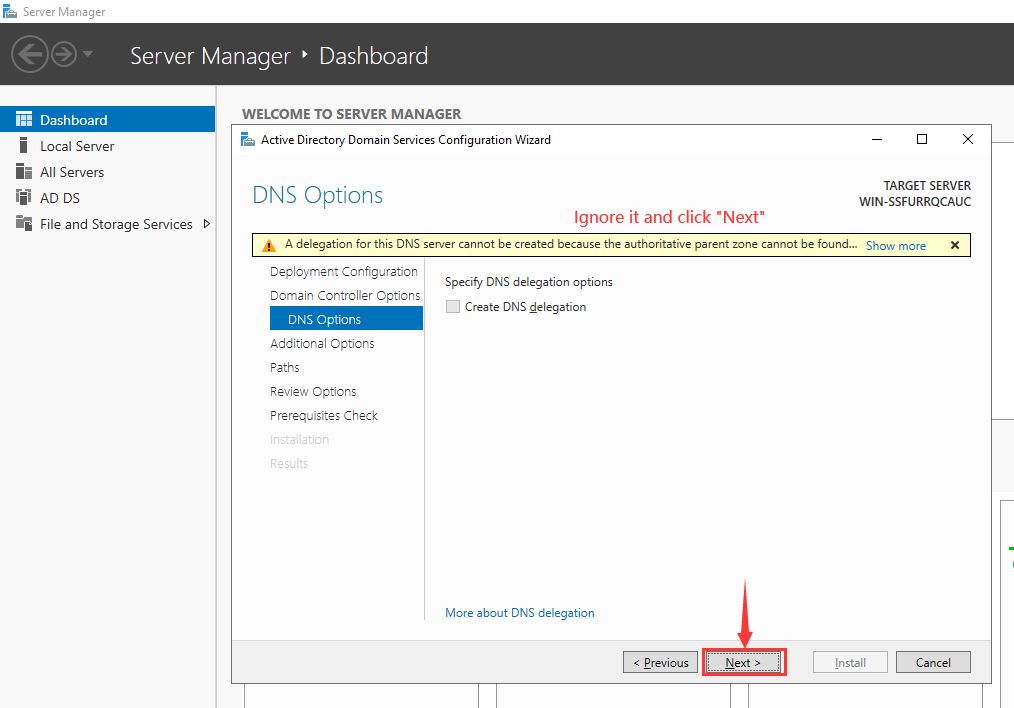
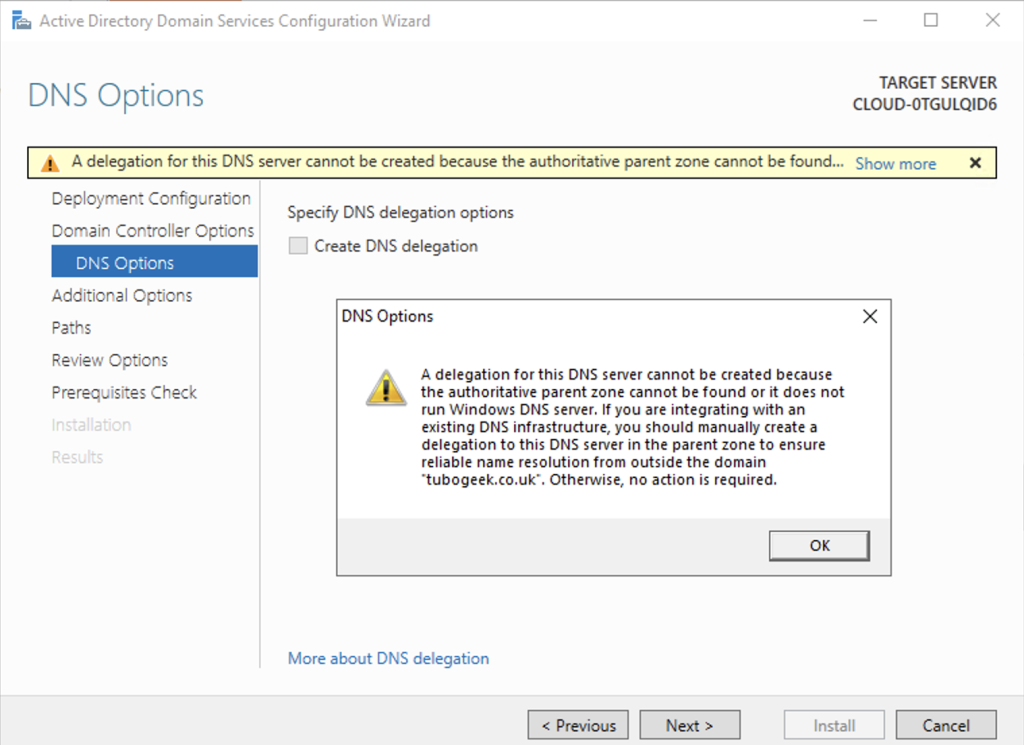
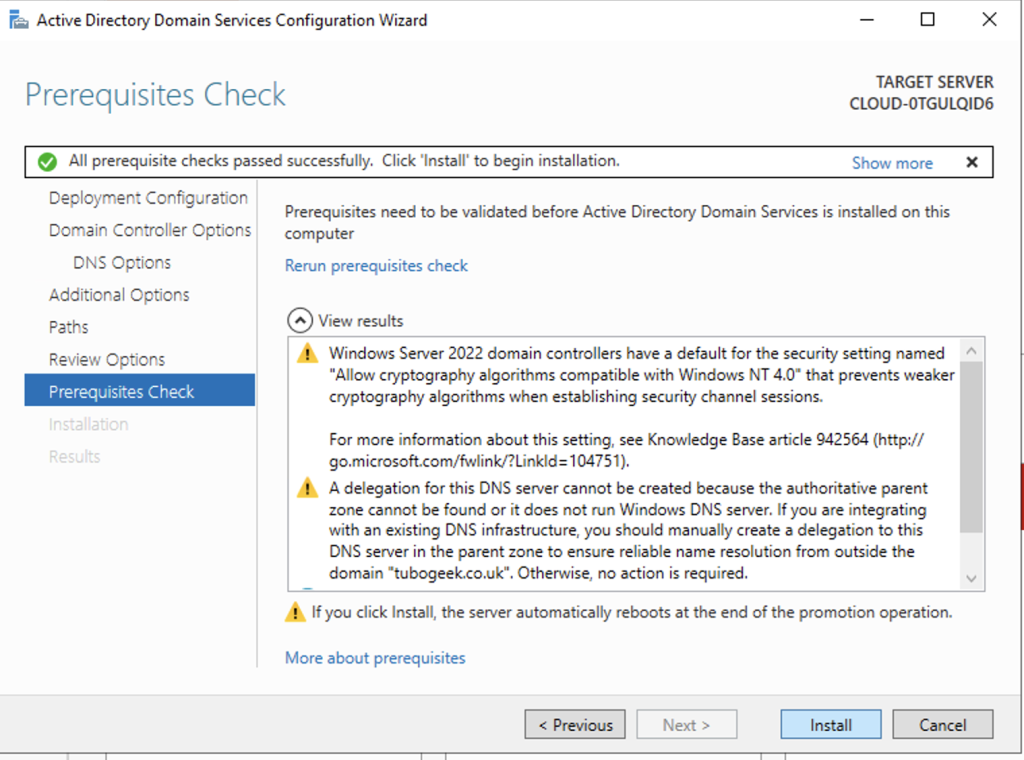
И наконец в окне Prerequisites Check нажмите Install для запуска процесса повышения роли сервера. Здесь следует обратить внимание на сообщение, которое говорит о том, что в настоящий момент не может быть создано делегирование для этого DNS-сервера, поскольку не удаётся найти родительскую зону. В данном случае это нормально, так как мы только создаём её.
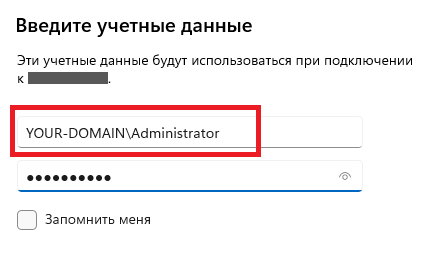
В процессе установки VPS перезагрузится. При авторизации на сервере скорее всего вам нужно будет указать краткое имя домена перед именем пользователем. В нашем примере такая запись будет выглядеть как \YOUR-DOMAIN\Administrator.
После чего вы сможете убедиться, что ваш сервер является частью домена. Для этого откройте Server Manager и перейдите в Local Server.
Active Directory is a powerful tool that allows administrators to manage user accounts, computers, and security policies across an organization’s network. It is a key component of Windows Server, and with the release of Windows Server 2022, how to install Active Directory has become even easier. In this article, we’ll guide you through the process of installing Active Directory on Windows Server 2022.
- Tip
- It is essential to have a reliable backup solution for your active directory. You can either choose the integrated Windows Server Backup service or a 3rd party backup solution, such as EaseUS Active Directory backup tool.
Process of Installing Active Directory on Windows Server 2022
To ensure a successful installation, please log in to your Windows Server 2022 environment as an administrator. Then follow the steps below to install Active Directory.
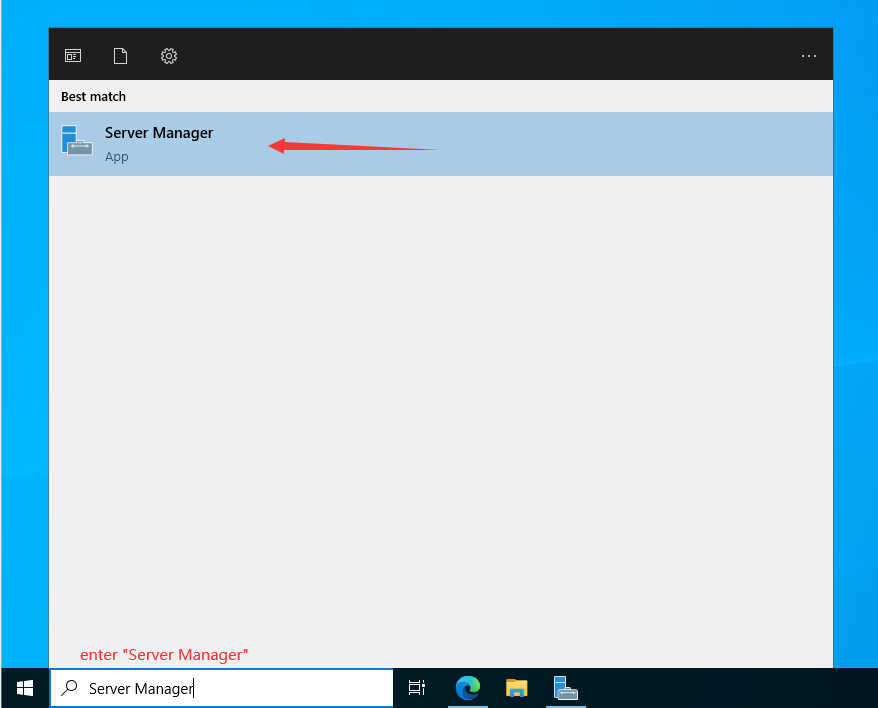
Step 1. Log in to Server Manager
To initiate the installation process for Active Directory Domain Services, please enter «Server Manager» in the Windows search box. After opening it, refer to the image below and follow the outlined steps.
Step 2. Select “Add Roles and Features”
Here are two ways to access to the «Add Roles and Features”. You can either click on the option on the home page or right-click “Manage” to choose the function from the context menu.
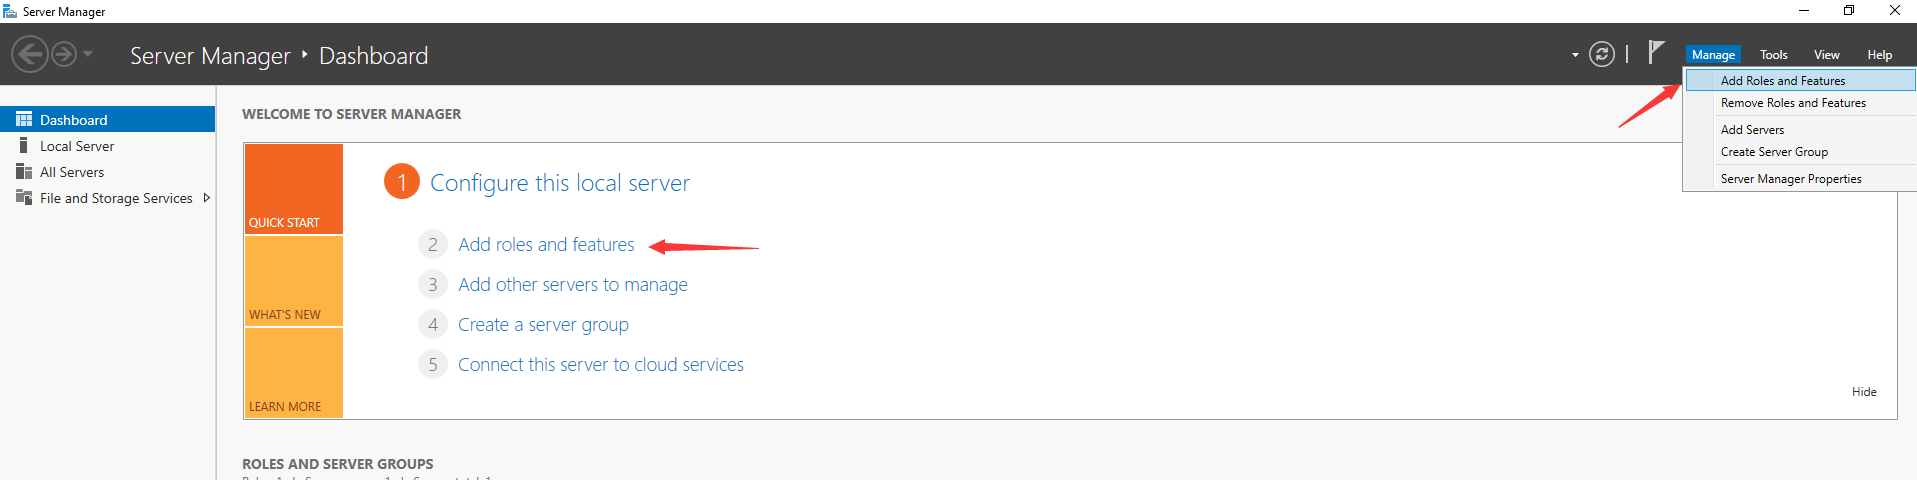
The process will open the “Add Roles and Features Wizard” page, which proceeds with the Active Directory installation. Please click on “Next”.
Step 3. Select Installation Type
On the «Installation Type» screen, select «Role-based or feature-based installation» and click «Next.»

Step 4. Server Selection
In the «Server Selection» screen, select the server on which you want to install Active Directory and click «Next«. Taking the picture as an example, we chose the local Windows Server 2022 Standard as the reference.
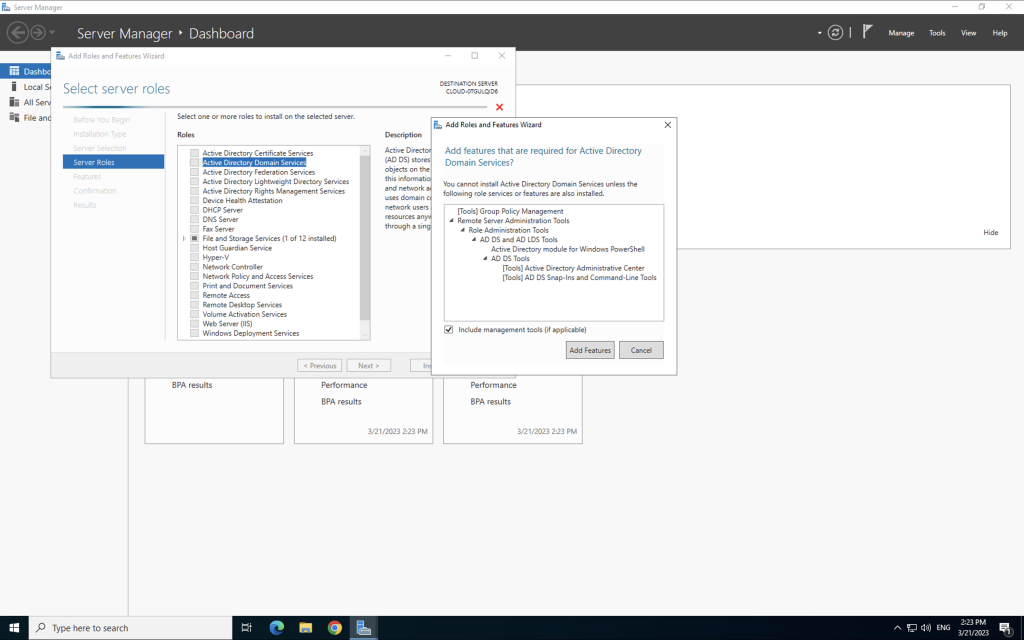
Step 5. Select Server Roles
All the previous settings will guide you to the «Server Roles» page where you will see multiple options with square checkbox beside them. To proceed, select «Active Directory Domain Services».
Step 6. Select and Add Features
The precondition to installing the Active Directory Domain Services is to add the necessary features. So please click “Add Features” first to select features and then proceed with the installation process.
Step 7. Active Directory Domain Service
After step 6, you will be directed to the “Activate Directory Domain Services” page.
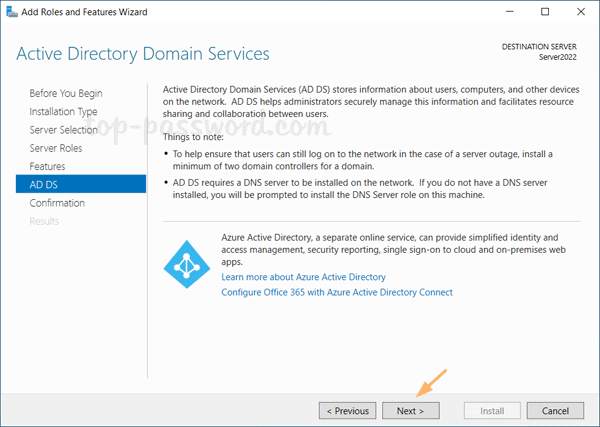
In the «AD DS» screen, review the information and click «Next».
Step 8. Confirm Installation Selections
Review your installation selections for confirmation before proceeding with the actual installation. You have the option to automatically restart the server if required. After checking, please click “Next” to move forward.

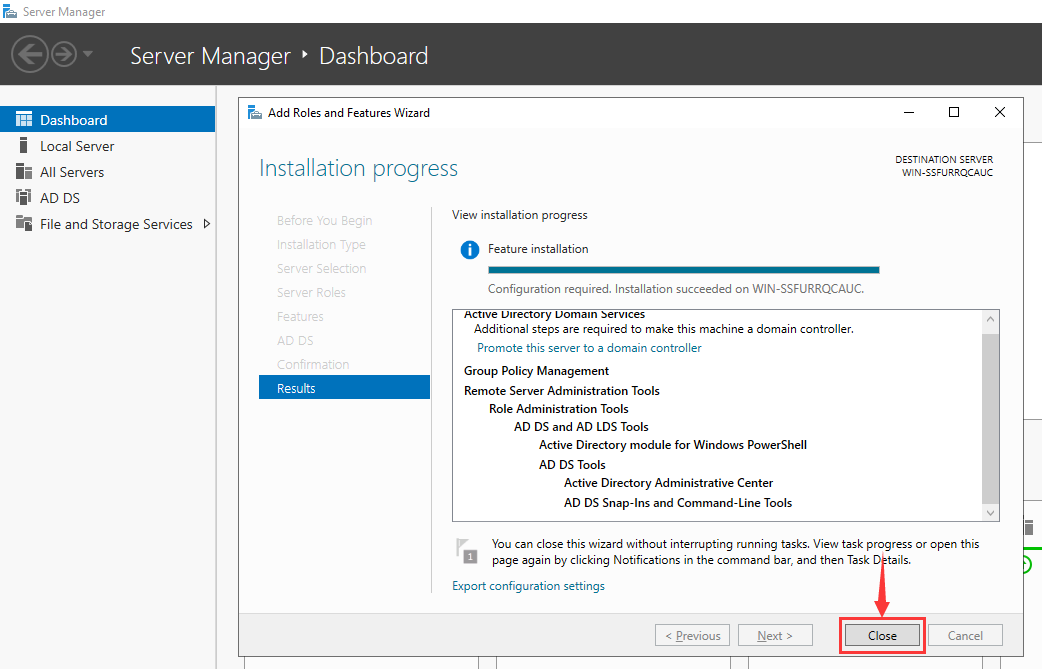
Once the previous settings are done, the installation will proceed.
After it finishes, please click “Close”.
Step 9. Configure Active Directory Domain Services
After Active Directory Domain Services installation is complete, promote it to a Domain Controller. Please open Server Manager and locate the «Manage» tab, which will have a yellow exclamation notification next to it. Click on it and select «Promote this server to a domain controller».
Step 10. Add a Forest
Click on «Promote this server to a domain controller», and a new window titled «Active Directory Domain Services Configuration Wizard» will appear. In this step, we will add a new Forest and customize your root domain name. However, if you have a different preference, you are free to choose the other options. Please enter your root domain name and click on «Next».
Step 11. Domain Controller Options
In the Domain Controller options, keep the default settings checked and set your password. After that, click on «Next».
Step 12. DNS Options
On the “DNS Options” page, there will be a notification at the top stating «A delegation for this DNS server cannot be created because the authoritative parent zone cannot be found». Please disregard this message and proceed by clicking on «Next».
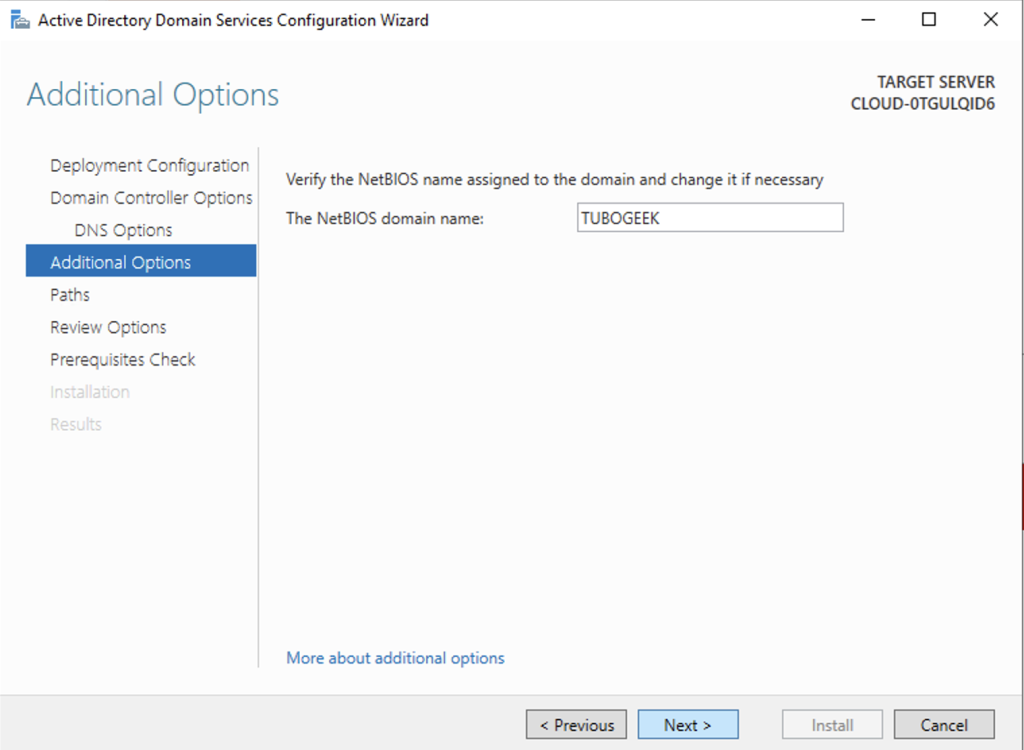
Step 13. Additional Options
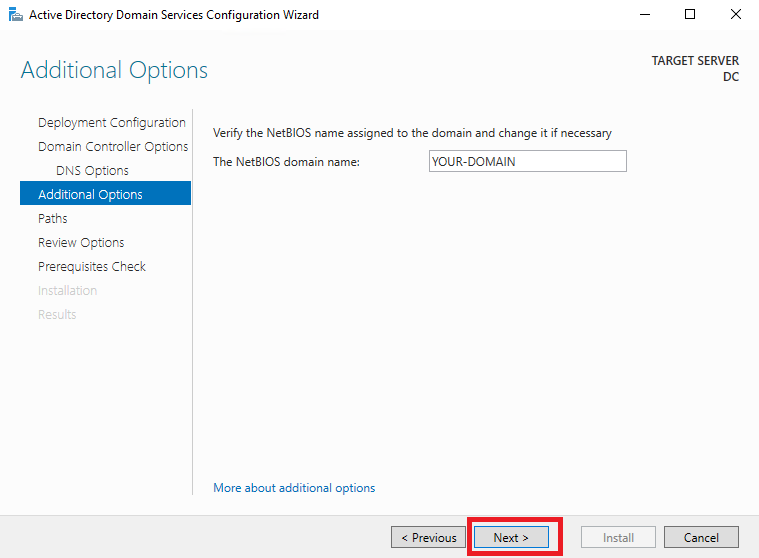
On the page, you can modify the NetBios domain name as long as it doesn’t exceed 15 characters. You are also able to keep the NetBIOS domain name as default. Once you have made your selection, click on «Next».
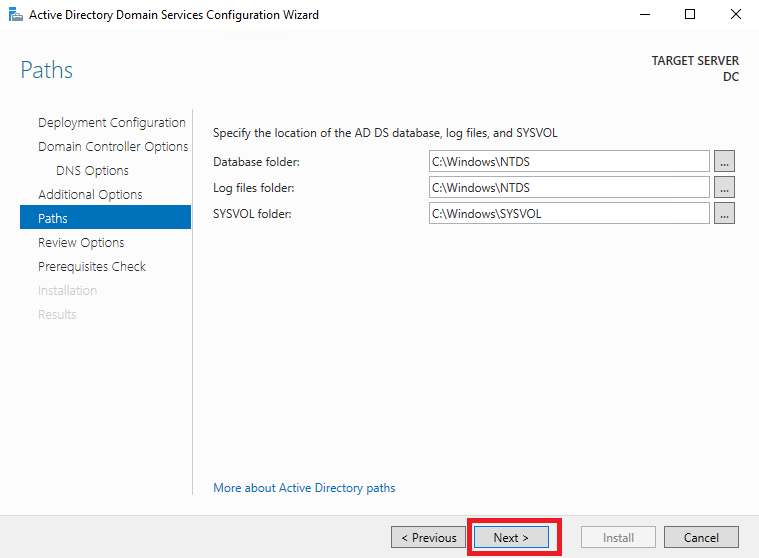
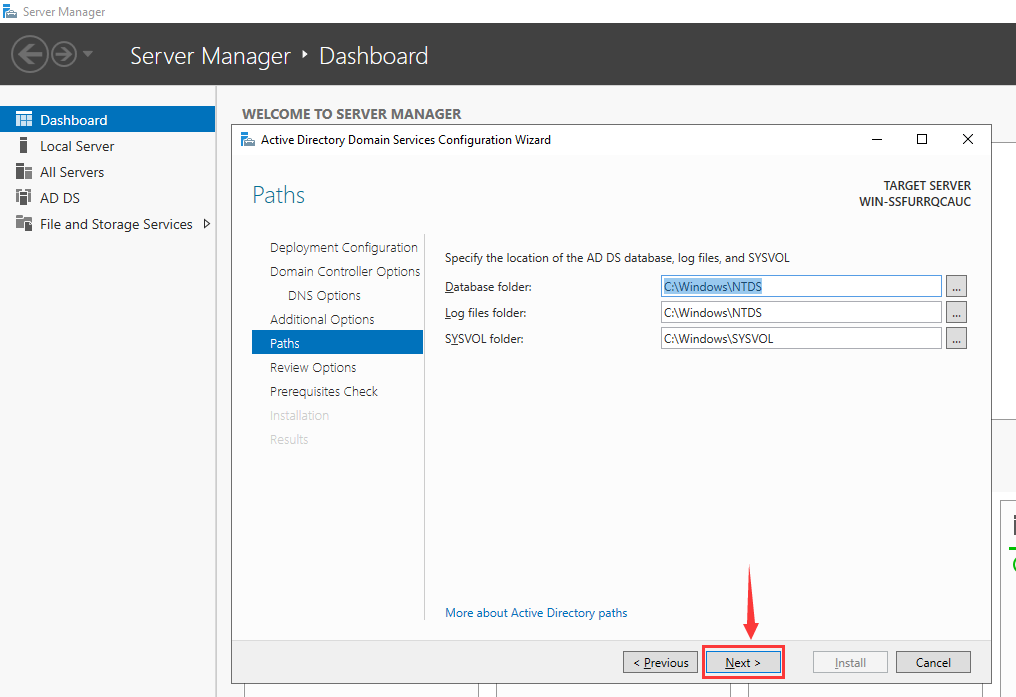
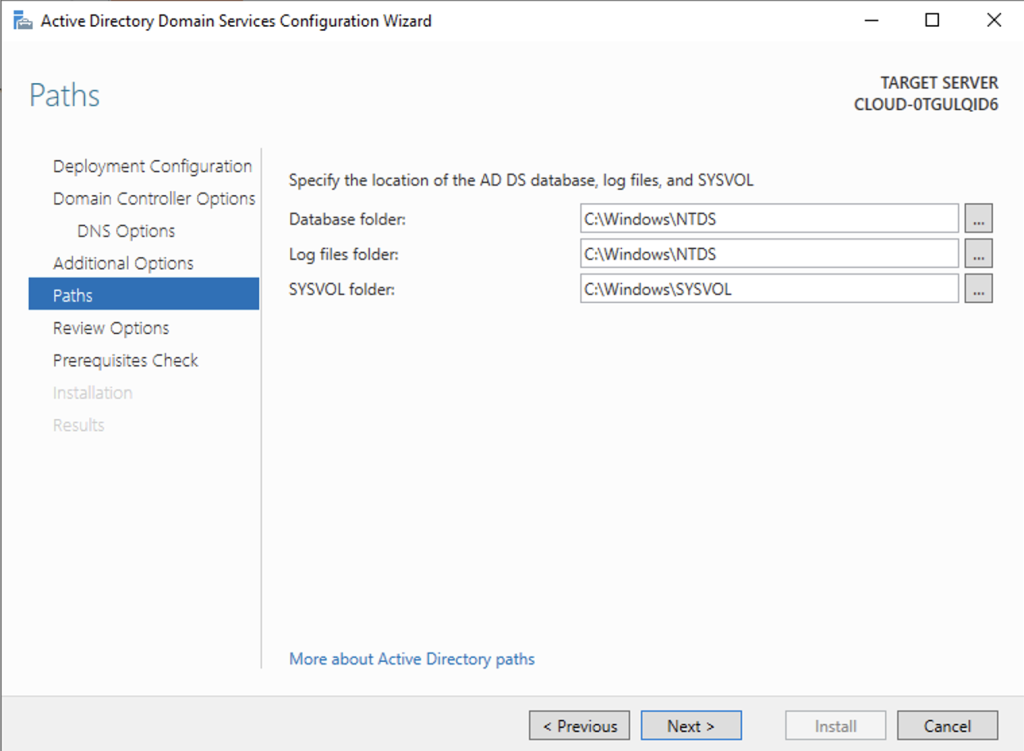
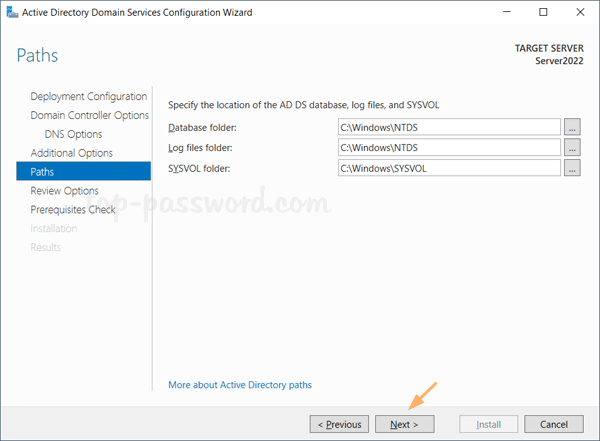
Step 14. Set Path
Please leave paths as default and click “Next” as shown below.
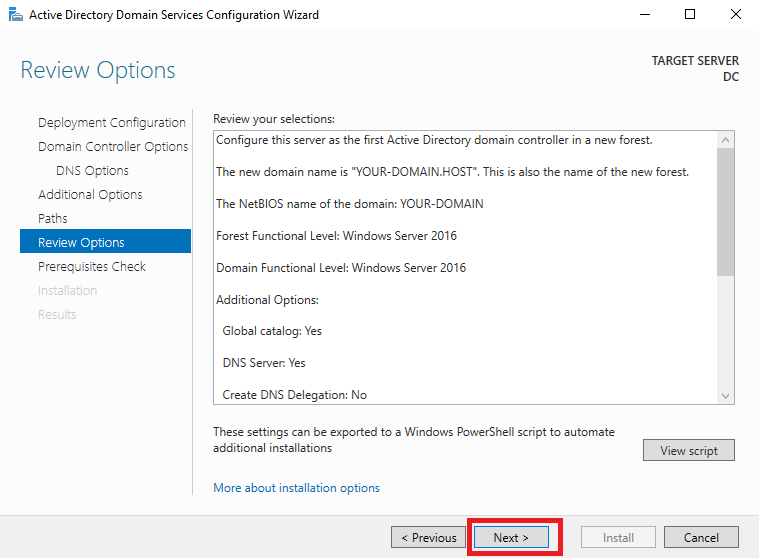
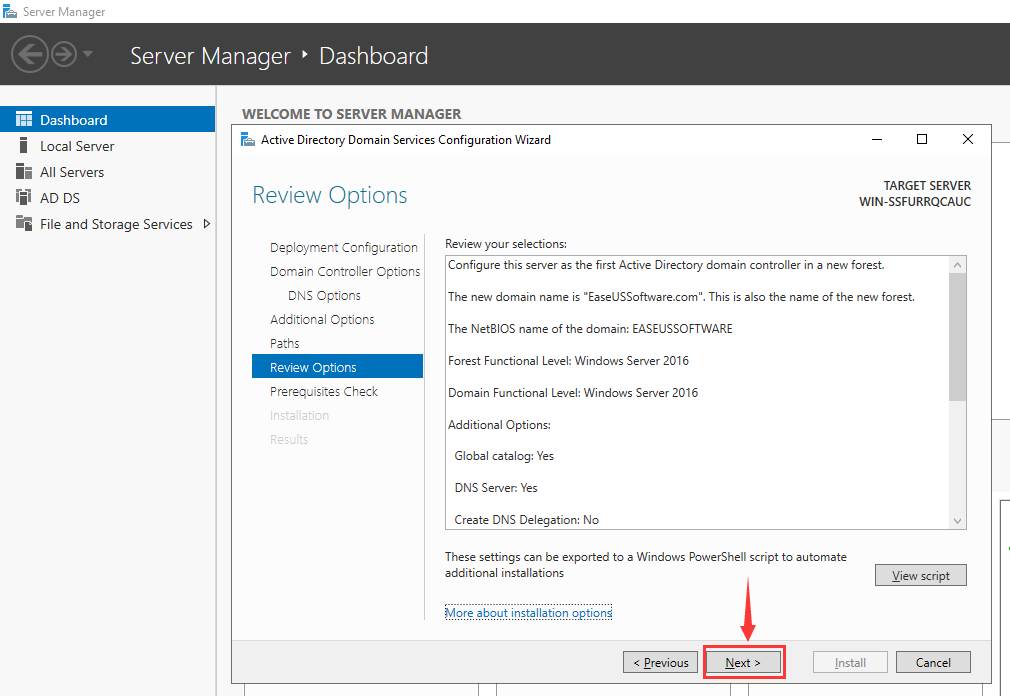
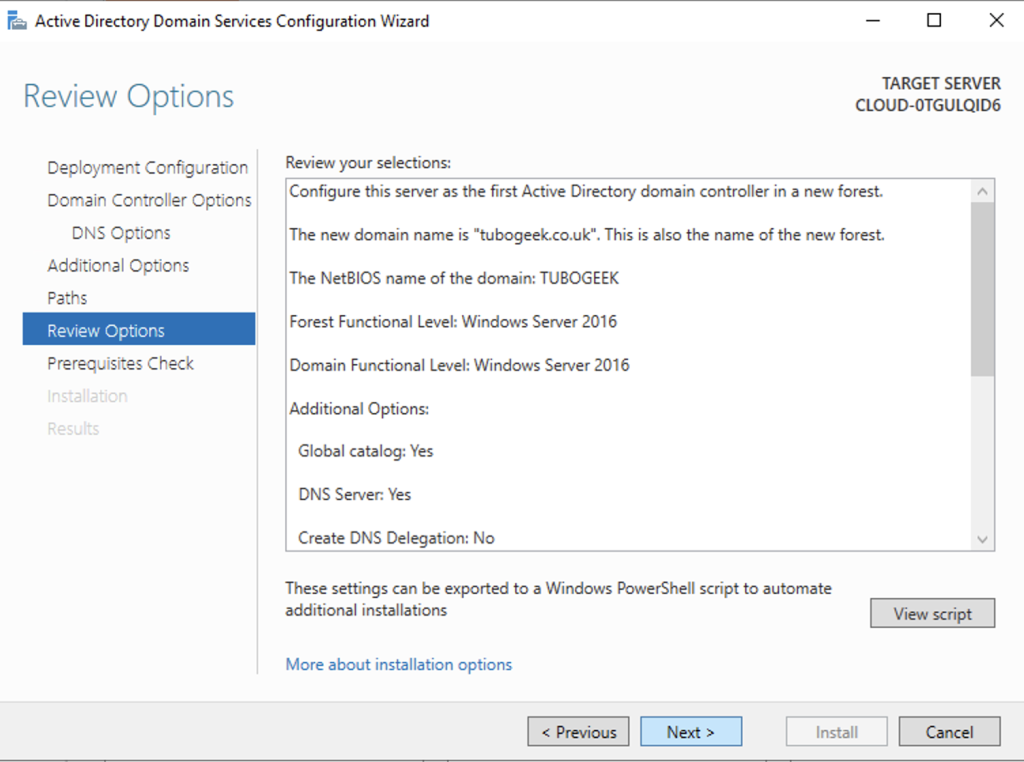
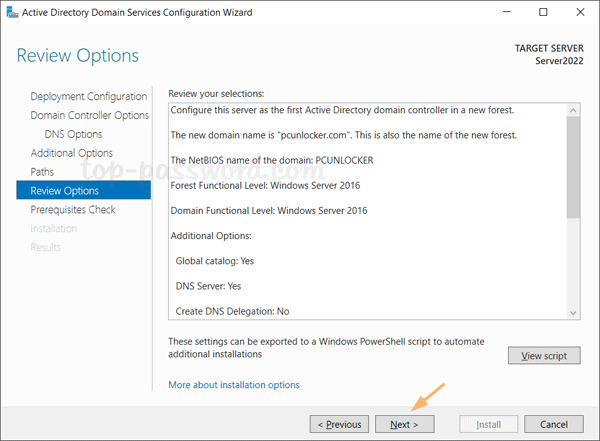
Step 15. Review Options
At this stage, the server will display a summary of the selections you have made. If you don’t want to change your choices, click on «Next» to proceed.
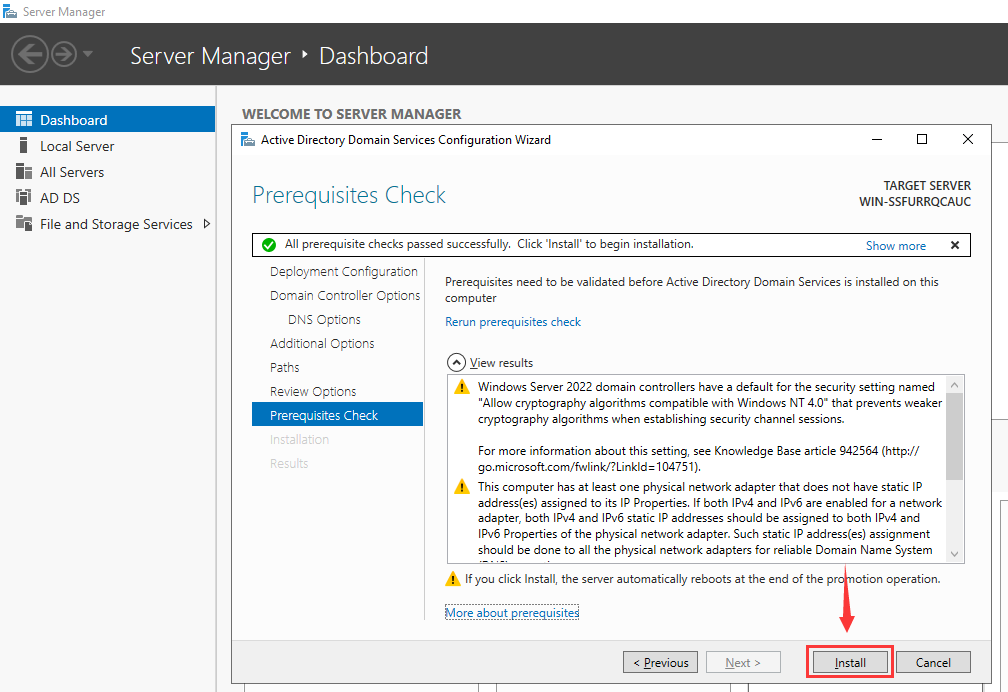
Step 16. Check Prerequisites
At this point, the server will provide a summary of the selections you have made. If you are content with your choices, proceed by clicking on «Install».
Then your server will reboot. After that, you can log into the Domain with your password.
Tools to Back Up Active Directory
After completing the aforementioned process, you will be able to effectively manage user accounts. To prevent potential data loss resulting from inadvertent actions, we recommend all domain administrators use using a reliable backup tool to back up activate directory regularly.
EaseUS Todo Backup Enterprise provides various solutions for all types of data backup, which is an excellent tool for backing up data on your Active Directory to avoid any accidental data loss. You can easily find and select your account there and then set up your backup plans to initiate the backup process.
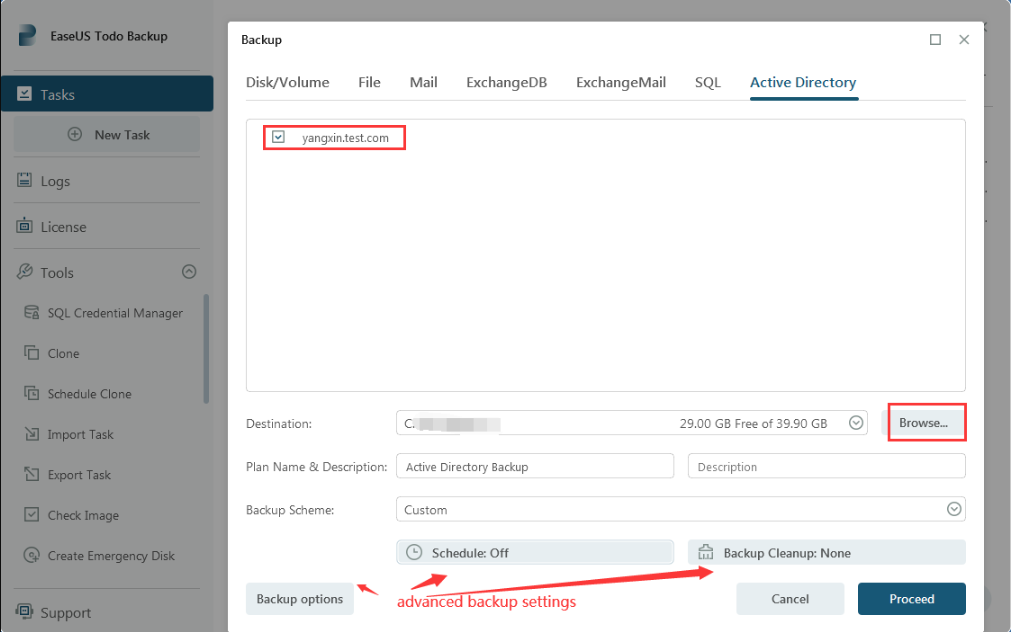
You can also refer to the guide on how to back up an active directory in EaseUS Todo Backup Enterprise.
Conclusion
Installing Active Directory on Windows Server 2022 is a straightforward process that allows administrators to manage user accounts, computers, and security policies across an organization’s network. By following the steps outlined in this article, you’ll be able to install and configure Active Directory on your Windows Server 2022 environment quickly and easily. And please do not forget to use a backup tool to protect your important data.
1. What is Active Directory in Windows Server 2022?
Active Directory in Windows Server 2022 is a directory service that provides a centralized database for managing and organizing user accounts, computers, and other resources on a network. It allows administrators to easily manage and control access to network resources, enforce security policies, and streamline user authentication and authorization processes.
2. How do I know if Active Directory is installed?
- Open the Server Manager
- In the Server Manager, click on «Local Server» in the left-hand pane.
- Look for the «Roles and Features» section in the right-hand pane and click on «Add roles and features.»
- In the «Add Roles and Features Wizard,» click «Next» until you reach the «Server Roles» page.
- Look for the «Active Directory Domain Services» role in the list. If it is checked, then Active Directory is installed on the server. If it is not checked, then Active Directory is not installed.
3. How to find your Active Directory Search Base?
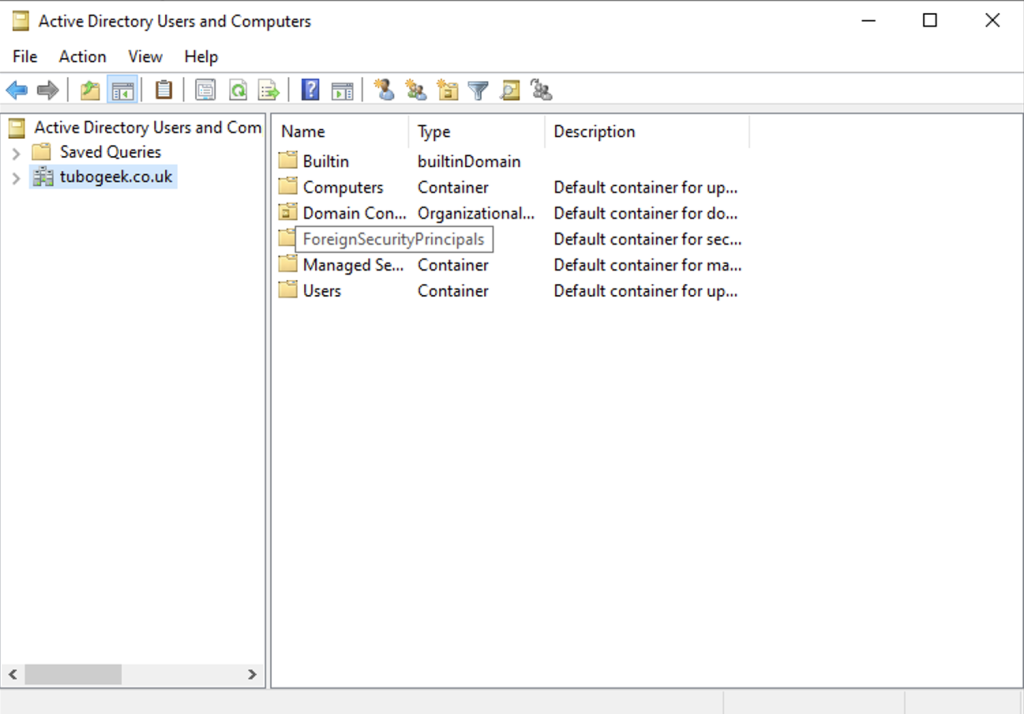
- Select Start > Administrative Tools > Active Directory Users and Computers.
- In the Active Directory Users and Computers tree, find and select your domain name.
- Expand the tree to find the path through your Active Directory hierarchy.
4. Can Windows Server 2022 Essentials be a domain controller?
No, Windows Server 2022 Essentials cannot be a domain controller. Microsoft has discontinued the Essentials edition of Windows Server starting with the 2022 release. Instead, Microsoft recommends using the Standard or Datacenter editions of Windows Server 2022 for domain controller roles.
Active Directory (AD) is a cornerstone of Microsoft Windows Server environments, essential for managing users, computers, and other resources within a network. With AD, administrators can create domain controllers that efficiently handle user accounts, implement group policies, and control access to resources across the domain. This comprehensive guide will walk you through installing and configuring Active Directory on Windows Server 2022, giving you with the tools to centralize and streamline network management.
All these steps can be completed using PowerShell; look out for the PowerShell tips.
180-Day Windows Server Trial
Did you know you can get a 180-day free trial of Windows Server 2022 – Simply download direct from Microsoft.
Active Directory Requirements and Pre-Installation Steps
Before diving into the installation process, let’s ensure your Windows Server environment meets the necessary active directory requirements.
These include:
- Processor: 1.4 GHz 64-bit processor
- RAM: 2 GB or higher
- Disk Space: At least 40 GB of free space on the system drive
- Network Adapter: A network adapter supporting Ethernet, Fast Ethernet, or Gigabit Ethernet
- Operating System: Windows Server 2022
- DNS Server: Configured or available on the network
- Domain Name: A unique and valid domain name
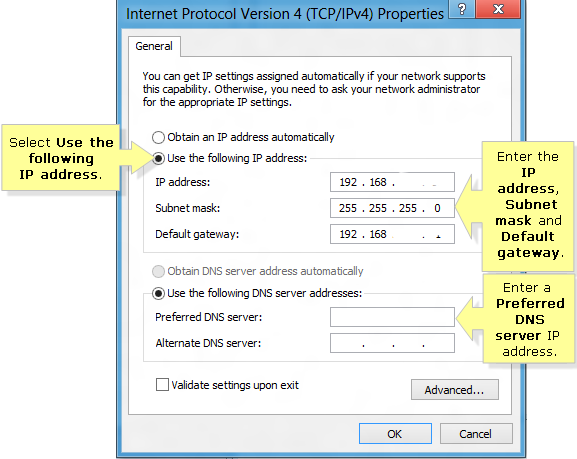
- Static IP Address: Setting a static IP address on your Windows Server is crucial. It ensures a consistent IP for your domain controller, preventing disruptions caused by IP changes.
Static IP Address
To set a static IP address, use the Network and Sharing Center or PowerShell:
Note: Set the IP Address and Default Gateway to your local values
To set a static IP address:
- First, open the Network and Sharing Center.
- Select your primary Ethernet connection. (Usually called Ethernet#1)
- Click on Properties
- Select Internet Protocol Version 4 (TCP/IPv4) from the list.
- Click on Properties
- Enter the IP address, subnet mask, default gateway, and DNS server address.
PowerShell
New-NetIPAddress -InterfaceAlias "Ethernet" -IPAddress "10.1.1.10" -PrefixLength 24 -DefaultGateway "10.1.1.1"It is important to note that the DNS server address should be set to the server’s IP address (127.0.0.1). This will ensure the server can resolve its hostname and prevent issues with the Active Directory installation.
Once the static IP address has been set, you can proceed with the AD installation.
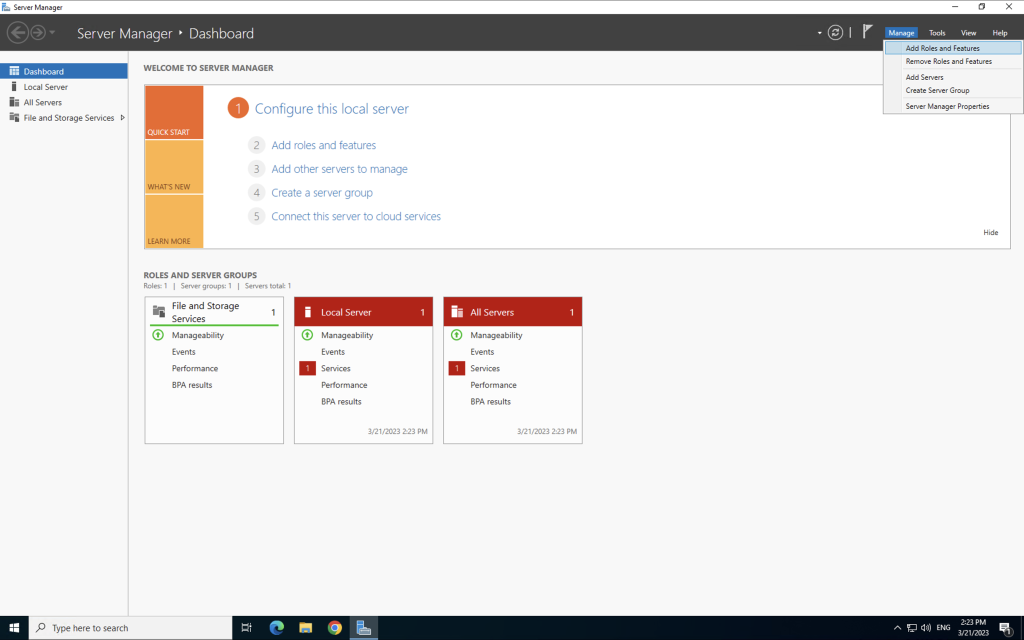
Step 1 – Add the Active Directory Domain Services Role
The first step in installing AD is to use Server Manager to add the Active Directory Domain Services role. To do this:
- Open Server Manager and navigate to “Add roles and features.”
- Click “Next” until you reach the “Server Roles” screen.
- Select “Active Directory Domain Services” and click “Next.”
- Review the selected features and click “Install.”
- Click Next until you reach the Server Roles screen. Select Active Directory Domain Services and click Next.
- Review the features and click Next again. Finally, click Install to begin the installation process.
PowerShell
Install-WindowsFeature -Name AD-Domain-Services, RSAT-AD-Tools -IncludeManagementToolsThis command not only installs the AD Domain Services role but also includes the Remote Server Administration Tools (RSAT), giving you the tools to manage Active Directory from other computers within the domain.
Step 2 – Install Active Directory
After installing the Active Directory Domain Services role, you must promote the server to a domain controller.
To do this,
- Open Server Manager
- Select the Active Directory Domain Services role from the Dashboard.
- Click on the Configuration Required link to open the configuration wizard. Follow the prompts to configure the necessary settings, such as the domain name, domain functional, and forest functional levels.
PowerShell
Install-ADDSForest -DomainName "turbogeek.co.uk" -DomainNetbiosName "TURBOGEEK" -DomainMode "WinThreshold" -ForestMode "WinThreshold" -InstallDns -NoRebootOnCompletionStep 3 – Setup the Domain
After selecting Promote this server to a domain controller, you will see the screen below. Fill in the information that’s relevant to you.
- Complete the Deployment configuration.
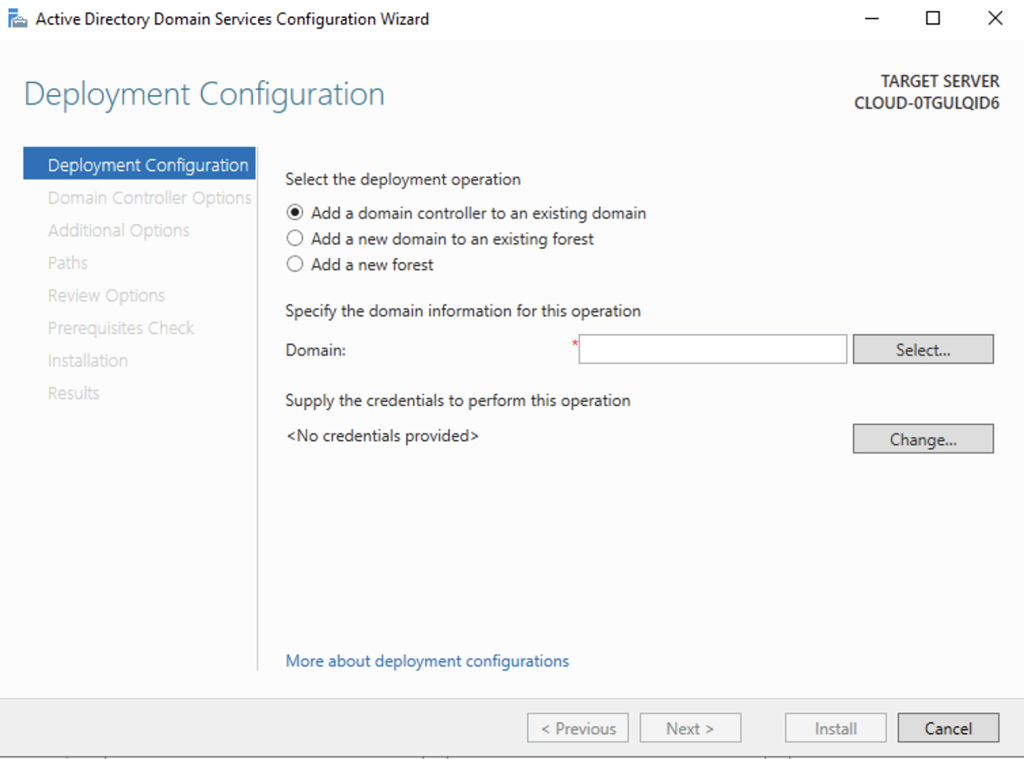
- Add the domain controller to an existing domain, add to an existing forest, or create a new one. In this example, I am creating a new forest called turbogeek.co.uk
- Set the Domain Functional Level and set a domain administrator password. I have also selected my domain controller as the DNS server and Global Catalog.To find out more about Domain Functional Levels, click here.

If required, you can configure your DNS settings on the next page. In my example, I am skipping this warning because my domain controller will be the DNS server too. It may be different in your domain.
- The installer should automatically populate the NetBIOS name on the next screen.
- Next, set the location to save the AD database, log files, and SYSVOL. In this example, I will leave these values as the default.
- You may want to move NTDS and SYSVOL to separate disks in a production environment. This can improve performance on very large AD deployments.
- Click next on the Review Options and Prerequisites Check pages.
- Once the installer is running, give it a few minutes to complete the installation.
Step 4 – View Active Directory Users and Computers
- Then, from Server Manager, Open “Active Directory Users and Computers
- Equally, you can type dsa.msc from the command prompt or Powershell CLI

Installing AD on Windows Server 2022 is crucial in managing users, computers, and resources in a network environment. By following the steps outlined in this guide, you can ensure that the installation is successful and that your network environment is secure and easy to manage. Remember to verify the successful installation and access AD tools to ensure everything works correctly.
Windows Server Hints and Tips
Here are some hints and tips for Windows Server 2022:
Use Server Core installation:
Server Core installation provides a minimalistic interface with less disk space usage and fewer vulnerabilities, making it more secure and easier to manage.
Enable Windows Admin Center:
Windows Admin Center is a web-based tool with a graphical interface for server management tasks. It’s free and easy to install, making it a valuable addition to any Windows Server 2022 environment.
Use the latest security features:
Windows Server 2022 has many built-in security features, such as Credential Guard, Device Guard, and Just Enough Administration (JEA). It’s recommended to enable these features to enhance the server’s security posture.
Consider using Azure Hybrid Benefits:
If you have an Azure subscription, you can use the Azure Hybrid Benefits to save money on your Windows Server 2022 licensing costs. This benefit allows you to use your existing Windows Server licenses to run virtual machines in Azure, reducing the need to purchase new licenses.
Use Storage Spaces Direct:
Storage Spaces Direct is a software-defined storage solution that allows you to use commodity hardware to create highly available and scalable storage solutions. It’s easy to set up and manage and can be a cost-effective alternative to traditional storage arrays.
Use the Windows Server Update Services (WSUS):
WSUS is a built-in feature allowing you to manage and deploy Windows Servers and other Microsoft product updates. Therefore, using WSUS can help you maintain the server’s security and stability by keeping it up-to-date with the latest patches and updates.
Enable Remote Desktop Protocol (RDP) with caution:
RDP is a convenient way to access the server remotely but can also be a security risk if not configured correctly. It’s recommended to use Network Level Authentication (NLA) and limit the number of users accessing RDP.
These are just a few hints and tips for Windows Server 2022, and there are many other features and best practices to explore. It’s important to stay informed and up-to-date with the latest developments and security updates to ensure the server’s optimal performance and security.
FAQ on Installing Active Directory on Windows Server 2022
What is Active Directory?
Active Directory is a Microsoft service that manages identities and authentication for resources, including users, computers, and applications. It simplifies the management of user accounts and enables centralized management of security policies.
What are the system requirements for installing Active Directory on Windows Server 2022?
To install Active Directory on Windows Server 2022, your server must meet the minimum hardware and software requirements. These include a 64-bit processor with a minimum of 4 GB of RAM and 64 GB of available disk space.
Q: Can I install Active Directory on a Windows Server 2022 Core installation?
A: You can install Active Directory on a Windows Server 2022 Core installation. However, the process is command-line based, and you will need to use PowerShell or the Sconfig tool to install and configure Active Directory.
Q: How do I install Active Directory on Windows Server 2022 using the Server Manager?
A: To install Active Directory using the Server Manager, launch the Server Manager and click on “Add roles and features”. Then select the “Active Directory Domain Services” role and follow the wizard to complete the installation.
Q: How do I configure Active Directory after installation?
A: After installing Active Directory, you must configure it by running the Active Directory Domain Services Configuration Wizard. This wizard will guide you through the process of configuring your domain, including setting up DNS, creating a domain controller, and configuring forest and domain functional levels.
Q: Can I install Active Directory on Windows 2022 Nano Server?
A: You cannot install Active Directory on a Windows 2022 Nano Server. Nano Server is a lightweight installation option that does not include the Active Directory Domain Services role.
Q: What is the difference between a domain and a forest in Active Directory?
A: A domain is a logical group of computers, users, and devices with a common security database. A forest is a collection of domains with a common schema and trust relationship. A forest can contain one or more domains.
Q: Can I add a Windows Server 2019 domain controller to a Windows Server 2022 domain?
A: You can add a Windows Server 2019 domain controller to a Windows Server 2022 domain. However, you must ensure that the forest and domain functional levels are compatible with Windows Server 2019.
Q: Can I install Active Directory on a virtual machine running on Windows Server 2022?
A: Yes, you can install Active Directory on a virtual machine running on Windows Server 2022. However, you must ensure that the virtual machine meets the minimum hardware and software requirements for installing Active Directory.
Q: What are some best practices for securing Active Directory on Windows Server 2022?
A: Some best practices for securing Active Directory include enforcing strong passwords, limiting administrative access, enabling auditing, and monitoring logs for suspicious activity regularly. You should also keep your server up-to-date with the latest security patches and updates.
Q: What is the role of the Domain Admins group in an Active Directory environment?
A: The Domain Admins group is a powerful group within Active Directory that grants its members full administrative access over all domain controllers, servers, computers, and user accounts within the domain. This includes the ability to reset passwords, modify security settings, and install software. It’s crucial to carefully manage membership in this group to maintain the security and integrity of your Active Directory environment.
Q: Can I have multiple domain controllers in my Active Directory environment? Why would I do this?
A: Yes, you can have multiple domain controllers within a single domain. This provides redundancy and fault tolerance, ensuring that if one domain controller fails, others can continue to authenticate users and provide access to resources. It also helps distribute the workload and improve overall performance, especially in larger organizations with numerous users and computers.
Q: Is there a difference between installing Active Directory on a physical server versus a virtual server?
A: While the installation process is generally the same for both physical and virtual servers, there are some considerations. Virtual servers may have specific requirements for allocating resources like CPU, RAM, and disk space. Additionally, ensure your virtualization platform supports Active Directory and that you follow best practices for virtualized domain controllers.
Q: How does Active Directory integrate with other Microsoft products?
A: Active Directory seamlessly integrates with a wide range of Microsoft products, including Exchange Server for email, SharePoint for collaboration, and Skype for Business for communication. This integration provides a unified authentication mechanism, single sign-on (SSO) capabilities, and centralized management of user accounts and security policies across the entire Microsoft ecosystem.
Q: Can Active Directory authenticate users on older Windows Server versions like Windows Server 2008 and 2008 R2?
A: Yes, Active Directory can authenticate users on older Windows Server versions, including Windows Server 2008 and 2008 R2. However, it’s important to note that these older operating systems are nearing or have reached the end of their support lifecycle. Consider upgrading to a newer version of Windows Server to benefit from the latest features, security updates, and improved performance.
Q: How does Active Directory ensure the accuracy and integrity of DNS records?
A: Active Directory Domain Services (AD DS) integrates with Domain Name System (DNS), providing a dynamic and centralized way to manage DNS records. When changes are made to objects in Active Directory, such as adding a new computer or modifying a user account, the corresponding DNS records are automatically updated, ensuring that clients can locate resources on the network reliably.
Q: What are organizational units (OUs) in Active Directory, and how are they used?
A: Organizational units (OUs) are containers within Active Directory that allow administrators to logically organize and manage objects, such as users, computers, and groups. OUs can be used to delegate administrative control, apply group policies, and simplify the management of complex Active Directory environments.
Feel free to ask if you’d like more Q&A or have any other questions!
Want to check out Windows Server 2025? Why not use our guide to get up and running on Microsoft’s latest Operating System.
Thanks for taking the time to read this article. if you have any questions or feedback, please write in the comment section below.
Post Views: 19,436
This article explains how to install Active Directory Core Server 2022 using any of the below methods. Windows Server Core is the best platform to host an Active Directory domain controller role due to its lower resource requirements and increased stability and security. In this article, we will show you how to install a domain controller in Windows Server Core 2022 in a new or existing Active Directory Forest with PowerShell.
Table of Contents
Windows Server Core 2022 Active Directory Installation
Joining Windows Server Core to a domain controller lets you manage the security of the server centrally. Instead of creating local user accounts and collecting them on the Windows Server Core device, you can utilize a directory services solution, such as Active Directory, to manage security settings and user access for all the resources on your network. In my previous article, I Install Windows Server 2022 Core.
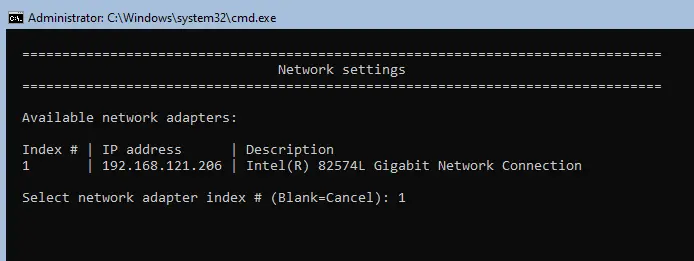
Change Windows Server 2022 name
Give a static IP address
A powerful administrator password
Date and Time
Install Active Directory Core Server 2022
To install Active Directory on Windows Server 2022 core, we have to set the server as per the recommended configuration for an Active Directory domain controller.
Type 15 and hit enter to exit from the SConfig interface.

By following my previous article on how to install Windows Server Core 2022 and assign a static IP address,.
Install Active Directory on Server Core Using PowerShell
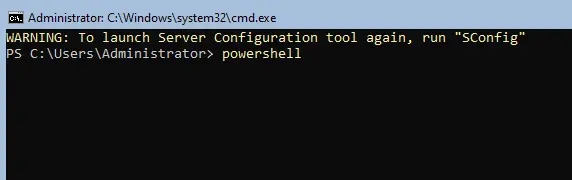
Enter PowerShell and hit enter to start the PowerShell command to create the Domain Controller
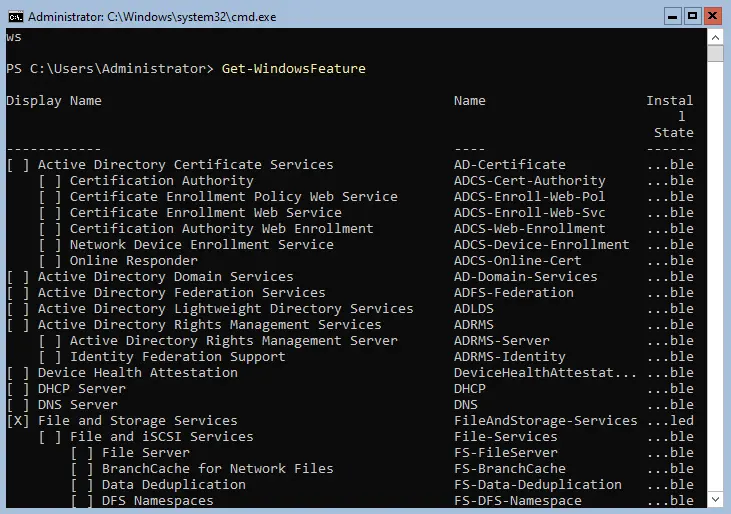
Type the following command to view the available Windows features:.
Get-WindowsFeature
Type
Get-Windowsfeature | ? {$_.Name -LIKE "ad*"}

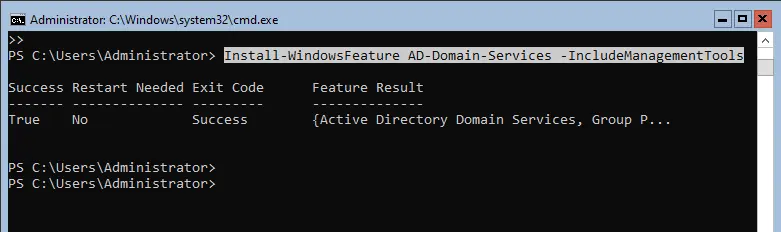
To install the domain controller on Server Core, type the below command.
install-windowsfeature AD-Domain-Services -IncludemanagementTools

Installing Active Directory on the core server in 2022.
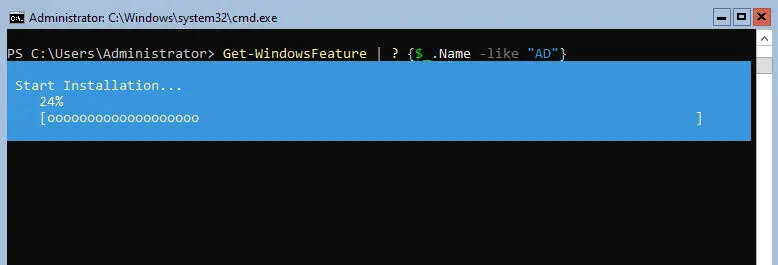
The Active Directory Domain Services feature was successfully enabled.
Configure Active Directory on Server Core 2022
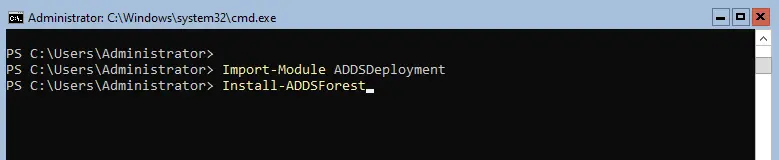
Enter the following commands:
import-Module ADDSDeployment
install-ADDSForest
Now type Y, and then hit enter.
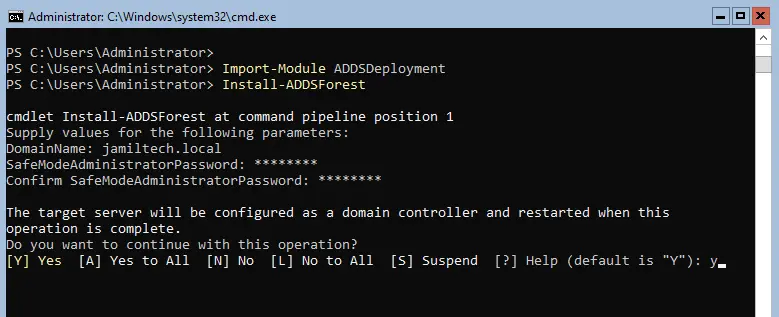
While installing Active Directory on the core server, you will see some warnings.
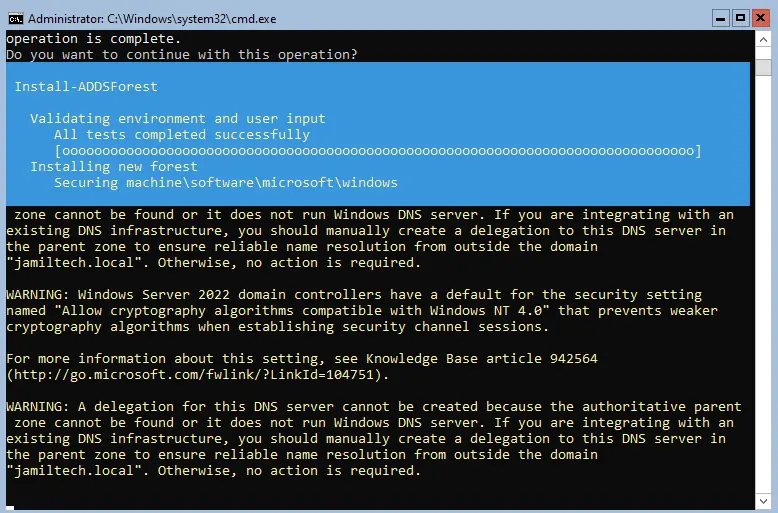
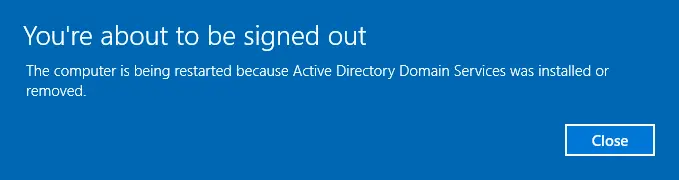
Once the Active Directory installation is done, the server will reboot automatically.
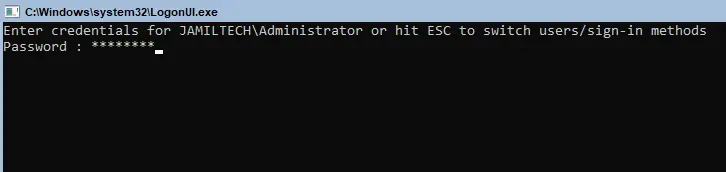
After restarting the server, enter the credentials, and then hit enter.
We have successfully installed Active Directory on the Windows server core.
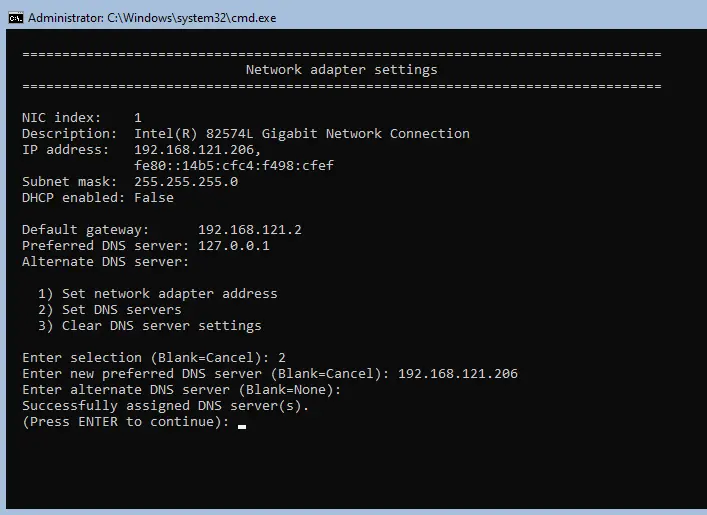
Type 8 to change the server’s DNS.
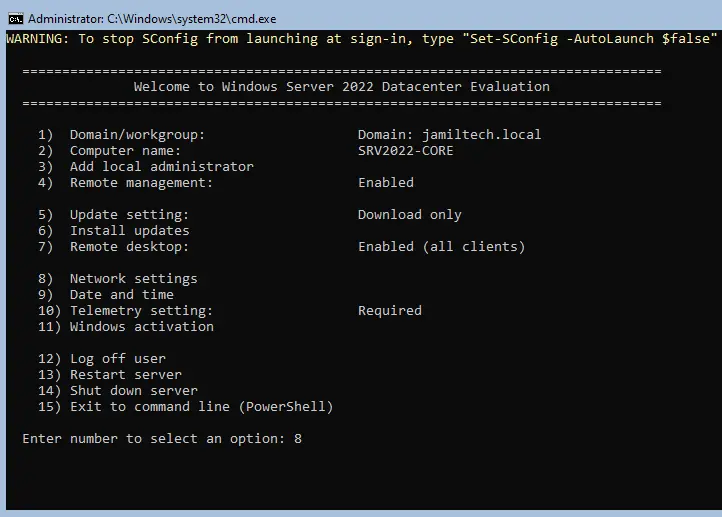
Type 1
Here you can see your server’s DNS, a loop address. You can change it.
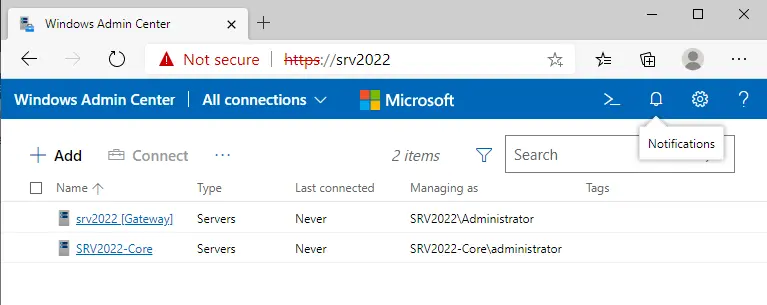
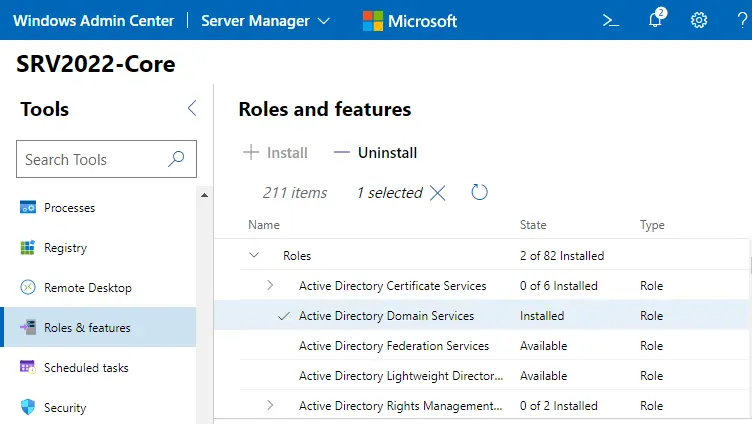
Install Active Directory Core Server using Windows Admin Center
Windows Admin Center will help you install Active Directory domain service roles and features, but for active directory configuration, we need to use PowerShell.
Click on your core server to install Active Directory domain services.
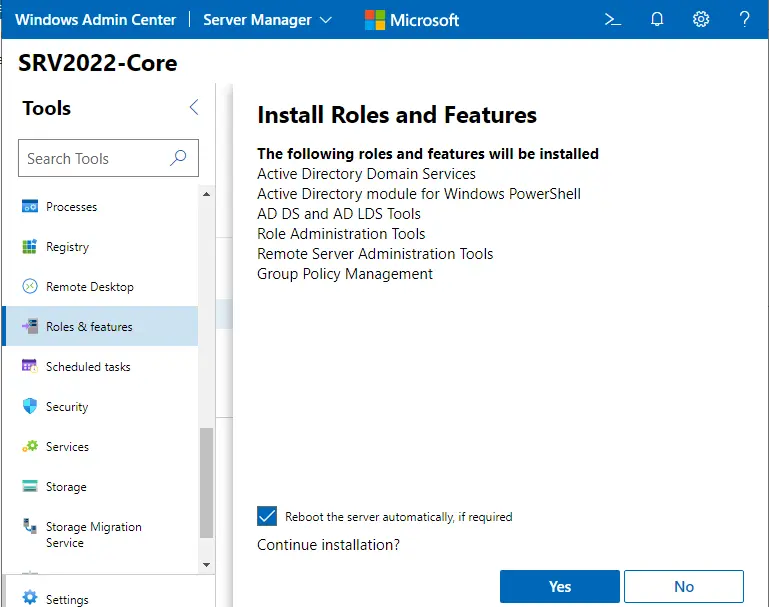
Under the Admin Center, it is very easy to install the Active Directory Domain Services role. After connecting to the server, scroll down, go to Roles and Features, and then install the ADDS role.

Enabling the Active Directory Domain Services role via Windows admin center
The Active Directory installation wizard will show you how to restart the server automatically. Actually, after installing only the Active Directory role, it won’t reboot. Choose yes
If required, please reboot the core server.
Refer to this article for more details about installing Active Directory on the core server in 2022.
Jamilhttp://jamiltech.com
A Professional Technology Blog Writer | An energetic professional with more than 20+ years of rich experience in Technology, Planning, Designing, Installation, and Networking.
How can I set up a domain controller for small office? If you want to install Active Directory on Windows Server Core, you need to prepare a PowerShell script and it’s a bit challenging. For Windows Server with desktop experience (GUI), the setup procedure is much easier. In this tutorial we’ll show you how to install Active Directory in Windows Server 2022, and promote it to domain controller.
Part 1: Install Active Directory in Windows Server 2022
Before getting started, give your server a static IP address instead of letting DHCP assign the IP address automatically. Once logged in with the local administrator account, you can install Active Directory by following these steps:
- Click the Start button, and then click the “Server Manager” shortcut which should appear in the Start Menu and Live Tiles.

- Click the “Add roles and features” option.

- When the wizard starts, click Next.

- Choose the “Role-based or feature-based installation” type, click Next.
- Select the local server where the Active Directory role will be installed, and click Next.
- On the Server Roles page, check the “Active Directory Domain Services” role from the list.
- When a pop-up window prompts you to include all the necessary tools, click the Add Features button.

- You should now see a tickmark next to the “Active Directory Domain Services” role, click Next.
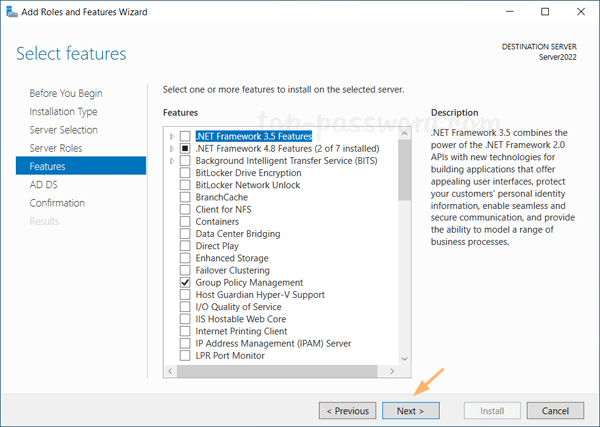
- On the Features page, the basic features for required role are already selected by default. Just click Next.
- Click Next.
- Click Install to confirm and begin the role features installation.

Part 2: Promote Windows Server 2022 to Domain Controller
- After the AD DS role is installed, open Server Manager again and you will see a notification flag next to the Manage menu. From there you need to click “Promote this server to a domain controller“.

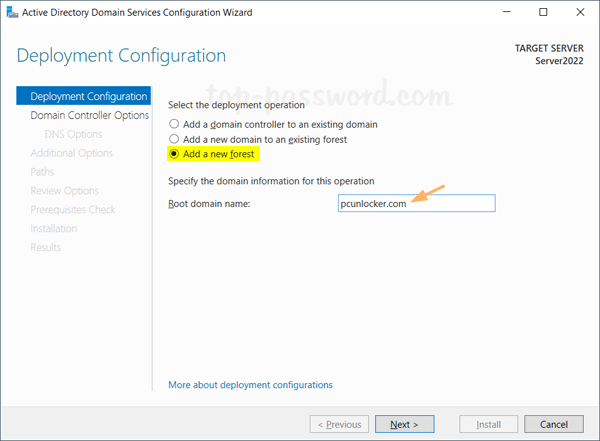
- Choose the “Add a new forest” option, type a root domain name and click Next.

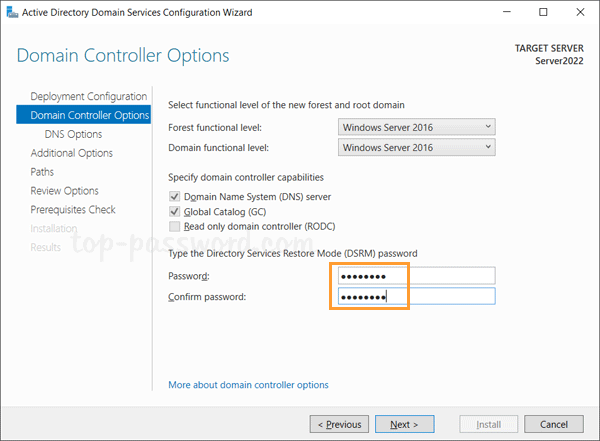
- Set up the DSRM password and click Next. DSRM password is used only when you need to boot the server into Directory Services Restore Mode to perform maintenance tasks.
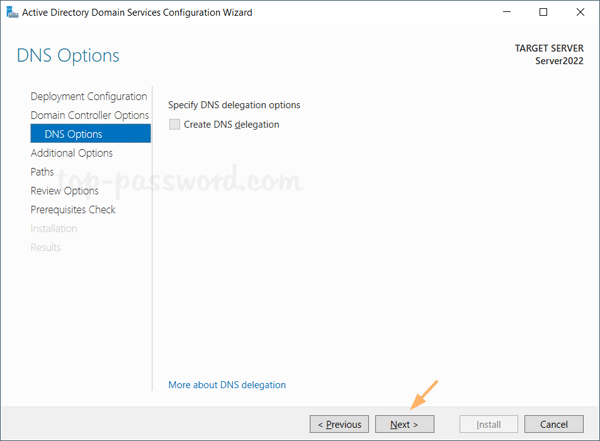
- On the DNS Options page, click Next.
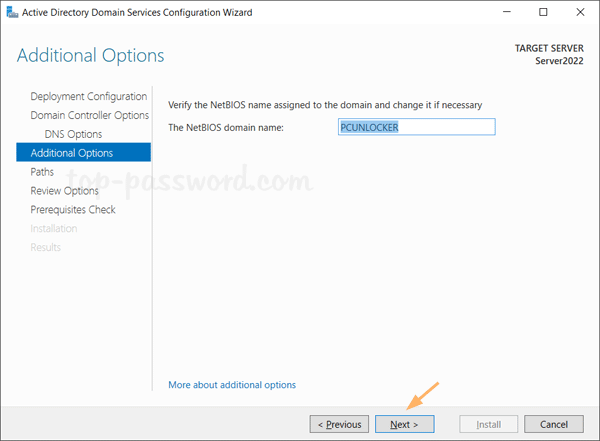
- The NetBIOS name is generated automatically based on your domain name. Just click Next.
- You’ll see the default paths for database, log files and SYSVOL folders. Click Next.
- Review your selections and click Next.
- A prerequisite check will be performed. If no error is detected, you can click Install to promote your server as domain controller. You server will restart automatically once the installation is complete.

That’s it!
- Previous Post: How to Enable Inline AutoComplete in File Explorer and Run Dialog in Windows 11
- Next Post: 3 Steps to Make Windows 11 Show Seconds in System Tray Clock