
Ableton Live 11 is the latest version of Ableton’s popular digital audio workstation (DAW) software.
It offers musicians, producers, and DJs a flexible platform for music creation and performance. In this guide, I’ll walk you through how to download and install Ableton Live 11 on a Windows computer.
Prerequisites
Before downloading and installing Ableton Live 11, make sure your Windows PC meets the minimum system requirements:
- Windows 10 version 1909 or later
- 64-bit multi-core processor
- 8 GB RAM (16 GB recommended)
- 15 GB disk space
You’ll also need an Ableton account and a Live 11 serial number, which you can purchase directly from Ableton or an authorized retailer.
Downloading Ableton Live 11
Once you have an Ableton account and Live 11 serial, follow these steps to download the software:
- Go to Ableton.com/download and click the “Download Live 11 Trial” button. This will download the Ableton Live 11 installer.
- Open the downloaded .exe file and select your preferred language. Click “OK” to begin the installation process.
- Read through the License Agreement and click “Agree” if you accept the terms and wish to continue.
- On the Account screen, enter your Ableton account email and password. This verifies your Ableton account and allows you to install Live 11.
- Choose the installation location on your Windows PC. By default this will be
C:\Program Files\Ableton\Live 11. - Wait for the installer to finish downloading additional components and extracting files. This may take several minutes depending on your internet speed.
Once the installation completes, Ableton Live 11 will be successfully installed on your Windows PC!
Authorizing Live 11
After installation, you’ll need to authorize Live 11 using your serial number before you can start using it. Here’s how:
- Open Ableton Live 11 on your computer.
- When prompted, enter your Ableton account email and password again.
- Click “Enter Serial” and input your Ableton Live 11 serial number exactly as provided.
- Click “Authorize” and Ableton will activate your copy of Live 11.
That’s it! Ableton Live 11 is now authorized and ready to use on your Windows system.
Managing Your Ableton Account
Your Ableton account gives you access to useful features like cloud file storage, software downloads, and the Exchange community. It’s important to keep your account details safe and your software activations synced across devices.
On Ableton.com, you can manage your account settings, view licensed software and serials, download installers, and access other services. Take some time to familiarize yourself with the account dashboard.
Getting Started with Live 11
Now that everything is installed and authorized, it’s time to start learning your way around Ableton Live 11!
Here are some tips for getting started:
- Watch the built-in tutorials under Help > Read the Manual
- Explore the demo songs and sample projects
- Add VST plugins, samples, and sounds in the Browser
- Learn Warping to sync audio clips to the tempo
- Understand the Session View for improvisation and live performance
- Record and edit MIDI and audio in the Arrangement View
- Automate track parameters like volume, panning, and effects
- Customize the interface colors, themes, and layout
- Save and export your projects
Don’t be afraid to experiment! Ableton Live’s flexible workflow enables creativity.
Live 11 Editions Comparison
Ableton offers three versions of Live 11, each aimed at different users and priced accordingly. Here’s a quick comparison of the features in Intro, Standard, and Suite editions:
| Feature | Intro | Standard | Suite |
|---|---|---|---|
| Tracks | 16 | Unlimited | Unlimited |
| Audio inputs/outputs | 8/8 | 16/16 | 32/32 |
| MIDI ports | 8 | Unlimited | Unlimited |
| Instruments/effects | 11 | 41 | 59 |
| Packs | 2 | 16 | 43 |
| Max for Live | No | No | Yes |
| Wavetable synth | No | Yes | Yes |
| Drum synths | No | Yes | Yes |
As you can see, Suite has the most advanced features while Intro covers the basics. Choose the edition with the tools you need for your production workflow.
FAQs
Here are answers to some frequently asked questions about downloading Ableton Live 11 on Windows:
Does Live 11 work on both Windows 10 and Windows 11?
Yes, Live 11 is compatible with the latest Windows 10 and Windows 11 operating systems.
Can I install Live 11 on multiple computers?
You can activate Live 11 on up to two computers using a single-user license. Use your Ableton account to manage installations.
Is there a trial version I can try before buying?
Yes, Ableton offers a free 90-day trial for Live 11. All features are unlocked so you can test Suite edition.
Where can I buy Ableton Live 11 and how much does it cost?
Live 11 is available on Ableton.com or authorized retailers. Intro costs $99, Standard is $449, and Suite is $749. Additional discounts are available for students and teachers.
How do I know if my system meets the minimum requirements?
Use Ableton’s online tool to analyze your PC specs against the Live 11 requirements before installing: Ableton.com/en/live/requirements
Where can I find help and support for Live 11?
Visit Ableton’s Knowledge Base for manuals, tutorials, downloads, and technical support resources. You can also find help from other users in the Ableton forums.
Conclusion
Installing Ableton Live 11 on your Windows PC unlocks a world of music creation possibilities. With its intuitive interface, flexible workflow, and built-in sounds and effects, Live provides everything you need to record, produce, and perform. Follow the steps in this guide to download and authorize Live 11, then start exploring all that this powerful DAW software has to offer. The only limit is your creativity!
Installing Ableton Live 11: A Step-by-Step Guide
Table of Contents
- Preparing Your System
- Unpacking and Extracting Ableton Live 11
- Installing the Ableton Live 11 Suite
- Launching and Configuring Ableton Live 11
- First Steps in Ableton Live 11
1. Preparing Your System
Before you can install Ableton Live 11, you need to make sure your system is ready. Here are the necessary steps:
- Minimum System Requirements:
- Operating System: Windows 10 (64-bit) or macOS High Sierra (10.13) or later
- Processor: Intel Core i5 or AMD equivalent
- RAM: 8 GB (16 GB or more recommended)
- Storage: 128 GB (256 GB or more recommended)
- Graphics: Dedicated graphics card (NVIDIA or AMD) with 4 GB or more VRAM
- Software Requirements:
- Ableton Live 11 Suite (Downloadable from the Ableton website)
- A compatible version of Creative Cloud (such as Adobe Creative Cloud)
2. Unpacking and Extracting Ableton Live 11
To install Ableton Live 11, you’ll need to unpack the software and extract the necessary files:
- Unpacking the Software:
- Open the Ableton Live 11 Suite folder ( usually located in the «Ableton Software» or » Ableton Store» folder)
- Extract the Software:
- Use a zip file to extract the entire Ableton Live 11 Suite package
- Unzip the extracted folder to your desired location
- Extracting the Library and Projects:
- In the extracted Ableton Live 11 Suite folder, you’ll find three subfolders:
- Ableton Library: Contains the Ableton virtual instruments and effects
- Ableton Projects: Contains your projects and templates
- Ableton Lumberyard: Contains assets and content for your projects
- In the extracted Ableton Live 11 Suite folder, you’ll find three subfolders:
3. Installing the Ableton Live 11 Suite
Now that your system is ready, you can install the Ableton Live 11 Suite:
- Uninstalling Older Versions:
- Go to Control Panel > Programs and Features
- Select the Ableton Live 11 Suite and Uninstall
- Installing the Suite:
- Download the Ableton Live 11 Suite from the Ableton website
- Create a new folder in your preferred location (e.g., C:Ableton Live 11 Suite)
- Extract the downloaded Ableton Live 11 Suite package to the new folder
4. Launching and Configuring Ableton Live 11
Once you’ve installed the Ableton Live 11 Suite, you can launch it and configure your accounts:
- Launch Ableton Live 11:
- In the extracted Ableton Live 11 Suite folder, find the Ableton Live 11 executable file (usually named studio.exe or live.exe)
- Double-click the executable file to launch Ableton Live 11
- Configuring Your Accounts:
- Create a New User Account:
- Go to Settings > Account Information
- Create a new account and fill in your name, email, and password
- Configure Your Accounts:
- Go to Settings > Account Information
- Configure your account settings, including your license details and serial number
- Create a New User Account:
5. First Steps in Ableton Live 11
Now that you’ve installed and configured Ableton Live 11, you can start exploring its features:
- Creating a New Project:
- Go to File > New Project or press Ctrl + Shift + N
- Choose a project type (e.g., Track or Sequencer)
- Configure your project settings, including settings and channels
- Basic Controls:
- Explore the Audio menu to configure your audio settings
- Use the Navigation menu to access various MIDI and control knobs
- Zoom to adjust the size of your instruments and effects
- Starting Your First Song:
- Create a new project and add a track
- Start experimenting with your instruments and effects
Additional Tips and Tricks
- Use the Ableton Browser:
- Use the Browser to browse and manage your instruments, effects, and settings
- Use the Search function to quickly find specific instruments or effects
- Create Your Own Browser Pages:
- Use the Browser to create custom pages for your projects
- Use Boots and Prompt to define custom user interface elements
- Take Advantage of the Live Styles:
- Explore the Live Styles feature to find inspiration for your music
- Use the MIDI Chord and Scene features to create complex beats
Conclusion
Congratulations! You’ve successfully installed Ableton Live 11 and are now ready to start creating your own music. Remember to explore the software’s features and use its built-in tutorials to get the most out of Ableton. Happy producing!
Unlock the Future: Watch Our Essential Tech Videos!
Ableton Live is a DAW that needs no introduction, and its combination of performance and production features mean it’s as popular with performers and DJs as it is with creators.
Live 11 Lite is a cut-down version of Ableton Live, with all of the essential workflows, instruments and effects, but with limited track count, and for many years this has been bundled with apps and hardware products. This month, you can grab a free copy of Ableton Live 11 Lite with the latest issue of Computer Music Magazine.
To mark this momentous occasion and also to get you started using this fabulous software, we’ve put together a series of tutorials that run through everything you need to get acquainted with Ableton Live 11 Lite, so you can learn how to build a track from scratch.
Our tutorials are primarily for new users, but that said, we’ll also flag some of the new features you’ll find in Live 11 Lite, so even if you’ve used Live Lite before, there may be some things for you to learn here.
Finally, although Live 11 Lite is awesome software, there are more fully featured versions of Ableton Live available on Ableton’s website. So, let’s get creating in Live 11 Lite!
- Check out the full set of video tutorials on MusicRadar’s YouTube channel.
In the first instalment of our tutorial series, we’re going to cover how to download, install and activate the free copy of Ableton Live 11 Lite we’re giving away with this month’s issue of Computer Music Magazine. Keep an eye out over the coming weeks as we’ll be posting one stage of the tutorial every day throughout the month of January.
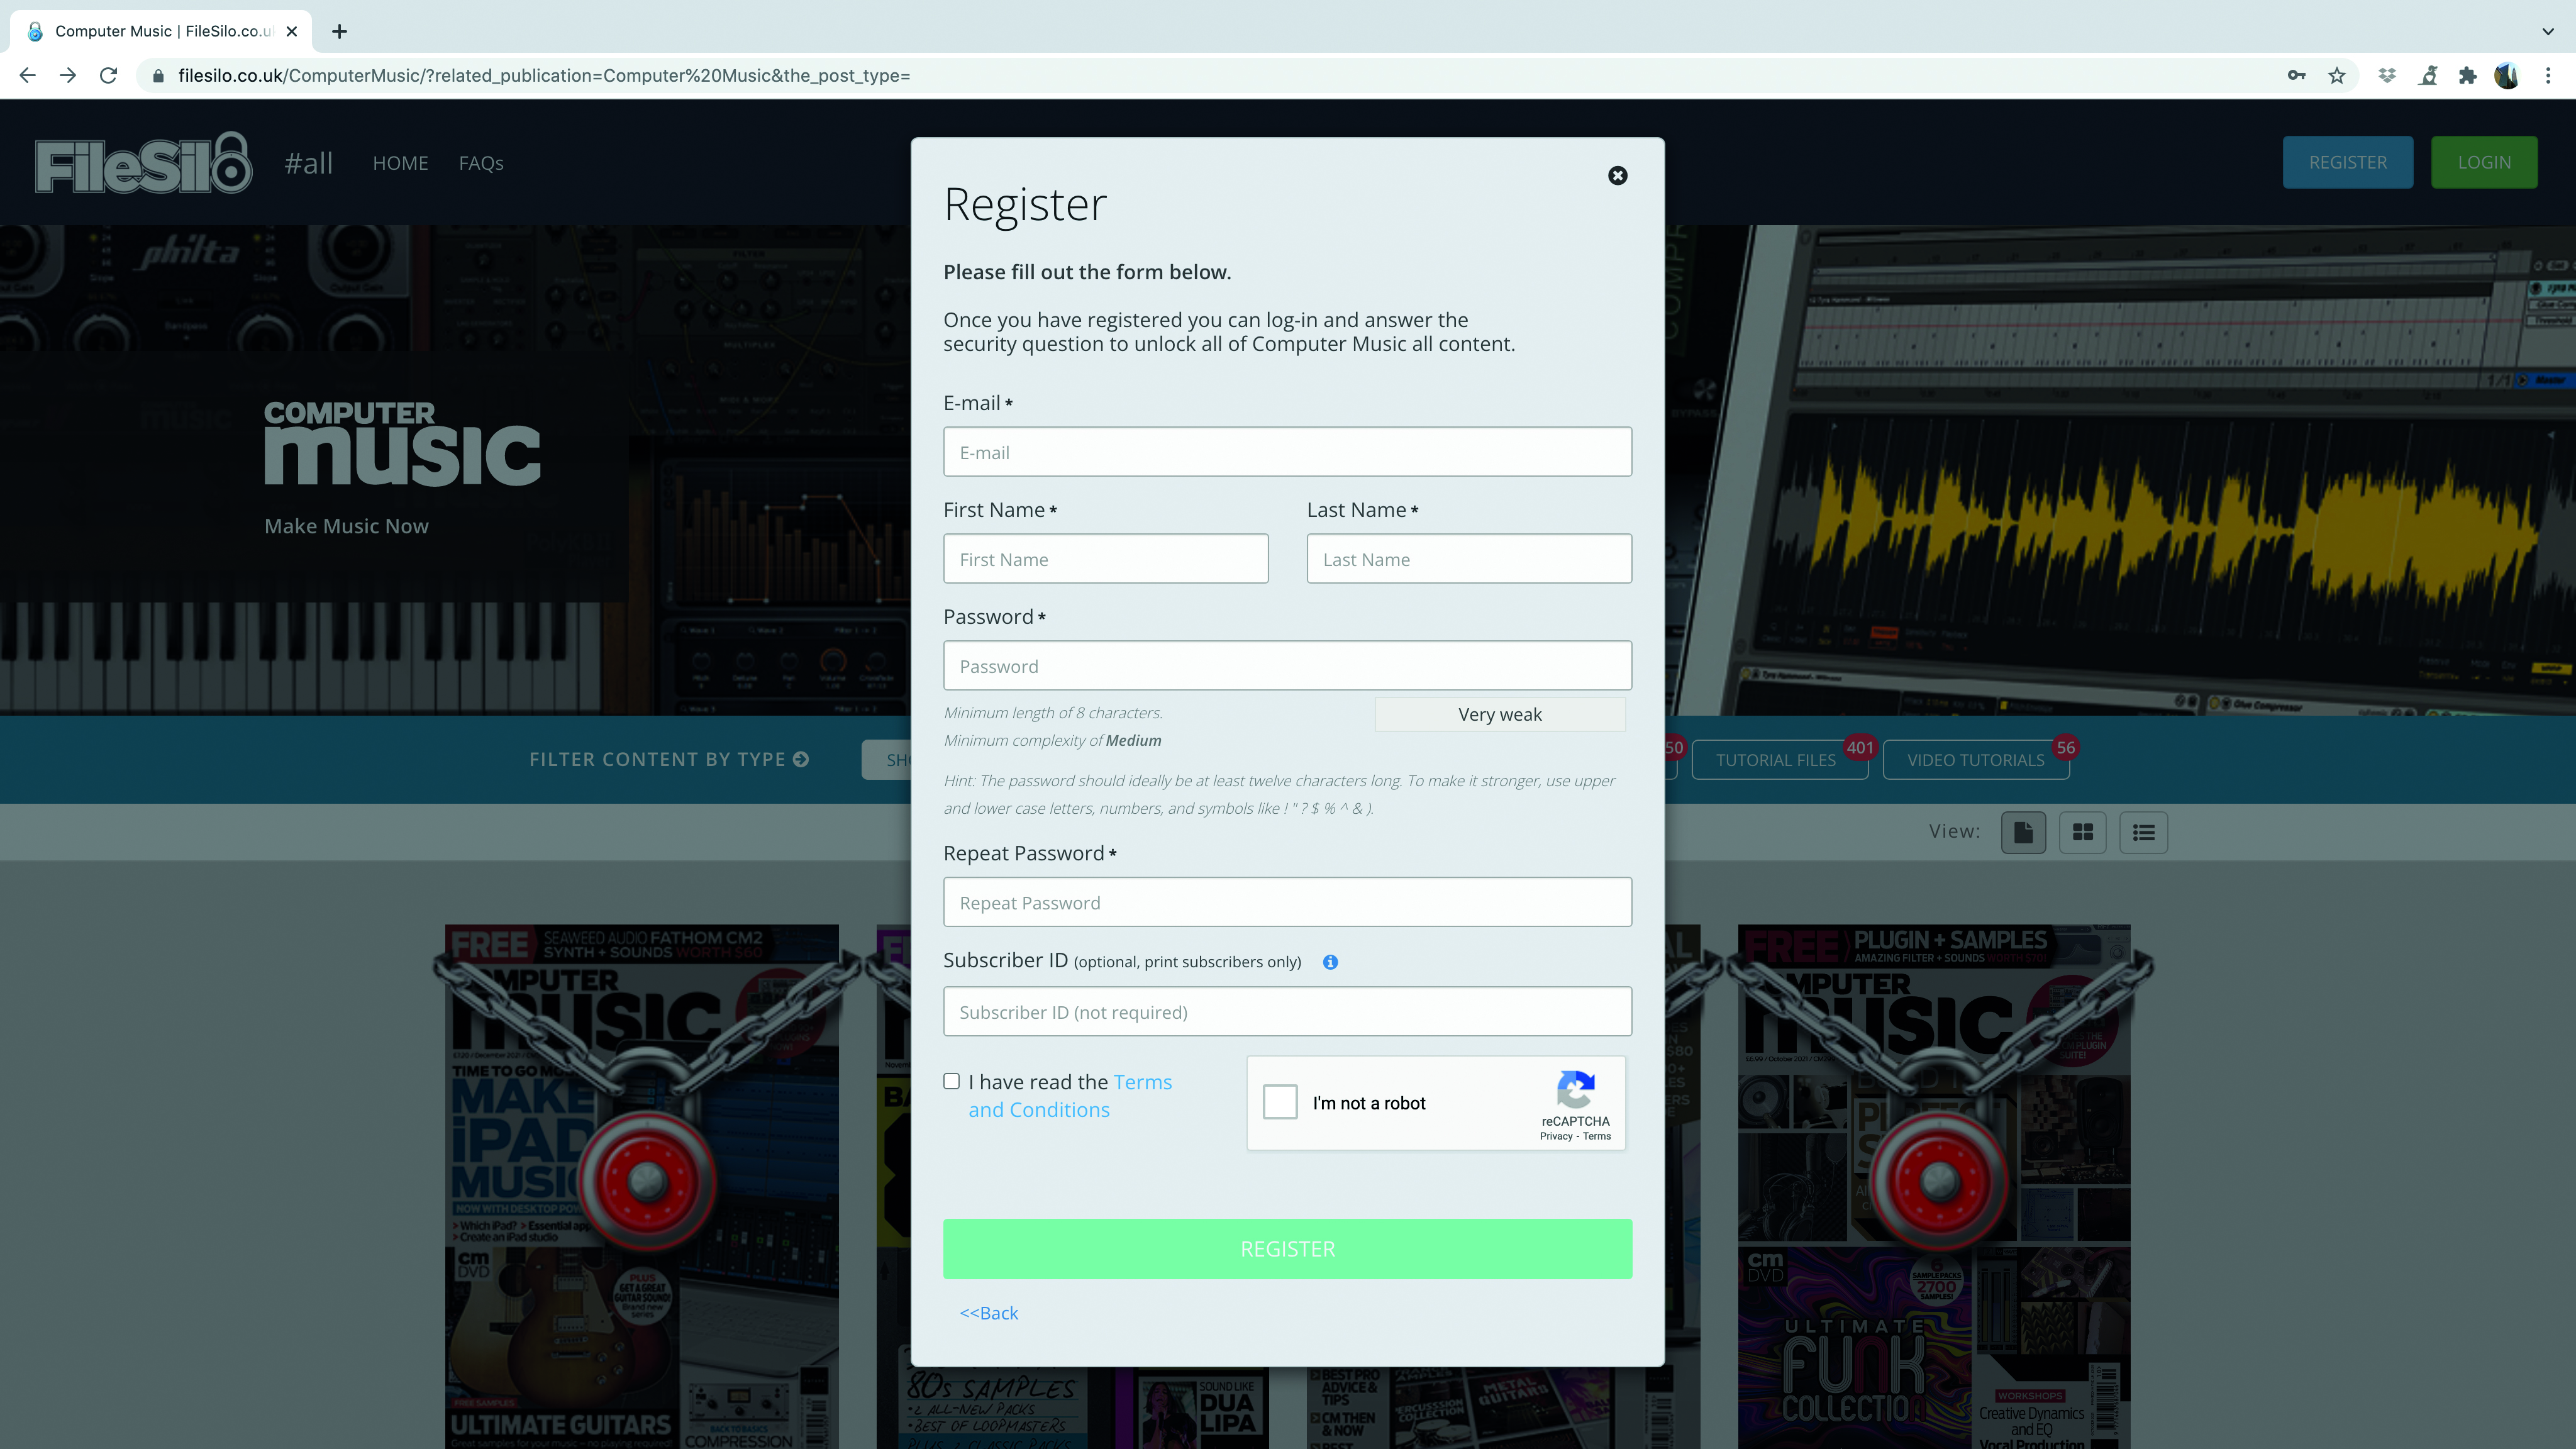
Step 1: To get started, the first thing you’ll need is your personal serial number for Live 11 Lite. This is available from the Computer Music pages at FileSilo, so if you don’t already have an account, head to the FileSilo website and register.
Want all the hottest music and gear news, reviews, deals, features and more, direct to your inbox? Sign up here.
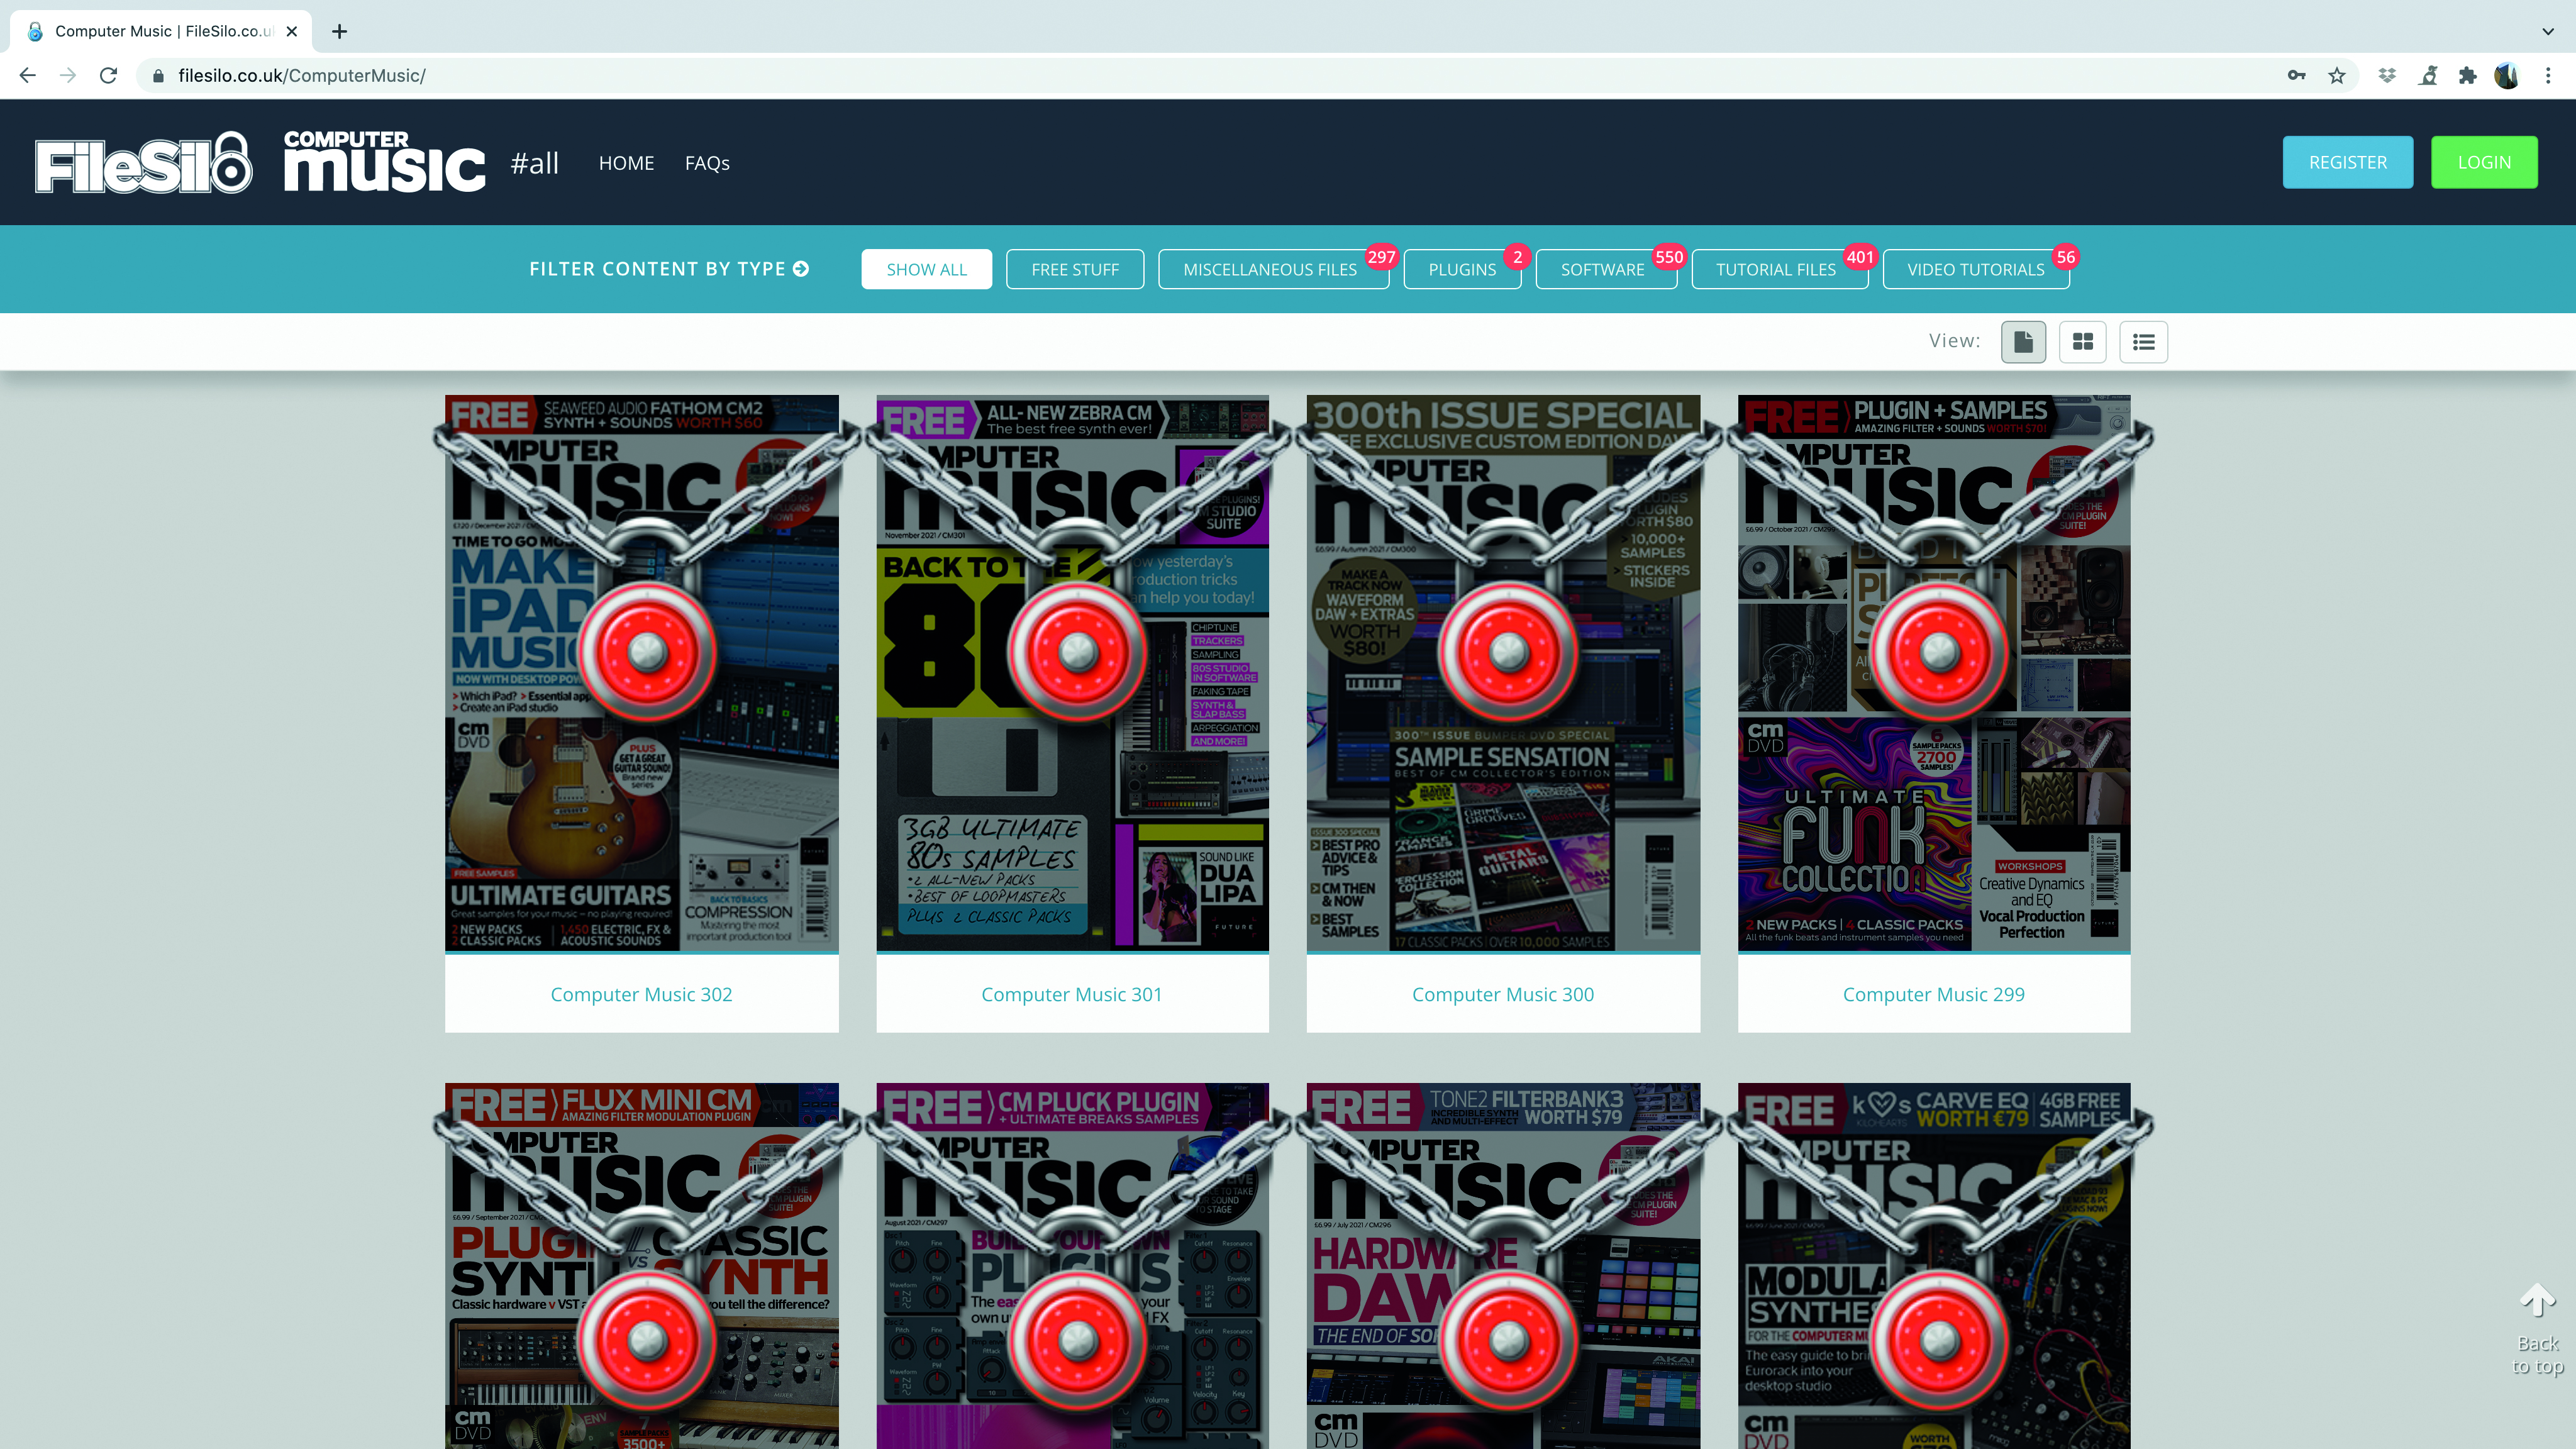
Step 2: Once registered, you’ll need to unlock the content for this issue of Computer Music. Have your copy to hand as you’ll need to answer the issue-related question. Then follow the instructions to grab your serial number.
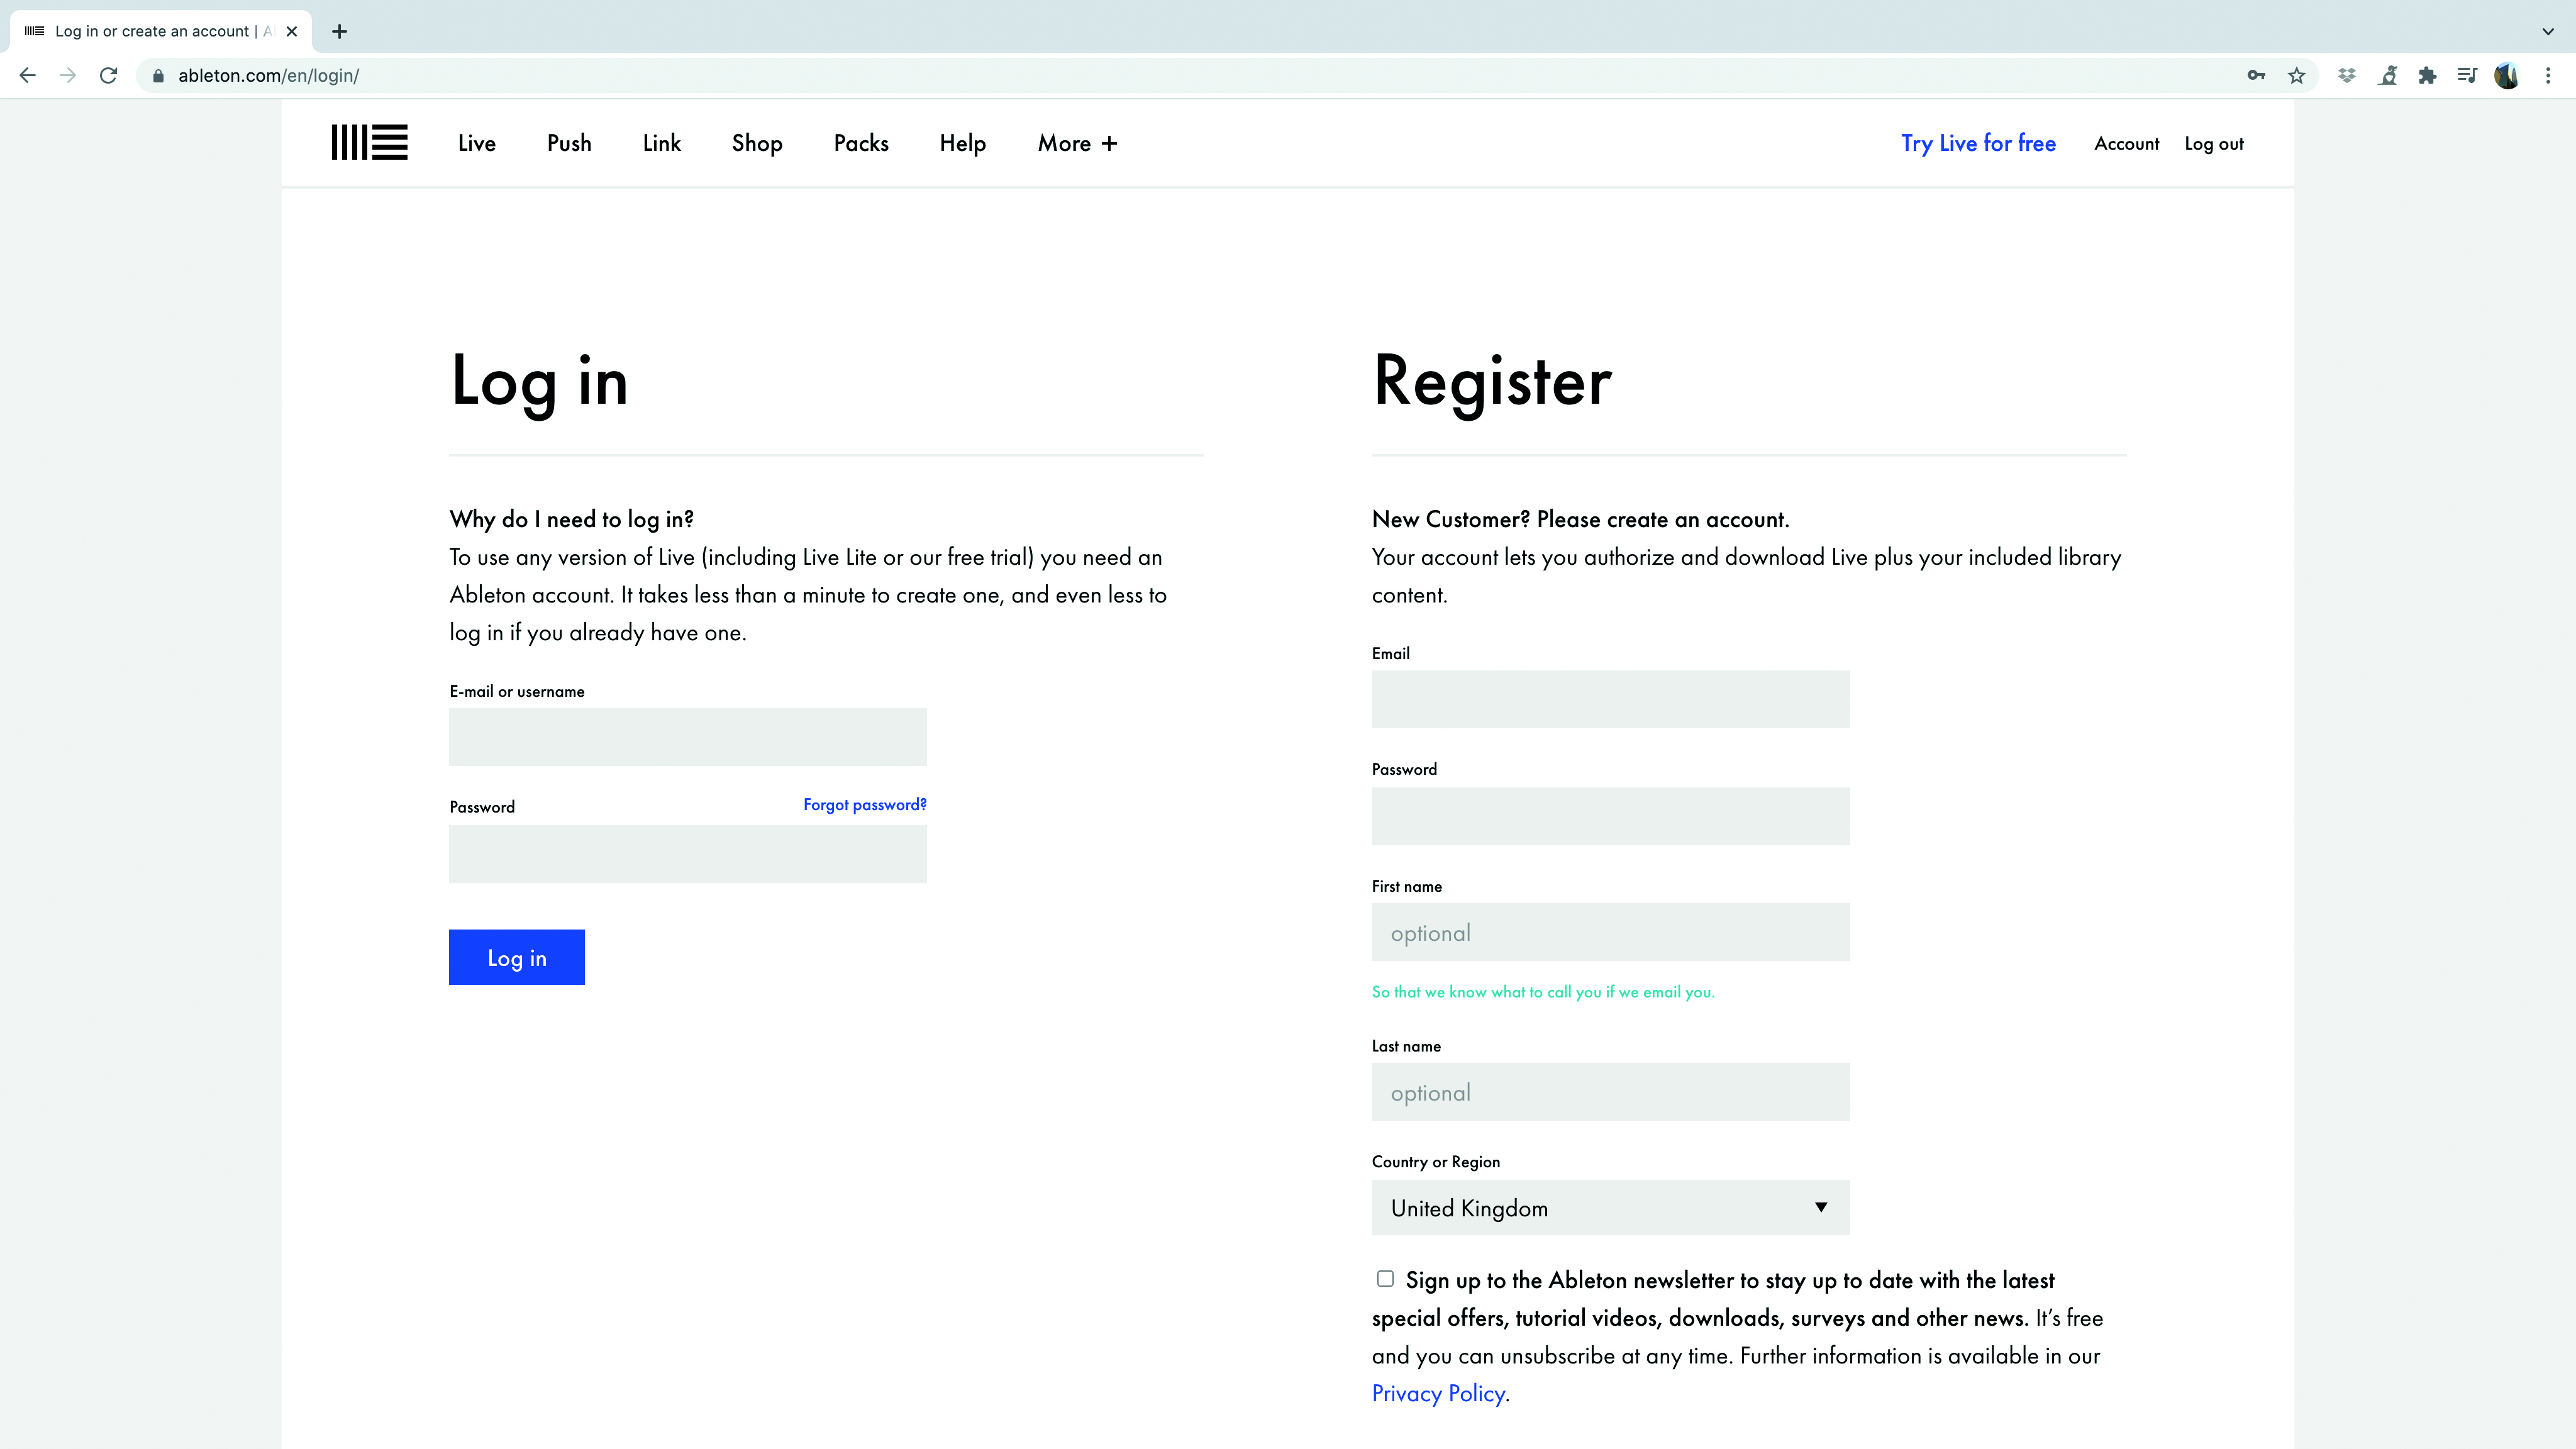
Step 3: Armed with your serial number you now need to register it with Ableton and for this you’ll need an Ableton account. Head over to Ableton’s login page where you can log into an existing account or create a new one.
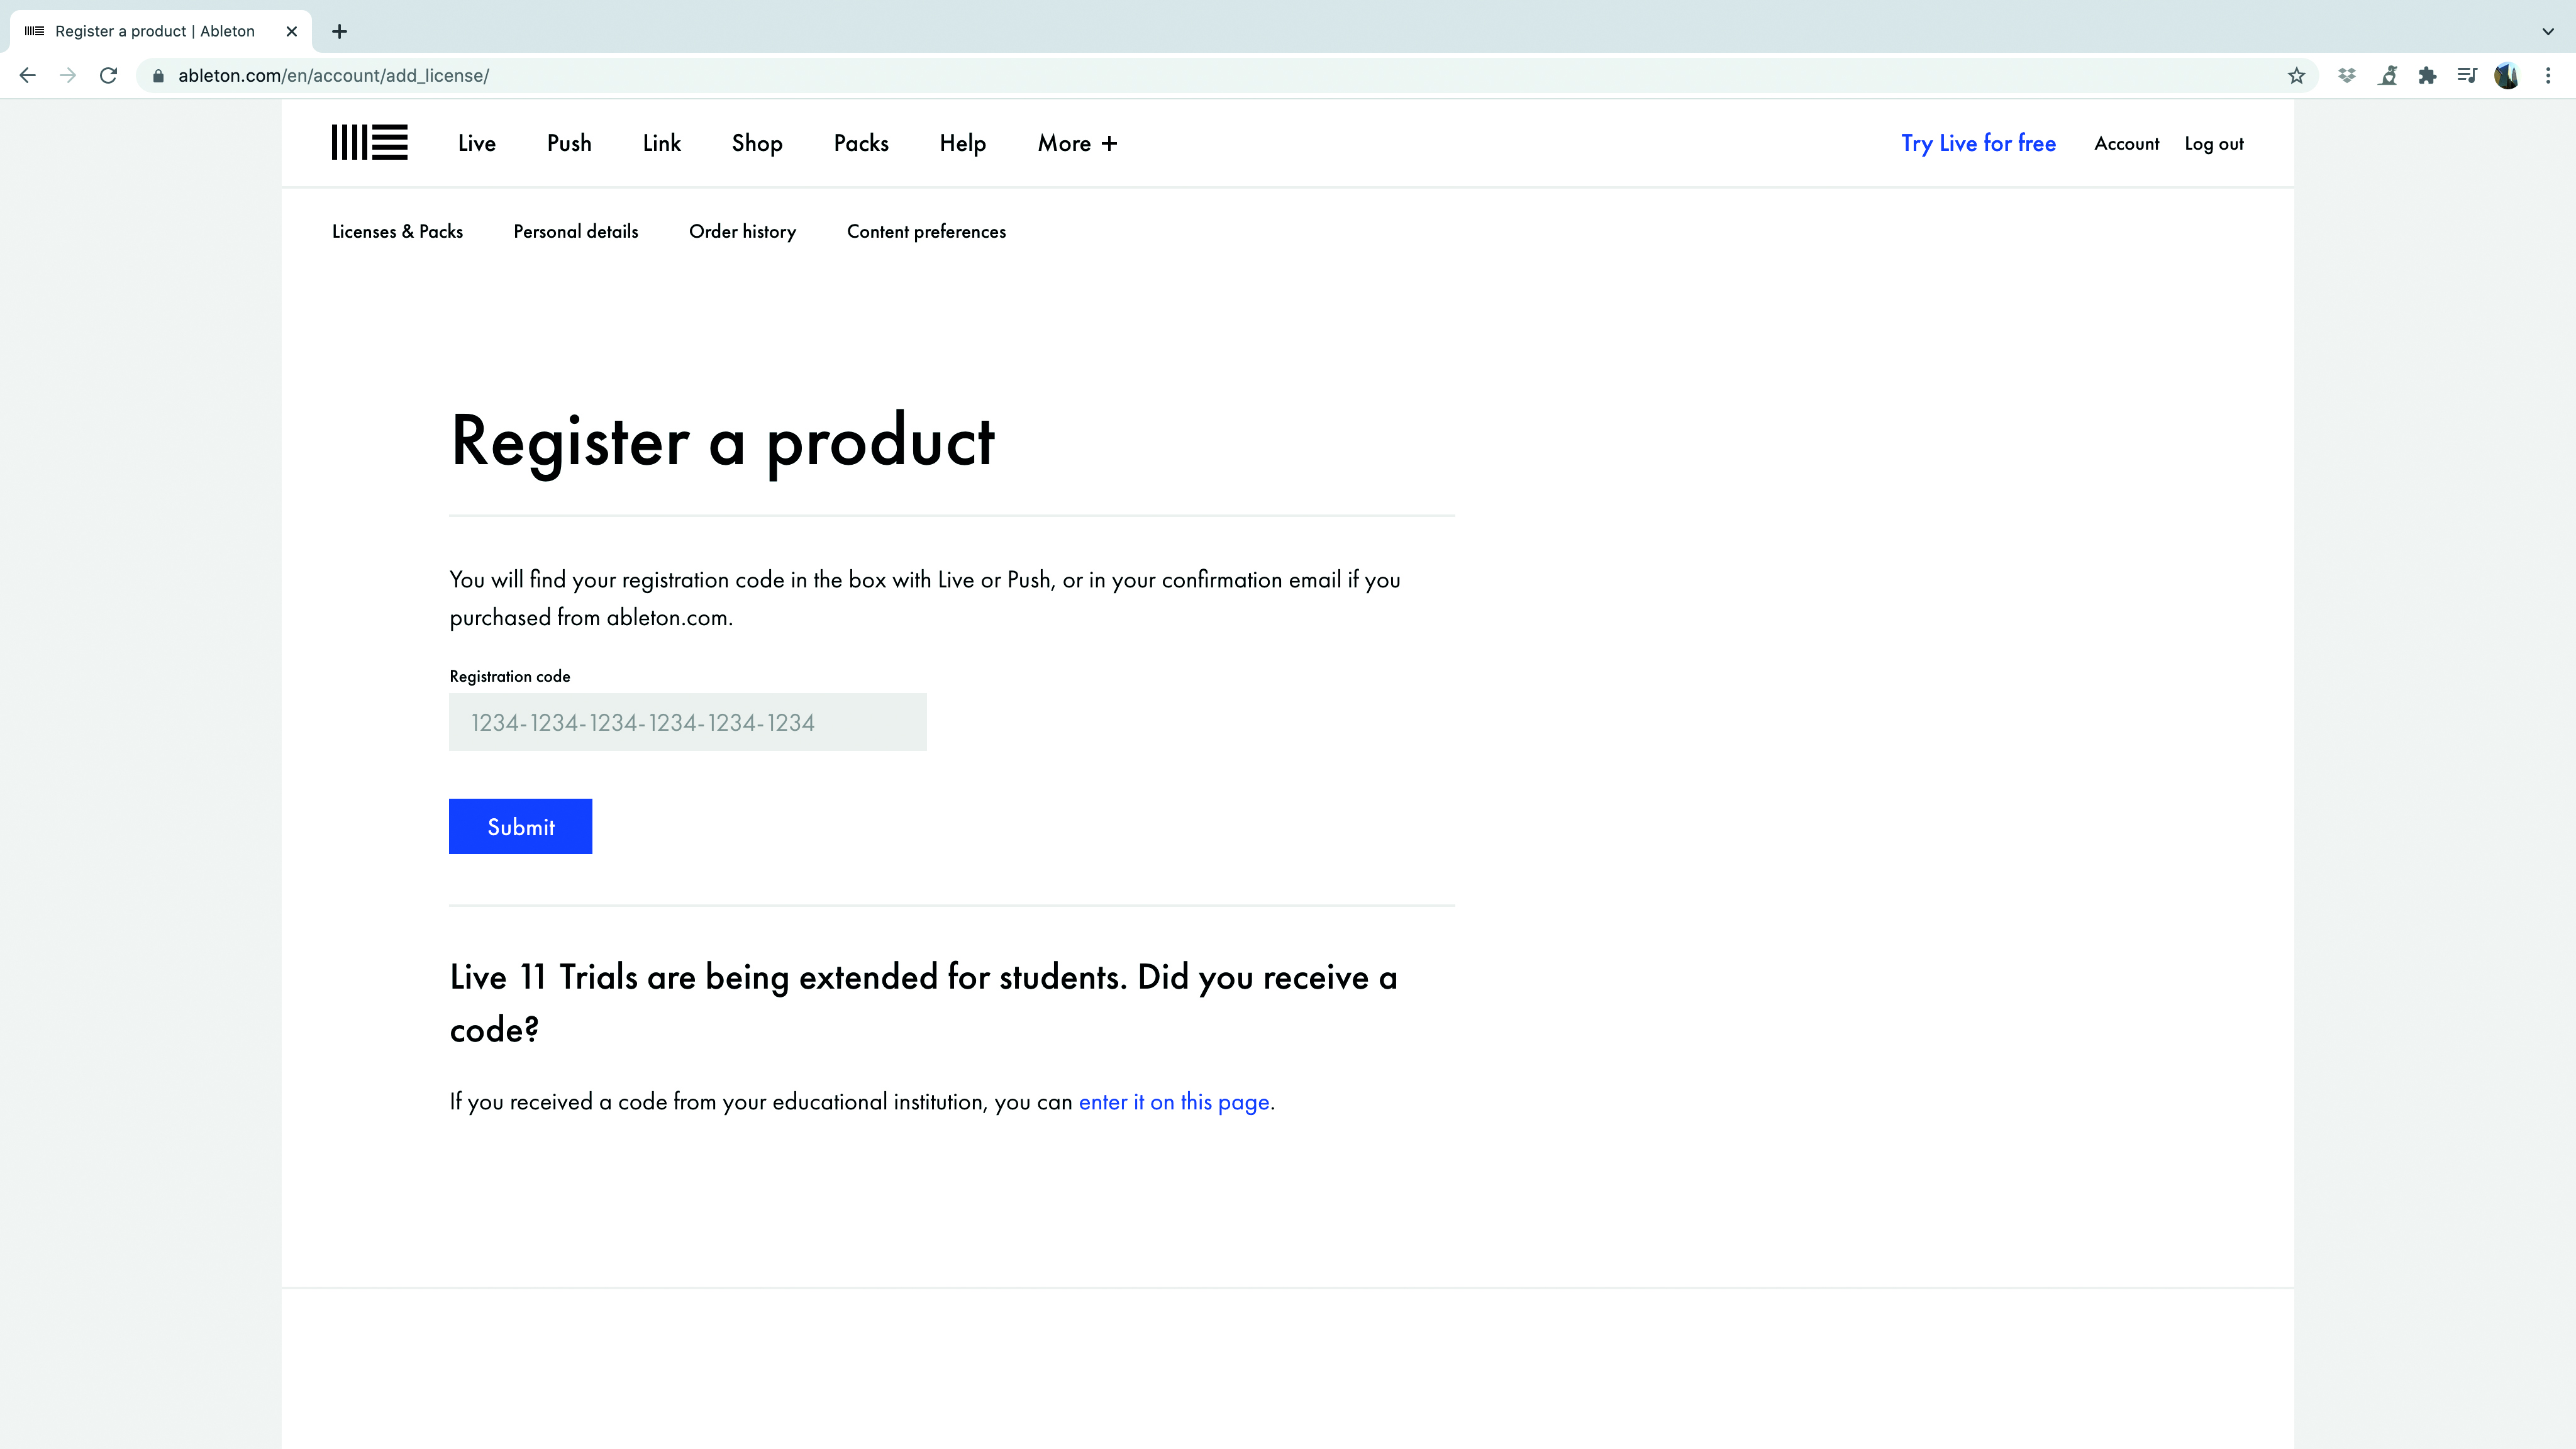
Step 4: Once you’re logged in you can then add the serial number to your account which you can do here. You should now be able to see the License under the Licenses and Packs tab of your user account.
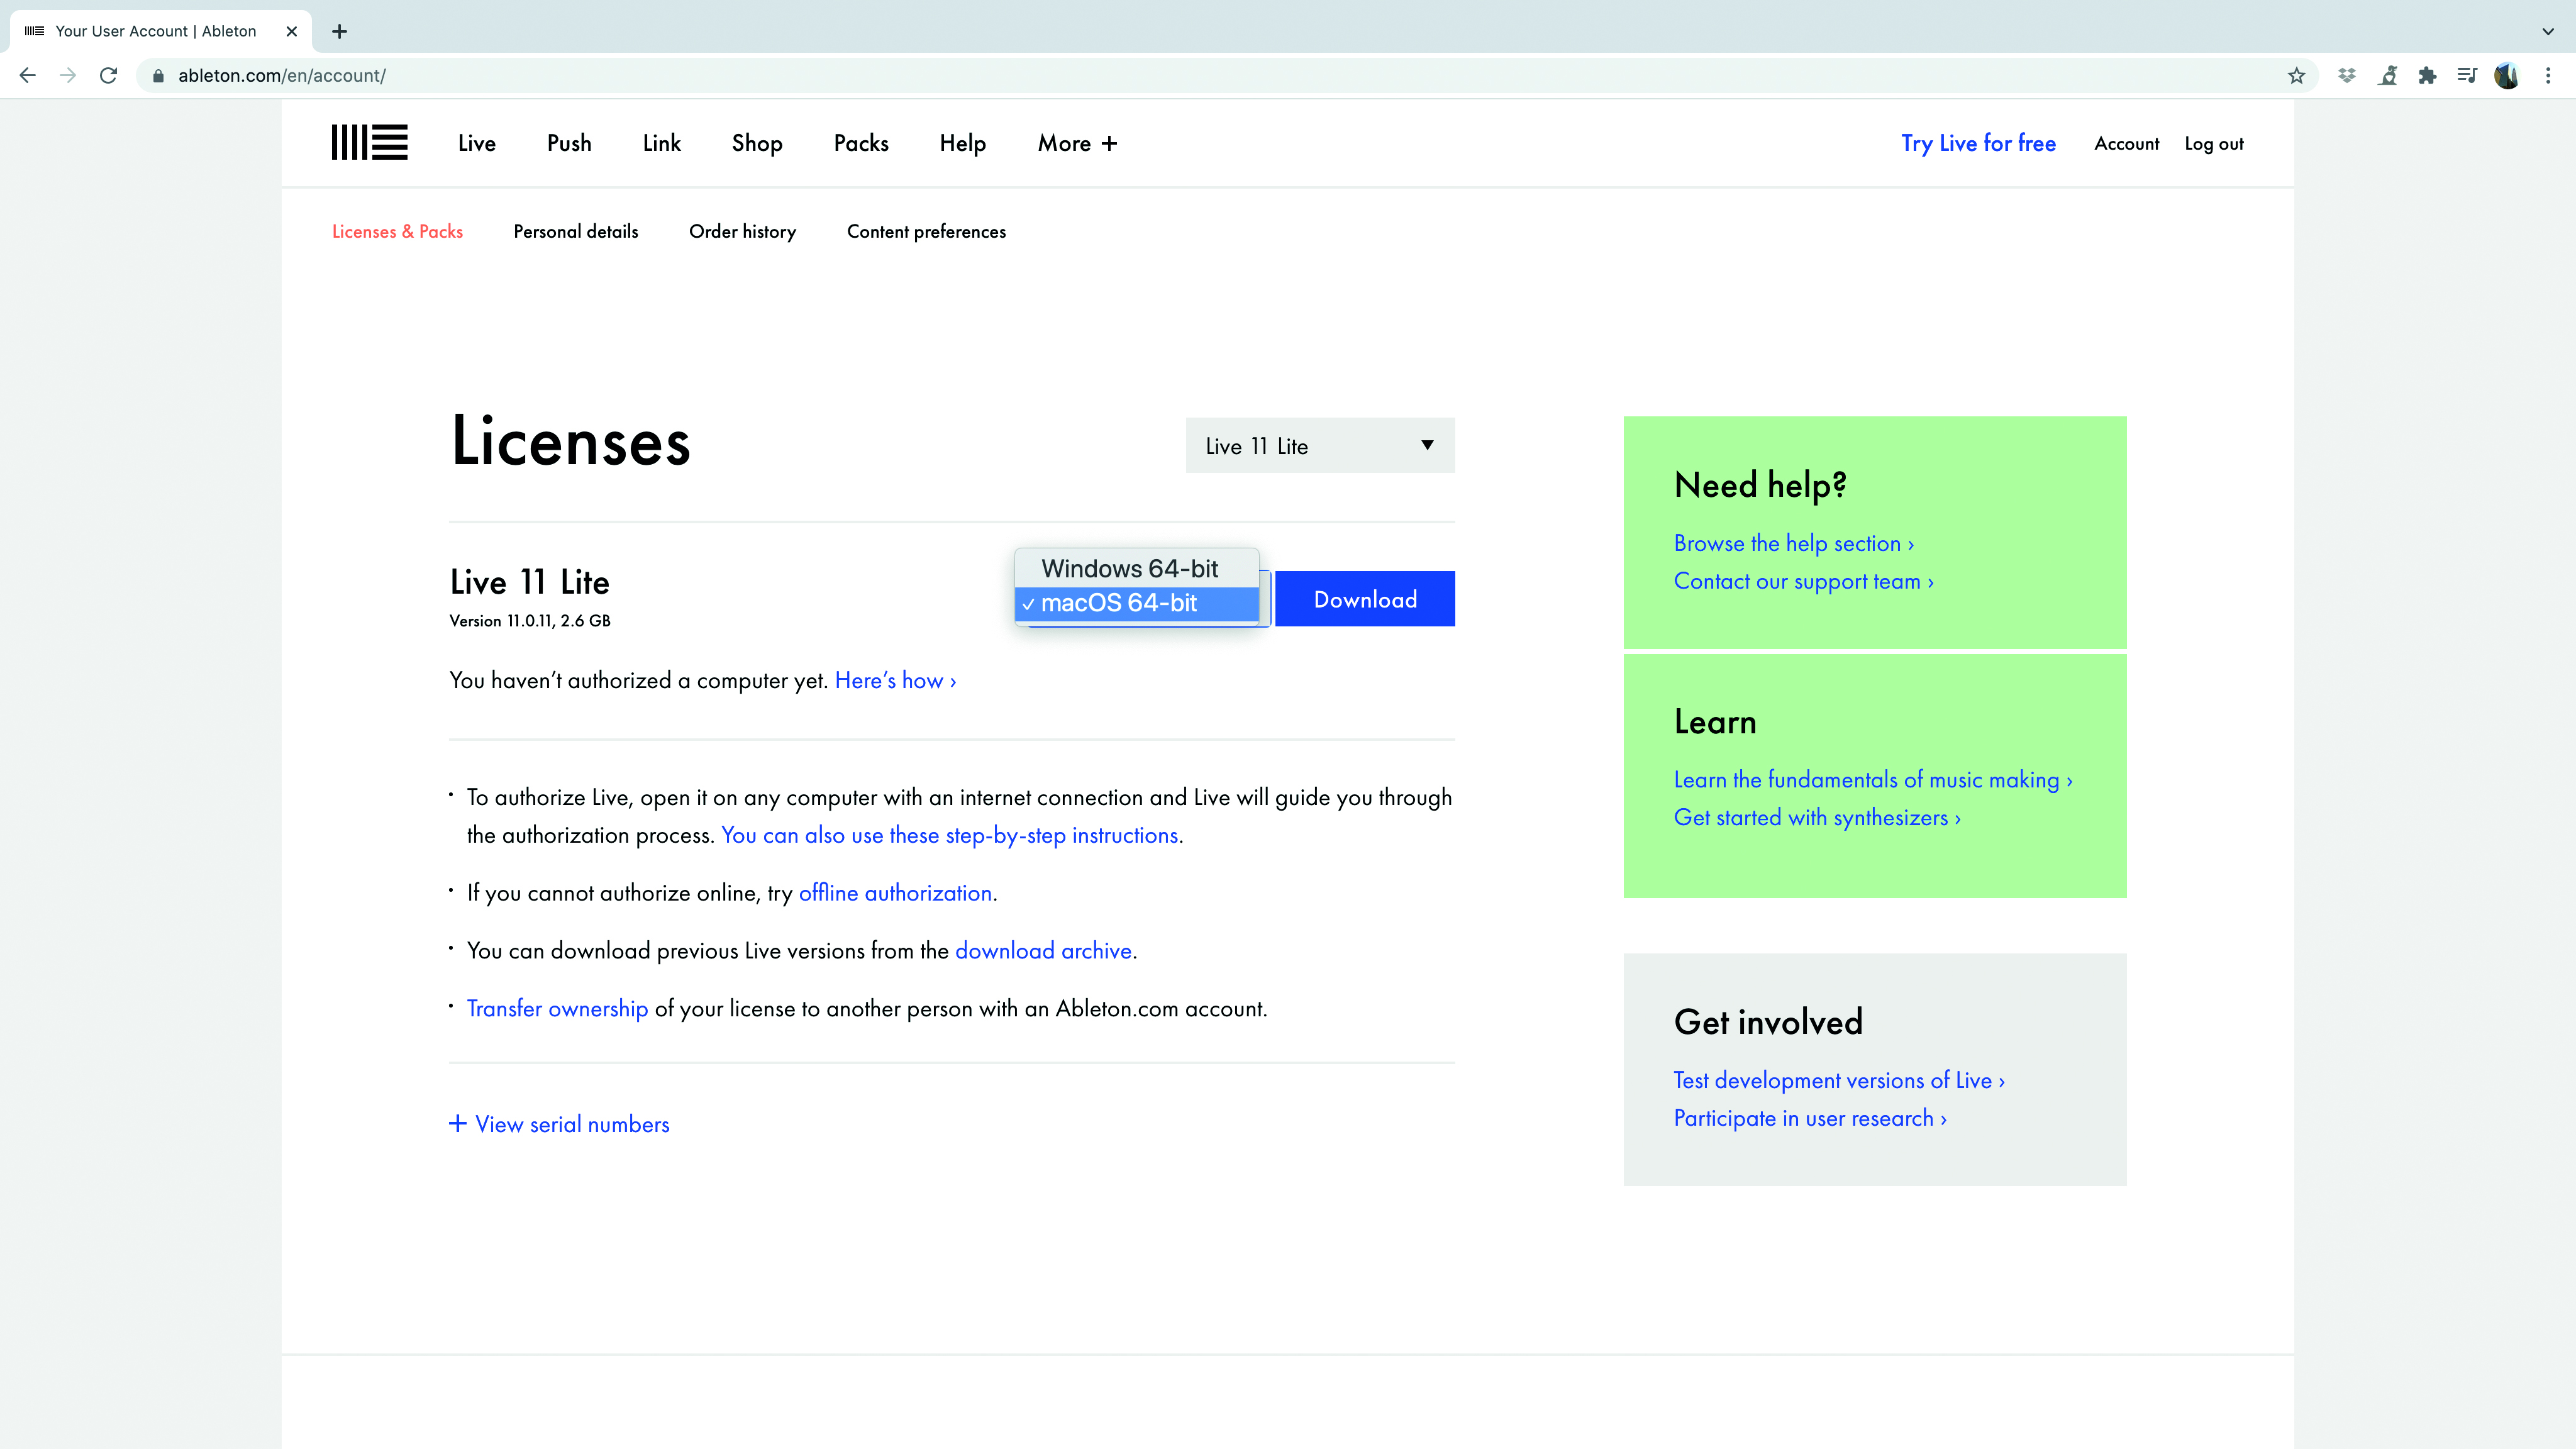
Step 5: Now from the drop-down tab, select the correct download for your operating system – Windows or Mac OS. Once the download is complete, install the software in the standard way.
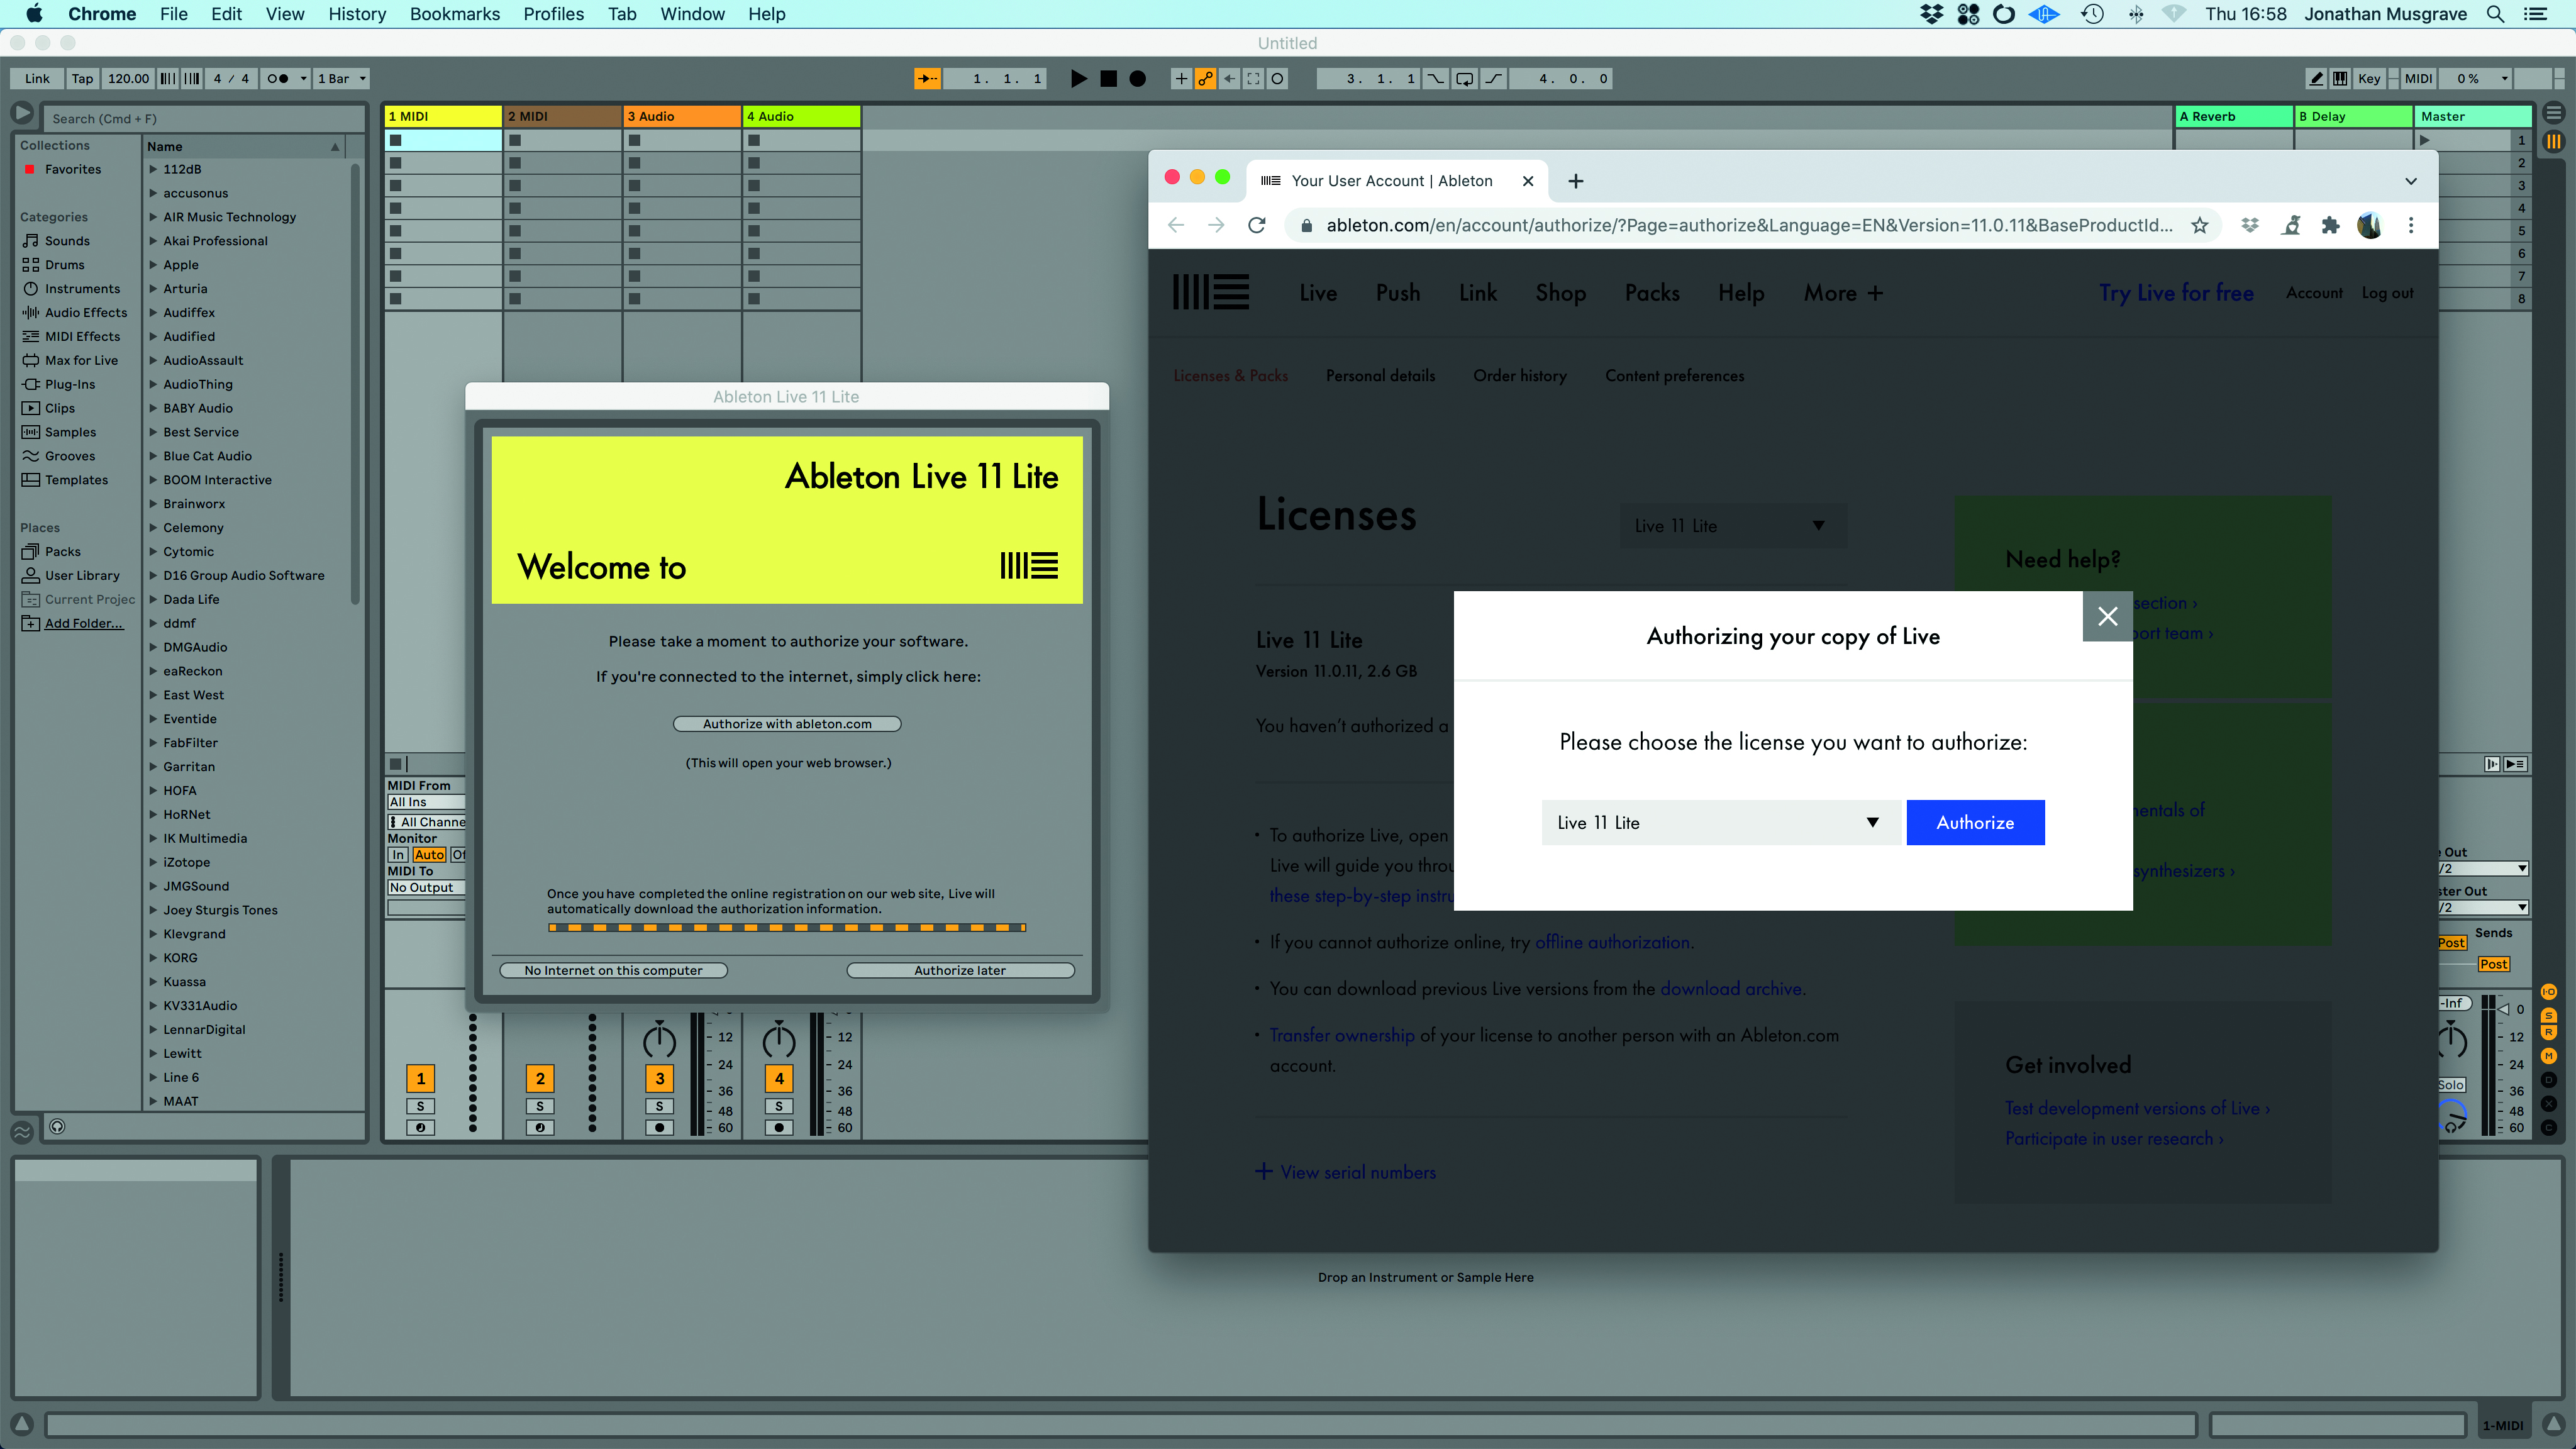
Step 6: When you first launch Ableton Live 11 Lite it will ask you to authorise it. You can do this offline if you wish but the easiest way is to click on the button which launches the online authorisation. Log into your account and select the
Authorise button.
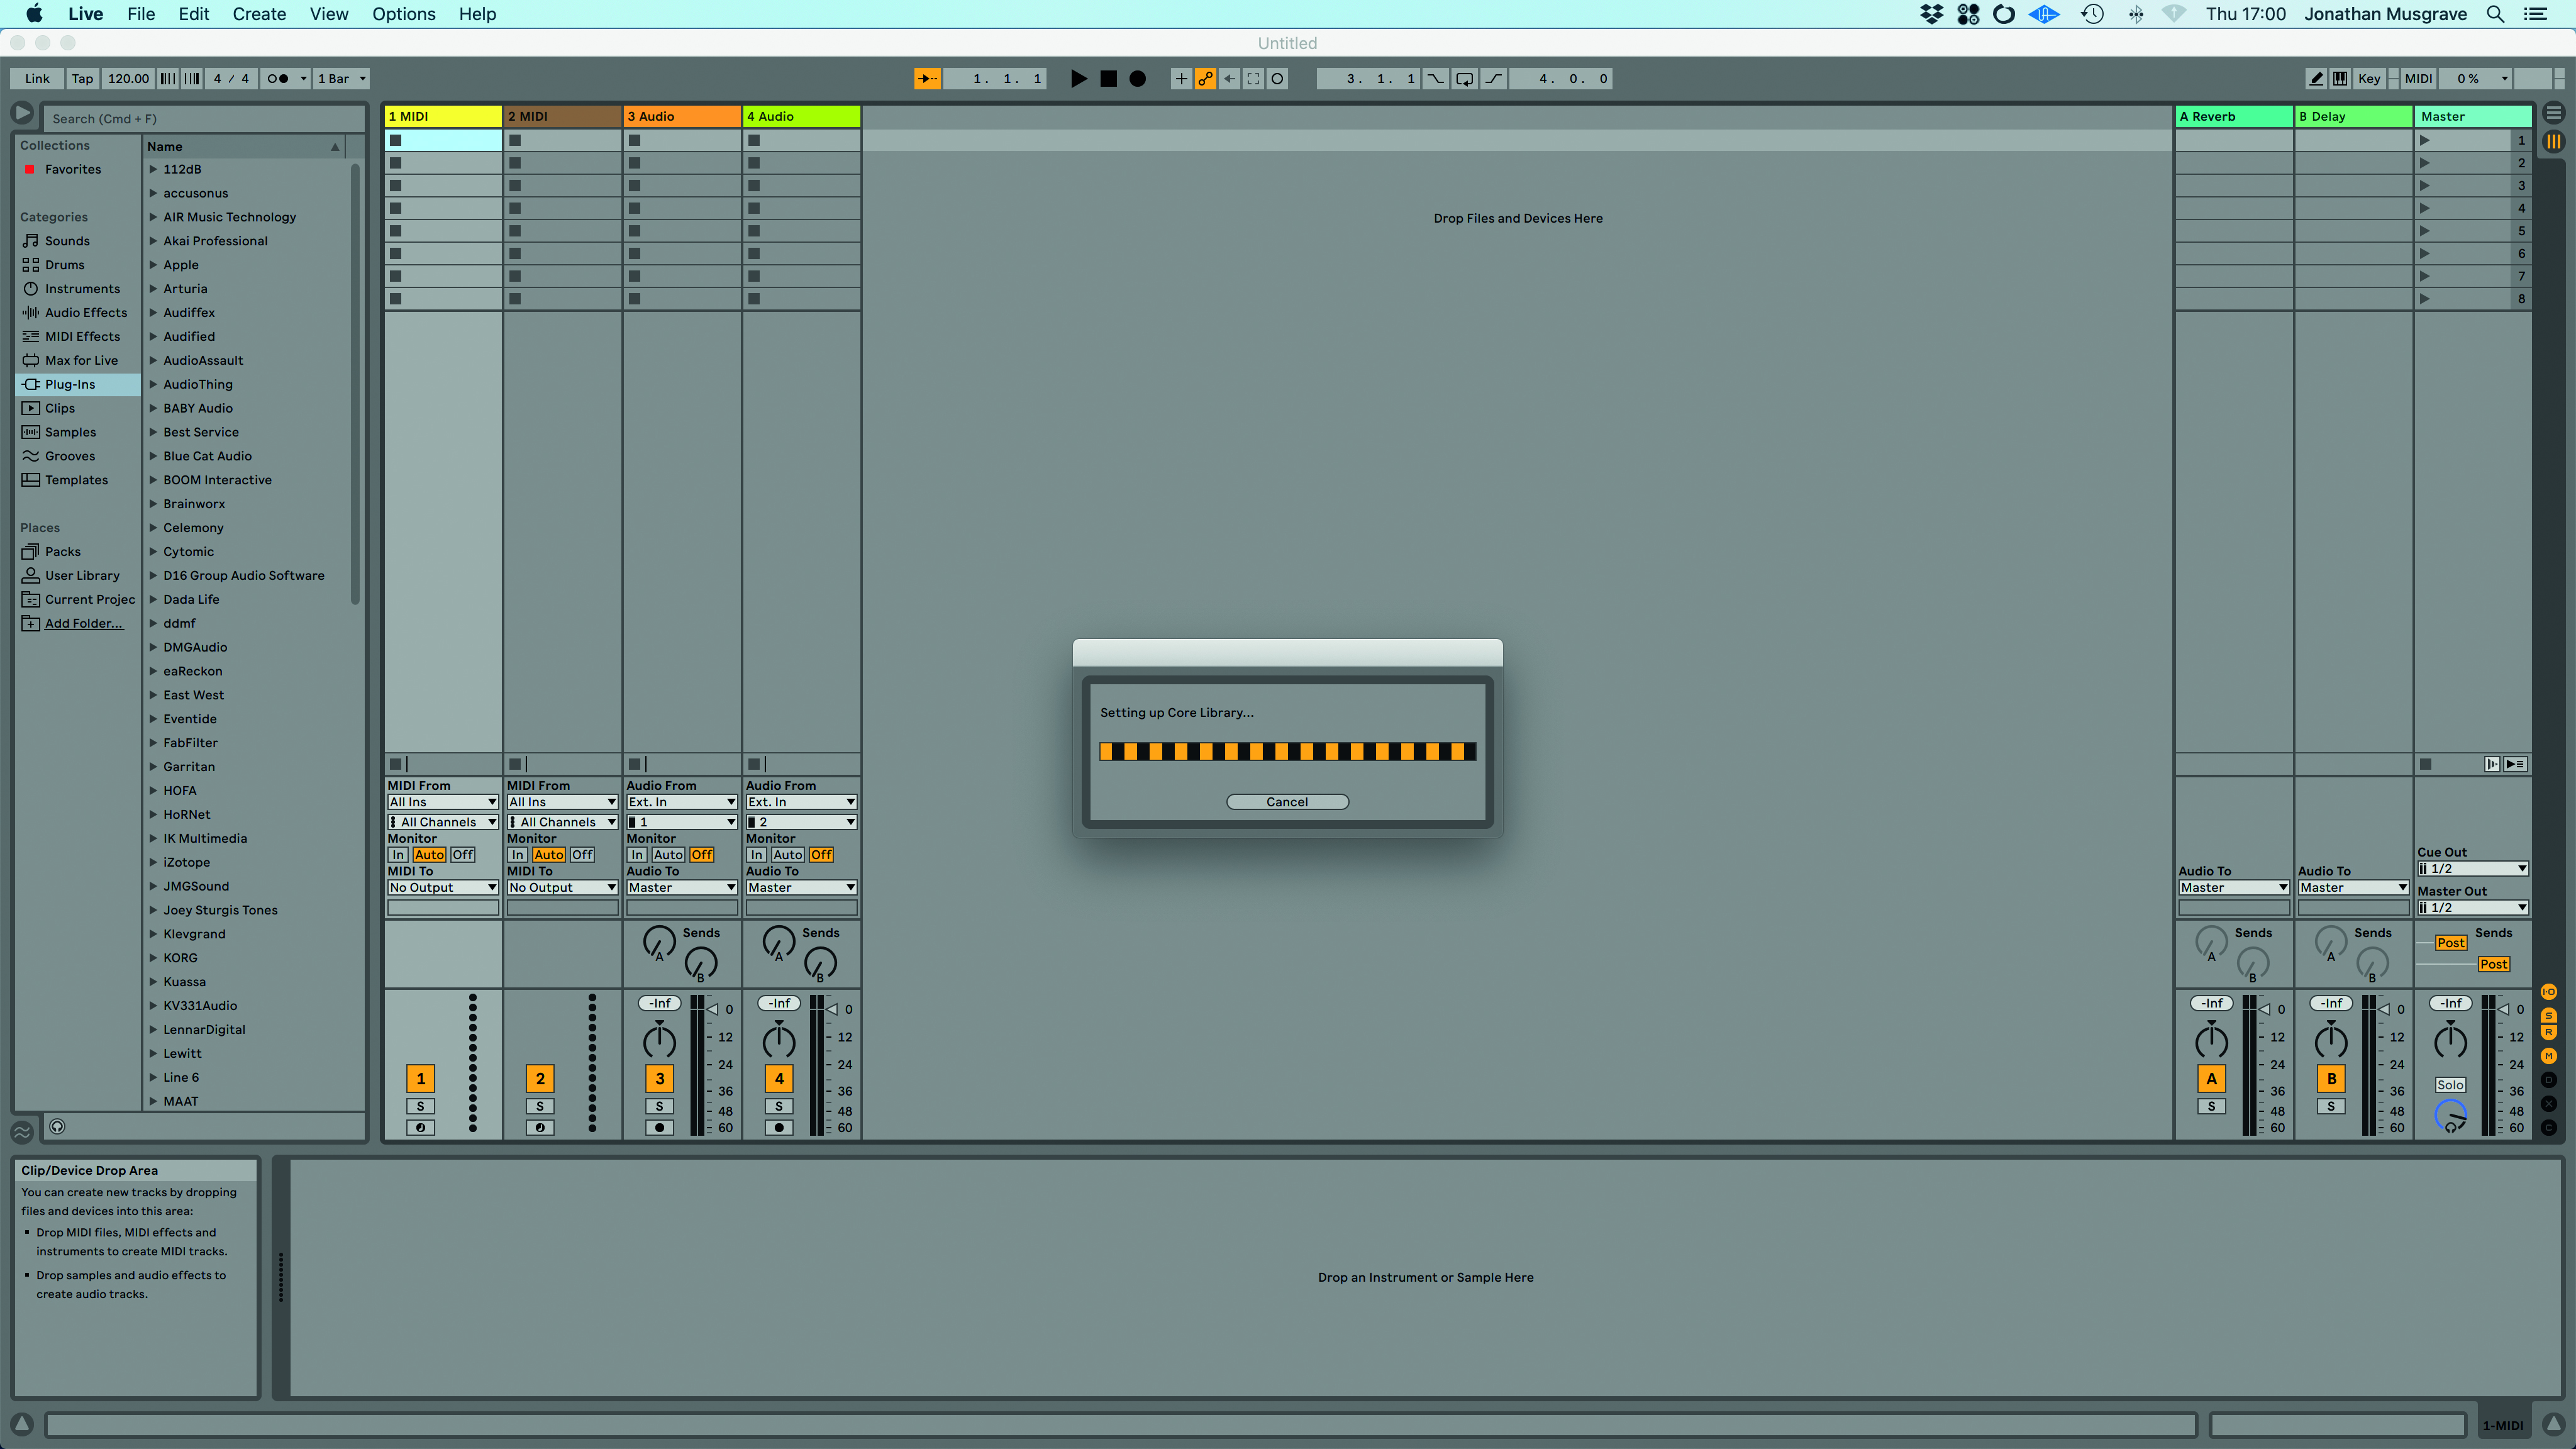
Step 7: Once Live Lite has been authorised for your machine, it will automatically prepare the Core Library and then load a demo song. Keep this open as we’ll use it on the next page to do our familiarisation.
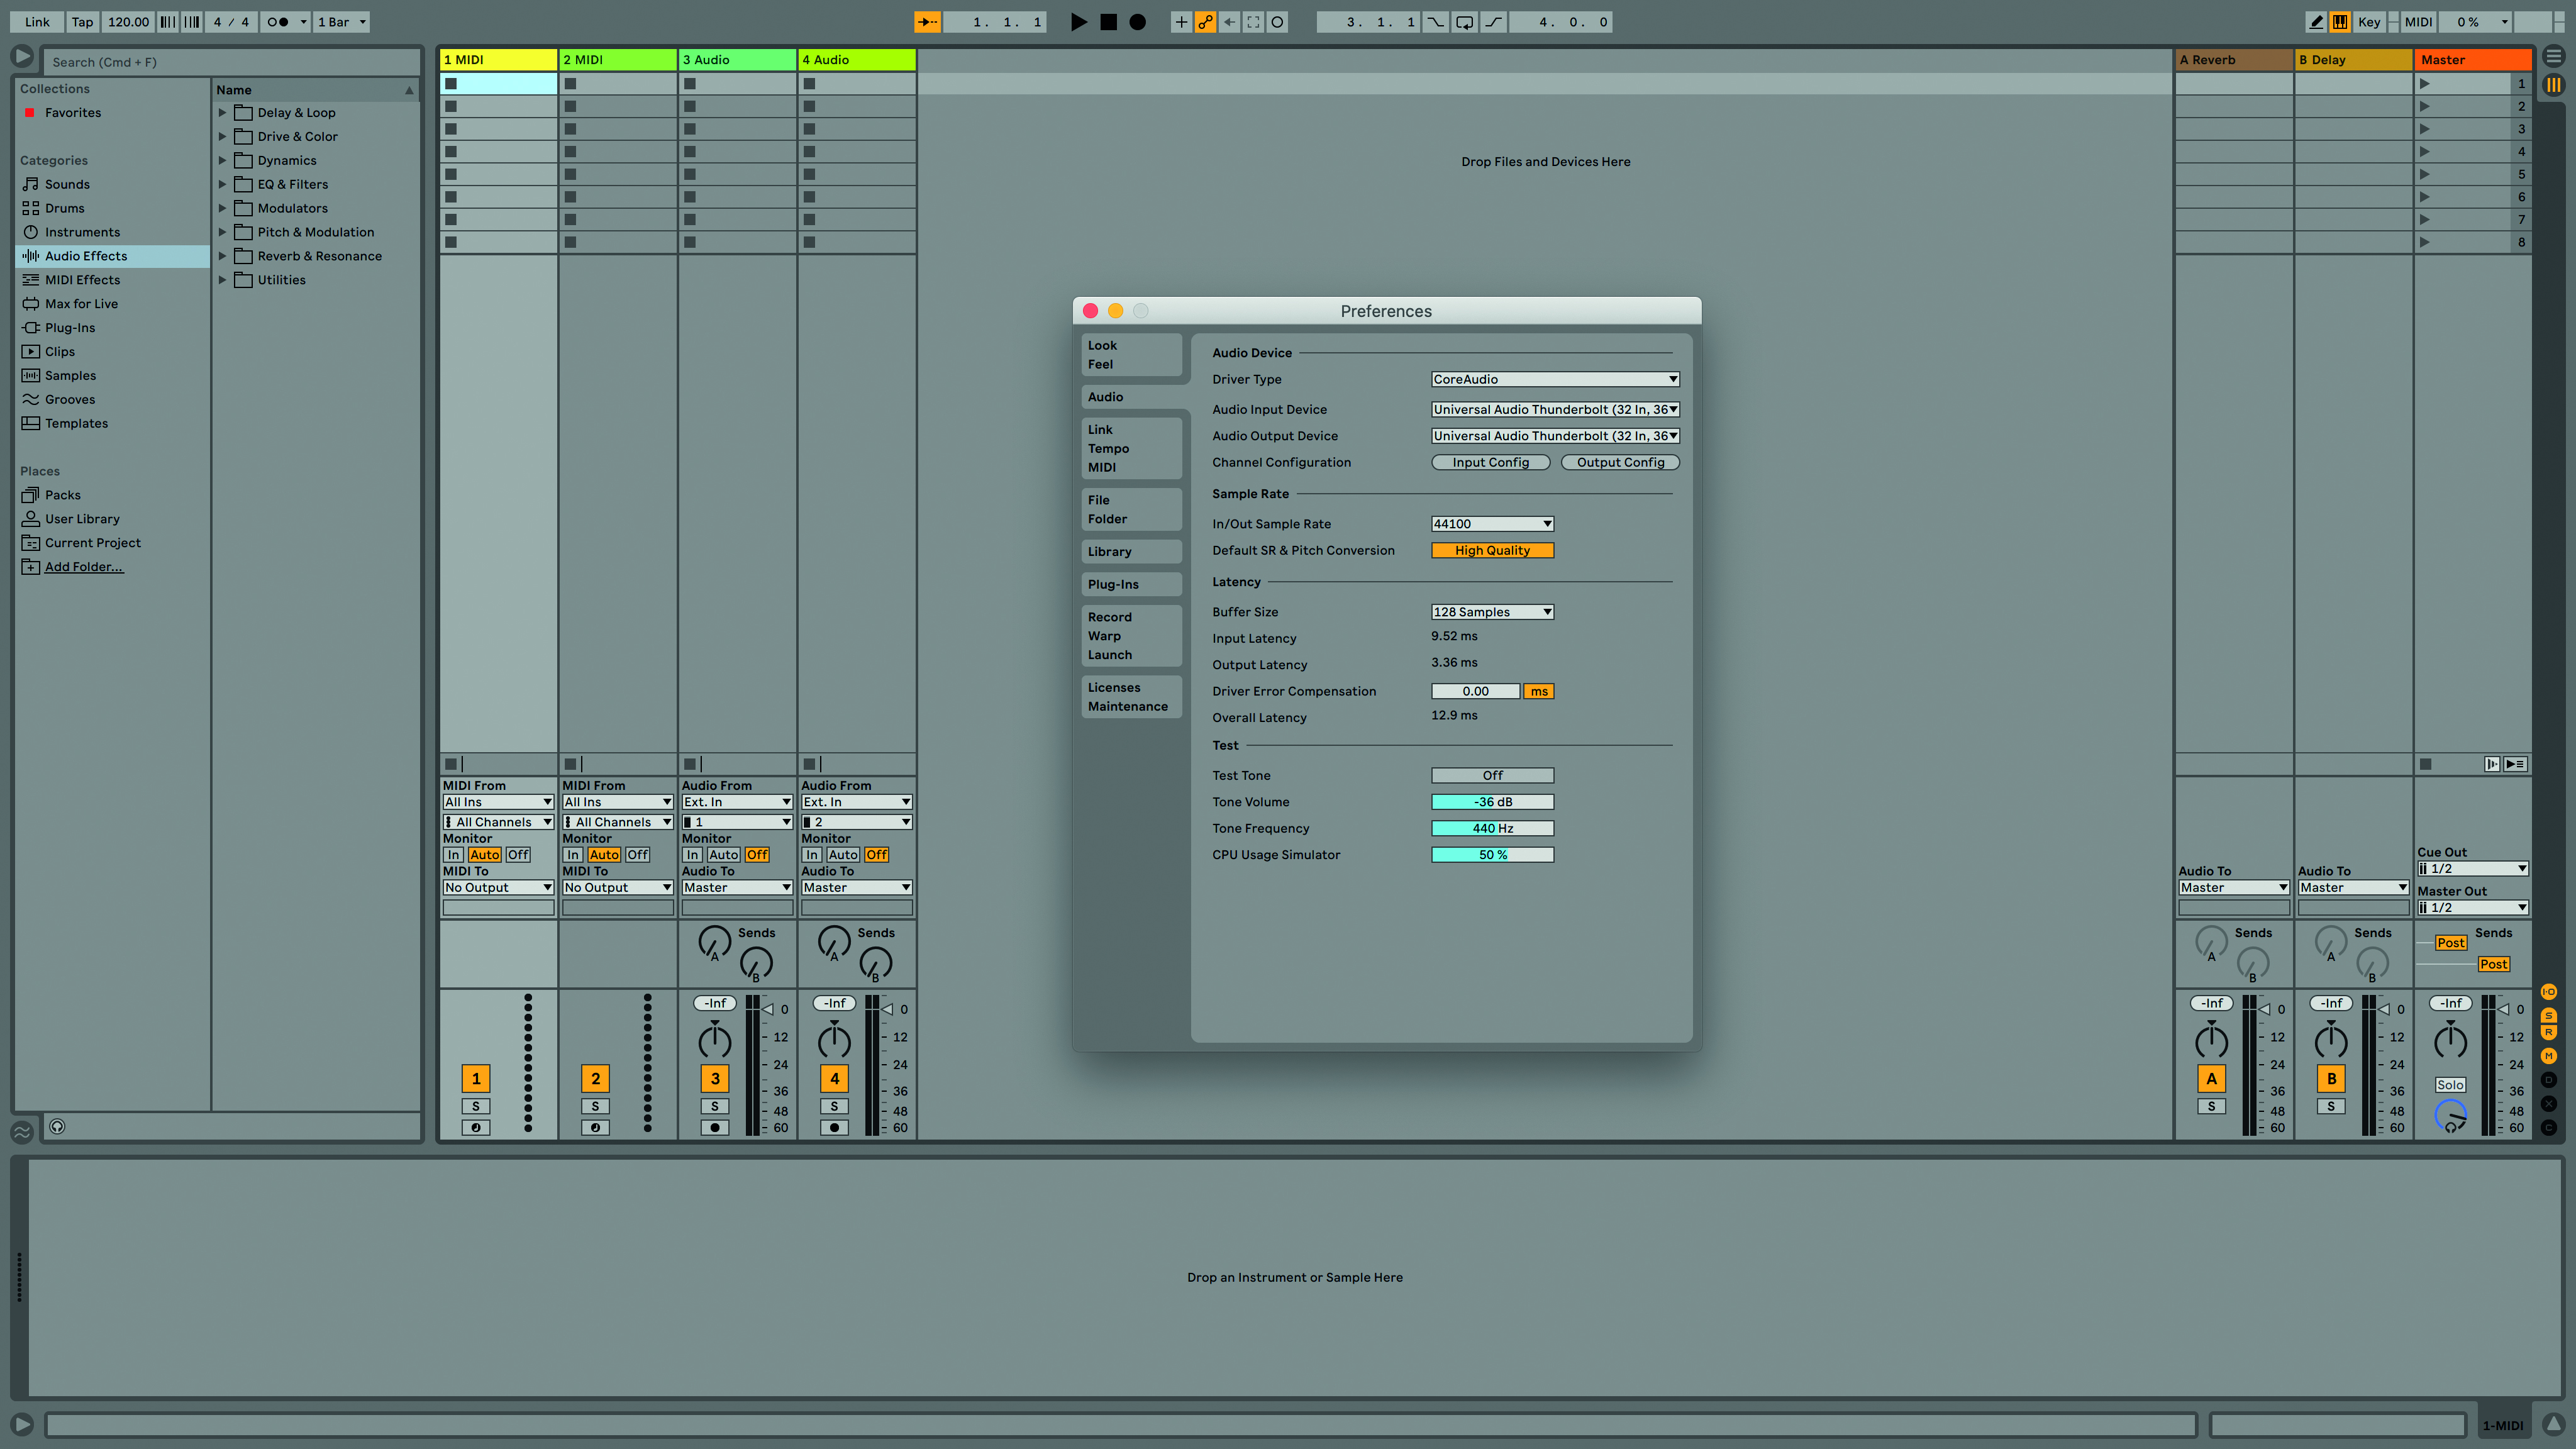
Step 8: Before we move on, it’s important to make sure we can get audio in and out of Live Lite. From the Live menu head to Preferences>Audio. First up, make sure your audio interface is selected as both Input and Output Device.
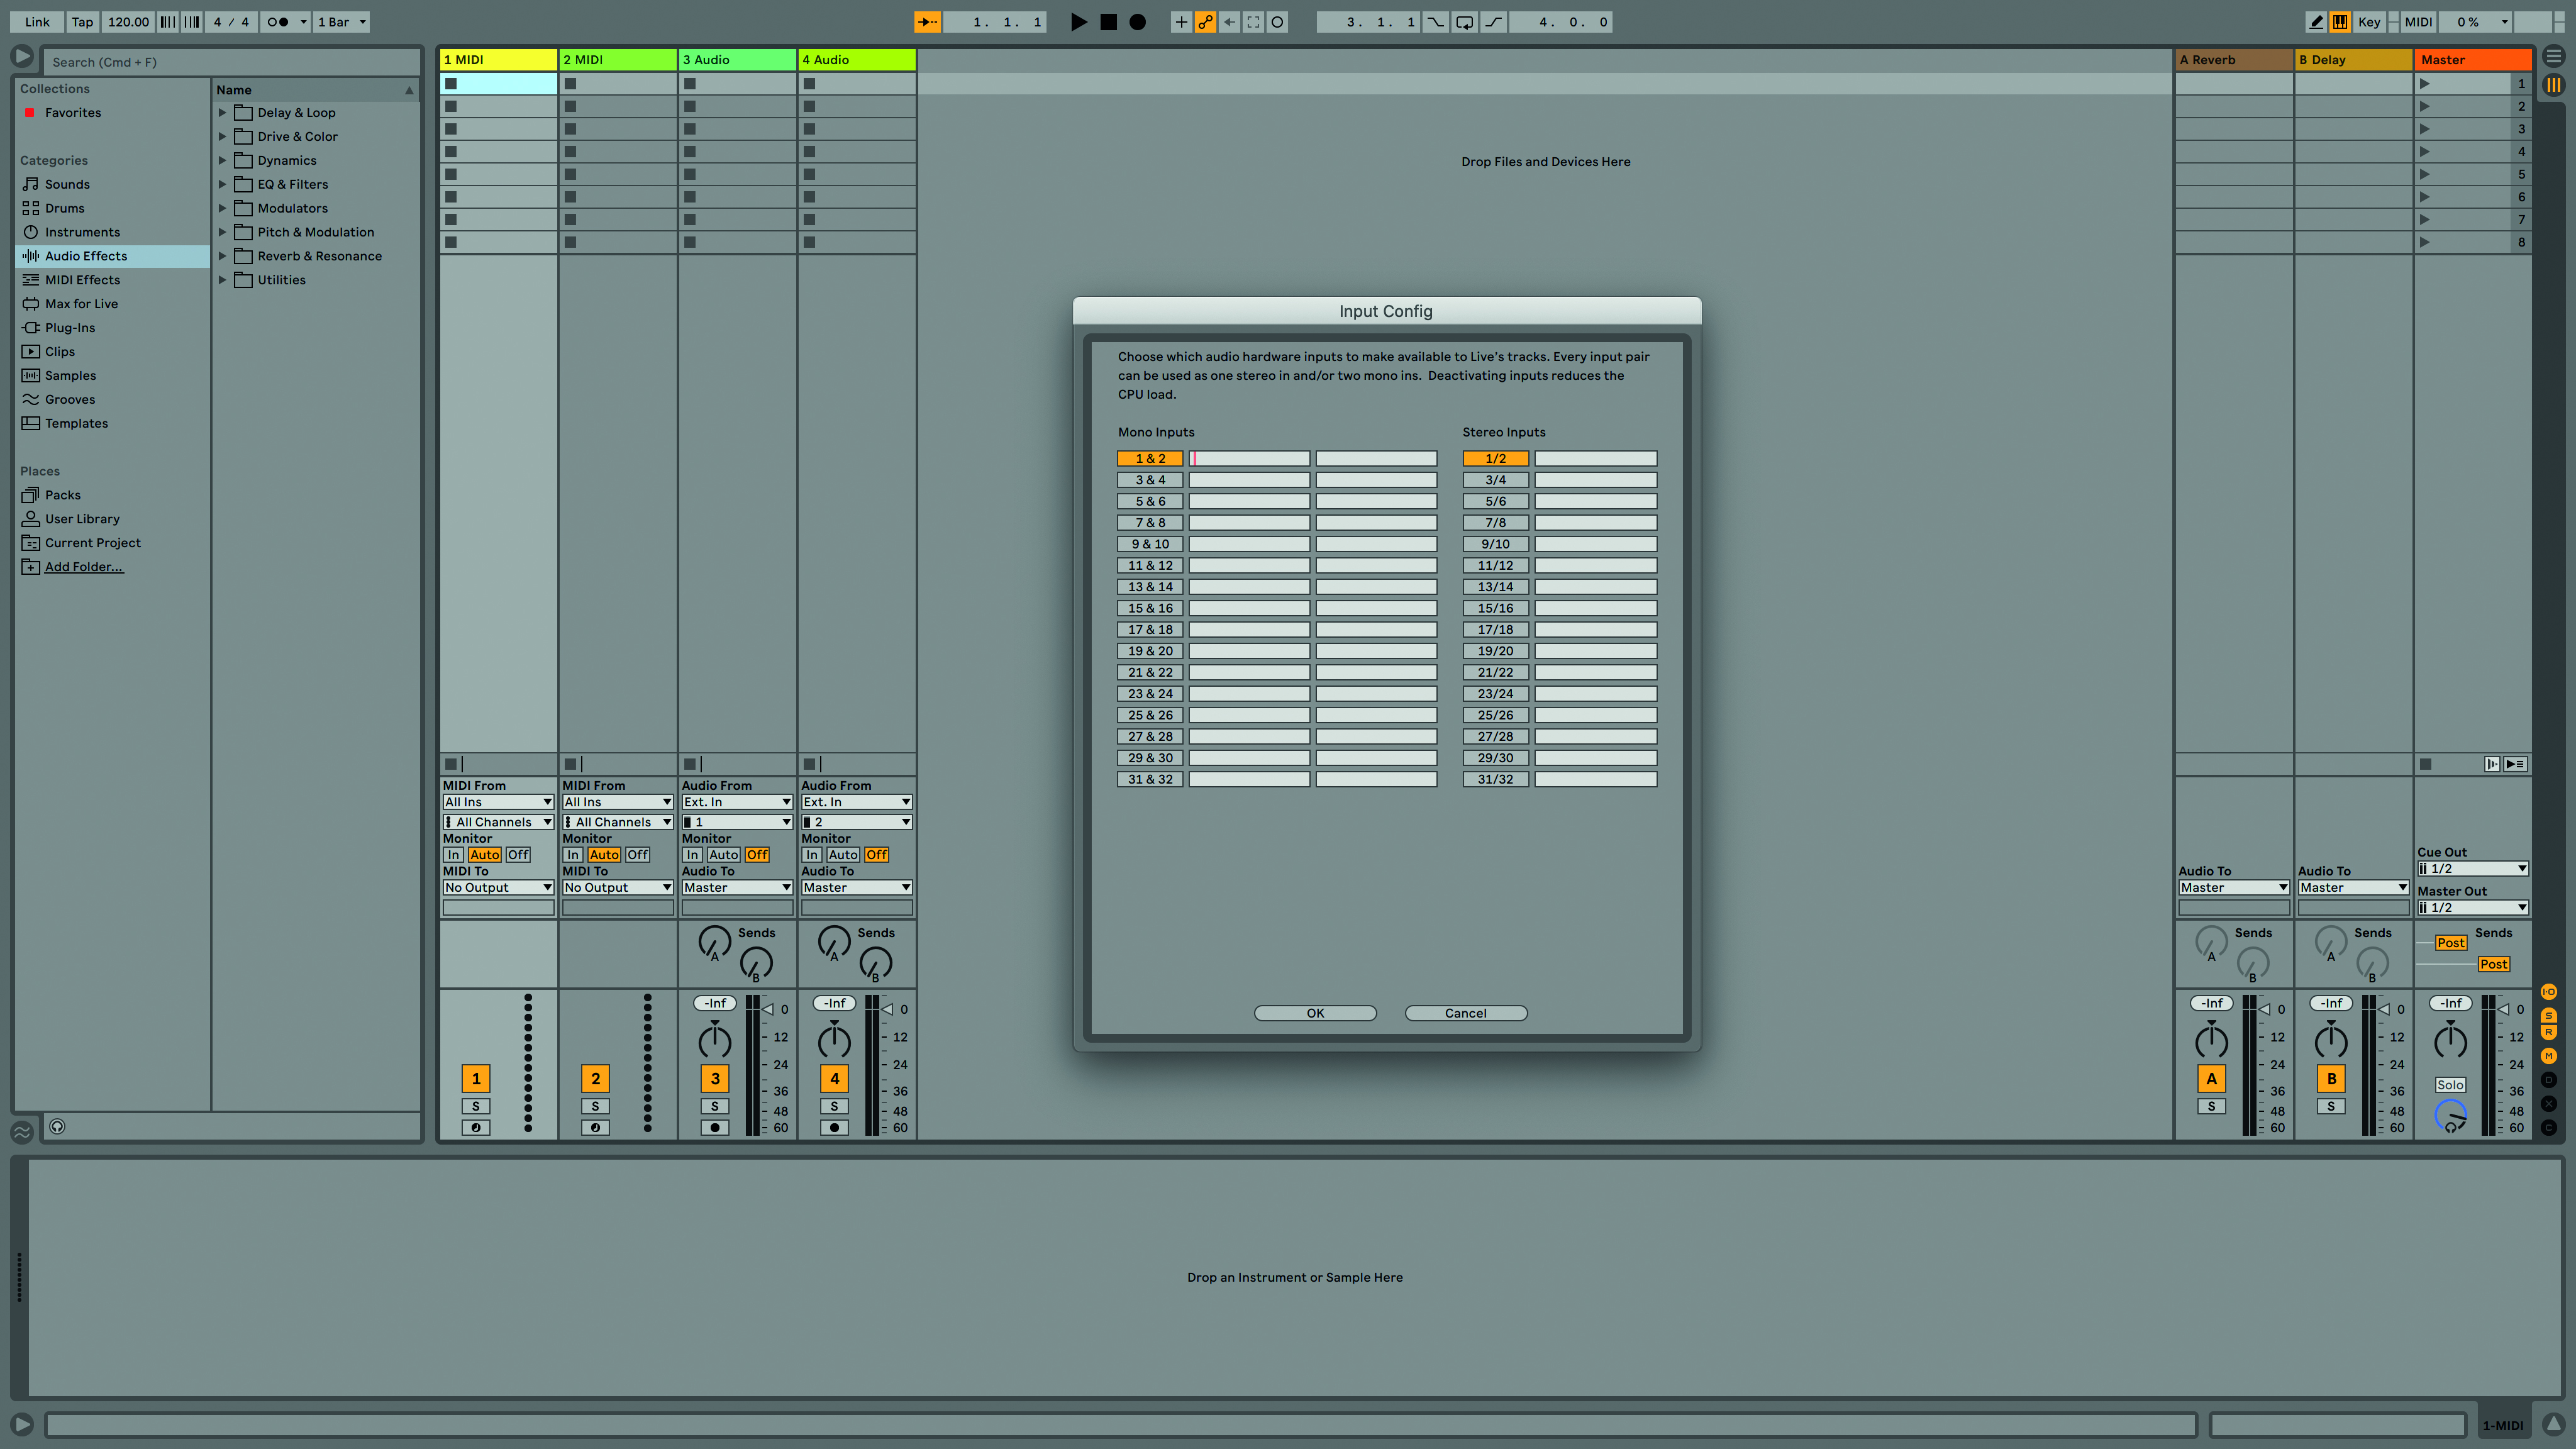
Step 9: Next, select the Input Config and Output Config tabs and choose which interface connections you want to make available to Live Lite. These should then appear orange. You don’t have to select all of them and here we’ve just chosen the first two. Once done, click OK and use the Test Tone button to make sure you can hear something.
Ableton 11 – это мощный музыкальный софт, предназначенный для создания и обработки звуковых треков. Если вы являетесь музыкантом, диджеем или просто интересуетесь музыкой, то установка Ableton 11 на вашем компьютере может быть отличным выбором. В этой статье мы рассмотрим подробную инструкцию по установке Ableton 11 на операционной системе Windows 10.
Шаг 1: Первым делом необходимо скачать установочный файл Ableton 11 с официального сайта разработчика. Для этого откройте свой любимый браузер и перейдите на официальный сайт Ableton.
Шаг 2: На сайте вы должны найти раздел «Загрузки» или «Скачать», где вы сможете найти нужный файл для скачивания. Обычно он называется что-то вроде «Ableton Live 11 Installer». Нажмите на ссылку скачивания и дождитесь завершения загрузки файла.
Шаг 3: Когда файл был успешно скачан на ваш компьютер, найдите его в папке Загрузки или в месте, куда вы обычно сохраняете загруженные файлы. Откройте скачанный файл для запуска установщика.
Шаг 4: Установщик Ableton 11 появится на экране вашего компьютера. Следуйте инструкциям, отвечайте на вопросы, и принимайте условия лицензионного соглашения. Затем нажмите на кнопку «Установить», чтобы начать установку программы.
Шаг 5: После того, как установка будет завершена, вам может быть предложено ввести номер вашей лицензии или зарегистрировать программу на официальном сайте Ableton. Если у вас нет лицензии, вы можете выбрать пробную версию и начать использовать Ableton 11 уже сейчас.
Поздравляем! Вы успешно установили Ableton 11 на ваш компьютер с операционной системой Windows 10. Теперь вы готовы воплотить в жизнь свои музыкальные идеи и создавать потрясающие треки с помощью этого инновационного музыкального софта.
Содержание
- Проверка системных требований
- Покупка и загрузка Ableton 11
- Запуск установочного файла
- Выбор языка и настройка параметров
- Принятие лицензионного соглашения и выбор пути установки
- Установка компонентов и завершение процесса
- Запуск и активация Ableton 11 на Windows 10
Проверка системных требований
Перед установкой Ableton 11 на компьютер с операционной системой Windows 10 необходимо убедиться, что ваша система соответствует минимальным требованиям программы.
Вот основные системные требования для установки Ableton 11 на Windows 10:
- Операционная система: Windows 10 (64-разрядная версия)
- Процессор: Многоядерный процессор Intel Core или AMD с поддержкой расширений SSE4.2
- Оперативная память: Минимум 8 ГБ, рекомендуется 16 ГБ или больше
- Свободное пространство на жестком диске: Минимум 10 ГБ
- Разрешение экрана: Минимум 1366 x 768
- Звуковая карта: Звуковой интерфейс с ASIO-драйвером
- Интернет: Для активации и доступа к онлайн-сервисам
Если ваша система соответствует этим требованиям, вы готовы к установке Ableton 11 на Windows 10. Если нет, обновите или модернизируйте вашу систему, чтобы удовлетворить указанным требованиям.
Покупка и загрузка Ableton 11
Перед установкой Ableton 11 на Windows 10 необходимо приобрести программу и получить лицензионный ключ. Вот как это сделать:
- Перейдите на официальный сайт Ableton.
- Выберите пакет Ableton 11, который соответствует вашим потребностям.
- Нажмите на кнопку «Купить» и выберите способ оплаты.
- Заполните необходимые данные для оплаты и подтвердите заказ.
- После успешной оплаты вам будет предоставлен лицензионный ключ.
Теперь, когда у вас есть лицензионный ключ Ableton 11, вы готовы загрузить программу:
- Приобретенный ключ должен быть активирован на вашей учетной записи Ableton.
- Перейдите на страницу загрузки Ableton 11 на официальном сайте.
- Введите свои данные для входа в учетную запись Ableton.
- После входа в систему выберите версию Ableton 11, которую хотите загрузить.
- Нажмите на кнопку «Загрузить» и сохраните установочный файл на ваш компьютер.
Теперь вы можете приступить к установке Ableton 11 на Windows 10. Обратите внимание, что для установки программы необходимо иметь достаточное количество свободного места на жестком диске и соответствующую конфигурацию компьютера, указанную в системных требованиях Ableton.
Запуск установочного файла
После скачивания установочного файла Ableton Live 11 для Windows 10, вам необходимо запустить его для начала установки.
Для этого выполните следующие шаги:
| Шаг 1: | Найдите скачанный файл «Ableton Live 11 Installer.exe» в папке загрузок вашего компьютера. |
| Шаг 2: | Щелкните на файле правой кнопкой мыши и выберите «Запуск от имени администратора». |
| Шаг 3: | Если появляется окно контроля учетных данных пользователя, подтвердите свое действие, нажав «Да». Это позволит программе вносить изменения в систему. |
| Шаг 4: | В появившемся окне установщика приветствуется кнопкой «Далее». Щелкните на ней, чтобы продолжить процесс установки. |
| Шаг 5: | Выберите путь для установки Ableton Live 11. Вы можете использовать предлагаемый путь по умолчанию или выбрать другой путь, нажав на кнопку «Обзор». После выбора пути, нажмите «Далее». |
| Шаг 6: | Выберите компоненты, которые вы хотите установить. Если вы не уверены, оставьте выбраными все компоненты по умолчанию. Нажмите «Далее». |
| Шаг 7: | После выбора компонентов, установочная программа покажет вам краткое описание функций и изменений, которые внесет Ableton Live 11 в вашу систему. Ознакомьтесь с ними и нажмите «Далее». |
| Шаг 8: | Настройте дополнительные параметры установки, если необходимо, и нажмите «Установить». |
| Шаг 9: | Подождите, пока установка завершится. Это может занять некоторое время, в зависимости от производительности вашего компьютера. |
| Шаг 10: | После завершения установки, нажмите «Готово» и Ableton Live 11 будет готов к использованию на вашем компьютере. |
Теперь вы можете наслаждаться работой с Ableton Live 11 на вашем компьютере под управлением Windows 10!
Выбор языка и настройка параметров
После установки Ableton 11 на Windows 10 первым шагом необходимо выбрать язык пользовательского интерфейса и настроить параметры программы в соответствии с вашими предпочтениями.
1. Запустите программу Ableton 11.
2. При первом запуске появится окно «Выбор языка». В этом окне можно выбрать желаемый язык интерфейса программы. Выберите русский язык из предоставленного списка.
Примечание: Если вы ранее выбирали язык, то окно «Выбор языка» может не появляться и программа будет запускаться на ранее выбранном языке.
3. После выбора языка программы откроется главное окно Ableton 11.
4. Чтобы настроить параметры программы, щелкните по иконке «Настройки» в правом верхнем углу окна программы или выберите пункт «Настройки» в меню «Опции».
5. В открывшемся окне настроек вы сможете настроить различные параметры, такие как звуковые настройки, настройки MIDI-контроллеров, настройки проекта и другие важные параметры. Измените параметры в соответствии с вашими предпочтениями.
6. После завершения настройки параметров нажмите кнопку «Применить» или «ОК», чтобы сохранить изменения.
Теперь вы можете использовать Ableton 11 на вашем компьютере с выбранным языком интерфейса и настроенными параметрами программы.
Принятие лицензионного соглашения и выбор пути установки
Перед началом установки Ableton 11 на Windows 10 необходимо принять лицензионное соглашение. Убедитесь, что вы ознакомились с условиями и нажмите кнопку «Принять».
После принятия лицензионного соглашения появится окно выбора пути установки. Здесь вам необходимо указать папку, в которую будет установлен Ableton 11.
Рекомендуется выбрать стандартный путь установки, предложенный программой. Однако, если вы хотите установить Ableton 11 в другую папку, вы можете нажать кнопку «Обзор» и выбрать нужную директорию на вашем компьютере.
После выбора пути установки нажмите кнопку «Далее» и перейдите к следующему шагу установки.
Установка компонентов и завершение процесса
После завершения загрузки и установки основной программы Ableton 11, вам может потребоваться установить дополнительные компоненты, чтобы получить полный функционал программы.
1. Откройте Ableton 11 и выполните вход в свою учетную запись.
2. Перейдите в раздел «Настройки» или «Preferences» в меню программы.
3. В этом разделе найдите вкладку «Library» или «Библиотека».
4. Нажмите на кнопку «Install» или «Установить» рядом с недостающими компонентами, которые вы хотите установить.
5. Дождитесь завершения процесса установки компонентов. Время установки может варьироваться в зависимости от размера и количества компонентов.
6. После завершения установки компонентов, перезапустите Ableton 11 для их активации.
Теперь вы полностью установили Ableton 11 на свой компьютер с операционной системой Windows 10. Вы можете начать использовать программу и наслаждаться всеми ее возможностями для создания и записи музыки.
Запуск и активация Ableton 11 на Windows 10
После успешной установки Ableton 11 на ваш компьютер с операционной системой Windows 10, вы готовы запустить программу и активировать ее. В этом разделе я подробно опишу, как выполнить этот процесс.
- Найдите ярлык Ableton 11 на рабочем столе или в меню «Пуск».
- Щелкните по ярлыку, чтобы запустить программу.
- При запуске Ableton 11 вам может быть предложено ввести свой серийный номер или использовать пробную версию. Если у вас есть серийный номер, выберите опцию «Ввести серийный номер» и введите его в соответствующее поле.
- Если у вас нет серийного номера, вы можете выбрать опцию «Пробная версия» и использовать программу в ограниченном режиме.
- После ввода серийного номера или выбора пробной версии нажмите кнопку «Далее» или «Продолжить».
- При первом запуске Ableton 11 может потребовать активацию через интернет. Если у вас есть доступ к интернету, выберите опцию «Активировать через интернет» и следуйте инструкциям на экране.
- Если у вас нет доступа к интернету или вам не удалось активировать программу, выберите опцию «Активировать позднее» и завершите процесс запуска.
После успешной активации Ableton 11 вы сможете начать работу с программой и использовать все ее функции и возможности полностью.
Не забудьте сохранить ваш серийный номер в надежном месте, чтобы иметь возможность активировать Ableton 11 в случае переустановки системы или на другом компьютере.