
Из коробки Hyper-V Module для Powershell входит только в состав дистрибутивов Windows Server 2012 и 2012 R2. Если устанавливать гипервизор «с нуля» используя данные дистрибутивы, то Hyper-V модуль ставится вместе с самим Hyper-V. Однако, если мы делаем так называемый «in-place upgrade» системы с Windows Server 2008R2 до WS 2012 то получим лишь обновленный Hypervisor без модуля для PS. Итак, где же взять данный модуль…
Для версии Hyper-V 2008 вышеуказанный модуль для PS приходилось скачивать и устанавливать вручную (вот например Мануал). Но так как в WS 2012 модуль включен по умолчанию то ничего дополнительно качать не нужно. И хотя некоторые пользователи для того, чтобы установить Hyper-V Module для Powershell пробуют переустановить весь гипервизор… Есть решения куда более простые.
Итак. Добавить модуль можно двумя способами:
- И через сам Powershell используя команду:
Install-WindowsFeature Hyper-V-Powershell - Через GUI.
Заходим в ServerManager -> выбраем «Add Roles and Features» и на вкладке Features в компоненте RSAT находим заветный модуль(см. рис.).
Как видите, все не так уж трудно. А главное теперь можно смело автоматизировать огромное количество работ на своей виртуальной ферме.
Skip to content
Beginners Guide for Microsoft Hyper-V: How to Install Microsoft Hyper-V with PowerShell – Part 3
The last post covered installing Microsoft Hyper-V for beginners with Server Manager in Windows Server.
Quick Bites:
- The blog post discusses how to install Microsoft Hyper-V using PowerShell for beginners, emphasizing its simplicity and efficiency compared to traditional methods like using Server Manager
- It covers the benefits of PowerShell, provides step-by-step instructions for both local and remote installations, and highlights scenarios where PowerShell is particularly useful, such as setting up Hyper-V clusters or managing Windows Server Core
- Overall, it underscores the versatility and power of PowerShell in managing Hyper-V environments effectively
Table of Contents
- What is PowerShell, and why should you use it?
- Install Microsoft Hyper-V with PowerShell for beginners
- Installing the Windows Server Hyper-V Role on a local server using PowerShell
- Install the Windows Server Hyper-V Role on a remote server using PowerShell
- When would you use PowerShell to install Microsoft Hyper-V?
- Wrapping Up
What is PowerShell, and why should you use it?
PowerShell has quickly become the premier command line scripting tool for Windows environments. Windows PowerShell was first natively included in Windows Server 2008 R2. Ever since then, it has grown and matured into a robust command line tool providing powerful capabilities.
Protect Your Data with BDRSuite
PowerShell uses a verb/noun structure that is very human-readable and easy to understand. As a result, even those without much experience with scripting or development can quickly get up to speed with performing basic tasks using it. One of the great benefits of learning and using PowerShell along with your endeavor to learn Microsoft Hyper-V is that it is used everywhere and by arguably most, if not all, vendors.
PowerShell provides a way to perform routine tasks and configuration changes consistently, predictably, and collectively regarding Hyper-V administration, management, configuration, and other tasks. When installing the Windows Server Hyper-V role, you will notice that, by default, the installation will install Hyper-V Module for Windows PowerShell.
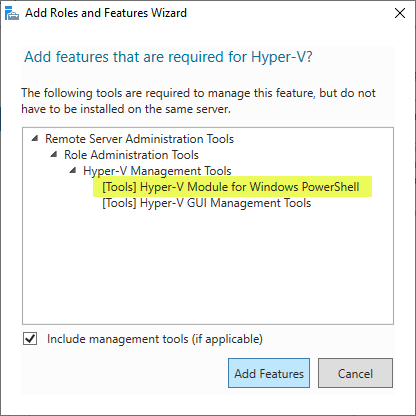

Hyper-V module for Windows PowerShell
In a future post, we will take a much deeper dive into the Hyper-V Windows PowerShell module. But, first, it helps to start understanding the benefits of using PowerShell with Hyper-V, which is a great way to take your Hyper-V learning and administration to the next level.
Install Microsoft Hyper-V with PowerShell for beginners
Ok, let’s see how we can install Microsoft Hyper-V with PowerShell in Windows Server 2022. The process is extremely easy. First, let’s launch a Windows PowerShell admin prompt. To do this in Windows Server 2019 and higher, you can right-click the Windows Start button and select Windows PowerShell (Admin) to launch the PowerShell prompt with administrative permissions. We need the admin privileges since we will be adding a Windows Server role and the underlying management components to manage the solution.
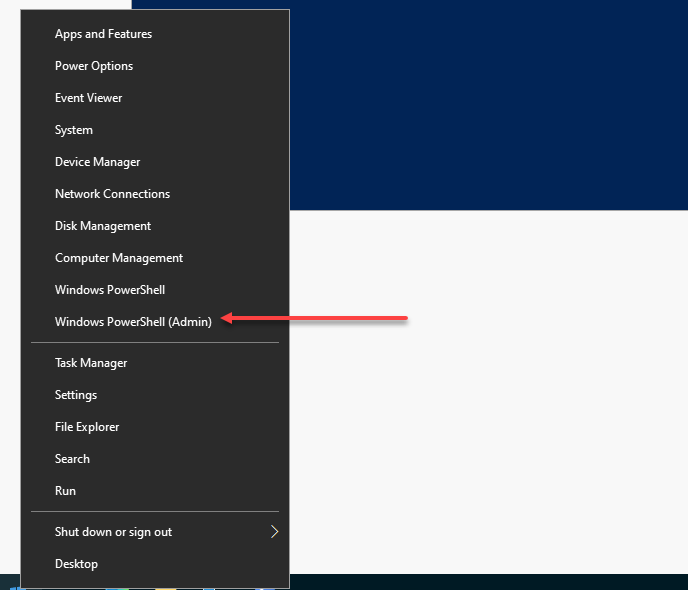
Launching Windows PowerShell as an administrator
Once Windows Powershell is launched as an administrator, installing the Windows Server Hyper-V role is a simple one-liner PowerShell command. There are a few variations of the command to note, but we will cover those below.
Installing the Windows Server Hyper-V Role on a local server using PowerShell
The Windows PowerShell command you can run to install the Hyper-V Windows Server Role is the following:
- Install-WindowsFeature -Name Hyper-V -IncludeManagementTools -Restart
Note in the above command, the “-IncludeManagementTools” parameter is included. This parameter tells PowerShell also to install the Hyper-V Management Tools, Hyper-V Module for Windows PowerShell, and Hyper-V GUI Management Tools.
If you only want to install the Hyper-V Windows Server Role, you can omit this parameter, and it will only install the Hyper-V Role itself, without the management tools. Also, installing the Windows Server Hyper-V Role requires a restart. If you pass in the “Restart” parameter, the server will be restarted as soon as the installation of the Windows Role is complete.
If you don’t want to restart the designated Hyper-V host immediately, you can leave off the “Restart” parameter and restart the Windows Server manually.
Install the Windows Server Hyper-V Role on a remote server using PowerShell
We only need to slightly tweak the above PowerShell cmdlet to adjust it to install the Windows Server Hyper-V role on a remote computer. The command to install the Hyper-V Role on a remote Windows Server is as follows:
- Install-WindowsFeature -Name Hyper-V -ComputerName -IncludeManagementTools -Restart
In the above command, we are only adding the “-ComputerName” parameter. This parameter tells PowerShell we want to install the Windows Server Role on the computer name specified. Again, be sure you want to restart the Windows Server immediately if you pass in the “Restart” parameter. The server will restart automatically and immediately after the Hyper-V role installation is complete.
Below, I have removed the “Restart” parameter to allow seeing what is displayed in the PowerShell window after installing the Hyper-V role.
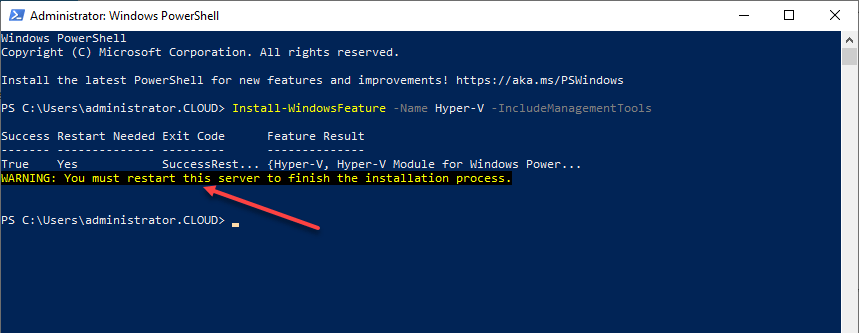
Installing the Windows Server Hyper-V role using PowerShell
As noted, if you didn’t use the “Restart” parameter as part of the command, you will need to reboot the server manually. You can easily do this in PowerShell using the cmdlet:
- Restart-Computer
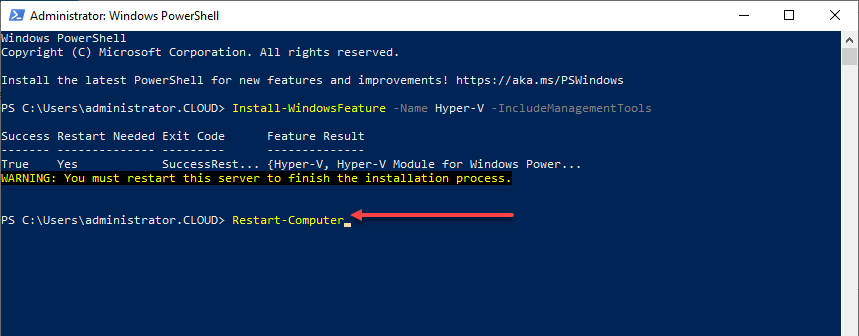
Using PowerShell to reboot the Windows Server after installing Hyper-V
When would you use PowerShell to install Microsoft Hyper-V?
Using PowerShell to install Microsoft Hyper-V makes a lot of sense when installing Hyper-V on multiple Windows Servers, such as when setting up a Hyper-V cluster. PowerShell works well in this case because you can quickly install the Hyper-V Role on multiple Windows Server hosts without touching the GUI.
It is also a great option to install the Windows Server Hyper-V Role when working with Windows Server Core. Windows Server Core is a “headless” operating system without a GUI. So, you don’t have Server Manager available locally to install the Hyper-V Role. With Windows Server Core, PowerShell is a great way to manage, configure, and administer Hyper-V and other Windows Server roles.
PowerShell can also be used as a DevOps configuration management tool allowing Hyper-V administrators to check and enforce configuration on Hyper-V servers in their estate, ensuring these align with standardized configuration across the organization.
Wrapping Up
Microsoft has provided many ways to install Microsoft Hyper-V in Windows Server. For example, you can use the Server Manager GUI or PowerShell from the command line to install the Hyper-V Role. As shown, using PowerShell to install Hyper-V is a one-liner PowerShell cmdlet, and it is easy to install Hyper-V across multiple servers. Powershell is an excellent option when installing a Hyper-V cluster with numerous Windows Server hosts. Finally, it also provides a way for Hyper-V administrators to use a DevOps approach to configuring Hyper-V hosts and managing the Hyper-V hosts in their production Hyper-V server environment.
Read more on our Hyper-V Beginner’s series:
Hyper-V Mastery: A Step-by-Step Guide for Beginners to Elevate Your IT Skills and Boost Your Career
Related Posts:
Why use PowerShell Jobs?
6 reasons why you should learn Powershell
Convert VHD to VHDX using Hyper-V Manager and Powershell
Automating Windows Server 2019 Package Management with PowerShell
How to create Hyper-V Dashboard using Windows PowerShell?
Guide on how to make Html reports in PowerShell
How to Merge Hyper-V Checkpoints using Hyper-V Manager and Powershell
Beginner’s Guide for Microsoft Hyper-V: Top 10 PowerShell Commands for Hyper-V – Part 12
Follow our Twitter and Facebook feeds for new releases, updates, insightful posts and more.
Try BDRSuite for Free!
Schedule a live demo with one of our product experts
Start your full-featured 30-day free trial
Explore detailed pricing, editions & features
5 Key Steps to Install Hyper-V PowerShell Module: A Comprehensive Guide for Software Experts
Have you ever wondered how to manage your virtual machines more efficiently? Imagine being able to perform complex tasks like creating, configuring, and managing virtualization components through a simple command-line interface. That’s where the Hyper-V PowerShell module comes into play.
In 1500 comprehensive words, this article will provide you with a step-by-step guide on how to install the Hyper-V PowerShell module, with clear examples and secondary keywords to ensure you can expertly configure and manage your virtual environment. Not only will you learn how to install the module, but we’ll also explore related commands and techniques that will elevate your PowerShell experience. So, let’s dive right in!
Step 1: Validate System Requirements
Before attempting to install the Hyper-V PowerShell module, it’s crucial to verify that your system meets the necessary requirements:
* Windows Server: versions 2012 R2 or later
* Windows Client: Windows 10 or later, with Hyper-V enabled
* PowerShell: version 5.1 or later
To check the PowerShell version installed on your system, type `Get-Host | Select-Object Version` in the PowerShell command prompt. This command returns the installed version to confirm its compatibility with the Hyper-V PowerShell module.
Step 2: Enable the Hyper-V Role
Having ensured the compatibility of your system, the next step is to enable the Hyper-V role. Although not required for installing the PowerShell module, it’s a vital prerequisite for using the module effectively. To enable the Hyper-V role, use one of these methods:
# Option A: Using Windows Features
1. Open the *Control Panel*, click on *Programs and Features*, then select *Turn Windows features on or off*.
2. In the *Windows Features* dialog box, locate and select the checkbox for *Hyper-V*.
3. Click *OK*, then *Restart now* to finalize the installation.
# Option B: Using PowerShell
Execute the following command as an administrator:
“`
Enable-WindowsOptionalFeature -Online -FeatureName Microsoft-Hyper-V -All
“`
Step 3: Install the Hyper-V PowerShell Module
With the Hyper-V role enabled, it’s time to install the module itself. The installation process is significantly simple:
# Option A: Using Windows PowerShell
For Windows Server or Windows 10, you can install the module using this command:
“`
Install-WindowsFeature -Name Hyper-V-PowerShell
“`
# Option B: Installing from the PowerShell Gallery
For systems that support the PowerShell Gallery, use this command:
“`
Install-Module -Name Hyper-V -Scope CurrentUser
“`
_Note: Make sure to launch the command prompt as an administrator._
Step 4: Import the Hyper-V PowerShell Module
Once the installation is complete, import the module into your PowerShell session by executing the following command:
“`
Import-Module Hyper-V
“`
By importing the Hyper-V PowerShell module, you’ll gain access to the cmdlets required for managing virtual machines and other virtualization components.
Step 5: Explore Hyper-V Cmdlets and Management Techniques
Now that the Hyper-V module is installed and imported, you can begin mastering various cmdlets and techniques to manage your virtual environment effectively. Below is a brief list of tasks you can perform with the module:
1. Create a New Virtual Machine: Use the `New-VM` cmdlet to create a new virtual machine.
2. Manage Virtual Machine Memory: Adjust dynamic memory settings with the `Set-VMMemory` cmdlet.
3. Configure Network Adapters: Utilize the `Add-VMNetworkAdapter` and `Set-VMNetworkAdapter` cmdlets to manage network adapters for virtual machines.
4. Manage Virtual Hard Disks: Create, configure, and expand virtual hard disks using `New-VHD`, `Set-VHD`, and `Resize-VHD` cmdlets, respectively.
By employing the Hyper-V PowerShell module, you’ll unlock a world of possibilities in managing your virtual environment with ease and efficiency. The time invested in learning this powerful tool will significantly enhance your virtualization skills and make you a true expert in software engineering.
To summarize, we have discussed how to install the Hyper-V PowerShell module by validating system requirements, enabling the Hyper-V role, installing the module, importing it, and exploring various cmdlets for effective management. By following these steps and delving into the extensive resources provided online, you’ll quickly become proficient in leveraging the power of the Hyper-V PowerShell module, maximizing the potential of your virtual environment.
PowerShell For Beginners Full Course | PowerShell Beginner tutorial Full Course
How to Install Hyper-V in Windows Server 2022 !! Create & Run New Virtual Machine !! How Its Works
How can one install the PowerShell module for Hyper-V?
To install the PowerShell module for Hyper-V, you need to follow these steps:
1. Open PowerShell with administrative privileges. To do this, press the `Win + X` keys and select Windows PowerShell (Admin).
2. To check if the Hyper-V module is already installed, run the following command in PowerShell:
“`
Get-Module -ListAvailable *Hyper-V*
“`
If the Hyper-V module is listed, it means the module is already installed.
3. If the Hyper-V module is not installed, you can install it by running the following command:
“`
Install-WindowsFeature -Name Hyper-V-PowerShell
“`
This will install the Hyper-V PowerShell module on your system.
4. Once the installation is complete, you can verify if the module is installed by running the `Get-Module` command again:
“`
Get-Module -ListAvailable *Hyper-V*
“`
If the Hyper-V module is displayed in the list, you have successfully installed it.
Now you can use the Hyper-V PowerShell commands to manage your Hyper-V environment.
To install the Hyper-V PowerShell module using PowerShell, you need to use the Add-WindowsFeature cmdlet. Make sure you are running PowerShell as an administrator before executing the following command:
“`powershell
Add-WindowsFeature –Name RSAT-Hyper-V-Tools -IncludeAllSubFeature
“`
This command will install the Hyper-V PowerShell module along with all its subfeatures. After the installation is complete, restart your PowerShell session, and you’ll be able to use the Hyper-V cmdlets.
Is it possible to install Hyper-V using PowerShell?
Yes, it is possible to install Hyper-V using PowerShell. To do this, you need to use the Add-WindowsFeature or Install-WindowsFeature cmdlets along with the *Hyper-V* feature name. Here’s how to install Hyper-V using PowerShell:
1. First, make sure you are running PowerShell as Administrator. To open PowerShell with administrative privileges, right-click on the PowerShell icon and select “Run as Administrator”.
2. Use the following command to install Hyper-V:
“`
Add-WindowsFeature -Name Hyper-V -IncludeManagementTools
“`
or
“`
Install-WindowsFeature -Name Hyper-V -IncludeManagementTools
“`
The -IncludeManagementTools flag installs the Hyper-V management tools, including Hyper-V Manager and the Hyper-V PowerShell module.
3. After the installation is complete, you will be prompted to restart your computer. You can do that by running the following command:
“`
Restart-Computer
“`
Once your computer has restarted, Hyper-V should be installed and ready to use. You can launch the Hyper-V Manager from the Start menu or use the Hyper-V PowerShell module to manage your virtual machines.
How can I manually install a PowerShell module?
To manually install a PowerShell module, follow these steps:
1. Download the module: First, you need to download the module from the source. This may be available through the PowerShell Gallery, GitHub, or another online repository.
2. Extract the module: If the module is in a compressed format (like .zip), extract the contents into a folder.
3. Copy the module folder: Find the location where PowerShell modules are stored on your system. For the current user, this is typically `C:UsersDocumentsWindowsPowerShellModules`. For all users, this is usually `C:Program FilesWindowsPowerShellModules`. Copy the extracted module folder into one of these directories.
4. Update the module path (optional): If you cannot find the module folder in the default locations, you can check the environment variable `$env:PSModulePath`. This variable holds the locations where PowerShell searches for modules. To add a new location to the variable, use:
“`
$env:PSModulePath += “;”
“`
Replace “ with the actual folder path where your module is located.
5. Import the module: Now that the module is in the correct location, you can import it into your PowerShell session using the `Import-Module` cmdlet:
“`
Import-Module -Name
“`
Replace “ with the name of the module you want to import.
6. Verify the installation: To confirm that the module is installed and available for use, run the `Get-Module` cmdlet with the `-ListAvailable` parameter:
“`
Get-Module -ListAvailable -Name
“`
This will display information about the installed module, including version and file location.
Now, you can start using the cmdlets and functions available in the installed module. Remember to always import the module in your PowerShell session before using any cmdlets it provides.
What are the necessary steps to successfully install the Hyper-V PowerShell module in a Windows environment using PowerShell command-line?
To successfully install the Hyper-V PowerShell module in a Windows environment using PowerShell command-line, follow these steps:
1. Open PowerShell as an administrator by pressing Win + X and selecting “Windows PowerShell (Admin)” or searching for “PowerShell” in the Start menu, right-clicking, and choosing “Run as administrator.”
2. Check if the Hyper-V role is installed on your system by running the following command:
“`
Get-WindowsFeature -Name Hyper-V
“`
If the “Install State” is Installed, you can proceed to step 4. Otherwise, continue with step 3.
3. To install the Hyper-V role, run the following command:
“`
Install-WindowsFeature -Name Hyper-V -IncludeManagementTools -Restart
“`
Your computer will restart after the installation is complete.
4. Now, it’s time to install the Hyper-V PowerShell module. In PowerShell, run the following command:
“`
Install-WindowsFeature -Name RSAT-Hyper-V-Tools -IncludeAllSubFeature
“`
5. After the installation is finished, you can verify that the Hyper-V PowerShell module is installed by running the following command:
“`
Get-Module -ListAvailable *Hyper-V*
“`
You should see the Hyper-V module listed in the output.
Now, the Hyper-V PowerShell module is successfully installed in your Windows environment, and you can use it to manage your virtual machines and other Hyper-V-related tasks.
How can I verify if the Hyper-V PowerShell module has been correctly installed, and what commands should I use for managing Hyper-V from the command-line?
To verify if the Hyper-V PowerShell module has been correctly installed, you can use the following command:
“`powershell
Get-Module -ListAvailable -Name Hyper-V
“`
If the module is installed, this command will return information about the Hyper-V module, including its version and the path where it is stored.
To manage Hyper-V from the PowerShell command-line, you can use various cmdlets specifically designed for managing different aspects of your Hyper-V environment. Here are some essential commands:
1. Get-VM : Retrieves the list of all virtual machines on the Hyper-V host.
“`powershell
Get-VM
“`
2. New-VM : Creates a new virtual machine.
“`powershell
New-VM -Name “MyNewVM” -MemoryStartupBytes 2GB -Generation 2
“`
3. Start-VM : Starts a virtual machine.
“`powershell
Start-VM -Name “MyNewVM”
“`
4. Stop-VM : Stops a virtual machine.
“`powershell
Stop-VM -Name “MyNewVM”
“`
5. Set-VM : Modifies the settings of a virtual machine.
“`powershell
Set-VM -Name “MyNewVM” -ProcessorCount 4
“`
6. Remove-VM : Deletes a virtual machine.
“`powershell
Remove-VM -Name “MyNewVM”
“`
7. Get-VMCheckpoint : Retrieves the list of checkpoints (snapshots) for a virtual machine.
“`powershell
Get-VMCheckpoint -VMName “MyNewVM”
“`
8. New-VMCheckpoint : Creates a new checkpoint (snapshot) for a virtual machine.
“`powershell
New-VMCheckpoint -VMName “MyNewVM” -SnapshotName “MyNewSnapshot”
“`
Remember, these are just a few examples of the many commands available for managing Hyper-V using PowerShell. For a complete list of Hyper-V cmdlets, you can refer to Microsoft’s official documentation: [Hyper-V Cmdlets in Windows PowerShell](https://docs.microsoft.com/en-us/powershell/module/hyper-v/?view=windowsserver2019-ps).
Are there any potential issues or conflicts when installing the Hyper-V PowerShell module, and how can I troubleshoot or resolve them to ensure proper functionality?
There can be potential issues or conflicts when installing the Hyper-V PowerShell module. To help you troubleshoot and resolve these issues, follow these steps:
1. Check the Operating System compatibility: Make sure your operating system is compatible with the Hyper-V PowerShell module. It’s available on Windows Server 2012 or later and Windows 8 or higher (Professional or Enterprise editions).
2. Ensure the Hyper-V role is enabled: Before you can use Hyper-V PowerShell module, the Hyper-V role must be enabled on your system. You can enable it from the “Turn Windows features on or off” setting, or by running this command in an elevated PowerShell prompt:
“`
Enable-WindowsOptionalFeature -Online -FeatureName Microsoft-Hyper-V -All
“`
3. Install the Hyper-V PowerShell module: To install the module, open an elevated PowerShell prompt and run the following command:
“`
Install-WindowsFeature RSAT-Hyper-V-Tools
“`
4. Check if the module is installed: You can verify if the module is installed by running the following command in PowerShell:
“`
Get-Module -ListAvailable *Hyper-V*
“`
5. Import the module: If the module is not automatically loaded, you can manually import it using this command:
“`
Import-Module Hyper-V
“`
6. Check for conflicting modules: If you encounter issues, there might be conflicting modules loaded in your PowerShell session. You can check the loaded modules using:
“`
Get-Module
“`
If there are any conflicting modules, unload them using:
“`
Remove-Module -Name *ModuleName*
“`
7. Update PowerShell: Make sure your PowerShell version is up-to-date. Hyper-V PowerShell module requires PowerShell v3 or later.
By following these steps, you should be able to troubleshoot and resolve most issues related to the Hyper-V PowerShell module. If you still face problems, consult the official documentation, search online forums for similar issues, or seek help from experienced PowerShell users.
Post Views: 255
Running virtual machines on your desktop or notebook and be extremely powerful, to test and develop applications or just run an isolated environment. If you just need a quick disposable Windows 10 environment, I recommend that you have a quick look at the Windows 10 feature called Windows Sandbox. Since Windows 8 you can run Hyper-V on your desktop, laptop or Windows tablet and it can virtualize Windows as well as Linux virtual machines. To install or enable Hyper-V on your Windows 10 machine, you just need to have the following requirements:
- Windows 10 Enterprise, Professional, or Education (Home does not have the Hyper-V feature included)
- 64-bit processor with Second Level Address Translation (SLAT)
- CPU support for VM Monitor Mode Extension (VT-c on Intel CPU’s)
- Minimum of 4 GB memory
The easiest way to enable Hyper-V on Windows 10 is to run the following PowerShell command as an administrator. If you want to install it using the GUI, you can also install the Hyper-V feature in the Windows 10 Control Panel.
Enable-WindowsOptionalFeature -Online -FeatureName:Microsoft-Hyper-V -All
or you can use the following CMD DISM command:
DISM /Online /Enable-Feature /All /FeatureName:Microsoft-Hyper-V
If you are looking for installing Hyper-V on Windows Server, check the following blog post: Install Hyper-V on Windows Server using PowerShell. If you want to know more about Hyper-V on Windows 10, check the Microsoft Docs. If you have any questions feel free to leave a comment.
Hyper-V is also used in many other features within Windows. For example in Windows Defender Application Guard, Docker or Windows Sandbox.
Tags: Enable Hyper-V, Hyper-V, Hyper-V Windows 10, Hypervisor, install, Install Hyper-V, Install Hyper-V Windows 10, Microsoft, PowerShell, Virtualization, Windows, Windows 10, Windows Hyper-V Last modified: July 18, 2019
About the Author / Thomas Maurer
Thomas works as a Principal Program Manager & Chief Evangelist Azure Hybrid at Microsoft (Cloud + AI). He engages with the community and customers around the world to share his knowledge and collect feedback to improve the Azure hybrid cloud and edge platform. Prior to joining the Azure engineering team (Cloud + AI), Thomas was a Lead Architect and Microsoft MVP, to help architect, implement and promote Microsoft cloud technology.
If you want to know more about Thomas, check out his blog: www.thomasmaurer.ch and Twitter: www.twitter.com/thomasmaurer