
Маршрутизация в Windows
Маршрутизация – это процесс передачи IP-трафика адресатам в сети, то есть процесс передачи пакетов от хоста-источника к хосту-адресату через промежуточные маршрутизаторы. Изучая эту статью предполагается что вы изучили материал основы компьютерных сетей.
Изучим как работает маршрутизация в Windows, что бы понять как она работает, а не просто прочитать и забыть, вам необходимо несколько виртуальных машин, а именно:
- ВМ с Windows XP.
- 2 ВМ с Windows Server 2003.
Учтите, что при настройке виртуальных машин, в настройках сети нужно указать «Внутренняя сеть» и задать одинаковое имя сети для всех машин.
Если вы не поленитесь и установите три виртуальные машины, а так же изучите этот материал до конца, то у вас будет практическое понимание работы сети в операционных системах семейства Windows.
Содержание:
- Таблица маршрутизации
- Статическая маршрутизация
- Маршрутизация по умолчанию
- Динамическая маршрутизация, протокол RIP
Для простоты передачи данных хост-источник и маршрутизатор принимают решения о передаче пакетов на основе своих таблиц IP-маршрутизации. Записи таблицы создаются при помощи:
- Программного обеспечения стека TCP/IP.
- Администратора, путем конфигурирования статических маршрутов.
- Протоколов маршрутизации, одним из которых является протокол передачи маршрутной информации – RIP.
По сути, таблица маршрутизации – это база данных, которая хранится в памяти всех IP-узлов. Цель таблицы IP-маршрутизации это предоставление IP-адреса назначения для каждого передаваемого пакета для следующего перехода в сети.
Пример маршрутизации в Windows
Допустим, у нас есть три узла:
- Windows XP.
- Windows Server 2003 – 1.
- Windows Server 2003 – 2.
Хост XP имеет один сетевой адаптер (интерфейс) с IP-адресом 192.168.0.2 и маской подсети 255.255.255.0. Маршрутизатор Server1 имеет два интерфейса с IP-адресами 192.168.0.1 и 192.168.1.1 и масками подсети 255.255.255.0. Маршрутизатор Server2 также имеет 2 сетевых адаптера с IPадресами 192.168.1.2 и 192.168.2.1 и масками подсети 255.255.255.0. Таким образом, мы имеем 3 сети: сеть с IP-адресом 192.168.0.0 (Net 1), сеть с IP-адресом 192.168.1.0 (Net 2), сеть с IP-адресом 192.168.2.0 (Net 3).
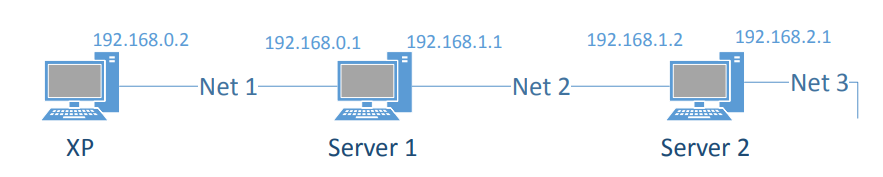
Таблица маршрутизации
Таблица маршрутизации по умолчанию создается на узле автоматически с помощью программного обеспечения стека TCP/IP.
При настройке сетевого подключения на хосте XP были статически заданы IP-адрес 192.168.0.2 и маска подсети 255.255.255.0, основной шлюз задан не был. Программное обеспечение стека TCP/IP автоматически создало таблицу маршрутизации по умолчанию.
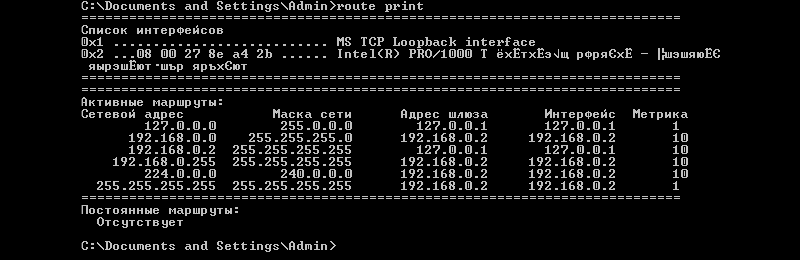
Что бы просмотреть таблицы маршрутизации на узле XP выполним команду route print в командной строке (Пуск -> Выполнить -> cmd).
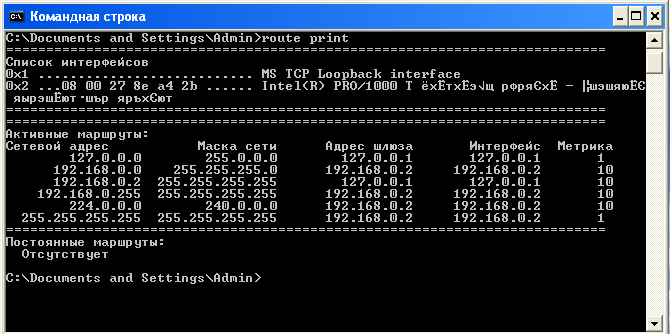
Таблица маршрутизации содержит для каждой записи следующие поля: Сетевой адрес (Network Destination), Маска сети (Netmask), Адрес шлюза (Gateway), Интерфейс (Interface) и Метрика (Metric). Разберем каждое поле подробнее.
Сетевой адрес. Поле определяет диапазон IP-адресов достижимых с использованием данной таблицы.
Маска сети. Битовая маска, которая служит для определения значащих разрядов в поле Сетевой адрес. Маска состоит из непрерывных единиц и нулей, отображается в десятичном коде. Поля Сетевой адрес и Маска определяют один или несколько IP-адрес.
Адрес шлюза. В этом поле содержаться IP-адрес, по которому должен быть направлен пакет, если он соответствует данной записи таблицы маршрутизации.
Интерфейс. Данное поле содержит адрес логического или физического интерфейса, используемого для продвижения пакетов, соответствующих данной записи таблицы маршрутизации.
Метрика. Используется для выбора маршрута, в случае если имеется несколько записей, которые соответствуют одному адресу назначения с одной и той же маской, то есть в случае если одного адресата можно достичь разными путями, через разные маршруты. При этом, чем меньше значение метрики тем короче маршрут.
На начальном этапе работы (т.е. с таблицами маршрутизации по умолчанию) маршрутизатор (хост) знает только, как достичь сетей, с которыми он соединен непосредственно. Пути в другие сети могут быть «выяснены» следующими способами:
- с помощью статических маршрутов;
- с помощью маршрутов по умолчанию;
- с помощью маршрутов, определенных протоколами динамической маршрутизации.
Рассмотрим каждый из способов по порядку.
Статическая маршрутизация
Статические маршруты задаются вручную. Плюс статических маршрутов в том, что они не требуют рассылки широковещательных пакетов с маршрутной информацией, которые занимают полосу пропускания сети.
Минус статических маршрутов состоит в том, что при изменении топологии сети администратор должен вручную изменить все статические маршруты, что довольно трудоемко, в случае если сеть имеет сложную структуру с большим количеством узлов.
Второй минус заключается в том, что при отказе какого-либо канала статический маршрут перестанет работать, даже если будут доступны другие каналы передачи данных, так как для них не задан статический маршрут.
Но вернемся к нашему примеру. Наша задача, имя исходные данные, установить соединения между хостом XP и Server2 который находится в сети Net3, то есть нужно что бы проходил пинг на 192.168.2.1.
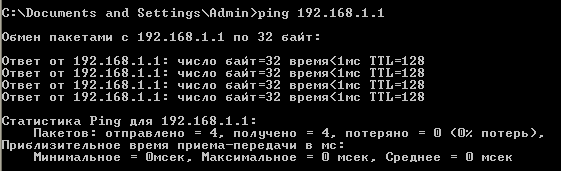
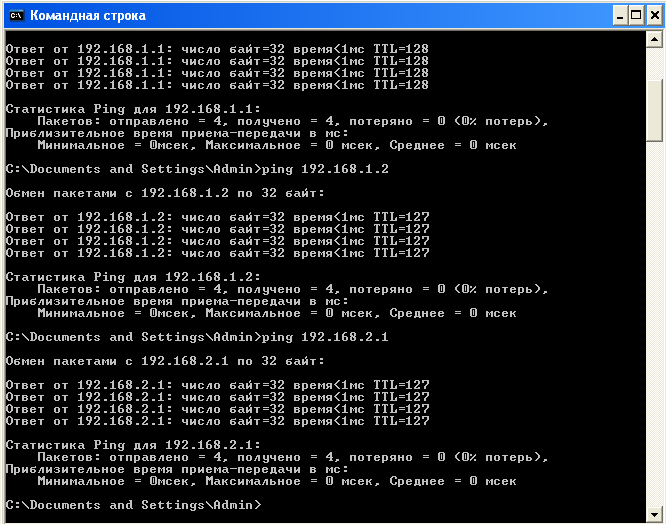
Начнем выполнять на хосте XP команды ping постепенно удаляясь от самого хоста. Выполните в Командной строке команды ping для адресов 192.168.0.2, 192.168.0.1, 192.168.1.1.
Мы видим, что команды ping по адресу собственного интерфейса хоста XP и по адресу ближайшего интерфейса соседнего маршрутизатора Server1 выполняются успешно.

Однако при попытке получить ответ от второго интерфейса маршрутизатора Server1 выводится сообщение «Заданный узел недоступен» или «Превышен интервал ожидания для запроса».

Это связано с тем, что в таблице маршрутизации по умолчанию хоста XP имеются записи о маршруте к хосту 192.168.0.2 и о маршруте к сети 192.168.0.0, к которой относится интерфейс маршрутизатора Server1 с адресом 192.168.0.1. Но в ней нет записей ни о маршруте к узлу 192.168.1.1, ни о маршруте к сети 192.168.1.0.
Добавим в таблицу маршрутизации XP запись о маршруте к сети 192.168.1.0. Для этого введем команду route add с необходимыми параметрами:
route add [адресат] [mask маска] [шлюз] [metric метрика] [if интерфейс]
Параметры команды имеют следующие значения:
- адресат — адрес сети или хоста, для которого добавляется маршрут;
- mask — если вводится это ключевое слово, то следующий параметр интерпретируется как маска подсети, соответственно маска — значение маски;
- шлюз — адрес шлюза;
- metric — после этого ключевого слова указывается метрика маршрута до адресата (метрика);
- if — после этого ключевого слова указывается индекс интерфейса, через который будут направляться пакеты заданному адресату.
Индекс интерфейса можно определить из секции Список интерфейсов (Interface List) выходных данных команды route print.
Выполним команду route print.

Теперь мы видим , что хост XP имеет два интерфейса: логический интерфейс замыкания на себя (Loopback) и физический интерфейс с сетевым адаптером Intel(R) PRO/1000. Индекс физического интерфейса – 0x2.
Теперь, зная индекс физического интерфейса, на хосте добавьте нужный маршрут, выполнив следующую команду:
route add 192.168.1.0 mask 255.255.255.0 192.168.0.1 metric 2 if 0x2
Данная команда сообщает хосту XP о том, что для того, чтобы достичь сети 192.168.1.0 с маской 255.255.255.0, необходимо использовать шлюз 192.168.0.1 и интерфейс с индексом 0x2, причем сеть 192.168.1.0 находится на расстоянии двух транзитных участка от хоста XP.
Выполним пинг на 192.168.1.1 и убедимся, что связь есть.
Продолжим пинговать серверы, теперь проверьте отклик от второго маршрутизатора, присоединенного к сети Net2 (Server2). Он имеет IP-адрес 192.168.1.2.
Получаем сообщение «Превышен интервал ожидания запроса». В данном случае это означает что наш хост XP знает как отправлять данные адресату, но он не получает ответа.
Это происходит по тому, что хост Server2 не имеет информации о маршруте до хоста 192.168.0.1 и до сети 192.168.0.0 соответственно, поэтому он не может отправить ответ.
Для этого необходимо выполнить команду route add с соответствующими параметрами, однако сначала необходимо узнать индекс интерфейса с адресом 192.168.1.2.
На Server2 выполним команду route print и посмотрим индекс первого физического интерфейса. Далее, с помощью команды route add добавьте на Server2 маршрут до сети Net1, аналогично тому, как мы добавляли маршрут хосту XP.
В моем случае это команда:
route add 192.168.0.0 mask 255.255.255.0 192.168.1.1 metric 2 if 0x10003
0x10003 — это индекс физического интерфейса сервера 2.

Индекс физического интерфейса может быть разным, обязательно обращайте на него внимание.
После того, как удостоверитесь в наличии связи между узлами XP и Server2, выполните команду ping 192.168.2.1, т.е. проверьте наличие маршрута узла XP до сети Net3 (192.168.2.1 – IP-адрес маршрутизатора Server2 в сети Net3).
Вместо ответа вы получите сообщение «Заданный узел недоступен». С этой проблемой мы сталкивались еще в самом начале лабораторной работы, машина XP не знает путей до сети 192.168.2.0.
Добавьте в таблицу маршрутизации хоста XP запись о маршруте к сети 192.168.2.0. Это можно сделать путем ввода в командной строке хоста XP команды route add с соответствующими параметрами:
route add 192.168.2.0 mask 255.255.255.0 192.168.0.1 metric 3 if 0x2
Я не буду подробно описывать как полностью настроить статическую маршрутизацию между узлами, думаю что суть ясна. Если у вас появились вопросы — задавайте их в комментариях.
Маршрутизация по умолчанию
Второй способ настройки маршрутизации в Windows — то маршрутизация по умолчанию.
Для маршрутизации по умолчанию необходимо задать на всех узлах сети маршруты по умолчанию.
Для добавления такого маршрута на хосте XP выполните следующую команду:
route add 0.0.0.0 mask 0.0.0.0 192.168.0.1 metric 2 if 0x10003Эта команда сообщает хосту XP о том, что для того, чтобы достичь любой сети, маршрут к которой отсутствует в таблице маршрутизации, необходимо использовать шлюз 192.168.0.1 и интерфейс с индексом
0x10003.Это так называемый маршрут по умолчанию.
Проверьте работоспособность с помощью команды ping.
Динамическая маршрутизация, протокол RIP
Протокол RIP (Routing Information Protocol или Протокол передачи маршрутной информации) является одним из самых распространенных протоколов динамической маршрутизации.
Его суть заключается в том, что маршрутизатор использующий RIP передает во все подключенные к нему сети содержимое своей таблицы маршрутизации и получает от соседних маршрутизаторов их таблицы.
Есть две версии протокола RIP. Версия 1 не поддерживает маски, поэтому между сетями распространяется только информация о сетях и расстояниях до них. При этом для корректной работы RIP на всех интерфейсах всех маршрутизаторов составной сети должна быть задана одна и та же маска.
Протокол RIP полностью поддерживается только серверной операционной системой, тогда как клиентская операционная система (например, Windows XP) поддерживает только прием маршрутной информации от других маршрутизаторов сети, а сама передавать маршрутную информацию не может.
Настраивать RIP можно двумя способами:
- В графическом режиме с помощью оснастки “Маршрутизация и удаленный доступ”.
- В режиме командной строки с помощью утилиты netsh.
Рассмотрим настройку в режиме командной строки с помощью утилиты netsh.
Netsh – это утилита командной строки и средство выполнения сценариев для сетевых компонентов операционных систем семейства Windows (начиная с Windows 2000).
Введите в командной строке команду netsh, после появления netsh> введите знак вопроса и нажмите Enter, появиться справка по команде.
Введите последовательно команды:
- routing
- Ip
- rip
- ?
Вы увидите, что среди доступных команд этого контекста есть команда add interface, позволяющая настроить RIP на заданном интерфейсе. Простейший вариант этой команды – add interface «Имя интерфейса».
Если ввести в Windows XP в контексте netsh routing ip rip команду add interface "Net1", то получим сообщение «RIP должен быть установлен первым». Дело в том, что Установить RIP можно только в серверной операционной системе. В Windows Server 2003 в RIP включается в оснастке «Маршрутизация и удаленный доступ» (Пуск –> Программы –> Администрирование –> Маршрутизация и удаленный доступ). Таким образом, включить RIP в нашем случае можно только на маршрутизаторах Server1 и Server2.
Настроим RIP на Server1. Но сначала нужно выключит брандмауэр.
Теперь в оснастке «Маршрутизация и удаленный доступ» в контекстном меню пункта SERVER1 (локально) выберите пункт «Настроить и включить Маршрутизация ЛВС
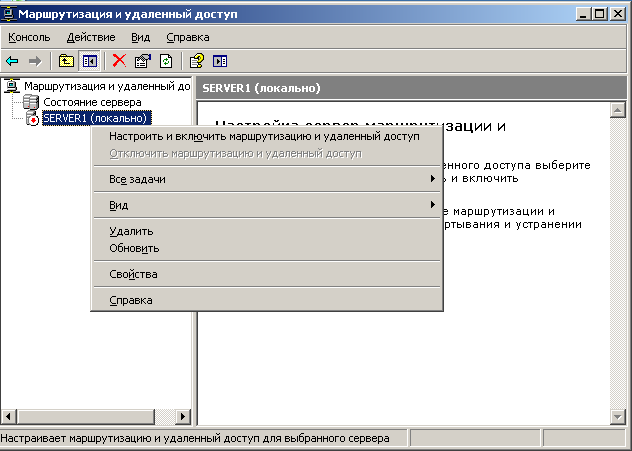
маршрутизацию и удаленный доступ».
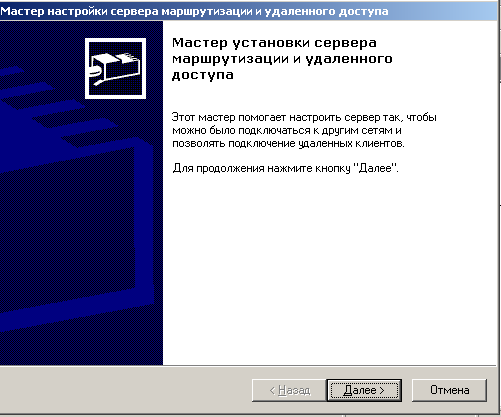
В появившемся окне мастера нажмите «Далее».
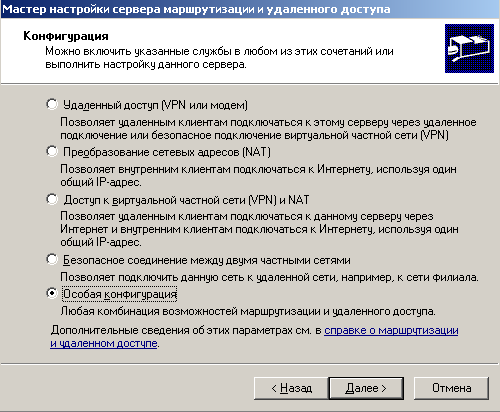
На следующем этапе выберите «Особая конфигурация» и нажмите «Далее».
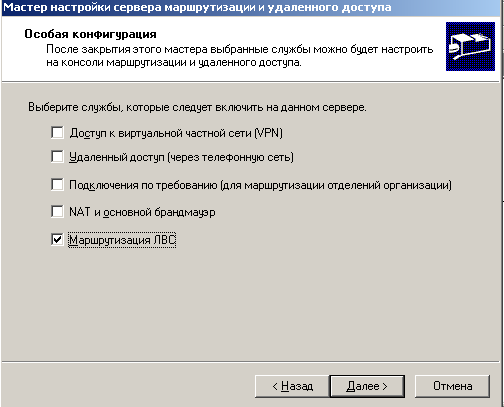
После чего нужно выбрать «Маршрутизация ЛВС» и завершить работу мастера.
То же самое нужно выполнить на Server2.
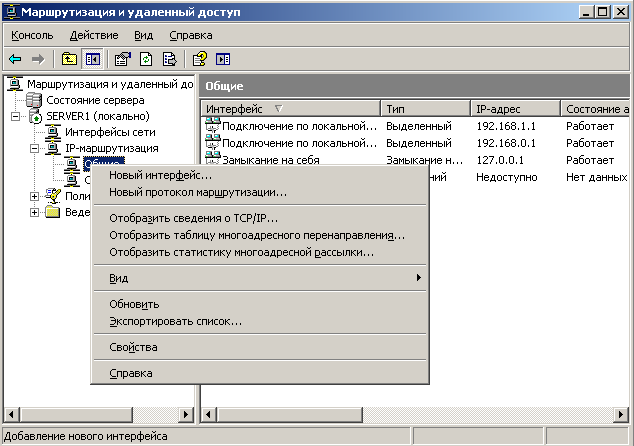
Настройка через оснастку
В контекстном меню вкладки «Общие» (SERVER1 –> IP-маршрутизация –> Общие) нужно выбрать пункт «Новый протокол маршрутизации».
Затем выделяем строку «RIP версии 2 для IP».
В контекстном меню появившейся вкладки «RIP» выберите «Новый интерфейс». Выделите строку «Подключение по локальной сети» и нажмите ОК.
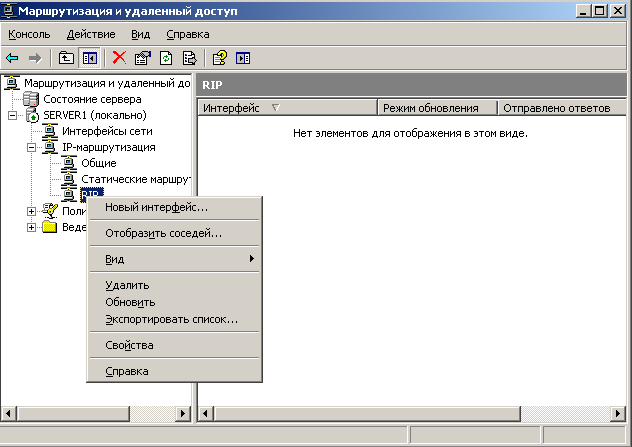
Перед вами появиться окно.
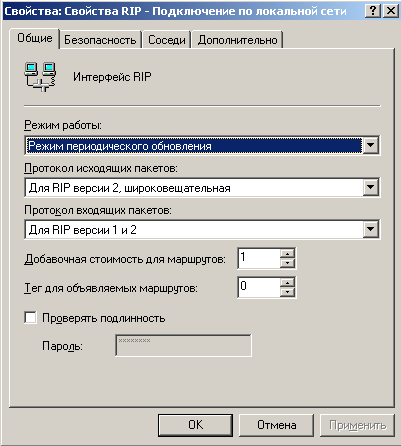
В появившемся окне необходимо задать следующие настройки:
- Режим работы –> Режим периодического обновления.
- Протокол для исходящих пакетов –> Для RIP версии 1.
- Протокол входящих пакетов –> Только для RIP версии 1.
Оставьте оставшиеся настройки по умолчанию и нажмите ОК.
Далее необходимо выполнить эти действия для второго сетевого интерфейса.
После выполните те же действия для Sever2.
Проверьте, с помощью команды ping, работу сети.
Поздравляю! Маршрутизация в Windows изучена.
Компьютер может быть одновременно подключён к нескольким сетям и любую из них использовать для Интернет-доступа. При этом для выхода в глобальную сеть, на самом деле, используется только одна сеть, а другая (или другие) находятся в резерве. Операционная система выбирает то подключение, которое обладает лучшими характеристиками.
Чтобы узнать, какое подключение является лучшим, для каждого из них вычисляется так называемая метрика — условное значение, которое учитывает сразу несколько параметров — скорость сети, потери пакетов и другое.
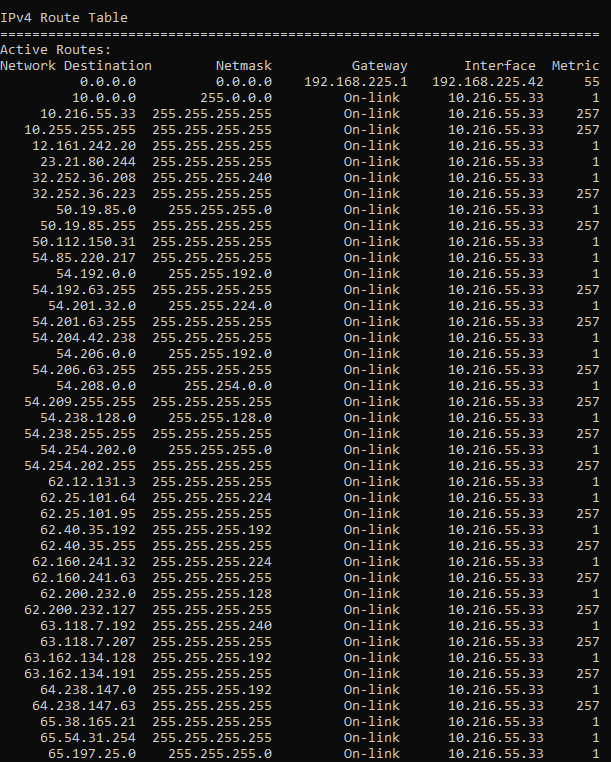
Смотрим таблицу маршрутизации
Открываем PowerShell и выполняем команду:
> route print -4
===========================================================================
Список интерфейсов
 19...1c 1b 0d e6 14 bd ......Realtek PCIe GbE Family Controller
 11...00 30 67 b5 8e d2 ......Realtek PCIe FE Family Controller
  1...........................Software Loopback Interface 1
===========================================================================

IPv4 таблица маршрута
===========================================================================
Активные маршруты:
  Сетевой адрес       Маска сети      Адрес шлюза        Интерфейс  Метрика
        0.0.0.0          0.0.0.0    192.168.110.1    192.168.110.2      291
        0.0.0.0          0.0.0.0    192.168.220.1    192.168.220.2      317
        ...................................................................
===========================================================================
Постоянные маршруты:
  Отсутствует
===========================================================================
Особое внимание надо обратить на строки, выделенные красным и зеленым. Сетевой адрес 0.0.0.0 и маска сети 0.0.0.0 это обозначение маршрута по умолчанию (default route). Это тот маршрут, куда отправляется трафик, для которого явно не прописан другой маршрут.
Посмотрим для примера на строку, которая может быть в списке маршрутов:
Сетевой адрес    Маска сети       Адрес шлюза    Интерфейс        Метрика
192.168.110.0    255.255.255.0    On-link        192.168.110.2    291
В ней есть сетевой адрес 192.168.110.0 с маской подсети 255.255.255.0 — то есть это любые IP-адреса в диапазоне 192.168.110.0—192.168.110.255. Так вот, для этих адресов явно прописан маршрут — пакеты будут отправлены через интерфейс 192.168.110.2.
Но если нужно отправить пакеты на любой другой IP-адрес, который отсутствует в таблице (т.е. для которого не указан конкретный маршрут), то он будет отправлен по маршруту по умолчанию — это то, что указано для сети 0.0.0.0 с маской 0.0.0.0. Самым типичным трафиком, отправляемым по default route является интернет-трафик.
Для выбора Интернет-подключения по умолчанию нужно изменить маршрут по умолчанию.
Изменение маршрута по умолчанию
Вернёмся к ранее полученным данным о маршруте по умолчанию:
    Сетевой адрес       Маска сети      Адрес шлюза       Интерфейс  Метрика
          0.0.0.0          0.0.0.0    192.168.110.1    192.168.110.2     291
          0.0.0.0          0.0.0.0    192.168.220.1    192.168.220.2     317
Из него следует, что у одного сетевого интерфейса IP-адрес 192.168.110.2 и метрика равна 291, у другого — IP-адрес 192.168.220.2 и метрика равна 317. Выигрывает тот маршрут, у которого значение метрики меньше (чем меньше метрика, тем лучше подключение). Таким образом, при выходе в Интернет, будет использоваться сетевой интерфейс 192.168.110.2.
Есть два способа изменить маршрут по умолчанию. Первый — изменить значение метрики так, чтобы приоритетным стал другой маршрут. Второй — удалить другие маршруты, оставив только один.
Как установить метрику
Для начала удалим все маршруты по умолчанию:
> route DELETE 0.0.0.0
Теперь добавляем тот, который нужно сделать маршрутом по умолчанию:
> route ADD 0.0.0.0 MASK 0.0.0.0 192.168.220.1
Здесь 192.168.220.1 — шлюз того интерфейса, через который будет выход в интернет. На данном этапе уже вернулось интернет-подключение и если достаточного одного подключения, то дальше можно не продолжать.
Чтобы в качестве резервного было активно и второе подключение, но по умолчанию не использовалось — добавляем еще один маршрут по умолчанию:
> route ADD 0.0.0.0 MASK 0.0.0.0 192.168.110.1 METRIC 100
Здесь 192.168.110.1 — IP-адрес шлюза «резервного» интерфейса. Здесь важно знать, что значение метрики 100 является не абсолютным, а относительным. Указанная величина добавляется к тому значению метрики, которое рассчитывает операционная система. Это значение нужно выбрать так, чтобы в сумме с рассчитанной метрикой получилось больше, чем метрика подключения, которое должно использоваться по умолчанию.
Проверяем, что получилось в итоге:
> route print -4
===========================================================================
Список интерфейсов
 19...1c 1b 0d e6 14 bd ......Realtek PCIe GbE Family Controller
 11...00 30 67 b5 8e d2 ......Realtek PCIe FE Family Controller
  1...........................Software Loopback Interface 1
===========================================================================

IPv4 таблица маршрута
===========================================================================
Активные маршруты:
  Сетевой адрес       Маска сети      Адрес шлюза        Интерфейс  Метрика
        0.0.0.0          0.0.0.0    192.168.220.1    192.168.220.2      317
        0.0.0.0          0.0.0.0    192.168.110.1    192.168.110.2      391
        ...................................................................
===========================================================================
Постоянные маршруты:
  Отсутствует
===========================================================================
Создание постоянных маршрутов
По умолчанию, все прописанные маршруты, в том числе значения метрик, будут сброшены при перезагрузке компьютера. С помощью ключа -p можно создавать постоянные маршруты, которые будут сохранены после перезагрузки.
Поиск:
CLI • Windows • Локальная сеть • route • Маршрутизация • Метрика • Команда
Каталог оборудования
Lorem ipsum dolor sit amet, consectetur adipiscing elit, sed do eiusmod tempor incididunt ut labore et dolore magna aliqua.
Производители
Lorem ipsum dolor sit amet, consectetur adipiscing elit, sed do eiusmod tempor incididunt ut labore et dolore magna aliqua.
Функциональные группы
Lorem ipsum dolor sit amet, consectetur adipiscing elit, sed do eiusmod tempor incididunt ut labore et dolore magna aliqua.
Have you ever connected to a VPN and realize that you cannot access some of the network resources that you have at home? Maybe you are not able to access Printer in your local network, or something else.
And other situation is you have a windows machine that is connected to two different networks and you Are not able to access some of the network resources and some of them are working fine.
Then you have a problem with your network routing, in this blog I am going to cover how you can solve those above issues by Reconfiguring the windows routing table.
What is routing?
If you are not familiar with routing then don’t worry, routing is a mechanism to connect two different network Segments to each other.
Suppose you have a network 192.168.1.0/24 and another 10.1.1.0/24. By default, both of those networks cannot talk to each other because both are two different subnets. For both the network to talk to each other, you need to use static routing.
There is something called dynamic routing, which is used by the network devices such as routers, firewall and layer3 switch and even some of the windows server machine.
In this blog, we are focusing on the end host level especially windows static routes.
What is static routing in windows?
A static route is a specific subnet route that is defined by the admins manually to reach a certain destination. You can specify the destination subnet that you want to reach from the host and point to a default gateway. You can add as many static routes as you like.
You can define for example, to reach 192.168.1.0/24 you can go via 10.1.1.1
The static route is usually not needed when you host has only a single interface, the default route will take care of that.
Read also,
Windows 11 on KVM – How to Install Step by Step?
How To Extend Windows Storage in KVM ?
KVM Windows No Sound? – Let’s fix it.
10 Easy Steps To Install Windows Server in Linux KVM
How To Set Static IP On Ubuntu? (GUI and CLI)
What is default route in windows?
If you don’t know the subnet that you want to reach, that’s when you use something called default routes. The default route is mainly configured to reach the internet.
We don’t know the IP addresses that are available on the internet, right?
That means you cannot specify the routes in the routing table, and on the internet, there are millions of IP addresses, and how do I reach those IP address from your local machine?
You can type 0.0.0.0 as the IP subnet and 0.0.0.0 as the mask and point the route to the default gateway. This basically tells the windows host that to reach any subnet apart from the specific subnet you use the default route.
Usually the default route is added to a window hosts or any end hosts for that matter is by configuring the default gateway. If you define a default gateway on the system, that would add a default route pointing to the default gateway.
However, In some situations, it can create a problem, because you may have multiple LAN ports and all are configured with DHCP, as soon as the host receive the IP address via DHCP on all ports, it also add default gateways for all those interfaces. The result is multiple default routes towards multiple gateways. This would create a problem when the end hosts wanted to reach the internet.
how to view the routing table in windows?
Like any network devices, the windows machine also has a local routing table. It can tell you lot of information about the routes that this windows box is aware of.
To view the windows routing table, you can enter the command route print in windows command line prompt. However, that you would display both the IPv4 and IPv6 routing table, and you can also get the route output specific to the IP version.
how do I see ipv4 routes in windows?
If you wanted to see just the IPv4 routes in windows you can type the command route print -4.
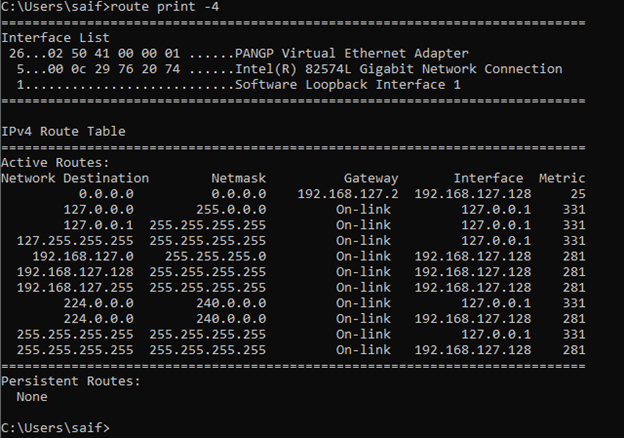
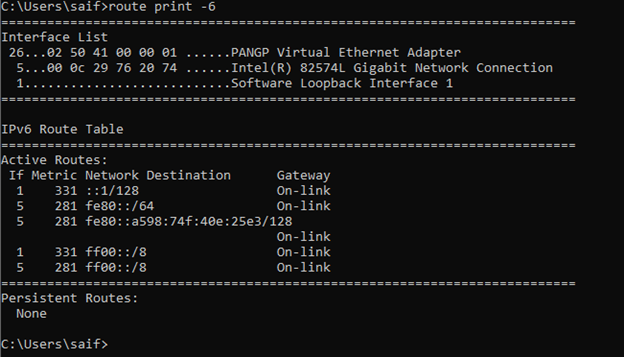
how do I see ipv6 routes in windows?
Just like the IPv4 you can also see the IPv6 routes alone in the windows routing table by typing route print -6.
How do you read a Windows routing table?
It’s quite common for anyone to look at the windows routing table and get confused with the information displayed. Let’s go through and explain each one of the items in the windows routing table.
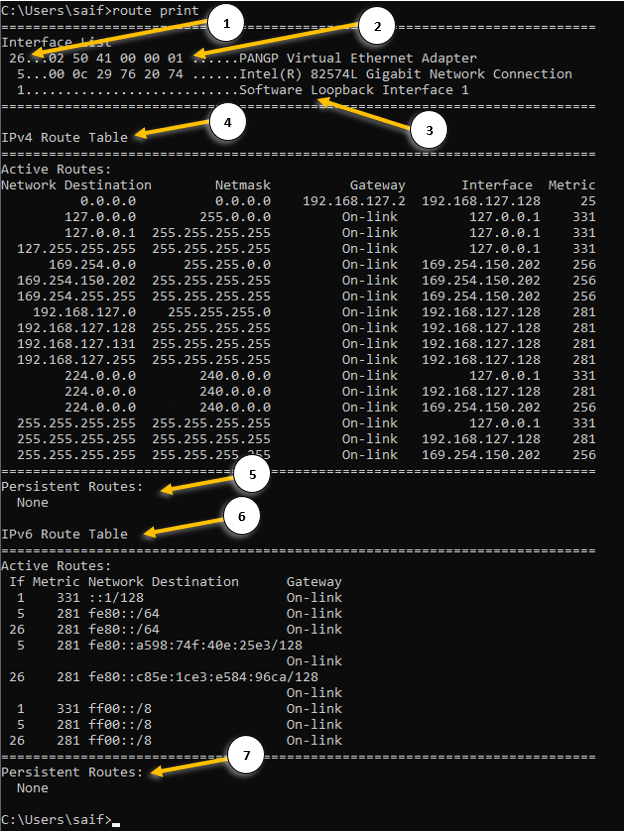
- Interface ID – each interface that you have on your machine will be identified with a unique ID.
- The mac address of the machine – this is the physical address of your network interface card. You can also get the mac address detail by typing ipconfig /all.
- The name of the interface.
- IPv4 routing table – Here you can view the IPv4 routing table.
- Network destination – It shows the destination subnet that this machine can reach currently.
- Netmask – the subnet mask of the network destination IP.
- Gateway – you can see the remote gateway as well as on-link where you are learning this route from.
On-link means, the directly connected routes from its own NIC. - Interface is the place you can see the IP address of each network interface.
- The IP address 127.0.0.1 is the machine’s loopback interface.
- Metric – It is the value that defines the priority of the route, the lower the metric the better.
- Persistent route – This route is defined by the admins and it would never be removed even when you power down the system, read on to learn more about it.
- IPv6 routing table – You can view the IPv6 routing table here.
- IPv6 persistent routes – The same persistent routes available in the Ipv4.
How do I manage multiple gateway in windows?
When you have two interfaces installed on the windows machine, you will have to manage the multiple gateways using static routes. Lets look at how we can configure multiple gateways using the static routes. below are the examples that we are going to configure.
- Validate the internet connectivity.
- Configure primary default gateway for windows 10.
- How to delete the route in windows?
- How to add two default routes in windows?
- How do I add a static route in Windows?
- How do I add a persistent route in Windows?
Validate the internet connectivity.
Before we begin, lets validate the internet connectivity on this host.
Open CMD with admin rights.
Click on the start menu, and type CMD. Right-click and Run as administrator. Click yes on the admin prompt.
Or
- Windows key + R
- Type CMD
- Press CTRL+Shift+Enter
Note: To see the routing table, you don’t need to access the CMD with Admin rights, normal access would do.
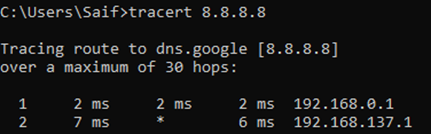
Lets try to ping the internet IP, which is 8.8.8.8.
Yes, I can reach the internet and let me check which path it is taking by using a command called tracert
As you can see, it is taking the path 192.168.0.1.
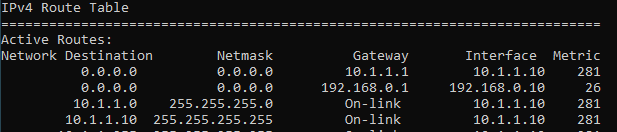
If you look closely at the routing table, you can notice, there are two default routes with same metric. One towards 192.168.0.1 (interface 1)and the other towards 10.1.1.1 (Interface 2) with equal metric.
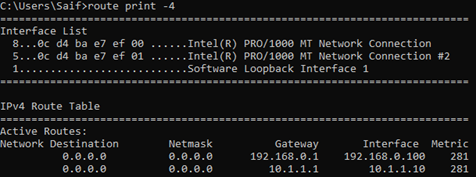
In this setup, for the first time when you try to access the internet, It will send the packet out to both the interfaces. And it elects the default gateway that it needs to use.
Configure primary default gateway for windows 10.
Since we don’t have access to internet via the interface 2 (10.1.1.1), we shouldn’t be using the default route towards it. To resolve multiple default gateways on your network, you got two options.
Change the metric for the windows interface or Delete the default gateway pointed to the interface 2.
We know that the interface which we wanted to use for the internet is interface 1 (192.168.0.1) and when we look at the metric, we can see that both the interface 1 and 2 has the same metric 281.
In normal windows machine you should be able to see the metric starting from 25, and if you are using windows as a VM you can notice its metric is by default 281. However, when you try to change the metric, you will be able to see windows machine by default would take the metric as 25 though you cannot see them.
To make the interface 1 as the priority one for the internet, you need to lower the metric of it.
All you have to do is, add the metric value of 1 for the interface 1., and that would change the windows metric value to 26 (25+1)
1.Get the interface ID.
When you enter the command route print -4, that will show you the interface list on the top.
And for our interface 1, the ID is 21, and interface 2 is it 25.
To validate the interface you can type ipconfig /all and compare the mac address with the interface list ID’s.

2. Change the interface metric.

3. Validate the configuration.
Lets check the routing table now.
As you can see, the metric changed to 26 for our main interface. From now on, all the internet traffic will go out via the interface 1.
What if the interface 1 goes out?, then by default windows machine will start using the interface2
To simulate the issue, I just unplugged the interface 1 and as you can see, I no longer have the default route towards the interface1.
How to delete the route in windows?
The above scenario will be useful, if you have internet access on both links where the interface 1 has more bandwidth than interface 2.
Since we don’t have internet access at all on interfac2, there is no point in keeping the default route so let’s go ahead plug the interface1 back in and remove the default route connected to the interface2.
- To delete a route in the windows routing table, you can use the command route DELETE.
As we are going to delete the default route pointed to 10.1.1.1, you can use the command below.
route DELETE 0.0.0.0 MASK 0.0.0.0 10.1.1.1

2. Verify the routing table.
We no longer have the default route pointed to 10.1.1.1 gateway.

How to add two default routes in windows?
In our previous scenario where everything was looking good, however when the internet on the interface 1 goes down there is no redundancy in place. So, you decided to add internet over secondary interface.
One of the use cases being, you have internet on interface 1 that has more bandwidth and internet 2 with less bandwidth, in the event of internet 1 goes down, the internet 2 on interface 2 should kick in.
In the routing table, we already have a default route in which we set the metric to 26 previously.

Let’s go ahead and add the second default route with more metric, that way the second default route will be less preferred over the primary link. And when the primary link goes down the secondary one will take care of the internet traffic.
To add the default route you can add the below commands.
route ADD 0.0.0.0 MASK 0.0.0.0 10.1.1.1 -p METRIC 50 -p

The reason I added the metric 50 because, if you add another default route without a metric it would just pick up the default metric that is already used by the other default route.
The newly added route now has the metric of 75 now.

When you have connected to wifi and wired at the same time on your windows 10 PC, you will have two default route with different metric and if you are thinking about prioritising the wifi network over wired, then you check out the article here to know how.
How do I add a static route in Windows?
Alright the internet part has been taken care with default route, now lets talk about the specific static routes towards the server from 1 to 6.
In the servers list, to reach server 1-3 you must go via the interface 2 and the server 3-7 should reach via interface 1.
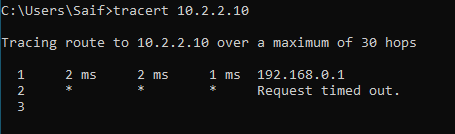
Lets start with the server1, 10.2.2.10 by pinging.
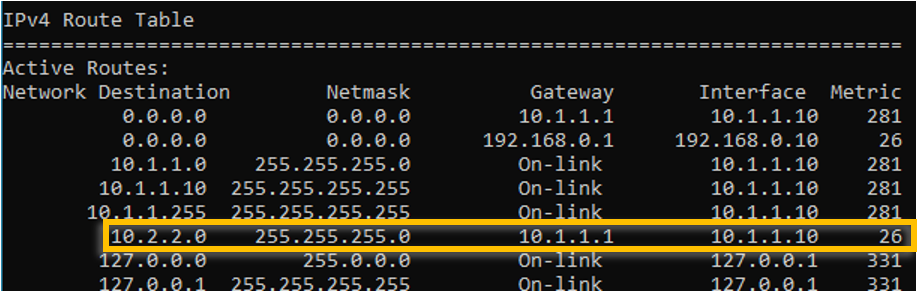
As you can see, we are not able to reach the IP, lets look into the IP table, and I don’t see any IP inside the routing table which is not good.

Currently what’s happening is that, since we do not have a specific route towards 10.2.2.0 it is taking the default route with lower metric on the interface1.
As you can see from the traceroute below.
We need to point the 10.2.2.0 towards interface 2.
In CMD add the route as below.
route add 10.2.2.0 mask 255.255.255.0 10.1.1.1
Verify the route table again.
Ping the IP address, as you can see, we are able to reach the iP address via interface 2 now.

How do I add a persistent route in Windows?
We just added a static route in windows and it is working as expected, however what happens if you reboot the machine?
When you reboot the machine, whatever the changes that you made for the routing will be removed. For those routes that are temperoroly it should be fine, but not good for the permanent destination.
To avoid that you can use persistent route in windows. That way the changes that you make on the windows routing table are retained even after you reboot the machine. To add a persistent route, you just have to add -p at the end of the route statement.
route add 10.2.2.0 mask 255.255.255.0 10.1.1.1 -p
From now on all the routes that we are going to add using the persistent command only.
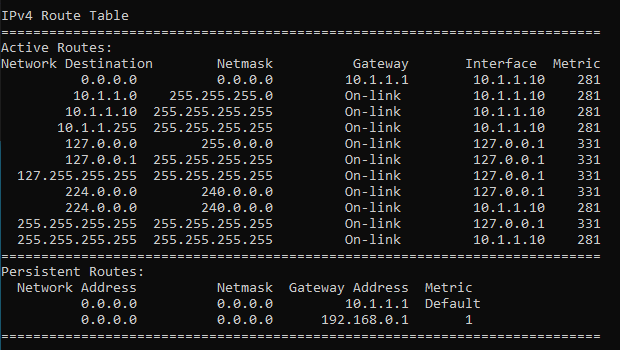
You should be able to see the persistent route on the bottom of the routing table.
Lets add rest of the other IP addresses, before we add the routes, lets verify the reachability.
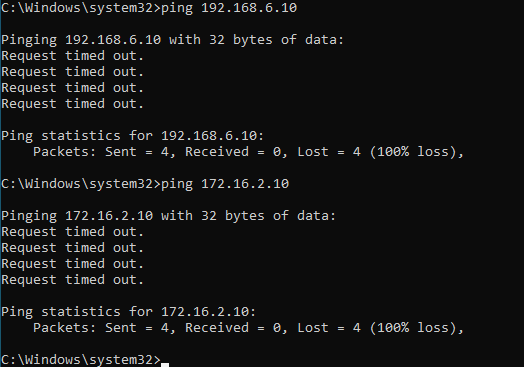
No, both destinations are not reachable now, so lets go ahead and add the routes.
route add 192.168.6.10 mask 255.255.255.0 10.1.1.1 -p
route add 172.16.2.10 mask 255.255.255.0 10.1.1.1 -p
The servers over the interface2 can be reached now, you may test the connectivity using the ping again and it should work just fine.
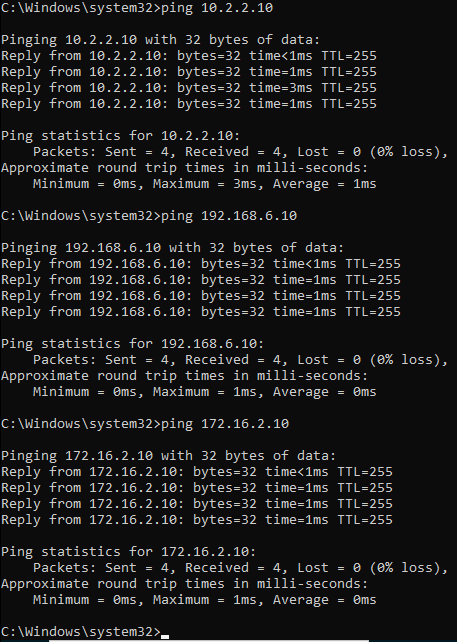
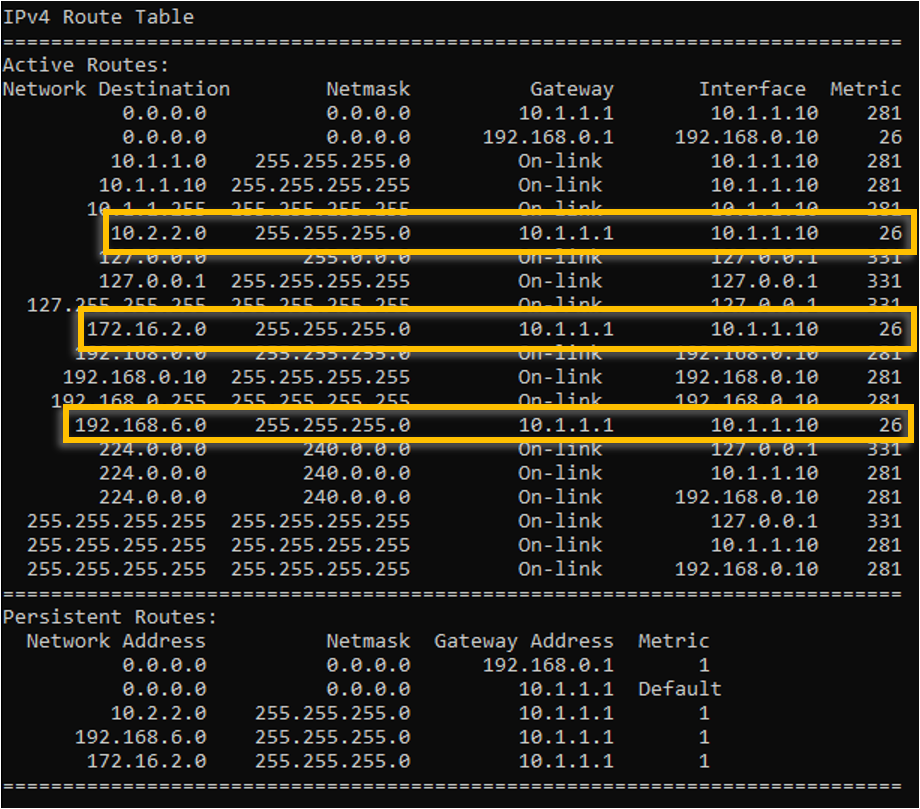
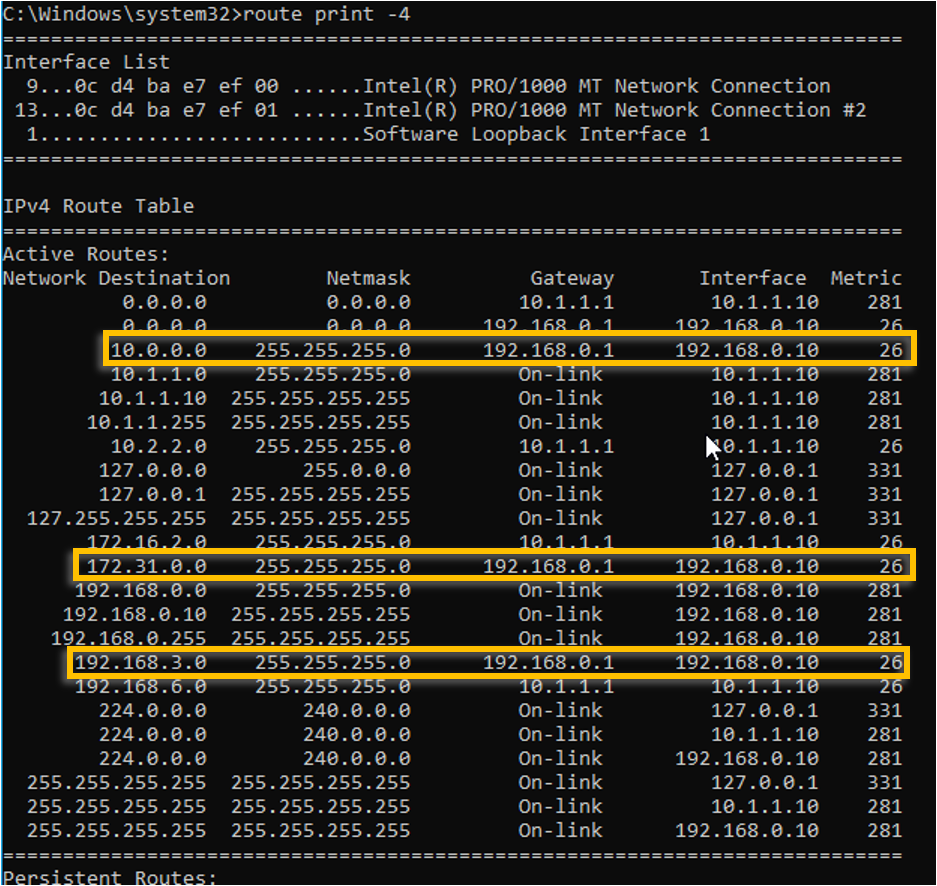
You can also verify the added routes in the windows routing table.
Can we reach the servers 4-6 in interface1 now? As you know we don’t have specific routes for it. If you said the answer is Yes, then you are right!.
let’s send ping to server 4,5 and 6.

As you can see, I am able to reach all three servers just fine, how come we are able to reach those servers even though we don’t have a specific static route for the same.
Its because, it is using the same default route on the interface1, so the PC would send the route to the default gateway, and because the gateway knows about the connected route 10.0.0.0/24, 198.168.3.0/24 and 172.0.0.0/24 the windows PC can reach all the servers on the interface1.
This is working great, right?
Yes but no, let me explain.
It is working fine now, but what if you decided to remove the default route on the interface 1, then it will be a problem. Those servers 4-6 going via interface 1 over the default route cannot get to the remote anymore.
It is recommended to add specific static routes that we added for the interface 2 and it should take care of everything. So even if you decide to remove the internet on the interface 1, you can peacefully remove the default route and specific routes will take care of the server reachability.
To add the rest of the servers subnet into the routing, you may add the route statement as below.
route add 10.0.0.0 mask 255.255.255.0 192.168.0.1 -p
route add 172.0.0.0 mask 255.255.255.0 192.168.0.1 -p
route add 192.168.3.0 mask 255.255.255.0 192.168.0.1 -p
Validate the routes.
Last Updated :
01 Nov, 2022
A routing table is a part of a computer’s operating system. It contains the details of the best way to reach different networks, such as your home or office network. The table helps your computer send data to different networks and devices. Windows uses a routing table to determine the best way to send data to a specific destination. A routing table is used in every operating system. It contains the details of the best way to reach different networks, such as your home or office network. The table helps your computer send data to different networks and devices. Windows uses a routing table to determine the best way to send data to a specific destination. You can add a static route to the routing table to save time if your home or business is frequently visited. You can also add alternate routes to your home or business if you have trouble reaching the original location via the routing table.
Interfaces and Route Table on Windows:
The Command route print prints the list of All Interfaces and the IPv4/v6 Routing Table. It is followed by a comma-delimited argument, which describes the command to run (e: -f). If there are no arguments then it reports all installed ports for each configured interface; if not supplied this would report only the ones present on that port range. The format uses spaces as normal in names. Below is the Snapshot after running route print on Windows.


Adding Static Route to the Routing Table:
To add a static route, press and hold the Windows key and the R key, then press Enter on your keyboard; this opens the Run dialog box. Type route print and press Enter on your keyboard. This opens Windows’ Routing and IP Configuration dialog box. In this dialog box, click on Add → Next → Next; this opens the Add Default Route window. In this window, enter the details for your new default route, then click on Add → Close → OK → Apply → Close→ OK → OK; Now you are now finished adding a static route to the Windows Routing Table.
The command to add an entry from cmd is as below
route add Destination_Address
MASK Subnet_Mask Gateway_IP Metric
Example: route add 192.168.39.0
MASK 255.255.255.0 192.148.0.2

Below is the output of the route print after adding the static route.

Alternate routes can be useful for travelers or for businesses with multiple locations throughout town or regionally. For example, if you live far from work you may want an alternate route, so you don’t have to constantly drive back and forth all day long between home and work each day; alternatively, if you’re a business owner with several locations throughout town or regionally, alternate routes can be useful for customers who need several locations open for business each day they can easily reach their location by traveling along different roads through town or regionally instead of having to travel back-and-forth on one road each day between their locations. Adding an alternate route to your home or business is easy with a properly functioning routing table; however, many users neglect to add them until they experience problems reaching their location via that main route. Adding a static route can also be effective when adding an alternate route for quick access for frequent use by family members or friends; either way, adding a static route or alternate route is easy with just a few steps.
Sometimes you need to manually add, change, or remove a route on a Windows machine. Here is quick guide to help you accomplish these tasks.
First start by opening a CMD prompt by going to start then typing cmd.
These commands should work for Win XP, Win Vista, Win 98, Win NT, Win 2000, Win 2008, Win 2012, Win 7, Win 8, Win 10.
Show the Current Routing Table
C:\>route print
===========================================================================
Interface List
 11...54 ee 75 5b e3 c9 ......Intel(R) Ethernet Connection (3) I218-LM
 13...5c e0 c5 7f e4 c8 ......Intel(R) Dual Band Wireless-AC 7265
===========================================================================

IPv4 Route Table
===========================================================================
Active Routes:
Network Destination        Netmask          Gateway       Interface  Metric
          0.0.0.0          0.0.0.0   192.168.177.1    192.168.177.30     10
        127.0.0.0        255.0.0.0         On-link         127.0.0.1    306
     192.168.60.0    255.255.255.0         On-link      192.168.60.1    276
     192.168.60.1  255.255.255.255         On-link      192.168.60.1    276
   192.168.60.255  255.255.255.255         On-link      192.168.60.1    276
    192.168.177.0    255.255.255.0         On-link     192.168.177.1    276
    192.168.177.1  255.255.255.255         On-link     192.168.177.1    276
  192.168.177.255  255.255.255.255         On-link     192.168.177.1    276
===========================================================================
Persistent Routes:
  None
The default route is represented by A destination/netmask of 0.0.0.0. If there isn’t a route with a more specific destination and netmask, the default route is used.
Use this subnet calculator if you need help subnetting.
Add a Static Route
To add a route to the routing table use the route add command. An example looks like this:
route add 10.0.0.0 mask 255.0.0.0 192.168.177.1You can optionally add a metric 2 to the end if you want to add a specific weight to the route. The routes with the lowest metric will take precedence over higher metrics. By default, static routes have a metric of 6.
You can also optionally add a IF 2 to the end. This will force the route to use interface 2. You can see what interface numbers you have with the route print command.
Active Routes:
Network Destination        Netmask          Gateway       Interface  Metric
         10.0.0.0        255.0.0.0         On-link     172.16.177.30      6
Remove a Static Route
To remove a route you must use the route delete command and the destination.
route delete 10.0.0.0Change a Static Route
If you simply want to update a static route you can use the route change command.
route CHANGE 157.0.0.0 MASK 255.0.0.0 157.55.80.5 METRIC 2 IF 2Troubleshooting
If you get the following error:
The requested operation requires elevation.
To resolve this you will need administrator access to the system. Go to the start menu and when you type cmd right click on the cmd.exe program and click Run As Administrator. This opens a CMD prompt with more privileges.
For any further help you can use the built in help the route command provides. Simply type route and hit enter.
C:\>route

Manipulates network routing tables.

ROUTE [-f] [-p] [-4|-6] command [destination]
                  [MASK netmask]  [gateway] [METRIC metric]  [IF interface]

  -f           Clears the routing tables of all gateway entries.  If this is
               used in conjunction with one of the commands, the tables are
               cleared prior to running the command.

  -p           When used with the ADD command, makes a route persistent across
               boots of the system. By default, routes are not preserved
               when the system is restarted. Ignored for all other commands,
               which always affect the appropriate persistent routes. This
               option is not supported in Windows 95.

  -4           Force using IPv4.

  -6           Force using IPv6.

  command      One of these:
                 PRINT     Prints  a route
                 ADD       Adds    a route
                 DELETE    Deletes a route
                 CHANGE    Modifies an existing route
  destination  Specifies the host.
  MASK         Specifies that the next parameter is the 'netmask' value.
  netmask      Specifies a subnet mask value for this route entry.
               If not specified, it defaults to 255.255.255.255.
  gateway      Specifies gateway.
  interface    the interface number for the specified route.
  METRIC       specifies the metric, ie. cost for the destination.

All symbolic names used for destination are looked up in the network database
file NETWORKS. The symbolic names for gateway are looked up in the host name
database file HOSTS.

If the command is PRINT or DELETE. Destination or gateway can be a wildcard,
(wildcard is specified as a star '*'), or the gateway argument may be omitted.

If Dest contains a * or ?, it is treated as a shell pattern, and only
matching destination routes are printed. The '*' matches any string,
and '?' matches any one char. Examples: 157.*.1, 157.*, 127.*, *224*.

Pattern match is only allowed in PRINT command.
Diagnostic Notes:
    Invalid MASK generates an error, that is when (DEST & MASK) != DEST.
    Example> route ADD 157.0.0.0 MASK 155.0.0.0 157.55.80.1 IF 1
             The route addition failed: The specified mask parameter is invalid.
 (Destination & Mask) != Destination.

Examples:

    > route PRINT
    > route PRINT -4
    > route PRINT -6
    > route PRINT 157*          .... Only prints those matching 157*

    > route ADD 157.0.0.0 MASK 255.0.0.0  157.55.80.1 METRIC 3 IF 2
             destination^      ^mask      ^gateway     metric^    ^
                                                         Interface^
      If IF is not given, it tries to find the best interface for a given
      gateway.
    > route ADD 3ffe::/32 3ffe::1

    > route CHANGE 157.0.0.0 MASK 255.0.0.0 157.55.80.5 METRIC 2 IF 2

      CHANGE is used to modify gateway and/or metric only.

    > route DELETE 157.0.0.0
    > route DELETE 3ffe::/32
Check out this article for more cool Windows CLI commands.