
- Skip to content
- Accessibility Policy
Looking for other Java downloads?
Java 24, Java 21, and earlier versions available now
JDK 24 is the latest release of the Java SE Platform.
JDK 21 is the latest Long-Term Support (LTS) release of the Java SE Platform.
Earlier JDK versions are available below.
- JDK 24
- JDK 21
- GraalVM for JDK 24
- GraalVM for JDK 21
Java SE Development Kit 24.0.1 downloads
JDK 24 binaries are free to use in production and free to redistribute, at no cost, under the Oracle No-Fee Terms and Conditions (NFTC).
JDK 24 will receive updates under these terms, until September 2025, when it will be superseded by JDK 25.
- Linux
- macOS
- Windows
Release information
- Online Documentation
-
Installation
Instructions - Release Notes
- Documentation License
-
JDK 24 Licensing Information User Manual (includes
third-party licenses) - Certified System Configurations
- Readme
- Java Value Engineering
Java SE Development Kit 21.0.7 downloads
JDK 21 binaries are free to use in production and free to redistribute, at no cost, under the Oracle No-Fee Terms and Conditions (NFTC).
JDK 21 will receive updates under the NFTC, until September 2026, a year after the release of the next LTS. Subsequent JDK 21 updates will be licensed under the Java SE OTN License (OTN) and production use beyond the limited free grants of the OTN license will require a fee.
- Linux
- macOS
- Windows
Release information
- Online Documentation
-
Installation
Instructions - Release Notes
- Documentation License
-
JDK 21 Licensing Information User Manual (includes
third-party licenses) - Certified System Configurations
- Readme
- Java Value Engineering
GraalVM for JDK 24.0.1 downloads
GraalVM for JDK 24 binaries are free to use in production and free to redistribute, at no cost, under the
GraalVM Free Terms and
Conditions (GFTC).
GraalVM for JDK 24 will receive updates under these terms, until September 2025, when it will be superseded by GraalVM for JDK 25.
Oracle GraalVM uses the Graal just-in-time compiler and includes the Native Image feature as optional early adopter technology.
Native Image is extensively tested and supported for use in production, but is not a conformant implementation of the Java Platform. GraalVM for JDK 24 without the Native Image feature included is available for customers at My Oracle Support.
- Linux
- macOS
- Windows
Release information
- Online Documentation
- Installation Instructions
- Release Notes
- Licensing Information User Manual (includes third-party licenses)
- Certified System Configurations
- Java Value Engineering
GraalVM for JDK 21.0.7 downloads
GraalVM for JDK 21 binaries are free to use in production and free to redistribute, at no cost, under the
GraalVM Free Terms and
Conditions (GFTC).
GraalVM for JDK 21 will receive updates under the GFTC, until September 2026, a year after the release of the next LTS. Subsequent updates of GraalVM for JDK 21 will be licensed under the GraalVM OTN License Including License for Early Adopter Versions (GOTN) and production use beyond the limited free grants of the GraalVM OTN license will require a fee.
Oracle GraalVM uses the Graal just-in-time compiler and includes the Native Image feature as optional early adopter technology.
Native Image is extensively tested and supported for use in production, but is not a conformant implementation of the Java Platform. GraalVM for JDK 21 without the Native Image feature included is available for customers at My Oracle Support.
- Linux
- macOS
- Windows
Release information
- Online Documentation
- Installation Instructions
- Release Notes
-
Licensing Information User Manual (includes
third-party licenses) - Certified System Configurations
- Java Value Engineering
Protect your investment—and more
Java SE subscribers get support for JDK 17, receive updates until at least October 2029, are entitled to GraalVM, Java Management Service, and bundled patch releases (BPRs) with fixes not yet available to
nonsubscribers, and more.
Java SE subscribers have more choices
Also available for development, personal use, and to run other licensed Oracle products.
- Java 17
- GraalVM for JDK 17
- Java 11
- Java 8
- Java 8 Enterprise Performance Pack
Java SE Development Kit 17.0.15 downloads
The Oracle JDK 17 license changed in October 2024
The Oracle Technology Network License Agreement for Oracle Java SE used for JDK 17 updates 17.0.13 and greater is substantially different from prior Oracle JDK 17 licenses. This license permits certain uses, such as personal use and development use, at no cost — but other uses authorized under prior Oracle JDK licenses may no longer be available. Please review the terms carefully before downloading and using this product. FAQs are available here.
Commercial license and support are available for a low cost with Java SE Universal Subscription.
JDK 17.0.15 checksums and OL 8 GPG Keys for RPMs
- Linux
- macOS
- Windows
Release information
- Online Documentation
-
Installation
Instructions - Release Notes
- Documentation License
-
JDK 17 Licensing Information User Manual (includes
third-party licenses) - Certified System Configurations
- Readme
- Java Value Engineering
GraalVM for JDK 17.0.15 downloads
The Oracle GraaalVM for JDK 17 license changed in October 2024
GraalVM OTN License Including License for Early Adopter Versions (GOTN) used for JDK 17 updates 17.0.13 and greater is substantially different from prior Oracle GraaalVM for JDK 17 licenses. This license permits certain uses, such as personal use and development use, at no cost — but other uses authorized under prior Oracle GraaalVM for JDK licenses may no longer be available. Please review the terms carefully before downloading and using this product. FAQs are available here.
Commercial license and support are available for a low cost with Java SE Universal Subscription.
Oracle GraalVM uses the Graal just-in-time compiler and includes the Native Image feature as optional early adopter technology.
Native Image is extensively tested and supported for use in production, but is not a conformant implementation of the Java Platform. GraalVM for JDK 17 without the Native Image feature included is available for customers at My Oracle Support.
GraaalVM for JDK 17.0.15 checksums and OL 8 GPG Keys for RPMs
- Linux
- macOS
- Windows
Release information
- Online Documentation
-
Installation
Instructions - Release Notes
-
Licensing Information User Manual (includes
third-party licenses) - Certified System Configurations
- Java Value Engineering
Java SE Development Kit 11.0.27
Java SE subscribers will receive JDK 11 updates until at least
January 2032.
These downloads can be used for development, personal use, or to run Oracle licensed products. Use for other
purposes, including production or commercial use, requires a Java SE Universal Subscription or another Oracle license.
Commercial license and support are available for a low cost with
Java SE Universal Subscription.
JDK 11 software is licensed under the
Oracle Technology Network
License Agreement for Oracle Java SE.
JDK 11.0.27 checksums and OL 8 GPG Keys for RPMs
- Linux
- macOS
- Solaris
- Windows
Release information
- Online Documentation
- Installation instructions
- Release Notes
- Documentation license
-
Java SE 11 Licensing Information User Manual
(includes 3rd party licenses) -
Certified System
Configurations - Readme
- Java Value Engineering
- Linux
- macOS
- Solaris
- Windows
-
JRE 8
- Linux
- macOS
- Solaris
- Windows
-
Server JRE 8
- Linux
- Solaris
- Windows
Which Java 8 package do I need?
-
Software developers: Java SE Development Kit (JDK)
For Java developers. Includes a complete JRE plus tools for developing, debugging, and monitoring Java applications.
-
Running headless Linux workloads at or near your systems’ CPU or memory limits
Enterprise Performance Pack brings significant memory and performance improvements including modern garbage collection algorithms, reduced memory usage and many other optimizations.
Learn more
-
Administrators running applications on a server
Server Java Runtime Environment (Server JRE). For deploying Java applications on servers. Includes tools for JVM monitoring and tools commonly required for server applications, but does not include browser integration (Java plug-in), auto-update, or an installer.
Learn more
-
End user running Java on a desktop: Java Runtime Environment (JRE)
Covers most end-users needs. Contains everything required to run Java applications on your system.
Release information
- Online Documentation
- Installation Instructions
- Release Notes
-
Java SE Licensing Information User Manual (includes
third-party licenses) -
Certified System
Configurations - JDK ReadMe
- JRE ReadMe
- Demos and Samples Archive
- Java Value Engineering
- Linux
A great many users are confused about the Java Runtime Environment (JRE). Now, this post of MiniTool explains the definition and provides a Java Runtime Environment download/install guide. It also introduces the differences between JRE vs JDL vs JVM.
Java is one of the most popular programming languages, developed by Oracle Corporation. It is widely used for desktop computers, android development, games, and other development tasks. A huge number of software developers are using this programming language.
However, a lot of people find there are different components of the Java program. Among them, Java Runtime Environment (JRE) has been heatedly discussed. So, we write this post that shows you how to get Java Runtime Environment downloaded and installed for Windows 10/11. In addition, the differences between JRE vs JDK vs JVM are discussed too.
Java Runtime Environment (JRE) Overview
After reading extensive references, we summarize the following common questions related to the Java Runtime Environment download subject. Let’s figure them out one by one.
What Is Java Runtime Environment
Java Runtime Environment, also known as JRE, is a freely available software distribution released by Oracle. It plays an important role in executing the Java programs or apps on your system. That is to say, JRE is required to install on a computer if a programmer needs to execute a Java program via the Java command.
In addition, JRE is used on JDB (Java Debugging) and utilizes the heap space for dynamic memory allocation for Java objects. It is made of many different supporting software tools and features, including Deployment solutions, Integration libraries, Language and utility libraries, Development toolkits, etc.
What’s Difference Between JRE vs JDK vs JVM
However, a lot of users are confused about the differences between JDK vs JRE vs JVM. They don’t know which one they should have. Here we will help you distinguish them from the following several aspects.
The Role of Them in Java:
- JRE: It provides an environment for a Java program or app using the Java command. It is mainly used for those who only want to execute Java programs that are end-users of the system.
- JDK: It is short for Java Development Kit which is a software development environment used for developing and executing Java programs. It contains many tools required to compile, debug, and run a program developed using the Java platform.
- JVM: It is short for Java Virtual Machine that is responsible for loading, verifying, and executing Java bytecode. It works like an interpreter or the core of the Java programming language.
Components:
- JRE: It is composed of 4 main parts: Deployment solutions, Development toolkits, Integration libraries, and Language and utility libraries. Of course, each component includes many subsidiary toolkits, features, and libraries.
- JDK: It contains all the Java tools, executables, and binaries required to run Java programs, including a JRE, a debugger, a compiler, an archiver, and other tools used in the Java development environment.
- JVM: It mainly consists of 3 components or subsystems, including Runtime Data Areas, Class Loader Subsystem, and Execution Engine.
JRE vs JDK vs JVM: Relationship
JDK is the development platform that includes JRE, while JRE is responsible for executing the Java program. JVM serves as the foundation or the core part of Java programming language and makes sure the source code of Java programs is platform-agnostic. Besides, JVM is necessary for both JDK and JRE and Java programs won’t run without it.
Have I Installed JRE on My Computer
Before you download JRE on Windows 10/11, you should check if it is installed or not. Here is a tutorial.
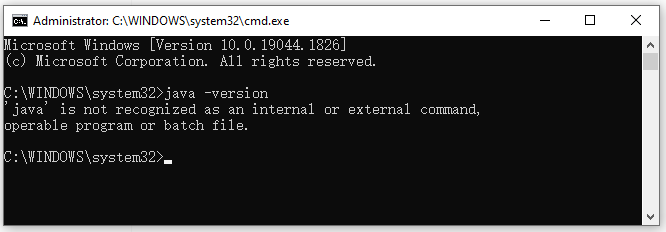
Step 1. Type cmd in the Search box, and then right-click the Command Prompt app and select Run as administrator.
Step 2. In the elevated Command Prompt window, type the java -version command in it and hit Enter. Then you can view the installed Java version and JRE. However, if you receive an error like “java’ is not recognized as an internal or external command, operable program, or batch file, then it may indicate the Java JRE is not installed or corrupted on your PC. You can follow the guide below to get Java JRE downloaded and installed.
Java Runtime Environment Download and Install for Windows 10/11 Guide
As mentioned above, JRE is an important part of executing Java programs. Without the JRE downloaded, you may encounter some errors like Jar file not opening, Lunar client crashing, etc. In this case, you need to download Java Runtime Environment and install it manually.
Oracle doesn’t provide a direct Java JRE download package for users, but it is included in the JDK package. So, you can download JRE by getting the Java JDK download package and installing it on Windows 10/11. Of course, some third-party websites provide a single Java Runtime Environment download package. If you don’t mind, you can download JRE from these websites.
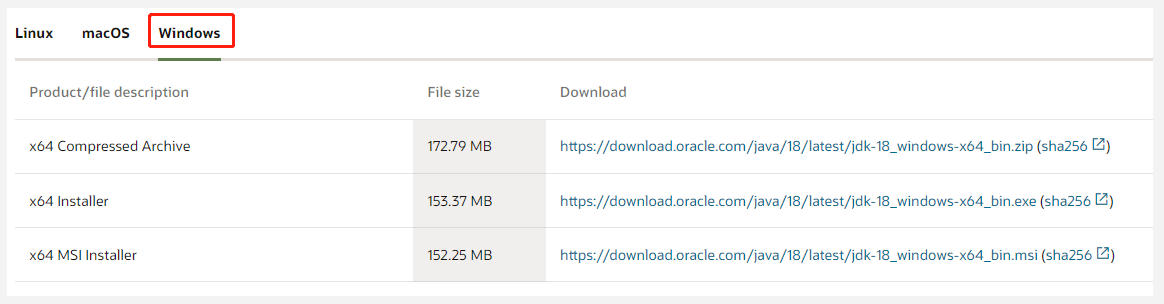
Step 1. Click here to open the Oracle Java Downloads page, navigate to the Windows tab and click on the download link that you need. There are 3 versions of JDK download packages and select one according to your need.
Step 2. Once downloaded, you will get 2 packages: JDK and JRE. Double click the JRE executable file and click on Yes to run it.
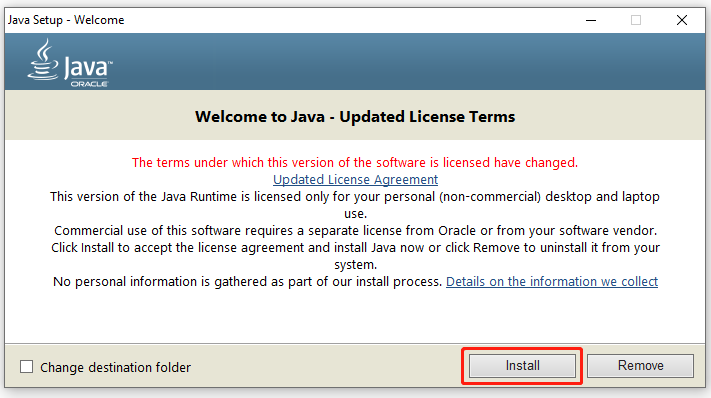
Step 3. In the Java Setup window, click on Install to start installing the Java Runtime program. Wait for the installation to complete and click on Close.
Further reading: If you encounter some issues like the C drive full when installing the program, MiniTool Partition Wizard can help you fix them easily. Moreover, you can use it to extend/resize/format partition, convert a disk to MBR/GPT, migrate OS, etc.
To run any Java program you need JDK installed on your windows machine. However, the process of downloading and installing JDK is not that hard. So today let’s download and Install Java JDK JRE in your windows 10.
Video Tutorial: How to Install Java JDK JRE on Windows 10
If you’re still finding it hard installing JDK on your Windows 10 machine then you can refer to the below video for a complete guide.
Step 1: Download the latest version of JDK (Java Development Kit)
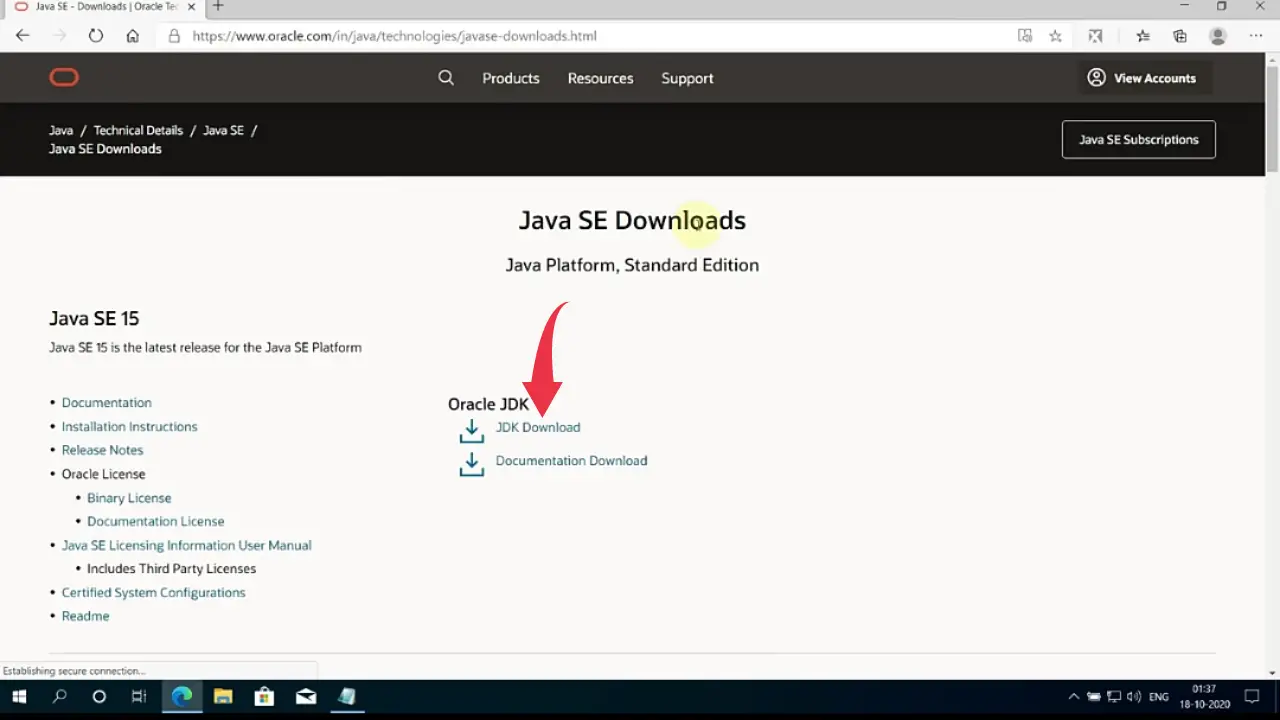
1) First things first you’ll need to download a jdk.exe and to download that you’ll have to click on the download link we’ve provided below. From there you’ll be redirected to the official JDK download page. Once you’re on that page click on the “JDK Download” button.
JDK Download Link: https://www.oracle.com/in/java/technologies/javase-downloads
2) After that, you’ll be redirected to the “Java SE Development Kit Downloads” page. Now scroll down and there you’ll see a “windows X64 Installer” row and next to that a download link is given. Click on that link to download the installer for windows 10.
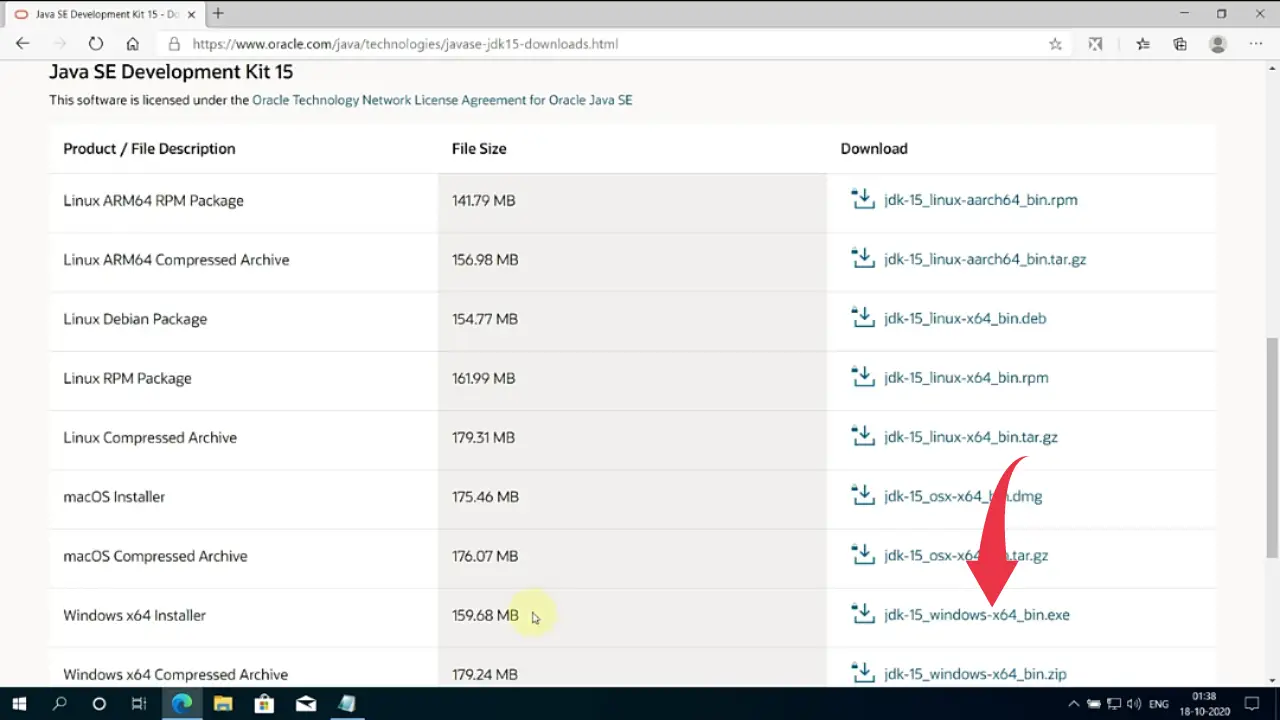
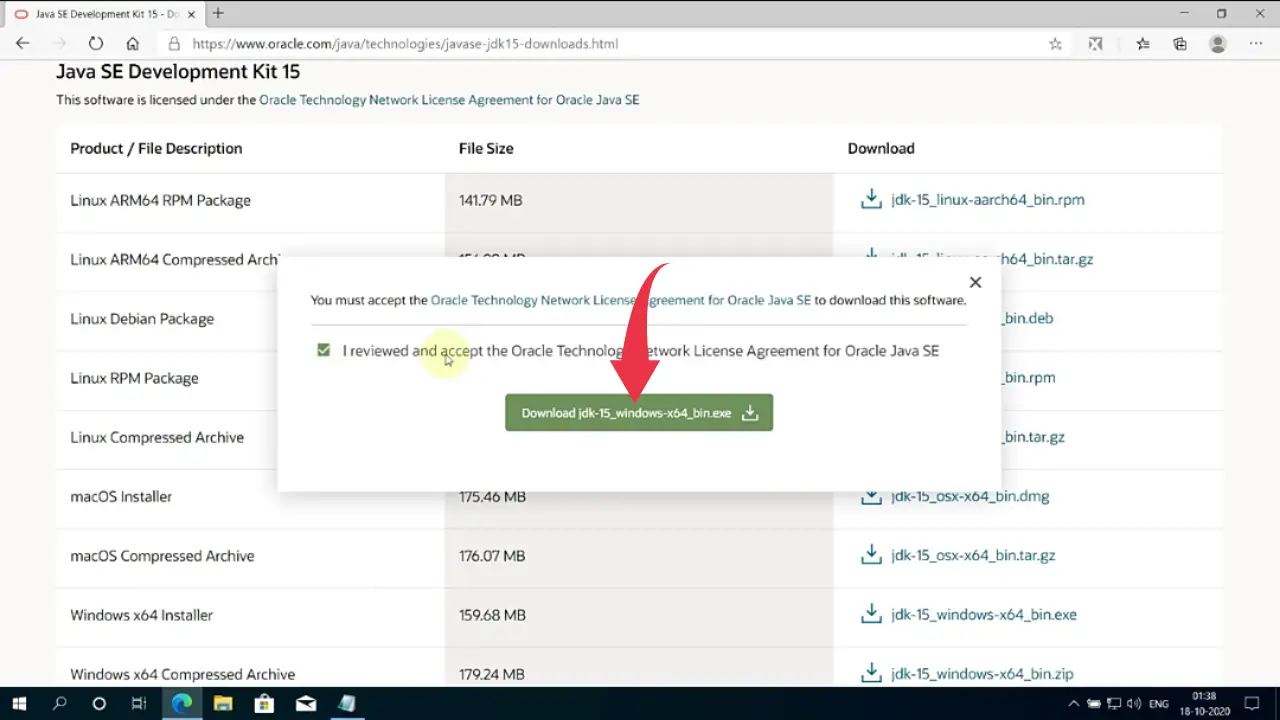
3) A popup screen will appear here, check the license agreement box and click on the long green download button. Depending on your internet connection the JDK file will get downloaded accordingly.
4) Now go to the folder where the downloaded exe file is available, right-click on the file and run it as administrator. A small window will appear to click on yes and the installation will begin.

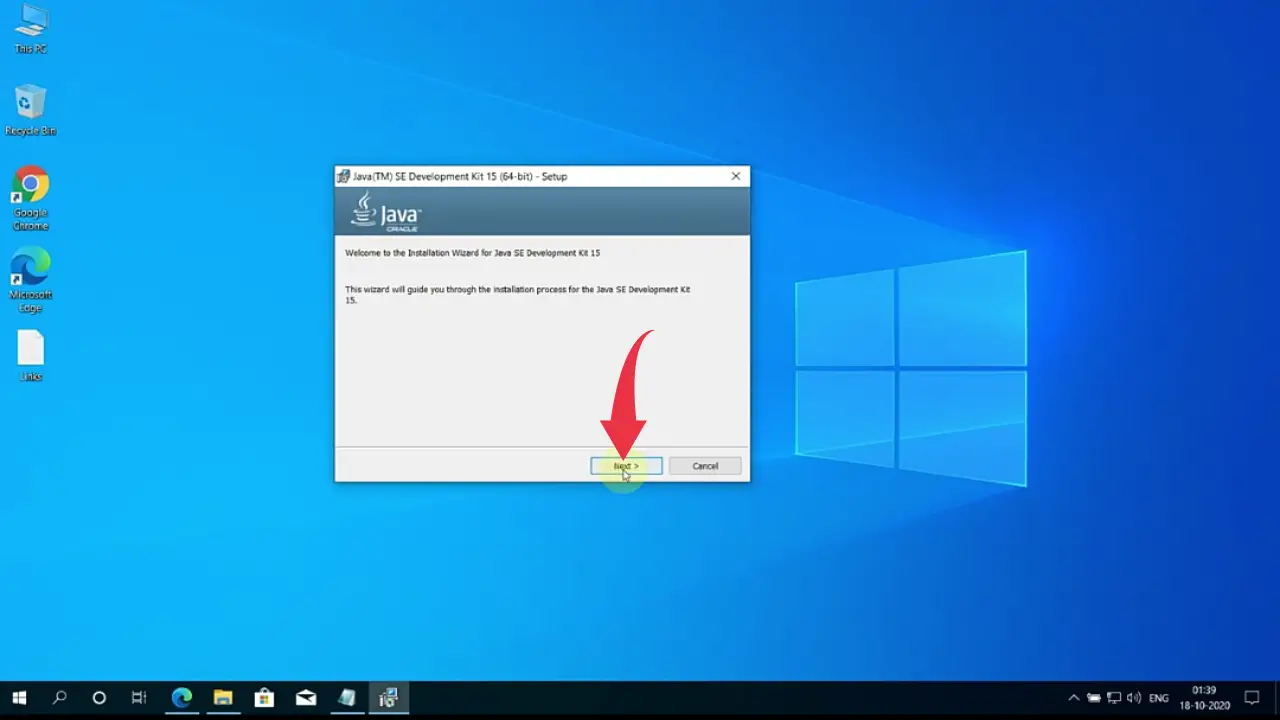
5) Once the installation gets finished a new installation wizard for Java will appear, here click next.
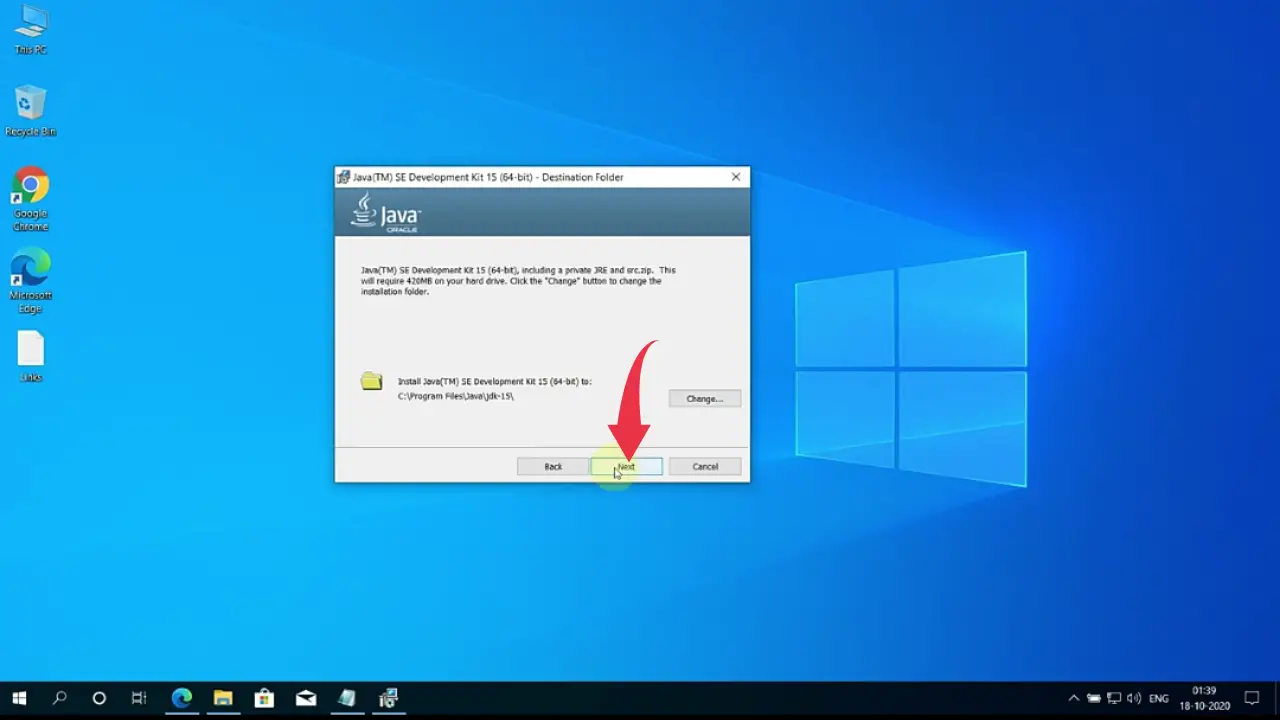
6) After that you’ll be asked to choose the installation folder, here we will go with the default installation folder so click on next.
7) A progress bar will appear showing the installation progress, once it gets completed “Java(TM) SE Development Kit successfully installed” will appear on the screen and after that click on the close button.
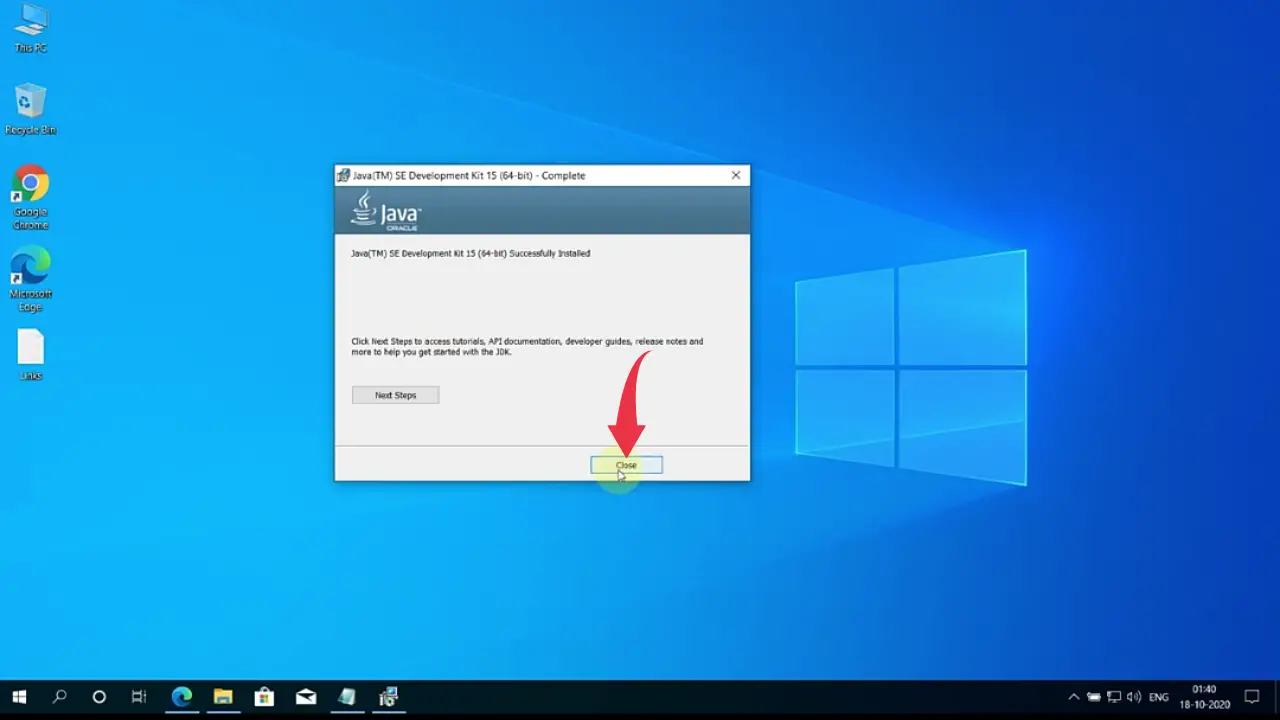
Congrats 👏👏, by this time you’ve successfully installed JDK in your windows 10 machine.
Step 2: Verify Java JDK JRE Version
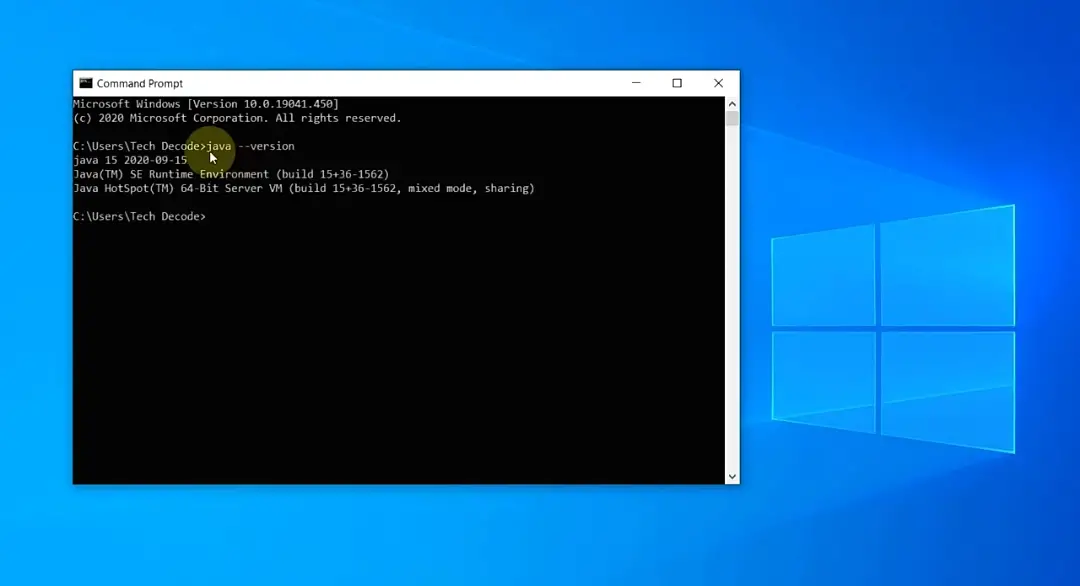
1) To check if JDK is installed properly or not, open up your command prompt by pressing the Windows button, type “cmd” and press enter.

2) In the command prompt type, “java –version” and press enter to check the installed version of JDK.
3) After that type “javac –version” and press enter to check the installed version of the java compiler.
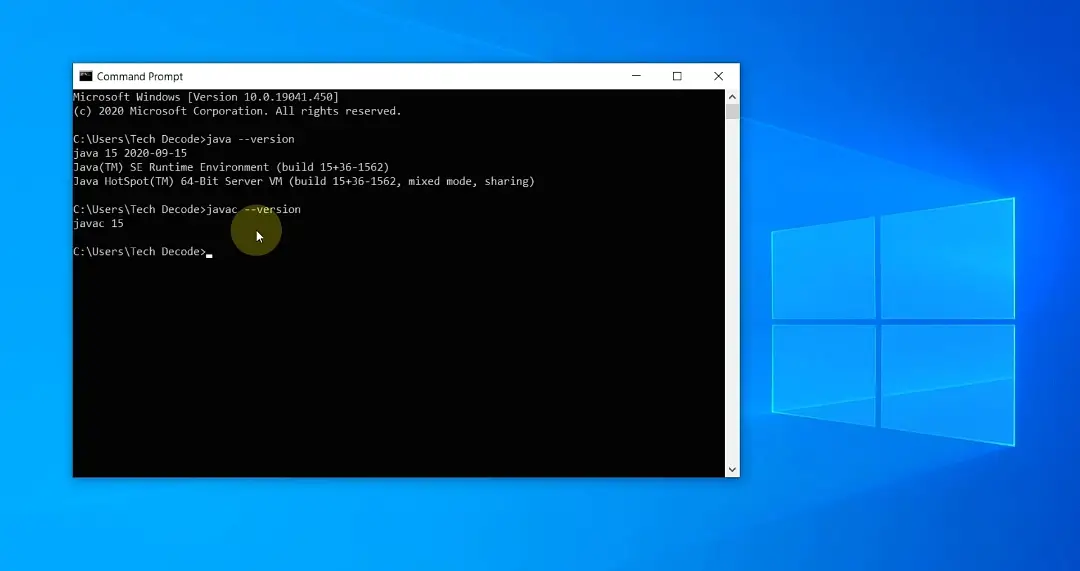
Now pat yourself in the back cause you’ve successfully installed JDK in windows 10 all by yourself🤗🤗.
Also Read: How to Run Java in Visual Studio Code on Windows 10
How to Install JRE on Windows 10
Installing Java Runtime Environment (JRE) on Windows 10 is a straightforward process. First, download the JRE installer from the official Java website. Next, open the installer and follow the on-screen instructions to complete the setup. Once installed, configure your system’s environment variables. Finally, verify the installation. With these steps, you can ensure Java applications run smoothly on your computer.
Step-by-Step Tutorial for Installing JRE on Windows 10
This section will guide you through the steps needed to install JRE on your Windows 10 machine, ensuring that you can run Java applications without any hiccups.
Step 1: Download the JRE Installer
Go to the official Java website and download the JRE installer.
Head over to the Oracle or Java official site. Look for the Java SE Runtime Environment download page. Make sure to choose the appropriate version for your Windows architecture (32-bit or 64-bit).
Step 2: Open the Installer
Locate the downloaded installer file and double-click to open it.
Usually, you’ll find the installer in your Downloads folder. Double-clicking the file will launch the setup wizard. If prompted, allow the application to make changes to your device.
Step 3: Follow the Setup Wizard Instructions
Follow the on-screen instructions to complete the installation.
The setup wizard will guide you through the installation steps. Typically, you will only need to click «Next» a few times, and then «Install». The process should take just a few minutes.
Step 4: Configure Environment Variables
Set up the JAVA_HOME and PATH environment variables.
Right-click on «This PC» or «Computer» on your desktop and select «Properties». Go to «Advanced system settings» and click on «Environment Variables». Add a new system variable named JAVA_HOME and set its value to the JRE installation path. Then, update the PATH variable to include %JAVA_HOME%bin.
Step 5: Verify the Installation
Open Command Prompt and type java -version to ensure JRE is installed correctly.
Press Win + R, type cmd, and hit Enter. In the Command Prompt window, type java -version and press Enter. If the installation was successful, you’ll see the Java version details.
After completing these steps, your system will be ready to run Java applications. The new settings will allow Java to function correctly within your system’s environment.
Tips for Installing JRE on Windows 10
- Always download JRE from the official Java website to avoid malware.
- Choose the correct version (32-bit or 64-bit) to match your system.
- Restart your computer after installation to ensure all settings are applied.
- Keep your JRE updated to the latest version to avoid security vulnerabilities.
- Consider installing JDK if you plan to develop Java applications, as it includes JRE and additional tools.
Frequently Asked Questions
How do I know if Java is already installed on my computer?
Open Command Prompt and type java -version. If Java is installed, the version details will appear.
What should I do if I encounter an error during installation?
Ensure you have administrative privileges and disable any antivirus programs temporarily.
Can I install multiple versions of JRE on my system?
Yes, but you need to manage the JAVA_HOME and PATH environment variables to point to the correct version.
How often should I update JRE?
Regularly check for updates on the official Java website and update as new versions are released.
Is JRE the same as JDK?
No, JRE is for running Java applications, while JDK includes JRE and additional tools for development.
Steps Summary
- Download the JRE installer from the official Java website.
- Open the installer.
- Follow the setup wizard instructions.
- Configure environment variables.
- Verify the installation.
Conclusion
Installing JRE on Windows 10 is a simple but essential task for running Java applications. By following the steps outlined in this guide, you can quickly set up your system to support Java software. This ensures that you can smoothly run any Java-based application without encountering issues. Remember to regularly update your JRE to keep your system secure and functioning optimally.
For further reading, consider exploring the differences between JRE and JDK, especially if you plan on developing Java applications. Additionally, always refer to the official Java documentation and support forums for any troubleshooting tips or advanced configurations.
Ready to start your journey with Java? Follow the steps above and dive into the world of Java applications on your Windows 10 machine!
Kermit Matthews is a freelance writer based in Philadelphia, Pennsylvania with more than a decade of experience writing technology guides. He has a Bachelor’s and Master’s degree in Computer Science and has spent much of his professional career in IT management.
He specializes in writing content about iPhones, Android devices, Microsoft Office, and many other popular applications and devices.
Read his full bio here.
Эта инструкция устарела, используйте вместо неё более новую
Во многих моих тренингах так или иначе используется Java, либо как язык программирования для разработки автотестов, либо как виртуальная машина для запуска приложений, написанных на Java — инструментов тестирования, сред разработки, и даже клиент системы видеоконференций GotoWebinar требует наличия Java.
Поэтому я решил описать процедуру установки Java для операционной системы Windows и последующей настройки системы, потому что, к сожалению, недостаточно просто “запустить инсталлятор и всегда нажимать кнопку Next”.
1. Где взять Java?
На официальном сайте Oracle Java.
2. Какую версию выбрать?
Разумеется, последнюю доступную (на момент написания инструкции это Java 8).
Выбирая из 32-битной и 64-битной версий, берите 64-битную, если ваша операционная система это позволяет, потому что у неё менее строгие ограничения по памяти, доступной исполняемым Java-приложениям.
3. Что устанавливать, JRE или JDK?
Java Runtime Environment, или JRE — это виртуальная машина, позволяющая запускать приложения, написанные на языке программирования Java.
Java Development Kit, или JDK — это набор инструментов, для разработки программ на языке программирования Java (компилятор, архиватор, генератор документации и прочие). JRE разумеется тоже входит в дистрибутив JDK.
Правило очень простое: если вы собираетесь что-нибудь писать на языке программирования Java, значит вам потребуется JDK. А если только запускать готовые программы — тогда достаточно JRE.
4. Установка Java
Вот тут, действительно, всё просто — нужно запустить инсталлятор и следовать указаниям визарда. Можно просто всё время нажимать кнопку Next.
5. Настройка переменных окружения
К сожалению, инсталлятор Java не выполняет настройку переменных окружения, поэтому придётся сделать это вручную после установки.
Во-первых, необходимо установить переменную JAVA_HOME, которая должна указывать на директорию, в которую установлена Java. Многие программы используют эту переменную, чтобы определить, где находится Java.
Во-вторых, надо в переменную PATH добавить путь к директории %JAVA_HOME%\bin. Эта переменная указывает операционной системе список директорий, в которых нужно искать исполняемые файлы, и чтобы можно было запускать Java из консоли, переменная PATH должна быть правильно настроена.
Для установки переменных окружения сначала нужно открыть свойства компьютера, либо использовав сочетание клавиш Win-Pause, либо через меню “Пуск”:
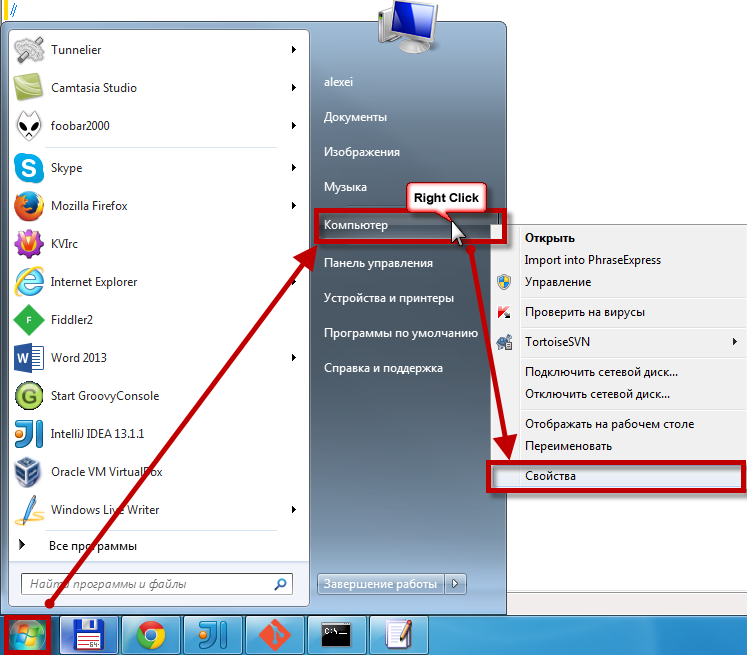
Затем нужно выбрать “Дополнительные параметры системы”, в открывшемся диалоге перейти на вкладку “Дополнительно” и нажать кнопку “Переменные среды”, после чего появится диалог настройки переменных окружения.
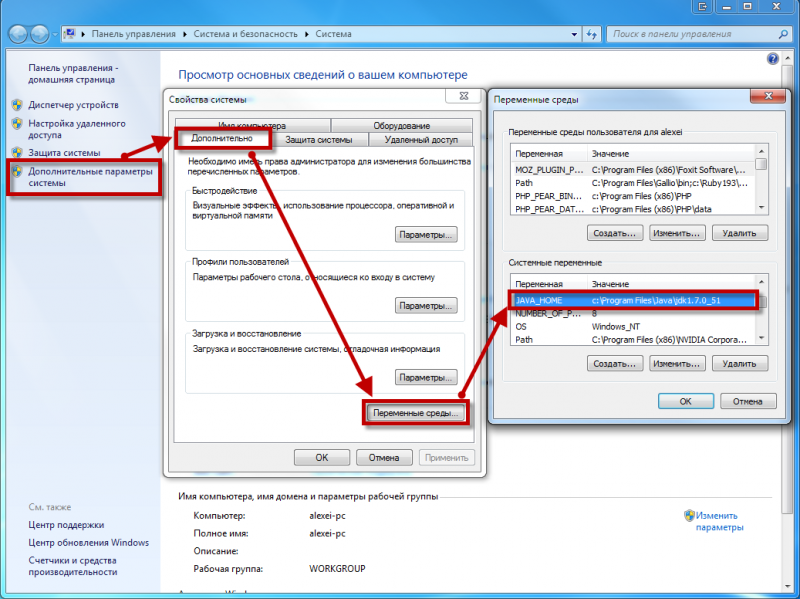
Если у вас уже есть переменная окружения JAVA_HOME — надо её отредактировать, если нет — создать новую. В качестве значения нужно указать путь к директории, куда установлена Java, то есть, например c:\Program Files\Java\jdk1.8.0_25\, если вы установили JDK, либо c:\Program Files\Java\jre1.8.0_25\, если вы установили только JRE.
После того, как вы установили значение переменной JAVA_HOME, необходимо отредактировать значение переменной PATH, добавив туда путь к директории, где находятся исполняемые файлы Java, то есть %JAVA_HOME%\bin
И сохранить всё это, закрыв все открытые диалоги в обратном порядке кнопками OK.
Обратите внимание, что если вы устанавливаете JDK, то в названии директории указывается номер версии, поэтому впоследствии, когда вы решите установить более новую версию, не забудьте поменять значение переменной окружения JAVA_HOME.
После того, как вы изменили переменные окружения, новые значения будут действительны только для новых запускаемых программ, уже запущенные программы не узнают о том, что переменные окружения поменялись. Поэтому если вы, например, пытались запустить Java из консоли и у вас не получилось из-за неправильных настроек переменной PATH, вам придётся перезапустить консоль после того, как вы поменяли значение переменной.
6. Удаление лишних файлов
Запустите консоль (cmd) и выполните в ней команду where java.
В результате вы должны увидеть путь к исполняемому файлу java.exe, который операционная система должна успешно обнаружить в том месте, куда вы установили Java. Если файл не нашёлся — значит неправильно настроена переменная PATH и нужно вернуться к предыдущему пункту.
Однако иногда бывает и наоборот, находятся «лишние» исполняемые файлы:
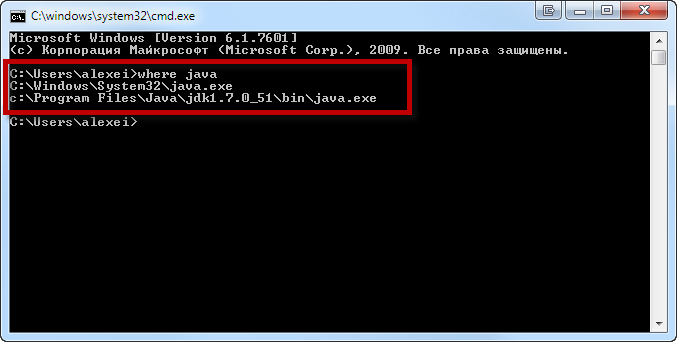
Происходит это из-за того, что инсталлятор Java вместо того, чтобы правильно настроить переменные окружения, пытается положить исполняемые файлы в директорию C:\Windows\system32
Это не очень хорошо — засоряется системная директория, может возникнуть рассогласование версий Java (в разных директориях разные версии). Поэтому надо удалить из каталога C:\Windows\system32 исполняемые файлы java.exe, javaw.exe и javaws.exe, если они там обнаружатся.
Вот и всё, теперь можно пользоваться Java. Только не забывайте о том, что после установки новой версии надо будет обновить переменную окружения JAVA_HOME!