
-
Установка на Windows, MacOS, iOS, Android
-
Установка для пользователей Linux
Как установить сертификаты НУЦ Минцифры
Установка на Windows, MacOS, iOS, Android
Для установки сертификата:
- Перейдите на страницу «Поддержка работы сайтов с российскими сертификатами» портала «Госуслуги».
- Скачайте сертификат для вашей ОС.
- Установите его по инструкции на сайте «Госуслуги».
- Зайдите в зарубежном браузере на страницу sberbank.ru и проверьте, что сертификаты установлены.
Установка для пользователей Linux
-
Перейдите на «Госуслуги».
-
Скачайте или загрузите по прямой ссылке сертификаты для MacOS.
-
Добавьте их в хранилище доверенных сертификатов.
Пути к хранилищу немного различаются для разных видов Linux:
-
в Ubuntu и Debian это /usr/local/share/ca-certificates/;
-
в Red Hat — /etc/pki/ca-trust/source/anchors/;
-
в Arch Linux — /etc/ca-certificates/trust-source/anchors/.
Например, сертификат можно скопировать в хранилище командой суперпользователя (Ubuntu)
sudo cp <path> /russiantrustedca.pem /usr/local/share/ca-certificates/. -
-
Обновите хранилище. Для этого от имени суперпользователя выполните команду:
- для Ubuntu и Debian —
sudo update-ca-certificates- для Red Hat и ArchLinux —
-
Зайдите в зарубежном браузере на страницу sberbank.ru и проверьте, что сертификаты установлены.
Ещё по теме
When it comes to securing your Windows 10 system, installing certificates plays a crucial role. Did you know that certificates are digital documents that verify the authenticity of websites, software, and other entities? These certificates ensure that your information remains protected and that you can trust the sources you interact with online. Installing certificates on Windows 10 is a necessary step to strengthen your system’s security and safeguard your sensitive data.
Installing certificates on Windows 10 is a straightforward process that helps establish trust between your computer and the websites or applications you use. By installing trusted certificates, you can ensure that your system is protected from potential security threats and malicious activities. Whether you need to install a certificate from a trusted authority or import a self-signed certificate, Windows 10 offers user-friendly options to manage and install certificates. By following a few simple steps, you can enhance the security of your system and enjoy a safer online experience.
Installing certificates on Windows 10 is a crucial step in ensuring secure connections and encrypted communications. Follow these steps to install certificates on your Windows 10 machine in a professional manner:
- Open the Start menu and type «certificates» in the search bar.
- Select «Manage computer certificates» from the results.
- In the Certificate Manager window, click on «Trusted Root Certification Authorities» and select «Certificates.»
- Click on «Action» in the menu bar and choose «Import.»
- Follow the wizard to import the certificate file, providing the necessary information.
- Once imported, you’ll receive a confirmation message.

Introduction
Installing certificates on Windows 10 is essential for maintaining a secure and trusted computing environment. Certificates play a vital role in encrypting communications and verifying the authenticity of websites, applications, and other network resources. In this article, we will explore the process of installing certificates on Windows 10, including how to obtain certificates from trusted certification authorities and how to import and manage certificates within the Windows Certificate Store.
Obtaining Certificates from Trusted Certification Authorities
Trusted Certification Authorities (CAs) are organizations responsible for issuing digital certificates. These CAs are included in the Trusted Root Certification Authorities store in Windows, which contains the list of trusted CAs pre-installed on the operating system. When you visit a website secured with SSL/TLS, your browser checks the certificate presented by the website against the Trusted Root Certification Authorities store to ensure it was issued by a trusted CA. If the certificate is trusted, the browser establishes a secure connection.
To obtain a certificate from a trusted CA, you can either purchase a certificate from a commercial CA or obtain a free certificate from a trusted CA such as Let’s Encrypt. Commercial CAs offer various types of certificates based on your needs, including single domain certificates, wildcard certificates, and extended validation (EV) certificates. Let’s Encrypt offers free SSL/TLS certificates through an automated process.
When obtaining a certificate from a trusted CA, you will usually need to generate a certificate signing request (CSR) based on your server or application requirements. The CSR contains information about your organization and the domain(s) the certificate will be issued for. You will then submit the CSR to the CA, who will validate your information and issue the certificate. Once you have received the certificate from the CA, you can proceed with installing it on your Windows 10 system.
Installing Certificates using the Certificate Import Wizard
To install a certificate on Windows 10, you can use the Certificate Import Wizard, which provides a user-friendly interface for importing certificates. Here’s how to use the Certificate Import Wizard:
- Locate the certificate file (.cer or .pfx) on your computer.
- Double-click the certificate file to start the Certificate Import Wizard.
- In the Certificate Import Wizard, select «Local Machine» and click «Next».
- Choose the certificate store where you want to install the certificate (e.g., Personal, Trusted Root Certification Authorities, etc.) and click «Next».
- Review the summary of the certificate information and click «Finish» to complete the installation.
Managing Certificates in the Windows Certificate Store
Once the certificate is installed, you can manage it using the Certificate Manager tool in Windows 10. The Certificate Manager allows you to view, export, import, and delete certificates in the Windows Certificate Store. Here are some common tasks you can perform using the Certificate Manager:
- To open the Certificate Manager, press Windows + R, type «certlm.msc» and press Enter.
- In the Certificate Manager, you can view the installed certificates in different certificate stores, including Personal, Trusted Root Certification Authorities, Intermediate Certification Authorities, and more.
- To export a certificate, right-click the certificate, select «All Tasks», and choose «Export». Follow the wizard to export the certificate to a file.
- To import a certificate, right-click the certificate store (e.g., Personal), select «All Tasks», and choose «Import». Follow the wizard to import the certificate from a file.
- To delete a certificate, right-click the certificate, select «Delete», and confirm the deletion.
Revoking Certificates
In some cases, you may need to revoke a certificate if it has been compromised or is no longer valid. To revoke a certificate, you should contact the CA that issued the certificate and follow their instructions for revocation. The CA will publish a certificate revocation list (CRL) or provide an OCSP (Online Certificate Status Protocol) service to verify the status of revoked certificates. Revoking a certificate ensures that it no longer remains valid and cannot be used maliciously.
Using Certificate Snap-in in Microsoft Management Console (MMC)
Another method to install and manage certificates on Windows 10 is by using the Certificate Snap-in in the Microsoft Management Console (MMC). The MMC provides a centralized platform for managing various aspects of Windows, including certificates. Here’s how to use the Certificate Snap-in in MMC:
- Press Windows + R, type «mmc», and press Enter to open the Microsoft Management Console.
- In the MMC, click «File» and select «Add/Remove Snap-in».
- In the Add or Remove Snap-ins window, select «Certificates» and click «Add».
- Choose the account whose certificates you want to manage (e.g., Local Computer or Current User) and click «Finish».
- Click «OK» to add the Certificate Snap-in to the MMC.
- In the MMC, you can navigate to different certificate stores and perform actions such as importing, exporting, and deleting certificates.
Backing Up Certificates
It is crucial to regularly back up your certificates to prevent loss of important credentials. To back up your certificates using the Certificate Snap-in in MMC:
- In the MMC, navigate to the certificate you want to back up.
- Right-click the certificate, select «All Tasks», and choose «Export».
- Follow the wizard to export the certificate and private key to a password-protected .pfx file.
- Store the backup file in a secure location, preferably offline, to prevent unauthorized access.
Conclusion
Installing certificates on Windows 10 is a crucial step in ensuring a secure and trusted computing environment. By obtaining certificates from trusted certification authorities and properly installing and managing them using the Certificate Import Wizard and Certificate Manager, you can protect your system from unauthorized access and establish secure connections with trusted websites and applications. Additionally, using the Certificate Snap-in in MMC provides a centralized platform for managing certificates and enables you to back up and restore your certificates to prevent any loss of important credentials. Take the necessary steps to install and manage certificates on your Windows 10 system to enhance security and protect your valuable information.

Installing Certificates on Windows 10
If you need to install certificates on Windows 10, follow these steps:
1. Open the Start menu and type «mmc» in the search bar. Click on the «mmc» (Microsoft Management Console) result.
2. In the Console window, click «File» and then «Add/Remove Snap-in.»
3. Select «Certificates» from the list of available snap-ins and click «Add.»
4. Choose «Computer account» and click «Next.»
5. Select «Local computer» and click «Finish.»
6. Click «OK» to return to the Console window.
7. Drag the «Certificates» folder to the «Trusted Root Certification Authorities» folder under «Console Root.»
8. Follow the prompts to complete the certificate installation process.
By following these steps, you can successfully install certificates on Windows 10.
Key Takeaways — How to Install Certificates on Windows 10
- Installing certificates on Windows 10 ensures secure communication with websites and applications.
- Go to the «Settings» on Windows 10 and select «Update & Security.»
- Click on «Windows Security» and then choose «Open Windows Security.»
- In the Windows Security app, select «App & browser control» and then click on «Check apps and files.»
- To install a certificate, click on «Start» and then «Settings.»
Frequently Asked Questions
Installing certificates on Windows 10 is an essential process for ensuring secure communication and online transactions. Here are some common questions and answers to help you navigate the installation process effectively.
1. Why do I need to install certificates on Windows 10?
Certificates are used to establish secure connections between devices and websites, encrypting data during transmission. By installing certificates on Windows 10, you can ensure that your online communication remains private and secure, protecting sensitive information such as login credentials, credit card details, and personal data from unauthorized access.
Certificates also help validate the authenticity of websites, assuring you that you are interacting with a genuine and trusted source. Without installing certificates, you may encounter security warnings or be unable to access certain websites that require a secure connection.
2. How do I install a certificate on Windows 10?
To install a certificate on Windows 10, follow these steps:
1. Open the Start menu and type «certmgr.msc» in the search bar, then press Enter. This will open the Certificate Manager.
2. In the Certificate Manager, navigate to the «Trusted Root Certification Authorities» folder on the left-hand side.
3. Right-click on the folder and select «All Tasks», then click on «Import» in the sub-menu.
4. Browse to the location where you have saved the certificate file (.cer or .pfx) and select it. Click on «Next» to proceed.
5. Follow the on-screen instructions to complete the installation process, and then click «Finish» to exit the Certificate Import Wizard.
Once the certificate is successfully installed, it will be added to the Trusted Root Certification Authorities store, and you should be able to access secure websites and establish secure connections without any issues.
3. Do I need administrative privileges to install certificates on Windows 10?
Yes, administrative privileges are required to install certificates on Windows 10. Only users with administrative rights can access the Certificate Manager and make changes to the system’s trusted certificates. If you don’t have administrative privileges on your Windows 10 computer, you will need to contact your system administrator or IT department for assistance with installing certificates.
4. What should I do if the certificate installation fails?
If the certificate installation fails on Windows 10, there are a few steps you can take to troubleshoot the issue:
1. Verify that the certificate file you are trying to install is valid and not corrupted. Try downloading the certificate again from the source or contact the issuer for assistance.
2. Ensure that you have the necessary administrative privileges to install certificates. If you don’t have administrative rights, contact your system administrator for assistance.
3. Check if there are any conflicting certificates installed on your system. Remove any duplicate or outdated certificates before attempting to install the new certificate.
4. Restart your computer and try installing the certificate again. Sometimes a simple restart can resolve installation issues.
If you are still unable to install the certificate, it is recommended to seek assistance from the certificate issuer or your IT support team for further troubleshooting.
5. How can I verify if a certificate is successfully installed on Windows 10?
To verify if a certificate is successfully installed on Windows 10, follow these steps:
1. Open the Start menu and type «certmgr.msc» in the search bar, then press Enter. This will open the Certificate Manager.
2. In the Certificate Manager, navigate to the «Trusted Root Certification Authorities» folder on the left-hand side.
3. Look for the certificate you installed in the list of certificates. If it is present, it means the certificate has been successfully installed.
4. You can also check if the certificate is being recognized by websites or applications. Open a web browser and visit a secure website that uses the installed certificate. If the website loads without any security warnings or errors, it indicates that the certificate is installed correctly and being recognized.
By following these steps, you can ensure that the certificate installation process is successful and verify its presence on your Windows 10 system.
In summary, installing certificates on Windows 10 is a straightforward process that ensures secure and trusted connections for various online activities. By following the step-by-step instructions provided, users can successfully install certificates and reap the benefits of enhanced security.
Remember to choose the appropriate certificate store, check for any certificate errors, and import the necessary files. Whether it’s for accessing secure websites, setting up a VPN connection, or authenticating digital signatures, installing certificates on Windows 10 is a crucial step in maintaining online privacy and security.
Installing a certificate on Windows 11 is a crucial step to ensure secure and encrypted communication between your computer and various websites or applications. Certificates play a vital role in establishing trust and verifying the identity of websites, ensuring that your data is transmitted securely. In this blog post, we will explore the process of installing a certificate on Windows 11 and provide detailed steps to help you through the process.
Video Tutorial:
What’s Needed
Before diving into the certificate installation process, there are a few things you need to have in place. These include:
1. The certificate file: You will need the digital certificate file that you want to install on your Windows 11 system. This file is usually provided by the website or the certification authority (CA) from which you obtained the certificate. Make sure you have a copy of this file readily available.
2. Admin access: To install a certificate on Windows 11, you need administrative privileges on your computer. This ensures that you have the necessary permissions to make system-level changes and install the certificate securely.
3. Basic computer knowledge: While the process of installing a certificate is not overly complex, having some basic knowledge about Windows 11 and navigating through the operating system will be helpful.
What Requires Your Focus?
When installing a certificate on Windows 11, there are a few key areas that require your attention. These include:
1. Certificate type: Different types of certificates exist for various purposes, such as web server certificates, code signing certificates, or email certificates. It is important to determine the type of certificate you have and the corresponding installation requirements.
2. Certificate store: Windows 11 has multiple certificate stores, and it is crucial to install the certificate in the appropriate store to ensure its proper functionality. Choosing the correct certificate store will depend on the purpose of the certificate and the applications or services it needs to interact with.
3. Trust and verification: Installing a certificate establishes trust between your computer and the website or application it is associated with. Verifying the authenticity and validity of the certificate is therefore essential to ensure the security of your data. Pay attention to any warnings or errors during the installation process to avoid potential security risks.
Method 1: How to Install Certificate via Windows Certificate Store
To install a certificate via the Windows Certificate Store on Windows 11, follow these steps:
1. Open the «Run» dialog by pressing the Windows key + R on your keyboard.
2. Type «certmgr.msc» in the Run dialog and press Enter to open the Certificate Manager.
3. In the Certificate Manager, navigate to the appropriate certificate store. For example, if you have a personal certificate, you can navigate to «Personal» > «Certificates.«
4. Right-click on the certificate store and select «All Tasks» > «Import.«
5. The Certificate Import Wizard will open. Click «Next» to proceed.
6. Click the «Browse» button and locate the certificate file you want to install. Select the file and click «Open.«
7. Follow the instructions in the wizard to complete the certificate installation. You may need to enter a password for the certificate if it is protected by one.
8. Once the installation is complete, you will receive a confirmation message. Click «Finish» to close the wizard.
Pros & Cons:
| Pros | Cons |
|---|---|
| 1. Allows for easy installation of certificates through the Windows Certificate Store. | 1. Limited control over advanced certificate installation settings. |
| 2. Centralized management of certificates within the Windows operating system. | 2. May not be suitable for installing certain types of certificates or custom configurations. |
| 3. Integration with other Windows security features, providing a seamless experience. | 3. Requires administrative access to the Certificate Manager. |
Method 2: How to Install Certificate Using Internet Explorer
If you prefer to install a certificate using Internet Explorer, follow these steps:
1. Open Internet Explorer on your Windows 11 system.
2. Click on the gear icon in the top-right corner to open the menu, and select «Internet options.«
3. In the Internet Options window, navigate to the «Content» tab.
4. Under the Certificates section, click on the «Certificates» button.
5. The Certificates window will open. Select the certificate store in the left-hand pane to which you want to install the certificate.
6. Click the «Import» button to start the Certificate Import Wizard.
7. Follow the instructions in the wizard to import the certificate file. You will need to browse for the certificate file and enter any necessary passwords.
8. Once the installation is complete, you will receive a confirmation message. Click «OK» to close the Certificates window.
9. Restart Internet Explorer for the changes to take effect.
Pros & Cons:
| Pros | Cons |
|---|---|
| 1. Familiar interface for users accustomed to Internet Explorer. | 1. Restricted to Internet Explorer as the installation method. |
| 2. Provides an alternative method for certificate installation. | 2. May not support all types of certificates or custom configurations. |
| 3. Offers control over certificate stores and management options within Internet Explorer. | 3. Requires administrative access to Internet Explorer settings. |
Method 3: How to Install Certificate Using the Certificate Import Wizard
Windows 11 also provides a standalone Certificate Import Wizard, which you can use to install certificates. Here’s how:
1. Locate the certificate file you want to install on your Windows 11 system.
2. Double-click on the certificate file to launch the Certificate Import Wizard.
3. The wizard will open and display the certificate details. Click «Next» to proceed.
4. Select the destination certificate store where you want to install the certificate, such as «Personal» or «Trusted Root Certification Authorities.«
5. Click «Next» to continue.
6. Review the settings and options presented in the wizard. If desired, you can change the certificate store or select additional options.
7. Click «Finish» when you are ready to install the certificate.
8. A confirmation message will indicate whether the installation was successful. Click «OK» to close the wizard.
Pros & Cons:
| Pros | Cons |
|---|---|
| 1. Provides a standalone method for certificate installation. | 1. Requires manual locating and launching of the Certificate Import Wizard. |
| 2. Offers flexibility in choosing the certificate store and installation options. | 2. May not be suitable for users who prefer a more integrated installation method. |
| 3. Can be used to install certificates with custom configurations and settings. | 3. Requires administrative access to launch the Certificate Import Wizard. |
Method 4: How to Install Certificate via Command Prompt
For those who prefer command-line interfaces, Windows 11 allows you to install certificates using the Command Prompt. Follow these steps:
1. Open the Command Prompt by pressing the Windows key + R on your keyboard, then type «cmd» and press Enter.
2. In the Command Prompt window, navigate to the directory where the certificate file is located. Use the «cd» command followed by the folder path to navigate.
3. Once you are in the correct directory, run the following command to install the certificate:
«`
certutil -addstore store_type certificate_file
«`
Replace «store_type» with the appropriate certificate store, such as «My» or «Root.» Replace «certificate_file» with the name of the certificate file.
4. Press Enter to execute the command and install the certificate.
5. After the installation is complete, you will receive a confirmation message in the Command Prompt.
Pros & Cons:
| Pros | Cons |
|---|---|
| 1. Provides a command-line alternative for certificate installation. | 1. Requires familiarity with Command Prompt and command-line interface. |
| 2. Offers automation and scriptability for advanced users. | 2. May not be suitable for users who prefer graphical interfaces and point-and-click interactions. |
| 3. Provides control over the installation process through command-line parameters. | 3. Requires administrative access and elevated privileges to use the Command Prompt. |
Why Can’t I Install My Certificate?
If you encounter issues during the certificate installation process, several common reasons could be causing the problem. Here are a few possible reasons and their respective fixes:
1. The certificate is expired or not yet valid: Check the validity dates of the certificate and ensure it is within the valid timeframe. If the certificate is expired, contact the issuing authority for a new certificate.
2. Incorrect certificate store selection: Make sure you are installing the certificate in the appropriate certificate store. Different certificate types and purposes require specific stores. Refer to the documentation or instructions provided with the certificate for guidance.
3. Insufficient permissions: Ensure that you have administrative access to your Windows 11 system. Administrative privileges are required to install certificates and make system-level changes.
Implications and Recommendations:
When installing a certificate on Windows 11, there are a few implications and recommendations to consider:
1. Regularly update and renew certificates: Certificates have expiration dates, and it is crucial to keep track of them and renew them as necessary. Expired certificates can lead to security vulnerabilities and communication issues.
2. Validate certificate authenticity: Before installing a certificate, always verify its authenticity and ensure it comes from a trusted source. This minimizes the risk of installing a malicious or forged certificate.
3. Backup certificates: It is recommended to create backups of your certificates to avoid potential data loss or certificate corruption. Keep copies of the certificates in a secure location or consider using a certificate management system.
5 FAQs about Installing Certificates
Q1: Can I install multiple certificates on Windows 11?
A1: Yes, you can install multiple certificates on Windows 11. However, ensure that you choose the appropriate certificate stores and avoid conflicting or duplicate certificates.
Q2: Where can I obtain certificates for installation?
A2: Certificates can be obtained from various sources, including certification authorities (CAs), third-party vendors, or internal certificate authorities. Depending on your requirements, you can choose the source that best fits your needs.
Q3: How do I know if a certificate is installed correctly?
A3: After installing a certificate, you can check its status and proper installation by accessing the corresponding certificate store in the Certificate Manager. Verify that the certificate is listed and does not display any errors or warnings.
Q4: Can I transfer certificates between different Windows 11 systems?
A4: Yes, you can export certificates from one Windows 11 system and import them into another. Exporting and importing certificates allows you to transfer them securely and maintain consistency across systems.
Q5: Can I revoke or remove a certificate after installation?
A5: Yes, you can revoke or remove a certificate after installation. Revoking a certificate invalidates its trust and prevents its use in secure communications. Removing a certificate deletes it from the certificate store on your Windows 11 system.
Final Words
Installing a certificate on Windows 11 is a critical step in ensuring secure communication and protecting your data. By following the methods outlined in this blog post, you can successfully install certificates via the Windows Certificate Store, Internet Explorer, the Certificate Import Wizard, or the Command Prompt. Remember to pay attention to certificate types, stores, and trust validation to guarantee the integrity and authenticity of the certificates you install.
Давайте, рассмотрим последовательность действий при установке личного сертификата электронной подписи на компьютерное устройство. Кстати, в Windows 7 она будет такой же, как и в Windows 10.
Для этого, прежде всего, запустите программу «КриптоПро CSP» (меню «Пуск» → «Панель управления» → «КриптоПро CSP»). После этого перейдите на закладку «Сервис» и нажмите кнопку «Просмотреть сертификаты в контейнере…».

В окне «Сертификаты в контейнере закрытого ключа» нажмите кнопку «Обзор» и выберите контейнер. После этого нажмите на кнопку «Далее».

Если при нажатии кнопки «Далее» появится окно выбора носителя с сообщением «Набор ключей не существует», скопируйте ключи с ключевого носителя (резервная копия).
В следующем окне с данными сертификата нажмите клавишу «Установить».
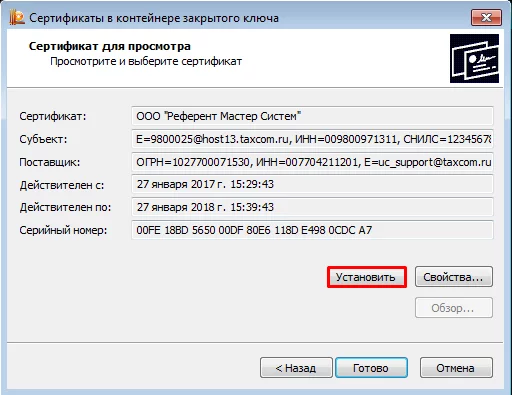
После этого последовательно кликните «Далее» → «Поместить все сертификаты в следующее хранилище», «Обзор» → «Личные» → «Далее» → «Готово».
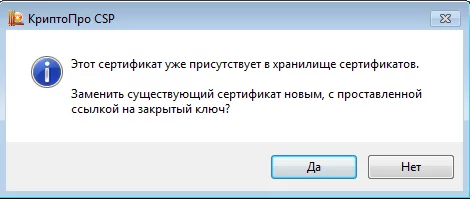
В том случае, если сертификат на данном рабочем месте уже был до этого установлен, появится сообщение, что такой сертификат уже есть в хранилище. В такой ситуации нажмите «Да», чтобы заменить его, и «Ок» в ответ на сообщение об успешной установке, а затем «Готово».
На этом установка сертификата считается завершенной. Каждый сертификат устанавливается отдельно.