
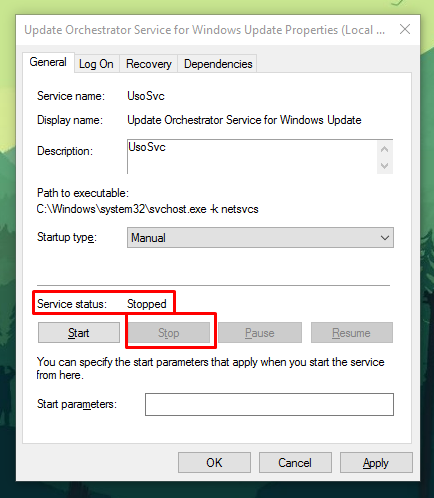
Manages Windows Updates. If stopped, your devices will not be able to download and install the latest updates.
Default Settings
| Startup type: |
|
||||||||||||||||||||||||||||||||||||||||||||||||||||||||||||||||||||||||||||||||||||||||||||||||||||||||
| Display name: | Update Orchestrator Service | ||||||||||||||||||||||||||||||||||||||||||||||||||||||||||||||||||||||||||||||||||||||||||||||||||||||||
| Service name: | UsoSvc | ||||||||||||||||||||||||||||||||||||||||||||||||||||||||||||||||||||||||||||||||||||||||||||||||||||||||
| Service type: | share | ||||||||||||||||||||||||||||||||||||||||||||||||||||||||||||||||||||||||||||||||||||||||||||||||||||||||
| Error control: | normal | ||||||||||||||||||||||||||||||||||||||||||||||||||||||||||||||||||||||||||||||||||||||||||||||||||||||||
| Object: | LocalSystem | ||||||||||||||||||||||||||||||||||||||||||||||||||||||||||||||||||||||||||||||||||||||||||||||||||||||||
| Path: | %SystemRoot%\system32\svchost.exe -k netsvcs -p | ||||||||||||||||||||||||||||||||||||||||||||||||||||||||||||||||||||||||||||||||||||||||||||||||||||||||
| File: | %SystemRoot%\system32\usosvc.dll | ||||||||||||||||||||||||||||||||||||||||||||||||||||||||||||||||||||||||||||||||||||||||||||||||||||||||
| Registry key: | HKEY_LOCAL_MACHINE\SYSTEM\CurrentControlSet\Services\UsoSvc | ||||||||||||||||||||||||||||||||||||||||||||||||||||||||||||||||||||||||||||||||||||||||||||||||||||||||
| Privileges: |
|
Default Behavior
Update Orchestrator Service is a Win32 service. It is starting only if the user, an application or another service starts it in all editions of Windows 10 1507, Windows 10 1511, Windows 10 1607, Windows 10 1703, Windows 10 1709. This service is starting automatically when the operating system starts in all editions of Windows 10 1803, Windows 10 1809, Windows 10 1903, Windows 10 2004, Windows 10 20H2, Windows 10 21H1, Windows 10 21H2, Windows 10 22H2.
When the Update Orchestrator Service is started, it is running as LocalSystem in a shared process of svchost.exe along with other services. If Update Orchestrator Service fails to start, the failure details are being recorded into Event Log. Then Windows 10 will start up and notify the user that the UsoSvc service has failed to start due to the error.
Dependencies
Update Orchestrator Service cannot be started under any conditions, if the Remote Procedure Call (RPC) service is disabled.
Restore Default Startup Configuration of Update Orchestrator Service
Before you begin doing this, make sure that all the services on which Update Orchestrator Service depends are configured by default and function properly. See the list of dependencies above.
1. Run the Command Prompt as an administrator.
2. Depending on the version of your operating system, copy the commands below, paste them into the command window and press ENTER.
For Windows 10 1507 Home, Windows 10 1507 Pro, Windows 10 1507 Education, Windows 10 1507 Enterprise, Windows 10 1511 Home, Windows 10 1511 Pro, Windows 10 1511 Education, Windows 10 1511 Enterprise, Windows 10 1607 Home, Windows 10 1607 Pro, Windows 10 1607 Education, Windows 10 1607 Enterprise, Windows 10 1703 Home, Windows 10 1703 Pro, Windows 10 1703 Education, Windows 10 1703 Enterprise, Windows 10 1709 Home, Windows 10 1709 Pro, Windows 10 1709 Education, Windows 10 1709 Enterprise:
sc config UsoSvc start= demand
For Windows 10 1803 Home, Windows 10 1803 Pro, Windows 10 1803 Education, Windows 10 1803 Enterprise, Windows 10 1809 Home, Windows 10 1809 Pro, Windows 10 1809 Education, Windows 10 1809 Enterprise, Windows 10 1903 Home, Windows 10 1903 Pro, Windows 10 1903 Education, Windows 10 1903 Enterprise, Windows 10 1909 Home, Windows 10 1909 Pro, Windows 10 1909 Education, Windows 10 1909 Enterprise, Windows 10 2004 Home, Windows 10 2004 Pro, Windows 10 2004 Education, Windows 10 2004 Enterprise, Windows 10 20H2 Home, Windows 10 20H2 Pro, Windows 10 20H2 Education, Windows 10 20H2 Enterprise, Windows 10 21H1 Home, Windows 10 21H1 Pro, Windows 10 21H1 Education, Windows 10 21H1 Enterprise, Windows 10 21H2 Home, Windows 10 21H2 Pro, Windows 10 21H2 Education, Windows 10 21H2 Enterprise, Windows 10 22H2 Home, Windows 10 22H2 Pro, Windows 10 22H2 Education, Windows 10 22H2 Enterprise:
sc config UsoSvc start= auto
sc start UsoSvc
3. Close the command window and restart the computer.
The UsoSvc service is using the usosvc.dll file that is located in the C:\Windows\system32 directory. If the file is removed or corrupted, read this article to restore its original version from Windows 10 installation media.
Manages Windows Updates. If stopped, your devices will not be able to download and install the latest updates.
This service also exists in Windows 11.
Startup Type
| Windows 10 version | Home | Pro | Education | Enterprise |
|---|---|---|---|---|
| 1507 | Manual | Manual | Manual | Manual |
| 1511 | Manual | Manual | Manual | Manual |
| 1607 | Manual | Manual | Manual | Manual |
| 1703 | Manual | Manual | Manual | Manual |
| 1709 | Manual | Manual | Manual | Manual |
| 1803 | Automatic | Automatic | Automatic | Automatic |
| 1809 | Automatic | Automatic | Automatic | Automatic |
| 1903 | Automatic | Automatic | Automatic | Automatic |
| 1909 | Automatic | Automatic | Automatic | Automatic |
| 2004 | Automatic | Automatic | Automatic | Automatic |
| 20H2 | Automatic | Automatic | Automatic | Automatic |
| 21H1 | Automatic | Automatic | Automatic | Automatic |
| 21H2 | Automatic | Automatic | Automatic | Automatic |
| 22H2 | Automatic | Automatic | Automatic | Automatic |
Default Properties
| Display name: | Update Orchestrator Service |
| Service name: | UsoSvc |
| Type: | share |
| Path: | %WinDir%\system32\svchost.exe -k netsvcs -p |
| File: | %WinDir%\system32\usosvc.dll |
| Error control: | normal |
| Object: | LocalSystem |
| Privileges: |
|
Default Behavior
The Update Orchestrator Service is running as LocalSystem in a shared process of svchost.exe. Other services might run in the same process. If Update Orchestrator Service fails to start, the error is logged. Windows 10 startup proceeds, but a message box is displayed informing you that the UsoSvc service has failed to start.
Dependencies
Update Orchestrator Service is unable to start, if the Remote Procedure Call (RPC) service is stopped or disabled.
Restore Default Startup Type of Update Orchestrator Service
Automated Restore
1. Select your Windows 10 edition and release, and then click on the Download button below.
2. Save the RestoreUpdateOrchestratorServiceWindows10.bat file to any folder on your hard drive.
3. Right-click the downloaded batch file and select Run as administrator.
4. Restart the computer to save changes.
Note. Make sure that the usosvc.dll file exists in the %WinDir%\system32 folder. If this file is missing you can try to restore it from your Windows 10 installation media.
Yea, though I walk through the valley of the shadow of death, I will fear no evil: for thou art with me; thy rod and thy staff they comfort me.
Microsoft has come a long way with its release of Windows 10. The latest operating system was somewhat similar to Windows 8 (or Windows 8.1) when it first got rolled out. Most of the primary differences between the new Windows version and the previous one got embedded in the feature updates, which Microsoft has been releasing for some time now.
For example, in the Windows 10 Anniversary Update, the Update Orchestrator Service made its debut. You might see this service referred to as UsoSvc (an acronym for Update Orchestrator Service). If you are running a build of Windows 10 older than the Windows 10 Anniversary Update, you are unlikely to see this service.
What is the Update Orchestrator Service on Windows 10?
Unfortunately, Microsoft is yet to provide detailed information about the nature of this service. The service is also relatively new, so even most system experts have not had enough time to understand and define its operations.
We can always make assumptions, though. From the name of the service, one could infer that the service has something to do with Windows Update.
What does UsoSvc do?
The service probably initializes or manages updates on Windows devices. It should be equipped with components that download, verify, and install Windows updates on behalf of users. If these postulations are correct, then the service must always be allowed to run.
Windows updates are far too important to miss out on, which means disabling the service is off the cards. In other words, if you stop the Update Orchestrator Service on your PC, your computer will struggle or fail to download and install Windows updates.
Microsoft sometimes introduces new features or functionalities through Windows updates (in Feature Updates especially). Other times, the operating system maker is busy using Windows updates to provide patches and fixes to get rid of vulnerabilities (or holes) in the Windows operating system environment.
Invariably, your computer needs Windows updates to remain secure and perform well. Unsurprisingly, Windows 10 was designed to be capable of updating itself with as limited input from users as possible. For example, the typical Windows 10 device is set up to download updates in the background without you noticing the ongoing operation.
How to disable UsoSvc?
We understand that you might have come to this page to find out how to disable or stop the Update Orchestrator Service on your computer. Like you, a good number of users were fed up with the excessive consumption of their system resources by this particular service, and they sought to do away with it.
Is your computer running slow or suffering system glitches? If so, it may need maintenance. Try running a dedicated PC optimization tool to check the health of your PC and apply the necessary fixes.
However, given the importance of the service in ensuring Windows Update operations run smoothly, we advise you reconsider things before you move on to disable it. Perhaps, the high disk or CPU usage figure you saw in the Task Manager app has something to do with a malicious program masquerading as the Update Orchestrator Service. This event is quite unlikely, though.
The real Update Orchestrator Service, when running, has its root in this path: % WinDir% \ system32 \usocore.dll. You can test the service displayed to verify its authenticity.
In theory, the Update Orchestrator Service is not supposed to keep your CPU or disk usage as high as 100% for an extended period. If the figure is reached at all, it should not take long for it to fall.
Well, if you still want to disable the service at this point, then there is not much we can do to stop you. Your mind is made up already.
Go through the instructions below:
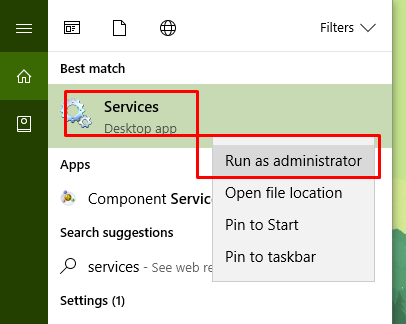
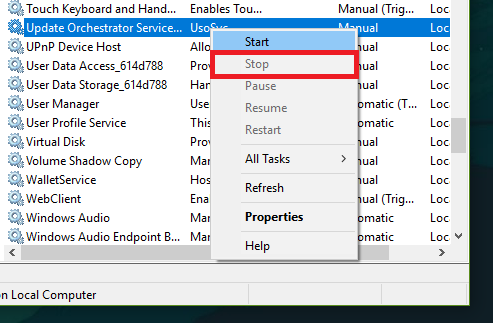
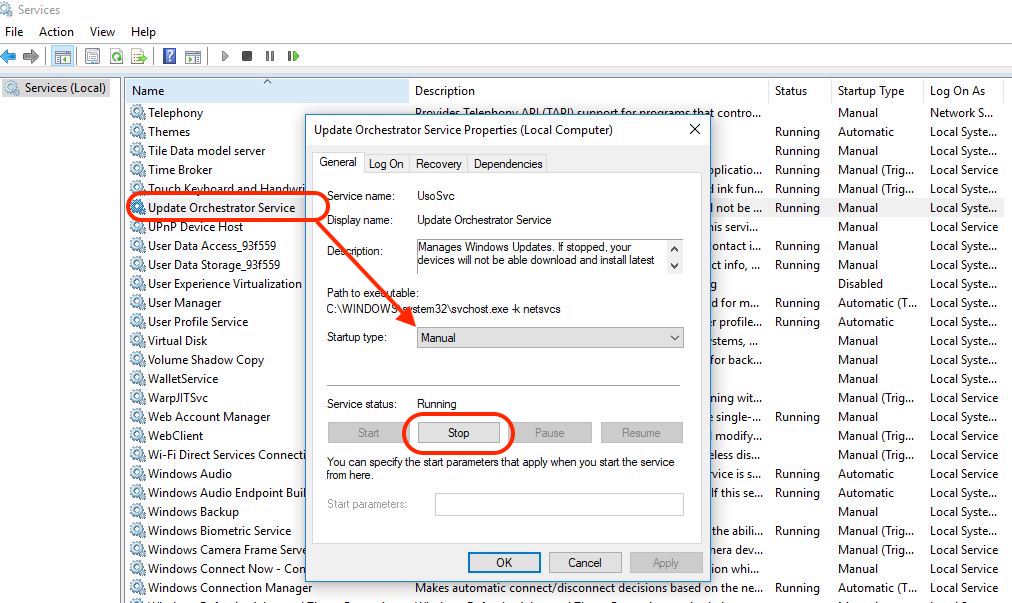
- First, you have to launch the Services program. Press the Windows button on your PC’s keyboard to see the Windows Start menu. Now, type in Services into the text field available to do a quick search for this keyword.
From the results displayed, you have to right-click on the first item on the list, which is usually Services (Desktop app), to see some options. Click on Run as administrator.
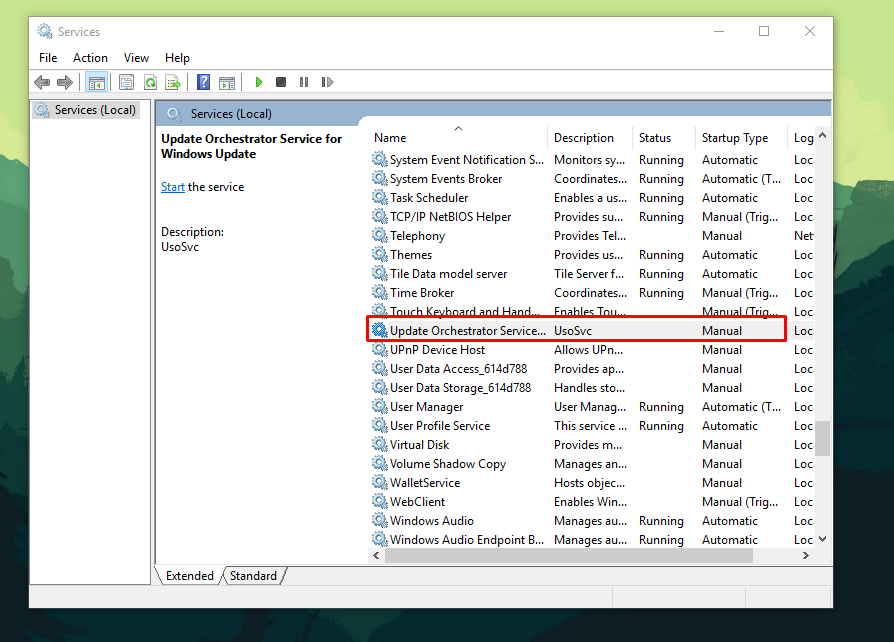
- On the Services screen, you will see the complete list of services operating on your device. Scroll down and locate the Update Orchestrator Service.
- Right-click on the stated service to see the options available. If the service is currently running, you should see Stop on the list. Click on this option if you want to stop the service. This operation should deliver the result you want.
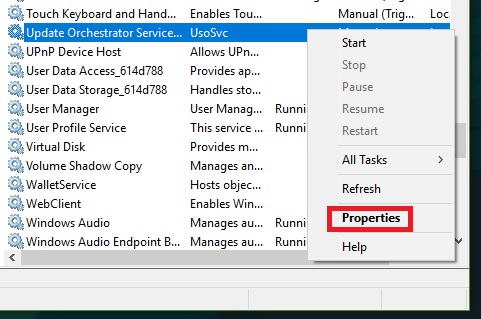
- If you want to go a step further to ensure Windows does not start up the service the next time your system boots up, you have to click on Properties (from the list of options).
- Here, we believe the Properties window for the selected service is up by now. There, you have to click on the drop-down menu for Startup type to see the available parameters.
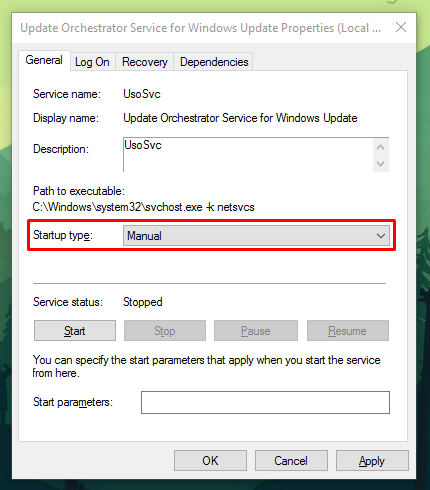
- Select Manual.
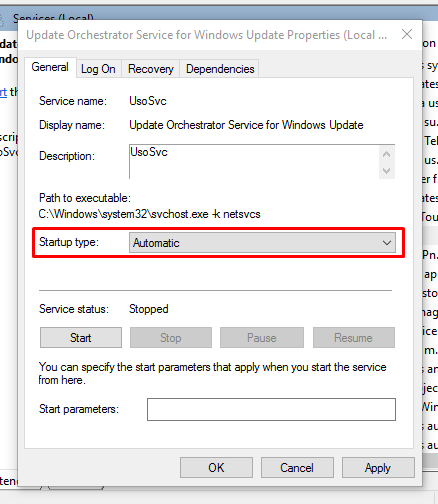
Automatic is usually the default parameter, whose setting forces Windows to start up the service when your computer boots up. When Manual is selected, you are the one that gets to start the service (if you want to).
The Service Status should also read Stopped. Otherwise, you have to click on the Stop button again to stop the service in its tracks.
- At this point, you should be done with the required operations on the Properties program window for the service. Click on the Apply button, then round up things by clicking on the Ok button. That should be all.
Other things to note
We generally advise users to wait before moving on to disable the service. If the service is using up a significant percentage of your system resources currently, then your system is probably executing intensive Windows Update operations. Your computer will eventually complete the process), which means your PC will return to normalcy soon enough.
Nevertheless, if you insist on disabling the service anyway, we recommend that you stop it (only as a temporary measure). You do not have to change its Startup type setting to Manual since the termination of the service should cause your CPU or disk usage figure to fall.
If the Startup type setting is left at Automatic, Windows will start up the service the time you boot up your computer. Your system is likely to have completed Windows Update operations by then, which means you are unlikely to experience the same problems that compelled you to stop the service in the first place.
If you find out that the Update Orchestrator Service on your device has stopped running due to an error, you have to re-start it. If you cannot get the service to start, you must try running scans using the DISM tool to repair the Windows Update components for your system. You can also try resetting the Windows Update components by executing some codes in an elevated Command Prompt window.
TIP:
If your PC getting slow due to operations involving the Update Orchestrator Service caused you to worry, we can safely infer that your system’s speed is somewhat important to you. We feel you can achieve more by installing Auslogics BoostSpeed.
Instead of going through the trouble to disable an essential service, you can use the recommended program to execute intensive optimizations, repairs, and other effective operations that should result in your computer performing better than before.
Microsoft latest operating system is Windows 10 that comes with a variety of features and improvements that replaces its predecessors. We have seen the greater speed, and it is compatible with many old processors.
Windows 10 is fairly optimised operating system for old computers, but it’s originally built for the latest computers and laptops. If you look at the latest PC’s and laptops, they run Windows 10 smoothly despite having an entry-level configuration.
Contents
- What does USOSVC do and How to disable USOVSC?
- What does USOSVC stand for?
We are sure that many of the people who have upgraded from Windows 7 or 8.1 Pro to Windows 10 Home have faced the problem with USOSVC.
Also read : How You Can Stop DoSVC From Eating Your Bandwidth
Those who have installed Win10 (Anniversary update) have faced a problem with USOSVC, which is a common problem found in the old computer.
What does USOSVC stand for?
USOSVC stands for Update orchestrator service, which is part of the latest development that has come from the Win10 home statistics.
The USOSVC comes with Anniversary Windows 10 update, so if you are using that version or above, then you will face this problem.
It is very unclear on why Update orchestrator service exists.
However, there was a development added to the Microsoft System Center 2012 suite; it was called Microsoft System Center Orchestrator. It is a repackaged product of workflow automation software “Opalis vNext.”
It is a drop graphical interface, which enables the administrators to define books. It is a translator that translates visual representations like PowerShell, SSH Commands, .NET scripts to automate workflows. The capability of the Microsoft System Center Orchestrator is capable enough to handle multiple operating systems, and it was designed to handle VMware- and Citrix-based workflows.
It could be a toolkit that is related to the Virtualization or VMware kind of machine.
How to disable it?
Now let’s get into how you can disable it from your Windows 10 PC. Let us make it clear that you won’t find it in the previous versions.
If you PC is Disk usage, Processor usage is going higher; then this can be a cause.
Not only that heating is also reported by the users, who have said that after disabling, but the computer also cooled down.

If you are having similar problems in your older Windows 10 PC, then you should test it by turning off the Update orchestrator service.
Step 1: We hope that your search bar s working smoothing because we are going to need it. Type services in the search bar and wait for the results.
Step 2: Now you have to select the result, and run as administrator.
Step 3: Now the services tab will open, and you have to scroll down until you find Update orchestrator service.
Step 4: You have to use your mouse, and highlight on the option, then right-click on the mouse for more options.
Step 5: As I have already turned off, which is why you see start option, but you will have STOP option. You have to select properties.
Step 6: In the option, you have to select “Start-up type, which normally is always at Automatic,” but you have to change it.
Step 7: You have to change it to Manual. So, it will never open again, until you change the setting back to Automatic.
Step 8: Remember, the service needs to be stopped, so you have to click on STOP if it is running on your Windows 10 version. We have stopped it months back, so we don’t have that option running at this moment.
The service status should be “Stopped,” if it is not, then click on “Stop” button, which we have highlighted in the snapshot.
Step 9: You have click on “Apply,” then “OK.” Make sure you follow the pattern or else the changes won’t be saved.
Step 10: The best way find out its status is to check the things we have highlighted in the snapshot. The first should be on “Start”, and the next one should be “Manual.”
Conclusion
Turning off on your old PC or laptop may have better performance, but we recommend you to test and see if it make any difference. Let us know your thoughts on this and why do you want to turn it off in the first place in the comment section.
You are here: Home / Windows 10 / What is Update Orchestrator Service [High Disk usage?]
Update Orchestrator Service (UsoSvc), as the name suggests, orchestrates the updates for your Windows PC. It runs in the background and facilitates safe, secure and optimal update process for your PC.
This article will guide you with everything you should know about this Windows service.
Update Orchestrator Service controls the download, installation, and verification of Windows updates for your computer. In any case, if you want to continue receiving and installing updates, you should keep this service running.
The service runs under the shared process svchost.exe, which basically launches a lot of processes, and Update Orchestrator Service is one of these processes. It is being launched from:
% WinDir% \ system32 \usocore.dll.
For Windows 10, the Update Orchestrator Service depends on the Remote Procedure Call (RPC). The Update Orchestrator Service won’t work if it is disabled.
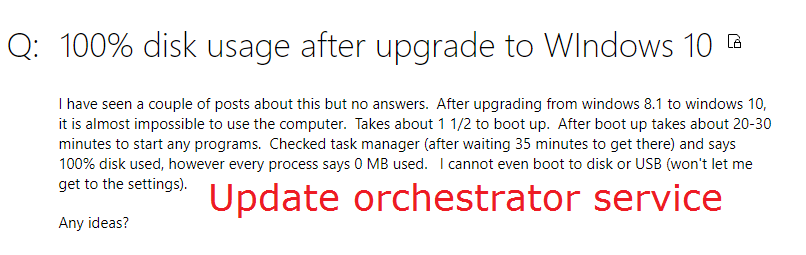
UsoSvc Consuming a lot of CPU (High Disk Usage)
There might be the case that the Update Orchestrator Service is consuming a lot of your Memory or Disk Resources. Many users have reported this issue, that UsoSvc is consuming a lot of resources of your computer.
There is no need to be worried. This is just probably the case, that UsoSvc is running an update process in the background. As soon as this process is over, your CPU and Disk Usage should be back to normal.
We do not recommend stopping or disabling the Service midway through as this could hamper with the update currently going on and cause more issues. Instead, wait for the ongoing update to finish.
How to Disable Update Orchestrator Service
If for any reason, you desire to Disable the Update Orchestrator Service (to get rid of High Disk usage), you can do that very easily. Here, we have outlined the steps to disable UsoSvc in Windows 10:
- Press the Windows Key + R
- Type services.msc
- Press Enter
- Windows Service Manager will open
- In the list of services, you need to find Update Orchestrator Service
- Right Click on it and select Stop
The application will get stopped.
Note: This won’t permanently disable the Service. Once you stop it, it will remain like that and you can start the service again from the Service Manager if you want. Otherwise, once you restart your computer, UsoSvc will again start running.
How to Restore Default Startup Configuration for Update Orchestrator Service
Do you need to restore the default startup configuration for Update Orchestrator Service? Did you make a mistake and just want the defaults to be loaded back?
That’s okay. We have an easy fix for you here.
First off, you need to make sure before we proceed that the services on which Update Orchestrator Service depends are functioning properly. After that, follow the steps given below:
- Run Command Prompt as Administrator
- Check the list given Below. If your system has one of these versions:
Windows 10 1507 Home, Windows 10 1507 Pro, Windows 10 1507 Education, Windows 10 1507 Enterprise, Windows 10 1511 Home, Windows 10 1511 Pro, Windows 10 1511 Education, Windows 10 1511 Enterprise, Windows 10 1607 Home, Windows 10 1607 Pro, Windows 10 1607 Education, Windows 10 1607 Enterprise, Windows 10 1703 Home, Windows 10 1703 Pro, Windows 10 1703 Education, Windows 10 1703 Enterprise, Windows 10 1709 Home, Windows 10 1709 Pro,Windows 10 1709 Education, Windows 10 1709 Enterprise
- Then type into the command prompt
sc config UsoSvc start= demand - Otherwise, if your system has the version
Windows 10 1803 Home, Windows 10 1803 Pro, Windows 10 1803 Education, Windows 10 1803 Enterprise
- Then type into the command prompt
sc config UsoSvc start= auto
sc start UsoSvc
- Close Command Prompt
- Restart the PC
When you are done restarting, the default startup configuration for this service will be restored. It’s as simple as that!
Final Verdict
Update Orchestrator Service is an extremely useful Service that controls all sorts of updates on your PC, from security updates to software updates and even driver updates. Thus, if you notice that it is taking up too much of your CPU disk space, it’s best to let it finish the update instead of trying to disable it.
We hope that by reading this article, you have acquired knowledge about UsoSvc, its use and how to disable it if needed.