
В диспетчере задач Windows 10, а также в отчетах о сетевой активности вы можете увидеть процессы с именами usoclient.exe и usocoreworker.exe. Иногда они способны вызывать высокую нагрузку на процессор, а в некоторых случаях просто любопытство пользователей заставляет задать вопрос о том, что это за процессы и безопасны ли они.
В этом материале подробно о назначении usocoreworker.exe и usoclient.exe в Windows 10, для чего они нужны и дополнительная информация, которая может оказаться полезной. Примечание: вы можете и не увидеть таких процессов, они не всегда запущены. Но, если зайти в Параметры — Обновления и безопасность — Центр обновления Windows, usocoreworker.exe сразу запустится. Обновление: про процесс MoUSOCoreWorker.exe в новых версиях Windows 11 и Windows 10
- Что такое usoclient.exe и usocoreworker.exe
- Что делать, если эти процессы грузят CPU
- Использование usoclient.exe в командной строке
Что представляют собой usoclient.exe и usocoreworker.exe

Usoclient.exe и usocoreworker.exe располагающиеся в папке C:\Windows\System32 и соответствующие им процессы в диспетчере задач являются системными компонентами Windows 10 и относятся к Update Session Orchestrator — системной службе, работающей с обновлениями: их поиском, скачиванием и установкой.
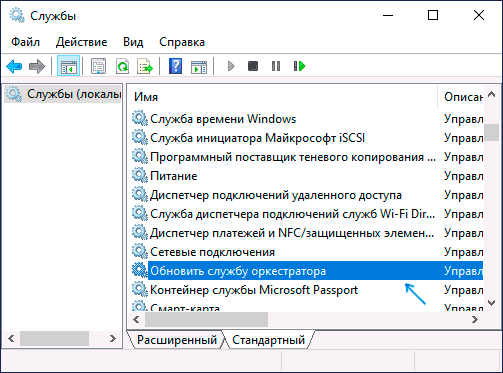
В русской версии Windows 10 служба в списке служб носит название «Обновить службу оркестратора» или «Служба оркестратора обновлений», не исключаю, что в будущем она будет переименована: сейчас название очень похоже на машинный перевод. В английской версии — «Update Orchestrator Service».
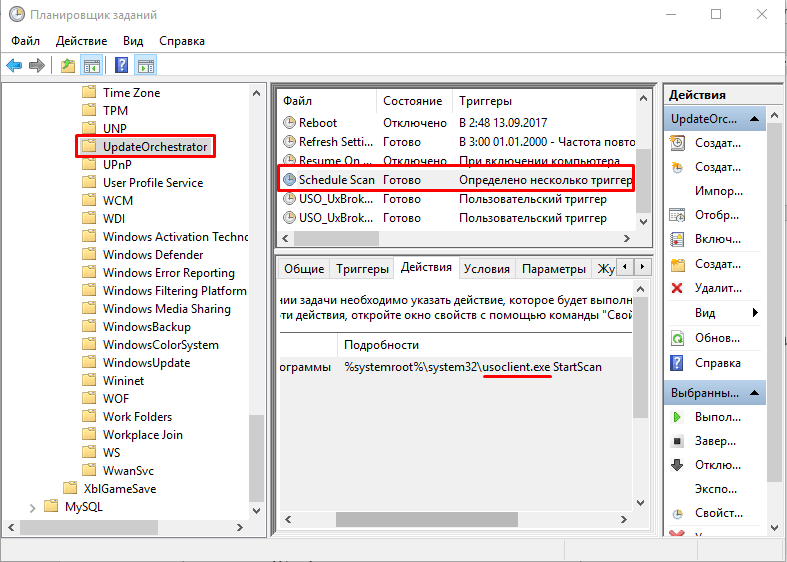
Помимо самой службы, запускать процессы, связанные с работой usocoreworker.exe и usoclient.exe могут задания, найти которые можно в планировщике заданий в разделе «Библиотека планировщика заданий» — «Microsoft» — «Windows» — «UpdateOrchestrator».
Что делать, если эти процессы грузят процессор и память
Иногда вы можете столкнуться с тем, что usoclient.exe или usocoreworker.exe грузят процессор компьютера или ноутбука. В большинстве случаев — это нормальная ситуация, которая возникает время от времени, а именно в те периоды, когда система выполняет работу с обновлениями (в том числе в фоновом режиме).
То есть переживать об этом не стоит, если ситуация не носит постоянный характер, и нагрузка никогда не падает. В последнем случае следует разобраться, что мешает нормальной работе системы с обновлениями. В случае, если вы отключали обновления Windows 10, попробуйте дополнительно отключить и службу «Обновить службу оркестратора», а затем перезагрузить компьютер: возможно, это решит проблему.
Использование usoclient.exe в командной строке
При желании вы можете использовать usoclient.exe вручную в командной строке со следующими параметрами для работы с обновлениями:
- usoclient.exe RestartDevice — для перезагрузки и завершения установки обновлений. Может не работать в некоторых версиях Windows 10.
- usoclient.exe ResumeUpdate — продолжить процесс обновления при загрузке.
- usoclient.exe ScanInstallWait — скачивает, но не устанавливает обновления. До выполнения команды следующие команды exe использовать нельзя.
- usoclient.exe StartDownload — запустить скачивание обновлений.
- usoclient.exe StartInstall — запустить установку обновлений, работает после ScanInstallWait.
- usoclient.exe StartInteractiveScan — интерактивный поиск обновлений (может показать диалоговые окна с информацией и запросами).
- usoclient.exe StartScan — запустить поиск обновлений.
Обратите внимание, для передачи параметров не используются какие-то дополнительные символы (слэш, дефис), просто вводим параметр сразу после usoclient.exe.
Posted on 24/04/2020 by sie
Windows 10 оказалась очень практичной системой. За несколько лет эксплуатации в корпоративной среде мы не имели с ней проблем. И расслабились  — как-то разом застряли кумулятивные обновления на всех системах.
По всей видимости через WSUS приехало некачественное обновление и попортило образы систем. В CBS.log на разных компьютерах ошибки на разные компоненты. Будто это не детерминированные компьютеры, а последствия взрыва гранаты — где как пришлось.
Попробовали вылечить несколько систем вручную с помощью sfc и dism. Несколько ошибок они исправили, но не все. Победить проблему удалось только утилитой SFCFix. Но это же не вариант лечить вручную сотни компьютеров, да ещё сторонней утилитой!
Открыли системам доступ в Интернет на сайты Windows Update. Dism сразу стал инициировать загрузку каких-то компонентов, но до конца всё так и не вылечил.
К счастью оказалось, что последние обновления всё-таки ставятся и проблема лечится автоматически: загрузка последних обновлений, пара установок с аварийным завершением (при этом в CBS.log видно исправление ошибок образа системы!) и перезагрузкой — и всё работает. (Иногда правда перезагрузка может зависать надолго на некоторых системах, но это терпимо.)
Попутно выяснилось, что привычная wuauclt утилита не работает. К тому же её можно было запускать только локально.
Если на Windows XP и Windows 7 приходилось из-за ограничений Windows Update клиента прибегать к некоторым ухищрениям, чтобы удаленно инициировать установку обновлений, то на Windows 10 было приятно открыть для себя утилиту UsoClient, которая работает через удаленное подключение PowerShell или PSExec.
С помощью неё можно не только иницировать поиск обновлений, но и их загрузку, установку и перезагрузку системы.
Список параметров от доброго человека:
- StartScan Used To Start Scan
- StartDownload Used to Start Download of Patches
- StartInstall Used to Install Downloaded Patches
- RefreshSettings Refresh Settings if any changes were made
- StartInteractiveScan May ask for user input and/or open dialogues to show progress or report errors
- RestartDevice Restart device to finish installation of updates
- ScanInstallWait Combined Scan Download Install
- ResumeUpdate Resume Update Installation On Boot
Filed under: Windows, Windows 10, WSUS | Tagged: Windows, Windows 10, WSUS |
-
Что это такое?
-
Как остановить процесс?
-
Как проверить на вирусы?
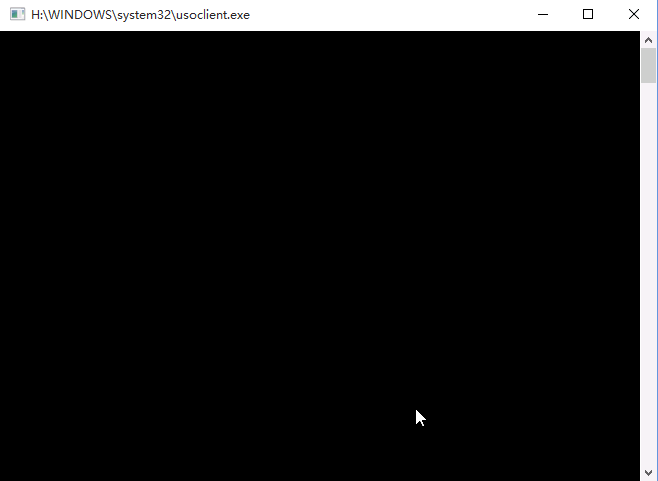
При отображении неизвестного черного окна командной строки появляется желание мгновенно выключить компьютер, дабы возможный вирус не успел повредить важные файлы. Но если вы увидели слово usoclient, можете не беспокоиться. Итак, Usoclient.exe: что это и как отключить?
Что это такое?
Usoclient.exe – это стандартный процесс Windows, который вызывается Планировщиком заданий и отвечает за сканирование и управление стоковой утилиты «Центр обновления Windows».
Как уже известно, файл не является вирусом и полностью безопасен. Однако, если usoclient.exe расположен в любой другой папке, кроме С:\Windows\system32\usoclient.exe, стоит проверить компьютер на наличие вирусов. Любое другое расположение объекта свидетельствует о его фейковости.
В целом, запущенный Usoclient не влияет на производительность компьютера и не нуждается в обязательном отключении.
Как остановить процесс?
Если всплывающее окно таки мешает, отключите его в несколько простых действий:
- Откройте окно «Выполнить», нажав Win+R.
- Введите
taskschd.mscи нажмите Enter.
- В окне «Планировщик задач» откройте следующее дерево: Библиотека планировщика заданий – Microsoft – Windows – UpdatеOrchestrator.
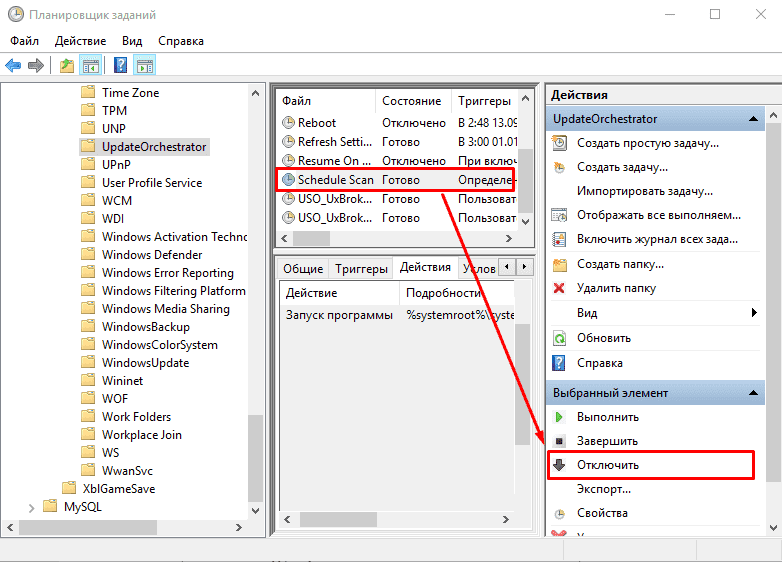
- Найдите задачу Schedule Scan и кликните по ней.

- В правом подменю нажмите кнопку «Отключить».


Внимание! После остановки задачи проверять обновления Windows нужно вручную!
Как проверить на вирусы?
Если файл находится не в стандартной директории, проверьте компьютер:
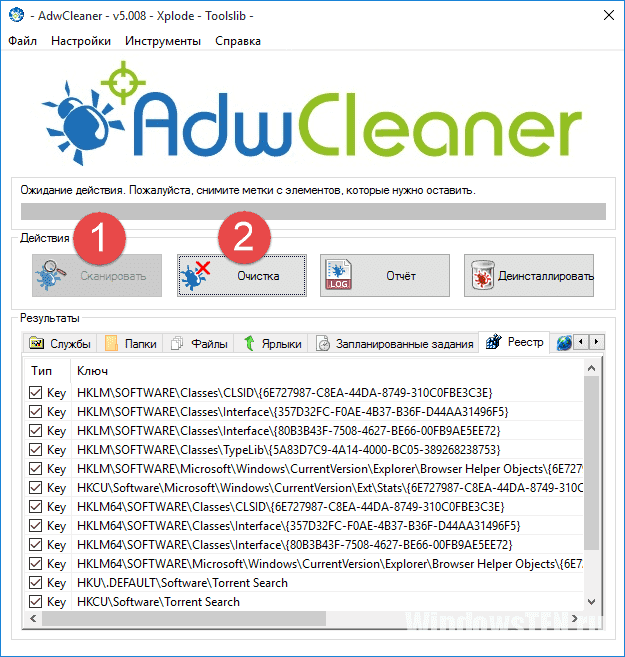
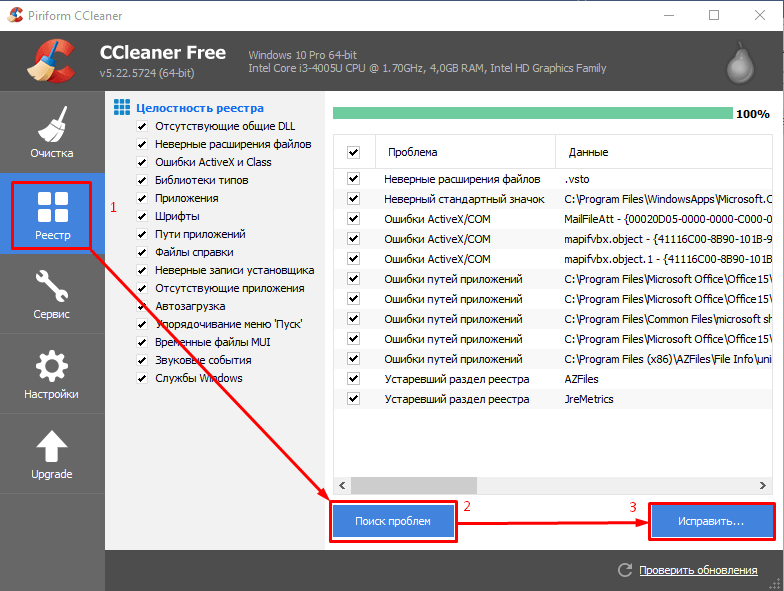
- Установите AdwCleaner, Web CureIt! и CCleaner.
- Запустите AdwCleaner (от имени администратора), нажмите кнопку «Сканировать», а после завершения проверки – «Очистка».

- Откройте Dr.Web CureIt! и выполните глубокую проверку системы. В случае обнаружения угрозы следуйте подсказкам программы.
- Запустите CCleaner и очистите записи реестра.

На этом статья подходит к концу. Вы узнали всю необходимую информацию об Usoclient.exe: что это и как отключить. На все вопросы буду рад ответить в комментариях.
Microsoft Windows updates are essential since they fix bugs and security loopholes in Windows. But sometimes these updates cause the Windows to become unstable and create more problems then the update was supposed to fix. And one such issue that is created by Windows update is the brief usoclient.exe CMD popup at the startup. Now, most people think that this usoclient.exe pop-up appears because their system is infected with a virus or malware. But don’t worry as Usoclient.exe is not a virus and it simply appears because of Task Scheduler.

Now if the usoclient.exe appears only sometimes and doesn’t stay long you can definitely ignore the issue altogether. But if the pop-up stays long and does not go away then it’s an issue and you need to fix the underlying cause to get rid of the usoclient.exe pop-up. So without wasting any time let’s see What is usoclient.exe, and how do you disable usoclient.exe at the startup with the help of the below-listed tutorial.
Table of Contents
Usoclient stands for Update Session Orchestra. Usoclient is the replacement of Windows Update Agent in Windows 10. It is a component of Windows 10 Update and naturally, its main task is to check for new updates automatically in Windows 10. Since usoclient.exe has replaced Windows Update Agent, so it has to handles all the tasks of Windows Update Agent such as to install, scan, pause, or resume Windows update.
Is Usoclient.exe is a virus?
As discussed above usoclient.exe is a very legitimate executable file that is associated with Windows Updates. But in some cases, a virus or malware infection is also capable of creating pop-ups to hamper the user experience or to create unnecessary issues. So it is important to check if the usoclient.exe popup is really caused by the Windows Update USOclient or due to a virus or malware infection.
To check the pop up that is appearing is Usoclient.exe or not, follow the below steps:
1.Open Task Manager by searching for it using the search bar or press Shift + Ctrl + Esc keys together.

2.As soon as you hit Enter button the Task Manager window will open up.

3.Under the processes tab, look for the Usoclient.exe process by scrolling through the list of processes.
4.Once you find the usoclient.exe, right-click on it and select “Open file location“.
5.If the location of the file that opens up is C:/Windows/System32 then it means you are safe and there is no harm to your system.

6.But if the location of the file opens anywhere else then it is definite that your system is infected with viruses or malware. In this case, you need to run powerful antivirus software that will scan & remove the virus infection from your system. If you don’t have one then you can check out our in-depth article to run Malwarebytes to remove viruses or malware from your system.
But what if the Usoclient.exe popup is actually caused by Windows Update, then your natural instinct will be to remove the UsoClient.exe from your PC. So now we will see if it is a good idea to delete the UsoClient.exe from your Windows folder or not.
Is It Ok to Delete the Usoclient.exe?
If the Usoclient.exe popup is appearing on your screen for a long time and is not easily going away, then obviously you need to take some action in order to resolve the issue. But deleting Usoclient.exe is not advisable since it may trigger some unwanted behavior from Windows. Since Usoclient.exe is a system file that is actively used by Windows 10 on a day-to-day basis, so even if you delete the file from your system the OS will recreate the file at the next boot. In short, there is no point in deleting the Usoclient.exe file as this will not fix the pop-up issue.
So you need to find some solution which will fix the underlying cause of the USoclient.exe popup and will resolve this problem altogether. Now the best way to do this is to simply disable the Usoclient.exe on your system.
How to Disable Usoclient.exe?
There are several methods using which you can easily disable the Usoclient.exe. But before you go ahead and disable the Usoclient.exe, it is important to understand that by disabling it you are preventing your computer from staying up-to-date with the latest Windows updates that will make your system more vulnerable as you won’t be able to install security updates & patches released by Microsoft. Now if you are OK with this then you can proceed with the below methods to disable the Usoclient.exe
3 Ways to Disable UsoClient.exe in Windows 10
Before proceeding, make sure to create a restore point just in case something goes wrong.
Method 1: Disable Usoclient.exe using Task Scheduler
You can disable the Usoclient.exe pop-up to appearing on your screen using Task Scheduler, to do so follow the below steps:
1.Press Windows Key + R then type taskschd.msc and hit Enter to open Task Scheduler.
2.Navigate to the below path in the Task Scheduler window:
Task Scheduler Library > Microsoft > Windows >UpdateOrchestrator
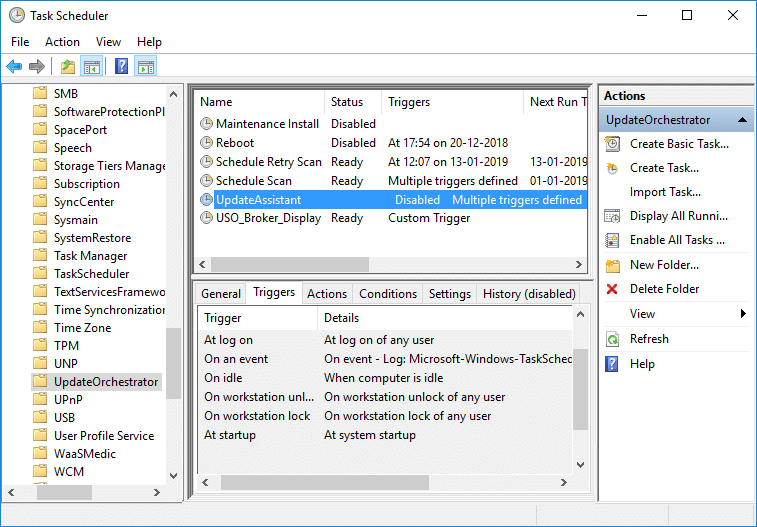
3.Once you reached the selected path, click on UpdateOrchestrator.
4.Now from the middle window pane, right-click on the Schedule Scan option and select Disable.
Note: Or you can click on Schedule Scan option to select it then from the right-window pane click on Disable.

5.Close Task Scheduler window and reboot your PC to save changes.
After the computer restarts, you will notice that the Usoclient.exe pop up will no longer appear on your screen.
Method 2: Disable Usoclient.exe using Group Policy Editor
You can disable the Usoclient.exe pop-up to appearing on your screen using Group Policy Editor. This method only works for Windows 10 Pro, Education, & Enterprise edition version, if you’re on Windows 10 Home then you need to either install Gpedit.msc on your system or you can directly go to the next method.
Let’s see how to disable automatic restart for Automatic Updates by opening your Group Policy Editor:
1.Press Windows Key + R then type gpedit.msc and hit Enter.
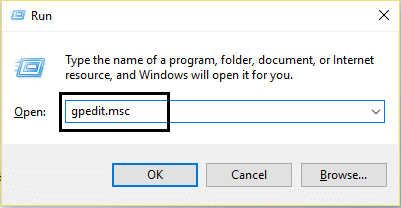
2.Now navigate to the following location under Group Policy Editor:
Computer Configuration > Administrative Templates > Windows Components > Windows Update
3.Select Windows update than in the right window pane, double-click on “No auto-restart with logged on users for scheduled automatic updates installations“.

4.Next, Enable the No auto-restart with logged on users for scheduled automatic updates installations setting.

5.Click Apply followed by OK.
6.Close Group Policy Editor and restart your PC.
Method 3: Disable Usoclient.exe using Registry Editor
You can also use Registry Editor to disable Usoclient.exe pop at startup. This method involves creating a Dword 32-bit value called NoAutoRebootWithLoggedOnUsers.
To use Registry Editor to disable Usiclient.exe follow the below steps:
1.Press Windows Key + R then type regedit and hit Enter.

2.Now navigate to the following folder under Registry Editor:
HKEY_LOCAL_MACHINE\SOFTWARE\Policies\Microsoft\Windows\WindowsUpdate\AU

3.Right-click on the AU folder and select New > DWORD (32-bit) Value.

4.Name this newly created DWORD as NoAutoRebootWithLoggedOnUsers.

5.Double-click on NoAutoRebootWithLoggedOnUsers and set it’s value to 1 by entering 1 in the Value data field.

6.Click OK and close the Registry Editor.
7.Reboot your PC to save changes and after the computer restarts, you will find out that the Usoclient.exe pop up will no longer be visible.
So the next time you see the USOClient.exe pop-up at the startup you don’t need to be alarmed unless the pop-up stays there and conflicts with Windows startup. If the popup causes issue then you can use any one of the above methods to disable the Usoclient.exe and let it not interfere with your system startup.
Recommended:
- Fix Windows Media Player Server Execution Failed Error
- How to Connect a Bluetooth Device on Windows 10
- Fix Can’t Print PDF Files from Adobe Reader
- How to Format Hard Drive on Windows 10
I hope the above steps were able to help you Disable Usoclient.exe in Windows 10 but if you still have any queries regarding this guide then feel free to ask them in the comment’s section.
It is likely you are reading this post because you have noticed a brief pop-up during your Windows 10 startup. The way this USOclient.exe pop-up appears at startup may even have you wondering if your computer has a malware infection. To quickly allay your fears, the reason for this pop-up is because the executable is called by the task scheduler. It is not in any way a malware.
Having this pop-up come on for very few seconds is normal, but there could be cases when it comes on and does not go away. This is usually attributed to a Windows Update bug.
In this article the focus is on explaining what the USOclient is and also how to disable it if that becomes necessary.
Also read: Latest Windows Update Problems and How to Fix Them
What is the USOclient.exe?
The acronym stands for “Update Session Orchestrator.” It is a component of Windows Update. Its main purpose is to check for updates automatically. If you ever heard of the Windows Update Agent, this is a replacement for it in Windows 10. Just like the feature it replaced, it has the main duty of running tasks to install, scan or resume Windows updates.
Caution with USOclient
While the USOclient is a very legitimate Windows process, malware can also have the effect of creating quick pop-ups. Even though no malware has been known to show up as the USOClient, it is necessary to check if the pop-up was really caused by the USOclient.
To ascertain that the pop-up is caused by the USOClient, first open your task manager. You can do this by the keyboard shortcut Ctrl + Shift + Esc or by right-clicking on an empty part of the taskbar and selecting the task manager option.
In the task manager locate “usoclient.exe” by scrolling through the Processes list. Once located, right-click on it and select the “Open File Location” option.
If the location revealed is “C:\Windows\System32\,” you are safe, but if the location is in any other part of the computer, there is a high chance that you are facing a malware situation. You will need to employ a powerful scanner.
Also read: How to Troubleshoot Critical Structure Corruption in Windows 10
Disabling USOclient
The question you may want to ask is if it is safe to delete this program. I would advise against this. Deleting it may cause erratic computer behavior. However, an alternative is to disable the service.
To disable the service, on your Run Window type gpedit.msc and hit Enter.

Once the Local Group Policy Editor opens, navigate in the left panel to the location “Computer Configuration -> Administrative Templates -> Windows Components -> Windows Update.”

In the right pane double-click on and enable the “No auto restart with logged on users for scheduled automatic updates installations” setting.
Conclusion
There should be no cause for alarm when you see the USOClient.exe pop-up unless it stays there and interferes with your login. With issues of pop-ups on Windows 10 such as this, it is handy to know how you can fix it to not let it interfere with your work.