
Перейти к контенту
Posted by AEisen 2010-06-01T13:50:50Z
I’m trying to migrate a local user profile from a terminal server we want to decomission to a new one. Both servers are running Windows 2003 R2.
When I run scanstate, I receive an error saying that USMT does not support Windows Server operating systems.
Does anyone know of an alternative? Could I just copy the profile from one server to another the old-fashioned way?
FYI — I’m migrating one account now as a test, but we will eventually want to migrate over 100 accounts at one time
7 Replies
-
Kimberlin wrote:
ADMT should do it for a domain environment.
http:/ Opens a new window/www.computerperformance.co.uk/w2k3/W2K3_ADMT.htm Opens a new window
if it is a workgroup environment you could use MSVR
http:/ Opens a new window/www.winzero.ca/MSVR-Migrator.htm Opens a new window
Thanks. I’ve used the ADMT before, but I’ve never heard of it being used to migrate the user profile. The two terminal servers are staying within the same domain
Was this post helpful?
thumb_up
thumb_down
-
you could try just adding a dummy profile with admin rights to the old server and use that to log in, then copy the entire profiles folder to the new server.
Was this post helpful?
thumb_up
thumb_down
-
Kimberlin wrote:
you could try just adding a dummy profile with admin rights to the old server and use that to log in, then copy the entire profiles folder to the new server.
Unfortunately, we also want to filter what gets migrated [Outlook settings and User Environment (Desktop, favorites, etc)], which USMT could do through the XML configuration files.
It’s a good plan B, though
Was this post helpful?
thumb_up
thumb_down
-
thought USMT worked on 2003, did you try it without scanstate?
Was this post helpful?
thumb_up
thumb_down
-
Kimberlin wrote:
thought USMT worked on 2003, did you try it without scanstate?
I don’t understand the question. I still need to get the profiles off the original Windows 2003 server. How else would I do it with the USMT without using scanstate?
Was this post helpful?
thumb_up
thumb_down
-
sorry i confused myself. i don’t know of anyway to do what you are trying to do with local profiles.
Was this post helpful?
thumb_up
thumb_down
| title | description | ms.reviewer | manager | ms.author | ms.prod | author | ms.date | ms.topic | ms.technology |
|---|---|---|---|---|---|---|---|---|---|
|
USMT Requirements (Windows 10) |
While the User State Migration Tool (USMT) doesn’t have many requirements, these tips and tricks can help smooth the migration process. |
aaroncz |
frankroj |
windows-client |
frankroj |
11/01/2022 |
article |
itpro-deploy |
USMT requirements
Supported operating systems
The User State Migration Tool (USMT) 10.0 doesn’t have any explicit RAM or CPU speed requirements for either the source or destination computers. If your computer complies with the system requirements of the operating system, it also complies with the requirements for USMT. You need an intermediate store location large enough to hold all of the migrated data and settings, and the same amount of hard disk space on the destination computer for the migrated files and settings.
The following table lists the operating systems supported in USMT.
| Operating Systems | ScanState (source computer) | LoadState (destination computer) |
|---|---|---|
| 32-bit versions of Windows 7 | ✔️ | ✔️ |
| 64-bit versions of Windows 7 | ✔️ | ✔️ |
| 32-bit versions of Windows 8 | ✔️ | ✔️ |
| 64-bit versions of Windows 8 | ✔️ | ✔️ |
| 32-bit versions of Windows 10 | ✔️ | ✔️ |
| 64-bit versions of Windows 10 | ✔️ | ✔️ |
[!NOTE]
You can migrate a 32-bit operating system to a 64-bit operating system. However, you cannot migrate a 64-bit operating system to a 32-bit operating system.
Unsupported scenarios
- USMT doesn’t support any of the Windows Server® operating systems.
- USMT for Windows 10 shouldn’t be used for migrating between previous versions of Windows. USMT for Windows 10 is only meant to migrate to Windows 10 or between Windows 10 versions. For more information about previous releases of the USMT tools, see User State Migration Tool (USMT) overview.
- Must use latest version of Windows PE. For example, to migrate to Windows 10, you’ll need Windows PE 5.1. For more info, see What’s New in Windows PE.
Credentials
- Run as administrator
When manually running the ScanState and LoadState tools on Windows 7, Windows 8, or Windows 10 you must run them from an elevated command prompt to ensure that all specified users are migrated. If you don’t run USMT from an elevated prompt, only the user profile that is logged on will be included in the migration.
To open an elevated command prompt:
- Select Start.
- Enter
cmdin the search function. - Depending on the OS you’re using, cmd or Command Prompt is displayed.
- Right-click cmd or Command Prompt, and then select Run as administrator.
- If the current user isn’t already an administrator, you’ll be prompted to enter administrator credentials.
[!IMPORTANT]
You must run USMT using an account with full administrative permissions, including the following privileges:
- SeBackupPrivilege (Back up files and directories)
- SeDebugPrivilege (Debug programs)
- SeRestorePrivilege (Restore files and directories)
- SeSecurityPrivilege (Manage auditing and security log)
- SeTakeOwnership Privilege (Take ownership of files or other objects)
Config.xml
Specify the /c option and <ErrorControl> settings in the Config.xml file
USMT will fail if it can’t migrate a file or setting, unless you specify the /c option. When you specify the /c option, USMT logs an error each time it encounters a file that is in use that didn’t migrate, but the migration won’t be interrupted. In USMT, you can specify in the Config.xml file, which types of errors should allow the migration to continue, and which should cause the migration to fail. For more information about error reporting, and the <ErrorControl> element, see Config.xml file, Log files, and XML elements library.
LoadState
Install applications before running the LoadState command
Install all applications on the destination computer before restoring the user state. Installing applications before running the LoadState.exe command ensures that migrated settings are preserved.
Hard-disk requirements
Ensure that there’s enough available space in the migration-store location and on the source and destination computers. For more information, see Estimate Migration Store Size.
User prerequisites
This documentation assumes that IT professionals using USMT understand command-line tools. The documentation also assumes that IT professionals using USMT to author MigXML rules understand the following concepts:
- The navigation and hierarchy of the Windows registry.
- The files and file types that applications use.
- The methods to extract application and setting information manually from applications created by internal software-development groups and non-Microsoft software publishers.
- XML-authoring basics.
Related articles
- Plan your migration
- Estimate migration store size
- User State Migration Tool (USMT) overview topics
- Remove From My Forums
-
Вопрос
-
I am a part of an IT team that is currently attempting to migrate to Windows 10.
We have been using the USMT scanstate and loadstate tools to migrate the profiles from the old machine to the new machine. We are doing clean installs of Windows 10 on each machine as we roll through the migration.
I’ve done several so far with no issues, but they were all Windows 10 to Windows 10.
Recently I’ve been running into an issue when I attempt to scan Windows 7 32-bit and load it to a Windows 10 64 bit. The scan says that it was successful, but when I look in the log every file has failed and the loadstate cannot find the migration file.
I understand that 32-bit to 64-bit is compatible, but I haven’t been able to figure out why I’m running into so many issues consistently when attempting to migrate from windows 7 to windows 10.
| User State Migration Tool | |
|---|---|
| Basic data | |
| developer | Microsoft |
| Current version | 4.0 |
| operating system | Windows |
| German speaking | Yes |
| USMT 4 Users Guide |
The User State Migration Tool ( USMT ) is a command line program from Microsoft for transferring user files and user settings from one Windows computer to another. It is mainly intended for network administrators when a large number of Windows computers need to be migrated to a different version . It is used via a script call or, if, for example, the migration is carried out using SCCM , integrated into the set-up process of the operating system. For the migration of individual computers, e.g. For example, for home use, the Windows Easy Transfer (WET) program is intended.
USMT migrates files and settings from Windows versions 2000, XP, Vista and Windows 7. Migrations from 32-bit versions to 64-bit versions are possible, but not the other way around. USMT 4.0 does not support Windows Server operating systems, nor does it support Windows 2000 and the Starter Editions of Windows XP, Windows Vista or Windows 7. In addition, USMT 4.0 only supports the migration from Windows XP with Service Pack 2 or Service Pack 3.
Versions
USMT 3.0.1 and 2.6.2 are publicly available. USMT 3.0.2 is a limited private release on Microsoft Connect for select customers. USMT 4.0 and higher are included in the Windows Automated Installation Kit (AIK).
Source and target operating systems
| USMT version | Source operating system | Target operating system |
|---|---|---|
| USMT 2 | Windows 98, Windows NT 4.0, Windows 2000 Professional, Windows XP, Windows XP Professional x64 | Windows 2000 Professional, Windows XP |
| USMT 3 | Windows 2000 Professional, Windows XP, Windows XP Professional x64, Windows Vista (all 32-bit and 64-bit editions) | Windows XP, Windows Vista (all 32-bit and 64-bit editions) |
| USMT 4 | Windows XP SP3, Windows XP Professional x64, Windows Vista SP1 and Windows 7 (all 32-bit and 64-bit editions) | Windows Vista and Windows 7 (all 32-bit and 64-bit editions) |
| USMT 5 | Windows XP, Windows XP Professional x64, Windows Vista, Windows 7 and Windows 8 (all 32-bit and 64-bit editions) | Windows Vista, Windows 7 and Windows 8 (all 32-bit and 64-bit editions) |
| USMT 6.1 | Windows XP, Windows XP Professional x64, Windows Vista, Windows 7, Windows 8, Windows 8.1 (All 32-bit and 64-bit editions) | Windows Vista, Windows 7, Windows 8, Windows 8.1 (All 32-bit and 64-bit Editions) |
| USMT 10 | Windows XP, Windows XP Professional x64, Windows Vista, Windows 7, Windows 8, Windows 8.1, Windows 10, (All 32-bit and 64-bit editions) | Windows Vista, Windows 7, Windows 8, Windows 8.1, Windows 10 (All 32-bit and 64-bit Editions) |
What USMT is transferring
USMT records:
- Selected user accounts,
- User files and folders,
- Windows settings,
- Program files and settings,
- Emails, settings and contacts,
- Photos, music and videos,
- Internet settings.
Web links
- Microsoft TechNet: Migration of User State in Windows XP
Individual evidence
- ↑ User manual for USMT 4.0
- ↑ USMT 3.0.1
- ↑ USMT 2.6.2
I know there are a few guides out there with how to do this but i really couldnt find one that helped. So im writing this in the hope it will help at least one person.
I will set it out in easy to follow steps as best I can.
Stage 1: Create the USMT Package and prepare System Role
Im not going to type this out again, im just going to point you to the excellent USMT package creation tutorial on the web site currently
http://www.windows-noob.com/forums/index.php?/topic/4512-using-sccm-2012-rc-in-a-lab-part-8-deploying-windows-7-x64/
Add System Role for State Migration Point
- Click Administration > Servers and Site System Roles
- Right Click on the server you wish to use
- Add Site System Roles
- Click next and put a tick in the State Migration Point.
- Follow the wizard.
Stage 2: Collecting the information
The following stage assumes you have already deployed an operating system to the destination computer or the computer is new, on the domain and listed as a device in SCCM 2012.
- Open SCCM 2012 Console
- Open Assets and Compliance > User State Migration
- Click on Create Computer Association in the ribbon along the top.
- Under the Computer Association tab. Next to Source Computer box Click Search, Click Search again. Use the filter to narrow down to the computer you will use as the source. Click on the Computer and click ok.
- Repeat step 4 for the destination computer.
- Click on User Accounts Tab along the top.
The Migration Behavior should be self explantory. If you wish to transfer just specific user accounts (default) click on the yellow star underneath this drop down to select from Active Directory which users you which to capture from this computer. - Click OK
Your association is now complete.
Stage 3: Isolate the Computers
- Click on Assets and Compliance > Devices
- Find the source computer
- Right click on the computer > Add Selected Items > To New Collection
- When the wizard for a new collection appears. Call the collection Capture User Data (or something similar)
- Click next all the way through the rest of the wizard.
- Repeat the above steps for the Destination computer but call the collection Restore User Data
Stage 4: Create the capture Task Sequence
- Click on Software Library
- Click on Task Sequences
- Click Create Task Sequence along the top
- Create a new custom sequence > Next
- Call it Capture Task Sequence or something similar
- Click next to everything
- Click Finish
- Right Click on Capture Task Sequence and click Edit
- Along the top click Add > User State > Request State Store
- Make sure Capture state from computer is selected and put a tick in If Computer Account fails..
- Click Add > User State > Capture User State
- Browse and select USMT 4 for the package. Capture all user profiles using standard options. Enable verbose logging & Skip files should be checked. Capture using VSS option selected
- In options tab Check continue on error.
- Click Add > User State > Release State Store
- Click ok
Deploy this to the Capture User Data collection you created earlier.
Stage 5: Create the restore Task Sequence
- Click Create Task Sequence again
- Create a new custom sequence > next
- Call it Restore Task Sequence or something similar
- Click next to everything and click finish
- Right click on Restore Task Sequence and click edit
- Add > User State > Request State Store
- make sure Restore from comuter is selected and put a tick in If Computer Account fails
- Click Add > User State > Restore User State
- Browse and select USMT 4 for the package. Restore all user profiles. Check Continue if some files cannot be restore and enable verbose logging.
- Add > User State > Release State Store
- Click OK
Deploy this to the Restore User Data collection you created earlier
Stage 6: Capture the Source Machine
- On the source machine, open System Center 2012 Software Center. If the task sequence isnt there yet, leave it for a few minutes and press F5 to refresh. If it is there, click on it and click Install. A warning asking if your sure you want to install and operating system. Just ok this as your not really installing an operating system
- Leave it to do its stuff.
Once its finished we’re on to Stage 7: Restore to Destination Computer
- On the destination computer, Open software Center as above and look for the restore task sequence. When it appears, Install and click ok the message about an operating system
- Leave it to do its stuff
Hopefully, your data should now be on the new machine.
Многие из нас сталкиваются с тем, что необходимо мигрировать профиль из старой windows в новую или в случае каких-то проблем и необходимости в переустановки ОС. Для этого Microsoft придумали программу USMT. Это консольная программа поможет вам очень быстро скопировать данные.
- Для начала скачаем программу отсюда.
- Распакуем в любой удобный каталог на старом рабочем месте.
- Закрываем все приложения. Запускаем командную строку от имени администратора. Переходим в каталог куда мы её распаковали и используем команду scanstate. Подробнее о команде с примерами ниже.
- Если мы создавали миграционный файл в сетевую папку переходим к следующему пункту. Если создали на этом компьютере, значит переносим архив на новый компьютер или на внешний носитель, если просто хотим здесь переустановить систему.
- На новом рабочем месте выполняем пункт 2. Закрываем все приложения. Запускаем командную строку от имени администратора. Переходим в каталог куда мы её распаковали и выполняем команду loadstate. Подробнее о команде с примерами ниже.
- Входим под учётной записью и наслаждаемся привычной областью, которую повторно не нужно настраивать.
Команда scanstate.
В большинстве случаев для переноса пользовательского профиля нам потребуется данная команда, которая переносит только активные (использовались в последнии полгода) доменные профили:
scanstate d:migr /o /c /i:miguser.xml /localonly /uel:180 /ue:%computername%*
scanstate \test02migr /o /c /i:miguser.xml /localonly /uel:180 /ue:%computername%*
Первая команда сохраняет на диске D данные. Вторая на сетевом хранилище.
Переносит все учётные записи, которые есть на данной машине:
scanstate d:migr /o /c /i:miguser.xml /localonly
scanstate \test02migr /o /c /i:miguser.xml /localonly
Если вам этого недостаточно для выших целей, все возможности ключей в этой статье.
Команда loadstate.
loadstate d:migr /all /i:miguser.xml /c
loadstate \test02migr /all /i:miguser.xml /c
Первая команда переносит из диска D данные на новую операционную систему. Вторая из сетевого хранилища.
Если вам этого недостаточно для выших целей, все возможности ключей в этой статье.
В 90% случаев данного материала будет вполне достаточно чтобы освоить и успешно применять данную полезную программу. Но если вы хотите добиться больших высот, то вот дополнительные материалы по ней:
- Все ключи команды scanstate
- Все ключи команды loadstate
- Правила создания собственных xml файлов
Вот еще несколько интересных статей:
Find all needed information about Usmt Does Not Support Windows Server Operating Systems. Below you can see links where you can find everything you want to know about Usmt Does Not Support Windows Server Operating Systems.
Download Windows User State Migration Tool (USMT) Version …
- https://www.microsoft.com/en-eg/download/details.aspx?id=10837
- USMT does not support any version of Microsoft Windows Server as either a source or destination system. Instructions Click the file download link to download the appropriate version of …
Download Windows User State Migration Tool (USMT) Version …
- https://www.microsoft.com/en-gb/download/details.aspx?id=10837
- Microsoft® Windows® User State Migration Tool (USMT) version 3.0.1 migrates user files and settings during deployments of Microsoft Windows XP and Windows Vista™. USMT captures files and settings from the source computer and then migrates them to a new Windows installation.
Migrating Profiles using USMT from one Win2k3 Terminal …
- https://community.spiceworks.com/topic/100412-migrating-profiles-using-usmt-from-one-win2k3-terminal-server-to-another
- Jun 02, 2010 · thought USMT worked on 2003, did you try it without scanstate? I don’t understand the question. I still need to get the profiles off the original Windows 2003 server. How else would I do it with the USMT without using scanstate?
USMT GUI — Gui for MS User State Migration
- http://usmtgui.com/
- With the WinPE Boot ISO you can move user accounts from any Windows PC and since USMT 10 does not run natively on systems older than Windows 7, the USMTGUI Offline Boot ISO gives you a unique opportunity to resque profiles from systems older than Windows 7. Supports XP (SP3), Vista, Windows 7, 8, 8.1 and Windows 10. Bitlocker enabled Latest …
Information about the User State Migration Tool (USMT) 4.0 …
- https://support.microsoft.com/en-in/help/2023591/information-about-the-user-state-migration-tool-usmt-4-0-update
- Information about the User State Migration Tool (USMT) 4.0 update. Content provided by Microsoft. … Note The scanstate command is part of Windows User State Migration Tool (USMT) 4.0. USMT 4.0 is included in Windows 7. … USMT does not support migrating settings to a version of Office that is earlier than the version that is currently …
windows-itpro-docs/usmt-requirements.md at master …
- https://github.com/MicrosoftDocs/windows-itpro-docs/blob/master/windows/deployment/usmt/usmt-requirements.md
- Aug 06, 2019 · However, you cannot migrate a 64-bit operating system to a 32-bit operating system. USMT does not support any of the Windows Server® operating systems, Windows 2000, Windows XP, or any of the starter editions for Windows Vista or Windows 7. USMT for Windows 10 should not be used for migrating from Windows 7 to Windows 8.1.
Upgrading Windows XP to Windows 7 and Migrate Microsoft …
- https://blogs.technet.microsoft.com/danstolts/2009/09/upgrading-windows-xp-to-windows-7-and-migrate-microsoft-office-and-other-applications-using-the-user-state-migration-tool-usmt/
- Sep 26, 2009 · USMT migrates operating-system components to a destination computer running Windows 7 from computers running Windows XP, Windows Vista, or Windows 7. Note: If you are using USMT 4.0 to migrate a user state to Windows Vista instead of to Windows 7, use the /targetvista option with the ScanState tool.
Need to find Usmt Does Not Support Windows Server Operating Systems information?
To find needed information please read the text beloow. If you need to know more you can click on the links to visit sites with more detailed data.
| User State Migration Tool | |
|---|---|
| Basic data | |
| developer | Microsoft |
| Current version | 4.0 |
| operating system | Windows |
| German speaking | Yes |
| USMT 4 Users Guide |
The User State Migration Tool ( USMT ) is a command line program from Microsoft for transferring user files and user settings from one Windows computer to another. It is mainly intended for network administrators when a large number of Windows computers need to be migrated to a different version . It is used via a script call or, if, for example, the migration is carried out using SCCM , integrated into the set-up process of the operating system. For the migration of individual computers, e.g. For example, for home use, the Windows Easy Transfer (WET) program is intended.
USMT migrates files and settings from Windows versions 2000, XP, Vista and Windows 7. Migrations from 32-bit versions to 64-bit versions are possible, but not the other way around. USMT 4.0 does not support Windows Server operating systems, nor does it support Windows 2000 and the Starter Editions of Windows XP, Windows Vista or Windows 7. In addition, USMT 4.0 only supports the migration from Windows XP with Service Pack 2 or Service Pack 3.
Versions
USMT 3.0.1 and 2.6.2 are publicly available. USMT 3.0.2 is a limited private release on Microsoft Connect for select customers. USMT 4.0 and higher are included in the Windows Automated Installation Kit (AIK).
Source and target operating systems
| USMT version | Source operating system | Target operating system |
|---|---|---|
| USMT 2 | Windows 98, Windows NT 4.0, Windows 2000 Professional, Windows XP, Windows XP Professional x64 | Windows 2000 Professional, Windows XP |
| USMT 3 | Windows 2000 Professional, Windows XP, Windows XP Professional x64, Windows Vista (all 32-bit and 64-bit editions) | Windows XP, Windows Vista (all 32-bit and 64-bit editions) |
| USMT 4 | Windows XP SP3, Windows XP Professional x64, Windows Vista SP1 and Windows 7 (all 32-bit and 64-bit editions) | Windows Vista and Windows 7 (all 32-bit and 64-bit editions) |
| USMT 5 | Windows XP, Windows XP Professional x64, Windows Vista, Windows 7 and Windows 8 (all 32-bit and 64-bit editions) | Windows Vista, Windows 7 and Windows 8 (all 32-bit and 64-bit editions) |
| USMT 6.1 | Windows XP, Windows XP Professional x64, Windows Vista, Windows 7, Windows 8, Windows 8.1 (All 32-bit and 64-bit editions) | Windows Vista, Windows 7, Windows 8, Windows 8.1 (All 32-bit and 64-bit Editions) |
| USMT 10 | Windows XP, Windows XP Professional x64, Windows Vista, Windows 7, Windows 8, Windows 8.1, Windows 10, (All 32-bit and 64-bit editions) | Windows Vista, Windows 7, Windows 8, Windows 8.1, Windows 10 (All 32-bit and 64-bit Editions) |
What USMT is transferring
USMT records:
- Selected user accounts,
- User files and folders,
- Windows settings,
- Program files and settings,
- Emails, settings and contacts,
- Photos, music and videos,
- Internet settings.
Web links
- Microsoft TechNet: Migration of User State in Windows XP
Individual evidence
- ↑ User manual for USMT 4.0
- ↑ USMT 3.0.1
- ↑ USMT 2.6.2
Microsoft® Windows® User State Migration Tool (USMT) version 3.0.1 migrates user files and settings during deployments of Microsoft Windows XP and Windows Vista™. USMT captures files and settings from the source computer and then migrates them to a new Windows installation. If you are only upgrading your operating system, USMT is not needed.
This tool includes two command-line tools named ScanState and LoadState.
ScanState creates an intermediate store that contains the user files and settings from the source computer. (backup)
LoadState restores these files and settings to the destination computer. (restore)
USMT 3.0.1 also has three default migration rule (.xml) files named MigApp.xml, MigUser.xml, and MigSys.xml.
You can alter the default .xml files and you can also create customized .xml files. Depending on what you want to migrate, you can specify all or none of the default .xml files on the command line. The entire migration process is controlled by the .xml rules, which you can modify, and logic that is built into the tool. When using USMT for automated migration, in almost all cases, you should modify the migration .xml files for your unique situation.
USMT 3.0.1 contains the following updates to USMT 3.0:
1. You can now install this tool on computers that are running non-English versions of Windows Vista.
2. In USMT 3.0, some settings for local accounts were not being migrated. This has been fixed in USMT 3.0.1.
Where can I download it from ?
From here
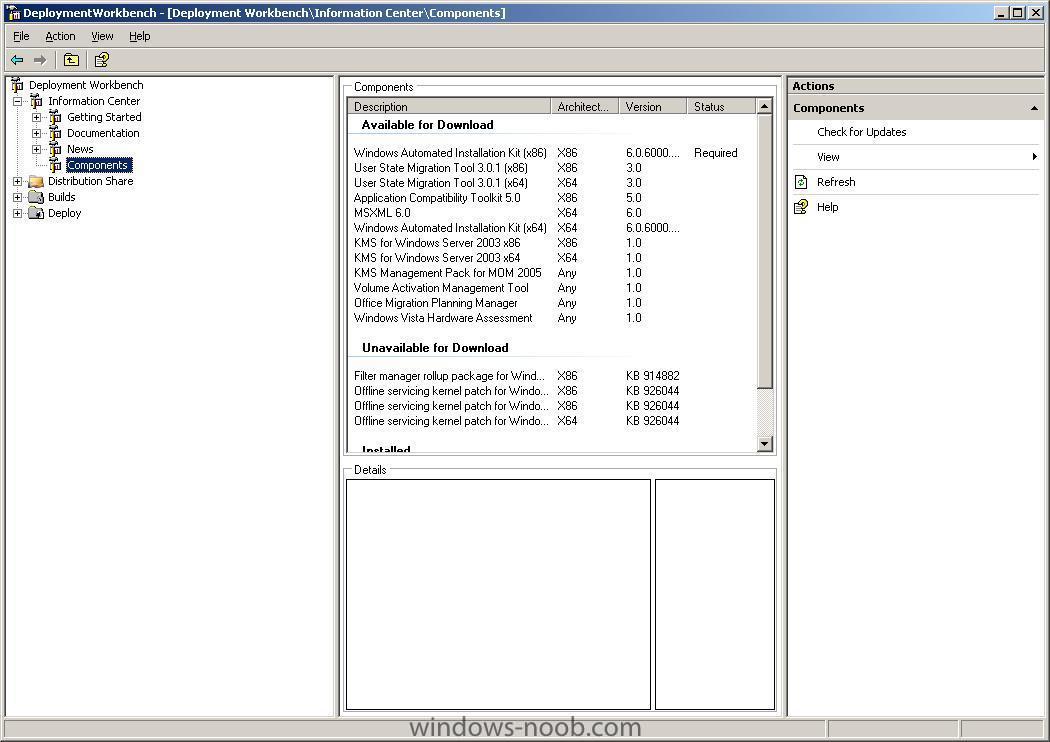
In addition, you can use the download features elements in BDD 2007 (or MDT 2008) to download it, to do this, select the Information Center, then click on the Components Section. Highlight the USMT version (x86 or x64) that you want, and download it.
Where can I get a detailed User guide for USMT ?
From here
Where can I see a list of USMT Error codes ?
From the Deployment Guys
Where can I read the USMT Team Blog ?
From here
Can I install USMT on Windows Server 2008 ?
No, and for more details see here
When should I use USMT?
USMT is best used in automated deployment scenarios where a user is being migrated from one install of Windows to another (on the same computer) or when a user is being migrated from one computer to another (two different computers). USMT 3.0.1 currently supports migrating to and from the following operating systems:
Windows 2000 to Windows XP, Windows Vista
Windows XP to Windows XP, Windows Vista
Windows Vista to Windows Vista
cheers
anyweb

Доброго времени суток, господа. В связи с недавней кончиной Windows XP данная тема довольно актуальна, посему, приступим.
Основная проблема — USMT 6.3 не поддерживает Windows XP, а USMT 5.0 не поддерживает Windows 8.1. Придется использовать обе версии.
Верхнеуровневое разбиение работ:
1. Подготовка SCCM к процедуре OSD
2. Создание необходимых пакетов
3. Создание необходимых Task Sequence’ов (далее TS)
4. Связывание компьютеров в SCCM
5. Миграция данных с Windows XP на точку миграции данных.
6. Установка Windows 8.1 на компьютер с восстановлением заранее мигрированных данных.
Кроме этого, я предполагаю у Вас наличие готовой и работающей инфраструктуры SCCM 2012 R2.
Ограничения:
1. На всех машинах с Windows XP должен быть установлен SCCM Client
2. Мигрировать можно папки и файлы, настройки не переедут.
Подробнее под катом.
Подготовка SCCM к процедуре OSD
1. Подготовка PXE
Открываем консоль, далее топаем в Administration > Servers and Site System Roles > Distribution Point, открываем свойства, ставим галочку «Enable PXE support for clients», «Enable unknown computer support» и «Allow this distribution point to respond to incoming PXE requests». Кроме того, Вам необходимо сконфигурировать DHCP для корректной работы PXE.
опция 66 — NetBIOS имя PXE сервера
опция 67 — \smsboot\x64\wdsnbp.com
Настройки WDS трогать не нужно.
2. Установка роли State Migration Point
Открываем консоль, далее топаем в Administration > Sites, правой кнопкой мыши на необходимый сайт «Add Site System Roles». В случае если у Вас Standalone Primary Site (а это верно для 99.99% читающих это) нажимайте на кнопку «далее» N-нное количество раз, не забудьте выбрать роль State Migration Point, указать папку для хранения данных и срок удержания данных после успешной миграции.
Создание необходимых пакетов
1. Добавление образа Windows 8.1
Я лично добавил просто install.wim с установочного диска (в рамках теста), если у Вас есть корпоративный образ добавьте его.
2. Добавление пакета USMT.
USMT 6.3 создается при установке SCCM, нам нужен USMT 5.0 (build 6.2.9200.16384), качаем ADK отсюда и ставим на какую-то машину только USMT (лучше не на машину с уже установленным USMT 6.3) и «выдираем» из неё файлы USMT (папка по умолчанию C:\Program Files (x86)\Windows Kits\8.0\Assessment and Deployment Kit\User State Migration Tool)
После чего копируем их на сервер и создаем пакет в который входят скопированные файлы, программу создавать не нужно.
3. Создание MDT Boot Image
Открываем консоль, далее топаем в Software Library > Operating Systems > Boot Images. «Create Boot Image using MDT», вводим имя, описание, путь до места хранения пакета, после чего выбираем битность и размер «Scratch Space», рекомендуется выбрать размер не менее 128мб. Необходимо создать и x86 и x64 образы. После создания необходимо зайти в свойства созданных образов и поставить галочку «Deploy this boot image from the PXE-enabled distribution point»
Создание необходимых TS’ов
1. Создание TS для миграции данных с Windows XP.
Открываем консоль, далее топаем в Software Library > Operating Systems > Task Sequence. Создаем обычный «Custom Task Sequence» с тремя шагами: Request State Store, Capture User State, Release State Store. В шаге Capture User State необходимо выбрать пункт «Customize how user profiles are captured» и добавить файлы MigDocs.xml и MigUser.xml.
В данном TS будет использоваться пакет USMT 5.0
2. Создание TS для установки Windows 8.1
Открываем консоль, далее топаем в Software Library > Operating Systems > Task Sequence. Создаем MDT Task Sequence. Задаем имя и комментарии, вводим информацию об организации, вводе в домен и тд, на следующем экране оставляем галочку «This task sequence will never be used to capture an image». Выбираем загрузочный образ и пакет Windows 8.1 созданные ранее. Создаем новый MDT Toolkit Package, заполняем информацию. Выбираем пункт «Zero Touch Installation». Выбираем пакет клиента SCCM. Выбираем пакет USMT (6.3!) Создаем новый MDT Settings Package, заполняем информацию. Жмем «далее» до конца.
3. Модификация TS
Необходимо модифицировать наш TS чтобы он работал. В данном TS будет использоваться пакет USMT 6.3.
Открываем консоль, далее топаем в Software Library > Operating Systems > Task Sequence. Выбираем наш TS и нажимаем «Edit». Находим шаг «Set Status 5» и добавляем после него шаг «Request State Store» и выбираем «Restore State from another computer»

В закладке «Options» добавьте условие «Task Sequence Variable» «USMTLOCAL» «Not equals» «True»

Добавьте под пунктом «Restore User State» пункт «Release State Store» и добавьте для него такое же условие.
Далее в пункте «Restore User State» выберите пункт «Customize how user profiles are restored» и добавить файлы MigDocs.xml и MigUser.xml

В пункте «Set Variable for Drive Letter» в группе «Install» измените значение на «True»
4. Модификация CustomSettings.ini
При создании MDT Setting Package был создан файл CustomSettings.ini необходимо его модифицировать. Добавьте в него следующие строчки:
DeploymentType=NEWCOMPUTER
SLShare=\\имя_сервера\xxx\log — UNC путь к папке куда TS будет копировать логи, очень удобно для траблшутинга.
ScanStateArgs=/v:5 /o /c /ue:%computername%\* — внимание, данная команда исключит всех локальных пользователей из процесса миграции.
LoadStateArgs=/v:5 /c
5. Распространяем пакеты
Необходимо распространить все пакеты и оба образа загрузочных на точку распространения контента. (Я, лично, всегда забываю это сделать)
Связывание компьютеров в SCCM
Данный шаг необходим для успешности миграции, необходимо связать компьютеры для успешной миграции между разными компьютерами.
Открываем консоль, далее топаем в Assets And Compliance > User State Migration. Выбираем пункт «Create Computer Association» и выбираем исходный компьютер (Windows XP) и целевой (Windows 8.1). Если целевого компьютера еще нет его необходимо создать в SCCM.
В случае если Вам необходимо реализовать сценарий «Refresh», а не «Replace» Вам не нужно связывать компьютеры. Вы просто запускаете сбор данных, после чего перегружаете машину в PXE и запускаете установку Windows 8.1.
Далее следуют пункты 5 и 6.
Естественно, для грамотной миграции Вам необходимо правильно создать коллекции на которые Вы «натравите» данные TS’ы.
Коллекция со всеми Windows XP компьютерами:
select * from SMS_R_System inner join SMS_G_System_OPERATING_SYSTEM on SMS_G_System_OPERATING_SYSTEM.ResourceId = SMS_R_System.ResourceId where SMS_G_System_OPERATING_SYSTEM.Caption like «*Windows XP*»
Коллекцию для Windows 8.1 компьютеров так же будет необходимо создать.
Таким образом можно мигрировать как настройки со старого компьютера на новый, так и в «пределах» одной машины.
Из плюсов — копия файлов пользователя на сервере лежит столько сколько нужно, единый сценарий для «Refresh» (этот сценарий лучше реализовывать целиком через WinPE, но для этого необходим отдельный TS) и «Replace» сценариев.
Из минусов — 2 TS, один делается не в WinPE потому пользователь может как-то на него повлиять, необходимо много места на State Migration Point для хранения информации пользователей.
Данный пост является набором псевдослучайных данных.
4c74356b41
пс. Отвечу на основной вопрос в комментариях «Зачем?». Если у Вас тысячи машин на Windows XP никакой речи о ручной миграции быть не может, программы SCCM может устанавливать в процессе установки системы, в больших компаниях всегда есть какие-то корпоративные стандарты и у пользователя обычно не нужно спрашивать какие программы ему нужны.
Безусловно, каждый решает возникшие перед ним задачи так как ему удобнее, у меня же не было выбора, передо мной поставили конкретную задачу, по итогам исследования проблемы я и написал данный опус.