По умолчанию в Windows включена функция ускорения мыши (повышенная точность установки указателя). Она может быть удобной при использовании компьютера для работы, но по отзывам многих пользователей, специализирующихся на играх, может мешать точности прицеливания или указания в других игровых задачах и функцию лучше отключить.
В этой инструкции о том, как отключить ускорение мыши в Windows 11 и Windows 10 и дополнительная информация на тему, которая может пригодиться.
Отключение ускорения мыши в Панели управления
Основной способ отключения ускорения мыши во всех последних версиях Windows — использовать её настройки в панели управления. Шаги будут следующими:
- Нажмите клавиши Win+R на клавиатуре, введите main.cpl и нажмите Enter, либо зайдите в Параметры — Bluetooth и устройства — Мышь — Дополнительные параметры мыши.
- Перейдите на вкладку «Параметры указателя».
- Снимите отметку «Включить повышенную точность установки указателя» и нажмите «Ок».
Готово, ускорения указателя мыши отключено.
Обычно этого способа бывает достаточно, но при желании вы можете выполнить те же действия и альтернативными методами.
В редакторе реестра
Отключение ускорения указателя мыши возможно и в реестре Windows, для этого выполните следующие действия:
- Нажмите клавиши Win+R на клавиатуре, введите regedit и нажмите Enter.
- Перейдите в раздел реестра
HKEY_CURRENT_USER\Control Panel\Mouse
- Измените значения параметров (дважды нажав по соответствующему параметру и указав новое значение) MouseSpeed, MouseThreshold1 и MouseThreshold2 на 0
Это полностью отключит функции ускорения мыши в Windows.
Если в дальнейшем потребуется вернуть значения по умолчанию:
- MouseSpeed — 1
- MouseThreshold1 — 6
- MouseThreshold1 — 10
Суть функции ускорения мыши или повышенной точности установки указателя в том, что в зависимости от того, с какой скоростью вы передвигаете мышь, расстояние, на которое будет перемещаться указатель на экране за каждый пройденный сантиметр поверхности, будет отличаться.
Помимо описанных способов отключения ускорения мыши возможно использование следующих способов:
- Включение и отключение ускорения мыши может быть доступным в фирменном ПО мыши, в том числе с возможностью автоматического отключения в играх.
- В интернете можно найти дополнительные возможности отключения ускорения мыши: reg-файлы CPL Mouse Fix и MarkC Mouse Acceleration Fix, драйвер и ПО для управления ускорением мыши Raw Accel и другие. При их использовании рекомендую не удалять соответствующие reg-файлы с компьютера: они могут пригодиться, когда потребуется вернуть настройки по умолчанию.
На близкую тему может быть полезным: Как узнать DPI мыши, Как настроить чувствительность мыши в Windows.
(Image credit: Mauro Huculak)
On Windows 10, the mouse is an essential component for navigating the desktop and apps efficiently. However, its effectiveness depends on configuring its settings to suit individual preferences. As a peripheral that processes analog inputs, user preferences can vary significantly.
For instance, some users may prefer a faster cursor speed, especially in multi-monitor setups, while others might opt for a slower speed to better track the pointer on the screen.
Regardless of your preference, Windows 10 offers at least three methods to adjust mouse speed sensitivity through the Settings app, the Control Panel, and Registry, enabling a more precise navigation experience.
In this how-to guide, I’ll explain the steps to adjust the mouse speed on your computer.
Recent updates
These instructions has been updated to ensure accuracy and reflect changes to the process in the operating system.
How to change mouse speed using Settings
To adjust the mouse speed on Windows 10, use these steps:
- Open Settings.
- Click on Devices.
- Click on Mouse.
- Use the Cursor speed slider and change the setting to the desired speed (slow or fast).
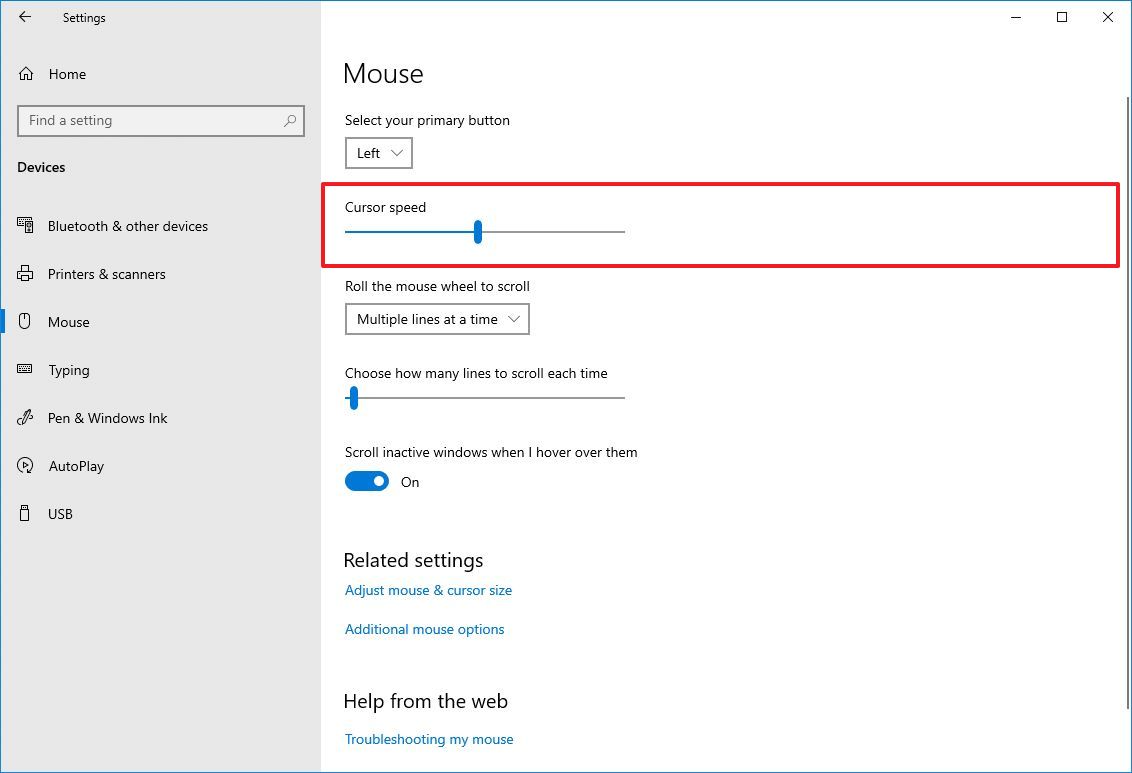
Once you complete the steps, the mouse speed will change to the level you specified.
How to change mouse speed using Control Panel
To change the mouse speed with Control Panel, use these steps:
All the latest news, reviews, and guides for Windows and Xbox diehards.
- Open Control Panel.
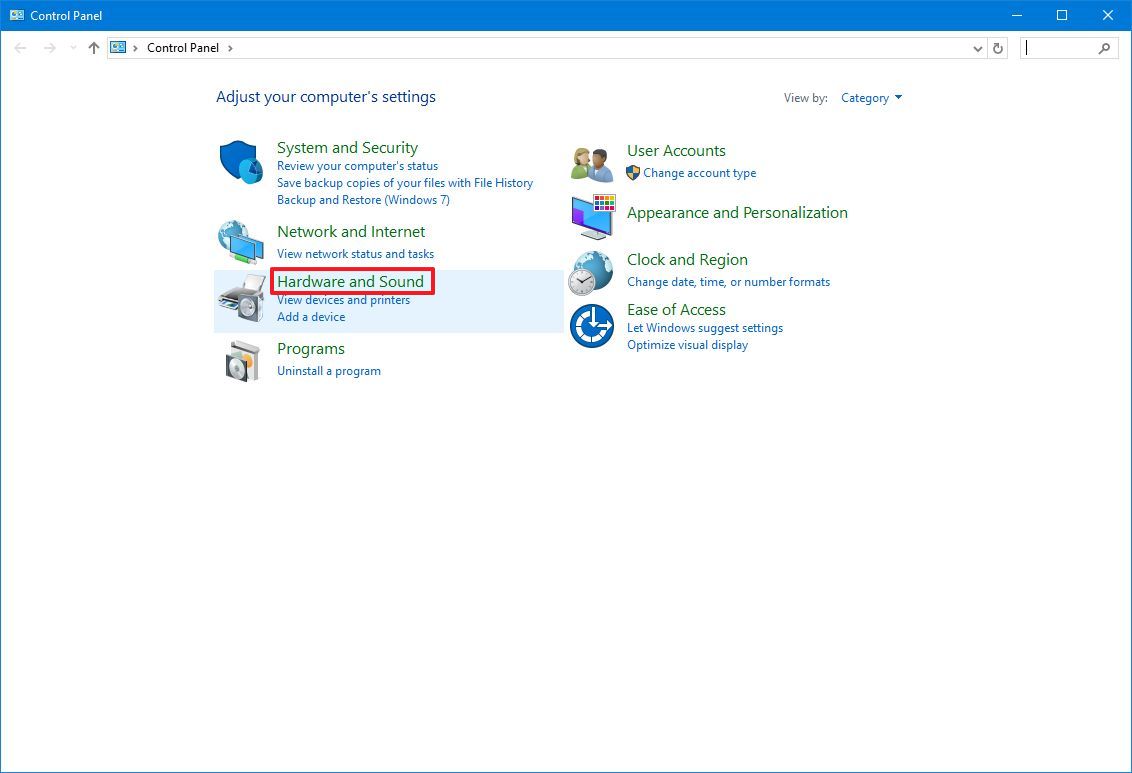
- Click on Hardware and Sound.
- Click the Mouse option under the «Devices and Printers» section.
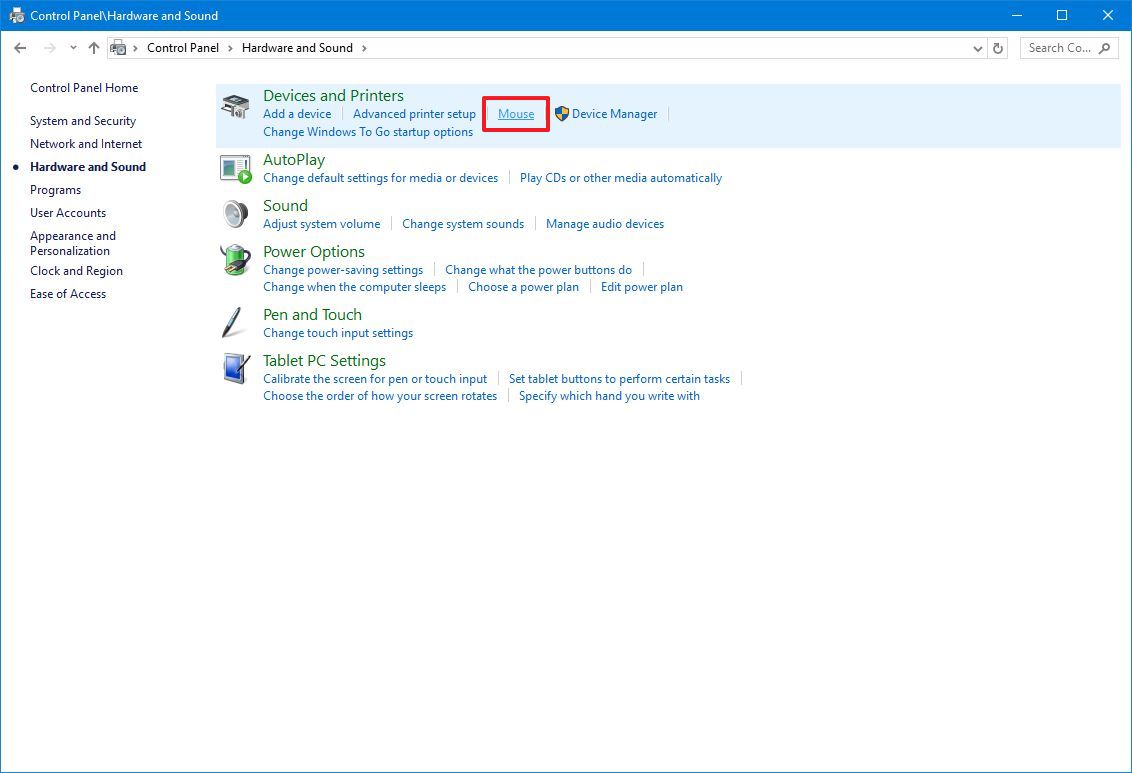
- Click the Pointer Options tab.
- Under the «Motion» section, use the slider to adjust the speed sensitivity.
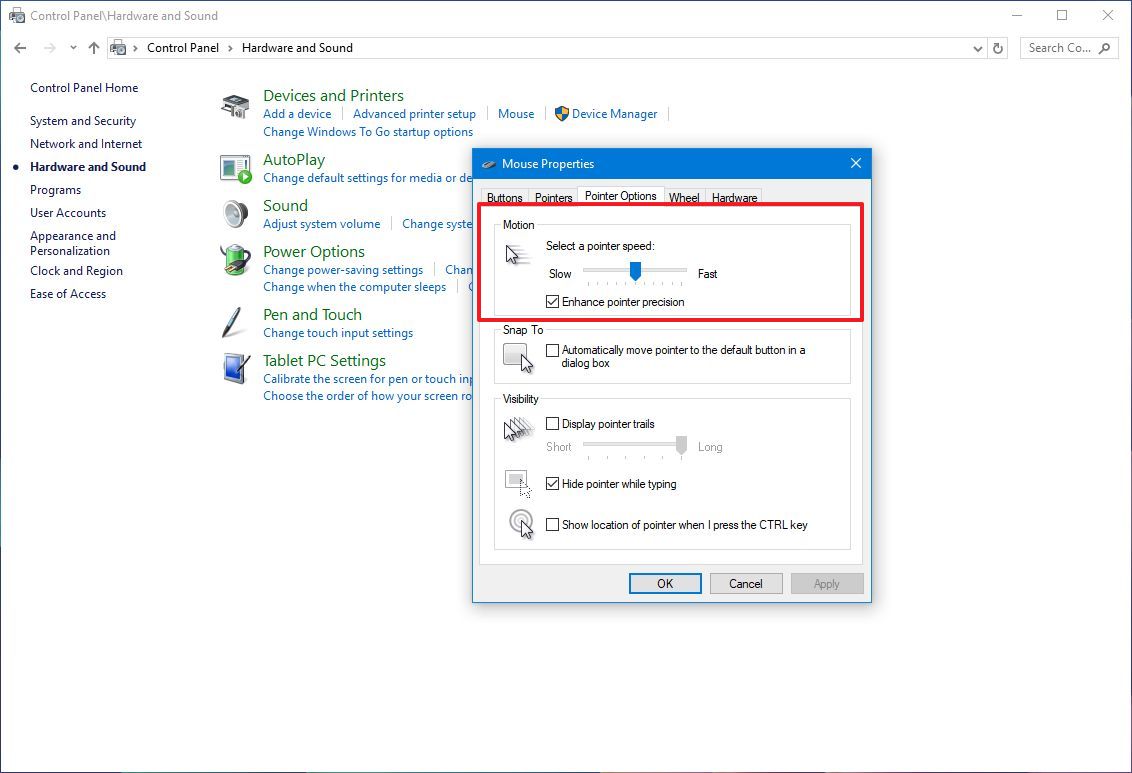
- Click the Apply button.
- Click the OK button.
After you complete the steps, you can start using the mouse pointer with the speed you specified.
How to change mouse speed using Registry
Alternatively, you can adjust the mouse’s sensitivity by modifying the registry.
Warning: This is a friendly reminder that editing the Registry is risky and can cause irreversible damage to your installation if you don’t do it correctly. It’s recommended that you make a full backup of your PC before proceeding.
To change the mouse speed by modifying the Registry, use these steps:
- Open Start.
- Search for regedit and click the top result to open the Registry.
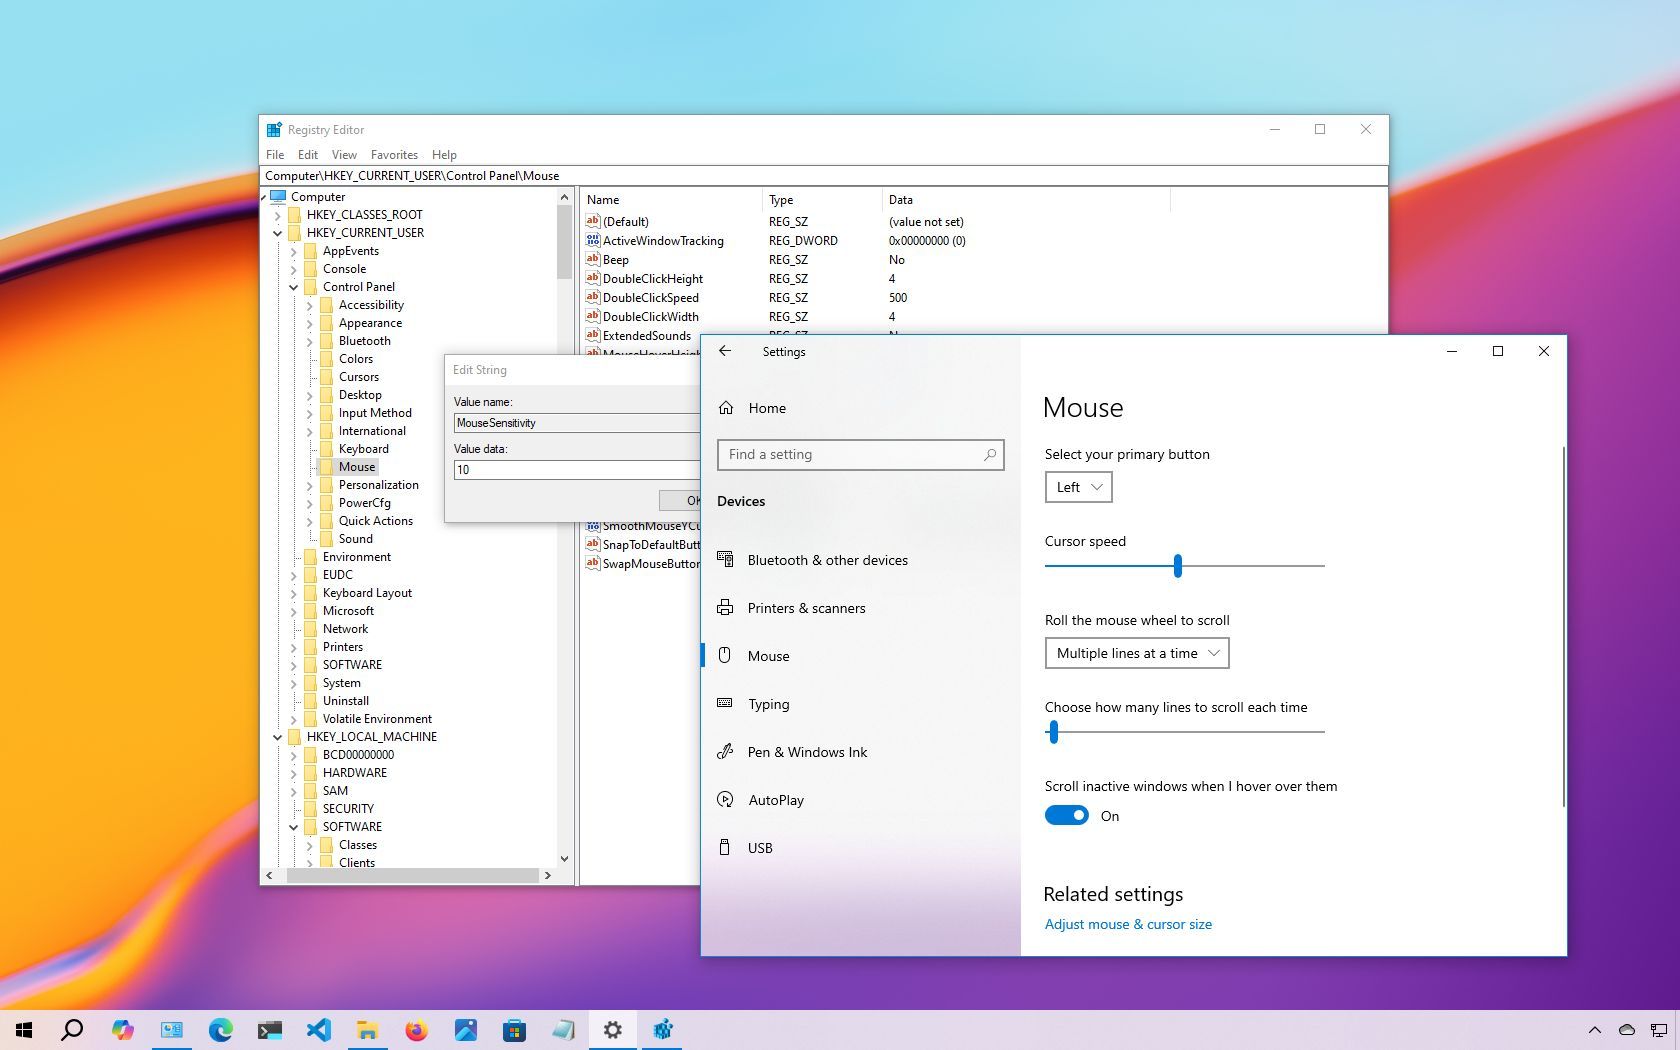
- Browse the following path: HKEY_CURRENT_USER\Control Panel\Mouse
- Quick tip: On Windows 10, you can now copy and paste the path in the Registry’s address bar to quickly jump to the key destination.
- Double-click the MouseSensitivity key and set the value to any number from 1 to 20 to set the desired speed.
- Quick tip: Usually, the default value is «10.» Anything below this number will make the mouse pointer slower, and anything higher will make it faster.
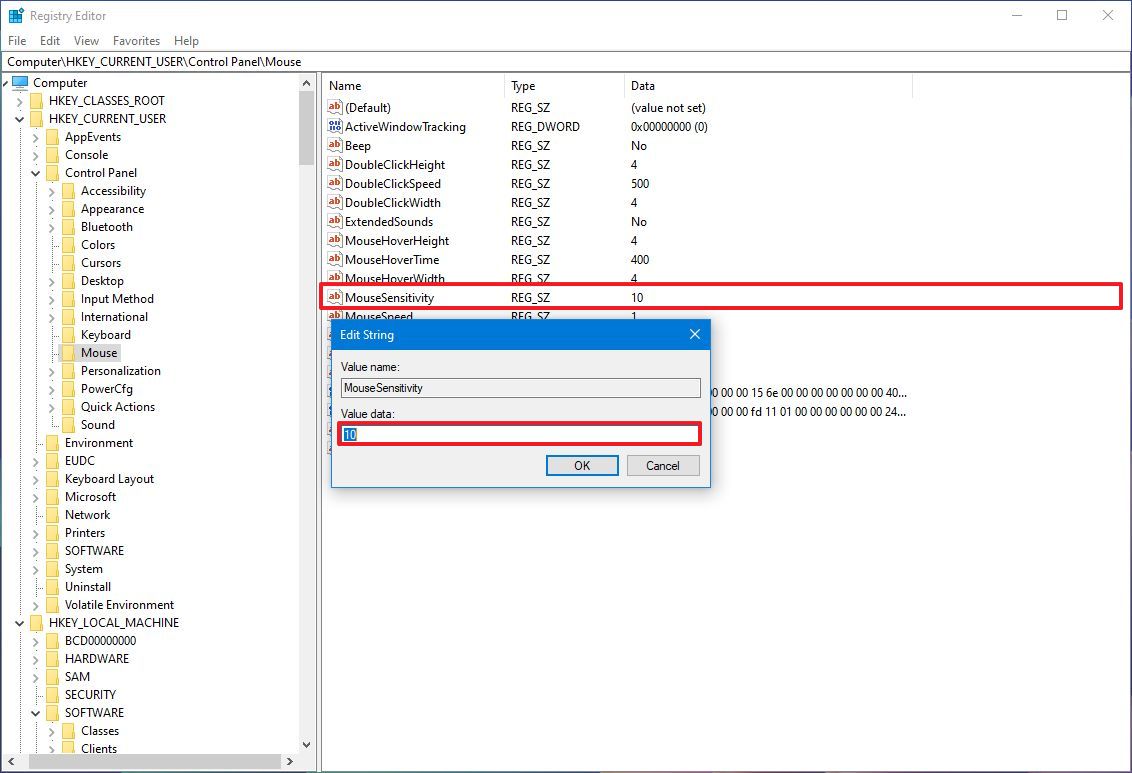
- Click the OK button.
- Restart your computer.
Once you complete the steps, the speed of the mouse should be reflected after restarting the device.
You can always revert the changes by using the same instructions, but on step 4, make sure to set the value to 10 or the previously configured value.
More resources
Find in-depth guides, troubleshooting tips, and the latest updates on Windows 11 and 10 here:
- Windows 11 on Windows Central — All you need to know
- Windows 10 on Windows Central — All you need to know
Mauro Huculak has been a Windows How-To Expert contributor for WindowsCentral.com for nearly a decade and has over 15 years of experience writing comprehensive guides. He also has an IT background and has achieved different professional certifications from Microsoft, Cisco, VMware, and CompTIA. He has been recognized as a Microsoft MVP for many years.
Sign in to your How-To Geek account
Quick Links
-
What Is Mouse Acceleration?
-
How to Disable Mouse Acceleration
If your cursor keeps overshooting your target on your Windows 10 desktop, the culprit might be a feature known as mouse acceleration. Disabling it might increase your pointer accuracy, letting you land right on point every time.
- What Is Mouse Acceleration?
- How to Disable Mouse Acceleration
What Is Mouse Acceleration?
Mouse acceleration in Windows 10 is a feature that increases the distance and speed at which your cursor moves across the screen in response to the speed with which you move your physical mouse.
With mouse acceleration enabled, if you were to quickly move your physical mouse three inches, your cursor could travel from one side of the screen to the other. However, if you were to move your mouse the exact same distance, only much slower, your cursor might only make it halfway across the screen.
This feature is enabled on Windows 10 devices by default, and the goal is to enhance the precision of your cursor. For many, it has the exact opposite effect—especially for gamers. If you find this to be the case for you, you can disable it.
How to Disable Mouse Acceleration
To turn off the mouse acceleration feature, type «Mouse Settings» into the Windows Search bar and click «Mouse Settings» from the search results.
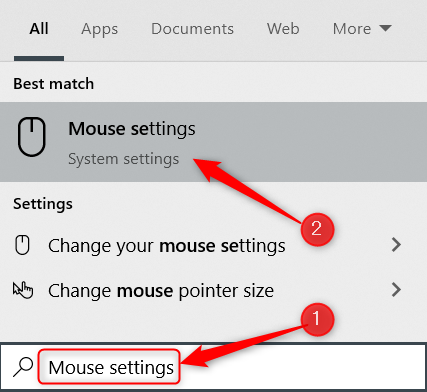
The Mouse Settings window will appear. Find the «Related Settings» group to the right of the window (or the bottom if your window size is small). Click «Additional Mouse Options.»

The Mouse Properties window will appear. Click the «Pointer Options» tab.

In the Motion group, uncheck «Enhance Pointer Precision,» and then click «Apply.»
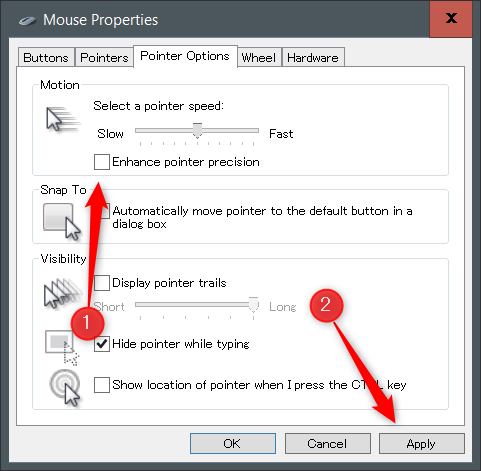
Mouse acceleration is now disabled.
This should help you more accurately land on your targets. But if you’re a gamer and you’re still having problems, it could be time to read up on mouse DPI and polling rates and invest in a mouse that’s designed for gaming.
Все способы:
- Отключаем акселерацию мыши в Windows 10
- Способ 1: Меню «Параметры»
- Способ 2: Редактор реестра
- Способ 3: Изменение параметров запуска игры
- Вопросы и ответы: 2
Акселерация мыши — опция, отвечающая за ускорение перемещения курсора при резких или размашистых движениях девайсом. По умолчанию эта функция в операционной системе находится во включенном режиме, что может вызывать трудности у некоторых пользователей во время прохождения игр или взаимодействия с Windows 10. Поэтому мы предлагаем изучить доступные методы отключения этого параметра с целью оптимизации отклика указателя при передвижении мыши рукой. Сегодня мы рассмотрим три доступных варианта осуществления поставленной задачи.
Отключаем акселерацию мыши в Windows 10
Каждый возможный способ отключения акселерации мыши в Windows 10 имеет свои преимущества и недостатки, которые связаны с текущей конфигурацией ОС или особенностями ее поведения. Мы предлагаем изучить каждую представленную инструкцию, чтобы узнать, какая из них будет оптимальной в сложившейся ситуации. После этого уже можно будет переходить к ее реализации, пошагово выполняя каждое действие.
Способ 1: Меню «Параметры»
Первый и самый простой метод заключается в использовании раздела конфигурации в меню «Параметры». Здесь через графическое меню путем снятия галочки всего с одного пункта можно отключить акселерацию, что производится следующим образом:
- Запустите «Пуск» и перейдите в «Параметры».
- Откройте категорию «Устройства».
- Воспользуйтесь панелью слева, чтобы переместиться к пункту «Мышь».
- Отыщите надпись «Дополнительные параметры мыши» и кликните по ней ЛКМ.
- Отобразится отдельное окно со свойствами. Здесь следует перейти на вкладку «Параметры указателя».
- Снимите галочку с пункта «Включить повышенную точность установки указателя», а затем примените изменения, щелкнув по специально отведенной кнопке.
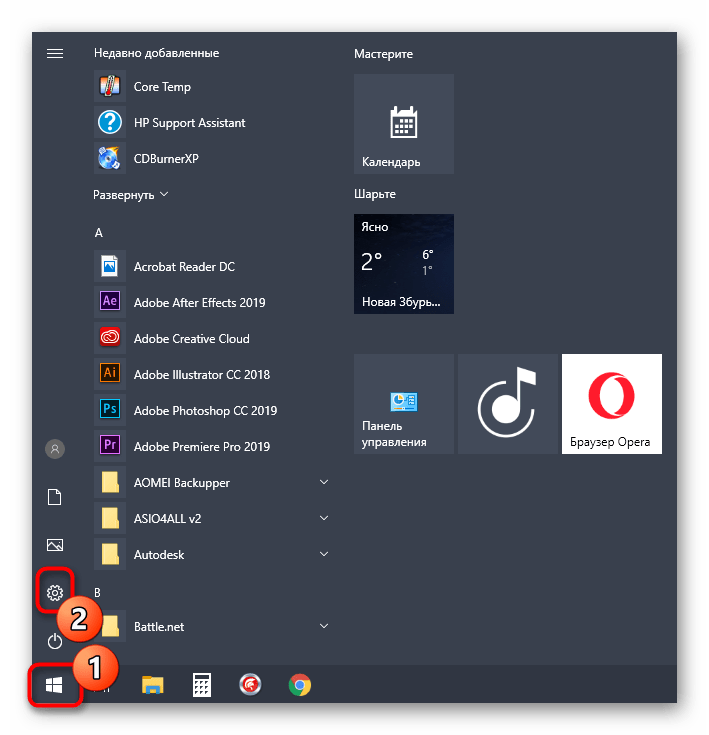
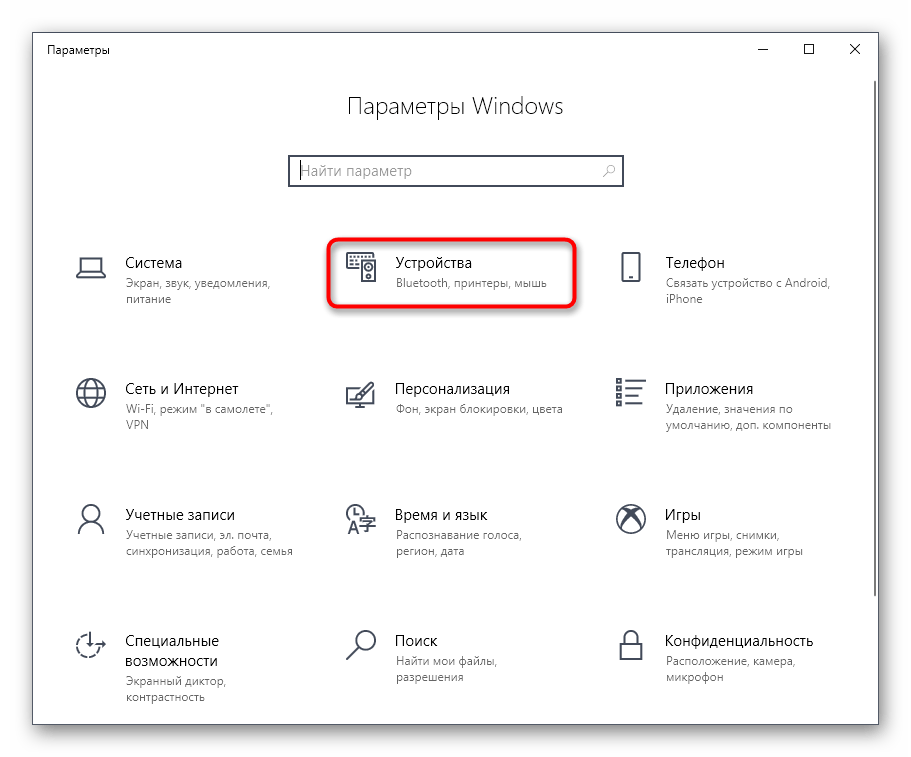

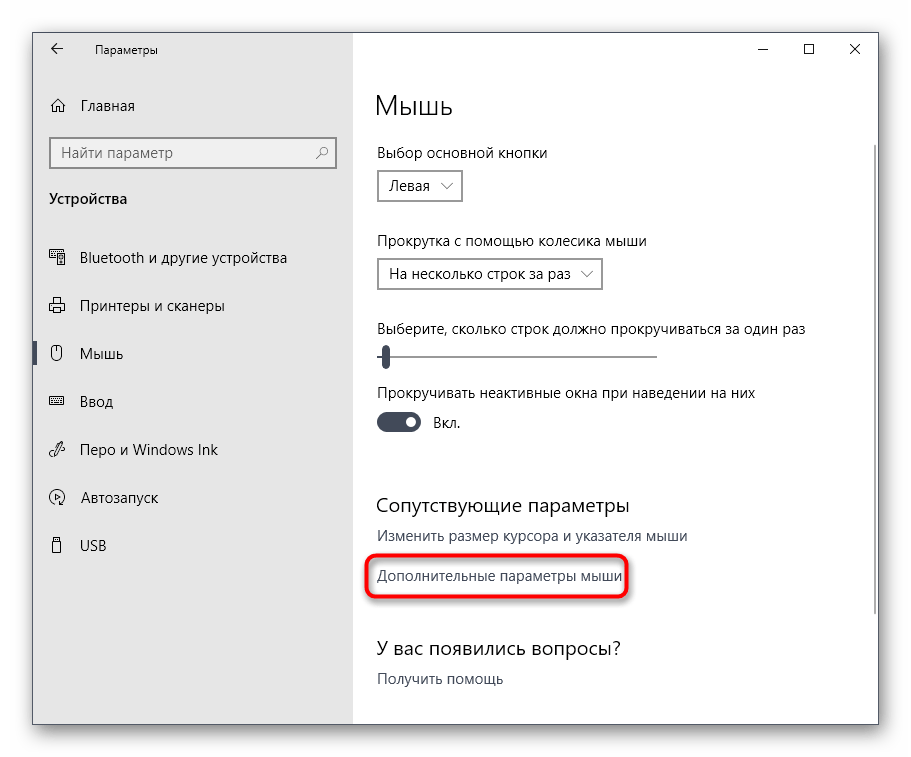
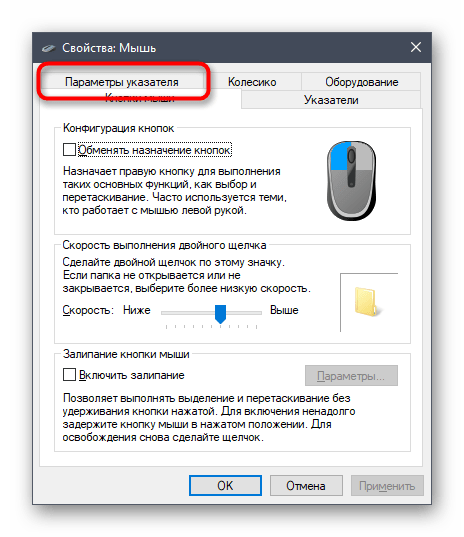
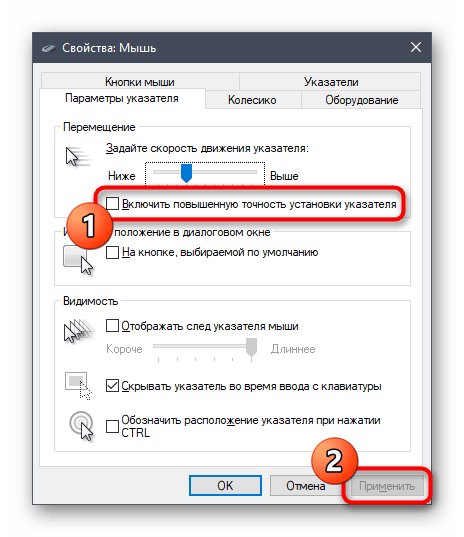
После внесения данных изменений скорость перемещения указателя может немного снизиться. С учетом этого сразу отредактируйте данный параметр, настроив оптимальное положение ползунка в этой же вкладке «Параметры указателя». Рекомендуется перезагрузить компьютер, чтобы убедиться в сохранении установленных ранее настроек.
Способ 2: Редактор реестра
Иногда устанавливаемые через «Параметры» настройки при создании нового сеанса операционной системы просто сбрасываются. Иногда это происходит и после запуска определенной игры, что в итоге приводит к повторной активации акселерации мыши. В таких ситуациях лучше обратиться к редактору реестра, чтобы самостоятельно внести правки в необходимые файлы.
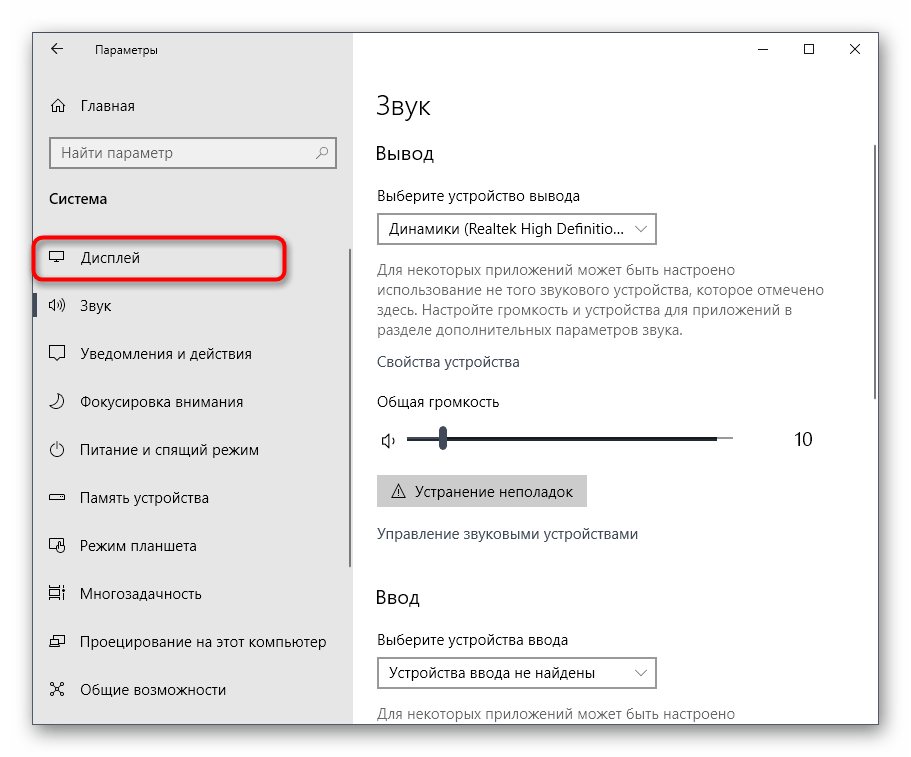
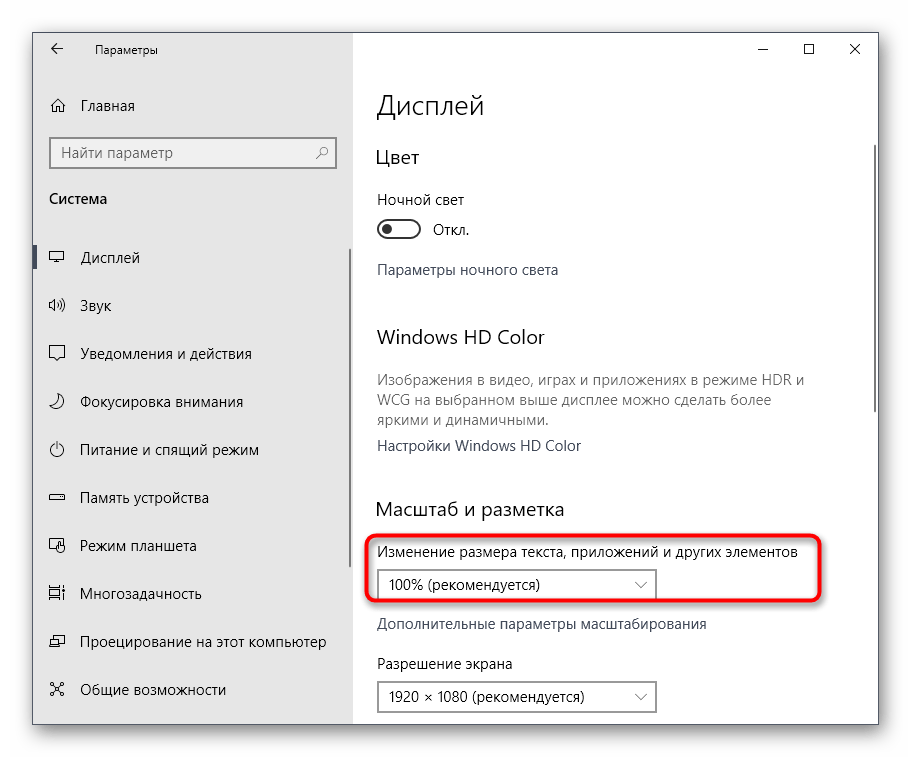
- Уточним, что приведенные далее конфигурации рассчитаны на стандартный масштаб экрана 100%. При его пользовательском значении советуем вернуть состояние по умолчанию. Для этого в меню «Параметры» откройте раздел «Система».
- Через левую панель переместитесь в «Дисплей».
- Здесь в «Масштаб и разметка» установите значение «100% (рекомендуется)».
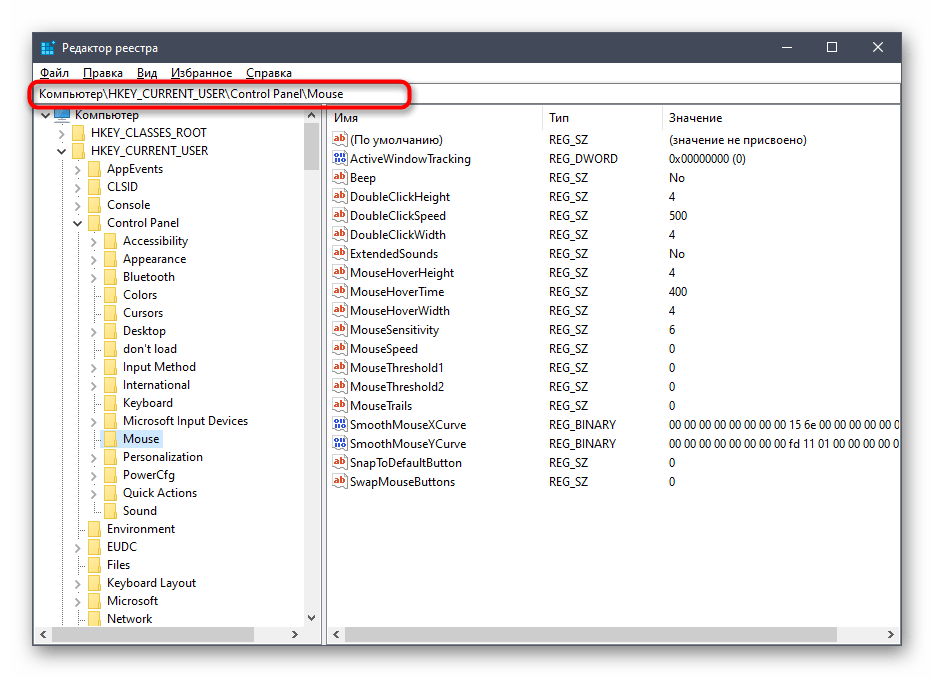
- Теперь можно переходить непосредственно к редактированию реестра. Откройте утилиту «Выполнить», зажав горячую клавишу Win + R. В строке напишите
regeditи нажмите на Enter. - Используйте адресную строку, чтобы быстро перейти по пути
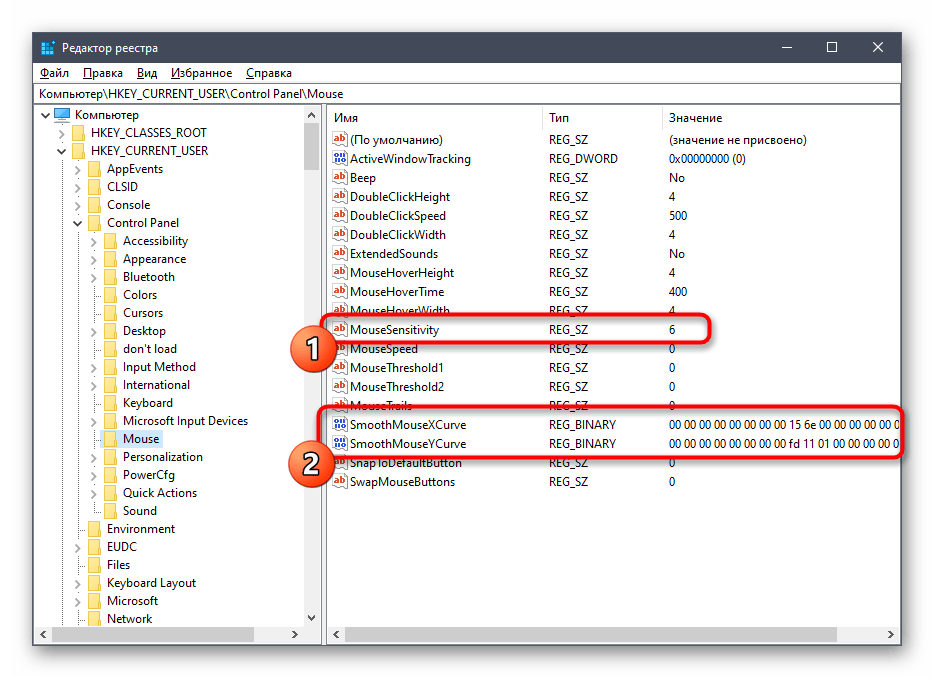
HKEY_CURRENT_USER\Control Panel\Mouse. - Здесь найдите три параметра с названиями «MouseSensitivity», «SmoothMouseXCurve» и «SmoothMouseYCurve». Дважды щелкните левой кнопкой мыши по первому из них, чтобы перейти к изменению значения.
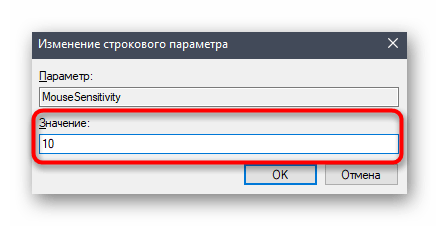
- В «MouseSensitivity» рекомендуется установить стандартное значение скорости перемещения курсора. Значит, в строке «Значения» напишите
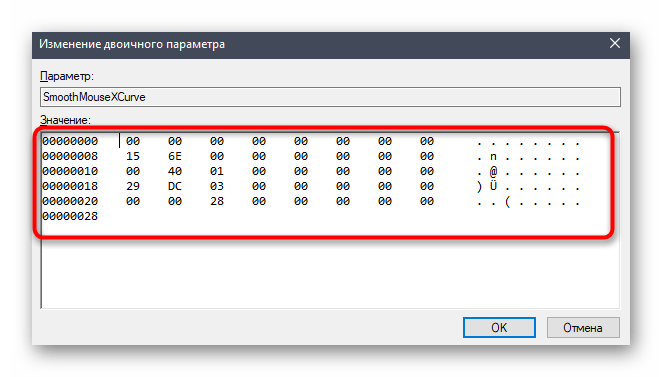
10и сохраните изменения. - Откройте окно редактирования «SmoothMouseXCurve» и замените содержимое на приведенное ниже.
=hex:\

00,00,00,00,00,00,00,00,\

C0,CC,0C,00,00,00,00,00,\

80,99,19,00,00,00,00,00,\

40,66,26,00,00,00,00,00,\

00,33,33,00,00,00,00,00После этого откройте «SmoothMouseYCurve» и замените «Значение» на
=hex:\

00,00,00,00,00,00,00,00,\

00,00,38,00,00,00,00,00,\

00,00,70,00,00,00,00,00,\

00,00,A8,00,00,00,00,00,\

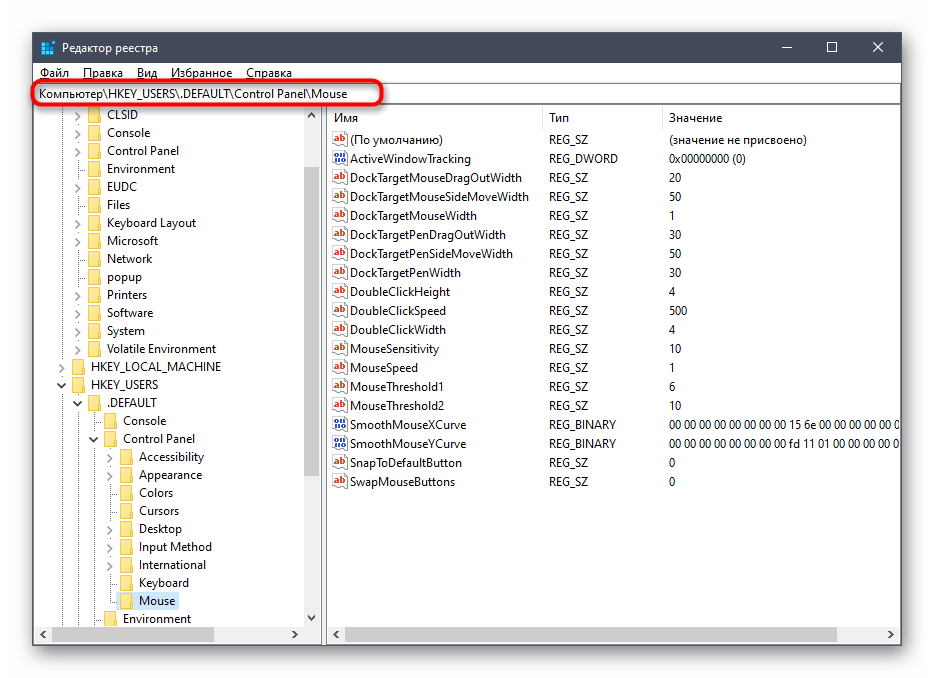
00,00,E0,00,00,00,00,00 - После применения всех изменений перейдите по пути
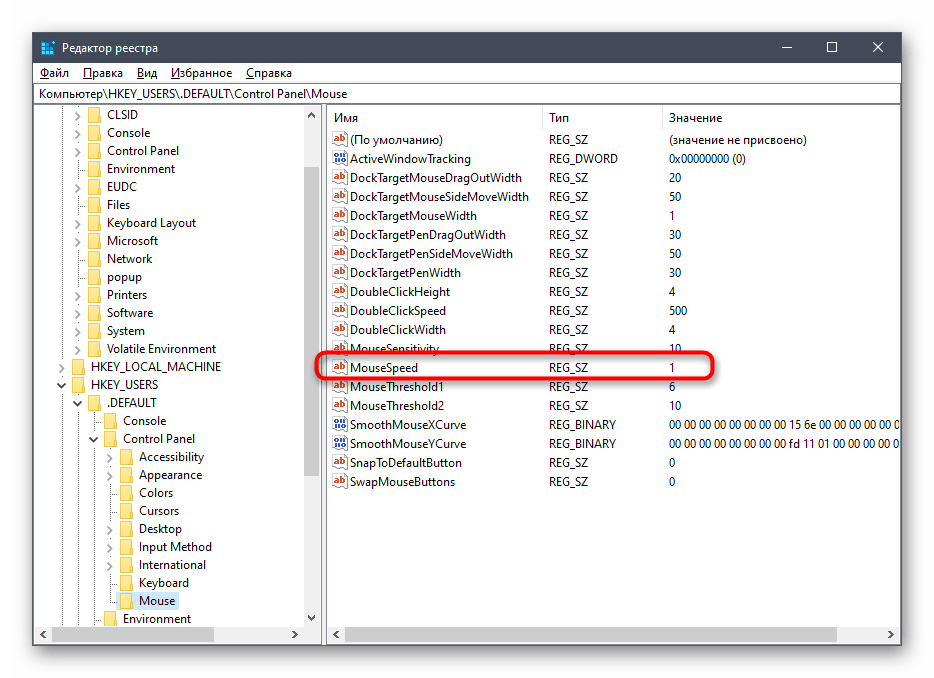
HKEY_USERS\.DEFAULT\Control Panel\Mouse. - Отыщите параметр «MouseSpeed» и откройте его для изменения.
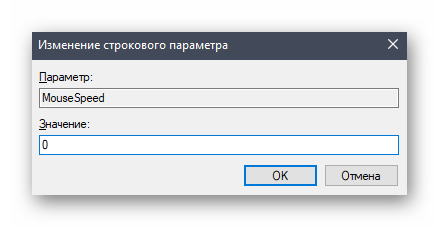
- Установите значение
0и нажмите на «ОК». - Значение параметров «MouseThreshold1» и «MouseThreshold2» тоже измените на
0.
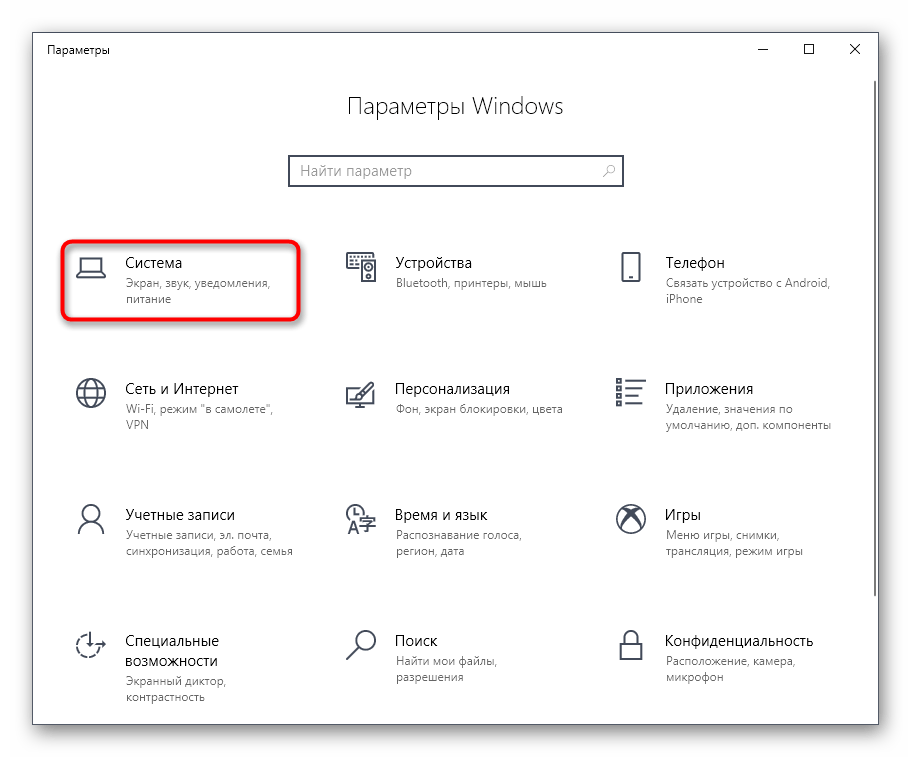

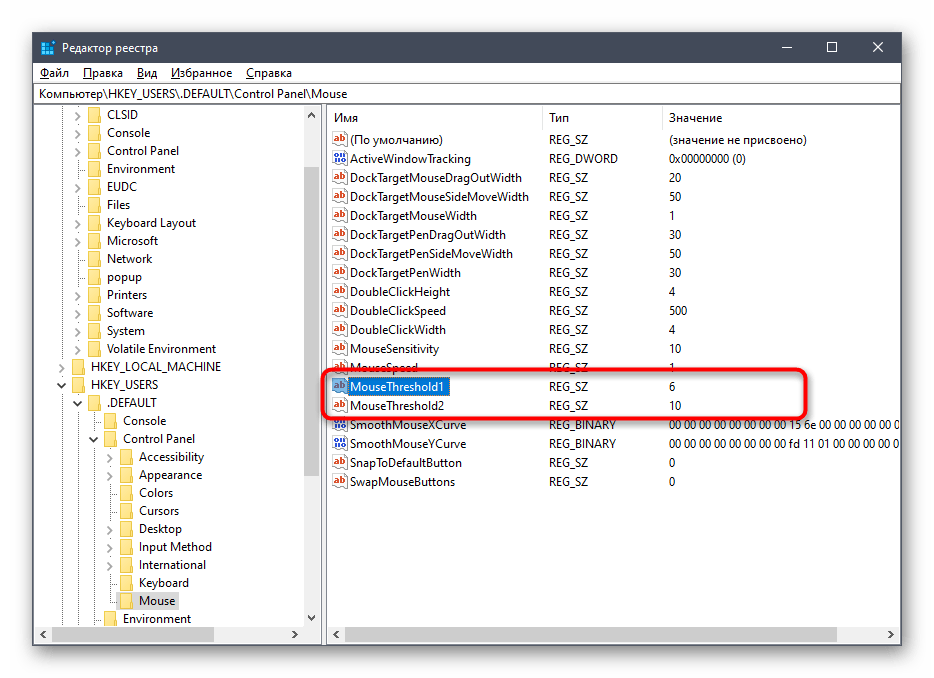
Теперь, когда все изменения были сохранены, никаких сбоев наблюдаться не должно. Однако учитывайте, что любая конфигурация, произведенная через редактор реестра, вступает в силу только после перезагрузки компьютера. Сделайте это, а уже потом переходите к взаимодействию с мышкой.
Способ 3: Изменение параметров запуска игры
Иногда акселерация мыши мешает только в определенных играх, поскольку делает перемещение курсора непредсказуемым. Некоторые пользователи попросту не желают вносить глобальные изменения в ОС или они по каким-либо причинам не сохраняются. В таком случае необходимо изменить параметры запуска или конфигурационный файл конкретного приложения. Давайте рассмотрим эту процедуру с играми от Valve (Counter-Strike, Dota 2, Half-Life) через официальный клиент.
- Запустите Steam и перейдите в личную библиотеку игр.
- Здесь отыщите необходимую игру. Нажмите по ее значку правой кнопкой мыши и выберите пункт «Свойства».
- В появившемся окне вас интересует кнопка «Установить параметры запуска».
- Введите
-noforcemparms -noforcemaccelи нажмите на «ОК».


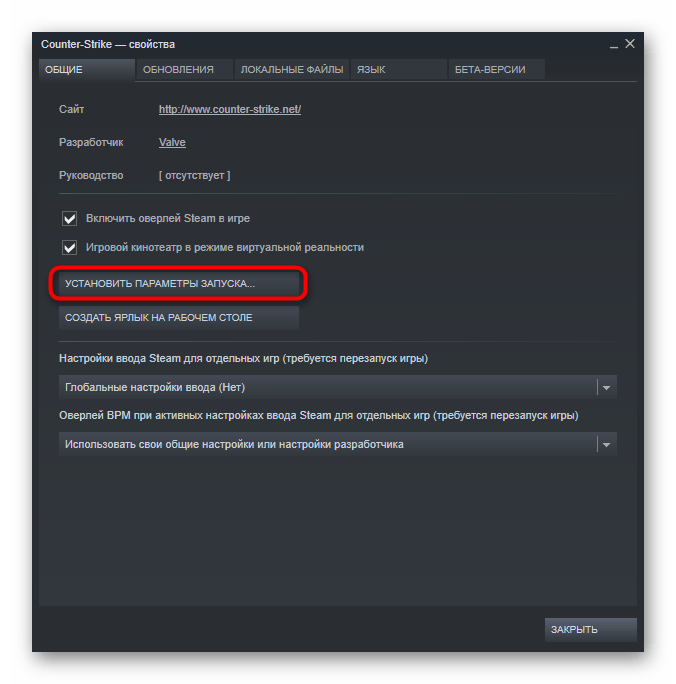
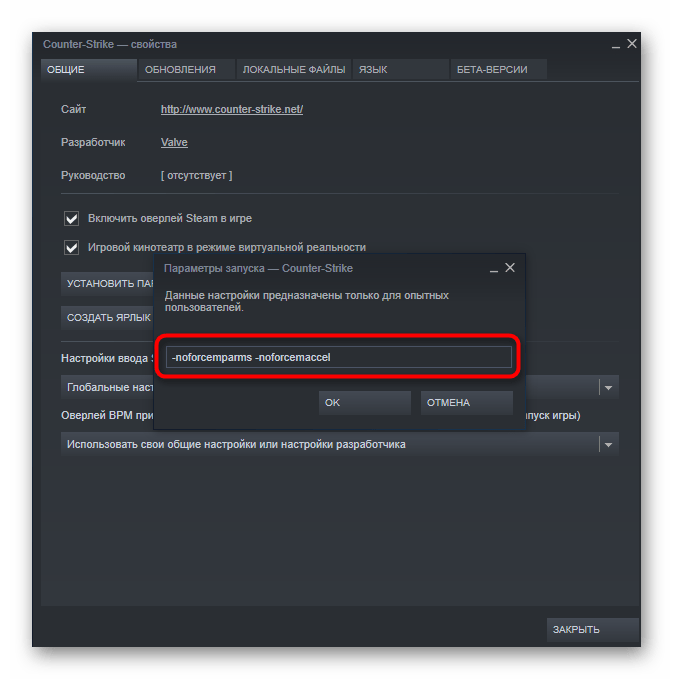
Два этих параметра будут автоматически отключать акселерацию мыши при запуске игры и позволят оптимизировать отклик движений. Если Steam отсутствует, то произвести эту настройку для игр от Valve можно и через ярлык:
- Найдите значок игры и кликните по нему ПКМ. В появившемся контекстном меню выберите пункт «Свойства».
- На вкладке «Ярлык» отыщите поле «Объект».
- Сделайте отступ от последнего символа в конец строки вставьте
-noforcemparms -noforcemaccel, применив после этого изменения.
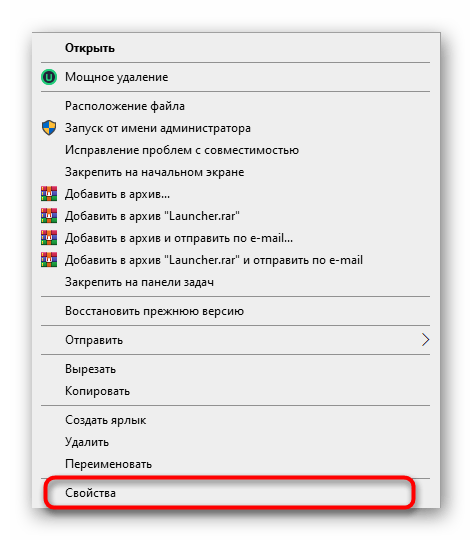
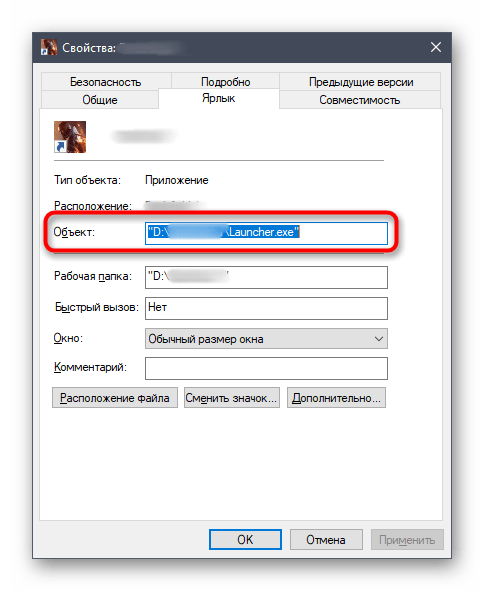
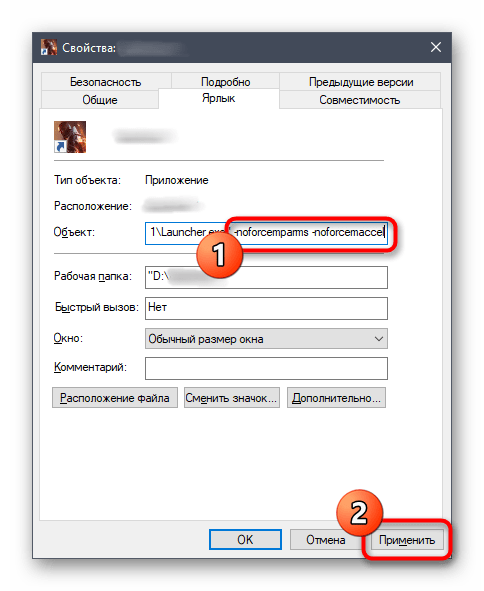
К сожалению, для игр от других компаний такая настройка не работает, поэтому придется обращаться в меню параметров в самом приложении и отключать там акселерацию, если соответствующий пункт имеется. Дополнительно можно обратиться на форумы игры или задать вопрос разработчику, чтобы понять, какие изменения вносить в конфигурационные файлы для выполнения поставленной задачи.
Это были три доступных варианта отключения акселерации мыши в Виндовс 10. Каждый из них имеет свой алгоритм действий, который мы постарались максимально детально описать. Вам следует лишь определить оптимальный способ и произвести инструкцию, чтобы реализовать нужную конфигурацию.
Наша группа в TelegramПолезные советы и помощь
If you buy a new mouse, you might be surprised by how quick it is. A higher DPI (dots per inch) rating for your mouse means greater accuracy in picking up the smallest of movements. This isn’t always ideal, and you may prefer to lower the sensitivity on your mouse by reducing the mouse speed.
Thankfully, it’s easy to change your mouse speed in Windows 10. You can use the built-in Windows settings for your mouse to do this, or you can use a third-party solution. Your mouse may even include an easy-access sensitivity button to switch between settings. To change your mouse speed, here’s what you’ll need to do.

If you want to tweak your mouse speed and overall mouse sensitivity, the best place to start is in your Windows 10 settings area. Windows allows you to change various settings that can impact on how you use your mouse or trackpad, including the ability to change button actions, line scrolling speeds, and cursor speeds.
- To change any of the built-in Windows 10 mouse settings, you’ll need to access your Windows 10 settings area. To do this, right-click the Windows Start menu and click Settings.
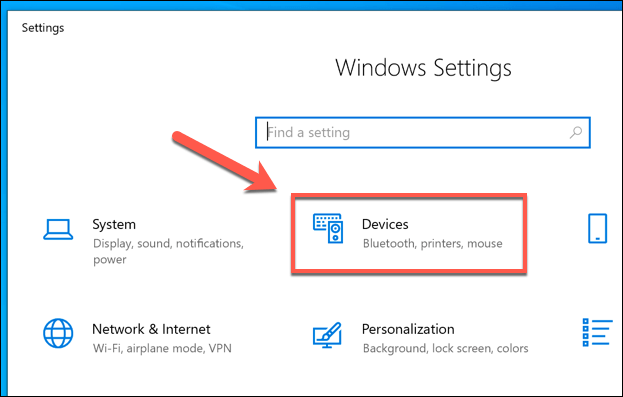
- In the Windows Settings menu, click the Devices option to enter that menu.
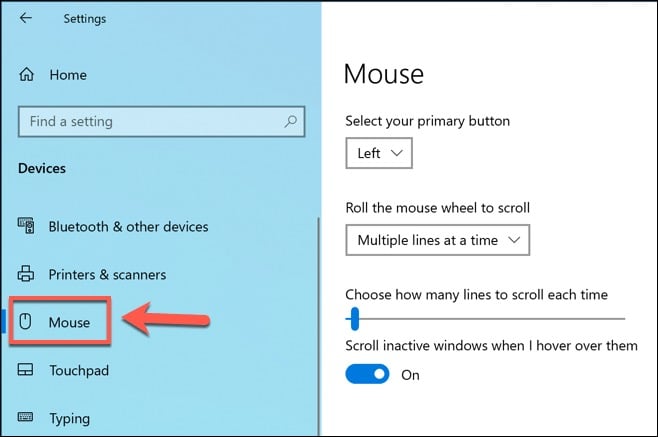
- Click Mouse in the left-hand menu to access some of the more basic mouse settings. From here, you can change your mouse scroll speeds and line length, as well as change some basic mouse button actions.
- For more advanced mouse settings, click the Additional Mouse Options option under the Related settings section on the right (or at the bottom if the window is too small).
- Under the Buttons tab of the Mouse Properties window, you can change the double-click speed. This is the speed you’ll need to be able to perform a double clicking action for Windows to register it. To change this, move the slider towards the left to slow the speed down, or right to speed it up.

- You can change the action speed of your mouse cursor under the Pointer Options tab. Move the slider under the Select a pointer speed section to do this, moving it left to slow it down, or right to speed your cursor up. If you find that your pointer isn’t as precise, click to enable the Enhance pointer precision checkbox.
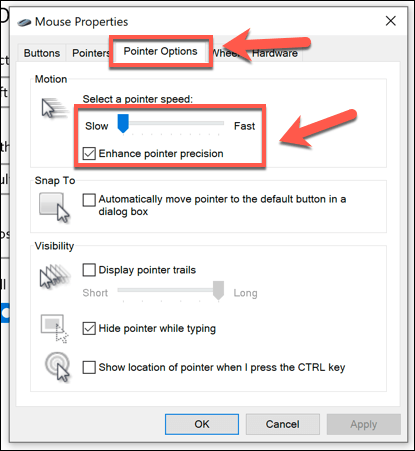
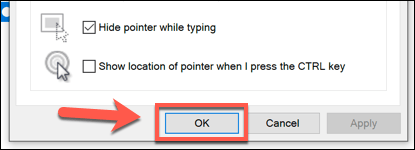
- Once you’re happy with the changes you’ve made, click OK to save and close the window. Any changes you’ve made will be applied automatically and can be quickly tweaked or reversed, if needed.
Using The Windows Registry Editor To Change Mouse Sensitivity
If you’re comfortable tweaking with the Windows Registry, then you can use the Windows Registry Editor to change some of your mouse sensitivity settings instead. This could allow you to make more precise changes to your mouse speed compared to using the Windows 10 settings menu.
- To do this, press Ctrl+R on your keyboard to open the Run dialog box. Type regedit into the box, then click OK to open it.
- Using the registry navigation menu on the left, head to KEY_CURRENT_USERControl PanelMouse to view the registry entries for your mouse settings.
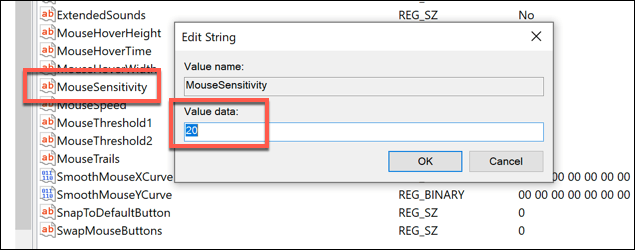
- You’ll see various registry entries for your mouse settings, but one of the most important is the MouseSensitivity entry. Double-click the entry to change the value to any figure up to 20.
- You can also tweak how precise your cursor movements are using the MouseSpeed, MouseThreshold1 and MouseThreshold2 entries. Your mouse movements will double when the value for MouseSpeed equals or is greater than the value for MouseThreshold1, and quadruples for MouseThreshold2. The values reflect distance travelled by pixels.

- These entries have a default value of 0, but you can see their default values by enabling the Enhance pointer precision checkbox first (Windows Settings > Devices > Mouse > Additional Mouse Options). If you want to set it to maximum, set MouseSpeed to 2, and set the value of MouseThreshold1 and MouseThreshold2 to 0.

- Once you’re done, close the Windows Registry Editor. Any changes you make should be applied automatically, but you may need to restart to see some of the changes take effect.
Using a Third-Party Mouse Settings App
While cheaper mice and keyboard combos are typically supplied without software, more advanced gaming mice will often come with manufacturer settings apps that allow you to tweak and change how they operate. They can also help to unlock additional features, supported by your mouse but not by Windows directly.
If your mouse comes with a DPI settings button (as many gaming mice do), you’ll need to install the settings software from the manufacturer to allow you to set up the different sensitivity profiles that the button supports. Popular gaming manufacturers, including Logitech and Razer, offer this feature.
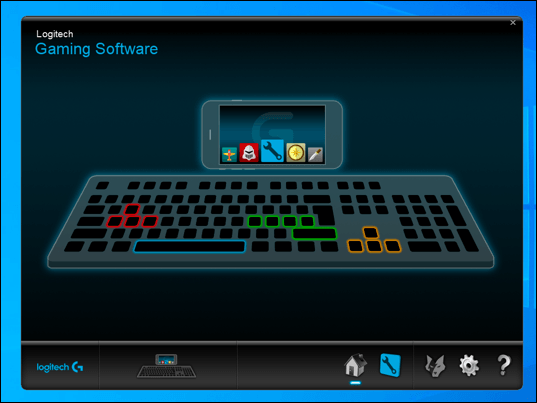
One example of software that you can use to control your mouse settings is Logitech Gaming Software, designed to support Logitech-branded gaming equipment, including mice and keyboard. Installing this software will allow you to control various settings for your mouse, including the speeds.
In the first instance, check the website for your mouse manufacturer to see if this is something that is offered for your mouse model. If it isn’t, you may find that software that isn’t specifically designed for your mouse will work for some features, but this isn’t guaranteed.
Making Changes In Windows 10
Once you know how to change your mouse speed in Windows 10, you can start to look at other tweaks you can make to your settings. You may wish to change your keyboard language to help your language skills improve, or tweak your display settings to improve your Windows 10 display quality.
If you make too many changes, don’t worry, as you can reset and restore Windows to default settings pretty quickly. Be sure to back up your important files before you do this to make sure you don’t lose anything essential, however. If you’re tired of slowdowns, you could always start building a new custom PC to start afresh.
Related Posts
- How to Fix a “This file does not have an app associated with it” Error on Windows
- How to Fix an Update Error 0x800705b4 on Windows
- How to Resolve “A JavaScript error occured in the main process” Error on Windows
- How to Fix the Network Discovery Is Turned Off Error on Windows
- How to Change Folder Icons in Windows


