
Applies ToWindows 7 Enterprise Windows 7 Home Basic Windows 7 Home Premium Windows 7 Professional Windows 7 Starter Windows 7 Ultimate Windows 8
Windows 8, Windows 7 и Windows Server 2008 R2 используют дополнительные параметры контроля учетных записей (UAC). Аналогичные параметры используются при настройке безопасности зон в браузере Internet Explorer. Войдя в систему с учетной записью локального администратора, можно включить или отключить уведомления контроля учетных записей или указать время, когда сообщения об изменениях должны приходить на ваш компьютер.
ВВЕДЕНИЕ
Windows Vista использует только два типа параметров UAC: включено и выключено. Windows 7 и Windows 8 используют больше параметров.
1.Настройка параметров UAC
В Windows 7:
. Откройте раздел Параметры контроля учетных записей. Для этого введите UAC в поле поиска и в окне панели управления выберите пункт Изменение параметров контроля учетных записей.
Настройка параметров контроля учетных записей в Windows 8:
.Наведите указатель мыши на кнопку Aero Peek, которая также используется в качестве кнопки «Свернуть все окна» и находится в правой части новой панели задач..Щелкните значок Поиск, введите в поисковом поле UAC и щелкните пункт Параметры под ним..На левой панели выберите пункт Изменение параметров контроля учетных записей.
2. Переместите ползунок на нужную отметку и нажмите кнопку ОК.
Можно указать один из четырех параметров UAC:
-
Всегда уведомлять
Выберите этот параметр, чтобы:
-
всегда получать уведомления о попытках программ установить программное обеспечение или внести изменения в компьютер;
-
всегда получать уведомления при изменении параметров Windows пользователем.
-
-
Уведомлять только при попытках программ внести изменения в компьютер
Выберите этот параметр, чтобы:
-
получать уведомления только при попытках программ внести изменения в компьютер;
-
не получать уведомления при изменении параметров Windows пользователем.
-
-
Уведомлять только при попытках программ внести изменения в компьютер (не затемнять рабочий стол)
Выберите этот параметр, чтобы:
-
получать уведомления только при попытках программ внести изменения в компьютер без затемнения рабочего стола;
-
не получать уведомления при изменении параметров Windows пользователем.
-
-
Никогда не уведомлять (Отключить контроль учетных записей)
Выберите этот параметр, чтобы:
-
никогда не получать уведомления при попытках программ установить программное обеспечение или внести изменения в компьютер;
-
никогда не получать уведомления при изменении параметров Windows пользователем.
-
Дополнительная информация
Нужна дополнительная помощь?
Нужны дополнительные параметры?
Изучите преимущества подписки, просмотрите учебные курсы, узнайте, как защитить свое устройство и т. д.
Whether your customers operate in a workgroup or a domain/Active Directory environment, user account setup and group memberships control their rights, permissions and roles.
There are three types of basic Windows 7 user accounts for solutions providers to work with: one for local administrators and their equivalents; one for standard, everyday users; and another for a guest account — which is turned off by default in Windows 7. All of these account types are shown in Figure 1, along with an administrator account.
To access the Windows 7 User Accounts item in the Control Panel, type user into the Start menu search box, then click User Accounts in the resulting menu selections that appear.
With administrator accounts, solutions providers can install software, make configuration changes, add or delete files in most directories, and so forth. Standard users can manage their own files inside the %SystemDrive%\Users\ directory tree, but they can only make limited changes to their machines. Guests can look at system files, but only in certain directories, and they can’t do much to the Windows machines they have access to.
Having User Account Control is vital for creating user IDs and associating passwords and images to accounts. But when it comes to managing user rights and permissions, the real action lies elsewhere in Windows 7.
The best Windows 7 user account control comes via group management
Ask any experienced Windows solutions provider and he or she will tell you that the best way to manage rights and permissions — the controls that establish which applications or services a customer can run and which files or other system resources he can access — is by establishing groups related to specific kinds of roles or activities.
A quick look at Windows 7’s default group names and descriptions — Figure 2 — helps illustrate this principle, while also listing the roles and activities that Microsoft finds most useful on Windows 7 systems.
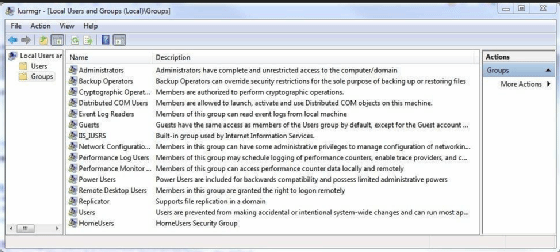
Notice the kinds of groups that appear by default, which include backup operators, who can back up or restore systems; event log readers, who can access and view event log contents to seek out and diagnose system issues; network configuration operators, who can manage network configuration items and elements; remote desktop users, who are allowed to log in from across the network or the internet; and so on.
The idea is to break various types of functionalities into distinct areas or roles, each of which is associated with a group, and then to use group membership to grant access to groups. For example, a system with Photoshop installed might have a Photoshop users group, and only those who belong to the group can run Photoshop on a specific computer.
To access this capability, solutions providers must be logged in using the Administrator account or another account with administrator privileges, like the Ed account in Figure 1. Then, you can simply type lusrmgr.msc in the Start command search box to open the Local Users and Groups management console plugin depicted in Figure 2. The word Local is important because the control applies only to one Windows machine at a time.
For network users, Active Directory and Group Policy hold the keys to the kingdom
The principles of managing Windows 7 user accounts are slightly different on Windows server networks, where Active Directory (AD) servers typically house user account and group information and definitions, as well as the policies that go with them. Though you can manage groups, accounts and Group Policies locally from individual Windows machines on production networks, the process is too time-consuming to be worth the effort.
Most solutions providers use the Microsoft Management Console — mmc.exe — with plugins to support users, groups and Group Policy management. You can use the AD Users and Computers tool to set up AD users and groups, and you can use a Group Policy management tool — the Group Policy Management Console, or gpmc.msc — to set up and manage group policy settings. Group policy settings can be used to control desktop appearance, application access, file system rights and permissions, and lots more.
For more information on Windows administration, check out our Windows 10 Group Policy Objects management feature and our overview articles on remote server administration tools and free Windows administration tools.
Dig Deeper on MSP technology services
-

How to record Zoom meetings with OBS
By: David Maldow
-
How to edit a Domain Group Policy for a Windows desktop
By: Brien Posey
-
How to create a local admin account with Microsoft Intune
By: Brien Posey
-
What to do when Group Policy shows an access denied message
By: Stephen Bigelow


Lesson 5: Managing User Accounts and Parental Controls
/en/windows7/getting-started-with-windows-7/content/
Introduction
With Windows 7, everyone who uses your computer can have their own user account. This allows each person to have his or her own settings, and it allows you to set up Parental Controls to limit the types of games and programs your children are able to use.
In this lesson, you will learn how to create new user accounts, change account settings, and set up Parental Controls for your children’s accounts.
Setting up multiple user accounts
Why should you have multiple user accounts?
If you wanted to, you could have a single account on your computer that everyone could use. But having multiple accounts has some advantages. If each user has his or her own account, then each person will have his or her own desktop for organizing files and folders. Each person also will be able to choose a specific desktop background, along with other personalization features. In addition, parents will be able to set Parental Controls for each child’s account.
Standard vs. administrator accounts
Before you start making new user accounts, it’s important to understand the two types of accounts:
- Standard: Standard accounts are the basic accounts you use for normal, everyday tasks. As a Standard user, you can do just about anything you would need to do, such as running software or personalizing your desktop. Also, Parental Controls can be placed on Standard accounts.
- Administrator: Administrator accounts are special accounts that are used for making certain changes to system settings or managing other people’s accounts. They have full access to every setting on the computer. Every computer will have at least one Administrator account.
As you can see, Administrator accounts are more powerful. But for the same reason, Standard accounts are safer, so they are generally better for everyday use. In fact, you can make Administrator-level changes while logged into a Standard account; you will just need to provide an Administrator password when making the changes.
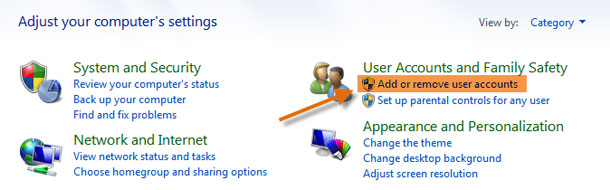
To go to your user accounts:
- Go to the Control Panel from the Start Menu.
- Click Add or remove user accounts.

Going to user accounts
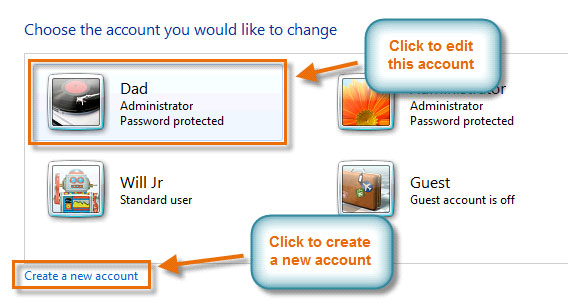
- The Manage Accounts pane will appear. You will see all of the user accounts here, and you can add more accounts or manage existing ones.

The Manage Accounts pane
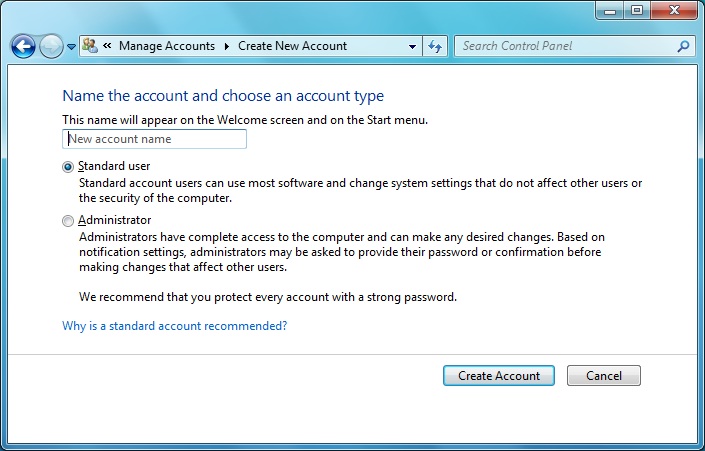
To create a new account:
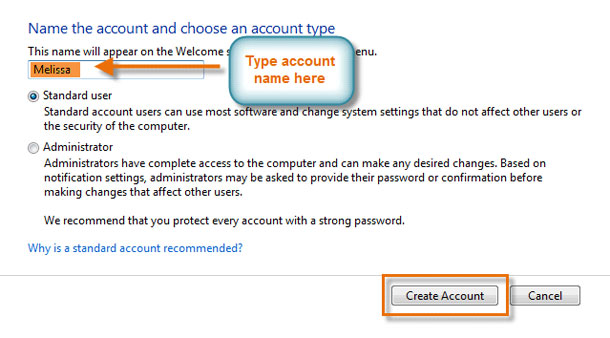
- From the Manage Accounts pane, click Create a new account.
- Type an account name.

Creating an account
- Select Standard user or Administrator.
- Click Create Account.
Changing an account’s settings
Once you’ve created a new account, you may want to add a password or make other changes to the account’s settings.
To create a password:
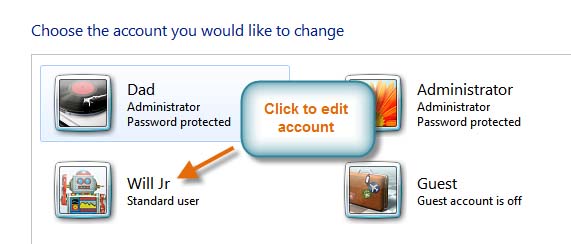
- From the Manage Accounts pane, click the account name or picture.

Edit an account
- Click Create a password.
Create a password
- Type a password in the New password field, and retype it in the Confirm new password field.

Type a password and hint
- If you want, you can type a password hint to help you remember your password.
- Click Create password.
- To go back to the Manage Accounts pane, click Manage another account.
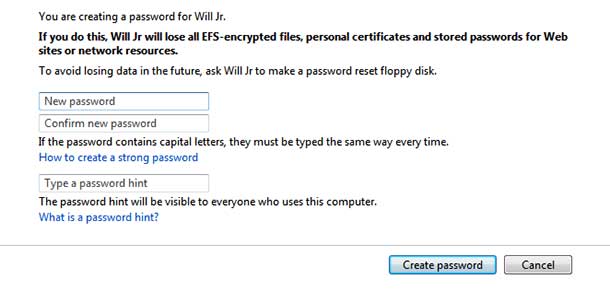
Account passwords are case sensitive, which means capital and lowercase letters are treated as different characters. For example, aBc1 is not the same as abc1.
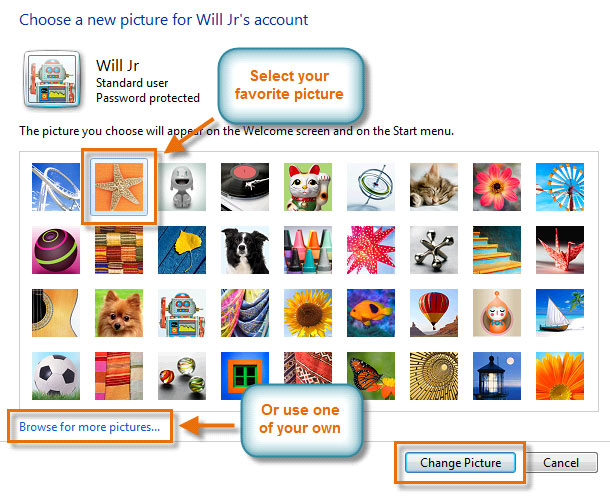
To change your account picture:
You can also change the picture for any account. This picture appears next to the account name and helps you easily identify the account.
- From the Manage Accounts pane, click the account name or picture.
- Click Change the picture.
Change the picture
- Select a picture, or click Browse for more pictures to select one of your own.

Account pictures
- Click Change Picture.
Using Parental Controls
Windows 7 offers various Parental Controls to help you control the types of content your children can access. You can place parental controls on any Standard account, and each account can have different settings. If you have more than one child, each child can have access to different types of content, and you can always change the Parental Controls settings as your children get older.
Learn more about Parental Controls in this video.
Before you set up Parental Controls
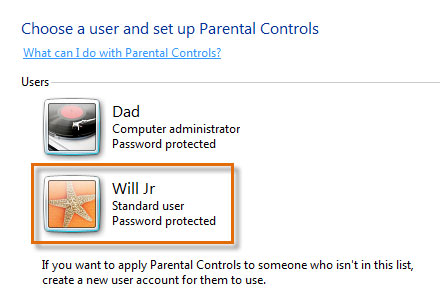
You’ll need to create an account for your child, if you haven’t already. It should be a Standard account; you cannot apply Parental Controls to an Administrator account.
When you’re setting up Parental Controls, it doesn’t matter which account you’re logged in to, but if you’re logged in to a Standard account you’ll need to provide an Administrator password before making any changes.
Make sure your children do not know your Administrator password, as it would allow them to change or disable Parental Controls for any user account.
To set up Parental Controls
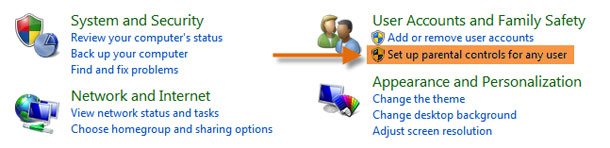
- Go to the Control Panel from the Start Menu.
- Click Set up parental controls for any user.

Getting to Parental Controls
- Click on any Standard Account.

Choose an account
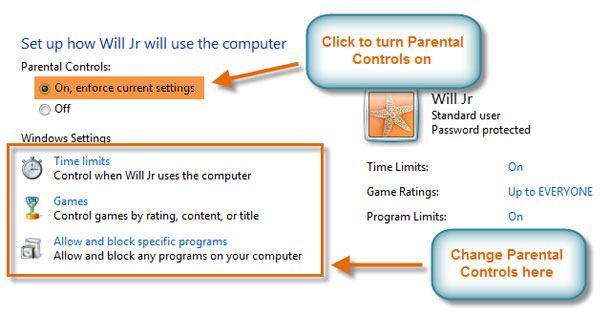
- Click On to turn Parental Controls on.

Parental Controls main page
- Now you can click Time limits, Games, or Allow and block specific programs to set the Parental Controls. We’ll explore each of these on the next page.
To learn more about available parental control options you can use, check out this article on Five Free Ways to Protect Your Kids Online.
Changing your Parental Controls settings
Time limits
The time limits settings allow you to control when your children can use the computer. Click and drag from any box to allow or block a section of time. If you want, you can set different time limits on different days. For example, you may want to allow more computer use on weekends.

Time limits
Games
The Games settings allow you to select which game ratings to allow, and you can also allow or block specific games. First, you’ll have to click Yes to allow your children to play games, then you can change your Games settings.
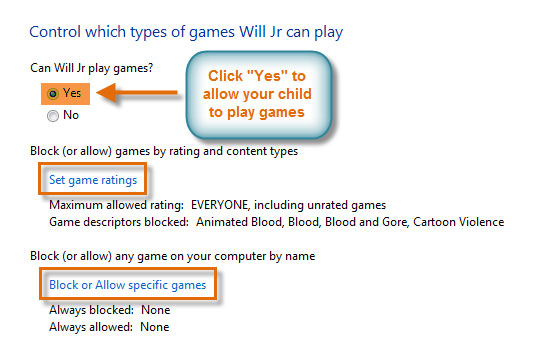
Games settings
Here, we have selected «Everyone» as the highest rating allowed. This means your children can play games rated «Everyone» OR «Early Childhood.»
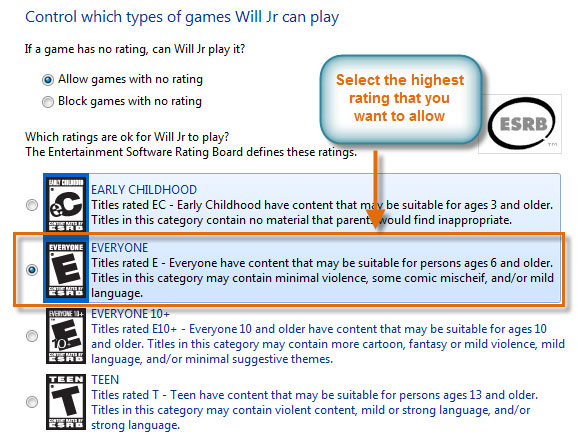
Game ratings
To allow or block specific programs:
Allow and block specific programs controls which nongame programs your children can use. By default, your children can use all nongame programs. But there may be some programs you don’t want your children to use, like a financial or email program. Here’s how to block specific programs:
- Click Will Jr can only use the programs I allow.
- Click Check All.
- Uncheck the programs you want to block.
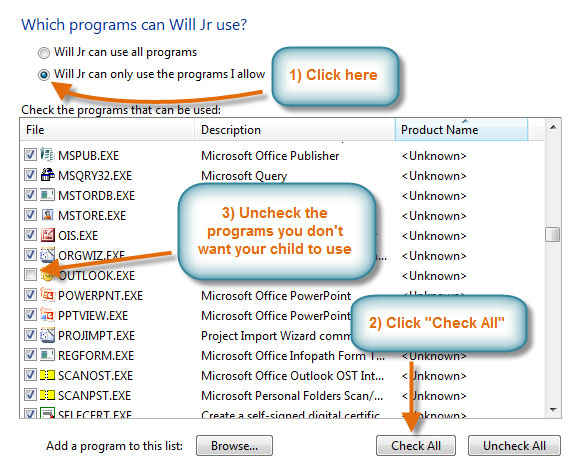
Non-game programs
Conclusion
You can now create new accounts whenever you want, and all users will be able to easily access their own files and customize the appearance of Windows 7 while they’re logged in to their respective accounts.
If you’re using Parental Controls, take the time to familiarize yourself with the different controls offered. Windows 7 gives you a lot of flexibility when using Parental Controls, so you can apply them with as much or as little detail as you want.
/en/windows7/finding-your-files-with-search-and-libraries/content/
Home » How To » How to Manage User Accounts in Windows 7
For users who are new to the Windows 7 experience, and who share a computer with other users, this post is a guide to help you manage user accounts in Windows 7. Sharing your PC with another person means that you want to have a unique desktop experience, one customized to suit your working style. You can take advantage of the three types of user accounts available in Windows 7 to set up accounts for different users each with its own personalized desktop, Start menu, and Library settings.
Before we get started, let’s take at the 3 types of user accounts available.
Administrators
A Windows 7 administrator has unlimited access to all programs on the computer. Admin users can install software programs, hardware drivers, create new users and groups, reset passwords, edit the Windows 7 Registry and more.
Standard Users
These are everyday users of the computer. They do not have top level access to the computer and cannot install software or hardware, cannot create new users or groups, or edit registry files. They can access programs, customize desktop settings, work on documents and save them on the computer.
Guests
A guest user is a temporary user who has minimal access to the system.
When you install Windows for the first time, you are asked for a user name and password. Thus your first account is set up with Admin privileges. Now you can go about creating additional user accounts and manage them.
How to Create a New User Account in Windows 7 : Standard User
1. Click the Start button and choose Control Panel.
2. In the User Accounts and Family Safety section, click Add or remove user accounts.

3. In the next screen, select Create a new account.

4. In the next screen, in the New account name text box, enter a user name. Verify that standard user is selected. It is preferred that you create a standard account for general everyday use. Click Create Account.

How to Create a New User Account in Windows 7 : Guest User
1. In the Control Panel, in the User Accounts and Family Safety section, click Add or remove user accounts.
2. In the next screen, select Guest.
3. In the next screen, click Turn On to activate the guest account.
Now that you have created your first users, you can go ahead and edit the user account settings.
How to Edit User Accounts in Windows 7
1. Navigate to the Add or remove user accounts section.
2. Select the user account you want to edit.
3. In the next screen, you have options to change the account name, account type, and picture, set up parental controls, create a password, or delete the account.

The process to manage each of the individual items specified above is quite simple, so just follow the instructions on screen and you should be on your way to becoming an expert user account manager!
Follow us on Twitter or join our Facebook fan page to get tutorials, updates and how-to articles on Microsoft, Google and Apple products.
Adeline is a tech enthusiast who loves exploring the latest tools and applications in the marketplace. She also loves her Android and spends time reviewing apps and playing games when she has the time.
Reader Interactions
A computer running Windows 7 might be used by a single person, by a group of people in an office, or by a family in a home. Fortunately, Windows 7 was designed from the ground up to be a multiuser operating system. The new OS is flexible and can support many different scenarios, with each user having appropriate permissions and a customized environment. Every person using Windows 7 must log in with an account, and each account has a personalized desktop, Start menu, documents folder, history, favorites, and other customizations.
All of that stuff resides in the Users folder on the root of the system drive, where each account has a subfolder named after it. The two main tools I’ll describe in this article are the ‘User Accounts and Family Safety’ wizard-based tool, which you can find in the Control Panel, and the traditional ‘Local Users and Groups’ tool, which is available in Computer Management.
Account Types
Before you start creating new users on your Windows 7 computer, you should understand the difference between the two main account types.
Administrators have full control over the system. They can install software programs and hardware drivers, and they can create and modify new users and groups. Additionally, they can reset passwords, set policies, and edit the Registry. The OS identifies tasks that require administrator permissions with a Windows security icon.
Standard users are permitted to log on to the computer, run programs, customize their accounts, and save files in their user folders. Users are restricted from making systemwide changes.
The First User
When Windows first installs, it asks you for a user name and password, which it then uses to create your first account. This account joins the Administrators group, which has the highest set of privileges. From this account you can create and manage all other user accounts. When one person is the sole user of a computer, this first account is sometimes the only one ever created. However, even if you are the only user, a recommended practice is to create a second, standard account for daily use, so that you have it separate from your account with administrative privileges for managing the system. If you want to install software or make other system changes while logged in as a standard user, never fear: When you attempt to make the change, Windows will prompt you to authenticate your administrator account so that you won’t need to log on with it.
Creating a New Account
To create a new account, open Control Panel and choose User Accounts and Family Safety, Add or remove user accounts. Click on Create a new account. Type in the new account name, select either the Administrators or Standard Users user type, and then click Create Account. By default, Windows assigns no password; you can make one by clicking on that user’s icon and selecting Create a password. Alternatively, you can leave it blank to allow the user to set a password when they first log on.
Editing Accounts
Once you’ve created an account, you can customize it further by editing. To edit an account, open Control Panel once again and select User Accounts and Family Safety, Add or remove user accounts. This takes you to the Manage Accounts window, where you can select an account to edit by clicking on its icon. In this window, you can change the account name, create or remove a password, change the picture, set up parental controls, change the account type, or delete the account. Be cautious when removing a password, since it will cause that user to lose any encrypted files, personal certificates, and stored passwords.
If You Accidentally Delete Your Last Administrator Account
Windows 7 has a built-in Administrator account that has no password and is hidden by default. Like all other administrator accounts, it has full control of the system; for you to use it, however, it must be the only remaining administrator account, and you must start the computer in Safe Mode.
Parental Controls
Concerned parents are often wary about letting their children have free rein on the family computer. Windows 7’s parental controls offer parents a way to keep their children’s Web surfing or gaming in check. To arrange parental controls, go to Control Panel and select User Accounts and Family Safety, Set up parental controls for any user. Click on the user for which you want to set controls.
Since all administrators can disable these controls, if an administrator account doesn’t have a password, Windows 7’s parental controls will offer the option to force that person to set a password at the next log-on.
Turn on parental controls by selecting On, enforce current settings, and then modify each setting as appropriate.
- Time limits: If you want Windows to boot your child off the computer after, say, 10 p.m., this is where you can explicitly permit or deny computer usage by time and by the day of the week.
- Games: Here you can define whether the account is permitted to play games, which game ratings are acceptable, and whether unrated games are allowed. You may also allow or block particular games.
- Allow and block specific programs: If you want to limit your child’s computer use to certain applications, this is where you choose them.
Windows 7’s parental controls can work in conjunction with the downloadable Windows Live Family Safety, which allows you to set parental controls on Web content.
Changing Your Password
The simplest way to change your password when you are logged in is to press Ctrl-Alt-Del and click Change a Password. In this window, you simply type in your old password and your new one, and then confirm it. Administrators may also overwrite the user name and change the password for another user.
Changing Your Picture
Windows 7 allows you to choose a picture to associate with your account. This is the image you click to log on to the computer. To change it, open Control Panel and choose Users Accounts. Under Users, click Change your Account Picture. You can select from a number of built-in images, or you can browse to one of your own images.
Creating a Password-Reset Disk
A password-reset disk is useful if you forget your password, but the catch is that you have to create it while you are logged in–if you have already forgotten your password, it’s too late. You probably don’t have a floppy drive on your PC, but a USB drive will work just fine. To create a password-reset disk, open Control Panel and select User Accounts and Family Safety, User Accounts. Click on Create a password reset disk in the left pane. A wizard will guide you through the procedure, asking you on which drive to place the password key as well as what your current password is. Be careful where you store the disk or USB drive–anyone who can access it can use it to gain entry to your account.
Resetting Your Password Using the Password-Reset Disk
If you enter your password incorrectly when you attempt to log on to your computer, Windows will display a Reset password link under the password box. Click it to launch the Password Reset Wizard. When prompted, select the drive that contains the password key, and then type in a new password and password hint.
Using the ‘Local Users and Groups’ Tool
Though the Windows 7 wizard-based user-management tools are great and easy to use, some people will prefer the legacy tool, called ‘Local Users and Groups’. This tool has changed little since its introduction in Windows 2000. To access it, right-click Computer on the Start menu, and select Manage. This will open Computer Management. From there, expand Local Users and Groups.
Creating a new user: Right-click on Users, select New User, and then enter the user name. Optionally you may supply a full name, description, and password. Click Create to make the account.
Modifying users: In ‘Local Users and Groups’, expand Users and double-click on the appropriate user name.
On the General tab, you may modify the following settings by checking the appropriate box:
- User must change password at next logon
- User cannot change password
- Password never expires
- Account is disabled
- Account is locked out (to unlock an account that Windows has locked in response to a user’s entering an incorrect password too many times, as specified by the local security policy, clear this check box)
A note about disabling user accounts: A common administrative practice is to disable an account rather than delete it when an employee leaves. That way, if another user replaces that staffer, you can simply rename and reenable the account, and the new employee will have all the same settings as the previous one.
The Guest account: Windows 7 includes an account named Guest, which has a bare minimum of permissions and is disabled by default. If you want to use this account, click Local Users and Groups, expand Users, double-click on the Guest account, and clear the Account is disabled check box.
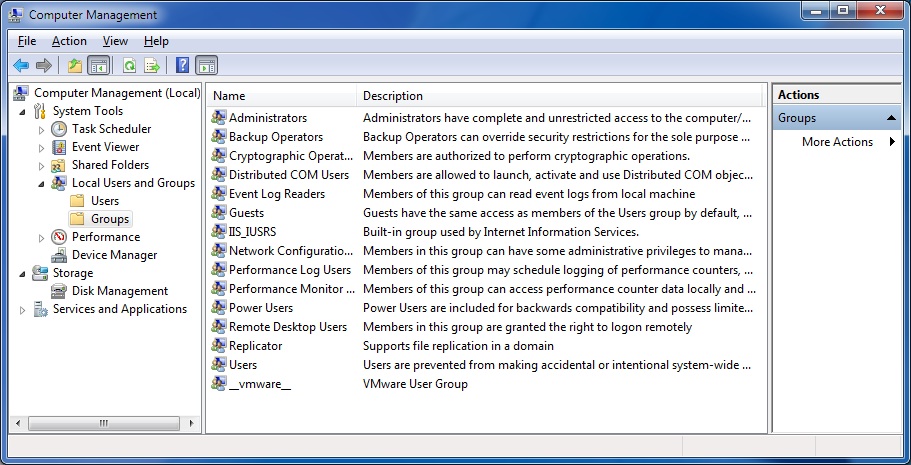
Managing groups: Every Windows account is a member of at least one group. Group membership defines what set of permissions each account has. Most people use the groups built in to Windows (called Account Types when you’re in the Create User wizard), but you are free to create and customize your own. Groups exist to make administration of a computer easier by allowing the administrator the flexibility to apply permissions and policies to more than one account simultaneously.
Besides Users (or Standard Users) and Administrators, you’ll find a multitude of other groups in Windows 7. Some of these are intended for backward-compatibility, while others are designed for specialized purposes such as allowing access to back up and restore files, to read log files, or to connect through Remote Desktop.
Creating a new group: Right-click on Groups in the ‘Local Users and Groups’ tool, and select New Group. Specify a name and description, and click Add to add the members. Finally, click Create.
Managing User Accounts for Domain Members
Each computer is a member of either a workgroup or a domain. Computers that are part of a domain usually have a network administrator who manages user accounts. These accounts are not located on individual computers, but in a central database called Active Directory. A workgroup is more of an ad-hoc network where each computer is managed separately. Only computers running Windows 7 Professional or greater have the option of joining a domain.
When a PC joins a domain, the user-management options change a bit. Parental controls are unavailable, the User Account tool replaces the ‘User Accounts and Family Safety’ tool, and you may create local users only through the ‘Local Users and Groups’ management tool.
Adding a domain user to a local group: In the Control Panel, open User Accounts, and click on Give other users access to this computer. From there, type in the person’s user name and the domain (or click Browse to select it from Active Directory), click Next to add them to a group, and then click Finish.
Michael Scalisi is a California-based IT Manager and the writer of PC World’s Net Work blog.
For comprehensive, straightforward advice and tips that can help you get the most out of the new operating system, order PC World’s Windows 7 Superguide, on CD-ROM or in a convenient, downloadable PDF file.