
Download Windows Speedup Tool to fix errors and make PC run faster
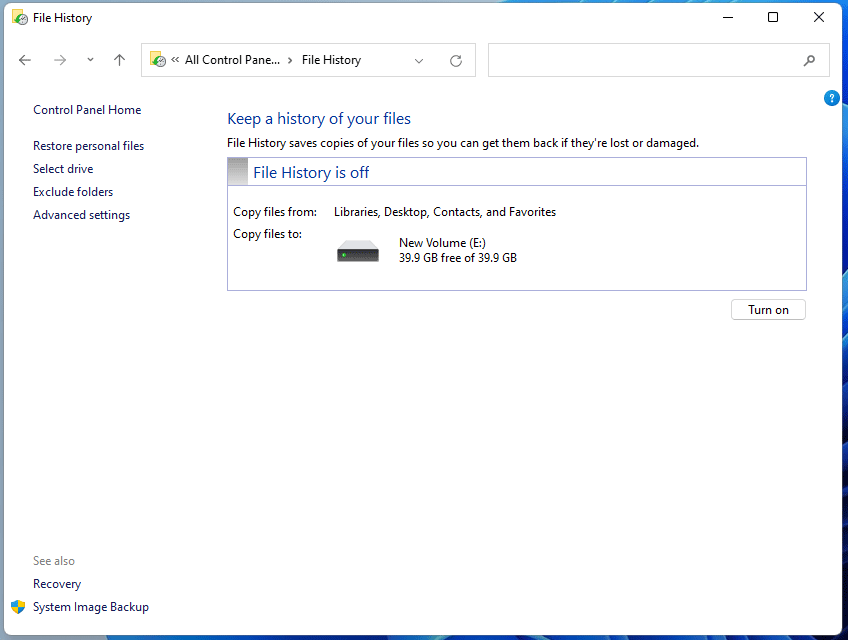
This tutorial shows how to reset File History on a Windows 11/10 computer. File History feature in Windows PC helps to save copies of files stored on the Desktop, Documents, Favorites, Pictures, Videos, Saved Games, Downloads, Music, and other locations to a network location or an external drive (SSD, HDD, or USB drive). This lets you get back your files even if the original files are damaged or lost. You can easily turn on and use File History to backup and restore files. However, if you face some problems in using this feature, then you may need to reset File History settings to default. The steps covered in this post will help you with that.
Do note that resetting the File History settings to default won’t remove the FileHistory folder stored in the backup drive. It only removes the FileHistory folder and stored items available in your account or user profile in your Windows 11/10 system.
There are two ways to reset File History on a Windows 11/10 PC. These are:
- Reset File History from the original location
- Reset File History using the Command Prompt window.
Let’s check both options.
1] Reset File History from the original location

File History data is stored under a FileHistory folder present in the Windows folder on your system. So, you can access that original location and then reset the File History manually. For this, follow these steps:
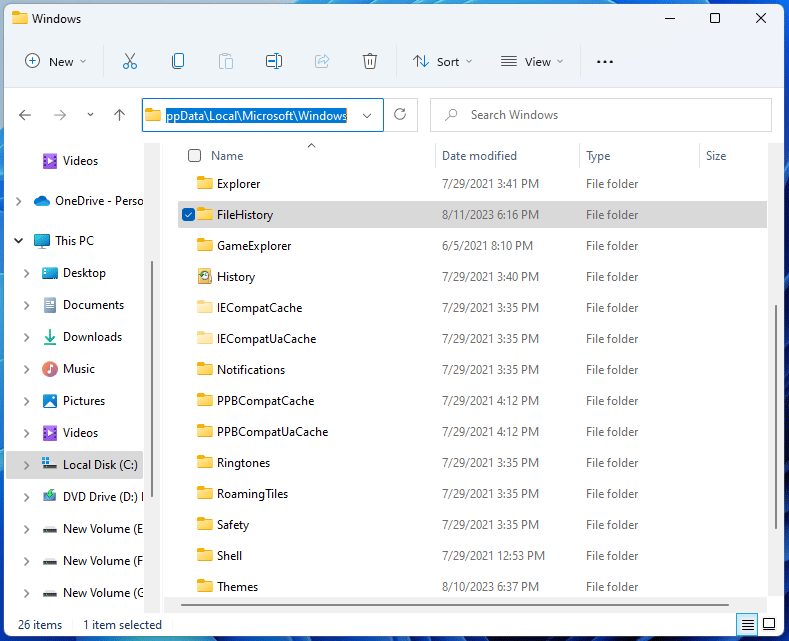
- First, show hidden files and folders on your Windows 11/10 computer so that you can access the Windows folder
- In the address bar of File Explorer, paste the following path, and press the Enter key:
%UserProfile%\AppData\Local\Microsoft\Windows
- Look for the FileHistory folder and open it. You won’t see this folder if File History is turned off
- Select all the items (Configuration folder and Data folder) stored in that folder and delete them.
Read: File History not working in Windows 11; Doesn’t recognize this drive
2] Reset File History using the Command Prompt window

This option deletes the entire FileHistory folder present in the Windows folder to reset File History to default settings. The steps are as follows:
- Type cmd in the Search box and press the Enter key
- When the Command Prompt window is opened, enter and execute the following command:
if exist "%UserProfile%\AppData\Local\Microsoft\Windows\FileHistory" RD /S /Q "%UserProfile%\AppData\Local\Microsoft\Windows\FileHistory"
This command first checks if the FileHistory folder and this location are present on your PC. If yes, then the given parameters remove that folder or directory and sub-folders and files present in that directory in the quiet mode.
Hope this helps.
Where is File History stored in Windows 11?
If you want to access the File History backups stored in your Windows 11 computer, then open the Control Panel window, access the System and Security category, and select the File History option. On the left section, click on the Restore personal files option. A window will open where you can see all the saved versions of your files. Each version shows the backup locations such as Desktop, Contacts, Documents, etc. Double-clicking on any location will show the backup items.
How do I clear recents in Windows 11?
To clear all the Recent items (recently accessed OneDrive files, most recent files opened from a hard drive, etc.) from File Explorer in Windows 11, first open File Explorer (Win+E). Click on the Home page from the navigation pane. Right-click on the Recent section and this will automatically select all the files present in that section. Finally, click on the Remove from Recent option present in the right-click menu.
Read next: Reconnect your drive, Your File History drive was disconnected for too long.
Anand Khanse is the Admin of TheWindowsClub.com, a 10-year Microsoft MVP (2006-16) & a Windows Insider MVP (2016-2022). Please read the entire post & the comments first, create a System Restore Point before making any changes to your system & be careful about any 3rd-party offers while installing freeware.
If you enabled File History on Windows 10 to automatically back up your files, you may already have many backup versions on your computer. So you need to delete old backups to save disk space. This post from MiniTool provides 4 ways for you to delete old Windows 10 File History backup.
File History continuously protects personal files stored in the Library, Desktop, Favorites, and Contacts folders. It preserves every change to your personal files. However, your backups will get bigger and bigger until your disk is full.
You may want to delete old Windows 10 File History backup to release space. The following part introduces 4 ways for you.
How to Delete Old Windows 10 File History Backup?
Way 1: Change File History Backup Settings
The first method for you to delete File History backup is changing File History backup settings. Follow the guide below:
Step 1: Type Control Panel in the Search box and click Open to launch it.
Step 2: Click Small icons next to View by. Then, choose File History from the list.
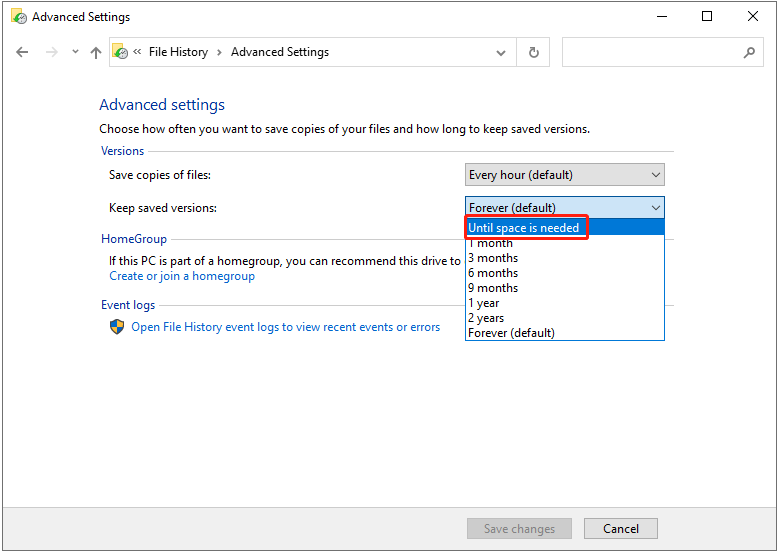
Step 3: Choose Advanced Settings in the left panel.
Step 4: Go to Versions > Keep saved versions and click the drop-down menu to choose Until space is needed. Then, click Save changes.
Way 2: Clean up Old Versions
The second method to delete File History Windows 10 is cleaning up old versions.
Step 1: Type Control Panel in the Search box and click Open to launch it.
Step 2: Click Small icons next to View by. Then, choose File History from the list.
Step 3: Choose Advanced Settings in the left panel.
Step 4: Go to Versions > Keep saved versions. Select Clean up versions under it.
Step 5: Select All but the latest one or older than 1 year (default).
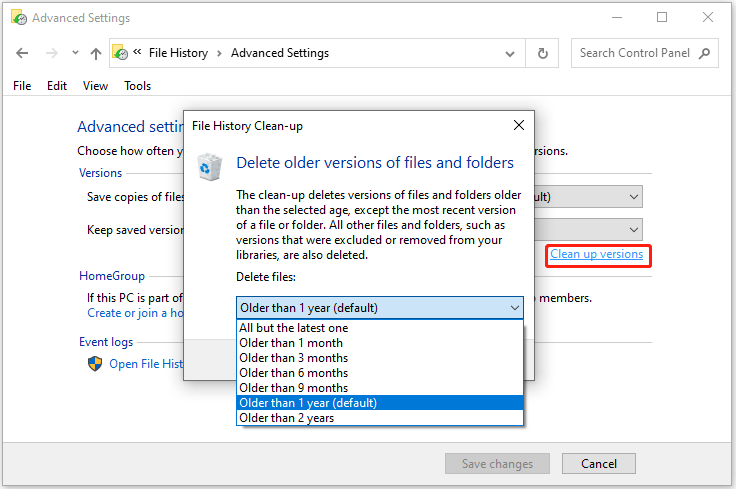
Step 6: Then, click Clean up to delete File History Windows 10 backup.
Way 3: Delete File History Backup via Command Prompt
To clear old versions of file history backups, there is also a command-line tool called fhmanagew.exe. FhManagew.exe deletes file versions older than the specified age from the currently assigned file history target device.
Step 1: Type cmd in the Search box and choose Run as administrator to open Command Prompt.
Step 2: Type the FhManagew.exe -cleanup (time) command and press Enter.
The number is the period of the backup you want to delete. Then, your old File History backups for the period you specified will be deleted.
- All but the latest one: FhManagew.exe -cleanup 0
- Older than 1 month: FhManagew.exe -cleanup 30
- Older than 3 month: FhManagew.exe -cleanup 90
- Older than 6 month: FhManagew.exe -cleanup 180
- Older than 1 year (default): FhManagew.exe -cleanup 365
Way 4: Turn off Back up Using File History
Another way to fix delete File History backup is by turning off back up using File History.
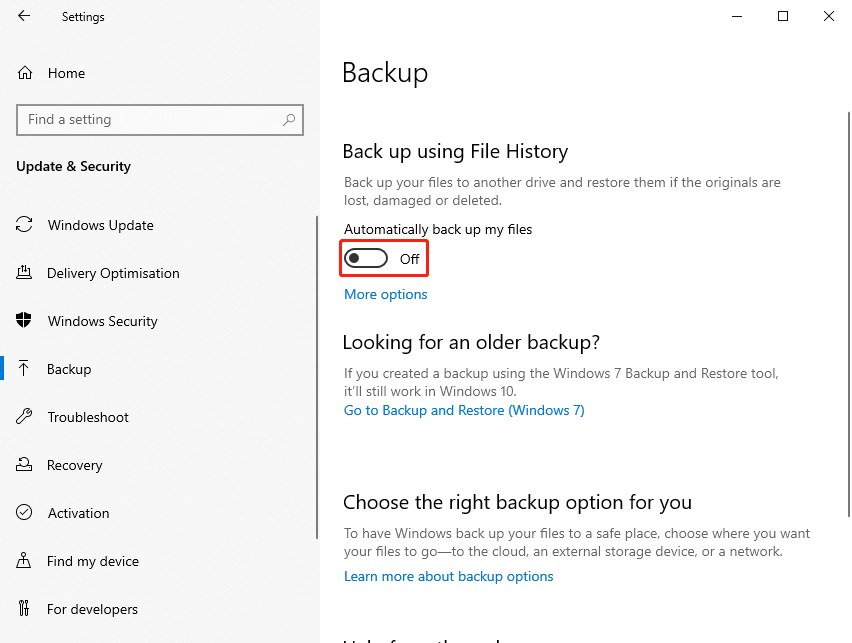
Step 1: Open Settings by pressing the Windows + I keys together.
Step 2: Go to Update & Security > Backup, then you will see Back up using File History.
Step 3: Turn off the Automatically back up my files button. If it shows Off, the File History is disabled.
Step 4: Go to the backup drive and delete the File History folder. Usually, it’s named as FileBackup.
File History Cannot Delete Old Backups
Some users report that they encounter the “File History delete old backup not working” issue. The error messages vary as follows:
- File History element not found
- Failed to perform File History cleanup with error 80040507
This issue can occur for various reasons such as corrupted system files, disk issues, etc. The easiest way to do this is to unplug all USB drives and devices connected to your computer and perform a File History cleanup again.
If the solution is not working, try the following solutions.
Fix 1: Transfer Files to the New User Profile
If your File History or user profile is corrupt, you can transfer files to a new user profile to fix the issue.
Step 1: Go to File Explorer > View > Options > Change folder and search options.
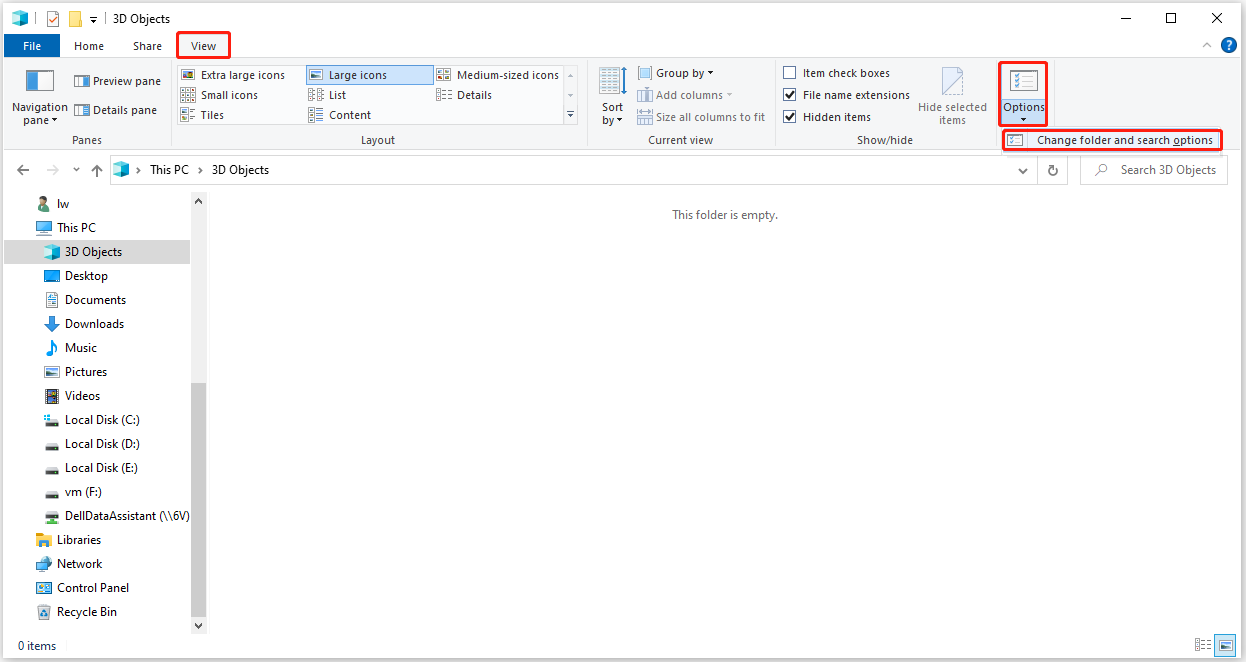
Step 2: In the Folder Options window, go to the View tab, check Show hidden files, folders or drives, and uncheck Hide protected operating system files. Then, click Apply and OK to confirm.
Step 3: Locate the C:\Users\Old_Username folder and C:\Users\New_Username folder. The C: is the drive with Windows installed on it. And the Old Username and New Username are the names of the profile you want to copy files from and to.
Step 4: Copy files in the older user profile and paste them into new user profiles. Please don’t copy the following 3 files.
- Ntuser.dat
- Ntuser.dat.log
- Ntuser.ini
Step 5: Restart your computer and see if you can access files in the new user profile.
Fix 2: Clean up and Repair the Disk
A full hard drive can also cause the “File History Clean up versions not working” issue. Thus, you should clean up and repair the hard drive. You can follow the steps below to do that:
Step 1: Type disk cleanup in the Search box and choose Disk Clean-up from the best match.
Step 2: In the pop-up window, the system drive is selected by default. You need to click OK to continue.
Step 3: Then, you will see how much disk space you can get in total by deleting all files listed in the box, including:
- Windows Upgrade Log Files.
- Setup Log File.
- Downloaded Program Files.
- Temporary Internet Files.
- System archived/queued Windows Error Reporting.
- Delivery Optimization Files.
- Recycle Bin.
- Temporary Windows Installation Files.
- Previous Windows installation(s).
Step 4: Now, select the file types you want to delete and click the OK button.
Step 5: Right-click the C drive in File Explorer to choose Properties. Then, click Tools and the Check button to check your drive for file system errors.
Fix 3: Reset File History
This solution is to reset File History and clean up your old version again.
Step 1: Go to Control Panel > System and Security > File History. Then, click Turn off if it says File History is on.
Step 2: Go to %UserProfile%\AppData\Local\Microsoft\Windows\FileHistory in File Explorer.
Step 3: Delete all files and folders.
Step 4: Go to File History in the Control Panel again and click Turn on.
Step 5: Click Advanced settings in the left menu, and set a longer backup frequency and shorter backup retention. Then Click Save changes.
Step 6: Now, you need to click Delete Files to confirm.
Fix 4: Run SFC
If there are some corrupted or missing system files, you may also encounter the File History can’t delete backups issue. You can run Windows System File Checker (SFC) to fix the issue.
Step 1: Type cmd in the search box. Right-click Command Prompt and choose Run as administrator.
Step 2: When you get into Command Prompt, input sfc /scannow and press Enter.
Step 3: Then Windows will scan for system file issues. You need to wait until the process is 100% completed. Now exit Command Prompt and restart the computer.
Fix 5: Uninstall Recent Updates
If the File History issue starts appearing after updating the operating system, you can uninstall the latest update and restart your computer
Step 1: Go to Control Panel. Under Programs, click Uninstall a program.
Step 2: Click View installed updates to uninstall an update.
Step 3: Then find the recent update and delete it.
How to Backup Files Without Occupying Much Disk Space
You can easily delete old Windows 10 File History backups, but it’s only temporary if you don’t configure your backup settings properly. The backup settings in File History are limited, the longest backup frequency is daily, the shortest retention is 1 month, and your file history drive will fill up quickly.
If you want more flexible backup features, it’s recommended to try a piece of professional backup software – MiniTool ShadowMaker. It allows you to perform system backup, partition backup, disk backup, file backup, and folder backup. Now, let’s see how to back up files without occupying much disk space in MiniTool ShadowMaker.
MiniTool ShadowMaker TrialClick to Download100%Clean & Safe
Step 1: After downloading MiniTool ShadowMaker, double-click it to enter its main interface and click Keep Trial.
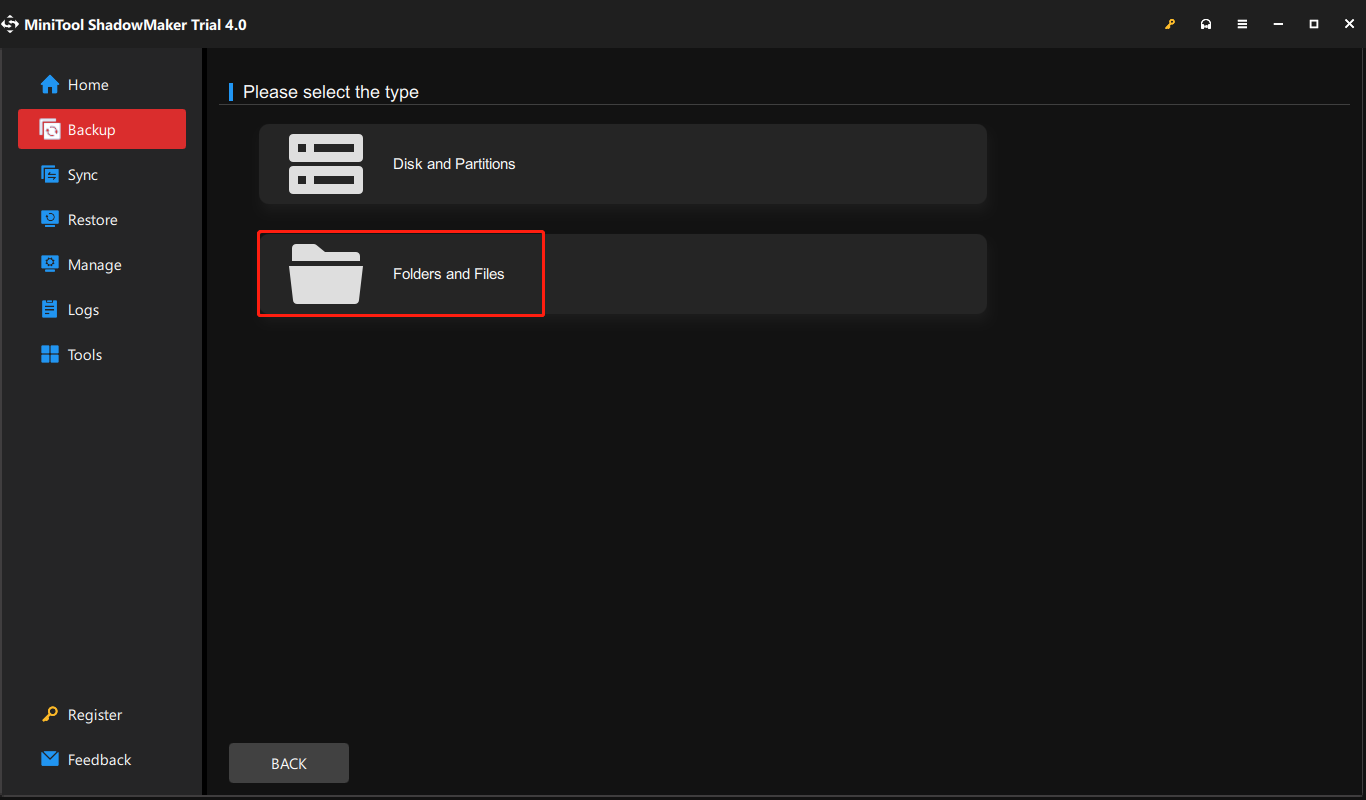
Step 2: Go to the Backup tab, and click the SOURCE part. Click Folders and Files to choose the files you want to backup.
Step 3: Click the DESTINATION part and choose a location to store your backup. Click OK to continue.
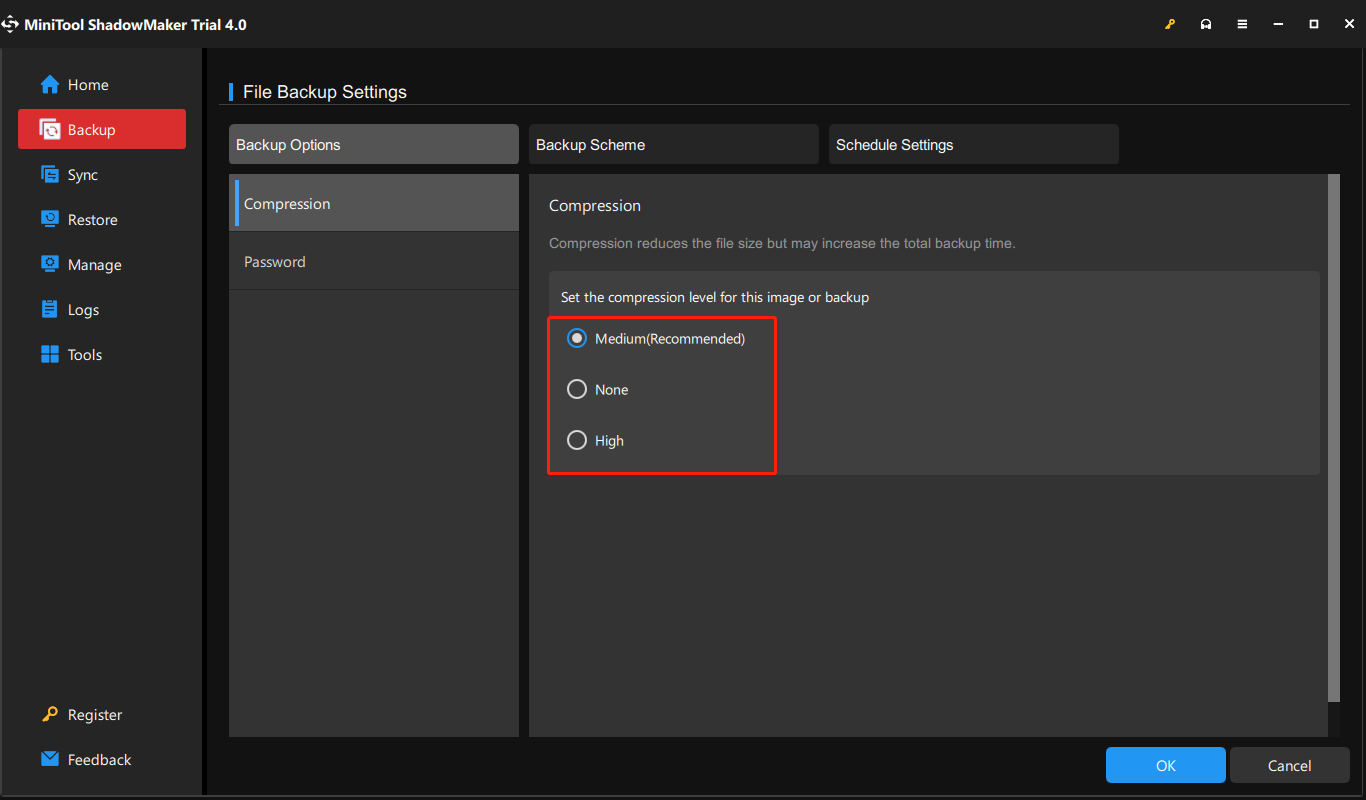
Step 4: Click the Options button on the lower right corner of the main interface. There are some file backup settings for you. Under the Backup options tab, click Compression. There are three options:
- Medium: Data will be compressed moderately. This is the default data compression level.
- None: Data will be imaged without any compression, which may increase the backup file size.
- High: This compression level will take a long time to create a backup and the image file size is smaller than the other two levels.
Step 5: Click OK. Then, you can click Back Up Now to perform the backup task immediately.
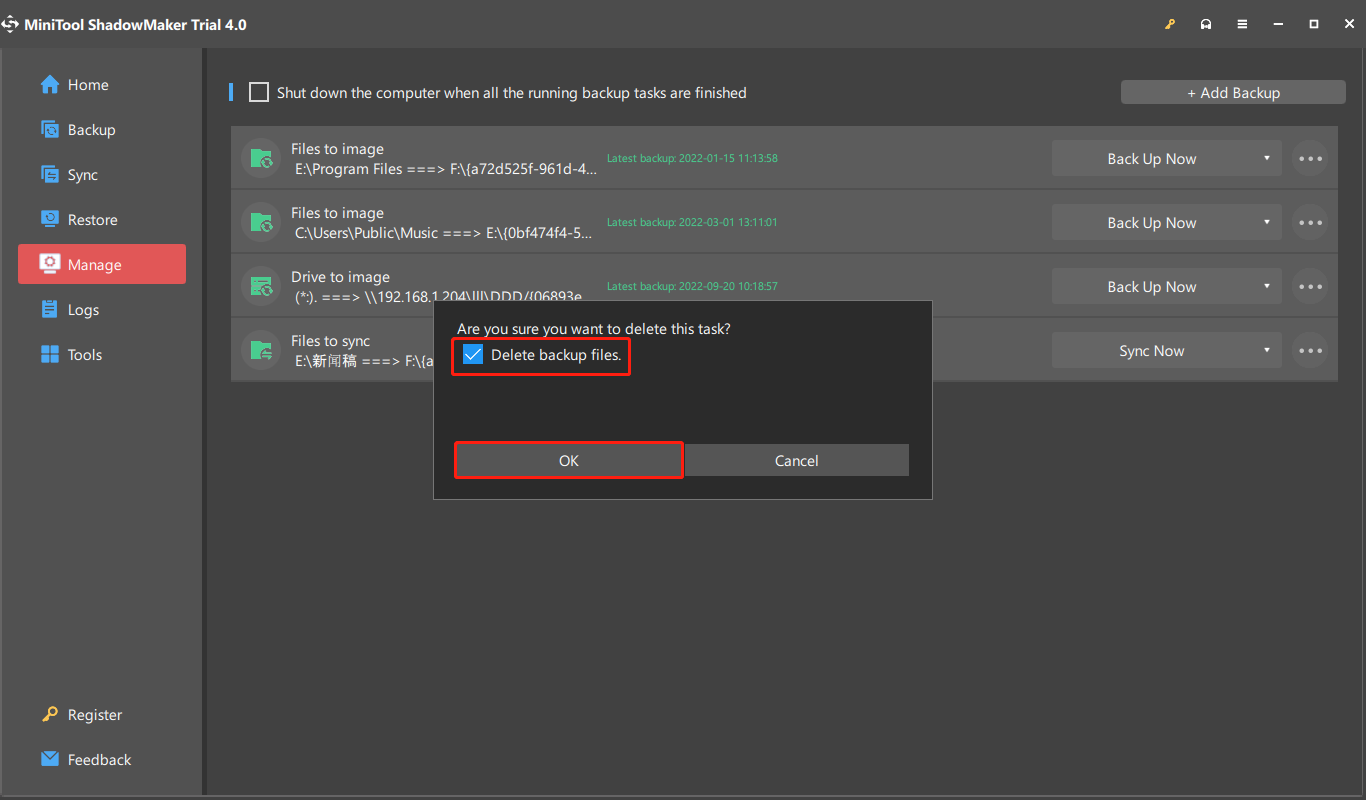
If you want to delete the backup files to get more space. Go to Manage and find your backup task. Click the three-dot menu next to your task and choose Delete. When you receive the Are you sure you want to delete this task? message, check the Delete backup files box.
Bottom Line
To sum up, this post has introduced 4 ways to delete old Windows 10 File History backup. If you come across the same issue, try these solutions. If you have any better solution to fix the issue, you can share it in the comment zone.
To back up files without occupying much space, it is recommended you use MiniTool ShadowMaker. If you have any problem when using the MiniTool program, please feel free to contact us via the email at [email protected] and we will reply to you as soon as possible.
-
Home
-
News
- What’s File History? How to Reset It?
What’s File History? How to Reset It?
By Linda | Follow |
Last Updated
File History is a backup and restore feature for personal files. If it doesn’t work, you may need to reset it. This post from MiniTool Partition Wizard shows you how to reset File History on Windows 11/10.
What Is File History?
File History is a snapshot mechanism for your files in the Libraries, Desktop, Contacts, and Favorites folders.
Tips:
Libraries are virtual containers for users’ content. Libraries are built upon the legacy known folders (such as My Documents, My Pictures, and My Music) that users are familiar with. In other words, Libraries include almost all folders under a user account.
The File History feature in Windows PC helps to save copies of files stored on the Desktop, Documents, Favorites, Pictures, Videos, Saved Games, Downloads, Music, and other locations to a network location or an external drive (SSD, HDD, or USB drive).
This lets you get back your files even if the original files are damaged or lost. In addition, you can also browse and restore different versions of your files.
Note that File History is not turned on by default in Windows 11/10/8. You need to enable it manually through the following steps:
- Open Control Panel.
- Change the View by to Large icons or Small icons.
- Click File History.
- Click Select drive on the left side and then select a File History drive. Click OK.
- Click Turn on.
If you want to restore files using File History, you need to click Restore personal files. Note that File History backs up only certain files. It cannot, for example, back up entire drives. Nor can File History restore an entire Windows installation.
If you face some problems in using File History, you may need to reset it. Resetting the File History settings to default won’t remove the File History folder stored in the backup drive. It only removes the File History folder and stored items available in your account or user profile.
How to reset File History Windows 10/11? You can refer to the guide below:
- Open File Explorer.
- Click View > Show > Hidden items.
- Go to C:\Users and then click your user account.
- Go to AppData > Local > Microsoft > Windows. The AppData folder is hidden by default. That’s why I ask you to show hidden items first.
- Find the FileHistory folder and open it. If the File History feature is turned off, you won’t see this folder.
- Delete all items stored in this folder.
You can also reset File History Windows 11/10 using commands. You just need to open Command Prompt and execute this command: if exist “%UserProfile%\AppData\Local\Microsoft\Windows\FileHistory” RD /S /Q “%UserProfile%\AppData\Local\Microsoft\Windows\FileHistory”.
This command first checks if the FileHistory folder exists on your PC. If yes, this command will delete the entire FileHistory folder to reset File History to default settings.
Bottom Line
MiniTool Partition Wizard is a functional tool. It can recover data from hard drive, migrate OS, clone disk, recover partitions, etc. If you have this need, download it to have a try.
MiniTool Partition Wizard DemoClick to Download100%Clean & Safe
About The Author
Position: Columnist
Linda has been working as an editor at MiniTool for 5 years. She is always curious about computer knowledge and learns it crazily. Her articles are simple and easy to understand. Even people who do not understand computer can gain something. By the way, her special focuses are disk management, data recovery and PDF editing.
You can create backups of crucial files and folders on an external storage device using the File History function. In general, this feature functions well, although occasionally bugs in the software or a faulty database can create problems. The best course of action in such cases is to reset the File History. So let’s look at some easy methods for Windows 11’s File History to be reset.
Also Read: How To Fix “File History Does Not Recognize This Drive” Error
Prerequisite: How To Restore Files With File History?
Before you consider resetting your file history, it is recommended to check the existing file history and restore files if required. Here are the steps to do that:
Step 1: Connect the storage device holding your backup files, if it is an external one.
Step 2: Type Control Panel into the taskbar search box, then choose it from the list of results.
Step 3: Type “File History” into the Control Panel’s search bar.
Step 4: From the list of results, choose Save backup copies of your files with File History. To restore your files, adhere to the instructions.
When you sign in with your Microsoft account on your new PC, settings from a Windows 11 device that you have opted to sync will be instantly restored. You can also get your OneDrive folders and Microsoft Store apps back in Windows 11.
Also Read: 6 Ways To Fix “We Found Errors In File History Settings“ Error
How To Use The File Explorer To Reset File History?
To access files and directories on your computer, you typically utilize Windows File Explorer. However, if you take the proper steps, you can also use it to reset the File History. The steps are as follows:
Step 1: To launch the File Explorer, press the Win + E key.
Step 2: Next use the mouse to click on the View dropdown on the top tab. Bring your mouse cursor on Show and then select Hidden Items.

Step 3: Press the Enter key after pasting the following address into the File Explorer’s address field.
%UserProfile%\AppData\Local\Microsoft\Windows

Step 4: To choose all the continents in this folder, you need to click on Ctrl + A. Press the Delete button on your keyboard to delete the contents of this folder.
Also Read: Best Ways To Fix Your File History Drive Was Disconnected For Too Long on Windows 11/10
How To Use The Command Prompt To Reset File History?
You may utilize the Command Prompt, a crucial Windows tool, to correct damaged files, carry out administrative procedures, delete file histories, and much more. Here is how to reset File History on Windows 11 using this tool:
Step 1: Press Win + R to open the RUN command.
Step 2: Type “CMD” in the text space and then press Ctrl + Shift + Enter to open the Command Prompt window in elevated mode.
Step 3: In the Command Prompt window, type the following command and hit Enter.
if exist "%UserProfile%\AppData\Local\Microsoft\Windows\FileHistory" RD /S /Q "%UserProfile%\AppData\Local\Microsoft\Windows\FileHistory"

Also Read: How To Disable File Explorer Search History In Windows 11
Bonus Feature: Backup System Files Using Advanced System Optimizer
If you want to take a back of the important settings and files of your system then the main issue would be to identify those files. In this case, Advanced System Optimizer can help auto-detect the important system files and take a backup. You can take a backup of your system files when your system is running in an optimal state. Later on, this backup can be used to restore the system files if there arises issues with your PC.

Advanced System Optimizer is a complete PC Optimization tool that helps remove junk files, temp files, uninstall programs completely, optimize registry, and much more. It also has separate modules for finding duplicate files and updating your drivers as well. The Undelete module helps users recover their accidentally deleted files provided they have not been overwritten.
Also Read: How To Fix Common Computer Errors On Your Computer Using Advanced System Optimizer?
The Final Word On How To Reset The File History On Windows 11?
These were all available techniques for Windows 11’s File History Reset. Despite the fact that either technique is helpful, we advise customers who are new to the OS to choose the first one because it does not require command-line tools like Command Prompt, which may be a bit difficult to follow.
Please let us know in the comments below if you have any questions or recommendations. We would be delighted to provide you with a resolution. We frequently publish advice, tricks, and solutions to common tech-related problems. You can also find us on Facebook, Twitter, YouTube, Instagram, Flipboard,and Pinterest.
История файлов (File history) — механизм резервного копирования данных, появившийся в Windows 8. В отличии от классических систем резервного копирования история файлов является достаточно узкоспециализированной вещью. С ее помощью нельзя создать образ системы или забэкапить диск, основное предназначение истории файлов — предоставить пользователю максимально простой и быстрый способ восстановления удаленных\измененных файлов.
Что интересно, изначально история файлов пришла на замену ″выпиленной″ из восьмерки технологии Pervious Versions. Однако в Windows 10 Pervious Versions вернули на прежнее место, так что у пользователя есть возможность выбора между двумя этими технологиями. И сегодня мы разберемся в том, как пользоваться историей файлов, а также немного поговорим о принципе ее работы и тонкостях настройки.
Включение и настройка
Открыть историю файлов можно разными способами, самый быстрый — это нажать Win+R и выполнить команду filehistory.
По умолчанию история файлов не включена, поэтому при первом входе вам будет предложено перейти по ссылке и настроить ее.

Первое, что необходимо сделать — это убедиться в наличии диска для хранения резервных копий. Если система не находит подходящий диск, то выводится соответствующее предупреждение, а кнопка включения неактивна.

Для выбора диска необходимо перейти в раздел «Смена диска» и указать место хранения резервных копий. Для архивирования можно использовать:
• Любой раздел текущего жесткого диска (кроме системного);
• Любой раздел другого физического диска;
• Внешний жесткий USB-диск или флешку;
• Сетевую папку.

По умолчанию в резервную копию включается все содержимое пользовательского профиля — «Библиотеки», «Рабочий стол», «Контакты» и «Избранное», а также содержимое облачного хранилища OneDrive (если оно подключено). При необходимости некоторые отдельные папки можно исключить из бэкапа. Для этого надо перейти в раздел «Исключение папок» и выбрать папки, которые не надо включать в резервную копию.

Также в разделе «Дополнительные параметры» необходимо настроить частоту создания резервных копий. По умолчанию копии создаются каждый час, но можно указать интервал от 10 минут до 1 дня.

Там же указываем длительность хранения резервных копий — от 1 месяца до бесконечности. По умолчанию это время не ограничено и зависит только от наличия свободного места на диске.

После всех настроек остается только нажать кнопку «Включить» и активировать историю файлов.

После включения сразу запускается процесс первоначальной архивации. Затем архивация производится по заданному расписанию, а также можно запустить ее вручную в любой момент.

Настроить Историю файлов можно и из новой панели управления, перейдя в меню Пуск -> Параметры -> Обновление и безопасность -> Служба архивации.

Здесь можно произвести все те-же настройки — указать частоту резервного копирования и срок хранения,

выбрать диск и исключить лишние папки.

А также отсюда можно добавить в бэкап любую произвольную папку. Так для примера я добавил папку C:\Documents, не входящую в профиль пользователя.

Восстановление
Открыть окно восстановления истории файлов можно командой filehistory, либо в проводнике выбрать нуждающуюся в восстановлении файл\папку и кликнуть по значку на ленте.

Окно восстановления представляет из себя некую смесь проводника с медиа-плеером. Содержимое можно упорядочить нужным образом, задавать нужный вид (значки, таблица и т.п.), воспользоваться поиском. Бэкапы отсортированы по дате создания, навигация по ним производится с помощью стрелок, расположенных снизу окна.

По версиям можно перемещаться как в основном разделе, так и внутри каждой папки, что очень удобно. В каждой папке показаны файлы, которые были в ней на момент создания резервной копии. К примеру, если файл находился в папке Documents и был удален в 13;05, то его можно найти в папке за 13:01.

Найдя нужный файл, его можно просмотреть прямо в окне восстановления. Это очень удобно в том случае, если требуется найти определенную версию файла. Предпросмотр работает для текстовых файлов, изображений, а также аудио и видео файлов (которые может открыть Windows Media Player). Если файл нельзя открыть с помощью встроенных средств Windows, то просмотреть его не удастся, но будет предложено открыть его с помощью подходящей программы.

Определившись с версией, можно восстановить файл в исходную папку либо выбрать другое расположение.

Принцип работы
История файлов не использует для создания резервных копий механизм теневого копирования (VSS), за ее работу отвечает специальная служба fhsvc. Эта служба включена по умолчанию и работает независимо от того, активна или нет история файлов.
Резервное копирование осуществляется не на блочном уровне (как у традиционных систем резервного копирования), а на уровне файлов. Т.е. вместо полного сканирования всех каталогов и файлов на наличие изменений служба просто проверяет журнал изменений файловой системы NTFS (usn change journal) и составляет список измененных файлов, которые необходимо скопировать. Соответственно в резервную копию попадают только файлы, измененные со времени последнего бэкапа.

Данные хранятся на бэкапном диске в папке FileHistory\UserName\ComputerName\Data. Подобная схема позволяет хранить в одном расположении бэкапы разных пользователей и (при использовании общего сетевого хранилища) с разных компьютеров. Примечательно, что первоначальное разделение производится по имени пользователя, а не компьютера.

Структура хранения резервных копий полностью повторяет структуру папок, включенных в историю файлов. В каждой папке располагаются все имеющиеся в наличии версии файлов. Каждый файл содержит в своем имени дату создания резервной копии в формате UTC. К примеру, в исходной папке Documents находятся 2 файла — FileHistory1.txt и 01_high.mp4. Посмотрев содержимое резервного хранилища, можно сделать вывод, что 01_high.mp4 изменялся один раз, а FileHistory1.txt подвергся изменению дважды.
Обратите внимание, что при хранении резервных копий не используется сжатие. Такой подход помогает ускорить навигацию и просмотр содержимого, однако требует много дискового пространства. Этот момент стоит учитывать при настройке частоты резервного копирования, особенно при наличии большого количества часто изменяемых файлов.

Впрочем, при недостатке места лишние копии можно удалить вручную. Для этого надо перейти в раздел дополнительных параметров, кликнуть по ссылке «Очистить версии» и указать версии, которые можно удалить.

Кроме пользовательских папок для каждого компьютера создается папка Configuration, в которой хранится конфигурация истории файлов. Файл EDB по идее должен содержать список путей и имен файлов, а в XML файле хранятся настройки резервного копирования. Оба файла имеют по две версии. Опытным путем было выяснено, что версия с префиксом 2 — это первоначальный вариант, а версия с префиксом 1 содержит последние изменения.

Автономный кэш
Еще один важный момент, о котором стоит знать. В том случае, если недоступен внешний диск или сетевая папка, на которой хранятся резервные копии, File History использует временное хранилище, или автономный кэш (offline cashe). Этот кэш располагается в профиле пользователя, в директории C:\Users\username\AppData\Local\Microsoft\Windows\FileHistory. Пока диск недоступен, резервные копии файлов сохраняются в кэш, а как только подключение к диску восстановлено, то все его содержимое переносится на диск и кэш очищается. Также в кэше хранятся файлы конфигурации, что позволяет истории файлов продолжать работу даже при отключенном диске.
Что интересно, в Windows 8.1 имелась настройка, позволяющая задать размер кэша в процентах от размера диска (от 2% до 20%). Однако в Windows 10 этот параметр отсутствует, видимо разработчики сочли подобную информацию излишней для пользователя. Впрочем, при желании эти настройки можно найти в файле конфигурации, в секции StagingArea, где указаны допустимые размеры кэша и его местоположение.

Управление
Как ни странно, но инструментов для централизованного управления историей файлов нет, по крайней мере я их не нашел. Видимо этот функционал предназначен исключительно для индивидуального пользования, поскольку нет ни утилиты командной строки, ни PowerShell модуля, ни групповых политик — только графическая оснастка. Единственное, что мне удалось откопать — это параметр групповой политики, позволяющий запретить использование истории файлов. Находится он в разделе Конфигурация компьютера\Административные шаблоны\Компоненты Windows\История файлов (Computer Configuration\Administrative Templates\Windows Components\File History).

Если этот параметр включен, то историю файлов нельзя использовать, если отключен или не задан (значение по умолчанию) — то можно.

Эта же настройка находится в реестре, в разделе HKLM\Software\Policies\Microsoft\Windows\FileHistory. За нее отвечает параметр типа DWORD с именем Disabled, который имеет два значения:
0 — история файлов доступна для включения;
1 — история файлов запрещена.

Заключение
В заключение несколько важных моментов, которые нужно знать при использовании истории файлов:
• Не рекомендуется хранить резервные копии на одном физическом диске с оригинальными файлами, т.к. при выходе диска из строя все файлы будут потеряны;
• История файлов не поддерживает использование EFS (Encrypting File System). Если требуется шифрование, то можно воспользоваться BitLocker;
• История файлов не производит бэкап содержимого OneDrive до тех пор, пока оно не станет доступно в оффлайне;
• В отличие от традиционых систем резервного копирования история файлов не требует от пользователя административных прав при настройке и использовании. Любой пользователь компьютера может настроить бэкап своих файлов в удобное для себя расположение;
• И на всякий случай напомню, что история файлов не является полноценной системой резервного копирования и может использоваться лишь как дополнение к полному бэкапу системы, а не вместо него.