
User Profile Disks (UPD, диски профилей пользователей) позволяет хранить профиль каждого пользователей Remote Desktop Services (
%USERPROFILE%
) в отдельном виртуальном VHDX диске. Такой профиль подключается при входе пользователя в Windows и отключается при выходе (с сохранением изменений в профиле). User Profile Disks можно хранить на внешнем файловом ресурсе, благодаря чему пользователь может получить доступ к своему окружению (профили) при входе на любой сервер фермы RDS. UPD диски представляют собой альтернативу использованию технологий перемещаемых профилей (roaming profile) и перенаправления папок (folder redirection) в терминальных сценариях RDS.
В этой статье мы рассмотрим особенности настроить и использовать профили User Profile Disks на серверах с ролью Remote Desktop Services на Windows Server 2022/2019/2016/2012R2.
Содержание:
- Настройка User Profile Disks в Windows Server RDS
- VHDX файлы с UPD профилями пользователей RDS
- Как расширить/сжать диск User Profile Disk с помощью PowerShell?
- Временный профиль при использовании User Profile Disk в RDS
Настройка User Profile Disks в Windows Server RDS
Создайте общую сетевую папку для хранения файлов профилей UPD. Эту папку нужно разместить на любом файловом сервере за пределами фермы RDS ( рекомендуем расположить сетевую папку на кластере для обеспечения высокой доступности UPD профилей). В нашем примере, путь к такому каталогу будет выглядеть так:
\\srv01\RDSProfiles
.
Создайте в AD группу безопасности, в которую нужно включить все хосты в вашей RDS коллекции. МОжете создать группу с помощью графической консоли ADUC или с помощью PowerShell командлетов из модуля Active Directory for Windows PowerShell:
New-ADGroup mskRDSHCollection1 -path "OU=Groups,OU=MSK,OU=RU,DC=winitpro,DC=loc" -GroupScope Domain -PassThru –Verbose
Add-AdGroupMember -Identity mskRDSHCollection1 -Members msk-rds1$, msk-rds2$, msk-rds3$
Теперь предоставьте права Full Control на папку \\srv01\RDSProfiles для группы mskRDSHCollection1.
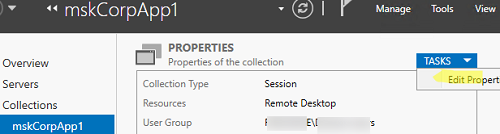
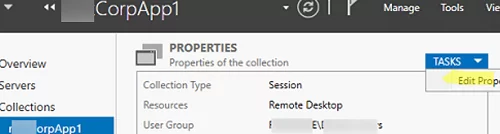
Вы можете включить User Profile Disks в настройках коллекций Remote Desktop при ее создании. Если коллекция уже создана, найдите ее в консоли Server Manager и в верхнем левом углу выберите Tasks-> Edit Properties.
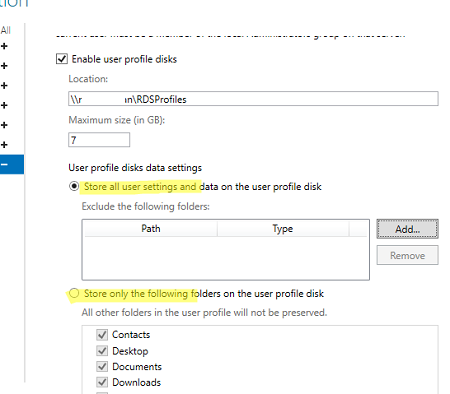
Затем в разделе User Profile Disks включите опцию Enable user profile disks, укажите к созданной ранее сетевой папке (
\\srv01\RDSProfiles
) и задайте максимальный размер диска с профилем (пусть это будет 7 Гб). Сохраните изменения.
Допустимо использовать пространство имен DFS для хранения UPD профилей DFS сервера. На DFS хостах нужно использовать Windows Server 2012 R2 или более новые версии. При использовании предыдущих версий Windows Server вы получите ошибку:
Unable to enable user disks on rVHDShare. Could not create template VHD. Error Message: The network location "\\winitpro.ru\namespace\UPD1" is not available.
Вы можете проверить, что UPD включен для коллекции RDS и получить путь к каталогу, в котором хранятся профиля с помощью команды:
Get-RDSessionCollectionConfiguration -CollectionName mskCorpApp1 –UserProfileDisk

Совет. Для каждой RDS коллекции создается только один vhdx файл с UPD профилем пользователя. Если пользователь подключается к хостам из двух разных RDS коллекций, для каждой из них будет создан отдельный vhdx файл.
По умолчанию UPD диск хранит все содержимое профиля пользователя. Вы можете исключить определенные папки из списка синхронизируемых каталогов. Если каталог исключен из профиля, изменения в нем не будут сохраняться в VHDX диске в сетевом каталоге. Доступные две опции:
- Store all user settings and data on the user profile disk
- Store only the following folders in the user profile disk
При использовании RDS с UPD на Windows Server 2019/2016 со временем вы можете столкнуться со снижением производительности серверов, появления черного экрана при входе в RDP. Подробно проблема описана здесь. Рекомендуем сразу включить на всех RDS хостах параметр реестра DeleteUserAppContainersOnLogoff:
New-ItemProperty -Path “HKLM:\SYSTEM\CurrentControlSet\Services\SharedAccess\Parameters\FirewallPolicy” -Type DWord -Path -Name DeleteUserAppContainersOnLogoff -Value 1
VHDX файлы с UPD профилями пользователей RDS
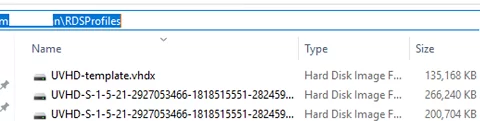
После того, как вы изменили настройки коллекции и включили UPD, в целевом каталоге будет создан файл UVHD-template.vhdx.
Этот файл представляет собой шаблон виртуального диска с профилем пользователя. Когда новый пользователей подключается к серверу RDS по RDP, этот шаблон копируется и переименовывается в vhdx файл, содержащий в имени SID пользователя. Для каждого пользователя создается отдельный VHDX файл.
Совет. Информацию о событиях входа пользователей можно отслеживать в журнале Event Viewer -> Application (источник User Profile Service) и Applications and Services Logs -> -Microsoft -> Windows -> User Profile Service -> Operational.

Чтобы понять, какому пользователю принадлежит VHDX файл, нужно сопоставить имя UPD файла с именем пользователя. Можно вручную преобразовать SID в имя учетной записи с помощью командлета Get-ADUser:
Get-ADUser -Identity S-1-5-21-305647651-3952524288-2944781117-23711116
Или воспользуйтесь скриптом ShowUPDFolderDetails.ps1, который выводит имена UPD файлов и их владельцев:
$UPDShare = "\\srv01\RDSProfiles"
$UserProfiles = @()
$fc = new-object -com scripting.filesystemobject
$folder = $fc.getfolder($UPDShare)
"Username,SiD" >> export.csv
foreach ($i in $folder.files)
{
$sid = $i.Name
$sid = $sid.Substring(5,$sid.Length-10)
if ($sid -ne "template")
{
$securityidentifier = new-object security.principal.securityidentifier $sid
$user = ( $securityidentifier.translate( [security.principal.ntaccount] ) )
$UserProfile = New-Object PSObject -Property @{
UserName = $user
UPDFile=$i.Name
}
 $UserProfiles += $UserProfile
}
}
$UserProfiles| select UserName, UPDFile

Т.к. UPD профиль представляет собой обычный файл виртуального диска в формате VHDX, вы можете смонтировать его и просмотреть содержимое. Щелкните правой кнопкой по файлу и выберите Mount.
Как вы видите, содержимое VHDX диска представляет набор каталогов и файлов обычного профиля пользователя.
UPD профиль может монтируется в монопольном режиме. Это значит, что, если профиль пользователя сейчас подключен в RDS сессии пользователя или смонтирован вручную, вы не сможете открыть его с ошибкой: The file couldn’t be mounted because it’s in use.
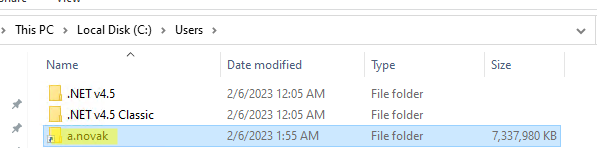
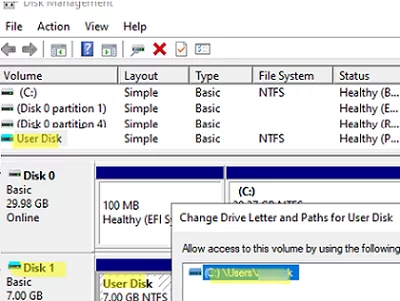
На сервере RD Session Host профиль пользователя в файле VHDX монтируется в каталог C:\users\<username> и выглядит таким образом:
Обратите внимание, что UPD диск привязан к версии Windows Server на RDS хосте. Вы не сможете перенести UPD профиль пользователя с RDS сервера с одной версии Windows Server на другую.
Запись данных в файл vhdx ведется в реальном времени. Т.е. при копировании данных в профиль пользователя на сервере RDS, размер vhdx файла на общем хранилище увеличивается сразу.
Если в Windows уже есть каталог с профилем пользователя, каталог со старым профилем переименовывается в формат <username>-BACKUP-<number>.
VHDX диск монтируется при старте сессии пользователя на VDI или RDS сервере. Каждый UPD профиль монтируется в каталог C:\Users. Список смонтированных VHDX дисков с профилями отображается в консоли Disk Management.
Как расширить/сжать диск User Profile Disk с помощью PowerShell?
Вы можете расширить виртуальный vhdx диск с UPD профилем конкретного пользователя с помощью PowerShell командлета Resize-VirtualDisk из модуля Hyper-V (на компьютере должны быть установлены компоненты управления Hyper-V: Enable-WindowsOptionalFeature -Online –FeatureName Microsoft-Hyper-V-Management-Clients )
Net use U: \\srv01\RDSProfiles
Resize-VHD -Path u:\UVHD-<SID>.vhdx -SizeBytes 30GB
Net use U: /delete
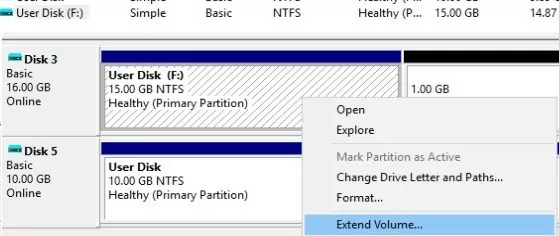
Теперь нужно расширить раздел из графического интерфейса консоли Управления дисками (Disk Manager). Действие –> Подключить виртуальный жесткий диск -> Расширить том.

Либо воспользуйтесь таким PowesShell скриптом:
<#
.Synopsis
This script extend size of VHDX file and resize the disk partition to Max
#>
Param(
[Parameter(Mandatory=$true,ValueFromPipeline=$true)]
[alias("Path")]
[string]$vhdxFile,
[Parameter(Mandatory=$true,ValueFromPipeline=$true)]
[alias("Size")]
[int64]$vhdxNewSize
)
begin{
try {
Mount-VHD -Path $vhdxFile -ErrorAction Stop
}
catch {
Write-Error "File $vhdxFile is busy"
Break
}
$vhdx = Get-VHD -Path $vhdxFile
if ($vhdx.Size -ge $vhdxNewSize){
Write-Warning "File $vhdxFile already have this size!"
$vhdx | Dismount-VHD
Break
}
}
process{
Dismount-VHD -Path $vhdxFile
Resize-VHD -Path $vhdxFile -SizeBytes $vhdxNewSize
$vhdxxpart = Mount-VHD -Path $vhdxFile -NoDriveLetter -Passthru | Get-Disk | Get-Partition
$partsize = $vhdxxpart | Get-PartitionSupportedSize
$vhdxxpart | Resize-Partition -Size $partsize.SizeMax
}
end{
Dismount-VHD -Path $vhdxFile
}
Обратите внимание, что нельзя расширить UPD диск пользователя с активной RDS сессией.
Чтобы уменьшить размер файла UPD (при условии, что вы удалили данные пользователя внутри vhdx файла и размер файлов на диске меньше выделенного ему размера) можно воспользоваться командами:
resize-VHD \\srv01\RDSProfiles\UVHD-<SID>.vhdx –ToMinimumSize
А затем:
Optimize-vhd -path \\srv01\RDSProfiles\UVHD-<SID>.vhdx -mode full
Временный профиль при использовании User Profile Disk в RDS
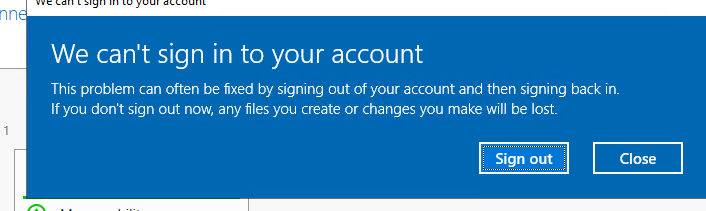
Одной из частых проблем, с которых вы можете столкнуться при использовании RDS – периодическое появление временных профилей пользователей.
We can’t sign in to your account.
You’ve have been signed in with a temporary profile.
You can’t access your files, and files created in this profile will be deleted when you sign out. To fix this, sigh out and try signing later.
При этом для пользователя создается временный профиль:
Event ID 1511
Source: User Profile Service
Windows cannot find the local profile and is logging you on with a temporary profile. Changes you make to this profile will be lost when you log off.
Чаще всего это связано с тем, что в предыдущей сессии VHDX файл пользователя не был освобожден. Вы можете найти RDSH хост, на котором сейчас подключен VHDX диск пользователя. Вы можете использовать такой PowerShell скрипт (запускается на сервере с ролью RD Connection Broker)
$UserToFind = "a.novak"
$User = $env:USERDOMAIN + '\' + $UserToFind
$RDCollection = Get-RDSessionCollection | where {$_.ResourceType -eq 'Remote Desktop'}
$RDHosts = Get-RDSessionHost -CollectionName $RDCollection.CollectionName | select SessionHost
$Array = Invoke-Command -ComputerName $RDHosts.SessionHost -ScriptBlock { Get-Disk | select Location,DiskNumber | where {$_.Location -notmatch "Integrated"} }
foreach ($VHD in $Array){
$DiskID = (Get-Item $VHD.Location).Name.Substring(5).Split(".")[0]
$objSID = New-Object System.Security.Principal.SecurityIdentifier ($DiskID)
$objUser = $objSID.Translate( [System.Security.Principal.NTAccount])
if ($objUser.Value -eq $User){
$result = "$($objUser.Value) disk number $($VHD.DiskNumber) on $($VHD.PSComputername)"
}else{
$result = "$($User) - no active RSH sessions were found."
}
}
$result

Можно удаленно отмонтировать UPD диск командой:
Invoke-Command -ComputerName $VHD.PSComputername -ScriptBlock { Dismount-VHD -DiskNumber $VHD.DiskNumber }
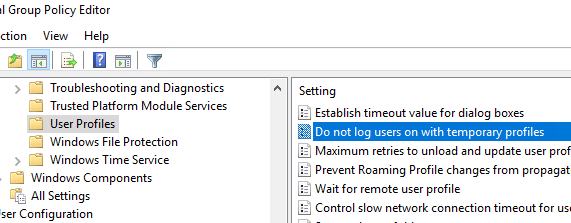
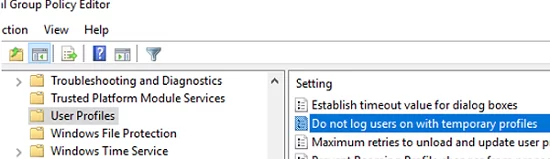
Чтобы уменьшить количество проблем с временными профилями на RDS, рекомендуем настроить таймауты для RDS сессий пользователей (установите отключение через 2-4 часа для неактивных сессий). Также вы можете включить параметр GPO, который запрещает создание временных профилей: Computer Configuration -> Administrative Templates -> System -> User profiles, включите параметр Do not log users on with temporary profiles.
После освобождении VHDX диска администратору нужно вручную удалить временный профиль пользователя:
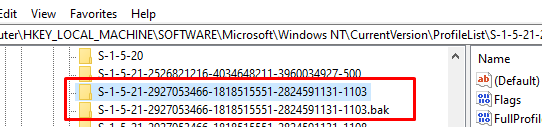
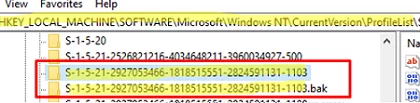
- Удалите ветки с SID пользователя в разделе реестра
HKEY_LOCAL_MACHINE\SOFTWARE\Microsoft\Windows NT\CurrentVersion\ProfileList
. В этом примере есть две ветки, одна из которых с суффиксом .bak);
- Удалите TEMP папку пользователя из каталога
C:\Users
.Подробнее об удалении профилей пользователей в Windows в статье по ссылке.
В этой статье мы рассмотрели, как настроить профили User Profile Disks в RDS на Windows Server. Настройка UPD намного проще чем процесс настройки перемещаемых профилей и перенаправляемых папок. Диски привязаны к коллекции RDS и не могут повредиться при попытке совместного использования профиля несколькими терминальными серверами (в отличии от обычных профилей). Диски профилей пользователей могут храниться на SMB шарах, CSV, SOFS, в SAN или на локальных дисках.
User Profile Disk (UPD) allows you to store the profile of each Remote Desktop Services user (%USERPROFILE%) in a separate VHDX (virtual disk) file. Such a profile disk is connected when the user logs on to Windows and will be disconnected when the user logs out (with the changes to the profile being saved). You can store user profile disks on an external file share so that a user can access their environment (profiles) when they login to any server in the RDS farm. UPDs are an alternative to roaming profile or folder redirection technologies in RDS terminal solutions.
In this article, we’ll describe how to configure and manage User Profile Disks on hosts with the Remote Desktop Services role running on Windows Server 2022, 2019, 2016, or 2012R2.
Contents:
- Enable User Profile Disks on Windows Server RDS
- User Profile Disks in VHDX Files on RDS
- How to Expand/Reduce User Profile Disk with PowerShell?
- Temporary Profile Issue When Using User Profile Disks on RDS
Enable User Profile Disks on Windows Server RDS
Create a shared network folder to store the UPD profile files. This folder must be located on a file server outside the RDS farm. To ensure the high availability of UPD profiles, we recommend that you place the network folder on a cluster. The path to such a directory looks like this in our example: \\fs01\RDSProfiles .
Create a security group in AD and add all the hosts in your RDS collection to it. You can create a group using the ADUC graphical console or using cmdlets from the Active Directory for Windows PowerShell module:
New-ADGroup munRDSHCollection1 -path "OU=Groups,OU=MUN,DC=woshub,DC=loc" -GroupScope Domain -PassThru –Verbose
 Add-AdGroupMember -Identity munRDSHCollection1 -Members munrds1$, munrds2$, munrds3$
To add computers to an AD group, you must add $ to the end of the computer name (this is part of the SAMAccountName attribute).
Now grant Full Control permissions on the \\fs01\RDSProfiles folder for the munRDSHCollection1 group.
You can enable User Profile Disks in the Remote Desktop Collection settings when you create it. If the collection already exists, find it in the Server Manager console and select Tasks-> Edit Properties in the upper right corner.
User Profile Disks mode can be enabled and configured in the collection settings of Remote Desktop Services. This mode can be enabled when creating a new collection, or you can return to it later.
Then go to the User Profile Disks tab. Check the option Enable user profile disks, specify the path to the previously created shared folder (\\fs01\RDSProfiles), and set a maximum profile disk size (let it be 7 GB). Save the changes.
It is possible to use a DFS namespace to store the UPD profiles of a DFS server, but this configuration is not officially supported. DFS hosts must be running Windows Server 2012 R2 or later. If you are using earlier versions of Windows Server, you will receive an error:
Unable to enable user disks on rVHDShare. Could not create template VHD. Error Message: The network location "\\woshub.com\namespace\UserProfileDisk" is not available.
You can check if UPD is enabled for the RDS collection and get the path to the directory where the profiles are stored with the PowerShell command:
Get-RDSessionCollectionConfiguration -CollectionName munCorpApp1 –UserProfileDisk

Tip. In a single RDS collection, there can exist only one VHDX profile file for one user. If a user connects to the resources from two different collections, a separate profile disk will be created for each of them.
By default, a User Profile Disk contains all the user profile contents. You can exclude certain folders from the list of synchronized directories or specify that only certain folders should be saved. Thus, any changes made to the folders in the list of excluded directories during the user’s terminal session will not be saved to the VHDX disk in the shared folder. There are two options available:
- Store all user settings and data on the user profile disk
- Store only the following folders in the user profile disk
If you are using RDS with UPD on Windows Server 2019/2016, over time you may experience RDS host performance degradation. We recommend you immediately enable the DeleteUserAppContainersOnLogoff registry option on all RDS hosts.
New-ItemProperty -Path “HKLM:\SYSTEM\CurrentControlSet\Services\SharedAccess\Parameters\FirewallPolicy” -Type DWord -Path -Name DeleteUserAppContainersOnLogoff -Value 1
User Profile Disks in VHDX Files on RDS
After you have changed the collection settings and enabled UPD, a file called UVHD-template.vhdx will be created in the target UPD folder.
This file is the template for the user’s profile disk. When a user logs on to the RDS server for the first time, this template is copied and renamed as a VHDX file with the user’s SID in the name. For each user, a separate VHDX file is created.
Hint. For detailed logs about using UPD to log on to the server, see Event Viewer -> Application (with the User Profile Service source) and Applications and Services Logs -> -Microsoft -> Windows -> User Profile Service -> Operational.
You can match the UPD file name with the owner user. For example, you can manually convert the SID to a user account name using the Get-ADUser cmdlet:
Get-ADUser -Identity S-1-5-21-32549751-3956249758-2943215497-23733695
Or use the ShowUPDFolderDetails.ps1 script, which displays the names of UPD files in a specified folder and their owners:
$UPDShare = "\\fs01\RDSProfiles"
 $UserProfiles = @()
 $fc = new-object -com scripting.filesystemobject
 $folder = $fc.getfolder($UPDShare)
 "Username,SiD" >> export.csv
 foreach ($i in $folder.files)
 {
 $sid = $i.Name
 $sid = $sid.Substring(5,$sid.Length-10)
 if ($sid -ne "template")
 {
 $securityidentifier = new-object security.principal.securityidentifier $sid
 $user = ( $securityidentifier.translate( [security.principal.ntaccount] ) )
 $UserProfile = New-Object PSObject -Property @{
 UserName = $user
 UPDFile=$i.Name
 }
 $UserProfiles += $UserProfile
 }
 }
 $UserProfiles| select UserName, UPDFile

Since the UPD profile is a regular virtual disk file in VHDX format, you can mount it and view its contents from any Windows host. Right-click the file and select Mount.
As you can see, the VHDX disk contains a set of folders and files of a standard user profile.
On the RD Session Host, the user profile in the VHDX file is mounted to the C:\users\<username> and looks like this:
The UPD profile is mounted in exclusive mode. This means that if a user profile is currently connected to the user’s RDS session or manually mounted, you will not be able to open it with an error: The file couldn’t be mounted because it’s in use.
The User Profile Disks from an RDS server cannot migrate between versions of Windows Server.
Data is written to the VHDX file in real-time. This means that when data is copied to a user profile on an RDS server, the size of the VHDX file on the shared storage is increased immediately.
If the user profile folder already exists in Windows, the folder with an old profile is renamed to the <username>-BACKUP-<number>.
A VHDX disk is mounted when a user logs on to a VDI or RDS host. Each UPD profile is mounted to the C:\Users directory. The list of mounted VHDX disks and mount points of the user profiles appears in Disk Management.
How to Expand/Reduce User Profile Disk with PowerShell?
You can expand or shrink a virtual VHDX disk image with a specific user’s UPD profile using the Resize-VirtualDisk PowerShell cmdlet from the Hyper-V module (Hyper-V management tools must be installed on a computer: Enable-WindowsOptionalFeature -Online –FeatureName Microsoft-Hyper-V-Management-Clients):
Net use U: \\fs01\RDSProfiles
 Resize-VHD -Path u:\UVHD-<SID>.vhdx -SizeBytes 40GB
 Net use U: /delete
Now you need to increase the volume size from the Disk Management console GUI (Action -> Attach VHD -> Extend volume).
Or use the following PowerShell script to automatically extend the VHDX file to the maximum available size:
<#
 .Synopsis
 This script extend size of VHDX file and resize the disk partition to Max
 #>
 Param(
 [Parameter(Mandatory=$true,ValueFromPipeline=$true)]
 [alias("Path")]
 [string]$vhdxFile,
 [Parameter(Mandatory=$true,ValueFromPipeline=$true)]
 [alias("Size")]
 [int64]$vhdxNewSize
 )
 begin{
 try {
 Mount-VHD -Path $vhdxFile -ErrorAction Stop
 }
 catch {
 Write-Error "File $vhdxFile is busy"
 Break
 }
 $vhdx = Get-VHD -Path $vhdxFile
 if ($vhdx.Size -ge $vhdxNewSize){
 Write-Warning "File $vhdxFile already have this size!"
 $vhdx | Dismount-VHD
 Break
 }
 }
 process{
 Dismount-VHD -Path $vhdxFile
 Resize-VHD -Path $vhdxFile -SizeBytes $vhdxNewSize
 $vhdxxpart = Mount-VHD -Path $vhdxFile -NoDriveLetter -Passthru | Get-Disk | Get-Partition
 $partsize = $vhdxxpart | Get-PartitionSupportedSize
 $vhdxxpart | Resize-Partition -Size $partsize.SizeMax
 }
 end{
 Dismount-VHD -Path $vhdxFile
 }
Note that you can’t expand the UPD disk of a user with an active RDS session.
To reduce the size of the UPD file (assuming that you deleted the user’s data inside the VHDX file and the data size on the disk is less than the size assigned to it), you can use the commands:
Resize-VHD \\fs01\RDSProfiles\UVHD-<SID>.vhdx –ToMinimumSize
And then optimize the allocation of space in the file:
Optimize-vhd -path \\fs01\RDSProfiles\UVHD-<SID>.vhdx -mode full
Temporary Profile Issue When Using User Profile Disks on RDS
Temporary user profiles are one of the most common problems you may encounter when using roaming profiles or user profile disks on RDS:
We can’t sign in to your account.
You’ve have been signed in with a temporary profile.
You can’t access your files, and files created in this profile will be deleted when you sign out. To fix this, sigh out and try signing later.

A temporary profile is created for the user in this case:
Event ID 1511
Source: User Profile Service
A temporary profile is created for the user because Windows cannot find the local profile. Changes you make to this profile will be lost when you log off.
Most often, this is because the user’s VHDX file was not closed in the previous session. Use the following PowerShell to locate the RDSH host on which the user’s VHDX drive is mounted (run the script on the host with the RD Connection Broker role):
$UserToFind = "a.smith"
 $User = $env:USERDOMAIN + '\' + $UserToFind
 $RDCollection = Get-RDSessionCollection | where {$_.ResourceType -eq 'Remote Desktop'}
 $RDHosts = Get-RDSessionHost -CollectionName $RDCollection.CollectionName | select SessionHost
 $Array = Invoke-Command -ComputerName $RDHosts.SessionHost -ScriptBlock { Get-Disk | select Location,DiskNumber | where {$_.Location -notmatch "Integrated"} }
 foreach ($VHD in $Array){
 $DiskID = (Get-Item $VHD.Location).Name.Substring(5).Split(".")[0]
 $objSID = New-Object System.Security.Principal.SecurityIdentifier ($DiskID)
 $objUser = $objSID.Translate( [System.Security.Principal.NTAccount])
 if ($objUser.Value -eq $User){
 $result = "$($objUser.Value) disk number $($VHD.DiskNumber) on $($VHD.PSComputername)"
 }else{
 $result = "$($User) - no active RSH sessions were found."
 }
 }
 $result

You can unmount the UPD virtual drive remotely with the command:
Invoke-Command -ComputerName $VHD.PSComputername -ScriptBlock { Dismount-VHD -DiskNumber $VHD.DiskNumber }
To reduce problems with temporary profiles on RDS, it is a good idea to configure timeouts for RDS user sessions. Set idle/disconnected sessions to terminate after 2 to 4 hours. You can also enable the GPO setting that prevents creating temporary profiles: Computer Configuration -> Administrative Templates -> System -> User profiles, enable the option Do not log users on with temporary profiles.
This policy setting may intermittently cause the “The User Profile Service failed the sign-in, user profile cannot be loaded” if the user profiles folder is unavailable.
The administrator must manually delete the temporary user profile on the RDS host after releasing the VHDX disk:
- Delete the subkeys with the user SID under the following registry key
HKEY_LOCAL_MACHINE\SOFTWARE\Microsoft\Windows NT\CurrentVersion\ProfileList. In this example, there are two subkeys, one of which ends with .bak (delete them both);
- Remove the user’s TEMP profile folder from the C:\Users directory.
The User Profile Disk technology, which was introduced nearly ten years ago (in Windows Server 2012), has several drawbacks. Microsoft currently recommends using the newer FSLogix containers to store RDS user profiles.
So, we have looked at how to configure User Profile Disks in an RDS/VDI environment on a Windows Server. Configuring UPDs is much easier than configuring roaming profiles or redirected folders. User Profile Disks are bound to an RDS collection and cannot be corrupted when a user profile is shared between multiple terminal servers (unlike standard user profile folders). The User Profile Disks can be stored on SMB shares, CSV, SOFS, SAN, or local disks.
RDS User Profile Disks are an alternative to roaming profiles and folder redirection in the RDS scenarios.
As part of our Server Management Services, we assist our customers to setup User Profile Disk in Windows.
Today, let’s see some of its benefits and how our Support Engineers configure it.
User Profile Disks (UPD)
User Profile Disks (UPD) is a new feature of Remote Desktop Services in Windows Server 2012.
The whole point of UPD is to store user and apps data in a separate VHDX disk on the network shared folder. This virtual disk is mounted to the user session as soon as we sign in to the RDS server, and unmounted when we log out.
Let us now focus on some key suggestions from our Support Engineers.
Benefits of RDS User Profile Disks
- Configuration and deployment is simple
- Maintain on pooled virtual desktops that get rolled back after logoff
- Less logon and logoff time
- Specific to the collection, cannot use on multiple computers simultaneously
- Administrators can have granular control of exactly which locations get saved to the virtual hard disk (VHDX)
- Stored on Server Message Block (SMB) shares, cluster shared volumes, SANs, or local storage.
Points to note before we configure RDS User Profile Disks
- User profile disks are for a single collection.
A user connecting to two different collections will have two separate profiles;
- Properties are set automatically upon creation and contain all profile data and registry settings by default.
These properties can be defined prior to creation or after in the ‘Session Collection’ properties from ‘Server Manager’;
- A form of central file share is required as the UNC path of this share is to provide in the wizard during initial configuration.
One major benefit of these file shares is that when more RDS hosts are added to support the collection, those hosts automatically add to the ACL of the share, not requiring an administrator to take any action in modifying security permissions;
- Single session.
If a user logs into one RDS host, they cannot connect to another and they cannot have more than one session active on a single host;
- User Profile Disks are created using a naming scheme that corresponds to a user’s GUID and makes identifying the UPD associated with a user a very risky task.
Best practices when working with RDS User Profile Disks
Given that a user will have a UPD respective to each collection, each will therefore require respective file shares. It’s advisable to name each file share according to the collection with which it associates.
Leverage the benefits of new file server technology in Server 2012 R2 – Scale Out File Server (SOFS)
+ SOFS differs from clustered file servers in that all file shares on all nodes are always active instead of being active on one node at any given time – active/active instead of active/passive
Configuring RDS User Profile Disks on Windows
First of all, it is necessary to create a shared folder on any corporate file server to store user profiles as VHDX disk.
For example, the path to our folder will be: \\rdvh1\DemoLabOficeApp.
Servers which are a part of RDS collection should have full access permission to access this shared folder.
In a single RDS collection, there can exist only one VHDX profile file for one user. If a user connects to the resources from different collections, we should create a separate profile disk for each.
We can configure RDS User Profile Disks in the collection settings of Remote Desktop Services. We can enable this mode while creating a new collection.
In our example, the collection already exists, so in the Server Manager console, we select this collection and in the upper left corner click Tasks -> Edit Properties.
Here. in User Profile Disks section we ‘Enable’ user profile disks, specify the path to the previous shared folder (\\rdvh1\DemoLabOficeApps) and a maximum profile disk size. Then we save the changes.
Once done, we make sure to change NTFS permissions for Profile Disks folder. In our case, the collection consists of one RDSH01 server, which has full control permission.
Hence, a full Control permissions is given to the RDSH01 server on the shared folder level.
When we add new RD Session Host servers to the RDS collection, the wizard automatically changes the folder permissions and gives access to the new servers.
It is very convenient, since when scaling a terminal farm we do not need to remember to set permissions for the profile folder.
[Need help to configure RDS User Profile Disks on Windows? We are available 24*7]
UPD: User profile as VHDX file
First, we have to go to the network shared folder with user profiles. There is a UVHD-template.vhdx file. This file is the user profile disk template.
When a user logs on to the RDS server for the first time, this template copies and renames as a VHDX file, with user SID in its name.
To match an UPD file name with the user name, we must use a separate script.
For example, we can convert the SID to an account name by using the Get-ADUser cmdlet:
Get-ADUser -Identity S-1-5-21-32549751-3956249758-2943215497-23733695
-
What does User profile disk contain?
Right-click the VHDX file and select Mount. The UPD disk can only be used in one session on one RDS host (exclusive access). We cannot mount an UPD VHDX disk if the user is currently using it on the RDS server.
As we can see, the VHDX disk contains a set of folders and files of a standard user profile. At logon, a user gets completely transparent access to the data in the profile.
On the side of RD Session Host server, a .vhdx user’s file is mounted to the C:\users\<username> and looks like this:
Note that the UPD drive is bound to the RDS server Windows OS version. We cannot transfer (use) an UPD user profile from an RDS server from one version of Windows Server to another.
Data is written to the vhdx file in real time. When copying data to a user profile on an RDS server, the size of the vhdx file on the shared storage increments immediately.
If the user profile folder already exists in the system, the folder with an old profile renames to the <username>-BACKUP-<number>.
The VHDX disk is mounted when the user session starts on a VDI or RDS server. A list of connected UPD disks with profiles can be listed using the mountvol utility.
-
The three options:
By default, a User Profile Disk contains all the user profile contents. However, we can exclude certain folders from the list of synchronized directories in the RDS collection settings.
Thus, all the changes made during the user’s terminal session to the folders in the list of excluded directories are not saved into the VHDX disk on the shared folder.

The second option allows us to save only specific directories in the UPD profile.

If necessary, the last option allows us to implement the scenarios for saving the settings of the Start Screen, in appsfolder.itemdata-ms file.
In this example, we have only added the path to \AppData\Local\Microsoft\Windows folder as an additional path to be saved in the UPD.

[Stuck with User Profile Disks? We are here for you]
Resizing RDS User Profile Disks Using PowerShell
We can extend the virtual vhdx drive with the user’s UPD profile using the PowerShell cmdlet
Resize-VirtualDiskfrom the Hyper-V module.
Net use U: \\rdvh1\DemoLabOficeApps Resize-VHD -Path u:\UVHD-<SID>.vhdx -SizeBytes 40GB Net use U: /deleteIf we want to run the Resize-VHD cmdlet from a desktop with Windows 10, we must install the feature: Hyper-V -> Hyper-V Platform -> Hyper-V Services.
Now we need to extend the volume from the GUI of the Disk Management console (Action -> Attach VHD -> Extend volume).
Or we use the following PowerShell script to automatically extend the vhdx file to the maximum available size:
<# .Synopsis This script extend size of VHDX file and resize the disk partition to Max #> Param( [Parameter(Mandatory=$true,ValueFromPipeline=$true)] [alias(“Path”)] [string]$vhdxFile, [Parameter(Mandatory=$true,ValueFromPipeline=$true)] [alias(“Size”)] [int64]$vhdxNewSize ) begin{ try { Mount-VHD -Path $vhdxFile -ErrorAction Stop } catch { Write-Error “File $vhdxFile is busy” Break } $vhdx = Get-VHD -Path $vhdxFile if ($vhdx.Size -ge $vhdxNewSize){ Write-Warning “File $vhdxFile already have this size!” $vhdx | Dismount-VHD Break } } process{ Dismount-VHD -Path $vhdxFile Resize-VHD -Path $vhdxFile -SizeBytes $vhdxNewSize $vhdxxpart = Mount-VHD -Path $vhdxFile -NoDriveLetter -Passthru | Get-Disk | Get-Partition $partsize = $vhdxxpart | Get-PartitionSupportedSize $vhdxxpart | Resize-Partition -Size $partsize.SizeMax } end{ Dismount-VHD -Path $vhdxFile }Note that we cannot extend the user’s UPD disk with an active RDS session.
To reduce the size of the UPD file, we can use the commands:
resize-VHD \\rdvh\DemoLabOficeApps\UVHD-<SID>.vhdx –ToMinimumSizeAnd then:
Optimize-vhd -path \\rdvh1\DemoLabOficeApps\UVHD-<SID>.vhdx -mode fullSo, we have discussed the major peculiarities of User Profile Disks in RDS/VDI solutions running Windows Server 2016 and 2012 R2.
UPD configuration is much easier than the configuration of roaming profiles or redirected folders. The disks connects to the RDS collection and cannot damage while using the shared profile by several servers.
We can store the User Profile Disks in SMB shares, CSV, SOFS, SAN or on the local disks.
If we are planning to store UPD profiles on DFS servers, we must install Windows Server 2012 R2. If we are using previous versions of Windows Server, we will get an error:
Unable to enable user disks on rVHDShare. Could not create template VHD. Error Message: The network location “\\bobcares.com\namesp
Also it is desirable to use the version SMB 3.02 on the file server side (Windows Server 2012 R2) or higher.
Anyway, since User Profile Disks is a relatively new technology, prior to mass UPD implementations, we recommend to test their work and possible problems in a test environment.
[Need assistance to configure RDS User Profile Disks? We are happy to help.]
Conclusion
In short, RDS User Profile Disks is an alternative to roaming profiles and folder redirection in the RDS scenarios. Today, we saw how our Support Engineers configure the same.
PREVENT YOUR SERVER FROM CRASHING!
Never again lose customers to poor server speed! Let us help you.
Our server experts will monitor & maintain your server 24/7 so that it remains lightning fast and secure.
GET STARTED
var google_conversion_label = «owonCMyG5nEQ0aD71QM»;
Introduction
User Profile Disks (UPD) is a feature of Remote Desktop Services (RDS) in Windows Server 2012 (and higher) that allows each user to have a separate, virtualized disk attached to their session. The contents of the disk are made available to the user regardless of which RDS server they connect to within a farm. This provides a consistent and reliable user experience, as well as simplifying the process of managing user profiles.
UPDs are implemented as VHDX files, and are attached to the user’s session when they log in. The VHDX file is then unmounted and detached from the session when the user logs out. When a user logs back in, their UPD is attached to their session once again.
Creating a UPD
To create a UPD, you must first create a blank VHDX file. This can be done using the Disk Management snap-in, or by using the New-VHD cmdlet in PowerShell. Once the VHDX file has been created, it must be attached to a session, and then formatted with a file system. This can be done using the Diskpart utility, or by using the Format-Volume cmdlet in PowerShell.
Configuring UPD Settings
Once a UPD has been created, there are a few settings that can be configured to optimize its performance. These settings can be found in the RDS Client Settings GPO, under the “User Profile Disk” node.
-
The “Enable user profile disk” setting should be set to “Enabled”. This setting enables UPDs for all users that connect to the RDS farm.
-
The “Maximum size of user profile disk” setting determines the maximum size of the UPD. This setting should be set to a value that is appropriate for the users that will be using UPDs.
-
The “Do not allow passwords to be stored on user profile disks” setting prevents passwords from being stored on UPDs. This setting should be set to “Enabled” to prevent passwords from being stored in an insecure location.
Mapping a Network Drive to a UPD
It is often useful to map a network drive to a UPD. This can be done using the New-PSDrive cmdlet in PowerShell. For example, to map a network drive to the UPD of the user “contosouser1”, the following command could be used:
New-PSDrive -Name "U" -PSProvider "FileSystem" -Root "\contosouser1profile.vhdx"
Conclusion
UPDs are a valuable feature of RDS that can simplify the process of managing user profiles. By creating a UPD for each user, you can provide a consistent and reliable user experience, as well as reducing the amount of storage required for user profiles.
In Windows Server 2022, you can now implement user profile disks (UPDs) to roaming user profiles in a Remote Desktop Services (RDS) deployment. This allows users to have a consistent experience when they roam between RDS-connected computers.
To implement UPDs in an RDS deployment, you need to:
Configure the RDS deployment to use UPDs.
Create and assign UPDs to users.
Configure the RDS deployment to use UPDs
To configure an RDS deployment to use UPDs, you need to:
Enable the Use user profile disks group policy setting.
Configure the RDS deployment to use a shared folder for UPDs.
Enable the Use user profile disks group policy setting
You can use the Group Policy Management Console to enable the Use user profile disks group policy setting. The setting is located in the following location:
Computer ConfigurationPoliciesAdministrative TemplatesWindows ComponentsRemote Desktop ServicesRemote Desktop Session HostUser Profile Disks
When you enable this setting, you can also specify the location of the shared folder that will be used for UPDs.
Configure the RDS deployment to use a shared folder for UPDs
To use a shared folder for UPDs, you need to:
Create a shared folder on an RDS server.
Configure the RDS deployment to use the shared folder.
Create a shared folder on an RDS server
To create a shared folder on an RDS server, you need to:
Open the Server Manager console.
Click on the File and Storage Services role.
Click on Shares.
Click on Tasks and select New Share.
Configure the RDS deployment to use the shared folder
To configure the RDS deployment to use the shared folder, you need to:
Open the Remote Desktop Session Host Configuration console.
Click on the Profiles tab.
Click on Configure user profile disks.
Select the Enable user profile disks check box.
Specify the location of the shared folder in the User profile disk path box.
Click Apply and then click OK.
Assign UPDs to users
To assign UPDs to users, you need to:
Open the Remote Desktop Session Host Configuration console.
Click on the Profiles tab.
Click on Configure user profile disks.
Click on the User Profiles tab.
Click on New.
Specify the name of the user in the User name box.
Click Browse and select the user account in the Active Directory Users and Computers console.
Click OK.
Click Apply and then click OK.
The user will now be assigned a UPD.
Implementing Remote Desktop Services User Profile Disks in Windows Server 2022
User Profile Disks (UPD) provide a method of storing user and application data on a single virtual disk that is separate from the operating system disk. This allows the user data to be persisted across sessions and allows the profile to be Roamed to different machines.
In order to implement UPDs in Windows Server 2022, you will need to install the Remote Desktop Services role. Once the role has been installed, you will then need to create a new UPD by going to the “User Profile Disks” section in the “Remote Desktop Services” section of Server Manager.
Once you have created the new UPD, you will need to assign it to a user account. This can be done by going to the “User Accounts” section in Server Manager and selecting the user account that you want to assign the UPD to.
Once the UPD has been assigned to a user account, you will need to configure the UPD settings. The most important setting to configure is the “Profile Path” setting. This setting should be set to the path of the user’s profile directory on the UPD.
After the UPD has been created and assigned to a user account, you will need to configure the user’s profile to use the UPD. This can be done by editing the user’s registry hive and adding the following values:
“UserProfileDisk”=”UPD Path”
“UserProfileDiskEnabled”=dword:00000001
Once these values have been added to the registry, the user’s profile will be redirected to the UPD.
If you want to redirect the user’s entire profile to the UPD, you can also add the following value to the registry:
“UserProfileDiskMountPath”=”UPD Path”
After the user’s profile has been redirected to the UPD, you will need to configure the applications that the user will be using to use the UPD. This can be done by editing the application’s registry hive and adding the following values:
“UserProfileDisk”=”UPD Path”
“UserProfileDiskEnabled”=dword:00000001
After the application has been configured to use the UPD, the user will be able to Roam their profile and data to different machines.
A User Profile Disk is simply a VHDX that is created for each user that contains their C:\USERS\<user> profile and blocks remote users from interacting with the physical disk. This is good for security and also lets user profiles roam across different Session Hosts.
Setting up User Profile Disks is easy but the thing tech’s make a mistake on is using a local path. You MUST use a path that all of your RDS users can get to. We recommend that you make it a hidden network share so that others on your network can not see it.
To Setup & Enable RDS User Profile Disks:
- Create a shared network location for the disks
- We suggest that if you don’t already have a better location, that you use your RDS Gateway or Broker server and create a path like E:\UserProfileDisks and then a share like \\YourServerNameHere\UserProfileDisks$
- The ‘$’ makes it a hidden share so your staff can’t easily browse for it. The $ is NOT required, but we like it.
- We suggest that if you don’t already have a better location, that you use your RDS Gateway or Broker server and create a path like E:\UserProfileDisks and then a share like \\YourServerNameHere\UserProfileDisks$
- Launch SERVER MANAGER
- Expand REMOTE DESKTOP SERVICES > COLLECTIONS
- Click on your Collection
- Click TASKS > EDIT PROPERTIES (top right corner)
- Click USER PROFILE DISKS (bottom of the menu on the left)
- Click ENABLE USER PROFILE DISKS
- Set the location to what you created in step 1
- i.e. \\YourServerNameHere\UserProfileDisks$
- Set the maximum size of those disks.
- User Profile Disks are dynamically expanding disk
- The default is 20GB but we like 10GB because we want our remote users to mostly save things on the network and not on there Desktop or Documents
- Scroll down and set what you want to have stored on those VHD’s.
- The default is everything, and that is what we like, so we left it at STORE ALL USER SETTINGS AND DATA ON THE USER PROFILE DISK
That’s it boss. From this point on your RDS users will have new VHD’s created in \\YourServerNameHere\UserProfileDisks$ .
One thing to note is that if those users already had profiles, they will be ignored and fresh ones created the first time they sign in. Also of note is that the User Profile Disk VHD name will be the user GUID, not their username like it normally is in C:\USERS\<username> .
This article was created as reference material for our article on GPO’s To Lock Down RDS Session Hosts.
You might find this video useful, even though it is for Server 2012: