
User Manager Windows Server

User Manager Windows Server is a powerful tool used to manage users on a Windows Server. This tool allows the administrator to create, modify, and delete user accounts, manage groups, and set permissions for different resources. In this article, we will discuss the features, benefits, and how to use this tool effectively.
Features of User Manager
- Creation and management of user accounts
- Group creation and management
- Setting permissions for resources
- Enabling and disabling user accounts
- Resetting passwords for user accounts
- Assigning user rights and privileges
Benefits of User Manager
Managing users on a server can be a challenging task, especially for larger organizations. User Manager Windows Server provides a user-friendly interface for creating and managing user accounts, groups, and permissions. The tool simplifies account management, ensures security, promotes productivity, and saves time.
Getting started with User Manager
To access User Manager, you need to be logged in to your Windows Server as an administrator. Once you have logged in, follow these steps to open User Manager:
- Open the Start menu and click on Administrative Tools.
- Click on Computer Management.
- Expand the Local Users and Groups folder.
- Click on the Users folder.
- Double-click on the user you want to modify or create a new user by right-clicking on the Users folder and selecting New User.
Creating a new user account
To create a new user account, right-click on the Users folder in User Manager, then select New User. This will open the New User dialog box. Follow these steps to create a new user account:
- Enter the user’s first and last name in the Full Name field.
- Enter the user’s login name in the User Name field.
- Enter a password for the user in the Password and Confirm Password fields.
- Choose any optional settings you want for the user by clicking on the tabs in the dialog box.
- Click OK to create the new user account.
Managing user accounts

After you have created a user account, you can manage it by right-clicking on the user in the User Manager and selecting Properties. This will open the Properties dialog box, where you can modify the user’s attributes, such as their password, account options, and group membership.
Creating and managing groups
User Manager also allows you to create and manage groups. Group membership simplifies the process of assigning permissions and rights to multiple users at once. You can create a new group by right-clicking on the Groups folder in User Manager and selecting New Group.
To manage group membership, right-click on the group name, then select Properties. This will open the Properties dialog box, where you can add and remove users from the group.
Setting permissions for resources
One of the primary features of User Manager is the ability to set permissions for different resources, such as files and folders. Permissions can be set for individual users, groups, or everyone. With User Manager, you can grant, revoke, or modify permissions to ensure that users have the access they need while also ensuring security.
Conclusion
User Manager Windows Server is a powerful tool that simplifies the process of managing users on a Windows Server. The tool provides a user-friendly interface for creating and managing user accounts, groups, and permissions. It is an essential tool for administrators who want to ensure security, promote productivity, and save time.
User Manager Windows Server
Windows Server является одной из самых мощных операционных систем для управления предприятием. Эта система обладает множеством инструментов для управления пользователями и группами. Один из таких важных инструментов — User Manager. В этой статье мы рассмотрим подробно, что это за инструмент, как им пользоваться и какие преимущества он предоставляет.
Что такое User Manager?
User Manager — это основной инструмент для администрирования пользователей и групп в Windows Server. С его помощью администраторы могут управлять учетными записями пользователей, ограничивать их права доступа и назначать различные группы и роли в предприятии.
Как использовать User Manager?

Для того чтобы использовать User Manager необходимо зайти в панель управления Windows Server и выбрать раздел «Управление пользователями». В этом разделе находится основное окно User Manager. В этом окне можно найти список всех пользователей и групп в предприятии. Для того чтобы открыть настройки пользователя необходимо дважды щелкнуть на его имени в списке.
В настройках пользователя можно назначить различные параметры учетной записи, такие как пароль, дата истечения срока действия учетной записи, наличие прав администратора и другие параметры. Кроме того, можно назначать пользователям различные группы и роли в предприятии.
Преимущества User Manager

Использование User Manager имеет множество преимуществ для администраторов предприятия:
- Полный контроль над учетными записями пользователей и группами.
- Контроль доступа к ресурсам в предприятии.
- Назначение различных групп и ролей.
- Установка ограничений по времени и срокам действия учетных записей.
- Упрощение управления пользователями и группами в предприятии.
«User Manager является необходимым инструментом для администрирования пользователей и групп в Windows Server. С помощью него администраторы могут полностью контролировать доступ к ресурсам в предприятии и упростить управление пользователями и группами.»
Итог
User Manager — это важный инструмент для администраторов предприятий, который позволяет полностью контролировать учетные записи пользователей и групп. Он упрощает управление пользователями и группами, позволяет назначать различные группы и роли, устанавливать ограничения по времени и срокам действия учетных записей. Он является необходимым инструментом для обеспечения безопасности в предприятии и упрощения процессов управления пользователями и группами.»
User Manager Windows Server
Windows Server is an operating system designed to run on servers and provide functionality for running applications and services for client computers. One of the essential tools in Windows Server is the User Manager, which allows administrators to manage user accounts and groups on the server.
What is User Manager?
User Manager is a graphical tool found in the Administrative Tools folder of Windows Server that is used to manage user accounts and groups. User Manager allows administrators to create or delete user accounts, reset passwords, modify account properties, and assign users to groups.
How to Access User Manager

To access User Manager in Windows Server, follow these steps:
- Log in to the server as an administrator.
- Click on the Start menu and select Administrative Tools.
- Select User Manager.
Creating and Managing User Accounts

Creating a new user account in User Manager is a simple process. Administrators can create new user accounts by clicking on the New User button and filling out the necessary information, such as name, description, and password. Once the user account has been created, administrators can modify account properties, such as disabling the account or changing the password.
Managing user accounts in User Manager involves tasks such as resetting passwords, deleting accounts, and modifying account properties. Users can be assigned to groups for easier management and to provide access to resources based on their group membership.
Managing Groups
Groups in User Manager are used to organize users and provide access to shared resources. Administrators can create new groups, assign users to groups, and modify group properties in User Manager.
Group membership can be managed by selecting the user account and modifying the group membership properties. Administrators can also create new groups and assign users to those groups by selecting the New Group button and filling out the necessary information. Group properties, such as group name, description, and membership, can also be modified using Group Manager.
Managing Permissions
Permissions in Windows Server are used to control access to resources, such as files, folders, and printers. Permissions can be assigned to individual users or groups of users to control access to specific resources. User Manager provides a graphical interface for managing permissions, including assigning permissions and modifying permissions for individual users or groups of users.
Overall Benefits of User Manager
The ability to manage user accounts, groups, and permissions in a centralized location provides many benefits to organizations. Administrators can easily create new user accounts and assign them to groups for easier management, and permissions can be assigned to groups for more efficient management of resources.
User Manager also provides a graphical interface that makes managing user accounts and groups more accessible for administrators who are not familiar with command-line tools. This can save time and reduce the potential for errors when managing user accounts and permissions.
Conclusion
User Manager in Windows Server is a powerful tool for managing user accounts, groups, and permissions. As a centralized management tool, User Manager provides organizations with greater control over access to resources and simplifies the management of user accounts and groups. Its graphical interface makes it accessible to administrators who are not familiar with command-line tools, making management more efficient and effective.
User management in Windows Server environments is crucial for the smooth operation of any organization’s IT infrastructure. Proper server management ensures that resources are allocated efficiently and that security measures are in place to protect sensitive information.
Without streamlined user management, administrators can find themselves tangled in a web of challenges. These obstacles not only hinder productivity but also open up vulnerabilities in network security. Here, mobile device management (MDM) solutions step in to bolster Windows Server management, offering an additional layer of oversight and control over who accesses what, from where, and how.
Understanding User Management in Windows Server
User management in Windows Server is the process of administering and managing user accounts, including the creation, deletion, and modification of user details. Effective user management is vital for businesses to ensure that only authorized users have access to necessary resources, maintaining both operational efficiency and security.
Key Components of Windows Server User Management
To understand the intricacies of user management, let’s look at some of its components.
The Backbone of Windows Server: Active Directory
Active Directory plays a pivotal role in centralizing user management by allowing administrators to manage user accounts and access rights from a single location. This is especially beneficial in environments with multiple users and groups, where consistent access provisioning is critical.
Crafting User Experiences with Group Policy
Group Policy is a feature that empowers administrators to customize user experiences and enforce security policies across the network. By managing user accounts through Group Policies, administrators can ensure that users have the necessary permissions to perform their roles efficiently, without compromising on security.
Beyond the Basics: Integrating MDM
Integrating mobile device management (MDM) solutions with Windows Server user management can significantly enhance user policies across mobile devices. This integration allows for seamless management of user accounts, ensuring that users have consistent access to resources, regardless of the device they use or the versions of Windows they operate on.
Crafting Windows User Accounts
Creating a Windows user account within Active Directory begins with navigating to the “Users” folder in the Active Directory Users and Computers console. Right-click, select “New,” and then “User.” Fill in the new user’s first and last name, along with their email address, and proceed to set a username.
Setting up user properties and permissions involves detailing user-specific settings. For example, you might assign the user to the “local users and groups” on specific machines or add them to the “administrators group” if they require administrative access. Remember to select the account options that align with the user’s role and security needs.
Navigating User Account Management
Effective management of a Windows user account lifecycle is key to maintaining a secure and efficient IT environment. This includes rigorous employee onboarding and offboarding processes, ensuring users have access only while they are active employees. Regularly update permissions to reflect changes in roles or responsibilities.
Integrating MDM solutions facilitates streamlined user access management on mobile platforms. By extending the principles of user account management to mobile devices, MDM ensures that users receive appropriate access rights, whether they’re using a local account on a desktop or accessing resources remotely, enhancing both security and user experience.

Implementing Group Policies
Group Policies in Windows Server are tools that allow administrators to manage the settings of users and computers within an organization centrally. By using the Windows Server user management console, administrators can implement policies that ensure security and efficiency across the network.
Crafting Policies with Precision
To create and link Group Policy Objects (GPOs) to Organizational Units (OUs), open the Group Policy Management console from the server management tools. Right-click on the OU where you want the policy applied, select “Create a GPO in this domain, and Link it here,” then name your GPO.
Tailoring the User Experience
Common policies might include configurations for security settings, such as password requirements or software management restrictions, ensuring that standard accounts do not have more permissions than necessary. Alternatively, policies can add someone else to a specific user group automatically based on their role.
Embracing Mobility
The rise of mobile devices has added a layer of complexity to Group Policy considerations. MDM solutions work in synergy with Group Policies by extending the reach of policies beyond traditional desktops and laptops to mobile platforms, ensuring a consistent and secure user experience across all devices.
Enhancing Security with User Management
In the digital age, safeguarding your organization’s data and systems is more critical than ever. Enhancing security through meticulous user management ensures that access is granted judiciously and monitored continuously.
Mastering Permissions and Access
In the realm of user management, assigning the correct permissions and access controls is paramount. Utilizing the control panel on each local computer, administrators can fine-tune security settings to ensure that users have only the access they need to perform their duties, thus minimizing the risk of internal threats.
MDM solutions play a crucial role in extending these permission strategies to mobile devices. They allow for the seamless management of access rights, ensuring that the mobile workforce remains productive without compromising the organization’s security posture.
Vigilance Through Monitoring and Auditing
Implementing tools for monitoring user activities is vital for detecting potential security breaches and ensuring compliance with data loss prevention and disaster recovery policies. Regular audits of security settings across Windows Server environments help in identifying unauthorized access or alterations to user permissions.
The integration of security measures across Windows Server and mobile ecosystems is essential. By aligning the monitoring and auditing processes, organizations can achieve a comprehensive overview of their security landscape, ensuring that data remains protected, regardless of where it is accessed from.

Practical Tips for Efficient Windows Server User Management
In Windows Server administration, keeping user management efficient is a top priority. Regular reviews of user access levels are crucial. Periodically ensure that each user’s access reflects their current role and responsibilities. This practice prevents unnecessary access rights from accumulating, which can pose a security risk.
Automation: Your Best Ally
Leveraging automation features within Windows Server can dramatically improve the management process. For tasks such as user onboarding, select “Add someone else to this PC” and click “Add” to use Windows provisioning scripts. This not only saves time but also reduces the chance of human error, making the process smoother and more reliable.
Bridging Devices with MDM
The role of MDM in enhancing Windows Server user management cannot be overstated. It ensures seamless access across devices, providing a unified management approach that extends beyond traditional desktop environments. With MDM, administrators can apply consistent policies across all devices, ensuring security and efficiency regardless of where or how users are accessing the system.
Wrapping Up
Mastering Windows Server user management is paramount for maintaining a secure and efficient IT infrastructure. By carefully managing user access, leveraging automation, and conducting regular audits, organizations can safeguard their resources while optimizing their operations. These practices form the cornerstone of a robust server management strategy, which can be further enhanced with remote server management services. These services enable organizations to remotely monitor, troubleshoot, and manage their servers, ensuring uninterrupted operation and swift resolution of issues.
Integrating MDM solutions like Trio provides a seamless bridge between desktop and mobile management, offering a comprehensive approach to user management. We invite you to consider how your current user management practices can be enhanced with our solutions. Explore the benefits and take the first step towards streamlined management by signing up for a free demo with us today.
Get Ahead of the Curve
Every organization today needs a solution to automate time-consuming tasks and strengthen security.
Without the right tools, manual processes drain resources and leave gaps in protection. Trio MDM is designed to solve this problem, automating key tasks, boosting security, and ensuring compliance with ease.
Don’t let inefficiencies hold you back. Learn how Trio MDM can revolutionize your IT operations or request a free trial today!
In the vast world of IT and computer systems management, Windows Server is undoubtedly a prevalent and powerful tool. As one of the leading server operating systems in the world, Windows Server offers a host of features and capabilities to streamline your IT operations and business tasks. Whether you’re an experienced IT professional or just starting, understanding how to manage users and groups in Windows Server is an essential skill to learn. And that’s precisely what this comprehensive guide from SRVPS will help you to achieve.
In this tutorial, we’ll take an in-depth look into how to effectively manage users and groups within the Windows Server environment, empowering you with the knowledge and skills to make the most of your Windows virtual server.
What is User and Group Management?
Before we delve into the details, let’s first understand what user and group management entails. User and group management is a critical aspect of systems administration. It involves creating, modifying, and deleting user accounts and groups. The primary aim is to control who can access your system, what resources they can use, and the actions they can perform.
Why is User and Group Management Important?
By effectively managing users and groups, you can enhance your system’s security, improve productivity, and ensure efficient resource utilization. Here’s why:
- Security: User and group management helps in defining access rights and permissions, preventing unauthorized access to sensitive data and systems.
- Productivity: By granting the right permissions, you can ensure that users have access to the resources they need to perform their tasks effectively.
- Efficiency: Managing user groups allows you to organize users with similar roles or responsibilities, making it easier to assign and manage permissions.
Getting Started with Windows Server User Management
Now that we understand the importance of user and group management let’s dive into the practical aspect of how to handle it on your Windows Server.
Creating a New User Account
To create a new user account, follow these steps:
- Open Server Manager.
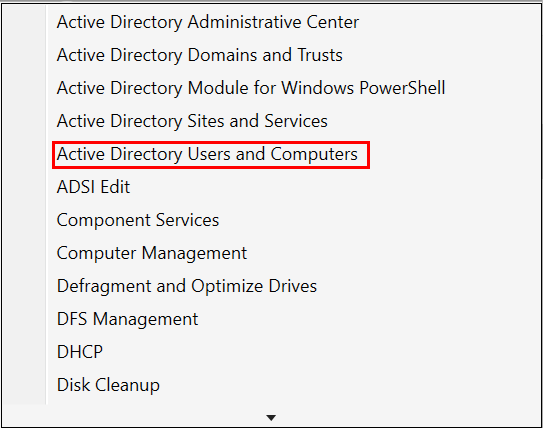
- Select
Tools, then chooseActive Directory Users and Computers. - Navigate to the location where you want to create the new user account. This could be within an Organizational Unit (OU) or a domain.
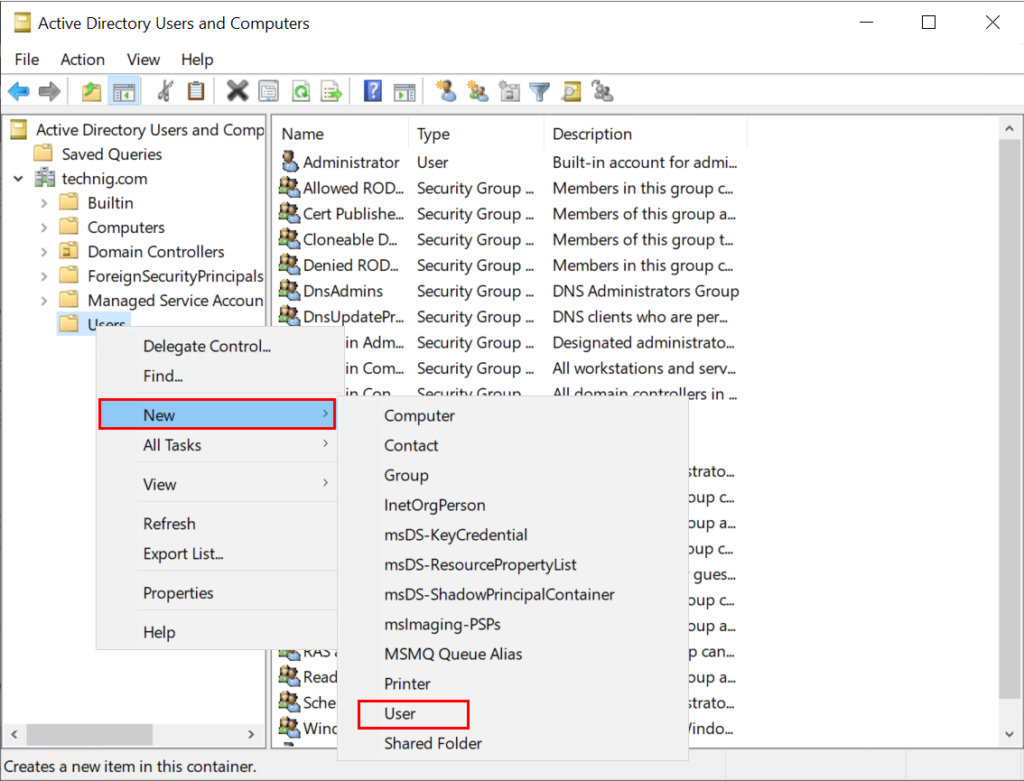
- Right-click the desired location, select
New, and thenUser. - Fill in the user’s details, including their name and logon name.
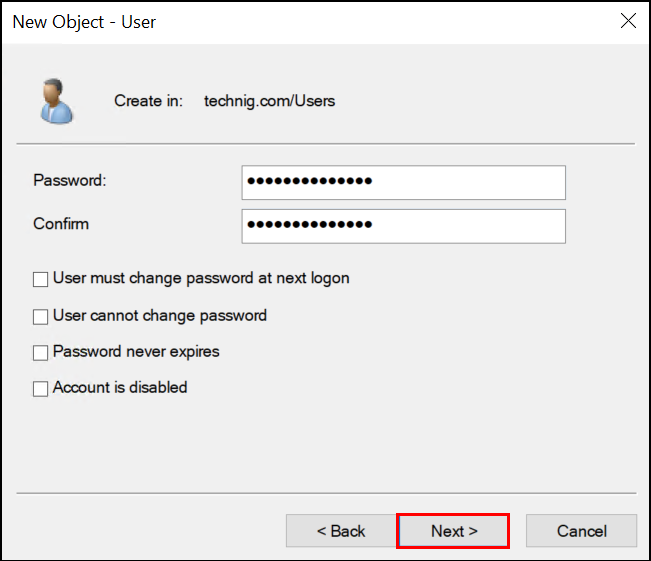
- Set a password for the account and choose the appropriate password options.
- Click
Next, review the information, and then clickFinishto create the account.
Modifying User Accounts
To modify a user account, use the Active Directory Users and Computers tool in the Server Manager. Find the user account, right-click it, and choose Properties. Here, you can change various settings, such as the user’s name, logon name, and description.
Deleting User Accounts
To delete a user account, navigate to the account using the Active Directory Users and Computers tool, right-click it, and select Delete.
Managing Groups in Windows Server
Groups are collections of user accounts. By assigning permissions to a group, you automatically grant those permissions to all members of the group. Let’s look at how to manage groups in Windows Server.
Creating a New Group
To create a new group, follow these steps:
- Open Server Manager and navigate to
Active Directory Users and Computers. - Select the location where you want to create the group.
- Right-click the location, select
New, and thenGroup. - Enter the group name and select the group scope and type.
- Click
OKto create the group.
Modifying Groups
To modify a group, find it in Active Directory Users and Computers, right-click it, and select Properties. Here, you can add or remove group members, change the group name, and adjust other settings.
Deleting Groups
To delete a group, find it in Active Directory Users and Computers, right-click it, and select Delete.
Best Practices for User and Group Management
While managing users and groups, keep the following best practices in mind:
- Follow the principle of least privilege: Always grant users the minimum permissions they need to perform their tasks.
- Regularly review and update user and group permissions to ensure they’re still appropriate.
- Use meaningful names for user accounts and groups to make management easier.
In conclusion, understanding how to manage users and groups on Windows Server is key to effective system administration. We hope that this tutorial from SRVPS provides you with the information you need to manage your Windows virtual server effectively.
For more in-depth understanding and practical tips on managing Windows servers, you can explore other Windows tutorials on our blog. Visit SRVPS’s Windows Tutorials for a wide range of topics, tips, and insights that will further enhance your proficiency in handling Windows servers. Continue your learning journey with SRVPS, and unlock the full potential of your Windows virtual server today.
A Complete Guide to Managing Users and Groups in Windows Server 2019
The robust operating system Windows Server 2019 is capable of efficiently managing users and groups. Any organisation must manage users and groups in Windows Server 2019 because it improves security and resource management.
This guide will cover effective user and group management in Windows Server 2019.
Establishing Users and Groups
Creating new users and groups is the first step in managing users and groups in Windows Server 2019.
Follow these steps to create a new user:
- Launch the «Local Users and Groups» section of the Server Manager console.
- From the context menu, click «Users» and choose «New User.»
- Type the user’s name, full name, description, and password in the «New User» dialogue box.
- To create a new user, click «Create.»
The steps below should be followed to create a new group:
- Launch the «Local Users and Groups» section of the Server Manager console.
- From the context menu, click «Groups,» then choose «New Group.»
- Enter the group name, description, and group type in the «New Group» dialogue box.
- To create the new group, click «Create.»

Taking care of Users and Groups
The next step is to manage new users and groups efficiently after they have been created.
Various tools are available in Windows Server 2019 to manage users and groups.
These tools consist of:
- Active Directory Users and Computers: This application is used for Active Directory user and group management.
- Local Users and Groups: On a local computer, users and groups are managed using this tool.
- PowerShell: PowerShell is an effective scripting language that can be used to manage users and groups.
Active Directory Users and Computers User Management
Follow these steps to manage users with Active Directory Users and Computers:
- Launch the console for Active Directory Users and Computers.
- Locate the container labelled «Users.»
- Double-click the user whose account you wish to manage.
- You can change a number of attributes, including the user’s name, description, password, and group membership, in the user’s properties dialogue box.
- To save the changes, click «OK.»
Using Active Directory Users and Computers for Group Management
The steps listed below can be used to manage groups with Active Directory Users and Computers:
- Launch the console for Active Directory Users and Computers.
- Select the «Groups» container from the list.
- Double-click the group that needs management.
- You can change a number of attributes, including the group’s name, description, membership, and scope, in the group’s properties dialogue box.
- To save the changes, click «OK.»
Using PowerShell for User and Group Management
An effective command-line interface for managing users and groups is offered by PowerShell.
Follow these steps to manage users and groups using PowerShell:
- Launch the PowerShell console.
- Use the «Get-ADUser» and «Set-ADUser» cmdlets to manage users.
- Use the «Get-ADGroup» and «Set-ADGroup» cmdlets to manage groups.
- Use the appropriate parameters to change different user and group attributes.
Managing Permissions for Users and Groups
Enhancing security and resource management requires managing user and group permissions.
Various tools are available in Windows Server 2019 to manage user and group permissions.
These tools consist of:
- File Explorer: File Explorer can be used to control folder and file permissions.
- Security Configuration Wizard: You can set up security settings on servers and applications using the Security Configuration Wizard.
- Group Policy: Group Policy allows users and groups to have their security settings customised.
File Explorer’s User and Group Permissions Management
2. Select «Security» from the tabs.
3. To change the permissions, click the «Edit» button.
4. You can edit the permissions for users and groups in the «Permissions for [file or folder]» dialogue box by adding or removing them.
5. To save the changes, click «OK.»
Utilizing Group Policy to Manage User and Group Permissions
The steps listed below can be used to manage user and group permissions using Group Policy:
- Launch the console for Group Policy Management.
- Make changes to an existing Group Policy Object (GPO) or create a new one.
- Select «Computer Configuration> Policies> Windows Settings> Security Settings> Local Policies> User Rights Assignment.»
- Double-click the user right that needs to be changed.
- You have the option to add or remove users and groups in the user right properties dialogue box.
- Press «OK» to save the modifications.
Conclusion
In conclusion, optimising security and resource management in an organisation requires managing users and groups in Windows Server 2019.
In order to effectively manage users, groups, and resources, Windows Server 2019 offers a variety of features and tools.
Using tools like Active Directory Users and Computers, Local Users and Groups, and PowerShell, we covered how to create and manage users and groups in Windows Server 2019 in this guide.
We also covered the use of tools like File Explorer, Security Configuration Wizard, and Group Policy for managing user and group permissions.
You can effectively manage users and groups in Windows Server 2019 and improve resource management and security in your company by following the instructions provided in this guide.
FAQs
- How do I define Windows Server 2019?
The robust operating system Windows Server 2019 is made for servers, and it offers many features and tools for efficiently managing users, groups, and resources.
- In Windows Server 2019, what role does managing users and groups play?
Enhancing security and resource management in an organisation requires managing users and groups in Windows Server 2019.
It aids in maintaining data integrity and limiting access to resources.
- What tools are available in Windows Server 2019 for managing users and groups?
Active Directory Users and Computers, Local Users and Groups, PowerShell, and other tools are available in Windows Server 2019 to manage users and groups.
- In Windows Server 2019, how do I manage user and group permissions?
In Windows Server 2019, tools like File Explorer, the Security Configuration Wizard, and Group Policy can be used to manage user and group permissions.
- What advantages does Windows Server 2019’s management of user and group permissions offer?
In Windows Server 2019, managing user and group permissions improves resource management and security within an organisation. It aids in regulating resource access, preserving data integrity, and preventing unauthorised access.
Whenever a new server administrator or user comes on board, you need to get him a new user account to let them join the network and start his/her job. In the following article, I will create a new user account by the name of Ali Hasnain using Server Manager and PowerShell. By the end of this article, I hope you can easily add a new user to Windows Server 2022.
Related: Download Windows Server 2022 ISO File for Free
Add new user on Windows Server 2022
You can add a new user account on Windows Server either through PowerShell or Server Manager.
How to add a new user using Server Manager?
To add a new user via the Server Manager, follow the steps below:
- Open the Server Manager (You can search it in the Search Box or open it from the Start Menu)
- Click on the Tools on the top right-hand side of the Server Manager Dashboard window. Find, Active Directory Users and Computers from the drop-down menu and click on it.
- On the Active Directory Users and Computers window, you will see the domain name on the top left-hand side. Click on the domain name to expand it.
- There are multiple folders (containers) and organizational units. Find the Users container and left-click on it. You will see all the existing users and groups.
- If you right-click on the Users folder, a right-click menu shows up. Then click on the New > Users to add a new user.
- Fill in the new user’s first name, last name, and user login name in the new dialog box and click next.
- Enter the new password, and confirm it. Moreover, there are four options that you can check or uncheck according to your wish. If you want the user to change the password at the next login, tick the first option. Select the second option if you do not allow the user to change the password. You can read each option’s instructions and act according to your wish.
You have created a new user account, go back to the Users container, and see the new user added to the list. If you want to edit the user information, you can double-click on the user and add or change the user information from the user’s properties.
How to create a Local User Account on Windows Server from PowerShell?
The second way to create a user account on Windows Server 2022 is through PowerShell. To do that, you must run PowerShell ISE as an administrator. In the PowerShell window, write the following commands and enter:
New-LocalUser –Name “Name_of_the_User” –NoPassword
The above command creates a new user without a password. Remember to write the new user’s name between the quotation marks. If you want to add more details of the new user, such as full name and description, write the command below:
New-LocalUser –Name "Name_of_The_User" –FullName "Full_Name_of_User" –Description "write the description for the user" –NoPassword.
This command adds a description and full name for the new user. (Write the description and full name between the quotation marks).
If you want to create a new user with a password, first, you must define a variable ($Password Statement) to store the password securely as a secure string. Write the below command and enter. A password box pops up, enter the password and click OK.
$Password = Read-Host –AsSecureString

The $Password statement defines a variable to save the password as a secure string. Now write the command below to create a new user.
New-LocalUser –name “Name_of_User” –Password $Password
Instead of giving a password directly, you may notice that we used the variable name ($password), and this variable name contains the password.
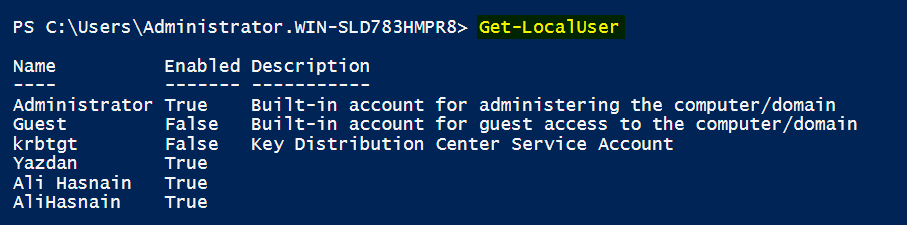
Now you created a user with PowerShell. To see the list of users, write the command below and enter:
Get-LocalUser
Conclusion
In this article, you have learned to create a new user using the Server Manager and PowerShell. You can now create a new user on your Windows Server system and use that account easily to log into your system.
You may like: How to Disable Server Manager Auto-Launch in Windows Server 2022