
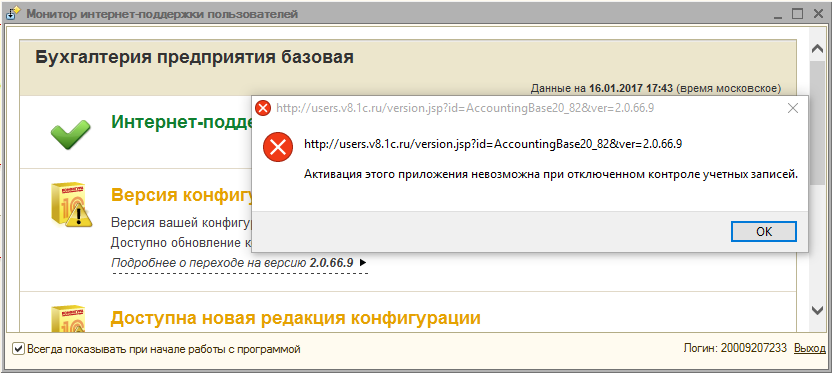
Достаточно часто наши клиеты сталкиваются с проблемой запуска приложений в Windows 10 из-за отключенного контроля учетных записей. После обновления системы до Windows 10 невозможно открыть браузер Microsoft Edge. Возникают проблемы с активацией приложений: система выдает сообщение «Активация этого приложения невозможна при отключенном контроле учетных записей».
Компонент операционной системы «Контроль учётных записей пользователей» запрашивает подтверждение действий программы, требующих прав администратора, в целях защиты от несанкционированного использования компьютера. Окно с запросом появляется на рабочем столе, чтобы предотвратить «нажатие» кнопки разрешения самой программой. Запросы выдаются при попытке изменения системного времени, установки программ, редактирования реестра, изменения меню…
Как включить контроль учетных записей?
Один из способов включения контроля учетных записей – через Панель управления.
Правой кнопкой по меню Пуск ->Панель Управления ->Учетные Записи ->Изменить параметры контроля учетных записей.


При этом не всегда получается изменить контроль, при изменении уровня контроля и нажатия «ОК», выбор не сохраняется и остается на «Никогда не уведомлять».
Есть другой способ включения контроля учетных записей
Правой кнопкой по меню Пуск ->Выполнить.
В строке «Открыть» вводим secpol.msc, кнопка «ОК».
Выбираем Локальные политики -> Параметры безопасности.
Находим в правой части среди списка «Контроль учетных записей: все администраторы работают в режиме одобрения администратором». Кликаем на эту запись.
Выбираем — Включён. «ОК».
Перезагружаем компьютер.


Applies ToWindows 11 Windows 10
Контроль учетных записей (UAC) предназначен для предотвращения несанкционированных изменений в Windows.
Если для действия требуются разрешения уровня администратора, контроль учетных записей предлагает утвердить или отклонить изменение. Это помогает защитить устройство с Windows от вредоносных программ и несанкционированных изменений.

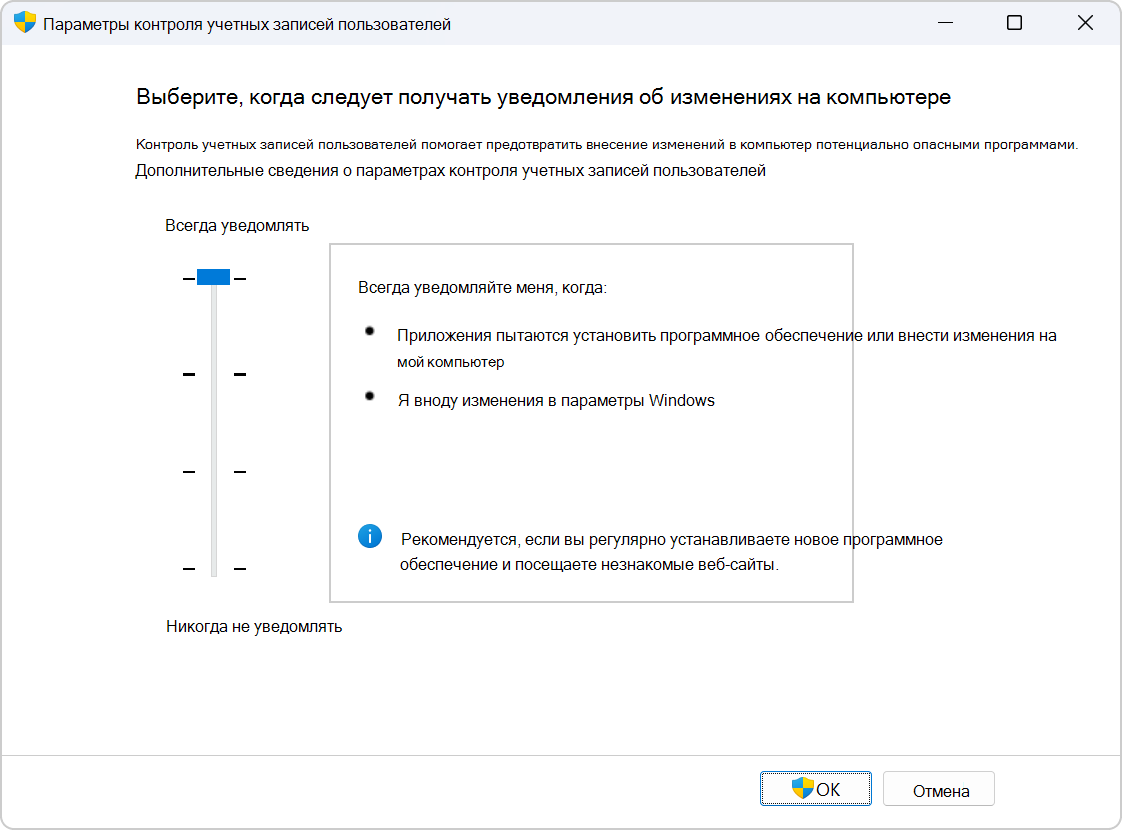
Поведение контроля учетных записей можно изменить, открыв параметры панель управления > система и безопасность > изменить контроль учетных записей пользователей.
Переместите ползунок на нужный уровень уведомлений и нажмите кнопку ОК, чтобы сохранить изменения.
Разверните следующие разделы, чтобы узнать больше о каждом варианте контроля учетных записей.
-
Уведомлять вас о попытках программ установить программное обеспечение или внести изменения в устройство
-
Уведомление о внесении изменений в параметры Windows
-
Замораживание других задач до тех пор, пока вы не ответите
Примечание: Этот вариант рекомендуется, если вы регулярно устанавливаете новое программное обеспечение или посещаете незнакомые веб-сайты.
-
Уведомлять вас о попытках программ установить программное обеспечение или внести изменения в компьютер
-
Не уведомлять вас о внесении изменений в параметры Windows
-
Замораживание других задач до тех пор, пока вы не ответите
Примечание: Этот вариант рекомендуется, если вы регулярно устанавливаете новое программное обеспечение или посещаете незнакомые веб-сайты, но не хотите получать уведомления о внесении изменений в параметры Windows.
-
Уведомлять вас о попытках программ установить программное обеспечение или внести изменения в устройство
-
Не уведомлять вас о внесении изменений в параметры Windows
-
Не замораживать другие задачи или ждать ответа
Примечание: Этот вариант рекомендуется использовать только в том случае, если на то, чтобы затемнить рабочий стол на компьютере, требуется много времени. В противном случае рекомендуется выбрать один из параметров, описанных выше.
-
Не уведомлять вас, когда программы пытаются установить программное обеспечение или внести изменения в устройство
-
Не уведомлять вас о внесении изменений в параметры Windows
-
Не замораживать другие задачи или ждать ответа
Внимание: Этот параметр не рекомендуется использовать из-за проблем с безопасностью.
Нужна дополнительная помощь?
Нужны дополнительные параметры?
Изучите преимущества подписки, просмотрите учебные курсы, узнайте, как защитить свое устройство и т. д.
Enabling User Account Control (UAC) in Windows 10 is a straightforward process that can enhance your computer’s security. By following these steps, you will be able to activate UAC and manage how Windows asks for permission before allowing changes to your system.
Enabling UAC in Windows 10 will help protect your computer from unauthorized changes. The steps below will guide you through the process, ensuring that your system becomes more secure.
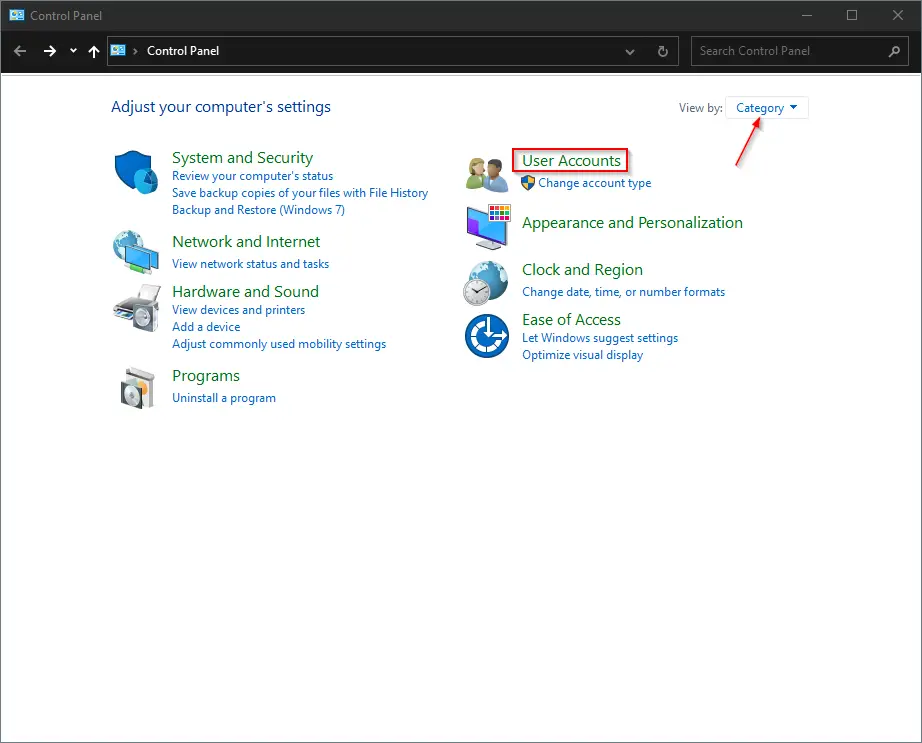
Step 1: Open the Control Panel
First, open the Control Panel from the Start menu.
To do this, click the Windows icon in the bottom-left corner of your screen, type «Control Panel,» and select it from the search results.
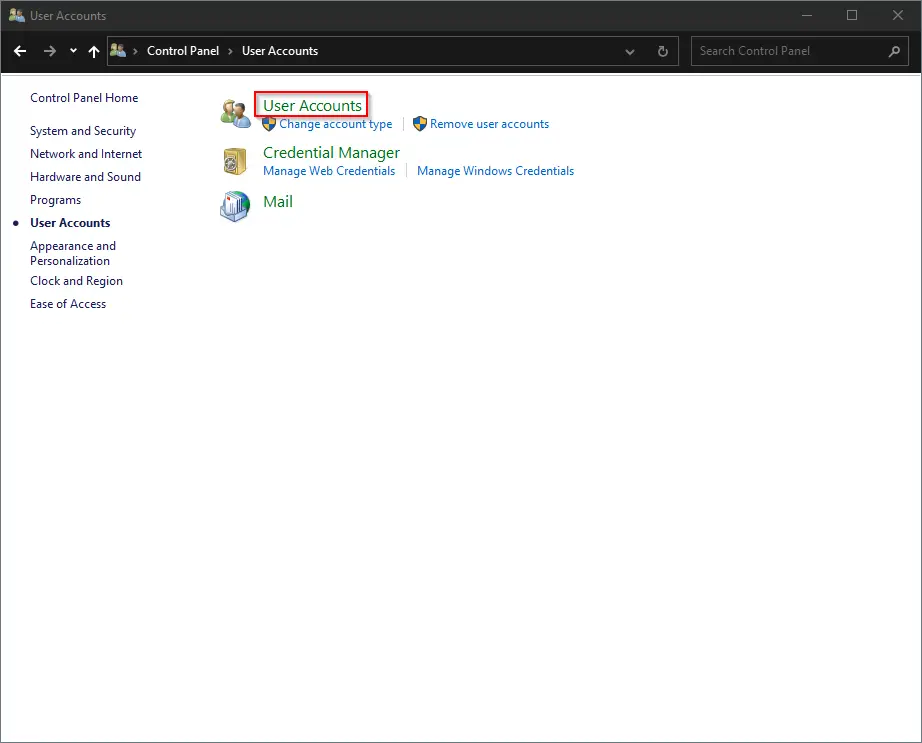
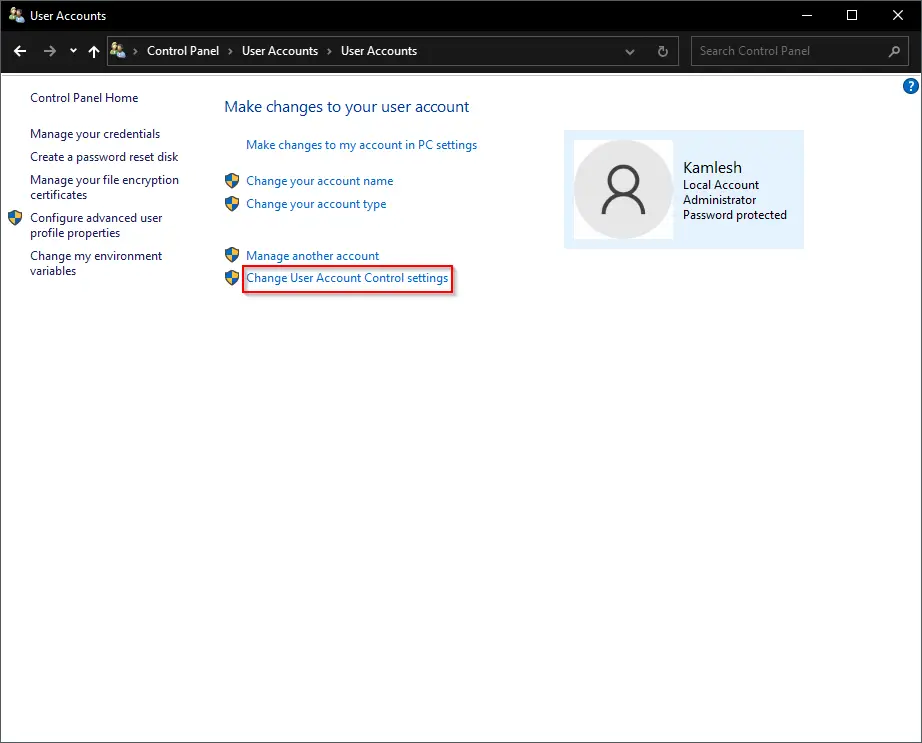
Step 2: Go to User Accounts
Next, navigate to the User Accounts section in the Control Panel.
Once you are in the Control Panel, locate and click on «User Accounts.» This is where you will manage various user-related settings, including UAC.
Step 3: Click on “Change User Account Control settings”
Now, click on the “Change User Account Control settings” link.
This link will open a new window where you can adjust the UAC settings for your computer.
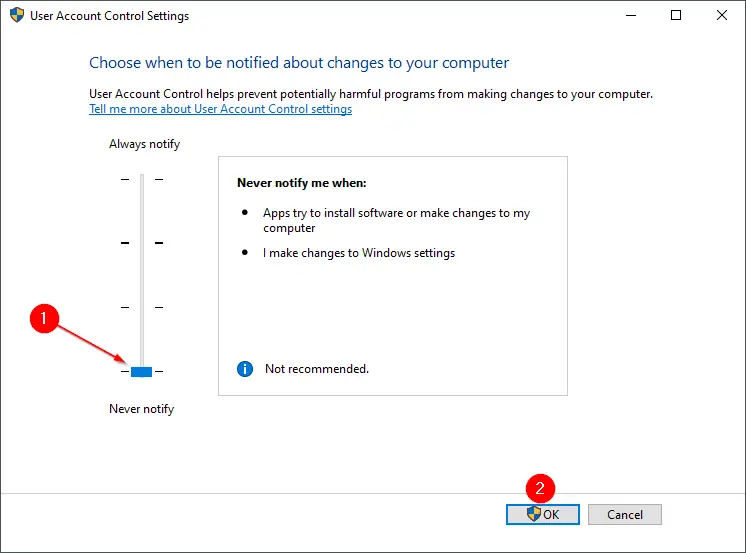
Step 4: Adjust the UAC Slider
Drag the slider to the desired level of security.
The UAC settings window has a slider with four levels of security, ranging from «Always notify» to «Never notify.» Choose the level that best fits your security needs.
Step 5: Click OK
Finally, click OK to save your settings.
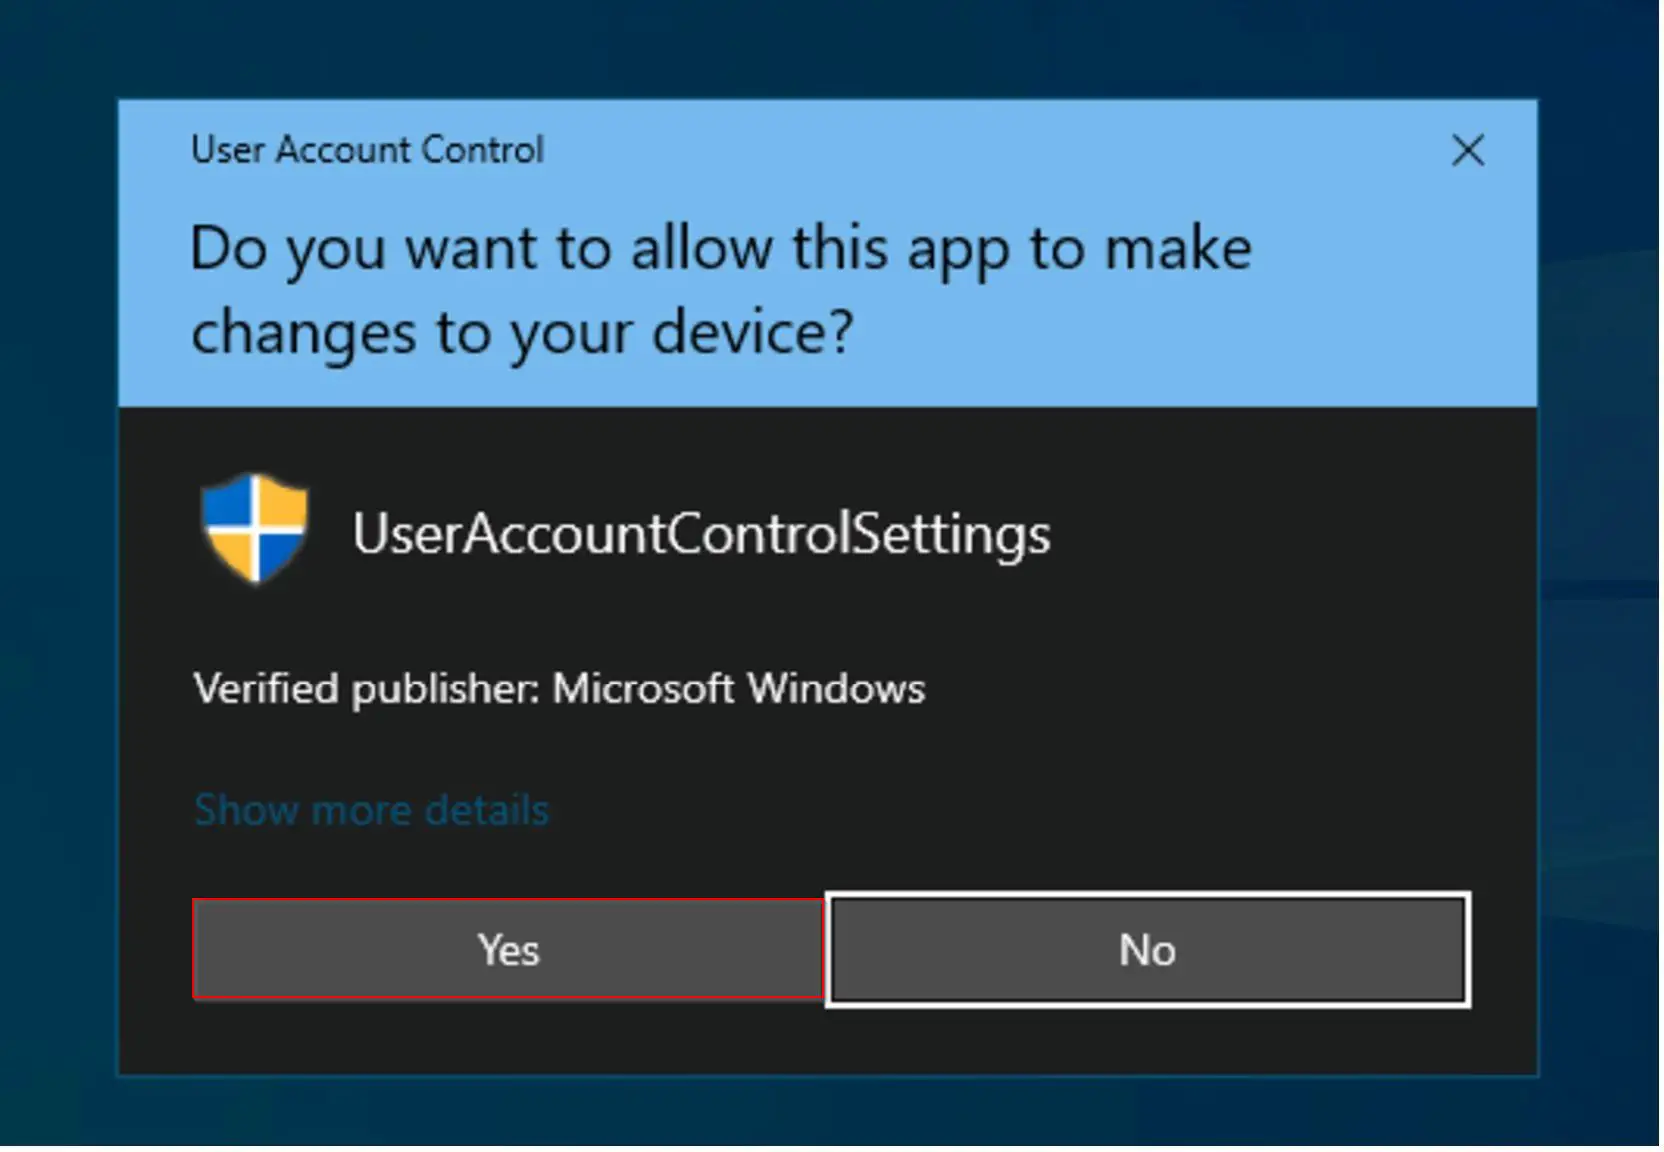
After adjusting the slider, click the OK button. You may be prompted to confirm your choice by entering an administrator password or clicking Yes.
Once you complete these steps, Windows will apply the new UAC settings, and your computer will be more secure against unauthorized changes.
Tips for How to Enable UAC Windows 10
- Always choose a UAC level that prompts you for confirmation. This can prevent accidental or malicious changes to your system.
- If you are unsure which level to choose, the default setting is a good balance between security and convenience.
- Regularly check your UAC settings to ensure they have not been altered without your knowledge.
- Inform other users of your computer about the importance of UAC and how to respond to its prompts.
- Keep your Windows operating system and all software up to date to maximize security alongside UAC.
Frequently Asked Questions
What is User Account Control (UAC)?
UAC is a security feature in Windows that helps prevent unauthorized changes to your operating system by prompting for permission or an administrator password.
Why should I enable UAC?
Enabling UAC helps protect your computer from malicious software and accidental changes that could harm your system.
How do I know which UAC level to choose?
The default level is usually sufficient for most users, but you can adjust it based on how often you want to be notified about changes.
Can I turn off UAC entirely?
Yes, you can set the slider to «Never notify,» but this is not recommended as it reduces your computer’s security.
Will enabling UAC affect my daily computer use?
Enabling UAC may result in occasional prompts asking for permission to make changes, but it significantly enhances system security.
Summary
- Open the Control Panel.
- Go to User Accounts.
- Click on “Change User Account Control settings.”
- Adjust the UAC Slider.
- Click OK.
Conclusion
Enabling User Account Control (UAC) in Windows 10 is a crucial step towards maintaining a secure and well-protected computer system. With UAC activated, your computer will prompt you before allowing significant changes, thus preventing unauthorized access and potential harm. Although it might seem a bit annoying to receive these prompts now and then, the added security layer is well worth it. Plus, you can always adjust the frequency of these notifications to suit your comfort level.
If you’re serious about keeping your system safe, make sure to regularly update your UAC settings and keep your Windows operating system up to date. The combination of these measures will create a robust defense against potential security threats.
By taking these simple steps, you can ensure that your computer remains secure without sacrificing too much convenience. So, don’t delay—enable UAC on your Windows 10 system today and enjoy peace of mind knowing that your data and settings are more secure.
Matt Jacobs has been working as an IT consultant for small businesses since receiving his Master’s degree in 2003. While he still does some consulting work, his primary focus now is on creating technology support content for SupportYourTech.com.
His work can be found on many websites and focuses on topics such as Microsoft Office, Apple devices, Android devices, Photoshop, and more.
How do I enable UAC prompt? How do I change user account control settings? User Account Control or UAC is a part of the Windows security system which prevents programs or application from making unwanted changes on your PC. When a program tries to change system-related parts of the Windows Registry or file system, Windows 10 shows a pop-up UAC confirmation dialog. When the user confirms by clicking the Yes button, the application can make the changes on your Windows PC.
UAC is really a helpful feature to secure your PC from threats. This way, the UAC dialog provides a special security environment for your user account by limiting the access rights. It can elevate a particular process to full access rights when necessary. However, many Windows users do not want to see these UAC prompts and prefer to use Windows 10 with the classic security model, i.e., just like Windows XP and earlier.
If you are one of those Windows 10 users who dislike the User Account Control prompt and want to eliminate the pop-up UAC dialog, this article will guide you to do so.
As of now, there are at least three ways through which you can enable or disable the UAC prompt on Windows 10. These are the following:-
- Using Control Panel
- Via Registry Editor
- Through Winaero Tweaker
How to Turn On or Turn Off User Account Control (UAC) Prompt in Windows 10 using Control Panel?
Step 1. Open Control Panel. Set the “View by” to Category and then click the User Accounts.
Step 2. In the next window that opens, again click the “User Accounts” option.
Step 3. Next, click the link “Change User Account Control settings.”
Step 4. In the User Account Control Settings dialog that opens, move the slider to the bottom (Never Notify).
Step 5. A User Account Control (UAC) dialog will appear. Click the Yes button to continue.
Once you complete the above steps, User Account Control (UAC) prompt is disabled on your Windows 10. Now
If you want to enable it again, repeat the above steps, and in step 4, raise the level of security by dragging the slider upward.
How to Enable or Disable User Account Control (UAC) Prompt in Windows 10 via Registry Editor?
Step 1. Open the Registry Editor.
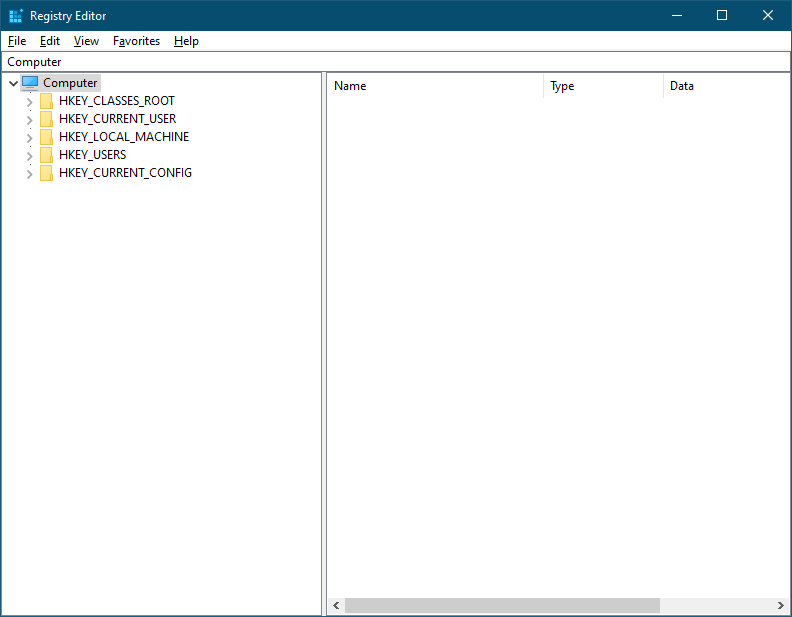
Step 2. In the left side pane of the Registry Editor, navigate to the following key:-
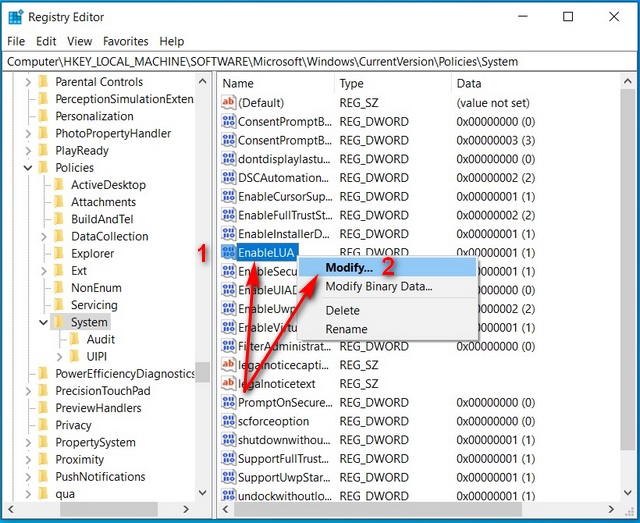
HKEY_LOCAL_MACHINE\SOFTWARE\Microsoft\Windows\CurrentVersion\Policies\System
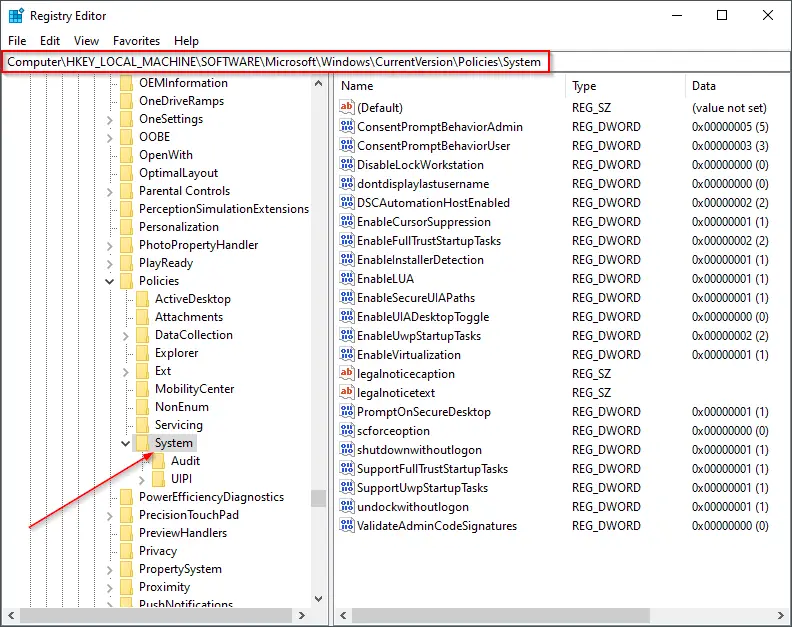
Step 3. In the right pane, look for EnableLUA and double-click on it to modify the value. Set its Value data to 0 to disable the UAC prompt.
Step 4. Click OK.
After executing the above registry steps, now User Account Control dialog will completely disappear.
If you would like to enable the UAC prompt again on your Windows 10 PC, repeat the above steps, and in step 3 above, set the Value data to 1.
How to Allow or Disallow User Account Control (UAC) Prompt in Windows 10 using Winaero Tweaker?
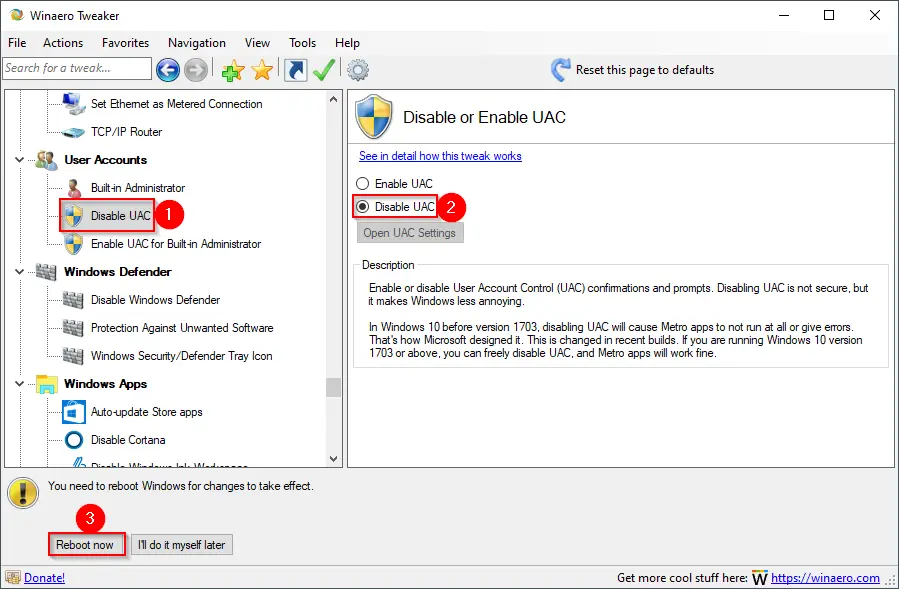
Winaero Tweaker is a free application that comes with several features to customize Windows 10. You can also use this tool to allow or disallow UAC prompts.
Simply download Winaero Tweaker and open in portable mode. It will extract all files in the “C” drive in WinaeroTweaker folder. Double-click on the executable file to launch this tool. In the left side pane, scroll down to the User Accounts section and then click the “Disable UAC” option. On the right side pane, select the radio button Disable UAC. Finally, click the Reboot now button to disable UAC prompt on your Windows 10 PC.
That’s all!!!
User Account Control (UAC) in Windows is meant to be a safety net to prevent apps from making unwanted changes in the system. While it can be helpful for novice users, it can also be a massive annoyance for advanced users, which is why many seek to disable it on their computers. So if you find the popups bothersome and want to turn off User Account Control (UAC) warnings on your Windows 10 computer, read on. Because here, we will show you how to change, disable, or enable User Account Control (UAC) messages in Windows 10.
In this guide, we will describe four different ways in which to change or disable User Account Control on your Windows 10 computer, including from the Control Panel, the Registry Editor, the Local Group Policy Editor and the command line (Command Prompt). We will also tell you about what is UAC and the arguments for and against disabling it on your PC. So without further ado, let’s check out how you can change or turn off User Account Control (UAC) prompts on your Windows 10 PC.
Table Of Contents
What is User Account Control (UAC) in Windows?
User Account Control is a component of the Windows security system. It is meant to stop potential malware attacks by preventing apps from making unwanted changes on the computer. When a software tries to make changes to the file system or the Windows Registry, Windows 10 shows an UAC confirmation dialog. The user then needs to manually confirm that they are intentionally making that change.
The feature provides a special security environment with limited access rights for your user account, but any particular process (like an app installation or settings changes) can be elevated to full access on a case-by-case basis. User Account Control is enabled by default, but users can disable it with a few simple clicks.
Why Should User Account Control (UAC) be Disabled?
While UAC provides an additional layer of security for novice users, the constant nagging and the warning prompts at the most ill-opportune moments can often hamper workflow for advanced users. Even then, for most users, the default settings are best left untouched. However, many folks just find it easier to turn off the popup messages on their computer to be able to work normally. So if you’re one of them, here’s how you can turn off User Account Control (UAC) and get rid of its annoying warnings on Windows 10.
Method 1: Via Control panel
- Open Control Panel (Search for ‘Control’ in the Windows Search Bar). On the top-right corner, change the View to ‘Small Icons’ and click on ‘Security and Maintenance’.

- On the next page, click on ‘Change User Account Control settings’.

Note: You can also get here directly by searching for “uac” (without quotes) in the Windows Search Bar.
- On the UAC settings page, move the slider to the bottom (Never Notify). Click on ‘OK’ and confirm when asked.

This is the easiest way to change the User Account Control (UAC) settings on your Windows 10 computer.
Method 2: Via Registry Editor (Regedit)
You can also easily enable or disable (turn on or turn off) User Account Control using the Windows Registry Editor (Regedit). Here’s how you do it:
- Open the Windows Registry Editor. For that, search for “regedit” in the Windows Search Bar and click on the first result.
- Using the left pane of the Registry Editor window, navigate to the following key:
HKEY_LOCAL_MACHINE\SOFTWARE\Microsoft\Windows\CurrentVersion\Policies\System. In the right pane, find “EnableLUA”. Right-click on it and choose ‘Modify’.
- Finally, change the DWORD value to 0. Restart your computer.
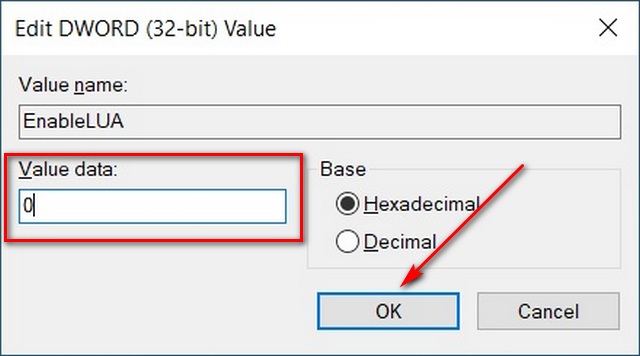
Note: You might have to create a DWORD value if there isn’t one already.
That’s it. You now know how to turn off User Account Control (UAC) on your Windows 10 computer using Regedit.
Method 3: Via Local Group Policy Editor
You can also enable or disable User Account warnings in Windows 10 using the Local Group Policy Editor. Here’s how you do it:
Note: The Local Group Policy Editor is only available in the Windows 10 Pro, Enterprise and Education editions.
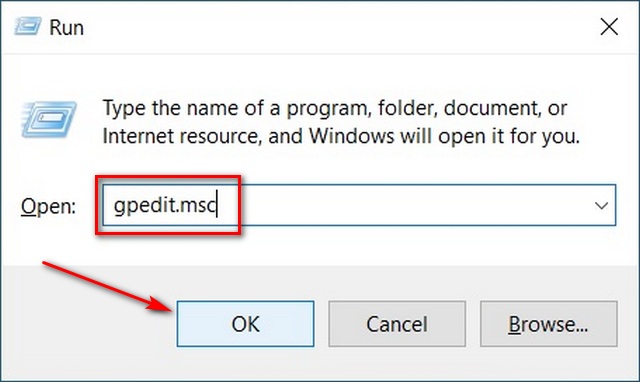
- Open Local Group Policy Editor on your computer. To do that, firstly search for ‘Run’ in the Windows Search Bar and choose the Run option from the results.
- In the Run box, type in
gpedit.mscand press Enter or click on ‘OK’ to open the Local Group Policy Editor.
- In the Group Policy Editor window, navigate to
Computer Configuration > Windows Settings > Security Settings > Local Policies > Security Optionsusing the left pane. Now scroll down to the bottom and find the following entry: “User Account Control: Run all administrators in Admin Approval Mode”.

- Double-click on it and in the popup window, choose ‘Disabled’. Finally, click on ‘OK’ at the bottom.

You can now easily enable or disable (turn on or off) User Account Control (UAC) in Windows 10 using the Group Policy Editor.
Method 4: Via Command Prompt
You can also enable or disable User Account Policy in Windows 10 using the command line (command Prompt). Here’s how you do it:
- Open the command Prompt as administrator. For that, search for ‘cmd’ in the Windows Search Bar and click on ‘Run as Administrator’ as seen below.

- Now enter the following command and press Enter:
reg.exe ADD HKLM\SOFTWARE\Microsoft\Windows\CurrentVersion\Policies\System /v EnableLUA /t REG_DWORD /d 0 /f. Reboot your computer.

That’s it. You now know how to disable User Account Control (UAC) on your Windows 10 computer using command line.
Note: Click on the link to learn more Command Prompt tips for Windows 10.
Get Rid of Annoying Warnings on Your PC to Improve Workflow
While getting rid of the UAC warning prompts certainly reduces annoyance, it could be potentially dangerous for some users. So unless you know what you’re doing, it is best left on its default setting. However, if you have made up your mind to make the change, now you know not one or two, but four ways to disable User Account Control on your Windows 10 PC. Meanwhile, since you’re a Windows 10 user, you should also check out some cool Windows 10 tips and tricks, how to use God Mode in Windows 10 and how to use PowerToys on Windows 10 to get the best out of your computer.