
Подглава 1.5:
https://git-scm.com/book/en/v2/Getting-Started-Installing-Git
https://git-scm.com/book/ru/v2/Введение-Установка-Git
В этой подглаве коротко описано, как можно установить программу «Git» на свой компьютер разными способами. Порядок установки зависит от операционной системы, установленной на компьютере. В подглаве описан порядок установки для Unix-подобных операционных систем и для операционных систем семейства «Windows». Заключительная часть подглавы посвящена тому, как можно собрать исполняемый файл программы «Git» из исходников (это программа с открытыми исходниками) на Unix-подобной операционной системе.
У меня на компьютере установлена операционная система «Windows 10 Pro» (64-разрядная), поэтому меня интересовал раздел данной подглавы, посвященный установке программы «Git» на компьютер с операционной системой семейства «Windows». Этот раздел данной подглавы маленький, состоит всего из двух параграфов, но всё необходимое там описано. Вот страница официального сайта программы «Git», посвященная установке этой программы на компьютер с операционной системой из семейства «Windows»:
https://git-scm.com/download/win
Хоть в учебнике сказано, что после перехода по этой ссылке должно начаться автоматическое скачивание дистрибутива программы «Git», этого не происходит. Видимо, с 2014 года (время написания учебника) это убрали.
В учебнике отмечено, что с указанной страницы можно скачать не оригинальную программу «Git» (которая, как я понимаю, работает только на Unix-подобных операционных системах), а отдельную программу для операционных систем «Windows», которая называется «Git for Windows».
Вот ссылки на исходники оригинальной программы «Git»:
https://git.kernel.org/pub/scm/git/git.git/
https://www.kernel.org/pub/software/scm/git/
https://github.com/git/git
Вот ссылка на исходники программы «Git for Windows»:
https://github.com/git-for-windows/git
У программы «Git for Windows» есть собственный отдельный сайт, у которого есть два адреса URL (оба этих адреса ведут на один и тот же сайт):
http://git-for-windows.github.io
https://gitforwindows.org
В описании проекта «Git for Windows» на веб-сервисе «GitHub» сказано, что программа «Git for Windows» является форком оригинальной программы «Git», содержащим изменения, нужные при работе в операционных системах семейства «Windows».
Что интересно, на данный момент номера версий для оригинальной программы «Git» и для программы «Git for Windows» совпадают. Вероятно, разработчики этих отдельных программ как-то согласуют свои действия друг с другом.
Установка на практике
Итак, я перешел на страницу, упомянутую выше:
https://git-scm.com/download/win
и нажал там на первую же ссылку для скачивания «Click here to download», хотя ниже есть еще ссылки на разные версии дистрибутива. Эта ссылка указывает на один из дистрибутивов, расположенных на веб-сервисе «GitHub» по следующему адресу:
https://github.com/git-for-windows/git/releases/
Я скачал файл с таким названием (его размер 47,9 Мбайт):
Git-2.35.1.2-64-bit.exe
Из названия этого файла видно, что это дистрибутив программы «Git for Windows» версии 2.35.1(2) для операционной системы семейства «Windows» (64-разрядной), не младше «Windows Vista». Это самая свежая версия этой программы на данный момент, датированная 1 февраля 2022 года.
Я запустил эту программу-установщик. Она установила программу «Git for Windows» в следующую папку, затребовав 263,9 Мбайт места на жестком диске:
C:\Program Files\Git
Список устанавливаемых компонентов программы «Git for Windows» я оставил по умолчанию:

Далее установщик попросил выбрать текстовый редактор, который программа «Git for Windows» будет использовать по умолчанию. Я выбрал из предложенного списка текстовый редактор «Notepad++», которым давно пользуюсь.
Далее предлагается возможность сменить умолчательное название первоначальной ветки нового репозитория, создаваемого с помощью программы «Git for Windows» (команда git init), с «master» на какое-нибудь другое. Эта функция установщика, очевидно, была добавлена после известного скандала, случившегося года два назад (см. тут). Тогда каким-то американцам не понравилось название «master» (одно из значений этого слова переводится на русский язык как «господин» или «хозяин») из-за того, что оно, якобы, неприятно напомнило им о судьбе когда-то угнетавшихся в США негров.
Лично меня слово «master» не смущает, так как в данном случае оно используется в другом значении («главный»). Поэтому я оставил опцию по умолчанию: «Let Git decide» (позволить программе «Git» самой решать). Это значит, что пока что умолчательное имя для первоначальной ветки остаётся «master», но в будущих версиях программы это может измениться. На уже существующие репозитории эта опция не влияет.
Далее установщик предлагает выбрать один из трех вариантов настройки переменной среды PATH: 1) не изменять эту переменную среды. Там сказано, что в этом случае программу «Git for Windows» можно будет запустить только из «Git Bash» (я пока не знаю точно, что это такое, но подозреваю, что это программа-эмулятор командной строки «bash» из Unix-подобных операционных систем); 2) прописать путь к программе «Git for Windows» в этой переменной среды. В этом случае программу «Git for Windows» можно будет запустить из командной строки «cmd.exe» или из программы «Windows PowerShell» без указания полного пути к исполняемому файлу программы; 3) Прописать в этой переменной среды кроме пути к программе «Git for Windows» еще пути к каким-то дополнительным утилитам. Это может повлиять на работу обычных утилит операционной системы «Windows».
По умолчанию выбрана вторая опция из этих трех. Ее я и оставил выбранной.
Далее я выбирал из двух опций насчет использования SSH (тут подробнее). Выбрал опцию по умолчанию: будет использоваться программа «ssh.exe», которая установится сейчас вместе с программой «Git for Windows».
Выбрал опцию (предлагается два варианта) насчет библиотеки SSL/TLS, используемой программой «Git for Windows» при соединениях по протоколу HTTPS: «Use the native Windows Secure Channel library» (использовать встроенную в операционную систему «Windows» библиотеку).
Настройка преобразований окончаний строк: есть три опции. Оставил опцию по умолчанию: «Checkout Windows-style, commit Unix-style line endings» (при получении текстовых файлов из каталога «Git» в рабочую копию для изменения конвертировать LF в CRLF, при коммитах конвертировать CRLF в LF). Там сказано, что это рекомендуемая опция в кроссплатформенных проектах для операционной системы «Windows».
Настройка эмулятора терминала: есть две опции: 1) использовать «MinTTY»; 2) использовать умолчательное для операционной системы «Windows» окно консоли. Выбрал вторую опцию.
Выбор поведения команды git pull: есть три опции. Выбрал первую: «Default (fast-forward or merge)», так как там сказано, что это стандартное поведение этой команды.
Выбор «credential helper» (по-русски «менеджер учетных данных»): есть две опции. Я выбрал опцию «None» (не использовать менеджер учетных данных).
Настройка дополнительных опций: есть два флага: 1) «Enable file system caching» (включить кэширование при работе с файлами), по умолчанию флаг установлен; 2) «Enable symbolic links» (включить символические ссылки), по умолчанию флаг не установлен. Оставил умолчания.
Настройка экспериментальных опций: есть два флага, по умолчанию оба не установлены. Оставил, как есть.
Только после этого началась и успешно закончилась установка программы.
Выводы
В целом мне понравилось, как сделана программа-установщик. Однако, при установке требуется настроить слишком много опций. Это минус. Очевидно, что большинство из этих опций можно сконфигурировать уже после установки программы «Git for Windows», поэтому их настройку следовало бы отложить до момента после установки.
О настройке большинства из перечисленных опций я имею довольно смутное представление, поскольку являюсь новичком в использовании программы «Git for Windows». Надеюсь, позже будет возможность перенастроить вышеуказанные опции при необходимости.
Я пока что не знаю, как проверить работоспособность установленной программы. Продолжу читать учебник дальше. Думаю, в следующих главах всё станет понятно.
Git Install Options and Their Meanings
like me if you you also wonder what are the meanings of various options that git provides while installing and what are the repurcussions and what is recommended then readon…

screen1
explain some important options on screen 1 above
- Git Bash Here — adds a context(right click) menu «git bash here»
- Git Bash Here — adds a context(right click) menu «git GUI here»
- Git LFS(Large File Support) — self explainatory

screen2
explain options on screen 2 above
- Select Editor — by default git uses Vim but also recommends to use your favorite modern GUI editor viz. VSCode, Sublime, Notepad++ etc
screen3
explain options on screen 3 above
- Intial Branch — if you let Git decide then Git is going to use ‘master’ as default branch name
- It is recommended to use ‘main’ — many teams has already changed their default branch names to ‘main

screen4
explain options on screen 4 above
-
Adjusting PATH environment —
- Use Git from Git Bash Only — simplest option but will not allow you to use Git from other commandline tools like PowerShell,Command Prompt etc (NOT RECOMMENDED)
- Git from Commandline and also from 3rd Party-software — Allows Git to be used fromCommand Prompt, PowerShell or any other 3rd party software which is looking for Git in the Path environemnt (RECOMMENDED)

screen5
explain options on screen 5 above
-
Choosing SSH Executable —
- Use Bundled OpenSSH — Uses the ssh.exe that comes with Git
- Use external OpenSSH — Git doesn’t install ists own OpenSSH instead you are free to use othe SSH say windows OepnSSH
explain options on screen 6 above
-
Choosing HTTPS transport backend — CONSULT YOUR IT DEPT
- Use OpenSSL Library — CONSULT YOUR IT DEPT
- Use the native Windows Secure Channel library — CONSULT YOUR IT DEPT
explain options on screen 7 above
-
Choosing HTTPS transport backend — recommended to uese the one of the first 2 options
** on windows — Checkout Windows-Style, Commit Unix-style. Note:- this option sets ‘core.autocrlf’ option to ‘true’ in Git config files
** on Unix — Checkout as-is, Commit-Unix-Style.Note:- this option sets ‘core.autocrlf’ option to ‘input in Git Config files


explain options on screen 8 above
- Configure terminal emulator — using MinTTY is good choice as windows command prompt is very limited
explain options on screen 9 above
- default git pull behavior — I would go with default option that is ‘fast-forward or merge’

explain options on screen 10 above
- Choose a credential helper — If you’re using ssh this option doesn’t matter but for https ‘Git Credential Manager (GCM)’ is good to use. GIT Credential Manager. Note:- Git Credential Manger is also called Git Credential Manager Core.
** The credential helper can be changed to any other helper like say windows credential manager at later point.
purpose
install [git] to [windows 10]
What is git?
commend based program that is for tracking file changes. Origianlly, it invented for programming, thus, git file contains information of when did the file created, changed and moved.
steps
1. downlad git
official link
2. install the program
3. installation settings
-
Additional icons > On the Desktop : create shortcut
-
Windows Exporer integration
- Git Bash Here : Git Bash connection, any folder can connect with git right away
- Git GUI Here : Git GUI connection, create some GUI on right click menu
-
Git LFS (Large File Support) — origianlly git was for coding. Basically codes are just text files. If you check this, it can support other files too.
-
Associate .git configuration files with the default text editor — you can open git file with default text editor
-
Associate .sh files to be run with Bash — sh files(this file is for script language) is connected with git Bash
-
Use a TrueType font in all console windows
-
Check daily for Git for Windows updates
4. Environment variable) setting
- Use Git from Git Bash only
- Use Git from the Windows Command Prompt
- Use Git and optional Unix tools from the Windows Command Prompt
5. HTTPS transport backend setting
- Use the OpenSSL library — OpenSSL is open source library for encrypting connection between server and website
- Use the native Windows Secure Channel library
6. conversions setting
- Checkout Windows-style, commit Unix-style line endings
- Checkout as-is, commit Unix-style line endings
- Checkout as-is, commit as-is
- Windows-style line endings is “\r\n”
- Unix-style line endings is “\n”
Since git invented under Unix system, git cannot verify the “\r”. If you are using windows and check the “Checkout as-is, commit as-is”, it may cause line changing issue. If you use window, check the “Checkout Windows-style, commit Unix-style line endings”
7. terminal emulator setting
- Use MinTTY(the default terminal of MSYS2) — MinTTY terminal emulator
- Use Windows’ default console window
- Enable file system caching — file will be saved in cach memory and it will work faster
- Enable Git Credential Manager — Git Credential Manager for windows
- Enable symbolic links
9. check installed
- git Bash and other coemmed will be added to right click menu
- you can cemmend “git –version” on cmd
10. set user name and email
git verify users with email and username. If you do not set, it will cause some issue when you upload online
set user name
git config --global user.name "your id"
set email
git config --global user.email "your email"
checking
you can cemmend “git config –list” on cmd for checking
Share!
comments powered by
If you use Git on Windows (either via command-line or a GUI), you might run into the following error:
$ git clone https://lanedirt.tech/repo.git
Cloning into 'repo'...
fatal: unable to access 'https://lanedirt.tech/repo.git/': SSL certificate problem: unable to get local issuer certificate
Read on in order to fix this..
Problem and cause
When you encounter the error above on Windows machines, it is most often caused by the SSL backend config option. The SSL backend defines at which place Windows will look for known root certificate authorities in order to verify a SSL certificate.
During the installation of Git for Windows, you will see the following option:
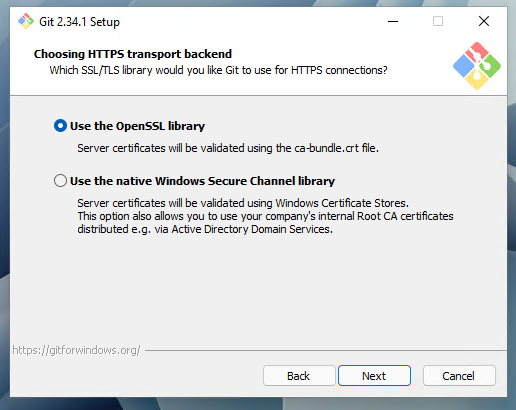
- OpenSSL: this is the built-in certificate store which is shipped with Git by default. However, this built-in certificate store does not contain any custom SSL certificate authorities which Windows knows about (e.g. internal SSL certs used in company local networks).
- Native Windows Secure Channel library: this option uses the Windows SChannel backend, which will cause all SSL certificate validations to be handled by Windows itself. This has the benefit that any custom SSL root certificates added to Windows (e.g. distributed via Active Directory) will also work with Git.
Solution: use SChannel
As you can see in the screenshot above, the default option for new installations is to use the OpenSSL library. However, you can switch this config option via command line at any time you want. Most of the times, switching to the “SChannel” SSL backend will fix all problems. To do this, open up a Git bash window, and input the following:
git config --global http.sslbackend schannel
This will set SChannel as the default sslbackend for all Git projects on this machine. Now if we try to execute a Git clone again, it will work:
$ git clone https://lanedirt.tech/repo.git
Cloning into 'repo'...
remote: Enumerating objects: 66576, done.
remote: Counting objects: 100% (988/988), done.
remote: Compressing objects: 100% (171/171), done.
remote: Total 66576 (delta 921), reused 856 (delta 817), pack-reused 65588
Receiving objects: 100% (66576/66576), 64.34 MiB | 32.36 MiB/s, done.
Resolving deltas: 100% (41051/41051), done.
Updating files: 100% (10253/10253), done.
Success!
Git is a powerful version control system that is widely used by developers and teams to manage code and track changes in projects. Whether you are a seasoned developer or a beginner looking to dip your toes into version control, knowing how to install and use Git is essential. This comprehensive guide will walk you through the process of installing Git on Windows 11.
Understanding Git
Before diving into the installation process, let’s briefly discuss what Git is and why it is important. Git allows multiple developers to work on the same project simultaneously without overwriting each other’s changes. It also provides a detailed history of modifications, enabling easy tracking and rollback of changes when necessary. By using Git, you can collaborate effectively with your team, manage releases, and maintain a clean codebase.
System Requirements
Before proceeding, ensure that your Windows 11 system meets the following requirements for running Git:
- Operating System: Windows 11 (or later)
- Processor: 1 GHz or faster
- Memory: 2 GB RAM (4 GB recommended)
- Disk Space: At least 200 MB of available disk space
Step 1: Download Git Installer
-
Visit the Official Git Website:
To download Git, navigate to the official Git website at git-scm.com. -
Choose the Windows Version:
On the homepage, you should see a download button for the Windows version of Git. Click on it to download the latest installer compatible with Windows 11. -
Check for Latest Release:
It’s good practice to ensure you’re downloading the latest version. You may also click on the ‘Downloads’ section of the website, where you can find different versions of Git for various operating systems. Look for the «Windows» link, usually highlighted, to get the most recent installer.
Step 2: Run the Installer
-
Locate the Downloaded Installer:
After the download is complete, navigate to the folder where the installer file (usually namedGit-x.x.x-x64-bit.exe) is saved. -
Run the Installer:
Double-click the installer file to begin the installation process. If prompted by User Account Control (UAC), click ‘Yes’ to allow the installer to make changes to your device.
Step 3: Installation Wizard Setup
Once the installer is up and running, you’ll go through a series of steps in the installation wizard.
-
Select Components:
The first window will present you with options regarding the components you want to install. The default selection includes:- Git Bash: A command-line shell for Unix commands and Git.
- Git GUI: A graphical user interface for Git.
- Editor for commits: You can choose any text editor for writing commit messages.
- Windows Explorer Integration: Options to add Git Bash context menu entries.
You can leave all options checked for a typical installation and click ‘Next.’
-
Choosing the Installation Path:
By default, Git will be installed inC:Program FilesGit. You can change this location if preferred. After confirming the path, click ‘Next.’ -
Adjusting Your PATH Environment:
The wizard will prompt you to choose how to use Git from the command line. Here are the recommended settings:- Use Git from the Windows Command Prompt (recommended): This option allows you to use Git from both Git Bash and the Windows command prompt.
- Use Git and optional Unix tools from the Windows Command Prompt: If you choose this, you’ll be able to use additional Unix commands.
Select your preferred option and click ‘Next.’
-
Choosing HTTPS Transport Backend:
Here, you’ll need to choose between two transport backends for HTTPS connections:- Use the Open SSL library: The default option, which is recommended for most users.
- Use the native Windows Secure Channel library: This may be more seamless for some Windows applications, but OpenSSL is often safer.
Make your selection and click ‘Next.’
-
Configuring the Line Ending Conversions:
You will now be asked how you want Git to handle line endings. The choices are:- Checkout Windows-style, commit Unix-style line endings (recommended for most users).
- Checkout as-is, commit as-is: Useful if you intend to collaborate with project members who do not rely on Windows.
- Checkout as-is, commit Unix-style line endings: Best for developers consistently working in Unix/Linux environments.
Choose an option that best fits your development style and click ‘Next.’
-
Configuring the Terminal Emulator:
The wizard will prompt you to select the terminal emulator to use. The options include:- Use MinTTY (the default terminal of MSYS2): This is the recommended option. It provides a better experience for use with Git Bash.
- Use Windows’ default console window: If you prefer consistency across Windows tools.
Select an option and then click ‘Next.’
-
Choosing the Default Behavior of ‘git pull’:
You will see an option to choose the default behavior of thegit pullcommand. The options are:- Default (fast-forward or merge): This is the default option, which allows for the standard behavior of
git pull. - Only fast-forward: This restricts the
git pullaction, preventing merge commits.
Choose your preference and proceed by clicking ‘Next.’
- Default (fast-forward or merge): This is the default option, which allows for the standard behavior of
-
Configuring Extra Options:
You’ll be presented with options for configuring extra settings, including:- Enable file system caching.
- Enable Git Credential Manager: This helps manage authentication with remote repositories.
Select your preferences and click ‘Next.’
-
Installing:
After going through all the options, the last screen confirms your selections. Click ‘Install’ to begin the installation process. This may take a few minutes.
Step 4: Completing the Installation
Once the installation process finishes, you will see a completion screen letting you know that Git has been successfully installed. You may leave the option to view the Release Notes checked if you want to learn about any new features or changes. Then click ‘Finish’ to exit the installer.
Step 5: Verifying the Installation
To ensure that Git was installed correctly, you can verify the installation by checking the version:
-
Open Git Bash: Click on the Start menu and search for “Git Bash.” Open it.
-
Check Git Version:
In the Git Bash window, type the following command and press Enter:git --versionIf Git is installed correctly, you should see output displaying the installed Git version, something like
git version 2.37.0.windows.2.
Step 6: Configure Git with Your User Information
Before you start using Git, it’s a good practice to configure your user information as this will be included in your commit messages.
-
Set Your Username:
In the Git Bash terminal, enter the following command, replacingYour Namewith your actual name:git config --global user.name "Your Name" -
Set Your Email:
Similarly, set your email address:git config --global user.email "[email protected]" -
Check Configuration:
To validate your configuration settings, type:git config --global --listThis will display all the configuration settings you’ve just set, confirming the successful setup of your Git environment.
Step 7: Generating SSH Keys (Optional)
If you plan to interact with remote repositories (like GitHub or GitLab), you may want to generate SSH keys for secure communication.
-
Generate SSH Key Pair:
Execute the following command in Git Bash:ssh-keygen -t rsa -b 4096 -C "[email protected]"You will be prompted to answer a few questions, including specifying the file path to save the key (hit Enter to accept the default) and creating a passphrase if desired.
-
Add SSH Key to the SSH Agent:
Start the ssh-agent in the background:eval $(ssh-agent -s)Then, add your SSH private key:
ssh-add ~/.ssh/id_rsa -
Copy the SSH Key:
You can now copy your SSH public key to use it for GitHub or GitLab by running:clip < ~/.ssh/id_rsa.pubThis command will copy the key to your clipboard.
-
Add SSH Key to Your GitHub/GitLab Account:
Go to your GitHub or GitLab account settings and find the “SSH and GPG keys” section. Click on “New SSH key,” paste your key into the key field, and save it.
Step 8: Getting Started with Git
Now that you have Git installed and configured, you can start using it for version control in your projects:
-
Creating a New Repository:
You can create a new Git repository in a new or existing directory by running:git init -
Cloning an Existing Repository:
To work on an existing project, you can clone a repository using:git clone https://github.com/username/repository.git -
Making Changes and Committing:
After making changes to your files, you can stage those changes and commit them:git add . git commit -m "Your commit message here" -
Pushing Changes:
Push your commits to the remote repository using:git push origin main -
Pulling Changes:
To pull the latest changes from the remote, run:git pull origin main
Conclusion
Congratulations! You have successfully installed Git on Windows 11 and are ready to start managing your projects with version control. Understanding Git will significantly improve your development workflow, enhance collaboration skills, and help you track project history more efficiently. If you’re new to Git, consider experimenting with simple commands and gradually exploring more advanced features as you become comfortable.
Feel free to connect with the vast Git community online, read official documentation, and explore available resources to deepen your understanding and enhance your development skills. Happy coding!