
I’ve been experiencing the BSOD after system wake 4-5 times now. The Bluescreenview shows USBXHCI.SYS as the problem with SYSTEM_THREAD_EXCEPTION_NOT_HANDLED being the bug check string. Any idea of how I can fix this specific driver error – Anonymous user
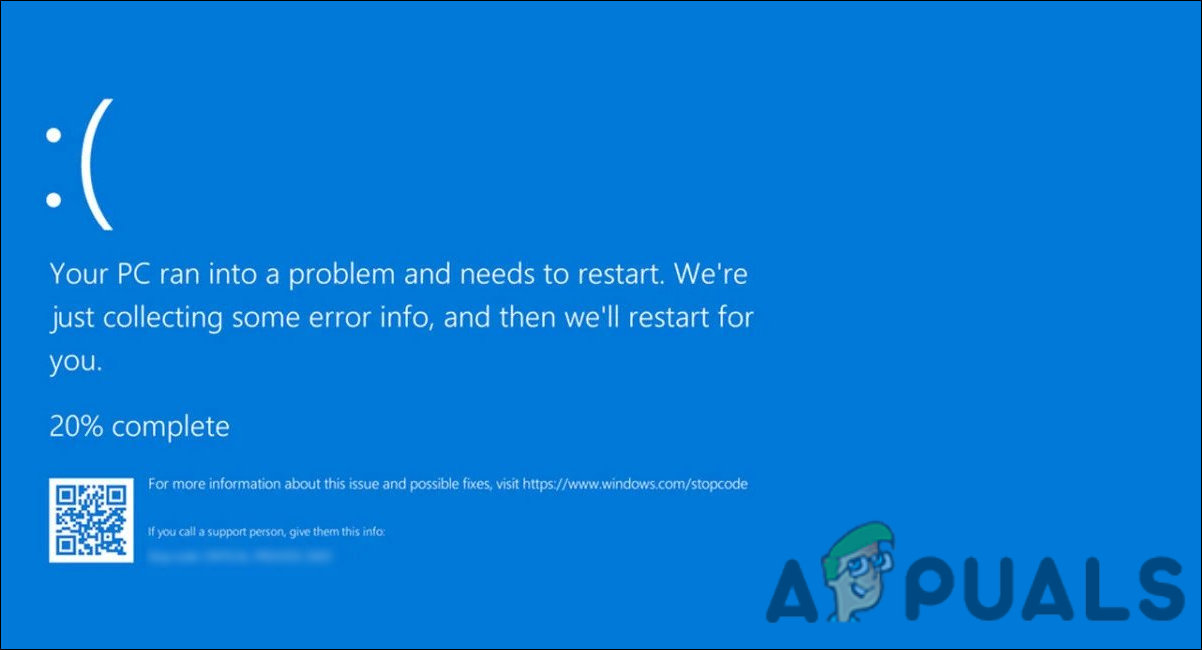
While trying to access data on a USB storage device or transfer files from a Windows computer, some users face a strange USBXHCI.SYS blue screen error. This BSoD error randomly gets generated after a sudden system crash. The USBXHCI.SYS failed blue screen is accompanied by a stop code, as shown in the image below.
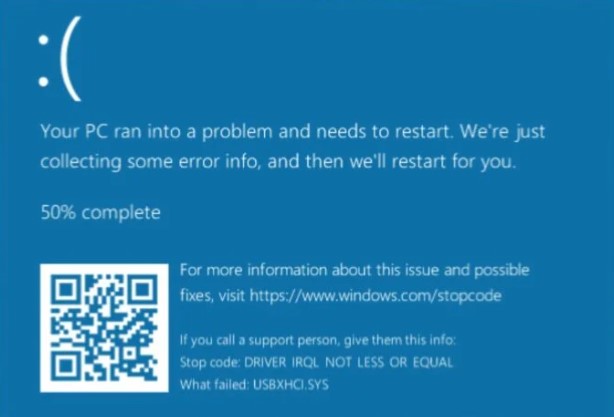
If you are seeing this blue screen error, don’t worry. The methods explained below will help you resolve the USBXHCI.SYS BSoD error on your Windows 10/11 PC in no time.
What is USBXHCI.SYS?
It is very clear from the name of the failed system file, USBXHCI.SYS – where USB stands for Universal Serial BUS and XHCI for eXtensible Host Controller Interface. This file is a critical system file responsible for the management and control of connected USB 3.0 devices. Without this file, your Windows PC will not be able to properly recognize and interact with the connected device.
Main Causes Behind USBXHCI.SYS Blue Screen Error
- Corrupt USB drivers
- Outdated BIOS or chipset
- Corrupted hardware
- Incorrect USB configuration settings
- Incompatible power plan
Methods to Fix the USBXHCI.SYS Blue Screen Error
Occurrence of USBXHCI.SYS BSoD not only hampers our work but also affects the stability of the system. To get rid of this error, we have explained some methods that you can use. These methods are simple and will save you time searching through the internet.
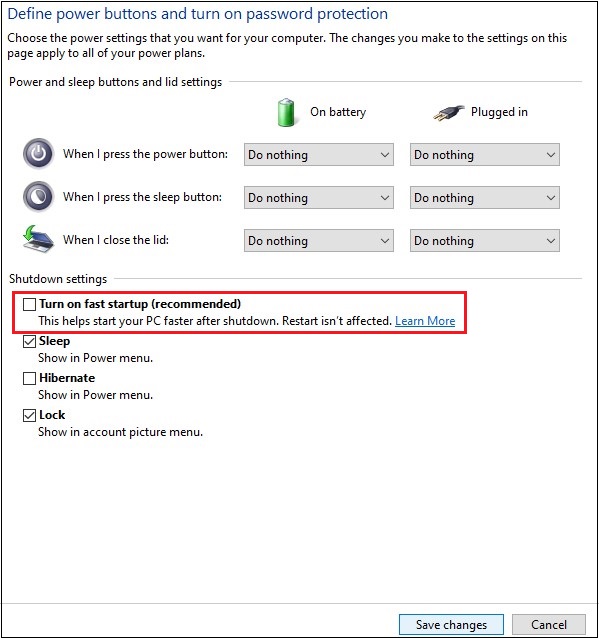
Method 1: Turn off Fast Startup
Fast startup is an added feature in later versions of Windows that allows the computer to boot faster using a saved image of the Windows Kernel and drivers in hiberfile (hiberfile.sys). However, in certain situations, fast startup or boot can cause problems for the computer that could lead to potential issues like the USBXHCI.SYS blue screen error. You can resolve this issue by simply disabling the fast boot feature. Here’s what to do –
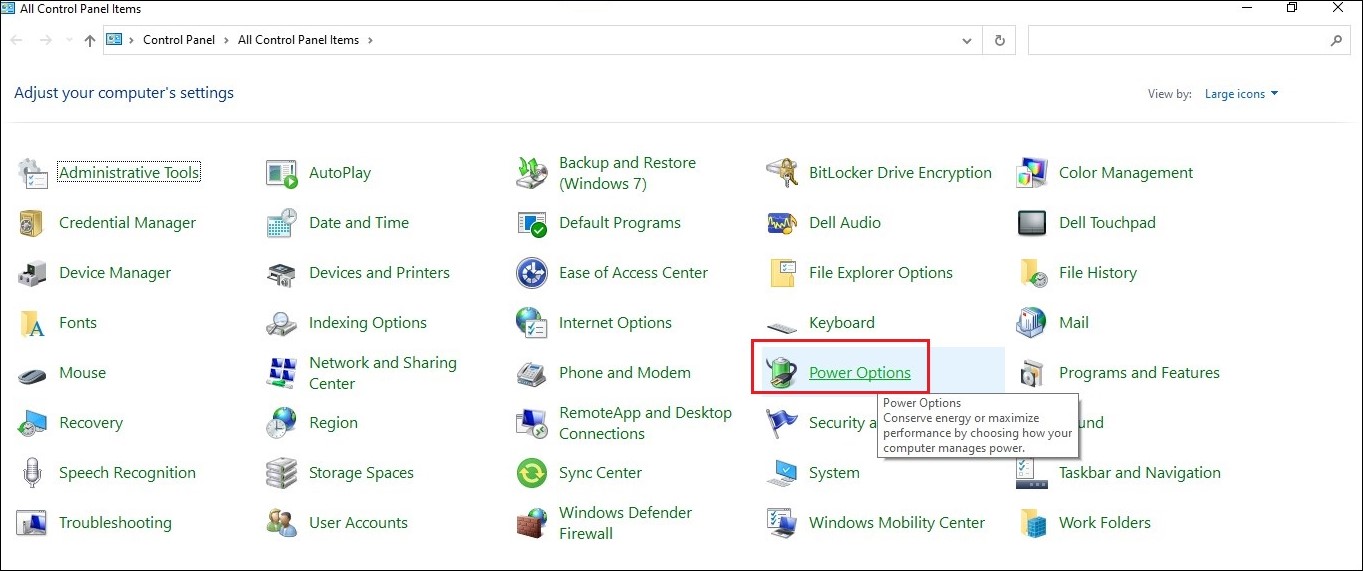
- Open Control Panel.
- Click on Power Options.

- In the left pane, click on Choose what the power buttons do.
- Then, click on Change settings that are currently unavailable.
- Navigate to the Shutdown settings and uncheck the Turn on fast startup (recommended) option.
- Click on Save Changes.
Method 2: Check for OS, Driver, & Chipset Updates
Another major reason behind your Windows 10/11 computer showing the USBXHCI.SYS blue screen of death is outdated OS or specific device drivers or chipset drivers. You can easily eliminate the annoying USBXHCI.SYS BSoD from your system by –
- Installing the latest OS updates from Settings > Update & Security > Windows Updates.
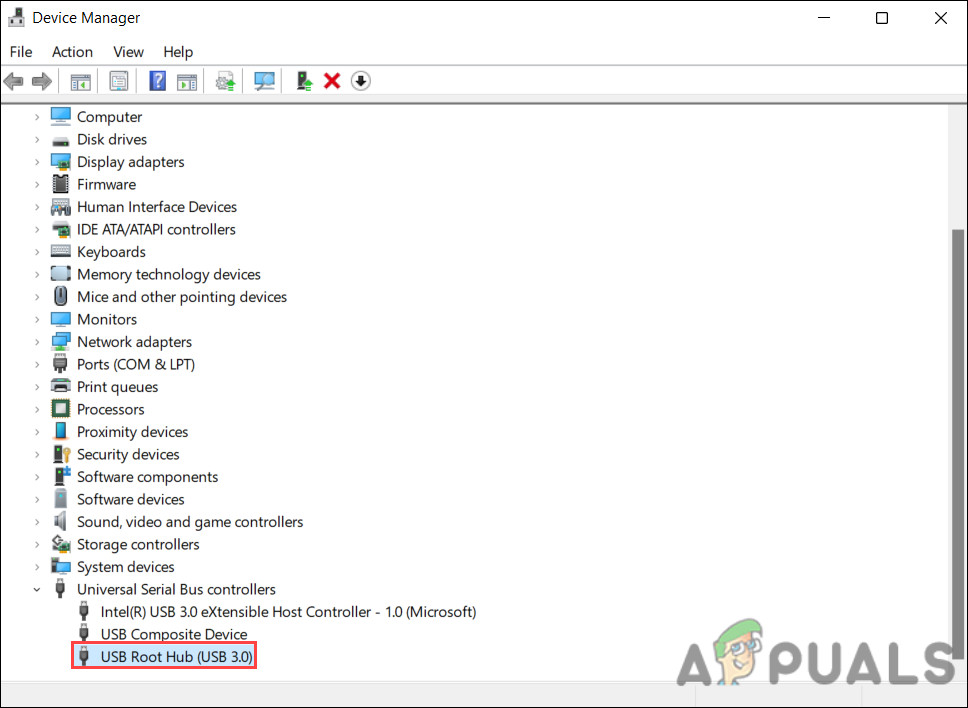
- Updating USB Root Hub (USB 3.0) device driver by going to Device Manager > Universal Serial Bus.
- Installing the latest chipset updates by visiting your motherboard manufacturer’s website.
Method 3: Update BIOS
Updating BIOS is another great way to fix the USBXHCI.SYS blue screen error on your Windows. Running your Windows PC on an outdated BIOS can be a stairway to errors and issues. Avoid unnecessary issues by keeping your BIOS updated. Go to your motherboard manufacturer’s website and check for available BIOS updates.
Note – Be careful while updating BIOS and keep your laptop plugged into an AC power source. This will help you avoid any unwanted interruptions due to power loss. If you are on a desktop, use a UPS to safeguard yourself from sudden power loss/surges, as they might damage the SSD/HDD, which can cause data loss.
Method 4: Enable XHCI mode in BIOS
You can be encountering the USBXHCI.SYS blue screen error on your system while using USB 3.0 ports due to the XHCI Hand-Off feature disabled in the BIOS. You can resolve the USBXHCI.SYS BSoD by enabling the XHCI Hand-Off via BIOS. Carefully follow the steps mentioned below –
- Restart your PC and use the assigned BIOS key to access the BIOS.
Note – Power ON the computer and keep pressing the assigned key to enter the BIOS. It could be F2, F8, F10, F11, ESC, DEL, or any other key designated by the computer manufacturer. Refer to your device’s/motherboard’s manual for details.
- Navigate to the Advanced tab and locate USB Configuration.
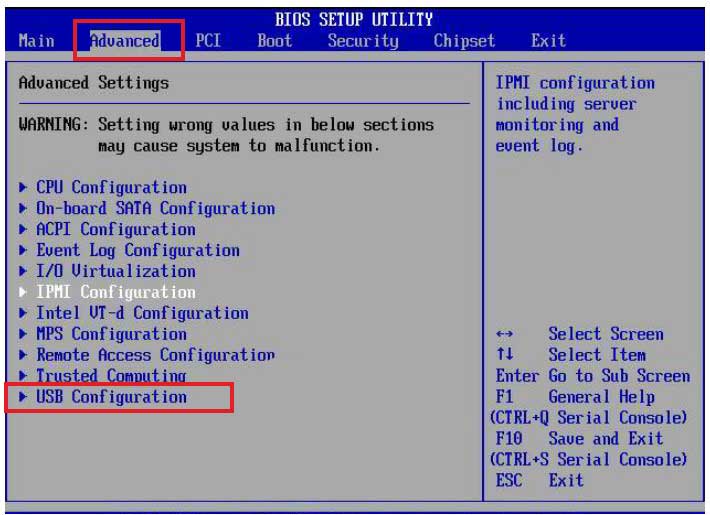
- Go to XHCI Hand-Off and enable it. Do the same for USB 3.0 Support.
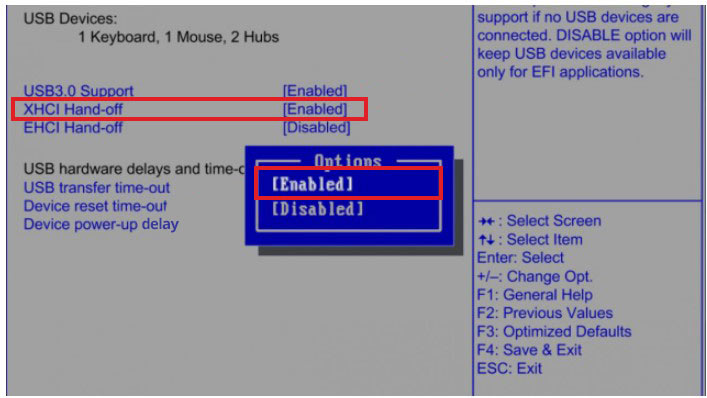
- Save & Exit the BIOS to restart your PC.
Doing this will help you fix the USBXHCI.SYS blue screen error on your Windows 10/11 PCs.
Method 5: Disable the USB Selective Suspend Feature
The USB selective suspend feature allows the hub driver to suspend individual USB ports without affecting the operations of other USB ports. While this feature helps the system reduce overall power consumption, this feature can run into issues leading to errors like the USBXHCI.SYS BSoD. You can disable this feature to fix unexpected USBXHCI.SYS blue screen errors on your computer. Here’s what to do –
- Go to Control Panel.
- Click on Power Options.
- Click on Change plan settings under the Selected plan section.
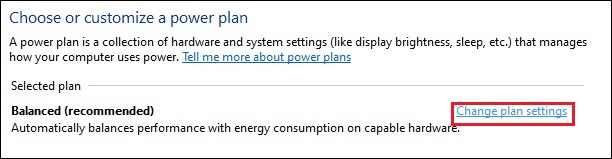
- Click on Change advanced power settings.
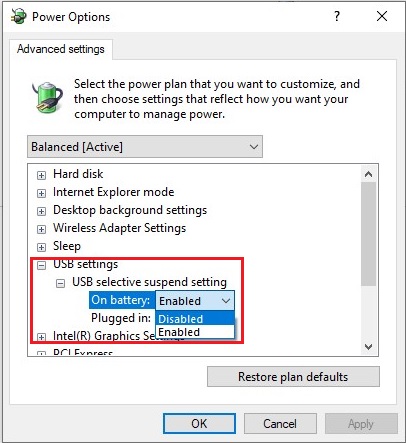
- The Power Options window will appear. Scroll down to USB settings and expand it.
- Expand the USB selective suspend setting.
- Click on the setting you want to change and use the drop-down menu to select Disable.
- Once done, press OK and close everything.
- Restart your PC.
Following the above steps should help you eliminate USBXHCI.SYS blue screen of death. You can check if using USB 3.0 ports or any other USB ports generate this BSoD or not.
The Error Seems to be Lingering. What Now?
The above methods are sufficient to help you eliminate the USBXHCI.SYS failed blue screen error. However, if the USBXHCI.SYS BSoD is persistent or is coming while using USB 2.0 ports that are preventing you from transferring files from your PC to your external drive, you can use a powerful file recovery software like Stellar Data Recovery to recover files to your cloud storage.
You can also create a disk image if the amount of data exceeds the amount of available storage on the cloud. Simply save the disk image and upload that to your cloud storage. Then, use it on another computer to recover your data.
Once you have recovered your data, you can reset Windows or do a clean installation of Windows 10 or Windows 11 on your computer.
Wrapping Up
The USBXHCI.SYS blue screen error is a kind of BSoD that mostly occurs when a user connects a USB device to the USB 3.0 port. This BSoD is a result of a faulty USB root driver, outdated BIOS or chipset firmware, and more. In some extreme scenarios, the underlying issues affect all the USB ports, resulting in this error. If this error screen unexpectedly pops up on your screen, do not worry and use the methods explained above to fix this BSoD.
Related Reads
FIX NMI Hardware Failure BSoD
Methods to fix Bindflt.sys Blue Screen of Death
The usbxhci.sys blue screen is often caused when the users try to launch their system with one or more external devices connected to the computer. In some cases, the computers also crash when the user launches the system and upon booting, connects external devices to the computer.
The most common factor that triggers this particular issue is the corrupt USB drivers on the system. In other cases, it can also be caused due to corruption errors within the system or the hardware being faulty.
Whatever the reason might be in your case, we have listed several troubleshooting methods below that will help you fix the issue for good. We suggest you go through the solutions first to determine the cause of the error and then proceed with the most relevant method.
1. Update or Reinstall the USB Driver
As we mentioned earlier, the most common issue behind the usbxhci.sys blue screen is a corrupt or outdated USB driver.
The best way to fix issues with drivers is by updating them to the latest version available. If that does not work, you can uninstall the driver and reinstall it from the manufacturer’s website from scratch.
In this method, we will first update the driver and check if the issue is resolved. If the error persists, we will reinstall the driver to fix the problem.
Here is how to proceed:
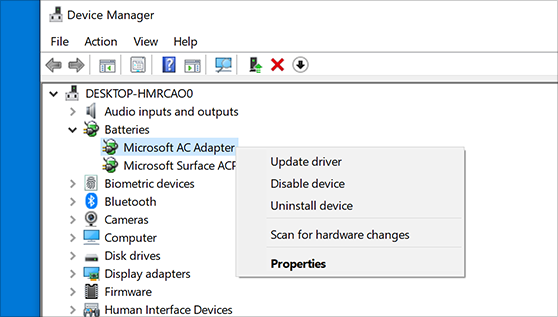
- Type Device Manager in Windows search and click Open.
- In the Device Manager window, expand the Universal Serial Bus Controller section and right-click USB Root Hub.

Expand the USB Root Hub section - Choose Update driver.
- Now, click on Search automatically for drivers and wait for the system to look for an updated version of the driver.
- Follow the on-screen instructions to proceed.
Once done, check if you still face the usbxhci.sys blue screen problem. If you do, we recommend you proceed with reinstalling the driver.
In that case, follow these steps:
- In the Device Manager window, right-click on the USB Root Hub device and choose Uninstall device.
- Then, hit the Uninstall button again.
- Once done, restart your PC.
Upon reboot, the driver will install back automatically. You can also uninstall the USB xHCI Compliant Host Controller driver if reinstalling USB Root Hub does not work.
Simply, head back to the Device Manager window and expand the Universal Serial Bus Controller section. Right-click on the USB xHCI Compliant Host Controller and click Uninstall. Checkmark the box for Delete the driver software for this device and click Uninstall again.
Hopefully, this will fix the problem.
2. Use the System Restore Utility
You can also try reverting the system state back to when the system worked properly without the usbxhci.sys blue screen. In order to accomplish this, we will use the System Restore utility, which creates restore points periodically. The restore points can be used to go back to a previous state of your system.
Reverting your system will, however, erase any changes you made since the restore point you selected was made.
Follow these steps to proceed:
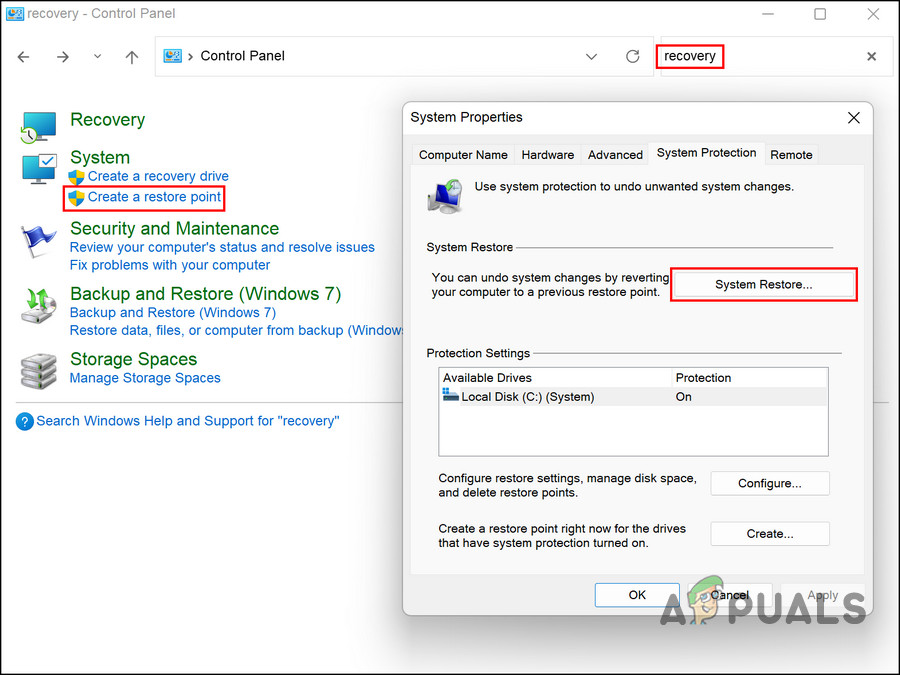
- Type Control Panel in the search area of the taskbar and click Open.
- Search for Recovery in the Control Panel and select Create system restore > System Restore.

Click on the System Restore button - Click Next.
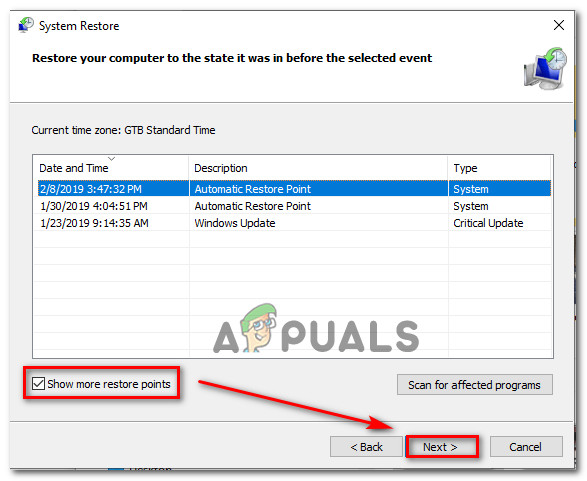
- You will see a list of restore points created on your system in the following window. Choose one, preferably the most recent one and click Next.

Deploy a System Restore operation - Wait for the process to complete and check if the issue is resolved.
3. Run System Scans
Windows users often experience errors like the usbxhci.sys blue screen due to generic errors or viruses within the system. Most of the time, however, these can be resolved using the built-in troubleshooting utilities Microsoft has equipped Windows with.
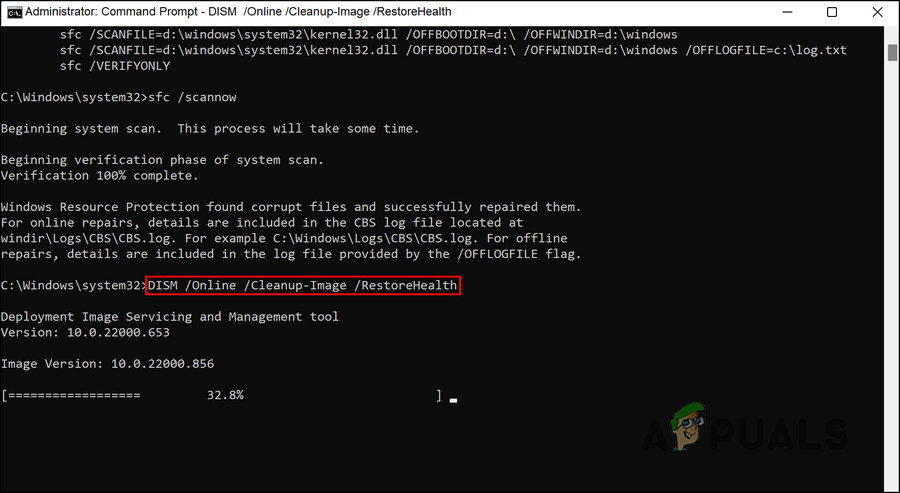
We will use the SFC and DISM utilities via Command Prompt to fix this error. The System File Checker checks the system for any files with compromised integrity and replaces the faulty ones with their healthy counterparts. The DISM tool, on the other hand, is more powerful than the System File Checker and repairs corrupt system images.
Here is how you can run these tools:
- To launch Command Prompt with administrative privileges, type cmd in the search bar and click Run as administrator.
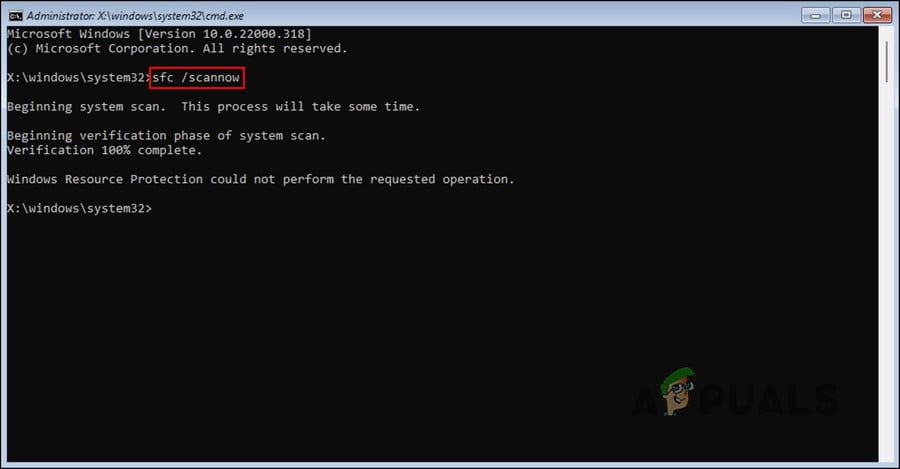
- Inside the Command Prompt window, type the command mentioned below and hit Enter to execute it.
sfc /scannow

Execute the SFC command - Wait for the process to complete and then restart your computer.
- Upon rebooting, launch Command Prompt as an administrator once again and execute the DISM command.
Dism /Online /Cleanup-Image /RestoreHealth

Restore system’s health with the DISM command - Now, restart your PC again and check if the usbxhci.sys blue screen issue is resolved.
4. Reset Your PC
As a last resort, if the troubleshooting methods listed above did not help, you can try resetting your PC.
The method allows you to keep your files or remove them all. If you choose to delete your files, your system will be reverted to its default state. We suggest that you copy your important files elsewhere, and proceed with the second option.
In this way, the error will be completely removed.
Here is how to reset your Windows:
- Press the Win + I keys to open the Settings app.
- Choose System from the left pane.
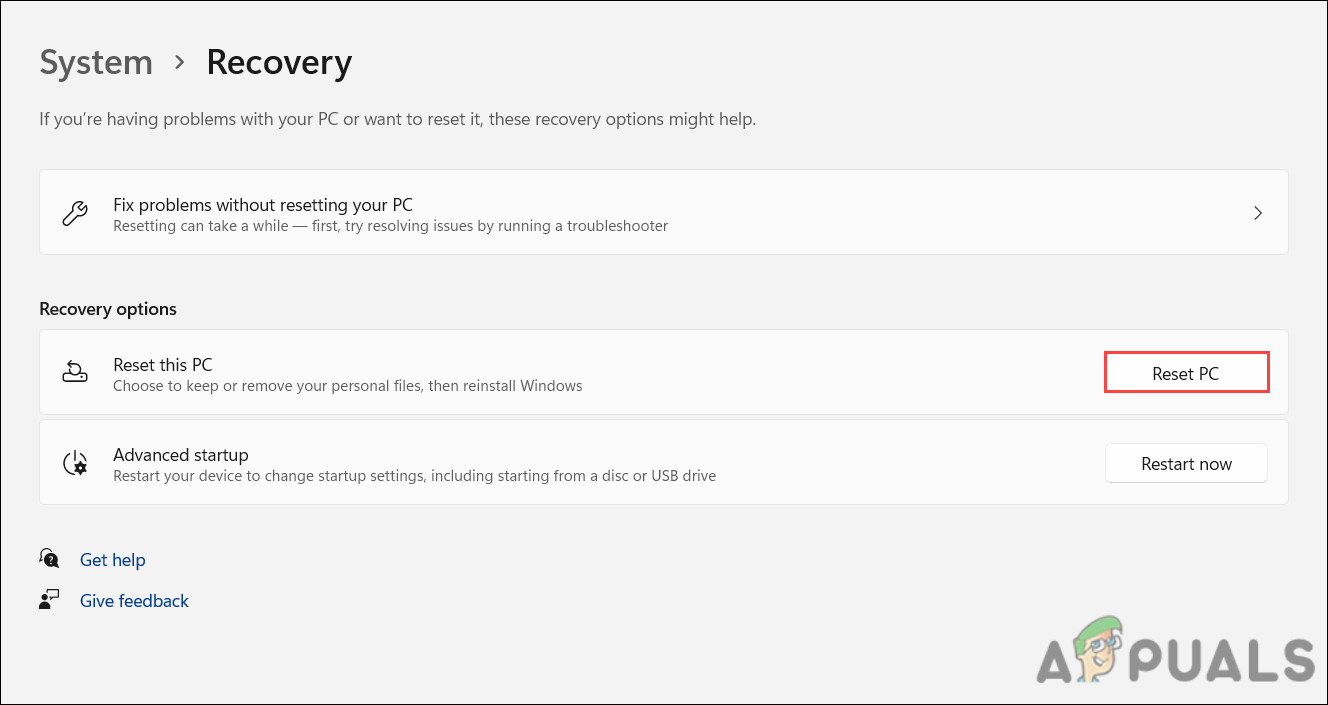
- Click on Recovery.
- Head over to the Recovery options section and click on the Reset PC button.

Click on the Reset PC button - Follow the on-screen instructions to complete the process.
Hopefully, performing a system reset will fix the usbxhci.sys blue screen problem once and for all.
However, if you do not want to proceed with a reset just yet, you can contact Microsoft support and report the issue to them. They will help you identify the cause of the error, and then suggest a relevant fix that will hopefully fix the problem once and for all.
Zainab Falak
Zainab Falak is a highly educated professional with a background in actuarial science and a strong passion for technology. Her expertise lies in the field of data analytics and she is a proficient programmer in languages such as Python and R. At Appuals, Zainab shares her extensive knowledge of Windows 8, 10, and 11, covering a broad range of topics related to these operating systems. Zainab’s ability to effectively communicate technical concepts in a clear and concise manner has earned her recognition and respect in the tech community. She is committed to staying up-to-date with the latest developments in the field and providing readers with insightful and informative content.
| Информация о файле | Описание |
|---|---|
| Размер файла: | 427 kB |
| Дата и время изменения файла: | 2020:03:04 15:16:51+00:00 |
| Тип файла: | Win64 EXE |
| Тип MIME: | application/octet-stream |
| Предупреждение! | Possibly corrupt Version resource |
| Тип компьютера: | AMD AMD64 |
| Метка времени: | 2090:03:18 03:15:02+00:00 |
| Тип PE: | PE32+ |
| Версия компоновщика: | 14.10 |
| Размер кода: | 318976 |
| Размер инициализированных данных: | 110080 |
| Размер неинициализированных данных: | 0 |
| Точка входа: | 0x7140 |
| Версия ОС: | 10.0 |
| Версия образа: | 10.0 |
| Версия подсистемы: | 10.0 |
| Подсистема: | Native |
| Номер версии файла: | 10.0.16299.579 |
| Номер версии продукта: | 10.0.16299.579 |
| Маска флагов файлов: | 0x003f |
| Флаги файлов: | (none) |
| Файловая ОС: | Windows NT 32-bit |
| Тип объектного файла: | Driver |
| Подтип файла: | 7 |
| Код языка: | English (U.S.) |
| Набор символов: | Unicode |
| Наименование компании: | Microsoft Corporation |
| Описание файла: | USB XHCI Driver |
| Версия файла: | 10.0.16299.579 (WinBuild.160101.0800) |
| Внутреннее имя: | usbxhci.sys |
| Авторское право: | © Microsoft Corporation. All rights reserved. |
| Название продукта: | Microsoft® Windows® Operating System |
| Версия продукта: | 10.0.16299.579 |
✻ Фрагменты данных файлов предоставлены участником Exiftool (Phil Harvey) и распространяются под лицензией Perl Artistic.
Updated May 2025: Stop error messages and fix your computer problem with this tool. Get it now at this link
- Download and install the software.
- It will scan your computer for problems.
- The tool will then fix the issues that were found.
Blue Screen of Death USBXHCI.SYS error has something to do with the USB 3.0 or USB 3.1 ports on the motherboard. Or at least the driver that drives the USB 3.0 specification port on the motherboard.
If the motherboard BIOS provides the ability to charge USB devices at high speed, fast, or in standby mode, disable BIOS settings as a temporary test.
A blue screen error (also known as a stop error) can occur if your computer unexpectedly shuts down or restarts due to some problem. If this type of error occurs, you will not be able to see anything, such as the Start menu or taskbar, on the screen when you turn on your computer. Instead, a blue screen may appear informing you that there is a problem with your PC and needs to be restarted.
SYS errors, such as those associated with USBXHCI.SYS, most often appear when starting your computer, starting a program, or trying to use a specific function of your program (such as printing).
In this article, you will find detailed USBXHCI.SYS information, a SYS file troubleshooting guide, and a list of versions that are available for free download.
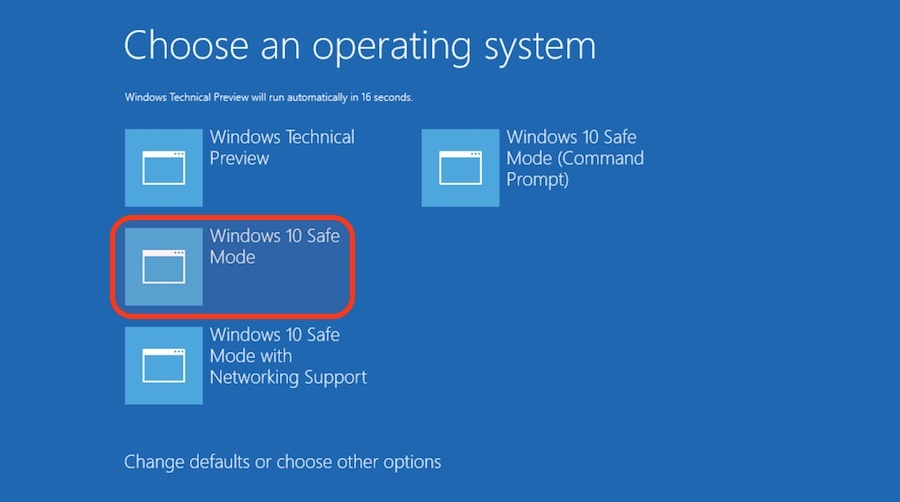
Force Safe Boot
A forced secure boot is performed as follows.
- If the Windows logo appears on the screen while starting the computer, immediately press the power button on the chassis. This will force the computer to shutdown.
- Repeat the above step three times (i.e. step 1).
- After the third startup, your computer will display an automatic recovery screen.
- Select Advanced Options.
- Select “Troubleshoot”.
- Select Advanced Options.
- Now select “Startup Options”.
- Click Restart.
- Select “Enable Safe Mode”.
- Click Restart.
- Your computer or laptop is now in Force Secure Boot mode.
Install the latest drivers
Incompatible device driver files can cause fatal blue screen errors. You can fix BSOD errors by installing the latest driver files. To install the latest drivers, follow these steps after starting your computer or laptop in Safe Mode.
- Enter “device manager” without quotes in the search box on the taskbar.
- Select Device Manager.
- Double-click the first type of device.
- All device names are displayed according to the device type.
- Right click on the name of each device.
- Click Update Driver.
- Repeat steps 5 and 6 for each device name.
- Now double click the next device type.
- Repeat steps 5 and 6 for each device name for the above device type.
- Repeat steps 8 and 9 for all device types.
- Reboot your computer or laptop.
- Check if usbxhci.sys blue screen of death error is fixed or not.
Start your computer in Safe Mode.
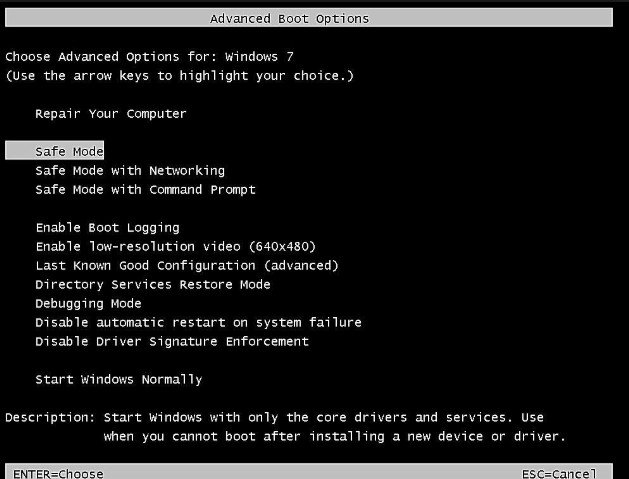
- Restart your computer and press Shift + F8 when the Win logo appears.
- On the next screen, select the “Repair this PC” option and click “Troubleshoot”.
- Then select Advanced Options, then Startup Options.
- Finally, turn on Safe Mode and sign in to your account.
- Be sure to restart your network and follow the steps in Method 1 to complete the update.
Updated: May 2025
We highly recommend that you use this tool for your error. Furthermore, this tool detects and removes common computer errors, protects you from loss of files, malware, and hardware failures, and optimizes your device for maximum performance. This software will help you fix your PC problems and prevent others from happening again:
- Step 1 : Install PC Repair & Optimizer Tool (Windows 11, 10, 8, 7, XP, Vista).
- Step 2 : Click Start Scan to find out what issues are causing PC problems.
- Step 3 : Click on Repair All to correct all issues.
Run Windows Memory Diagnostics
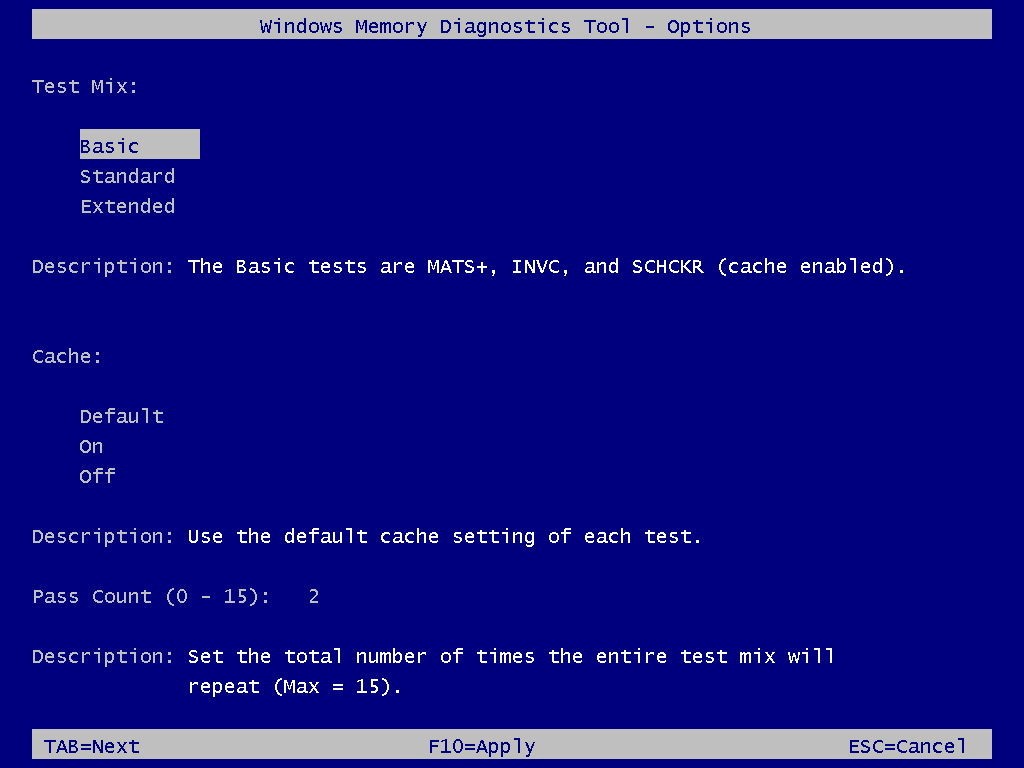
- To run the Windows Memory Diagnostic Tool, open the Start menu, type Windows Memory Diagnostics, and press Enter.
- You can also press Windows + R, type mdsched.exe in the Run dialog box that appears, and press Enter.
- You must restart your computer to run the test. You cannot use your computer during the test.
- Click Restart Now and Check for Problems (Recommended) to confirm. Be sure to save your work first. Your computer will restart immediately.
Reinstall USB drivers
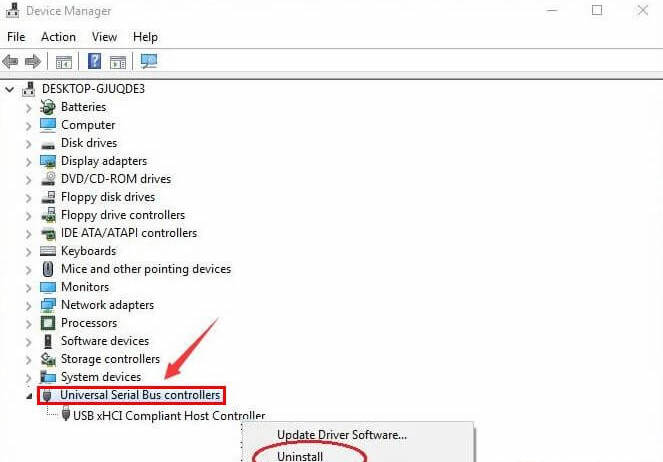
- Press Windows Key + R. Run will open. You can also go to Start and search for Run.
- In the Run dialog box, type devmgmt.msc and press Enter.
- Expand Universal Serial Bus Controllers.
- Right-click the USB Root Hub and select Uninstall.
- Now select the Remove the software driver for this device check box.
- Click Remove.
- Restart your computer.
RECOMMENATION: Click here for help with Windows errors.
Have you ever encountered the dreaded Blue Screen of Death (BSoD) on your Windows computer? If so, you may have come across an error related to the USBXHCI.SYS file. This article will delve into what USBXHCI.SYS is, why it can cause a BSoD, and provide you with effective solutions to fix it.

Understanding USBXHCI.SYS
USBXHCI.SYS is a system file associated with the USB 3.0 driver in Windows operating systems. It plays a crucial role in managing USB 3.0 ports and devices connected to them. This file allows for faster data transfer rates and improved performance compared to USB 2.0.
However, like any other system file, USBXHCI.SYS can encounter issues that lead to a BSoD. The BSoD occurs when Windows encounters a critical error that it cannot recover from, forcing the system to shut down to prevent further damage.
Common Causes of USBXHCI.SYS BSoD
Several factors can contribute to the USBXHCI.SYS BSoD error. Understanding these causes can help you troubleshoot and fix the issue effectively:
- Outdated or incompatible USB drivers: If your USB drivers are outdated or incompatible with your operating system, it can lead to conflicts and trigger the BSoD.
- Hardware conflicts: In some cases, incompatible hardware or faulty USB devices can cause conflicts with the USBXHCI.SYS driver, resulting in a BSoD.
- Corrupted system files: If the USBXHCI.SYS file or other critical system files become corrupted, it can lead to system instability and trigger a BSoD.
- Malware or virus infections: Malicious software can corrupt system files, including USBXHCI.SYS, leading to BSoD errors.
How to Fix USBXHCI.SYS BSoD
Now that we understand the potential causes of the USBXHCI.SYS BSoD, let’s explore some effective solutions to fix it:
1. Run the DISM and SFC scans
DISM (Deployment Image Servicing and Management) and SFC (System File Checker) are built-in Windows tools that can repair corrupted or missing system files and restore the health of your computer. Both DISM and SFC scans can be run from an elevated command prompt (with administrative privileges). Here are the steps to do so:
- To open the Command Prompt as an administrator in Windows, type “cmd” in the search bar and then right-click on the Command Prompt result and select “Run as administrator” as shown in the image below.

- To run a DISM scan, type the following command and press Enter:
dism /online /cleanup-image /restorehealth
This will check your Windows component store for corruption and automatically fix any problems it finds. This process may take several minutes or longer depending on your system
- To run an SFC scan, type in the Command Prompt the following command and press Enter:
sfc /scannow
This will scan all protected system files and replace any corrupted or missing ones with a cached copy. Wait for the scan to complete. It may take some time depending on your system configuration.
- After both scans are completed, you should restart your computer to apply any changes. Check to see if the issue is solved.


2. Check for faulty software.
If there is a specific program that is causing this issue, try uninstalling and then reinstalling it (eg. Microsoft DirectX, Microsoft Visual C++ Redistributable, NET Framework) to check if it will solve the problem.
Windows 11Windows 10Windows 8Windows 7
-
First, open Windows Settings by pressing Windows+I on your keyboard. You can also right-click your Start button and select “Settings” from the list.

-
When Settings opens, click “Apps” in the sidebar, then select “Apps & Features”.
-
In Apps & Features settings, scroll down to the app list and search for the program you want to uninstall. When you find the program, click the three dots button beside it and select “Uninstall” in the menu that appears.

-
In the next message box, confirm the uninstall process by clicking on Uninstall, then follow the prompts to uninstall the program.


- Press the Windows key + I on your keyboard to open the Settings app. You can also ope the Settings app by clicking the Start button on the taskbar, then select “Settings” (gear icon).

-
When the “Windows Settings” window opens, click on “Apps“. By default, it should open “Apps and Features” but if it doesn’t, select it from the list on the left.

-
In Apps & Features settings, scroll down to the app list and search for the program you want to uninstall. When you find the program, click on it and select “Uninstall” in the menu that appears.

-
In the next message box, confirm the uninstall process by clicking on Uninstall, then follow the prompts to uninstall the program.


-
Right-click on the Start button in the taskbar, then select “Programs and Features”. This will take you directly to your list of installed programs.

-
The “Programs and Features” screen will be displayed with a list of all the programs installed on your computer. Scroll through the list until you find the program, then click to highlight it, then click the “Uninstall” button.

- In the next message box, confirm the uninstall process by clicking on Yes, then follow the prompts to uninstall program.


3. Scan for your computer for malware
Malware can damage your system files and registry entries and cause various errors. We will now, download and run a scan with Malwarebytes to check if you’re device is clean.
Malwarebytes is one of the most popular and most used anti-malware software for Windows, and for good reasons. It is able to destroy many types of malware that other software tends to miss, without costing you absolutely nothing. When it comes to cleaning up an infected device, Malwarebytes has always been free and we recommend it as an essential tool in the fight against malware.
-
You can download Malwarebytes by clicking the link below.
-
When Malwarebytes has finished downloading, double-click on the MBSetup file to install Malwarebytes on your computer. In most cases, downloaded files are saved to the Downloads folder.

You may be presented with a User Account Control pop-up asking if you want to allow Malwarebytes to make changes to your device. If this happens, you should click “Yes” to continue with the Malwarebytes installation.

-
When the Malwarebytes installation begins, you will see the Malwarebytes setup wizard which will guide you through the installation process. The Malwarebytes installer will first ask you what type of computer are you installing this program on, click either Personal Computer or Work Computer.

On the next screen, click “Install” to install Malwarebytes on your computer.

When your Malwarebytes installation completes, the program opens the Welcome to Malwarebytes screen.
-
Malwarebytes is now installed on your computer, to start a scan click on the “Scan” button. Malwarebytes will automatically update the antivirus database and start scanning your computer for malicious programs.

-
Malwarebytes will now scan your computer for browser hijackers and other malicious programs. This process can take a few minutes, so we suggest you do something else and periodically check on the status of the scan to see when it is finished.

-
When the Malwarebytes scan is finished scanning it will show a screen that displays any malware, adware, or potentially unwanted programs that it has detected. To remove the malicious programs that Malwarebytes has found, click on the “Quarantine” button.

-
Malwarebytes will now remove all the malicious files and registry keys that it has found. To complete the malware removal process, Malwarebytes may ask you to restart your computer.


4. Check for updates
Make sure your operating system, drivers, and other software are up to date. If the errors started happening after an update, you can uninstall that specific update patch.
To check for Windows updates, follow the below steps:
- Press the Windows key + I to open the Settings menu. Click the “Windows Update” tab on the left side of the screen.
For Windows 10 users, the Windows Update menu can be found in Settings > Update & Security > Windows Update. - Click the “Check for updates” button. This will initiate a scan for updates. If any updates are available, they will be downloaded and installed automatically.

- If you want to check for updates for other software, you can do so by opening the software and looking for a “Check for updates” option in the menu. You can also check the software’s website for updates.

5. Disable any unnecessary startup programs
Startup programs are applications that automatically launch when you start your computer. While some of these programs may be necessary for your system to function properly, others may be unnecessary and can cause errors.
- Open the Task Manager by pressing the Ctrl + Shift + Esc keys on your keyboard simultaneously.

- In the Task Manager, go to the “Startup” tab and disable any programs that you do not need to start automatically when you turn on your computer.
Keep in mind that some startup programs may be essential to the functioning of your system, so be careful not to disable any important programs.


6. Run a memory test
A faulty RAM module can cause random crashes. Run a memory test to check for any issues with your RAM. To run a memory test, follow these steps:
- Press the Windows key + R to open the Run dialog.
- Type “mdsched.exe” into the Run dialog and press Enter. This will launch the Windows Memory Diagnostic tool.

- You will be asked whether you want to restart your PC and run the test immediately or schedule the test to run the next time you start your PC. Choose the option you prefer and click “OK”.

If you choose to run the test immediately, your PC will restart and the test will begin. The test will run automatically and may take several minutes to complete.
- If the test finds any errors, it will display a message indicating the type and location of the error. You may need to replace your RAM if the test finds any errors.
- If the test completes without finding any errors, it will display a message indicating that the test has completed successfully.


7.Check your hardware
Start by inspecting your computer’s hardware components for any signs of damage or failure. Ensure that all connections are secure and that there are no loose cables. If you suspect a faulty component, consider consulting a professional or replacing it if necessary.
Next, check your RAM, hard drive, graphics card, and any other hardware components using the Windows Device Manager.
-
To access the Device Manager, type “devmgmt.msc” into the search bar on the Start menu and select “Device Manager” from the list of results.

-
In the Device Manager, you can view a list of all the hardware devices connected to your computer and check for any errors or issues. If you see a yellow exclamation point next to a device, it may indicate a problem with that device. You can right-click on the device and select “Update driver” or “Troubleshoot” to try and fix any issues.


8. Try a system restore.
If you have a restore point saved, you can try using it to revert your system to a previous state. This may fix the issue if it was caused by a recent change. To do a system restore follow these steps:
- Press the Windows key + S to open the Search menu.
- Type “system restore” into the search bar and click the “Create a restore point” result.

- Click the “System Restore” button.

- In the System Restore window, click “Next.”

- Select a restore point from the list and click “Next.” A restore point is a saved state of your system that you can use to revert your system to a previous state. Make sure to select a restore point that was created before you started experiencing problems.
- Click “Finish” to begin the restore process. Your PC will restart and the restore process will begin. This may take several minutes to complete.

- When the restore is complete, your PC will restart again. You may need to adjust your settings and reinstall any software that was installed after the restore point was created.


9. Reset your PC
One of the most drastic solutions is to reset your PC to its default configuration. This can be considered the nuclear option for fixing errors because it will wipe out all the third-party software you installed on your computer. However, this option can also be effective if none of the other methods work for you.
Before you reset your PC, make sure you back up your important data and files. You can also choose to keep your personal files in the Reset this PC tool, but it is better to have a separate backup just in case something goes wrong.
To reset your PC, follow these steps:
- Open Settings by pressing Windows + I keys.
- Click on System and then on Recovery.

- Under Reset this PC section, click on Reset PC button.
- Choose whether you want to keep your files or remove everything.
- Follow the on-screen instructions to complete the process.


After resetting your PC, you should be able to run your applications without getting any errors. However, keep in mind that this solution will also remove any custom settings and preferences you had on your computer. You will need to reinstall and configure your programs again after resetting.
Summary
The USBXHCI.SYS BSoD error can be frustrating and disruptive, but with the right troubleshooting steps, it can be resolved. In this article, we explored the causes of the USBXHCI.SYS BSoD and provided effective solutions to fix it.
To summarize:
- USBXHCI.SYS is a system file associated with the USB 3.0 driver in Windows.
- Common causes of USBXHCI.SYS BSoD include outdated drivers, hardware conflicts, corrupted system files, and malware infections.
- To fix the USBXHCI.SYS BSoD, update USB drivers, check for hardware conflicts, scan for malware, and repair corrupted system files.
By following these steps, you can resolve the USBXHCI.SYS BSoD error and ensure a stable and reliable computing experience.
Here are 10 basic security tips to help you avoid malware and protect your device:
Use a good antivirus and keep it up-to-date.
It’s essential to use a good quality antivirus and keep it up-to-date to stay ahead of the latest cyber threats. We are huge fans of Malwarebytes Premium and use it on all of our devices, including Windows and Mac computers as well as our mobile devices. Malwarebytes sits beside your traditional antivirus, filling in any gaps in its defenses, and providing extra protection against sneakier security threats.
Keep software and operating systems up-to-date.
Keep your operating system and apps up to date. Whenever an update is released for your device, download and install it right away. These updates often include security fixes, vulnerability patches, and other necessary maintenance.
Be careful when installing programs and apps.
Pay close attention to installation screens and license agreements when installing software. Custom or advanced installation options will often disclose any third-party software that is also being installed. Take great care in every stage of the process and make sure you know what it is you’re agreeing to before you click «Next.»
Install an ad blocker.
Use a browser-based content blocker, like AdGuard. Content blockers help stop malicious ads, Trojans, phishing, and other undesirable content that an antivirus product alone may not stop.
Be careful what you download.
A top goal of cybercriminals is to trick you into downloading malware—programs or apps that carry malware or try to steal information. This malware can be disguised as an app: anything from a popular game to something that checks traffic or the weather.
Be alert for people trying to trick you.
Whether it’s your email, phone, messenger, or other applications, always be alert and on guard for someone trying to trick you into clicking on links or replying to messages. Remember that it’s easy to spoof phone numbers, so a familiar name or number doesn’t make messages more trustworthy.
Back up your data.
Back up your data frequently and check that your backup data can be restored. You can do this manually on an external HDD/USB stick, or automatically using backup software. This is also the best way to counter ransomware. Never connect the backup drive to a computer if you suspect that the computer is infected with malware.
Choose strong passwords.
Use strong and unique passwords for each of your accounts. Avoid using personal information or easily guessable words in your passwords. Enable two-factor authentication (2FA) on your accounts whenever possible.
Be careful where you click.
Be cautious when clicking on links or downloading attachments from unknown sources. These could potentially contain malware or phishing scams.
Don’t use pirated software.
Avoid using Peer-to-Peer (P2P) file-sharing programs, keygens, cracks, and other pirated software that can often compromise your data, privacy, or both.
To avoid potential dangers on the internet, it’s important to follow these 10 basic safety rules. By doing so, you can protect yourself from many of the unpleasant surprises that can arise when using the web.