
-
Главная -
Драйверы
-
Сетевые устройства
-
Сетевые устройства USB
- USB xHCI Compliant Host Controller
-
USB xHCI Compliant Host Controller
Тип драйвера:
Universal Serial Bus controllers
Производитель:
Fresco Logic
Версия:
3.8.33709.0
Файл *.inf:
oem11.inf
Windows 8
64-bit ,
8.1
64-bit ,
10 / 11
64-bit
-
USB xHCI Compliant Host Controller
Тип драйвера:
Universal Serial Bus controllers
Производитель:
Advanced Micro Devices
Версия:
1.1.0.0118
Файл *.inf:
amdxhc.inf
Windows 8
,
8.1
,
10 / 11
В каталоге нет драйверов для USB xHCI Compliant Host Controller под Windows.
Скачайте DriverHub для автоматического подбора драйвера.
Драйверы для USB xHCI Compliant Host Controller собраны с официальных сайтов компаний-производителей и других проверенных источников.
Официальные пакеты драйверов помогут исправить ошибки и неполадки в работе USB xHCI Compliant Host Controller (Сетевые устройства).
Скачать последние версии драйверов на USB xHCI Compliant Host Controller для компьютеров и ноутбуков на Windows.
Версия: 1.3.15.3625 для Windows 8, 10 и 11
Бесплатное ПО
В комплекте идет опциональное ПО
- Yandex Browser
- Opera Browser
- Avast Free Antivirus
- World of Tanks
- World of Warships
Suppose you’ve opened your computer and noticed that the ‘USB xHCI Compliant Host Controller’ isn’t starting. Consequently, none of the USB ports could work. So, what to do now?
You can fix “XHCI USB host controller is not working” issue in Windows 10, you have to run the “Hardware and Devices” troubleshooter, uninstall the “USB xHCI” driver, or disable the “USB selective suspend setting”.
If you don’t know how to troubleshoot the mentioned issue, no need to be worried. All the possible solutions to this problem are contain in this article. By following the fixes, you will get rid of the error.

Before we move to the solution, we need to understand what USB xHCI Compliant Host Controller is.
xHCI as known as eXtensible Host Controller Interface is a computer interface specification that –
- Polls the devices using a polling interval determined by the device,
- Defines a register-level description of a host controller for Universal Serial Bus (USB),
- Directs the USB bus
If USB xHCI stop working, individual devices will be unable to arbitrate for the bus. Means, the interfacing between the device and USB 1. x, 2.0, and 3. x compatible devices will be stopped.
What to Do If ‘USB xHCI Compliant Host Controller’ Cannot Start
There are a couple of fixes that you can apply from your side to solve the error. I compile the fixes in detail. Before diving into the deep, let’s take a glimpse of the list first.
- Fix 1: Run ‘Hardware and Device’ Troubleshooter
- Fix 2: Check for Available Windows Update
- Fix 3: Reinstall the driver
- Fix 4: Disable ‘USB selective suspend setting’
- Fix 5: Customize Registry Editor
Fix 1: Run ‘Hardware and Device’ Troubleshooter
‘Hardware and Device’ Troubleshooting can be the first choice to fix the error you face. But, you may not run the troubleshooter like the usual troubleshooting process. Here I brief the process step by step below.
Step 1
Right-click on the ‘Start’ menu. You have to find the ‘Windows PowerShell (Admin)’ option from here. While finding the option, click on it.
Step 2
Consequently, the Windows PowerShell administrator command prompt will appear on the screen. You need to copy the below command and paste it into the prompt.
‘msdt.exe -id DeviceDiagnostic’

In the end, you have to hit the ‘enter’ button.
Step 3
As a result, the ‘Hardware and Devices’ troubleshooter will become evident. You have to click on ‘Next’ to execute the troubleshooting.

Step 4
It may take several seconds to detect problems. So, you have to wait for a while.

Step 5
After the diagnosis, you will get two options. Either you have to choose the ‘Apply this fix’ option to solve the error automatically. Or choose ‘Skip the fix’ to apply the finding manually and continue the troubleshooting.

Step 6
After finishing the process, you will receive a confirmation message. Then follow the on-screen command according to the troubleshooting result.

If the problem still exists, you will move to the next fix.
Fix 2: Check for Available Windows Update
Windows update will be another fix you can try to resolve the error. I will describe the way below.
Step 1
Firstly, press the Windows and ‘I’ keys together to access the ‘Settings’ window. After that, scroll down to the bottom and select the ‘Update & Security’ section.

Step 2
Then look at the left sidebar of the newly appeared interface and click on the ‘Windows Update’ option.
Step 3
Next, give your concentration on the right sidebar. Here you will get the ‘Check for updates’ option. You have to click on it to check the availability of Windows updates. To apply this, you need an internet connection.
On the other hand, if your PC always has an internet connection, Windows will automatically download the update. And complete the installation. But, if you stop the update download option, you will have to do it manually.
Check the problem after updating the Windows. If this system issue does not solve the error, you need to apply some settings and driver-related fixes.
Fix 3: Reinstall the Driver
You can reinstall the problematic driver to solve the error. To do that, you have to uninstall it first. The process will be given below.
Step 1
Right-click on the ‘Start’ menu again. This time you have to find ‘Device Manager‘ from the newly appeared interface. While you see the category, click on it.
Step 2
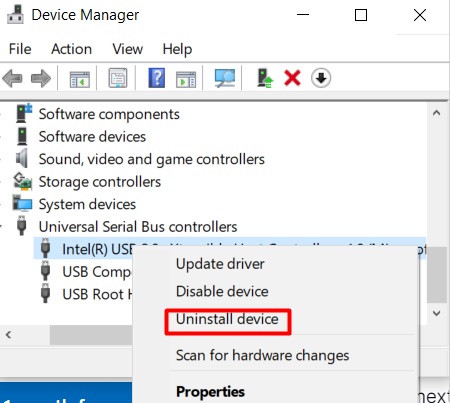
Consequently, the ‘Device Manager’ window will be visible. You need to scroll down to the bottom. Here you will get the ‘Universal Serial Bus controllers’ option. Expand it.
Step 3
Then you will find the problematic USB device. You have to right-click on it. As a result, the ‘Uninstall device’ option will be visible inside the newly appeared interface. Click on it.
Step 4
After that, you have to restart the PC.
Step 5
Next, you have to download the Windows 10 display driver from the PC manufacturer’s website. Then install the driver by following the on-screen direction.
Finally, check the problematic device. If the error still exists, you need to follow the next one.
Fix 4: Disable ‘USB selective suspend setting’
Windows system has the ‘USB selective suspend setting’ option. You may need to disable it to fix the error we discuss. I will describe the disable process below.
Step 1
Tap the Windows key and type ‘edit power plan’. As a result, you will get the same-named ‘Control panel’ on top of the newly appeared interface. You have to click on it.

Step 2
Then you will see the ‘Edit Plan Settings’ window. Look at the left bottom and click on the ‘Change advanced power settings’ option.

Step 3
Consequently, the ‘Power Options’ window will become evident. You have to scroll down to find the ‘USB settings’ section. While finding it, you need to click on the plus icon box.

Step 4
Next, the ‘USB selective suspend setting’ option will be visible. You have to disable it. To do so, toggle down the dropdown menu and select ‘Disabled’. Here you will get two categories. One will be ‘On battery’, and the other will be ‘Plugged in’. You have to choose ‘Disabled’ for both.
Step 5
In this step, you need to confirm the submission. To do so, tap the ‘Apply’ tab and press ‘Ok’ at the end.

Finally, restart your PC and check the existence of the error. If still, you face it somehow, you will need to follow the last fix.
Fix 5: Customize Registry Editor
The last option you can try will customize ‘Registry Editor’ to fix the error you still face. The full process will be given below.
Step 1
Firstly, tap the Windows and ‘R’ keys together. As per the command, the ‘Run’ window will become evident. Type ‘regedit’ into the ‘Open’ box and click on ‘Ok’.

Step 2
Consequently, the ‘Registry Editor’ will appear on the screen. Then copy the below direction and paste it on the address bar.
‘Computer\HKEY_LOCAL_MACHINE\SYSTEM\CurrentControlSet\Services\USBXHCI’

After that, you have to hit the ‘enter’ button.
Step 3
Next, look at the right sidebar of the window. You need to right-click on the blank space. Then expand the ‘New’ section and choose ‘DWORD (32-bit) Value’.

Step 4
Here you have to rename the newly created DWORD as ‘DisableSelectiveSuspend’. Then double-click on it.
Step 5
As a result, you will get the ‘Edit DWORD (32-bit) Value’ window. Here you need to put ‘1’ into the ‘Value data’ box. Select the ‘Hexadecimal’ as the ‘Base’. And then click on ‘Ok’ at the end.

Finally, close the ‘Registry Editor’ and check the error. Hopefully, you won’t face the problem anymore.
Final Words
In addition, I assume that you will get a fruitful direction by applying fix no. 1 while the ‘USB xHCI Compliant Host Controller’ Cannot start. Then you can follow fix no. 2, 3, and 4 one after another until you solve the error. Furthermore, you need to apply fix no. 5 rarely.
When attempting to download HP Smart, the first step is to ensure that your device meets the operating system requirements for the application. After confirming that you meet these requirements, then you should access the official download webpage on either your mobile device or computer. There, you will be able to download and install HP Smart. Once installed, open up the application and follow any further instructions.
If you are experiencing problems with your Pantum M6550NW printer, be sure to check the manufacturer’s website for troubleshooting and support options. Additionally, you should make sure that the printer is up-to-date with the latest firmware version. Troubleshooting steps such as restarting both devices (printer & PC/Laptop) or checking cables can help in many scenarios too.
If you are having issues with the Pantum M6550nw driver, please go to https://www.pantum.com/download and select your printer model from the drop-down menu to download and install the correct driver for your system.
Troubleshooting Microsoft Issues can be a time-consuming and complicated process. The goal of this guide is to provide a step-by-step approach to troubleshoot any issues with Microsoft products. We’ll start by providing general advice for diagnosing the problem and then review troubleshooting techniques specific to different types of Microsoft services, such as Windows, Office, or Azure services. With this comprehensive roadmap in hand, you should find yourself better equipped to identify and resolve even complex issues quickly.
Realtek can cause a range of issues that can be difficult to troubleshoot without the right expertise. This comprehensive guide covers everything you need to know for troubleshooting Realtek problems so that you can get back on track quickly and easily.
software that may be blocking TeamViewer. Many firewalls and antivirus programs will block the connection unless you explicitly allow it.
Driver packs are collections of drivers that can be used to update outdated or missing device drivers. If you are having trouble with driver pack, the best thing you can do is use a trusted and reliable driver updater tool to automatically download and install the correct version of the required drivers for your PC. This will ensure all your devices are running on their latest available software.
If you are looking to download the driver for your Canon Pixma MG2500 printer, you can do so from the official Canon website. Simply go to their online support page and search for the model number of your printer. Once selected, click on ‘Drivers & Downloads’ tab and choose your operating system to get access to a list of all available downloads related to that particular model.
If you’re having issues with your Epson L4150 Printer software, try updating the software by downloading and installing the latest version from Epson’s website. You can also refer to their troubleshooting guide for more help on resolving any issues.
KMS Pico is a powerful tool that can be used to activate Windows 10. It works by emulating the Microsoft KMS server on your computer, allowing you to bypass activation processes and activate your copy of Windows for free. To fix this user query, simply download the latest version of KMS Pico from a trusted source and follow the installation instructions when prompted.
See all queries
Jun. 23, 2022 / Updated by
Bessie Shaw to
Windows Driver Solutions
“I just upgrade to Windows 10 from Windows 7 and I find that the USB xHCI Compliant Host Controller cannot start (code 10). None of my USB 3.0 ports work. I’m currently using a CM6850 Mobo. Does anyone else have this issue or know a fix?” – Quoted from Windows Community
Are you also troubled by USB xHCI Compliant Host Controller error code 10? Don’t panic. You are not alone. Here are top two effective methods to help you deal with this error. Read on to get them.
Read Also:
-
Top 4 Ways to Fix USB Not Working after Windows 10 Update
-
How to Fix USB Device Not Recognized Issue after Windows 10 Anniversary Update
Method 1. Run the Troubleshooter to Get Rid of Error Code 10
When the error code 10 occurs, it usually indicates that there are unspecified driver or hardware problems on your computer. To get rid of this error, the first method you can try is to run the troubleshooter. Take these steps:
Step 1. Type “Troubleshoot” into the search bar and click on Troubleshoot in the search result.
Step 2. Scroll down to find Hardware and Devices.
Step 3. Click on Hardware and Devices and select Run the troubleshooter.

The troubleshooter will detect and fix the error automatically. You just need to wait a few minutes.
Method 2. Reinstall or Update the USB xHCI Compliant Host Controller Driver
In most cases, the corrupted or outdated USB xHCI Compliant Host Controller driver should be blamed for the error code 10. If the driver is corrupted or outdated, the device cannot start normally. Therefore, to fix the error code 10, you can try to reinstall or update your USB xHCI Compliant Host Controller driver.
Read Also: 2 Ways to Update Outdated Drivers in Windows 10
To resolve driver issues, it’s highly recommended to use a reliable driver update utility. Reinstalling or updating drivers via a driver update utility will be more efficient and less time consuming than reinstalling or updating drivers manually. Driver Talent can be your best helper in this regard. If you haven’t installed it on your computer, click on the Download Now button below to grab it right now.
Download Now
Then you can follow the guide below to resolve the error code 10 easily.
If you want to reinstall the USB xHCI Compliant Host Controller driver, you need to uninstall it in the Device Manager first. Do like this:
Step 1. Right click the Start button and select Device Manager to launch it.
Or you can type “devmgmt.msc” into the Run box and hit Enter to open it.
Step 2. Find Universal Serial Bus controllers in the device list and click it to expand. Then find USB xHCI Compliant Host Controller under it. Right click on USB xHCI Compliant Host Controller and select Uninstall from the pop-up menu.

Step 3. Select OK when asked to confirm the uninstallation.
After uninstall the USB xHCI Compliant Host Controller driver completely, now you can use Driver Talent to reinstall it.
Step 1. Launch Driver Talent and click the Scan button to perform a full scan on your computer. Then Driver Talent will detect the missing of the USB xHCI Compliant Host Controller driver and will recommend you to download and install it.

Step 2. Click on the Download button in the right of the driver. After the download is completed, click on the Install button to install it.
Step 3. Reboot your computer to let the change take effect.
If you want to update the USB xHCI Compliant Host Controller driver, do as follows.
Step 1. Launch Driver Talent and click the Scan button to perform a full scan on your computer. Then all the iffy drivers will be listed, including the outdated ones.
Step 2. If the USB xHCI Compliant Host Controller driver is detected as outdated, click on the Update button in the right to update it.

Step 3. Reboot your computer.
Those are the top two methods to fix USB xHCI Compliant Host Controller error code 10. If you have any other good ideas, you can share them with us in the comment section below. Any comments will be much appreciated. For more solutions to other computer issues, you can get to the Resource section on this site.
Recommended Download
|
ExplorerMax |
Driver Talent for Network Card | |||
| Smart and advanced file explorer tool for Windows platforms | Download & Install Network Drivers without Internet Connection | |||
|
30-day Free Trial |
Free Download |
For your safety, we advise against self-installing USB xHCI Compliant Host Controller driver if you lack experience. Attempting to install it on your own may cause irreversible damage to your computer.
To avoid this, we have integrated the driver with a secure and free optimization software that will install the driver and fix any associated issues. By clicking the green button below, you confirm your agreement to install both the optimization software and the driver.
If you choose to install the driver independently, please note that it is at your own risk.
Download USB xHCI Compliant Host Controller driver with Driver Updater
Special offer. See more information about Outbyte and uninstall instructions. Please review EULA and Privacy Policy.
No viruses or unwanted programs. Installation files were scanned by AVarmor. Last check: 06.05.2025
Outbyte Driver Updater gets only official drivers made exactly for each device being updated
Pidvens compatible with USB xHCI Compliant Host Controller driver
ACPI\PNP0D10
ACPI\PNP0D15
PCI\CC_0C0330