
Для получения прямого доступа к физическим USB устройствам компьютера из подсистемы Windows для Linux (WSL2) или виртуальной машины Hyper-V вы можете open-source проект usbipd-win. Это проект позволяет настроить сквозную передачу внешнего USB устройства, подключенного к хостовой Windows, в любой дистрибутив Linux, запущенный в виде WSL или в виртуальные машины. Это позволяет выполнять любые действия с USB устройствами из Linux (прошивка Android устройств/ADB/Fastboot, доступ к смарт-картам, работа с оборудованием Arduino и т.д.).
В usbipd-win используется протокол USB/IP для перенаправления USB трафика через виртуальный сетевой интерфейс между WSL и хостовой Windows. Сначала мы настроим клиент USB/IP в Linux (WSL), и затем установим и установим и запустим серверную часть usbipd-win на Windows и прокинем USB устройство в Linux.
Usbipd-win поддерживает версии, начиная с Windows 8.1 x64 и Windows Server 2012 R2, и позволяет предоставить общий доступ к локальным USB устройствам Windows другим виртуальным машинам (включая WSL2 и гостевые ОС Linux на Hyper-V). С помощью встроенных средств Hyper-V ранее можно было пробрасывать только USB накопители или другие виды USB устройства через довольно ограниченный режим Enhanced Session Mode.
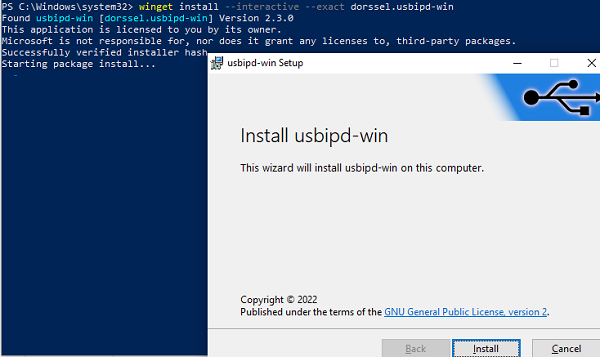
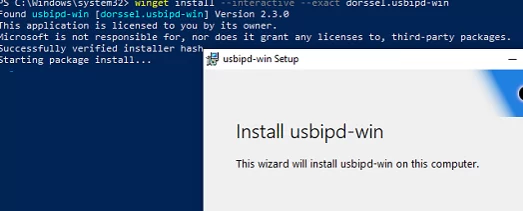
Проект usbipd-win доступен на GitHub (https://github.com/dorssel/usbipd-win). Вы можете скачать и установить его вручную (доступен установочный MSI файл), но гораздо быстрее установить приложение с помощью встроенного менеджера пакетов winget.
winget install --interactive --exact dorssel.usbipd-win
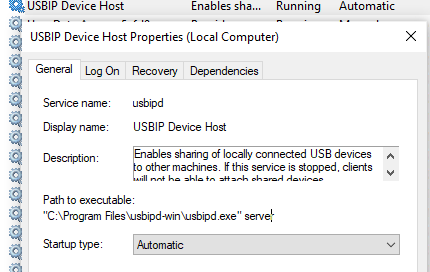
Программа создаст в Windows отдельную службу usbipd (USBIP Device Host):
"C:\Program Files\usbipd-win\usbipd.exe" server,
которая слушает на порту TCP 3240
Для программы usbipd.exe в Windows Defender Firewall создано правило (
usbipd
), разрешающее доступ на порт TCP 3240 с компьютеров в локальной сети.
Теперь настроим поддержку USBIP в среде Windows Subsystem for Linux. Проверьте, что версия ядра в вашем образе не ниже 5.10.60.1 (в нашем примере для демонстрации используется WSL 2 с образом Ubuntu 22.04 LTS):
$ uname -a
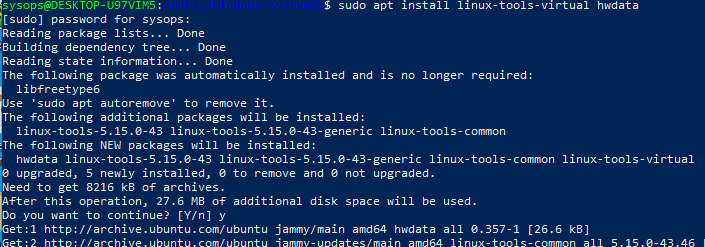
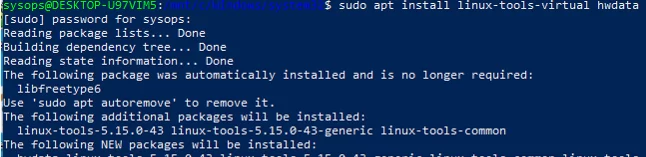
Теперь нужно установить инструменты для работы с USB/IP и базу с идентификаторами USB устройств.
$ sudo apt install linux-tools-virtual hwdata
$ sudo update-alternatives --install /usr/local/bin/usbip usbip `ls /usr/lib/linux-tools/*/usbip | tail -n1` 20
В Debian образе WSL используется команда:
$ sudo apt-get install usbip hwdata usbutils
Установка USB/IP утилит в WSL образа на базе rpm (CentOS/Oracle Linux):
$ sudo rpm --import https://www.elrepo.org/RPM-GPG-KEY-elrepo.org
$ sudo rpm -ivh http://www.elrepo.org/elrepo-release-7.0-3.el7.elrepo.noarch.rpm
$ sudo yum install kmod-usbip
$ sudo yum install usbip-utils
$ sudo yum install hwdata
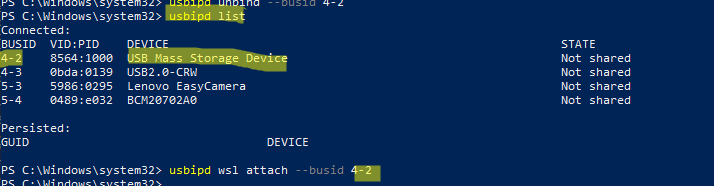
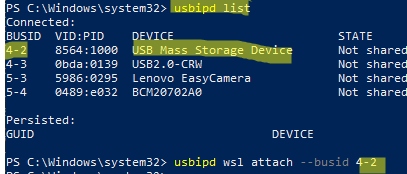
Теперь откройте командную строку с правами администратора на хостовом Windows компьютере и выведите список USB устройств:
usbipd wsl list
Как вы видите, ни одно из USB устройств не опубликовано (Not shared). Вы можете предоставить общий доступ к USB устройству по его BUSID. В моем примере я хочу прокинуть в WSL флешку (USB Mass Storage Device) с BUISID 4-2.
usbipd wsl attach --busid 4-2
- Если вы используете WSL 1 (не поддерживается в usbip), появится ошибка: sbipd: error: The specified WSL distribution is using WSL 1, but WSL 2 is required. Learn how to upgrade at https://docs.microsoft.com/windows/wsl/basic-commands#set-wsl-version-to-1-or-2.
- Если появится ошибка: usbipd: error: WSL kernel is not USBIP capable, обновите WSL систему командой:
wsl --update
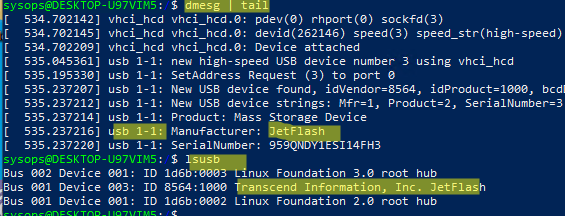
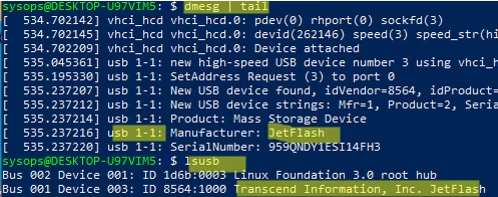
Проверьте, что ваша флешка была подключена к WSL:
dmesg | tail
lsusb
Если вы хотите прокинуть ваше USB устройство на другой компьютер с Linux ОС по сети (это может быть виртуальная машина с гостевой Linux на Hyper-V, или любом другом гипервизоре), сначала получить список опубликованных USB устройств:
$ usbip list --remote=192.168.31.20
Теперь можно подключить нужное USB по его ID:
$ sudo usbip attach -remote=192.168.31.20 --busid=4-2
В этом примере указан IP адрес хоста Windows, где запущен сервер usbipd-win.
Теперь ваши Linux утилиты должны увидеть подключенное USB устройство.
Чтобы отключить общий доступ к USB устройству в Windows:
usbipd wsl detach --busid 4-2
Обратите внимание, что подключенные таким образом USB накопители не определяются как блочные устройства в WSL. Проверьте это командой lsblk. Дело в том, что в ядре WSL отсутствует драйвера для USB накопителей (чтобы добавить их придется пересобрать ядро).
В обычных дистрибутивах Linux вы сможете смонтировать файловую систему прокинутых USB накопителей стандартным образом.
Поэтому, если вам нужно смонтировать внешнюю USB флешку, диск, SD карту в WSL, нужно использовать такие команды:
$ sudo mkdir /mnt/f
$ sudo mount -t drvfs f: /mnt/f
WSL может смонтировать таким образом диски с FAT, ExFAT, ReFs или NTFS, а также VHD образы.
Таким образом usbipd-win можно использовать для сквозной передачи физических USB устройств из Windows в WSL, в виртуальные машину или физические компьютер с Linux по сети с помощью USBOverIP
В наши дни очень большую популярность у пользователей набрали USB флешки. Они используются для обмена файлами, различными фильмами и документами, установки операционных систем, а также восстановления системы после сбоя. Чтобы работать с флешкой в Linux ее нужно примонтировать в корневую файловую систему.
Дело в том, что организация файловой системы Linux немного отличается от того, что мы привыкли видеть в Winodws. Здесь нет никаких дисков C,D,E и так далее, есть только корень, самая верхняя точка файловой системы, в подкаталоги которой подключаются все жесткие диски и внешние носители.
Если в системе используется окружение рабочего стола, то оно, как правило, берет на себя всю низкоуровневую работу чтобы выполнить монтирование флешки в linux. Система обнаруживает подключенную флешку и в системном лотке всплывает уведомление о подключенном устройстве. Дальше остается кликнуть по значку флешки, чтобы система выполнила все нужные для ее монитрования действия. Но если окружение рабочего стола не запущенно или вам нужно работать в консоли можно выполнить все действия по монтированию флешки вручную.
В этой инструкции мы рассмотрим монтирование usb флешки в linux через терминал, а также настройку автоматического монтирования для оконных менеджеров, которые не поддерживают такую возможность.
Содержание статьи
- Монтирование флешки в Linux
- Автоматическое монтирование флешки в Linux
- Выводы
Самое первое, что нужно сделать после того, как вы подключили флешку — узнать имя ее файла в системе. В Unix все устройства имеют свои файлы и именно через эти файлы система и программное обеспечение взаимодействуют с ними.
Файлы флешек и других устройств хранения данных находятся в каталоге /dev. Устройства нумеруются по алфавиту sda, sdb, sdc, sdd и т д. Так как флешка подключается последней у нее будет старшая буква. Например, sdb или sdc. Имя sda принадлежит жесткому диску. Можно, конечно, просто посмотреть содержимое каталога /dev/, но такой способ ненадежный. Мы воспользуемся утилитой fdisk.
Подключите флешку и выполните:
fdisk -l
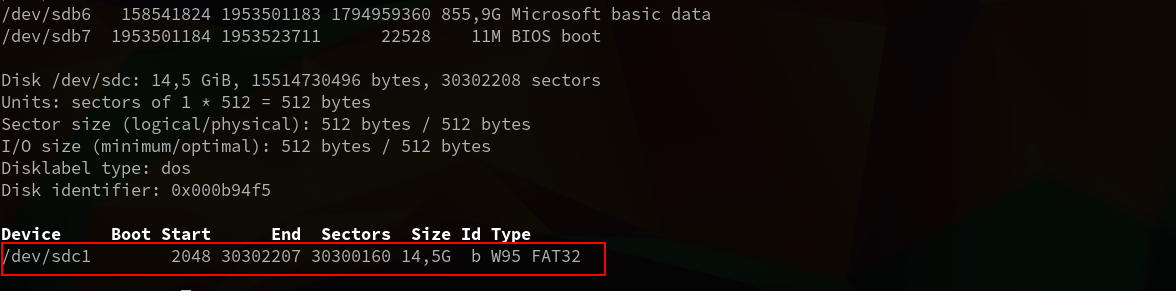
Как видите, здесь мы можем посмотреть детальную информацию об устройстве. Имя файла, список разделов, формат таблицы разделов, список разделов. А главное для нас, размер раздела и его файловую систему. Теперь не сложно понять какая из них флешка. В этом примере это /dev/sdc1
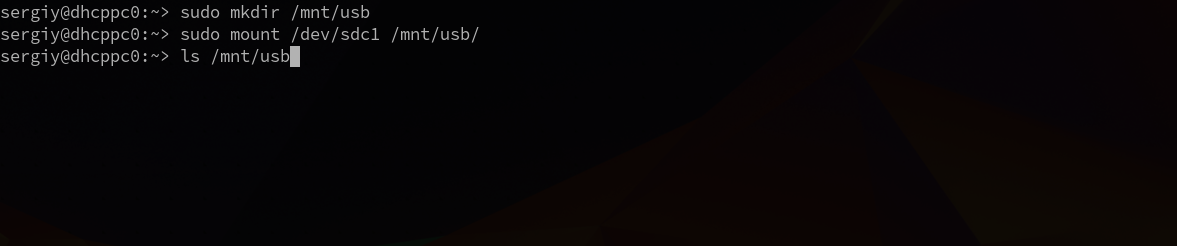
Создаем папку для монтирования:
sudo mkdir /mnt/usb
Теперь монтируем флешку с помощью команды mount:
sudo mount /dev/sdc1 /mnt/usb
Если знаете файловую систему флешки, то лучше ее указать с помощью опции -t. Чаще всего используется FAT, так как ее легко открывают как Windows так и Linux системы:
sudo mount -t vfat /dev/sdc1 /mnt/usb
Монтирование осуществляется от суперпользователя, но если нужно чтобы отмонитровать флешку мог любой нужно указать опцию users:
sudo mount -t vfat -o users /dev/sdc1 /mnt/usb
По умолчанию владельцем файлов на флешке при монтировании устанавливается root, поэтому если вы захотите работать с флешкой через файловый менеджер, то нужно будет его запускать с правами суперпользователя или же сразу примонтировать флешку в linux таким образом, чтобы владельцем был ваш пользователь. Для этого укажите группу и id своего пользователя в опциях uid и gid:
sudo mount -o users,uid=1000,gid=1000 /dev/sdc1 /mnt/usb
Удостовериться что флешка подключена можно посмотрев содержимое каталога, в который мы ее монтировали:
ls /mnt/usb
Или выполнив команду mount:
mount

После завершения работы с флешкой не забудьте ее отмонтировать. Потому что иначе данные могут быть не сохранны или вообще повреждена файловая система флешки:
sudo umount /dev/sdc1
Автоматическое монтирование флешки в Linux
Популярные окружения рабочего стола выполняют монтирование флешки linux автоматически, как только она подключена к системе или по клику на ярлыке. Мы можем это реализовать с помощью службы udisks2.
Udisks — это служба dbus, позволяющая другим программам и пользователю взаимодействовать с udev. Мы можем получать сообщения о только что подключенных устройствах, выполнять их монтирование и отключение. Окружения рабочего стола используют именно этот сервис для монтирования устройств.
Мы тоже можем использовать его для ручного монтирования. Здесь даже есть несколько плюсов. Во-первых, мы можем монтировать без прав суперпользователя, во-вторых, не нужно создавать папку.
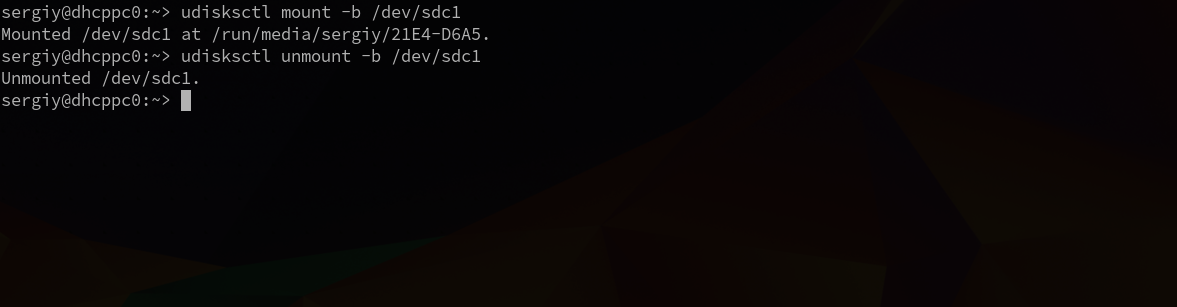
Для монтирования используется такая команда:
udisksctl mount -b /dev/sdc1

Здесь /dev/sdc1 — файл нашей флешки, а опция -b указывает, что нужно монтировать блочное устройство. Так же как и в mount здесь можно задать опции монтирования -o и файловую систему -t. Флешка будет примонтирована в папку /run/имя_пользователя/uuid-флешки/
Для размонтирования используется аналогичная команда:
udisksctl unmount -b /dev/sdc1
Автоматическое монтирование usb флешки в linux можно настроить с помощью утилиты udiskie. Все новые подключенные флешки будут автоматически подключаться, после подключения устройства будет всплывать окно с предложением открыть файловый менеджер, а также значок, с помощью которого можно получить доступ к каждому из устройств.
Устанавливается утилита в Ubuntu командой:
sudo apt install udiskie
Дальше остается запустить программу:
udiskie -a -n -t
Теперь все подключаемые устройства будут автоматически монтироваться с помощью udisks. Рассмотрим что значат опции:
- -a — выполнять автоматическое монтирование
- -n — показывать всплывающее уведомление
- -t — показывать значок в трее.
Выводы
Теперь монтирование флешки linux не вызовет у вас проблем. Даже если у вас не будет работать окружение рабочего стола и придется делать все вручную. Если остались еще вопросы, спрашивайте в комментариях.
You can use the open-source usbipd-win project to access a computer’s physical USB devices from the Windows Subsystem for Linux (WSL2) or Hyper-V virtual machine. This tool allows you to pass-through an external USB device connected to the Windows host to any Linux distribution (running as WSL) or to a virtual machine. This allows performing any actions with USB devices from virtual machines or Linux environment (flashing Android devices, using ADB and Fastboot, accessing smart cards, working with Arduino hardware, etc.).
Usbipd-win uses the TCP/IP protocol to forward the USB device traffic over a virtual network interface between the VM/WSL and the host Windows operating system. First, we’ll show how to install the usbipd-win server on a Windows host, then we’ll install a USB/IP client on Linux (WSL) and attach a shared USB device to the Linux VM (WSL).
Usbipd-win supports Windows 8.1 x64 and Windows Server 2012 R2 (and later) and allows to share local USB devices on Windows with other virtual machines (including WSL2 and Linux guest operating systems on Hyper-V). Previously on Hyper-V, it was only possible to redirect USB drives to VMs or other USB device types through the rather limited Enhanced Session Mode.
Usbipd-win project is available on GitHub (https://github.com/dorssel/usbipd-win). You can download and install it manually (an MSI installation file is available), but it’s much quicker to install it using the built-in Winget package manager.
winget install --interactive --exact dorssel.usbipd-win
The program will create a separate usbipd (USBIP Device Host) service on Windows: "C:\Program Files\usbipd-win\usbipd.exe" which listens on TCP port 3240
An additional rule has been created in Windows Defender Firewall for the usbipd.exe to allow access to TCP port 3240 from computers on the local network.
Now let’s configure USBIP support in Windows Subsystem for the Linux environment. Make sure that the kernel version in your image is at least 5.10.60.1 (our demo example uses WSL 2 with an Ubuntu 22.04 LTS image):
$ uname -a
Now you need to install USB/IP tools and USB hardware ID base.
$ sudo apt install linux-tools-virtual hwdata
 $ sudo update-alternatives --install /usr/local/bin/usbip usbip `ls /usr/lib/linux-tools/*/usbip | tail -n1` 20
Use the following command in the Debian WSL image:
$ sudo apt-get install usbip hwdata usbutils
Install USB/IP tools in an rpm-based WSL image (CentOS/Oracle Linux):
$ sudo rpm --import https://www.elrepo.org/RPM-GPG-KEY-elrepo.org
 $ sudo rpm -ivh http://www.elrepo.org/elrepo-release-7.0-3.el7.elrepo.noarch.rpm
 $ sudo yum install kmod-usbip
 $ sudo yum install usbip-utils
 $ sudo yum install hwdata
Now open an elevated command prompt on the host Windows computer and list the USB devices:
usbipd wsl list
As you can see, none of the USB devices are shared (Not shared). You may share the USB device by its BUSID. In my example, I’d like to passthrough the USB Mass Storage Device with BUISID 4-2 into WSL.
usbipd wsl attach --busid 4-2
- If you are using WSL 1 (not supported by usbip) you will get an error.
sbipd: error: The specified WSL distribution is using WSL 1, but WSL 2 is required. Learn how to upgrade at https://docs.microsoft.com/windows/wsl/basic-commands#set-wsl-version-to-1-or-2.
- If an error appears:
usbipd: error: WSL kernel is not USBIP capable, update WSL system with the following command:
wsl --update
Check that your USB flash drive is connected to WSL:
$ dmesg | tail
 $ lsusb
If you would like to share your USB device with another computer running Linux over the network (it can be a virtual machine with a Linux guest on Hyper-V or any other hypervisor), first list the available USB devices on a remote Windows host:
$ usbip list --remote=192.168.13.21
You can now mount the required USB device by its ID:
$ sudo usbip attach -remote=192.168.13.21 --busid=4-2
In this example, the IP address of the Windows host on which the usbipd-win server is running is specified.
The shared USB device should now be visible to your Linux tools.
To disable USB device sharing in Windows:
usbipd wsl detach --busid 4-2
Please note that USB drives connected in this way are not recognized as block devices in WSL. Check this using the lsblk command. The fact is that the WSL kernel does not have a driver for USB drives (to add them, you will have to rebuild the kernel).
You will be able to mount the file system of the shared USB drives in the standard way on the Linux distros.
Therefore, you must use the following commands to mount an external USB flash drive, floppy disc, or SD card in WSL:
$ sudo mkdir /mnt/f
 $ sudo mount -t drvfs f: /mnt/f
WSL mount FAT, ExFAT, ReFs, or NTFS drives, as well as VHD images.
Thus, usbipd-win can be used to pass-through physical USB devices from a physical Windows host to WSL, virtual machine, or Linux computers over a network using the USBOverIP protocol.
The release of Windows 11 has brought excitement among tech enthusiasts and everyday users alike. If you’re looking to install or upgrade to Windows 11, creating a bootable USB drive from an ISO file is a necessary step in the process. This article will walk you through a detailed guide on how to mount a Windows 11 ISO to a USB drive, ensuring you have all the tools and steps needed to accomplish the task efficiently.
Understanding ISO Files and Bootable USBs
Before we jump into the process, it’s essential to grasp what an ISO file is and why we need a bootable USB drive. An ISO file is a disk image that contains all the data needed to replicate the original DVDs or CDs used for software installations. It behaves as a virtual disc, collecting files and information that a computer needs to install an operating system or software program.
A bootable USB drive, on the other hand, is a USB flash drive that has been formatted and loaded with the necessary files from an ISO file, allowing your computer to read the USB and boot from it during the installation process. This method is particularly useful due to its portability and speed compared to traditional DVD installations.
Pre-requisites for Mounting Windows 11 ISO to USB
Before you start creating a bootable USB drive, ensure you have the following:
-
Windows 11 ISO File: First thing’s first, download the official Windows 11 ISO file from Microsoft’s website. You can find it in the Windows 11 download section under the Media Creation Tool or the direct link for ISO downloads.
-
USB Flash Drive: You will need a USB drive with a minimum of 8 GB of free space. Note that this process will erase all files on the USB, so back up any important data beforehand.
-
A Computer Running Windows: This task requires the use of a Windows PC.
-
Rufus or Windows Media Creation Tool: While Windows has built-in methods to create installation media, using third-party software like Rufus can provide flexibility and reliability.
Step-by-Step Guide to Mount Windows 11 ISO to USB
Step 1: Download the Windows 11 ISO File
- Go to the official Microsoft website.
- Navigate to the Windows 11 download section.
- Select either the Media Creation Tool option if you want to use that or download the ISO file directly.
- If using the direct download, select your desired edition and language, then confirm and download the ISO file.
Step 2: Prepare Your USB Drive
- Insert your USB flash drive into your computer.
- Open File Explorer and locate your USB drive. Note the drive letter (like E: or F:).
- Backup any valuable data from this drive, as the formatting process will erase everything on it.
Step 3: Download and Install Rufus (Optional)
If you choose to use Rufus, follow these steps to download and install it:
- Visit the Rufus download page: https://rufus.ie/.
- Download the latest version of the executable file.
- Open the downloaded file. There’s no installation required, as Rufus runs as a portable application.
Step 4: Create Bootable USB Using the Windows Media Creation Tool
If you opt to use the Windows Media Creation Tool, here’s how to go about it:
-
Open the Media Creation Tool:
- Double-click the downloaded MediaCreationTool.exe file.
-
Accept License Terms:
- Review and accept the Microsoft Software License Terms to continue.
-
Choose Your Action:
- Select «Create installation media (USB flash drive, DVD, or ISO file) for another PC.»
-
Configure Language and Edition:
- Select language, edition, and architecture (32-bit or 64-bit) based on your needs. You can follow the recommended options or customize them.
-
Select USB Drive:
- Choose «USB flash drive» from the selection options.
-
Choose the USB Drive:
- Select your USB drive from the list (make sure it’s the correct one, as it will be formatted).
-
Create the USB Drive:
- Click «Next,» and the tool will download Windows 11 and create a bootable USB drive. This process may take time, depending on your internet speed and PC performance.
Step 5: Create Bootable USB Using Rufus
If you prefer Rufus over the Media Creation Tool, follow these steps:
-
Open Rufus:
- Launch the Rufus application you downloaded.
-
Select Your USB Device:
- Under the “Device” section, choose your USB drive from the dropdown menu.
-
Select ISO File:
- Click on the “Select” button next to the “Boot selection” section, then navigate to where you saved the Windows 11 ISO file. Choose the file and click «Open.»
-
Partition Scheme:
- Choose the partition scheme. Most modern computers use UEFI, so select “GPT.” If your computer uses Legacy BIOS, opt for «MBR.»
-
File System:
- Set the file system to “FAT32” for compatibility or “NTFS” for larger files (FAT32 has a 4GB file size limit).
-
Volume Label:
- You can name your USB drive in the «Volume Label» field, although it’s optional.
-
Start the Process:
- Click “Start” to begin the process. A warning message will appear stating that all data will be destroyed on the USB drive. Ensure that you have selected the correct drive, then click «OK.»
-
Wait for Completion:
- Rufus will now create the bootable USB drive, which might take several minutes depending on your USB drive speed and computer performance.
Step 6: Boot From the USB Drive
Once the bootable USB drive is ready, follow these steps to boot from it:
-
Restart Your Computer:
- Leave the USB drive inserted and restart your computer.
-
Access BIOS/UEFI Settings:
- As your computer starts, press the designated key to enter the BIOS/UEFI settings (common keys include F2, F12, DEL, or ESC; this varies by manufacturer).
-
Change Boot Order:
- Locate the boot order settings and set your USB drive as the primary boot device. This ensures that your computer attempts to boot from the USB first.
-
Save Settings and Exit:
- Save your changes and exit the BIOS. Your computer should now boot from the USB drive.
Step 7: Install Windows 11
Now that you’re booted from the USB drive, follow these steps to install Windows 11:
-
Start the Installation:
- The Windows 11 setup will begin. Select your language, time, and keyboard preference, and click “Next.”
-
Click Install Now:
- On the next screen, click the “Install now” button to continue.
-
Enter Product Key:
- If prompted, enter your Windows 11 product key. If you are upgrading from a previous version of Windows, you may be able to skip this step.
-
Select Installation Type:
- Choose “Custom: Install Windows only (advanced)” for a clean installation or “Upgrade: Install Windows and keep files, settings, and applications” if you want to keep your personal files.
-
Partition Selection:
- Select the drive where you want to install Windows 11. If the disk contains previous Windows installations, you may format or delete these partitions as needed.
-
Begin Installation:
- Click “Next,” and Windows will start the installation process, which could take some time. The installation may involve several restarts.
-
Follow On-Screen Instructions:
- Follow the prompts to set up your Windows 11 installation. This includes setting up region, keyboard layout, and user account preferences.
Troubleshooting Common Issues
While the process to mount Windows 11 ISO to a USB is straightforward, various issues can arise. Here are some common problems and solutions:
-
USB Not Recognized:
- Ensure that the USB drive is properly connected. Try different USB ports. If still unrecognized, consider formatting the USB or using a different flash drive.
-
Installation Errors:
- If the installation fails, check for compatibility issues or corruption in the ISO file. Make sure your system meets the minimum requirements for Windows 11.
-
Boot Issues:
- If the computer doesn’t boot from the USB drive, double-check that the boot order is set correctly in BIOS/UEFI. Ensure the USB drive is created properly and is functional.
Conclusion
Creating a bootable USB drive from a Windows 11 ISO file is a critical step for upgrading or installing the latest Windows operating system on your machine. Following the outlined steps will assist you in efficiently completing the task, with options for both Windows Media Creation Tool and Rufus.
By preparing your USB drive and knowing how to boot from it to install Windows 11, you can enjoy the new features and enhancements that come with the latest version of Microsoft’s operating system. Should you run into any issues during the process, refer to the troubleshooting section for guidance. Happy computing with your fresh installation of Windows 11!