
On this page, we have managed to share the official Google USB Driver for Windows
Google USB Driver for Windows helps you to connect your Android Smartphone and Tablets to the Windows Computer and transfer data between the device and the computer.
It also allows you to Flash Android Stock Firmware on your Android Device using the preloader drivers. Here on this page, we have shared the official Android USB Driver for all android devices.
Direct Download
Just click on the link below to download the Google USB Driver ZIP file to your PC.
- Latest version: usb_driver_r13-windows.zip
[#] Driver Signature Error: If you are facing Driver Signature Error while installing the USB Driver, then head over to How to Fix Driver Signature Error page.
That’s all the tutorial on download Google USB Driver for Windows for the Windows procedure. If there is a problem or an error, you can keep in touch with us through the Contact menu at the bottom of this page. Support us and share it with anyone who needs it so we can continue to support you.
Back to top button
Skip to content
Navigation Menu
Provide feedback
Saved searches
Use saved searches to filter your results more quickly
Sign up
Description
UBports Installer 0.8.9-beta (exe)
Environment: Microsoft Windows 11 Pro 10.0.22000 win32 10.0.22000 x64 22000 0.0 NodeJS v12.18.3
Device: walleye
Target OS: Ubuntu Touch
Settings: undefined
OPEN-CUTS run: N/A
Log: N/A
I would suggest to add these instructions for anyone run the installer on Windows system:
First: To Downgrade your device and make sure you flash the required flash os version, use the link: https://flash.android.com/build/5670241?target=walleye-user&signed=true
Second: the User needs to use Google USB driver file and indicate that manually on the Device manager, so the system can regeconise the phone as Android device when reboot loader is on.
Download link for USB driver : https://dl.google.com/android/repository/usb_driver_r13-windows.zip
Google USB Drivers are required to connect Google Pixel or Nexus devices to Windows PC using a USB cable. You will need these drivers to transfer files or sync data on your Pixel/Nexus device, and especially when working with the Android ADB and Fastboot tools.
You can download the latest Google USB Drivers from here and follow the instructions on how to manually install them on your Windows PC. Furthermore, we have also provided instructions on how to modify the ‘android_winusb.inf‘ file included in the drivers to support other Android devices.
Normally, the said USB drivers come bundled with SDK Manager in the Android Studio IDE, which is constantly updated with the latest available drivers. But if you’re an average Android user, chances are that you might not have the IDE set up on your PC. That’s because it is used mostly by experienced developers and enthusiasts. In that case, you can use the standalone USB drivers, which as provided directly by Google for users who might face issues of Windows not recognizing their phone over a USB connection.
Google USB drivers also act as ‘Android ADB and Fastboot Drivers‘ that allow your computer to communicate with your Android device over the Android Bootloader Interface (Fastboot Mode) as well as Android Composite ADB Interface. So you can install them on your PC to use ADB (Android Debug Bridge) for debugging apps and ROMs, boot your device into Bootloader/Recovery modes, or use Fastboot to unlock the bootloader and flash factory images on your Pixel/Nexus device.
To sum up, the drivers are useful in various situations. With that in mind, go ahead to download the latest version of the USB Drivers from below and follow the instructions on how to install them on your Windows PC.
Page Contents
- Download Google USB Drivers
- Direct Download
- Download via Android Studio
- How to Install Google USB Drivers
- On Windows 11 and Windows 10
- On Windows 7 and Windows 8/8.1
- How to Modify Google USB Drivers to Support Other Android Devices
- Step 1: Get the VID and PID of your Android Device
- Step 2: Modify ‘android_winusb.inf’ file
- Step 3: Install the Modified USB Drivers
Now, there are two different ways/methods to download the USB driver on Windows. You can either download the Google USB Driver ZIP file manually. Or, you can use the SDK Manager in the Android Studio to download it.
The latter gives an added benefit, that is the SDK Manager will automatically notify you when a newer version is available. The former method, on the contrary, will require you to manually check if a newer driver version is available and download it again.
In our personal experience, downloading the ZIP package directly is easier than using the Android Studio. But the choice is solely up to you. We have covered both the methods below.
Note: If you’re using macOS or Linux, you would not need these drivers.
Direct Download
Just click on the link below to download the Google USB Driver ZIP file to your PC.
- Latest version: usb_driver_r13-windows.zip
- Previous versions:
- usb_driver_r12-windows.zip
- usb_driver_r11-windows.zip
- usb_driver_r10-windows.zip
Once downloaded, extract the ZIP file to a suitable location on your computer. The extracted ‘usb_drivers’ folder should contain the required ‘android_winusb.inf’ driver file.
Download via Android Studio
First of all, make sure that you have downloaded and installed the latest version of Android Studio on your Windows PC. Once you have it installed, follow the instructions below:
Android Studio will now download the Google USB drivers to ‘android_sdk\extras\google\usb_driver\‘ on your PC. Here ‘android_sdk‘ is the folder where the Android SDK is installed on your PC.
How to Install Google USB Drivers
The Google USB Drivers come in the form of an ‘android_winusb.inf‘ setup information file, rather than a Windows executable. So, you will need to manually install it on your Windows PC. The same steps can also be used to upgrade the existing drivers installed on your PC to the latest version available.
Now follow the installation guide below according to the Windows OS version you’re using. It’s quite easy and wouldn’t take more than a minute to install them.
On Windows 11 and Windows 10
To install Google Android USB Drivers on Windows 10, follow the instructions below.
- First, connect your Android device to the PC’s USB port.
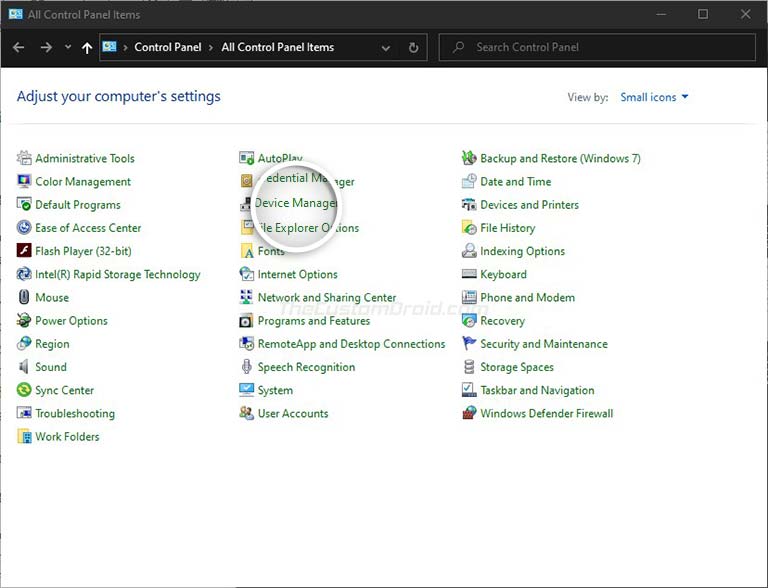
- Go to the ‘Control Panel‘ and click on ‘Device Manager‘.
- For example: If you downloaded the drivers using Android Studio, the folder should be located in ‘android_sdk\extras\google\’ on the PC. Or, if you downloaded the ZIP file, then just locate the extracted ‘usb_driver’ folder.
On Windows 7 and Windows 8/8.1
To install Google Android USB drivers on Windows 7, Windows 8, and Windows 8.1 PC, follow the instructions below.
- First, connect your Android device to the Windows PC’s USB port.
- Then right-click on ‘Computer‘ and select ‘Manage‘.
- Select Devices in the left pane.
- Double-click on ‘Other device‘ in the right pane to expand it.
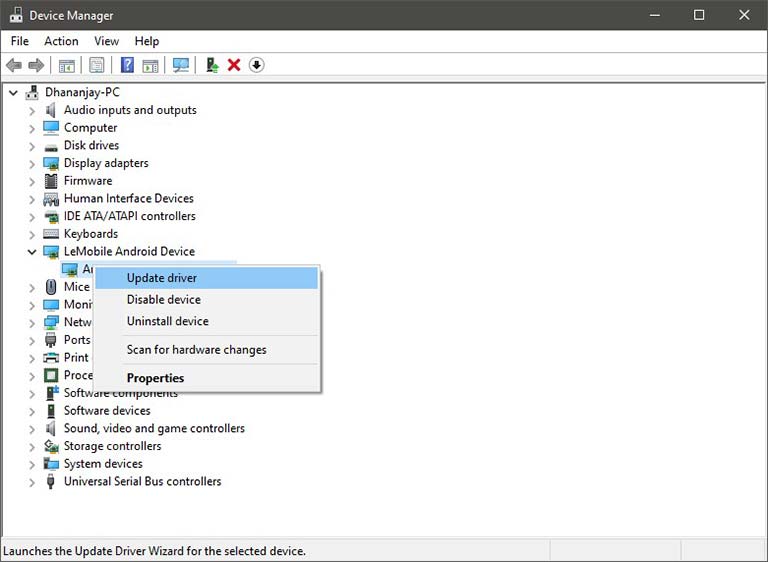
- Right-click on the device name (e.g. Google Pixel) and select the ‘Update Driver‘ option.
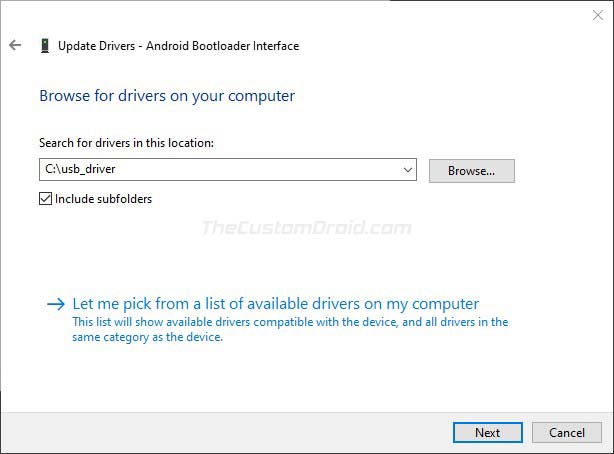
- Click on ‘Browse my computer for driver software‘ in the Hardware Update wizard.
- Click ‘Browse‘ and locate the ‘usb_driver’ folder.
- Finally, click on ‘Next‘ to install the USB drivers.
You should now have the Google USB Drivers installed. Your Windows PC should now detect and recognize your Android device over the USB connection.
Important Note
If the drivers fail to install even after following the steps, OR the ADB/Fastboot commands do no work even if the drivers are installed, then it could be because you’re using a USB 3.0/3.1/3.2 port or an AMD based PC. This is an issue faced by a lot of users recently.
To fix it, simply try using a USB 2.0 port (If it’s not available, you can also use a USB 2.0 hub) on your PC. Also, try using an Intel-based PC for especially when using ADB/Fastboot tools.
How to Modify Google USB Drivers to Support Other Android Devices
Like we mentioned above, Google USB Drivers also work as ‘ADB Drivers’. But by default, they only support the Google Pixel and Nexus devices.
While Android OEMs do provide their own drivers, but it’s more often than they miss to include the required ADB USB drivers in them. In such cases, you can easily modify the ‘android_winusb.inf’ file in Google USB Drivers to support any other Android device to use the ADB and Fastboot tools.
In order for the drivers to support your non-Pixel/Nexus device, you will first need to acquire the Vendor ID (VID) and Product ID (PID) of your device. Once you have them, the second step is to edit the ‘android_winusb.inf’ file and add a new device section with the VID and PID of your own device. And finally, the third and last step is to install the modified drivers.
Sounds confusing? It’s quite simple actually. Just follow the step-by-step instructions below.
Step 1: Get the VID and PID of your Android Device
- First, connect your Android device to the PC using the USB cable.
- Go to ‘Control Panel‘ > ‘Device Manager‘ on the PC.
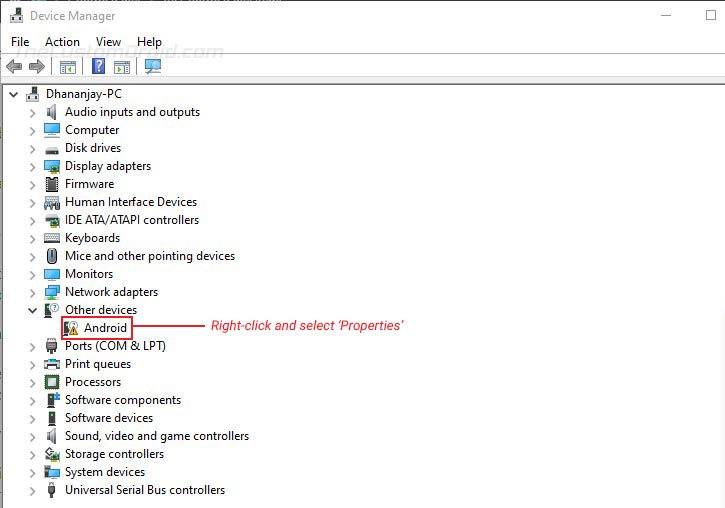
- Locate your unrecognized Android device. An unrecognized device can normally be located under the ‘Universal Serial Bus controllers‘ OR ‘Other devices‘ sections in Device Manager. You would see a yellow-colored triangle warning icon beside the connected device.

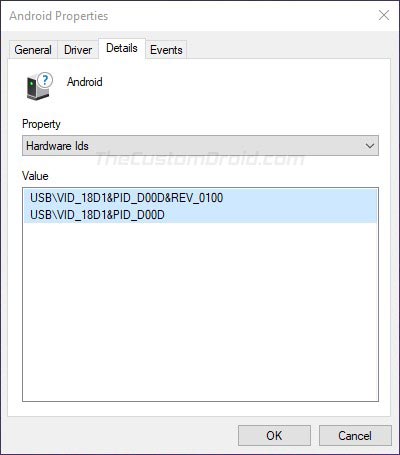
- Right-click on the device name and click on ‘Properties‘.
- Go to the ‘Details‘ tab and select ‘Hardware Ids‘ from the dropdown menu.

- You should now see the Vendor and Product IDs of your Android device.
Step 2: Modify ‘android_winusb.inf’ file
Now that you have the required IDs, you can modify/edit the ‘android_winusb.inf’ file to add your device to the supported list.
- First, locate the ‘usb_driver‘ folder on your PC. Inside the folder, you should have the ‘android_winusb.inf‘ file.
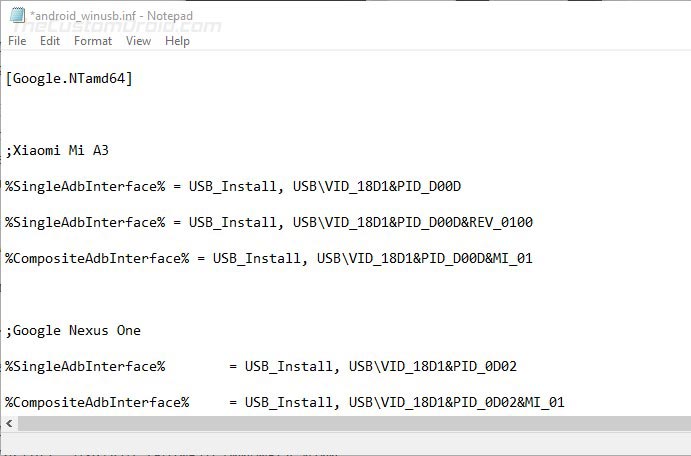
- Open the file using a text editor and locate the ‘[Google.NTx86]‘ section if your Windows PC is 32-bit (x86) or the ‘[Google.NTamd64]‘ section if your Windows PC is 64-bit (x64).
- In the said section, you will see a number of items with the following format:
;[device name]
%SingleAdbInterface% = USB_Install, USB\VID_xxxx&PID_xxxx
%CompositeAdbInterface% = USB_Install, USB\VID_xxxx&PID_xxxx&MI_xx
- You can copy the above lines into the respective section and edit it accordingly.
- The first thing to do is to replace the ‘[device name]‘ item with your actual device name (Nothing specific, it could be anything).
- Next, you have to add your device’s VID and PID values to the %SingleAdbInterface% and %CompositeAdbInterface% items.
- In case your device also has a REV_xxxx ID, you will need to add two lines for the %SingleAdbInterface% item. One without and another with the REV ID. The line with the REV ID should look like:
USB\VID_xxxx&PID_xxxx&REV_xxxx
- For the %CompositeAdbInterface% item, you will further need to add ‘MI_01‘ ID towards the end. With the MI_01 ID, the line should look like:
USB\VID_xxxx&PID_xxxx&MI_01
- In case your device also has a REV_xxxx ID, you will need to add two lines for the %SingleAdbInterface% item. One without and another with the REV ID. The line with the REV ID should look like:
- For example, my Xiaomi Mi A3 has a VID and PID as ‘USB\VID_18D1&PID_D00D’ & ‘USB\VID_18D1&PID_D00D&REV_0100’. In that case, the lines should look like the following:
;Xiaomi Mi A3
%SingleAdbInterface% = USB_Install, USB\VID_18D1&PID_D00D
%SingleAdbInterface% = USB_Install, USB\VID_18D1&PID_D00D&REV_0100
%CompositeAdbInterface% = USB_Install, USB\VID_18D1&PID_D00D&MI_01

Once you have added the lines under the proper section (depending on your PC’s architecture), save the file and exit.
Step 3: Install the Modified USB Drivers
You have now successfully modified the Google USB Drivers to support your Android device. The last step is to install these modified drivers for your device.
Important information:
The android_winusb.inf file is signed by Google and making changes to it (although intentional, such as we did here) will directly affects its digital signature. Once the file has been modified, the “Driver Signature Enforcement” feature of Windows (11/10/8.1/8) will prevent you from installing the modified USB driver.
To bypass this, you will need to temporarily disable Driver Signature Verification by enabling Test Mode. How-to-Geek has a pretty good explanatory piece on how to do it using two different methods.
Thanks Hamid for pointing it out!
Now, to install the modified Google USB drivers: go to ‘Control Panel’ > ‘Device Manager’ and right-click on your device’s name. Then select ‘Update drivers’ to launch the Hardware Update wizard. Click on ‘Browse my computer for driver software’ and select ‘Browse’. Now locate the ‘usb_driver’ folder that contains the modified android_winusb.inf file and select it.
Finally, click ‘Next’ to install the modified drivers for your device. That’s it! Reboot your Windows computer and it should now recognize your Android device over ADB or Fastboot.
Installing the Google USB Drivers is the easiest solution to make your Windows PC successfully recognize your Android device. And while it should work for most other Android devices too, it’s not a hundred percent guaranteed. And if this happens, you may want to install your device’s OEM specific drivers from this page or by clicking your device manufacturer link below.
- Huawei
- Realme
- Samsung
- OnePlus
- LG
- Xiaomi
For low-level firmware flashing, you could also use MediaTek or Qualcomm USB drivers.
If you face any issues installing the drivers on your PC, feel free to ask us through the comments.
Drivers source: Google
Dhananjay has more than 11 years of experience in Android software customization and development, and has spent the past 10 years writing about it.
He spends most of his prime time reading, learning and writing about Android and other open-source projects. He is also a community-taught web developer. Apart from that, he loves mountain biking and playing video games on his PlayStation.