
Last Updated :
21 Oct, 2024
Looking to run Windows from a USB drive? Whether you’re using it for troubleshooting, testing, or as a portable version of your operating system, booting Windows from a USB drive can be extremely useful. With the right tools and setup, you can create a bootable Windows USB drive that lets you carry a portable version of Windows anywhere. In this guide, we’ll show you how to run Windows from a USB, including creating the drive and getting your system to boot from it.
Table of Content
- How to Run Windows From a USB Drive?
- Method 1: Download the Bootable image
- Method 2: Configure USB Drive
- Method 3: Change Boot Priority
- Method 4: Setup Process
- Method 5: Explore Windows
- How to Run Windows From a USB Drive — FAQ’s
How to Run Windows From a USB Drive?
Users can run their Windows operating system by following the below-mentioned methods —
Method 1: Download the Bootable image
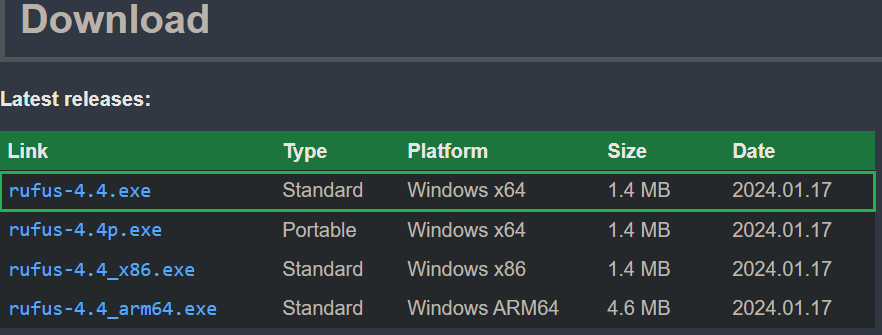
- Go to the official page of Microsoft Windows to download the boot image for Windows 10.
- Using a Computer browser you will not get the download option for boot image so use a Mobile device for downloading.
- Select edition and language and click on Confirm.

Method 2: Configure USB Drive
- Download the latest version of Rufus from the official website which will be used to flash the boot image into a USB drive.
- Insert a USB Drive of minimum 16GB of storage into the computer and run Rufus. Select the iso file for Windows 10 in Boot Selection.
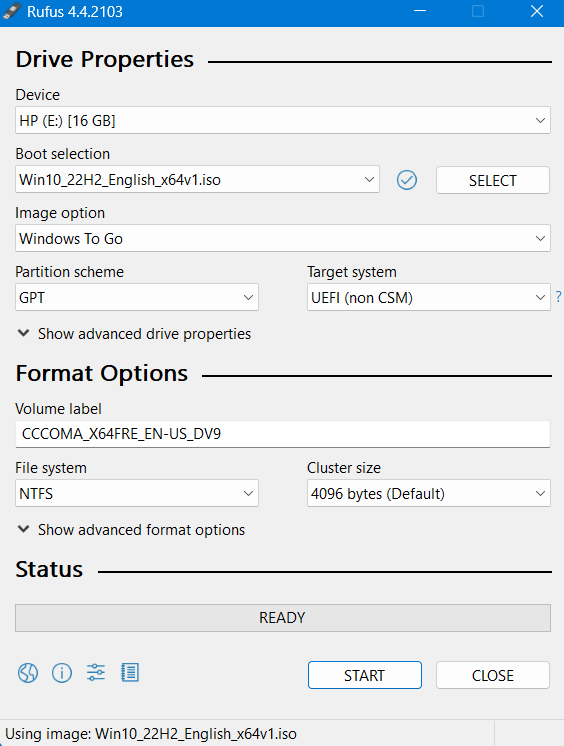
- For Image Option choose Windows To Go.
- Use Partition scheme as GPT.
- Leave other fields as it is and click on Start.
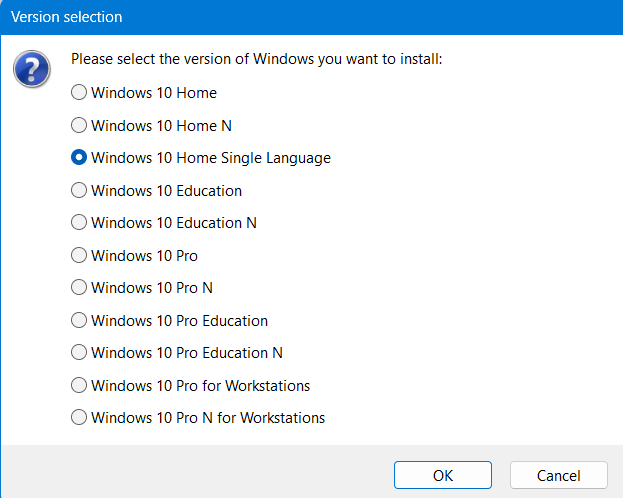
- On the next screen choose the suitable Windows edition and click on OK.
- Now configure the Windows User Experience as per your requirements.
- Once done press OK.

Wait a few minutes for Rufus to flash the boot image, once completed you can close the application.
Method 3: Change Boot Priority
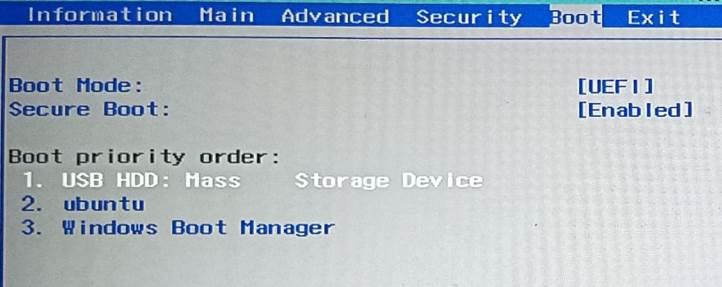
- Restart the computer and open BIOS Settings.
- To know the BIOS key, check the manufacturer’s website.
- On the BIOS menu, go to the boot section and select USB device as the highest priority.
- Disable secure boot if you face any issues during startup.
Method 4: Setup Process
As the installation process is already completed while flashing the boot image. We will start the setup process when the computer restarts.
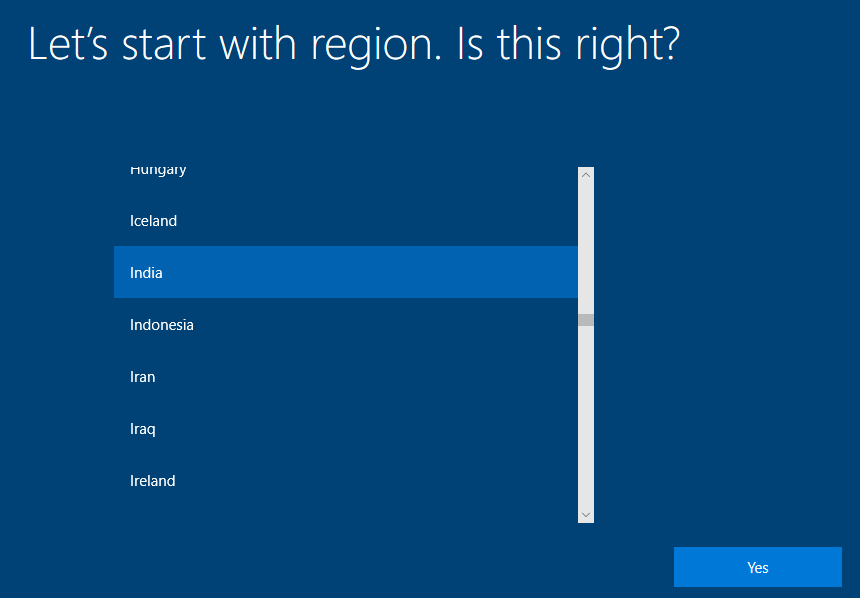
- Choose the region based on your location and click on Yes.
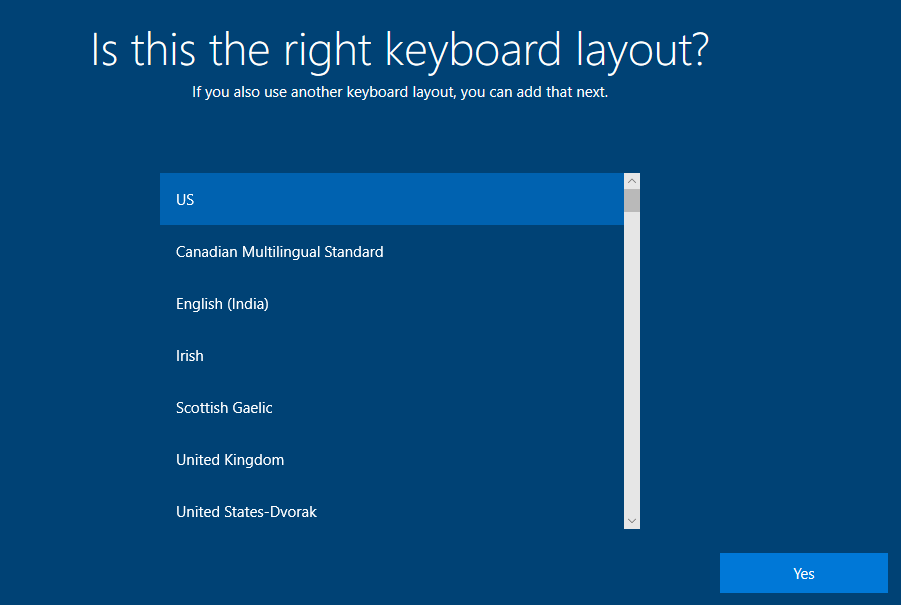
- Choose the correct keyboard layout or add a new keyboard layout and then click on Yes.
- Carefully read the Windows 10 License Agreement and click on Accept.

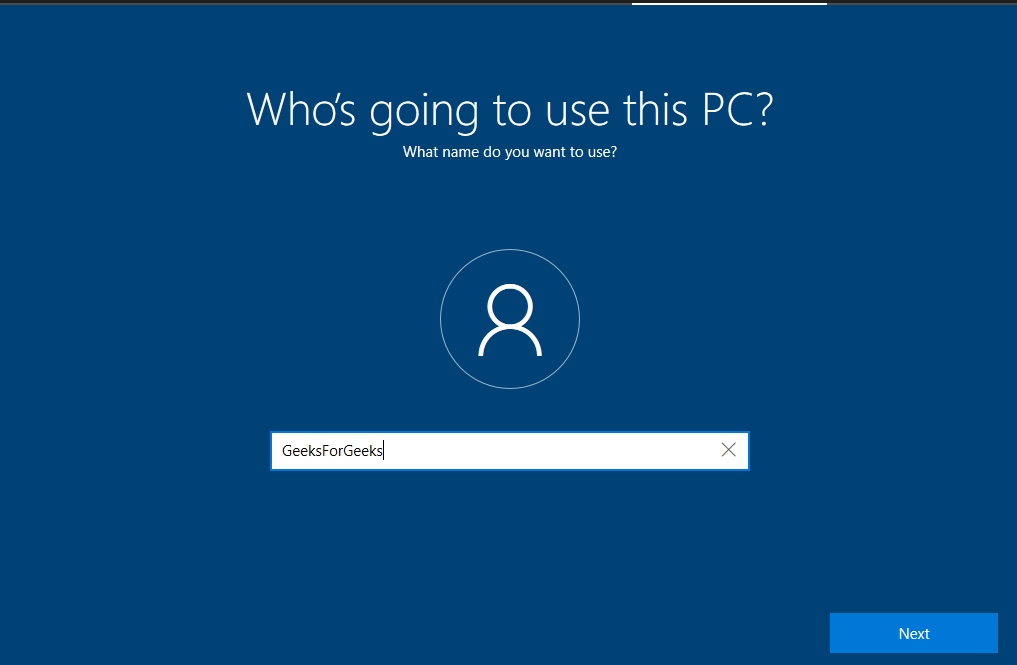
- Now, Create a User for the PC. Write your username and click on Next.

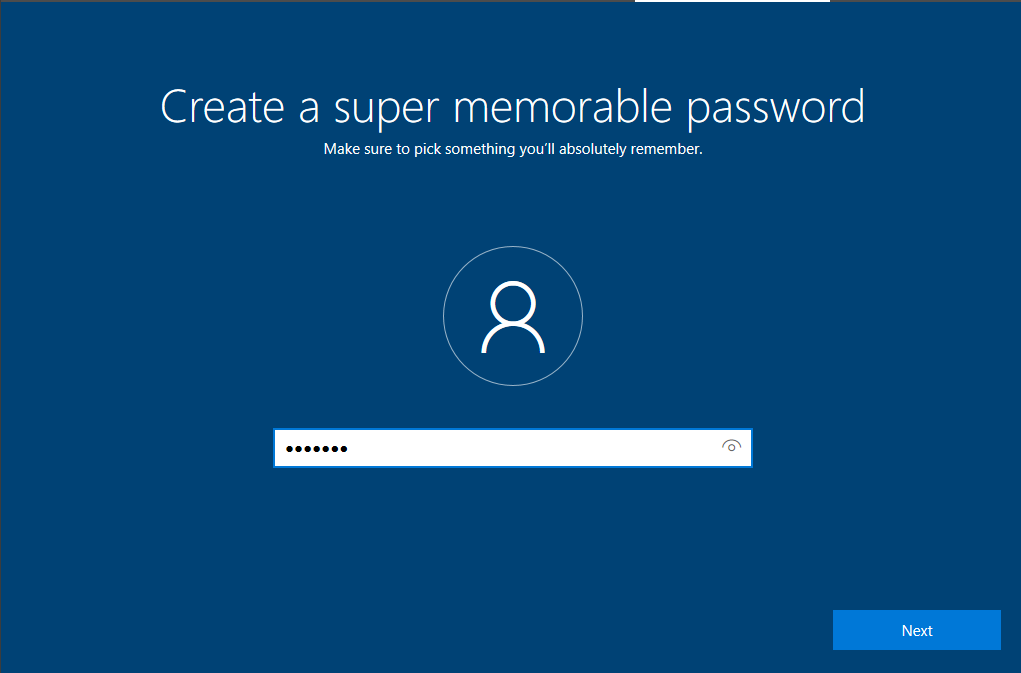
- Enter a strong password that you can remember easily and click on Next.
- Set up security questions and answers on the next screen to reset your suit password in case you forgot.
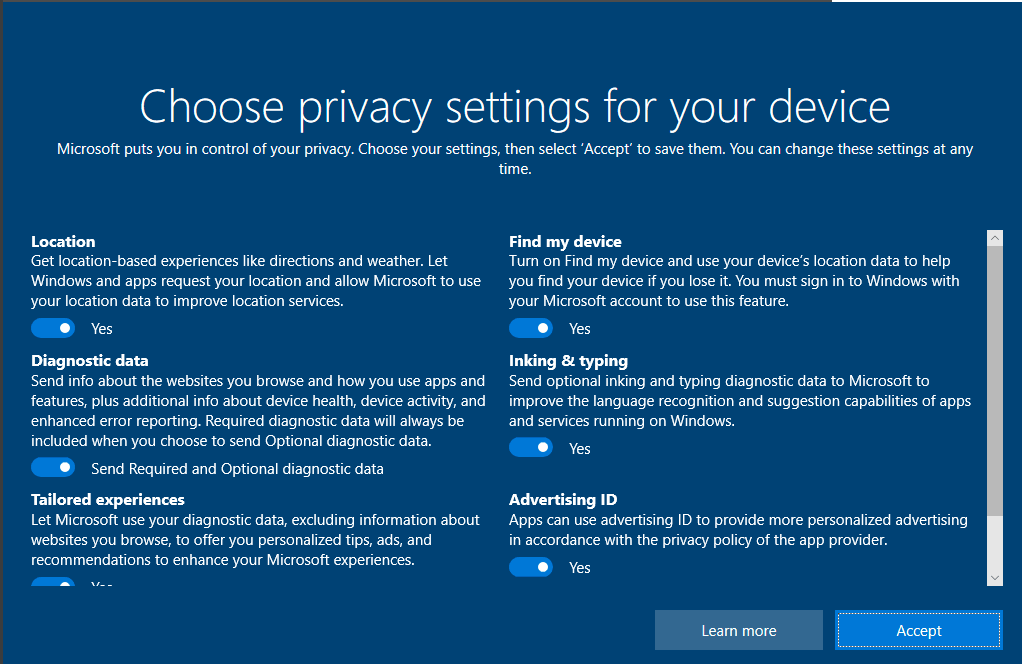
- On the privacy settings page, choose the options that suit you. Turn off or Turn on the features as per your requirements and click on Accept.

Now wait for a few minutes and Windows will complete the rest of the setup for you. During this, the PC can be restarted automatically for several times.
Method 5: Explore Windows
Once the setup is completed you will be taken to the home screen of Windows 10.
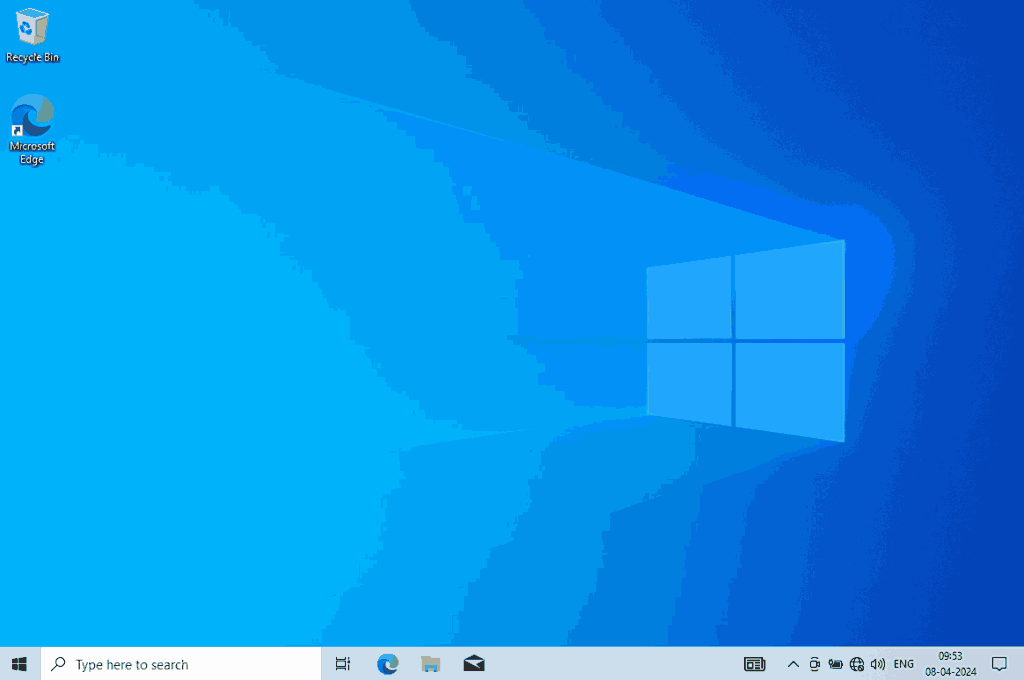
- This looks the same as the Windows running on stand-alone PCs.
- To check the folders you can go to File Explorer and check the C drive.
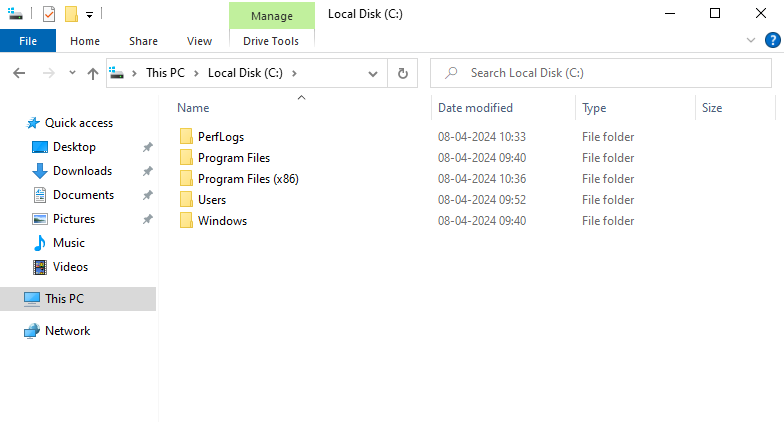
- As you can see this contains the same file structure as any other Windows machine. As the whole OS is running from the USB Drive you will see only a single Drive here with the storage capacity the same as the USB Disk.

Conclusion
Using a bootable Windows USB drive is a great way to have a portable, fully functional Windows environment wherever you go. By following the steps in this guide, you can easily run Windows from a USB drive, making it perfect for testing or emergencies. Whether you’re looking to install Windows on an external USB drive or simply need a portable version of your OS, this setup gives you flexibility and convenience.
Also Read
- How to Install Windows 10 From a USB Flash Drive?
- How to Create a Bootable USB Flash drive in Windows/Linux using CMD?
Download Article
A simple guide to plug your flash drive into a desktop or laptop computer
Download Article
- Insert the USB Drive
- Troubleshooting Tips
- Video
- Q&A
- Tips
- Warnings
- Things You’ll Need
|
|
|
|
|
|
Do you need to connect your flash drive or external hard drive to your PC or Mac? USB thumb drives are small storage devices that plug directly into your computer’s USB port, which you’ll usually find on the side of your laptop or the back of your desktop tower. Inserting the USB drive will automatically download the drivers that you’ll need to access the files on the drive. This wikiHow guide will show you how to attach a USB drive to your Windows or Mac computer.
Things You Should Know
- If your drive comes with a cable, plug it into your device.
- Insert the USB connector into the USB port on your computer. If it’s your first time using the drive, some drivers will automatically install.
- Eject your USB drive before removing it. In Windows, right-click the drive in File Explorer and click Eject.
- In macOS, open Finder and click the Eject button next to the USB drive name.
-

If your USB drive has a power switch or power cord, turn the drive on before connecting it to your PC or Mac. Turn on your computer as well.
-
Small storage drives will typically have an integrated USB connector, but portable hard drives, solid state drives, and other devices may need a cord. Plug the cord into the device to ready it for connecting to your computer.
- If you have a small flash drive or pen drive, you typically won’t need to attach a cord.
Advertisement
-
Most USB drives have a USB-A connector, which is rectangular. Others have USB-C connectors, which are oval. If you have a laptop, you’ll usually find the ports on the sides of the case. On a desktop tower, you’ll often find some USB ports on the front panel, and possibly others on the rear side of the case.[1]
- If you plan on using the device on a permanent basis, use a USB port located on the back of your computer. Front ports are a better option for quickly attaching and removing devices.
- The ports will have the USB logo next to them, which shows a circle and a 3-pronged arrow.
- USB-A ports are directional, which means you’ll only be able to connect the drive to the port in one direction. They have 4 metal contacts inside.
- USB-C ports aren’t directional, so they’re extra easy to connect.
-
The connector should fit easily and snugly into the port. USB-A will only fit in 1 direction, so flip the connector around if the fit seems wrong.
- For additional info on USB storage on Windows and Mac, check out our guide on ways to use a USB flash drive.
-
If attaching the drive for the first time, your operating system may search for and install the necessary drivers. You will see a prompt after a few seconds that the drivers have been installed and that the device is ready for use. If you already installed drivers manually, you don’t need to wait to use the drive.[2]
-
When you want to disconnect the USB drive, you need to eject or «unmount» it first.
- In Windows, right-click on the drive’s icon in File Explorer and select Eject.[3]
- In macOS, open finder. Then, click the Eject button next to the USB drive’s name.[4]
- After ejecting, physically remove the drive by pulling it straight out of the port.
- In Windows, right-click on the drive’s icon in File Explorer and select Eject.[3]


Advertisement
-
Some computers (especially laptops) don’t have a USB port that matches the USB drive. For example, a laptop might have only USB-C ports but most USB drives are USB-A. Here are a couple things to try:
- Use an adapter. Search for an adapter that can connect the port type on your computer to the plug type on your USB drive.
- Use a USB docking station. These connect to your computer’s USB port to add additional USB ports in an external dock. Make sure the USB plug matches your computer, and that the dock features the port you need for your USB drive.
-
Typically, the required drivers will automatically download when you insert a USB device for the first time. But sometimes they don’t!
- If you have the packaging for the USB drive, check the instructions to see if a driver is included for installation.
- A driver is a piece of software that allows your computer to communicate with the drive. All operating systems are designed to automatically download the required drivers, but if you have no Internet connection, or if the instructions specify to install the driver manually, you should do so.[5]
- The driver will usually be included on a CD if manual installation is necessary. Insert the CD and follow the prompts that appear to install the driver.
- If this doesn’t solve the issue, you can try repairing the USB flash drive itself.


Advertisement
Add New Question
-
Question
How do I attach a Sony Camera battery card to a mini Lenovo laptop?
I think you mean a memory card, which has your photos on it. If the mini laptop has a card reader built in, the Sony SD card will go into that slot. If it does not have a slot for this you can use a «USB SD card reader» — you will have to buy it — it plugs into the USB port and has a slot for SD cards and micro SD cards. If you meant a battery to power a laptop that’s a fun idea, I wonder if that is possible.
-
Question
How do I attach a hard drive to my computer if it doesn’t have a USB port?
Open the computer up and then attach the HDD to the motherboard using a SATA or IDE cable (SATA is thinner than IDE). If the HDD cannot be plugged in with a SATA or IDE cable then get an adapter (IDE or SATA to USB).
Ask a Question
200 characters left
Include your email address to get a message when this question is answered.
Submit
Advertisement
Video
-
For USB-powered devices (those without a battery or power cord), you should plug them directly into your computer’s USB ports. Using these devices with a USB hub may not allow them to draw enough power.
Thanks for submitting a tip for review!
Advertisement
-
Do not remove a USB drive while data is being saved to it. This will corrupt your files and render them unusable.
Advertisement
Things You’ll Need
- USB drive
- Installation software (optional)
- USB cord
- Computer
About This Article
Thanks to all authors for creating a page that has been read 178,441 times.
Is this article up to date?
The release of Windows 11 has brought excitement among tech enthusiasts and everyday users alike. If you’re looking to install or upgrade to Windows 11, creating a bootable USB drive from an ISO file is a necessary step in the process. This article will walk you through a detailed guide on how to mount a Windows 11 ISO to a USB drive, ensuring you have all the tools and steps needed to accomplish the task efficiently.
Understanding ISO Files and Bootable USBs
Before we jump into the process, it’s essential to grasp what an ISO file is and why we need a bootable USB drive. An ISO file is a disk image that contains all the data needed to replicate the original DVDs or CDs used for software installations. It behaves as a virtual disc, collecting files and information that a computer needs to install an operating system or software program.
A bootable USB drive, on the other hand, is a USB flash drive that has been formatted and loaded with the necessary files from an ISO file, allowing your computer to read the USB and boot from it during the installation process. This method is particularly useful due to its portability and speed compared to traditional DVD installations.
Pre-requisites for Mounting Windows 11 ISO to USB
Before you start creating a bootable USB drive, ensure you have the following:
-
Windows 11 ISO File: First thing’s first, download the official Windows 11 ISO file from Microsoft’s website. You can find it in the Windows 11 download section under the Media Creation Tool or the direct link for ISO downloads.
-
USB Flash Drive: You will need a USB drive with a minimum of 8 GB of free space. Note that this process will erase all files on the USB, so back up any important data beforehand.
-
A Computer Running Windows: This task requires the use of a Windows PC.
-
Rufus or Windows Media Creation Tool: While Windows has built-in methods to create installation media, using third-party software like Rufus can provide flexibility and reliability.
Step-by-Step Guide to Mount Windows 11 ISO to USB
Step 1: Download the Windows 11 ISO File
- Go to the official Microsoft website.
- Navigate to the Windows 11 download section.
- Select either the Media Creation Tool option if you want to use that or download the ISO file directly.
- If using the direct download, select your desired edition and language, then confirm and download the ISO file.
Step 2: Prepare Your USB Drive
- Insert your USB flash drive into your computer.
- Open File Explorer and locate your USB drive. Note the drive letter (like E: or F:).
- Backup any valuable data from this drive, as the formatting process will erase everything on it.
Step 3: Download and Install Rufus (Optional)
If you choose to use Rufus, follow these steps to download and install it:
- Visit the Rufus download page: https://rufus.ie/.
- Download the latest version of the executable file.
- Open the downloaded file. There’s no installation required, as Rufus runs as a portable application.
Step 4: Create Bootable USB Using the Windows Media Creation Tool
If you opt to use the Windows Media Creation Tool, here’s how to go about it:
-
Open the Media Creation Tool:
- Double-click the downloaded MediaCreationTool.exe file.
-
Accept License Terms:
- Review and accept the Microsoft Software License Terms to continue.
-
Choose Your Action:
- Select «Create installation media (USB flash drive, DVD, or ISO file) for another PC.»
-
Configure Language and Edition:
- Select language, edition, and architecture (32-bit or 64-bit) based on your needs. You can follow the recommended options or customize them.
-
Select USB Drive:
- Choose «USB flash drive» from the selection options.
-
Choose the USB Drive:
- Select your USB drive from the list (make sure it’s the correct one, as it will be formatted).
-
Create the USB Drive:
- Click «Next,» and the tool will download Windows 11 and create a bootable USB drive. This process may take time, depending on your internet speed and PC performance.
Step 5: Create Bootable USB Using Rufus
If you prefer Rufus over the Media Creation Tool, follow these steps:
-
Open Rufus:
- Launch the Rufus application you downloaded.
-
Select Your USB Device:
- Under the “Device” section, choose your USB drive from the dropdown menu.
-
Select ISO File:
- Click on the “Select” button next to the “Boot selection” section, then navigate to where you saved the Windows 11 ISO file. Choose the file and click «Open.»
-
Partition Scheme:
- Choose the partition scheme. Most modern computers use UEFI, so select “GPT.” If your computer uses Legacy BIOS, opt for «MBR.»
-
File System:
- Set the file system to “FAT32” for compatibility or “NTFS” for larger files (FAT32 has a 4GB file size limit).
-
Volume Label:
- You can name your USB drive in the «Volume Label» field, although it’s optional.
-
Start the Process:
- Click “Start” to begin the process. A warning message will appear stating that all data will be destroyed on the USB drive. Ensure that you have selected the correct drive, then click «OK.»
-
Wait for Completion:
- Rufus will now create the bootable USB drive, which might take several minutes depending on your USB drive speed and computer performance.
Step 6: Boot From the USB Drive
Once the bootable USB drive is ready, follow these steps to boot from it:
-
Restart Your Computer:
- Leave the USB drive inserted and restart your computer.
-
Access BIOS/UEFI Settings:
- As your computer starts, press the designated key to enter the BIOS/UEFI settings (common keys include F2, F12, DEL, or ESC; this varies by manufacturer).
-
Change Boot Order:
- Locate the boot order settings and set your USB drive as the primary boot device. This ensures that your computer attempts to boot from the USB first.
-
Save Settings and Exit:
- Save your changes and exit the BIOS. Your computer should now boot from the USB drive.
Step 7: Install Windows 11
Now that you’re booted from the USB drive, follow these steps to install Windows 11:
-
Start the Installation:
- The Windows 11 setup will begin. Select your language, time, and keyboard preference, and click “Next.”
-
Click Install Now:
- On the next screen, click the “Install now” button to continue.
-
Enter Product Key:
- If prompted, enter your Windows 11 product key. If you are upgrading from a previous version of Windows, you may be able to skip this step.
-
Select Installation Type:
- Choose “Custom: Install Windows only (advanced)” for a clean installation or “Upgrade: Install Windows and keep files, settings, and applications” if you want to keep your personal files.
-
Partition Selection:
- Select the drive where you want to install Windows 11. If the disk contains previous Windows installations, you may format or delete these partitions as needed.
-
Begin Installation:
- Click “Next,” and Windows will start the installation process, which could take some time. The installation may involve several restarts.
-
Follow On-Screen Instructions:
- Follow the prompts to set up your Windows 11 installation. This includes setting up region, keyboard layout, and user account preferences.
Troubleshooting Common Issues
While the process to mount Windows 11 ISO to a USB is straightforward, various issues can arise. Here are some common problems and solutions:
-
USB Not Recognized:
- Ensure that the USB drive is properly connected. Try different USB ports. If still unrecognized, consider formatting the USB or using a different flash drive.
-
Installation Errors:
- If the installation fails, check for compatibility issues or corruption in the ISO file. Make sure your system meets the minimum requirements for Windows 11.
-
Boot Issues:
- If the computer doesn’t boot from the USB drive, double-check that the boot order is set correctly in BIOS/UEFI. Ensure the USB drive is created properly and is functional.
Conclusion
Creating a bootable USB drive from a Windows 11 ISO file is a critical step for upgrading or installing the latest Windows operating system on your machine. Following the outlined steps will assist you in efficiently completing the task, with options for both Windows Media Creation Tool and Rufus.
By preparing your USB drive and knowing how to boot from it to install Windows 11, you can enjoy the new features and enhancements that come with the latest version of Microsoft’s operating system. Should you run into any issues during the process, refer to the troubleshooting section for guidance. Happy computing with your fresh installation of Windows 11!
This post shows students and new users steps to mount and unmount a removable USB or thumb drive in the Windows Systems for Linux (WSL) environment. Windows 11 allows users to mount removable drives with ease. Simply insert a removable drive, and Windows will recognize and mount it.
However, when running WSL, mounting removable drives inside the WSL environment isn’t that easy.
Windows Subsystem for Linux allows you to mount drives manually using the mount command. WSL will automatically mount all fixed NTFS drives. So, if you have internal fixed C: and E: drives, you’ll see them mounted at /mnt/c and /mnt/e in your WSL environment.
You’ll have to mount external, removable drives in WSL manually. Davis also allows you to mount external drives like USBs, CDs, and DVDs. These devices must be formatted using a Windows file system like NTFS or FAT.
Similarly to internal drives, external drives will remain accessible in Windows 11 when mounted within the Windows Subsystem for the Linux environment.
Below is how one can mount an external drive in a WSL environment.
How to mount an external drive in WSL
As mentioned above, one can mount external drives like USB, CD, and other devices in Windows System for Linux.
For example, if you have an external drive attached to your Windows 11 computer using the drive letter F: you can mount it in WSL using the commands below.
sudo mkdir /mnt/f
sudo mount -t drvfs F: /mnt/f
You can now access the drive content in Linux at the mount point /mnt/f.
To unmount the drive, simply run the commands below.
sudo umount /mnt/f/
That should do it!
Conclusion:
- Mounting external drives in the WSL environment provides easy access to USBs, CDs, and other removable devices.
- The mount command is required for external drives, while internal drives are automatically mounted in WSL.
- Using drive letters, like F:, allows you to specify which external drive to mount.
- Unmounting is straightforward with the
umountcommand. - Following these steps ensures seamless integration of WSL with your Windows file systems.
Readers help support Windows Report. We may get a commission if you buy through our links.
Read our disclosure page to find out how can you help Windows Report sustain the editorial team. Read more
Have you ever tried to plug in your external USB drive to your computer, but it’s not mounting in Windows?
This can be problematic, especially when you urgently need the files saved in the drive or your drive is the only tool you have to save your files for use elsewhere.
The first instinct would be to unplug and plug it back through another port. However, if this doesn’t resolve the issue, then either your external USB drive has a problem, and if not, there are various solutions you can use to resolve it. Keep reading to find out!
What can I do if USB drive is not mounting in Windows 10?
Before we head to the slightly complex solutions, try these quick ones:
- Restart the computer.
- Unplug any USB hub connected to your computer and remove other devices.
- Check for any pending updates from Windows Update.
- If the external USB drive has a power switch, power it on.
- Try your external USB drive on a different computer. If it still isn’t working, then the drive has a problem.
- Sometimes Windows may ask you to format the external USB drive. Don’t do it yet because you may lose all your files. It is possible your drive was formatted on a different operating system, so you can either read it on a different OS or choose a third-party program to help you read its contents. Otherwise, if you don’t need the files, choose Format disk and proceed.
If none work, head to the fixes listed next.
1. Scan for hardware changes
- Right-click the Start button.
- Select Run.
- Type devmgmt.msc.
- The Device Manager will open, then select the USB entry.
- Go to the Action tab, and select Scan for hardware changes.


If this still doesn’t resolve the issue with your external USB drive, then the next solution.
2. Uninstall and reconnect the external USB drive
- Right-click the Start button and select Device Manager.
- Select Disk Drives.
- Right click on the problematic external USB drive, and click Uninstall device.
- Unplug the external USB drive, then wait for about a minute and reconnect it again.

Once you do the above, the drive should load automatically. To be sure it has been recognized, go to Windows/File Explorer and check for it.
3. Reinstall USB controllers
- Right-click the Start button.
- Select Device Manager.
- Find Universal Serial Bus controllers and click to expand it.
- Right-click on the device.
- Click Uninstall device.
- Rinse and repeat for all other problematic devices.
- Reboot your computer.

Once you do the above, the drive should load automatically.
4. Disable USB selective suspend
- Click on the battery icon from the taskbar and select Power and sleep settings.
- Click on Additional Power settings.
- Next to your current power plan, choose Change plan settings.

- Click on Change Advanced Power Settings.
- A pop up will appear.
- Find USB settings, and expand it.
- Expand USB Selective Suspend.
- Click on the drop down menu, and choose Disabled.

- Click Apply, then OK.


Ensure you have a system restore point created first, and if these solutions do not yield any results, remember to restore your old settings back.
- Fix: PRIMARY_TRANSPORT_CONNECT_FAILED Error
- ERROR_IO_PRIVILEGE_FAILED: How to Fix
- How to Fix MFReadWrite.dll is Missing on Windows N
- DWMAPI.DLL Missing/Loading Errors – Fix-it Guide
5. Update the drivers
- Right-click the Start button.
- Choose Control Panel.
- Under Hardware and Sounds, click View Devices and Printers.
- Your computer will start scanning for available devices.
- Check for any entry on any Unidentified USB device or Unknown Device.
- Open the Properties of the unknown or unidentified external USB drive.

- Update the driver if there’s an update available.

6. Prevent computer from turning off device
- Right-click the Start button.
- Select Device Manager.
- Click on Universal Serial Bus Controllers to expand the list.
- Select the USB Root Hub for your drive.
- Right-click and select Properties.
- A popup box will appear. Navigate to the Power Management tab.
- Uncheck the Allow the computer to turn off this device to save power option, and click OK.

In case the USB drive is still not mounting in Windows 10, head to the next method.
7. Update the USB drive drivers
- Right click Start button
- Select Device Manager
- Click on Universal Serial Bus Controllers to expand the list
- See whether there are any devices with either a yellow exclamation mark, question mark, down-arrow mark, or an error notification or code.
- If the driver has a yellow exclamation mark on it, double-click on it, then open Properties
- Under Drivers tab, choose Update Driver, and follow the on-screen instructions to complete the process.

Perhaps your computer cannot identify or see the external USB drive, but it is visible on other computers. This indicates that something is wrong with your USB drive drivers. In this case, updating the drivers will do the trick.
And if the USB drive was not mounting earlier, it should be listed both under the Device Manager and File Explorer now.
Hope these solutions worked. But let us know your experience.
Milan Stanojevic
Windows Toubleshooting Expert
Milan has been enthusiastic about technology ever since his childhood days, and this led him to take interest in all PC-related technologies. He’s a PC enthusiast and he spends most of his time learning about computers and technology.
Before joining WindowsReport, he worked as a front-end web developer. Now, he’s one of the Troubleshooting experts in our worldwide team, specializing in Windows errors & software issues.