
Как сжать Windows 10 и освободить место. Самый удобный аудио- и видеотранскодер под Windows, Mac и Linux. Аналог GitHub для внутреннего использования
Как сжать Windows 10
В июле 2016 года Microsoft выпустила для Windows 10 новый механизм компрессии Compact OS для утилиты командной строки compact.exe, которая сжимает файлы операционной системы непосредственно во время её работы. У нового механизма компрессии есть много других интересных функций, но в целом он похож на работу программы WIMBoot в Windows 8.1 Update 1.
Compact OS освобождает минимум 2 ГБ места на диске. Не так уж и много, но на небольших SSD-накопителях это заметно.
Программа работает из командной строки с привилегиями администратора. Это значит, что после запуска cmd.exe следует нажать комбинацию клавиш Ctrl+Shift+Enter.
Перед началом сжатия Windows 10 есть смысл узнать, принесёт ли эта процедура результат, отличный от нулевого. Возможно, система уже находится в сжатом состоянии, так что дополнительных процедур не требуется. Чтобы определить текущее состояние бинарников ОС, запускаем следующую команду:
- compact.exe /q

Команда покажет информацию о текущем состоянии: сколько файлов сжато или не сжато, уровень компрессии, сколько конкретно байт находится в контейнере сжатых файлов. Если уровень компрессии близок к 1.0, то использование программы будет эффективно.
В определённых условиях система в сжатом состоянии может немного снизить производительность, но на большинстве компьютеров это будет незаметно. Имейте в виду, что всегда есть возможность вернуть файлы в обычное состояние, если заметите какие-то проблемы с производительностью. В любом случае, перед сжатием системных файлов рекомендуется сделать резервную копию.
Для проведения процедуры нужно запустить следующую команду:
- compact.exe /CompactOS:always

Сжатие всех файлов должно занять несколько минут, хотя на некоторых системах может занять 20 или более минут. На последнем Insider Build освобождается более 2 ГБ.
Для возвращения системы в исходное состояние:
- compact.exe /CompactOS:never
Обратная процедура происходит несколько быстрее.
Удобная и бесплатная программа, которая конвертирует аудио- и видеофайлы в разные форматы
Есть несколько программ, которые соответствуют главным требованиям:
- открытые исходники;
- бесплатное использование;
- поддержка многих форматов файлов;
- кроссплатформенность;
- легковесность.
Пожалуй, самыми удобными из них являются две: Handbrake и ffmpeg (например, с графическим интерфейсом WinFF). Конвертировать файлы умеет, например, и популярный свободный видеоплеер VLC, но всё-таки в большинстве случаев удобнее использовать специализированную программу.
Handbrake работает под Windows, Mac и Linux. Последней версией под Windows на данный момент является 0.10.5.
В качестве исходного материала принимается практически любой мультимедийный файл (или папка с файлами), диск DVD или BlueRay, если там нет защиты от копирования.
Форматы целевого файла
- Контейнеры: .MP4(.M4V) и .MKV
- Видеокодеры: H.265 (x265 и QuickSync), H.264 (x264 и QuickSync), H.265 MPEG-4 и MPEG-2, VP8, Theora
- Аудиокодеры: AAC / HE-AAC, MP3, Flac, AC3, Vorbis
- Сквозная передача аудио: AC-3, E-AC3, DTS, DTS-HD, TrueHD, AAC, треки MP3
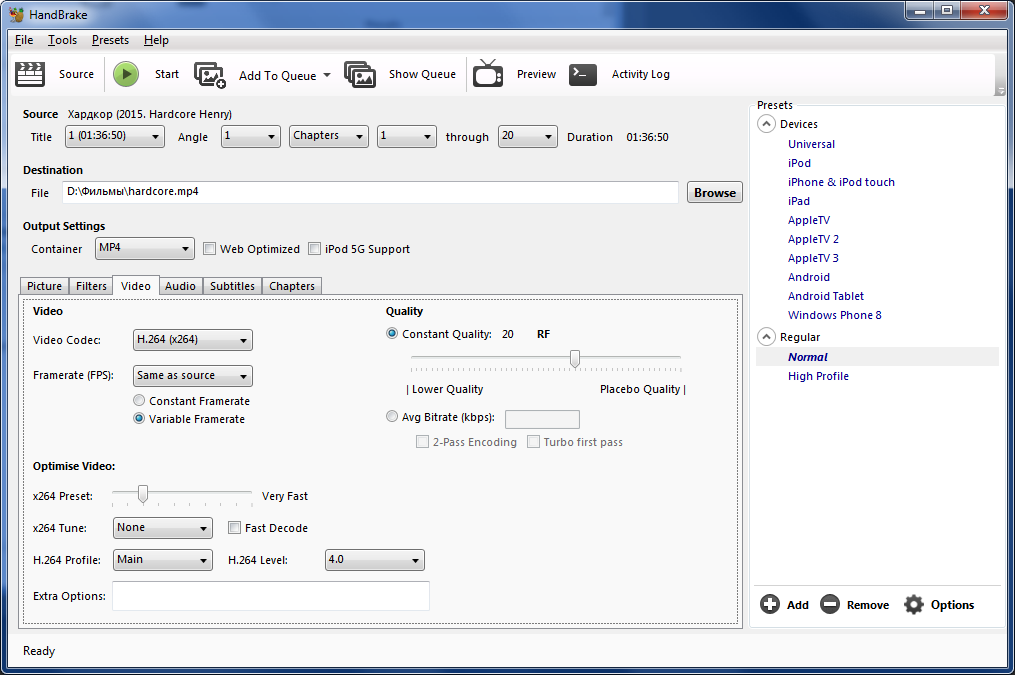
Программу удобно использовать, чтобы перекодировать DVD или скачанный файл для просмотра на другом устройстве, кроме ПК. В Handbrake встроены профили кодирования для следующих устройств:
- iPod
- iPhone и iPod touch
- iPad
- AppleTV
- AppleTV 2
- AppleTV 3
- Android
- Android Tablet
- Windows Phone 8
В программе множество дополнительных функций.
- Выбор фрагментов (частей исходного файла для кодирования)
- Пакетная обработка и очередь запросов
- Маркеры глав
- Субтитры (VobSub, Closed Captions CEA-608, SSA, SRT)
- Постоянный битрейт или постоянное качество (переменный битрейт)
- Поддержка VFR, CFR и VFR
- Видеофильтры при транскодировании: Deinterlacing, Decomb, Denoise, Detelecine, Deblock, Grayscale, Cropping, Scaling
- Предварительный просмотр в реальном времени
Бóльшая часть исходного кода Handbrake распространяется под свободной лицензией GNU GPL, version 2. Отдельные части — под BSD 3 Clause.
Похожую функциональность обеспечивает ещё одна свободная программа WinFF, которая как будто ориентирована на пользователей Linux (см. список дистрибутивов), хотя есть версии под Windows от Windows 95 до Windows 8. Для неё разработаны интерфейсы на русском, украинском и многих других языках.

Какой выбрать бесплатный VPN
Для анонимной работы в интернете и обхода государственной цензуры (блокировка сайтов) удобно использовать бесплатный VPN. Одним из самых популярных вариантов является FreeOpenVPN (через клиентское приложение OpenVPN).
Кстати, 31 июля 2016 года вышел Kaspersky Internet Security 2017 (популярный в России антивирус), в состав которого включён VPN-клиент. В бесплатном режиме он работает только через сервера в России и позволяет передавать 200 МБ в сутки. Конечно, это довольно убогое предложение, но если у вас уже установлен KIS 2017, то такой вариант следует иметь в виду. Только пользователям KIS не следует активировать функцию платного VPN в программе, потому что существует множество бесплатных альтернатив.
Альтернатива GitHub для собственного хостинга
Отличный выбор для self-hosted GitHub — GitLab. Совместная разработка в собственном рабочем коллективе, на собственном сервере. Поддерживается система контроля версий Git, SSH-доступ, разграничение прав доступа, пулл-реквесты, работа с тикетами (открытие, комментирование, закрытие), поиск и т.д. Отличный веб-интерфейс, через который осуществляется администрирование репозиториев.
Демо

GitLab — разумное предложение для компаний, которые не хотят выкладывать исходный код в открытый доступ в процессе разработки.
Windows 11/10 includes a new feature called Compact OS. Using the built-in compact.exe tool, you can reduce the size of the operating system & run it from compressed files, similar to WIMBoot. This post discusses the Compact OS feature in Windows 11/10 and tells you how to compress the OS files to save precious hard disk space.
Before talking about the compact feature in Windows 11/10, let’s take a quick look at the WIMBoot feature in Windows 8.1. The feature was brought in Windows 8.1 to let users save space on devices with lower memory. Windows 8.1, as such, takes about 9GB. If users implement WIMBoot, the device space occupied shrinks to 3GB.
WIMBoot stands for Windows Image Boot. Instead of decompressing all the operating system files, it decompresses files as and when required and then again compresses them back to the INSTALL.WIM. The Install.wim file is about 3GB and allows plenty of storage space. Using this method, you don’t need a recovery file as the WIMBoot file (Install.wim) is used for restructuring the operating system when needed.
The WIMBoot feature discussed above is brought to Windows 11/10 with some modifications. The best part is that with Windows 10, you do not need a separate recovery file for a System Reset. Thus, around 6GB of space is released for your apps and software.
The OS files are there, and you will see that the operating system creates restore points at regular intervals or before downloading Windows 10 updates. The system restores points that take up space.
Windows 11/10 will take around 3 GB of space if compacted. Let’s say 1GB is allocated to System Restore. That way, the operating system will take up a little more space. It is good that Windows 10 allows you to set up how much storage you wish to set apart for System Restore. Thus if compact Windows 10 takes up 3GB and you’ve set up 1GB for system restore, the total space occupied by the OS would be 4GB + space for the Page file.
You can set up the page file to be constant using System > Advanced Properties so that you know exactly how much space the OS uses.
Then there are Windows Updates installed regularly that will take up space. Thus, 4GB for OS with restore points and page files combined and another one or two GB for updates. Even with that, you are saving approx. 4 GB with the compact OS in Windows 10 – including page files, system restore points, and Windows updates.
Related read: System Compression & how Windows 11/10 saves space on devices.
Reduce Windows 11/10 OS size
You can compact the Windows 11/10 OS while installing it or even after you have installed it. There are plenty of methods to compact Windows 11/10. I am mentioning the two easiest methods below.
Using DISM command
This command will help you compact the OS even when installing it. First, format the hard disk and partition it as you want. Then apply the image file using the DISM command:
DISM.exe /Apply-Image /ImageFile: Install.WIM /Index: 1 /ApplyDir: C:\ /COMPACT:ON
Once the image is applied to the C drive, you use the BCDBOOT command to specify the bootable partition:
BCDBOOT C:\WINDOWS
When done, reboot the computer to compact the OS.
How to use compact.exe tool?
You can use the Compact.exe command if you have already installed Windows 11/10 on your computer. To enable Windows system compression, type the following command:
Compact /CompactOS: Always
This tool ensures that the compact OS installs the operating system files as compressed files. Compact OS is supported on both UEFI-based and BIOS-based devices. Windows updates can replace or remove individual files as needed to help maintain the drive footprint size over time.
You can query whether the operating system is running Compact OS, and change it at any time by running Compact.exe /CompactOS:Query /WinDir:E:\Windows on Terminal.
How to turn off the Compact OS feature in Windows 11/10
You can use the Compact command to turn off the compact feature until you need it again. Use the following syntax:
Compact /CompactOS: Never
The Compact OS feature in Windows 11/10 is easy, as you can see. When you run the COMPACT command, it might take up to 20-30 minutes to compress or decompress the files.
That said, if you face hurdles with hardware not compatible with the Compact OS, it’s best first to disable the feature and restore the image from the old backup. Make sure the snapshot is not of the compact OS but one without it.
For more information – such as using the Compact feature in scripts, visit TechNet and MSDN.
Read next: CompactGUI will compress installed Programs and save Disk Space on Windows 11/10.
Вы тут: Главная → Windows → Compact OS: как сжать системные файлы Windows 10 и сэкономить несколько гигабайт
SSD уже стали обычным делом, и борьба за скорость загрузки отошла на второй план, а на первый вышла схватка за след системы на диске. Microsoft представила сжатие системных файлов в Windows 8.1 Update, и в Windows 10 идея получила интересное развитие.
В прошлой статье я ведь не случайно рассказывал, как правильно измерить место на диске 
[+] Сегодня в большой программе
История вопроса
Давайте посмотрим, что происходило с размером Windows в последнее десятилетие.
Windows Vista
В 2006 году Windows переходит на новую компонентную систему обслуживания, а развертывание ОС происходит путем применения к диску файлов из образа install.wim.
WIM — новый формат, поддерживающий несжатое состояние и два типа сжатия. Благодаря файловому формату, систему можно распаковать в папку, применить обновления и захватить обратно в сжатый WIM-образ.
Windows 7
Система уверенно набирает популярность, и папка WinSxS становится объектом пристального внимания пограничных служб диска Цэ. У них обретают актуальность различные средства кастрации, но в массы это варварство не идет.

Впрочем, появляются и более осмысленные руководства, освобождающие место на диске средствами ОС за счет сжатия:
- всего диска путем установки флажка в его свойствах
- только системных файлов утилитой compact.exe
В усилиях энтузиастов все неплохо кроме одного – работа сжатой Windows не поддерживается.
Сама Microsoft рассуждает на тему производительности сжатия NTFS в KB251186, относящейся к диапазону Windows 2000 — Windows 7. А в KB307987 замораживает на отметке Windows XP явные инструкции по установке сжимающего флажка в свойствах диска. Я также помню, что Джозеф Конвей, сотрудник Microsoft и источник ТЗ по CBS, писал в форуме TechNet или своем блоге, что сжатие папки Windows не поддерживается.
Windows 8 — сжатие NTFS
Windows теперь должна работать и на планшетах, а у них с дисковым пространством негусто. В Windows 8 под пресс сжатия NTFS ложатся отключенные компоненты, манифесты и предыдущие версии системных файлов, замененные обновлениями Windows Update, но необходимые для отката (остальные удаляются).
Увеличить рисунок
В Windows 8.1 добавляется /ResetBase, но он фактически удаляет уже сжатое. Внезапно, уже после выхода Windows 8.1 RTM, Microsoft привносит в утилиту очистки диска Windows 7 возможности удаления старых версий файлов, но без /ResetBase и без сжатия.
Windows 8.1 — разностное сжатие
В первой статье про очистку папки WinSxS я упоминаю разностное сжатие (delta compression), но технические подробности остаются тайной за семью печатями. Спустя полгода в блоге Ask the Core Team появляется серия статей, которая наконец-то срывает покровы с изменений в системе обслуживания Windows 8.1.
Вместо отдельного рассказа я ограничился обновлением уже опубликованной записи блога (анонса не было, так что рекомендую к прочтению).
Внедрив разностное сжатие в Windows 8.1, Microsoft переносит его задним числом в Windows 8, выпуская обновление стека обслуживания KB2821895.
Заметьте, что текущие версии файлов ОС остаются в несжатом виде, т.е. Microsoft все еще не поддерживает сжатие Windows официально.
Windows 8.1 Update — WimBoot
Наконец, в Windows 8.1 Update на свет появляется WimBoot. Эта технология, видимо, родилась в рамках программы под кодовым названием «усилие 116» — 1GB RAM + 16GB SSD. На столь крохотном диске планшета наряду с ОС приходилось размещать образ восстановления, что не оставляло места под пользовательские файлы.
В конфигурации WimBoot ОС запускается и работает, используя файлы из сжатого образа восстановления, чему способствует небольшой набор служебных файлов-указателей на разделе с Windows.
Таким образом, в Windows 8.1 Update впервые стала официально поддерживаться работа сжатой Windows.
Задолго до официального выхода Windows 10 в блоге Windows появился на редкость расплывчатый пост об оптимизации дискового пространства новой ОС. В нем декларировались интересные улучшения, но технические подробности отсутствовали. Их и сейчас немного, впрочем.
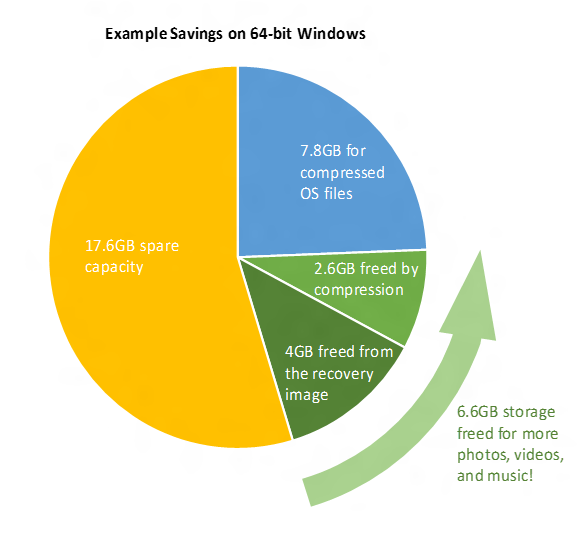
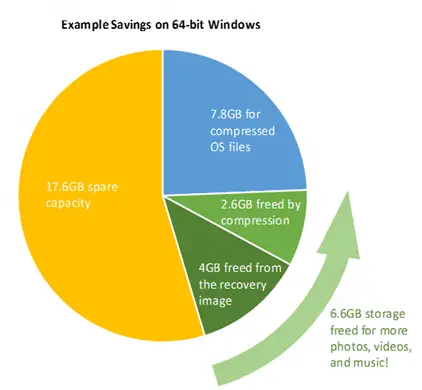
На картинке два направления экономии:
- 4-12GB благодаря отказу от образа восстановления (на практике и больше бывает)
- 2.6GB за счет сжатия (в х86 – 1.5GB)
Про восстановление будет следующая статья серии, а сейчас речь пойдет о механизме сжатия системных файлов под названием Compact OS .
Как выяснить статус сжатия
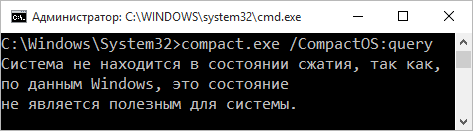
Windows может автоматически применять сжатие, поэтому для начала проверьте текущее состояние системы командой:
compact.exe /CompactOS:query
Наряду со статусом, в результатах также отображается рекомендация – сжимать или не сжимать.
Как выполнить сжатие
Перейти к работе с компактной ОС можно массой различных способов.
В работающей системе
Пожалуйста, сначала проверьте текущее состояние↑ и, если ОС не сжата, измерьте дисковое пространство и сообщите в комментариях подробности1
В командной строке от имени администратора:
compact.exe /CompactOS:always
Заметьте, что точкой входа в новую технологию стала хорошо знакомая утилита compact.exe! Выполнение команды займет некоторое время.
Отмена сжатия реализована так же просто:
compact.exe /CompactOS:never
В момент установки или обновления
Недавно я рассказывал про новый ключ программы установки /Compat для проверки ПК на совместимость с Windows 10. Еще одной новинкой стал ключ /Compact OS:
setup /CompactOS enable
С помощью файла ответов
И у файла ответов есть новый параметр Compact.
Microsoft-Windows-Setup\ImageInstall\OSImage\Compact
В MSDN есть интересное примечание, что установку необходимо запускать из среды Windows 10 или ее версии Windows PE (в более старые PE можно вручную добавить драйвер). Вероятно, это также применимо к ключу /Compact OS программы установки.
В момент применения образа в среде Windows PE
У DISM тоже появился новый ключ /Compact.
DISM.EXE /Apply-Image /ImageFile:INSTALL.WIM /Index:1 /ApplyDir:C:\ /Compact:ON
В MDT и ConfigMgr
Смотрите тут.
Как работает и сколько экономит сжатие
Подробной документации я не нашел, поэтому свожу в одну статью все известные мне сведения на данный момент.
Какое сжатие применяется
Для компрессии отдельных файлов утилита compact.exe может использовать разные алгоритмы сжатия (по умолчанию — 4K XPRESS, см. справку к утилите). Такие файлы получают атрибут «Сжатый» и отображаются в проводнике синим цветом, как и в случае сжатия NTFS (алгоритм LZNT1). Можно подумать, что при сжатии ОС утилита точно так же проходит по всем системным файлам, которые имеет смысл сжимать. Однако Compact OS работает иначе.
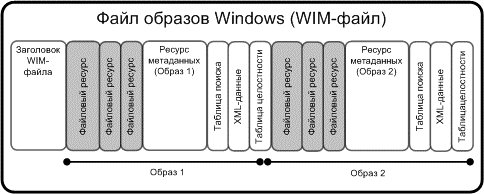
Compact OS – это эволюция технологии WimBoot. Подлежащие оптимизации файлы помещаются в скрытый контейнер (фактически WIM-файл) и сжимаются.
С точки зрения компрессии, Compact OS аналогична образу WimBoot или любому образу WIM с обычным сжатием, поскольку во всех этих случаях применяется алгоритм 4K XPRESS Huffman (для максимального сжатия WIM задействуют LZX).
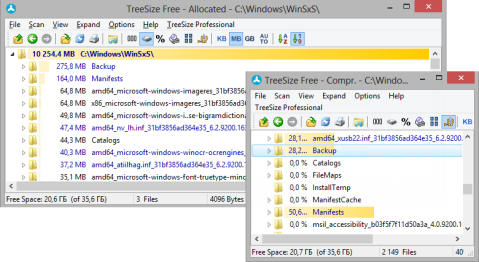
Поэтому, в отличие от сжатия NTFS, файлы Compact OS не получают атрибут «Сжатый» и не помечаются другим цветом в проводнике или сторонних программах. Любопытно, что утилита TreeSize все-таки подсвечивает синим папки, в которых файлы подверглись сжатию.
Что именно сжимается
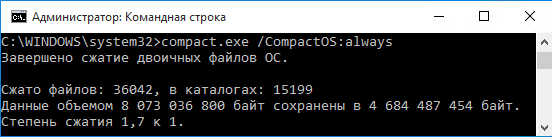
Отчет о сжатии выглядит примерно так.
Completed Compressing OS binaries.
37953 files within 17349 directories were compressed.
6 670 708 067 total bytes of data are stored in 3 953 427 362 bytes.
The compression ratio is 1,7 to 1.
Сжимаются файлы в папках Windows и Program Files, а также магазинные приложения. Системные файлы обеспечивают львиную долю сэкономленного места. Это хорошо видно из отчета DISM о хранилище компонентов.
Dism.exe /Online /Cleanup-Image /AnalyzeComponentStore
Ниже сведения из чистой установке Windows 10 Pro x64 RU. Напоминаю, что реальный размер хранилища складывается из первых трех строк таблицы.
| Аспект | До сжатия | После сжатия | Экономия |
|---|---|---|---|
| Общие с Windows файлы | 5.24GB | 3.12GB | 2.12GB (40%) |
|
Резервные копии Отключенные компоненты |
1.61GB | 1.02GB | 0.59GB (37%) |
| Кэш и временные файлы | 0.19GB | 0.19GB | — |
| Реальный размер хранилища | 7.05GB | 4.34GB | 2.71GB (38%) |
| Занятое место на всем диске | 13.50GB | 10.65GB | 2.85GB (21%) |
Общая экономия в гигабайтах вполне совпадает с цифрами из официального блога, но еще лучше она выглядит в процентном отношении.
Сравнение подходов к уменьшению следа системы на диске
Технология WimBoot позволяла без проблем установить Windows на планшет с 16GB, и у пользователя даже оставалось место для файлов. Однако была одна неприятная проблема. С каждой порцией установленных обновлений образ WimBoot становился все дальше и дальше от текущего состояния операционной системы, постепенно превращаясь в мертвый груз.
Compact OS предлагает более сбалансированный подход к экономии дискового пространства.
| Аспект |
Обычная установка |
WimBoot |
Compact OS |
|---|---|---|---|
|
Алгоритм сжатия |
Нет |
4K XPRESS Huffman |
4K XPRESS Huffman |
|
Исходная экономия дискового пространства |
Нет |
Высокая |
Умеренная |
|
Увеличение размера ОС со временем |
Минимальное |
Значительное |
Минимальное |
Вопросы и ответы
Я постарался предвосхитить ваши основные вопросы.
На каких типах устройств работает Compact OS?
Поддерживаются устройства с UEFI и BIOS.
Как Windows определяет, дает ли сжатие преимущество конкретному ПК?
Точно неизвестно. В блоге Windows на первые два места поставили объем RAM и скорость CPU. Емкость диска не упоминали, но очевидно, что технология ориентирована в первую очередь на маленькие диски.
Предположу, что сжатие не выполняется автоматически и не предлагается на системах с емкостью физического диска (а не системного раздела) свыше 128GB. Надеюсь, ваши отчеты в комментариях помогут прояснить расклад.
Upd. 19-Nov-15. Отчеты читателей не опровергли мое предположение, но и не позволили вывести некую формулу зависимости сжатия от размера жесткого диска. Однако читатель Максим Донников установил, что если система не использует сжатие, но сообщает, что может перейти в сжатое состояние при необходимости, то компрессия автоматически выполняется в фоне спустя некоторое время после того, как на диске образуется недостаток свободного пространства.
Как сжатие влияет на производительность? Есть ли противопоказания?
В блоге Windows расплывчатые формулировки сводятся к «все ОК», но они относятся к ситуациям, когда сжатие без вашего вмешательства реализует изготовитель ПК или сама Windows.
Я не рекомендую применять Compact OS:
- Жестких дисках. Целевым устройством Compact OS является ПК с маленьким твердотельным накопителем. На современных жестких дисках нет проблем со свободным пространством, если только не стрелять себе в ногу. WimBoot в Windows 8.1 не поддерживалась на жестких дисках именно ввиду их недостаточной производительности. Официально Compact OS в Windows 10 годится для любых накопителей, но Microsoft советует применять ее только на SSD. У них высокая скорость последовательных трансферов, поэтому влияние на скорость запуска ОС и программ минимально.
- ПК с зашифрованным системным диском (BitLocker). Шифрование само по себе снижает производительность, и дополнительное сжатие может только ухудшить ситуацию. Microsoft советовала избегать шифрования на системах с WimBoot, и я не вижу причин к отмене этой рекомендации для Compact OS.
Очевидно, я рассматриваю ситуацию с точки зрения оптимальной производительности в условиях значительной нагрузки на диск. Я уверен, что найдется масса людей, которые сожмут ОС на HDD или SSD с BitLocker и не заметят никаких замедлений.
Почему разжимается намного меньше файлов, чем сжимается?
Если сразу после сжатия вернуться к исходному состоянию, будет примерно такая картина
23256 files within 17349 directories were uncompressed.
По сравнению с отчетом о сжатии 2 папок обработано столько же, а файлов разжато в примерно в 1.5 раза меньше, чем сжималось ранее.
Точной причины такого поведения я не знаю. Возможно, в отчет сжатия попадают все обработанные файлы, в т.ч. с фактором 1:1, а при декомпрессии они не считаются разжатыми.
Как сочетается Compact OS и сжатие компонентов в папке WinSxS?
Технологии работают параллельно. Состояние Compact OS вы можете контролировать сами, а разностное сжатие компонентов выполняется без вашего участия и необратимо.
Продолжение следует…
Литература
В процессе подготовки статьи мне пригодились следующие материалы:
- How Windows 10 achieves its compact footprint (блог Windows)
- Windows 10: Reducing the disk footprint (Michael Niehaus, Microsoft)
- Compact OS, single-instancing, and image optimization (MSDN)
- Push-button reset frequently-asked questions (FAQ) (MSDN)
- [MS-XCA]: Xpress Compression Algorithm — Microsoft
- Windows Image File Boot (WIMBoot) Overview
(TechNet)
Дискуссия
Сокращение размеров и стоимости ПК ставит перед создателями Windows интересные задачи, и они не только придумывают решения, но и продолжают совершенствовать их. K еще одной стороне технологии Compact OS я вернусь чуть позже, а в следующей статье я расскажу, что еще изобрели разработчики для уменьшения следа системы на диске.
Однако в контексте дискового пространства далеко не все ПО Microsoft находится на одном уровне технологического развития. Так, Microsoft Office в этом плане выглядит неутешительно – у традиционного пакета стали нормой ежемесячные обновления весом в 500-600MB, оседающие в папке Installer, а обновления Office 2016 Click-to-Run могут отъедать гигабайты в папке ProgramData.
В комментариях напишите:
- исходный статус сжатия Windows 10
- модель устройства, емкость диска, марку CPU и объем RAM
- способ текущей установки Windows 10 (обновление / чистая)
- объем освободившегося дискового пространства после сжатия
You are here:
Home » Windows 10 » How To Compress Windows 10 Installation Files & Folders
If your Windows 10 drive is running low on disk space, there are plenty of ways to free up some valuable space on the drive. The best way is to run a junk cleaning software like CCleaner (if not done already), and uninstall unwanted software. If that’s not possible, extend your system partition size.
If you have tried all other possible options to free up the disk space, you can consider the compress OS feature in Windows 10 to free up a considerable amount of space. It will compress all the files and folders that are part of the operating system. And unlike the NTFS compression (which has been part of all recent versions of Windows), this compress OS feature will not degrade your system performance.
By compressing the operating system, you can free up around 2 GB of free space. The compress OS is instructed first with Windows 10 and is not present in its predecessors.
WARNING: Although the method is safe, we recommend you create an image backup of Windows 10 just in case if something goes wrong.
Method 1 of 2
Compress Windows 10 OS to free up disk space
Step 1: Open Command Prompt as administrator. To do so, type CMD in Start menu search box, right-click on Command Prompt in search results and then click Run as administrator option.

You can also right-click on the Start button and then click Command Prompt (admin) to open elevated Command Prompt.
Click Yes button when you see the User Account Control dialog.
Step 2: Before actually beginning to compress the operating system, it’s a good idea to check the status of the compact state. In the elevated Command Prompt, type the following command and press Enter key to know the status of the compact state.
compact /compactos:query


The message “The system is not in the compact state because Windows has determined that it is not beneficial for this system” indicates that Windows 10 is not compressed using the compact OS feature. The tool is showing “not beneficial for this system” likely because Windows 10 was installed on a large drive.
And if the compact state is enabled, you will get “The system is in the compact state. It will remain in this state unless an administrator changes it” message.
Step 3: To compress your Windows 10 OS, type the following command, and press Enter key.
compact /compactos:always


Depending on the size of the data on drive where Windows 10 is installed and your PC’s hardware configuration, Windows might take up to an hour to complete the job. Once done, check the drive properties to know how much space you gained by compressing Windows 10 OS.
You should be able to free up at least 2 GB of free space by compressing the Windows 10 operating system.
Uncompress Windows 10 install
To turn off compact state feature and uncompress Windows 10, execute the following command.
compact /compactos:never

Method 2 of 2
Compress Windows 10 using the NTFS compression method
As mentioned before, compressing operating system files might degrade Windows 10 performance. If possible, we suggest you avoid compressing Windows 10 install and use other ways out there to free up some space on the system drive.
Please note that this NTFS file compression feature is available only if the drive where Windows 10 is installed is using NTFS instead of other file systems. To check the file system type, right-click on the drive, and then click properties.
NOTE: It’s hard to tell the exact amount of space you will gain by compressing your Windows 10 install files and folders. On our Windows 10 Pro (x64), we managed to free up a little more than 1.5 GB of space. Depending on the total size of the data on the drive, you might be able to free up less or more.
To compress
Step 1: Open up File Explorer, right-click on the drive where Windows 10 is installed (usually “C” drive), and then click Properties option.

Step 2: Under the General tab, check the box labeled Compress this drive to save disk space, and then click Apply button.

Step 3: When you see the following confirmation dialog, make sure that the select option labeled Apply changes to drive, subfolders, and files before clicking the OK button.
Depending on the total size of the data on the drive, Windows 10 might take a couple of minutes to hours to complete the compression.

Once the compression is done, all files and folders on your Windows 10 drive will have blue icons, as shown below. These icons also appear on files and folders on the desktop.
To uncompress Windows 10 install drive
Step 1: Right-click on the drive where Window 10 is installed and then click Properties to open drive’s properties dialog.
Step 2: Under the General tab, deselect the option labeled Compress this drive to save disk space and then click Apply button.
Step 3: When you see the following confirmation dialog, click the OK button.
In my previous post, I talked about the size of Windows 10. (And yes, it’s slowly getting bigger.) But if you wanted to make a smaller image, how much smaller is even possible? Let’s see if we can find out.
As I mentioned, the size of Windows 10 Enterprise exported from the Windows 10 20H2 business ISO is 4.67GB:

So that’s the starting point. The first exercise is to prove that deploying that OS to a virtual machine, sysprepping it, and then capturing a new image — without changing anything — doesn’t result in a significant change of size. To do that “sanity test,” I’ll use an MDT task sequence. (I ran into a bug in MDT while doing this, so check out this post if you haven’t already.)

So the end result isn’t awful:

The image got a little bigger, which can probably be attributed to event log growth, but that’s quite reasonable (for now at least). Now let’s see if we can make it smaller.
Removing in-box apps
There are lots of people that don’t like the in-box apps anyway. (Personally, I like Calculator, but can’t say that I use too many of the others.) So, let’s remove as many of them as we can. Some are used as part of the operating system so they can’t be removed, but for simplicity let’s remove the rest using a trivial script added to the MDT task sequence:

The end result of that shows 40 apps (installed per-user) remain, along with zero provisioning apps (which doesn’t include the “hidden” system ones that you can’t touch, most of which correspond to those 40 per-user apps). How much disk space is freed up by that process?

Disappointingly, only about 34MB.
Removing optional features and capabilities
I’ve never understood why Windows 10 has both “Windows capabilities” (features on demand) and “Windows optional features.” But regardless, let’s try to remove all of those to see if it makes any difference. Again, that can be done with a pretty simple script (with the try/catch logic needed to handle the terminating error that you get when trying to remove a capability that can’t be removed):

The “Exit 3010” didn’t work either as the device didn’t restart until it found pending file rename operations later. So add a restart computer step after removing the features.
The result of this extra script:

Well, that only made a 15MB difference. Why so little? A couple of reasons:
- There aren’t many features on demand installed by default, so not much to remove there.
- You can’t actually remove optional features, you can just turn them off.
That second point is worth discussing a little more. Yes, there is a “-Remove” switch on the Disable-WindowsOptionalFeature cmdlet (and the corresponding DISM command line), but it doesn’t actually do anything. It used to, but starting with Windows 10 it no longer does.
To see what I mean, run the “Get-WindowsOptionalFeature -online” command after you’ve disabled all the features with the -Remove switch and rebooted (i.e. after capturing the image, let it go back through the specialization process and sign on as the local Administrator account). If the payload was actually removed, the “State” value for the feature should be “DisabledWithPayloadRemoved.” But there will be only one feature set that way, .NET Framework 3, because Windows 10 ships with that one removed. All the other “removed” features are only now “disabled.” Why? That’s tied to a little note that you can find on this doc page:
“Beginning with Windows 10, the payload is not removed from Windows client SKUs in order to support push-button reset. The payload is removed from Windows Server SKUs.”
Also note that Windows will put some of the features back automatically (e.g. some of the language components), so capture quickly before that happens (or build your image with no internet connection).
One final note: This will also remove (well, disable) Paint, Notepad, and WordPad, so it’s probably not something you want to do for a “real” system without adding some filtering.
Windows Update cleanup
This is a tough one. If you don’t download the latest ISO from Microsoft every month, you might just let the task sequence install the latest cumulative update. That’s easy to do by enabling at least one of the “Windows Update” steps in the task sequence:

But guess what? That makes the image bigger — very much bigger:

That’s a 2.4GB increase in size, caused by the doubling of a significant percentage of the Windows components in the OS: before applying the patch, there was one version; after the patch, there were two. Obviously there is some more cleanup needed any time you apply a patch to your image. So, let’s enable that by adding a new step to the task sequence to run DISM to get rid of the old versions, followed by another reboot:

You need to specify “/Cleanup-Image /StartComponentCleanup” to reduce from “many” versions to two versions (typically the original plus the latest patched version) and “/ResetBase” to get down to one version (just the latest patched version). So will that be good enough to reduce the size back to what it was before patching?

Not quite, still 700MB bigger than the smallest WIM I managed to create. A quick (and sadly, manual) comparison of the two points out some differences:
- More of the in-box app files disappeared. This is likely a result of some background cleanup operation having time to finish (during the servicing and cleanup operations), so I didn’t really get rid of all the app files in my initial attempt. But that means the growth issue is actually worse than it appears.
- Silverlight was installed. That’s likely a side effect of the MDT “install updates” task installing any available update. If you don’t want Silverlight, it would probably be best to exclude that explicitly (or use WSUS where that wouldn’t be approved).
- The servicing process added a whole bunch of files in \windows\servicing\LCU and \windows\servicing\packages, along with the expected changes in \windows\winsxs. It also added a bunch of empty folders in \windows\winsxs\temp\inflight, but those shouldn’t take up much space.
- Flash was removed — but still exists in the \windows\winsxs folder structure (because you might want to put it back?).
- Delivery Optimization cached some stuff (probably the WU downloads).
- There were random changes due to Windows Search, Defender, Edge updates, OneDrive updates, etc.
So what did this prove? Well, just that there’s a certain amount of folly in trying to shrink Windows, because even after all of your efforts, you might find them all wiped out by the installation of an update.
But let’s ignore the futility of the exercise for now and see what else we might be able to clean up.
Automating disk cleanup
There is a built-in tool in Windows to clean up the disk, called Disk Cleanup. It runs CLEANMGR.EXE to do its thing. You can automate it (see my separate blog on that one) and add it to the task sequence:

Did it result in a reduced image size? No, in fact the image got a little bigger:

See this blog for more details.
Exclude Silverlight
Since I didn’t really want Silverlight, let’s go ahead and prevent it from being installed by adding an entry to CustomSettings.ini:
You can see that KB identifier in the BDD.LOG:

Also notice that the Defender definition update is failing with an 80070643 error code — repeatedly, with the ZTIWindowsUpdate script rebooting and trying again several times until it finally gives up. See my separate blog that has a workaround for that one.
Excluding Silverlight, the result gets slightly better:

A failed attempt at clearing the event logs
I tried one more thing that didn’t work at all: clearing all the event logs. I figured that they contained at least some events from the original image creation process and my imaging build task sequence, so maybe it could free up a little space. I used this PowerShell command manually to clear the event logs:
Get-WinEvent -ListLog * -Force | % { Wevtutil.exe cl $_.LogName }
But weirdly enough, that caused the amount of disk space used to grow, not shrink. I have no idea how that’s possible, but I gave up on this idea pretty quickly.
Excluding more stuff
MDT uses a template “wimscript.ini” file to exclude things that shouldn’t be captured:

That could conceivably be tweaked to exclude additional files. (And yes, there are plenty of garbage entries in there, which aren’t really worth going into, as well as some MDT-specific items.). But what else should be excluded, without causing any issues with the OS further down the line? That’s where things can get more interesting.
First, you need to know what’s included. The easiest way to figure that out is to dump a directory list to a text file:
Then you can open that in Notepad or Visual Studio Code to easily see what’s there. There are only 210,000 or so files in the OS, how hard can it be to scan through them looking for patterns of extra stuff? Ugh. By my quick scan, there were some .log files, but those are dangerous to broadly remove. The only ones I thought were less important were *.etl files. Outside of that, it would be necessary to explicitly remove individual files using their full path, and that’s a major hassle.
I did notice in the DISM documentation that there are also options to not compress certain file types, i.e. those that are already compressed (since the compression at best wastes time and at worst increases the file size), but those options aren’t in MDT’s wimscript.ini template. In addition to the four noted in the docs (.mp3, .zip., .cab, .pnf), I added a few more common ones (.wim, .png, .jpg).
The net result is this modified wimscript.ini file (located in the Tools\<platform> folders on your MDT deployment shares), with the new files added:

But is it enough to make a difference? It made a difference, sure, but not a good one: the resulting WIM grew by about 107MB. That’s probably because of the compression entries — the files may not compress very well, but they do probably still compress some.
So I removed those entries and tried again. And guess what? It was still bigger.

Like I said before, futility. There is enough randomness in the process that I could probably run the same task sequence five times and get five different sized WIMs. They would all behave the same (I wouldn’t expect the differences in size to have any real impact on the operation of the OS), but each would have a slightly different set of extra garbage.
Finally
So what did we learn from this process? Well, for one thing, Microsoft does a pretty good job of keeping the Windows 10 media size small — you’d be hard-pressed to make it any smaller yourself. But that’s a direct result of how Windows was designed. While the OS might be fully modular with components that can be assembled in different ways to create the individual Windows SKUs (client and server), that modularity really only benefits Microsoft. You can’t “compose” your own OS in any meaningful way. Sure, you can add some optional components and/or features on demand, and you can remove things that aren’t truly part of the OS anyway (e.g. non-system UWP apps), but that’s it.
Maybe at some point in the future we can get an OS that is truly modular. Imagine being able to build an OS where you say “I don’t want any 32-bit app support” and therefore you have no WoW subsystem at all. Or where you can remove drivers that you don’t need. Or features that you don’t use.
For those of you who are familiar with Linux, you’re probably already recognized that this is something that it can already do. You can start off with a very small OS and add packages to it, or with a large OS and subtract packages from it. So you can end up with an OS as small as a few hundred megabytes or one larger than any Windows 10 installation would be (before adding apps).
It will be quite interesting to see if Windows 10x does anything to help with this. Perhaps because the first version isn’t expected to run Win32 apps, it will start off smaller than Windows 10. But will it stay that way? Will it be more modular? Time will tell.