
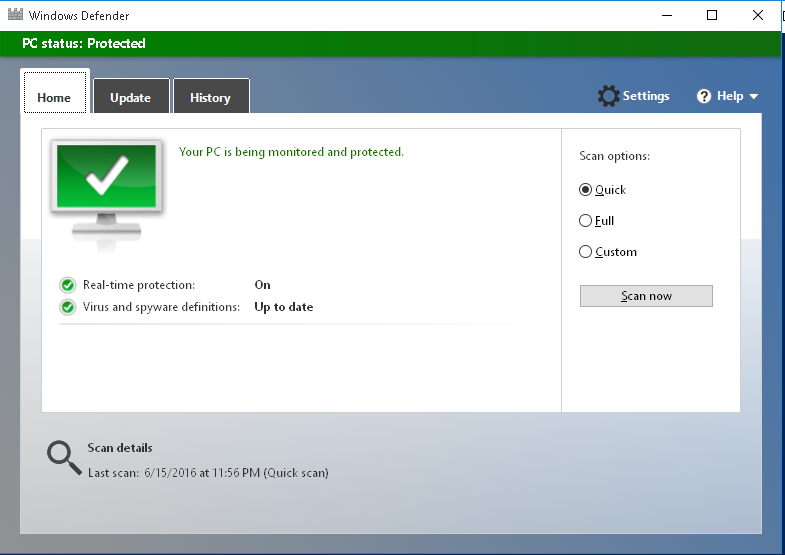
Windows Defender впервые появился как антивирусная утилита от MS еще в Windows XP, и начиная с Windows Vista он постоянно присутствует в операционных системах Windows в качестве встроенного средства защиты от зловредов. В Windows 8 Defender был объединен с другим антивирусным продуктом — Microsoft Security Essentials, так что на данный момент он является полноценным антивирусным решением.
Windows Defender достаточно производителен и не требователен к системным ресурсам, он может быть использован не только на домашних компьютерах, но и в сети небольших организаций. Антивирус можно обновлять как с сайтов Microsoft, так и с внутреннего WSUS сервера. Однако, основным плюсом Windows Defender является тот факт, что он уже предустановлен и активен в Windows, и практически не требует ручной донастройки.
Совет. На данный момент Windows Defender является частью системы только на пользовательских ОС, и не доступен в Windows Server. Однако в предрелизе Windows Server 2016, Windows Defender может быть установлен как отдельный компонент сервера командой:
Install-WindowsFeature-Name Windows-Server-Antimalware
В большинство случае Windows Defender хорошо работает и со стандартными настройками, но в случае необходимости их можно изменить. Большое количество настроек Defender можно изменить через PowerShell с помощью специального модуля Defender. Впервые он появился в PowerShell 4.0 и разработан специально для управления Windows Defender. Этот модуль содержит 11 командлетов.
Полный список командлетов модуля можно вывести с помощью команды:
Get-Command -Module Defender

- Add-MpPreferenc
- Get-MpComputerStatus
- Get-MpPreference
- Get-MpThreat
- Get-MpThreatCatalog
- Get-MpThreatDetection
- Remove-MpPreference
- Remove-MpThreat
- Set-MpPreference
- Start-MpScan
- Update-MpSignature
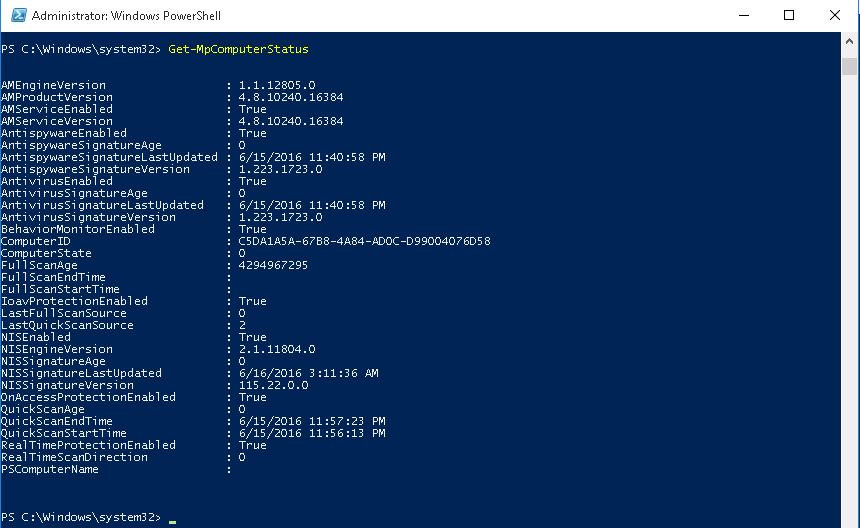
Get-MpComputerStatus – позволяет вывести текущий статус (включенные опции, дату и версию антивирусных баз, время последнего сканирования и т.д.)
Вывести текущие настройки Defender может командлет Get-MpPreference, чтобы их изменить используется — Set-MpPreference.
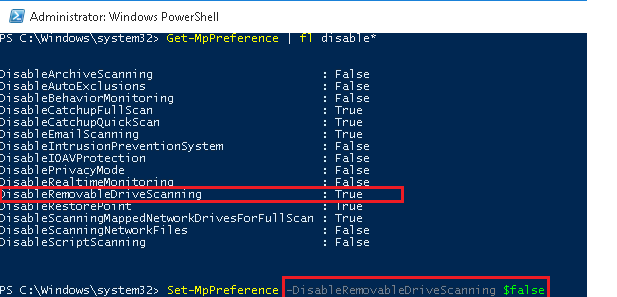
Например, нам требуется включить сканирование внешних USB накопителей. Получим текущие настройки командой:
Get-MpPreference | fl disable*
Как вы видит сканирование USB накопителей отключено (DisableRemovableDriveScanning = True). Включим сканирование командой:
Set-MpPreference -DisableRemovableDriveScanning $false
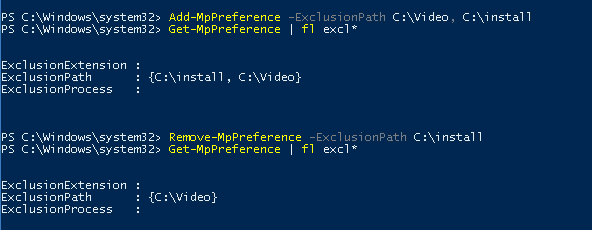
Также, чтобы изменить настройки антивируса можно использовать командлеты Add-MpPreference и Remove-MpPreference. Например, добавим несколько папок в список исключений антивируса (сканирование в них не будет выполняться):
Add-MpPreference -ExclusionPath C:\Video, C:\install
Полный список исключений Windows Defender можно вывести так:
Get-MpPreference | fl excl*
Удалим конкретную папку из списка исключений:
Remove-MpPreference -ExclusionPath C:\install
Для обновления антивирусных сигнатур в базе используется команда Update-MpSignature. С помощью аргумента UpdateSource можно указать источник обновлений.
Возможны следующие источники обновлений:
- MicrosoftUpdateServer – сервера обновлений MS в интернете
- MMPC — Microsoft Malware Protection Center
- FileShares – сетевая папка
- InternalDefinitionUpdateServer — внутренний WSUS сервер
Для обновления из сетевой папки нужно предварительно скачать файлы с сигнатурами баз с сайта https://www.microsoft.com/security/portal/definitions/adl.aspx и поместить в сетевой каталог. Чтобы обновить базы Defender из сетевого каталога, нужно задать его UNC путь:
Set-MpPreference -SignatureDefinitionUpdateFileSharesSources \\FileShare1\Updates
Запустим обновление:
Update-MpSignature -UpdateSource FileShares
Update-MpSignature

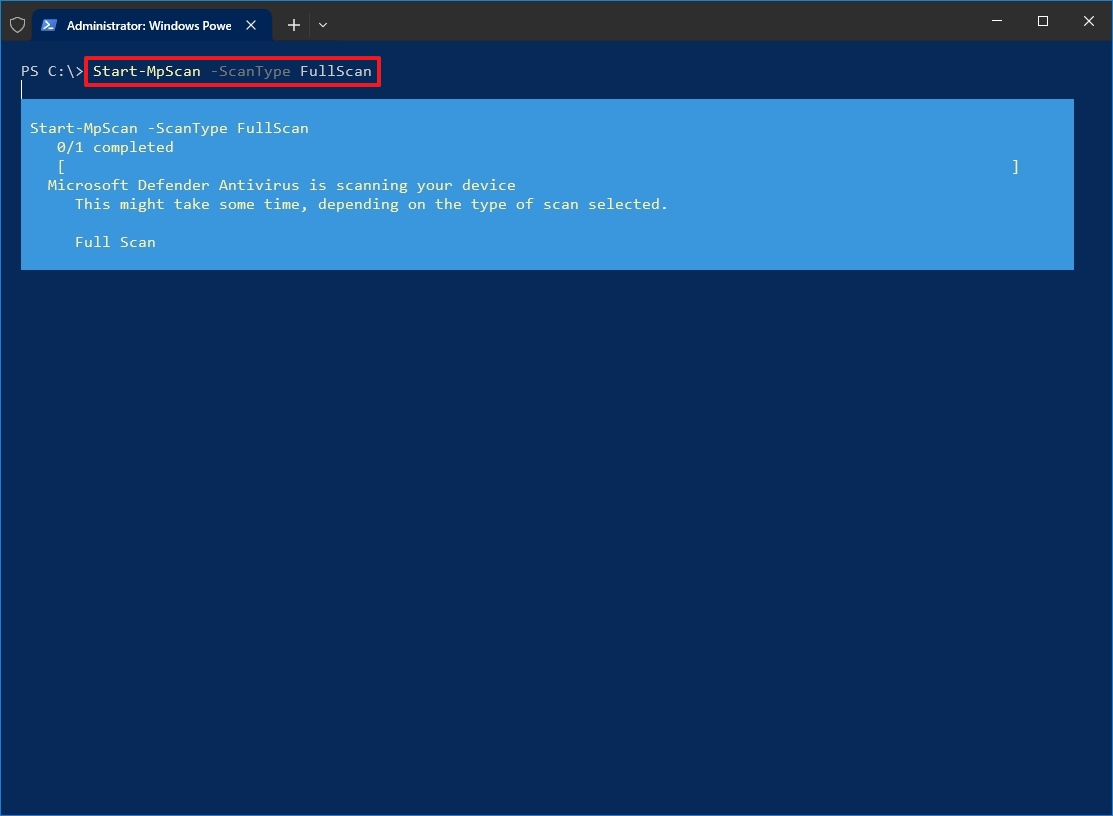
Выполнить сканирование системы можно с помощью командлета Start-MpScan. Аргумент ScanType позволяет указать один из трех режимов сканирования.
- FullScan – полное сканирование всех файлов на компьютере, в том числе реестра и запушенных программ
- QuickScan – быстрый анализ наиболее частых мест, которые могут быть инфицированы
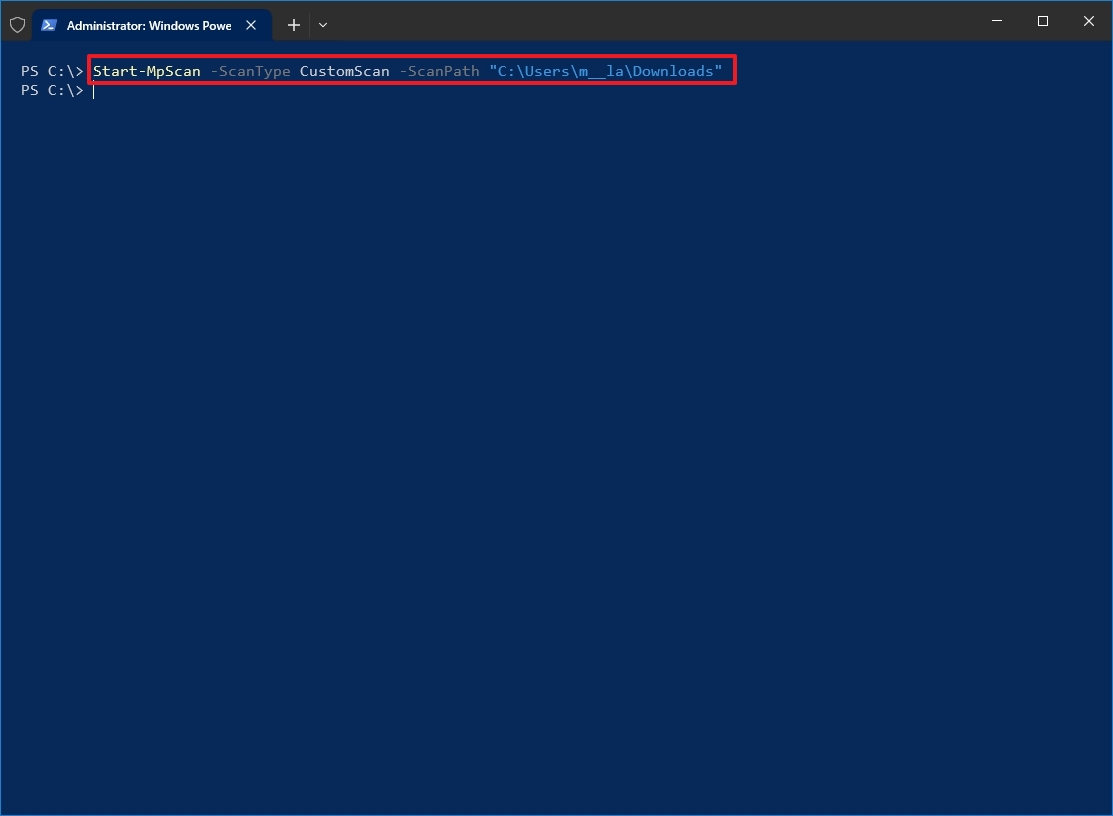
- CustomScan – пользователь сам может указать диски и папки для сканирования.
Например, чтобы просканировать каталог “C:\Program Files”:
Start-MpScan -ScanType CustomScan -ScanPath ”C:\Program Files”
Все командлеты модуля Defender могут быть использованы для управления как локальным, так и удаленным компьютером. Для подключения к удаленному компьютеру нужно использовать опцию CimSession. Например, чтобы получить время последнего сканирования на удаленном компьютере с именем msk-wks-1, запустите такую команду (WimRM на удаленном ПК должен быть включен):
$session = NewCimSession -ComputerName msk-wks-1
Get-MpComputerStatus -CimSession $session | fl fullscan*
Если нужно отключить защиту Defender в реальном времени:
Set-MpPreference -DisableRealtimeMonitoring $true
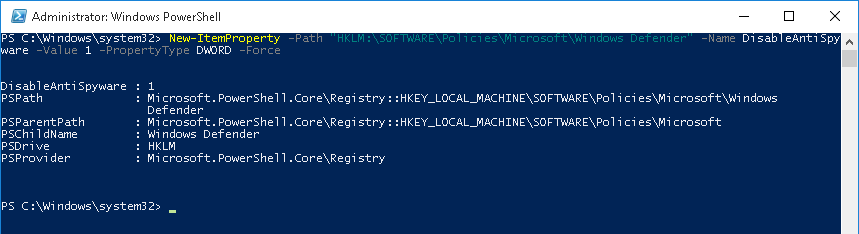
Полностью отключить Windows Defender на компьютере можно, добавив в реестр ключ с помощью команды PowerShell:
New-ItemProperty -Path “HKLM:\SOFTWARE\Policies\Microsoft\Windows Defender” -Name DisableAntiSpyware -Value 1 -PropertyType DWORD -Force
Microsoft has invested heavily in Microsoft Defender Antivirus (known as Windows Defender) over the years to reduce the attack surface on the Windows environment against viruses and spyware, and ransomware.
There are multiple ways of managing Windows Defender, such as PowerShell, GPO, UI…etc. In this post, the focus is on managing Windows Defender by using PowerShell. Seems good… so let’s start.
Table of Contents
How to Get Windows Defender Realtime Protection Status using PowerShell
To get Windows Defender’s real-time protection status using PowerShell, you need to:
- Open Windows PowerShell, and make sure you start PowerShell as Administrator.
- Type the following PowerShell line
Get-MpComputerStatus | select RealTimeProtectionEnabledThe output shows the status of Windows Defender.

How to get The Defender Status on a Remote Machine using WMI.
To get Windows Defender status on a remote machine, you can use WMI:
- Open Windows PowerShell, and make sure you start PowerShell as Administrator.
- Type the following PowerShell line
Get-CimInstance -ComputerName MyRemoteServer -Query 'Select * from MSFT_MPComputerStatus' -Namespace 'root\Microsoft\Windows\Defender' | Select RealTimeProtectionEnabled,PSComputerNameThe result shows the current Windows Defender status on the remote server.

All the Windows Defender WMI classes are located under Root\Microsoft\Windows\Defender namespace.
Disable Windows Defender Using PowerShell.
To turn off or disable Windows Defender using PowerShell, start with the following.
- Open Windows PowerShell, and make sure you start PowerShell as Administrator.
- Type the following PowerShell line
Set-MpPreference -DisableRealtimeMonitoring $trueNo result appears after the execution, but you can confirm that Windows Defender is disabled by running the PowerShell line.
Get-MpPreference | Select-Object DisableRealtimeMonitoringThe Return of the line above will be $True

Enable Windows Defender Using PowerShell
To turn on or Enable Windows Defender using PowerShell, start with the following.
- Open Windows PowerShell, and make sure you start PowerShell as Administrator.
- Type the following PowerShell line.
set-MpPreference -DisableRealtimeMonitoring $FalseThere will be no result return, but you can confirm that settings are disabled by running the following cmdlet.
Get-MpPreference | Select-Object DisableRealtimeMonitoringThe return of the command line should be $False

Updating Windows Defender Definitions
Get the Definition Date and Age
Windows Defender requires an internet connection to get the latest signature and antivirus database as with any security solution. So let’s see how to update the definitions online.
Its possible to download the definitions as an offline package, but to utilize the best protection and AI integration with Microsoft cloud, its highly recommended to keep ensure your computer is connected to the internet.
First, let’s get the details of the current definition.
Get-MpComputerStatus | Select-Object *LastUpdated,*SignatureAge
Using Get-MpComputerStatus lists all the computer protection details, such as last scan time, the scanned score, real-time protection status, etc. But to get the result related to the signature info, use the Select-Object
Look at the dates as it gives the last time the update was completed. Also, the AntispywareSignatureAge, AntivirusSignatureAge, and NISSignatureAge represent the gap between today and the last successful update. So this is a pretty old definition and should be updated as soon as possible.
Its also possible to get the protection details on a remote computer using the following line
Invoke-Command -ScriptBlock {Get-MpComputerStatus} -ComputerName Your_Remote_ServerUpdate The Signature Definitions Using PowerShell.
To Update the signature definition using PowerShell.
- Open Windows PowerShell, and make sure you start PowerShell as Administrator.
- In the prompt, type
Update-MpSignature
PowerShell will connect to the Microsoft update repo and get the latest definitions. This might take a while and during this process, there is no activity on the screen. It’s not stuck. This is normal.

If the computer is not connected to the internet, you can download an offline copy of the definition from microsoft website
You might see a quick progress bar, but it depends on the internet connection speed.

If the computer is connected to the internet, the Antivirus engine gets its update. There will be no output from the console unless the -Verbose parameter is enabled. The console will return.
VERBOSE: Virus and spyware definitions update was completed successfully.
If the computer is not connected to the internet and PowerShell cannot complete the update, the following error is returned, and you need to get the offline package from the Microsoft website.
Update-MpSignature : Virus and spyware definitions update was completed with errors.

How to Update Windows Defender on a Remote Machine using PowerShell
To update windows defender on a remote machine using PowerShell, do the following steps:
- Open Windows PowerShell, and make sure to start it as Run As Administrator
- Type the command
Update-MPSignature -CimSessionRemoteMahcineName

How to Start Windows Defender Scan using PowerShell
Before starting the scanning, you need to know the three scanning types available.
- FullScan: Scan the computer for any threat.
- QuickScan: Scan System directories, Memory, and common locations.
- CustomScan: Require to set the
ScanPathparameter and type the path to scan
Once you know which scan type is needed, follow the steps below to start the scan you need:
- Open Windows PowerShell, and make sure you start PowerShell as Administrator.
- Type the following PowerShell line.
#Start Full Scan
Start-MpScan -ScanType FullScan
#Scan Quick Scan
Start-MpScan -ScanType QuickScan
#Scan Custom Scan
Start-MpScan -ScanType CustomScan -ScanPath C:\windows
How to Find the Detected Threat and remove them using PowerShell
To know the history of detected threats using PowerShell:
- Open Windows PowerShell, and make sure you Run as Administrator.
- Use the command
Get-MpThreat

If you want to test your antivirus functionality and confirm that its able to do a basic detection, then download the Eicar virus test file
To remove the detected threat, follow these steps:
- Open Windows PowerShell, and make sure you Run As Administrator
- Type the following command
Remove-MpThreat - The command has no return unless the
-Verboseparameter is set
How to Get all Windows Defender Configuration using PowerShell
To get all the configuration using PowerShell, use the following cmdlet Get-MpPreference.
Take a small break and go through them. You can google any unclear value. But do not worry, as I will take you through some examples and show you how to change these values.
AllowNetworkProtectionOnWinServer             : False
AttackSurfaceReductionOnlyExclusions          :
AttackSurfaceReductionRules_Actions           :
AttackSurfaceReductionRules_Ids               :
CheckForSignaturesBeforeRunningScan           : False
CloudBlockLevel                               : 0
CloudExtendedTimeout                          : 0
ComputerID                                    : 91244B04-B3E5-47DA-AAC2-064CF85D0A1D
ControlledFolderAccessAllowedApplications     :
ControlledFolderAccessProtectedFolders        :
DisableArchiveScanning                        : False
DisableAutoExclusions                         : False
DisableBehaviorMonitoring                     : False
DisableBlockAtFirstSeen                       : False
DisableCatchupFullScan                        : True
DisableCatchupQuickScan                       : True
DisableCpuThrottleOnIdleScans                 : True
DisableDatagramProcessing                     : False
DisableEmailScanning                          : True
DisableIntrusionPreventionSystem              :
DisableIOAVProtection                         : False
DisablePrivacyMode                            : False
DisableRealtimeMonitoring                     : False
DisableRemovableDriveScanning                 : True
DisableRestorePoint                           : True
DisableScanningMappedNetworkDrivesForFullScan : True
DisableScanningNetworkFiles                   : False
DisableScriptScanning                         : False
EnableControlledFolderAccess                  : 0
EnableFileHashComputation                     : False
EnableFullScanOnBatteryPower                  : False
EnableLowCpuPriority                          : False
EnableNetworkProtection                       : 0
ExclusionExtension                            :
ExclusionIpAddress                            :
ExclusionPath                                 :
ExclusionProcess                              :
ForceUseProxyOnly                             : False
HighThreatDefaultAction                       : 0
LowThreatDefaultAction                        : 0
MAPSReporting                                 : 2
MeteredConnectionUpdates                      : False
ModerateThreatDefaultAction                   : 0
ProxyBypass                                   :
ProxyPacUrl                                   :
ProxyServer                                   :
PUAProtection                                 : 0
QuarantinePurgeItemsAfterDelay                : 90
RandomizeScheduleTaskTimes                    : True
RealTimeScanDirection                         : 0
RemediationScheduleDay                        : 0
RemediationScheduleTime                       : 02:00:00
ReportingAdditionalActionTimeOut              : 10080
ReportingCriticalFailureTimeOut               : 10080
ReportingNonCriticalTimeOut                   : 1440
ScanAvgCPULoadFactor                          : 50
ScanOnlyIfIdleEnabled                         : True
ScanParameters                                : 1
ScanPurgeItemsAfterDelay                      : 15
ScanScheduleDay                               : 0
ScanScheduleQuickScanTime                     : 00:00:00
ScanScheduleTime                              : 02:00:00
SevereThreatDefaultAction                     : 0
SharedSignaturesPath                          :
SignatureAuGracePeriod                        : 0
SignatureBlobFileSharesSources                :
SignatureBlobUpdateInterval                   : 60
SignatureDefinitionUpdateFileSharesSources    :
SignatureDisableUpdateOnStartupWithoutEngine  : False
SignatureFallbackOrder                        : MicrosoftUpdateServer|MMPC
SignatureFirstAuGracePeriod                   : 120
SignatureScheduleDay                          : 8
SignatureScheduleTime                         : 01:45:00
SignatureUpdateCatchupInterval                : 1
SignatureUpdateInterval                       : 0
SubmitSamplesConsent                          : 1
ThreatIDDefaultAction_Actions                 :
ThreatIDDefaultAction_Ids                     :
UILockdown                                    : False
UnknownThreatDefaultAction                    : 0
PSComputerName                                :
How to Disable or Enable Windows Defender Archive (Compressed file) Scanning.
- Open Windows PowerShell (Run As Administrator)
- Use the
Set-MpPreferencewith DisableArchiveScanning as a parameter- $True: means disable the archive scanning
- $False: means don’t disable the archive scanning
So the full command looks like this:
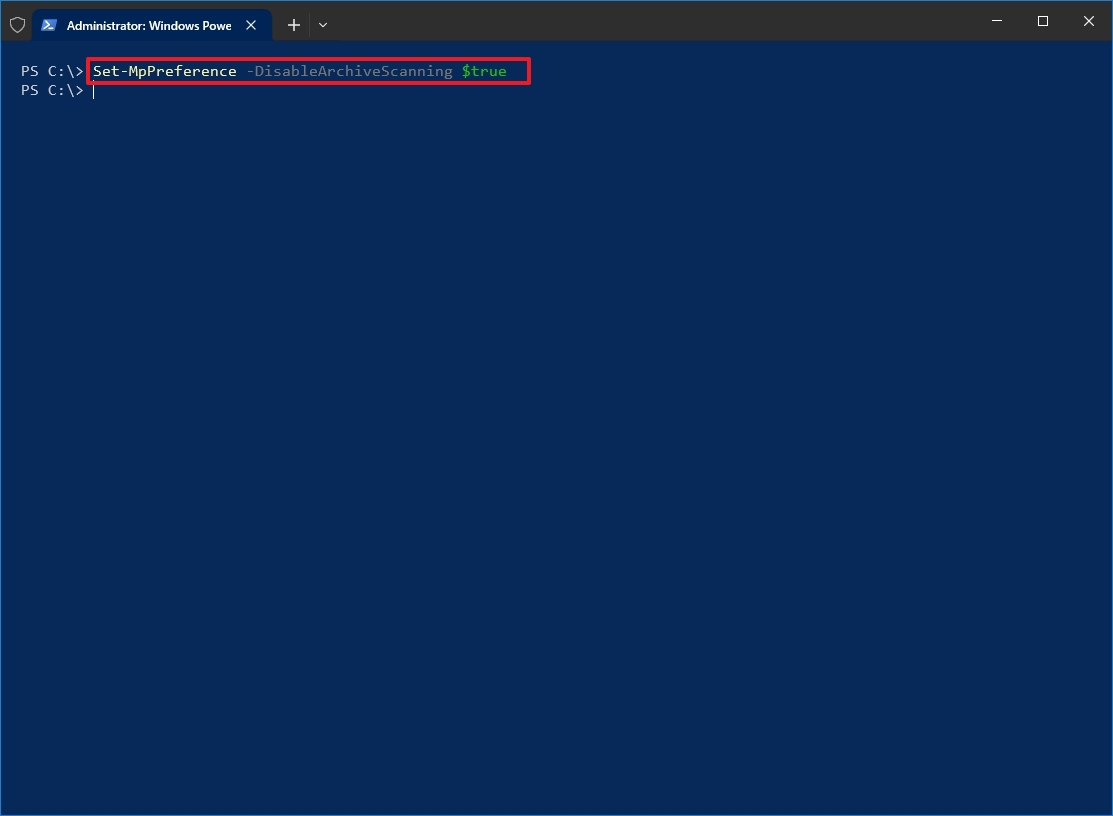
Set-MpPreference -DisableArchiveScanning $trueTo confirm the change, you can run the
Get-MpPreference
How to Disable or Enable Windows Defender Email scanning using PowerShell.
To disable or enable Windows defender email scanning for incoming and outgoing emails using PowerShell:
- Start by opening Windows PowerShell (Run As Administrator)
- Use the
Set-MpPreferencewith DisableEmailScanning as a parameter:- :$True: disable the archive scanning.
- $False: don’t disable the archive scanning.
So the full command looks like this:
Set-MpPreference -DisableEmailScanning $true
How to Exclude an Extension from Windows Defender Scanning using PowerShell
To exclude an extension from Windows Defender Scanning using PowerShell:
- Open PowerShell (Run As Administrator).
- Use the
Set-MpPreferencecmdlet with-ExclusionExtensionparameter. - You can add a single or multiple extensions separated by a comma.
So the full command looks like this:
Set-MpPreference -ExclusionExtension *.mp3,*.MP4,*.wav,*.EDBHow to Exclude a path from Windows Defender using PowerShell
You can exclude a path or multiple paths from Windows Defender scanning using Powershell using the following steps:
- Start Windows PowerShell, and make sure you Run As Administrator.
- Use the
Set-MpPreferencecmdlet with-ExclusionPathparameter. - You can add single or multiple paths separated by a comma.
So the full command looks like this:
Set-MpPreference -ExclusionPath C:\Windows,C:\UsersIf the path contain any white space, make sure to include it between quotation mark.
Set-MpPreference -ExclusionPath 'C:\123 abd\'
How to configure Windows Defender Scanning schedule using PowerShell.
The Schedule consists of three elements:
- Type of Scan (Full or Quick).
- Time To start the scan.
- Days of the week to start the scan.
These are the elements you need to understand to create the schedule, so let’s put it all into action.
To configure Windows Defender Scanning Schedule using PowerShell:
- Open PowerShell, and make sure you Run As Administrator.
- Use the
Set-MpPreferencewith theScanParameterset toFullScanorQuickScan. So the full command for a full scan looks likeSet-MpPreference -ScanParameters FullScan - Let’s configure the starting time. Note that the time is in a 24 Hours format and written as 00:00:00. For example, if the schedule should start at 10 AM, the entire command looks like this:
Set-MpPreference -ScanScheduleTime 10:00:00
Another example, If the schedule starts at 11 PM, the entire command looks like this:Set-MpPreference -ScanScheduleTime 23:00:00 - The last step is to select which day of the week to start the scan on time specified in step two. To set the day, use the parameter.
ScanScheduleDay.ScanScheduleDayaccepts the following values- 0: Everyday
- 1: Sunday
- 2: Monday
- 3: Tuesday
- 4: Wednesday
- 5: Thursday
- 6: Friday
- 7: Saturday
- 8: Never
So to enable scanning every day the full command looks like this: Set-MpPreference -ScanScheduleDay 0 or you can replace the number with the value like Set-MpPreference -ScanScheduleDay Sunday. Another example, let set the schedule every Monday and Friday, the PowerShell line looks like this:
Set-MpPreference -ScanScheduleDay Monday,Friday
So to put it all together, the following line triggers a full scan on Sunday at 11 PM
Set-MpPreference -ScanScheduleDay Everyday -ScanScheduleTime 23:00:00 -ScanParameters FullScanLimit Access to Windows Defender UI using PowerShell
To limit access to Windows defender user interface (UI) using PowerShell:
- Open Windows PowerShell, and make sure you start PowerShell as Administrator.
- Use the
Set-MpPreferencewithUILockdownparameter set to $true, so the full command looks like this:
Set-MpPreference -UILockdown $trueWhen a user tries to open the application interface, the user will get an error indicating that the Administrator has limited access to this part of the application.
Your IT administrator has limited access to some areas of this app, and the item you tried to access is not available. Contact IT Helpdesk for more information

Also, you will notice that the antivirus icon disappears from the Security Center.
To gain back access to the antivirus, use the following command
Set-MpPreference -UILockdown $FalseThis should be effective within a minute.
Read More
I hope you like this post. I think you will enjoy the following post on how to Control your infrastructure using Telegram and PowerShell.
Microsoft Defender is a built-in antivirus software that comes pre-installed on all Windows 10 and 11 editions. Users can manage the Microsoft Defender antivirus from the Windows Security app GUI or using the PowerShell command line. This guide explains how to use PowerShell to enable/disable Microsoft Defender on Windows, how to manage various settings, and scan the computer for threats and viruses.
How to Check the Microsoft Defender Status with PowerShell
Only Windows desktop operating systems (such as Windows 11 or 10) have Microsoft Defender antivirus pre-installed. Open an elevated PowerShell prompt and check the current status of Microsoft Defender with the command:
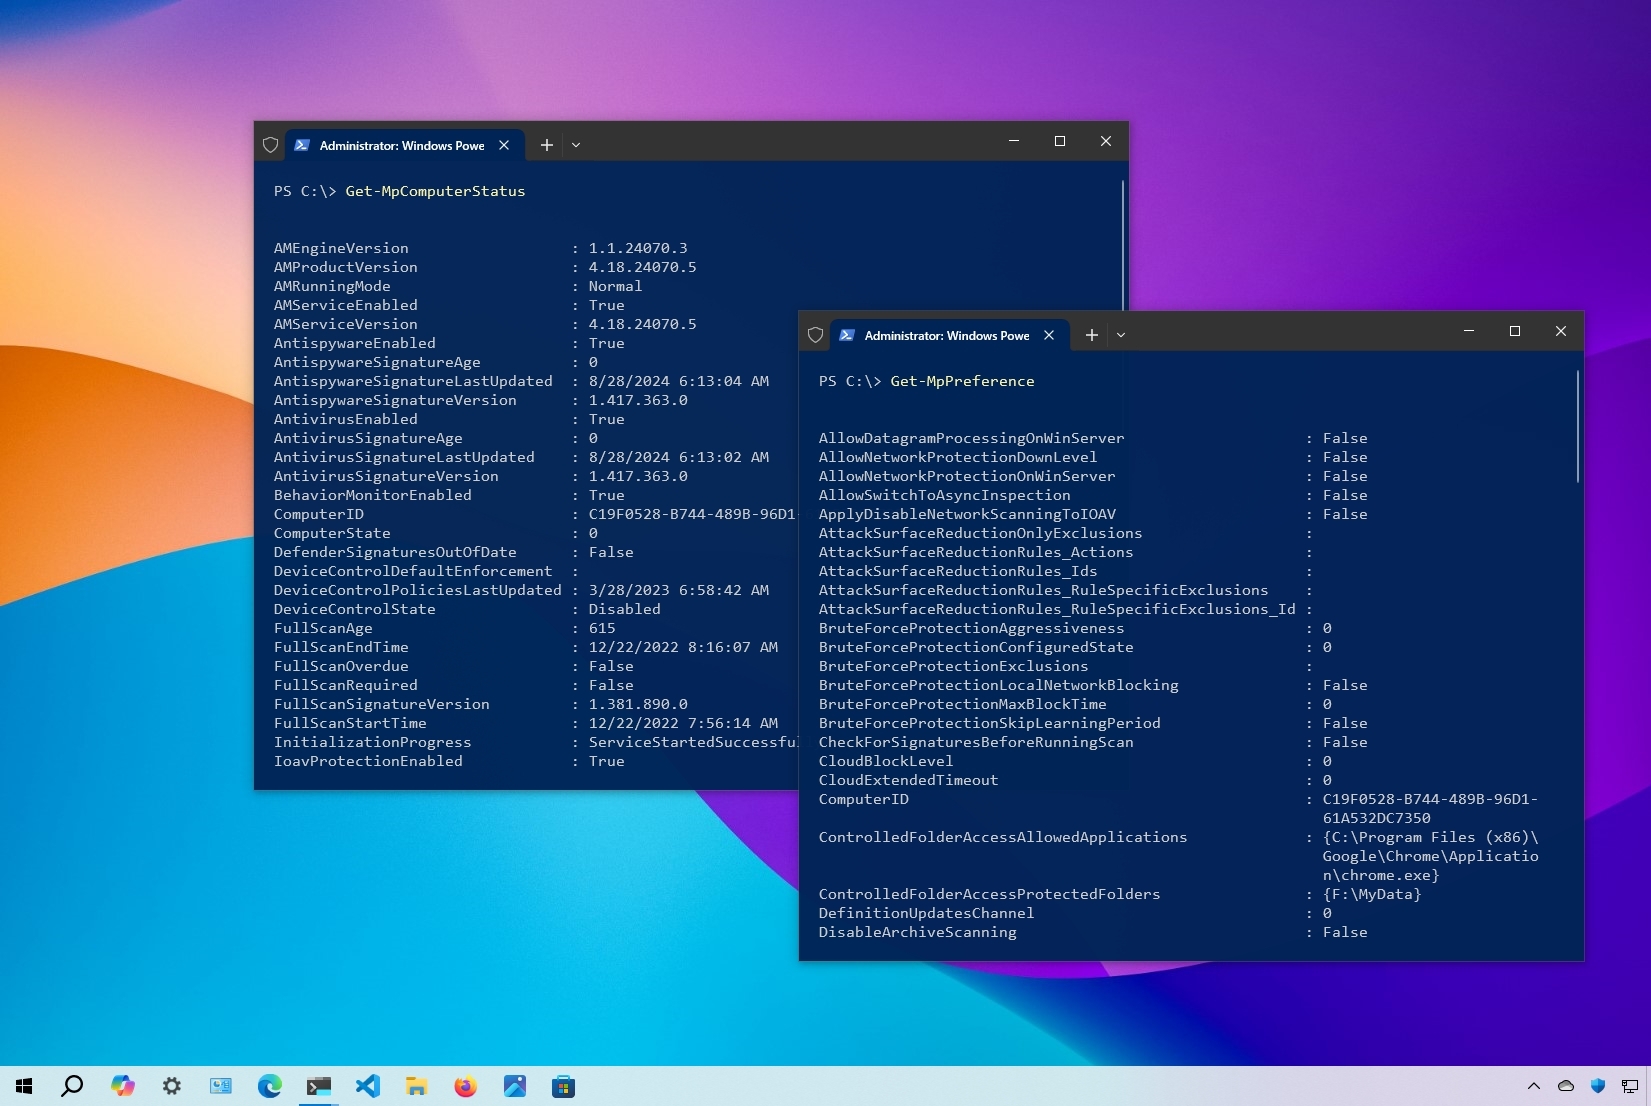
Get-MpComputerStatus
Or quickly check if Microsoft Defender is on, which protection settings are enabled, and when antivirus definitions were last updated:
Get-MpComputerStatus | Select-Object -Property Antivirusenabled,AMServiceEnabled,AntispywareEnabled,BehaviorMonitorEnabled,IoavProtectionEnabled,NISEnabled,OnAccessProtectionEnabled,RealTimeProtectionEnabled,IsTamperProtected,AntivirusSignatureLastUpdated

If Defender Antivirus is disabled, check the following service statuses on a computer:
- Microsoft Defender Antivirus Service (WinDefend)
- Windows Security Service (SecurityHealthService),
- Security Center (wscsvc)
Get-Service Windefend, SecurityHealthService, wscsvc| Select Name,DisplayName,Status

How to Disable or Enable Microsoft Defender Protection using PowerShell
In Windows 10 and 11, you can temporarily pause Microsoft Defender protection or turn it off completely.
How to Temporarily Disable (Pause) the Defender Antivirus Protection on Windows
There is a built-in security feature called Tamper protection that is enabled by default in all modern versions of Windows (starting with build 21H2). This feature prevents users from modifying Defender security features through PowerShell, registry settings, or Group Policy.
Check the Tamper Protection state:
Get-MpComputerStatus | select IsTamperProtected

Tamper Protection can only be disabled from the Windows Security UI. Go to “Virus & Threat Protection” > click “Manage Settings” > scroll down to “Tamper Protection” and move the slider to the “Off” position.

Tamper protection is off. Your device may be vulnerable.

Now disable Microsoft Defender real-time protection with PowerShell:
Set-MpPreference -DisableRealtimeMonitoring $true
Disable the cloud-delivered protection:
Set-MpPreference -MAPSReporting Disabled

This will suspend antivirus protection in Windows until the next restart.
To restore real-time protection, run:
Set-MpPreference -DisableRealtimeMonitoring $false
Turn on cloud-delivered protection:
Set-MpPreference -MAPSReporting Advanced
Permanently Turn Off Microsoft Defender on Windows 11 or 10
If you have a third-party certified AV solution installed on the computer, Microsoft Defender antivirus will automatically switch to passive EDR or block mode. But in some cases, you may to completely disable Microsoft Defender on a computer without installing third-party AV.
In earlier versions of Windows, the Microsoft Defender Antivirus can be disabled using the GPO option Turn off Windows Defender Antivirus (Computer Configuration > Administrative Templates > Windows Components > Microsoft Defender Antivirus) or with the DisableAntiSpyware = 1 registry parameter. However, these options no longer completely disable Microsoft Defender Antivirus in the latest Windows 10 and 11 builds.

The only way to completely disable Microsoft Defender is to restart your computer in Safe Mode and prevent the Defender services from starting.
- To boot Windows into the Safe Mode, run:
bcdedit /set {current} safeboot minimal

shutdown -r -t 0
- Open the Registry Editor (regedit.exe) after booting into Safe Mode
- Then open the following registry keys one by one and change the value of the Start registry parameter in each key to 4
- Now turn off the Safe Mode Boot mode and restart Windows:
bcdedit /deletevalue {current} safebootSign into Windows with your account and check that Microsoft Defender is now disabled.


| Registry key | Parameter | Default Value | New value (disable defender) |
| HKLM\SYSTEM\CurrentControlSet\Services\Sense\ | Start | 3 | 4 |
| HKLM\SYSTEM\CurrentControlSet\Services\WdBoot\ | Start | 0 | 4 |
| HKLM\SYSTEM\CurrentControlSet\Services\WdFilter\ | Start | 0 | 4 |
| HKLM\SYSTEM\CurrentControlSet\Services\WdNisDrv\ | Start | 3 | 4 |
| HKLM\SYSTEM\CurrentControlSet\Services\WdNisSvc\ | Start | 3 | 4 |
| HKLM\SYSTEM\CurrentControlSet\Services\WinDefend\ | Start | 2 | 4 |

Uninstall Windows Defender on Windows Server 2019/2016 using PowerShell
Microsoft Defender is not pre-installed by default on Windows Server 2019/2016 platforms. It can be installed as an additional feature:
Install-WindowsFeature -Name Windows-Defender
If you want to uninstall Windows Defender on a Windows Server, remove the feature:
Uninstall-WindowsFeature -Name Windows-Defender
Manage Microsoft Defender Using PowerShell
Microsoft.SecHealthUI is a graphical UWP app that can be used for the management of Microsoft Defender on Windows 10 and 11 (available via Settings > Privacy & Security > Windows Security or with the ms-settings:windowsdefender command).

All of the Microsoft Defender configuration settings that are available in the Windows Security app can be performed using the PowerShell cmdlets of the built-in Defender module. List available cmdlets in this module:
Get-Command -Module Defender

You can get help about a specific cmdlet from the Defender module:
Get-Help Start-MpScan –Full
Or only list examples:
Get-Help Add-MpPreference -Examples
The following are the most common Microsoft Defender management tasks that you can perform from the PowerShell prompt:
Turn certain Microsoft Defender security options on or off
The following Microsoft Defender features are disabled by default:
- DisableCatchupFullScan.
- DisableCatchupQuickScan.
- DisableCpuThrottleOnIdleScans.
- DisableEmailScanning.
- DisableRemovableDriveScanning.
- DisableRestorePoint.
- DisableScanningMappedNetworkDrivesForFullScan.
- EnableFileHashComputation.
- EnableFullScanOnBatteryPower.
- EnableLowCpuPriority.
For example, enable automatic scanning of removable drives:
Set-MpPreference -DisableRemovableDriveScanning $false

Disable real-time scanning of archive files (files (RAR, ZIP, CAB):
Set-MpPreference -DisableArchiveScanning $True
Enable protect against unwanted programs (Potentially Unwanted Program — PUP, Potentially Unwanted Application — PUA):
Set-MpPreference -PUAProtection 1
Manage Microsoft Defender antivirus exclusions
- Add paths to the antivirus exclusions:
Add-MpPreference -ExclusionPath C:\Video, C:\install
- Remove a folder exclusion:
Remove-MpPreference -ExclusionPath C:\install
- Exclude process from real-time antivirus scanning:
Set-MpPreference -ExclusionProcess "word.exe", "vmwp.exe"
- Exclude specific file extensions from Microsoft Defender scan:
Set-MpPreference -ExclusionExtension *.mp3,*.MP4,*.wav,*.EDB
Disable Microsoft Defender user interface (UI)
Set-MpPreference -UILockdown $true
‘Virus and threat protection’ section will be hidden from the Windows Security UI.

Update Microsoft Defender signatures
Update-MpSignature
Update antivirus definitions from a shared network folder on your LAN. Download the necessary definition update files and set an UNC path as the default update source:
Set-MpPreference -SignatureDefinitionUpdateFileSharesSources \\DESKTOP-V20E3PO\Updates
Update the virus and malware definitions:
Update-MpSignature -UpdateSource FileShares

Update-MpSignature
Run an on-demand antivirus scan
Start-MpScan -ScanType CustomScan -ScanPath ”C:\Program Files”
Perform a full computer scan:
Start-MpScan -ScanType FullScan
Or quick threats scan:
Start-MpScan -ScanType QuickScan
Run an offline scan by booting into an isolated WinPE environment.
Start-MpWDOScan

View threat history
Get-MpThreat
List of active and pass malware detections:
Get-MpThreatDetection

To remove all active threats:
Remove-MpThreat
Cyril Kardashevsky
I enjoy technology and developing websites. Since 2012 I’m running a few of my own websites, and share useful content on gadgets, PC administration and website promotion.
(Image credit: Mauro Huculak)
On Windows 10, Microsoft Defender Antivirus is part of the Windows Security app, providing real-time protection against unwanted viruses, ransomware, spyware, rootkits, and many other malware and hackers. It even happens to be one of our best antivirus software picks.
Although you can easily control everyday security tasks through the Windows Security app, you can also manage the anti-malware solution using PowerShell commands, which can come in handy in many scenarios. For example, when you’re trying to customize an option that is unavailable through the graphical interface, such as scheduling a quick or full scan or signature update. You need to create scripts to automate some Microsoft Defender tasks. Also, using commands instead of a graphical interface can speed up the configuration process, especially when you need to apply the same settings on multiple computers.
In this how-to guide, I will explain how to start managing Microsoft Defender Antivirus with PowerShell commands.
How to check status of Microsoft Defender
To check the current status of Microsoft Defender using PowerShell, use these steps:
- Open Start.
- Search for PowerShell, right-click the top result, and select the Run as administrator option.
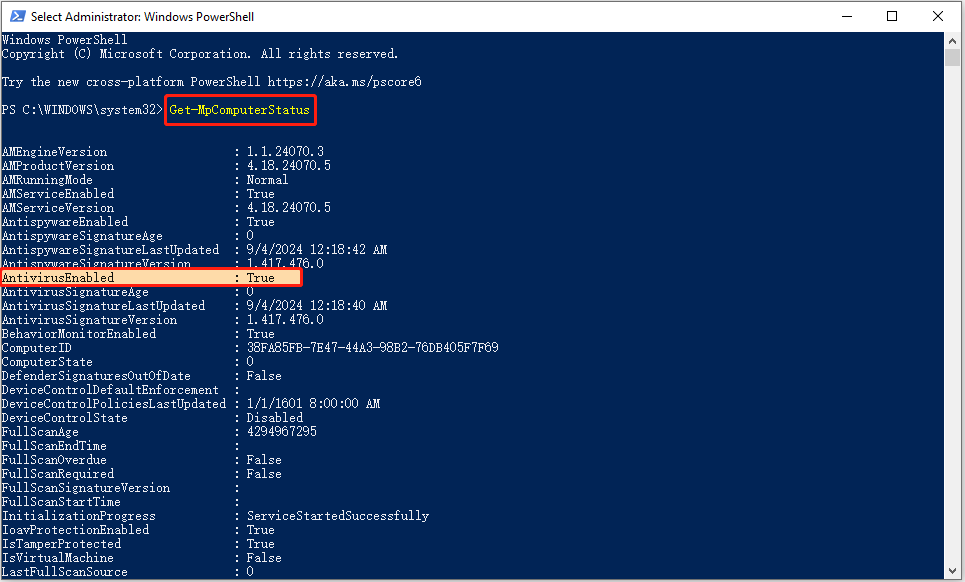
- Type the following command to see the Microsoft Defender Antivirus status and press Enter: Get-MpComputerStatus
- Confirm the AntivirusEnabled setting reads True to know if the security solution is running.
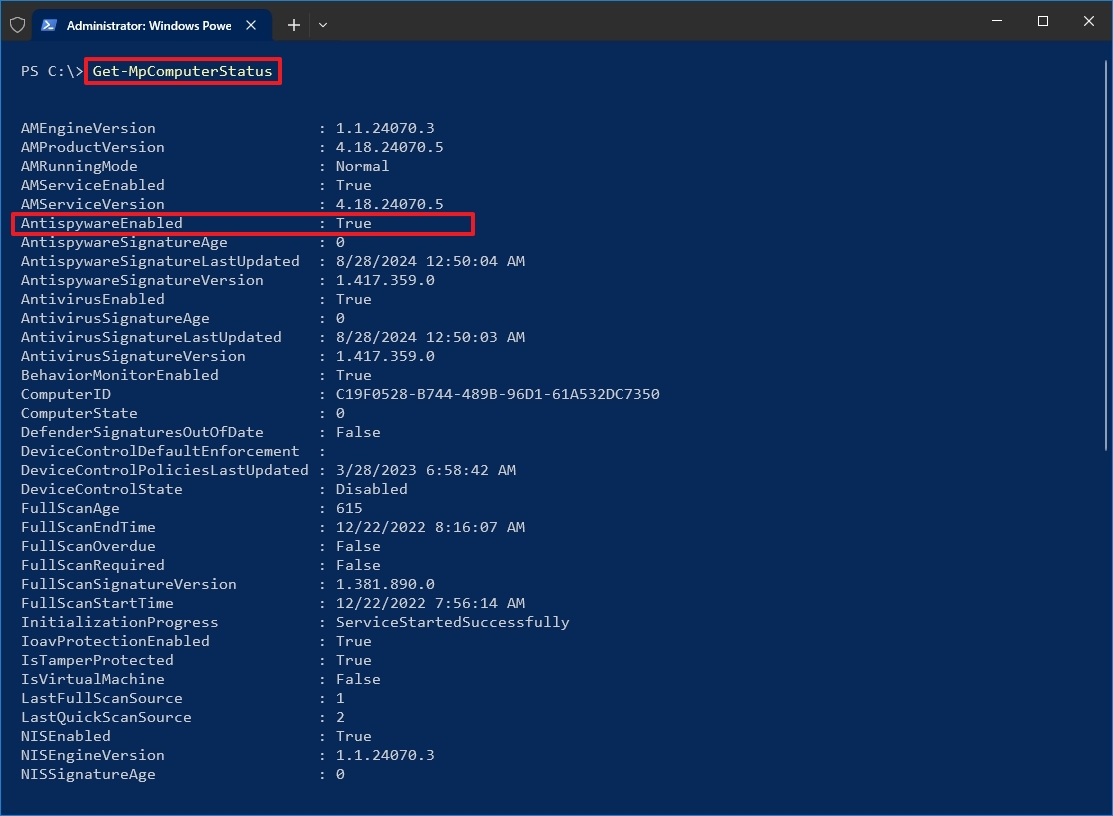
In addition to checking whether the antivirus is running, the command output also displays other important information, such as the version of the engine and product version, real-time protection status, last time updated, and more.
How to check for updates on Microsoft Defender
To use PowerShell to update Microsoft Defender Antivirus with the latest definition, use these steps:
- Open Start.
- Search for PowerShell, right-click the top result, and select the Run as administrator option.
- Type the following command to check to update Microsoft Defender Antivirus and press Enter: Update-MpSignature
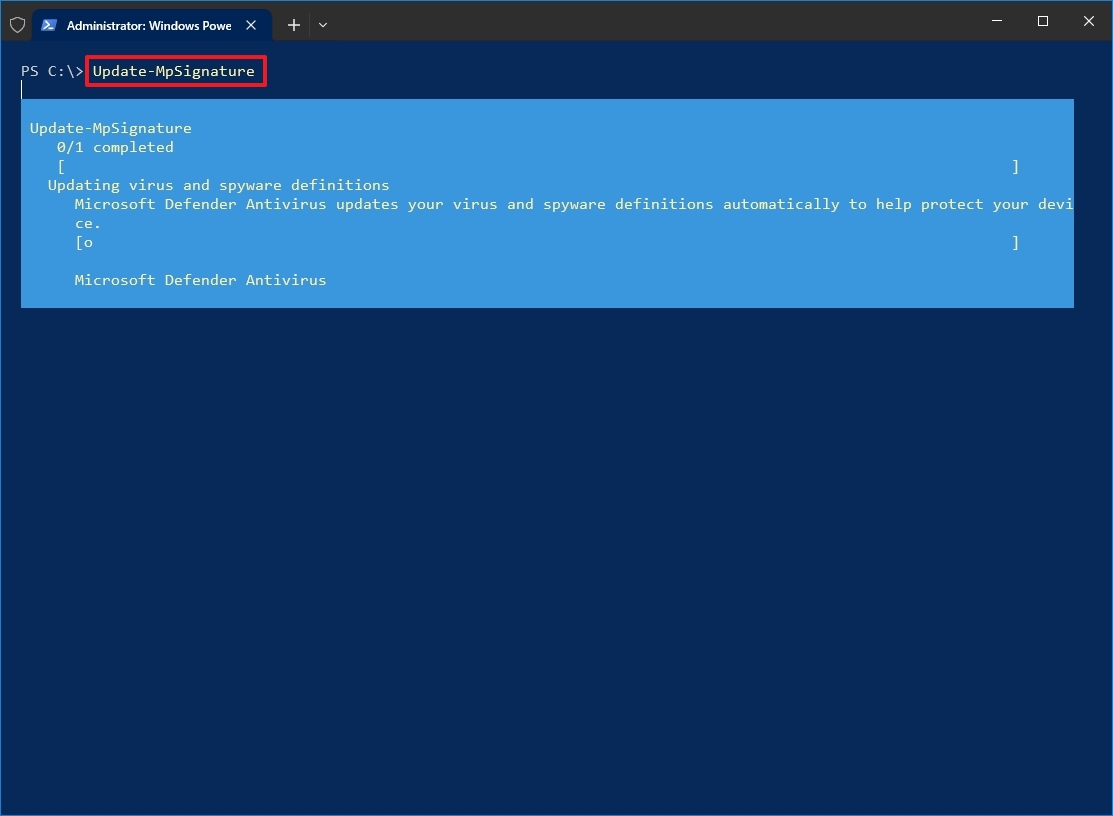
Once you complete the steps, if new updates are available, they will download and install on your device.
All the latest news, reviews, and guides for Windows and Xbox diehards.
How to perform quick virus scan with Microsoft Defender
To complete a quick scan using PowerShell, use these steps:
- Open Start.
- Search for PowerShell, right-click the top result, and select the Run as administrator option.
- Type the following command to start a quick virus scan and press Enter: Start-MpScan -ScanType QuickScan

After you complete the steps, Microsoft Defender Antivirus will perform a quick virus scan on your device.
How to perform full virus scan with Microsoft Defender
To complete a full scan using commands on Windows 10, use these steps:
- Open Start.
- Search for PowerShell, right-click the top result, and select the Run as administrator option.
- Type the following command to start a full virus scan and press Enter: Start-MpScan -ScanType FullScan
Once you complete the steps, the Windows 10 antivirus will scan the entire system for malware and malicious code.
How to perform custom virus scan with Microsoft Defender
To set up a custom scan using PowerShell, use these steps:
- Open Start.
- Search for PowerShell, right-click the top result, and select the Run as administrator option.
- Type the following command to perform a custom Microsoft Defender Antivirus scan and press Enter: Start-MpScan -ScanType CustomScan -ScanPath PATH\TO\FOLDER-FILES
In the command, make sure to update the path to match the folder location you want to scan. For example, this command scans the «Downloads» folder: Start-MpScan -ScanType CustomScan -ScanPath «C:\Users\user\Downloads»
After you complete the steps, Microsoft Defender will only scan for viruses in the location you specified.
How to perform offline virus scan with Microsoft Defender
Microsoft Defender Antivirus also provides an offline scan option, which will come in handy when unwanted malware infects the device, and the antivirus cannot remove it while Windows 10 is fully loaded.
Quick note: Before proceeding, save any work you may have open, as the command will immediately restart the device to perform an offline scan.
To start an offline scan, use these steps:
- Open Start.
- Search for PowerShell, right-click the top result, and select the Run as administrator option.
- Type the following command to start an offline virus scan and press Enter: Start-MpWDOScan
Once you complete the steps, the device will restart automatically. It will boot into the recovery environment and perform a full scan to remove viruses that wouldn’t be possible to detect during normal Windows 10 operation. After the scan, the device will restart automatically, and then you can view the scan report on Windows Security > Virus & Thread Protection > Protection history.
Check out my comprehensive guide to learn about offline scanning with Microsoft Defender Antivirus.
How to delete active threat on Microsoft Defender
To remove all active threats from your computer, use these steps:
- Open Start.
- Search for PowerShell, right-click the top result, and select the Run as administrator option.
- Type the following command to eliminate active threats using Microsoft Defender and press Enter: Remove-MpThreat
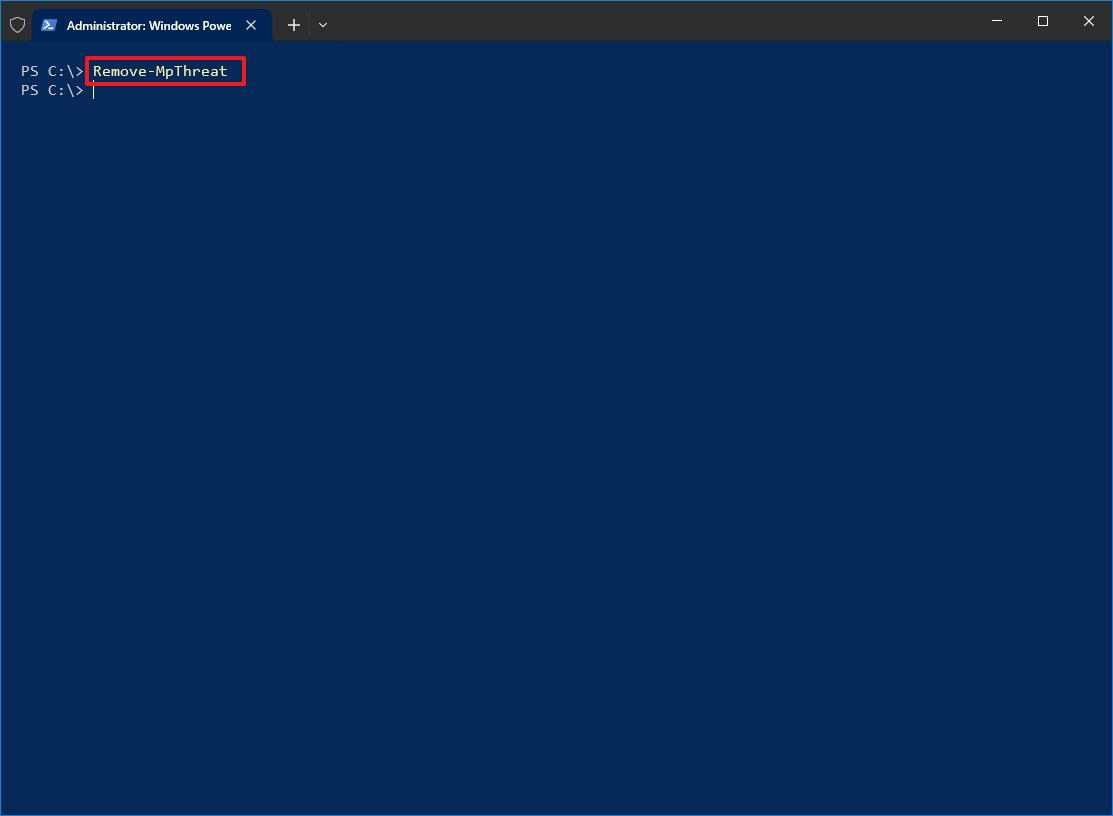
After you complete the steps, the anti-malware feature will eliminate any active threats on the computer. Although this is an interesting command, it’ll only work for threats that the antivirus hasn’t already mitigated.
How to change preferences on Microsoft Defender
Various features of Microsoft Defender Antivirus can also be configured using PowerShell commands. For example, you can exclude locations and files, specify a quarantine retention period, run different scans, schedule virus scans, change scan preferences, and much more.
List preferences
To list all the available preferences for Microsoft Defender with PowerShell, use these steps:
- Open Start.
- Search for PowerShell, right-click the top result, and select the Run as administrator option.
- Type the following command to get a full list of the current configurations for the Microsoft Defender Antivirus and press Enter: Get-MpPreference

Once you complete the steps, you’ll understand all the settings that you can configure with the built-in antivirus.
The following commands are examples of the preferences you can customize using PowerShell.
Exclude locations
Microsoft Defender Antivirus includes an option to exclude folder locations from real-time and scheduled scanning.
To exclude a folder path with PowerShell, use these steps:
- Open Start.
- Search for PowerShell, right-click the top result, and select the Run as administrator option.
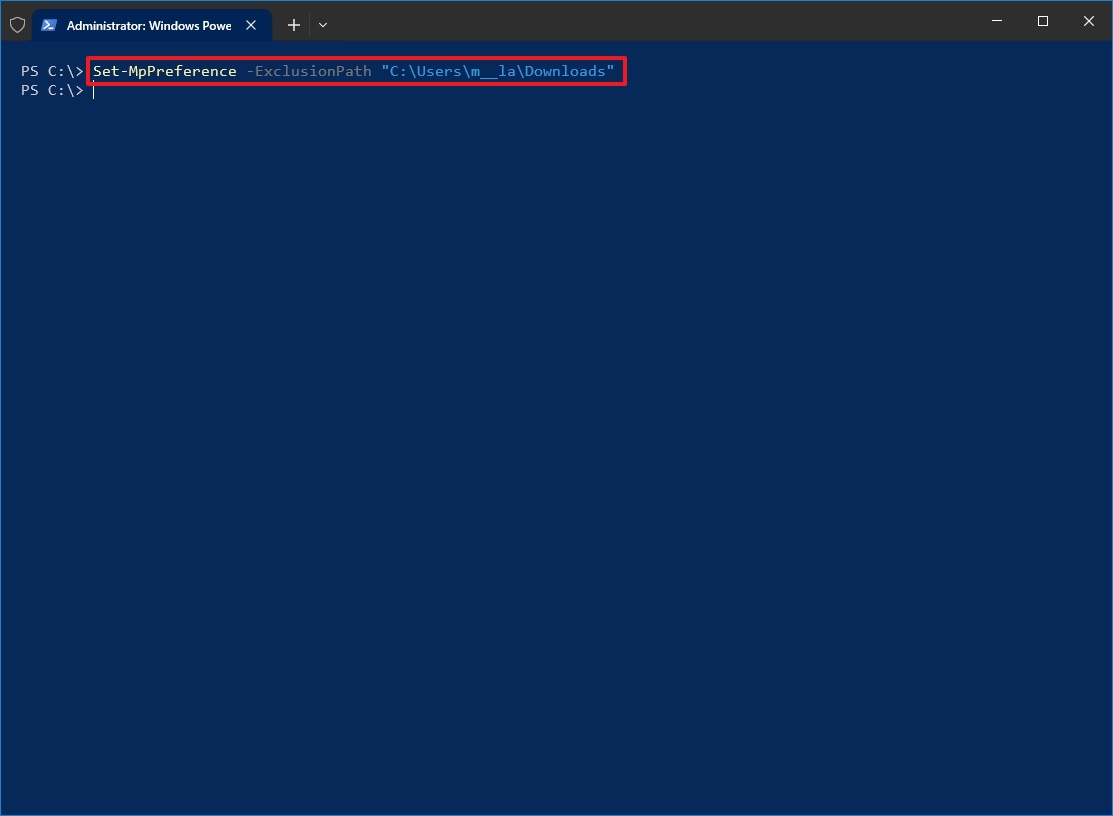
- Type the following command to exclude a folder and press Enter: Set-MpPreference -ExclusionPath PATH\TO\FOLDER
In the command, make sure to replace «PATH\TO\FOLDER» with the path you want to exclude. For example, this command excludes the Users folder from being scanned: Set-MpPreference -ExclusionPath C:\Users
After you complete the steps, Microsoft Defender will ignore the folders you specified during real-time and scheduled scanning.
If you want to remove a folder from the exclusion list, you can use this command: Remove-MpPreference -ExclusionPath «PATH\TO\FOLDER-FILES» , and don’t forget to update the command with the path you wish to remove.
Exclude file type
Also, to exclude locations, you can prevent certain file types from being scan with Microsoft Defender.
To exclude a file type with PowerShell, use these steps:
- Open Start.
- Search for PowerShell, right-click the top result, and select the Run as administrator option.
- Type the following command to exclude a file type and press Enter: Set-MpPreference -ExclusionExtension EXTENSION
In the command, make sure to replace «EXTENSION» with the extension you want to exclude. For example, this command excludes the Microsoft Word files from being scanned: Set-MpPreference -ExclusionExtension docx

Once you complete the steps, the file extension will be added to the database of formats that need to be ignored during malware real-time, custom, or scheduled scanning. If you need to remove an extension from the exclusion list, you can use the Remove-MpPreference -ExclusionExtension EXTENSION command and don’t forget to update the command with the extension you wish to remove.
Quarantine time before deletion
You can also specify the number of days to keep threats in quarantine with these steps:
- Open Start.
- Search for PowerShell, right-click the top result, and select the Run as administrator option.
- Type the following command to specify the days to keep items in quarantine and press Enter: Set-MpPreference -QuarantinePurgeItemsAfterDelay DAYS
In the command, replace «DAYS» with the number of days you want to keep items. For example, the Set-MpPreference -QuarantinePurgeItemsAfterDelay 30 command keeps items for 30 days before being deleted.
- Quick tip: You can use the value of «0» (zero) or no value to set keep items indefinitely.

After you complete the steps, items in the Quarantine folder will be deleted automatically after the specified period.
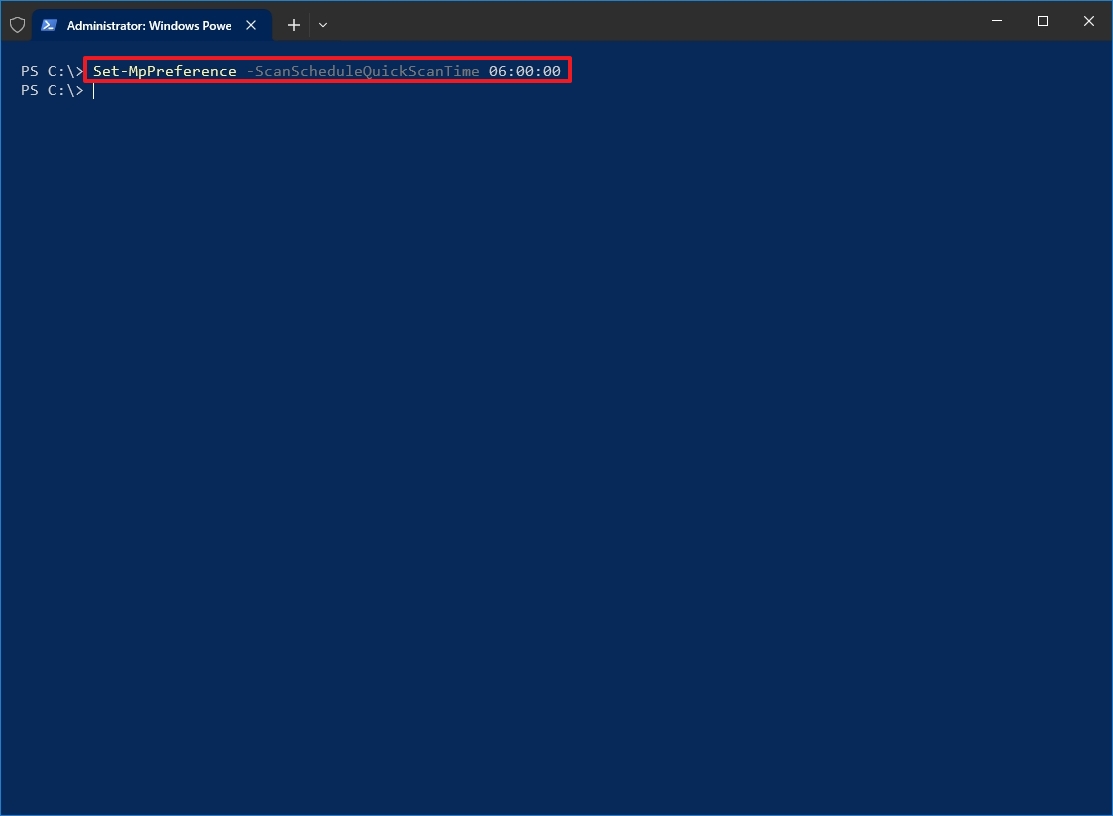
Schedule quick scan
To schedule a daily quick malware scan with a PowerShell command, use these steps:
- Open Start.
- Search for PowerShell, right-click the top result, and select the Run as administrator option.
- Type the following command to schedule a daily quick scan and press Enter: Set-MpPreference -ScanScheduleQuickScanTime SCAN-TIME
In the command, replace «SCAN-TIME» with the 24-hour time you want to run the scan. For example, the Set-MpPreference -ScanScheduleQuickScanTime 06:00:00 command schedules a quick daily scan at 6:00 a.m. local time.
Quick tip: You can specify no time value or set the time to two hours after midnight to reset the settings to their defaults.
Once you complete the steps, Microsoft Defender will perform a quick scan during the time you specified.
Schedule full scan
You can also specify the day and time to perform a full malware scan using PowerShell commands.
To schedule a full malware scan on Windows 10, use these steps:
- Open Start.
- Search for PowerShell, right-click the top result, and select the Run as administrator option.
- Type the following command to schedule a full scan and press Enter: Set-MpPreference -ScanParameters 2
- Quick note: The number «2» in the parameter is what specifies Microsoft Defender a full scan.
- Type the following command to set a scan day and press Enter: Set-MpPreference -RemediationScheduleDay SCAN-DAY
In the command, change the «SCAN-DAY» for the day (number) you want to run the scan. Here are the available options: For example, the Set-MpPreference -RemediationScheduleDay 1 command schedule the full scan for Sundays.
- 0 – Everyday
- 1 – Sunday
- 2 – Monday
- 3 – Tuesday
- 4 – Wednesday
- 5 – Thursday
- 6 – Friday
- 7 – Saturday
- 8 – Never
- Quick tip: You can revert to the default scanning schedule using option number «8.»
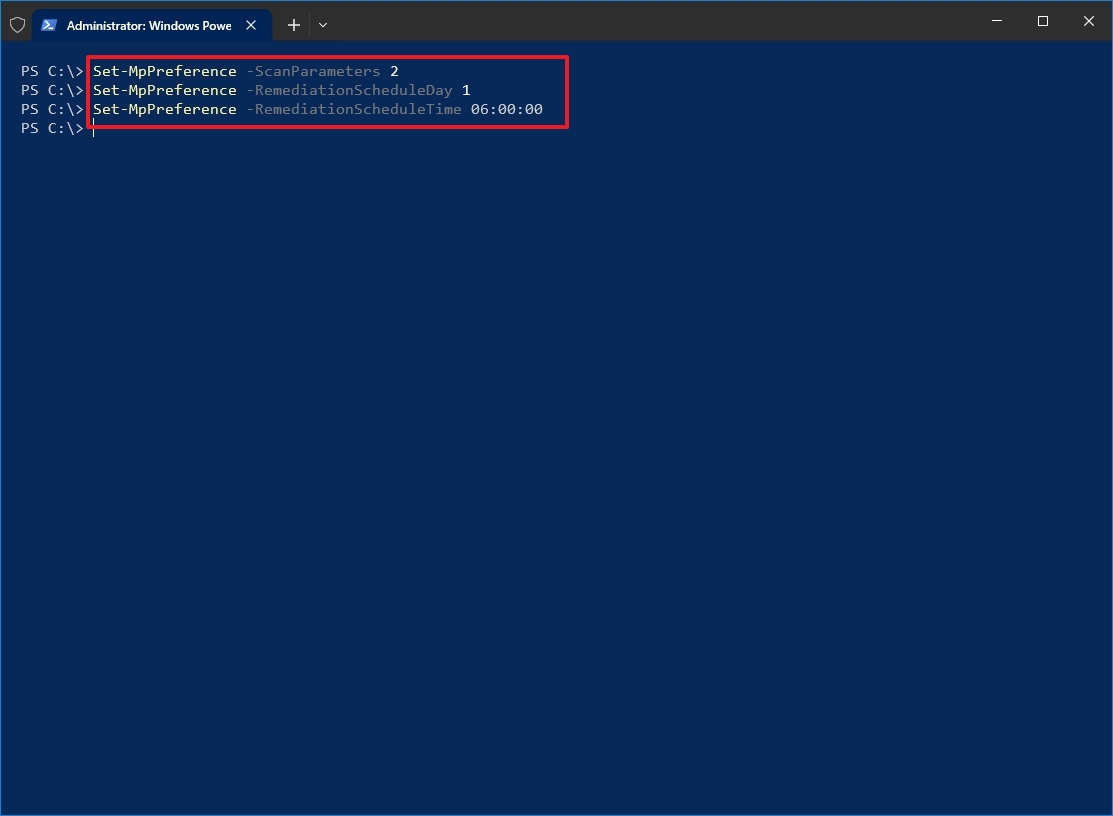
- Type the following command to specify a time for the scan and press Enter: Set-MpPreference -RemediationScheduleTime SCAN-TIME
In the command, change «SCAN-TIME» with the time in 24-hour format you want to run the scan. For example, the Set-MpPreference -RemediationScheduleTime 06:00:00 command schedules a full scan at 6:00 am, local time.
After you complete the steps, Microsoft Defender Antivirus will run a full scan on the day and time you specified in the preferences.
Disable antivirus
Although Microsoft Defender offers a command to disable the antivirus, it’s guarded by the «Tamper Protection» feature, which you can only disable through the «Virus & threat protection settings» available in the Windows Security app.
To disable the antivirus, turn off «Tamper Protection» from the Windows Security app, and then use these steps on PowerShell:
- Open Start.
- Search for PowerShell, right-click the top result, and select the Run as administrator option.
- Type the following command to temporarily disable Microsoft Defender Antivirus and press Enter: Set-MpPreference -DisableRealtimeMonitoring $true
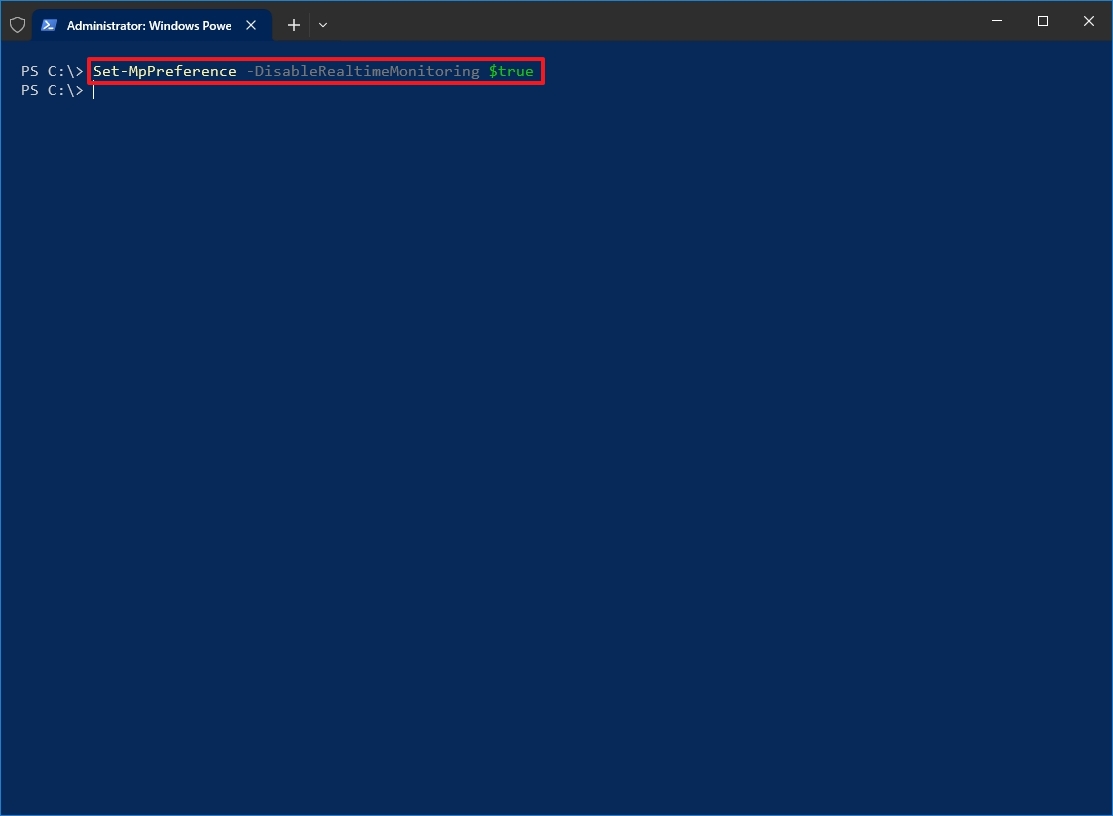
Once you complete the steps, the real-time antivirus protection will be disabled until the next reboot. Or you can run the Set-MpPreference -DisableRealtimeMonitoring $false command to turn on real-time immediately through PowerShell.
Enable external drive scanning
By default, the antivirus built-in to Windows 10 doesn’t scan for malicious and unwanted programs inside removable storage, but you can change this behavior with these steps:
- Open Start.
- Search for PowerShell, right-click the top result, and select the Run as administrator option.
- Type the following command to allow scanning for removable drives during a quick or full scan and press Enter: Set-MpPreference -DisableRemovableDriveScanning $false
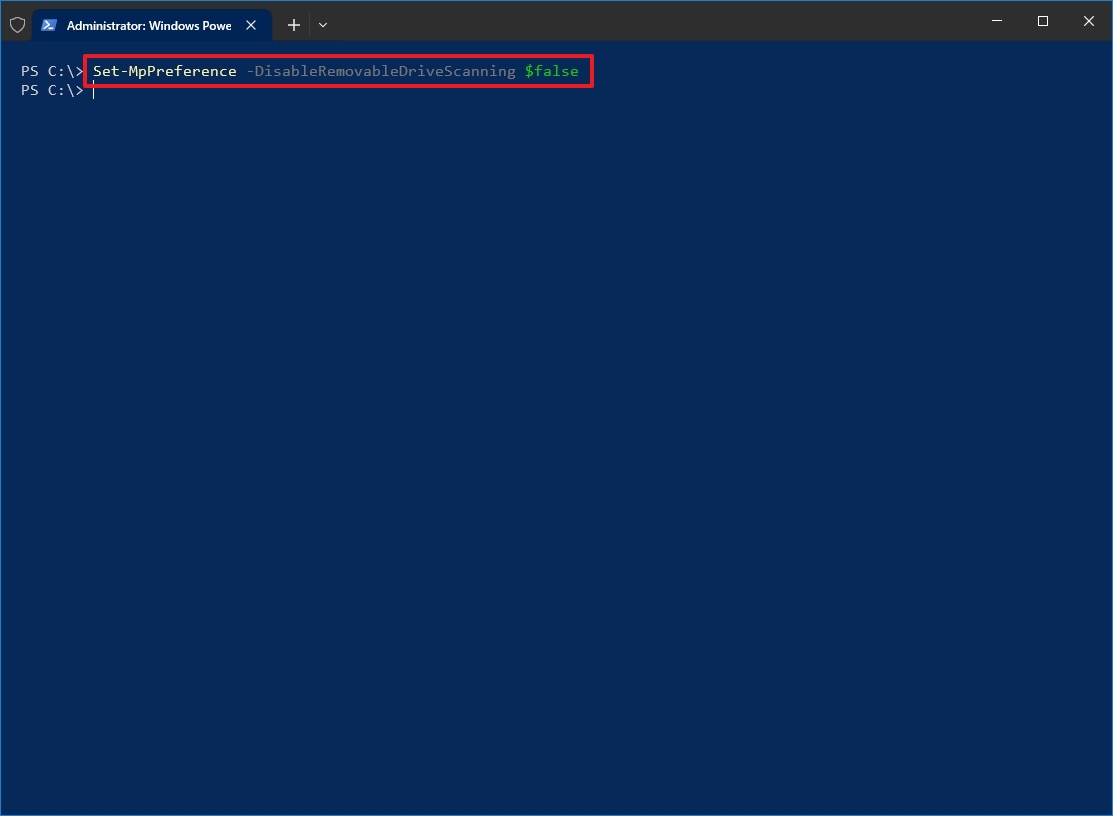
After you complete the steps, the anti-malware feature will scan external storage devices during a full scan.
If you want to revert the changes, use the same instructions, but in step 3, use the Set-MpPreference -DisableRemovableDriveScanning $true command.
Disable archive scanning
By default, the antivirus scans .zip, .cab, and other archive files, but if you have a reason not to scan archives, you can disable the option with these steps:
- Open Start.
- Search for PowerShell, right-click the top result, and select the Run as administrator option.
- Type the following command to allow scanning for archives files during a quick or full scan and press Enter: Set-MpPreference -DisableArchiveScanning $true
Once you complete the steps, Microsoft Defender won’t scan archive files.
If you want to undo the settings, you can use the same instructions, but on step No. 3, use the Set-MpPreference -DisableArchiveScanning $false command.
Enable network drive scanning
To allow Microsoft Defender Antivirus to scan network drives, use these steps:
- Open Start.
- Search for PowerShell, right-click the top result, and select the Run as administrator option.
- Type the following command to enable network drive scan during a quick or full scan and press Enter: Set-MpPreference -DisableScanningMappedNetworkDrivesForFullScan $false
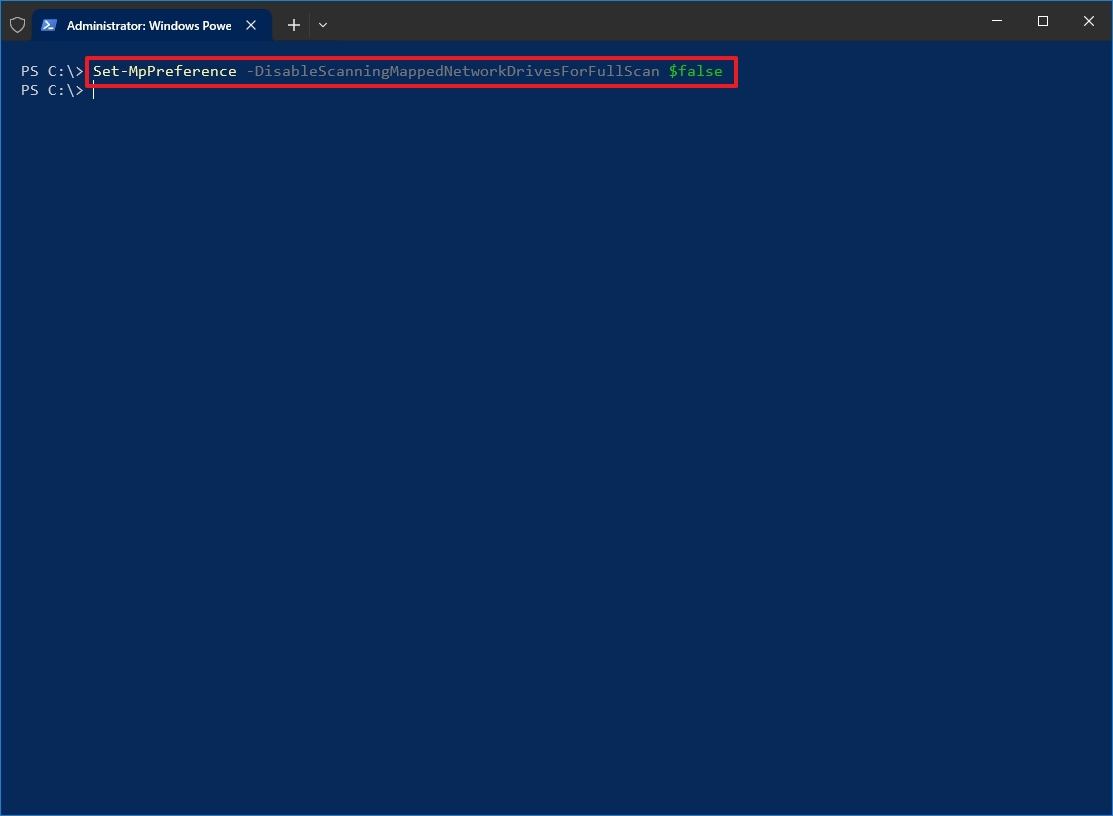
After you complete the steps, network drives will be scanned for malicious and unwanted programs during a full scan.
If you want to roll back the original settings, you can use the same instructions, but on step 3, use the Set-MpPreference -DisableScanningMappedNetworkDrivesForFullScan $true command.
You can always check this Microsoft support page to learn about the settings you can configure for the antivirus.
More resources
For more helpful articles, coverage, and answers to common questions about Windows 10 and Windows 11, visit the following resources:
- Windows 11 on Windows Central — All you need to know
- Windows 10 on Windows Central — All you need to know
Mauro Huculak has been a Windows How-To Expert contributor for WindowsCentral.com for nearly a decade and has over 15 years of experience writing comprehensive guides. He also has an IT background and has achieved different professional certifications from Microsoft, Cisco, VMware, and CompTIA. He has been recognized as a Microsoft MVP for many years.
Windows Defender is an antivirus that is built into the Windows operating system. Here this tutorial on MiniTool will walk you through how to manage Windows Defender with PowerShell command line. You will learn how to check the antivirus status, run a quick/full scan, enable/disable the real-time protection, etc. with Windows Defender PowerShell commands.
Overview of Windows Defender and PowerShell
Windows Defender is the default antivirus software on Windows developed by Microsoft. It is used to scan your computer for viruses, malware, or other threats and then remove them to protect your device. PowerShell is a tool used to manage computer tasks. For example, you can use PowerShell to empty the Recycle Bin, use PowerShell to check if a file exists, and more.
In this article, we will show you how to manage Windows Defender with PowerShell. Keep reading to get specific command lines.
How to Manage Windows Defender With PowerShell
Check Whether Windows Defender Is Enabled
First, we will show you how to check the current status of Windows Defender by using PowerShell.
Step 1. In the Windows search box, type PowerShell and then select Run as administrator under Windows PowerShell in the right pane.
Step 2. If a UAC window appears, click the Yes option to continue.
Step 3. In the command line window, type Get-MpComputerStatus and press Enter.
Step 4. In the new window, if the value of AntivirusEnabled is True, it means that the Windows Defender antivirus is running. If the AntivirusEnabled status shows as False, it indicates that Windows Defender is disabled.
Enable/Disable Windows Defender Real-time Protection PowerShell
After executing the above command line, in addition to the status of Windows Defender, a lot of other information about this antivirus software will be displayed, including the real-time protection status.
If the real-time protection is disabled and you want to enable it, you can run this command line:
Set-MpPreference -DisableRealtimeMonitoring $false
The command line to disable Windows Defender antivirus real-time protection is:
Set-MpPreference -DisableRealtimeMonitoring $true
Run a Quick Scan/Full Scan/Custom Scan/Offline Scan
Here you can see how to perform a quick/full/custom/offline scan by using Windows Defender PowerShell commands.
Quick scan:
Type this command: Start-MpScan -ScanType QuickScan in the command line window and press Enter. Then a quick scan will start.
Full scan:
To carry out a full virus scan, you need to execute this command line: Start-MpScan -ScanType FullScan.
Custom scan:
Windows Defender allows you to select specific drives or locations to check for viruses. Here you can see how to complete this task via PowerShell.
First, confirm the location/drive you want to scan.
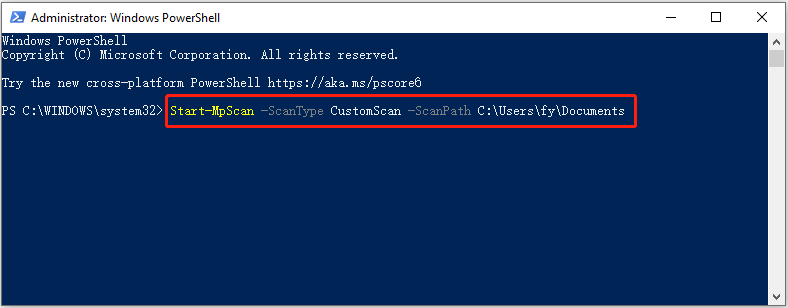
Second, type Start-MpScan -ScanType CustomScan -ScanPath file location path and press Enter. You need to replace the file location path with the actual directory. For example, you can type Start-MpScan -ScanType CustomScan -ScanPath C:\Users\username\Documents and press Enter to scan the Documents folder. Remember to replace the username with the actual one.
Offline scan:
Windows Defender provides you with an offline scan option that helps you detect and remove persistent malware or viruses. This scan runs outside of the Windows kernel so it can inspect and clean your system more thoroughly.
Tips:
Before running the command line to perform an offline scan, you need to make sure all your open works are saved. Running an offline scan requires a computer restart.
Input Start-MpWDOScan and press Enter to start scanning for viruses offline.
This is all about how to manage Windows Defender with PowerShell.
Windows Data Recovery Software Recommended:
There are many cases of data loss due to virus infection. Some viruses can directly delete files on your computer while others may damage the hard drive file system, making the files inaccessible or unreadable. If you encounter such a situation and lose your files, you can use MiniTool Power Data Recovery to recover deleted files.
The free edition of this data recovery software supports recovering 1 GB of documents, pictures, videos, audio, emails, etc. for free. You can download it and have a try.
MiniTool Power Data Recovery FreeClick to Download100%Clean & Safe
Bottom Line
How to manage Windows Defender with PowerShell? Now you should know the command lines to check Windows Defender status, enable/disable real-time protection, and run different types of virus scans.